

Page 1
NDA-30141
ISSUE 1
STOCK # 200893
®
CallCenterWorX-EnterpriseIMX MAT
Quick Reference Guide
MAY, 2000
NEC America, Inc.
Page 2

LIABILITY DISCLAIMER
NEC America, Inc. reserves the right to change the specifications,
functions, or features, at any time, without notice.
NEC America, Inc. has prepared this document for the exclusive use
of its employees and customer s. The information contained herein is
the property of NEC America, Inc. and shall not be reproduced
without prior written approval from NEC America, Inc.
NEAX, and CallCenterWorX are registered trademarks of NEC
Corporation.
© 2000 NEC America, Inc.
Printed in the USA
All other brand or product names are or may be trademarks or
registered trademarks of, and are used to identify products or
services of, their respective owners.
MS-DOS, Microsoft, Windows, and Windows NT are registered
trademarks of Microsoft Corporation. Microsoft Windows 95 and
Microsoft Windows 98 are trademarks of Microsoft Corporation.
Page 3

CallCenterWorX-Enterprise IMX MAT Quick Reference Guide CONTENTS
TABLE OF CONTENTS
Page
Chapter 1 - About This Manual. . . . . . . . . . . . . . . . . . . . . . . . . . . . . . . . . . . . . . . . . . . . . 1
How This Guide is Organized . . . . . . . . . . . . . . . . . . . . . . . . . . . . . . . . . . . . . . . . . . . . . . . . . . . . . 1
Using This Guide . . . . . . . . . . . . . . . . . . . . . . . . . . . . . . . . . . . . . . . . . . . . . . . . . . . . . . . . . . . . . . 1
General Conventions. . . . . . . . . . . . . . . . . . . . . . . . . . . . . . . . . . . . . . . . . . . . . . . . . . . . . . . . . . 2
Chapter 2 - Getting Started. . . . . . . . . . . . . . . . . . . . . . . . . . . . . . . . . . . . . . . . . . . . . . . . 3
CallCenterWorX-Enterprise IMX MAT Overview . . . . . . . . . . . . . . . . . . . . . . . . . . . . . . . . . . . . . . 3
Requirements. . . . . . . . . . . . . . . . . . . . . . . . . . . . . . . . . . . . . . . . . . . . . . . . . . . . . . . . . . . . . . . . 4
Server Requirements . . . . . . . . . . . . . . . . . . . . . . . . . . . . . . . . . . . . . . . . . . . . . . . . . . . . . . . . 4
LAN Requirements . . . . . . . . . . . . . . . . . . . . . . . . . . . . . . . . . . . . . . . . . . . . . . . . . . . . . . . . . . 4
Communications Port Requirements . . . . . . . . . . . . . . . . . . . . . . . . . . . . . . . . . . . . . . . . . . . . 4
Installing CallCenterWorX-Enterprise IMX MAT . . . . . . . . . . . . . . . . . . . . . . . . . . . . . . . . . . . . . . . 5
Chapter 3 - Using Online Help . . . . . . . . . . . . . . . . . . . . . . . . . . . . . . . . . . . . . . . . . . . . 13
Online Help Features . . . . . . . . . . . . . . . . . . . . . . . . . . . . . . . . . . . . . . . . . . . . . . . . . . . . . . . . . 13
Accessing the Online Help System . . . . . . . . . . . . . . . . . . . . . . . . . . . . . . . . . . . . . . . . . . . . . . 13
Navigating the Help System. . . . . . . . . . . . . . . . . . . . . . . . . . . . . . . . . . . . . . . . . . . . . . . . . . . . 14
Contents Tab . . . . . . . . . . . . . . . . . . . . . . . . . . . . . . . . . . . . . . . . . . . . . . . . . . . . . . . . . . . . . 14
Index Tab . . . . . . . . . . . . . . . . . . . . . . . . . . . . . . . . . . . . . . . . . . . . . . . . . . . . . . . . . . . . . . . . 14
Search Tab . . . . . . . . . . . . . . . . . . . . . . . . . . . . . . . . . . . . . . . . . . . . . . . . . . . . . . . . . . . . . . . 15
Glossary Tab. . . . . . . . . . . . . . . . . . . . . . . . . . . . . . . . . . . . . . . . . . . . . . . . . . . . . . . . . . . . . . 16
Printing Help Topics. . . . . . . . . . . . . . . . . . . . . . . . . . . . . . . . . . . . . . . . . . . . . . . . . . . . . . . . . . 17
Printing from the Contents, Index or Find Tabs . . . . . . . . . . . . . . . . . . . . . . . . . . . . . . . . . . . 17
Tips . . . . . . . . . . . . . . . . . . . . . . . . . . . . . . . . . . . . . . . . . . . . . . . . . . . . . . . . . . . . . . . . . . . . . 18
Chapter 4 - IMX MAT Menu Commands. . . . . . . . . . . . . . . . . . . . . . . . . . . . . . . . . . . . . 21
File Menu . . . . . . . . . . . . . . . . . . . . . . . . . . . . . . . . . . . . . . . . . . . . . . . . . . . . . . . . . . . . . . . . 21
View Menu . . . . . . . . . . . . . . . . . . . . . . . . . . . . . . . . . . . . . . . . . . . . . . . . . . . . . . . . . . . . . . . 21
Options Menu . . . . . . . . . . . . . . . . . . . . . . . . . . . . . . . . . . . . . . . . . . . . . . . . . . . . . . . . . . . . . 24
MAT Menu . . . . . . . . . . . . . . . . . . . . . . . . . . . . . . . . . . . . . . . . . . . . . . . . . . . . . . . . . . . . . . . 25
Data Screen Buttons. . . . . . . . . . . . . . . . . . . . . . . . . . . . . . . . . . . . . . . . . . . . . . . . . . . . . . . . 26
How to Use the Buttons . . . . . . . . . . . . . . . . . . . . . . . . . . . . . . . . . . . . . . . . . . . . . . . . . . . . . 26
Information Choices . . . . . . . . . . . . . . . . . . . . . . . . . . . . . . . . . . . . . . . . . . . . . . . . . . . . . . . . 27
Message Bars. . . . . . . . . . . . . . . . . . . . . . . . . . . . . . . . . . . . . . . . . . . . . . . . . . . . . . . . . . . . . 27
Report Menu. . . . . . . . . . . . . . . . . . . . . . . . . . . . . . . . . . . . . . . . . . . . . . . . . . . . . . . . . . . . . . 27
Window Menu . . . . . . . . . . . . . . . . . . . . . . . . . . . . . . . . . . . . . . . . . . . . . . . . . . . . . . . . . . . . . 31
Help Menu. . . . . . . . . . . . . . . . . . . . . . . . . . . . . . . . . . . . . . . . . . . . . . . . . . . . . . . . . . . . . . . . 31
NDA-30141 Revision 1 Page i
Page 4

CONTENTS CallCenterWorX-Enterprise IMX MAT Quick Reference Guide
This Page Left Blank.
Page ii NDA-30141 Revision 1
Page 5

CallCenterWorX-Enterprise IMX MAT Quick Reference Guide FIGURES
LIST OF FIGURES
Figure Title Page
2-1 Welcome Dialog . . . . . . . . . . . . . . . . . . . . . . . . . . . . . . . . . . . . . . . . . . . . . . . . . . . . . . 5
2-2 Software License Agreement . . . . . . . . . . . . . . . . . . . . . . . . . . . . . . . . . . . . . . . . . . . . 6
2-3 Installatio n In formation . . . . . . . . . . . . . . . . . . . . . . . . . . . . . . . . . . . . . . . . . . . . . . . . . 7
2-4 User Information . . . . . . . . . . . . . . . . . . . . . . . . . . . . . . . . . . . . . . . . . . . . . . . . . . . . . . 8
2-5 Select Components. . . . . . . . . . . . . . . . . . . . . . . . . . . . . . . . . . . . . . . . . . . . . . . . . . . . 9
2-6 Select Progr am Folder . . . . . . . . . . . . . . . . . . . . . . . . . . . . . . . . . . . . . . . . . . . . . . . . 10
2-7 Copying Files. . . . . . . . . . . . . . . . . . . . . . . . . . . . . . . . . . . . . . . . . . . . . . . . . . . . . . . . 10
3-1 Help Topics Window . . . . . . . . . . . . . . . . . . . . . . . . . . . . . . . . . . . . . . . . . . . . . . . . . . 14
3-2 Help Topics Window - Index Tab . . . . . . . . . . . . . . . . . . . . . . . . . . . . . . . . . . . . . . . . 15
3-3 Help Topics Window - Search Tab . . . . . . . . . . . . . . . . . . . . . . . . . . . . . . . . . . . . . . . 16
3-4 Help Topics Window - Glossary Tab. . . . . . . . . . . . . . . . . . . . . . . . . . . . . . . . . . . . . . 17
3-5 Print Dialog Box. . . . . . . . . . . . . . . . . . . . . . . . . . . . . . . . . . . . . . . . . . . . . . . . . . . . . . 18
4-1 IMX ACD MAT Console Screen . . . . . . . . . . . . . . . . . . . . . . . . . . . . . . . . . . . . . . . . . 21
4-2 Console Screen. . . . . . . . . . . . . . . . . . . . . . . . . . . . . . . . . . . . . . . . . . . . . . . . . . . . . . 22
4-3 Toolbar Window . . . . . . . . . . . . . . . . . . . . . . . . . . . . . . . . . . . . . . . . . . . . . . . . . . . . . 23
4-4 New Toolbar Window . . . . . . . . . . . . . . . . . . . . . . . . . . . . . . . . . . . . . . . . . . . . . . . . . 23
4-5 Data Entry Screen Background Colors . . . . . . . . . . . . . . . . . . . . . . . . . . . . . . . . . . . . 24
4-6 MAT Menu. . . . . . . . . . . . . . . . . . . . . . . . . . . . . . . . . . . . . . . . . . . . . . . . . . . . . . . . . . 25
4-7 MAT Toolbar Icons . . . . . . . . . . . . . . . . . . . . . . . . . . . . . . . . . . . . . . . . . . . . . . . . . . . 25
4-8 Sample Data Entry Screen . . . . . . . . . . . . . . . . . . . . . . . . . . . . . . . . . . . . . . . . . . . . . 26
4-9 Report Menu . . . . . . . . . . . . . . . . . . . . . . . . . . . . . . . . . . . . . . . . . . . . . . . . . . . . . . . . 28
4-10 Sample Data Entry and Data Report Screens. . . . . . . . . . . . . . . . . . . . . . . . . . . . . . . 29
4-11 Samp le Re p or t P rint Preview Scr e e n . . . . . . . . . . . . . . . . . . . . . . . . . . . . . . . . . . . . . 30
NDA-30141 Revision 1 Page iii
Page 6

FIGURES CallCenterWorX-Enterprise IMX MAT Quick Reference Guide
This Page Left Blank.
Page iv NDA-30141 Revision 1
Page 7

CallCenterWorX-Enterprise IMX MAT Quick Reference Guide About This Manual
Chapter 1 About This Manual
The CallCenterWorX-Enterprise IMX MAT Quick Reference Guide (“IMX ACD
MAT”) is designed to explain the basic capabilities of the CallCenterWorX-
Enterprise IMX MAT application and the online Help system. All procedural
informati on is located in the online Help system, not this Quick Reference Guide.
If you need instruct ions f or per formin g a p rocedure, whic h is not expla ined i n thi s
document, you should refer to the CallCenterWorX-Enterprise IMX MAT online
Help system. Refer to Us ing Online Help in th is manua l for i nstructi ons on how t o
access CallCenterWorX-Enterprise IMX MAT online Help.
How This Guide is Organized
Chapter 1 - About This Manual
This chapter outlines how to use the manual, including the actual manual
organization, and chapter layout.
Using This Guide
Chapter 2 - Ge tting Started
This chapter outlines hardware requirements and installation procedures.
Chapter 3 - U si n g Onl in e H e lp
This chapter describe th e purpose and us e of the CallCen terWorX-Enterprise IMX
MAT online Help system.
Chapter 4 - IMX MAT Menu Commands
This chapter gives a detailed overview of the CallCe nterWorX-Enterprise IMX
MAT application and its functions a nd features, including sc reen format a nd menu
descriptions.
This guide is designed to make the application easy to understand and simple to
use. In Chapter 2 - Getting Started, there are examples of the installation screens
you will see in the CallCenterWorX-Enterprise IMX MAT application installation,
with step-by-step inst ructi ons for t he insta llat ion proc edures you need to perf orm.
Note: The screens and pr ocedur es shown in this guide r epr esent the typical installation
of the CallCenterWorX-Enterprise IMX MAT. Remember that the
CallCenterWorX-Enterprise IMX MAT application can be customized for each
site, so the screens shown in this guide may not always reflect what appears on
your installing PC.
NDA-30141 Revision 1 Page 1
Page 8

About This Manual CallCenterWorX-Enterprise IMX MAT Quick Reference Guide
General Conventions
This guide uses the following type conventions:
Item T ypeface or
Convention
Example
Book title s Italics The CallCenterWorX-
Enterprise IMX MAT
User input, variables Boldface Enter password at the
prompt.
Menu names, Window titles,
field name s
Any screen output generated
by the The CallCenterWorX-
Enterprise IMX MAT
application
Capitalized O
Monospace 1]UccQWUdXQdQ``UQbc
PTIONS MENU, LINE
TATUS WINDOW, USER ID
S
FIELD
Y^Q`_`e`gY^T_g_bdXU
cdQdecQbUQ_VdXU
cSbUU^
.
This guide uses the following conventions for menus and shortcuts:
Example Means
File > Workstation Choose the Workstation submenu on the
File menu.
CTRL+N Hold down the CTRL key while pressing
the “n” key
CTRL+Shift+N Hold down the CTRL key and the Shift
key while pressing the “n” key
Click
Right-click
Click the left mouse button
Click the right mouse button
Page 2 NDA-30141 Revision 1
Page 9

CallCenterWorX-Enterprise IMX MAT Quick Reference Guide Getting Started
Chapter 2 Getting Started
CallCenterWorX-Enterprise IMX MAT Overview
The NEAX 2400 IMX CallCenterWorX-Enterprise IMX MAT (maintenance
administration termin al) application is a windows-base d, user-friendly tool that can
be used by any certified Call Center Manager, Supervisor, Administrator, or
Technician. This application facilitates programming the database entities for both
CallCenterWorX-Enterprise and Enterprise (I). This new Graphical User Interface
(GUI) makes administering the ACD eas y and simple. Adds, moves, and changes
to the database can be done quickly and easily from any workstation running the
application program.
The true benefit of this tool is that any Cal l Center Supervisor can login to the PBX
from any Windows workstation on the LAN/WAN and administer the ACD
database with an easy-to-use, user-friendly graphical interface. An online Help
system is also available with this tool to help navigate through the application.
The CallCenterWorX-Enterprise IMX MAT application can reside on any
Windows 95, 98, 2000, or NT workstation and will permit the administrators to
connect remotely to the ACD engine via the LAN and assign or mo dify the way t he
ACD and its entities (agents, splits, login IDs, call control vectors, etc.) are
programmed. The CallCenterWorX-Enterprise IMX MAT Commands can be
loaded onto any windows wo rkstation on the network. When t he CallCenterWorX-
Enterprise IMX MAT applica tion is r unning , it atta ches t o the I MX MAT program
which must also be installed and running on the same workstation. Both
applications connect to the switch via a TCP/IP LAN/WAN or serial RS-232
connection. Once conne ction is established to the PBX, changes to the d atabase can
be performed quickly by the Call Center administrator. For security purposes, a
password and login ID may be required at each workstation gaining access to the
database.
The user interface provides the administrator with a toolbar of icons that permit
access to each area of the ACD. The user simply p oints to the appro priate icon, and
clicks on it to go into a certain progra mming entity. Pilot numbers, spli ts, login IDs,
and call control vectors are among other things that can be accessed and changed
from this use r interface.
NDA-30141 Revision 1 Page 3
Page 10

CallCenterWorX-Enterprise IMX MAT Quick Reference Guide Getting Started
Requirements In order for the IMX ACD MAT application to operate properly, your operating
environment must meet the following requirements.
Server Requirements
Minimum Configuration
• Microsoft
®
Windows 95, 98, 2000, or NT® Workstation 4.0 operating system
• Pentium 166 MHz processor
• 64 MB RAM
• 100 MB free hard drive space
• 800X600 monitor resolution
• CD-ROM drive (any OS supported device)
• Modem (any OS supported device; requ ired when IMX MAT is used for remote
dialup access).
LAN Requirements
Any 10 BASE-T Network Interface Card when IMX MAT is connected across
TCP/IP.
Communications Port Requirements
COM1-COM4 when IMX MAT is connected across serial RS-232C port.
Note: The IMX MAT Commands must also be installed at the same workstation as the
CallCenterWo rX-Enterprise IMX MAT Commands. CallCenterWorX-Enterprise
IMX MAT command will not work without the IMX MAT commands.
NDA-30141 Revision 1 Page 4
Page 11
CallCenterWorX-Enterprise IMX MAT Quick Reference Guide Getting Started
Installing CallCenterWo rX-Enterprise IMX MAT
The following procedures guide you through the installation of CallCenterWorXEnterprise IMX MAT applica tion. The Setup progr am consists of a series of dialo g
boxes that supply defa ult answers to question s regardin g the ins tallati on of file s to
your hard disk.
Important: Be sure to close all Windows programs before beginning the application in-
stallation.
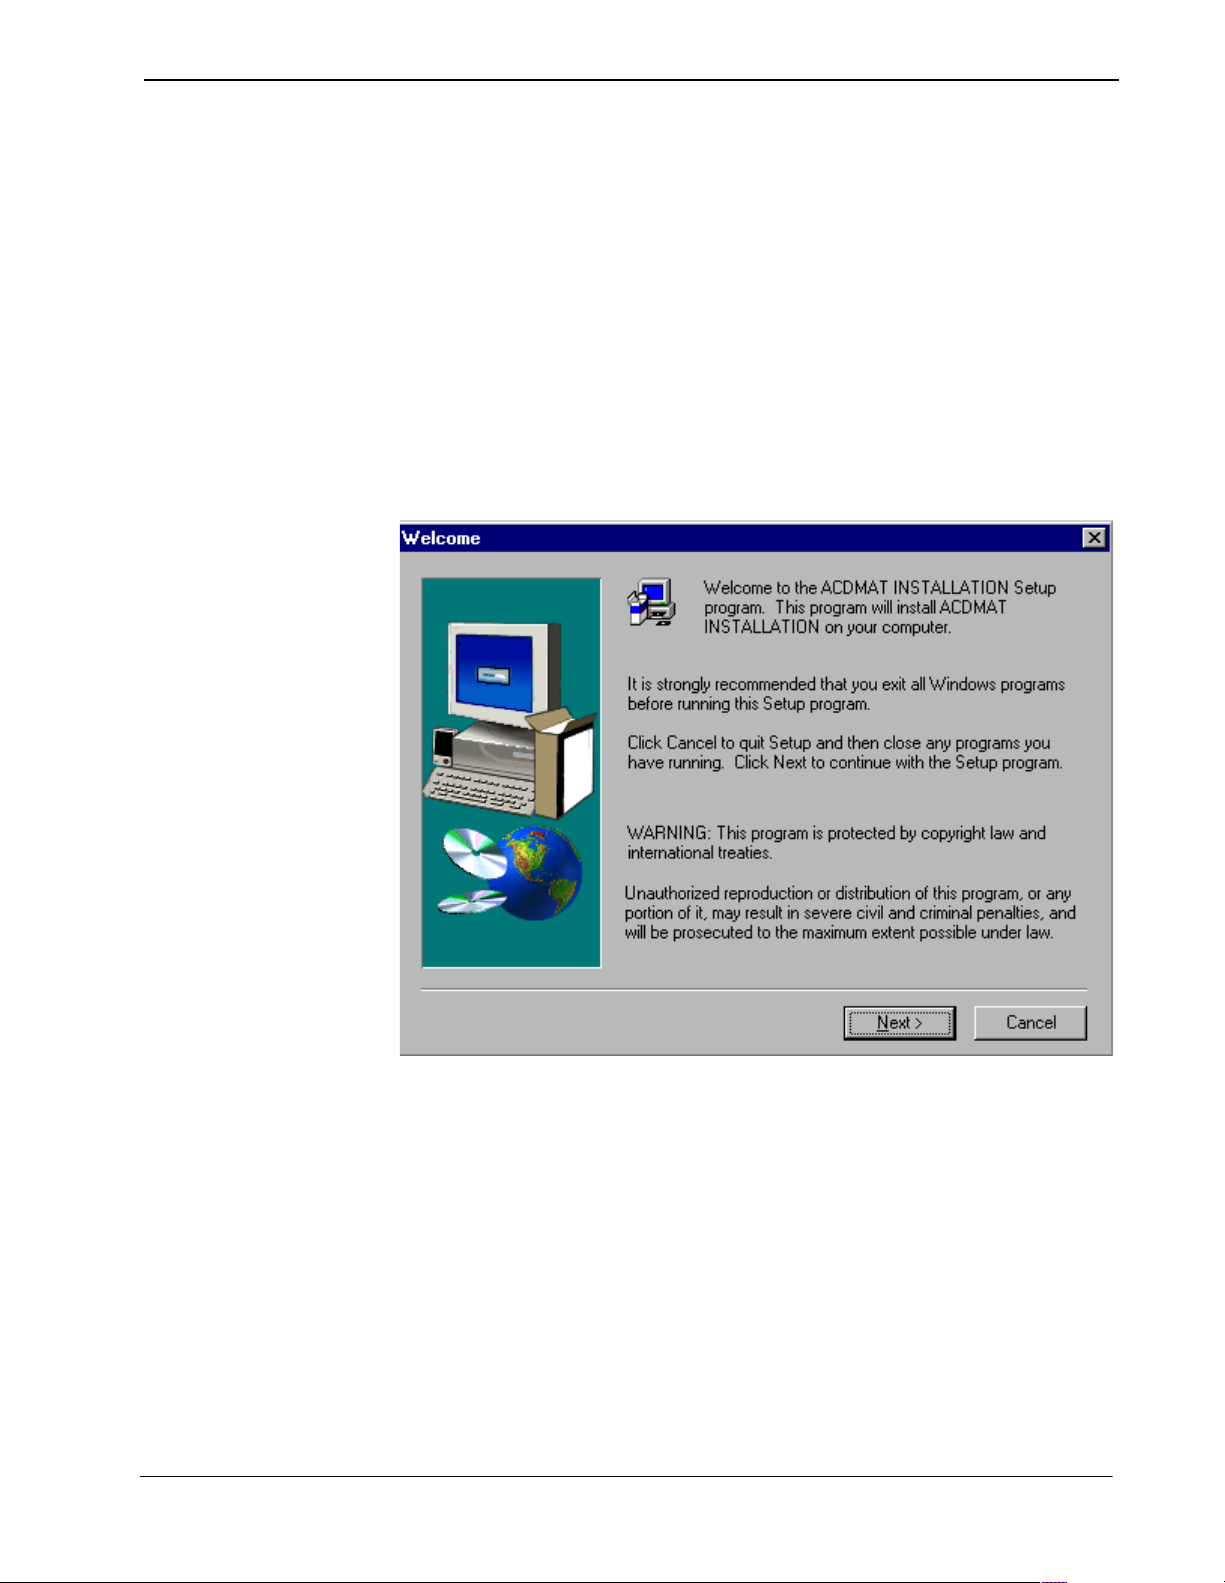
1 Insert the CallCenterWorX-Enterprise IMX MAT installation CD into the CD-
ROM drive to begin the Setup program. The autorun feature of
CallCenterWorX-Enterp rise IMX MAT application displays the introduction
window, followed by the Welcome dialog (Figure 2-1).
Figure 2-1 Welcome Dialog
NDA-30141 Revision 1 Page 5
Page 12
CallCenterWorX-Enterprise IMX MAT Quick Reference Guide Getting Started
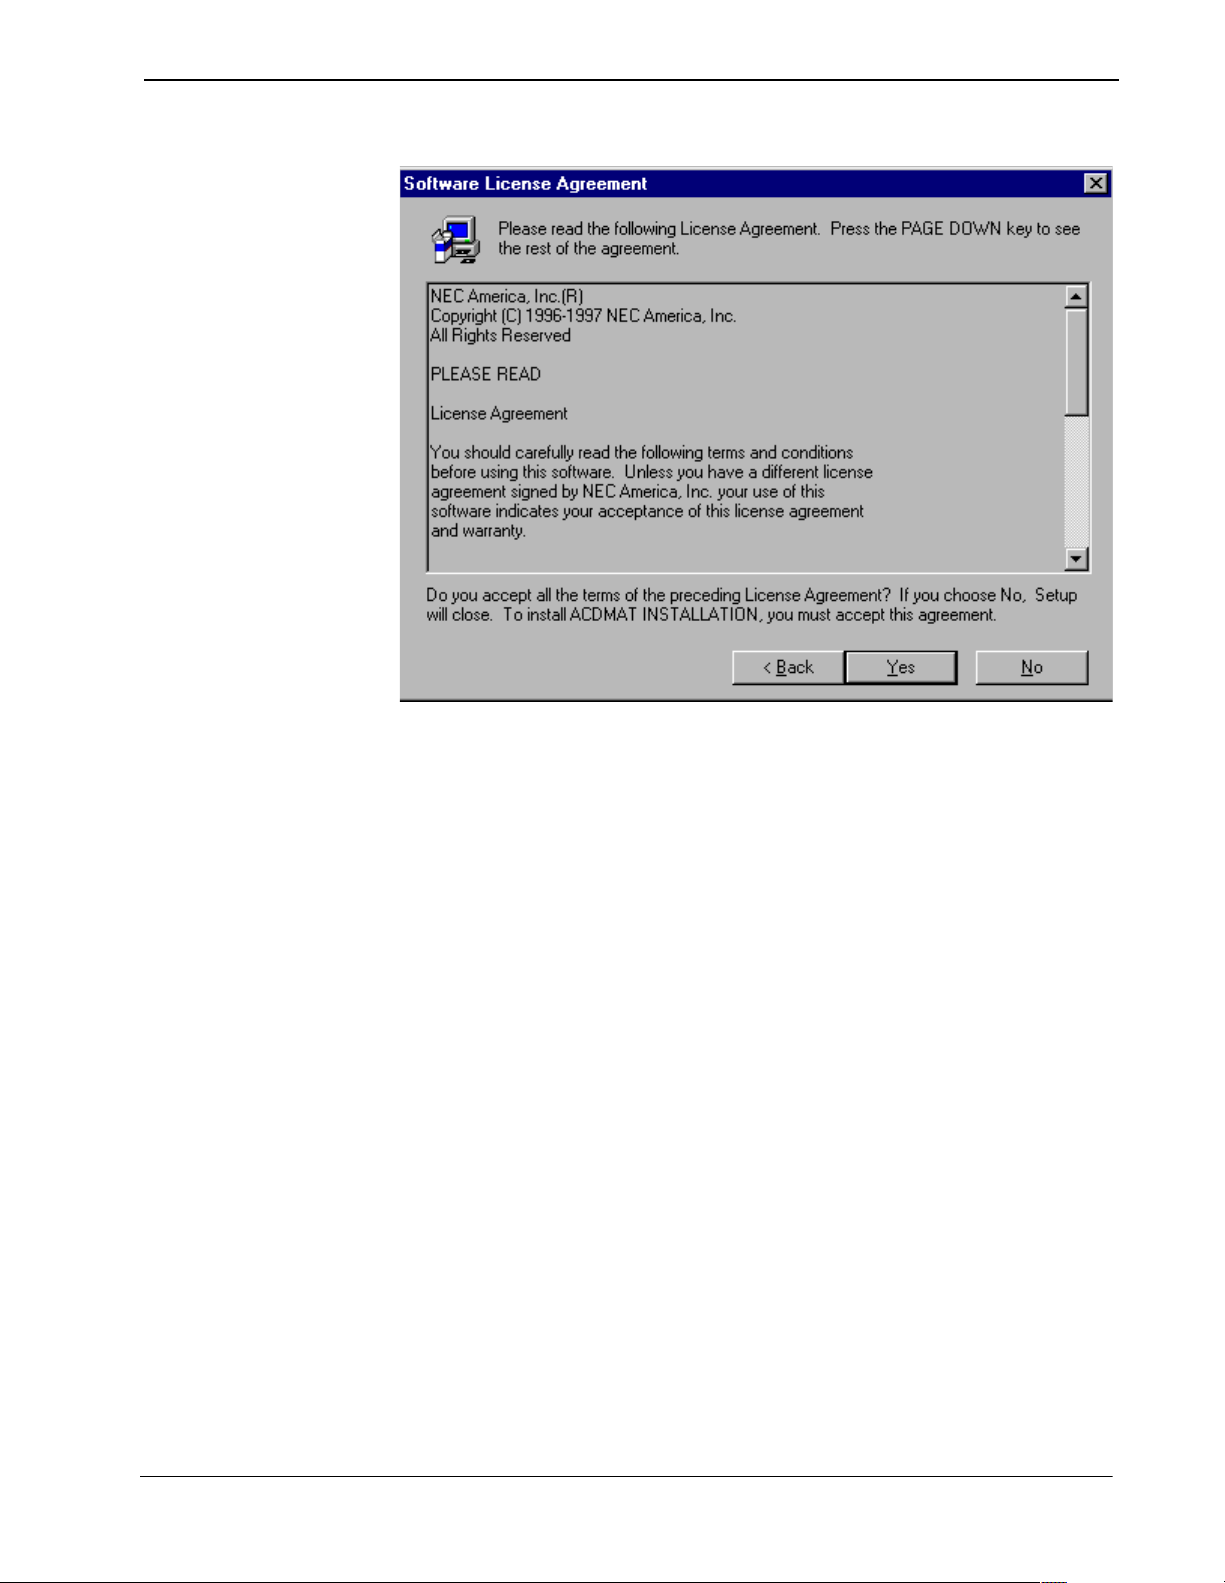
2. Click Next. The Software License Agreeme nt dialog box di splay s (Figure 2-2 ).
Figure 2-2 Software License Agreement
3. Read the software license agreement in the list box and click Yes to accept the
terms of the agreement and to continue with the installation.
4. The Installation Information screen displays (Figure 2-3 ). Click Next to con-
tinue.
NDA-30141 Revision 1 Page 6
Page 13

CallCenterWorX-Enterprise IMX MAT Quick Reference Guide Getting Started
Figure 2-3 Installation Information
5. The User Information screen is displayed next (Figure 2-4 ). Verify the information appearing in each field or enter in information where the fields are left
blank. Click Next.
NDA-30141 Revision 1 Page 7
Page 14

CallCenterWorX-Enterprise IMX MAT Quick Reference Guide Getting Started
Figure 2-4 User Information
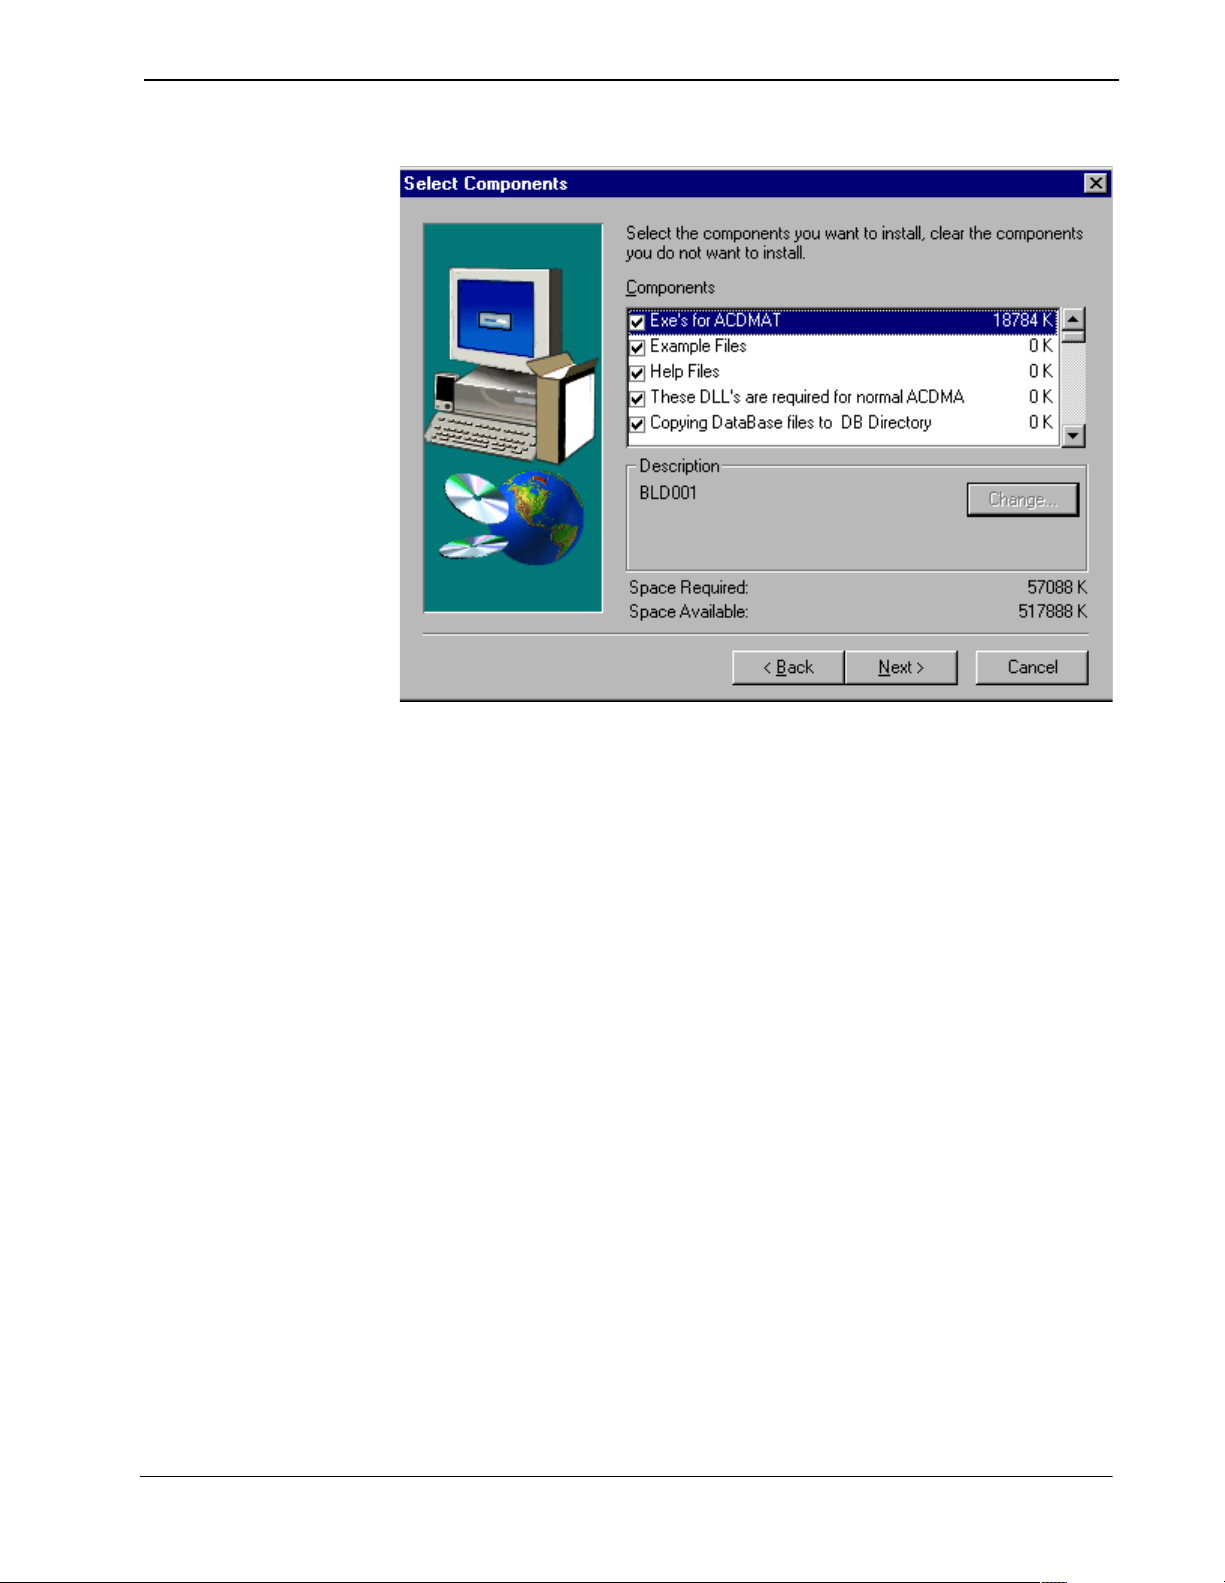
6. The Select Components scree n di splays (Figure 2-5 ). Those components with
a checkmark to th e left wil l be ins talled. If ther e are ce rtain co mponents yo u do
not want installed, simply click in the checkbox to deselect that component.
Click Next to continue.
NDA-30141 Revision 1 Page 8
Page 15
CallCenterWorX-Enterprise IMX MAT Quick Reference Guide Getting Started
Figure 2-5 Select Components
7. The Select Program Folder screen displ ays (Figure 2- 6 ). You may select a folder name from the existing folder lis t, or type a new name in the box. To accept
the Program Folder shown in the dialog box, click Next.
NDA-30141 Revision 1 Page 9
Page 16

Getting Started CallCenterWorX-Enterprise IMX MAT Quick Reference Guide
Figure 2-6 Select Program Folder
8. Next, the progress of ins tall file copying and the ove rall installati on is shown on
the graphics indicators.
Figure 2-7 Copying Files
Page 10 NDA-30141 Revision 1
Page 17

CallCenterWorX-Enterprise IMX MAT Quick Reference Guide Getting Started
9. When all files have been copie d and inst alled, you will be returned to your win dows environment.
This completes the setup and installation for the CallCenterWorX-Enterprise IMX
MAT application.
NDA-30141 Revision 1 Page 11
Page 18

Getting Started CallCenterWorX-Enterprise IMX MAT Quick Reference Guide
This Page Left Blank.
Page 12 NDA-30141 Revision 1
Page 19

CallCenterWorX-Enterprise IMX MAT Quick Reference Guide Using Online Help
Chapter 3 Using On line Help
Online Help Features
Accessing the Online Help System
The CallCenterWorX-Enterprise IMX MAT online Help system features include:
• Context-sensitive Help for every dialog, button, and field within the program.
• Step-by-step procedures assigning, displaying, updating, printing, and
removing CallCenterWorX-Enterprise IMX MAT data.
• Comprehensive glossary in each progra m .
• ACD functionality with respect to supported commands.
There are several ways to use the online Help system within CallCenterWorX-
Enterprise IMX MAT. You can disp lay and work in the curre nt dialog while a Help
window is open. You can also resize, move, tile, or cascade the online Help
window to make it easier to display and f ollow the Hel p procedures whil e working
in the CallCenterWorX-Enterprise IMX MAT application.
To access Help from within the CallCenterWorX-Enterprise IMX MAT
application, do one of the following:
• Select
• Press
• Click on the
Help Topic from the Help Menu.
F1 to display Help for the current CallCenterWorX-Enterprise IMX MAT
MAT dialog.
Help button for help on a topic. Cli ck the What’s Th is Hel p
button for context-sensitive help.
NDA-30141 Revision 1 Page 13
Page 20

Using Online Help CallCenterWorX-Enterprise IMX MAT Quick Reference Guide
Navigating the Help System
CallCenterWorX-Enterprise IMX MAT Online Help is deployed using the
Microsoft HTML Help format. The help system will be viewed in a tri-pane
window.
• The left pane contains the Contents, Index, Search and Glossary tabs to
help users move around the system.
• The right pane contains the selected help topic.
• The top pane has naviga tional buttons t o help the users mov e through the
help system.
Figure 3-1 Help Topics Window
Contents Tab
The Contents tab (Figure 3- 1 )is intended to be u sed as an online Table of Contents.
• Double-clicking a Closed Book Bullet displays all the help topics contained
within the book.
• Double-clicking an Open Book Bul let cl oses t he book an d all of its h el p topic s.
• Double-clicking a Help Topic Bullet displays the Help topic window for that
bullet
Index Tab
The Index tab (Figure 3-2) displays a multi-level list of topics and keywords or
phrases.
Page 14 NDA-30141 Revision 1
Page 21

CallCenterWorX-Enterprise IMX MAT Quick Reference Guide Using Online Help
Figure 3-2 Help T opics Window - Index Tab
Search Tab
The Search tab (Figure 3-3 ) provides another quick way to find information.
Simply type a keyword or phrase and a list of all topics where the keyword or
phrase is found will be displayed. Click on a topic to go directly to that topic.
NDA-30141 Revision 1 Page 15
Page 22

Using Online Help CallCenterWorX-Enterprise IMX MAT Quick Reference Guide
Figure 3-3 Help Topics Window - Search Tab
Glossary Tab
The Glossary tab (Figure 3-4 ) provides a list of terms and definitions related
to the subject matter in the help system.
Page 16 NDA-30141 Revision 1
Page 23

CallCenterWorX-Enterprise IMX MAT Quick Reference Guide Using Online Help
Printing Help Topics
Figure 3-4 Help Topics Window - Glossary Tab
CallCenterWorX-Enterprise IMX MAT Onli ne Help i s n ot avai labl e in har d copy,
but you can print topics of interest to you from several places within the Help
system. The following procedure explains the process of printing Help topics.
Printing from the Contents, Index or Find Tabs
1. Highlight the Help topic you wish to print.
2. Click the
(Figure 3-5 ).
Print icon at the top of the window. The Print dialog box displays
NDA-30141 Revision 1 Page 17
Page 24

Using Online Help CallCenterWorX-Enterprise IMX MAT Quick Reference Guide
Figure 3-5 Print Dialog Box
3. Choose one of the following in the Print Setup:
• To print to a printer, click on the
• To print to a file, click the
4. In your Print command, click the
5. Use the
up and/or down arrows in the Number of copies field, or double-clic k
Name drop down box and select a printer.
Print to file check box.
All radio button to print t he entire report.
in the field and enter a value.
6. (Optional) Click the Collate check box in the Copies box.
7. (Optional) Click the Print all linked documents checkbox to print all topics
that are linked to the current topic. or click the Print table of li nks to print a
listing of the topics that are liked to the current topic.
8. Click OK.
Tips
• Use the right mouse button to cl ick inside the Help windo w , th en click Print
Topic. This also works for printing the contents of a pop-up window.
Page 18 NDA-30141 Revision 1
Page 25

CallCenterWorX-Enterprise IMX MAT Quick Reference Guide Using Online Help
• Print a group of related topics by clicking a book in the Help Contents and
then clicking the
Print button.
NDA-30141 Revision 1 Page 19
Page 26

Using Online Help CallCenterWorX-Enterprise IMX MAT Quick Reference Guide
This Page Left Blank.
Page 20 NDA-30141 Revision 1
Page 27
CallCenterWorX-Enterprise IMX MAT Quick Reference Guide IMX MAT Menu Commands
Chapter 4 IMX MAT Menu Commands
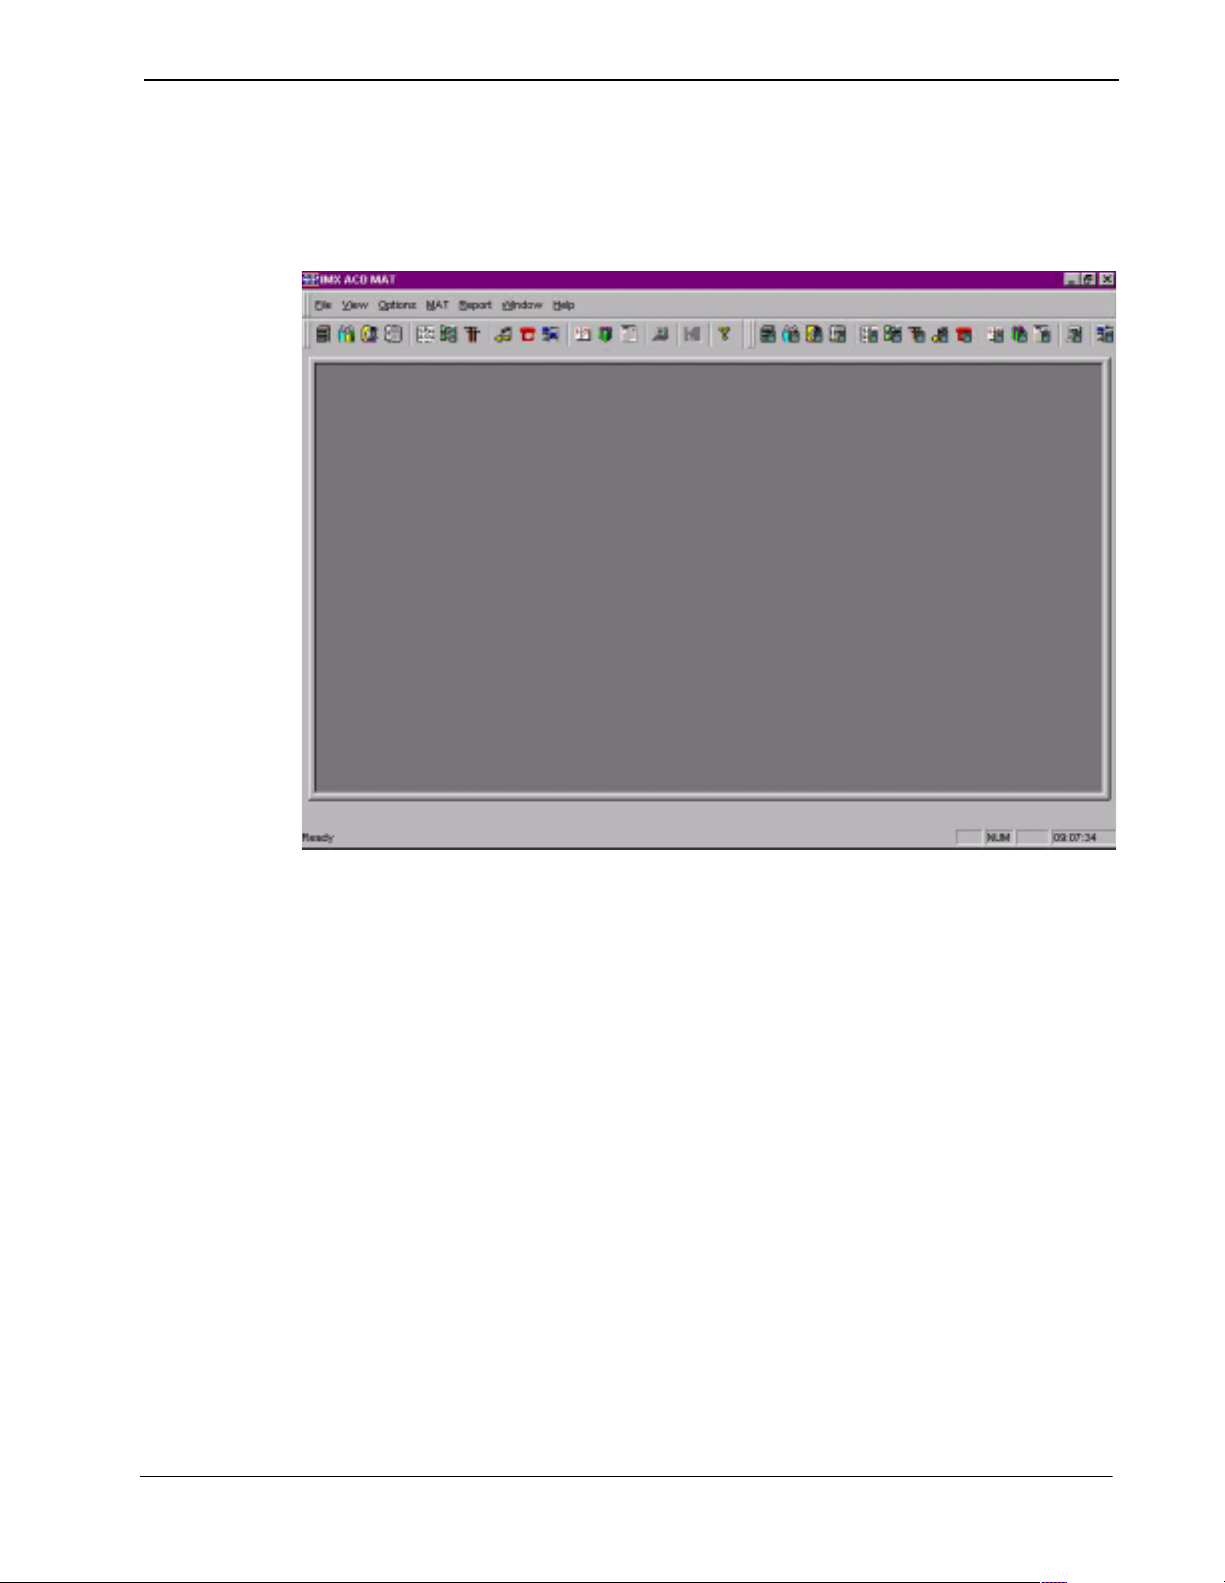
Figure 4-1 IMX ACD MAT Console Screen
The CallCenterWorX-Enterprise IMX MAT console window is the main window
of the application and is used for all of t he adminis trative functio ns. The men us on
the CallCenterWorX-Enterprise IMX MAT window are de scribed in the following
sections.
File Menu
The File menu contains the Exit command, which provid es an orderly exit from the
program.
View Menu
The View Menu controls the behavio r of the To olbars, the Workbook area , and the
Status Bar on the console screen.
NDA-30141 Revision 1 Page 21
Page 28

IMX MAT Menu Commands CallCenterWorX-Enterprise IMX MAT Quick Reference Guide
Figure 4-2 Console Screen
The Toolbar areas show n above, are the MAT command toolbar, the Reports
toolbar, and the
• The
MAT toolbar icons provide one of the three ways to access MAT
Personal toolbar.
commands.
• Reports can be generated by use of the
Report toolbar icons as well as from the
Data Entry screen List button.
• The
Personal toolbar can be named to suit your purpose and can include any
icons you wish to use.
Page 22 NDA-30141 Revision 1
Page 29
CallCenterWorX-Enterprise IMX MAT Quick Reference Guide IMX MAT Menu Commands
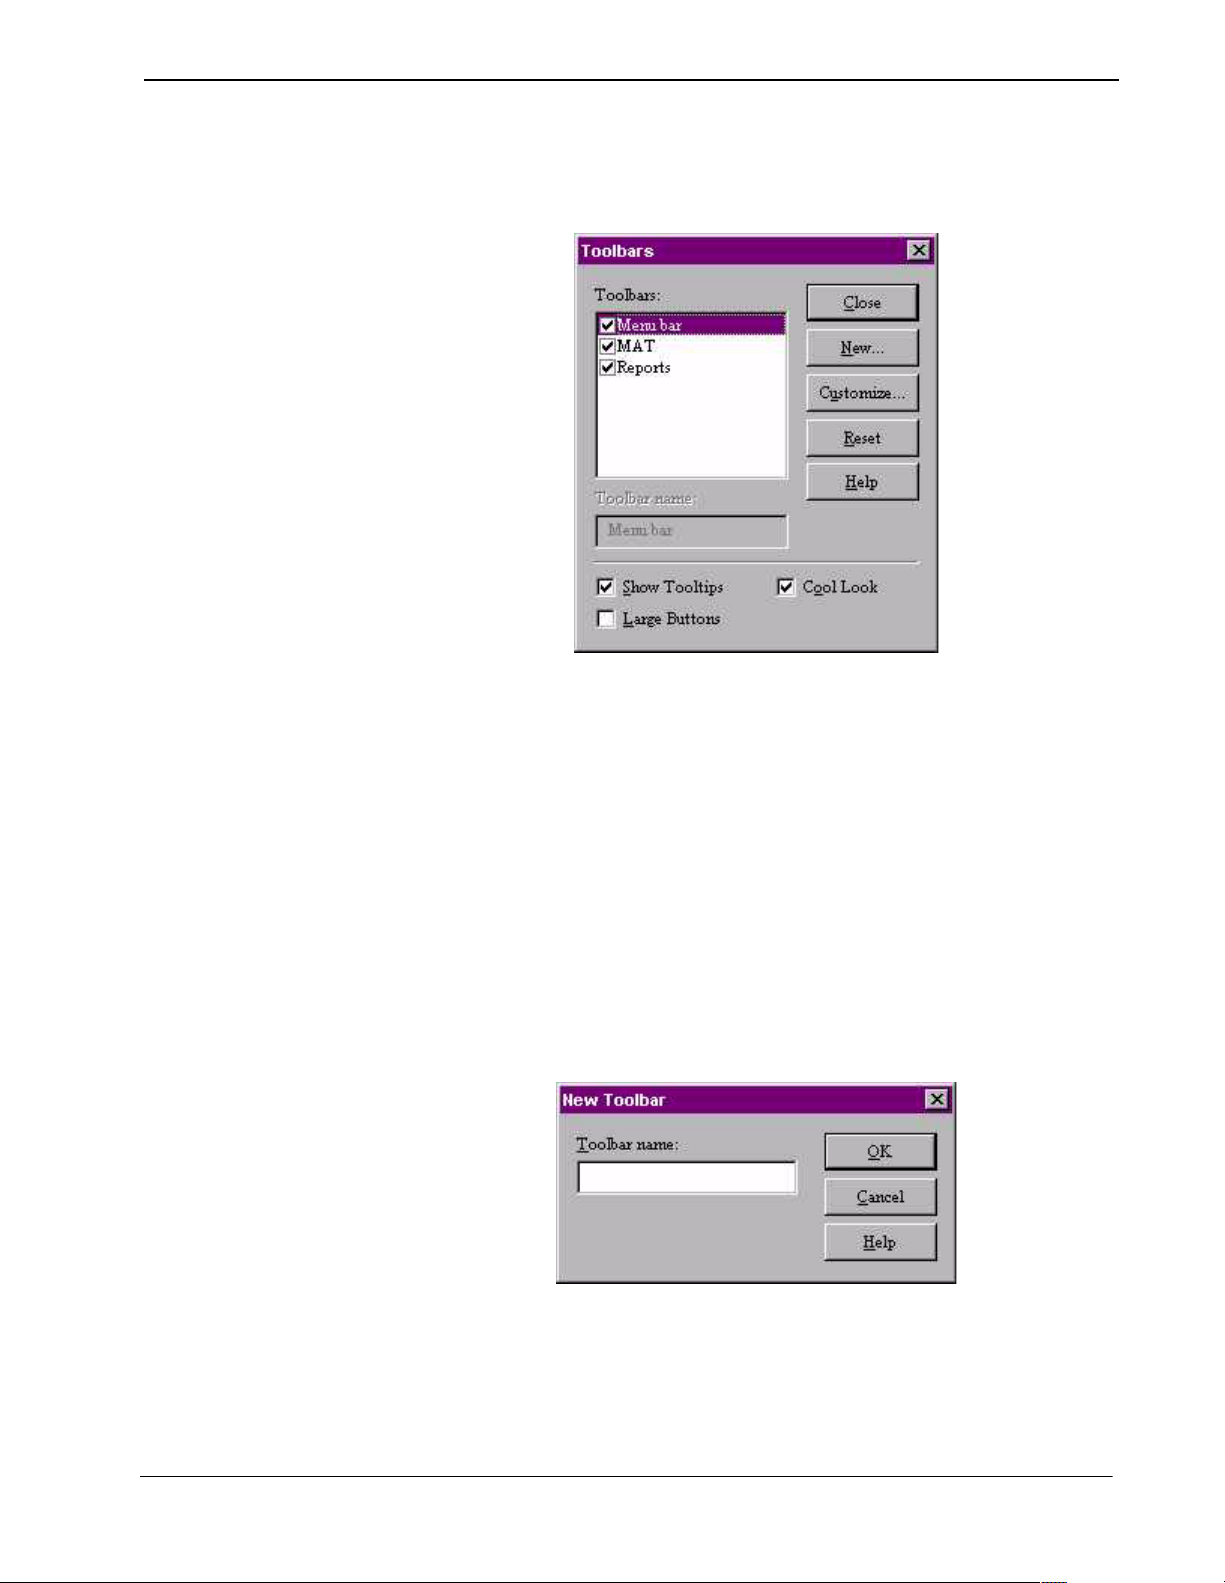
Selecting the Toolbars option under the View menu displays the check list of
available toolbars.
Figure 4-3 Toolbar Window
Toolbars Options
• Toolbars can be displayed (checked) or hidden (unchecked).
• A toolbar can be reloc ated to any porti on of the screen , including the Workbook
area.
• The
Reset button will restore the default condition to the toolbars.
Personal Toolbar s
• Personal toolbars can be created for specifi c purposes or for convenience in
frequent usage. Using the New... button in the main Toolbars dialog box to
display the New Toolbar window, you can type in a custom name for the ne w
toolbar.
Figure 4-4 New Toolbar Window
• You can drag individual icons to the new toolbar to construct a personalized
selection in any order.
NDA-30141 Revision 1 Page 23
Page 30
IMX MAT Menu Commands CallCenterWorX-Enterprise IMX MAT Quick Reference Guide
Note: If you move an icon onto a personal toolbar which you later deactivate, and the
icon is then missing from its original (source) toolbar, re-selecting the original
toolbar in the main
store the icon.
Toolbars dialog box and pressing the Reset button wi ll re-
The Workbook area of the console screen shows a tab for each screen as it is
opened, allowing rapid selection when multiple screens are displayed.
• The tab shows the icon of the command with the name of the command.
• The W orkboo k area can be removed to increase sp ace on the ma in screen by
clicking the checked option under the
View menu. This toggles to an un-
checked option which removes the Workbook until you check it again.
Status Bar on the console screen indicates the curr ent condition of the system.
The
• The “Ready” on the left side indicates that th e system is connected and ready
for the input of commands or data.
• The
Status Bar area can be removed by clicking the checked option under
View menu. This toggles to an unchecked option and converts the Status
the
Bar area to screen area. Clicking on the unchecked Status Bar option restores
the Status Bar to the screen.
Options Menu
• The Workbook / Toggle Icons option allows the choice of showing or not
showing the command icon on the Workbook tab at the bottom of the screen.
• The
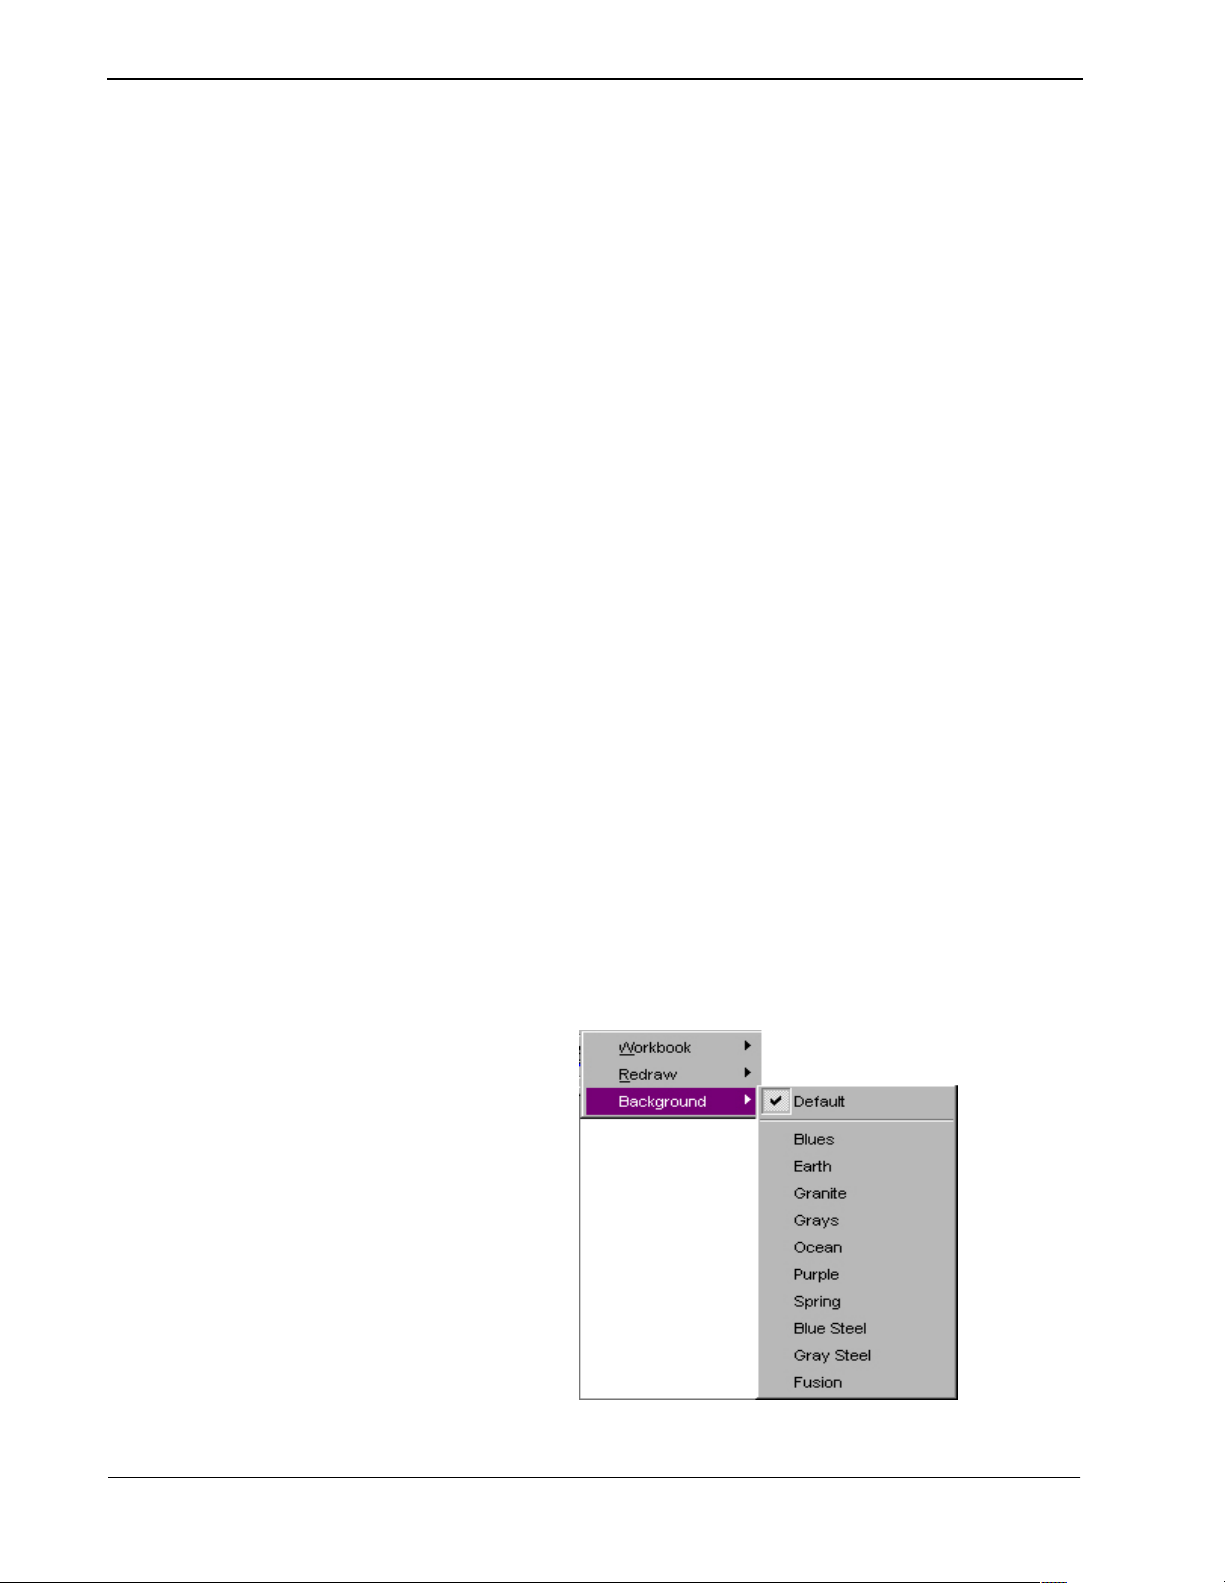
•
Redraw choice provides the options of Normal or Optimized for
refreshing the screen.
Background offers a choice of colors and textures for the Data Entry screens.
The next screen opened after making a color selection will show that
background color while the screen is open.
Figure 4-5 Data Entry Screen Background Colors
Page 24 NDA-30141 Revision 1
Page 31
CallCenterWorX-Enterprise IMX MAT Quick Reference Guide IMX MAT Menu Commands
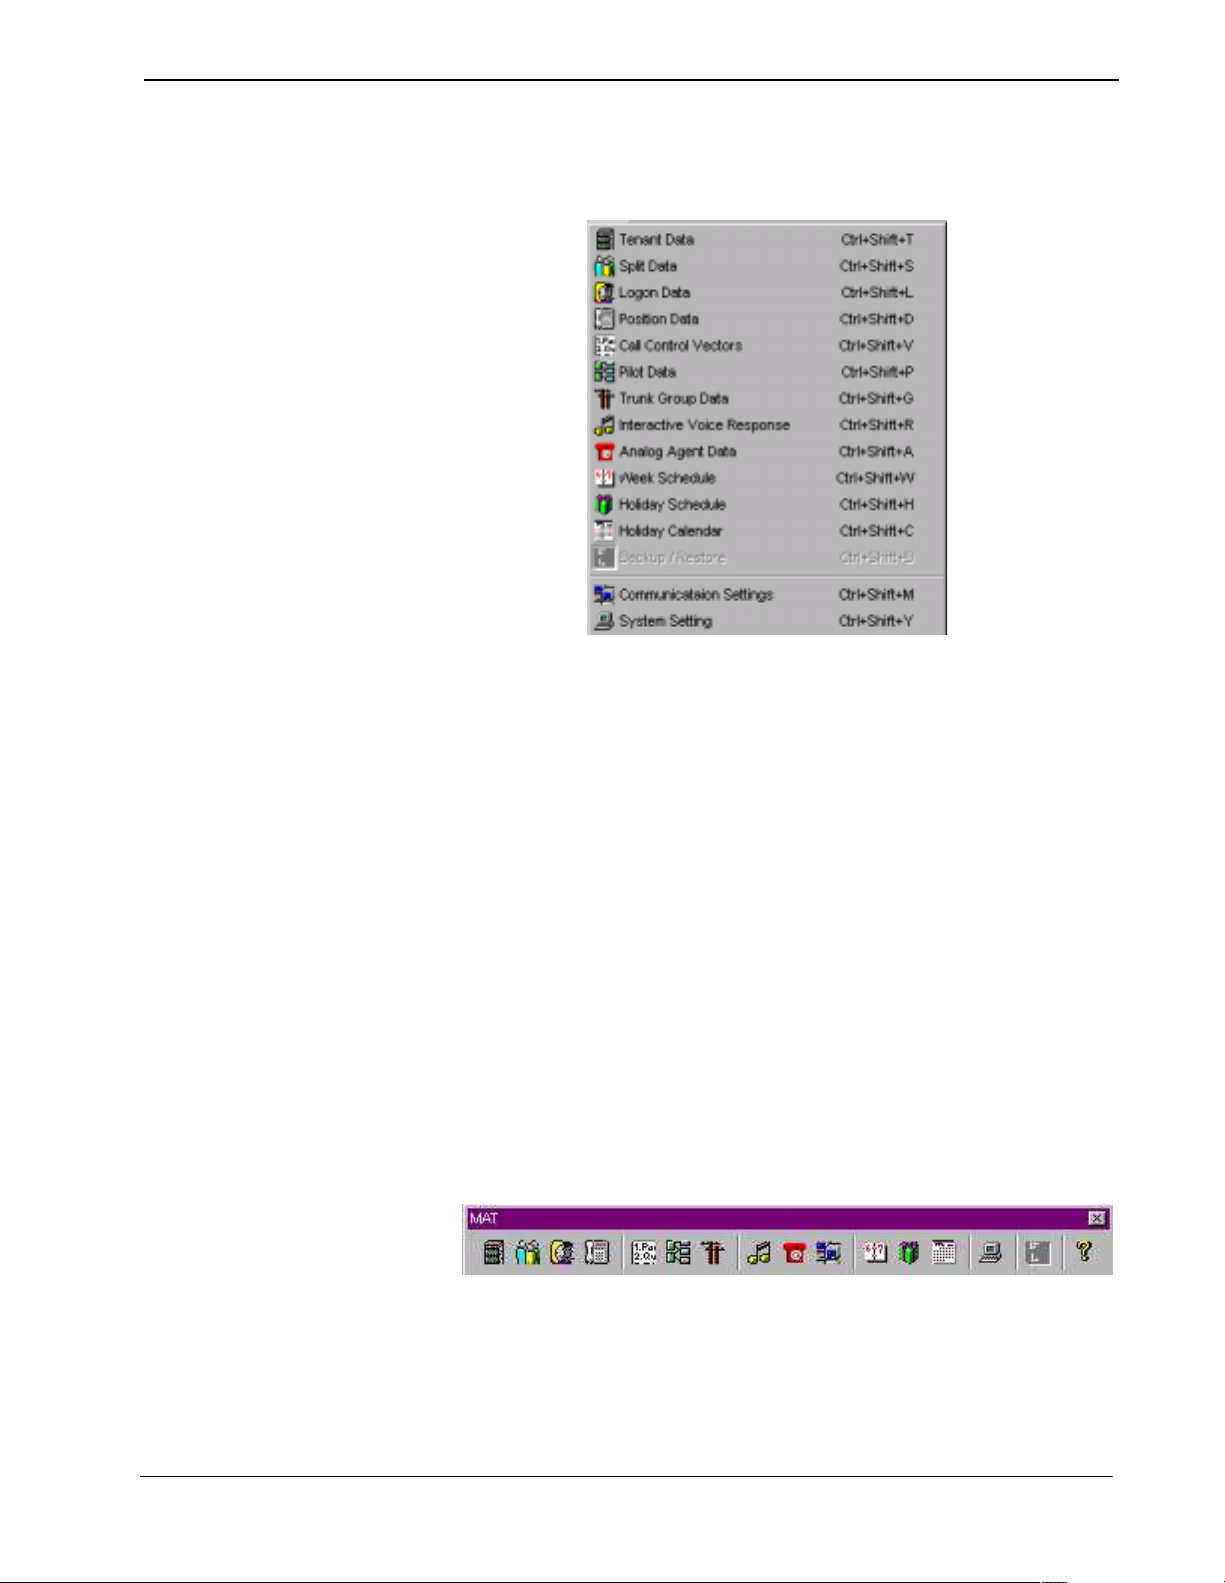
MAT Menu
Figure 4-6 MA T Menu
Menu Commands
The commands used for the Maintenance Administration Terminal (MAT)
functions are listed in t his menu. MAT functions can be act ivated in one of 3 ways:
1. Select a command from the MAT menu (such as selecting the
Tenant Data command by clicking Tenant Data under the MAT
menu
).
2. Select a command from the
and
Shift keys and pressing an alphabetic letter (such as selecting
the
Tenant Data command by holding down CTRL and SHIFT and
pressing
T). For a complete list of MAT menu and keyboard com-
keyboard by holding down the Control
mands.
3. Select a command from the
menu bar by using the mouse (such as selecting the
toolbar icon
).
MAT icon Toolbar located under the
Tenant Data
Figure 4-7 MAT Toolbar Icons
Each data entry screen displays its icon in the top left corner, and the icon
also appears on the screen’s tab in the Workbook area.
NDA-30141 Revision 1 Page 25
Page 32

IMX MAT Menu Commands CallCenterWorX-Enterprise IMX MAT Quick Reference Guide
Figure 4-8 Sample Data Entry Screen
Data Screen Buttons
• The top Update/Remove button reflects the status of the contents. The “Up-
date
” button will initially be shown with the first configuration of data.
Press the
Update button (o r th e keyboard Ent er key) to save an ent ry o r a
change. Any data entry or change after the first entry will cause the top button to show “
ton
) to remove a previous entry.
• The center
Remove.” Y ou can press t he top bu tton (now the Remove but-
List button opens a Report screen view of the current data con-
figured for this command. Tha t scre en disp lays ic ons all owing you t o
to a file, Print
, Print Preview, or Change font style or size directly from
the Report view.
• The bottom
Close button closes the data screen without saving any change s
if the top button ( Update/Remove) has n ot been pressed pre viously . Pressing
keyboard Escape key also closes the screen without saving entries or
the
changes if Update/Remove has not been pressed previously.
How to Use the Buttons
(a) To save newly entered or changed information, press Update or the Enter
key.
(b)To delete information, press Remove.
Save
(c) To close without saving changes, press
Escape key.
the
(d)To close after saving changes by pressing
Page 26 NDA-30141 Revision 1
Close instead of Update, or press
Update or Enter, press Close.
Page 33

CallCenterWorX-Enterprise IMX MAT Quick Reference Guide IMX MAT Menu Commands
Information Choices
The choices shown in t he drop-down boxes in the data dialog sometimes
include only the information previously entered. For example, if only
Split 1 and Split 2 have been entered and saved, those will be the only
options shown, even though the T enant Data may have been conf igured to
allow more than 2 splits.
In order to access an additional option, it must first be entered as new
information and the
Update button (or Enter key) pressed. It will then
become another choice.
Attempted entry of out-of-range information ( such as more splits than a
tenant has been configured for) will generate a red error message on the
Operation Result Message Bar of the Data Entry Screen.
Message Bars
The Form Status Message Bar, located in the bottom left area of the
Data Entry Screen, reflects the current state of information entry in the
form.
State Message
An entry exists which is unchanged this session Remove Entry?
A change has been made to an existing entry Update name of entity (such as Split)
An entry is made that does not yet ex ist in the ACD New name of entity
The
Operation Result Message Bar, located in the bottom right area of
the Data Entry Screen reflects the result of the current entry in the form.
State Message
Correct entry of an item (within cha ract er and digi t lim-
its, within co nfiguration limits)
Attempted entry of an item which already exists in an-
other entity
ACD Data written successfully
(in green)
Entry exists in another name of entity
(in red)
Report Menu
The first options available on the Report Menu are:
•
Save to Text File, which saves the data to the text file name you sp ecify.
•
Print Report, which outputs a repor t to a designated pr inter without opening
the Data Entry screen.
Print Preview, which displays a sample of the report as it will be printed.
•
NDA-30141 Revision 1 Page 27
Page 34

IMX MAT Menu Commands CallCenterWorX-Enterprise IMX MAT Quick Reference Guide
• Additionally , yo u can change the repor t text and header f ont by selecting the
font style and size.
These options are al so available a s icons on the menu bar of the Data Report screen
(which is created by pressing the
List button on the Data Entry screen).
Figure 4-9 Report Menu
Opening a Report screen for a particular MAT command name can be done in
any of four ways:
1. Select a MAT command name from the listing of report titl es under th e Report
menu.
2. Hold down the
ALT an d Shift keys and enter the letter specified in the Report
menu listing for that command.
3. Press the
4. Select the icon for that command from the
List button on the Data E ntry screen fo r that command.
Reports Toolbar.
Page 28 NDA-30141 Revision 1
Page 35

CallCenterWorX-Enterprise IMX MAT Quick Reference Guide IMX MAT Menu Commands
Figure 4-10 Sample Data Entry and Data Report Screens
The icons on the Data Report Screen shown above offer quick ways to:
• Save the data to a text file.
• Change th e font style and size used in the report.
• View a Print Preview of the report.
• Send the report to a printer.
Data Reports which are too wide for the whole report to fit on the screen will
appear with a hori zontal s croll ba r across the bott om, allowing you to move across
the columns. You can also adjust the vie wing po si ti on of a re port by sel ect ing the
title bar with the mouse and dragging the report to bring the desired columns into
view.
columns in a Data Report screen can be resized or rearranged by using the
The
mouse to drag the column headings.
NDA-30141 Revision 1 Page 29
Page 36

IMX MAT Menu Commands CallCenterWorX-Enterprise IMX MAT Quick Reference Guide
Figure 4-11 Sample Report Print Preview Screen
The Print Previe w screen can be opened by choosing the Print Preview
command
on the Report menu, or by cl icking th e Print Preview icon on the Data
Report menu bar.
• The
• The
Print command sends the report to the printer.
Next Page, Previous Page, Two Page , Zoom In, and Zoom Out
commands on the Print Preview menu bar allow you to have varying views of
the displayed report.
• The
Close command closes the Print Preview screen.
• The column arrangement will r eflect any col umn adjustments made in t he Data
Report screen.
Page 30 NDA-30141 Revision 1
Page 37

CallCenterWorX-Enterprise IMX MAT Quick Reference Guide IMX MAT Menu Commands
Window Menu
Cascade
• Places all open dialogs on top of each other in a cascading fashion, with each
title bar visible and selectable.
Tile
• Places all open dialogs apart from each other with some overlap between
dialogs, with each item selectable.
Close All
• Closes all open screens.
Help Menu
• Help Topic opens the IMX ACD MAT online Help system.
•
About provides information about the IMX ACD MAT system including
version and build number.
NDA-30141 Revision 1 Page 31
Page 38

IMX MAT Menu Commands CallCenterWorX-Enterprise IMX MAT Quick Reference Guide
This Page Left Blank.
Page 32 NDA-30141 Revision 1
 Loading...