

Page 1

Expense Management
Cable Management Module
User Guide
NEC
NDA-31135, Revision 1
NEC Corporation
November 2010
Page 2

Liability Disclaimer
NEC Corporation reserves the right to change the specifications,
functions, or features, at any time, without notice.
NEC Corporation has prepared this document for the exclusive use of
its employees and customers. The information contained herein
is the property of NEC Corporation and shall not be reproduced
without prior written approval from NEC Corporation
© 2010 NEC Corporation
Windows®, and Microsoft® are
registered trademarks of Microsoft Corporation.
All other brand or product names are or may be trademarks or
registered trademarks of, and are used to identify products or services
of, their respective owners.
Page 3

Contents
i
Introduction 1-1
Cable Management Overview. . . . . . . . . . . . . . . . . . . . . . . . . . . . . . . . . . . . . . 1-1
How This Guide is Organized . . . . . . . . . . . . . . . . . . . . . . . . . . . . . . . . . . . . . . 1-1
Getting Started 2-1
Accessing the Cable Management Module. . . . . . . . . . . . . . . . . . . . . . . . . . . . 2-1
Cable Management Main Window . . . . . . . . . . . . . . . . . . . . . . . . . . . . . . . . . . 2-1
Navigation Pane . . . . . . . . . . . . . . . . . . . . . . . . . . . . . . . . . . . . . . . . . . . . . . . . 2-2
Grid Pane . . . . . . . . . . . . . . . . . . . . . . . . . . . . . . . . . . . . . . . . . . . . . . . . . . . . . 2-2
User Defined Fields 3-1
User Defined Fields Applications . . . . . . . . . . . . . . . . . . . . . . . . . . . . . . . . . . . 3-1
Editing User Defined Fields . . . . . . . . . . . . . . . . . . . . . . . . . . . . . . . . . . . . . . . 3-1
User Defined Field Descriptions . . . . . . . . . . . . . . . . . . . . . . . . . . . . . . . . . . . . 3-2
Managing Cables 4-1
Cable Data . . . . . . . . . . . . . . . . . . . . . . . . . . . . . . . . . . . . . . . . . . . . . . . . . . . . 4-1
Adding a New Cable . . . . . . . . . . . . . . . . . . . . . . . . . . . . . . . . . . . . . . . . . . . . . 4-2
Viewing and Editing a Cable . . . . . . . . . . . . . . . . . . . . . . . . . . . . . . . . . . . . . . . 4-3
Deleting a Cable . . . . . . . . . . . . . . . . . . . . . . . . . . . . . . . . . . . . . . . . . . . . . . . . 4-3
Deleting all Cables . . . . . . . . . . . . . . . . . . . . . . . . . . . . . . . . . . . . . . . . . . . . . . 4-4
Expense Management Cable Managment Module User Guide - Revision 1
Page 4

ii Contents
Administration 5-1
Administration - Introduction . . . . . . . . . . . . . . . . . . . . . . . . . . . . . . . . . . . . . . . 5-1
Importing and Exporting Files . . . . . . . . . . . . . . . . . . . . . . . . . . . . . . . . . . . . . . 5-1
Importing Cables From a File . . . . . . . . . . . . . . . . . . . . . . . . . . . . . . . . . . . . . . 5-1
Exporting Cables into a File . . . . . . . . . . . . . . . . . . . . . . . . . . . . . . . . . . . . . . . 5-2
Backing Up and Restoring Cables . . . . . . . . . . . . . . . . . . . . . . . . . . . . . . . . . . 5-3
Reports 6-1
Reports - Introduction . . . . . . . . . . . . . . . . . . . . . . . . . . . . . . . . . . . . . . . . . . . . 6-1
Generating a Report . . . . . . . . . . . . . . . . . . . . . . . . . . . . . . . . . . . . . . . . . . . . . 6-1
Integration with other Modules of Application Suite 7-1
Integration - Introduction . . . . . . . . . . . . . . . . . . . . . . . . . . . . . . . . . . . . . . . . . . 7-1
Integration with Devices . . . . . . . . . . . . . . . . . . . . . . . . . . . . . . . . . . . . . . . . . . 7-1
Integration with Tickets . . . . . . . . . . . . . . . . . . . . . . . . . . . . . . . . . . . . . . . . . . . 7-2
Expense Management Cable Managment Module User Guide - Revision 1
Page 5

Figures
Figure Title Page
iii
2-1 Module Selection Bar. . . . . . . . . . . . . . . . . . . . . . . . . . . . . . . . . . . . . . . . 2-1
2-2 Cable Management Main Window Panes . . . . . . . . . . . . . . . . . . . . . . . . 2-2
2-3 Filtering Results . . . . . . . . . . . . . . . . . . . . . . . . . . . . . . . . . . . . . . . . . . . . 2-3
2-4 Saving Favorites . . . . . . . . . . . . . . . . . . . . . . . . . . . . . . . . . . . . . . . . . . . 2-5
3-1 User Defined Info Fields Grid . . . . . . . . . . . . . . . . . . . . . . . . . . . . . . . . . 3-2
4-1 Cable Grid . . . . . . . . . . . . . . . . . . . . . . . . . . . . . . . . . . . . . . . . . . . . . . . . 4-2
4-2 Cable Dialog Box . . . . . . . . . . . . . . . . . . . . . . . . . . . . . . . . . . . . . . . . . . . 4-2
5-1 Import Cables Dialog Box . . . . . . . . . . . . . . . . . . . . . . . . . . . . . . . . . . . . 5-2
5-2 Export Cables Dialog Box . . . . . . . . . . . . . . . . . . . . . . . . . . . . . . . . . . . . 5-3
5-3 Export Finished Dialog Box . . . . . . . . . . . . . . . . . . . . . . . . . . . . . . . . . . . 5-3
5-4 Backup Grid . . . . . . . . . . . . . . . . . . . . . . . . . . . . . . . . . . . . . . . . . . . . . . . 5-4
6-1 Duplicate Entities Dialog Box. . . . . . . . . . . . . . . . . . . . . . . . . . . . . . . . . . 6-2
7-1 Device Integration . . . . . . . . . . . . . . . . . . . . . . . . . . . . . . . . . . . . . . . . . . 7-2
7-2 Ticket Integration . . . . . . . . . . . . . . . . . . . . . . . . . . . . . . . . . . . . . . . . . . . 7-3
Expense Management Cable Managment Module User Guide - Revision 1
Page 6

iv Figures
Expense Management Cable Managment Module User Guide - Revision 1
Page 7

Tables
v
Table Title Page
3-1 User Defined Fields - Datafill . . . . . . . . . . . . . . . . . . . . . . . . . . . . . . . . . . 3-2
4-1 Cable Fields. . . . . . . . . . . . . . . . . . . . . . . . . . . . . . . . . . . . . . . . . . . . . . . 4-4
6-1 Available Reports. . . . . . . . . . . . . . . . . . . . . . . . . . . . . . . . . . . . . . . . . . . 6-1
6-2 Report Specific Parameters. . . . . . . . . . . . . . . . . . . . . . . . . . . . . . . . . . . 6-2
6-3 Send Output To - Options . . . . . . . . . . . . . . . . . . . . . . . . . . . . . . . . . . . . 6-3
Expense Management Cable Managment Module User Guide - Revision 1
Page 8

vi Tables
Expense Management Cable Managment Module User Guide - Revision 1
Page 9

1
Introduction
The Expense Management Cable Management Module User Guide
provides the information you need to manage the cables in your
organization.
Chapter Topics •Cable Management Overview
• How This Guide is Organized
1-1
Cable Management Overview
The Cable Management Module is a tool that enables you to manage the
cables in your organization, including their locations and connections.
With the Cable Management Module, you can:
• Integrate location data (building, room, and floor) from the Cable
Management Module into the Edit Device dialog box.
• Integrate location data (building, room, and floor) from the Cable
Management Module into the Ticket dialog box of the Help Desk
module.
How This Guide is Organized
Chapter 1
Introduction
Chapter 2
Getting Started
Chapter 3
User Defined Fields
This chapter outlines how to use the manual including the organization
and chapter layout of the Expense Management Cable Management
Module User Guide.
This chapter introduces you to the Cable Management Module basics.
This chapter introduces you user defined fields, their applications and
descriptions.
Managing Cables
Chapter 4
Chapter 5
Administration
Chapter 6
Reports
Expense Management Cable Managment Module User Guide - Revision 1
This chapter explains cable identification, location, and status data,
along with additional information on specific cable management fields.
This chapter introduces you to tasks associated with the Administrative
sub-module.
This chapter describes report types, specific parameters, and report
output options for the Cable Management Module.
Page 10

1-2 Introduction
Chapter 7
Integration with
other Modules of
Application Suite
This chapter details Cable Management Module integration with other
modules of the Application Suite.
Expense Management Cable Managment Module User Guide - Revision 1
Page 11

2
Getting Started
This chapter introduces you to the Cable Management Module basics,
including how to access the module, the Cable Management main
window and navigation.
Chapter Topics • Accessing the Cable Management Module
• Cable Management Main Window
2-1
Accessing the Cable Management Module
From the Module Selection Bar of the Application Suite window, select
the CM tab, see Figure 2-1 .
Figure 2-1
Module Selection Bar
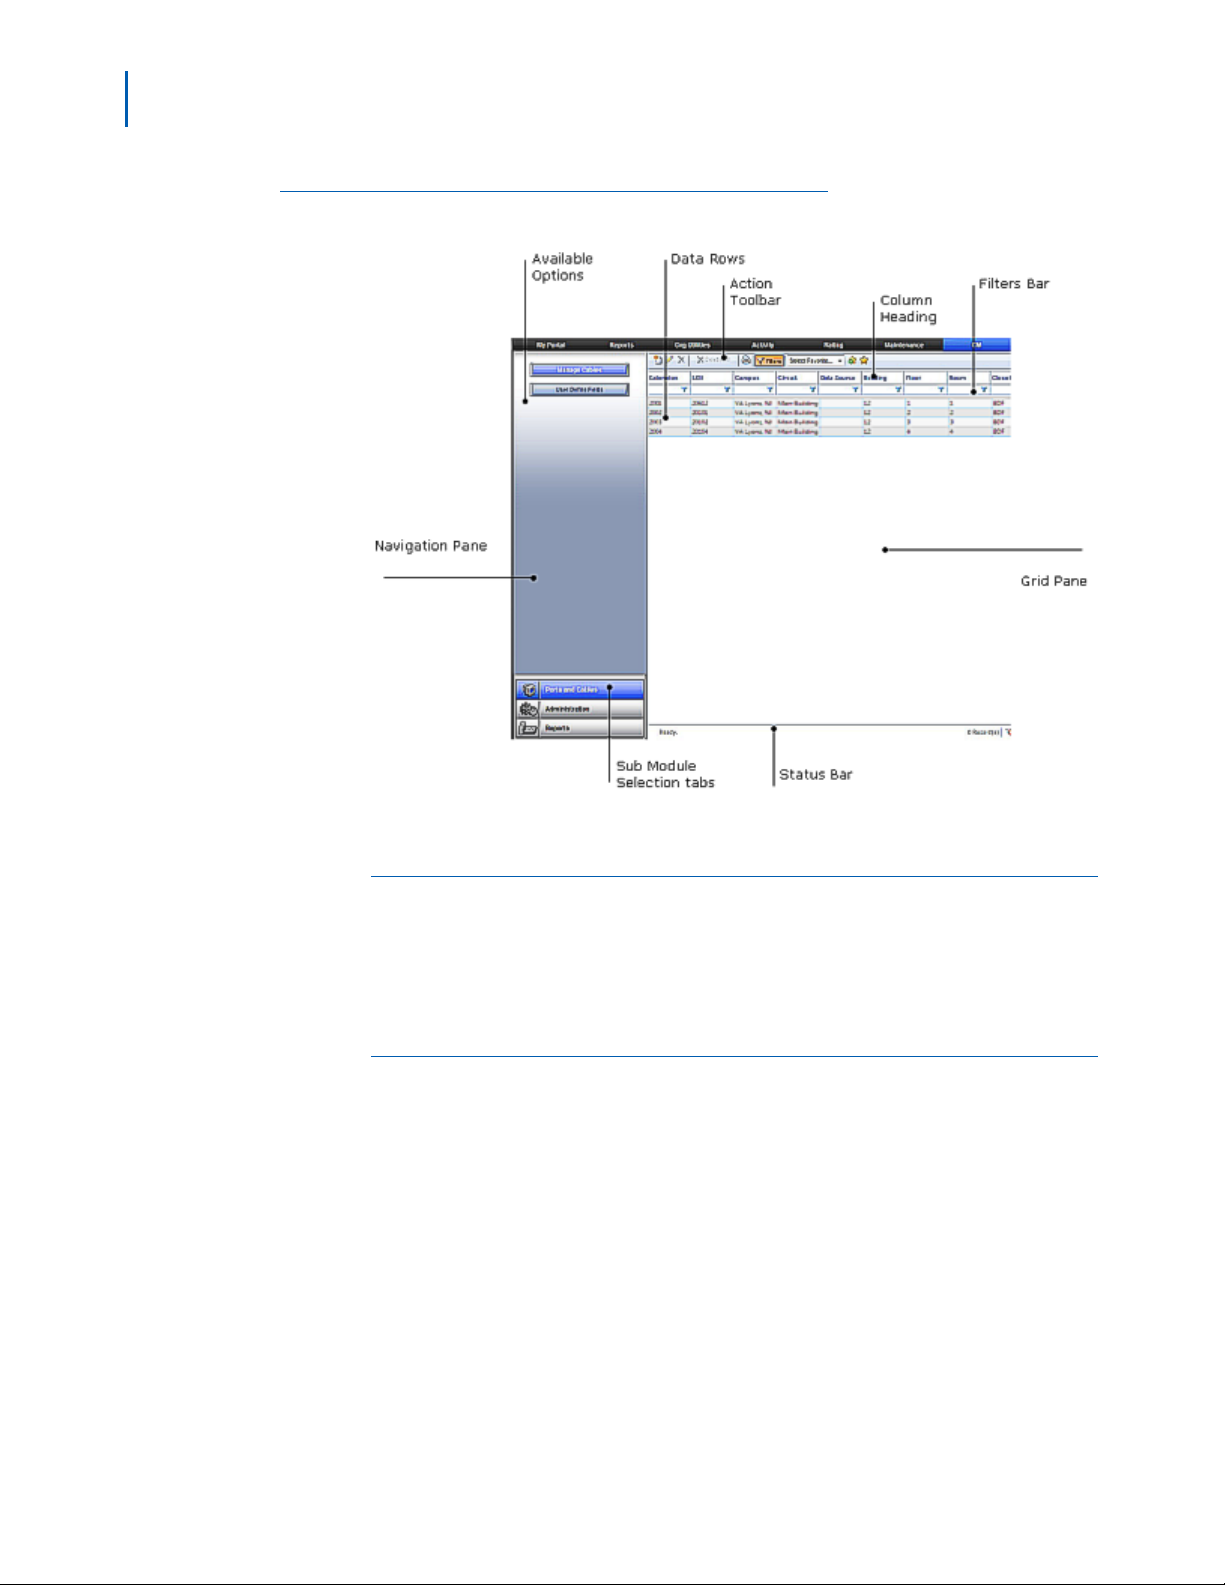
Cable Management Main Window
The Cable Management main window is composed of following two parts
as shown in Figure 2-2:
• Navigation pane on
• Grid pane on the rig
the left hand side of the window
ht hand side of the window
Expense Management Cable Managment Module User Guide - Revision 1
Page 12
2-2 Getting Started
Figure 2-2
Cable Management Main Window Panes
Navigation Pane
At the bottom of the navigation pane, you will find the sub-module
selection tabs. The upper part of the navigation pane displays the
options available for the selected sub-module.
Grid Pane
The grid pane on the right hand side of the window displays data and
toolbars appropriate to the option selected. For the Ports and Cables
sub-module, this area contains the cables' grid which is composed of the
following parts:
• Action toolbar - contains the currently available tools and action
• Column Heading bar - each column represents one data field of the
current cable
• Filters bar - where you define filters
• Data rows - each row represents one data record
• Status Bar - displays current status, paging information, and some
tional action buttons
addi
Expense Management Cable Managment Module User Guide - Revision 1
Page 13

Getting Started 2-3
The first time you click in the column heading, it is sorted
by ascending order. A small triangle
in the column
heading indicates the sort order.
To reverse the sort order, click in the column heading again.
The small triangle is reversed indicating descending sort
order.
Sorting Grid Records
In the cables' grid, you can sort the displayed cables by any of the
columns, but only by one column at a time. A small triangle in the
column heading indicates the sort field and sort order. Follow the steps
below to sort grid records.
— Click in a column heading t
o sort by that column.
—
—
Filtering Grid Records
By setting filtering conditions, filtering enables you to display only
records that match the defined filter fields. If more than one filter field is
defined, only records matching all non-empty filter fields are displayed.
To filter cable records, perform the following steps.
Step 1 If the filter bar is not shown, right-click any of the column headings and
select filter bar, or click Filters
Step 2 In a column to which you wish to apply a filter, click the filter icon
and select from the popup menu the appropriate relation for the filter.
Step 3 Click in the filter cell (not on the icon). A value entering text box opens.
on the action toolbar.
Step 4 Enter the appropriate value.
Step 5 To activate all currently set filters now, press Enter, or wait until all filters
are set and then activate all set filters at once in Step 7.
Step 6 Repeat steps 2 to 5 for each column to which you wish to apply a filter.
Step 7 To activate all set filters, click any of the filter icons in the filters bar and
select Apply All Filters.
The new selection is displayed. The paging information and tools on the
atus bar reflect the results of applying the filters as shown in Filtering
st
Results.
Figure 2-3
Filtering Results
Managing the Displayed Columns
You can control which columns to show and their order. However, this
setting is not saved and is valid only for the current display.
Expense Management Cable Managment Module User Guide - Revision 1
Page 14

2-4 Getting Started
Hiding Columns
To hide one column from the display, right-click the heading of the
col
umn you wish to hide and select Remove This Column from the
popup menu.
Selecting the Displayed Column
To select the displayed columns, do the following.
Step 1 Right-click anywhere in the column heading row and select Select
Columns from the popup menu.
A second popup menu opens with all the available columns displayed.
Step 2 Click next to each column’s name to alternately check or uncheck that
column.
Step 3 Once all columns are checked or unchecked to suit your needs, select
Apply Changes from the second popup menu.
Displaying All Columns
To display all columns, do the following.
Step 1 Right-click anywhere in the column heading row and select Select
Columns from the popup menu.
Step 2 Select Reset from the second popup menu.
Changing Column Order
The order the columns appear on the Cable Management main window
can be changed by following the steps below.
Step 1 Drag a column heading to another place in the column heading row until
the border between two adjacent column headings becomes bold.
Step 2 Drop the column heading in its new place.
Managing Favorites
Favorites enable you to assign a name and save the current filter and
column setting so that you can use them again whenever you need
them.
Saving a Current Setting as a Favorite
To save the current setting as a favorite, do the following.
Step 1 Set the filter and column setting and activate it to ensure the setting is
correct.
Step 2 In the action toolbar, click Add to Favorites . Figure 2-4 displays.
Expense Management Cable Managment Module User Guide - Revision 1
Page 15

Getting Started 2-5
Figure 2-4
Saving Favorites
Step 3 In the Save As dialog box, type a name for this favorite filters setting. If
you wish to make it your default filters setting, check the Set as Default
check box.
Step 4 Click Save.
The new setting is saved to
your favorites list.
Using a Favorite Filter Setting
To use a favorite filter setting, do the following.
Step 1 In the action toobar, open the Select Favorite.......
drop-down list.
Step 2 Select the desired filter. The selected setting is applied.
Organizing Favorites List
Favorite lists can be organized to suit your preferences. Favorites can be
deleted, edited, or switched to another favorite. To organize favorites,
do the following:
Step 1 In the action toolbar, click Organize Favorites .
Step 2 In the Organize Favorites dialog box do one of the following:
—To delete a favorite, click in the favorite row to s
delete
.
—To edit a favorite, click in the favorite row
Edit
.
—To change the default favorite, check or uncheck the default check
bo
x. There can be only one default favorite.
Step 3 Close the Organize Favorites dialog box.
elect it, then click
to select it, and then click
Expense Management Cable Managment Module User Guide - Revision 1
Page 16

2-6 Getting Started
Expense Management Cable Managment Module User Guide - Revision 1
Page 17

3
User Defined Fields
Chapter Topics • User Defined Fields Applications
User Defined Fields Applications
User defined fields enable you to adjust the Cable Management Module
to your organization’s needs. Up to 20 potential user defined fields exist.
The field names in the database are Info1 through Info20. You cannot
add or delete user defined fields or change their names. However, in
order to use these “raw” fields, you have to make them visible and
define their properties to suit your needs; otherwise they remain
invisible and cannot be used.
3-1
Editing User Defined Fields
To make the fields visible and define their properties, perform the
following steps.
Step 1 Select Ports and Cables from the sub-module selection tabs.
Step 2 Select User Defined Fields in the available options area. Figure 3-1
displays.
Expense Management Cable Managment Module User Guide - Revision 1
Page 18

3-2 User Defined Fields
Figure 3-1
User Defined Info Fields Grid
Step 3 For each field you wish to define, complete the datafill as described in
Table 3-1, “User Defined Fields - Datafill” on page 2.
Step 4 Click Save to save changes.
User Defined Field Descriptions
Table 3-1 provides the User Defined Fields and a brief description.
Table 3-1 User Defined Fields - Datafill
Field Description
Visible
Name
Label The field’s label in the user interface.
Typ e Select the desired type from the drop-down menu.
To use an info field you must make it visible by checking this
check box. Visible fields have appropriate data entry boxes in
the Cable dialog box and may be shown in the cables’ grid.
Uncheck this check box to make the field invisible. The
system behaves as if the field doesn’t exist, but any
information already stored in the field is not discarded. When
this field is made visible again, information is available.
The name of the field in the database. You cannot change this
name.
Text
Text fields can hold up to 50
characters of free text.
Expense Management Cable Managment Module User Guide - Revision 1
Page 19

User Defined Fields 3-3
Field Description
Option List Select Option List to define a closed
set of pre-defined values for the field.
In the Cable dialog box, these values
will be available for selection from a
drop-down list.
To define the available options:
• Click Edit next to the
options list.
• In the upper text box of the List
Editor dialog box, enter a value and
press the Enter key or click New
• Repeat the previous step for each
predefined optional value.
• To delete a value, select it and then
click Delete .
• When done, click OK.
Select Checkbox to define a true/
false field.
Mandatory
Checkbox
For Info fields of type Text and Option List, check this box to
make the field mandatory and uncheck it to make the field
optional.
to transfer it to the list below.
For Info fields of type Checkbox, this field is not relevant.
Default Value Define the default value of the field.
Define a group name
Group
All fields with the same group names appear in the dialog box
together under the heading of this group name. Optional
Show in Manage Cables Display this field in the cable’s grid.
Expense Management Cable Managment Module User Guide - Revision 1
Page 20

3-4 User Defined Fields
Expense Management Cable Managment Module User Guide - Revision 1
Page 21

4
Managing Cables
This chapter explains cable identification, location, and status data,
along with additional information on specific cable management fields.
Chapter Topics • Cable Data
Cable Data
4-1
Once the Info fields are defined, you can begin entering or importing
cable data. Cable details include:
• Cable Identification Data - extension, LEN, campus, circuit, data
source, pair
• Physical Location Data - building, floor, room, closet, jack
• Status Information - jack status, pair status, DID
• Additional info - up to 20 cable management specific fields (see User
Defined Fields).
To open the cable management grid, under the sub-module selection
tab, select Ports and Cables. The cable’s grid opens, Figure 4-1.
Expense Management Cable Managment Module User Guide - Revision 1
Page 22

4-2 Managing Cables
Figure 4-1
Cable Grid
Adding a New Cable
To add a new cable, do the following.
Step 1 In the cable management grid, click Add in the action toolbar.
Figure 4-2
Figure 4-2 displays.
Cable Dialog Box
Step 2 Datafill the fields. Tab l e 4 - 1 provides a description of each field.
Step 3 When done, click Save to save the cable
OR
Expense Management Cable Managment Module User Guide - Revision 1
Page 23

Managing Cables 4-3
Click Save & New to save the cable and continue adding new
cables.
Viewing and Editing a Cable
Viewing and editing cables can be done in the Cable Management main
window. To edit a cable, do the following.
Step 1 Select a cable and then click Edit in the action toolbar.
OR
Right-click any cable’s data row and select Edit C
menu.
OR
Double-click on a cable.
able from the popup
—The Edit Cable dia
Step 2 Edit the cable fields.
Step 3 When done, do one of the following:
—Click Save
—Click Save & New
log box opens.
to save the cable.
to save the cable and continue editing cables.
Deleting a Cable
Perform the procedure below to delete a cable.
Step 1 In the cables’ main window, do one of the following
—Select a cable and then click De
OR
—Right-click any cable’s data row and select De
popup menu.
Step 2 In the Delete Confirmation dialog box, select .
lete in the action toolbar.
lete Cable from the
Expense Management Cable Managment Module User Guide - Revision 1
Page 24

4-4 Managing Cables
NOTE
Deleting all Cables
Only the administrator can use the Delete All functionality.
Step 1 In the cable’s main window, select a cable and then click in
the action toolbar.
Step 2 In the Delete Confirmation dialog box, select .
Table 4-1
Cable Fields
Field Description
The extension currently active through the cable. Select an
Extension *0
LEN *0 Identification of the Local Exchange Node.
Campus 0 The campus where this cable is installed.
Circuit 0
Closet 0 The cable’s closet.
Building 0
Floor 0 Describing the physical location of the cable socket.
Room 0
Jack 0 Identification of the cable’s jack.
Pair *0
Pair Status 0 Select from the drop-down list: Available, Used, N/A, or Other.
extension from the drop-down list of all extensions. This field is
used to integrate the Cable Management Module with Devices
and Work Orders.
Note: At least one of the field’s Extension, LEN, or Pair must be
defined.
The circuit for this cable.
Describing the physical location of the cable socket.
Describing the physical location of the cable socket.
Identification of the pair connected to the cable. Pair ID must be
unique.
DID 0
The external dialing number to the extension.
Comments M Any free text.
Expense Management Cable Managment Module User Guide - Revision 1
Page 25

5
Administration
This chapter introduces you to tasks associated with the Administration
sub-module.
Chapter Topics • Administration - Introduction
• Importing and Exporting Files
Administration - Introduction
5-1
The Administration sub-module enables you to export and import cable
files and to backup and restore from backup.
Importing and Exporting Files
You can export and import to comma delimited files (CSV files).
Importing Cables From a File
Import is done from a file on your local computer. To import cables, do
the following.
Step 1 In the sub-module selection tabs, select Administration.
Step 2 In the Option Selection area, select Import. The Import Cables dialog
box,
Figure 5-1 displays.
Expense Management Cable Managment Module User Guide - Revision 1
Page 26

5-2 Administration
Figure 5-1
Import Cables Dialog Box
Step 3 Enter the full path name or click Browse... and select the file.
The file must confirm to the cable m
anagement structure:
• The Header record and the number of fields in each record must
tch the cable record.
ma
• At least one of the field’s Extension, LEN, an
d Pair must be defined.
• The pair field must be unique.
Step 4 Click .
Step 5 A dialog box suggesting to backup the data before executing the import
displays. Click
to backup.
Step 6 Click .
Step 7 When the import is finished, the system displays one of the following
messages:
• “Import Cables finished successfully.” Click OK to
• “Import Cables finished with errors. Pleas
e see logs for details.” Click
continue.
the Log File link to see the errors found in the file. When finished, click
OK.
Exporting Cables into a File
Export is done to a file on the server.
Step 1 In the sub-module selection tabs, select Administration.
Step 2 In the Option Selection area, select Export. The Export Cables dialog
box displays, Figure 5-2.
Expense Management Cable Managment Module User Guide - Revision 1
Page 27

Administration 5-3
Figure 5-2
Figure 5-3
Export Cables Dialog Box
Step 3 Click Browse....and select the appropriate directory on the server.
Step 4 Enter a file name. The file suffix must be CSV.
Step 5 Click .
Step 6 When the export is finished, the Export Finished dialog box, Figure 5-3
displays.
Export Finished Dialog Box
Step 7 Click the link to view the exported data or click OK to continue.
Backing Up and Restoring Cables
To backup and restore cables, perform the following procedure.
Step 1 In the sub-module selection tabs, select Administration.
Step 2 In the Option Selection area, select Management. A grid showing
existing backups of cables displays.
Step 3 In the cable backup grid (Figure 5-4) you can:
Expense Management Cable Managment Module User Guide - Revision 1
Page 28

5-4 Administration
• Create a new backup by clicking Backup .
Figure 5-4
Backup Grid
• Delete an existing backup by clicking Delete or
Delete All.
• Restore cable data from a specific backup. Select a backup row and
click
Restore
.
• View a specific backup by clicking the backup name.
Expense Management Cable Managment Module User Guide - Revision 1
Page 29

6
Reports
This chapter describes report types, specific parameters and report
output options for the Cable Management Module.
Chapter Topics • Reports - Introduction
Reports - Introduction
6-1
The Cable Management Module includes six report types (described in
Table 6-1). You can view the output using the following methods:
•Viewing on screen
• Sending it to a printer
• Sending it as an e-mail attachment
— MS Word document (DOC)
— MS Excel document (XLS)
—Portable document (PDF)
Table 6-1 Available Reports
Report Name Description
Available Jacks Lists the available jacks grouped by the selected Group By field.
Available Pairs Lists the available pairs grouped by the selected Group By field.
Jacks by Status
Pairs by Status Lists all pairs with the selected status.
List of Extensions
Duplicate Entities Lists duplicate entities of the checked entity types.
in one of the following formats:
Lists all jacks with the selected status.
Lists all extensions with the requested data.
Generating a Report
To generate a report, do the following.
Step 1 In the sub-module selection tabs, select Reports.
Step 2 In the Option Selection area, select the desired report. (See Table 6-1).
Expense Management Cable Managment Module User Guide - Revision 1
Page 30

6-2 Reports
The relevant Report dialog box displays. Each report has a
slightly different dialog box. Figure 6-1 is an example of the
Duplicate Entities dialog box.
Figure 6-1
Duplicate Entities Dialog Box
Step 3 Supply the report specific parameters as described in Table 6-2.
Step 4 Select Send Output to options and supply the required additional
parameters as described in Table 6-3.
Step 5 Click .
Table 6-2 Report Specific Parameters
Report Name Parameter Name Description
Available Jacks Group By
Expense Management Cable Managment Module User Guide - Revision 1
Select how to group the list of jacks
from:
• Campus
• Circuit
• Building
• Floor
• Room
Page 31

Reports 6-3
Report Name Parameter Name Description
Select how to group the list of pairs from:
• Campus
Available Pairs Group By
Jacks by Status Filter By
Pairs by Status Filter By
List of Extensions Group By
Duplicate Entities Duplicate Entities
• Circuit
• Building
• Room
Select how to filter the list of jacks from:
• All - no selection
• Available
•Used
•Broken
•N/A
• Other
Select how to filter the list of pairs from:
• All - no selection
• Available
•Used
•Broken
•N/A
• Other
Select how to group the list of
extensions from:
• Campus
• Circuit
• Building
• Floor
• Room
Select which type of duplicate entities to
include in the report:
• Extension
•LEN
•Jack
• Circuit - Pair
Table 6-3 Send Output To - Options
Send Output to Parameter Name Description
Screen Sends the generated report to your screen.
E-mail
E-Mail Address Supply the e-mail address to send the report to.
Expense Management Cable Managment Module User Guide - Revision 1
Sends the generated report as an e-mail
attachment to the supplied address.
Page 32

6-4 Reports
Send Output to Parameter Name Description
Select one of the following formats:
• MS Word document (DOC)
Output Format
Printer
Select Printer Select a printer form the drop-down list.
• MS Excel worksheet (XLS)
• Portable document (PDF)
Sends the generated report to the specified
printer.
Expense Management Cable Managment Module User Guide - Revision 1
Page 33

7
Integration with other Modules of
Application Suite
The Cable Management Module supports integration with other modules
of the Application Suite.
Chapter Topics • Integration - Introduction
• Integration with Devices
• Integration with Tickets
7-1
Integration - Introduction
Once the Cable Management is installed, it is integrated with the
Application Suite database in two places.
• In the device dialog box of the Org Utilities module
• In the new ticket dialog box of the Help Desk module
The integration is based on matching the extension field.
Integration with Devices
In the Device dialog box, if the device matches an extension number in
the Cable Management Module, then:
•A Cable Information link on the device dialog box enables you to
access the cable dialog box directly from the device.
• The information displayed in the fields Building, Room, and Floor
are taken from the cable management.
example.
Figure 7-1 provides an
Expense Management Cable Managment Module User Guide - Revision 1
Page 34

7-2 Integration with other Modules of Application Suite
Figure 7-1
Device Integration
Integration with Tickets
In the Ticket dialog box of the Help Desk module, if the field
Extension/Resource matches an extension in the Cable Management
Module, then:
• A cable information link on the Ticket dialog box enables you to access
the Cable d
• The information displayed in the fields Building, Ro
and Jack are taken from the cable management. Figure 7-2 provides
an example.
ialog box directly from the Ticket.
om, Floor, Pair,
Expense Management Cable Managment Module User Guide - Revision 1
Page 35

7-3 Integration with other Modules of Application Suite
Figure 7-2
Ticket Integration
Expense Management Cable Managment Module User Guide - Revision 1
Page 36

7-4 Integration with other Modules of Application Suite
Expense Management Cable Managment Module User Guide - Revision 1
Page 37

For additional information or support on this NEC Corporation
product, contact your NEC Corporation representative.
Page 38

Expense Management Cable Managment Module User Guide
NEC
NEC Corporation
NDA-31153, Revision 1
 Loading...