

Page 1

ATTENDANT MONITOR
Operations Manual
NEC America, Inc.
NDA-30135
Revision 1
October, 2000
Stock Number 241662
Page 2

LIABILITY DISCLAIMER
NEC America, Inc. reserves the right to change the specifications,
functions, or features, at any time, without notice.
NEC America, Inc. has prepared this document for the exclusive use
of its employees and customers. The information contained herein is
the property of NEC America, Inc. and shall not be reproduced
without prior written approval from NEC America, Inc.
NEAX and D
term
are registered trademarks of NEC Corporation.
© 2000 NEC America, Inc.
Printed in the USA
All other brand or product names are or may be trademarks or
registered trademarks of, and are used to identify products or
services of, their respective owners.
Page 3

Attendant Monitor Operations Manual CONTENTS
TABLE OF CONTENTS
Page
Chapter 1 - INTRODUCTION . . . . . . . . . . . . . . . . . . . . . . . . . . . . . . . . . . . . . . . . . . . . . . . 1
How To Use This Manual . . . . . . . . . . . . . . . . . . . . . . . . . . . . . . . . . . . . . . . . . . . . . . . . . . . . . . . . 1
Manual Organization . . . . . . . . . . . . . . . . . . . . . . . . . . . . . . . . . . . . . . . . . . . . . . . . . . . . . . . . . . 1
Chapter 1 - Introduction . . . . . . . . . . . . . . . . . . . . . . . . . . . . . . . . . . . . . . . . . . . . . . . . . . . . . . 1
Chapter 2 - Installation and Configuration. . . . . . . . . . . . . . . . . . . . . . . . . . . . . . . . . . . . . . . . . 1
Chapter 3 - Administrator Tasks. . . . . . . . . . . . . . . . . . . . . . . . . . . . . . . . . . . . . . . . . . . . . . . . 1
Chapter 4 - Attendant Tasks. . . . . . . . . . . . . . . . . . . . . . . . . . . . . . . . . . . . . . . . . . . . . . . . . . . 1
What is Attendant Monitor?. . . . . . . . . . . . . . . . . . . . . . . . . . . . . . . . . . . . . . . . . . . . . . . . . . . . . . . 2
Overview . . . . . . . . . . . . . . . . . . . . . . . . . . . . . . . . . . . . . . . . . . . . . . . . . . . . . . . . . . . . . . . . . . . 2
Chapter 2 - INSTALLATION & CONFIGURATION . . . . . . . . . . . . . . . . . . . . . . . . . . . . . . 3
Installation Procedure. . . . . . . . . . . . . . . . . . . . . . . . . . . . . . . . . . . . . . . . . . . . . . . . . . . . . . . . . . . 3
Application Configuration . . . . . . . . . . . . . . . . . . . . . . . . . . . . . . . . . . . . . . . . . . . . . . . . . . . . . . . . 8
AttendantMonitor Component . . . . . . . . . . . . . . . . . . . . . . . . . . . . . . . . . . . . . . . . . . . . . . . . . . . 8
Primary Configuration Parameters. . . . . . . . . . . . . . . . . . . . . . . . . . . . . . . . . . . . . . . . . . . . . . . . 9
OAI Facilities . . . . . . . . . . . . . . . . . . . . . . . . . . . . . . . . . . . . . . . . . . . . . . . . . . . . . . . . . . . . . . . . 9
OAI-Conf Settings . . . . . . . . . . . . . . . . . . . . . . . . . . . . . . . . . . . . . . . . . . . . . . . . . . . . . . . . . . . 10
User-Defined Parameters . . . . . . . . . . . . . . . . . . . . . . . . . . . . . . . . . . . . . . . . . . . . . . . . . . . . . 10
Database Support. . . . . . . . . . . . . . . . . . . . . . . . . . . . . . . . . . . . . . . . . . . . . . . . . . . . . . . . . . . . . 11
Attendant Monitor Database . . . . . . . . . . . . . . . . . . . . . . . . . . . . . . . . . . . . . . . . . . . . . . . . . . . 11
Master Database File - filename ’attmon’ .. . . . . . . . . . . . . . . . . . . . . . . . . . . . . . . . . . . . . . . . 11
Application Database File - filename ’Attmon’. . . . . . . . . . . . . . . . . . . . . . . . . . . . . . . . . . . . . 11
Configuring the Attendant Monitor Database . . . . . . . . . . . . . . . . . . . . . . . . . . . . . . . . . . . . . 12
AMNO: PBX assignment of Monitored Number . . . . . . . . . . . . . . . . . . . . . . . . . . . . . . . . . . . 12
Tenant Number Database . . . . . . . . . . . . . . . . . . . . . . . . . . . . . . . . . . . . . . . . . . . . . . . . . . . . . 13
Master Database File - filename ’tenant_m’.. . . . . . . . . . . . . . . . . . . . . . . . . . . . . . . . . . . . . . 13
Application Database File - filename ’tenants’.. . . . . . . . . . . . . . . . . . . . . . . . . . . . . . . . . . . . 13
Configuring the Tenant Number Database . . . . . . . . . . . . . . . . . . . . . . . . . . . . . . . . . . . . . . . 14
Initialize Component . . . . . . . . . . . . . . . . . . . . . . . . . . . . . . . . . . . . . . . . . . . . . . . . . . . . . . . . . 14
Chapter 3 - ADMINISTRATOR TASKS . . . . . . . . . . . . . . . . . . . . . . . . . . . . . . . . . . . . . . 15
Attendant Monitor Database Records. . . . . . . . . . . . . . . . . . . . . . . . . . . . . . . . . . . . . . . . . . . . . . 15
AMNO: PBX assignment of Monitored Number . . . . . . . . . . . . . . . . . . . . . . . . . . . . . . . . . . . 15
Tenant Number Database Records . . . . . . . . . . . . . . . . . . . . . . . . . . . . . . . . . . . . . . . . . . . . . . . 16
Chapter 4 - ATTENDANT TASKS . . . . . . . . . . . . . . . . . . . . . . . . . . . . . . . . . . . . . . . . . . 17
Login and Logout . . . . . . . . . . . . . . . . . . . . . . . . . . . . . . . . . . . . . . . . . . . . . . . . . . . . . . . . . . . . . 17
NDA-30135 Revision 1 Page i
Page 4

CONTENTS Attendant Monitor Operations Manual
This Page Left Blank.
Page ii NDA-30135 Revision 1
Page 5

Attendant Monitor Operations Manual INTRODUCTION
Chapter 1 INTRODUCTION
This manual provides the information needed to configure and operate the
Attendant Monitor software application.
How To Use This Manual
This manual describes the various screens, windows and functions for the
installation, configuration and operation of Attendant Monitor. Examples of
displayed scree ns and step-by-s tep procedures a re shown in the following chap ters.
The procedural steps to per form a given tas k are give n in seque nce and ma rked as
shown below:
Step 1: From the Main Menu, select...
Manual Organization
Chapter 1 - Introduction
This chapter details how to use this manual, t he actual manual org anization, and an
overview of the Attendant Monitor application.
Chapter 2 - Installation and Configuration
Chapter 2 describe s how to install an d configure the applic ation, along wit h the key
usage conventions, main menu screen, and an overview of the main menu
functions.
Chapter 3 - Administrator Tasks
This chapter describes the various functions and tasks available to maintain the
Attendant Monitor databases.
Chapter 4 - Attendant Tasks
Chapter 4 describes the basic attendant functions and tasks.
NDA-30135 Revision 1 Page 1
Page 6
INTRODUCTION Attendant Monitor Operations Manual
What is Attendant Monitor?
Overview Attendant Monitor is an ap pli cation that will accumulate attendant statistics when
attendant consoles ar e used in a stand alone environmen t. Attendant Monitor serves
as the event collector for the Attendant Console Statistics application, detecting
events generated by the attendants and the PBX, and sending messages to the
Attendant Console Stati st ic s Log ger component. The Logger parses the messages
and saves the statistic data in an In formix Data base. The da ta is then used to
generate attendant statistic reports.
Note: Attendant Monitor is not required if Attendant Console Statistics is used with the
Hospitality Center System (HCS) or the Medical Center System (MCS), since
these applications serve as event collectors.
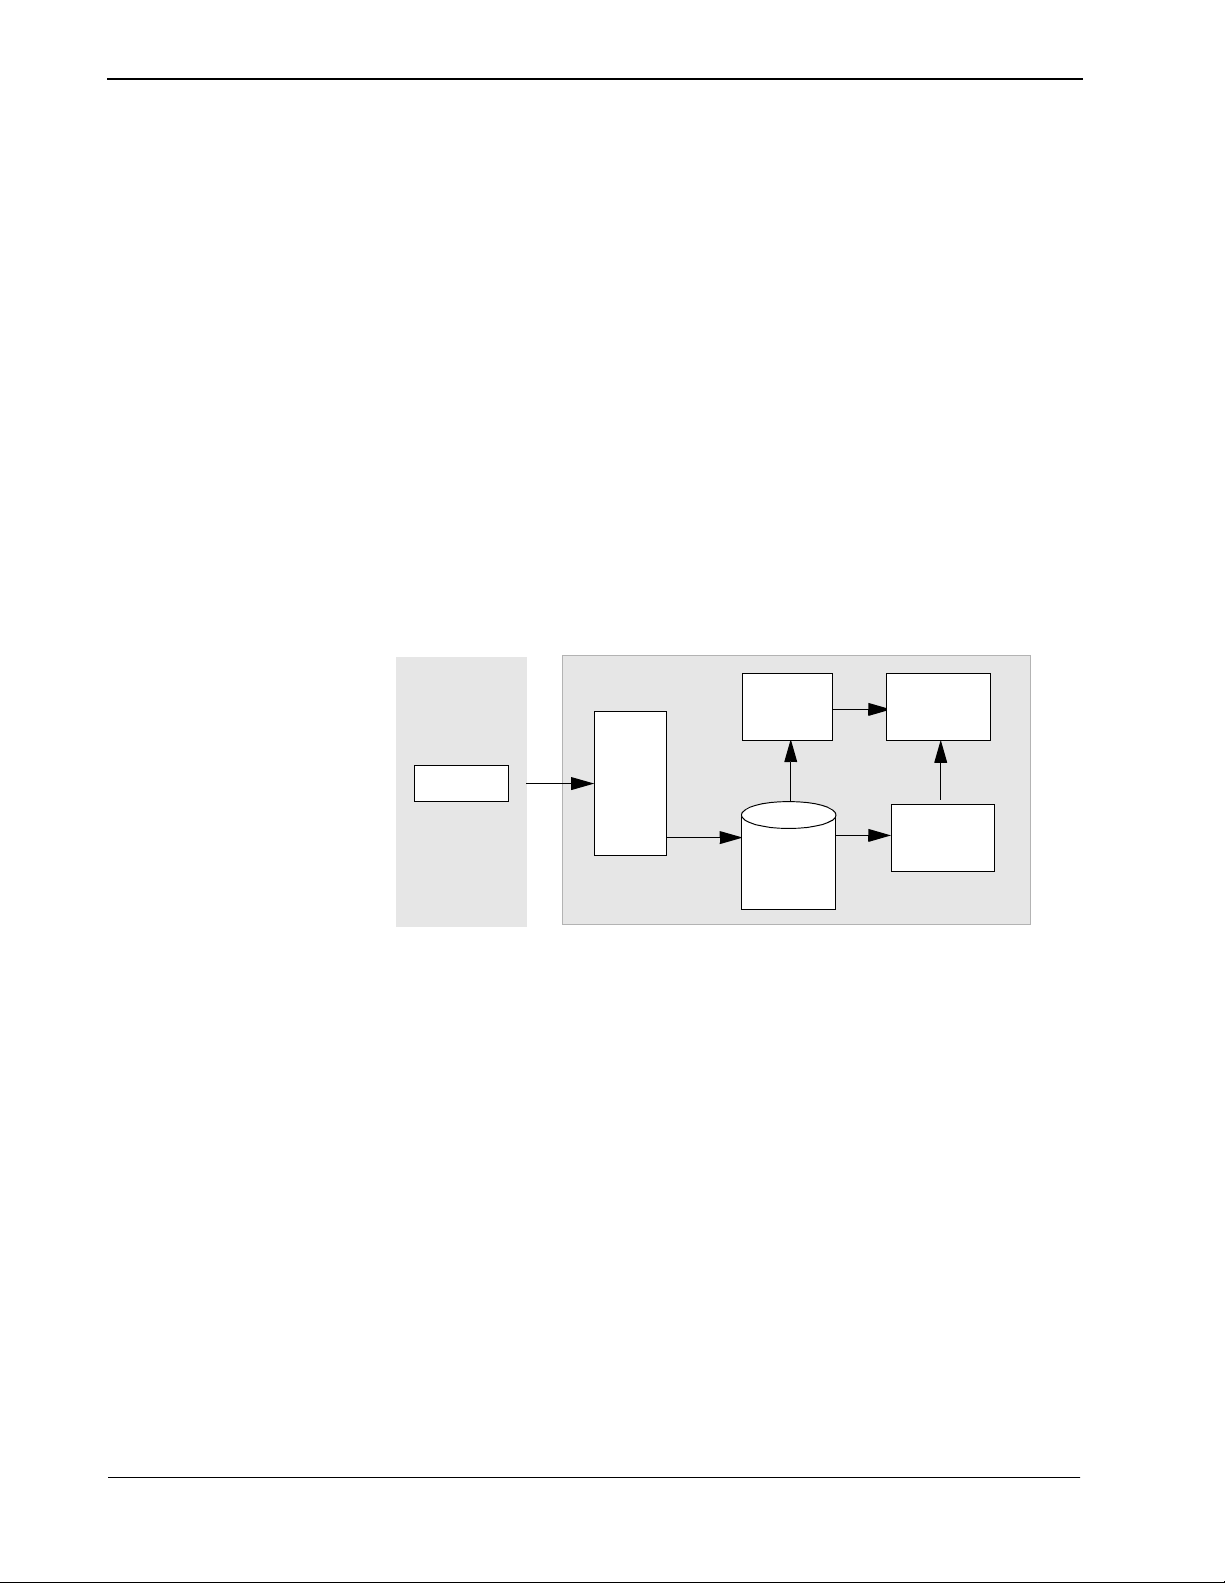
The following diagram illustrates how Att end ant Mo nit or interfaces with the
Attendant Console Statistics application.
Event Collector
Atte n d a n t
Monitor
Logger
Console Statistics Components
Au to mated
Report
Generator
Infor mix
Database
Administrator
Reports
Page 2 NDA-30135 Revision 1
Page 7

Attendant Monitor Operations Manual INSTALLATION & CONFIGURATION
Chapter 2 INSTALLATION & CONFIGURATION
This chapter provides a step-by-step description of the installation, initial
configuration, and Main Menu functions for Atten dant Monitor. Before proceedi ng
with the configuration, ensure that the SCO UNIX operating system and the
Applicati ons Manager (APM) plat form software are installed on the system.
The Applications Manager Operations Manual provides detailed instructions for
using the APM menus and for compl eting the data entry scree ns illustrated in this
manual. NEAX2400 IMS system manuals provide the procedures for making the
data assignments at the NEAX MAT.
Installation Procedure
This section describes the procedures to install the Attendant Monitor application
software. Follow the procedure below to install the software.
login: apmadm
password:
Note: Some keyboar ds use a marked Return key for the carriage return function. Other
keyboards mark this function key as Enter. The installation procedure will iden-
tify this function as Return (Enter). When the procedur e indica tes, use the ap pr opriate marked key on your particular keyboard.
To begin the Attendant Monitor
software installation, type apmadm at
the UNIX login prompt and press
Enter.
(If your “apmadm” account requires a
password, enter the “apmadm”
password at the subsequent password
prompt.)
Continue with the installation on the following pages...
NDA-30135 Revision 1 Page 3
Page 8

INSTALLATION & CONFIGURATION Attendant Monitor Operations Manual
NEC America APM Administration Wed - Oct 31, 1996
APM Platform Release Rel2.3 (May 22, 1996)
Main Menu
APM
Debug Facilities
Halt APM System
File Archive
Installation of Applications/Packages
PBX Simulator
Removal of Packages
Start-up APM System
Logout
UNIX
Enter Option: [i]
APM Status: ACTIVE
NEC America APM Administration Wed - Oct 31, 1996
Installation of Applications/Packages
Available Packages are:
applications asl mtl tcpip uapname uucp x25
APM Administration Main Menu.
Type ’i’ in the “Enter Option: [ ]” field
to select “Installation of Applications/
Packages” and press Enter.
Note: The APM Platform release and date
may vary from this example.
Attendant Monitor is an application.
When prompted for the package to be
installed, type ’applications’ and press
Enter.
Enter Package to be installed: applications
NEC America APM Administration Wed - Oct 31, 1996
Installation of Applications/Packages
Available Packages are:
applications asl mtl tcpip uapname uucp x25
Enter Package to be installed: applications
Release Media Devices are:
(F)loppy Disk Device (C)artridge Tape Device
Enter Release Media Device: F
You are asked to select the installation
media. Type ’F’ for “Floppy Disk
Device” and press Enter.
Note: The standard Floppy Disk Device
will be a 3.5 inch type.
Page 4 NDA-30135 Revision 1
Page 9

Attendant Monitor Operations Manual INSTALLATION & CONFIGURATION
Install Procedure
Installing from /dev/fd0
Insert OAI Application/Update Release Media #1
Enter <Return> to continue:
Install Procedure
Installing from /dev/fd0
Insert OAI Application/Update Release Media #1
Enter <Return> to continue:
Copying ........
tar: blocksize = 20
x oai/app/attMonitor/install/etc/updstats.Z, 112163 bytes, 220 tape blocks
x oai/app/attMonitor/install/etc/swpcall.Z, 115463 bytes, 226 tape blocks
x oai/app/attMonitor/install/etc/swpattl.Z, 114652 bytes, 224 tape blocks
x oai/app/attMonitor/install/bluebars1.Z, 562 bytes, 2 tape blocks
x oai/app/attMonitor/install/bluebars2.Z, 343 bytes, 1 tape blocks
.
x oai/app/attMonitor/install/stats_ins.Z, 5263 bytes, 11 tape blocks
.
x oai/app/attMonitor/install/createAccounts.Z, 947 bytes, 2 tape blocks
x oai/app/consoleStats.ins, 2050 bytes, 5 tape blocks
x oai/chksum_app, 5259 bytes, 11 tape blocks
Has all release media been loaded [y or n] ? y
Next, you are requested to insert the
Attendant Monitor installation diskette
in the Flop py Disk Device.
Insert the diskette and press Enter to
continue.
Note: The Attendant Monitor
installation diskette will be a 3.5 inch type.
The screen displays t he fi les as the y are
loaded from the media. Some f iles may
scroll off the screen, until all the files
from the diskette have been processed.
You are asked if all of the application
release media (diskettes) have been
processed. Type ’n’ for any additional
diskettes fo r Attendant Monitor. When
all diskettes have been loaded, type ’y’
(yes) and press Enter.
Note: The number of bytes, tape blocks,
and/or files may vary from this example.
APM installation beg ins, processi ng all
OAI Platform is at revision 6 for machine i386 (May 22 1996 Rel3.1.4)
attMonitor Revision: 6machine type: i386 Version: Ver3.0.0
Processing, please wait...
Validating installed files
..............
Validation Completed
Looking for installation scripts
Installing the Release Files
Processing files
NDA-30135 Revision 1 Page 5
of the Attendant Monitor installation
files and chec king them for correctness.
The screen indicates the status of this
installation.
Note: Some revisions and dates may vary
from this example.
Page 10

INSTALLATION & CONFIGURATION Attendant Monitor Operations Manual
NEC America Attendant Monitor Wed - Oct 31,1996
NEC America Attendant Monitor Wed - Oct 31,1996
Creating installation directories
Creating backup directories
Installation Options
[I]nstall
[U]pgrade
[C]ancel Installation
Enter Option
Select the installation option for
Attendant Monitor. For a new
installation, type ’I’ and press Enter.
The installation of files will now begin.
If performing an upgrade, type U and
press Enter. If you wish to Cancel the
installation at this tim e, type ’C’ and
press Enter.
Screen messages show the installation
and backup directories being installed.
NEC America Attendant Monitor Wed - Oct 31,1996
Status messages sh ow the insta llation of
various files.
Installing APM database files...
Installing config files...
Installing executable files...
Updating APM Configuration files...
Page 6 NDA-30135 Revision 1
Page 11

Attendant Monitor Operations Manual INSTALLATION & CONFIGURATION
NEC America Attendant Monitor Wed - Oct 31,1996
Configuring StatLogger
autocfg running...
autocfg: AttenantMonitor application configured.
autocfg terminated normally.
Press Return to continue installation
NEC America Attendant Monitor Wed - Oct 31,1996
Setting up info files...
Old files saved in /tmp/attMonitor0, the system deletes these after 7 days.
Apm should now be Terminated and then Re-Initialized and the appropriate
Attendant Monitor APM Database files should be modified.
Installation Complete.
Press Return
Status messages show the installation
and configuration of the first Attendant
Monitor main component.
At the prompt, press Enter to continue
the install ation.
Status messages show the progress of
the Attendant Monitor installation.
When all files have been set-up by the
installer, the Attendant Monitor
installation is complete.
Press Enter to exit this screen and
return to the APM Main Menu.
Proceed to the next page to configure the APM and various components...
NDA-30135 Revision 1 Page 7
Page 12

INSTALLATION & CONFIGURATION Attendant Monitor Operations Manual
Application Configuration
Since Attendant Monitor is internally supported by the APM, its compone nt must
be configured in the APM enviro nment. This sec tion provides the i nformation tha t
must be entered into the AP M configuration file.
Attendant Monitor is set-up in the APM sy stem using the Add function of the
Application Configuration option on the APM System Administration menu.
A Note on Se lecting Commands
In the following procedure s, a step may c all for pressi ng the Tab key to se lect
a command. It may be necessary to press the Tab key multiple times in order
to select the specific command. When reading a step, understand to press the
Tab key (as needed) to select the specified command.
APM System
Configuration
AttendantMonitor Component
Follow the steps to configure the APM system for Attendant Monitor.
- Enter the APM option from the APM Platform Management menu.
- Enter the System Administrator password at the APM password screen.
- Select the Application Configuration option from the System
Administration menu.
Attendant Monitor has one component that must be configured through the APM.
AttendantMonitor – Detects events generated by attendants and the PBX, then
sends messages to the Attendant Console Statistics Logger
component.
Define the AttendantMonitor component Characteristics in the APM
environment exactly as shown in the table:
Characteristic Value Description
OAI Application Y Whether (Yes or No) the component
communicates with the NEAX2400 using OAI
processes.
CRT Application N Whether (Yes or No) the component runs on
the same screen as the APM, rendering the
APM temporarily inaccessible.
Communication Queue N Communication Queue whether (Yes or No)
the component needs an IPC queue to
communicate with other processes.
Page 8 NDA-30135 Revision 1
Page 13

Attendant Monitor Operations Manual INSTALLATION & CONFIGURATION
Primary Configuration Parameters
From the APM Configuration Entry screen, configure the AttendantMonitor
component as follows. All pa ramete rs marked wit h asterisks ( *) should be entered
exactly as shown. The rest of the entries in the table below are just examples.
Parameter Entry Value Description
Application Name AttendantMonitor The name to be displayed in the APM menus.
This name is displayed as it is entered
here — i.e., capital letters, lowercase, etc.
Executable Filename* /oai/app/attMonitor/
bin/attMonitor
Group* The group that the component belongs to.
Response Mode* I(gnore) The action that the APM is to take with the
Initialization Batch N(o) Whether (Yes or No) the component is to be
Termination Mode* M(essage) How the APM is to notify the component to
Standard Output /dev/null Where any output is sent.
The path name of the executable file.
Make no entry.
component should a member of the group
terminate.
initialized automatically when the OAI system
is initialized.
terminate.
Number of Restarts 0 How many times the APM may restart the
component after it terminates in error.
OAI Facilities Following the instructions in the APM Operations Manual, name the following
NEAX2400 facilities for the AttendantMonitor component using the Facilities
command on the APM Configuration Entry screen:
- SCF Switch Control
- SMFR Status Request (R)
- SMFN Status Notification (N)
Continue to the next page for OAI-Conf settings...
NDA-30135 Revision 1 Page 9
Page 14

INSTALLATION & CONFIGURATION Attendant Monitor Operations Manual
OAI-Conf Settings Use the OAI-Conf command on the APM Configuratio n Entr y screen to make the
necessary paramete r entri es. For paramete rs shown wit h an asteris k (*) in the t able
below, make entries exactly as shown. The other parameters are shown with
sample entries that may be cha nged to meet site re quirements. Use the instruct ions
provided for this option in the APM Operations Manual:
Parameter Entry Value Description
Database Name #1* /oai/db/ cur/te nants The path name of the tenant number
database.
Database Name #2* /oai/db/ cur/Attmon The path name of the Attendant Monitor
database.
Timeout Value #1 0 Unused
Timeout Value #2 0 Unused
Tenant Number 1 Default Tenant Number
Source Link Name OAI1TCP Port on the source side of the
communication link. Entry sh ould match a
link name in the APM system
configuration file.
User-Defined Parameters
Destination Link Name PBX1TCP Port on the destination side of the
communication link. Entry sh ould match a
link name in the APM system
configuration file.
Association Recovery 30 Number of seconds Attendant Monitor
waits before trying to reestablish an
association with the NEAX that has been
released.
No user defined parameters are used in Attenda nt Mon it or. Therefore, all user
defined parameters are blank.
Continue to the next page for Database Support...
Page 10 NDA-30135 Revision 1
Page 15

Attendant Monitor Operations Manual INSTALLATION & CONFIGURATION
Database Support
Attendant Monitor requires two APM databases: the Attendant Monitor database
and the Tenant Numbe r Data base. These d atabas es ar e cre ated wit h defa ult values
during initial software installation, but specific records must be added before
Attendant Monitor is enabled.
Attendant Monitor Database
The Attendant Monitor database (attmon) con sists of a Master Datab ase file
component and an Application Database file component.
Master Database File - filename ’attmon’.
The attmon master database structure and example entries are shown in the table
below.
Field Name
Monitored Number A 6 5000
Attendant Name A 8 Smith
TTY A 25 5000
Supervisor Flag A 1 n n
Type Size Min.
Value
Field Definitions
- The Monitor Number field specifies the monitor number the attendant will
dial to log on and log off the system.
- The Attendant Name field specifies the attendant name that will be used in
attendant reports.
- The TTY field spe cifies t he unique TTY devi ce used by the att endant. Since
stand alone attendants do not use an actual TTY device, the monitored
number value ma y be entered ag ain in this f ield to ensur e that the TTY v alue
is unique.
- The Supervisor Flag fields speci f ies if the atten dant is a supe rviso r. It may
be set to ‘Y’ or ‘y’ to indicate the attendant is a supervisor, or to ‘N’ or ‘n’
to indicate the attendant is not a supervisor.
Max.
Value
Example
Entry
Application Database File - filename ’Attmon’.
The Attmon application database structure is shown in the table below:
Field Description Data Type
Monitored Number
Attendant Name
TTY
Supervisor Flag
NDA-30135 Revision 1 Page 11
ASCII
ASCII
ASCII
ASCII
Page 16

INSTALLATION & CONFIGURATION Attendant Monitor Operations Manual
Attendant Monitor
Database (cont)
Configuring the Attendant Monitor Database
The database is initi ally b lank. It must be configu red be fore t he Atten dant Monitor
application can operate. The database values are set using the APM Applications
Manager Main Menu-- Selecting the Application Configuration option. The
general sequence is the following:
1. Build a Master Database File
Enter data into the master database fields to add the necessary Monitored
Number, Attendant Name, T TY, and Supervisor Flag values for Attendant
Monitor.
2. Process the Application Database
Use the Process Application Databases option on the APM Database
Administration menu to create the application database file.
(When the Process o ption is act iv ated, data is drawn from th e master databas e
and converted to the formats specified in the application definition file.)
3. Install the Application Database
Use the Install Application Databases option on the APM Database
Administration menu to enable Attendant Monitor to copy its database.
Note: Refer to the APM Operations Manual for more detailed instructions on adding a
database.
AMNO: PBX assignment of Monitored Number
Each monitored number that is specified in the Attendant Monitor database must
be created on the PBX using the AMNO command.
Note: Refer to the NEAX2400 IMS system manuals for detailed pr o cedur es for making
the data assignments at the NEAX MAT.
Continue to the Tenant Number database on the next page...
Page 12 NDA-30135 Revision 1
Page 17

Attendant Monitor Operations Manual INSTALLATION & CONFIGURATION
Tenant Number Database
The Tenant Database is an APM database used by the Attendant Monitor
application and other OAI applicati ons. It provi des a mechani sm for retri eving the
tenant number of an extension.
The Tenant Number databas e consists o f a Master Dat abase file component and a n
Application Database file compon ent:
Master Database File - filename ’tenant_m’.
The tenant_m master database structure and example e ntries are shown in the t able
below:
Field Name
Type Size Min.
Value
First Extension ASCII 10
Last Extension ASCII 10
Tenant Number Numeric 3 1 255
Field Definitions
- The Tenant Number field contains the Tenant Number that is used by one
or more extensions. Tenant Numbers are associated with extensions using
the following me thods:
Max.
Value
Example
Entry
0
99999
1
- A Tenant Number may be associat ed with a set of extens ions def ined b y the
First and Last Extension fields. The First Extension field contains the
smallest extension number in the set, and the Last Extension field contains
the largest extension number in the set.
- A Tenant Number may be associated with a single extension by setting the
First and Last Extension fields to the same extension value.
- A Tena nt Nu mber may be as socia ted wit h a si ngle e xt ension that contai ns a
non-numeric charact er suc h as ’*’ or ’#’. The Fir st Exte nsion field contains
the extension value, and the Last Extension field is left blank.
Application Database File - filename ’tenants’.
The tenants application database structure is shown in the table below:
Field Description Data Type
First Extension ASCII
Last Extension ASCII
Tenant Number Short Integer
NDA-30135 Revision 1 Page 13
Page 18

INSTALLATION & CONFIGURATION Attendant Monitor Operations Manual
Tenant Number
Database (cont)
Configuring the Tenant Number Database
This database must be configured before the Attendant Monitor application can
operate. The database values are set using the APM Applications Manager Main
Menu-- Selecting the Appli cation Conf iguration option. The gene ral sequenc e is
the followin g:
1. Build a Master Database File
Enter data into the master database fields to add the necessary phone line
numbers.
2. Process the Application Database
Use the Process Application Databases option on the APM Database
Administration menu to create the application database file.
(When the Process o ption is act iv ated, data is drawn from th e master databas e
and converted to the formats specified in the application definition file.)
3. Install the Application Database
Use the Install Application Databases option on the APM Database
Administration menu to enable Attendant Monitor to copy its database.
Note: Refer to the APM Operations Manual for more detailed instructions on adding a
database.
Initialize Component
The Attendant Monitor component must be initialized from the APM. Follow the
steps below to initialize the AttendantMonitor component:
- On the APM System Operations Menu, select the Non-CRT Application
Control option.
- Use the Initialize command to start up the “AttendantMonitor” component.
This completes the Atendant Monitor a pplication in stallation and
configuration...
Page 14 NDA-30135 Revision 1
Page 19

Attendant Monitor Operations Manual ADMINISTRATOR TASKS
Chapter 3 ADMINISTRATOR TASKS
A change of attendan t personne l or change s to monito red numbers wi ll requi re the
databases used by Attendant Monitor to be modified. Specific database records
must be modified to reflect these changes. The following must be changed:
• Attendant Monitor Database to reflect changes to attendant names, num-
bers, or other values.
• AMNO command to make changes on the PBX.
• Tenant Number Database for any changes to numbers.
Perform the following procedures to make changes to the Attendant Monitor
databases:
Note: Refer to the procedural instructions in the APM Operations Manual. If you en-
counter messages during this process, refer to the “Process” an d “Error Messages” chapters of t he APM Operations Manual.
Attendant Monitor Database Records
Perform the following steps to add, modify, o r delete records:
1. Build a Master Database File
Enter data into the master database fields to chan ge the Monitored Number,
Attendant Name, TTY, or Supervisor Flag values.
2. Process the Application Database
Use the Process Application Databases option on the APM Database
Administration menu to create the application database file.
(When the Process option is acti vate d, data is dra wn from the mas ter database
and converted to the formats specified in the application definition file.)
3. Install the Application Database
Use the Install Application Databases option on the APM Database
Administration menu to enable Attendant Monitor to copy its database.
AMNO: PBX assignment of Monitored Number
Any monitored number that is added, chan ged, or del eted in t he Attendant Monitor
database must be so modified on the PBX using the AMNO command.
Note: Refer to the NEAX2400 IMS system manuals for detailed pr ocedu r es for ma king
the data assignments at the NEAX MAT.
NDA-30135 Revision 1 Page 15
Page 20

ADMINISTRATOR TASKS Attendant Monitor Operations Manual
Tenant Number Database Records
Any changes to monitored numbers will also require a change to the Tenants
database. Perform the following steps to add, modify, or delete records:
1. Build a Master Database File
Enter data into the master database fields to change the necessary extension
numbers.
2. Process and Tenant the Application Database
Use the Process Application Databases option on the APM Database
Administration menu to create the application database file.
(When the Process o ption is act iv ated, data is drawn from th e master databas e
and converted to the formats specified in the application definition file.)
3. Install the Application Database
Use the Install Application Databases option on the APM Database
Administration menu to enable Attendant Monitor to copy its database.
Page 16 NDA-30135 Revision 1
Page 21

Attendant Monitor Operations Manual ATTENDANT TASKS
Chapter 4 ATTENDANT TASKS
The only attendant task s associated with Attendant Moni tor is th e login and logou t
of an attendant. Follow the steps below:
Login and Logout
Step 1: At an attendant console, press one of the loop keys to seize a loop.
Step 2: Dial your monitored number assigned by the Administrator.
- If not logged in, you will now be logged in at the console.
- If logged in at another console, you will be logged out at the other console and logged in at this console
After the login or logout, the loop is automatically released.
NDA-30135 Revision 1 Page 17
Page 22

ATTENDANT TASKS Attendant Monitor Operations Manual
This Page Left Blank.
Page 18 NDA-30135 Revision 1
 Loading...