

Page 1

N3306 User manual
I
NEC
User Manual for
N3306
Mobile Phone
September, 2006
Page 2

N3306 User manual
II
Summary
Welcome to select N3306 mobile phone. This instruction manual explains the excellent performance
of N3306 mobile phone for details. Besides basic function of talking, N3306 mobile phone and system
network also provide you with practical multi-functions and service to facilitate your work and leisure
activity.
We provide you with the multiple special fitting parts including charging battery and charger for your
selection. Please refer to section 14 of this instruction manual for the detailed description on these fitting
parts. If using fitting parts without permission from the providers, it is possible to result in danger; the
resulted damage is beyond warranty.
Our company reserves the right to modify the technical specification in this instruction manual
without pre-notification.
Explanation for reading the manual
Different styles are used to describe different operation details in this manual as follows:
Operation Content description Example
Display
content
Represented with normal character 0-9
General key Except the function keys, all others are
represented by normal character with frame
0-9
Function key Function keys are represented with
overstriking and frame
OK
Menu item Represented by italics with boldface
Hold the call
Note: The pictures used in the manual are the function illustration pictures only, and maybe they are
different from display in your mobile phone. Please take yours as the standard.
Page 3

N3306 User manual
第 1 页
目 录
SUMMARY .............................................................................................................................................................. II
SECURITY AND PERFORMANCE.......................................................................................................................6
1 START TO USE...........................................................................................................................................11
1.1 B
ATTERY....................................................................................................................................... 11
1.1.1 The disassembly and installation of battery.......................................................................................11
1.1.2 Battery charging.................................................................................................................................11
1.1.3 Use of battery .....................................................................................................................................11
1.1.4 Indication of battery capacity.............................................................................................................12
1.2 C
ONNECTION OF NETWORK........................................................................................................... 12
1.2.1 SIM card.............................................................................................................................................12
1.2.2 Insertion of SIM card..........................................................................................................................12
1.2.3 Unlocking of SIM card.......................................................................................................................12
1.2.4 Connection to network........................................................................................................................13
1.3 I
NSERTION OF MEMORY CARD....................................................................................................... 13
1.4 I
DLE SCREEN AND CONTENT..........................................................................................................14
1.5 K
EYS............................................................................................................................................. 16
1.6 I
NPUT MESSAGE ............................................................................................................................ 17
1.6.1 Input method of handwriting..............................................................................................................17
2 DIAL AND ANSWER THE PHONE.........................................................................................................20
2.1 T
URN ON/OFF PHONE..................................................................................................................... 20
2.2 M
AKE A PHONE CALL.................................................................................................................... 20
2.2.1 Direct dial...........................................................................................................................................20
2.2.2 Make a phone call from phonebook....................................................................................................21
2.2.3 Quick dial...........................................................................................................................................21
2.2.4 SIM card dial......................................................................................................................................21
2.2.5 Unsuccessful calls ..............................................................................................................................21
2.3 A
NSWER THE CALL........................................................................................................................ 22
2.4 D
URING THE TALKING................................................................................................................... 22
2.4.1 Adjust volume.....................................................................................................................................22
2.4.2 Reject the call.....................................................................................................................................22
2.4.3 New message......................................................................................................................................22
2.4.4 Answer the new call............................................................................................................................23
2.4.5 Answering two calls simultaneously...................................................................................................23
2.4.6 Conference..........................................................................................................................................23
2.5 E
MERGENCY CALL ........................................................................................................................ 24
Page 4

N3306 User manual
第 2 页
3 MENU OPERATION...................................................................................................................................25
3.1 S
TRUCTURE OF MAIN MENU .......................................................................................................... 25
3.2 S
ELECTION OF MAIN MENU ........................................................................................................... 25
3.3 O
THER SELECTION MODES ............................................................................................................ 25
3.4 F
UNCTION TABLE OF MENU........................................................................................................... 25
4 SETTINGS....................................................................................................................................................27
4.1 P
HONE........................................................................................................................................... 27
4.1.1 Receiver volume .................................................................................................................................27
4.1.2 Folder answer.....................................................................................................................................27
4.1.3 Date & Time.......................................................................................................................................27
4.1.4 Language............................................................................................................................................27
4.1.5 Side key lock.......................................................................................................................................27
4.2 P
HONE MODES.............................................................................................................................. 27
4.2.1 Startup the mode.................................................................................................................................27
4.2.2 Personal Setup....................................................................................................................................28
4.3 D
ISPLAY........................................................................................................................................28
4.4 C
ALLS ........................................................................................................................................... 29
4.4.1 Call diversion.....................................................................................................................................29
4.4.2 Call waiting........................................................................................................................................29
4.4.3 Auto redial..........................................................................................................................................29
4.4.4 Send my number .................................................................................................................................29
4.4.5 Quick dial...........................................................................................................................................30
4.4.6 Minute tone.........................................................................................................................................30
4.4.7 Call filter............................................................................................................................................30
4.4.8 IP code................................................................................................................................................30
4.5 S
ECURITY......................................................................................................................................30
4.5.1 PIN .....................................................................................................................................................30
4.5.2 Phone lock..........................................................................................................................................30
4.5.3 PIM.....................................................................................................................................................31
4.5.4 Change password...............................................................................................................................31
4.5.5 Bar calls ...................................................................................................................... .......................31
4.6 N
ETWORK SERVICE....................................................................................................................... 31
4.7 M
Y MENU......................................................................................................................................32
4.8 C
ONNECTION PROFILE................................................................................................................... 32
4.9 C
ALIBRATION................................................................................................................................ 33
4.10 R
ESET............................................................................................................................................ 33
4.10.1 Reset settings......................................................................................................................................33
4.10.2 Reset all..............................................................................................................................................33
Page 5

N3306 User manual
第 3 页
5 MUSIC PLAYER.........................................................................................................................................34
6 WAP ..............................................................................................................................................................35
6.1 M
ENU OF WAP EXPLORER WHEN OFFLINE BROWSE.....................................................................35
6.1.1 Homepage...........................................................................................................................................35
6.1.2 Bookmark............................................................................................................................................35
6.1.3 Go to URL ..........................................................................................................................................35
6.1.4 Go to last page ...................................................................................................................................35
6.1.5 History................................................................................................................................................35
6.1.6 Offline browse....................................................................................................................................36
6.1.7 Settings...............................................................................................................................................36
6.1.8 GPRS info...........................................................................................................................................36
6.2 M
ENU OF WAP EXPLORER WHEN ONLINE BROWSE ...................................................................... 36
7 MY FAVORITES.........................................................................................................................................37
7.1 M
ULTIMEDIA RESOURCE............................................................................................................... 37
7.2 U
SAGES OF RESOURCE .................................................................................................................. 37
7.3 V
IDEO ........................................................................................................................................... 37
7.4 S
OUND .......................................................................................................................................... 37
7.4.1 Download...........................................................................................................................................37
7.4.2 Preset..................................................................................................................................................38
7.5 P
ICTURES ...................................................................................................................................... 38
7.5.1 Photos.................................................................................................................................................38
7.5.2 Download...........................................................................................................................................38
7.5.3 Preset..................................................................................................................................................39
7.6 M
USIC........................................................................................................................................... 39
7.7 M
EMORY CARD............................................................................................................................. 39
7.7.1 Video...................................................................................................................................................39
7.7.2 Picture................................................................................................................................................39
7.7.3 Music..................................................................................................................................................40
7.7.4 Format................................................................................................................................................40
7.8 S
TORAGE STATUS.......................................................................................................................... 40
8 MESSAGES..................................................................................................................................................41
8.1 M
ESSAGES .................................................................................................................................... 41
8.2 C
REATE......................................................................................................................................... 41
8.2.1 SMS.....................................................................................................................................................41
8.2.2 MMS...................................................................................................................................................42
8.3 R
ECEIVE MESSAGE........................................................................................................................ 43
Page 6

N3306 User manual
第 4 页
8.4 READ MESSAGE............................................................................................................................. 43
8.5 O
UTBOX........................................................................................................................................ 45
8.6 S
ENT ............................................................................................................................................. 45
8.7 D
RAFTS......................................................................................................................................... 45
8.8 M
Y FOLDER................................................................................................................................... 46
8.9 V
OICE MAIL................................................................................................................................... 46
8.10 SMS
SETTINGS.............................................................................................................................. 46
8.11 MMS
SETTINGS............................................................................................................................. 47
8.12 R
ESET............................................................................................................................................ 47
8.13 S
TORAGE STATUS.......................................................................................................................... 47
9 PHONEBOOK..............................................................................................................................................48
9.1 G
ROUPING OF PHONE BOOK .......................................................................................................... 48
9.2 F
IND.............................................................................................................................................. 48
9.3 C
REATE......................................................................................................................................... 48
9.4 C
OPY.............................................................................................................................................49
9.5 M
OVE............................................................................................................................................49
9.6 D
ELETE ......................................................................................................................................... 49
9.7 M
ULTI-DELETE.............................................................................................................................. 50
9.8 D
ELETE ALL .................................................................................................................................. 50
9.9 G
ROUPS......................................................................................................................................... 50
9.10 S
ETTING........................................................................................................................................ 50
9.10.1
SHOW TYPE........................................................................................................................................ 50
9.10.2
MY NUMBER...................................................................................................................................... 50
9.11 S
TORAGE STATUS.......................................................................................................................... 50
9.12 P
HONE LIST................................................................................................................................... 50
9.13 S
AVE TELEPHONE NUMBER........................................................................................................... 51
10 ENTERTAINMENT....................................................................................................................................52
10.1 G
AMES .......................................................................................................................................... 52
10.1.1 Boxman...............................................................................................................................................52
10.1.2 Tasty fruit ...........................................................................................................................................52
10.2 J
AVA BOX...................................................................................................................................... 52
Page 7

N3306 User manual
第 5 页
10.2.1 Applications........................................................................................................................................52
10.2.2 Preset applications.............................................................................................................................52
10.2.3 Download ...........................................................................................................................................52
10.2.4 Storage status.....................................................................................................................................52
10.2.5 Network settings .................................................................................................................................52
11 CALL HISTORY .........................................................................................................................................53
11.1 D
IALED CALLS .............................................................................................................................. 53
11.2 R
ECEIVED CALLS........................................................................................................................... 53
11.3 M
ISSED CALLS .............................................................................................................................. 53
12 ACCESSORY...............................................................................................................................................54
12.1 A
LARM.......................................................................................................................................... 55
12.1.1 Alarm on.............................................................................................................................................55
12.1.2 Alarm off.............................................................................................................................................55
12.1.3 Alarming.............................................................................................................................................56
12.2 S
CHEDULE..................................................................................................................................... 56
12.2.1 Function description...........................................................................................................................56
12.2.2 Select date...........................................................................................................................................56
12.2.3 Create.................................................................................................................................................56
12.2.4 Schedule list........................................................................................................................................56
12.2.5 View summary ....................................................................................................................................57
12.3 T
OOLS ........................................................................................................................................... 57
12.3.1 Dictionary...........................................................................................................................................57
12.3.2 Notepad ..............................................................................................................................................57
12.3.3 Calculator...........................................................................................................................................57
12.3.4 World clock.........................................................................................................................................58
12.3.5 Currency.............................................................................................................................................58
12.3.6 Countdown..........................................................................................................................................58
12.3.7 Stopwatch ...........................................................................................................................................59
12.4 C
ONNECTION TOOLS ..................................................................................................................... 59
12.4.1 PC tool................................................................................................................................................59
12.4.2 GPRS wizard ......................................................................................................................................59
12.4.3 USB mode...........................................................................................................................................59
12.4.4 STK.....................................................................................................................................................60
13 COMMON QUESTIONS............................................................................................................................61
14 FITTINGS.....................................................................................................................................................62
15 MAINTENANCE GUIDELINE..................................................................................................................63
Page 8

N3306 User manual
第 6 页
Security and performance
Welcome to select NEC mobile phone. After you start using the phone, the background will send IMEI
number to the management system of manufacturer, which helps you to query the purchase time and
guarantee time of the phone under the situation of missing the warranty card and purchase receipt.
Registration message will be sent in SMS and charged by the network provider as 0.10 or 0.15 yuan without
other fee.
◆ Emergency service
In any country, if want to dial the emergency telephone, you can directly dial 911 (or other emergency service
telephone), you must confirm the power of mobile phone is on and it is within the service area, then input the
emergency service number (911 or other numbers) and tap
to make the call.
Note: Because of the property of the mobile network, each emergency call is not sure to succeed.
Caution
♦ Changes or modifications made in the radio phone, not expressly approved by NEC, will void the
user's authority to operate the equipment.
RF Energy Interference/Compatibility
♦ This device complies with Part 15 of the FCC Rules. Operation is subject to the following two
conditions: (1) this device may not cause harmful interference, and (2) this device must accept any
interference received, including interference that may cause undesired operation.
What's in the Box?
♦ Your wireless mobile phone comes with a battery, charger, user manual, product and service user
data. You can purchase other accessories to customize your phone for maximum performance and
portability.
Body-worn operation
♦ To maintain compliance with FCC RF exposure guidelines, if you wear a radio product on your
body when transmitting, always place the radio product in a NEC approved clip, holder, holster,
case or body harness for this product. Use of non-NEC-approved accessories may exceed FCC RF
exposure guidelines.
SAR INFORMATION
♦ The SAR limit of USA (FCC) is 1.6 W/kg averaged over one gram of tissue. Device types NEC
N3306 (FCC ID: S5D-KMP6J1CM1) has also been tested against this SAR limit. The highest SAR
value reported under this standard during product certification for use at the ear is 0.445 W/kg and
when properly worn on the body is 0.167 W/kg. This device was tested for typical body-worn
operations with the back of the handset kept 1.5cm from the body. To maintain compliance with
FCC RF exposure requirements, use accessories that maintain a 1.5cm separation distance between
the user's body and the back of the handset. The use of belt clips, holsters and similar accessories
should not contain metallic components in its assembly. The use of accessories that do not satisfy
Page 9

N3306 User manual
第 7 页
these requirements may not comply with FCC RF exposure requirements, and should be avoided.
Section 15.105 Information to the User
♦ NOTE: This equipment has been tested and found to comply with the limits for a Class B digital
device, pursuant to part 15 of the FCC Rules. These limits are designed to provide reasonable
protection against harmful interference in a residential installation. This equipment generates, uses
and can radiate radio frequency energy and, if not installed and used in accordance with the
instructions, may cause harmful interference to radio communications. However, there is no
guarantee that interference will not occur in a particular installation. If this equipment does cause
harmful interference to radio or television reception, which can be determined by turning the
equipment off and on, the user is encouraged to try to correct the interference by one or more of the
following measures:
♦ Reorient or relocate the receiving antenna.
♦ Increase the separation between the equipment and receiver.
♦ Connect the equipment into an outlet on a circuit different from that to which the receiver is
connected.
♦ Consult the dealer or an experienced radio/ TV technician for help.
Individual
♦ When using the radio frequency device including mobile phone, it is possible to have some
disturbance on some medical devices with bad shielding performance, such as Acousticon or heart
pacemaker. Before using the mobile phone, please consult with the producer of the medical device
or your doctor.
♦ For the user with heart disease, please pay close attention to the setting of ring tone volume and
vibration.
♦ In the places where the explosive gas or production process exist, such as oil warehouse, or
chemical factory, please pay the close attention to restricts of use for radio frequency device. When
your mobile phone is in idle, it still emits electromagnetic signals. If required, you should turn off
the mobile phone.
♦ Please pay attention to the transportation safety. When driving, the mobile phone should not be used,
if using it; it is suggested to stop the car first.
♦ When your mobile phone is missing or stolen, please immediately inform the telecom department to
prohibit the SIM card from using. It will make you free from the economic loss caused by other
pseudo calls.
♦ When you contact with telecom department or sales agents, they should know the IMEI number of
your mobile phone, which is printed on the label of back of the mobile phone (remove battery or
dial “*#06#” to find it ). Please record the number and keep it safely for future use.
♦ To make your mobile phone misused, please adopt prevention measures, such as: set SIM card PIN
number or personal security code or change the code in time as other person knows it.
♦ When leave the car, please keep the mobile phone at the unobvious place, it would better take it or
lock in the luggage boot.
♦ Please keep the children from the mobile phone, charger or battery.
Mobile phone
The mobile phone includes the precise electric wires, magnet and battery system, which should be
dealt with carefully, especially pays attention to the following important points:
Page 10

N3306 User manual
第 8 页
♦ Your mobile phone can produce electromagnetic field; please do not place the magnetic storage
media such as computer disk near to the mobile phone.
♦ When using the mobile phone near to the electric devices such as TV, telephone, radio and personal
computer, it maybe leads to disturbance and effect on the performance of mobile phone.
♦ No matter when, please do not make the mobile phone and its fitting parts touch the liquid or keep
them in the wet environment.
♦ Please do not keep the mobile phone in the environment with over-temperature or under-
temperature.
♦ Please do not keep the mobile phone near to the flame, litten cigar or cigarette.
♦ Please do not scrawl on the mobile phone.
♦ Please do not fall the mobile phone off or behave any rude beating on the mobile ph one.
♦ Please do not keep the mobile phone together with computer magnetic disk, credit card, traveling
card or other magnetic objects. Otherwise the stored information in magnetic card or credit card is
affected by it.
♦ Please do not keep the mobile phone or battery at the position with the temperature beyond 60 , ℃
such as the car instrument panel, screensill or the back of the glass screen with direct shining.
♦ Please do not try to disassemble the mobile phone or any other accessories.
♦ Only little wet or anti-static cloth can be used to wipe the mobile phone. Please do not use dry or
static cloth to wipe the mobile phone. Please do not use the cleanser with chemical reagent or
grinding sand, otherwise the cleanser will damage the shell of the mobile phone.
♦ The receiver of mobile phone will produce some heat during the using normally; same as the mobile
phone is charging.
♦ Please remember the recycle, the bandbox package for the mobile phone is very suitable for recycle.
♦ Please do not keep the mobile phone in the status of non-battery or empty battery capacity;
otherwise some data may be lost.
♦ Some mental material included in the mobile phone may make you allergic, which is determined by
your physique and health condition.
♦ Please do not put the mobile ph one i n th e re a r po ck e t of the trousers or skirt to prevent from damage
when sitting. At the same time please do not put the mobile phone at the bottom of the bag to
prevent from impact or strong extrusion.
♦ If vibration function is on, please keep the mobile phone far from heat sources (such as heater) and
prevent it from sliding from the desk top for the vibration.
♦ Only handwriting pen authorized by NEC can be used. Use other handwriting pen maybe infract the
warranty, and possibly damage the touch screen.
♦ Please plug and draw the hardwiring pen carefully, and plug the pen in the correct position without
use to prevent from children.
♦ Please try to avoid scratching the touch pen. It is prohibited to use the normal pen, pencil, or other
sharp instrument write on the touch screen.
Battery
♦ Please do not keep the batter device short circuit, which will damage on the battery, produce heat
and even cause fire.
♦ It is prohibited to throw the battery into the fire for preventing from explosion. The discarded
battery should be returned to the provider, or be put into he specified recycle bin; do not put them
into the home waste.
♦ Please do not make the metal, such as coin or key ring, touch the end point of the battery caused
Page 11

N3306 User manual
第 9 页
short circuit.
♦ Please do not remove the battery when the mobile phone powers on.
♦ Please do not put the mobile phone’s battery into mouth, because the electrolyte will result in
poisoning.
♦ One built-in battery in the mobile phone can only be replaced by the professional engineer. If using
the battery with wrong type to replace, it is possible to result in explosion. Please deal with the used
battery according to provider instruction.
♦ When using any battery and charger which is not specified by the provider, potential danger exists.
The resulted damage on the mobile phone is beyond the warranty.
Note: If the battery is damaged, the material in the battery should be prevented from touching. If touching
with the skin, it should be washed with plenty of water, or get help from a doctor if necessary.
On the way
♦ The car must be securely controlled all along, please pay attention to driving.
♦ Please comply with all rules in the local transportation security regulations.
♦ Before sending and answering phone, you should closely notice the local law system on use for
wireless phone and pay attention to it when using.
♦ Please send or answer call after stopping the car according to the requirements of driving condition.
♦ Except for emergent situation, it is prohibited to stop the car at the side of the highway for receiving
or dialing the phone.
♦ The electronic system in the car, such as the lock brake, quick control and combustion ejection
system generally are not affected by the wireless radio wave. The manufacturer of this type of
devices will tell you whether these devices have good shielding function. If you have doubt that the
wireless wave causes the car’s failure, please contact the franchiser. Please do not disassemble the
mobile phone before the quantified professional personnel checks it.
♦ When the airbag swells, it will produce strong external force. Please do not install or place wireless
talking device above the airbag or within the touchable area of the airbag after it extends. If the car
wireless talking is not installed correctly, once the airbag swells, it will result in serious damage.
♦ When renewing petroleum, please turn off your mobile phone. Same case also applies to the place
where the bidirectional wireless device is prohibited for using. Please do not put the flammable and
explosive substances together with the mobile phone or carry them together; for internal spark may
result in combustion.
On the plane
♦ When on the plane or near to the plane, please turn off the mobile phone and take out the battery.
The behavior to use the mobile phone on the plane is illegal, which may result in danger for the
operation of plane, also damage the mobile phone network. The violator may be paused or canceled
the mobile phone service, even prosecuted, or punished doubly.
♦ Under the emergent situation, it is allowed to use the mobile phone with the agreement of crewman
in terms of security regulation.
Device from other manufacturers
♦ If using the devices, cable or fitting parts from the other providers without NEC production or
authorization, it is possible to result in invalidation for warranty; moreover, it has also influences on
the normal use of the mobile phone. It is obligatory to use fitting parts of NEC.
Page 12

N3306 User manual
第 10 页
Maintenance service
♦ The phone, battery and inside of charge have no part which the user can repair freely. Advise you to
take your NEC mobile phone to maintenance agent authorized by NEC for repair. When you need
the maintenance service, please consult with the network service provider or NEC in detail.
Non-ionic radiation
♦ A wireless device should connect to the antenna by the non-radiation cable (for example coaxial-
cable). The antenna should not be installed near to the human body, except the metal shielding exists
between them, such as metal roof. Only the antenna specially designed for this mobile phone can be
used. The antenna without authorization or with fitting parts refitted or added by users own maybe
damages the mobile phone or violates the related rules, which results in performance decrease or
radiation with unqualified standards.
Effective use
♦ To obtain the best performance with the least power consumption, please pay attention to the
following rules: when talking, please do not use the hand to cover the position of built-in antenna,
which may affect the quality of talking and cause that the mobile phone works with the output power
beyond the normal standard and shorten the talking and idle duration of battery.
Energy of radio frequency
♦ Your mobile phone is a kind of wireless transmitter and receiver with low power. Once the mobile
phone turns on, it will receive and transmit wireless signal intermittently. The network system will
control the transmitting power of the mobile phone.
Electromagnetic radiation
♦ Your mobile phone completely complies with the standard on the wireless radiation constituted by
the nation authoritative organization and international health association. These standards of
limitation are a part of the comprehensive rules and compose of permissive standard of public
wireless radiation. These standards are gradually formed through the long-term and in-depth
scientific research conducted by some independent scientific organization ICNIRP (International
Commission on Non-ionizing Radiation Protection). These limit standards contain lots of security
capacity so as to keep person safe, whatever the age or health status, and also consider the
changeable factors of various kinds of measure condition.
If the content described in this manual does not conform to your mobile phone, please take yours as the
standard. NEC possesses the right of the final explanation for this instruction manual.
NEC reserves the right to modify the technical specification without the pre-notification.
NEC reserves the right to modify this manual without the pre-notification.
The manufacturer reserves the right to modify the product technical specification without the prenotification.
Page 13

N3306 User manual
第 11 页
1 Start to use
Before using the mobile phone, please read this section. The section will tell you how to install charge
and maintain your mobile phone’s battery. It also tells you the information about the di gital GSM n etwork and
instructs you how to insert and unlock SIM card. The detailed information about it will be also stated in the
section.
1.1 Battery
The mobile phone contains one battery. When purchasing, the battery is not charged, but maybe supports
to turn on the phone. A new battery should be charged for at least 16 hours, after the battery is used up
for the first time, then it is charged fully for use; same as the second and third time, then the battery will
easily reach the best status for use.
1.1.1 The disassembly and installation of battery
When dissembling, make the mobile phone back face upward, and press down the back cover of phone,
then take out the back cover. Lift the top of the battery upward and take it out.
When installing, insert the clip at the top of the battery into the corresponding clamping slot in the phone
and press the battery downward, then install the phone’s back cover.
1.1.2 Battery charging
Insert the adapter of the charger into the plughole of mobile phone as follows;
Connect the charger with the power. At this moment, a sign of battery will sparkle indicating the battery
is charging;
When the power capacity reaches the fourth level, and charging sign changes to the power capacity,
which means the charging is completed. During the charging, the battery, mobile phone and charger will
become heated, which is normal phenomena;
After the charging completed, disconnect the power and pull off the charger.
Warning:
When charging, the phone must be placed at the site with the temperature
between -5℃ and 55℃ and use the charger from the provider. When using the
charger without permission, it is possible to result in danger, moreover violate
the permission and terms of warranty for mobile phone.
1.1.3 Use of battery
The phone idle duration provided by the manufacturer is based on the ideal work environment. In the
Page 14

N3306 User manual
第 12 页
practice, the work duration of battery will vary with the different network state, work environment and use
mode.
Please deal with the battery according to local regulations; do not take it as the life waste.
1.1.4 Indication of battery capacity
When the mobile phone powers on, the level of battery capacity displays on the top left corner of the
screen. The residual power capacity is represented by indication bars from one to four levels.
1.2 Connection of network
1.2.1 SIM card
Your network provider will provide you with a plug-in type of SIM card (user identification card). SIM
card is the key for you to enter the digital GSM network. Before using the mobile phone, you must insert
valid SIM card into the mobile phone.
All information related with network connection records in the SIM card, also including name, telephone
number and short message. SIM card can also be taken out from your mobile phone and insert into any GSM
mobile phone for use (new mobile phone automatically identifies SIM card.).
To prevent from loss and damage on the information in the card, please avoid touching the metal plat
area and keep the SIM far from electric and magnetic field. You can not enter the GSM network as the SIM
card damages.
Warning: Before taking out SIM card, the mobile phone must be turned off. It
is absolutely prohibited to insert into or take out SIM card when the phone is
connecting to external power, otherwise SIM card may be damaged.
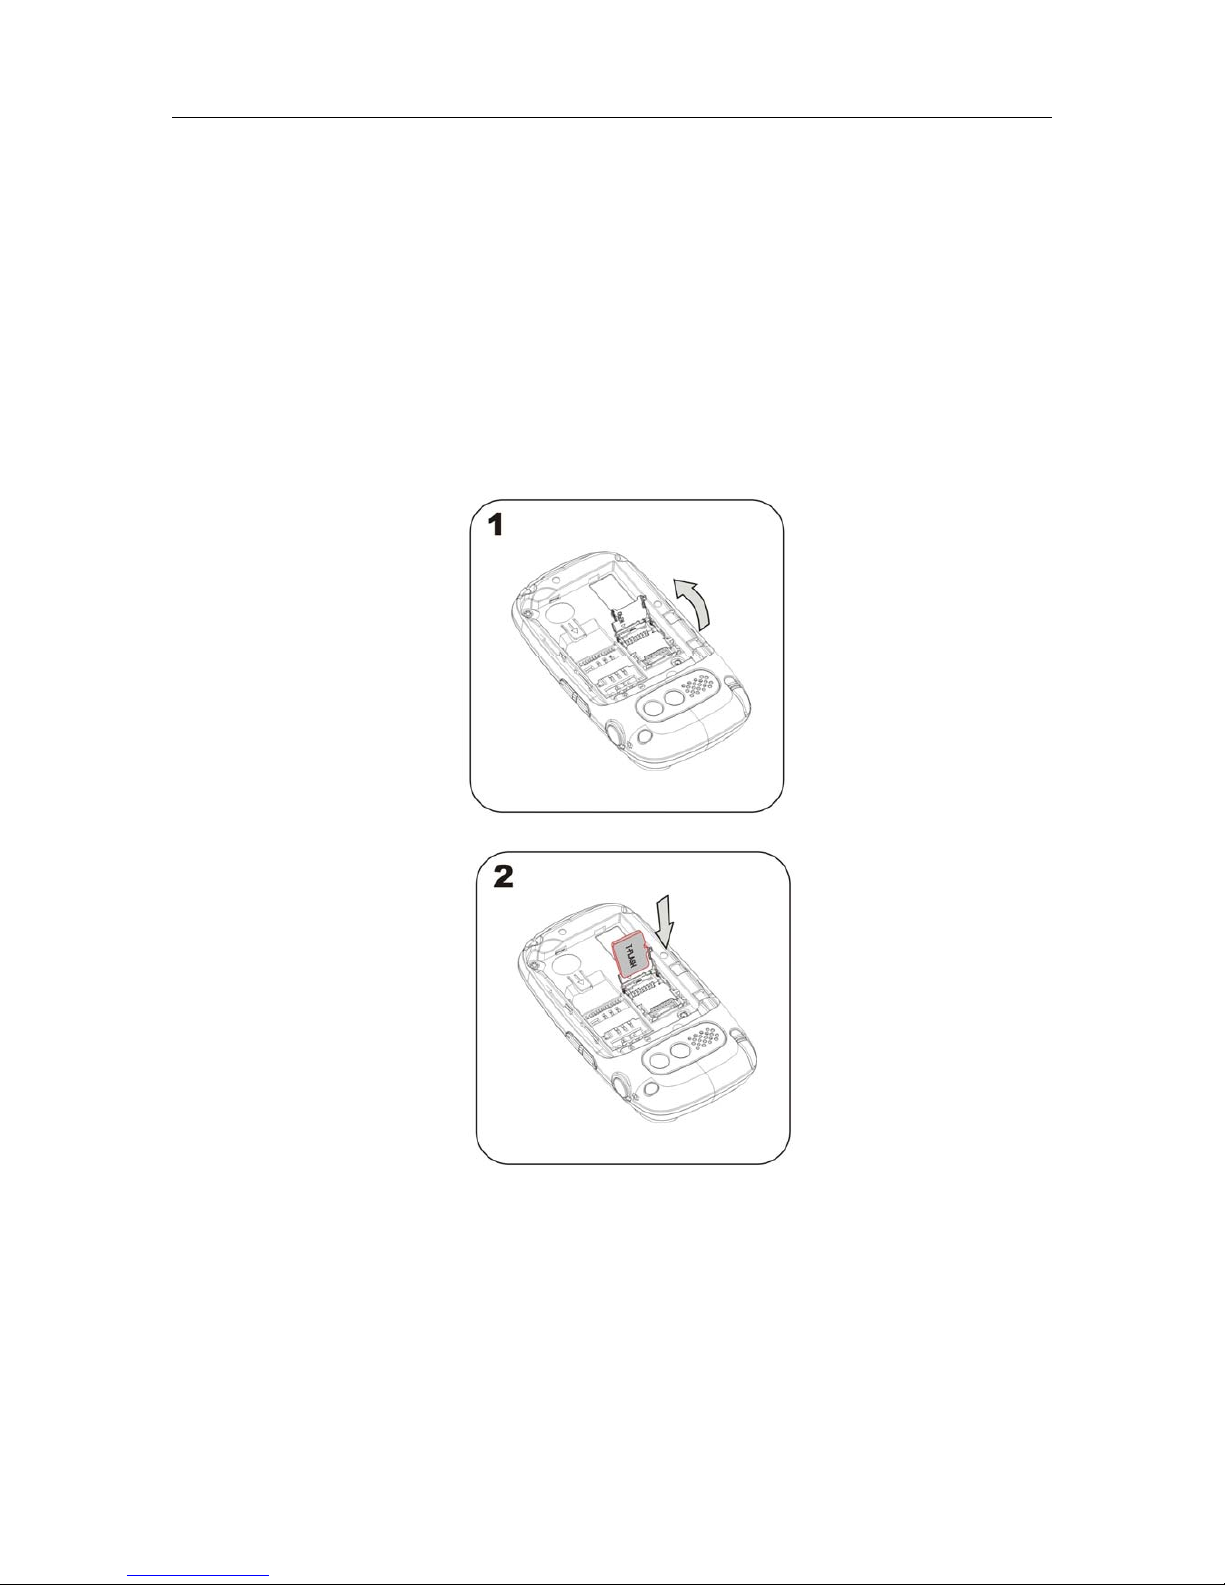
1.2.2 Insertion of SIM card
Generally SIM card is put into a card, and it must be taken out carefully before installation.
Turn off the mobile phone and remove the battery and other external power.
Insert SIM card into the bottom of lugs and ensure the metal plane area is downward and the position of
its corner is the same as which of clamping slot’s corner;
Push SIM card , lock SIM card and install the battery;
If you need take out SIM card, please first turn off mobile phone and take out the battery, then remove
SIM card.
1.2.3 Unlocking of SIM card
To prevent from illegal use, SIM card adopts PIN (personal identification number) code to encrypt for
protection. When this function is selected (refer to section 4.5.1), each time you turn on the mobile phone, you
must input PIN code to unlock SIM card for sending or answering calls. A user can also relieve SIM card
protection (refer to section 4.5.1). In this case, SIM card is not prevented from illegal use.
Long press Pwr to turn on the mobile phone;
Input PIN code, tap OK or press camera key to confirm. For example: if PIN is set as 1234, then input as
following: 1 2 3 4 OK. If you continue inputting wrong code for three times, then your SIM card will
be locked. The mobile phone will query PUK code. (Please refer to the instruction of SIM card.)
Page 15
N3306 User manual
第 13 页
Note: Your network operator will set a standard PIN number (from 4 bits to 8 bits) you’re your SIM card; you
should change it to your private password as rapidly as possible. Please refer to section 4.5.2.
1.2.4 Connection to network
After SIM card is decrypted successfully, the mobile phone will search your registered network or local
available network automatically (It will display “network is connecting, please wait for a while” in the screen).
Once the connection is successful, the network sign for the network operator will appear on the top of the
screen. At present, your mobile phone is in idle status; you can send or answer calls.
1.3 Insertion of memory card
Before inserting, please push the memory card block as the direction on it, then open it as follows:
Insert the memory card as follows:
Close the card block as follows, and then lock it:
Page 16

N3306 User manual
第 14 页
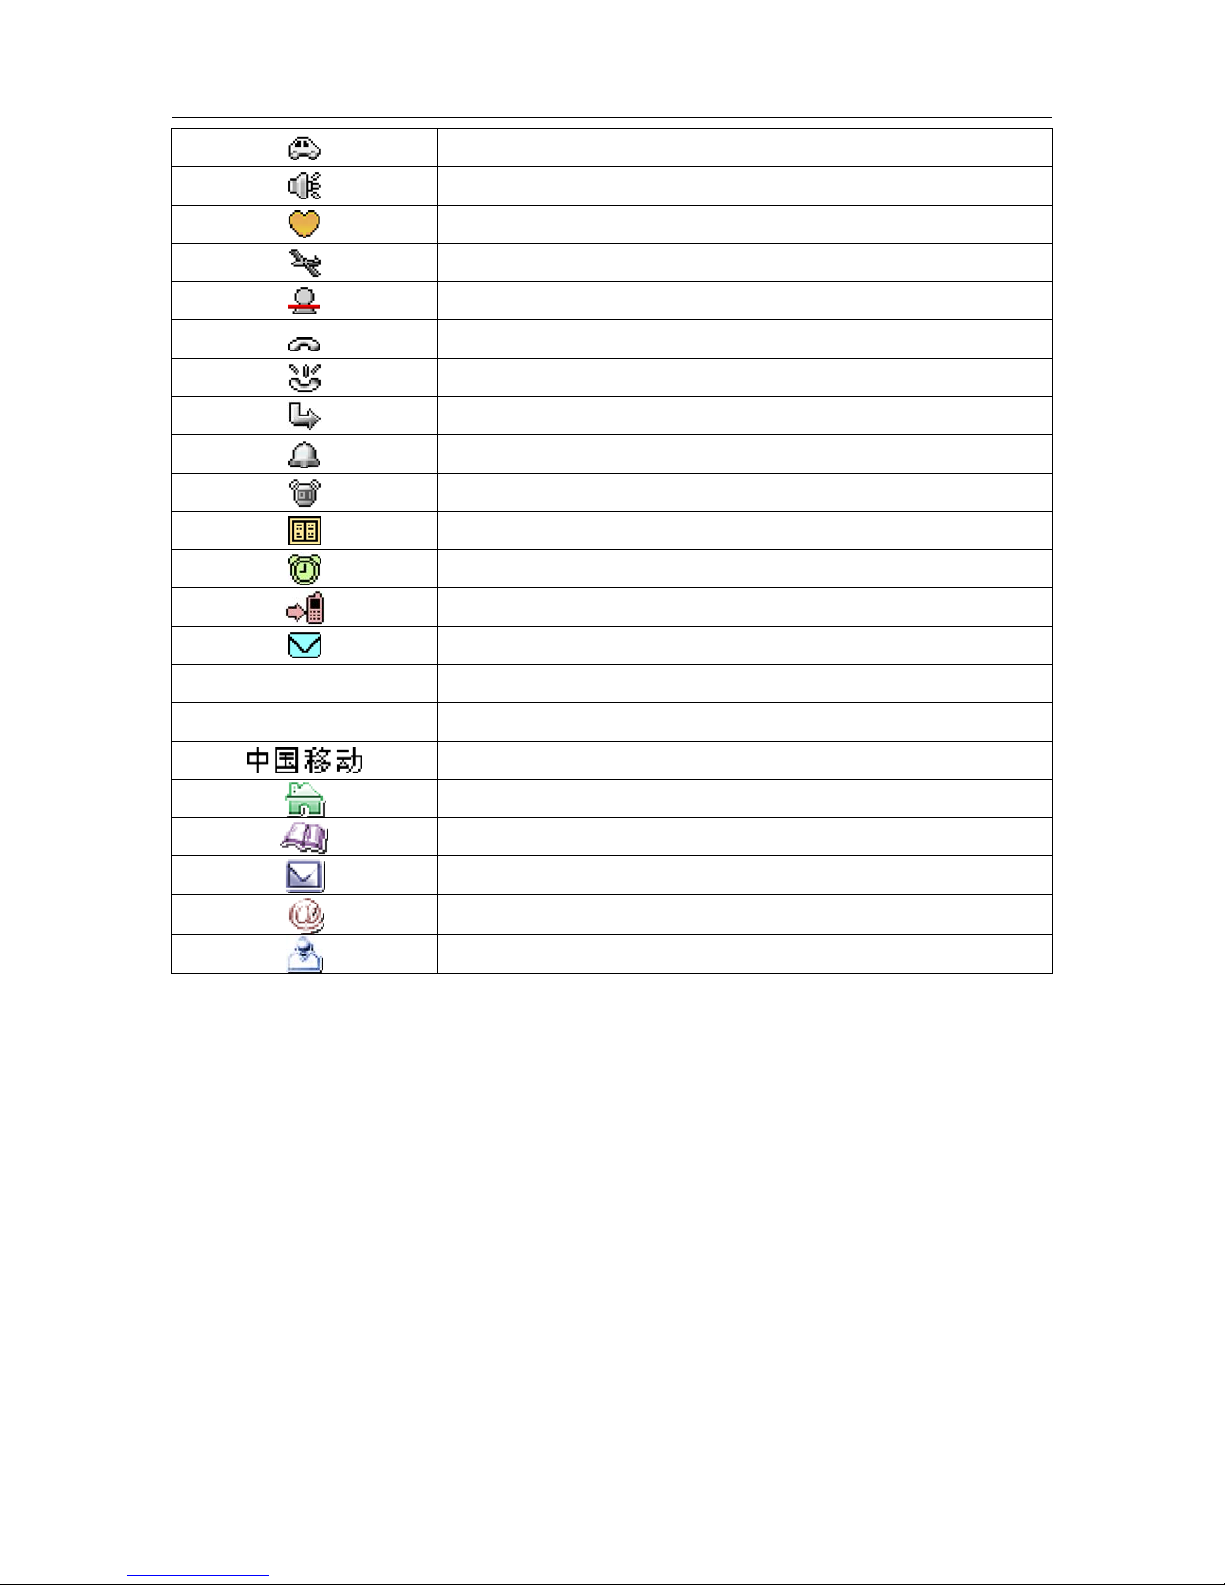
1.4 Idle screen and content
You can get the information needed via the indication and sign on the idle display screen.
Current battery capability left
Charging
Current signal intensity
GPRS applied(related with SIM card)
GPRS applying(related with SIM card)
Unread messages in indicate bar
Unread WAP PUSH messages in indicate bar
Messages memory full
Phone memory full
SIM card memory full
MMS on the Phone full
WAP push messages full
Insert T-flash card
Meeting mode
Page 17
N3306 User manual
第 15 页
Car mode
Outdoors mode
Personal
Offline
Call filter activated
Missed calls in indicate bar
Calling
Call diversion
Alarm has been set
Stopwatch is on
Schedule is time out.
Alarm is time out.
Missed calls in idle
Unread messages in idle
2006/06/06(二)
Current date
22:22
Current time
Network operator
Shortcut key for main menu
Shortcut key for phonebook
Shortcut key for messages
Shortcut key for wap
Shortcut key for my menu
Note:
1. Use the touchpen to tap the screen for entering the interface of dial plate, input number to make a call, etc;
2. Use the touchpen to tap the date on screen for entering the window of schedule to operate
correspondingly;
3. Use the touchpen to tap the time on screen for entering the window of date to operate the date, time,
alarm and world clock.
Page 18
N3306 User manual
第 16 页
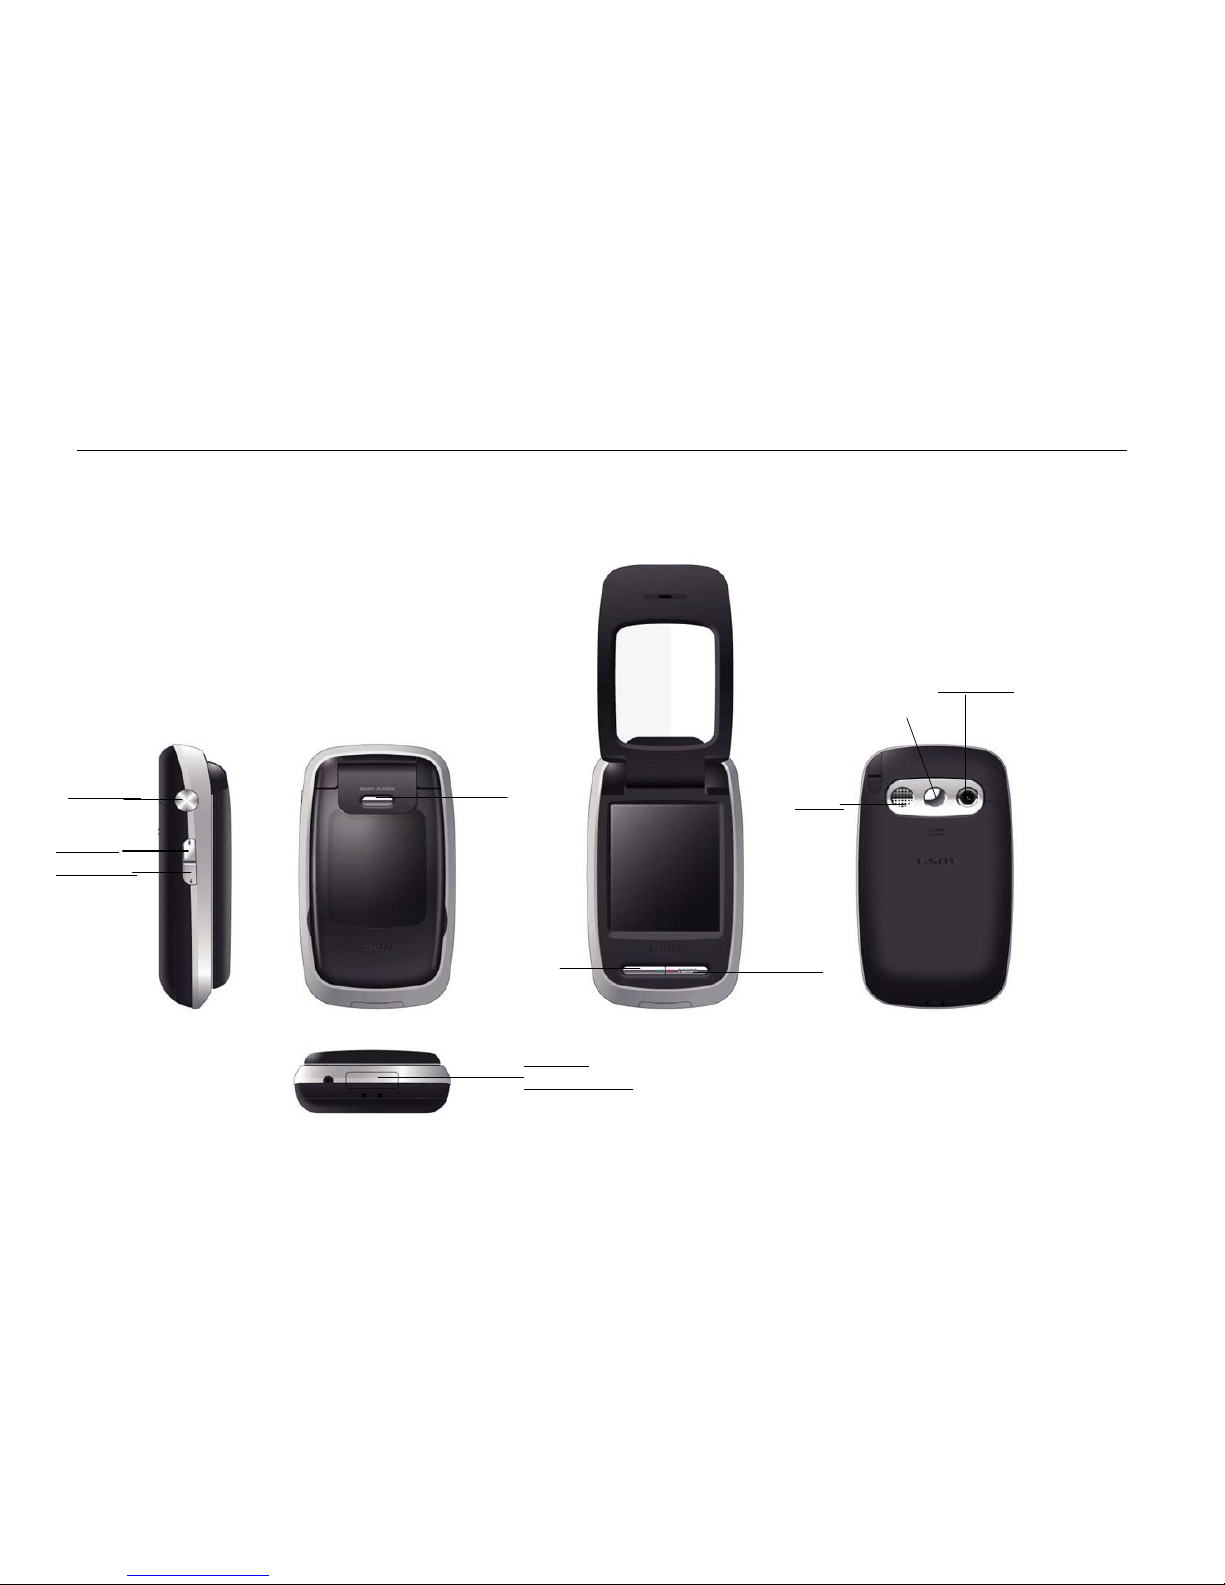
1.5 Keys
The index of function for keys is illustrated as following:
Charger &
datawire plughole
Camera lens
Pwr: Power
Side up Vu
Side down Vd
Speaker
Snd key
MP3 key
Camera viewfinder
Camera key
Page 19

N3306 User manual
第 17 页
Camera key
Confirm、select、dial、answer the phone;enter the camera screen
in main menu; confirm the selection in the menu list; long press to
select all items in the multi-selection, and long press again to deselect
all items
Side up key Short press to quickly mute the ring tone of incoming calls and alarm;
short press to increase the volume of receiver; short press to enter the
screen of adjusting the volume of ring tone in the idle; short press to
scroll highlight or page up; to increase the volume in MP3 and the
setting of ring tone
Side down key Short press to quickly mute the ring tone of incoming calls and alarm;
short press to decrease the volume of receiver; short press to enter the
screen of adjusting the volume of ring tone in the idle; short press to
scroll highlight or page down; to decrease the volume in MP3 and the
setting of ring tone
Power key (Pwr) Power on /off, hang up calls, terminate (return to idle screen)
MP3 key
Long press to start MP3 player,short press to pay the music and short
press again to pause
* key Input * in dial screen
# key
Input # in dial screen;long tap to input P in dial screen
0 Long tap to input + in dial screen
1 Long tap to enter the voice mail in dial screen
Touch
keypad
2-9
Input number; long tap (2-9)to enter the quick dial (need to set)
When the alarm and schedule times out or missed call and unread messages (including WAP PUSH
messages) prompt in the idle, the idle will display the corresponding icon (refer to section 1.3), use the
touchpen to tap the corresponding icon to view the content directly.
Note: In this user manual, “tap” means to tap the screen down then release, while
“long tap” means to tap the screen for more than 1.5 seconds then release.
1.6 Input message
In order to make it convenient to input the characters in the phone, input methods as handwriting are
specially built in N3306 mobile telephone, which makes you look up the relevant characters with less times
of key-tapping.
1.6.1 Input method of handwriting
1. Input method of handwriting
Input method of handwriting is the main method to input character for this mobile phone, which adopts
Handwriting input area
Page 20

N3306 User manual
第 18 页
the advanced technology of character identification, so as to make you input Chinese and English in full
screen conveniently and quickly.
Tap the icons of corresponding input methods to switch proper input method among Pinyin, Stoke,
English/Number, Symbol and Handwriting.
♦ Handwriting Chinese
Before use input handwriting Chinese, confirm the type of character first. Tap “
”,and the cursor
will display the current input position。Use the touchpen to write in the input area,pause for a while and
the screen will automatically display the character identified,and spare character will display in the selected
area。If the character displayed on the screen is not you required,tap the character in selected area to
replace。This mobile phone has the function of intelligent Chinese, in detail that tap the spear character on
the screen,it will display the second character formed with the first one usually. Tapping the second
character directly will input it.
♦ Handwriting English
Except Handwriting Chinese, you can use Handwriting English to input English。Tap “
” to
complete the input。
♦ Handwriting number
Except Handwriting Chinese, you can use Handwriting number to input number。Tap “
” to
complete the input。
2. Input of Pinyin
When edit, tap “ ” to select input Pinyin, and use the touchpen to input Pinyin,then choose
from the selected area,it will display in the input area;If the character displayed in the selected area is not
you required, tap the arrow on the right side to flip pages for select other characters, then tap the character
selected, it will display in the input area. Pinyin has the intelligent function as Handwriting Chinese. After
select the handwriting character, the character that can usually form the words will display the selected area,
which quickens the input speed with selecting the related characters. When write on the screen again, the
character in the selected area will renew automatically.
3. Input of Stroke
When edit, tap “ ” to select input Stroke。During the process of inputting, tap “?” to input
“?”for substituting the unknown strokes. Take “好” as an example, if you do not know how to input the first
stroke “ㄑ”,you can tap “?”for substituting. At this moment, Stroke prompts the question mark, then tap
the number of rest strokes as their order,you will see the character “好” displays in the selected area,and
tap “好” to complete the input。
4. Input of English and number
When edit, tap “ ” to activate the input panel of English and number。Directly tap to complete the
input. Tap
to switch between capital letter and small letter. Directly tap the number in the display area to
Page 21

N3306 User manual
第 19 页
complete the input.
5. Input of Symbol
When edit, tap “” to select input Symbol。During the process of inputting, use the touchpen to tap the
symbol in the table, it will appear the position of cursor. Tap “
” and “ ” for more symbols; tap “ ”
and “
” to lock/unlock the input screen. When locked, you can input more than one symbol in this screen,
or only can input one symbol.
Page 22
N3306 User manual
第 20 页
2 Dial and answer the phone
After the setting of mobile phone is completed, you can dial or answer phone. This section will provide
all basic information you needed.
Note: when using the earphone, please insert and pull carefully to avoid damaging the hole of earphone
2.1 Turn on/off phone
1. Under the status of phone power off, long press Pwr key to turn on phone, then the starting
animation appears.
2. If PIN code is required, please refer to section 1.2.3.
3. In the status of power on, long press Pwr key to turn off phone.
2.2 Make a phone call
When the sign of network operator appears on the display screen, the phone enters the idle screen, and
then you can dial or answer calls. The indication bar on to p right corner of screen displays th e intensity
of network signal (Four level bars mean the strongest signal). The barrier has great influence on the
quality of talking, so moving in a small range can enhance the intensity of signal effectively.
There are multiple dialing modes from idle screen, namely: direct dial, phone book dial, quick dial and
SIM card dial.
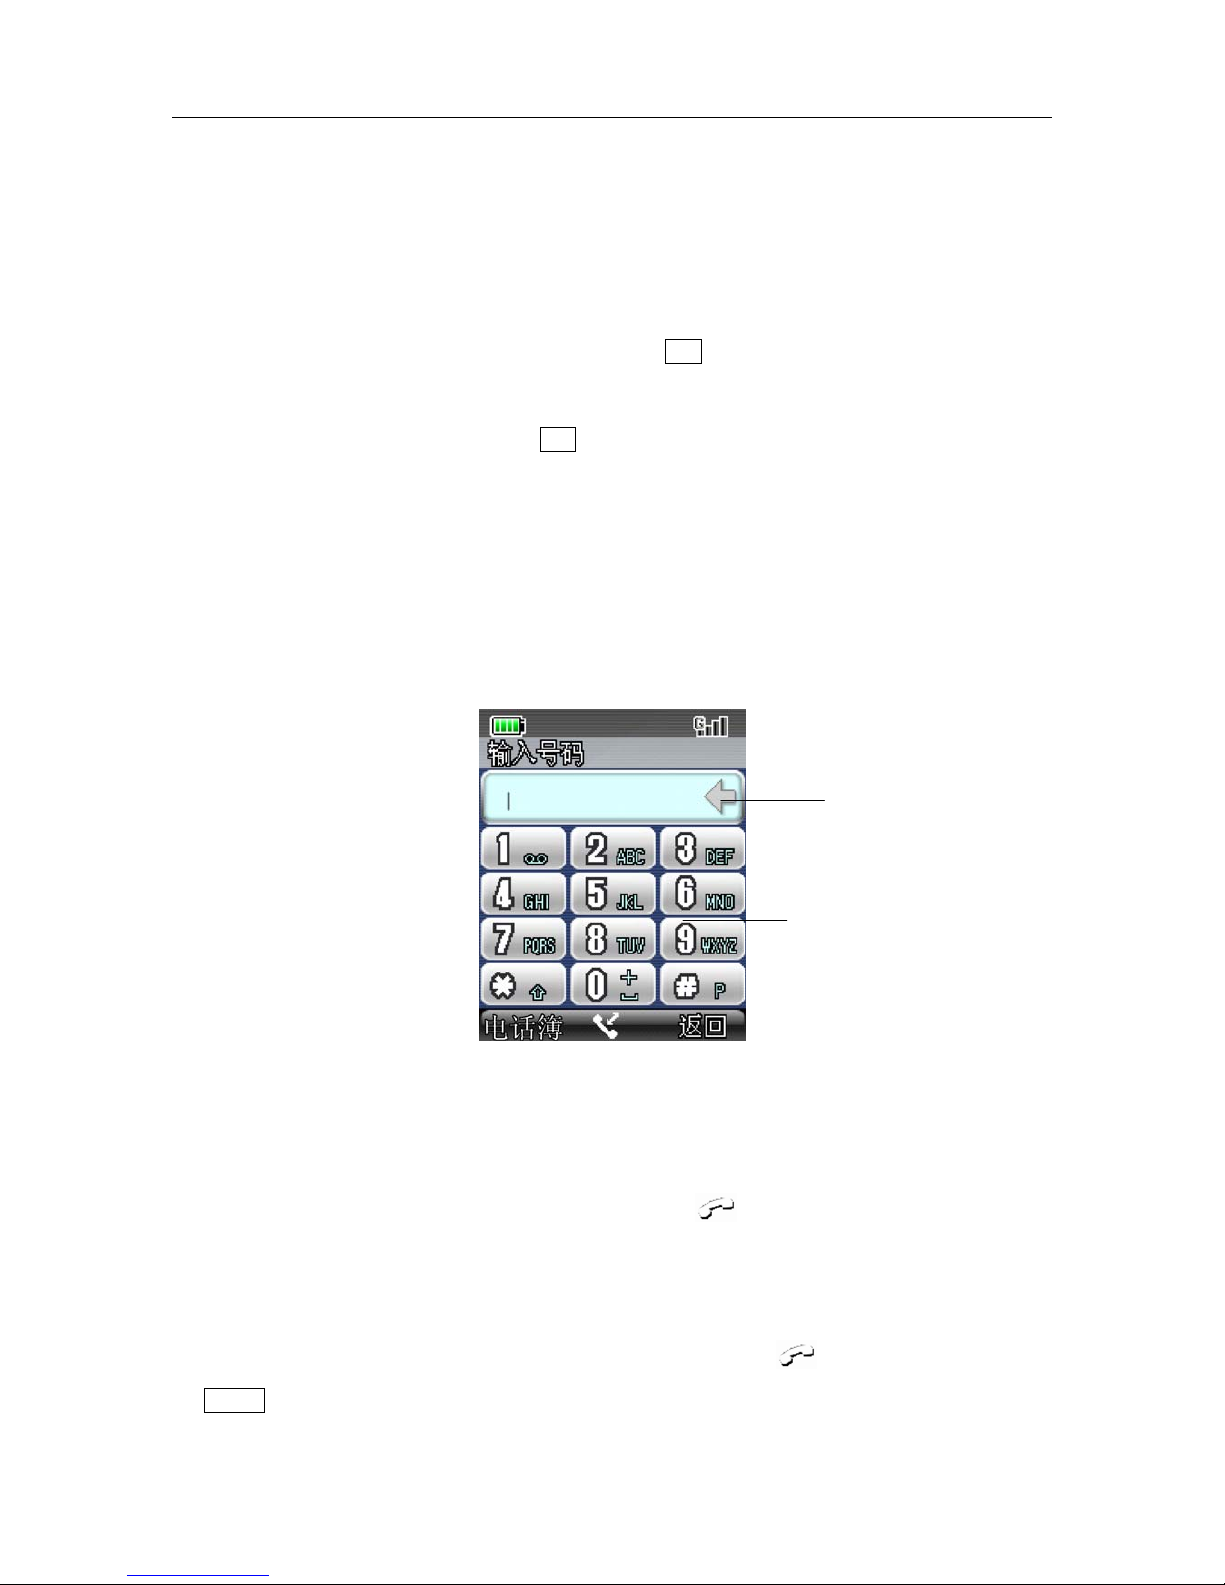
2.2.1 Direct dial
Dial the domestic phone
The simplest way to make a call is to tap number on the dial panel to input the phone number (If it is
domestic long-distance call, the area code is needed.) then tap
or press camera or send key to call.
While dialing, the screen will display the name and number. After the call connected, it displays the call time,
phone number of the other side or the phone number and name of the other side (If the number has been
saved.).
After inputting the phone number via tapping the number, directly tap
or press camera key to call;
tap Option to activate the menu as following:
Select Call to call current number
Select IP call to insert IP number in the front of the phone number then dial out (The function is needed
Delete
模拟 keypad
Page 23

N3306 User manual
第 21 页
to set before use, and refer to section 4.4.8);
Select Save to save the telephone number (Refer to section 9.3 for detailed operation);
Select Start countdown to start the countdown (Refer to section 12.4.6 for detailed operation);
Select Send SMS to enter short message edit screen and complete the corresponding operation (Refer to
section 8.2.1 for operation on function of short message);
Select Send MMS to enter MMS edit screen and complete the corresponding operation (Refer to section
8.2.2 for operation on function of short message).
After talking, press Pwr key to hang up the phone. The phone will display the call duration for this time.
Dial the fixed extension telephone
Some fixed extension telephone can not directly be dialed. You need to connect the main line first then
dial the extension number. If you insert symbol “P” between the main number and the extension number
when inputting the number, the phone will make the call for you and dial the extension number auto matically.
The method to input “P” is: long tap # (which will be displayed on your screen). You can input more than
one “p” to increase the duration of inputting the extension number.
Dial international phone call
When dialing international phone call, you only need input the symb ol “+” (Long tap 0 key until the
symbol “+” displays on the display screen.), then input the country code an d whole telephone number.
For example: if making a phone call to France, you need long tap 0 key until the symbol “+” appears,
then input the country code of France “33” and whole telephone number.
2.2.2 Make a phone call from phonebook
After entering phonebook, activate Option to select “find”, find corresponding person and select
corresponding phone, then tap “Call” to dial out phone.
2.2.3 Quick dial
Quick dialing is also called abbreviated dial, you can respectively set 8 number keys as telephone
number (refer to section 4.4.5 on setting).
In idle screen, long tap the number keys from 2 to 9 which are set as quick dial to automatically dial
corresponding set phone number. If the selected number key is not set as quick dial, the mobile phone will
prompt “Phone number is empty”.
2.2.4 SIM card dial
In dial panel screen, tap number and # in turn to dial from SIM card. That is the phone number stored at
the corresponding position in SIM card will display automatically. Directly tap or press camere or send
key to dial out phone.
2.2.5 Unsuccessful calls
The phenomena of unsuccessful calls may appear during the dialing, for example: the line is busy, reject
the call, the phone of other side is not within service area or the phone of other side is power off, etc. the
phone will prompt “Call failed”. At this time if you set auto redial (refer to section 4.4.3), the phone will
Page 24

N3306 User manual
第 22 页
automatically redial, and the system will prompt. Tap or press camera or send key to redial or redial
without operation, and tap Stop to cancel it.
2.3 Answer the call
When a new call comes, tap Answer to answer the call.
After talking is over, press Pwr key or tap Reject to hang up the phone.
During the talking, the phone will prompt new call by short sound. At this time you can tap Answer to
answer new call; moreover the previous call will become hold status. Please refer to section 7.2.3; if do not
want to answer, you can press Pwr key or tap Reject key to reject the call.
2.4 During the talking
During the talking, tap Option to activate the menu, which may complete the following functions: Hold,
Mute, New call, Phonebook and Create SMS.
Select Hold to hold the current talk (related with SIM card), at this time both parties can not hear the
voice, meanwhile the menu changes to Active, select this menu to return to normal talking;
Select Mute to pause voice of current talkin g, a t th i s ti me you can hear the voice of other side, but it can
not hear your voice, which facilitates you to talk with other local person to during the talking. The menu
changes to Unmute, select this menu to return to normal talking;
Select New call to make the second phone call, or press number keys to make a new call during the
talking, then tap OK or press camera key to dial out phone;
Select Phonebook to enter phone book screen, and implement the corresponding operation, which
facilitates to search a phone number during the dialing;
Select Create SMS to enter new short message screen and complete the corresponding operation (refer
to section 8.2).
When dialing the extension, after hearing the prompt voice of the other side, tap
or press camera
key to dial panel for dialing the extension number, and only extension number displays on the screen. When
extension dialing completed, tap Back to display the number of switchboard.
During the talking, tap Speaker to talk in handfree,at this moment, Speaker becomes Receiver,ta p
Receiver to resume the normal talking。
2.4.1 Adjust volume
Press side up/down key to increase or decrease the receiver volume. The key position refers to the
picture within section 1.4。
2.4.2 Reject the call
Press Pwr key or tap Reject to end the call. After the rejection, the duration of talking will display.
2.4.3 New message
During the dialing phone, if there is new message, the phone will have prompt voice to remind you.
Page 25

N3306 User manual
第 23 页
2.4.4 Answer the new call
Refer to section 2.3 for the operation and content of answering the call, the different point is that after
answering a new call, the previous call will keep hold. The previous talking can be activated by tap Active,
and the new call will keep hold. Refer to section 2.4.5 for operation about answering two calls
simultaneously.
2.4.5 Answering two calls simultaneously
When answering two calls, the current talking number displays at the first line, the other call will keep
hold; two calls can be switched by tapping Active.
When the second call is active, activate Option and implement the following functions: Switch, Drop,
Mute, Conference (related with SIM card), Phonebook and Create SMS.
Select Switch to switch the call;
Select Drop to reject current talking, so does press Pwr key;
Select Mute to pause voice of current talkin g, a t th i s ti me you can hear the voice of other side, but it can
not hear your voice, which facilitates you to talk with other local person to during the
talking. The menu changes to Unmute, select this menu to return to normal talking.
Select Conference to hold conference call or talk with the specified participant separately;
Select Create SMS to enter new short message screen and complete the corresponding operation (refer
to section 8.2);
Select Phonebook to enter phone book screen, and implement the corresponding operation, which
facilitates to search a phone number during the dialing.
When dialing the extension, after hearing the prompt voice of the other side, tap
or press camera
key to dial panel for dialing the extension number, and only extension number displays on the screen. When
extension dialing completed, tap Back to display the number of switchboard.
During the talking, tap Speaker to talk in handfree,at this moment, Speaker becomes Receiver,ta p
Receiver to resume the normal talking。
2.4.6 Conference
During the conference talking, conference call can be held or talk with the specified participant
separately . Tap Option to complete: Hold, Mute, New call, Conference list, Phonebook and Create SMS.
Select Hold to hold the current talk (related with SIM card), at this time both parties can not hear the
voice, meanwhile the menu changes to Active, select this menu to return to normal talking; or directly tap
Active or Hold;
Select Mute to pause voice of current talking, at this time you can hear the voice of other side, but it can
not hear your voice, which facilitates you to talk with other local person to during the talking. The menu
changes to Unmute, select this menu to return to normal talking;
Select New call to make the second phone call, or tap
to make a new call during the talking, then
tap
or press camera key to dial out phone;
Select Conference list to enter the window of conference list, tap Option to activate , which may End
and Split,select End,end the talking with all members;select Split,split the member selected from
conference talking;
Page 26

N3306 User manual
第 24 页
Select Phonebook to enter phone book screen, and implement the corresponding operation, which
facilitates to search a phone number during the dialing.
Select Create SMS to enter new short message screen and complete the corresponding operation (refer
to section 8.2.
When dialing the extension, after hearing the prompt voice of the other side, tap
or press camera
key to dial panel for dialing the extension number, and only extension number displays on the screen. When
extension dialing completed, tap Back to display the number of switchboard.
During the talking, tap Speaker to talk in handfree,at this moment, Speaker becomes Receiver,ta p
Receiver to resume the normal talking。
If a new call comes during the conference talking, please refer to section 2.4.4 for processing.
2.5 Emergency call
In any country using the digital GSM network, if your phone is within the area covered by network (it
can be aware by checking network signal intensity on top right corner of screen.), you can call the emergency
service. if your phone is within the area covered by network, you can make an emergency call even you ha ve
not SIM card.
”911” is a standard emergency number of GSM, which can be used in any GSM network of
the world.
Page 27

N3306 User manual
第 25 页
3 Menu operation
This section will help you get to know the function and structure of the mobile phone’s menu, and in
detail explain how to user-define the functions of mobile phone for meeting your needs, moreover represent
you how to use basic operation function.
3.1 Structure of main menu
The function menu of the mobile phone contains: Settings, Music player, WAP, My favorites, Messages,
Phonebook, Entertainment, Call history and Accessory.
3.2 Selection of main menu
In the menu screen, tap the menu icon to enter the corresponding menu.
3.3 Other selection modes
In the idle screen, all function keys define the special menu function, which facilitates you to directly
enter menu function, illustrated as following:
Note: if the phone is locked, unlock it before use.
The default shortcut keys of special function are as follows:
Function key Items of function menu
Side up key
Short press: adjust the ring volume;
long press : toggle Meeting mode
Side down key
Short press: adjust the ring volume;
long press : toggle Meeting mode
Power key
Short press: Return to idle screen;
long press : power on/off
Snd key Short press/long press : enter call history screen
Camera key Short press/long press : enter camera screen
MP3key
Long press: start MP3 player when flip off , then short
press to paly the music
3.4 Function table of menu
Settings
Phone
Phone modes
Display
Calls
Security
Network
My menu
Connection profile
Calibration
Reset
Music palyer
WAP
Homepage
Bookmark
Go to URL
Go to last page
History
Offline browse
Page 28

N3306 User manual
第 26 页
Settings
GPRS info
My favorites
Video
Sound
Picture
Music
Java box
Memory card
Storage status
Messages
Create
Inbox
Outbox
Sent
Drafts
My folder
Voice mail
Phonebook
Entertainment
Games
Java box
Call history
Missed calls
Received calls
Dialed calls
Accessory
Camera
Alarm
Schedule
Tools
Connection tools
STK
Page 29

N3306 User manual
第 27 页
4 Settings
4.1 Phone
“Phone” is to set the service status of mobile phone, which includes Receiver volume, Folder answer,
Date & Time, Language and Side key lock.
4.1.1 Receiver volume
Press side up/down key to increase or decrease the receiver volume. The key position refers to the
picture within section 1.4。
4.1.2 Folder answer
To set folder answer on/off.
4.1.3 Date & Time
To set the time, date and corresponding format, use side up/down key to select the content, or tap the
content needed to modify to enter the corresponding window for modification:
Show clock:time displays in the idle;
Set time:to set the correct time;
Tim e format
:
to adjust the format of the time;
Date
:
to input the correct date;
Date format
:
to set the format of the date.
4.1.4 Language
In the window of “Language”, there are two choices namely simplified Chinese and English,use side
up/down key to select view the effect when setting,finally tap Select or press camera key or tap the
corresponding menu, confirm the content needed to modify;tap Back to cancel the content selected。
4.1.5 Side key lock
Using this function, the side key will lock automatically after each power on to avoid wrong operation.
Note: Side key lock only is valid when flip off.
4.2 Phone Modes
Phone modes are a group of preset characteristic definition, which is easy and quick to start. The mobile
phone provides a group of default modes including Normal mode、Meeting mode、Car mode、Pocket
mode、Offline、Personal. Every mode has a set of default value, and the user can change and save the mode
according to ones favorite.
4.2.1 Startup the mode
When select the mode needed, use side up/down to select the content, and tap Select or press camera
Page 30

N3306 User manual
第 28 页
key or directly tap the item to start up, at this moment, the current working mode of mobile phone will set
completely according to the selected mode.
4.2.2 Personal Setup
In the screen of mode, tap Edit to enter the Personal Setup, which the user can use it to set the
parameter of each mode, including the following items:
Ring tone to set the ring tone of incoming calls among Sounds and Music,Enter the screen of sound,
tap Play to play the ring tone selected,tap Stop to stop playing; tap Set or tap the name of ring tone or
press camera key to set it as ring tone;
Ring volume to adjust the volume of incoming calls, use side up/down or tap the volume icon to
increase/decrease the volume ;tap OK or press camera key to complete setting, and the phone prompts
“Ring tone set”;
Ring type to set the alert type of incoming calls,for instance:if
连续
is expected, only use side
up/down to select
连续
, tap OK or press camera key or tap the corresponding menu to confirm the selection,
and the phone prompts “Ring tone set!”;
SMS tone to set the ring tone of SMS among Sounds and Music,Enter the screen of sound, tap Play to
play the ring tone selected,tap Stop to stop playing; tap Set or tap the name of ring tone or press camera
key to set it as ring tone;
MMS tone to set the ring tone of MMS among Sounds and Music,Enter the screen of sound, tap Play
to play the ring tone selected,tap Stop to stop pl aying; t ap Set or tap the name of ring tone or press camera
key to set it as ring tone;
Msg volume to adjust the volume of messages, use side up/down or tap the volume icon to
increase/decrease the volume ;tap OK or press camera key to complete setting, and the phone prompts
“Ring tone set”;
Key tone to set the key tone on/off;
Alarm volume to adjust the volume of alarm, use side up/down or tap the volume icon to
increase/decrease the volume ;tap OK or press camera key to complete setting, and the phone prompts
“Ring tone set”;
Power on/off tone to set the tone of power on/off;
Vibrator to set the vibrator of power on/off;
SHF auto answer to set SHF auto answer on/off。
4.3 Display
Display includes:Wallpaper、Color style、Brightness and Backlight time。
Wallpaper to choose the favorite pictures as wallpaper from preset、photos、painter、download and
picture in card。Tap Preview to view the picture,tap Full to view the picture in full screen,press side
up/down key to view the previous or next picture。Tap Back to previous menu。In the screen of picture
view,activate Option to do the operation of wallpaper、Auto view and property;
Color style there are four choices to select, use side up/down key to select view the effect when
setting,finally tap Select or press camera key or tap the corresponding menu, confirm the content needed
to modify。Tap Back to cancel the content selected;
Clock style to set the clock style of sub LCD, tap Preview or press camera key to view the clock,tap
Set to set the style as current clock;
Brightness to set the background brightness among High、Normal、Power saving,after selecting ,
Page 31

N3306 User manual
第 29 页
tap Select,tap the corresponding menu, confirm the content needed to modify。Tap Back to cancel the
content selected;
Backlight time to set the background Backlight tine among 5 sec、15 sec、30 sec、60 sec,tap
Select or press camera key or tap the corresponding menu, confirm the content selected。
4.4 Calls
“Calls” is to confirm whether to use the call function or not. When entering the function, it will always
show the practical setting.
4.4.1 Call diversion
“Call diversion” is to transfer calls to the specified phone according to your request.
Within the setting of “Call diversion”, its success depends on network and SIM card. Mobile phone will
prompt the setting properly.
When setting the option, you need to input the correct phone number for correctly transferring the call
to the specified phone. If it is failed, please check the transferred number set in the mobile phone is correct or
not.
Unconditional when the option is set, all calls will be transferred to the specified number;
Busy when the option is set, the incoming call will be transferred to the specified number when your
mobile phone is busy;
No Reply when the option is set, the incoming call will be transferred to the specified number when you
do not answer the call;
Unreachable when the option is set, the incoming call will be transferred to the specified number when
you are not in the service area (For example, when the network signal is not good or the signal environment
is very poor);
Cancel diverts to select the call diversion which is needed to cancel, press OK key to cancel the
diversion, press Back key to the return the last menu;
Status to view the diversion status of all current calls.
4.4.2 Call waiting
“Call waiting” is to set whether permitting the call waiting or not. If it is closed, the phone is busy. For
example, when the third part is calling and it hears the busy tone.
4.4.3 Auto redial
“Auto redial” is to set whether permitting to redial automatically or not. Select On the system will redial
when the dialed call does not get through; select Off the system will not redial when the dialed call does not
get through.
4.4.4 Send my number
“Send my number” is to select whether displaying your own phone number on the phone of other side or
not. The function needs the support of the network provider.
Note: the function needs the support of the network.
Page 32

N3306 User manual
第 30 页
4.4.5 Quick dial
“Quick dial” can be set in the mobile phone. This is to use the number key of 2 ~9 to represent different
phone number. When using on the idle screen, long press some certain number of 2~9 to dial the
corresponding number. If the number key is not set with the phone number, the mobile phone will prompt
“Phone number is empty”.
After enter the screen of setting the quick dial, there is different prompt for various situation of setting
quick dial according to the number key selected. If the number key has been set as quick dial, the bottom of
mobile phone will display the number and contact person specified; if not, it will display “Not bind”.
To bind the number, tap Set to enter the number editing screen for inputting the number manually or get
the number from phonebook.
To cancel the binding, tap Delete to delete the binded number, and then tap OK to confirm and it will
prompt.
4.4.6 Minute tone
“Minute tone” is to set the minute prompt on off. If it is on, there will be minute prompt in the process
of call. If off, then there is no minute prompt at all.
4.4.7 Call filter
Call filter can provide you with the prevention from disturbed calls, which has “White list” and “Black
list”。 “Black list” is to save your undesired calls (10 persons are most)。“White list” is to save your
desired calls (10 persons are most)。Only one item can be enabled once.
4.4.8 IP code
IP code setting:input IP code needed,the preset code is “17951” without setting,and the effect is
same with normal call。
4.5 Security
The menu of “Security” includes the following settings: PIN、Phone lock、PIM、Change password、
Bar calls。
4.5.1 PIN
On:enable PIN card of SIM card。To power on the phone with inputting PIN code, or dial emergency
call 112。
Off:disable PIN card of SIM card,To power on the phone without inputting PIN code。
4.5.2 Phone lock
This function is to prevent other person from using the phone without permission. After lock the phone,
the password is needed to unlock it. The default is 1234, and you can change it from Settings ->Security-
>Change password.
At once
:
select this item, and input the correct password to lock the phone at once ;
Page 33

N3306 User manual
第 31 页
Auto:Input the correct password, the phone will lock automatically;
Off:Input the correct password to turn off the phone lock。
4.5.3 PIM
PIM protect is the Personal Information Manager code. You must enter this code before you access
important personal information such as Phonebook, Messages, Call History, My favorites, Schedule and
notepad so that it can prevent others from viewing the information without your authorization. The default
setting of PIM code is 1234.
On/Off :When PIM code is on, you are prompted to enter the code if you want to view any personal
information. When PIM code is off, you do not need to enter the code when viewing personal information
and the information will not be protected.
Protected items
:
to set the protected items, and the correct password is needed。Enter the screen of
protected items, tap the items for protection then tap OK to confirm the setting, and the system will prompt.
4.5.4 Change password
PIN: modify PIN password;
Phone/PIM
:
modify phone/PIM password。
4.5.5 Bar calls
The network operators will provide you with a 4-digit password (0000)to enable or disable this
function.
Incoming calls:
• When roaming: Reject all incoming calls when roaming.
• All incoming: Reject all incoming calls.
Outgoing calls:
• International: All outgoing international calls cannot be dialed out;
• Local calls: Only local calls can be dialed out;
• All outgoing: All calls cannot be dialed out.
Cancel all
:
Cancel all bar calls. The correct password is needed (The default password is
0000.).
Change password:
• Change restriction password of call: You can change the restriction password provided by
the network.
4.6 Network service
When your mobile phone is roaming abroad, you need to select the network for it to connect the
international GSM network. Generally, you can select the network mode of auto select (see below), or you
also can select to search the available network automatically or manually (see below)
. If you attempt to
connect a network which does not have the
valid roaming agreement you local network, the mobile phone will
prompt”
“Network connection failed”.
Automatic:Your mobile phone will search the original network first, and then search through the
network list in SIM card. If there is no available network, any network which has the valid roaming
agreement with your local network will be connected.
Page 34

N3306 User manual
第 32 页
Manual: Your mobile phone will scan for available network and provide you with the list of current
network. You can select the preferred network, and the phone will prompt such information as successful or
failed during the connection with network.
Preferred network
:
to view the name and ID of current network, tap Back to previous menu;
GPRS attach:to choose between “Always attach” and “Attach when using”。
4.7 My menu
To enter the window of My menu, and tap Option:Replace,list the spare items(9 items most),
select the item portended to add in My menu, tap Select or press camera key to confirm adding(Only
Create is available when My menu is empty.);after adding,tap Option to Insert before insert before the
item selected;Insert after insert after the item selected;Replace:replace the current item to another
one;Delete:delete the item selected;Delete all:delete all items。
4.8 Connection profile
To set the connection method to visit network, activate Option:
Save as:to save the changed connection setting of network as other setting. The system
setting will not be covered, and it will prompt;
Profile
:
to select the connection method to visit network among WAP, MMS and Java;
View
:
to view the name, homepage and bearer type and so on of current connection;
Tap the connection of non-system setting,and then tap Edit to enter the window of
connection setting to complete the following operations:
Profile title:to view or edit the name of profile;
Homepage:to view or change the address of homepage;
Gateway: include IP address ( for example 010.000.000.172 for CMCC); Port
number (for example 9201 for CMCC);Connect type:to select between HTTP
and WSP。
Bearer type:to select the bearer type of network visited, use side up/ down key to highlight
the type you wanted, tap Select to activate it:
♦ GPRS only:only use GPRS network;
♦ CSD only:only use CSD network。
GPRS settings:to change the connection setting of GPRS,select the setting needed to
change, tap Select to enter corresponding window:
♦ APN:to set the name of network;
♦ User name:user name of network service;
♦ Password:password of network service。
CSD settings:to change the connation setting of CS,select the setting needed to change,
tap Select to enter corresponding window:
♦ Dial-up number:dial-up number for network service;
♦ Call type:to set the call type between ISDN and Analogue;
♦ User name:user name of network service;
♦ Password:password of network service。
DNS settings
:
input DNS address 1 and DNS address 2。
Page 35

N3306 User manual
第 33 页
4.9 Calibration
When you feel the phone cannot react inaccurately after you use the touchpen to tap some place on the
screen,
calibration is needed, which ensures the touch screen of phone can react correctly for
tapping action.
1. on the screen of “Settings”,tap “Calibration” to enter the calibration screen;
2. use the touchpen to tap the center of cross according to the hint. After threw times, the screen
displays “Calibration OK”。
4.10 Reset
4.10.1 Reset settings
“Reset settings” is to resume all original default value. After selecting, the system will prompt “Input
security code”, then input correct password to reset, and it will prompt “Master Reset”. After confirming, the
system resumes the default value and prompts “Master resetting”. Using this function will not clear the data
of phonebook and message saved by you own. It only changes the setting of the working environment, such
as the selection of ring tone and phone modes, etc.
4.10.2 Reset all
“Reset all” is to resume all original default value. After selecting, the system will prompt “Input security
code”, then input correct password to reset, and it will prompt “Reset all?”. After confirming, the system
will prompt “Deleting all files”. Using this function will clear the data of phonebook and message saved by
you own. It only changes the setting of the working environment, such as the selection of ring tone and
phone modes, etc. After completion, the phone will power off automatically, and it is needed to restart.
Page 36
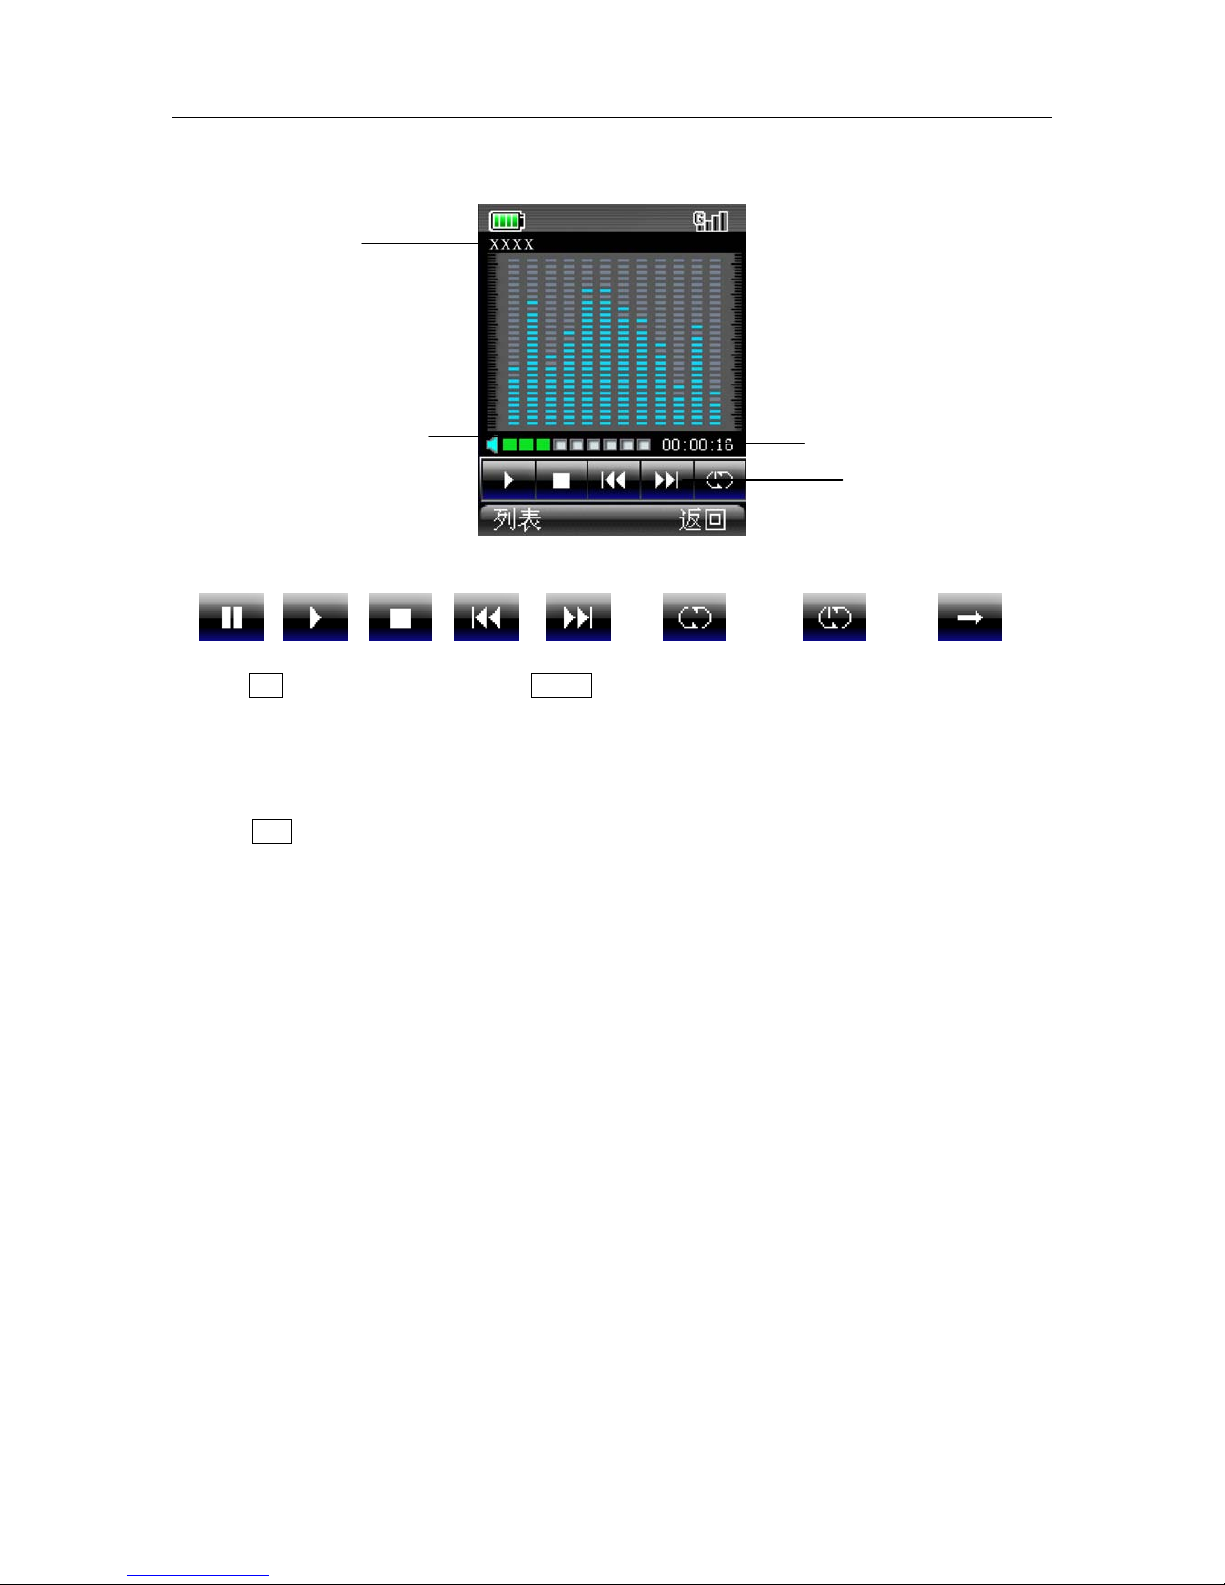
N3306 User manual
第 34 页
5 Music player
On the play screen, tap the control key to realize the function control:
Pause Play Stop Previous Next Cycle all Single cycle No cycle
Tap List to enter the music list then tap Option to:
Select Add: add the selected music from phone or memory card;
Select Delete: delete the selected music;
Select Deleat all: Deleat all the music;
Select View detail: view all contents relating to the selected music such as name, size, and format.
Tap Play to play the music, press camera key to switch the mode. During the palying, press side
up/down to increase/decrease the volume。
During the playing when flip off, long press camera key to lock or unlock the key.
File name
Volume
Control key
Playing time
Page 37

N3306 User manual
第 35 页
6 WAP
The phone has WAP function, which can be used to view Wireless Mark-Up Language (WML) used in
webpage, and make you keep close touch with the whole world and provide more convenience to access the
web.
T o use WAP, you need:
1. Please consult your network operator and service provider whether they provide the service and related
information of price and how to use the service;
2. Set WAP explorer correctly on your phone
3. Use WAP explorer to view webpage and make other operations.
The phone has GPRS function which can be used to access webpage by the way of both normal data
calling and GPRS based on GSM network.
Note: Using GPRS function to access webpage depends on whether network operator provides the
function and whether you apply for it.
6.1 Menu of WAP explorer when offline browse
6.1.1 Homepage
Homepage can make user access internet easily and directly. Scroll to Homepage and tap Select or
press camera key to access homepage.
6.1.2 Bookmark
Bookmark is used to save desired websites and set them by names for easily to remember. You can view
websites stored in bookmark, and scroll to Bookmark, tap OK or press camera key to enter the window of
bookmark; tap Option to select Go to URL view websites in bookmark, press Pwr key to cancel logging on;
select View to view the title of current bookmark selected and the information of URL; select Edi t to edit the
bookmark; select Rest to reset the bookmark as initial content. If the bookmark is not set, only Edit is
available.
6.1.3 Go to URL
Input desired website, then tap OK to view it.
6.1.4 Go to last page
To view the webpage visited for the last time, scroll to Last page tap OK or press camera key to browse
this webpage, or directly tap Last page to log on the website.
6.1.5 History
To view the history of websites address browsed,tap Option to select Delete:delete the histry
selected;select Delete all:delete all history。
Page 38

N3306 User manual
第 36 页
6.1.6 Offline browse
During the browse, tap Option to select Save snapshot,to save the current webpage you browse.
When offline browse, tap Option to select browse to browse the webpage saved; select Delete to delete the
webpage saved; select Delete all to delete all WebPages saved.
6.1.7 Settings
To set Connection profile、Clear cache、Image download、Background music and Security:
1. Connection profile:enter the window of Connection profile,tap Active or press camera key to
activate the profile;
2. Clear cache:to clear the cache of browse;
3. Image download: to set the download of images on/off;
4. Background music:to set the background music on/off;
5. Security:to set the function of security on/off。
6.1.8 GPRS info
To view the information of GPRS,scroll to GPRS info,tap OK or press camera key to enter the
window for viewing GPRS info of sent and received,as well as clearing the history。
6.2 Menu of WAP explorer when online browse
When online browse, tap Option:
Add to bookmark:add the current URL as bookmark ;
Homepage: browse the homepage which ha been set;
Bookmark
:
enter the bookmark menu to do the corresponding operation;
Go to URL:input the website desired to browse,tap OK to browse the webpage;
Refresh:to refresh the webpage for linking again;
Stop
:
to stop browsing;
Activate Option,select Show URL display the URL of current webpage ,tap Option to select Add to
bookmark add the current URL as bookmark;select Send URL
send the current URL as message。
select Save snapshot save the current webpage for offline browse。
select Save picture save the current picture to “My favorites” (It is available only
when the cursor is on the picture.)
select Save music save the current music to “My favorites” (It is available only
when the music is playing.)。
Offline browse
:
to browse the webpage saved offline;
History
:
to view the history;
Settings
:
to set the operations including、Image download and Background music;
GPRS info: to view GPRS info。
Select Back to enter the previous webpage within history;tap Back or press Pwr key to exit the
browser。
Page 39

N3306 User manual
第 37 页
7 My favorites
7.1 Multimedia resource
“My favorites” is used to browse, set, and utilize pictures and music resources in the mobile phone, as
well as inquire about the capacity. (If PIM security password is set, the correct password is required to enter
the window of My Favorite, the detailed content of PIM security password refers to section 4.5.3).
7.2 Usages of resource
The multimedia resource has different usages according to various types.
Picture: used for the background of desktop;
Music: used for all kinds of prompt voices in mobile phone as following:
z Incoming calls
z SMS
z MMS
z Calendar
z
Alarm
Note: The prompt voice of system does not belong to this scope except the option of on/off, such as
minute tone, etc.
7.3 Video
Some videos you shot are saved in video, tap Play to view the effect of videos, the detailed operation
refers to section 12.1.2. In the window of play list, tap Option to activate the menu:
Select Rename:change the name of video selected;
Select Delete:delete the video selected;
Select Multi-delete:enter the window of play list,press side up/down key to select the checkbox of
item,tap OK or press camera key to confirm the deletion。(During the process of Multi-delete,
tap Option to select all or cancel to select all.);
Select Delete all: delete all videos;
Select View detail:to view the name, date, size, format and DRM of video。
7.4 Sound
7.4.1 Download
Some sounds you downloaded are saved in Download, enter the window of play list, press side
up/down key to select sound, tap to play it. Tap Stop to stop it. Tap Option:
Select Rename:change the name of sound to your own favorite one;
Select Send MMS: send the sound as MMS;
Select Set as ring tone:after selecting, set the sound as ring tone of incoming calls, SMS, MMS,
WAP and schedule;
Select Delete:delete the sound selected;
Select Multi-delete:enter the window of play list,press side up/down to select the checkbox of
item,tap OK or press camera key to confirm the deletion。(During the process of Multi-delete,tap
Option to select all or cancel to select all.);
Select Delete all: delete all sounds;
Select View detail:to view the name, date, size, format and DRM of sound.
Page 40

N3306 User manual
第 38 页
7.4.2 Preset
Some preset sounds are saved in Preset,enter the window of play list, press side up/down key to select
sound, tap to play it. Tap Stop to stop it. Tap Option:
Select Set as ring tone:after selecting, set the sound as ring tone of incoming calls, SMS, MMS WAP
and schedule;
Select View detail:to view the name, date, size, format and DRM of sound.
7.5 Pictures
7.5.1 Photos
Some photos you taken are saved in Photos and you can view the effect of photo in this window. Press
sideup/down key to select the photo which you want to view, tap Option:
Select Set as wallpaper:set the selected photo as wallpaper;
Select Send MMS: send the photo as MMS;
Select Full screen view:view the photo in full screen;
Select Auto view:view the photo automatically;
Select Rename:change the name of photo to your own favorite one;
Select Delete:delete the selected photo;
Select Multi-delete:enter the window of play list,press side up/down to select the checkbox of
item,tap OK or press camera key to confirm the deletion.(During the process of Multi-delete,tap
Option to select all or cancel to select all.);
Select Delete all: delete all photos;
Select View detail:to view the name, date, size, format and DRM of photo.
Tap Preview to view the effect of photo,tap Full to view the photo in full screen,enter the display
window,activate Option:
Select Set as wallpaper:set the selected photo as wallpaper;
Select Send MMS: send the photo as MMS;
Select Auto view:view the photo automatically;
Select Delete:delete the selected photo.
7.5.2 Download
Some photos you downloaded are saved in Download and you can view the effect of photo in this
window. Press side up/down key to select the photo which you want to view, tap Option:
Select Set as wallpaper:set the selected photo as wallpaper;
Select Send MMS: send the photo as MMS;
Select Full screen view:view the photo in full screen;
Select Auto view:view the photo automatically;
Select Rename:change the name of photo to your own favorite one;
Select Delete:delete the selected photo;
Select Multi-delete:enter the window of play list,press side up/down to select the checkbox of
item,tap OK or press camera key to confirm the deletion。(During the process of Multi-delete,tap
Option to select all or cancel to select all.);
Select Delete all: delete all photos;
Select View detail:to view the name, date, size, format and DRM of photo.
Tap Preview to view the effect of photo,tap Full to view the photo in full screen,enter the display
window,activate Option:
Page 41

N3306 User manual
第 39 页
Select Set as wallpaper:set the selected photo as wallpaper;
Select Send MMS: send the photo as MMS;
Select Auto view:view the photo automatically;
Select Delete:delete the selected photo.
7.5.3 Preset
Some preset photos are saved in Preset,enter the window of photo list, press side up/down key to
select photo, tap Option:
Select Property:to view the name, date, size, format and DRM of photo.
Tap Preview to view the effect of photo,tap Full to view the photo in full screen,enter the display
window,activate Option:
Select Set as wallpaper:set the selected photo as wallpaper;
Select Full screen view:view the photo in full screen;
Select Auto view:view the photo automatically.
Select View detail:to view the name, date, size, format and DRM of photo.
7.6 Music
Some music you downloaded is saved in Music, tap Play to view the effect of videos, the detailed
operation refers to section 12.1.1. In the window of play list, tap Option:
Select Rename:change the name of music selected;
Select Set as ring tone:after selecting, set the music as ring tone of incoming calls, SMS, MMS,
WAP and schedule;
Select Delete:delete the selected music;
Select Multi-delete:enter the window of play list,press side up/down key to select the checkbox of
item,tap OK or press camera key to confirm the deletion。(During the process of Multi-delete,
tap Option to select all or cancel to select all.);
Select Delete all: delete all music;
Select View detail:to view the name, date, size, format and DRM of music。
7.7 Memory card
To view the video, picture and music saved in the memory card.
7.7.1 Video
Some videos you shot are saved in My video, tap Play to view the effect of videos, the detailed
operation refers to section 12.1.2. In the window of play list, tap Option to activate the menu:
Select Rename:change the name of video selected;
Select Delete:delete the video selected;
Select Multi-delete:enter the window of play list,press side up/down key to select the checkbox of
item,tap OK or press camera key to confirm the deletion。(During the process of Multi-delete,
tap Option to select all or cancel to select all.);
Select Delete all: delete all videos;
Select View summary:to view the name, date, size, format and DRM of video。
7.7.2 Picture
Some photos you taken are saved in Photos and you can view the effect of photo in this window. Press
sideup/down key to select the photo which you want to view, tap Option:
Select Set as wallpaper:set the selected photo as wallpaper;
Page 42

N3306 User manual
第 40 页
Select Full screen view:view the photo in full screen;
Select Auto view:view the photo automatically.
Select Rename:change the name of photo to your own favorite one;
Select Delete:delete the selected photo;
Select Multi-delete:enter the window of play list,press side up/down to select the checkbox of
item,tap OK or press camera key to confirm the deletion。(During the process of Multi-delete,tap
Option to select all or cancel to select all.);
Select Delete all: delete all photos;
Select View summary:to view the name, date, size, format and DRM of photo.
Tap Preview to view the effect of photo,tap Full to view the photo in full screen,enter the display
window,activate Option:
Select Set as wallpaper:set the selected photo as wallpaper;
Select Auto view:view the photo automatically;
Select Delete:delete the selected photo.
7.7.3 Music
Some music you downloaded is saved in Music, tap Play to view the effect of videos, the detailed
operation refers to section 12.1.1. In the window of play list, tap Option:
Select Rename:change the name of music selected;
Select Set as ring tone:after selecting, set the music as ring tone of incoming calls, SMS, MMS,
WAP and schedule;
Select Delete:delete the selected music;
Select Multi-delete:enter the window of play list,press side up/down key to select the checkbox of
item,tap OK or press camera key to confirm the deletion。(During the process of Multi-delete,
tap Option to select all or cancel to select all.);
Select Delete all: delete all music;
Select View summary:to view the name, date, size, format and DRM of music。
7.7.4 Format
To format the memory card via phone, select My favorites
-
Memory card-Format。
Note:After format, the file saved on the memory card will loss.
7.8 Storage status
It queries the situation of used space by Video, Sound, Picture, Music and Java. It also shows the used
space and the total space.
Page 43

N3306 User manual
第 41 页
8 Messages
This section will introduce message services supported by GSM. Some service may be not supported by
local or roaming GSM.
8.1 Messages
Your phone can receive the edited text message via the service center. You also can send a new message
or reply a message (via the service center) if the network supports. If your service provider supports message
service, you can receive/send messages optionally. (If PIM security password is set, the correct password is
required to enter the window of Messages, the detailed content of PIM security password refers to section
4.5.3).
The functions of messages include: Create, Inbox, Outbox, Sent, Drafts, My folder and Voice mail.
MMS(Multimedia Messaging Service, MMS)contains the content of word, pictures and sounds. You
can not only send or receive pictures and word, but also receive the file with sounds. (If PIM security
password is set, the correct password is required to enter the window of Messages, the detailed content of
PIM security password refers to section 4.5.3).
Note:MMS service needs the support of the network operator or service provider.
The phone only can receive MMS with 100KB most, if beyond this limit, it can receive this MMS but
can not read. At the same time, the phone only can send MMS with 100KB most.
The phone can receive MMS with more than one page, ie. Each page has one picture, one song and
word, and MMS contains much this kind of pages. If MMS has pictures, the phone will adjust the size for
display normally.
Note:you maybe need to pay fare for each sent MMS to the network operator or service provider。
MMS has the following format:
z Picture:
JPEG、GIF、WBMP、PNG。
z Sound:
MIDI、AMR、MP3。
If the messages received contains the nonsupported content, this content will not be displayed or
played or there is an error prompt。
Note:Many causes can cause to send MMS sent failed, so please do not use MMS to send the
important content.
8.2 Create
8.2.1 SMS
When create new message, select Create,and choose SMS within the type, tap Select or press camera
key to enter the edit screen of creating new message。
A)
Directly tap “To” to enter the screen of inputting the phone number; at this moment, tap PB to select the
number of contact person or select the contact person within the group from phonebook: PB to enter the
screen of contact person, press U or D key to select the receiver, or directly tap the checkbox in front of
receiver, tap OK to complete the section, then enter the screen of contact list and activate Option: Send to
send message; Create to add the receiver; Phonebook to enter the screen of contact person and add the
contact person; Groups to send the edited message to the group numbers; Delete to delete the selected
Page 44

N3306 User manual
第 42 页
receiver; Delete all to delete all receivers. When receivers are over 20, the phone prompts “Too many
selected”.
On the screen of “Create”, to operate as followings:
Select Send to send current message (It will be valid only when the contact person is added.);
Tap Back the system prompts “Exit with saving?”, which save this message into
Drafts for future use to avoid the repeated input。The content of Drafts refers to section
8.7(It is available only when the content is edited. )。
B) Content
Tap scroll bar to select “Content”, activate Option:
Select Insert contact to insert the contact person and corresponding number;
Select Insert quick text to insert frequent word about related subject provided by the phone in present
message to avoid the repeated input;
Select Save as quick text to save the message as quick text (It is available only when the content is
edited. );
Select Save to drafts to save the message.
Directly tap the content to enter the edit screen, which refers to section 1.5。
C) Send messages
Before sending message, you must input the number of SMS center. This step needs to be set only once,
please refer to 8.10.
When the message is sending, the phone will prompt “Send to…”; if sending is failed, the phone will
prompt “Send failed!” and the message which failed sending or unsent messages will save to “Outbox”.
If sending is successful, the phone will prompt “Sending successfully”, the sent message will be put into
“Sent”.
8.2.2 MMS
MMS(Multimedia Messaging Service, MMS)contains the content of word, pictures and sounds. If
MMS is beyond the limit, the phone can receive it but can not read. The phone only can receive 80 pieces of
MMS most. MMS centre will send the user a message for new MMS, and the user can select to receive
MMS automatically or manually.
When create new message, select Create,and choose SMS within the type, tap Select or press camera
key to enter the edit screen of creating new message。
A) TO
In the edit screen of MMS, select “To” to enter the edit screen of contact person to input new phone
number or email. In the edit screen, activate Option: Send to send message; Phonebook to enter the screen of
contact person and add the contact person; (At this moment, the email address can not be taken from
phonebook, and it is only available when enter the screen of detailed information of receiver. Then select the
email address, and select Send MMS after activate Option.)Groups to send the edited message to the group
numbers; Preview msg to preview the message; Information to view the information of receiver, subject, size,
date and time; Save to save MMS to Drafts (It is available only when the content is edited.)
B) Subject
Select “Subject” to enter the edit screen for inputting the subject of MMS.
Page 45
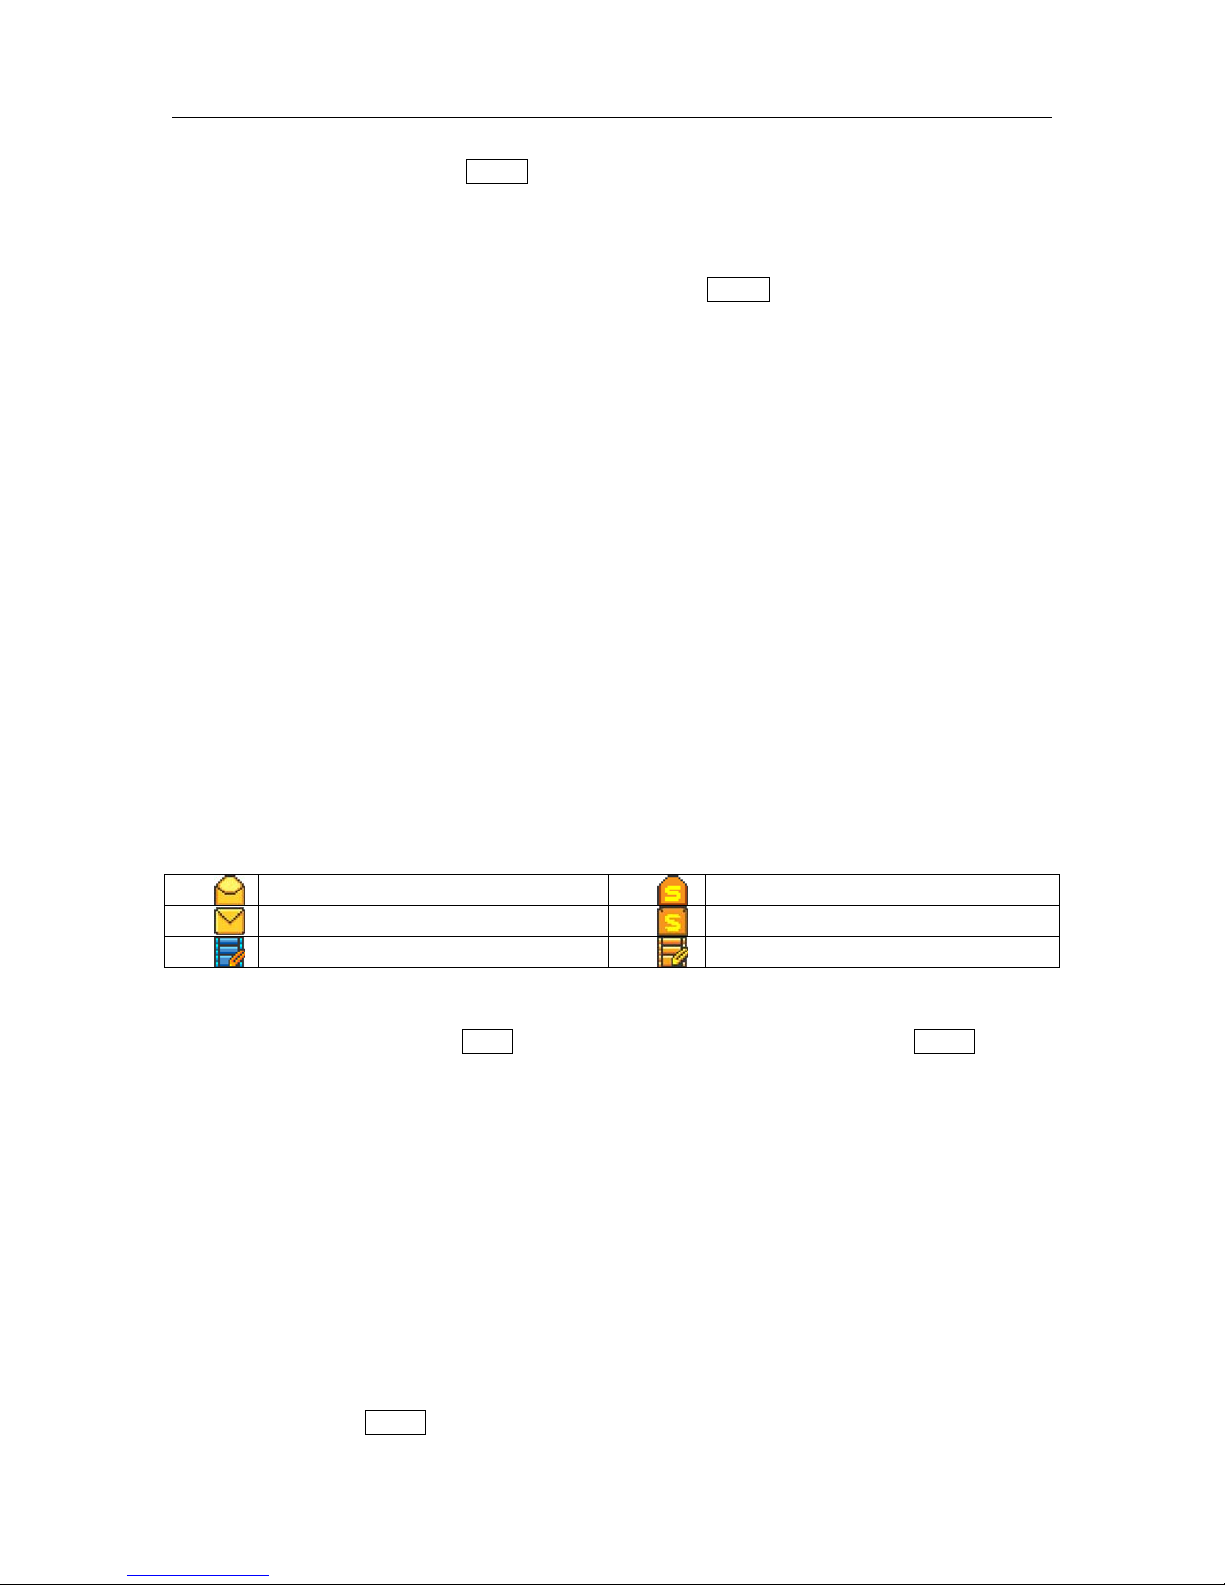
N3306 User manual
第 43 页
C) Content
Select “Content”,activate Option: Send to send message, if no contact person, it will enter the
screen of adding contact person;Preview msg to preview the message; Information to view the information
of receiver, subject, size, date and time; Save
:
to save MMS to Drafts(If not contact person, only Preview
msg, Information, Save are available)。
Directly tap to enter the edit screen of content, activate Option :Preview msg:to preview the
message;Arrange:to set the arrange of MMS among Text first and Picture first;Insert:to insert picture,
sound, video and text as the content of MMS(Note: the file on the memory card can not be inserted.);
Delete :to delete the content of MMS;Text editor:to edit the content of MMS;Multi-slide :to insert
new page for editing multiage MMS。
D) Send messages
If contact person is not available, to create it; if it is available, to enter the contact list to view or edit all
contact persons. Sending MMS will take more time than SMS. If sending fails, the messages will save to
“Outbox” for user to resend.
8.3 Receive message
When receiving a message, the phone will give a prompt sound (The setting of this character refers to section
4.2.2.) and then the message will be put into Inbox. The screen will display an icon of small envelope to
prompt there is a message you have not read yet (refer to section 1.3), and the message will be saved
automatically in the phone or SIM card (refer to section 8.10.). The maximum number of messages to be
saved (including those to be sent) is dependent on the storage capacity of the phone and SIM card.
8.4 Read message
“Inbox” is to store the messages received (including SMS, MMS, WAP PUSH and OTA). Each message
has an icon to indicate its status.(No icon of WAP PUSH)
Read messages saved on the phone
Read messages saved on SIM card
Unread messages saved on the phone
Unread messages saved on SIM card
Unread MMS
Read MMS
A) Read SMS
Select the message to read, tap Reply to reply the sender as SMS, MMS or call, and tap Option:
Select Read to read the message selected or directly tap the message to read it;
Select Forward to edit current message in the edit screen and forward it to the desired number; refer to
section 8.2.1;
Select Save sender number to save the phone number; refer to section 9.2;
Select Move to my folder to move the message to “My folder” (It is invalid for unread message.) in
order to reuse it, refer to section 8.8;
Select Delete to delete current message and back to “Inbox”, (If “Inbox” is empty, it will back to the
screen of message.);
Select Multi-delete to delete messages optionally, tap the checkbox in front of messages, tap OK or
press camera key to confirm the deletion;
Select Delete all to delete all messages in “Inbox”;
Select Sort to sort messages in “Inbox” by time or by type.
When reading, tap Option:
Select Forward to edit current message in the edit screen and forward it to the desired number; refer to
Page 46

N3306 User manual
第 44 页
section 8.2.1;
Select Get number to get the phone number or email address in messages and to save it to phonebook or
make a call;
Select Delete to delete current message and back to “Inbox”, (If “Inbox” is empty, it will back to the
screen of message.);
Select Copy to SIM card (phone) to copy the information from phone (SIM card) to SIM card (phone),
(Note:EMS can not be copy to SIM card or phone)。
B) Read WAP PUSH
Select the message to read, and tap Option:
Select Read to read the message selected or directly tap the message to read it;
Select Move to my folder to move the message to “My folder” (It is invalid for unread message.) in
order to reuse it, refer to section 8.8;
Select Delete to delete current message and back to “Inbox”, (If “Inbox” is empty, it will back to the
screen of message.);
Select Multi-delete to delete messages optionally, tap the checkbox in front of messages, tap OK or
press camera key to confirm the deletion;
Select Delete all to delete all messages in “Inbox”;
Select Sort to sort messages in “Inbox” by time or by type.
When reading, tap Option:
Select Go to directly link WAP;
Select Add to bookmark : to save the link address in message into bookmark;
Select Delete to delete current message;
C) Read MMS
Select the message to read, and tap Option:
Select Receive to receive MMS;
Select Delete to delete MMS.
After operation, tap Option:
Select Reply to reply the sender as SMS, MMS or call;
Select Forward to edit current message in the edit screen and forward it to the desired number; refer to
section 8.2.1;
Select Get number to get the phone number or email address in messages and to save it to phonebook or
make a call;
Select Delete to delete current message and back to “Inbox”, (If “Inbox” is empty, it will back to the
screen of message.);
Select Move to my folder to move the message to “My folder” (It is invalid for unread message.) in
order to reuse it, refer to section 8.8;
When reading, tap Option:
Select Reply to reply the sender as SMS, MMS or call;
Select Forward to edit current message in the edit screen and forward it to the desired number; refer to
section 8.2.1;
Select Get number to get the phone number or email address in messages and to save it to phonebook or
make a call;
Select Delete to delete current message and back to “Inbox”, (If “Inbox” is empty, it will back to the
screen of message.);
Page 47

N3306 User manual
第 45 页
Select Move to my folder to move the message to “My folder” (It is invalid for unread message.) in
order to reuse it, refer to section 8.8;
When reading, tap Play,then tap Option:
Select Save image to save the image in MMS;
Select Save audio to save the audio in MMS.
8.5 Outbox
“Outbox” is to view the details of messages (SMS and MMS) which failed sending, tap Option:
Select Resend to resend the message; refer to section 8.2;
Select Read to read the message selected or directly tap the message to read it;
Select Delete to delete current message and back to “Inbox”, (If “Inbox” is empty, it will back to the
screen of message.);
Select Multi-delete to delete messages optionally, tap the checkbox in front of messages, tap OK or
press camera key to confirm the deletion;
Select Delete all to delete all messages in “Outbox”;
Select Sort to sort messages in “Inbox” by time or by type.
When reading, tap Option:
Select Send to send the message; refer to section 8.2;
Select Edit to access the edit screen of message and edit the message, refer to section 8.2;
Select Delete to delete current message and back to “Inbox”, (If “Inbox” is empty, it will back to the
screen of message.).
As MMS, it has the operation View、Save image and Save audio when reading。
8.6 Sent
“Sent” is to view the details of messages which have been sent, then tap Option:
Select Read to read the message selected or directly tap the message to read it;
Select Move to my folder to move the message to “My folder” (It is invalid for unread message.) in
order to reuse it, refer to section 8.8;
Select Forward to edit current message in the edit screen and forward it to the desired number; refer to
section 8.2.1;
Select Delete to delete current message and back to “Inbox”, (If “Inbox” is empty, it will back to the
screen of message.);
Select Multi-delete to delete messages optionally, tap the checkbox in front of messages, tap OK or
press camera key to confirm the deletion;
Select Delete all to delete all messages in “Sent”;
Select Sort to sort messages in “Inbox” by time or by type.
When reading, tap Option:
Select Forward to edit current message in the edit screen and forward it to the desired number; refer to
section 8.2.1;
Select Delete to delete current message and back to “Sent”, (If “Sent” is empty, it will back to the screen
of message.).
8.7 Drafts
“Drafts” is store the messages which have not been edited or unsent, then tap Option:
Page 48

N3306 User manual
第 46 页
Select Delete to delete current message and back to “Drafts”, (If “Drafts” is empty, it will back to the
screen of message.);
Select Multi-delete to delete messages optionally, tap the checkbox in front of messages, tap OK or
press camera key to confirm the deletion;
Select Delete all to delete all messages in “Drafts”;
Select Sort to sort messages in “Inbox” by time or by type.
When reading, tap Option:
Select Edit to access the edit screen of message and edit the message, refer to section 8.2;
Select Delete to delete current message and back to “Drafts”, (If “Drafts” is empty, it will back to the
screen of message.).
8.8 My folder
“My folder” is to store messages delivered from inbox and outbox, activate Option key to operate as
followings:
Select Read to read the message selected or directly tap the message to read it;
Select Delete to delete current message and back to “My folder”, (If “My folder” is empty, it will back
to the screen of message.);
Select Multi-delete to delete messages optionally, tap the checkbox in front of messages, tap OK or
press camera key to confirm the deletion;
Select Delete all to delete all messages in “My folder”;
Select Sort to sort messages in “Inbox” by time or by type.
When reading, tap Option:
Select Edit to access the edit screen of message and edit the message, refer to section 8.2;
Select Forward to edit current message in the edit screen and forward it to the desired number; refer to
section 8.2.1;
Select Get number to get the phone number or email address in messages and to save it to phonebook or
make a call; refer to section 9.2;
Select Delete to delete current message and back to “My folder”, (If “My folder” is empty, it will back
to the screen of message.).
8.9 Voice mail
Voice mail service is a kind of network service. You can subscribe this service from your service
provider. The Voice mail centre number must be set before using this service. Select the screen of message,
highlight up/down the scroll bar to select the Voice mail, tap Select or press camera key to enter the screen of
Voice mail.
Select Listen to enter the screen of dialing, dial the number in the voice mail box and retrieve the voice
mails.
Select Edit to set the number in the voice mail box (Please contact the service provider for details of
number for your voice mail centre).
In the message screen, activate Option:
8.10 SMS settings
This function is to set parameter related to the operation of message such as SMS center、Validity
period、Delivery report、Storage type。
Page 49

N3306 User manual
第 47 页
Signature
To set Signature on/off。
SMS center
f supporting this service, the number of SMS center will be provided by your network operator.
Validity period
The maximum time to store messages has 4 options: 12 hours, 1 day, 1 week and maximum.
Delivery report
The function is to confirm whether the other side has received the message. If closing it, the function is
invalid.
Storage type
The save location of messages can be selected including SIM and phone. The storage capacity of SIM
card is limited, but when phone fails, the SIM card can be installed into other phone. The storage capacity of
phone is comparatively large, but when it fails all information can not be exported.
8.11 MMS settings
Connection profile:to set the profile of connection;
Send settings:to set Validity period、Read report、Delivery report、Priority。
Validity period: to select the validity period of storing messages in MMS center among 12 hours,
1 day, 1 week and maximum;
Read report:to enable the function of read report on/off。When the function is on, the network
will inform the user whether the message is read or not;
Delivery report:Two options: ON/OFF, which requires the gateway to send the delivery report;
Priority:Three options: Low、Normal and High。
Receive settings:to set the way of receiving and replying MMS。
Auto receive: Two options: Auto and Manual, which is to receive automatically or manually;
Reply:to set whether the system reply the other side automatically。
Filter:to set a filter list, and storage the number or email of contact person which not want to receive, then
the system will not receive MMS from these address. The filter list is most 20 items (phone number
or email address). If beyond this limit, the system will prompt “List full Can’t add!”. Tap Option:
Create to add new phone number or email; (20 most)
Edit to edit the selected content;
Delete to delete the selected content.
Delete to delete all content.
Tap View to view the selected message.
8.12 Reset
To resume all original default value as the system prompt,if so, the setting of message (SMS and
MMS) will resume to original default value。
8.13 Storage status
This function displays storage status for SMS, including phone and SIM card.
Page 50

N3306 User manual
第 48 页
9 Phonebook
This section describes various kinds of functions of phonebook. In main menu, press side key the
icon of phonebook to select the phonebook for entering the functions of phonebook (If PIM security
password is set, the correct password is required to enter the window of Messages, the detailed content of
PIM security password refers to section 4.5.3).
9.1 Grouping of phone book
In the phonebook of this mobile, all contact persons can be grouped. Among them, a special group is
SIM card group. The difference between it and other groups is: Its corresponding name can be only stored
for a telephone number. SIM card can keep some important telephone numbers at any time, and make you
find out the telephone number needed when use it on other mobile telephone. But for SIM card the number
of records and the character and figure of each record are limited, which is decided by the capacity of SIM
card.
Except SIM card group, other groups consist of many records and the contents of everybody's record
include Groups, Name, Mobile, Home, Office, Company, Department, Title, Fax, Address, Birthday, Email,
Memo and Portrait。
When creating a new record, it will be put into the default group if not specified.
9.2 Find
After entering the phonebook, tap Option to select Find, and the search types for selecting will display
as following:
Select Name: to input a special word to search the record with the special word within all recorded
names;
Select Number: to input a special phone number to se arch the record with the special phone number
within all recorded numbers.
9.3 Create
After entering into the phonebook, activate Option key and select the Create. Firstly to confirm the
storage type, including two options: “SIM” and “Phone”. If “full memory” appears, which means the mobile
phone’s memory has no enough space to save the record. The memory of phone must be cleaned up for more
space.
When the storage type is “Phone”, on the screen of new record, it may input Groups, Name, Mobiel,
Home, Office, Company, Department, Title, Fax, Address, Birthday, Email, Memo and Portrait.
Select Groups, directly tap the group icon to select the subgroup via side key, tap Select or press camera
key to confirm the selection or directly tap the group needed;
Input Name, Company, Department, Title, Address, Email and Memo, it will enter the edit screen of
character. Please refer to the section 1.5 for operation of editing character.
Input Mobile, Home, Office, Fax, Address and Birthday, it will enter into the dial panel, directly tap to
input the content, then tap Ok or press camera key for confirmation.
Select Portrait, tap the icon in the middle of screen or press camera key to enter the portrait list, then use
side key to view the CLI. Tap Set or press camera key to set it as CLI of contact person
After completing the input, tap OK or press camera key, the mobile phone will prompt “Successfully”.
When the storage type is “SIM”, it may only input name and one phone number.
Page 51

N3306 User manual
第 49 页
9.4 Copy
“Copy” is a shortcut provided to replace the mobile phone or copying the information. It is possible to
copy the records on the phone with multi-ways except. Company, Department, Title, Fax, Address, Birthday,
Email, Memo and Portrait can not be copied.
Copy current:copy the current contact of select person. If the contact is save on the SIM card, to
select the content among:Mobile、Home and Office;if saved on the phone, the 3
phone numbers of each record will save as 3 records with same names in SIM card;
Multi-copy:select the type of copying between From SIM and From phone.
Select From phone: copy to SIM card, the 3 phone numbers of each record will save as 3 records
with same names in SIM card.
Select From SIM: each record in SIM card will take one place in the phonebook of mobile phone, and
select the save place. When copying, the record will be copied to the Unfiled group in the
mobile phone. In the screen of multi-copy, select the person that needs to be copied, tap the
checkbox in front of item, tap OK or press camera key to confirm the selection. During
copying, tap Option to select Select all, Cancel all or View;
Copy all: choose the linkman that needs to be copied, then tap OK key for confirmation. You may
choose From SIM and From phone.
If the space is not enough during the copying, it will prompt “SIM card full, stop copying” and “Mobile
memory full, stop copying”.
9.5 Move
Move is a shortcut function provided for replacing the mobile phone and copying the information. If
moved, the original place will not save the content moved. It can move the phone records in the phonebook
with multi-ways. Company, Department, Title, Fax, Address, Birthday, Email, Memo and Portrait can not be
copied.
Move current:move the current contact of select person to phone or SIM card. If the contact is save
on the SIM card, to select the content among:Mobile、Home and Office;if saved on
the phone, the 3 phone numbers of each record will save as 3 records wit h same names in
SIM card.
Multi-move:select the type of moving between From SIM and From phone.
Select From phone: move to SIM card, the 3 phone numbers of each record will save as 3 records with
same names in SIM card.
Select From SIM: each record in SIM card will take one place in the phonebook of mobile phone, and
select the save place. When moving, the record will be moved to the Unfiled group
in the mobile phone. In the screen of multi-move, select the person that needs to be
moved, tap the checkbox in front of item, tap OK or press camera key to confirm
the selection. During moving, tap Option to select Select all, Cancel all or View;
Move all: choose the linkman that needs to be moved, then tap OK key for confirmation. You may
choose From SIM and From phone.
If the space is not enough during the moving, it will prompt “SIM card full, stop moving” and “Mobile
memory full, stop moving”.
9.6 Delete
The function of deleting the records in phonebook is set in this mobile phone. You can delete the
Page 52

N3306 User manual
第 50 页
records of SIM card and phone one by one or by package, and also delete them multiply. Select Delete the
system will prompt, tap OK or press camera key to delete the current highlighted data of the person selected,
tap Cancel not to delete the record.
9.7 Multi-delete
Select the type of deletion between From SIM and From phone. In the screen of multi-delete, select the
person that needs to be moved, tap the checkbox in front of item, tap OK or press camera
key to confirm the selection. During moving, tap Option to select Select all, Cancel all or
View.
9.8 Delete all
Select Phone to delete all record on the phone one-off;
Select SIM to delete all record on SIM card one-off;
Select All to delete all record on the phone and SIM card one-off。
9.9 Groups
Put the phone records into different groups as various property for convenient use。
The phone has 13 groups, and tap Option:
Select Send SMS send SMS to all group members;
Select Send MMS send MMS to all group members;
Select Edit to rename, select ring tone and group icon ( rename is not available for unfiled group).
In the group list, tap Select to enter the selected group, then tap Option to Add
、
Call、IP call、Send
SMS、Send MMS、Delete (group)、Delete (phone)、Delete all (group)、Delete all (phone)(Unfiled
group does not have Delete (group) and Delete all (group))。
9.10 Setting
9.10.1 Show type
To set the display type of contact list, including All, Phone and SIM.
9.10.2 My number
In the idle screen, enter the main menu, then select the options of “Phone book” “Option” and “My
number” in turn to input, change and view the own number. If no setting, it will enter the edit screen.
9.11 Storage status
The function of storage status Capacity is set in this mobile phone, which makes user clearly understand
the current usage situation of the mobile phone.
Storage status mainly provides the total and used amount of mobile phone and SIM card.
9.12 Phone list
List all the records in the phonebook according to the pronunciation of name and alphabet. After
selecting the record, you may tap Call to dial the telephone. Tap Option:
Select Call to dial out the phone number selected;
Select IP call to insert IP number in the front of the phone number then dial out (The function is needed
to set before use, and refer to section 4.4.8);
Select Send SMS to perform the function of SMS, refer to section 8.2.1;
Select Send MMS to perform the function of MMS, refer to section 8.2.2;
Page 53

N3306 User manual
第 51 页
Select S end name card to send out the content of name card as SMS, MMS or via Bluetooth, refer to
section 8.2 and 12.1.7.1.
Select Edit: to edit the content of records in the phone according to the new record;
Select Copy: to move the data selected to mobile phone (SIM card);
Select Move: to move the data selected to mobile phone (SIM card);
Select Delete: to delete the selected phone record.
9.13 Save telephone number
When you dial a new telephone (refer to section 2.2), inquiry the call history (refer to section 11) and
view SMS or MMS (refer to section 8.4), you may choose the option of saving telephone number in the popup menu to save it in the phonebook.
Note: the menu of saving telephone number doesn’t appear in the main menu.
Page 54

N3306 User manual
第 52 页
10 Entertainment
10.1 Games
10.1.1 Boxman
Push the box to the destination by tapping keys. When all boxes are in destination, game passes. If try
again, tap Replay or press camera key, game restarts.
10.1.2 Tasty fruit
Get three or more same fruit in a straight line then the fruit will disappear and you can get the score.
10.2 Java box
The wireless JAVA looks like a jewel box following with mobile phone. You may find all kinds of JAVA
software at any time. After downloading them, you may enjoy many services of Internet through mobile
phone such as downloading all kinds of games, cartoons, mini-novel, and so on. You may also carry out all
kinds of online applications such as network game, receiving or sending email, securities stock, information
query, etc. to change it into a game or stock machine.
10.2.1 Applications
To view the Java application downloaded, if no setting, it will display “No Java applications,use WAP
to download”。
10.2.2 Preset applications
The system has preset many Java games, and to operate the application according to the prompt of
system.
10.2.3 Download
To edit the address of bookmark。Select the bookmark needed to edit, press camera key or tap the
corresponding bookmark, select Edit to enter the edit window, input URL address, and the process of editing
refers to section。
10.2.4 Storage status
T o view the current stora ge status.
10.2.5 Network settings
The detailed setting of WAP refers to section 4.6。
Page 55

N3306 User manual
第 53 页
11 Call history
The call history covers recently Dialed calls/Received calls and Missed calls as well as the function of
deleting records.
Tap
to enter main menu, press side key to select Call history, tap to enter it. You may view
time, date and phone number Outgoing calls/Received calls/Missed calls (Call duration does not include in
the detailed information.).
11.1 Dialed calls
On the screen of Call history, press side up/down key to select the option of Outgoing calls, tap the
history selected or press camera key to enter Outgoing calls screen. Tap Option to do the operations as
followings:
Select Call to dial out the phone number selected, refer to section 2.2;
Select IP call to insert IP number in the front of the phone number then dial out (The function is needed
to set before use, and refer to section 4.4.8);
Select Send SMS to perform the function of SMS, refer to section 8.2.1;
Select Send MMS to perform the function of MMS, refer to section 8.2.2;
Select Save to save the necessary numbers to phonebook, refer to section 9.2;
Select Delete to delete the current record selected;
Select Delete all to delete all records;
On the screen of View details, activate option key to operate as followings:
Select Call to dial out the phone number selected, refer to section 2.2;
Select IP call to insert IP number in the front of the phone number then dial out (The function is needed
to set before use, and refer to section 4.4.8);
Select Send SMS to perform the function of SMS, refer to section 8.2.1;
Select Send MMS to perform the function of MMS, refer to section 8.2.2;
Select Save to save the necessary numbers to phonebook, refer to section 9.2;
Select Delete to delete the current record selected.
11.2 Received calls
The operation of Received calls is same as Dialed calls.
11.3 Missed calls
The operation of Missed calls is same as Dialed calls.
Page 56

N3306 User manual
第 54 页
12 Accessory
The use of application program “Camera” may allow you to take photos for the people or event around
you at any time, and the changing mode could be made easily across different modes. Photos is saved in the
application program of “Photos” within “My favorites”, which could be renamed under the same application,
and all photos by Camera are in JPG format.
In case that the remaining storage capacity in mobile phone is insufficient to take new photos, the
deletion of old ones is required to release space. For this purpose, you may check the storage state via
capacity inquiry.
Note:The preview and the shooting at the place where light is insufficient might decrease the image quality.
Enter the camera shooting screen the image portended to be taken will display on the screen of mobile
phone, and tap Shoot to take the ph oto; tap Option
to activate the menu.
Select Modes:to set the shoot mode among Single mode、Burst mode and Video mode;
Select Environment:to set the shoot environment between Normal、Darkness;
Select Effect
:
to set the shoot effect among Normal、Sepia and Monochrome;
Select Photo size: to set the photo size among 64×48、176×220、320×240、640×480、1280×960;
(only available for Single mode)
Select Image quality:to set the image quality among Normal、Fine、Super fine;(not available for
Video mode)
Select Self mode:to set the function of self mode on/off; after setting, it changes to Normal mode;
Select Save place
:
to set the save place of photo between Phone and Memory card;
Select Photos: The photos having been saved in cell phone may be reviewed. And they can be renamed,
copied, transferred to SIM card, or deleted by part/full delete;
Select My video in to the video list window ;
Select Other settings Select Brightness:to set up the shoot brightness;
Select Zoom:to determine the zoom size;
Select Shutter sound:to make three shutter sounds available for audition by
pressing the key Play or for confirmation of the
selection by pressing the key OK ;
Select Self timer: It is allowable for the self-shooting duration to be 5/10/15/20
seconds or to be closed.
Select Burst number set the continuous shooting number ;
Select Burst interval to set the shooting time;
Selec Show icon:to set up the open or close of the display icon.
During the process of shooting, use side up/down to change the shoot zoom for viewing the part of
image in detail。
The icons on the shoot screen are:
Burst mode Video mode
Environment
Normal
Environment
Darkness
Normal Fine Super fine Brightness
Zoom Self node
Select the single mode, and complete the shoot, then tap Save to save the photo, activate Option:
Page 57

N3306 User manual
第 55 页
Send as MMS: to send the photo as MMS;
Send as MMS: to send the photo as Email;
Send via Bluetooth: to send the photo via Bluetooth (refer to section 12.1.7.1);
Save: to save the photo as CLS;
Wallpaper: to set the photo as wallpaper;
Select the burst mode, and complete the shoot, activate Option:
Save current:to save the current photo;
Save all: to save all the photos taken;
Auto show: to show the photos as slides;
Thumbnail: to view the photos as thumbnail;
Single: to view the photos as single.
Tap Back the system will prompt “Discard?”. Tap Cancel to return the preview screen, tap OK or
press camera key to discard the operation.
Note: when taking the video, if to save it on the phone, the recording time is various by actual space of phone;
if to save it on the memory card, the recording time is 10 minutes.
12.1 Alarm
There are three alarms which can be set. The function and operation of three alarms are completely
same. You can set the alarm clocks on/off.
On the screen of alarm, it displays the status of the five alarms.
Alarm on/off is represented by different icons. If the alarm is on, the icon and alarm time will display
after the alarm name. If it is off, the icon does not display after the alarm name.
12.1.1 Alarm on
The user highlights an alarm and tap Select or press camera key to view the status and the detailed
settings.
If you want to alarm on, first to confirm the alarm time is right. For instance, if you attempt alarm on at
00:00, to select “Time” on the display screen to enter the screen of time setting, input the time needed, then
tap OK to confirm.
Secondly you need to conform the period is right. If not set the item, the al arm works once. If to set
others, enter the item of “Period”, including three options:
Once:the alarm only works once and then it will be off;
Daily:the alarm works at the same time everyday;
Day of the week:the alarm works on some day or days of week;
Sound: to set up the alarm tune.
Snooze
:
to set the alarm to ring 5 times every 5 minutes.
Finally, to select Status: to set the alarm on/off., the system will prompt “Start alarm?”,tap OK or
press camera key to complete the operation.
12.1.2 Alarm off
The user selects one alarm on, tap Select or press camera key to enter the status of the alarm.
Page 58

N3306 User manual
第 56 页
12.1.3 Alarming
When the set time is reached, the phone will play the alarm tone (If the setting is on.) and display the
alarm time on the screen.
Even if the phone is power off, the phone still works. At this time, tap Cancel or power key to stop the
alarm, and it will prompt “Power on”. Select Yes to power on, Select No exit the screen.
Please notice if the date and time have changed the alarm still works as the original time. Therefore,
please confirm the alarm date and time changed for next time.
12.2 Schedule
12.2.1 Function description
After entering the Calendar, the monthly calendar for current date will be displayed. Use side up/down
key to select the preferred date, and the Gregorian calendar year &month of specified date display on the
bottom right of corner of screen. Any date with event record will be represented with blue frame. Tap
Option key to activate the menu, which covers:Select date, Create, Scheduler list and View summary
12.2.2 Select date
Using this function, you may select any day (within valid time limit) and complete other functions. For
the first access, the current date is shown; upon the selection of any other day, tap OK to return the calendar,
it will display the date selected. Tap Back to return the calendar, it will display the date before entering
“Select date ”(Note:it may not be the calendar, which depends on your operation.).
12.2.3 Create
“Create” is used to add new events, and you need to input the relevant date & time for events, then to
set date and time for reminding.
On the screen of Calendar and event Schedule, tap Option key to activate the menu, select Create to
add events.
The setting of new events covers the following contents:
Date:refer to the date to be reminded for event, which may be set by entering the date with number
keys;
Time:refer to the time to be reminded for event, which may be set on the screen of “Time”;
Memo:refer to the description of event, with contents to be input on the screen of edit, refer to section;
Ring:refer to the ring to be reminded for event;
Period:refer to the period of event;
Status:refer to make the schedule item on/off.
Finally tap Save to save the setting, and tap Back to exit。
12.2.4 Schedule list
Simply tap OK to enter scheduler list box, which is used to check all schedulers. Activate the key
Option for following operations:
View:to view the content of selected scheduler;
Create:to add a new scheduler;
Page 59

N3306 User manual
第 57 页
Delete:to delete the selected scheduler;
Delete all:to delete all schedulers.
12.2.5 View summary
Within the status of “View summary”, the total/free number of schedule items is displayed, and tap
Back to back to calendar screen.
12.3 Tools
12.3.1 Dictionary
Dictionary provided in this cell phone supports the inter-translation across English and Chinese,which
means that the entered word may be translated from English/Chinese into Chinese/English.
Dictionary is activated by the selection with the soft key Select. Upon the completion of word or text
enter, tap OK,and word containing this character string is shown in this bilingual dictionary box. Press the
direction key “up” or “down” to search for the target word, then tap Select for its detailed information, and
tap Exit to return to word enter box;The cell phone reminds that “your word not available” when any
content can’t be found to match your word.
12.3.2 Notepad
Notepad is used for any simple record and memo, and tap Option:
Edit item:edit the item selected;
Send SMS:send the content of item via messages;
Delete:delete the item selected;
Delete all:delete all items。
12.3.3 Calculator
Using calculator can do the arithmetic including addition, subtraction, multiplication and division. After
entering the screen of calculator, you may directly input the number to account, and the number and
character input will display on the screen of edit:
Take the calculation of 123456789x7.2 as an example:
First step:enter digits “123456789”,and tap # to change between positive and negative;
Second step:tap operation symbol “*”;
Third step:enter digit “7.2”,whereby the dot can be made by * ;
Fourth step:tap operation symbol “=”;
The result will display on the bottom line.
Tap
to dele te the cont ent and tap C to clear the content and start new calculation, and tap Back key
to exit the calculator screen.
Press Pwr key can cancel the input, exit the calculator screen and back to idle screen, or tap Back key to
exit after clearing the edit screen.
In case that the calculation of number which is divided by zero produces a result over zero, or the result
is above 999999999 or below -999999999,the prompt “E” shall occur to indicate an error.
Page 60

N3306 User manual
第 58 页
12.3.4 World clock
With an easy operation method, the worldwide clock provide great convenience for travelers all over the
world.
Under the box of worldwide clock, Vu & Vd may be used to move the time zone indicating line located.
During the course of movement, items located in the lower position, including time zone, name of city, time
and date, will change by your random selection respectively. And the name of famed city within this time
zone is shown when shifting this indicating line, in such mode, tap OK or press camera key to set the time of
city selected to its local time.
So far, this cell phone could provide following cities correspond to respective time zones:
City Time zone City Time zone City Time zone
Beijing East zone 8 Los angels West zone 8 Moscow East zone 3
Hongkong East zone 8 Mexico West zone 6 Baghdad East zone 3
Taipei East zone 8 Chicago West zone 6 Kuwait East zone 3
Singapore East zone 8 Ottawa West zone 6 Teheran East zone 3
Pyongyang East zone 9 Miami West zone 5 New deli East zone 5
Seoul East zone 9 Washington West zone 5 Calcutta East zone 5
Tokyo East zone 9 New York West zone 5 Rangoon East zone 6
Osaka East zone 9 London Zone 0 Hanoi East zone 7
Manila East zone 9 Madrid East zone 1 Bangkok East zone 7
Sydney East zone 10 Rome East zone 1 Jakarta East zone 7
Hawaii West zone 10 Paris East zone 1
Alaska West zone 9 Frankfurt East zone 1
Seattle West zone 8 Berlin East zone 1
12.3.5 Currency
Using this function, an amount of currency may be exchanged to other equivalent foreign currency.
This cell phone has one type of preset currency exchange, which is changeable, and may be reset with
various currency exchange rates. For this purpose, select the item to be set with direction key “up” and
“down” as well as scroll bar, then tap OK or press camera key to enter respective setting box. After the
setting for exchange rates, the amount of currency to be exchanged to will be displayed.
12.3.6 Countdown
This function is mainly applicable to the prompt operation at given time. Such as:dial up after ten
minutes, etc. It provides no content for prompt, and easy for operation.
The countdown may be used in following methods:select the menu option Accessory
-
Tools-Countdown
under accessory box after entering main menu, the cell phone displays the countdown status, whereby the
countdown time may be entered. For example:if you need to be reminded after forty five minutes, just tap
the digit key ”45” under normal standby mode, then tap Start or press camera key to start countdown and
tap Cancel or press camera key to cancel it. The cell phone will prompt:“Countdown start!” The cell phone
will prompt in 45 minutes that the set time is available.
Note:• Enter values for minutes;
• Values for minutes shall not exceed 99(countdown values entered for minutes under standby
mode).
• The prompt box may produce under standby mode for the availability of countdown time. The
prompt for other working states shall be made by a prompt tune.
Page 61

N3306 User manual
第 59 页
12.3.7 Stopwatch
The stopwatch box is shown on the screen of cell phone by selecting the option stopwatch menu.
The time starts from zero by tapping Start or press camera key,may be stopped by tapping Pause or
press camera key,and may continue by tapping Go on or press camera key; or may return to zero by tapping
Reset (in such case, time may be re-started), or may exit from stopwatch box by tapping Back.
12.4 Connection tools
12.4.1 PC tool
This cell phone is capable to transmit phone book, preferred rings &pictures to user using the connection
between data lines(special accessory)and PC computer. When data lines are used, this cell phone supports
Windows 95, Windows 98, Windows NT and Windows 2000. If data lines are not included in the purchase of
cell phone, place an order from your local retailer. To activate the function as to transmit documents, the
installation of synchronized software is required in PC computer.
12.4.2 GPRS wizard
It stands for General Packet Radio Service (GPRS). Using GPRS technique,user is able to send or
receive data through cell phone network. In this sense, GPRS is a way for data transmission, which supports
user’s wireless connection with internet data network. And the GPRS application covers such services as
WAP, multi-media information, short message, the downloading of JAVA application program, and GPRS
dial-up program(e.g. Internet &e-mail).
Events to be noted before the use of GPRS technique:
1. Consult the local network operator or service supplier for the availability or the application procedure (if
GPRS not available) for GPRS service;
2. Save GPRS settings necessary for each application concerning GPRS data transmission;
Price for GPRS and other applications
Both the use of GPRS connection and various applications concerning GPRS data transmission need to be
paid respectively. The payment for normal data dial-up is calculated by the time duration of internet
connection, while that for GPRS mode is calculated by the data amount downloaded from internet. Please
consult local network operator or service supplier for detailed information relevant to price.
12.4.3 USB mode
There are two choices:Modem mode and U Disk mode;
Modem mode
:
startup the multifunctional connection mode, or the system only can be used as
modem,at the moment, U Disk mode is invalid。
U Disk mode:startup U Disk mode, the phone can be used as U Disk, at the moment, Modem mode is
invalid;
Note: the setting and power off is needed for mode switch. After the phone resets, the new mode will be
valid, and the system will prompt.
Page 62

N3306 User manual
第 60 页
12.4.4 STK
STK(SIM TOOL KIT)allows to operate its own software based on SIM card. STK card can receive and
send short message data of GSM. This mobile phone supports the service for various network operators.
Page 63

N3306 User manual
第 61 页
13 Common questions
The mobile phone can not power on.
The phone can not make call and power off due to lower battery. Please charge the battery.
The mobile phone can not to dial some calls.
The Call barring has been set, which restricts the use of mobile phone, please check and cancel it.
Someone else is answering my call.
The mobile phone has been set to transfer your call to another number, please check and cancel it.
The Display information
During the operation, the mobile phone may prompt the display information due to following error
operations:
”Insert SIM card”
SIM card must be inserted into mobile phone before used, or taken out (If already exists) for cleanup
the golden area with dry cloth and then insert again.
” Network not available”
Your mobile phone is out of the area covered by network (or the physical barrier might exist between
your phone and transmitter), and unable to dial or answer calls. Please close to the window if indoors.
”Emergent call only”
If your mobile phone is out of the area covered by network of service supplier, and another network
within your area may allow you to dial emergent call subject to the intensity of signal.
” Invalid SIM card”
The SIM card has been locked, which is unable to accept the SIM card inserted. Please insert correct
SIM card or contact with the distributor.
”Enter PUK code”
SIM card has been locked due to th e wrong input of PIN code for three times continuously. Therefore,
you must apply a special eight-digit PUK code from the network supplier to unlock the SIM card (PUK
code may be supplied with PIN code at same time).
Warning: If input wrong PUK code for ten times continuously, SIM card will be locked permanently.
You must apply a new SIM card from the network supplier.
Page 64

N3306 User manual
第 62 页
14 Fittings
Charger
- It will charge the Li battery quickly and completely. The charge duration varies subject to the
capacity of battery.
Li battery (One piece)
- The Li battery xxx mAh can provide the standby duration lasting for XXX-XXX hours or call
duration lasting for XX-XXX hours subject to practical using condition.
Note: Only the approved battery, charger and other accessories by manufacturer of
mobile phone may be used. Using other types of accessories will infringe the approval
and warranty of this mobile phone and cause the danger.
Page 65

N3306 User manual
第 63 页
15 Maintenance guideline
Welcome to use mobile phone produced by NEC Company. Whereby a failure occurs in the use of your
mobile phone, you are requested to contact with distributor or consult NEC maintenance center; whereby the
repair is needed,your mobile phone may be sent/brought to local maintenance center(The specific
maintenance centers shown in the voucher of warranty provided with mobile phone.) ; whereby a
maintenance center is not available in your place,you are requested to bring the mobile phone and copy of
its receipt to distributor for EMS mailing.
You shall be cautious to the use of mobile phone as it is made using excellent design and technique. To
prolong the life of mobile phone, you are required to perform the obligations specified in the warranty terms
as followings:
· Keep the mobile phone and its accessories away from the children;
· Keep the mobile phone dry all t he time as rain water, moisture, various liquid, and water contain mineral
materials, which may corrode the electronic circuit;
· Do not use, store the mobile phone in places containing dusts, which may damage its removable parts;
· Do not store the mobile phone in the excessive hot place, as the high temperature might shorten the life of
electronic parts, damage the battery, and deform or even melt some plastic parts;
· Do not store the mobile phone in the excessive cold place, or the humidity may form inside of the mobile
phone when the temperature of mobile phone rises(up to normal temperature), which may damage the
circuit board;
· Do not attempt to disassemble the mobile phone as the operation by unprofessional personnel will damage
it;
· Do not throw, beat or shake the mobile phone, or the internal circuit board might be damaged;
· Do not clean and wash the mobile phone with strong chemical product, ambulant, or strong detergent;
· Do not dye the mobile phone, or it will obstruct the removable parts so as to affect the normal work;
· To change the antenna,only authorized or matchable antenna shall be used. Any use of unauthorized
antenna or modified accessories may damage the mobile phone and infringe the relevant regulations for
wireless devices.
All above recommendations are also applicable to your mobile phone, battery, charger and each fitting part.
If they can not work normally, please bring/send them to the qualified maintenance organization nearest to
you for repairing.
 Loading...