

Page 1
M
E
N
U
E
N
T
E
R
C
A
N
C
E
L
S
E
LE
C
T
S
O
U
R
C
E
A
C
IN
C CARD
USB
3
4
M
E
N
U
E
N
T
E
S
E
L
E
C
T
A
C
IN
C
C
A
R
D
U
S
B
P
C
C
O
N
T
R
O
L
V
I
D
E
O
S
-V
I
D
E
O
R
G
B
A
U
D
IO
Quick Connect Guide
MultiSync LT156/LT155/LT154
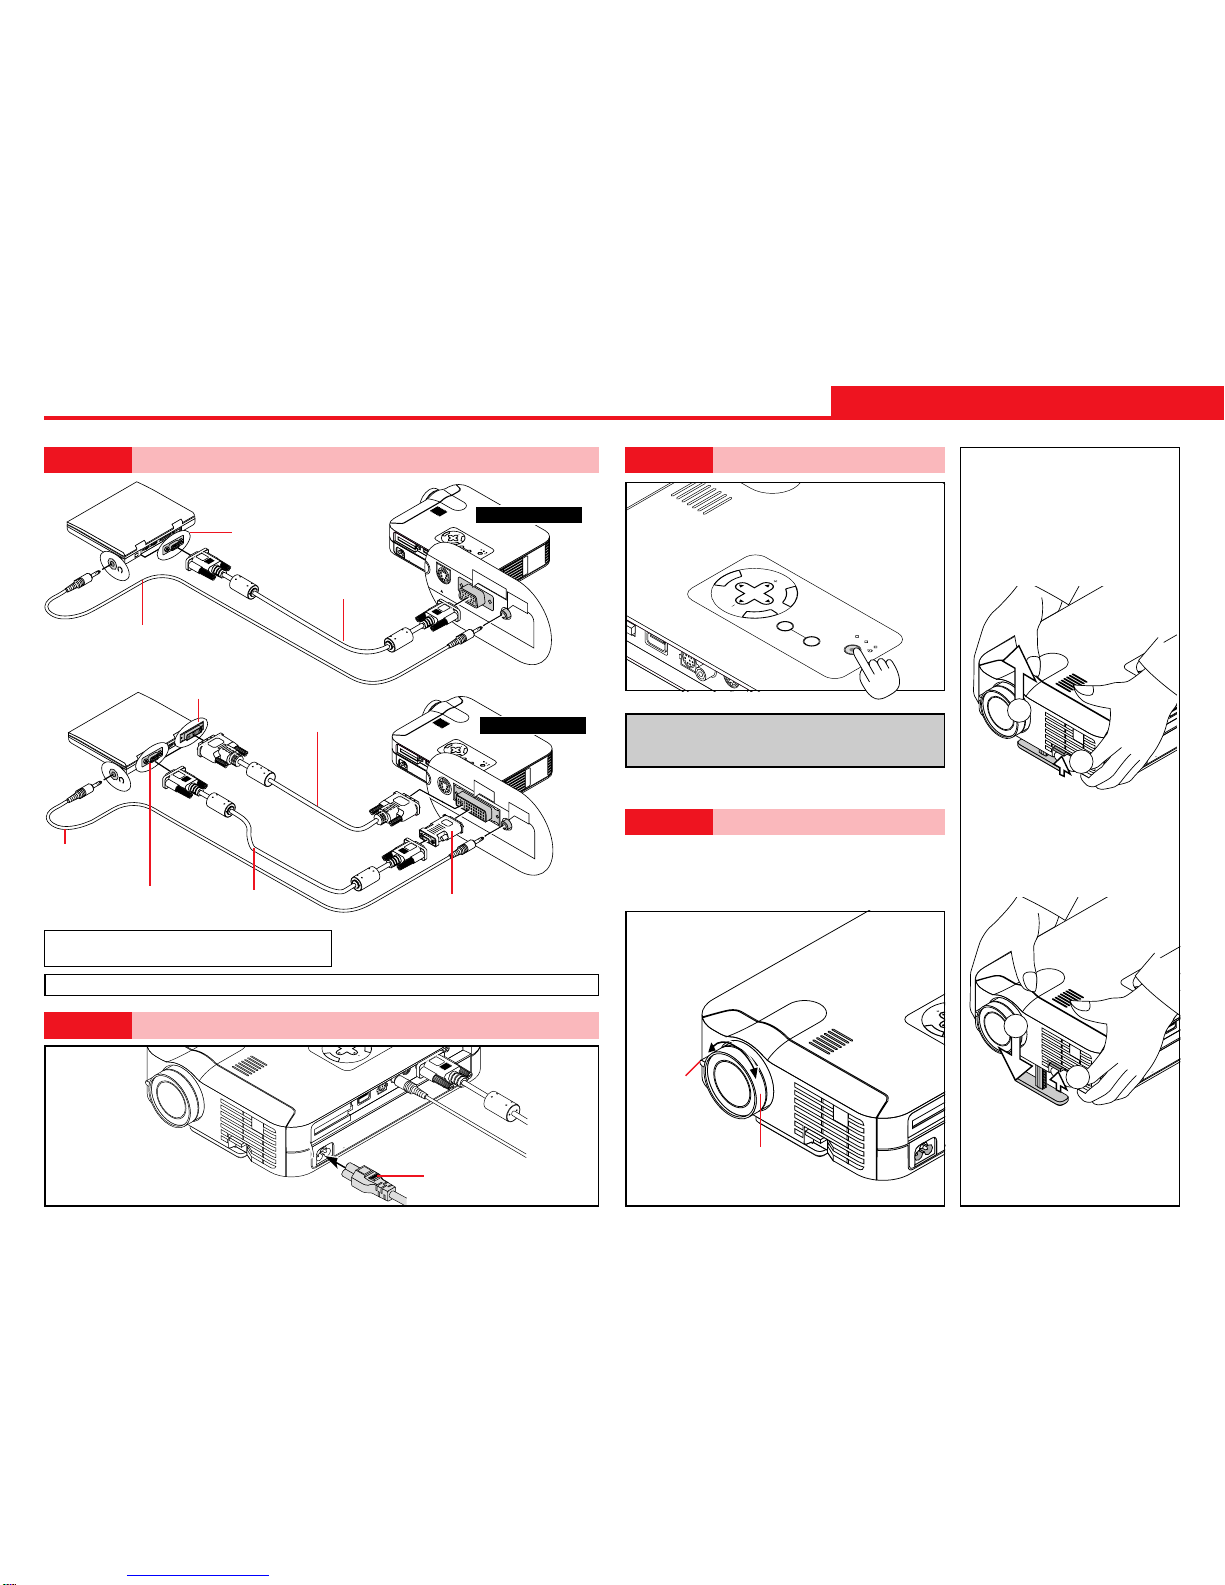
Step1 Connect the supplied signal cable.
Connect the supplied power cable.
Step2
Step3
Turn on the projector.
NOTE: To turn off the projector, press and hold the
Power (ON/STAND BY) button for a minimum of
two seconds.
Power cable
(supplied)
Always power down before you make any connections.
M
E
N
U
E
N
T
E
R
C
A
N
C
E
L
S
E
L
E
C
T
P
O
W
E
R
S
T
A
T
U
S
O
N
/
S
T
A
N
D
B
Y
S
O
U
R
C
E
A
U
T
O
A
D
J
U
S
T
P
C
C
A
R
D
A
C
C
E
S
S
A
C
I
N
C
C
A
R
D
P
C
C
O
N
T
R
O
L
V
I
D
E
O
R
G
B
U
S
B
S
-
V
I
D
E
O
A
U
D
I
O
RGB
S-VIDEO
AUDIO
RG
B INPUT
AU
DIO
C
C
A
R
D
P
C
C
O
N
T
R
O
L
V
I
D
E
O
D
V
I
-
D
U
S
B
S
-
V
I
D
E
O
A
U
D
I
O
M
E
N
U
E
N
T
E
R
C
A
N
C
E
L
S
E
L
E
C
T
P
O
W
E
R
S
T
A
T
U
S
O
N
/
S
T
A
N
D
B
Y
S
O
U
R
C
E
A
U
T
O
A
D
J
U
S
T
P
C
C
A
R
D
A
C
C
E
S
S
A
C
I
N
DVI-D
S-VIDEO
AUDIO
DVI
AUD
IO
RGB cable
(supplied)
Mini D-Sub 15 pin
connector
M
E
N
U
E
N
T
E
R
C
A
N
C
E
L
SELECT
POW
ER
STATUS
ON
/
STAND BY
SOURCE
AUTO
ADJUST
PC CARD
ACCESS
CARD
PC CONTROL
VIDEO
USB
S-VID
LT155/LT154
LT156
Audio cable (not supplied)
Audio cable
(not supplied)
DVI-D – DVI-D
signal cable (supplied)
DVI connector ①
DVI-A – VGA
adapter (supplied)
M
E
N
U
AC I
N
Step4
Set up the Projector
Focus ring
T o adjust the projector's f ocus or to zoom in and
out, use the Focus ring and Zoom lever on the
lens.
Zoom lever
1. Lift the front edge of the projector.
2. Press the Tilt button on the front
of the projector to extend the
Adjustable Tilt Foot.
Adjusting the Tilt Foot
M
E
N
U
T
E
R
C
A
N
C
E
L
SELECT
CE
AC IN
C
C
A
R
D
U
S
B
2
1
3. Press and hold the Tilt button.
4. Lower the front edge of the projector to the desired height and
release the Tilt button to lock
the Adjustable Tilt Foot.
• If the projected image does not appear square to the screen then use
keystone correction for proper adjustment. See page 29 or 34 of the
supplied user's manual.
Mini D-Sub 15 pin
connector ➁
RGB cable
(supplied)
Connection Option ① when using DVI output
Connection Option
➁ when using mini D-Sub 15 pin output
Page 2
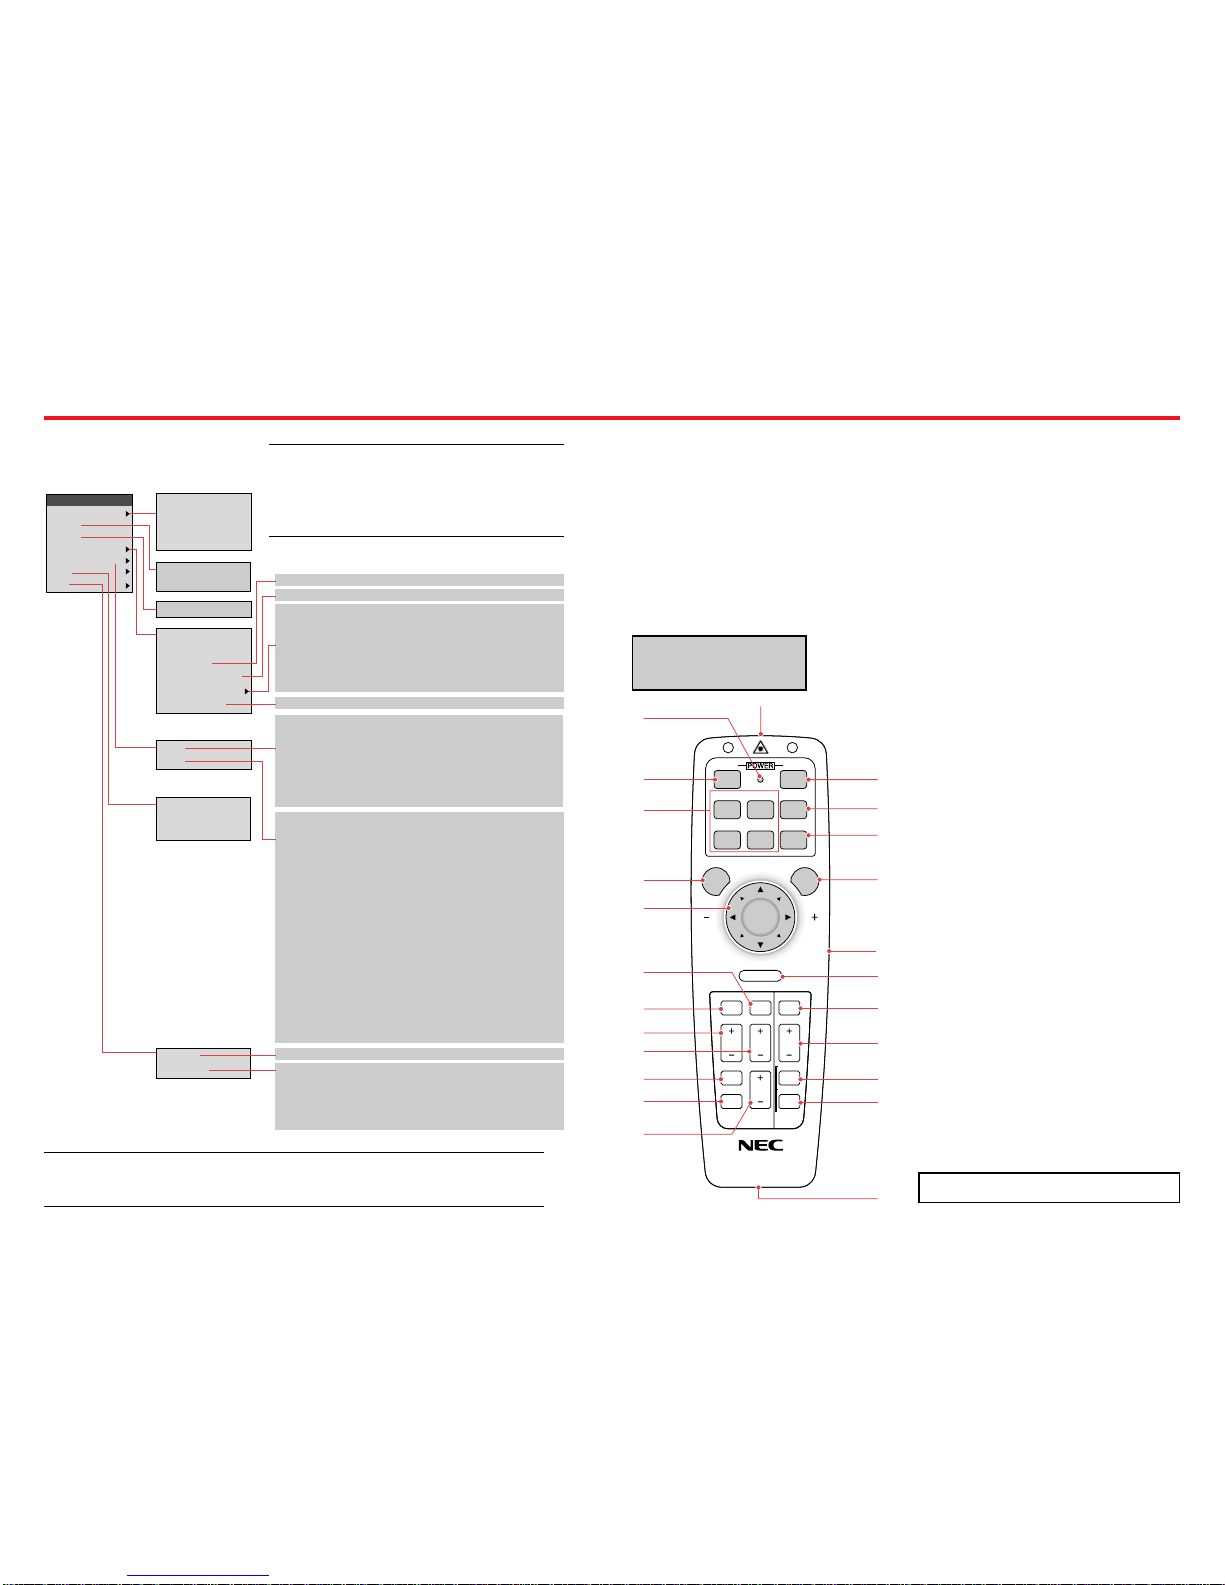
Menu Tree
Advanced Menu
Source Select
Picture
Volume
Image Options
Projector Options
Tools
Help
RGB
Video
S-Video
PC Card Viewer
Brightness / Contrast /
Color / Hue / Sharpness
Volume
High-Bright / Eco
Keystone
Color Temperature
Lamp Mode
Gamma Correction
Advanced Options
Factory Default
Normal / Natural 1 / Natural 2
Aspect Ratio
Noise Reduction
Color Matrix
White Balance
Position/Clock
Resolution
Video Filter
Normal / Zoom / Wide Zoom / Cinema
Off / Low / Medium / High
Select Color Matrix: HDTV/SDTV
Select Color Matrix Type: B-Y/R-Y,Cb/Cr,Pb/Pr
Brightness R/G/B, Contrast R/G/B
Horizontal / Vertical / Clock / Phase
Auto / Native
On / Off
All Data / Current Signal
Menu
Setup
Menu Mode (Advanced Menu, Basic/Custom Menu)
Basic/Custom Menu Edit
Language (English/German/French/Italian/Spanish/Swedish/Japanese)
Projector Pointer (Pointer 1-8)
Source Display (On / Off)
Direct Button Volume Bar (On / Off)
Keystone Bar (On / Off)
Menu Display Time (Manual/Auto 5 sec / Auto 10 sec / Auto 30 sec)
Orientation (Desktop Front / Ceiling Rear / Desktop Rear / Ceiling Front)
Background (Blue / Black / Logo)
Mouse Button (Right Hand / Left Hand)
Sensitivity (Fast / Medium / Slow)
PC Card Viewer Options
Show Folder List (On / Off)
(Auto Play / Manual Play)
Interval (5-300 sec)
Capture Options (High Quality/Normal/High Compression)
Signal Select RGB (Auto/RGB/Component)
Video (Auto/NTSC3.58/NTSC4.43/PAL/PAL60/SECAM)
S-Video (Auto/NTSC3.58/NTSC4.43/PAL/PAL60/SECAM)
Auto Adjust (RGB Only) (On/Off)
Auto Start (On/Off)
Power Management (On/Off)
Power Off Confirmation (On/Off)
Keystone Save (On/Off)
Clear Lamp Hour Meter
Communication Speed (4800/9600/19200/38400)
Default Source Select (Last/Auto/Select)
(RGB /Video/S-Video/PC Card Viewer)
Capture
PC Card Files
ChalkBoard
Contents
Information
Page1
Page2
Page3
Page4
Source Name / Input Terminal / Horizontal Frequency /
Vertical Frequency / Sync Polarity
Signal Type / Video Type / Sync Type / Interlace / Resolution
Aspect Ratio / Gamma Correction / Noise Reduction /
Color Matrix / Matrix Type
Lamp Remaining Time / Lamp Hour Meter / Projector Usage
Page 1
Page 2
Page 3
Page 4
Page 5
Contents
*
**
***
Remote Control Features
Printed in Japan
7N8P0223
1. Laser Pointer
Beams a laser light when "Laser" button is pressed.
2. LED
Flashes when any button is pressed.
3. Power On Button
If the main power is applied, you can
use this button to turn your projector
on.
4. Power Off Button
If the main power is applied, you can
use this button to turn your projector
off.
NOTE: To turn off the projector,
press and hold the POWER OFF
button for a minimum of two seconds.
KEYSTONE
FREEZE
PIC-MUTE
HELP
POINTER
PC CARD
VIDEO S-VIDEO
AUTO ADJ.
RGB 1
MENU LASER
R-CLICK/CANCEL
RGB 2 P
J
ONOFF
MAGNIFY
VOL.
SLIDE
FOLDER
SLIDE
LIST
2
1
4
3
6
7
8
5
9
10
13
14
15
16
17
18
19
12
11
20
21
22
23
24
(Underneath)
5. Source Buttons
Selects video source from VCR,
laserdisc, computer, D VD player.
The RGB2 button is not available on
LT155/LT154.
On LT156 the RGB1 b utton selects DVI
digital input; the RGB2 button selects
DVI analog input.
6. Auto Adjust Button (RGB only)
Adjusts the current image for optimal H/V
position, Pixel settings and resolutions.
7. PJ Button
Press this button if you want to use the
Mouse (▲▼
䊴 䊳
), Cancel/Right Click, and
Enter/Left Click buttons as your PC’ s.
8. Laser Button
Press and hold this button to activate
the laser pointer.
9. Menu Button
Displays the menu for various settings
and adjustments.
10. Mouse (▲▼
䊴 䊳
) / (+) (–) Button
When you are in the Computer mode,
these buttons work as a computer
mouse.
11. Enter / Left Click Button
When you are in the Computer mode,
this button works as the mouse left
button.
12. Cancel/ Right Click Button
When you are in the Computer mode,
this button works as the mouse right
button.
13. Pointer Button
Points to an area on screen to be
magnified.
14. Help Button
Displays information for the current menu or how to use
the menu.
15. Keystone (+) (–) Button
Corrects for keystone (trapezoidal) distortion to make the
image square.
16. Magnify (+) (–) Button
Magnifies image size up to 400%.
17. Freeze Button
Freezes a picture. Press again to resume motion.
18. Picture Mute Button
Turns off the image and sound f or a short period of time.
Press again to restore the image and sound.
19. Volume (+) (–) Button
Adjusts volume.
20. PC Card Button
Displays slides from CompactFlash memory card in
projector’s PC card slot.
21. Slide (+) (–) Button
Selects the next folder or slide and the previous f older or
slide.
22. Folder List Button
Selects PC Card Viewer source to display a list of f olders.
23. Slide List Button
Selects PC Card Viewer source to display a list of slides.
24. Remote Jack
Not available on this model.
See pages 11 to 13 of your User's Manual for more
information on features and operation.
NOTE:
1) When menu items are not available, they are indicated in white.
2) For LT156: When DVI (DIGITAL) is selected, making any adjustment
executes the Auto Adjust feature. The AUTO ADJUST button on the
remote control is also available. You can adjust the horizontal and
the vertical position for DVI digital signal but cannot save those adjustments.
NOTE:
*
On LT156, "DVI (DIGITAL)" and "DVI (ANALOG)" are displayed in the Source Select submenu.
**
On LT156, "DVI (ANALOG)" is displayed in the Signal Select on Page 3.
***
On LT156, "DVI (DIGITAL)" and "DVI (ANALOG)" can be also selected.
 Loading...