

NEC M
NEC M
NEC MNEC M
OBILE
OBILE
OBILEOBILE
PPPP
RO
RO
RORO
™™™™
P300
P300
P300P300
PPPP
OCKET
OCKET
OCKET OCKET
PC 2002
PC 2002
PC 2002PC 2002
REFERENCE GUIDE
REFERENCE GUIDE
REFERENCE GUIDEREFERENCE GUIDE

Proprietary Notice and Liability Disclaimer
The information disclosed in this document, including all designs and related materials, is the valuable
property of NEC Computers Inc. and/or its licensors. NEC Computers and/or its licensors, as appropriate,
reserve all patent, copyright and other proprietary rights to this document, including all design, manufacturing,
reproduction, use, and sales rights thereto, except to the extent said rights are expressly granted to others.
The NEC Computers product(s) discussed in this document are warranted in accordance with the terms of the
Warranty Statement accompanying each product. However, actual performance of each such product is
dependent upon factors such as system configuration, customer data, and operator control. Since
implementation by customers of each product may vary, the suitability of specific product configurations and
applications must be determined by the customer and is not warranted by NEC Computers.
To allow for design and specification improvements, the information in this document is subject to change at
any time, without notice. Reproduction of this document or portions thereof without prior written approval of
NEC Computers is prohibited.
NEC is a registered trademark and MobilePro is a trademark of NEC Corporation and/or one or more of its subsidiaries. All are used
under license.
Microsoft, MSN, ActiveSync, Outlook, Media Player, Hotmail, Windows, Windows NT, and the Windows logo are either registered
trademarks or trademarks of Microsoft Corporation in the United States and/or other countries. Microsoft products are licensed to
OEMs by Microsoft Licensing, Inc., a wholly owned subsidiary of Microsoft Corporation.
All other product, brand, or trade names used in this publication are the trademarks or registered trademarks of their respective trademark
owners.
First Printing — November 2001
Copyright 2001
NEC Computers Inc.
15 Business Park Way
Sacramento, CA 95828
All Rights Reserved

Contents
Preface .................................................................................................................................vii
1 Get Started
Unpack Your MobilePro P300 .......................................................................................... 1-2
Get to Know Your MobilePro P300 .................................................................................. 1-3
Front Features............................................................................................................. 1-4
Back Features ............................................................................................................. 1-5
Right Side Features..................................................................................................... 1-6
Left Side Features....................................................................................................... 1-7
Top Features ............................................................................................................... 1-8
Bottom Features.......................................................................................................... 1-8
Cradle Features........................................................................................................... 1-9
LCD Cover Features................................................................................................. 1-10
Charge the Battery ........................................................................................................... 1-10
Calibrate and Activate the MobilePro.............................................................................. 1-12
Learn the Basics............................................................................................................... 1-12
Today Screen ............................................................................................................ 1-13
Navigation Bar Screen.............................................................................................. 1-14
My Menu Screen ...................................................................................................... 1-15
Install ActiveSync............................................................................................................ 1-16
Use the Secure Data Card ................................................................................................ 1-18
Access MobilePro Functions ........................................................................................... 1-18
Get Help........................................................................................................................... 1-20
MobilePro Care................................................................................................................ 1-21
Install Productivity, Mobility, and Entertainment Applications ...................................... 1-22
ClearVue Office Viewers ......................................................................................... 1-22
VoiceMessenger Force ............................................................................................. 1-23
PhotoBase................................................................................................................. 1-25
MobilePro Synchronization System ......................................................................... 1-26
ZIOGolf 2 ................................................................................................................. 1-28
Golfwits .................................................................................................................... 1-29
2 Learn the Basics
Overview............................................................................................................................ 2-2
Pop-up Menus....................................................................................................................2-2
Notifications ...................................................................................................................... 2-2
Enter Information...............................................................................................................2-3
Enter Text with the Input Panel ......................................................................................... 2-3
Using the Soft Keyboard ............................................................................................ 2-3
Using Letter Recognizer............................................................................................. 2-4
Using Block Recognizer............................................................................................. 2-4
Using Transcriber ....................................................................................................... 2-5
Editing Your Text....................................................................................................... 2-5
Write on the Screen............................................................................................................ 2-5
Writing on the Screen................................................................................................. 2-5
Editing Your Writing.................................................................................................. 2-6
Converting Your Writing to Text ............................................................................... 2-7
Draw on the Screen............................................................................................................ 2-8
Creating a Drawing..................................................................................................... 2-8
Editing Your Drawing ................................................................................................ 2-9
Record a Message.............................................................................................................. 2-9
Use a Preset or Frequently Used Message....................................................................... 2-10
Find and Organize Information........................................................................................ 2-11
Customize Your MobilePro............................................................................................. 2-12
Adjusting Settings..................................................................................................... 2-12
Adding or Removing Programs................................................................................ 2-12
Contents iii

Using ActiveSync to Add Programs.................................................................. 2-12
Using the Internet to Add Programs .................................................................. 2-13
Adding a Program to the Start Menu ................................................................. 2-13
Removing a Program from the Start Menu........................................................ 2-14
3 Use Microsoft Pocket Outlook
Calendar: Scheduling Appointments and Meetings ........................................................... 3-2
Creating an Appointment............................................................................................ 3-2
Using the Summary Screen......................................................................................... 3-3
Creating Meeting Requests......................................................................................... 3-4
Schedule a meeting ..................................................................................................... 3-4
Contacts: Tracking Friends and Colleagues....................................................................... 3-4
Creating a Contact....................................................................................................... 3-5
Finding a contact......................................................................................................... 3-5
Using the Summary Screen......................................................................................... 3-6
Tasks: Keeping a To Do List .............................................................................................3-6
Creating a task ............................................................................................................ 3-7
Using the Summary Screen......................................................................................... 3-8
Notes: Capturing Thoughts and Ideas................................................................................ 3-8
Creating a Note ........................................................................................................... 3-9
Inbox: Sending and Receiving E-mail ...............................................................................3-9
Synchronizing E-mail Messages............................................................................... 3-10
Connecting Directly to an E-mail Server.................................................................. 3-10
Using the Message List............................................................................................. 3-11
Composing Messages................................................................................................ 3-12
Managing E-mail Messages and Folders .................................................................. 3-13
Folder Behavior with a Direct Connection to an E-mail Server ........................3-13
4 Use Companion Programs
Pocket Word....................................................................................................................... 4-2
Typing Mode............................................................................................................... 4-3
Writing Mode.............................................................................................................. 4-4
Drawing Mode ............................................................................................................ 4-5
Recording Mode .........................................................................................................4-5
Pocket Excel....................................................................................................................... 4-5
Tips for Working in Pocket Excel............................................................................... 4-6
MSN Messenger................................................................................................................. 4-7
Setting Up ................................................................................................................... 4-7
Working with Contacts ............................................................................................... 4-8
Chatting with Contacts................................................................................................ 4-9
Windows Media Player for Pocket PC............................................................................. 4-10
Microsoft Reader.............................................................................................................. 4-10
Getting Books on Your MobilePro ........................................................................... 4-11
Using the Library...................................................................................................... 4-11
Reading a Book......................................................................................................... 4-12
Using Reader Features.............................................................................................. 4-12
Removing a Book ..................................................................................................... 4-13
5 Use Pocket Internet Explorer
Pocket Internet Explorer ....................................................................................................5-2
View Mobile Favorites and Channels......................................................................... 5-2
Browse the Internet..................................................................................................... 5-3
Mobile Favorites Folder..................................................................................................... 5-3
Favorite Links............................................................................................................. 5-3
Mobile Favorites ......................................................................................................... 5-3
Creating a Mobile Favorite.................................................................................. 5-3
Saving MobilePro Memory .................................................................................5-4
iv Contents

AvantGo Channels............................................................................................................. 5-4
Sign up for AvantGo................................................................................................... 5-4
6 Get Connected
Transfer Items Using Infrared............................................................................................ 6-2
Send Information ........................................................................................................ 6-2
Receive Information ................................................................................................... 6-3
Connect to the Internet....................................................................................................... 6-3
Create an Ethernet connection to an ISP .................................................................... 6-4
Connect to Work................................................................................................................ 6-4
Create a Modem Connection to a Network................................................................. 6-4
Create an Ethernet Connection to a Network ............................................................. 6-5
End a Connection............................................................................................................... 6-6
Connect Directly to an E-mail Server................................................................................ 6-6
Set up an E-mail Service: ........................................................................................... 6-6
Get Help on Connecting .................................................................................................... 6-6
7 If You Have Problems
Problem Solving ................................................................................................................ 7-2
Help Resources ..................................................................................................................7-3
8 NEC Computers Information Services
NEC Computers Service and Support Functions............................................................... 8-2
NEC Computers Technical Support................................................................................... 8-2
NEC Computers Web Site.......................................................................................... 8-2
E-mail to Technical Support Services ........................................................................ 8-3
NEC Computers Technical Support Services ............................................................. 8-3
Applications Support ......................................................................................................... 8-3
9 Specifications
System Specifications........................................................................................................ 9-2
Physical Specifications ...................................................................................................... 9-4
Environment Specifications............................................................................................... 9-4
Index
Regulatory Statements
Contents v

Preface
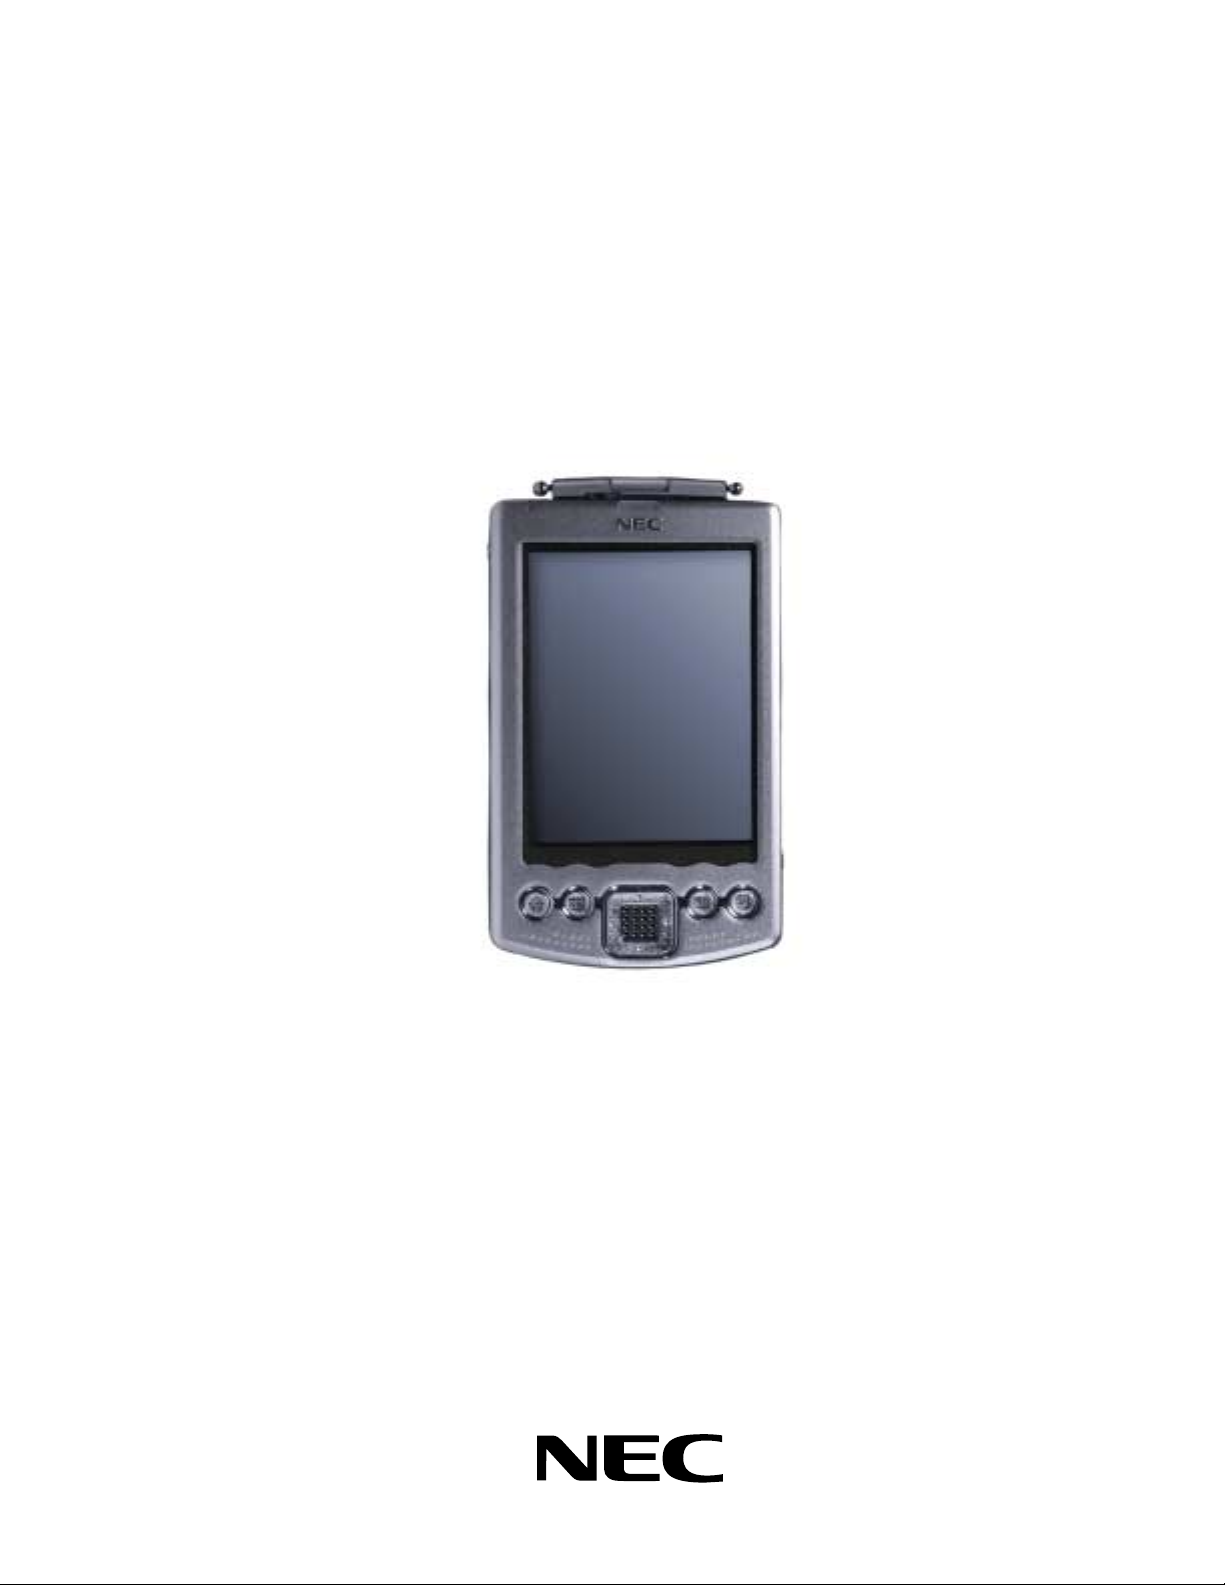
This reference guide contains detailed information on the use of the NEC MobilePro™ P300
powered with the Microsoft
®
Windows® Powered Pocket PC 2002.
The guide is organized as follows.
Chapter 1 — Get Started, provides procedures for unpacking, battery charging, calibration,
and installing Microsoft ActiveSync
®
.
Chapter 2 — Learn the Basics, includes information on pop-up menus, notifications, and
entering information. Also includes information for customizing your MobilePro.
Chapter 3 — Use Microsoft Pocket Outlook, provides procedures for using Microsoft Pocket
Outlook Calendar, Contacts, Tasks, Notes, and Inbox.
Chapter 4 — Use the Companion Programs, includes information on using Pocket Word,
Pocket Excel, MSN Messenger, Windows Media™ Player for Pocket PC, and Microsoft Reader.
Chapter 5 — Use Pocket Internet Explorer, provides information and procedures for using
Pocket Internet Explorer, Mobile Favorites folder, and AvantGo
®
interactive service.
Chapter 6 — Get Connected, includes procedures for connecting to the Internet and for
transferring data using infrared.
Chapter 7 — If You Have Problems, includes information for solving problems that you might
have in using the MobilePro.
Chapter 8 — NEC Computers Information Services, includes information for obtaining NEC
Computers technical support and for accessing the NEC Computers Web site.
Chapter 9 — Specifications, includes specifications for the MobilePro and its accessories.
Preface vii

Get Started
!
Unpack Your MobilePro P300
!
Get to Know Your MobilePro P300
!
Charge the Battery
!
Calibrate and Activate the MobilePro
!
Learn the Basics
!
Install ActiveSync
!
Use the Secure Data Card
!
Access MobilePro Functions
!
Get Help
1
!
MobilePro Care
!
Install Productivity, Mobility, and Entertainment Applications

This chapter includes the following information:
!
unpacking your MobilePro™ P300
!
getting to know your MobilePro
!
charging the battery
!
calibrating and activate the MobilePro
!
learning the basics
!
installing Microsoft® ActiveSync
!
using the Secure Data card
!
accessing MobilePro functions
!
getting help
!
MobilePro care
!
installing productivity, mobility, and entertainment applications.
®
Unpack Your MobilePro P300
Your MobilePro P300 ships with a number of accessories. When you unpack the MobilePro
P300, verify that you have all of the items listed here and that they are in good condition. If
anything is missing or damaged, contact the organization that sold you the MobilePro.
Note
built-in battery (see “Charging the Battery” later in this guide).
!
!
!
!
!
!
Before you start using your MobilePro P300 for the first time, you need to charge the
MobilePro P300 (includes a stylus in a holder on the MobilePro)
MobilePro P300 AC Adapter
MobilePro P300 Universal Serial Bus (USB) Cradle
USB PC Connect Cable
Liquid Crystal Display (LCD) Protection Cover (attached to the MobilePro)
Companion CD (contains the Microsoft ActiveSync software, and several productivity,
mobility, and entertainment applications)
!
Secure Digital (SD) Card (contains several productivity and mobility applications)
!
MobilePro P300 Quick Start
!
MobilePro P300 Getting Started Guide
!
MobilePro P300 Reference Guide (on the Companion CD)
!
MobilePro P300 Release Notes
1-2 Get Started

Get to Know Your MobilePro P300
Your MobilePro P300 is a multifunction handheld device designed for ease of use in the office,
on the road, at home, or wherever you are.
The MobilePro is powered by the Microsoft Windows Powered Pocket PC 2002 operating
system. Data synchronizing between the MobilePro and your computer is provided by Microsoft
ActiveSync.
Standard features include a 206-MHz Intel
dynamic random access memory (SDRAM), reflective LCD panel with 65K color, touch screen
with automatic backlighting, internal speaker, microphone, an internal rechargeable Lithium Ion
battery, and a removable LCD cover. Touch screen backlighting and brightness levels are
adjustable.
The MobilePro includes an infrared (IR) port, CompactFlash (CF) card slot, and Secure Digital
(SD) card slot. You can use the IR port to transfer data between other handheld devices with IR
capabilities or your computer. The CF and SD card slots can be used to expand memory, add
applications, and more.
Also included with the MobilePro is a cradle for holding the MobilePro, a USB synchronizing
cable, and an AC adapter. Use the cradle to charge the battery and to synchronize with your
computer.
Your MobilePro P300 comes with a stylus, a pen-like device that allows you to touch, tap, or
double tap objects on the MobilePro touch screen. The touch, tap, and double tap act just like a
point, click, and double click of a mouse.
®
Strong ARM processor, 32-MB synchronous
The external features of the MobilePro P300 and cradle are shown and described in the
following sections.
Get Started 1-3
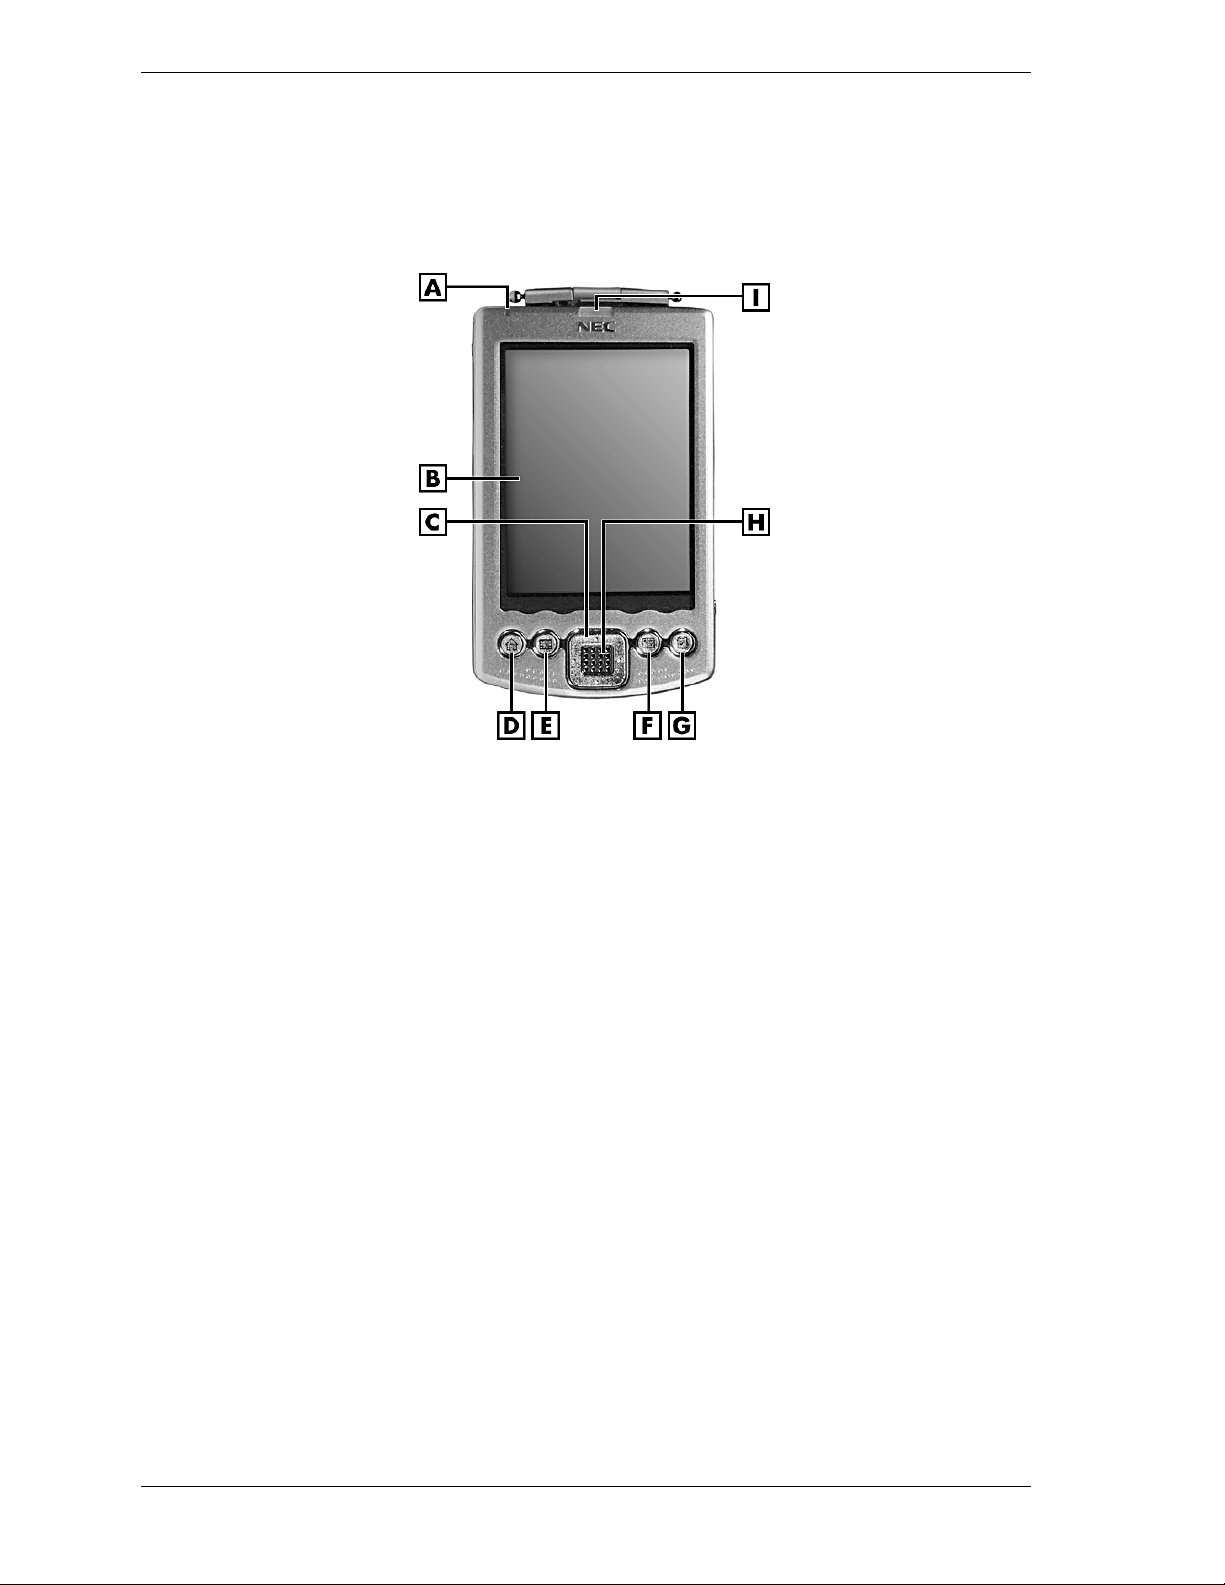
Front Features
The front features are shown in the following figure (shown with the cover folded back). Brief
descriptions follow the figure.
MobilePro P300 Front Features
A
– Battery Charging LED
B – Touch Screen G – Tasks Button
C – Navigation Buttons (4) H – Speaker
D – My Menu Button I – Notification LED
E
– Calendar Button
!
Touch Screen — enter, read, send, receive, and modify data by tapping the touch screen
F
– Contacts Button
with the stylus. Backlighting is automatic with automatic dimming after a preset time. Tap
the touch screen to restore full backlighting.
!
Battery Charging LED — lights amber while the battery is charging. Lights a light green
when the battery is charged.
!
Notification LED — a seven-color LED that indicates system status. Tap
Programs
, tap
My Setting
, and tap
LED Setting
to see what the LED colors indicate. The
Start
, tap
LEDs are customizable.
!
Program Buttons — press or tap the My Menu, Calendar, Contacts, or Tasks button for
quick access to tasks or programs. The buttons are customizable.
!
Navigation Buttons — use the four buttons as arrow keys, the same as you would for a
keyboard’s up, down, left, and right arrow keys.
!
Speaker — sounds alarms and plays back sound recordings.
1-4 Get Started
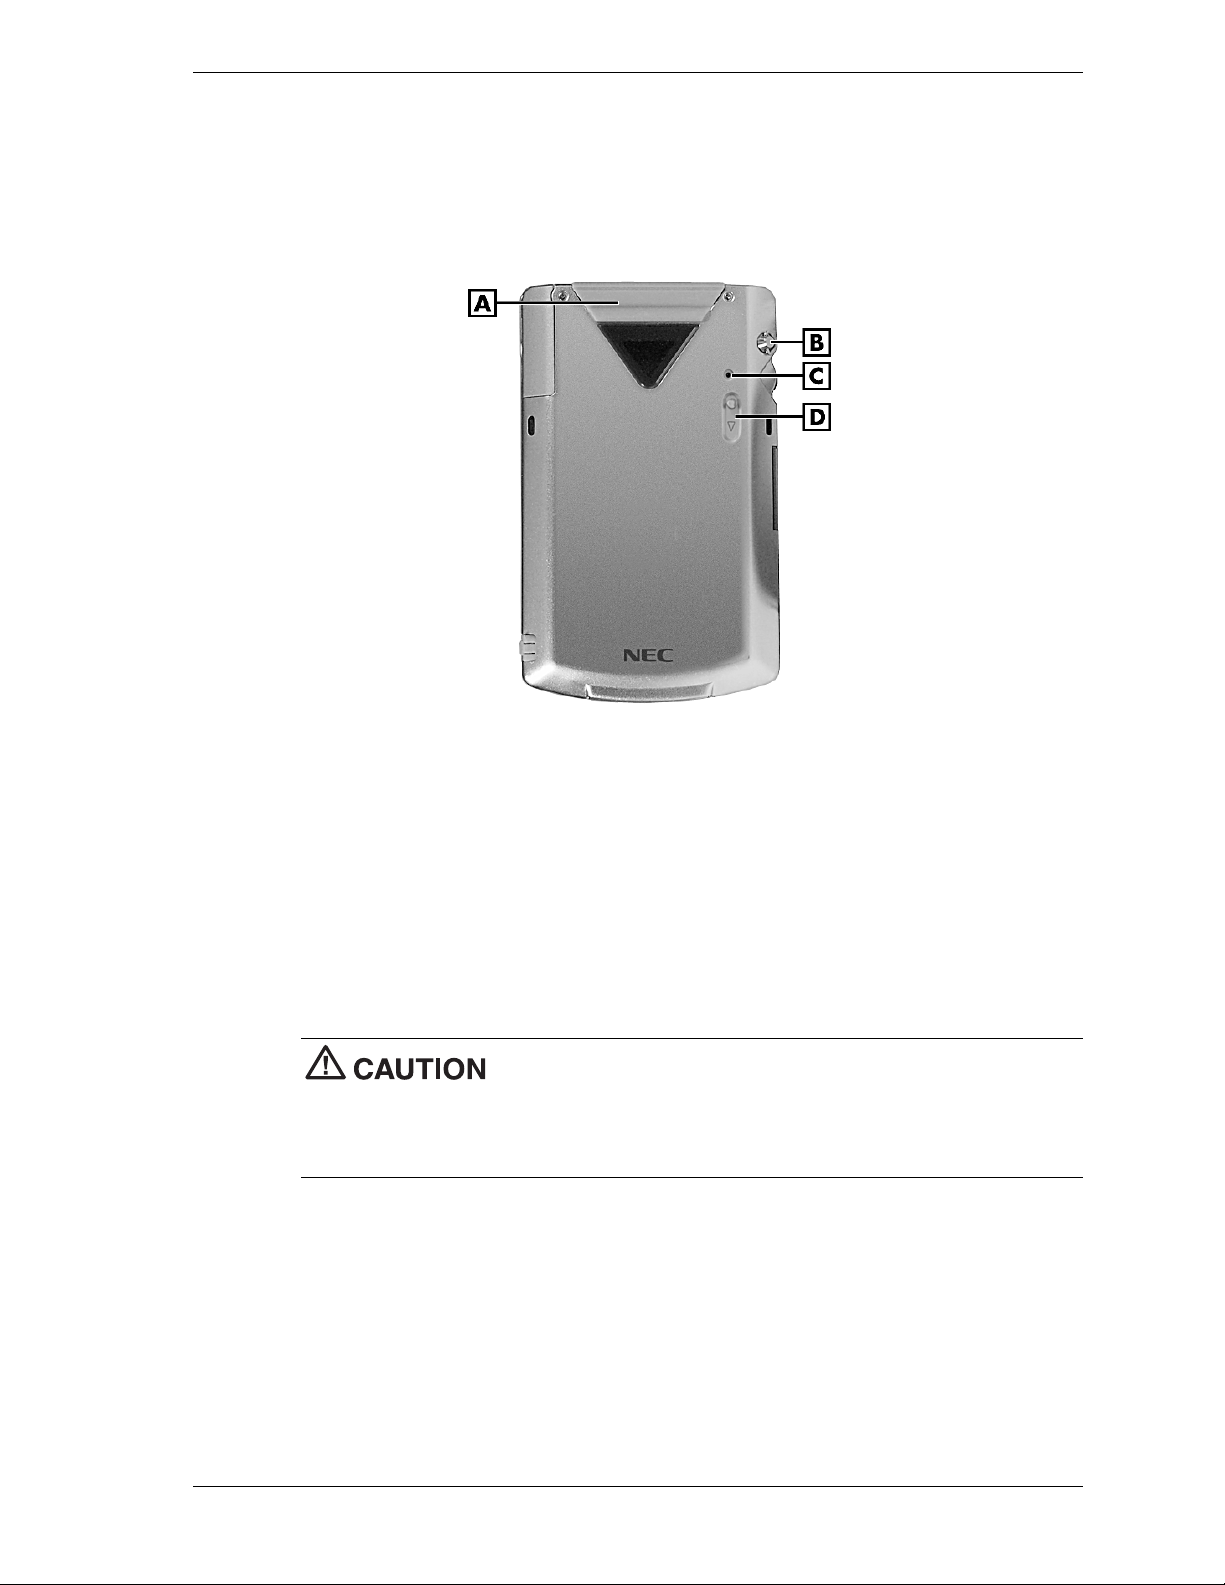
Back Features
The back features are shown in the following figure (shown with the cover removed). Brief
descriptions follow the figure.
MobilePro P300 Back Features
A – Compact Flash Card Slot C – Reset Button
B – Strap Holder D – Ejector Button
!
Compact Flash (CF) Card Slot — insert an optional CF card in this slot. Use the card for
data storage.
!
Strap Holder — clip an optional carrying strap to the holder.
!
Reset Button — performs a soft reset of the operating system in case of malfunction. Your
data is preserved if it was saved.
You can also use the reset button and power button to do a hard reset.
Save your data to a CF card or to your computer before doing a hard
reset or your data is lost when you do a hard reset.
Be careful how you hold the MobilePro to avoid accidentally touching or pressing the recording
button while simultaneously pressing the reset and power buttons.
Simultaneously press and hold the reset button and the power button to do a hard reset.
!
Ejector Button — ejects an installed CF card.
Get Started 1-5
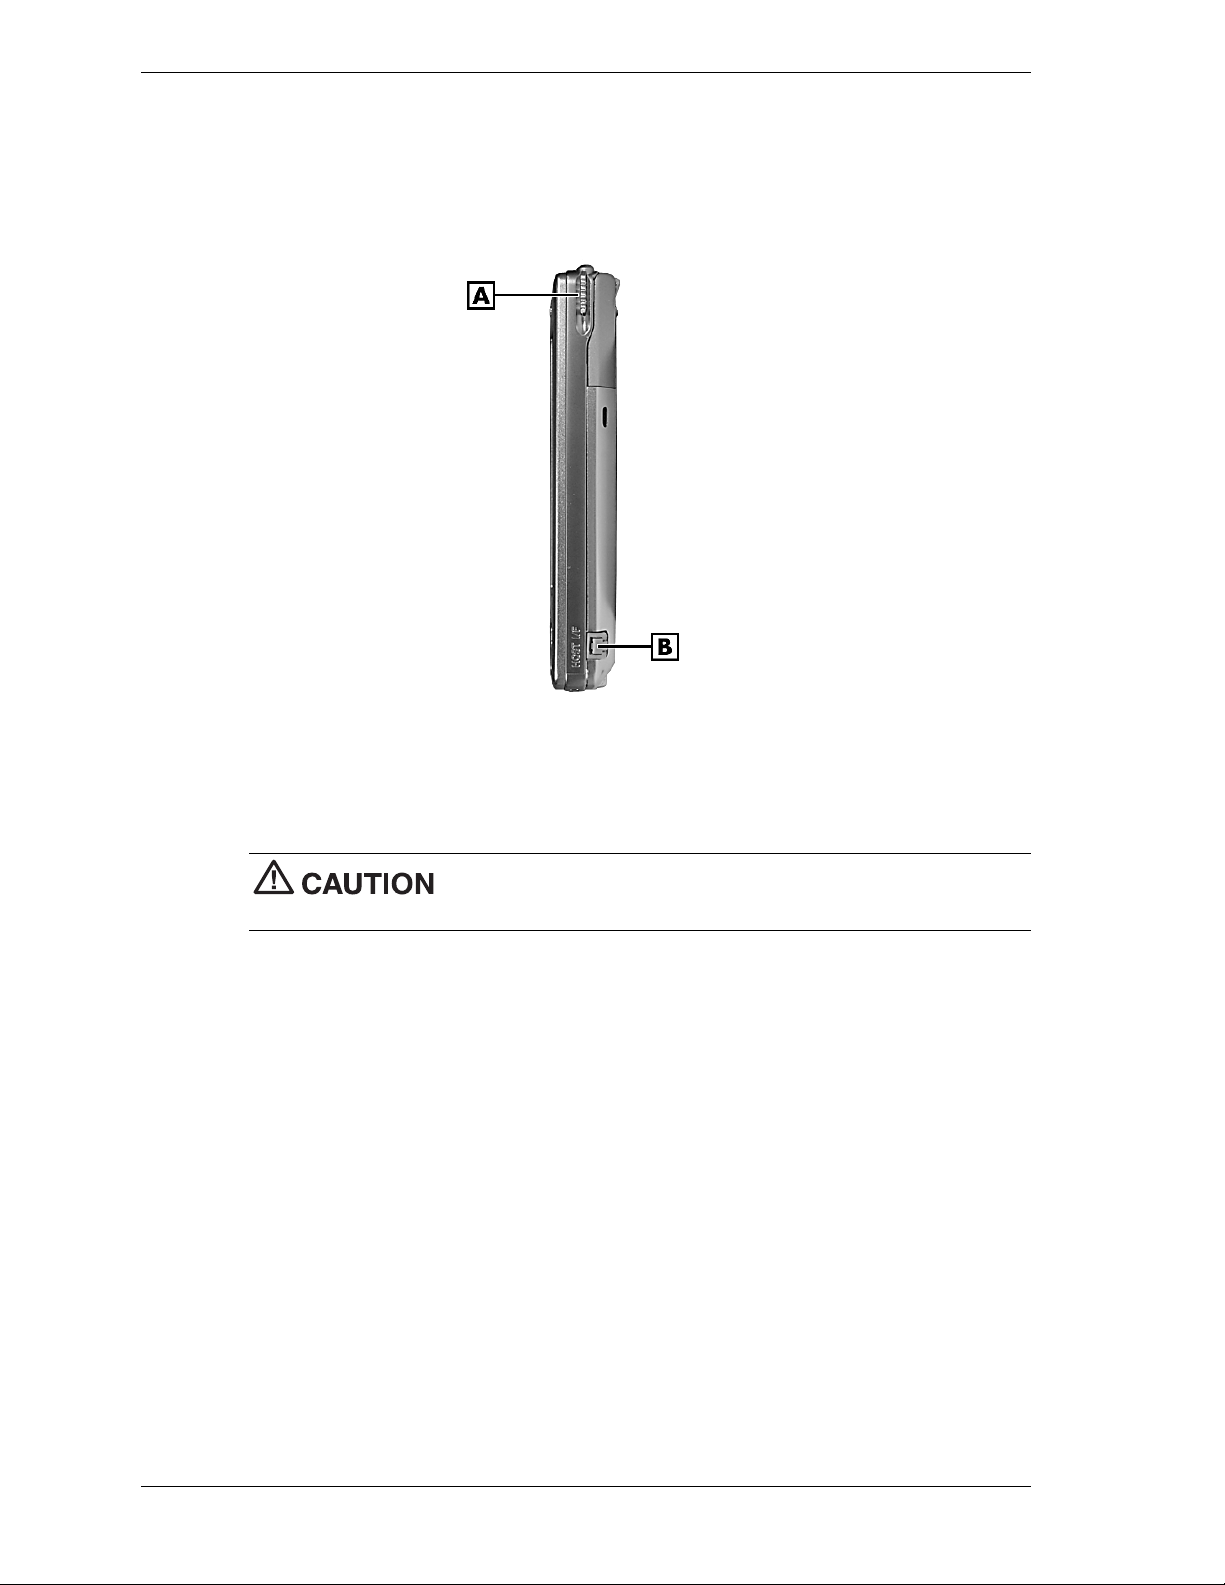
Right Side Features
The right side features are shown in the following figure (shown with the cover removed). Brief
descriptions follow the figure.
MobilePro P300 Right Side Features
A – Stylus B – Host Interface Connector
!
Stylus — use to tap or write on the screen. Slide the stylus out of its storage compartment
on your MobilePro.
Always use the stylus for tapping the touch screen. Never use hard-
pointed or sharp objects. These objects can damage the touch screen.
!
Host Interface (IF) Connector — connect an optional USB host I/F conversion cable to this
connector for connecting to USB devices.
1-6 Get Started
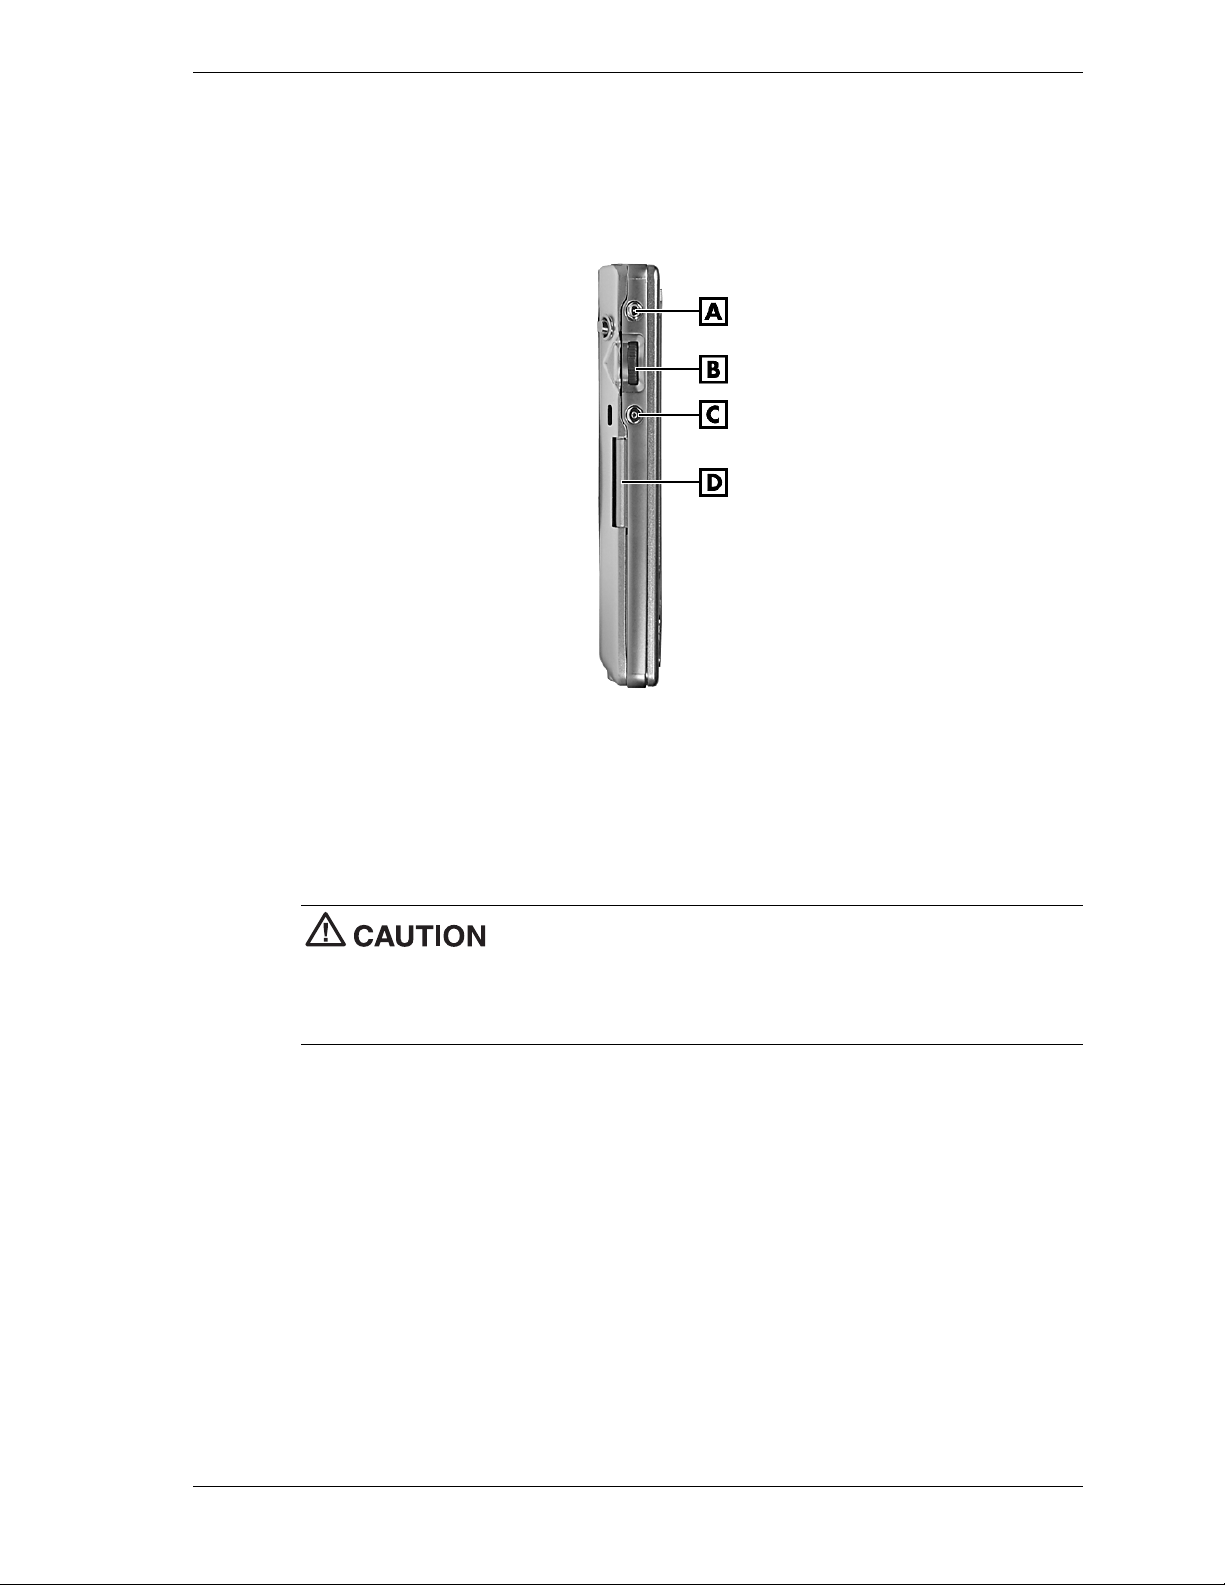
Left Side Features
The left side features are shown in the following figure (shown with the cover removed). Brief
descriptions follow the figure.
MobilePro P300 Left Side Features
A – Power Button C – Recording Button
B – Scroll Dial D – Secure Digital Card Slot
!
Power Button — turns power on and off. The MobilePro automatically turns off after one
minute of inactivity to conserve battery power. The inactivity setting is adjustable.
You can also use the power button and reset button to do a hard reset.
Save your data to a CF card or to your computer before doing a hard
reset or your data is lost when you do a hard reset.
Be careful how you hold the MobilePro to avoid accidentally touching or pressing the recording
button while simultaneously pressing the power and reset buttons.
Simultaneously press and hold the power button and the reset button to do a hard reset.
!
Scroll Dial — use to scroll through a menu and to select a program.
!
Recording Button — when pressed, records sound in Notes.
!
Secure Digital (SD) Card Slot — insert your SD card in this slot to load the productivity
and mobility applications into your MobilePro. You can also use optional SD cards to add
graphics, databases, and other information to your MobilePro.
Get Started 1-7
Top Features
The top features are shown in the following figure (shown with the cover removed). Brief
descriptions follow the figure.
MobilePro P300 Top Features
!
Headset Jack — connect an optional headset to this port.
!
Microphone — record your notes.
!
IR Port — exchange data with another handheld or your computer (both must have IR
capabilities).
!
CF Card Slot — insert an optional CF card in this slot. Open the cover to slide the card in
the slot. Slide the ejector button on the back of the MobilePro to eject a card.
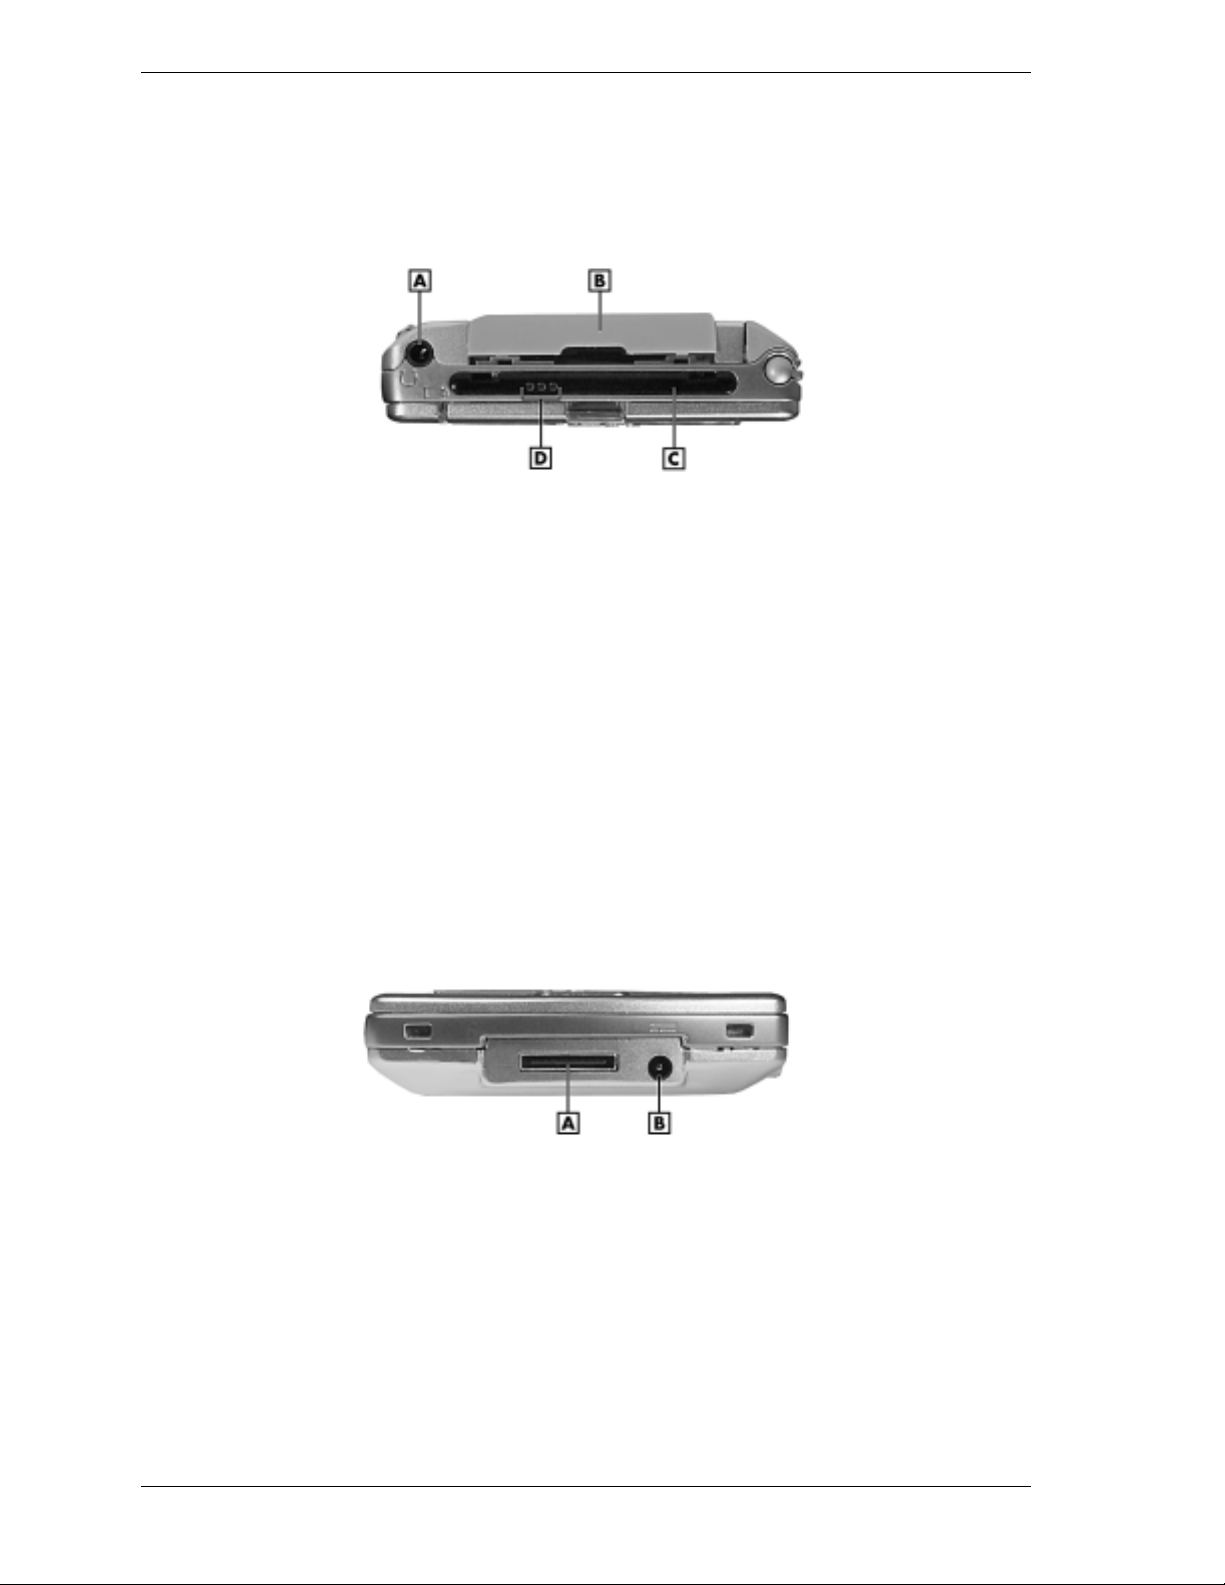
Bottom Features
The bottom features are shown in the following figure (shown with the cover removed). Brief
descriptions follow the figure.
A
– Headset Jack
B
– CF Card Slot
C
– IR Port
D
– Microphone
MobilePro P300 Bottom Features
!
!
1-8 Get Started
A
– Cradle Connector
B
– Power Connector
Cradle Connector — connect the cradle to this connector. Use the cradle to charge the
battery and to synchronize the MobilePro with your computer.
Power Connector — connect the AC adapter to this connector if you are not using the
cradle.
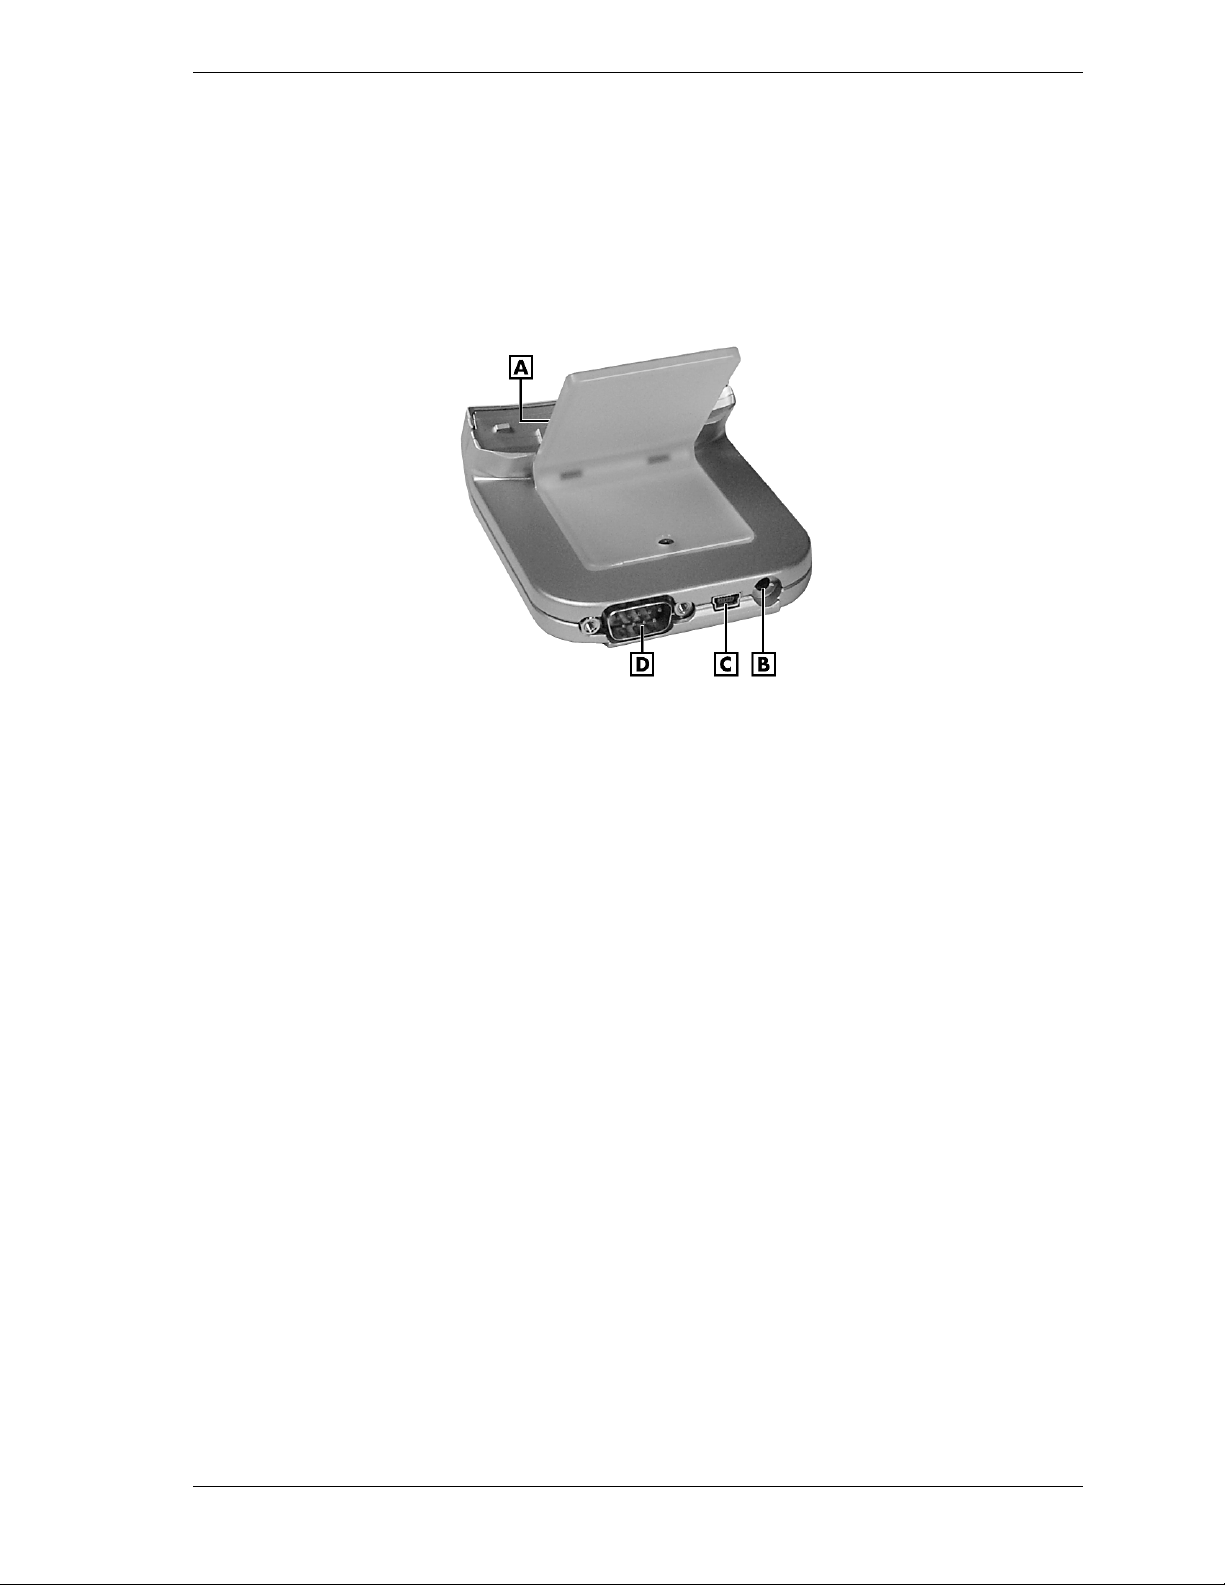
Cradle Features
The cradle holds the MobilePro for charging the battery, synchronizing data with your computer,
using expansion cards, or keeping your MobilePro on for long periods. You can also charge the
MobilePro without using the cradle.
The cradle features are shown in the following figure. Brief descriptions follow the figure.
MobilePro P300 Cradle Features
A – MobilePro Connector (on front) C – USB PC Cable Connector
B – Power Connector D – Serial Cable Connector
!
MobilePro Connector — connect your MobilePro to this connector. Use the cradle to charge
the battery and to synchronize the MobilePro with your computer.
!
Serial Cable Connector — connect an optional serial cable to this connector and a serial
port on your computer to synchronize the MobilePro with your computer. Use this feature if
you do not have a USB connector on your computer
!
USB PC Cable Connector — connect the USB PC cable to this connector and to the USB
port on your computer for synchronizing data.
!
Power Connector — connect the AC adapter to this connector.
Get Started 1-9
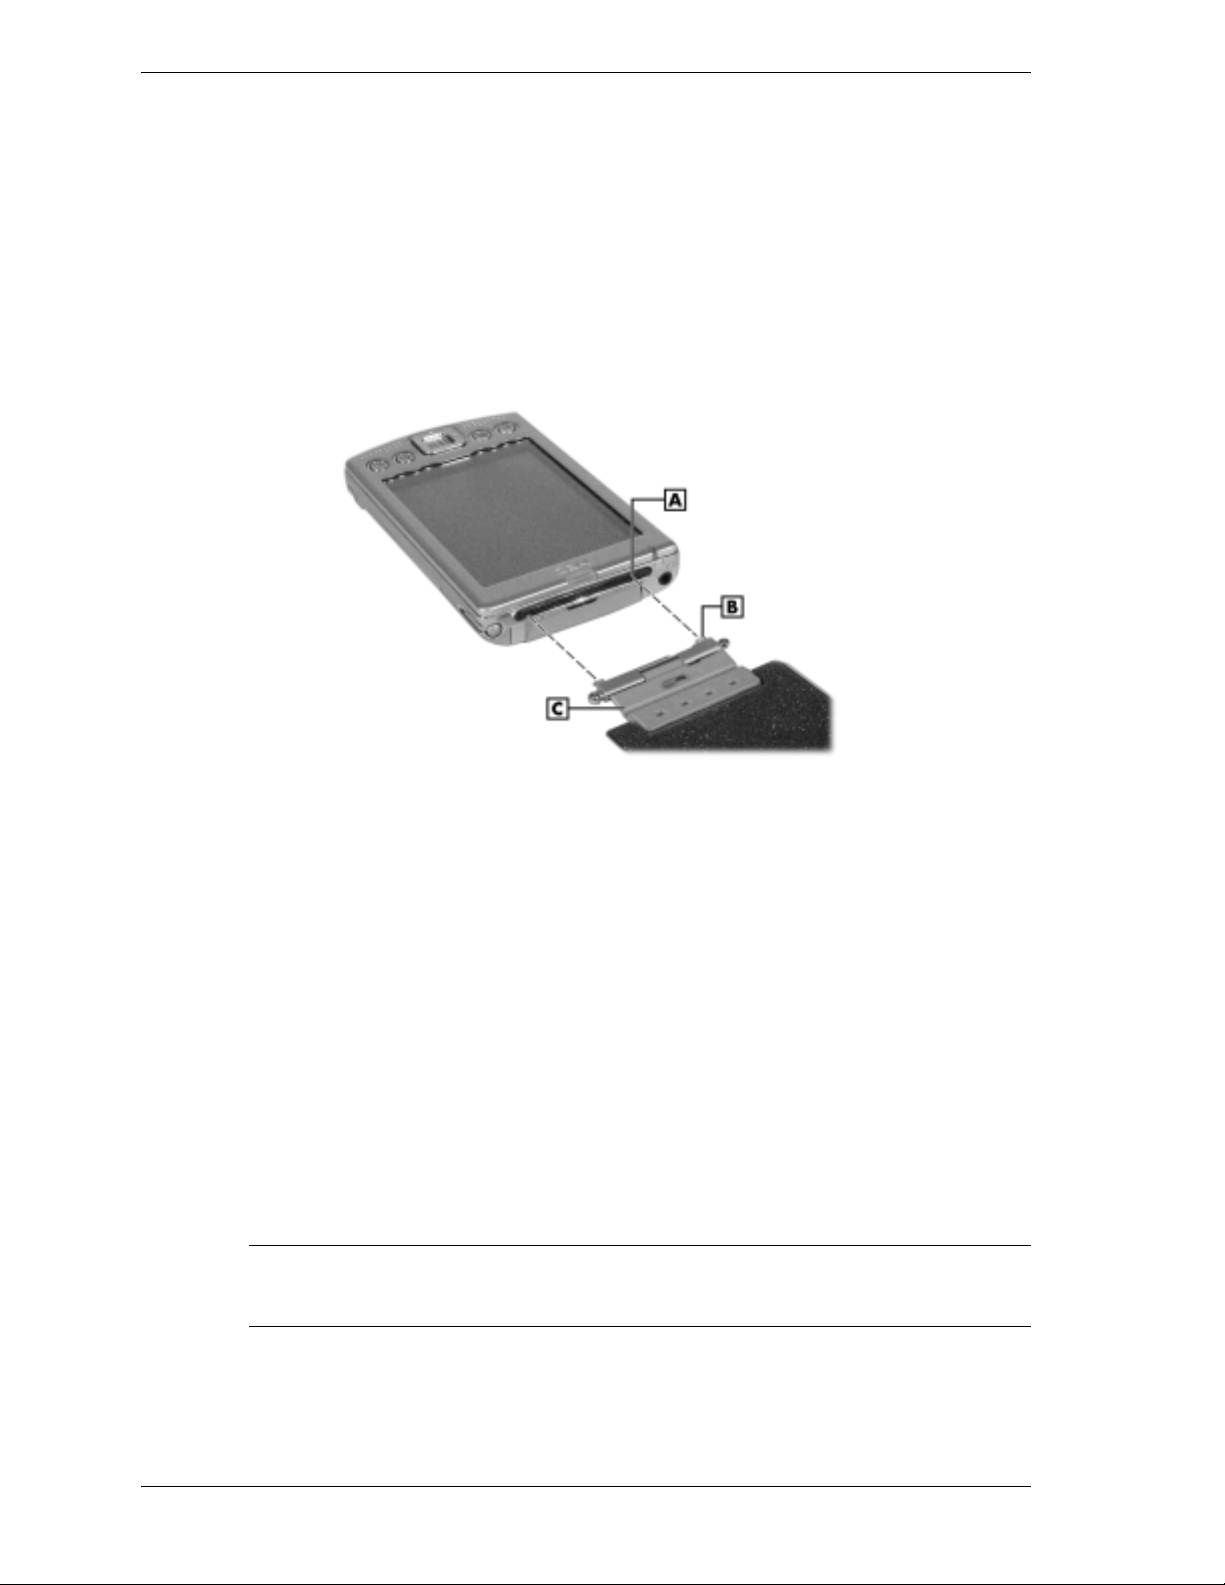
LCD Cover Features
The LCD cover is a hinged plastic cover that fits over the touch screen on your MobilePro. A
magnet at the bottom of the MobilePro holds the cover in place. The cover can be folded over
the back for clear access to the touch screen.
The cover can be removed from the MobilePro by pressing in on the two round pins on the
cover hinge and removing the cover from the MobilePro. Reinstall the cover by aligning it with
the top of the MobilePro, pressing in on the round pins, and inserting the hinge catches in the
slots.
Removing the Cover
A
– Slot (1 of 2)
B
– Catch (1 of 2)
Charge the Battery
Your MobilePro P300 contains a rechargeable Lithium Ion battery. The battery must be charged
before you use the MobilePro the first time and periodically recharged thereafter. As the battery
is rechargeable, you do not need to constantly replace batteries.
Battery power is monitored by your MobilePro P300. Warning messages and battery low icons
display when battery power becomes low. If you receive a battery low warning message, you
should save your data and recharge the battery as soon as possible to avoid data loss.
You can also monitor battery power activity through the power remaining indicator on your
MobilePro. Press or tap the My Menu button to see the indicator. Or tap
System
the
Use the MobilePro cradle and AC adapter to charge the battery. You can also directly charge the
MobilePro using the AC adapter.
Note
use the MobilePro until the battery is fully charged, as indicated by the steady green battery
charging LED and the power remaining indicator.
tab, and tap
Before using your MobilePro for the first time, you need to charge the battery. Do not
Power
C
– Cover Hinge
Start
, tap
Settings
, tap
.
1-10 Get Started

Charge the battery as follows.
1.
Position the cover so that it does not cover the back and front of the MobilePro.
2.
Plug the MobilePro into the cradle.
3.
Plug the AC adapter into the power port on the back of the cradle.
If you are not using the cradle, plug the AC adapter directly into the power port on the
bottom of the MobilePro.
Charging the Battery
A – Battery Charging LED D – AC Adapter
B – MobilePro E – Power Connector
C – Cradle
4.
Plug the other end of the AC adapter into a grounded 115-volt AC outlet.
! The battery-charging LED lights amber, indicating that the battery is charging.
! You can also check the power remaining indicator.
5.
When the battery is charged, the following occurs.
! The battery-charging LED lights green.
! The power remaining indicator indicates 100%.
Now calibrate and activate your MobilePro (see “Calibrate and Activate the MobilePro” in the
following section). Calibration must be done to ensure proper operation of your MobilePro.
You can leave the MobilePro in the cradle and the AC adapter connected to keep your battery
charged.
Note
source. Doing so keeps the battery charged.
Whenever possible, keep your MobilePro connected to the AC adapter and a power
Get Started 1-11

Calibrate and Activate the MobilePro
It is essential that you calibrate and activate your MobilePro before you use it. This ensures
accurate positioning when entering text and selecting menus. Calibrate and activate the
MobilePro as follows.
1.
Press the power button to power on the MobilePro.
2.
Tap the touch screen with the stylus to start the calibration and activation.
3.
At the prompt to align the screen, tap the center of the cross wherever the traveling cross
stops on the screen. You might have to do this several times to properly calibrate.
4.
On completion of the screen calibration, follow the screen prompts to complete the
activation.
! At the Stylus screen, tap
! At the “pop-up menus” screens, perform the indicated operations.
! At the Congratulations screen, tap
! At the “location” screen, select your time zone and tap
! At the “completion” screen, tap the screen to continue.
! The Today screen displays.
Note
Start, tap Settings, tap the System tab, and tap Screen.
You can also recalibrate the MobilePro at any time after the initial calibration. Tap
Your MobilePro is now ready to use. The following sections describe the MobilePro’s three
basic screens and how to use them for performing functions. Also included is information for
installing ActiveSync on your computer.
Learn the Basics
There are three basic screens you need to know about to get started. These are the Today screen,
the Navigation Bar screen, and the My Menu screen.
The first screen that you normally see on startup is the Today screen. This screen displays your
important events (for example, current date and time, your name, upcoming appointments,
unread messages, tasks).
Next
to continue.
Next
to continue.
Next
to continue.
Tapping
screen. At the Navigation Bar, you can select and access the programs available on your
MobilePro. Tap
The My Menu screen is opened by pressing or tapping the My Menu button on the front of the
MobilePro. Using My Menu is a fast and easy way to access many of the tasks and programs
available on the MobilePro.
Your actions on these basic screens are controlled with the stylus. The stylus is used as follows.
Tap — touch the screen once with the stylus to open programs and select options.
!
Drag — hold the stylus on the screen and drag across the screen to select text and images.
!
Drag in a list to select multiple items.
Tap and Hold — tap and hold the stylus on an item to see a list of actions available for that
!
item. On the displayed pop-up menu, tap the action that you want to perform.
See the following sections for more information on using the Today screen, Navigation Bar, My
Menu screen, and stylus.
1-12 Get Started
or tapping
Start
Start
on the Today screen with the stylus takes you to the Navigation Bar
to go back to the Today screen.
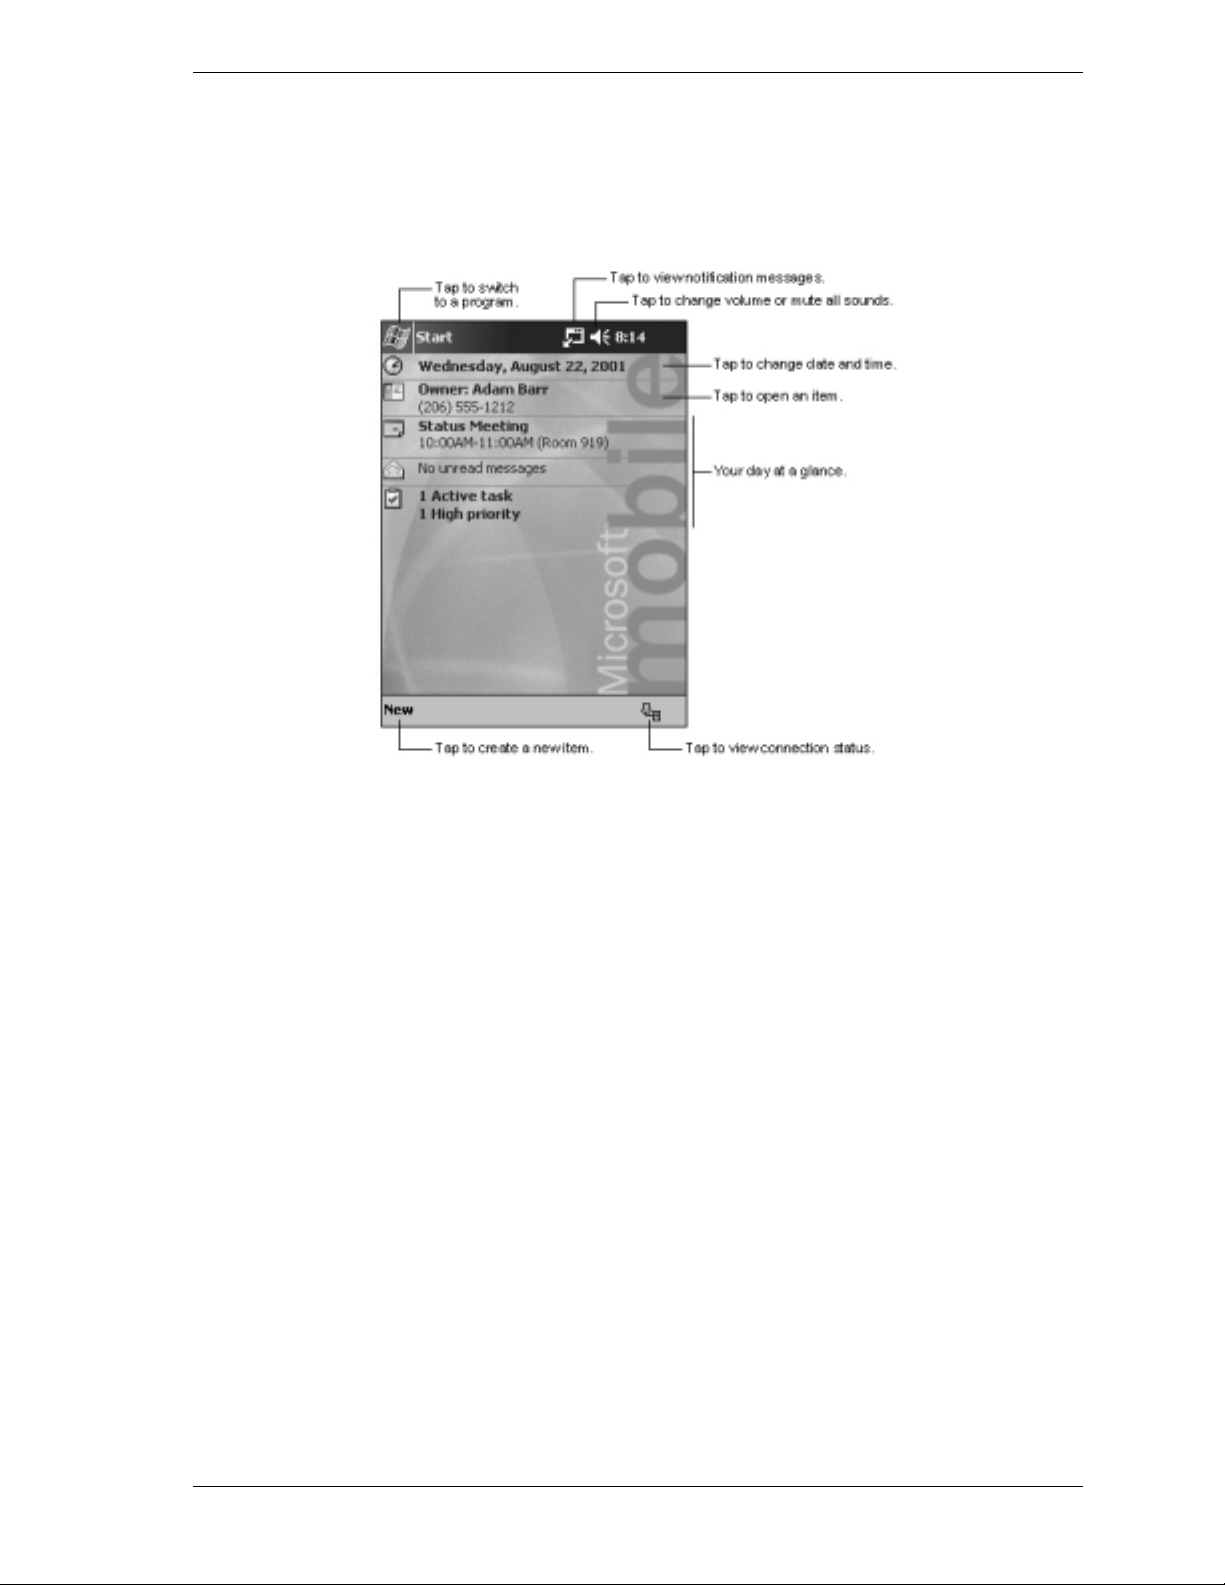
Today Screen
The Today screen normally appears whenever you power up the MobilePro. On the Today
screen, you can see at a glance your important information for the day. The following figure
shows a typical Today screen and what you can do from it.
Typical Today Screen
At the top of the screen is the Start bar. The bar displays the current time and any active
program. The bar also allows you to switch to programs and close screens.
From the Today screen, you can select any of the listed activities by tapping on your selection
with the stylus. For example, if you just activated your MobilePro, you might want to enter your
name as the owner. Do this as follows.
1.
At the Today screen, tap
2.
At the Owner Information screen, tap the keyboard icon at the lower right of the screen. The
Tap here to set owner information
.
keyboard is displayed.
3.
Tap once in the Name field. A blinking cursor appears, indicating that you can enter data.
4.
Use the keyboard to tap in your name, just as you would with your computer keyboard.
5.
If you make a mistake and need to remove a letter(s) or remove a word(s), you can
! correct minor mistakes by placing the cursor after the letter or letters to be deleted and
pressing the backspace arrow on the keyboard to delete the letter or letters.
! highlight a whole word(s) with the stylus and pressing and holding the stylus on the
word(s). A pop-up menu gives options to Undo, Cut, Copy, Paste, Clear, or Select All.
6.
When done, click OK. Your changes are saved and the Today screen is displayed with your
name as the owner.
New
At the bottom of the Today screen is the Command Bar. Tapping
on the bar lists several
tasks that you can tap to open. Use this as a short cut to open any of the listed tasks.
By using the stylus and several control buttons, you can open tasks from the Today screen and
Navigation Bar and enter or read data at selected screens.
Get Started 1-13
Navigation Bar Screen
To switch to the Navigation Bar screen, tap or tap
Start
at the top of the Today screen. The
Navigation Bar is displayed on the Today screen.
From the Navigation Bar, you can select any one of the listed activities by tapping on your
selection with the stylus. You can also use the navigation buttons on the front of the MobilePro
or the scroll dial on the side of the MobilePro to scroll up or down, then open the highlighted
program by pressing the dial.
Typical Navigation Bar Screen
The Start bar at the top of the screen displays the time and one or more status icons. The bar also
displays the
icon which you can tap to return to the Today screen.
To select a program from the Navigation Bar (for example, Contacts), tap
or tap
Contacts
.
You can also tap the Contacts button on the front of the MobilePro. Note the Contacts command
bar at the bottom of the screen.
The Contacts command bar has a
New
button for creating a new contact, a
changing the way the contacts are displayed (by name, by company), a
View
Tools
button for
button for
beaming contacts and changing various settings, and an input panel button. Tapping the input
panel button displays a keyboard which you can use to create or edit a contact.
You can also input information by writing data on the screen. Tap the triangle in the lower right
corner of the screen, and tap
information on using each input device, tap
Close the open activity by tapping
Block Recognizer, Letter Recognizer
?
(Help) to open a help screen.
X
in the upper right corner of the screen. If you changed
Transcriber
, or
. For
anything, tap the appropriate program command to save the changes.
Many of the programs available on your MobilePro are selected and used in a manner similar to
that described for Contacts.
The following table lists some of the programs that might be on your MobilePro. To see what
you actually have on your MobilePro, tap
To see additional programs, tap
Programs
Start
to open the Navigation Bar screen to see a list.
. Also look on the Companion CD and SD card for
more programs that you might want to install.
1-14 Get Started
Icon Program Description
ActiveSync Synchronize information between your MobilePro and computer.
Calendar Keep track of your appointments and create meeting requests.
Contacts Keep track of your colleagues and friends.
Programs
For further information on accessing and using the activities, tap
My Menu Screen
MobilePro
Synchronization
System
Inbox Send and receive e-mail messages.
Internet
Explorer
Notes Create handwritten or typed notes, drawings, and recordings.
Tasks Keep track of your tasks.
Windows Media Play audio or video files.
Programs
Settings
Find Use Find to find data in your MobilePro.
Help
Use as a single-source mobile solution to stay connected while
away from the office.
View Web pages downloaded from your computer or connect to
the Internet to browse the Web.
Tap Programs to see a list of the various programs available to
you.
Tap Settings to see the various areas that you can access for
changing/reviewing settings.
Tap Help to see the Help Contents.
Help
on the Navigation Bar.
You can open the My Menu screen at any time by pressing or tapping the My Menu button on
the front of the MobilePro. My Menu consists of several screens. On each screen are icons
representing a task, program, or setting. All are shortcuts, giving you faster access to many of
the functions available from the Navigation Bar. Use the My Menu screen and its icons as
shortcuts, similar to using shortcuts on your computer.
At the top of each My Menu screen is the My Menu bar. Tapping the flag icon or My Menu
takes you back to the Navigation Bar. Tapping the X exits the screen.
At the bottom of each screen is the command bar. Tap
Settings
to see a list of items for
customizing your MobilePro. Tap the up/down arrows icon to check battery charge, system
functions, and to open various programs. Tap the downward-pointing triangle to open a pop-up
selection menu, and tap a setting to switch to it. Tap the right and left triangles to advance to the
next screen or to go to the prior screen. Tap the upward-pointing triangles to scroll up or down.
Get Started 1-15

Install ActiveSync
A key component of your MobilePro is the Microsoft ActiveSync program. With Microsoft
ActiveSync, you can synchronize the information on your computer with the information on
your MobilePro and update both with the most recent information.
For example:
!
Keep Microsoft Pocket Outlook® data up-to-date by synchronizing your MobilePro with
Microsoft Outlook data on your computer.
!
Synchronize Microsoft Word and Microsoft Excel files between your MobilePro and
computer. Your files are automatically converted to the correct format.
Note
ActiveSync options to turn synchronization on and off for specific information types.
By default, ActiveSync does not automatically synchronize all types of information. Use
With ActiveSync, you can also:
!
Back up and restore your MobilePro data.
!
Copy (rather than synchronize) files between your MobilePro and computer.
!
Control when synchronization occurs by selecting a synchronization mode. For example,
you can synchronize continually while connected to your computer or only when you
choose the synchronize command.
!
Select which information types are synchronized and control how much data is
synchronized. For example, you can choose how many weeks of past appointments you
want synchronized.
Your MobilePro comes with ActiveSync already installed. However, to synchronize information
with your computer, you must also install ActiveSync on your computer.
Install ActiveSync on your computer from the Companion CD as follows.
Note
installed on your computer. If you don’t have Outlook, you can install Outlook 2002 from the
Companion CD. If you have Outlook 98 or Outlook 2000 installed, you are encouraged to update
to Outlook 2002. You should install Outlook 2002 before starting the ActiveSync installation.
Before starting the ActiveSync installation, ensure that you have Microsoft Outlook
1.
Connect your computer, monitor, mouse, and keyboard.
Note
2.
Power on your computer and monitor.
3.
Insert the Companion CD into the CD-ROM drive of your computer. The CD autoruns and
displays the Getting Started with Your Pocket PC screen.
4.
At the Getting Started with Your Pocket PC screen, click
5.
At the Start Here screen,
!
1-16 Get Started
Do not connect your MobilePro and cradle to the computer until ActiveSync is installed.
Start Here
.
Please read the Overview before installing ActiveSync 3.5. If you have not installed
Outlook, install it now. Click
Install Outlook 2002
and follow the prompts. Return to
the Start Here menu when done.

! Click
Download Connection Wizard
and read the overview to see if you require the
wizard. Follow the prompts to install the wizard on your computer. Return to the Start
Here menu when done.
6.
At the Start Here screen, click
7.
At the Install ActiveSync 3.5 screen, click
8.
At the File Download screen, click
9.
Follow the prompts to install ActiveSync on your computer. When prompted, connect your
Install ActiveSync 3.5
Install
Run this program from its current location
.
.
MobilePro to your computer.
! Install the MobilePro in the cradle.
! Connect the AC adapter to the cradle and power.
! Connect the USB PC synchronization cable to the cradle and to your computer.
Synchronizing Setup
.
A – MobilePro D – USB Port
B – Cradle E – USB Cable
C – AC Adapter Cable F – Computer
10. At the Add New Hardware Wizard screen, click
! When the Device Manager asks for the driver, click
(typically D or E) containing the Companion CD, and select the
Next
and follow the prompts.
Browse
, select the CD-ROM drive
Wceusbsh.inf
file
under the root directory.
Note
11.
Be sure that you select the Wceusbsh.inf file or ActiveSync won’t work.
! Click
OK
to continue.
Follow the prompts to complete the synchronization and establish a partnership between
your MobilePro and your computer.
Your first synchronization begins when the installation is completed. This takes time, as the
process is copying information to the MobilePro.
On completion of synchronization, you can either remove the MobilePro from the cradle or
leave it in with AC power connected.
Get Started 1-17

Press the power button on the MobilePro and check your Calendar. Tap the Calendar program
button, tap the Calendar icon on the Today screen, or tap
and tap (calendar). Note that
your calendar information in Microsoft Outlook on your computer was copied to your
MobilePro. Also look at Contacts and Tasks. If you have Contacts and Tasks information on
your computer, you should see that information copied to your MobilePro.
When done, tap the X button at the top right of the screen to exit the program.
For further information on using MobilePro ActiveSync, tap
Help
at the Navigation Bar screen. At the Help screen, tap
Synchronization
Start and Stop Synchronization
or tap
For information about using ActiveSync on your desktop computer, start ActiveSync on your
computer and click
ActiveSync Help
Once you have installed ActiveSync on your computer and performed your first
synchronization, synchronization occurs whenever the ActiveSync components on the
MobilePro and on your computer are activated.
Use the USB PC connect cable for synchronization. You can also use infrared or an optional
serial cable for synchronization. Set the synchronization type on the MobilePro by tapping
tapping
Sync
.
ActiveSync
, tapping
Tools
Use the Secure Data Card
The Secure Data (SD) card included with your MobilePro contains several productivity and
mobility programs that you can install on your MobilePro (see “Installing Productivity,
Mobility, and Entertainment Applications” at the end of this chapter). You can also load the
programs from your Companion CD.
To install the SD card and any of its programs, use the following procedure.
1.
Connect your MobilePro to the cradle and the AC adapter to the cradle and AC power.
.
, tapping
Connections
.
Connect via IR,
at the Today screen and tap
Set Up Remote
then
or tapping
and tap
Options
USB
Start
,
2.
Power on the MobilePro.
3.
Install the SD card in the SD slot on the side of your MobilePro. A menu displays on the
MobilePro touch screen, showing you the contents of the card.
4.
Select a program and follow the prompts to load it on your MobilePro.
5.
When finished, remove the SD card and store it in a static free bag, or use it to store data or
programs.
Access MobilePro Functions
The following table is a guide to many of the functions and settings for the MobilePro. Included
in the table is the tapping path for accessing the function from the Navigation Bar. Note that not
all functions are listed and some settings and selections may differ from that on your MobilePro.
You can also access many of these functions from the My Menu screen. Press or tap the My
Menu button on the front of the MobilePro, tap the triangle at the bottom right of the screen to
open a pop-up menu, and tap a selection (Top, Application, Data, Settings-Personal,
Settings-System, or Settings-Connections). At the selected screen, tap the function.
1-18 Get Started

Accessing MobilePro Functions
Function Access
About Pocket PC
ActiveSync
Align Screen
Backlight Settings
Backup Utility
Battery Status
Buttons, Front
Calendar
Clock
Contacts
File Explorer
Find
Front Light
Help
Tap Start, tap Settings, tap System tab, and tap About to see
Pocket PC version and processor type.
Tap Start, tap ActiveSync, and tap Sync or Tools.
Tap Start, tap Settings, tap System tab, and tap Screen.
Tap Start, tap Settings, tap System tab, and tap Backlight.
Tap Start, tap Programs, tap My Setting, and tap Backup Utility.
Tap Start, tap Settings, tap System tab, and tap Power.
Tap Start, tap Settings, and tap Buttons.
Press the Calendar program button on the front or tap Start and
tap Calendar.
Tap Start, tap Settings, tap System tab, and tap Clock.
Press Contacts program button on the front or tap Start and tap
Contacts.
Tap Start, tap Programs, and tap File Explorer.
Tap Start and tap Find.
Tap Start, tap Programs, tap My Settings, and tap Front Light.
Select brightness level.
Tap Start, tap Help, and select a help item.
MobilePro
Synchronization System
MobilePro
Synchronization System
Change Capture
Inbox
Infrared Receive
Input Panel
Internet Explorer
LED Settings
Memory Settings
MSN Messenger
My Settings
Notes
Owner information
Password
Tap Start and tap MobilePro Synchronization System.
Tap Start, tap Programs, and tap MobilePro Synchronization
System Change Capture.
Tap Start and tap Inbox.
Tap Start, tap Programs, and tap Infrared Receive.
Tap Start, tap Settings, and tap Input. Select input method.
Tap Start and tap Internet Explorer (requires optional modem or
MobilePro synched to computer).
Tap Start, tap Programs, tap My Setting, and tap LED Setting.
Tap Start, tap Settings, tap System tab, and tap Memory.
Tap Start, tap Programs, and tap MSN Messenger.
Tap Start, tap Programs, tap My Settings, and select Front Light,
AGC, Asset View, Wakeup, IR Setting, Autorun, LED Setting, or
Backup Utility.
Tap Start and tap Notes.
At the Today screen, tap Owner, and enter information.
Tap Start, tap Settings, and tap Password.
Pocket Excel
Tap Start, tap Programs, and tap Pocket Excel.
Get Started 1-19

Accessing MobilePro Functions
Function Access
Pocket PC Basics
Pocket Word
Programs
Regional Settings
Settings, Connections
Settings, Personal
Settings, System
Sound Volume
Start Menu
Tasks
Tap Start, tap Help, and tap Pocket PC Basics.
Tap Start, tap Programs, and tap Pocket Word.
Tap Start and tap Programs. Select Games, Calculator, File
Explorer, MobilePro Synchronization System Change Capture,
MobilePro Synchronization System, Infrared Receive, Microsoft
Reader, MSN Messenger, My Menu, My Settings, Pocket Excel,
Pocket Word, or Terminal Services Client.
Tap Start, tap Settings, tap System tab, and tap Regional
Settings.
Tap Start, tap Settings, and tap Connections tab. Select
AvantGo Connect, Beam, Connections, or Network Adapters.
Start
Tap
Input, Menus, Owner Information, Password, Sounds &
Notifications, or Today.
Tap Start, tap Settings, and tap Systems tab. Select About,
Backlight, Clock, Memory, Power, Regional Settings, Remove
Programs, or Screen.
Start
Tap
Tap Start, tap Settings, tap Menus, and select programs to
appear on Start menu.
Tap Tasks button on the front or tap Start and tap Tasks.
, tap
, tap
Settings
Settings
, and tap
, and tap
Personal
Sounds & Notifications.
tab. Select Buttons,
Get Help
The following table provides a comprehensive list of where you can get help and information on
your MobilePro P300, the software, connections, accessories, and support.
Windows Media
Tap Start and tap Windows Media.
Help Resources
Item Resource
MobilePro Operation
Windows Pocket PC
MobilePro Release Notes
MobilePro P300 Quick Start
MobilePro P300 Getting Started Guide
MobilePro P300 Reference Guide
Windows Pocket PC Help
Help file included with Windows Pocket PC. Tap Start on the
Today screen, tap Help on the Navigation Bar screen, and tap an
item on the Help Contents screen.
Windows Pocket PC web site
http://www.microsoft.com/mobile/pocketpc/default.asp
(this document)
1-20 Get Started

Item Resource
Help Resources
ActiveSync
Pocket Word, Excel,
Reader, Outlook (Inbox,
Calendar, Contacts,
Tasks, Notes), Windows
Media Player, Internet
Explorer
Software and Hardware
Resources
MobilePro Accessories
MobilePro Technical
Support
ActiveSync Help on your computer
After installing ActiveSync on your computer, click on
Start/Programs/ActiveSync to open the ActiveSync window.
Select Help from the menu bar and click on Microsoft ActiveSync
Help.
ActiveSync Help on your MobilePro
Tap
At the Help Contents screen, tap Connections. Select a topic for
help.
ActiveSync Help on the Web
http://www.microsoft.com/mobile/pocketpc/default.asp
Microsoft Pocket PC Features
http://www.microsoft.com/mobile/pocketpc/default.asp
Pocket PC Magazine
http://www.ppcmag.com
NEC Computers Inc. Accessories
http://www.neccomp.com/accessories_category.asp
NEC Computers Inc. MobilePro Support
http://support.neccomp.com
at the Today screen and tap Help on the Navigation Bar.
MobilePro Care
Your MobilePro is a durable, dependable unit built for extensive use and travel. Follow these
guidelines to maintain the condition and performance of the MobilePro.
!
Clean your MobilePro with a soft, clean, slightly damp, almost dry cloth. Use only water to
dampen the cloth. Do not use any type of cleaning products or soap or you might damage
the touch screen and discolor the case finish.
!
Do not spray liquids on the touch screen and case or allow liquids to drip into the
MobilePro.
!
Keep the cover closed over the touch screen whenever you are not using the MobilePro.
!
Do not put anything on top of the touch screen.
!
Always use the stylus to prevent scratching the touch screen.
!
Do not expose your MobilePro to moisture and temperature extremes.
!
Avoid dropping or bumping the MobilePro or the AC adapter.
!
Do not use the MobilePro in humid or dusty environments.
!
Avoid leaving the MobilePro and its components in direct sunlight or near heat sources.
Get Started 1-21

Install Productivity, Mobility, and Entertainment Applications
In addition to the standard programs provided on your MobilePro, the Companion CD and SD
card contain one or more of the following applications that you can install on your MobilePro:
!
ClearVue™ Office Viewers
!
VoiceMessenger Force
!
PhotoBase™
!
MobilePro Synchronization System
!
ZIOGolf™
!
Golfwits™
Each application is briefly described in the following sections. Included with each description is
the procedure for loading the application on your computer and MobilePro, as appropriate.
Before installing an application, you should check your MobilePro’s memory (tap
Settings
, tap the
application.
ClearVue Office Viewers
The Westtek® ClearVue Office Viewers application combines a Presentation, Worksheet, and
Document viewer for use on your MobilePro P300.
System
tab, and tap
Memory
) to see if there is sufficient memory for the
Start
, tap
With ClearVue Office Viewers, you can open and view native Microsoft Office 97, Office 2000,
and Office XP files. ClearVue supports timed transitions, custom animations, and inserted
images, fonts, text, AutoShapes, graphs, and charts.
The ClearVue Office Viewers application is on your MobilePro Companion CD and on your SD
card.
Use the Companion CD to install ClearVue on your computer and MobilePro as follows.
1.
Ensure that your MobilePro is on and connected to your computer, that both are
synchronized, and that you have established a partnership.
2.
Load the autorun Companion CD in the CD-ROM drive on your computer.
3.
At the Getting Started with Your Pocket PC screen, click
4.
At the Enhance Your Pocket PC screen, click
5.
At the Productivity screen, scroll to ClearVue Office Viewers. Click Details for information
about ClearVue Office Viewers and click
Productivity
Install
. Follow the prompts to install ClearVue
Enhance Your Pocket PC
.
.
Office Viewers on your computer.
If your MobilePro is connected and synched with the computer, ClearVue is installed on the
MobilePro.
If your MobilePro is not connected to the computer, the next time you perform a
synchronization, ClearVue automatically installs on it.
Use the SD card to install ClearVue on your MobilePro as follows.
1.
Install the MobilePro on the cradle and connect the AC adapter to the cradle and AC power.
2.
Install the SD card in the SD card slot.
1-22 Get Started

3.
At the applications selection screen on your MobilePro, tap
application installs.
4.
Remove the SD card from the MobilePro.
ClearVue.cab
. The ClearVue
5.
At the Today screen, tap
6.
Tap ? (Help) for detailed features, instructions, and troubleshooting information.
Please review the help file for detailed features, instructions, and troubleshooting information
before using the ClearVue Viewers.
VoiceMessenger Force
The VoiceMessenger Force is an instant messaging application that lets you connect your
MobilePro to the Microsoft
application allows you to send instant messages to your online buddies and have a group
conversation with multiple users. Along with text messages, VoiceMessenger allows you to
communicate via graphical “scribble” and voice messages.
To use MSN Messenger Service on the Internet, you need a Passport. If you have a Hotmail
MSN account, it serves as your Passport.
VoiceMessenger features include:
!
Authenticated User Logon — Users can log in using their unique Hotmail, MSN, or
Passport ID and password.
!
Presence Information — As soon as users log in to the MSN Messenger Service, they are
notified of the presence status of their contacts.
!
Contact List Management — Users can add or delete users from the contact list using their
Hotmail/MSN/Passport ID.
Start
®
MSN® Messenger Service and view your online buddies. The
, tap
Programs
, and tap one of the ClearVue viewer icons.
®
or
!
Online Status — Users can change their online status to Busy, Away From Computer, Out
To Lunch, On The Phone, Be Right Back, and Invisible modes.
!
Access Permissions — Users can configure their access permissions, to restrict the ability of
buddies to view their online status and send them instant messages.
!
Text Messaging — Users can send lightweight text messages to their online contacts in realtime.
!
Scribble — Users can send drawings/sketches in addition to text messages in an instant
messaging session to add a completely new dimension to the conversation.
!
Real-time Conversation with Multiple Users — Users can invite other online contacts in the
MSN Messenger Service to engage in a session, where they can send text and scribble
instant messages to each other.
!
Connectivity — Supports Ethernet, Wireless LAN (IEEE 802.11) card, and GPRS
connections.
!
Proxy — Includes SOCKS4 and SOCKS5 support to connect through firewalls.
!
Voice Chat — Using VoiceMessenger Force, users can now send voice messages to their
online buddies. Users can also send voice messages to their online buddies via computer.
Get Started 1-23

VoiceMessenger Force can be installed on your MobilePro from the Companion CD or the SD
card.
To install VoiceMessenger Force from the Companion CD, use the following steps.
1.
Ensure that your MobilePro is on and connected to your computer, both are synchronized,
and that you have established a partnership.
2.
Load the autorun Companion CD in the CD-ROM drive on your computer.
3.
At the Getting Started with Your Pocket PC screen, click
4.
At the Enhance Your Pocket PC screen, click
5.
At the Mobility screen, scroll to VoiceMessenger Force. Click
VoiceMessenger and click
Install
. Follow the prompts to install VoiceMessenger Force on
Mobility
Enhance Your Pocket PC
.
Details
for information about
you computer.
! Select the destination directory on your computer where you want the setup files to be
extracted before they are transferred to your MobilePro.
! After the files have been extracted, the installation terminates and the Application
Manager is launched. Follow the on-screen instructions to transfer the required files to
your MobilePro.
! The installation program copies the VoiceMessenger files to the desired location and
makes the necessary entries to set up the software on your MobilePro.
6.
At the successful completion of setup, the installation program closes automatically.
7.
On your MobilePro Today screen, tap
Start
, tap
Programs
, and tap the VoiceMessenger
Force icon.
To install VoiceMessenger Force from the SD card, use the following steps.
1.
Power on the MobilePro and install the MobilePro on the cradle. Connect the AC adapter to
the cradle and AC power.
.
2.
Install the SD card in the SD card slot.
3.
At the selection screen on your MobilePro, tap
VoiceMessenger Force.CAB
and follow the
prompts.
4.
At the completion of setup, remove the SD card from the MobilePro.
5.
At the Today screen, tap
6.
Tap ? (Help) to view the help file for detailed features, instructions, and troubleshooting
Start
, tap
Programs
, and tap the VoiceMessenger Force icon.
information.
Please review the help file before using VoiceMessenger Force.
The following issues are known to exist in the current version of VoiceMessenger Force.
VoiceMessenger Force does not work across most firewalls or address translated networks.
!
On Windows NT®/95/98 desktop machines, if VoiceMessenger Force is used along with
!
other applications that vie for the sound card (MP3 players, etc.), the application becomes
unstable. Specifically, toggling the communication mode from full duplex to half duplex
repeatedly causes the application to become unstable. This behavior is not observed on
Windows 2000 desktop machines.
When the MSN Messenger service closes the server session upon idle timeout
!
(approximately in 6 minutes), the application fails to establish any other voice conversation
after this event. The only workaround is to sign-out and sign in again.
1-24 Get Started

!
!
PhotoBase
ArcSoft® PhotoBase is an image management application for your MobilePro. The program
allows you to organize your images and perform basic editing functions.
The PhotoBase application can be installed on your MobilePro from the Companion CD. To
install PhotoBase from the Companion CD, use the following steps.
1.
2.
In the MSN Messenger, Desktop companion, if a user hits the Alt-F4 key repeatedly when a
voice chat invite is received, the application exits and causes the desktop MSN Messenger
Service to sign out.
In a voice conversation between a desktop and the MobilePro, if the user floods the MSN
Messenger Service server by sending multiple text messages at a furious pace, the server
terminates the session. At this point, the voice conversation ends on the computer and
MobilePro. However, sometimes the session close message isn’t received on the computer
and device, causing the voice conversation session to remain in an indeterminate state. The
voice chat session is closed when a ‘user left’ notification is received or when the buddy
goes offline.
Ensure that your MobilePro is on and connected to your computer, that both are
synchronized, and that you have established a partnership.
Load the autorun Companion CD in the CD-ROM drive on your computer.
3.
At the Getting Started with Your Pocket PC screen, click
4.
At the Enhance Your Pocket PC screen, click
5.
At the Productivity screen, scroll to ArcSoft PhotoBase. Click
Install
PhotoBase and click
. Follow the prompts to install PhotoBase on your computer.
Productivity
Enhance Your Pocket PC
.
Details
for information about
.
The installation program copies the PhotoBase files to the desired location on your
computer and installs the software on your MobilePro.
6.
At successful completion of the installation, the program closes automatically.
7.
On your MobilePro Today screen, tap
Start
and tap the PhotoBase icon to open PhotoBase.
When the application is first launched, a list of image files appears. Tap the current folder near
the top of the screen to see a list of other folders on your MobilePro. You can view your images
in List view or Album view.
At the bottom on the screen, tap the Album icon to see an organized, thumbnail layout of the
images in the current folder. When in List or Album view, you can run a slide show of the
images in the current folder by tapping the Slide Show button.
Double-tap a file or thumbnail to display the respective image exclusively on the screen. This is
known as Photo view. Use the scroll buttons to toggle through the images within the current
folder or album.
Edit
Tap
to work on your image. Tap the Draw icon and choose a color by tapping the color
box. Use the stylus to “paint” on your image. You can also rotate your image. Pan and zoom
options are available so you can view specific areas of an image in detail. An Undo tool allows
you to correct mistakes.
To enhance an image, with a single image onscreen, tap
Menu
and tap
Effect
. Choose between
Auto Enhance and Brightness & Contrast. Either option provides a means of enhancing the
quality of your image through controlled color manipulation.
Additional features include the ability to e-mail images directly from your MobilePro,
upload/download images from the Web (through a photo-sharing web site), and send images via
infrared. Please see the online Help file for additional information.
Get Started 1-25

MobilePro Synchronization System
The MobilePro Synchronization System, powered by Synchrologic™, allows you to stay in
contact with your office while you are away. The system serves as your launch pad for handling
all mobile applications at one time. By using the system, you can complete such tasks as:
!
downloading files, software applications, application updates
!
changing dial-up networking connections
!
backing up files
!
sending and receiving e-mail messages
!
getting company news
!
synchronizing data (for some applications)
!
synchronizing personal information manager (PIM) and e-mail
!
getting a history of connection activity.
Note
Synchronization System server which manages the flow of content.
To use the MobilePro Synchronization System, you must have access to the MobilePro
The MobilePro Synchronization System comes already installed on your MobilePro. If you need
to reinstall the system, use your Companion CD and the following procedures.
Install the MobilePro Synchronization System from the Companion CD to your computer and
MobilePro as follows. This installation installs the PIM, e-mail, iFile Distribution (iFD), and
iSystem Management (iSM) components on your MobilePro.
1.
Ensure that your MobilePro is on and connected to your computer, that both are
synchronized, and that you have established a partnership.
2.
Load the autorun Companion CD into the CD-ROM drive on your computer.
!
At the Getting Started with Your Pocket PC screen, click
!
At the Enhance Your Pocket PC screen, click
!
At the Mobility screen, scroll to MobilePro Synchronization System. Click
information and click
3.
At the License Agreement screen, click
!
At the Main menu, click
!
At the Client Installation screen, click
Install
Mobility.
.
Accept
Install MobilePro Synchronization System
Next
.
.
Enhance Your Pocket PC
Details
.
.
for
!
!
!
4.
If your MobilePro is connected to your computer (see step 1), a Retrieving Device Data
screen is displayed, followed by an Installing Applications screen.
!
1-26 Get Started
At the Choose Destination Location screen, choose a location for the files (typically,
Next
Program Files\MobilePro Sync System) and click
At the Select Program Folder screen, select
NEC
.
and click
Next
. The software installs
and the InstallShield Wizard Complete screen is displayed.
Finish
Click
Click
.
Yes
to install NEC MobilePro Sync Systems Manager for iFD and iSM and other
pending applications in the default application install directory.

! The client software installs on the MobilePro and the Application Downloading
Complete screen appears.
! Click
OK
. To complete the installation, you must configure the MobilePro
Synchronization System on your MobilePro (see the following paragraphs).
5.
If your MobilePro was not connected to your computer, a Pending Application Install
screen is displayed. Click
OK
. The client software installs at your next synchronization
session. You must configure the MobilePro Synchronization System on your MobilePro at
that time.
After you complete installation of the MobilePro Synchronization System on your MobilePro,
you need to configure the MobilePro for connecting to the MobilePro Synchronization System
server. Follow these steps.
1.
Power on your MobilePro.
! At the Today screen, tap
! At the Navigation Bar screen, tap
! At the MobilePro Sync System screen, tap
and tap
2.
At the Configuration screen, use the keyboard or Character Recognizer to enter data in the
Configuration
Start
.
MobilePro Synchronization System
Settings
, tap
. The Configuration screen displays.
.
File & Software Distribution
following fields (as needed).
! Server — enter the name or IP address of the MobilePro Synchronization System
server.
! Proxy — if using a proxy server, enter the name of the proxy server. If the proxy server
is set up to use a port other than port 8080, enter a colon (:) and the port number
immediately following the server name.
,
! User Name — enter your user ID (as entered in the server).
! Password — enter your user password (as entered in the server).
! Confirm — enter the same password again to confirm it.
3.
In the Clear History After box, type or select the number of days you want to keep the
history.
4.
Tap OK to exit the Configuration screen.
If you want to set up Secure Sockets Layer (SSL) encryption for passwords and authentication
for iSM and iFD on your MobilePro, use the following procedure. For this to work, SSL must
also be set on the server.
1.
Power on your MobilePro.
2.
At the Today screen, tap
! At the Navigation Bar, tap
! At the MobilePro Sync System screen, tap
and tap
3.
At the Connection screen, select the Enable SSL check box.
4.
Tap OK to exit the Connection screen.
Connection
Start
.
MobilePro Synchronization System
Settings
, tap
. The Connection screen is displayed.
.
File & Software Distribution
,
Get Started 1-27

Your MobilePro operating system has an autocomplete input feature that might hinder the
security of passwords. By default, this feature is enabled. If enabled, when you begin to enter a
password, suggested words are displayed in a window above the input panel. A space might also
be added to the end of the suggested word. To disable this feature, perform the following steps.
1.
Power on your MobilePro.
2.
At the Today screen, tap
! At the Navigation Bar, tap
! At the Settings screen, tap
! At the Input screen, tap
! Uncheck the box “Suggest words when entering text.” This also disables “Add a space
Start
.
Settings
Input
.
Word Completion
.
.
after suggested word.” Note that this is a global change.
! If you want to leave “Suggest words when entering text” enabled but want to disable
“Add a space after suggested word,” uncheck the “Add a space after suggest word”
box. Note that this is a global change.
3.
Tap OK to exit.
If you need to uninstall the MobilePro Synchronization System from your MobilePro, follow
these steps. If you keep the software on your computer, you can reinstall the MobilePro
Synchronization System at any time.
1.
Power on your MobilePro.
2.
At the Today screen, tap
! At the Navigation Bar, tap
! At the Settings screen, tap
Start
.
Settings
System
.
tab.
ZIOGolf 2
! At the Systems screen, tap
! At the Remove Programs screen, tap
Remove
, and tap
Yes
Remove Programs
MobilePro Synchronization System
.
to confirm removal. Repeat for any other MobilePro
, tap
Synchronization System components.
3.
Tap OK to exit.
The ZIOSoft, Inc. ZIOGolf™ 2 application is a real-time 3-D acceleration game. The
breathtaking scenery and hardcore challenges from each unique course delivers a true golfing
experience. With easy to play features and controls, sophisticated swing gauge, and life-like
graphics, this complete package is the only one you’ll need to get your game into full gear!
ZIOGolf can be installed on your MobilePro from the Companion CD. To install ZIOGolf from
the Companion CD, use the following steps.
1.
Ensure that your MobilePro is on and connected to your computer, both are synchronized,
and that you have established a partnership.
2.
Load the autorun Companion CD in the CD-ROM drive on your computer.
3.
At the Getting Started with Your Pocket PC screen, click
4.
At the Enhance Your Pocket PC screen, click
Entertainment.
Enhance Your Pocket PC
.
1-28 Get Started

5.
At the Entertainment screen, scroll to ZIOGolf 2. Click
ZIOGolf and click
Install
. Follow the prompts to install ZioGolf on your computer.
Details
for information about
The installation program copies the ZIOGolf files to the desired location on your computer
and installs the software on your MobilePro.
6.
At the successful completion of the installation, the program closes automatically.
Golfwits
7.
On your MobilePro Today screen, tap
Start
, tap
Programs
, tap
Games
, and tap the ZioGolf
icon to open ZIOGolf.
The Siscosoft Golfwits™ application was developed by golfers who have a passion for the
game. With an interactive map of the course in the palm of your hand, you now have
information at your fingertips that you’ve never had before. Information that can bring your
game to a new level of performance and enjoyment. Take Golfwits™ to the course... today!
Golfwits can be installed on your MobilePro from the Companion CD. To install Golfwits from
the Companion CD, use the following steps.
1.
Ensure that your MobilePro is on and connected to your computer, both are synchronized,
and that you have established a partnership.
2.
Load the autorun Companion CD in the CD-ROM drive on your computer.
3.
At the Getting Started with Your Pocket PC screen, click
4.
At the Enhance Your Pocket PC screen, click
5.
At the Entertainment screen, scroll to Golfwits. Click
Install
Golfwits and click
. Follow the prompts to install Golfwits on your computer.
Entertainment.
Enhance Your Pocket PC
Details
for information about
.
The installation program copies the Golfwits files to the desired location on your computer
and installs the software on your MobilePro.
6.
At successful completion of the installation, the program closes automatically.
7.
On your MobilePro Today screen, tap
Start
, tap
Programs
, tap
Games
Golfwits icon to open Golfwits.
, and tap the
Get Started 1-29

Learn the Basics
!
Overview
!
Pop-up Menus
!
Notifications
!
Enter Information
!
Enter Text with the Input Panel
!
Write on the Screen
!
Draw on the Screen
!
Record a Message
!
Use a Preset or Frequently Used Message
2
!
Find and Organize Information
!
Customize Your MobilePro

Overview
This chapter describes the basics for using your MobilePro. Included are the following topics:
!
pop-up menus
!
notifications
!
enter information
!
enter text
!
write and draw on the screen
!
record a message
!
use a preset message
!
find information
!
customize your MobilePro.
Pop-up Menus
Pop-up menus are used throughout your MobilePro and vary slightly from program to program.
With pop-up menus, you can quickly choose an action for an item.
For example, you can use the pop-up menu in the Tasks list to quickly delete a task or create a
copy. To access the pop-up menu, tap and hold the stylus on the task name that you want to copy
or delete. When the pop-up menu appears, lift the stylus and tap the action you want to perform.
To close the menu without performing an action, tap outside the menu.
Notifications
Your MobilePro can remind you of things to do. For example, if you have set up an appointment
in Calendar, a task with a due date in Tasks, or an alarm in Clock, you are notified in any of the
following ways.
!
A message box appears on the screen.
Pop-up Menu
!
A sound is played (you can specify the type of sound).
!
A light flashes on the MobilePro.
2-2 Learn the Basics

To select reminder types and sounds, tap and tap
Notifications
applies throughout your MobilePro.
. Make your choices and tap OK when done. Keep in mind that what you choose
Enter Information
Information is entered into your MobilePro in several ways.
!
Enter typed text in the input panel by using the soft keyboard or Letter Recognizer.
!
Write or draw pictures directly on the screen with the stylus.
!
Speak into your MobilePro microphone to record a message.
!
Use ActiveSync to synchronize or copy information from your computer to the MobilePro.
Enter Text with the Input Panel
Use the input panel in the Command Bar to select the way you want to enter information in any
program on your MobilePro. You can either type using the soft keyboard or write using Letter
Recognizer, Block Recognizer, or Transcriber. Whatever you choose, the characters appear as
typed text on the screen.
To show or hide the input panel, tap the Input Panel button. Tap the arrow next to the Input
Panel button to see your options.
Settings
. In Settings, tap
Sounds &
Using the Soft Keyboard
Use the soft keyboard to enter words as follows. To demonstrate, open Notes.
1.
In Notes, tap the arrow next to the input panel and tap
2.
Use your stylus to tap the keys to enter your information.
When you use the input panel and the soft keyboard , your MobilePro anticipates the word you
are typing or writing and displays it on the screen. When you tap the displayed word, it’s
inserted into the text at the insertion point. The more you use MobilePro, the more words it
learns to recognize.
Selecting the Input Panel
Keyboard
at the Options pop-up.
Learn the Basics 2-3

Using the Soft Keyboard
Note
tap , tap Settings, tap the Personal tab, tap Input, and tap the Word Completion tab.
To change word suggestion options, such as the number of words suggested at a time,
Using Letter Recognizer
With Letter Recognizer, you can use the stylus to write letters, just as you would on paper. Use
these steps to write with Letter Recognizer.
1.
Tap the arrow next to the input panel button and tap
2.
Write a letter in the box.
The written letter is converted to typed text and is displayed on the screen. For further
information on using Letter Recognizer, tap the question mark next to the writing area.
Using Block Recognizer
With Block Recognizer, you can the stylus to input character strokes that are similar to those
used on other devices. Use these steps to write with Block Recognizer.
1.
Tap the arrow next to the input panel button and tap
2.
Writer a letter in the box.
Letter Recognizer
Block Recognizer
.
.
The written letter is converted to typed text and is displayed on the screen. For further
information on using Block Recognizer, tap the question mark next to the writing area.
2-4 Learn the Basics

Using Transcriber
With Transcriber, you can use the stylus to write anywhere on the screen, just as you would on
paper. Unlike Letter Recognizer and Block Recognizer, you can write a sentence or additional
information. Pause after writing, and let Transcriber change the written characters to typed
characters. Use these steps to write with Transcriber.
1.
Tap the arrow next to the input panel button and tap
2.
Write anywhere on the screen.
The written words are converted to typed text and displayed on the screen. For further
information on using Transcriber, tap the question mark in the lower right corner of the screen.
Editing Your Text
If you want to edit or format typed text, you must first select the text.
1.
Highlight the text by dragging the stylus across the text.
2.
Tap and hold the selected words and tap an editing command on the pop-up menu (cut,
copy, paste) or tap the command on the Edit menu.
Write on the Screen
In any program that accepts writing, such as the Notes program, and in the Notes tab in
Calendar, Contacts, and Tasks, you can use your stylus to write directly on the screen. Write the
way you do on paper. You can edit and format what you’ve written and convert the information
to text at a later time.
Writing on the Screen
Transcriber
.
You can write directly on the screen in Notes as follows.
1.
Open Notes in your MobilePro.
2.
Tap the Pen button to switch to the writing mode. The screen displays blank space with
lines to help you write.
3.
Write your message on the screen (see the following figure).
Learn the Basics 2-5

Writing in Notes
Note
documentation that comes with the program to find out how to switch to the writing mode.
Some programs that accept writing might not have the Pen button. See the
Editing Your Writing
If you want to edit or format your writing, you must first select the writing, then edit it. Do this
as follows.
1.
Tap and hold the stylus next to the writing you want to select, until the insertion point
appears.
2.
Without lifting the stylus, drag it across the writing you want to select.
3.
Tap and hold the writing, then tap an editing command on the pop-up menu (cut, copy,
paste) or tap the command on the Edit menu.
If you accidentally write on the screen, tap
your writing by tapping the Pen button to deselect it and then dragging the stylus across the
screen.
Tools
, tap
Undo
, and try again. You can also select
2-6 Learn the Basics

Converting Your Writing to Text
After you hand wrote your message, you can convert it to text. Do it as follows.
1.
If you only want to convert certain words, select them before going to the next step.
Selecting and Coverting Your Writing
2.
Tap
Tools
and tap
Recognize
. Your writing is converted to text.
You can also tap and hold the selected words until the pop-up screen displays, then tap
Recognize
.
If a word is not recognized, it’s left as writing.
If the conversion is not correct, you can select different words from a list of alternates or return
to the original writing.
1.
Tap and hold the incorrect word (one word at a time).
2.
At the pop-up menu, tap Alternates. A menu with a list of alternate words displays.
Selecting Alternate Words
Learn the Basics 2-7

3.
Tap the word you want to use or tap the writing at the top of the menu to return to the
original writing.
Here are some tips for getting good resolution.
!
Write neatly.
!
Write on the lines and draw descenders below the line. Write the cross of the “t” and
apostrophes below the top line so that they are not confused with the word above. Write
periods and commas above the line.
!
For better recognition, try increasing the zoom level to 300% using the Tools menu.
!
Write the letters of a word closely and leave big gaps between words so that the device can
easily tell where words begin and end.
!
Hyphenated words, foreign words that use special characters such as accents, and some
punctuation cannot be converted.
!
If you add writing to a word to change it (such as changing a “3” to an “8”) after you
attempt to recognize the word, the writing you add will not be included if you attempt to
recognize the writing again.
Draw on the Screen
You can draw on the screen in the same way that you write on the screen. The difference
between writing and drawing on the screen is how you select items and how they are edited. For
example, selected drawings can be resized while writing cannot.
Creating a Drawing
You create a drawing by first creating a box on the screen, then make your drawing within the
box. Do this as follows, using Notes as an example.
1.
Use your stylus to make a stroke three ruled lines high. A dotted drawing box appears.
2.
Make your drawing in or touching the drawing box and crossing three ruled lines. If the
drawing does not cross three lines, it changes to writing.
Creating a Drawing
2-8 Learn the Basics

Note
Tap Tools and tap a zoom level.
You might want to change the zoom level to more easily work on or view your drawing.
Editing Your Drawing
If you want to edit or format your drawing, you must first select the drawing, then edit it. Do this
as follows.
1.
Tap and hold the stylus on the drawing until the selection handle appears.
To select multiple drawings, deselect the Pen button and then drag to select the drawings
you want.
2.
Tap and hold the selected drawing, then tap an editing command on the pop-up menu (cut,
copy, paste) or tap the command on the Edit menu.
3.
Resize a drawing by deselecting the Pen button (if selected) and dragging a selection handle
to the size you want.
Record a Message
In any program where you can write or draw on the screen, you can also quickly capture
thoughts, reminders, and phone numbers by recording a message. In Calendar, Tasks, and
Contacts, you can include a recording in the Notes tab.
In the Notes program, you can either create a stand-alone recording or include a recording in a
written note. If you want to include the recording in a note, open the note first.
In the Inbox program, you can add a recording to an e-mail message.
Create a recorded message in the Notes program as follows. Recording in other programs is
similar.
1.
Hold the MobilePro microphone near your mouth or other source of sound.
2.
Press and hold the Record button on your MobilePro until you hear a beep.
3.
While holding down the Record button, make your recording.
4.
To stop recording, release the Record button. Two beeps sound. The new recording appears
in the note list or as an embedded icon (see the following figure).
Note
To play a recording, tap it in the list or tap its icon in the note.
You can also make a recording by tapping the Record button on the Recording toolbar.
Learn the Basics 2-9

Recording a Message
Use a Preset or Frequently Used Message
When using Inbox or MSN Messenger, use My Text to quickly insert preset or frequently used
messages into the text entry area. To insert a message, tap
Note
before sending the message.
You can add text after inserting a My Text message. However, you have to add it
My Text
and tap a message.
Using a Preset Message
To edit a My Text message, tap
message you want to edit and make the desired changes.
2-10 Learn the Basics
Edit
in the Tools menu, and tap
My Text Messages
. Select the

Find and Organize Information
The Find feature on your MobilePro helps you to quickly locate information. You can also
organize your information with File Explorer.
Use the following steps to find information.
1.
On the menu, tap
2.
Enter the text you want to find, select a data type, and tap Go to start the search.
Note
Larger than 64 KB in Type.
To quickly find information that is taking up storage space on your MobilePro, tap
Find
.
Use these steps to find files and to organize your information with File Explorer.
1.
On the menu, tap
2.
Move files by tapping and holding the item you want to move and tapping
Paste
on the pop-up menu.
Programs
and tap
File Explorer
.
Organize Files
Cut
Copy and
or
Learn the Basics 2-11

Customize Your MobilePro
You can customize your MobilePro by adjusting its settings and installing additional software.
Adjusting Settings
You can adjust MobilePro settings to suit the way you work. To see available options, tap ,
tap Settings, and tap the Personal or System tab located at the bottom of the screen.
You also might want to adjust the following.
! Clock — change the time or set alarms
! Menus — customize what appears on the
New button
!
Owner Information — enter your contact information
! Password — limit access to your MobilePro
!
Power — maximize battery life
!
Today — customize the look and the information that is displayed on the Today screen.
Adding or Removing Programs
Programs added to your MobilePro at the factory are stored in read-only memory (ROM). You
cannot remove this software, and you’ll never accidentally lose ROM contents. The ROM
programs can be updated using special installation programs with a *.xip extension. All other
programs and data files added to your MobilePro after factory installation are stored in random
access memory (RAM).
You can install any program created for your MobilePro, as long as it has enough memory. The
most popular place to find software for your MobilePro is on the Pocket PC Web site
(http://www.microsoft.com/mobile/pocketpc). You can also find several productivity, mobility,
and amusement programs on your Companion CD and SD card.
Using ActiveSync to Add Programs
You’ll need to install the appropriate software for your MobilePro on your computer.
ActiveSync is already installed on your MobilePro.
menu, and enable a pop-up menu from the
1.
Determine your MobilePro and processor type so that you know which version of the
software to install. Tap
tab, make a note of the information in Processor.
2.
Insert the CD that contains the program into your desktop computer. You might see a single
*.xip, *.exe,, or *.zip file, a Setup.exe file, or several versions of files for different device
types and processors. Be sure to select the program designed for the Pocket PC and your
MobilePro processor type.
3.
Read any installation instructions, Read Me files, or documentation that comes with the
program. Many programs provide special installation instructions.
4.
Connect your MobilePro and computer.
5.
Double-click the *.exe file.
!
If the file is an installer, the installation wizard begins. Follow the directions on the
screen. Once the software has been installed on your computer, the installer
automatically transfers the software to your MobilePro.
2-12 Learn the Basics
and tap
Settings
. On the System tab, tap
About
. In the Version

! If the file is not an installer, you’ll see an error message stating that the program is
valid but it is designed for a different type of computer. You’ll need to move this file to
your MobilePro. If you cannot find any installation instructions for the program in the
Read Me file or documentation, use ActiveSync Explore to copy the program file to the
Program Files folder on your MobilePro. For more information on copying files using
ActiveSync, see ActiveSync Help.
6.
Once installation is complete, tap , tap Programs, and tap the program icon to switch to
it.
Using the Internet to Add Programs
Use the following procedure to load programs from the Internet on your MobilePro.
Note
network card installed on your MobilePro.
1.
To use the Internet, you need to be connected through an optional modem card or
Determine your MobilePro and processor type so that you know which version of the
software to install. Tap
and tap Settings. On the System tab, tap
tab, make a note of the information in Processor.
2.
Download the program to your MobilePro straight from the Internet using Pocket Internet
Explorer. You might see a single *.xip, *.exe or *.zip file, a Setup.exe file, or several
versions of files for different device types and processors. Be sure to select the program
designed for the Pocket PC and your MobilePro processor type.
3.
Read any installation instructions, Read Me files, or documentation that comes with the
program. Many programs provide special installation instructions.
4.
Tap the file, such as a *.xip or *.exe file. The installation wizard begins. Follow the
directions on the screen.
Adding a Program to the Start Menu
Use the following procedure to add a program to the Start menu.
1.
Tap , tap
program. If you do not see the program listed, you can either use File Explorer on the
MobilePro to move the program to the Start Menu folder or use ActiveSync on the desktop
computer to create a shortcut to the program and place the shortcut in the Start Menu folder.
Settings
, tap
Menus
, tap the
Start Menu
About
. In the Version
tab, and tap the check box for the
2.
If you are using File Explorer on the MobilePro:
! Tap , tap
Programs
labeled My Documents by default, and tap
File Explorer
, tap
, and locate the program (tap the folder list,
My Device
to see a list of all folders on the
MobilePro).
! Tap and hold the program and tap
Cut
on the pop-up menu. Open the Start Menu folder
located in the Windows folder, tap and hold a blank area of the window, and tap
on the pop-up menu.
! The program appears on the menu. For more information on using File Explorer,
see “Find and Organize Information,” earlier in this chapter.
3.
If you are using ActiveSync on the desktop computer:
! Use the Explorer in ActiveSync to explore your MobilePro files and locate the
program. Right-click the program, and then click Create Shortcut.
Learn the Basics 2-13
Paste

! Move the shortcut to the Start Menu folder in the Windows folder. The shortcut appears
on the
menu. For more information, see ActiveSync Help.
Removing a Program from the Start Menu
Use the following procedure to remove a program from the Start menu.
1.
Tap and tap
2.
If the program does not appear in the list of installed programs, use File Explorer on your
MobilePro to locate the program, tap and hold the program, and then tap
Settings
. On the System tab, tap
Remove Programs
.
Delete
up menu.
on the pop-
2-14 Learn the Basics

Use Microsoft Pocket Outlook
!
Calendar
!
Contacts
!
Tasks
!
Notes
!
Inbox
3

Microsoft Pocket Outlook includes Calendar, Contacts, Tasks, Inbox, and Notes. You can use
these programs individually or together. For example, e-mail addresses stored in Contacts can be
used to address e-mail messages in Inbox.
Using ActiveSync, you can synchronize information in Microsoft Outlook or Microsoft
Exchange on your desktop computer with your MobilePro. You can also synchronize this
information directly with a Microsoft Exchange server. Each time you synchronize, ActiveSync
compares the changes you made on your MobilePro and computer and updates both computers
with the latest information. For information on using ActiveSync, see ActiveSync Help on the
computer.
You can switch to any of these programs by tapping them on the
menu.
Calendar: Scheduling Appointments and Meetings
Use Calendar to schedule appointments, including meetings and other events. You can check
your appointments in one of several views (Agenda, Day, Week, Month, and Year) and easily
switch views by using the View menu.
Calendar Screen
Note
tapping Options on the Tools menu.
You can customize the Calendar display, such as changing the first day of the week, by
Creating an Appointment
Create an appointment for the calendar as follows.
1.
If you are in the Day or Week view, tap the desired date and time for the appointment.
2.
3.
4.
5.
3-2 Use Microsoft Pocket Outlook
New
Tap
Select a field (Subject, etc.). Using the keyboard or letter recognizer, enter a description and
a location.
If needed, tap the date and time to change them.
Enter other desired information. You need to hide the keyboard to see all available fields.
. Tap the up arrow and select an input device (keyboard, letter recognizer).

Calendar Appointment
6.
To add notes, tap the Notes tab. You can enter text, draw, or create a recording. For more
information on creating notes, see “Notes: Capturing Thoughts and Ideas,” later in this
chapter.
7.
When finished, tap OK to return to the calendar.
Note
the options set in , Settings, Personal tab, Sounds & Notifications.
If you select Remind me in an appointment, your MobilePro reminds you according to
Using the Summary Screen
When you tap an appointment in Calendar, a summary screen is displayed. To change the
Edit
appointment, tap
.
Summary Screen
Use Microsoft Pocket Outlook 3-3

Creating Meeting Requests
You can use Calendar to set up meetings with users of Outlook or Pocket Outlook. The meeting
request is created automatically and sent either when you synchronize Inbox or when you
connect to your e-mail server. Indicate how you want meeting requests sent by tapping
and tapping
ActiveSync.
Options
. If you send and receive e-mail messages through ActiveSync, select
Schedule a meeting
You can schedule a meeting as follows.
1.
Create an appointment.
Tools
2.
In the appointment details, hide the input panel, and tap
3.
From the list of e-mail addresses you’ve entered in Contacts, select the meeting attendees.
The meeting notice is created automatically and placed in the Outbox folder.
For more information on sending and receiving meeting requests, see Calendar Help and Inbox
Help on the MobilePro.
Attendees
Contacts: Tracking Friends and Colleagues
Contacts maintains a list of your friends and colleagues so that you can easily find the
information you’re looking for, whether you’re at home or on the road. Using your infrared (IR)
port, you can quickly share Contacts information with other device users with IR capabilities.
Contacts Screen
.
Note
3-4 Use Microsoft Pocket Outlook
To change the way information is displayed in the list, tap Tools and tap Options.

Creating a Contact
Create a contact as follows.
1.
2.
New
Tap
.
Using the input panel keyboard (or other input device), enter a name and other contact
information. Scroll down to see all the available fields.
Contacts Input Panel
3.
To assign the contact to a category, scroll to and tap
the list. In the contact list, you can display contacts by category.
4.
To add notes, tap the Notes tab. You can enter text, draw, or create a recording. For more
information on creating notes, see “Notes: Capturing Thoughts and Ideas,” later in this
chapter.
5.
When finished, tap OK to return to the contact list.
Finding a contact
There are four ways to find a contact.
!
In the contact list, enter a contact name in the box under the navigation bar. To show all
contacts again, clear text from the box or tap the button to the right of the box.
!
In the contact list, tap the category list (labeled All Contacts by default) and select the type
of contact that you want displayed. To show all contacts again, select
a contact not assigned to a category, select
!
To view the names of companies your contacts work for, in the contact list, tap
Company
the company name.
!
Tap , tap
None
Categories
.
and select a category from
All Contacts
. To view
View > By
. The number of contacts that work for that company are displayed to the right of
Find
, enter the contact name, select Contacts for the type, and tap Go.
Use Microsoft Pocket Outlook 3-5

Using the Summary Screen
When you tap a contact in the contact list, a summary screen is displayed. To change the contact
information, tap Edit.
Contacts Summary Screen
Tasks: Keeping a To Do List
Use Tasks to keep track of what you have to do.
Tasks Screen
Note
3-6 Use Microsoft Pocket Outlook
To change the way information is displayed in the list, tap Tools and tap Options.

Creating a task
Create a task as follows.
1.
2.
New
Tap
.
Using the input panel keyboard, enter a description.
Tasks Input Panel
3.
You can enter a start date and due date or enter other information by first tapping the field.
If the input panel is open, you need to hide it to see all available fields.
4.
To assign the task to a category, tap
Categories
and select a category from the list. In the
task list, you can display tasks by category.
5.
To add notes, tap the
Notes
tab. You can enter text, draw, or create a recording. For more
information on creating notes, see “Notes: Capturing Thoughts and Ideas,” later in this
chapter.
6.
When finished, tap OK to return to the task list.
Note
Tap here to add a new task and enter your task information.
To quickly create a task with only a subject, tap Entry Bar on the Tools menu. Tap
on
Use Microsoft Pocket Outlook 3-7

Using the Summary Screen
When you tap a task in the task list, a summary screen is displayed. To change the task, tap
Tasks Summary Screen
Edit
.
Notes: Capturing Thoughts and Ideas
Quickly capture thoughts, reminders, ideas, drawings, and phone numbers with Notes. You can
create a written note or a recording. You can also include a recording in a note. If a note is open
when you create the recording, it is included in the note as an icon. If the note list is displayed, it
is created as a stand-alone recording.
Notes Screen
3-8 Use Microsoft Pocket Outlook

Creating a Note
Create a note as follows.
1.
2.
New
Tap
Create your note by writing, drawing, typing, and recording. For more information about
using the input panel, writing and drawing on the screen, and creating recordings, see
Chapter 2.
.
Notes Input Screen
Inbox: Sending and Receiving E-mail
Use the Inbox to send and receive e-mail messages in one of several ways:
!
Synchronize e-mail messages with Microsoft Exchange or Microsoft Outlook on your
desktop computer.
!
Send and receive e-mail messages by connecting directly to an e-mail server through an
Internet service provider (ISP) or a network. You’ll need an optional modem or network
card installed on your MobilePro to connect to your ISP or network.
Use Microsoft Pocket Outlook 3-9

Synchronizing E-mail Messages
E-mail messages can be synchronized as part of the general synchronization process. To do this,
you need to enable Inbox synchronization in ActiveSync. For information on enabling Inbox
synchronization, see ActiveSync Help on the desktop computer.
During synchronization:
!
Messages are copied from the mail folders of Exchange or Outlook on your desktop
computer to the ActiveSync folder in Inbox on your MobilePro. By default, you receive
messages from the past three days only, the first 100 lines of each message, and file
attachments of less than 100 KB in size.
!
E-mail messages in the Outbox folder on your MobilePro are transferred to Exchange or
Outlook, and then sent from those programs.
!
E-mail messages in subfolders must be selected in ActiveSync on your desktop computer in
order to be transferred.
Note
location. For more information, see Chapter 6.
You can also synchronize e-mail messages with your desktop computer from a remote
Connecting Directly to an E-mail Server
In addition to synchronizing e-mail messages with your desktop computer, you can send and
receive e-mail messages by connecting to an e-mail server using an optional modem or network
card connected to your MobilePro. You’ll need to set up a remote connection to a network or an
ISP, and a connection to your e-mail server. For more information, see Chapter 6.
When you connect to the e-mail server, new messages are downloaded to the MobilePro Inbox
folder, messages in the MobilePro Outbox folder are sent, and messages that have been deleted
on the e-mail server are removed from the MobilePro Inbox folder.
Messages that you receive directly from an e-mail server are linked to your e-mail server rather
than your desktop computer. When you delete a message on your MobilePro, it is also deleted
from the e-mail server the next time you connect based on the settings you selected in
ActiveSync.
You can work online or offline. When working online, you read and respond to messages while
connected to the e-mail server. Messages are sent as soon as you tap
on your MobilePro.
When working offline, once you’ve downloaded new message headers or partial messages, you
can disconnect from the e-mail server and then decide which messages to download completely.
The next time you connect, Inbox downloads the complete messages you’ve marked for retrieval
and sends the messages you’ve composed.
Send
, which saves space
3-10 Use Microsoft Pocket Outlook

Using the Message List
Messages you receive are displayed in the message list. By default, the most recently received
messages are displayed first in the list.
Inbox Message List Screen
When you receive a message, tap it to open it. Unread messages are displayed in bold.
Message Screen
Use Microsoft Pocket Outlook 3-11

When you connect to your e-mail server or synchronize with your desktop computer, by default,
you’ll receive messages from the last three days only, the first 100 lines of each new message,
and file attachments of less than 100 KB in size. The original messages remain on the e-mail
server or your desktop computer.
You can mark the messages that you want to retrieve in full during your next synchronization or
e-mail server connection. In the message list, tap and hold the message you want to retrieve. On
the pop-up menu, tap
Mark for Download
. The icons in the Inbox message list give you visual
indications of message status.
You specify your downloading preferences when you set up the service or select your
synchronization options. You can change them at any time.
!
Change options for Inbox synchronization using ActiveSync options. For more information,
see ActiveSync Help.
!
Change options for direct e-mail server connections in Inbox on your MobilePro. Tap
and tap
Options
service and tap
Composing Messages
To compose a message, perform the following.
1.
2.
New
Tap
.
In the To field, enter an e-mail or SMS address of one or more recipients, separating them
with a semicolon, or select a name from the contact list by tapping the
button. All e-mail addresses entered in the e-mail fields in Contacts appear in the Address
Book.
. On the Service tab, tap the service you want to change. Tap and hold the
Delete
to remove a service.
Address Book
Composing Screen
Tools
3-12 Use Microsoft Pocket Outlook

3.
Compose your message. To enter preset or frequently used messages, tap
select a message.
My Text
and
4.
Tap
Send
when you’ve finished the message. If you are working offline, the message is
moved to the Outbox folder and is sent the next time you connect.
If you are sending an SMS message and want to know if it was received, before sending the
message, tap
Edit
, tap
Options
, and tap
Request SMS text message delivery notification
Managing E-mail Messages and Folders
By default, messages are displayed in one of five folders for each service you have created:
Inbox, Deleted Items, Drafts, Outbox, and Sent Items. The Deleted Items folder contains
messages that were deleted from the MobilePro. The behavior of the Deleted and Sent Items
folders depends on the options you have chosen. In the message list, tap
On the Message tab, select your options.
If you want to organize messages into additional folders, tap
Tools
create new folders. To move a message to another folder, in the message list, tap and hold the
message and tap
Move to
on the pop-up menu.
Folder Behavior with a Direct Connection to an E-mail Server
The behavior of the folders you create depends on whether you are using ActiveSync, SMS,
POP3, or IMAP4.
!
If you use ActiveSync, e-mail messages in the Inbox folder in Outlook are automatically
synchronized with your MobilePro. You can select to synchronize additional folders by
designating them for ActiveSync. The folders you create and the messages you move are
mirrored on the server. For example, if you move two messages from the Inbox folder to a
folder named Family, and you have designated Family for synchronization, the server
creates a copy of the Family folder and copies the messages into that folder. You can then
read the messages while away from your desktop computer.
Tools
, and tap
and tap
Manage Folders
Options
.
.
to
!
If you use SMS, messages are stored in the Inbox folder.
!
If you use POP3 and you move e-mail messages to a folder you created, the link is broken
between the messages on the MobilePro and their copies on the mail server. The next time
you connect, the mail server sees that the messages are missing from the device Inbox and
deletes them from the server. This prevents you from having duplicate copies of a message,
but it also means that you no longer have access to messages that you move to folders
created from anywhere except the MobilePro.
!
If you use IMAP4, the folders you create and the e-mail messages you move are mirrored
on the server. Therefore, messages are available to you anytime you connect to your mail
server, whether it is from your MobilePro or desktop computer. This synchronization of
folders occurs whenever you connect to your mail server, create new folders, or
rename/delete folders when connected.
Use Microsoft Pocket Outlook 3-13

Use Companion Programs
!
Pocket Word
!
Pocket Excel
!
MSN Messenger
!
Windows Media Player for Pocket PC
!
Microsoft Reader
4

The companion programs consist of Microsoft Pocket Word, Microsoft Pocket Excel, Windows
Media™ Player for Pocket PC, and Microsoft Reader.
To switch to a companion program on your device, tap
program name.
Pocket Word
Pocket Word works with Microsoft Word on your desktop computer to give you easy access to
copies of your documents. You can create new documents on your MobilePro, or you can copy
documents from your desktop computer to your MobilePro. Synchronize documents between
your desktop computer and your MobilePro so that you have the most up-to-date content in both
locations.
Use Pocket Word to create documents, such as letters, meeting minutes, and trip reports. To
create a new file, tap
appears. Or, if you’ve selected a template for new documents in the Options dialog box, that
template appears with appropriate text and formatting already provided. You can open only one
document at a time. When you open a second document, you’ll be asked to save the first. You
can save a document you create or edit in a variety of formats, including Word (.doc), Pocket
Word (.psw), Rich Text Format (.rtf), and Plain Text (.txt).
Pocket Word contains a list of the files stored on your device. Tap a file in the list to open it. To
delete, make copies of, and send files, tap and hold a file in the list. Then, select the appropriate
action on the pop-up menu.
Programs
, tap
Programs
Pocket Word
, tap
Pocket Word Folders Screen
on the menu, and tap the
, and tap
New
. A blank document
You can enter information in Pocket Word in one of four modes (typing, writing, drawing, or
recording), which are displayed on the View menu. Each mode has its own toolbar, which you
can show and hide by tapping the
Note
the percentage you want. Select a higher percentage to enter text and a lower one to see more of
your document.
4-2 Use Companion Programs
You can change the zoom magnification by tapping View and tapping Zoom. Select
Show/Hide Toolbar
button on the command bar.

Note
Window on the View menu so that you can see the entire document.
Typing Mode
Using the input panel (keyboard or other input mode), enter typed text into the document. For
more information on entering typed text, see Chapter 2.
To format existing text and to edit text, first select the text. You can select text as you do in a
Word document, using your stylus instead of the mouse to drag through the text you want to
select. You can search a document to find text by tapping Edit and tapping Find/Replace.
If you’re opening a Word document created on a desktop computer, select Wrap to
Pocket Word Document
Use Companion Programs 4-3

Writing Mode
In writing mode, use your stylus to write directly on the screen. Ruled lines are displayed as a
guide, and the zoom magnification is greater than in typing mode to allow you to write more
easily. For more information on writing and selecting writing, see Chapter 2.
Pocket Word Writing Screen
Note
and can be edited and manipulated as described in the following section.
Written words are converted to graphics (metafiles) when a Pocket Word document is converted
to a Word document on your desktop computer.
If you cross three ruled lines in a single stylus stroke, the writing becomes a drawing,
4-4 Use Companion Programs

Drawing Mode
In drawing mode, use your stylus to draw on the screen. Gridlines appear as a guide. When you
lift your stylus off the screen after the first stroke, you’ll see a drawing box indicating the
boundaries of the drawing. Every subsequent stroke within or touching the drawing box
becomes part of the drawing. For more information on drawing and selecting drawings, see
Chapter 2.
Pocket Word Drawing Screen
Recording Mode
In the recording mode, you can embed a recording into your document. Recordings are saved as
.wav files. For more information on recording, see Chapter 2.
For more information on using Pocket Word, tap
Pocket Excel
Pocket Excel works with Microsoft Excel on your desktop computer to give you easy access to
copies of your workbooks. You can create new workbooks on your MobilePro, or you can copy
workbooks from your desktop computer to your MobilePro. Synchronize workbooks between
your desktop computer and your MobilePro so that you have the most up-to-date content in both
locations.
Use Pocket Excel to create workbooks, such as expense reports and mileage logs. To create a
new file, tap
Or, if you’ve selected a template for new workbooks in the Options dialog box, that template
appears with appropriate text and formatting already provided. You can open only one
workbook at a time. When you open a second workbook, you are asked to save the first. You
can save a workbook you create or edit in a variety of formats, including Pocket Excel (.pxl) and
Excel (.xls).
, tap
Programs
Pocket Excel
, tap
and tap
, and tap
Help
.
New
. A blank workbook appears.
Use Companion Programs 4-5

Pocket Excel contains a list of the files stored on your MobilePro. Tap a file in the list to open it.
To delete, make copies of, and send files, tap and hold a file in the list. Then select the
appropriate action from the pop-up menu.
Pocket Excel provides fundamental spreadsheet tools, such as formulas, functions, sorting, and
filtering. To display the toolbar, tap
View
and tap
Toolbar
.
Pocket Excel Screen
Note
do so, open the workbook, tap Edit, and tap Password. Every time you open the workbook, you
need to enter the password, so choose one that is easy for you to remember but hard for others
to guess.
If your workbook contains sensitive information, you can protect it with a password. To
Tips for Working in Pocket Excel
Note the following when working in large worksheets in Pocket Excel.
!
View in full-screen mode to see as much of your worksheet as possible. Tap
Full Screen
!
Show and hide window elements. Tap
hide.
!
Freeze panes on a worksheet. First select the cell where you want to freeze panes. Tap
and tap
to keep row and column labels visible as you scroll through a sheet.
!
Split panes to view different areas of a large worksheet. Tap
the split bar to where you want it. To remove the split, tap
!
Show and hide rows and columns. To hide a hidden row or column, select a cell in the row
or column you want to hide. Then tap
a hidden row or column, tap
hidden row or column. When done, tap
. To exit full-screen mode, tap
Freeze Panes
. You might want to freeze the top and leftmost panes in a worksheet
Tools
, tap
View
Restore
View
and then tap the elements you want to show or
Format
Go To
Format
.
, tap
Row
or
View
View
and tap
Column
and tap
Remove Split
, and tap
Split
Hide
, and then type a reference that is in the
, tap
Row
or
Column
, and tap
and tap
. Then drag
. To show
Unhide
.
View
.
For more information on using Pocket Excel, tap
4-6 Use Companion Programs
and tap
Help
.

MSN Messenger
MSN Messenger on your MobilePro is an instant messaging program that lets you
!
see who is online
!
send and receive instant messages
!
have instant message conversations with groups of contacts.
To use MSN Messenger, you must have an Internet connection and a Microsoft Passport™
account or a Microsoft Exchange e-mail account. You must have a Passport to use MSN
Messenger Service. If you have a Hotmail
you have obtained either a Microsoft Passport or a Microsoft Exchange account, you can set up
your account.
or MSN account, you already have a Passport. Once
Setting Up
Note
Microsoft Hotmail e-mail address at http://www.hotmail.com.
To switch to MSN Messenger, tap , tap
Sign up for a Microsoft Passport account at http://www.passport.com. Get a free
Programs
, and tap
MSN Messenger
.
Before you can connect, you must enter Passport or Exchange account information. Set up an
account and sign in as follows.
1.
In the Tools menu, tap
2.
In the Accounts tab, enter your Passport or Exchange account information.
3.
To sign in, tap the sign-in screen and enter your e-mail address and password.
Note
on your MobilePro without being added again.
If you already use MSN Messenger on your desktop computer, your contacts show up
Options
.
Use Companion Programs 4-7

Working with Contacts
The MSN Messenger window shows all of your messenger contacts at a glance, and are divided
into Online and Not Online categories. From this view, while connected, you can chat, send
e-mail, block the contact from chatting with you, or delete contacts from your list using the popup menu.
MSN Messenger Contacts Screen
Note
Appear Offline.
If you block a contact, it appears offline but remains on the blocked contact’s list. To unblock a
contact, tap and hold the contact, then tap
To see others online without being seen, in the Tools menu, tap My Status and select
Unblock
on the pop-up menu.
4-8 Use Companion Programs

Chatting with Contacts
Tap a contact name to open a chat window. Enter your message in the text entry area at the
bottom of the screen, or tap
contact to a multi-user chat, in the
My Text
to enter a preset message, and tap
Tools
menu, tap
Invite
and tap the contact you want to invite.
MSN Messenger Chat Screen
Send
. To invite another
Note
back to your chat window, tap Chats and select the person whom you were chatting with.
To switch back to the main window without closing a chat, tap Contacts. To revert
To know if the contact you are chatting with is responding, look for the message under the text
entry area.
MSN Messenger Response Screen
Use Companion Programs 4-9

Windows Media Player for Pocket PC
Use Microsoft Windows Media Player for Pocket PC to play digital audio and video files that
are stored on your MobilePro or on a network. To switch to Windows Media Player for Pocket
PC, tap
and tap
Windows Media
.
Windows Media Player Screen
Use Microsoft Windows Media Player on your desktop computer to copy digital audio and
video files to your MobilePro. You can play Windows Media and MP3 files on your MobilePro.
For more information about using Windows Media Player, tap
Microsoft Reader
Use Microsoft Reader to read eBooks on your MobilePro. Download books to your desktop
computer from your favorite eBook Web site. Use ActiveSync to copy the book files to your
activated MobilePro. The books appear in the Reader Library, where you can tap them in the list
to open them.
Note
site (http://das.microsoft.com/activate). Follow the directions given at the Microsoft site.
Each book consists of a cover page, an optional table of contents, and the pages of the book.
You can:
!
!
!
Before you can use Microsoft Reader, you must activate it from the Microsoft activation
Page through the book by using the scroll dial on your MobilePro or by tapping the page
number on each page.
Annotate the book with highlighting, bookmarks, notes, and drawings.
Search for text and look up definitions for words.
, and tap
Help
.
4-10 Use Companion Programs

The Guidebook contains all the information you need to use the software. To open the
Guidebook, tap
title, and then tap
Help
on the Reader command bar. Or, on a book page, tap and hold on the book
Help
on the pop-up menu.
To switch to Microsoft Reader, tap
Getting Books on Your MobilePro
You can download book files from the Web. Just visit your favorite eBook retailer and follow
the instructions to download the book files.
Sample books and a dictionary are also included in the MSReader folder on the Companion CD.
Use ActiveSync to download the files from your desktop computer to your activated MobilePro
as described in the Read Me file in the MSReader folder.
Using the Library
The Library is your Reader home page. The home page displays a list of all books stored on
your MobilePro or storage card.
To open the Library:
!
on the Reader command bar, tap
!
on a book page, tap the book title, and tap
To open a book, tap its title in the Library list.
Microsoft Reader Library Screen
, tap
Library
Programs
Library
, and tap
Microsoft Reader
on the pop-up menu.
.
Use Companion Programs 4-11

Reading a Book
Each book consists of a cover page, an optional table of contents, and the pages of the book.
Navigation options are listed in the bottom portion of the cover page.
The first time you open a book, you’ll probably want to go to the first page or to the table of
contents, if there is one. Subsequently, whenever you open the book, you automatically go to the
last page read.
In addition to the text, each book page includes a page number and book title.
Microsoft Reader Book Page
You can also page through a book by using the scroll dial on your MobilePro.
Using Reader Features
Reading a book electronically gives you several options not available with paper books. These
options are available from any book page.
Select text by dragging across the text on the page. Then, tap an option on the pop-up menu, as
described here.
!
Search for Text. Find text in a book by tapping
you want to search for, and tap the desired Find option. Reader highlights found text on the
page. To close Find, tap outside the box. To return to your original page, tap the title and
then tap
!
Copy Text. You can copy text from books that support this feature into any program that
accepts text. On a book page, select the text you want to copy. Then, tap
pop-up menu. The text can be pasted into the program of your choice.
!
Bookmarks. When you add a bookmark to a book, a color-coded bookmark icon appears in
the right margin. You can add multiple bookmarks to a book. Then, from anywhere in the
book, tap the bookmark icon to go to the bookmarked page.
!
Highlights. When you highlight text, it appears with a colored background.
!
Notes. When you attach a note to text, you enter the text in a note pad that appears on top of
the book page. A Note icon displays in the left margin. To show or hide the note, tap the
icon.
Return
on the pop-up menu.
Find
on the pop-up menu. Enter the word
Copy Text
on the
4-12 Use Companion Programs

!
Drawings. When you add a drawing, a Drawing icon appears in the bottom-left corner of
the page, and drawing tools appear across the bottom of the page. Draw by dragging your
stylus.
!
To see a list of a book’s annotations, including bookmarks, highlights, text notes, and
drawings, tap
to go to the annotated page.
Removing a Book
When you finish reading a book, you can delete it to conserve space on your MobilePro. If a
copy of the book is stored on your desktop computer, you can download it again at any time.
To remove a book from your MobilePro, tap and hold the title in the Library list, and then tap
Delete
on the pop-up menu.
Annotations Index
on the book’s cover page. You can tap an entry in the list
Use Companion Programs 4-13

Use Pocket Internet Explorer
!
Pocket Internet Explorer
!
Mobile Favorites Folder
!
AvantGo Channels
5

Use Microsoft Pocket Internet Explorer to view Web or Wireless Application Protocol (WAP)
pages in either of these ways.
!
During synchronization with your desktop computer, download your favorite links and
mobile favorites that are stored in the Mobile Favorites subfolder in Internet Explorer on the
desktop computer.
!
Connect to an Internet service provider (ISP) or network and browse the Web directly from
your MobilePro. To do this, you’ll need an optional modem or network card and you’ll need
to create the connection, as described in Chapter 6.
When connected to an ISP or network, you can also download files and programs from the
Internet or intranet.
To switch to Pocket Internet Explorer, tap
Pocket Internet Explorer
You can use Pocket Internet Explorer to browse mobile favorites and channels that have been
downloaded to your MobilePro without connecting to the Internet. You can also connect to the
Internet through an ISP or a network connection and browse the Web.
View Mobile Favorites and Channels
You can easily view mobile favorites and channels with your MobilePro.
1.
Tap the
2.
Tap the page you want to view.
Favorites
button to display your list of favorites.
Viewing Favorites
and tap
Internet Explorer
.
You’ll see the page that was downloaded the last time you synchronized with your desktop
computer. If the page is not on your MobilePro, the favorite is dimmed. You need to
synchronize with your desktop computer again to download the page to your MobilePro, or
connect to the Internet to view the page.
5-2 Use Pocket Internet Explorer

Browse the Internet
You can browse the Internet with your MobilePro. Here’s how.
1.
Set up a connection to your ISP or corporate network using Connections, as described in
Chapter 6.
2.
To connect and start browsing, do one of the following:
! Tap the
! Tap
Favorites
View
and tap
button, and then tap the favorite you want to view.
Address Bar
Web address you want to visit and then tap
previously entered addresses.
Note
and hold on the page, and tap Add to Favorites.
To add a favorite link while using the MobilePro, go to the page you want to add, tap
Mobile Favorites Folder
Only items stored in the Mobile Favorites subfolder in the Favorites folder in Internet Explorer
on your desktop computer are synchronized with your MobilePro. This folder was created
automatically when you installed ActiveSync.
Favorite Links
During synchronization, the list of favorite links in the Mobile Favorites folder on your desktop
computer is synchronized with Pocket Internet Explorer on your MobilePro. Both computers are
updated with changes made to either list each time you synchronize. Unless you mark the
favorite link as a mobile favorite, only the link is downloaded to your MobilePro, and you need
to connect to your ISP or network to view the content. For more information on synchronization,
see ActiveSync Help on the desktop computer.
. In the address bar at the top of the screen, enter the
Go
. Tap the arrow to choose from
Mobile Favorites
If you are using Microsoft Internet Explorer 5.0 or later on your desktop computer, you can
download mobile favorites to your MobilePro. Synchronizing mobile favorites downloads Web
content to your device so that you can view pages while you are disconnected from your ISP and
desktop computer.
Use the Internet Explorer plug-in installed with ActiveSync to create mobile favorites quickly.
Creating a Mobile Favorite
Create a mobile favorite as follows.
1.
In Internet Explorer on your desktop computer, click
Favorite
2.
To change the link name, enter a new name in the Name box.
3.
Optionally, in Update, select a desired update schedule.
4.
Click OK. Internet Explorer downloads the latest version of the page to your desktop
computer.
5.
If you want to download the pages that are linked to the mobile favorite you just created, in
Internet Explorer on the desktop computer, right-click the mobile favorite and click
Properties
To conserve memory, go only one level deep.
.
. In the
Download
Tools
and click
Create Mobile
tab, specify the number of links deep you want to download.
Use Pocket Internet Explorer 5-3

6.
Synchronize your MobilePro and desktop computer. Mobile favorites that are stored in the
Mobile Favorites folder in Internet Explorer are downloaded to your MobilePro.
Note
content to keep the information updated on your desktop computer and MobilePro. Before
synchronizing with your MobilePro, in Internet Explorer on your desktop computer, click Tools
and click Synchronize. You’ll see the last time content was downloaded to the desktop
computer, and you can manually download content if needed.
You can add a button to the Internet Explorer toolbar for creating mobile favorites. In Internet
Explorer on your desktop computer, click View, click Toolbars, and click Customize.
If you did not specify an update schedule in step 3, you need to manually download
Saving MobilePro Memory
Mobile favorites take up storage memory on your MobilePro. To minimize the amount of
memory used:
!
In the settings for the Favorites information type in ActiveSync options, turn off pictures
and sounds, or stop some mobile favorites from being downloaded to the MobilePro. For
more information, see ActiveSync Help.
!
Limit the number of downloaded linked pages. In Internet Explorer on the desktop
computer, right-click the mobile favorite you want to change and click
Download tab, specify 0 or 1 for the number of linked pages you want to download.
AvantGo Channels
AvantGo is a free interactive service that gives you access to personalized content and thousands
of popular Web sites. You subscribe to AvantGo channels directly from your MobilePro. Then,
you synchronize your MobilePro and desktop computer, or connect to the Internet to download
the content. For more information, visit the AvantGo Web site.
Properties
. In the
Sign up for AvantGo
Sign up for the free AvantGo service as follows.
1.
In the ActiveSync options on the desktop computer, turn on synchronization for the
AvantGo information type.
2.
In Pocket Internet Explorer on your MobilePro, tap the
of favorites.
3.
Tap the
4.
Tap the
5.
Follow the directions on the screen. You’ll need to synchronize your MobilePro with your
desktop computer and then tap the
When synchronization is complete, tap the
see a few of the most popular channels. To add or remove channels, tap the
link.
AvantGo Channels
Activate
button.
link.
My Channels
AvantGo Channels
button to complete the AvantGo setup.
Favorites
button to display your list
link in your list of favorites to
Add
or
Remove
5-4 Use Pocket Internet Explorer

Get Connected
!
Transfer Items Using Infrared
!
Connect to the Internet
!
Connect to Work
!
End a Connection
!
Connect Directly to an E-mail Server
!
Get Help on Connecting
6

You can use your MobilePro to exchange information with other mobile devices as well as your
desktop computer, a network, or the Internet. You have the following connection options.
!
Use the IR port on your MobilePro to send and receive files between two devices. If this is
the method you want to use, see the following section “Transfer Items Using Infrared.”
Note
!
Check with your ISP to see if the ISP supports receiving e-mail on your MobilePro.
Connect to your ISP. Once connected, you can send and receive e-mail messages by using
Inbox and view Web or WAP pages by using Microsoft Pocket Internet Explorer. The
communication software for creating an ISP connection is already installed on your
MobilePro. Your service provider should provide software needed to install other services,
such as paging and fax services. If this is the method you want to use, see “Connect to an
Internet Service Provider” later in this chapter.
!
Connect to the network at your company or organization where you work. Once connected,
you can send and receive e-mail messages by using Inbox, view Web or WAP pages by
using Pocket Internet Explorer, and synchronize with your desktop computer. If this is the
method you want to use, see “Connect to Work” later in this chapter.
!
Connect to your desktop computer to synchronize remotely. Once connected, you can
synchronize information such as your Pocket Outlook information. If this is the method you
want to use, see ActiveSync Help on your desktop computer or Connections Help on the
device.
Transfer Items Using Infrared
With the MobilePro, you can send and receive data to and from another similarly equipped
device using the IR communication port. In addition, you can use the IR port to synchronize data
with your desktop computer, in place of using the synchronizing cable.
Using infrared (IR), you can send and receive information, such as contacts and appointments,
between two devices.
Send Information
Send information as follows.
1.
Switch to the program where you created the item you want to send and locate the item in
the list.
2.
Position the MobilePro and the second device so that the IR ports face each other. Position
the devices from 2 to 20 inches apart. You might want to remove the MobilePro cover so
that it does not block the IR port (see Chapter 1).
Note
might not be sent or received correctly.
3.
Be sure that nothing obstructs the path between the IR ports on both devices, and that the
ports are aligned properly.
4.
Tap and hold the item, and tap
Note
want to send, and then tap Beam File on the pop-up menu.
If the units are too far apart or if something blocks the path between the two ports, data
Beam Item
You can also send items, but not folders, from File Explorer. Tap and hold the item you
on the pop-up menu.
6-2 Get Connected

Receive Information
Receive information as follows.
1.
Align the IR ports on the two devices so that they are unobstructed and within 2 to 20
inches apart.
2.
Have the owner of the other device send the information to you. Your MobilePro
automatically receives it.
Connect to the Internet
You can connect to your ISP, and use the connection to send and receive e-mail messages and
view Web or WAP pages.
You can connect to work in one of two ways:
!
Create a modem connection. If this is the method you want to use, see “Create a Modem
Connection to an ISP.” You need an optional modem card and an optional PC Card
expansion jacket to do this.
!
Use an Ethernet card and a net tap to connect to the network. If this is the method you want
to use, see “Create an Ethernet Connection to an ISP.”
Create a modem connection to your ISP as follows.
1.
Obtain the following information from your ISP: ISP dial-up access telephone number, user
name, password, and TCP/IP settings. Some ISPs require information in front of the user
name, such as MSN/username.
2.
If your MobilePro does not have a modem, install an optional modem or use a NULL
modem cable and appropriate adapters to connect an external modem to your MobilePro
through the serial port on the cradle.
3.
Tap and tap
settings, select Internet Settings and tap
4.
In the Modem tab, tap
5.
Enter a name for the connection, such as “ISP Connection.”
6.
In the Select a modem list, select your modem type. If your modem type does not appear,
Settings
New
. In the Connections tab, tap
Modify
.
.
Connections
. Under The Internet
try re-inserting the modem card.
7.
You should not need to change any settings in Advanced. Most ISPs now use a
dynamically-assigned address. If the ISP you are connecting to does not use a dynamically-
Next
Advanced
.
and tap
assigned address, tap
OK
tap
and tap
8.
Enter the access phone number, and tap
9.
Select other desired options, and tap
10.
In the Dialing Locations tab, specify your current location and phone type (most phone lines
TCP/IP
Next
Finish
tab, and enter the address. When finished,
.
.
are tone). These settings apply to all connections you create.
11.
To start the connection, start using one of the following programs. Your device
automatically begins connecting. Once connected, you can:
!
Send and receive e-mail messages by using Inbox. Before you can use Inbox, you need
to provide the information it needs to communicate with the e-mail server. For specific
instructions, see “Connect Directly to an E-mail Server,” later in this chapter.
Get Connected 6-3

! Visit Web and WAP pages by using Pocket Internet Explorer. For more information,
see Chapter 5.
! Send and receive instant messages with MSN Messenger. For more information, see
“MSN Messenger” in Chapter 5.
Create an Ethernet connection to an ISP
Create an Ethernet connection to your ISP as follows.
1.
You do not need to create a new connection on your MobilePro. Instead, you need an
Ethernet card and PC Card expansion jacket for your MobilePro.
2.
Obtain a user name, password, and domain name from your ISP.
3.
Install the Ethernet card on your MobilePro. For instructions on installing and using the
Ethernet card, see the owner’s manual for the card.
4.
The first time you install the card, Network Settings appears automatically so that you can
configure the Ethernet card. Most networks use DHCP, so you should not have to change
these settings unless your network administrator instructs you to do so. Tap
not appear or to change settings later, tap
Network
5.
Connect the Ethernet card to the network with a network cable. For more information, see
the owner's manual for the card.
, tap the adapter you want to change, and tap
and tap
Settings
Properties
OK
. (If it does
. In the Connections tab, tap
.)
6.
Tap , tap
Settings
, tap the Connections tab, and tap
network card connects to list, select Internet.
To start the connection, start using one of the programs listed in the preceding section. Once
connected, you can perform the same activities as listed in the preceding section.
Connect to Work
If you have access to a network at work, you can send e-mail messages, view intranet pages,
synchronize your MobilePro, and possibly access the Internet. You can connect to work in one
of two ways:
Create a modem connection by using a Remote Access Services (RAS) account. Before you
!
can create this modem connection, your network administrator needs to set up a RAS
account for you. If this is the method you want to use, see “Create a Modem Connection to
a Network.” Your network administrator might also give you Virtual Private Network
(VPN) settings.
Use an optional Ethernet card and a net tap to connect to the network. If this is the method
!
you want to use, see “Create an Ethernet Connection to a Network.”
Create a Modem Connection to a Network
Create your modem connection to a network as follows.
Connections
. From the My
1.
Get the following information from your network administrator:
! dial-up access telephone number
! user name and password
! domain name and TCP/IP settings.
6-4 Get Connected

2.
Install an optional modem card.
3.
Tap and tap
settings, select Internet Settings and tap
4.
In the Modem tab, tap
5.
Enter a name for the connection, such as “Company Connection.”
6.
In the Select a Modem list, select your modem type. If your modem type does not appear,
Settings
New
. In the Connections tab, tap
Modify
.
.
Connections
. Under The Internet
try reinstalling the modem card. If you are using an external modem that is connected to
your MobilePro with a cable, select Hayes Compatible on COM1.
7.
You should not need to change any settings in Advanced. Most servers now use a
dynamically-assigned address. If the server you are connecting to does not use a
dynamically-assigned address, tap
OK
When finished, tap
8.
Enter the access phone number, and tap
9.
Select other desired options, and tap
10.
In the Dialing Locations tab, specify your current location and phone type (most phone lines
and tap
Advanced,
Next
.
Finish
tap the TCP/IP tab, and enter the address.
Next
.
.
are tone). These settings apply to all connections you create.
To start the connection, use one of the following programs. Your MobilePro automatically
begins connecting. Once connected, you can:
!
Send and receive e-mail messages by using Inbox. Before you can use Inbox, you need to
provide the information it needs to communicate with the e-mail server. For specific
instructions, see “Connect Directly to an E-mail Server,” later in this chapter.
!
Visit Internet or intranet Web or WAP pages by using Pocket Internet Explorer.
!
Send and receive instant messages with MSN Messenger. For more information, see “MSN
Messenger” in Chapter 5.
!
Synchronize. For more information, see ActiveSync Help on the desktop computer.
Create an Ethernet Connection to a Network
Create an Ethernet connection to a network as follows.
1.
You do not need to create a new connection on your MobilePro. You need an optional
Ethernet card and PC Card expansion jacket for your MobilePro.
2.
Get a user name, password, and domain name from your network administrator.
3.
Install the Ethernet card on your MobilePro. For instructions on installing and using the
Ethernet card, see the owner’s manual for the card.
4.
The first time you install the card, Network Settings appears automatically so that you can
configure the Ethernet card. Most networks use DHCP, so you should not have to change
these settings unless your network administrator instructs you to do so. Tap
not appear or to change settings later, tap
Network
5.
Connect the Ethernet card to the network with a network cable. For information, see the
owner's manual for the card.
, tap the adapter you want to change, and tap
and tap
Settings
Properties
OK
. (If it does
. On the Connections tab, tap
.)
6.
Tap , tap
Settings
, tap the Connections tab, and tap
network card connects to list, select
Work
Connections
. From the My
.
Get Connected 6-5

7.
If you want to synchronize your MobilePro, tap , and tap
menu, tap
Options
. In the PC tab, select Include PC when synchronizing remotely and
connect to, and select your computer's name.
Remote synchronization with a desktop computer works only if you set up a partnership
with that computer through ActiveSync and have set ActiveSync to allow remote
connections. Other restrictions apply. For more information on synchronizing remotely, see
ActiveSync Help on the desktop computer.
To start the connection, use one of the programs listed in the preceding section. Once connected,
you can perform the same activities as listed in the preceding section.
End a Connection
To end a connection, do one of the following:
!
When connected via dial-up or VPN, tap the Connection icon on the navigation bar, and
End
tap
!
When connected via cable or cradle, unplug your MobilePro from the cable or cradle.
!
When connected via Infrared, move the MobilePro away from the desktop computer.
!
When connected via a network (Ethernet) card, remove the card from your MobilePro.
.
Connect Directly to an E-mail Server
ActiveSync
. In the Tools
You can set up a connection to an e-mail server so that you can send and receive e-mail
messages by using an optional modem or network card and Inbox on your MobilePro.
Note
The ISP or network must use a POP3 or IMAP4 e-mail server and an SMTP gateway.
You can use multiple e-mail services to receive your messages. For each e-mail service you
intend to use, first set up and name the e-mail service. If you use the same service to connect to
different mailboxes, set up and name each mailbox connection.
Set up an E-mail Service:
In Inbox on your MobilePro, tap
New Service wizard.
For an explanation of a screen, tap
server, tap
Services
and tap
Connect
“Inbox: Sending and Receiving E-mail Messages” in Chapter 4.
Get Help on Connecting
More information on the procedures described here, as well as information on additional
procedures, can be found in the following locations.
!
“Inbox: Sending and Receiving E-mail Messages” in Chapter 4.
!
Online Help on the MobilePro. Tap
tap
Inbox
Connections
or
Services
and tap
, and tap
New Service
Help
. When finished, to connect to your e-mail
. Follow the directions in the
. For more information on using the Inbox program, see
and tap
Help
. Tap
View
All Installed Help
, tap
.
, and
!
ActiveSync Help on the desktop computer. In ActiveSync, click
Help
!
For troubleshooting information, see the Pocket PC Web site at:
http://www.microsoft.com/mobile/pocketpc
6-6 Get Connected
Microsoft ActiveSync
on the Help menu.

If You Have Problems
!
Problem Solving
!
Help Resources
7

You may occasionally encounter a problem with your MobilePro P300. In most cases, the
problem is one that you can solve yourself.
If there is a problem, the MobilePro may display an error message. If this happens, follow any
instructions on the screen.
If screen messages do not help or an error message does not appear, refer to the information in
this chapter to help determine and solve the problem.
Problem Solving
When trying to solve problems, you should note what the MobilePro was doing when the
problem occurred and what you attempted to do to correct the problem. This information is
useful if you request assistance.
See the following table to match your problem area and view what to do.
Problem What to Do
No display 1. Press the power button.
Problem Solving
2. Recharge the battery.
3. Check the backlight and brightness settings.
4. Soft reset the MobilePro. If possible, save your data then
use the stylus to press and hold in the reset button for several
seconds.
Display dark or hard to read 1. Turn on the backlight.
2. Adjust the backlight setting.
3. Adjust the brightness setting.
4. Use the Zoom tool or Text Size tool to enlarge text.
Unit responds slowly or
erratically
Unit stops responding or
locks up
Battery power low or does
not last long
Storage or program memory
low or unavailable
1. Recharge the battery.
2. Soft reset the MobilePro. If possible, save your data then
use the stylus to press and hold in the reset button for several
seconds.
1. Soft reset the MobilePro. If possible, save your data then
use the stylus to press and hold in the reset button for several
seconds.
2. Recharge the battery.
3. Hard reset to factory settings by simultaneously pressing
and holding the power and reset buttons. Be sure to back-up
all your data before doing a hard reset.
CAUTION
1. Recharge the battery.
2. Use external power as much as possible.
3. Shorten the auto-suspend time.
4. Adjust the backlight and brightness settings to a lower
value.
5. Turn off sounds not needed.
1. Close all unnecessary programs and tasks.
2. Move data to a storage card.
3. Set programs to save to a storage card.
4. Remove programs you no longer use.
5. Adjust the slider in memory settings allocation.
6. Soft reset the MobilePro.
, all your data is lost when you perform a hard reset.
7-2 If You Have Problems

Problem Solving
Problem What to Do
Touch screen does not
respond
AC Adapter doesn’t work 1. Check that all connections are secure.
Cradle doesn’t work 1. Check that all connections and cables are secure and
Help Resources
If the problem you are experiencing cannot be solved, you might want to try the following help
resources.
Item Resource
Windows Pocket PC
1. Calibrate the touch screen.
2. Check that the AC outlet is working.
correct for the task being performed.
2. Check that the MobilePro is securely seated in the cradle.
Help Resources
Windows Pocket PC Help
Help file included with Windows Pocket PC. Tap Start on the
Today screen, tap Help on the Programs screen, and tap an
item on the Help Contents screen.
Windows Pocket PC web site
http://www.microsoft.com/mobile/pocketpc/
howdoi/default.asp
ActiveSync
Pocket Word, Excel,
Reader, Outlook (Inbox,
Calendar, Contacts, Tasks,
Notes), Windows Media
Player, Internet Explorer
MobilePro Technical
Support
ActiveSync Help on your computer
After installing ActiveSync on your computer, click on
Start/Programs/ActiveSync to open the ActiveSync window.
Select Help from the menu bar and click on Microsoft
ActiveSync Help.
ActiveSync Help on your MobilePro
Tap
Bar. At the Help Contents screen, tap Connections. At the
Connections Help screen, tap a help topic.
ActiveSync Help on the Web
http://www.microsoft.com/mobile/pocketpc/
howdoi/default.asp
Microsoft Pocket PC Features
http://www.microsoft.com/mobile/pocketpc/
bguide/features/mobile_software.asp
NEC Computers Inc. MobilePro Support
http://support.neccomp.com
at the Today screen and tap Help on the Navigation
If You Have Problems 7-3

8
NEC Computers Information Services
!
NEC Computers Service and Support Functions
!
NEC Computers Technical Support
!
Applications Support

This chapter contains the following NEC Computers service and support information:
!
service and support telephone number, web address, and e-mail address
!
technical support.
In addition, this chapter contains contact information for several application providers.
NEC Computers Service and Support Functions
The following table lists the telephone number, web address, and e-mail address for the NEC
Computers service and support functions.
NEC Computers Service and Support
Service Telephone Number and Addresses
To contact NEC Computers Technical
Support Center:
To send technical questions by e-mail: tech-support@nec-computers.com
To access the NEC Computers web site: www.neccomp.com
In the U.S., call 800-632-4525
NEC Computers Technical Support
The following sections provide information for obtaining technical support from NEC
Computers. With access to a telephone and/or modem, you can use these services to obtain
information about the system at any time, day or night, seven days a week.
NEC Computers Web Site
If you have access to the Internet (via a network or a modem connection), you can access the
NEC Computers Web site. You can do this through a commercial online service or through your
Internet account. The NEC Computers web site contains general information about NEC
Computers and its products. The Web site also contains press releases, reviews, and service and
support information.
Look in the Service and Support area for the following:
!
technical documentation, including Frequently Asked Questions, user’s guides, reference
manuals, and warranty information
!
contact information, including telephone numbers for Technical Support and links to vendor
Web sites
!
automated e-mail form for your technical support questions.
To access the NEC Computers Web site, enter the following Internet Uniform Resource Locator
(URL) in your browser:
http://www.neccomp.com
8-2 NEC Computers Information Services

E-mail to Technical Support Services
The NEC Computers Technical Support Center offers technical support by e-mail over the
Internet network if you have access. The Internet e-mail address is:
tech-support@nec-computers.com/
When using the e-mail support service, please include the word
for prompt response from the appropriate technical person.
Provide as much specific information in your questions as possible. You should receive a
response to your questions within one business day.
NEC Computers Technical Support Services
NEC Computers also offers direct technical support through its Technical Support Center. (NEC
Computers technical support is for U.S. and Canadian customers only; international customers
should check with their sales provider.)
Direct assistance is available 24 hours a day, 7 days a week. Call the NEC Computers Technical
Support Center, toll free, at
1-800-632-4525
(U.S. and Canada only).
Please have the MobilePro accessible when you call the Technical Support Center so that a
technician can troubleshoot it.
For callers outside the U.S. or Canada, please contact your local NEC Computers sales provider.
Applications Support
In addition to NEC support, you can contact the following application providers for support on
their products.
!
ArcSoft PhotoBase
MobilePro
in the subject field
— e-mail
— telephone
— web site
!
Ruksun Software Technologies VoiceMessenger Force
— e-mail
— telephone
!
Siscosoft Golfwits
support@arcsoft.com
510-440-9901
http://www.arcsoft.com
techsupp@ruksun.com
+91-20-6816014
— e-mail support@siscosoft.com
!
Westtek ClearVue Office Viewers
— e-mail
!
ZIOSoft ZIOGolf 2
— e-mail
— fax
— telephone
support@westtek.com
support@ziosoft.com
408-778-2737
408-778-6500 x205
NEC Computers Information Services 8-3

Specifications
!
System
!
Physical
!
Environment
9

The following specifications are standard except where noted.
System Specifications
Display
65K color, 240 x 320 pixels, TFT, liquid crystal display (LCD), with backlight, touch screen
CPU
Intel Strong ARM, 206-MHz processor
User Data Entry Methods
!
Touch screen (input via stylus)
!
Scroll (Jog) dial
!
Soft keyboard
!
Block recognizer
!
Letter recognizer
!
Transcriber
Synchronous Dynamic Random Access Memory (SDRAM)
32 megabytes (MB)
Speaker
One built-in speaker
Infrared (IrDA) Communication
!
Data transfer rate — up to 115.2 kb per second
!
Distance — 2 to 20 inches
MobilePro I/O Ports
!
IrDA port
!
Microphone
!
Host Interface (I/F)
!
Power port (DC in)
USB Cradle I/O Ports
!
USB PC connect
!
Power port (DC in)
!
Serial
Card Slots
!
One CompactFlash (CF) card slot
!
One Secure Digital (SD) card slot
9-2 Specifications

Backlighting
!
Adjustable brightness levels
— Super bright
— High bright
— Medium bright
— Low bright
— Power save
Power
!
Cradle
— Input Voltage — 100 to 240 volts AC, 50 or 60 Hz
— Output Voltage — 5.0 volts, 3.0 amp
!
AC Adapter
— Input Voltage — 100 to 240 volts AC, 50 or 60 Hz
— Output Voltage — 5.0 volts, 3.0 amp
!
Battery — One rechargeable Lithium-Ion (Li-Ion) 1000 mAh battery (included)
Power Management
!
Low battery power detection
— Less than 20 % (battery low warning)
— Less than 10 % (battery very low warning)
— Less than 5 % (battery depleted warning, unit shuts off until battery is charged)
Data Protection
!
Battery less than 10 %, unit goes to minimum power, saves data, and goes into sleep mode
!
Battery less than 5 %, unit saves data and shuts off
Accessories (shipped with MobilePro)
!
AC adapter
!
USB cradle
!
PC connect cable
!
Stylus (stored on MobilePro)
!
SD card
!
LCD protection cover
Available Options (for U.S. and Canada only)
!
USB Host Interface (I/F) Conversion Cable
!
PC Card Expansion Jacket
!
Stylus Pack
!
CompactFlash Storage Card
Specifications 9-3

Physical Specifications
Dimensions (approximate)
!
5.0 in. (h) x 3.0 in. (w) x 0.75 in. (d)
!
127 mm (h) x 76.2 mm (w) x 19.05 mm (d)
Weight (approximate)
!
5.8 oz. (with battery)
!
163.5 grams (with battery)
Environment Specifications
Operating Environment
!
Temperature — 32º to 104ºF (0º to 40ºC)
!
Humidity — 20% to 90% (Non condensing)
Storage Environment
!
Temperature — -4º to 140ºF (–20º to 60ºC)
!
Humidity — 20% to 90% (Non condensing)
9-4 Specifications

Index
A
AC adapter
connecting to cradle, 1-11
ActiveSync
add programs, 2-12
features, 1-16
help, 1-21
Activites
partial listing, 1-14
Adjusting settings, 2-12
AdvantGo
channels, 5-4
sign up, 5-4
Application providers
support information, 8-3
ArcSoft cePhoto
support information, 8-3
B
Basics
entering information, 2-3
input panel, 2-3
My Menu screen, 1-15
Navigation Bar, 1-14
notifications, 2-2
overview, 2-2
pop-up menus, 2-2
screens, 1-12
Today screen, 1-13
Battery
charging, 1-10
charging LED, 1-4, 1-11
Lithium Ion, 1-3
warning messages, 1-10
Block recognizer, 2-4
Buttons
card ejector, 1-5
My Menu, 1-15
navigation, 1-4
power, 1-7
program, 1-4
C
Calendar
creating an appointment, 3-2
creating meeting requests, 3-4
schedule a meeting, 3-4
scheduling appointments and meetings, 3-2
summary screen, 3-3
Calibration
MobilePro, 1-12
Card slots
Secure Digital, 1-7
types, 1-3
Cards
Compact Flash, 1-5
CF card
slot, 1-8
Cleaning
MobilePro, 1-21
ClearVue Office Viewers, 1-22
features, 1-22
installation, 1-22
support information, 8-3
Command bar, 1-13
Compact Flash
card, 1-5
Connecting
getting help, 6-6
Connection
direct to e-mail server, 6-6
end, 6-6
Connectors
cradle, 1-8, 1-9
host interface, 1-6
optional serial cable, 1-9
power, 1-8, 1-9
USB PC cable, 1-9
Contacts
checking, 1-14
creating, 3-5
finding, 3-5
summary screen, 3-6
tracking friends and colleagues, 3-4
Cradle
connecting, 1-11
connectors, 1-8
features, 1-3, 1-9
Customization
adding or removing programs, 2-12
adjusting settings, 2-12
D
Drawing
creating, 2-8
editing on screen, 2-9
on screen, 2-8
E
Editing text, 2-5
E-mail
sending and receiving, 3-9
technical support, 8-3
E-mail service
setting up, 6-6
Ethernet
connecting to network, 6-5
Index-1

F
Features
accessing MobilePro functions, 1-18
back, 1-5
bottom, 1-8
cradle, 1-9
external, 1-3
general, 1-3
LCD cover, 1-10
left side, 1-7
right side, 1-6
top, 1-8
Functions
accessing, 1-18
G
Getting help
resources, 1-20
Golfwits, 1-22
installation, 1-29
support information, 8-3
H
Hard reset, 1-5, 1-7
Headset jack
location, 1-8
Help
contents, 1-15
resources, 1-20, 7-3
Host Interface
connector, 1-6
I
Inbox
composing messages, 3-12
connecting to e-mail server, 3-10
managing messages and folders, 3-13
sending and receiving e-mail, 3-9
synchronizing e-mail, 3-10
using message list, 3-11
Information
entering, 2-3
finding, 2-11
organizing, 2-11
Infrared
using, 6-2
Input panel
entering text, 2-3
using block recognizer, 2-4
using letter recognizer, 2-4
using soft keyboard, 2-3
using transcriber, 2-5
Internet
add programs, 2-13
connecting via ethernet, 6-4
connecting via modem, 6-3
Internet Explorer
creating mobile favorite, 5-3
favorite links, 5-3
mobile favorites folder, 5-3
mobile links, 5-3
saving MobilePro memory, 5-4
IR port
location, 1-8
K
Keyboard
soft, 2-3
L
LCD panel cover, 1-10
LED
battery charging, 1-4
notification, 1-4
Letter recognizer, 2-4
M
Memory
MobilePro, 1-3
Message
frequently used, 2-10
preset, 2-10
sound recording, 2-9
Microphone
location, 1-8
Microsoft Reader
book removal, 4-13
downloading books, 4-11
features, 4-12
library, 4-11
reading books, 4-12
MobilePro
back features, 1-5
bottom features, 1-8
calibration, 1-12
cleaning, 1-21
cradle features, 1-9
features, 1-3
items shipped, 1-2
LCD cover features, 1-10
left side features, 1-7
memory, 1-3
operating system, 1-3
right side features, 1-6
top features, 1-8
MobilePro Synchronization System, 1-15, 1-22
features, 1-26
installation, 1-26
Modem
connecting to ethernet, 6-4
connecting to Internet, 6-3
connecting to network, 6-4
connecting to work, 6-4
MSN Messenger
chatting with contacts, 4-9
features, 4-7
Index-2

setting up, 4-7
working with contacts, 4-8
My Menu screen, 1-15
N
Navigation Bar screen, 1-14
Navigation buttons, 1-4
NEC Computers
e-mail support, 8-3
Technical support services, 8-3
web site, 8-2
Network
connecting via ethernet, 6-5
connecting via modem, 6-4
Notes
capturing thoughts and ideas, 3-8
creating, 3-9
Notification LED, 1-4
Notifications, 2-2
O
Operating system, 1-3
Overview
basics, 2-2
P
PhotoBase, 1-22
features, 1-25
installation, 1-25
Pocket Excel
features, 4-5
tips for using, 4-6
Pocket Internet Explorer
browsing, 5-3
features, 5-2
view favorites, 5-2
Pocket PC 2002
operating system, 1-3
Pocket Word
drawing mode, 4-5
features, 4-2
recording mode, 4-5
typing mode, 4-3
writing mode, 4-4
Pop-up menus, 2-2
Power
connector, cradle, 1-8
Power button, 1-7
Problems
solutions, 7-2
solving, 7-2
Productivity and Mobility
applications, 1-22
Program buttons, 1-4
Programs
ActiveSync, 1-15
adding to Start menu, 2-13
adding with ActiveSync, 2-12
adding with Internet, 2-13
Calendar, 1-15
Contacts, 1-15
Inbox, 1-15
Internet Explorer, 1-15
list of, 1-15
Notes, 1-15
Outlook, 1-16
removing from Start menu, 2-14
Settings, 1-15
Tasks, 1-15
Windows Media, 1-15
R
Recording
message, 2-9
Recording button
location, 1-7
Resources
help, 7-3
S
Screen
drawing on, 2-8
editing writing, 2-6
writing on, 2-5
Screens
My Menu, 1-12, 1-15
Navigation Bar, 1-12, 1-14
Today, 1-12, 1-13
Scroll dial
location, 1-7
Secure Digital
card, 1-7
Secure Digital card
loading programs from, 1-18
Service and Support
contact information, 8-2
Speaker, 1-4
Specifications
card slots, 9-2
CPU, 9-2
cradle I/O ports, 9-2
display, 9-2
environment, 9-4
infrared (IR) port, 9-2
memory, 9-2
MobilePro I/O ports, 9-2
operating environment, 9-4
physical, 9-4
power, 9-3
speaker, 9-2
storage environment, 9-4
system, 9-2
weight, 9-4
Start menu
adding programs, 2-13
removing programs, 2-14
Index-3

Strap
holder, 1-5
Stylus
location, 1-6
use of, 1-12
using, 1-3
T
Tasks
creating, 3-7
summary screen, 3-8
to do list, 3-6
Technical support, 7-3, 8-2
Text editing, 2-5
Today screen, 1-13
Touch screen, 1-4
Transcriber, 2-5
Troubleshooting
problem solving, 7-2
solutions, 7-2
U
Unpacking, 1-2
V
VoiceMessenger Force, 1-22
features, 1-23
installation, 1-24
support information, 8-3
W
Web site
NEC Computers, 8-2
Windows Media Player
features, 4-10
Work
connecting via modem, 6-4
Writing
converting to text, 2-7
editing on screen, 2-6
on screen, 2-5
tips, 2-8
Z
ZIOGolf, 1-22
installation, 1-28
support information, 8-3
Index-4

Regulatory Statements for U.S. and Canada
The following regulatory statements include the Federal Communications Commission
(FCC) Radio Frequency Interference Statement, compliance statements for Canada, and
battery disposal and replacement information.
FCC Statement for United States Only
Changes or modifications to this unit not expressly approved by the party
responsible for compliance could void the user’s authority to operate the equipment.
Note
device, pursuant to Part 15 of the FCC Rules. These limits are designed to provide reasonable
protection against harmful interference in a residential installation. This equipment generates, uses
and can radiate radio frequency energy and, if not installed and used in accordance with the
instructions, may cause harmful interference to radio communications.
This equipment has been tested and found to comply with the limits for a Class B digital
However, there is no guarantee that interference will not occur in a particular installation. If
this equipment does cause harmful interference to radio or television reception, which can
be determined by turning the equipment off and on, the user is encouraged to try to correct
the interference by one or more of the following measures.
! Reorient or relocate the receiving antenna.
! Increase the separation between the equipment and receiver.
! Connect the equipment to an outlet on a circuit different from the one to which the
receiver is connected.
Regulatory Statements 1
 Loading...