

Page 1

MobilePro Users Guide Page 1 of 35
MobilePro™ HPC
User's Guide
l Notices
l Proprietary Notice and Liability Disclaimer
l Table of Contents
Notices
This device complies with Part 15 of the FCC Rules. Operation is subject to the following
two conditions:
1. This device may not cause harmful interference, and
http://kbase/mobilpro/400/docs/mprouser.htm 10/20/98
Page 2

MobilePro Users Guide Page 2 of 35
2. this device must accept any interference received, including interference that may
cause undesired operation.
WARNING
FCC Regulations state that any unauthorized changes or modifications to this equipment
not expressly approved by the manufacturer could void the user's authority to operate this
equipment.
Note: This equipment has been tested and found to comply with the limits for a class B
digital device, pursuant to Part 15 of the FCC Rules.
These limits are designed to provide reasonable protection against harmful interference in
a residential installation.
This equipment generates, uses, and can radiate radio frequency energy and, if not
installed and used in accordance with the instructions, may cause harmful interference to
radio communications.
However, there is no guarantee that interference will not occur in a particular installation. If
this equipment does cause harmful interference to radio or television reception, which can
be determined by turning the equipment off and on, the user is encouraged to try to correct
the interference by one or more of the following measures:
l Reorient or relocate the receiving antenna.
l Increase the separation between the equipment and receiver.
l Connect the equipment into an outlet on a circuit different from that to which the
receiver is connected.
l Consult the dealer or an experienced radio/TV technician for help.
CAUTION
l Danger of explosion if battery is incorrectly replaced.
l Replace only with the same or equivalent type recommended by the manufacturer.
l Dispose of used batteries according to the manufacturer's instructions.
Note: A shielded interface cable is required to ensure compliance with FCC regressions for
Class B certification.
l Danger of explosion if AC adapter is incorrectly used.
l Use only the AC adapter recommended by the manufacturer.
l Use the AC adapter only when the socket-outlet is near the equipment and easily
accessible.
http://kbase/mobilpro/400/docs/mprouser.htm 10/20/98
Page 3

MobilePro Users Guide Page 3 of 35
Proprietary Notice and Liability Disclaimer
The information disclosed in this document, including all designs and related materials, is
the valuable property of NEC Corporation (NEC) and/or its licensers. NEC and/or its
licensers, as appropriate, reserve all patent, copyright and other proprietary rights to this
document, including all design, manufacturing, reproduction, use and sales rights thereto,
except to the extent said rights are expressly granted to others.
The NEC product(s) discussed in this document are warranted in accordance with the
terms of the Warranty Statement accompanying each product. However, actual
performance of each such product is dependent upon factors such as system configuration,
customer data, and operator control. Since implementation by customers of each product
may vary, the suitability of specific product configurations and applications must be
determined by the customer and is not warranted by NEC.
To allow for design and specification improvements, the information in this document is
subject to change at ant time, without notice. Reproduction of this document or portions
thereof without written approval of NEC is prohibited.
MobilePro is a trademark of NEC Computer Systems Division. A Division of Packard Bell NEC, Inc. All other products, brand, or trade names used in
this publication are trademarks or registered trademarks of their respective trademark owners.
http://kbase/mobilpro/400/docs/mprouser.htm 10/20/98
Page 4

MobilePro Users Guide Page 4 of 35
Table of Contents
Getting Started
l External appearance
l Loading the Main Battery
l Installing the Sub Battery (Back-up Battery)
l Opening the display cover
l Turning the Power On
l Turning the Power Off
l Adjusting the Contrast
l Removing the Stylus
l First Time MobilePro HPC Setup
Using PCMCIA (PC) Cards with the MobilePro HPC
l Inserting a PCMCIA Card
http://kbase/mobilpro/400/docs/mprouser.htm 10/20/98
Page 5

MobilePro Users Guide Page 5 of 35
l Removing a PCMCIA Card
Data Transfer Using Optical Communication
l To Transfer Data
Using an AC Adapter (Optional on some Models)
l Connecting an AC Adapter
l Disconnecting an AC Adapter
Replacing the Batteries
l Replacing the Main Batteries
l Replacing the Sub Battery (Back-up Battery)
Connecting the MobilePro HPC to a PC
l Connection Using a Direct Connection Cable
l Connection Using a MobilePro HPC Cradle
Resetting the MobilePro HPC
l How to reset the MobilePro HPC
Troubleshooting
Product Specifications
http://kbase/mobilpro/400/docs/mprouser.htm 10/20/98
Page 6
MobilePro Users Guide Page 6 of 35
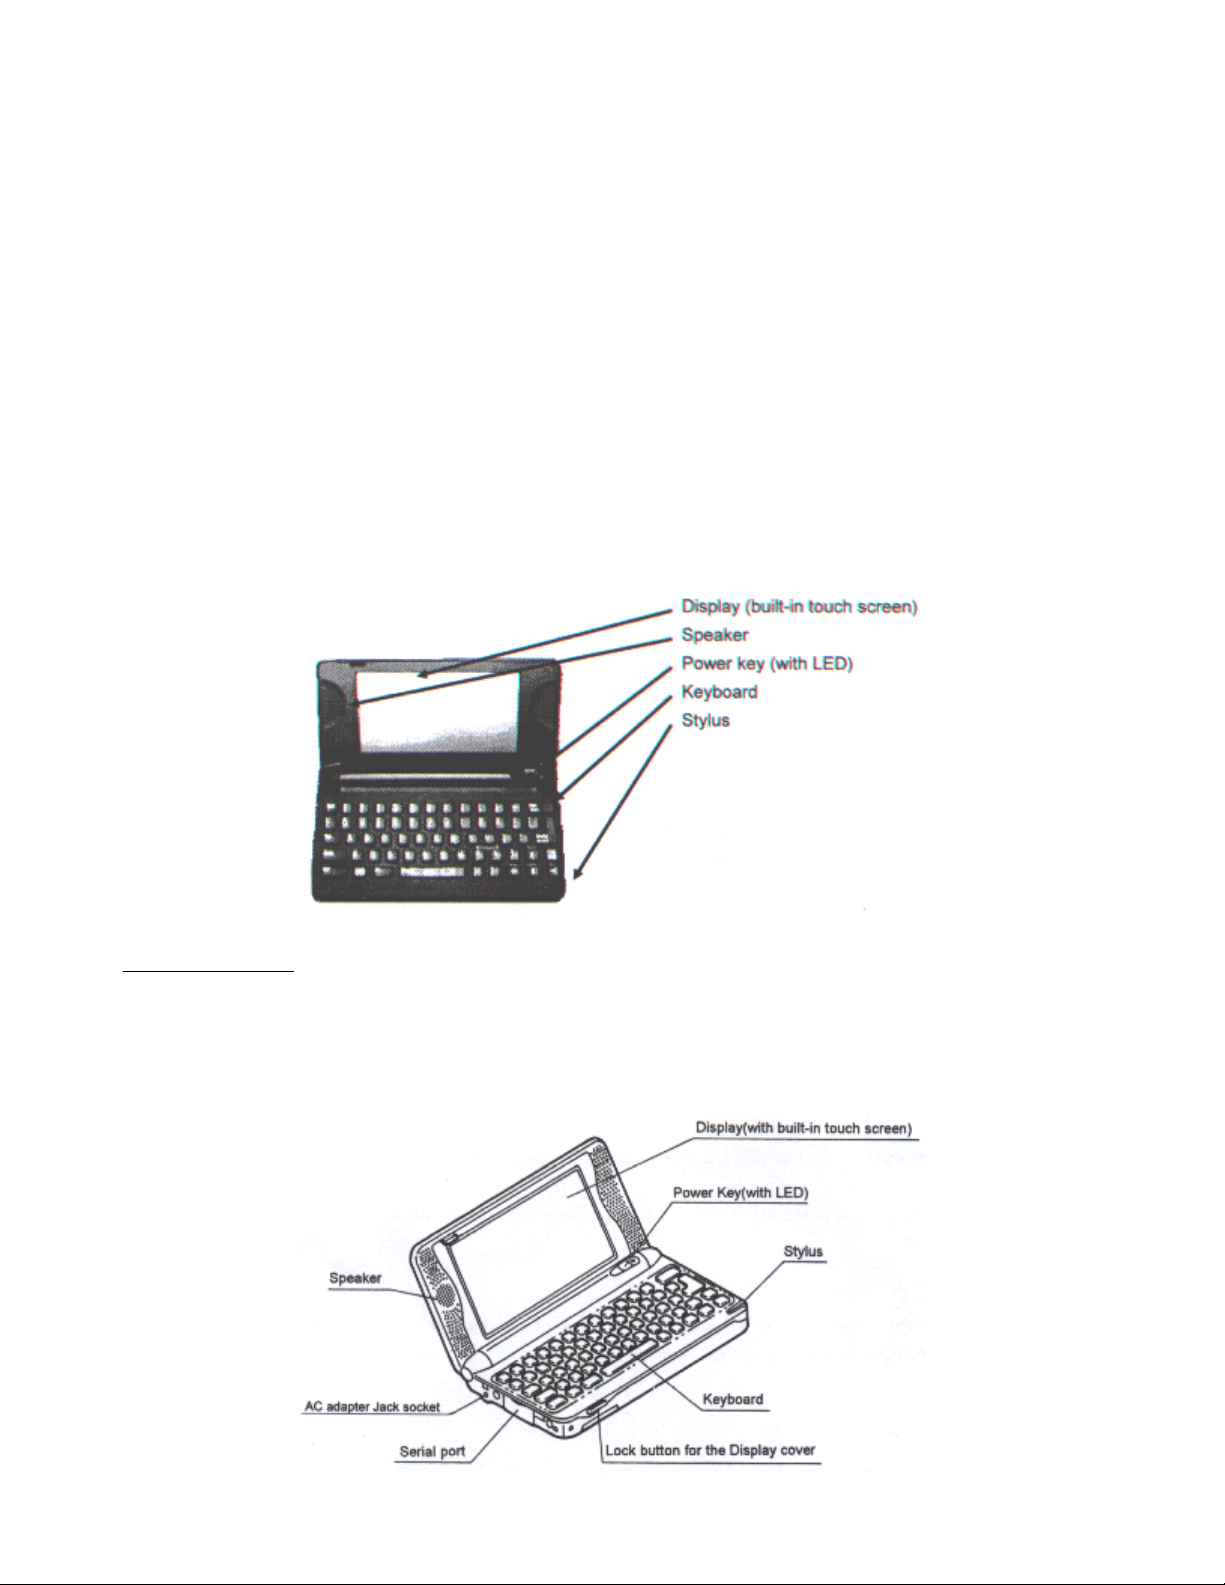
External Appearance
Important Note
As a general rule. Synchronize data between your MobilePro HPC and your desktop
frequently to assure data back-up if your batteries fail.
( Side View )
http://kbase/mobilpro/400/docs/mprouser.htm 10/20/98
Page 7
MobilePro Users Guide Page 7 of 35
( Bottom View )
Return to Table of Contents
http://kbase/mobilpro/400/docs/mprouser.htm 10/20/98
Page 8
MobilePro Users Guide Page 8 of 35
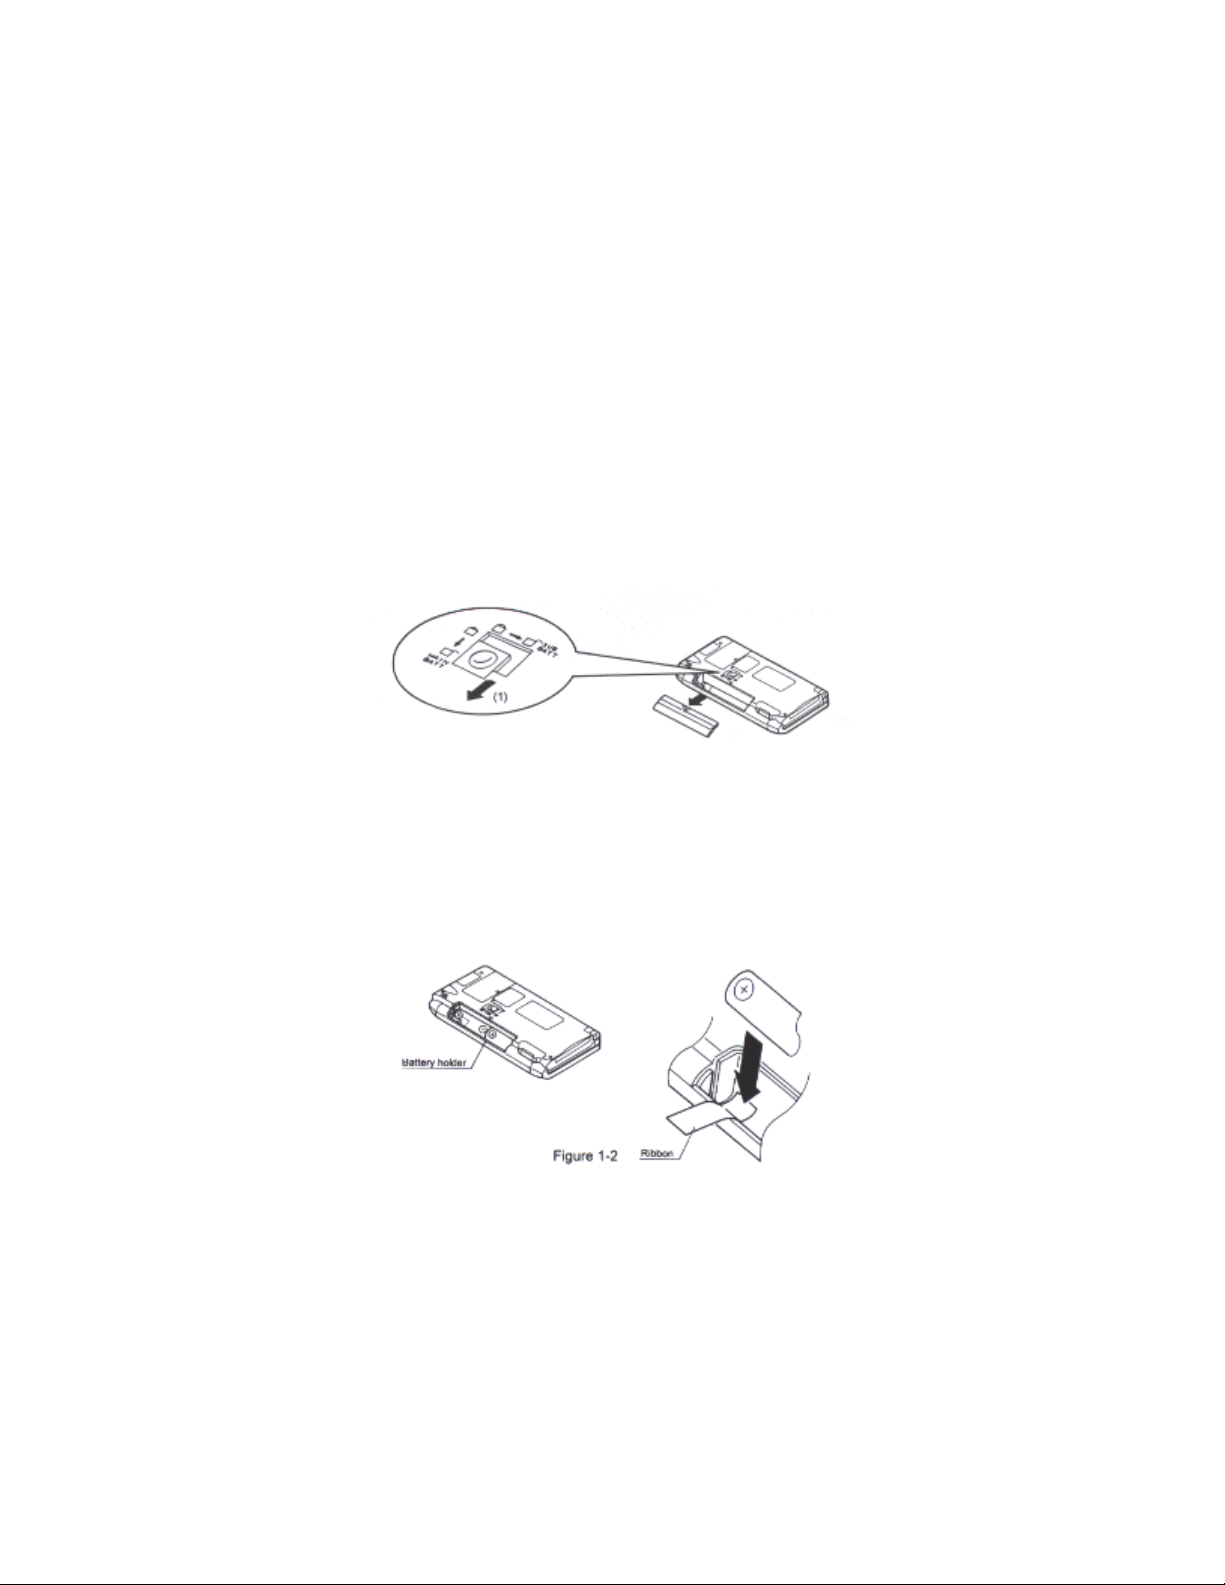
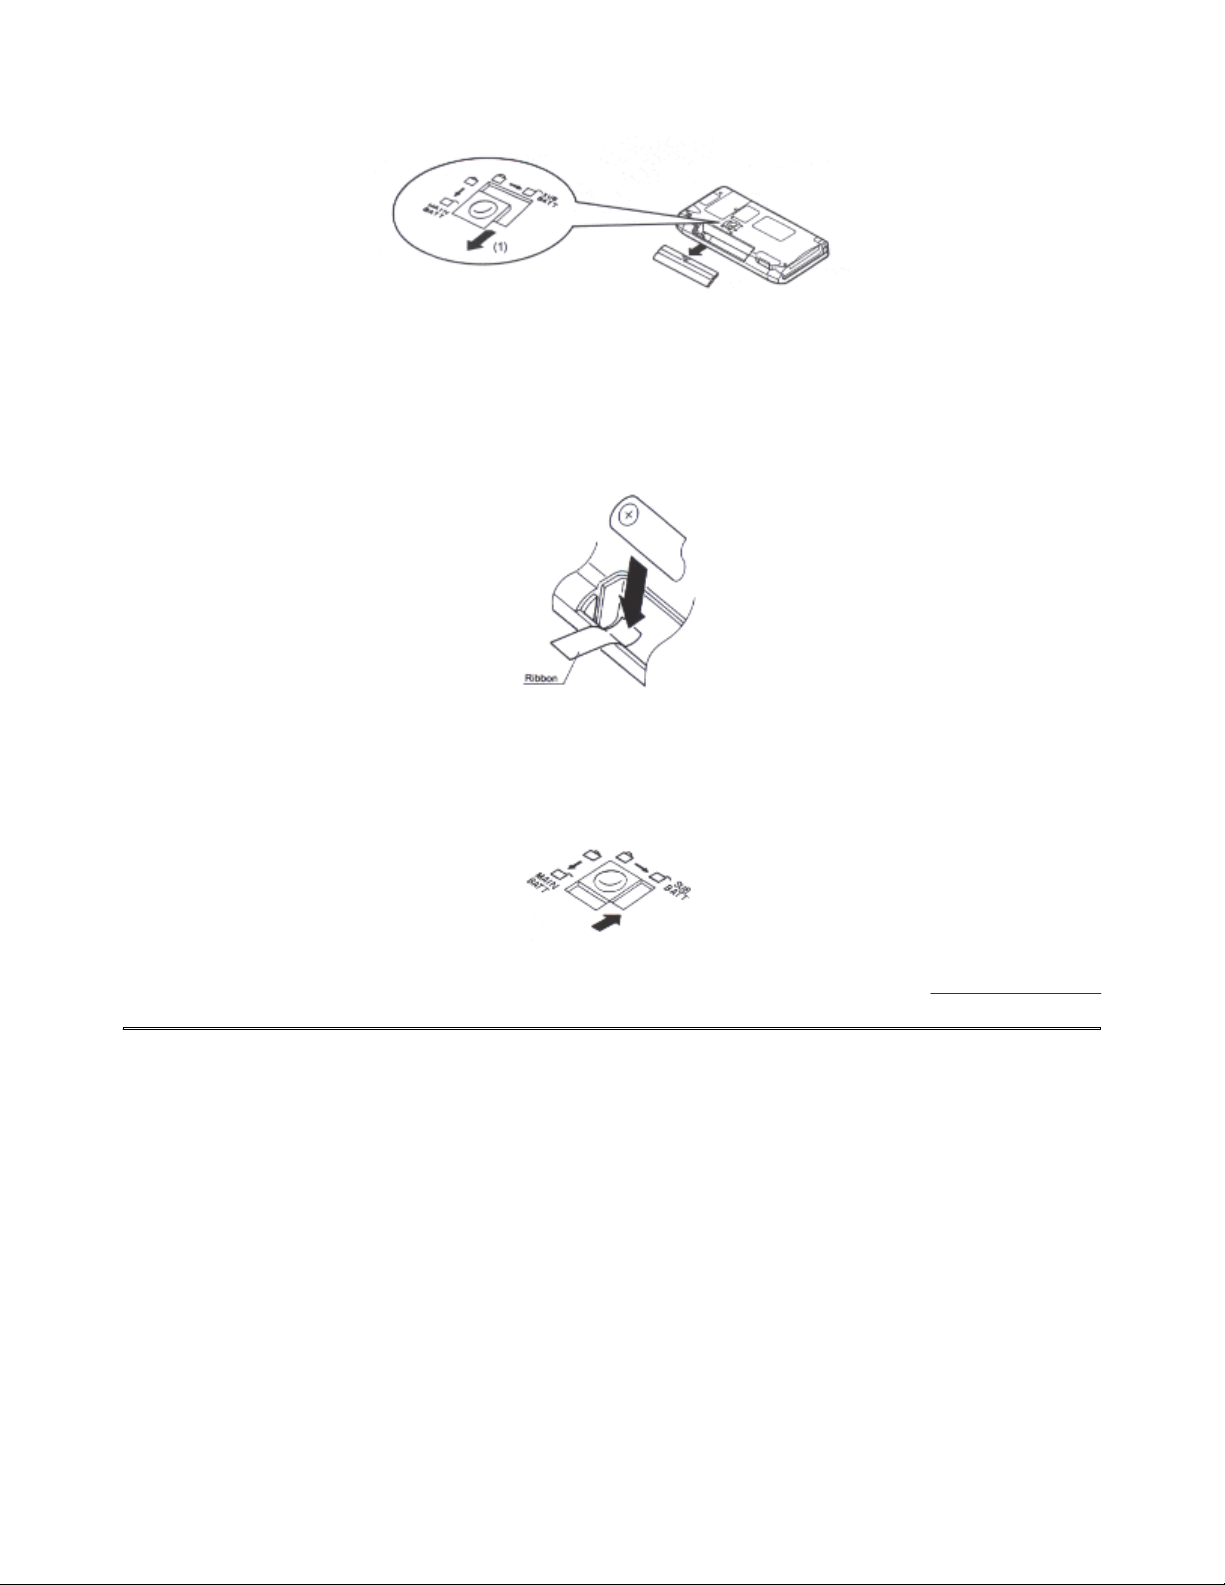
Loading the Main Battery
CAUTION
When using the MobilePro HPC for the first time, install the Main battery before installing
the Sub battery (back-up).
Before using your MobilePro HPC for the first time, insert the 2AA batteries (provided) as
follows:
Step 1
Slide the battery cover lock-switch on the bottom of the MobilePro HPC to the
MAIN_BATT position and slide the battery compartment cover in the direction of the arrow
to remove.
Step 2
Align the batteries as shown inside the battery compartment and insert two AA Alkaline
batteries into the battery compartment. Be sure to place the batteries on top of the ribbon in
the battery compartment as shown below.
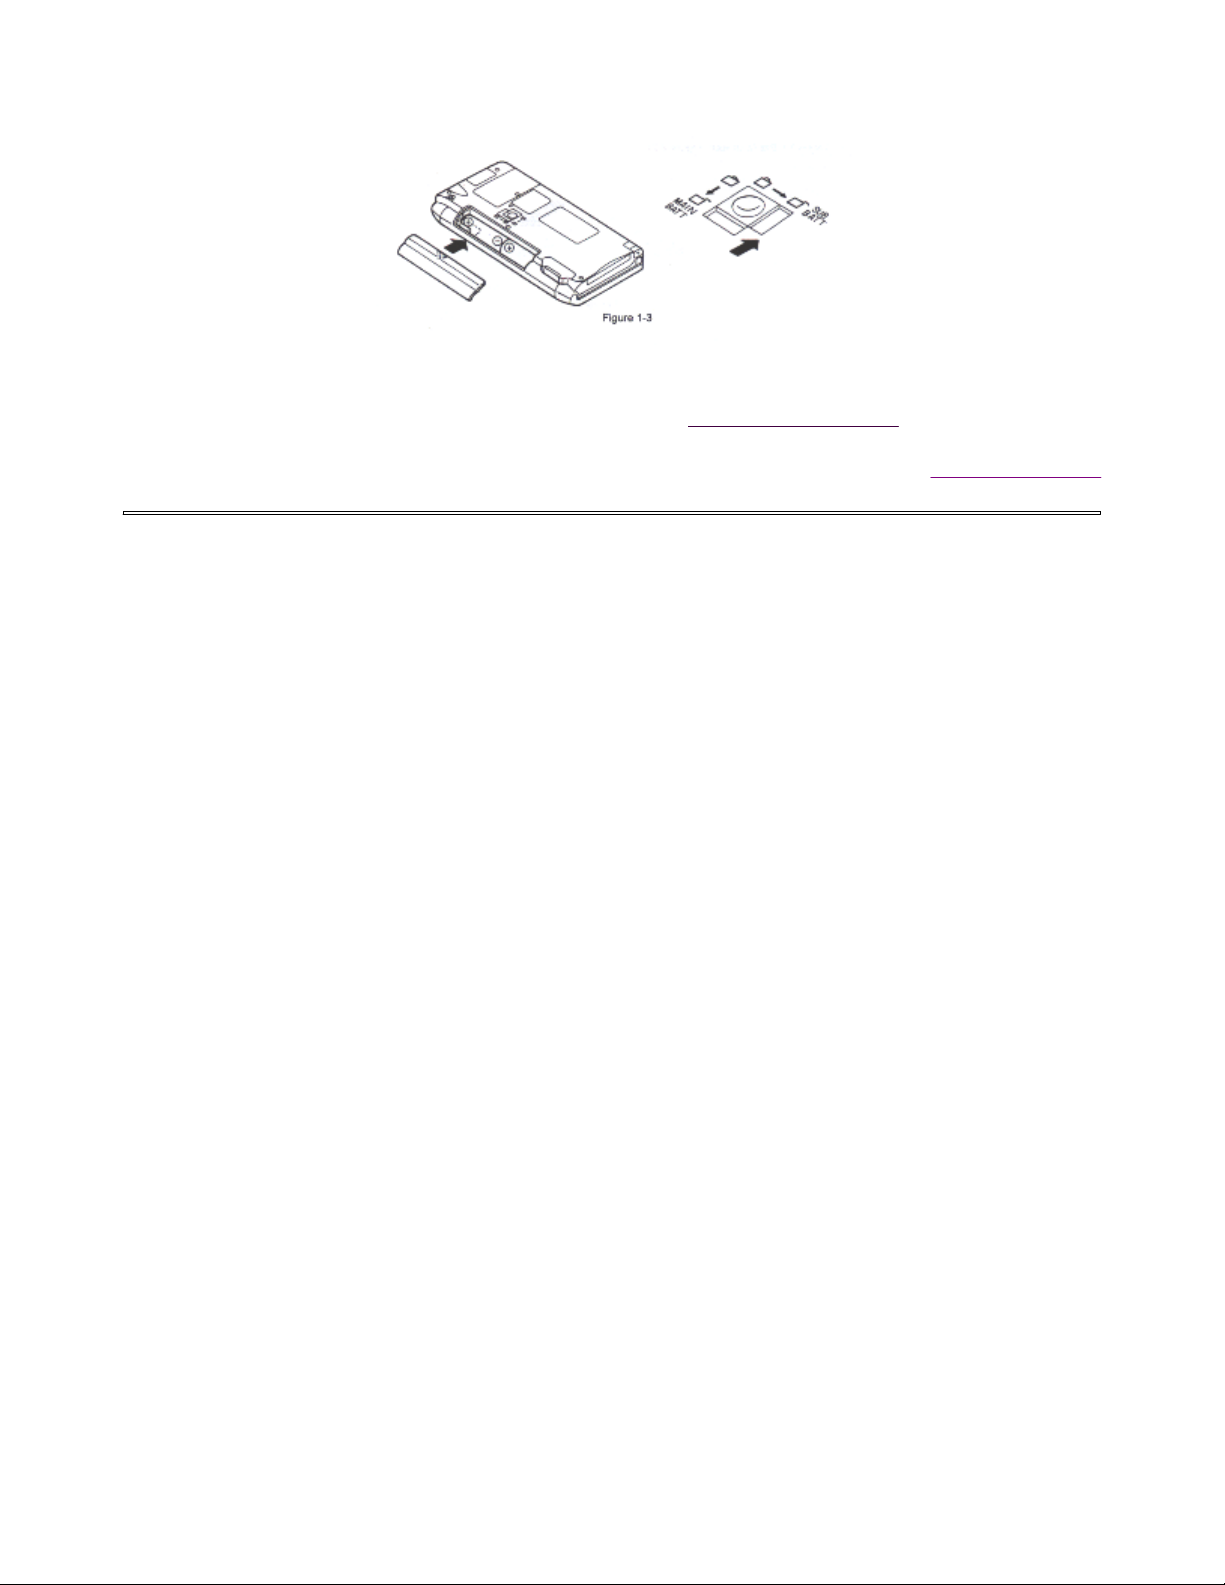
Step 3
Replace the battery compartment cover, as shown and slide the lock switch to the LOCK
position.
NOTE:
The unit operates only when the lock switch is in the LOCK position.
http://kbase/mobilpro/400/docs/mprouser.htm 10/20/98
Page 9
MobilePro Users Guide Page 9 of 35
CAUTION
When exchanging the main battery, be sure to read "Replacing Batteries".
Return to Table of Contents
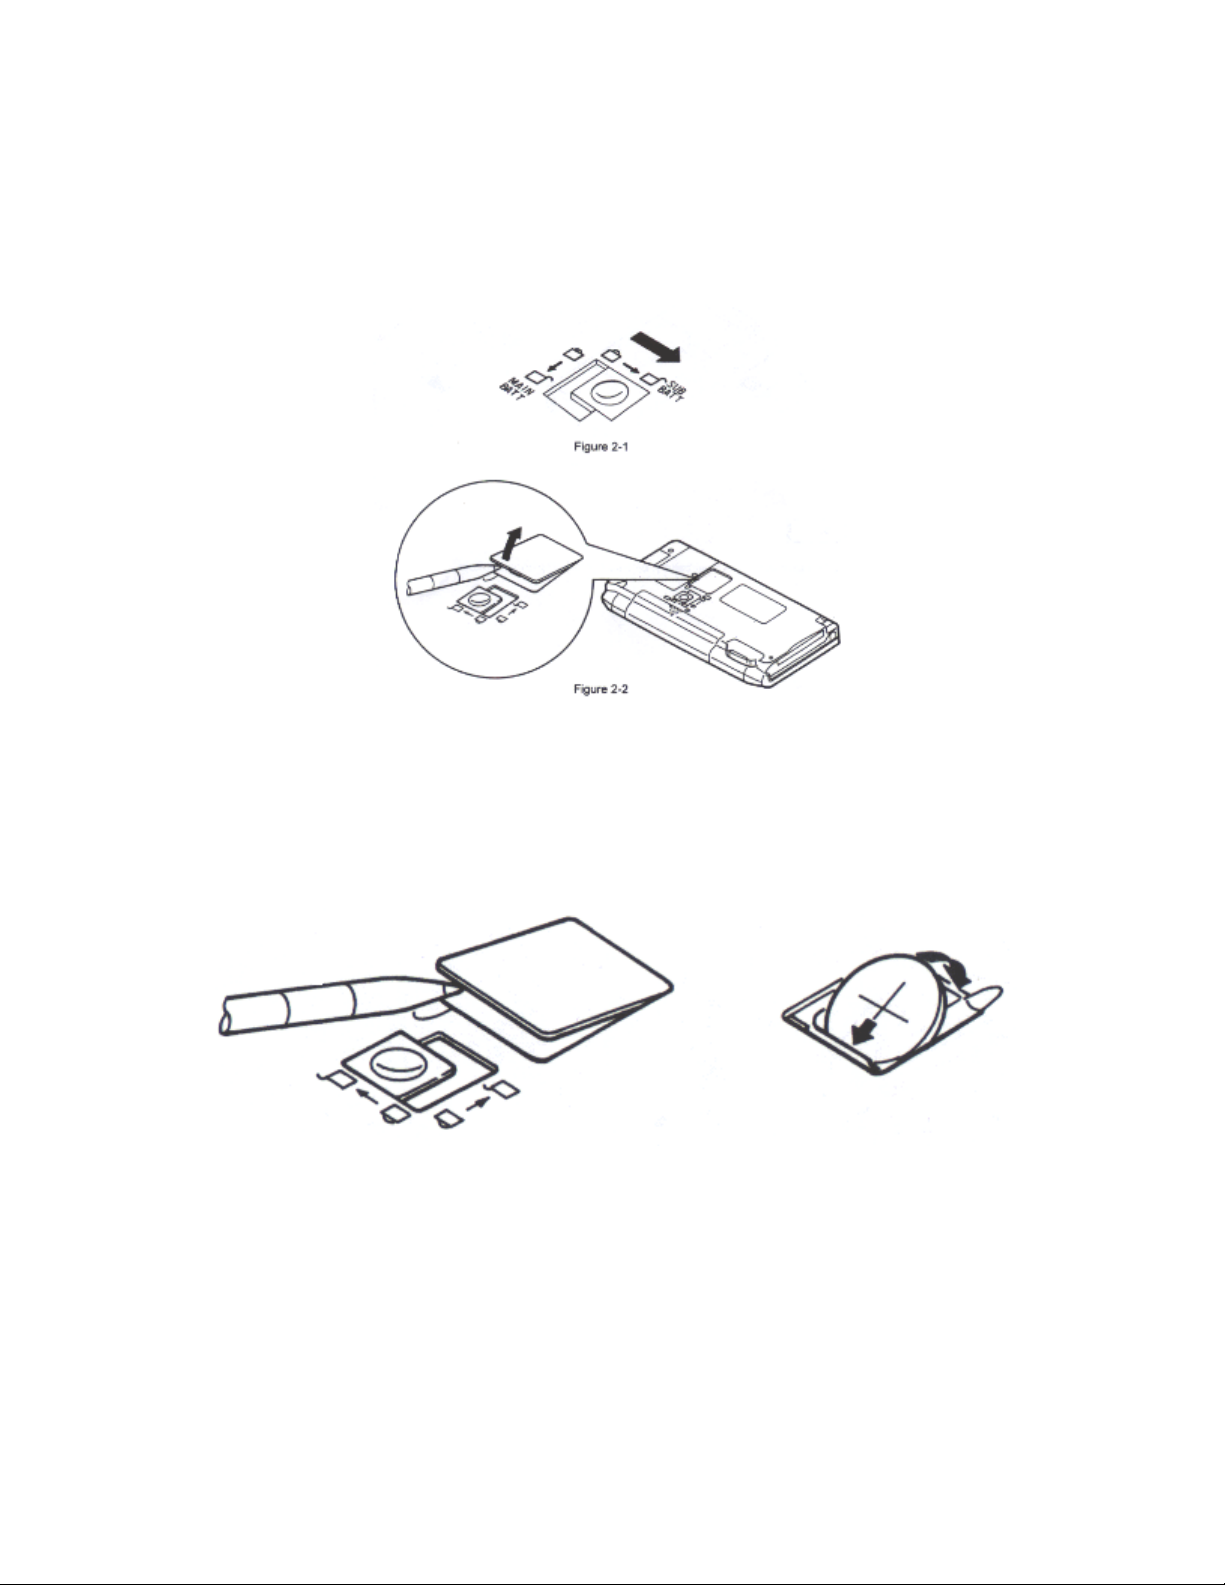
Installing the Sub Battery (Back-up Battery)
The sub battery backs up the MobilePro HPC system's memory.
http://kbase/mobilpro/400/docs/mprouser.htm 10/20/98
Page 10
MobilePro Users Guide Page 10 of 35
Step 1
Slide the battery cover lock-switch on the bottom of the MobilePro HPC to the SUB_BATT
position. Remove the sub battery compartment cover using the stylus as shown in the
illustration below.
Step 2
Insert the sub battery (CR2032) into the sub battery compartment with the plus mark (+)
facing up toward you.
Step 3
Replace the sub battery compartment cover. Then slide the lock to the LOCK position.
http://kbase/mobilpro/400/docs/mprouser.htm 10/20/98
Page 11
MobilePro Users Guide Page 11 of 35
CAUTION
You can operate the MobilePro HPC only when the battery cover lock switch is in the lock
position. For your data protection, be sure to install both the main batteries and the sub
battery before turning on the power key.
When you replace the batteries, be sure to read "Replacing the batteries".
Return to Table of Contents
http://kbase/mobilpro/400/docs/mprouser.htm 10/20/98
Page 12

MobilePro Users Guide Page 12 of 35
Opening the Display Cover
Step 1
Push the lock button, then lift the display cover in the direction of the arrow as shown
below.
CAUTION
When the MobilePro HPC is not in use, or when carrying it, keep the display cover closed.
This will help prevent accidental damage to the touch screen or keyboard.
Return to Table of Contents
http://kbase/mobilpro/400/docs/mprouser.htm 10/20/98
Page 13

MobilePro Users Guide Page 13 of 35
Turning the Power On
Step 1
Press the power key on the MobilePro HPC as shown below.
IMPORTANT
The first time you power on the MobilePro HPC, the screen contrast may need adjustment.
If necessary, adjust the contrast. See Adjusting the Contrast.
NOTE
The power may be turned on and off with the display cover in the closed or open position.
Return to Table of Contents
http://kbase/mobilpro/400/docs/mprouser.htm 10/20/98
Page 14

MobilePro Users Guide Page 14 of 35
Turning the power Off
Step 1
With the power on, press the power key to turn the power off.
IMPORTANT
l You can turn the MobilePro HPC power on and off with the display cover in the closed
or open position.
l The MobilePro HPC will automatically switch off if not used for some time. You can
http://kbase/mobilpro/400/docs/mprouser.htm 10/20/98
Page 15

MobilePro Users Guide Page 15 of 35
select how long the unit will remain on from the POWER selection of the Control
Panel.
NOTE
If you use the alarm function in the Windows CE software, and the LED on the power
switch blinks, pressing the power switch once will turn off the blinking LED. Pressing the
power switch again, will turn off the MobilePro HPC.
Return to Table of Contents
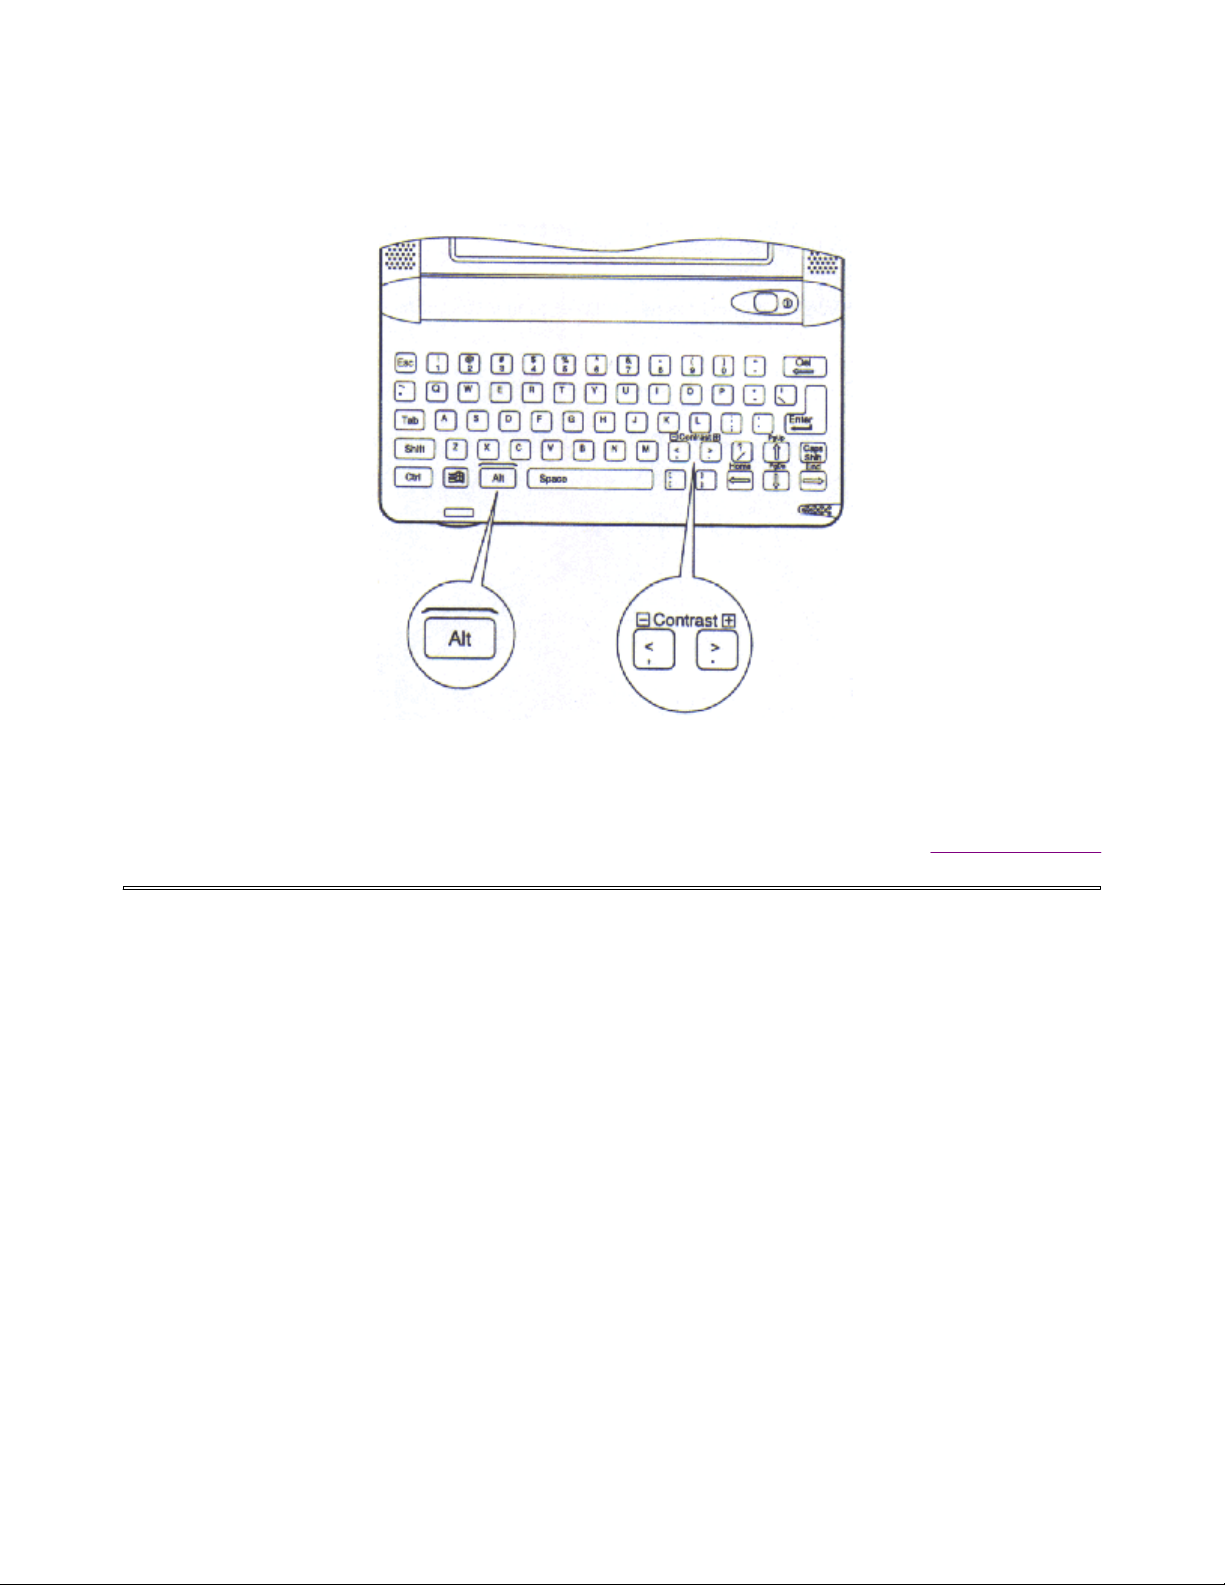
Adjusting the Contrast
Step 1
You can adjust the contrast on the MobilePro HPC touch screen to make it darker or lighter.
To adjust the contrast, press the ALT key and the < or the > key simultaneously.
http://kbase/mobilpro/400/docs/mprouser.htm 10/20/98
Page 16
MobilePro Users Guide Page 16 of 35
l Hold the ALT key down and press the > key to darken the screen.
l Hold the ALT key down and press the > key to darken the screen.
NOTE
You can also adjust the contrast through Windows CE Control Panel.
Return to Table of Contents
http://kbase/mobilpro/400/docs/mprouser.htm 10/20/98
Page 17
MobilePro Users Guide Page 17 of 35
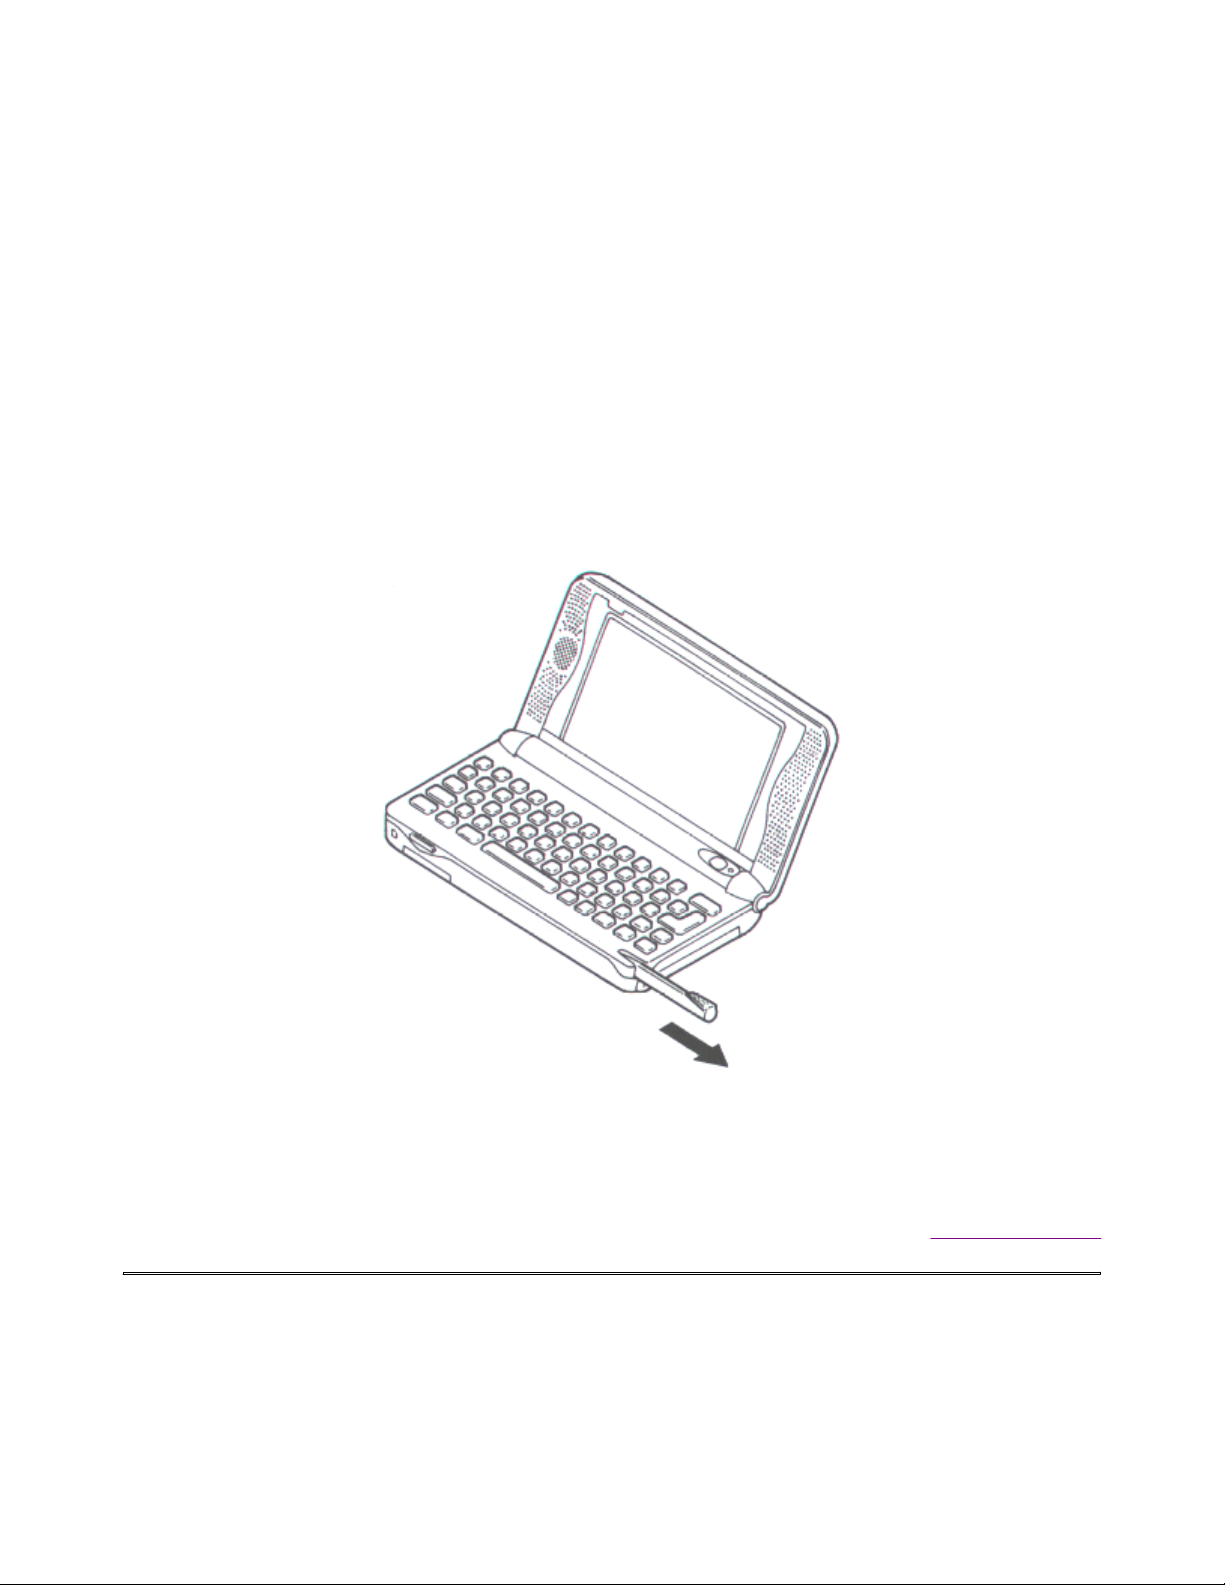
Removing the Stylus
Raise the display lid on the MobilePro HPC. Then slide the Stylus in the direction of the
arrow (seen below) to remove it.
CAUTION
Never use a device other than an approved stylus with your MobilePro HPC. Hard pointed,
or sharp objects can damage the touch screen.
Return to Table of Contents
http://kbase/mobilpro/400/docs/mprouser.htm 10/20/98
Page 18

MobilePro Users Guide Page 18 of 35
First Time MobilePro HPC Setup
The first time you turn the MobilePro HPC power on, you will have the opportunity to
customize some settings to your liking. A Windows CE Setup Wizard will guide you
through your options.
For example, through the Setup Wizard you can:
l Customize the unit for your name, address, etc.
l Add a security password
l Set the location and time
l Calibrate the stylus input
To use the Setup Wizard, simply follow the on-screen instructions.
Return to Table of Contents
http://kbase/mobilpro/400/docs/mprouser.htm 10/20/98
Page 19

MobilePro Users Guide Page 19 of 35
Inserting a PCMCIA Card
NOTE
NEC recommends using an AC Adapter (optional on some models) when using PCMCIA
cards, or modems. This will avoid potential data loss caused by the high energy
consumption of some PC Cards.
It is a good idea to save your data before you insert a new PCMCIA card.
Step 1
Make sure the power is turned off.
Step 2
Insert a PCMCIA card into the PCMCIA card slot as shown above. Be sure the PCMCIA
card is facing up. The PCMCIA card should fit securely into position.
http://kbase/mobilpro/400/docs/mprouser.htm 10/20/98
Page 20

MobilePro Users Guide Page 20 of 35
CAUTION
l Be certain to turn off the power before inserting a PCMCIA card.
l Be sure you insert the PCMCIA card in the right direction. Inserting a PCMCIA card in
the wrong direction may cause damage to the MobilePro HPC.
Return to Table of Contents
http://kbase/mobilpro/400/docs/mprouser.htm 10/20/98
Page 21

MobilePro Users Guide Page 21 of 35
Removing the PCMCIA Card
Step 1
Press the Eject button as shown to eject a PCMCIA card from the PCMCIA card slot.
CAUTION
Make sure to turn off the Power on the MobilePro HPC before pressing the Eject button.
Return to Table of Contents
http://kbase/mobilpro/400/docs/mprouser.htm 10/20/98
Page 22

MobilePro Users Guide Page 22 of 35
To Transfer Data
The MobilePro HPC can send and receive data to and from another Handheld PC (HPC)
using the optical communications port.
Step 1
Raise the display cover on both HPC devices as shown below.
Step 2
Position the MobilePro HPC and the other HPC facing each other (8 to 20 inches apart). Be
sure that there is nothing obstructing the path between the optical communication ports on
both HPCs.
NOTE
If the HPC's are too far apart, or if something blocks the path between the two ports, data
may not be sent or received correctly.
Return to Table of Contents
http://kbase/mobilpro/400/docs/mprouser.htm 10/20/98
Page 23

MobilePro Users Guide Page 23 of 35
Connecting an AC Adapter
When using your MobilePro HPC for long periods of time, when in one location, or when
using PCMCIA cards, we recommend using the AC Adapter. This will help save battery life
for when you're on the go, and will prevent data loss due to high energy consumption of
some PCMCIA cards.
AC Adapter:
S1424-11 Listed Direct Plug-In Power Unit, Class 2
Rated Voltage:
Input 100V to 240V AC, 60Hz, 8W
Output DC3V, 1000mA
Step 1
Make sure the MobilePro HPC is turned off. Insert the plug on the AC Adapter into the AC
jack socket on the MobilePro HPC (located on the left side of the unit).
Step 2
Plug the AC Adapter into an AC outlet. Then turn on your MobilePro HPC unit.
Return to Table of Contents
http://kbase/mobilpro/400/docs/mprouser.htm 10/20/98
Page 24

MobilePro Users Guide Page 24 of 35
Step 1
Step 2
Step 3
Disconnecting an AC Adapter
Make sure the MobilePro HPC is turned off.
Remove the power plug from the AC outlet.
Disconnect the AC Adapter by removing the plug from the AC Adapter jack socket on the
MobilePro HPC.
CAUTION
http://kbase/mobilpro/400/docs/mprouser.htm 10/20/98
Page 25

MobilePro Users Guide Page 25 of 35
l When using the AC Adapter, the socket-outlet should be near the MobilePro
HPC and easily accessible.
l Be certain that the MobilePro HPC is off before connecting or disconnecting an AC
Adapter.
l It is important to keep the main batteries loaded when running the AC Adapter. You
cannot power up the MobilePro HPC without the main batteries installed.
l Using an AC Adapter can conserve the battery power. When communicating for a
long time, it is recommended to use an AC Adapter. Note the following when using an
AC Adapter.
¡ An AC Adapter is not available if the main batteries are not loaded or the battery
worn-out message is displayed.
¡ Confirm that the power of the main unit is turned off before connecting the AC
Adapter.
¡ Turn the power of the main unit off before removing the AC Adapter.
Return to Table of Contents
http://kbase/mobilpro/400/docs/mprouser.htm 10/20/98
Page 26

MobilePro Users Guide Page 26 of 35
Replacing the Batteries
CAUTION
For replacing batteries:
l The power is automatically turned off if the MobilePro HPC is kept running when the
batteries are too weak. You must replace the batteries immediately if the power is
turned off.
l Always, use two new batteries of the same type, same manufacturer.
l User memory may be lost if the main batteries are not in place for a long time and the
sub battery is weak.
l If you use the MobilePro HPC without the sub battery installed, the user memory may
be unstable. The contents of the user memory may be lost when the main batteries
are removed.
l Always backup you data to the desktop before replacing the sub battery.
If the Battery Very Low message appears while using your Mobile HPC, immediately
replace the batteries as described below.
The following message is displayed when the main batteries are worn out.
Main Batteries Very Low....
CAUTION
If both the "Main Battery Very Low" and the "Sub Battery Very Low" messages are
indicated, replace the sub battery first.
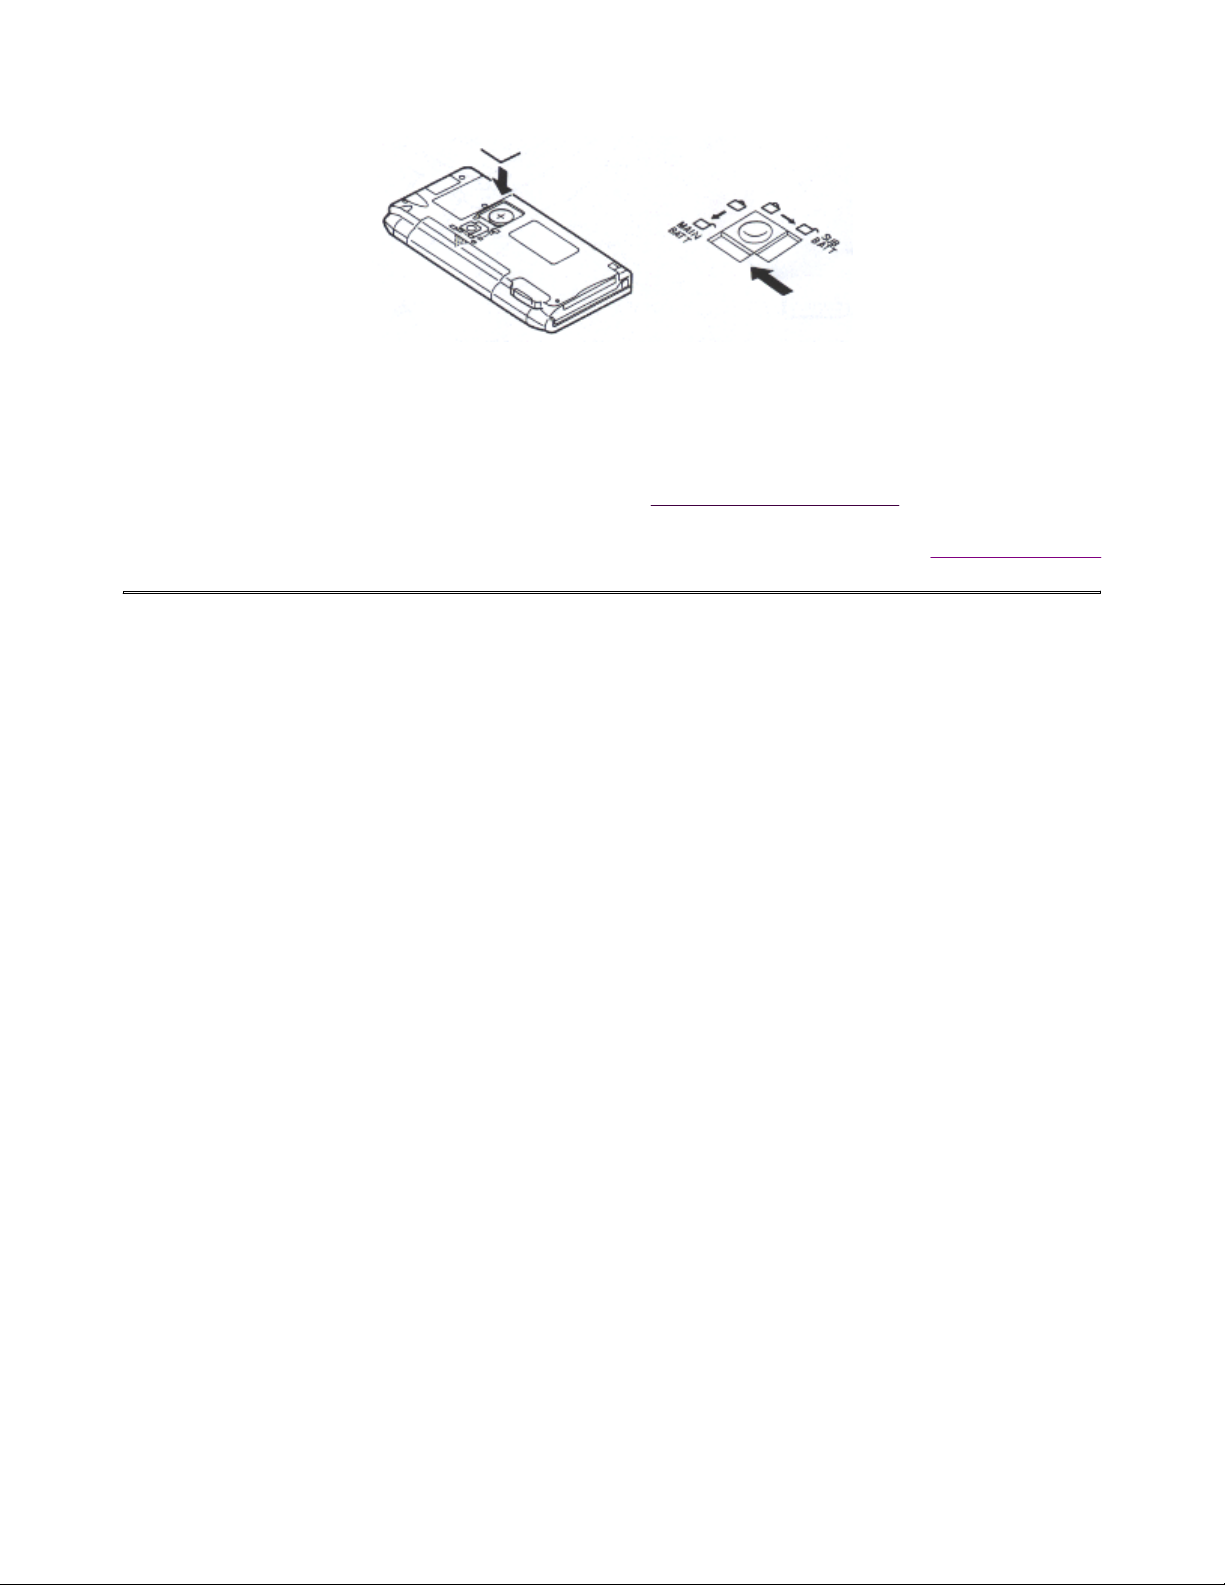
Step 1
Turn the MobilePro HPC off.
Step 2
Have two (2) new AA Alkaline batteries available.
Step 3
Slide the battery lock switch on the bottom of the unit to the MAIN_BATT position.
Carefully slide the battery compartment cover in the direction of the arrow as shown.
Remove the cover and take out the old batteries.
http://kbase/mobilpro/400/docs/mprouser.htm 10/20/98
Page 27
MobilePro Users Guide Page 27 of 35
Step 4
Insert two new AA Alkaline batteries into the battery compartment. Make sure the batteries
are placed on top of the ribbon, as shown below.
Step 5
Replace the battery compartment cover and slide the lock switch to the LOCK position.
Return to Table of Contents
http://kbase/mobilpro/400/docs/mprouser.htm 10/20/98
Page 28

MobilePro Users Guide Page 28 of 35
Replacing the Sub Battery (Back-up Battery)
If the Backup Battery Very Low message appears while using your MobilePro HPC, replace
the battery immediately. Remember to first back up your data to the desktop before
removing the sub battery.
CAUTION
l Replace the battery with Sony, CR2032 only.
l Use of another battery may present a risk of fire or explosion.
WARNING
l Battery may explode if mistreated.
l Do not recharge, disassemble or dispose of in fire.
The following message is displayed in the Power property window when the sub battery
is weak.
Backup Battery Very Low....
When the operating backup battery is depleted, replace it promptly with new a new battery.
If depleted main batteries are not replaced, the sub battery drains more quickly than
normal.
http://kbase/mobilpro/400/docs/mprouser.htm 10/20/98
Page 29

MobilePro Users Guide Page 29 of 35
Step 1
Turn the MobilePro HPC off.
Step 2
Have a new backup battery available (Lithium, CR 2032).
Step 3
Slide the battery lock switch on the bottom of the unit to the SUB_BATT position.
Pull the sub-battery compartment cover in the direction of the arrow as seen bellow using
the stylus. When the cover is removed, use the stylus to help remove the sub battery from
its compartment.
Step 4
Insert the new sub battery (CR2032) with the plus (+) mark facing up. See below.
Step 5
Replace the sub battery cover and slide the lock switch to the LOCK position.
CAUTION
http://kbase/mobilpro/400/docs/mprouser.htm 10/20/98
Page 30

MobilePro Users Guide Page 30 of 35
l When the batteries in your MobilePro HPC are very weak, the unit will turn off.
Replace the batteries immediately!
l Always use two of the same kind of battery (Do not mix Alkaline and NiMH, for
example).
l If both the main batteries and the back-up batteries are weak, data may be lost.
Always replace weak batteries as soon as possible. Replace the sub battery first.
l Using the MobilePro HPC without a backup battery could result in data loss.
l Dispose of used batteries promptly, keep away from children.
Return to Table of Contents
Connection Using a Direct Connection Cable
You can connect to a desktop or laptop PC by using the MobilePro HPC Direct Connection
Cable. Available as an option.
http://kbase/mobilpro/400/docs/mprouser.htm 10/20/98
Page 31

MobilePro Users Guide Page 31 of 35
Step 1
Make sure the power is turned off on the MobilePro HPC and your PC.
Step 2
Carefully connect the 14-pin end of the Direct Connection cable to the serial port on your
MobilePro HPC.
Step 3
Connect the 9-pin end of the Direct Connection cable to your PC Serial Port.
CAUTION
l Be sure the power is turned off on your MobilePro HPC and your PC before
connecting the cable.
l Make sure the ends are connected in the right orientation. Incorrect connection could
cause damage to the MobilePro HPC.
Return to Table of Contents
http://kbase/mobilpro/400/docs/mprouser.htm 10/20/98
Page 32

MobilePro Users Guide Page 32 of 35
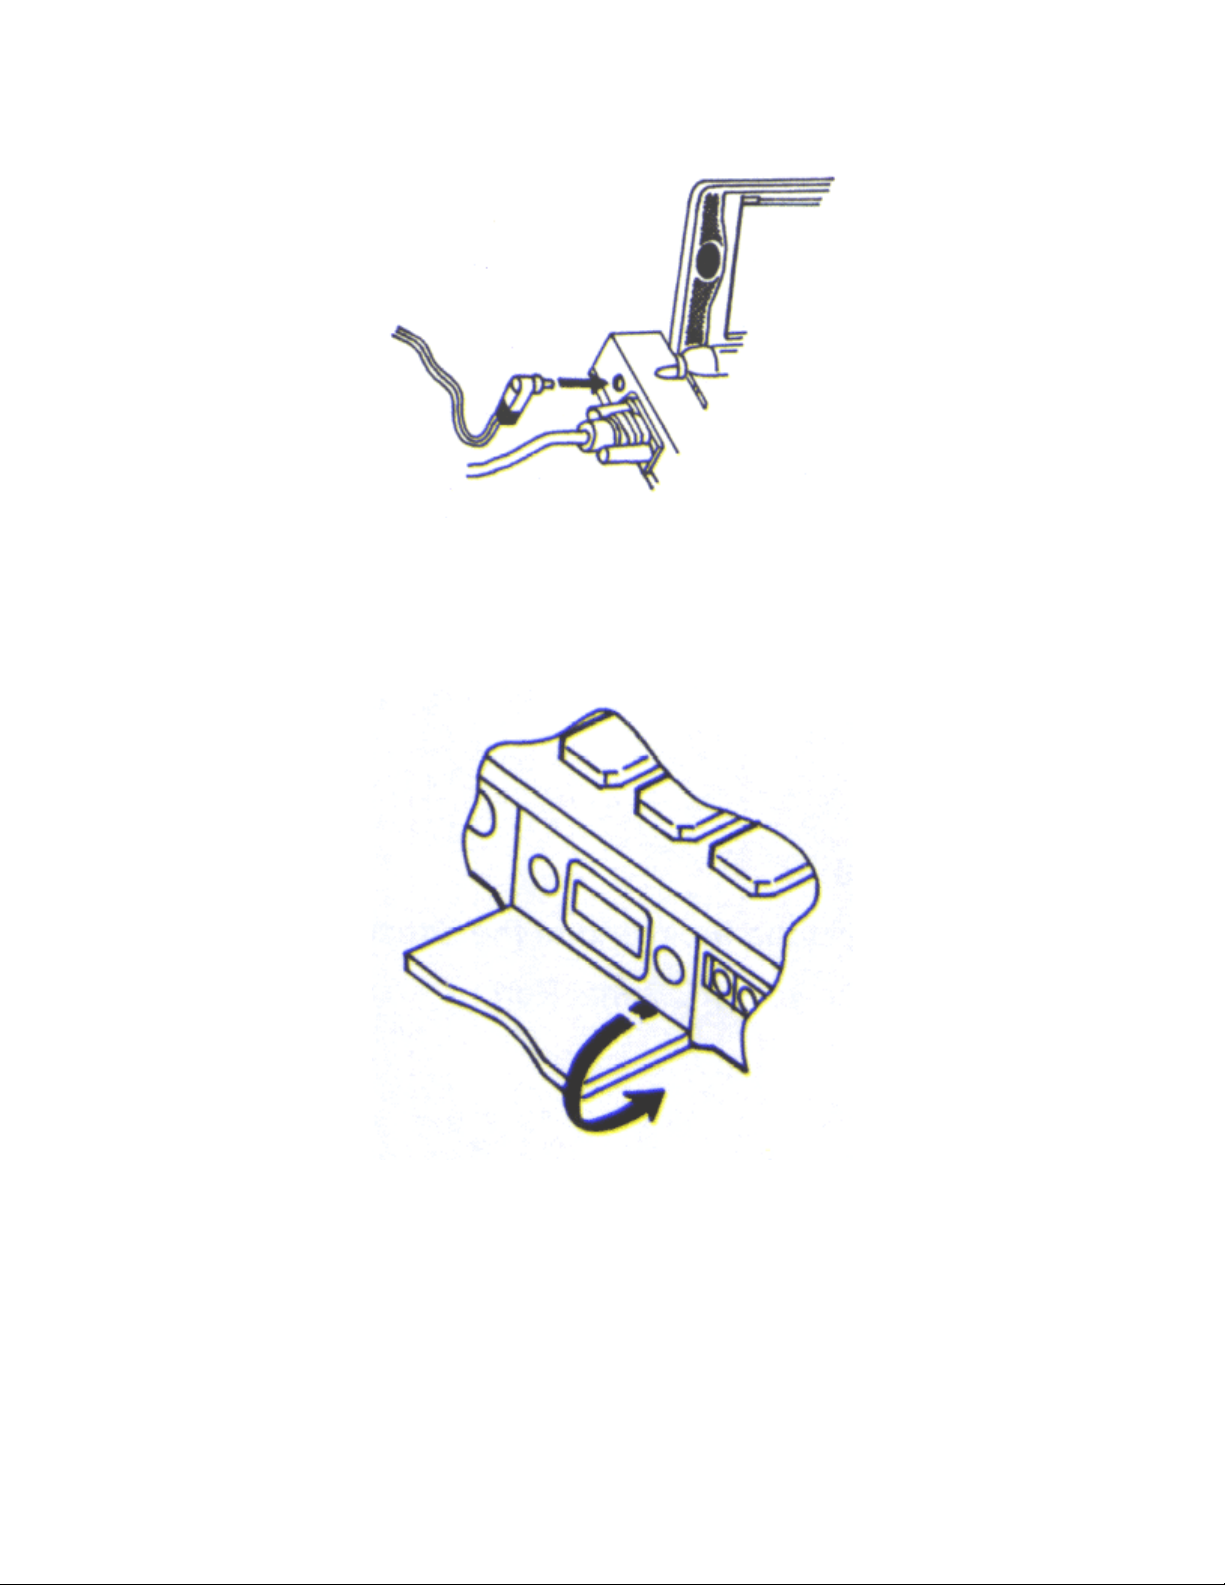
Connection Using a MobilePro HPC Cradle
Using a cradle next to your desktop or laptop is a good way to insure easy synchronization
with your MobilePro HPC. Available as an option.
NOTE
The AC Adapter is an option on some models.
Step 1
Connect the AC Adapter to the cradle by inserting the AC Adapter plug into the AC
connection on the cradle.
http://kbase/mobilpro/400/docs/mprouser.htm 10/20/98
Page 33
MobilePro Users Guide Page 33 of 35
Step 2
Make sure the power on the MobilePro HPC is turned off. Rotate the cover for the serial
port to the direction of the arrow, then lock it at the bottom.
Locate the serial port on your MobilePro HPC and gently slide it into the cradle until the
port on the unit and the connector on the cradle lock.
CAUTION
l Be certain to turn off the MobilePro HPC before connecting to the cradle.
l ALWAYS slide the unit into and out of the cradle. DO NOT ATTEMPT TO LIFT IT
OUT. Doing so, may damage the unit and the cradle connection.
http://kbase/mobilpro/400/docs/mprouser.htm 10/20/98
Page 34

MobilePro Users Guide Page 34 of 35
Return to Table of Contents
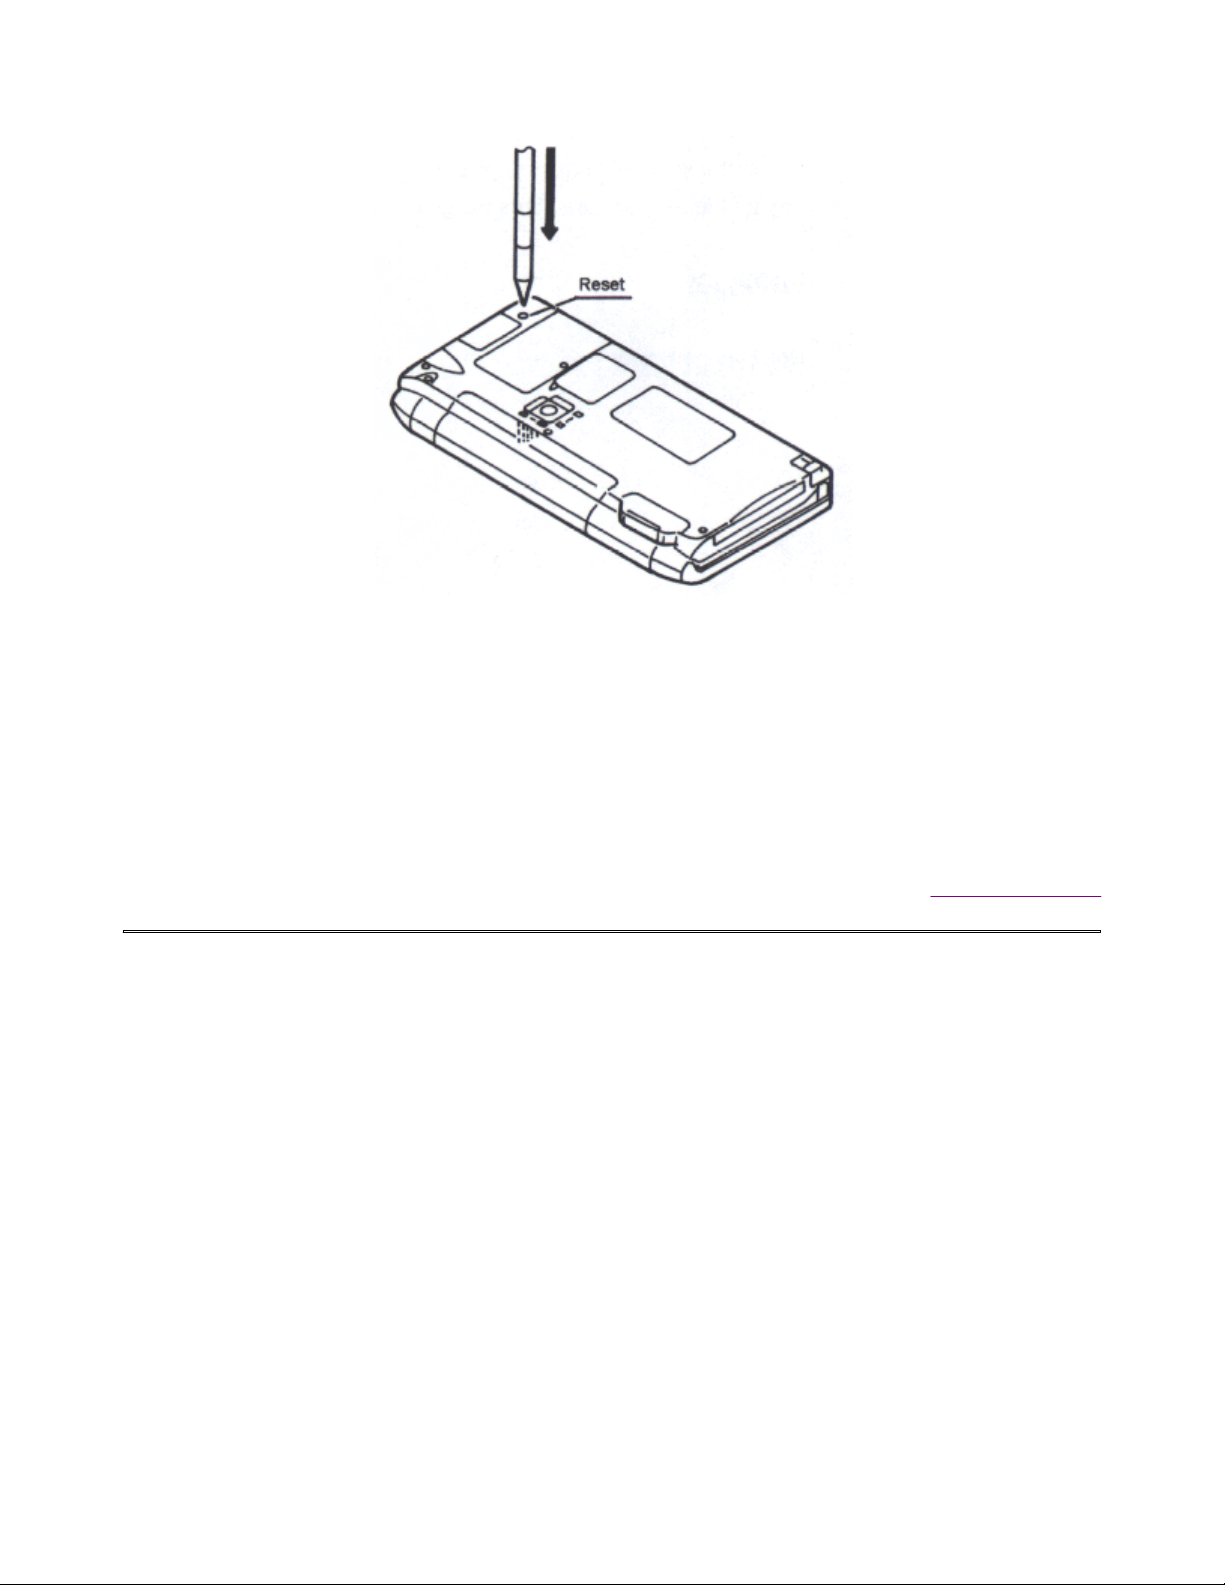
Resetting the MobilePro HPC
You may sometimes wish to reset your MobilePro HPC, Always backup your data to the
desktop software before resetting the MobilePro HPC.
Step 1
Locate the RESET button on the bottom of the MobilePro HPC as shown bellow.
http://kbase/mobilpro/400/docs/mprouser.htm 10/20/98
Page 35
MobilePro Users Guide Page 35 of 35
Step 2
Using the stylus, press the RESET button. The unit is now reset.
CAUTION
Stored data may be lost by resetting your MobilePro HPC.
Return to Table of Contents
http://kbase/mobilpro/400/docs/mprouser.htm 10/20/98
 Loading...