

Page 1
Page 2

Proprietary Notice and Liability Disclaimer
The information disclosed in this document, including all designs and
related materials, is the valuable property of NEC Computers Inc.
(hereinafter “NECC”) and/or its licensors. NECC and/or its licensors, as
appr op r ia t e, r eserve all p a t ent , copyrig ht a nd other p r op r ieta r y r ig ht s t o t his
document, including all design, manufacturing, reproduction, use, and sales
rights thereto, except to the extent said rights are expressly granted to
others.
The NECC product(s) discussed in this document are warranted in
accordance with the terms of the Warranty Statement accompanying each
product. However, actual performance of each such product is dependent
upon factors such as system configuration, customer data, and operator
contr ol. Since i mple menta tio n by cus tomer s of each p rodu ct ma y var y, th e
suitability of specific product configurations and applications must be
determined by the customer and is not warranted by NECC.
To allow for design and specification improvements, the information in this
document is subject to change at any time, without notice. Reproduction of
this document or portions thereof without prior written approval of
NEC C is prohibit e d.
NEC and MobilePro are registered trademarks or trademarks of NEC Corporation and/or
one or more of i ts subs idiar i es. All are used under license .
Microsoft , MS, MS N, PowerPoint, ActiveX, Acti veSync, O utlook, InkWr iter , Windows ,
Wind ow s NT, Visual Basic, Visual C++ , and the Windows logo are eithe r r egistered
trademarks or trademarks of Microsoft Corporation in the United States and/or other
count ries . Micros oft products are licensed to OEMs by Microsoft Licens ing, Inc. , a
wholly owned subsidiary of Microsoft Corporation.
All other product, brand, or trade names used in this publication are the trademarks or
registered trademarks of their r espective trademark ow ners.
First Printing — March 2000
Copyright 2000
NEC Computers Inc.
15 Business Park Way
Sacramento, CA 95828
All Rights Reserved
Page 3

Contents
Using This Guide
Text Conventions...........................................................................viii
1 Getting Started
Welcome....................................................................................... 1-2
Unpacking Your MobilePro.......................................................... 1-3
Getting to Know Your MobilePro................................................. 1-4
Accessories ........................................................................... 1-5
Installing and Charging the Battery............................................... 1-5
Connecting the AC Adapter.......................................................... 1-7
Taking a Quick Tour....................................................................1-10
Introducing the Software..............................................................1-10
Connecting to Your PC via Serial.................................................1-11
Verifying PC Connection Settings........................................1-12
Ensuring the Availability of the Serial Port...........................1-12
Connecting the PC Connect Cable........................................1-13
Installing Microsoft ActiveSync ...........................................1-15
Network Requirements .....................................................1-16
Installing ActiveSync........................................................1-17
Creating a Partnership ..........................................................1-18
Verifying Synchronization Settings.......................................1-18
Connecting to Your PC via Infrared.............................................1-19
Modifying PC Connection Settings.......................................1-20
Setting the Infrared Connection Speed..................................1-20
Enabling the Infrared Port.....................................................1-21
Installing Microsoft ActiveSync ...........................................1-22
Network Requirements .....................................................1-23
Installing ActiveSync........................................................1-24
Creating a Partnership ..........................................................1-25
Verifying Synchronization Settings.......................................1-25
Synchronizing with Your Host PC ...............................................1-26
Synchronizing via the Serial Port..........................................1-26
Synchronizing via the Infrared Port ......................................1-27
Resynchronizing Your MobilePro.........................................1-27
Contents iii
Page 4

Using other Communication Devices....................................1-27
Connecting Remotely...........................................................1-27
Getting Help................................................................................1-28
2 Introducing the NEC MobilePro
Identifying System Features.......................................................... 2-2
Around the Front of the System............................................. 2-2
Display Panel..................................................................... 2-2
Keyboard Panel and Base Unit........................................... 2-4
Around the Back of the System.............................................. 2-6
Around the Left Side of the System....................................... 2-7
Around the Right Side of the System..................................... 2-8
Around the Bottom of the System.......................................... 2-9
Opening the Display Panel...........................................................2-10
Using the Stylus...........................................................................2-10
Using MobilePro’s Power Sources...............................................2-11
Determining Battery Status...................................................2-11
Recharging the Main Battery Pack........................................2-12
Recharging the Backup Battery.............................................2-13
MobilePro Power Management.............................................2-13
Battery Replacement ............................................................2-14
Removing and Inserting the Battery Pack..........................2-14
Battery Precautions...............................................................2-17
Caring for the MobilePro.............................................................2-18
Precautions...........................................................................2-18
Storage Requirements...........................................................2-19
Routine Cleaning..................................................................2-20
3 Introducing Windows CE
Windows CE Operating System.................................................... 3-2
Using Windows CE............................................................... 3-2
Tapping............................................................................. 3-2
Selecting Objects............................................................... 3-3
Dragging and Dropping..................................................... 3-3
Windows CE Desktop ........................................................... 3-4
Pocket Applications........................................................... 3-6
Printing Features ................................................................... 3-8
Netw ork Ca pabilities............................................................3-10
iv Contents
Page 5

Creating a Network (Ethernet) Connection............................3-10
Microsoft ActiveSync..................................................................3-11
Backing Up and Restoring Data............................................3-12
Using Microsoft ActiveSync.............................................3-12
Using bSQUAR E
®
bUseful™ Backup Plus.......................3-13
Software Applications..................................................................3-14
Using the Bonus Software CD..............................................3-14
Online Help.................................................................................3-16
4 Using the NEC MobilePro
Powering On and Off.................................................................... 4-2
Making Display Panel Adjustments............................................... 4-4
Backlight............................................................................... 4-5
Automatic Off ................................................................... 4-5
Automatic On.................................................................... 4-6
Enabling the Suspend Switch................................................. 4-7
Using the Keyboard...................................................................... 4-9
Using Application Shortcut Keys..........................................4-10
Default Function Keys..........................................................4-12
Display Panel Icons ..............................................................4-12
Adjusting MobilePro Settings ......................................................4-13
Assigning User Software Icons.............................................4-14
Connecting the VGA Cable..................................................4-15
Using the Voice Recorder............................................................4-17
Menu....................................................................................4-18
Using PC Cards ...........................................................................4-18
Inserting PC Cards ...............................................................4-19
Removing PC Cards.............................................................4-20
Using CompactFlash Cards..........................................................4-20
Inserting CompactFlash Cards..............................................4-21
Removing CompactFlash Cards............................................4-22
Using the IR Port.........................................................................4-22
Upgrading ROM..........................................................................4-24
Resetting the MobilePro...............................................................4-26
Using the Soft Reset Button..................................................4-27
Using the Full Reset Button..................................................4-28
Contents v
Page 6

5 Setting Up a Remote Connection
Preparing for Connection Setup..................................................... 5-2
Connecting the Internal Modem.................................................... 5-3
Connecting to an Internet Service Provider.................................... 5-4
Connecting to a Remote Access Server ......................................... 5-6
Sending and Receiving Email........................................................ 5-7
Activating a Connection................................................................ 5-9
A Troubl eshoo ting
B Specifica tions
Index
vi Contents
Page 7

Using This Guide
The NEC MobilePro™ 880 User's Guide gives you the
information you need to maximize the use of your NEC
MobilePro 880 Professional PC Companion. Read this guide
to familiarize yourse lf with the MobilePro and its features.
For specific information, see the following.
Chapter 1, “Getting Started,” provides all the information
you need to get your MobilePro 880 working and
synchronized with your host PC.
Chapter 2, “Introducing the NEC MobilePro,” introduces
you to the MobilePro features, battery recharging, and
general unit care.
Chapter 3, “Introducing Windows CE,” provides an
overview of Microsoft® Windows® CE and Windows CE
applications.
Chapter 4, “Using the NEC Mo bilePro,” shows you how
to power on and off, make display panel adjustments,
install PC and CompactFlash™ cards, and more.
Chapter 5, “Setting Up a Remot e Co nnect ion,” describes
how to configure service connections for an internet
service pro vider, a r emot e access service, and how to
configure email for each new service connection.
Appendix A, “Troubleshooting,” walks you through some
common problems and possible solutions.
Appendix B, “Specifications,” deta ils the hardware
specific a tion s for yo ur MobilePro.
Using This Guide vii
Page 8
Text Conventions
To make this guide as easy to use as poss ible, text is set up as
follows.
Warnings, caut ions, and notes have the following format:
Warnings aler t you to situations that could result
in serious personal i njury or loss of life.
Cautions indicate situations that can damage the
system hardware or soft ware.
Note:
information about whatever is being described.
Notes give particularly important
!
WARNING
!
CAUTION
Names of keys are printed as they appear on the keyboard,
for example,
Text that you must type or keys that you must press are
presented in bold type. For example, type
Enter
.
viii Using This Guide
Ctrl, Alt
, or
Enter
.
dir
and press
Page 9

Getting Started
Welcome
Unpacking Your MobilePro
Getting to Know Your MobilePro
Installing and Charging the Battery
Connecting the AC Adapter
Taking a Quick Tour
Introducing the Software
Connecting to Your PC via Serial
1
Connecting to Your PC via Infrared
Synchronizing with your Hos t PC
Getting Help
Page 10

Welcome
Congratulations on purchasing your NEC MobilePro 880
Professional PC Companion powered by the Microsoft
®
Windows CE operating syste m. The size and capabi lit ies of
this device let you keep your most important business and
personal information up-to - date and close at hand. Microsoft
ActiveSync™ increases the power of your device by letting
you synchronize the information on your host PC with your
device. Picture yourself in the following situations:
You’re on a business trip, getting important customer
feedback to discuss with your co lleagues back in the
office. Using C alendar, Contacts , and Inbox, you s chedule
a meeting and send it to your colleagues while still on the
road.
You are on the road taking customer orders. Using Pocket
Access, you create r ecor ds for each customer order. At
night, you connect to your network and update the global
database wit h your new o rders. You also dow nload
updates to the product information database that you use
when making sales.
During a few spare minutes in the airport, you check your
e-mail and send a note to your daughter wishing her luck
at the gymnastics meet . (Requires access to an analog
phone line or wireless modem card and subscr iption to an
internet service pro v ider or corpo r ate network ser ver. )
Before you start using your device, you will need to install
batteries, t u r n it on, and adjust t he screen co nt r ast.
1-2 Getting Started
Page 11

Unpacking Your Mobi leP ro
Your NEC MobilePro ships w ith a number o f accessories.
When you unpack the NEC MobilePro, ver ify that you have
all of the items listed below and that t hey are in good
condition. If anything is missing or damaged, contact the
vendor who sold you the unit.
Note:
the batteries i nstalled. Be sure you have
completed the sections, “Installing and Charging
the Battery,” “Connec ting the AC Adapter,” and
“Taking a Quick Tour ,” in Chapter 1.
NEC M obilePro 880 (a stylus ship s in a holder in the
MobilePro)
NEC M obile Pro AC Adapter
NEC MobilePro VGA Cable
NEC MobilePro P C Connect Cable (serial cable)
NEC MobilePro RJ- 11 (telep hone ca ble)
Do not attempt to use the unit without
One (1) rechargeable Lithium-Ion Battery pack (main
battery)
Microsoft ActiveSync CD
NEC MobilePro Bonus Software CD
NEC MobilePro 880 User's Guide (this document)
Introduction to Your MobilePro Power System sheet
NEC MobilePr o Release Notes
1
For U.S. and Canada distribution only.
1
Getting Started 1-3
Page 12
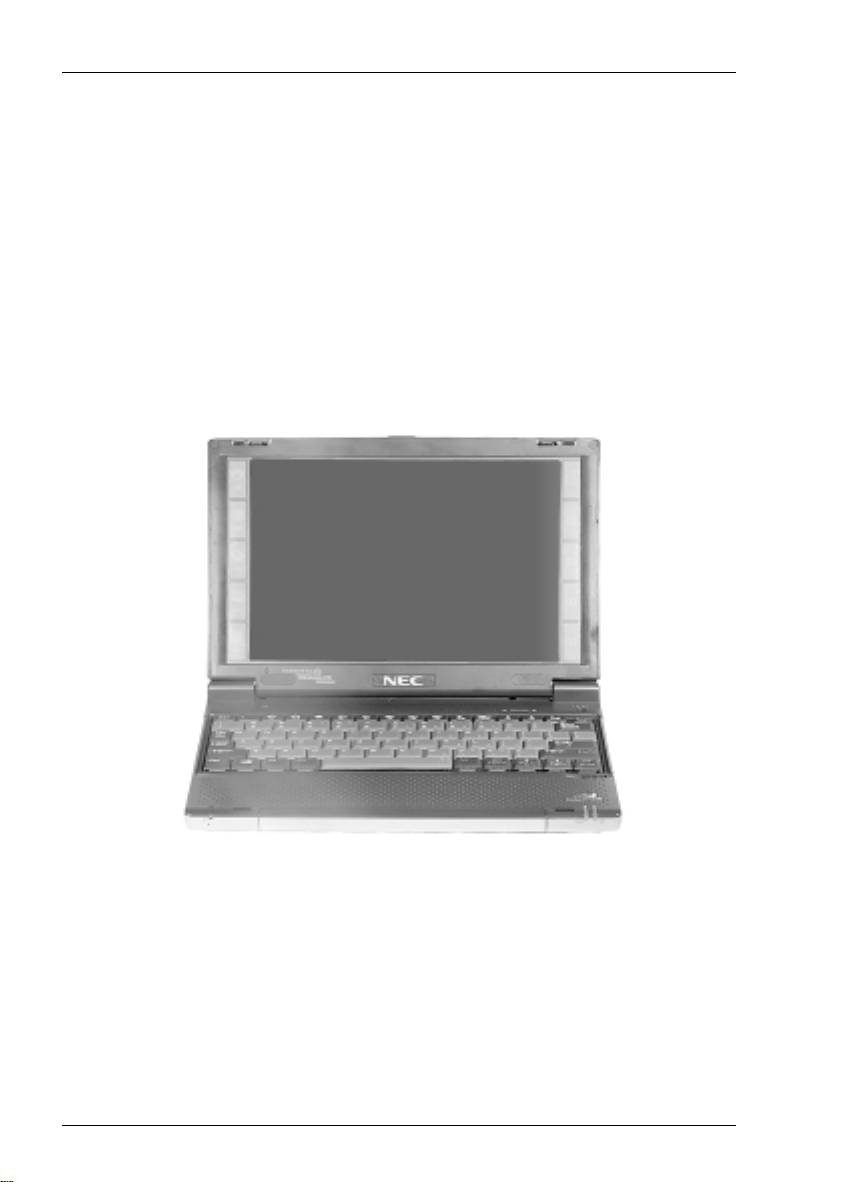
Getting to Know Your MobilePro
The NEC MobilePro 880 offers you a portable system
designed for synchronization with your host PC. Standard
features include a VR4121, 168-MHz, 32 MB RAM, a
9.4-inch SVGA DSTN, 64K color, enhanced touch screen, a
V.90 internal modem, a built-in microphone, internal speaker ,
and Type I/II PC card and CompactFlash™ Type II card
support.
NEC MobilePro 880
With your NEC MobilePro you can edit, cr eate, send, and
receive documents including text, spreadsheets, pr esent ations,
and email, manage your schedule and contacts, access the
internet with the internal modem, and synchronize data with
yo ur ho st PC.
1-4 Getting Started
Page 13
Accessories
The NEC MobilePro 880 ships with the following
accessories:
AC adapter
PC Connect (serial port) cable
RJ-11 Telephone cable
VGA Monitor cable
For a comprehensive l ist of MobilePro accessories, refer to
the MobilePro desktop. Tap Start, Help, and double tap the
MobilePro Accessories link.
Installing and Charging the Battery
Follow these steps t o install and charge the main batter y.
!
CAUTION
Use only the Mobil eP r o 880 batt er y (MC/BA 11A )
in the MobilePro 880 system ( M C/R730A) . Do
not use the MobilePro 800 battery (MC/BA11) in
the MobilePro 880 system . Use of the MobilePro
800 battery in the MobilePro 880 system may
cause battery damage and/or system data loss.
Getting Started 1-5
Page 14
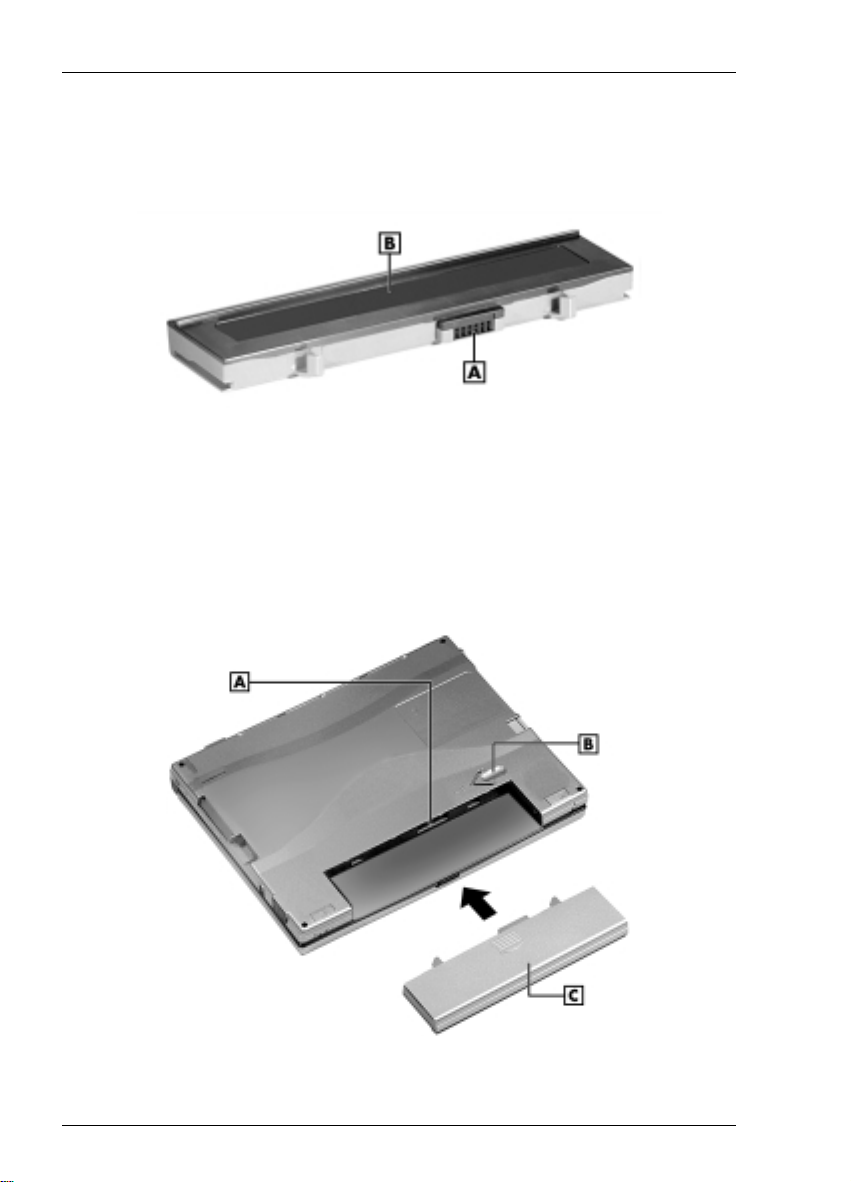
1. Unpack the contents of the MobilePro carton and locate
the unit and the Lithium-Ion battery pack.
Lithium-Ion battery pack
A
– Battery connectors B – Lithium-Ion battery pack
2. Insert the Lithium-Ion battery pack in the bay a nd slide
the battery in the direct ion of the arrow, as indicated in
the following figure.
Inserti ng the bat ter y pac k
A
– Battery connectors B – Battery release latch C – Lithium-Ion battery pack
1-6 Getting Started
Page 15

3. Firmly press the battery until it is securel y connect ed in
the bay.
4. Connect the AC adapter to beg in charging the batt er y.
Refer to the next section, “Connecting the AC Adapter,”
for connection information.
The color of the left status LED changes from amber to
green when the battery is fully charged.
Note:
time, all ow ten hours for both the main and the
backup batteries to fully charge, even if the
indicator on t he fr ont of the MobilePro lights
green before the ful l ten hours are passed. You
must repeat this full ten hour charge cycle, only if
the backup batter y becom es fully discharged.
To protect your data, do not use the system until
the backup batter y is charged. Recharge the
battery whenever the battery charging LED lights
amber.
Before using the system for the fi r st
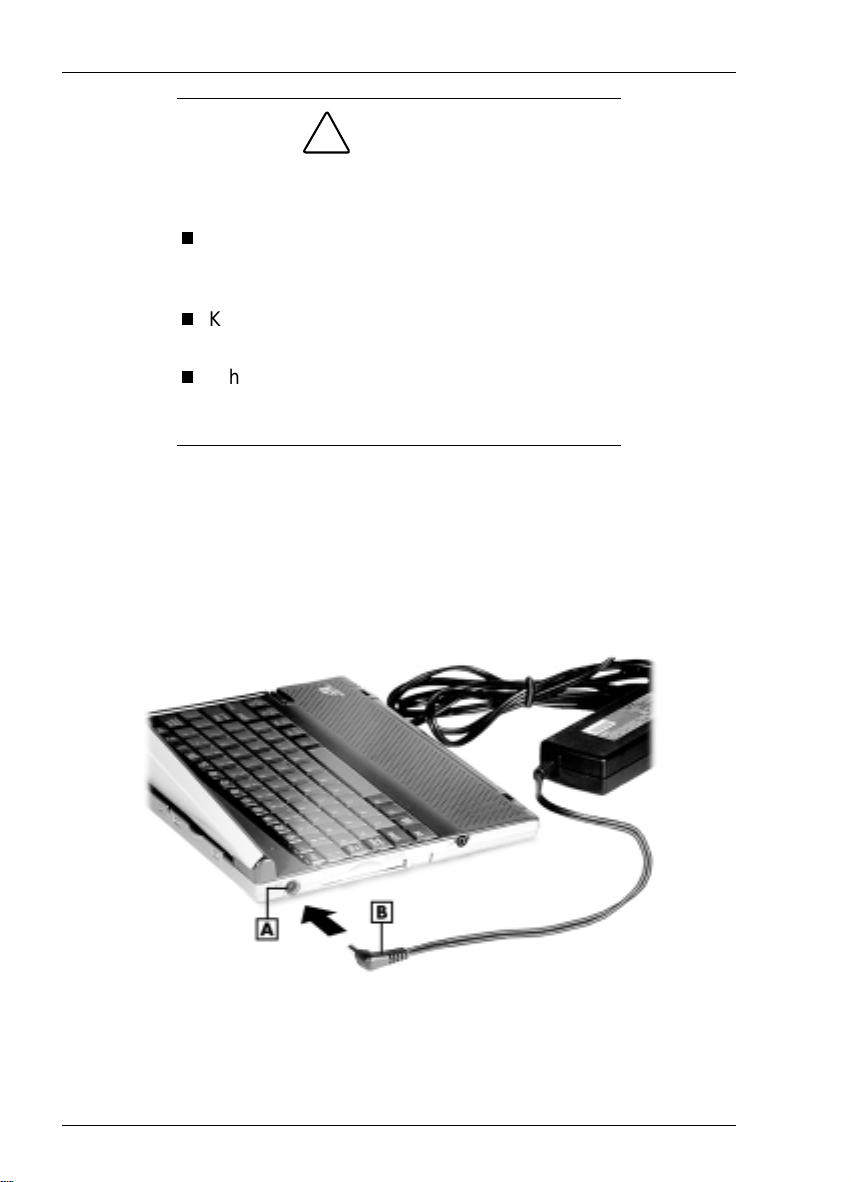
Connecting the AC Adapter
NECC recommends using the AC adapt er if you
are recharging the main batter y pack or the backup battery.
are using PC cards or Compact Flash™ cards.
are using the internal modem.
have your M obilePro on for long per iods.
Getting Started 1-7
Page 16
!
CAUTION
Follow these precautions whenever you use the
AC adapter and the NEC Mobil eP r o.
When using the AC adapter, make sure the
AC outlet is near the NEC Mobil eP r o and is
easily accessible.
Keep the main battery installed when runni ng
on AC power.
When communicating or sending
transmi ssions for a long time, use the AC
adapter to conserve power.
Follow these steps t o co nnect t he AC adapter .
1.
Insert the plug on the AC adapter cable into the AC
power port on the left side of the NEC MobilePro.
Connecting the AC adapter
A
– AC power port B – AC ada pter c able
2.
Plug the AC adapter into a working AC outlet.
1-8 Getting Started
Page 17

3. Power on the NEC MobilePro using the Power button at
the top right corner of the keyboard.
Using AC power saves battery life when you are on the go
and ensures that the backup battery maintains its charge and
helps preve nt data loss.
!
CAUTION
If you power off, then quickly power on the NEC
MobilePro, y our system m ay err oneousl y r epor t
the presence of Compact Flash cards.
In addition, repeatedly powering off and quickly
powering on, may cause data loss. NECC
recommends that you wait ten seconds after
powering off, bef or e powering on the NEC
MobilePro.
Continue working with the NEC MobilePro 880 as it charges
and leave it connected to AC power after the light turns
green.
Note:
time, all ow ten hours for both the main and the
backup batteries to fully charge, even if the
indicator on t he fr ont of the MobilePro lights
green before the ful l ten hours are passed.
Before using the system for the fi r st
Getting Started 1-9
Page 18

Taking a Quick Tour
This section takes you through the process of setting up yo ur
system for the first time.
1. Open the display panel to start your NEC MobilePro 880
for the first time.
Press the Power button if the system does not start
automatically.
2. Follow the on-screen instructions to calibrate the t ouch
screen. P r ess
3. Be sure to ent er your name, local cit y, and set the clock
fo r you r local time.
4. Be sure to specify a country for modem use. For details,
see the sect ion, “Adjusting MobilePro Settings,” in
Chapter 4.
Ctrl Alt =
to recalibrate at any time.
Introducing the Software
Your NEC MobilePro 880 features the latest version of
Microsoft Windows CE software along with additional
applications on the accompanying CDs.
Your NEC MobilePro 880 software includes:
Microsoft ActiveSync CD (Install on your host PC for
access and synchronization.)
Microso ft Windows CE pr e- loaded (in ROM) app lications.
Bonus Software CD (For U.S. and Canada distribution,
only.)
For more information about your MobilePro software, refer
to Chapter 3, “Int ro duc ing Windows CE.”
1-10 Getting Started
Page 19

Connecting to Your PC via Serial
The MobilePro is designed t o be a co mpanio n PC. Most users
want to synchronize the MobilePro 880 with a host PC. The
latest work done on either the MobilePro or the host PC
automatically appears o n both machines, once the
synchronization pro cess occurs.
The following section prov ides an overview o f the
synchronization process, using the serial port, followed by
detailed instructions for each stage of the process.
Follow these procedures to configure your MobilePro for
synchronization using the serial port.
Verify the accuracy of the PC Connect ion defau lt settings
on your MobilePro.
Ensure the availability of the serial port on your ho st PC.
Connect the PC Connect ( serial) ca ble to your ho st P C and
to your MobilePro.
Install Microsoft ActiveSync on your host PC.
Create a partnership between your host PC and your
MobilePro.
Verify that the desired synchronizat ion serv ices ar e
configured.
Getting Started 1-11
Page 20

Verifying PC Connection Settings
Your Mo b ilePr o ships with PC Co nnection default settings.
Follow these steps t o ver ify the accurac y o f the PC
Connection sett ings.
1. Tap Start, Settings, Control Panel.
2. Double tap the Communications icon and select t he PC
Connection tab.
3. Verify the following settings.
“Allow connection with desktop computer when
device is attached” is checked.
“Connect using Serial Port @ 115K” displays.
(Change this setting to 115K, if necessary. If
synchronization is unsuccess ful, revert to t he default
setting of 19200.)
Proceed to the next sect ion to check the availability o f the
serial port on yo ur host PC.
Ensuring the Availability of the Serial Port
The ser ial port on your host PC must be available for
synchronization with your NEC MobilePro. Follow these
steps to ensure t he availabi lity of the serial port.
1. Access the Se tup utility on yo ur host PC to verify t ha t t he
port is enabled.
2. Check the Windows device manager on your host PC to
identify potential conflicts for the serial port.
Go to Start, Settings, Control Panel.
1-12 Getting Started
Page 21

Double click the System icon and select the Device
Mana ger tab.
Check the Ports listing to deter mine if any conflict s
exist (another device is assigned to or using the serial
port). The port may be flagged with an exclamation
point, for example, if any conflicts exist.
If another device is assigned to or is using the serial
port, you must reassign the device to free up t he serial
po rt for MobilePro synchron iz atio n.
Proceed to the next sect ion to co nnect the PC co nnect cable.
Connecting the PC Connect Cable
Before installing Microsoft ActiveSync, follow these
instruct ions to co nnect the PC Connect (serial) cable that
ships wit h your M obilePro to both your MobileP ro and to
yo ur ho st PC.
1. Locate and open the serial port cover on the back of your
MobilePro.
Getting Started 1-13
Page 22
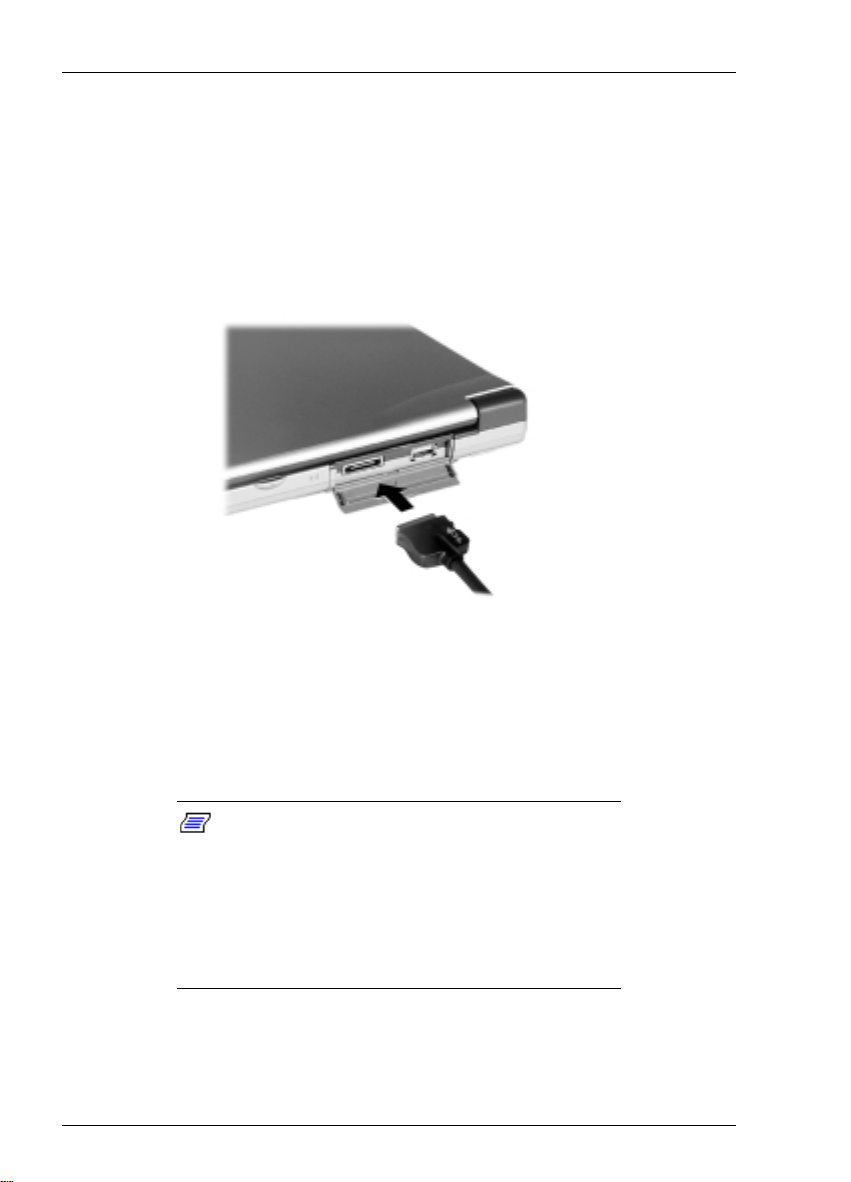
2. Align and attach the PC Connect cable to the serial port
on the Mo b ileP r o . (If your cab le is lab e led , inse rt the
cable with the word Up visible on the top. If your cable
has an arrow near the connecto r , insert t he cable with the
arrow visible on top.)
Connecting the PC connect cable
3. Connect the other end of the cable to the 9-pin serial port
on your host PC. If your host PC has a 25- pin serial port,
use an adapter (available in most co mputer stor es) .
Proceed to the next section to install Microsoft Act iveSync.
Note:
cable to the serial por t on your host P C, be sure
that the serial port is enabl ed in the host PC’s
BIOS setup and that no conflicts exist for the
port. For details, see a previous section in this
chapter, “E nsuring the Availability of the Serial
Port.”
1-14 Getting Started
Before connecting the P C Connect
Page 23

!
CAUTION
Be sure to properly align the cable connectors
and ports. Incorr ec t connec tion can damage the
MobilePro and t he c om puter.
Installing Microsoft ActiveSync
You must install Microsoft ActiveSync on your host PC to
enable synchronizat ion with your MobilePro. The Microsoft
ActiveSync CD that ships with your MobilePro contains the
ActiveSync soft ware desig ned fo r synchronizatio n with
Microsoft Office components. T he following procedur e
assumes Microsoft Outloo k as the host PC synchronization
component.
Before attempting to install ActiveSync, perform the
following procedure on the Windows 95/98 host PC.
Note:
and Windows 2000, see your operat ing system
documentati on, network administrator, or cont ac t
NECC Support Servic es at
For host PCs running Windows NT
1-800-632-4525
.
1.
On the host PC, click Start, Sett ings, and Control Panel
on the taskbar.
2.
Click on the network icon.
3.
Click on ADD.
4.
Under the Configuration tab, click on Protocol.
5.
Click on Microsoft.
6.
Select TCP/IP.
7.
When the Select Device scree n appears, select Microsoft.
Getting Started 1-15
Page 24

8. Select Dial-Up Adapter.
9. Reboot the system.
Network Requirements
If your host PC is connected to a network, configure one of
the following before installing Microsoft ActiveSync:
Configure a WINS server on the host PC's network, or,
Configure the host PC's IP address on the MobilePro as
follows:
1. Tap Start, Settings, Control Panel, and double tap the
net wor k icon.
2. Highlight NE2000 Compatible Ethernet Driver and select
the Propert ies butt on.
3. In the IP address tab, select (place a dot beside) "Obtain
an IP address via DCHP."
4. Select the Name Servers t ab and enter the host PC's IP
address in t he "Primary WINS" field.
To ide nt ify the host PC's IP address, run an IP config
utility. InWindows 98 and 95, run Win IP Config. In
Windows NT, run IP Config. If you need assistance, see
your network a dministra tor.
1-16 Getting Started
Page 25

Installing ActiveSync
Follow these st eps t o install Microsoft ActiveSync for
synchronization with Microsoft Outlook. The installation
sequence may vary depending upon the Microsoft
components ins talled on your host PC.
Note:
operating system, you must install Windows NT
Networking before installing Microsoft A ctiv eSync
to your host PC.
1. Insert the Microsoft Act iveSync CD in the CD-ROM
drive of your host PC.
If aut o insert is enabled on your host PC, the setup
window appears.
If aut o insert is not enabled, go to Start, Run, browse
for the CD-ROM drive, and run the setup. exe file.
2. Click Next to start the setup wizard.
If your host PC uses the Windows NT
The Selection Inst allation folder appears.
3. Click Next to accept the default installation folder or
modify the folder dest inat ion and click Next.
The Get Connected window appears.
4. Read the instruct ions about connect ing your device and
click Next.
The host PC verifies t he availa bil it y o f a COM por t and
po lls the Mobile Pro for s ynchronizatio n s ettings. The
New Partnership window appears.
Proceed to the next section to complete the installation.
Getting Started 1-17
Page 26

Creating a Partnership
Once the host PC verifies the availa bil it y o f a COM port and
po lls the Mobile Pro for s ynchronizatio n s ettings, the New
Partnership window appears.
1. Click Next to d isplay the S elect Synchro nization S e tting s
window.
2. Select the desired synchronization settings and click Next.
The Setup Complete window appears.
3. Click Finish to complete the installatio n pro c ess.
Verifying Synchronization Settings
Look for the new Microsoft ActiveSync desktop icon on your
host PC. Follow t hese steps to verify the synchronization
settings on the MobilePro.
1. Double click the ActiveSync icon.
2. Click Tools, Options and verify that the desired
synchronization ser vices ar e check ed. Modify the
selections as requ ired.
Note:
messages is not checked. Be sure to select the
checkbox for this service if you want to
synchronize email between your MobilePro to
your host PC.
1-18 Getting Started
By default, synchronization of email
Page 27

Once installed, Microsoft ActiveSync automatically
synchronizes your MobilePro 880 wit h your host PC's
Microsoft Outlook email, cont acts, calendar, and task list
each time you attach the PC Connect cable to the Mo bilePro
880 and the host PC.
Note:
ActiveSync automatically translates files and
email attachments during synchronization. This
allows you to use the Mobil eP r o to view and work
with files created on your host PC with Microsoft
Word, Excel, and PowerPoint, among others.
However, as noted in t he readme.doc file on the
Microsoft ActiveSync CD, PowerPoint files
created or modifi ed on the MobilePro are not
translated for viewing or modification on your
host PC. This limitation does not apply to Pocket
Word or Pocket Excel fil es.
Whenever possible Microsoft
Connecting to Your PC via Infrared
If your host PC is not equipped with a serial port or the serial
port(s) is in use, use the infrared port to synchronize the NEC
MobilePro with your host PC.
The following section prov ides an overview o f the
synchronization process, us ing the infrared port , followed by
detailed instructions for each stage of the process.
Follow these procedures to configure your MobilePro for
synchronization using the infrared port.
Modify the PC Connect ion default settings on your
MobilePro.
Set the infrared connection speed.
Getting Started 1-19
Page 28

Enable the infrared port on your host PC.
Install Microsoft ActiveSync on your host PC.
Create a partnership between your host PC and your
MobilePro.
Verify that the desired synchronizat ion serv ices ar e
configured.
Modi fying PC Connection Settings
Yo ur MobilePr o ships with PC Connection d efault
settings. Fo llow t hese steps to modify the PC connect ion
settings.
1. Tap St art, Sett ings, Control Panel, Comm unic ations.
2. Select the PC Connection tab.
3. Select the Change tab, use t he dropdown box to change
the setting to Infrared port, and click OK.
Proceed to the next sect ion to set t he infrared connection
speed, if necessary.
Setting the Infrared Connection Speed
Your NEC MobilePro supports both SIR (115 Kbps) and FIR
(4 Mbps) IR communications. Follow these steps to set the
infrared connection speed.
1. Tap Start, Settings, Control Panel, and double tap
MobilePr o Settings.
2. Select the IrDA tab and select t he appropr iate infrared
connection speed. The infrared connection speed on your
NEC MobilePro must be co mpatible with the infrared
co nnection speed on your host PC.
1-20 Getting Started
Page 29

3. Tap OK and close the Control Panel.
Proceed to the next section to enable the infrared por t on your
host PC.
Enabling the Infrared Port
The infrared port on your host PC must be available for
synchronization with your NEC MobilePro. Follow these
steps to enable the infrared po rt.
1. Access the setup utility on your host PC to verify that the
port is enabled. If required, select FIR support in Setup.
2. Set up infrared software components on your host PC. In
the Windows environment:
Go to Start, Settings, Control Panel.
If infrared is disabled, se lect t he o pt ions tab and place
a check in the box "Enable infrared co mmunications."
Place a check in the boxes, "Searc h and provide status
for devices in range," and "Install software for Plug
and Play devices within range."
Uncheck the box, "Limit connect ion speed to. "
3. Click Apply and click OK.
4. Check the device manager on your host PC to identify
potential conflicts for the infr ared port.
Double click the System icon and select the Device
Mana ger tab.
Check the Ports listing to deter mine if any conflict s
exist (another device is assigned to or is using the
infrared port). The port may be flagged with an
exclamation point, for example, if any conflicts exist.
Getting Started 1-21
Page 30

If another device is assigned to or is using the infrared
port, you must reassign the device to free up the
infrared port for MobilePro synchro n izat ion.
5. Reboot your host PC.
Once the system restar ts, an infrared icon (gray vert ical
bar with a red bump) appears in the system taskbar. If
there is an X to the right of the icon, infrared is not
enabled. Repeat st eps 1- 4 to enable infrared.
Installing Microsoft ActiveSync
You must install Microsoft ActiveSync on your host PC to
enable synchronizat ion with your MobilePro. The Microsoft
ActiveSync CD that ships with your MobilePro contains the
ActiveSync soft ware desig ned fo r synchronizatio n with
Microsoft Office components. The following procedure
assumes Microsoft Outlook as the host PC synchronization
component.
Before attempting to install ActiveSync, perform the
following procedure on the Windows 95/98 host PC.
Note:
and Windows 2000, see your operat ing system
documentati on, network administrator, or cont ac t
NECC Support Servic es at
1. On the host PC, click Start, Sett ings, and Control Panel
on the taskbar.
2. Click on the network icon.
3. Click on ADD.
4. Under the Configuration tab, click on Protocol.
1-22 Getting Started
For host PCs running Windows NT
1-800-632-4525
.
Page 31

5. Click on Microsoft.
6. Select TCP/IP.
7. When the Select Device scree n appears, select Microsoft.
8. Select Dial-Up Adapter.
9. Reboot the system.
Network Requirements
If your host PC is connected to a network, configure one of
the following before installing Microsoft ActiveSync:
Configure a WINS server on the host PC's network, or,
Configure the host PC's IP address on the MobilePro as
follows:
1. Tap Start, Settings, Control Panel, and double tap the
net wor k icon.
2. Highlight NE2000 Compatible Ethernet Driver and
select the Propert ies button.
3. In the IP address tab, select (place a dot beside)
"Obtain an IP address via DCHP."
4. Select the Name Servers t ab and enter the host PC's IP
address in t he "Primary WINS" field.
To ide nt ify the host PC's IP address, run an IP config
utility. InWindows 98 and 95, run Win IP Config. In
Windows NT, run IP Config. If you need assistance, see
your network a dministra tor.
Getting Started 1-23
Page 32

Installing ActiveSync
Follow these st eps t o install Microsoft ActiveSync for
synchronization with Microsoft Outlook. The installation
sequence may vary depending upon the Microsoft
components ins talled on your host PC.
Note:
NT operating system , you m ust install
Windows NT Networking before installing
Microsoft ActiveSync to your host PC.
1. Insert the Microsoft Act iveSync CD in the CD-ROM
reader of your host PC.
If aut o insert is enabled on your host PC, the setup
window appears.
If aut o insert is not enabled, go to Start, Run, browse
for the CD-ROM drive, and run the setup. exe file.
2. Click Next to start the setup wizard.
If your host PC uses the Windows
The Selection Inst allation folder appears.
3. Click Next to accept the default installation folder or
modify the folder dest inat ion and click Next.
The Get Connected window appears.
4. Place the NEC MobilePro so t hat the infrared port is
within range of the host PC infrared port and read the
instructions about connecting your device. Click Next.
5. On the NEC MobilePro, tap Start, Programs,
Communication, and PC Link.
1-24 Getting Started
Page 33

The host PC verifies the availabil it y o f an infrared port
and polls the MobilePro for s ynchronization settings. The
New Partnership window appears.
Proceed to the next section to complete the installation.
Creating a Partnership
Once the host PC verifies the availabilit y o f an infrared port
and polls the MobilePro for s ynchronization settings, the
New Partnership window appears.
1. Click Next to d isplay the S elect Synchro nization S e tt ings
window.
2. Select the desired synchronization settings and click Next.
The Setup Complete window appears.
3. Click Finish to complete the installatio n pro c ess.
Verifying Synchronization Settings
Look for the new Microsoft ActiveSync desktop icon on your
host PC. Fo llow t hese st eps t o verify synchronization set tings
on the Mobi lePro.
1. Double click the ActiveSync icon.
2. Click Tools, Options and verify that the
desired synchronizat ion services ar e checked. Modify the
selections as requ ired.
Once installed, Microsoft ActiveSync automatically
synchronizes your MobilePro 880 wit h your host PC's
Microsoft Outlook email, cont acts, calendar, and task list
each time you attach the PC Connect cable to the Mo bilePro
880 and the host PC.
Getting Started 1-25
Page 34

Note:
ActiveSync automatically translates files and
email attachment s during synchronization. This
allows you to use the Mobil eP r o to view and work
with files created on your host PC with Microsoft
Word, Excel, and PowerPoint, among others.
However, as noted in t he readme.doc file on the
Microsoft ActiveSync CD, PowerPoint files
created or modifi ed on the MobilePro are not
translated for viewing or modification on your
host PC. This limitation does not apply to Pocket
Word or Pocket Excel fil es.
Whenever possible Microsoft
Synchronizing with Your Host PC
Once your MobilePro is configured for synchronizat ion with
your host PC, synchron ization oc c urs w hen the ActiveSync
components o n the NEC Mo bilePro and on the host PC are
activated. When synchronizing via the ser ial port, the process
occurs automatically. When synchronizing via t he infrared
po rt, manual inter vention is required. Re fer to the next two
sections for details about synchronizing with your host PC.
Synchronizing via the Serial Port
Once the MobilePro is configured for synchronizat io n the
synchronization pro cess automatically occurs each time you
connect the MobilePro to your host PC, via the seria l port. In
addition, you can ma nually initiate the synchronization
process using Microsoft ActiveSync on your host PC. Simply
open the ActiveSync window, click File, and click
Synchronize.
1-26 Getting Started
Page 35

Synchronizing via the Infrared Port
Once the MobilePro is configured for synchronizatio n via
infrared, the Act iveSync component on the MobilePro must
be manually activa ted to init iate the synchr oniza tio n pro cess.
Simply ta p Start, Pro grams, Communica tion,
ActiveS ync t o init ia te synchr oniza tio n via in frared.
Resynchronizing Your MobilePro
Once synchronized, you may need to re-est ablish
communication between t he MobilePro and your host PC if
you soft reset the MobilePro or you warm boot your host PC.
To re-establish communication between the MobilePro and
your host PC, do one of the fo llowing:
Disconnect, t hen reconnect the PC Connect (serial) cable.
Power off, then power on the MobilePro unit.
Using other Communication Devices
During synchronizat ion, t he PC Connect (serial) cable must
be connected to your host PC. However, you must disconnect
the serial cable before using the internal modem, IR port or a
network card in your MobilePro.
Connecting Remotely
In addition to using yo ur Mo bilePro as a companion PC,
when you travel you can connect by modem directly to an
internet serv ice provider or a network remote access ser ver,
to get email and to view web pages.
Refer to Chapt e r 5, “Setting Up a Remote Co nnection” for
details.
Getting Started 1-27
Page 36

Getting Help
The following table provides a comprehensive list of where
you can get help on your MobilePr o 880, the software,
connections, accessor ies, and support.
Help Resources
Item Resource
MobilePro Operation
MobilePro User's Guide
Windows C E
ActiveSync
(formerly Windows CE Services)
Pocket Word, Excel, Access,
PowerPoint, Internet Explorer,
Inbox, Calendar, Contacts,
Tasks
Windows CE Main Help
Help file included with Windows CE. Tap Start
then Help on t h e M obil eP r o d es ktop taskb ar.
Microsoft Windows CE for the Handheld PC
Home
http://www.microsoft.com/windowsce
Microsoft Windows CE for the Handheld PC
Frequen t ly As ke d Qu estions
http://support.microsoft.com/support/windowsc
e/faq/default.asp
Microsoft Windows CE for the Handheld PC
Newsgroups
http://support.microsoft.com/support/news/Ngr
esults.asp?D=wce
Chris De Herrera's Windows CE Website
Home
http://www.cewindows.net
ActiveSync Help
After ins t alling ActiveSync on you r host PC,
click on St ar t/Progr ams /Ac t i v eSync to open th e
ActiveSync window. Select Help from the menu
bar and click on Microsoft ActiveSync Help.
Microsoft Windows CE for the Handheld PC
Highlights
http://support.microsoft.com/support/default.as
p?PR=wce&FR=0&SD=SO&
Connecting to Internet Service
Providers
1-28 Getting Started
Chris De Herrera's Windows CE Website
ISP Settings
http://www.cewindows.net/wce/isp.htm
Page 37

Help Resources
Item Resource
Software and Hardware
Resources
MobileP ro Accessories
MobilePro Technical Support,
W arranty Service
1
1
Microsoft Windows CE for the Handheld PC
Resource Guide
http://windowsce.resourceguide.net
(For PC cards, Compact Flash cards, network
adapters , wireless m od ems , s of t w ar e, and
more.)
Microsoft Windows CE for the Handheld PC
Product Locator
http://windowsce.microsoft.com/reftool/search/
s_hwsw.asp
NEC Computers Inc. Accessories
http://www.nec-computers.com
/accessories_category.asp
NEC Computers Inc. MobilePro Support
http://support.neccsdeast.com/c ommon/
csdnew. asp
NEC Computers Inc.
Support Telephone Numbers
800-632-4525, fax: 801-981-3133
2
MobilePro Homepage
NEC Computers Inc.
MobilePro Hom e
http://www.nec-computers.com
/store/product_line.asp?prod_line_no=4
1
For U.S. and Canada only. If you purchased and are using this computer outside the U.S. and
2
Canada, then a local service may apply. Contact a local NECC dealer in your country.
2
World Wide Web address subject to change.
Getting Started 1-29
Page 38

Introducing the NEC MobilePro
Identifying System Features
Opening the Display Panel
Using the Stylus
Using the MobilePro’s Power Sources
Caring for the MobilePro
2
Page 39

Identifying System Features
The NEC MobilePro 880 is compact with features on every
side. The next few sections provide figures and feature
descriptions.
Around the Front of the System
The following sections describe front features beginning with
the display panel.
Display Panel
Your NEC MobilePro 880 comes with a 9.4-inch display
panel that you can adjust for a comfortable viewing position.
See the section, “Mak ing D isp la y Panel Ad justments,” in
Chapter 4, for informat ion about adjust ing the panel
brightness.
Display pa nel
A
– System Information icons B – Display panel latch C – Display panel
D
– User software icons
2-2 Introducing the NEC MobilePro
Page 40

System Information Icons — provide direct access to the
following system func tio ns:
World Clock
MobilePr o Settings
Battery/Power Status
System Memory
Volume Control
Display Panel L a tch — secures the display pa nel when it
is clo sed.
Display Panel (wit h built -in touch scre en) — provides a
clear view of information stored or input into the unit. The
touch screen lets you activate functions by t o uching the
screen w ith the stylus or your fingertip.
User Software Icons — allow you to configure direct
access to five system functions or prog r ams o f your
choice. For details about defining t hese icons, r efer to t he
section, “Adjusting M obi lePro Settings,” in Chapter 4.
Introducing the NEC MobilePro 2-3
Page 41

Keyboard Panel and Base Unit
The NEC MobilePro keyboard panel and base unit provide
the features shown in the fo llowing figure. Feat ur es ar e
described after the figure.
Keyboar d pa nel an d base unit
A
– Suspend swi t ch B – Power button C – Keyboard
D
– Stylus E – Status LEDs F – Main battery pack
G
– Microphone H – Speaker
Suspend Switch — Shuts off the backlight when the LCD
panel is closed. Puts the Mo bilePro into a suspend st ate
when the lid is c losed (if enabled in MobilePro Settings).
Power Button — allows you to power on and off the unit
when it is o pen .
2-4 Introducing the NEC MobilePro
Page 42

Keyboard — lets you enter data with your fingertips.
Stylus — a “pen” that serves as an input device for the
touch screen. Remo ve the stylus from its holder t o use it.
Status LEDs — keeps you informed of the system's power
status and notifies you about scheduled appointments.
Status LEDs
A
– Battery C hargi ng LED B – Notificati o n LED
Battery Charging LED
– lights amber w hen the batter y is c harg ing.
– lights green when the battery is fully charged.
Notification LED — flashes amber as a reminder of
appointments, pages, etc.
Main Batter y Pack — provides battery power to the NEC
MobilePro when away from an AC power source.
Microphone — lets you record your voice.
Introducing the NEC MobilePro 2-5
Page 43

Speaker — lets you listen to digital audio. You can
program MobilePro audio to remind you of appointments,
notify you of operation events, or play applicationassociated so unds.
Around the Back of the System
The back of the NEC MobilePro o ffers the featur es sho wn in
the following figure. Features are described after the figure.
Features on the back of the system
A
– IR por t B – Not used C – VGA port
D
– Serial port E – USB port
Infrared (IrDA) Port — allo ws the MobilePro to
communicate without cables w ith similarly equipped
devices, including other MobilePros.
Not used in some models.
VGA Port — provides a connection point for the VGA
cable, for use with an external monitor.
Serial Port — provides a connection point for the PC
Connect cable.
2-6 Introducing the NEC MobilePro
Page 44

USB Port — allows you to connect a USB mouse to your
NEC M obilePro .
Around the Left Side of the System
The left side of your NEC MobilePro offers t he featur es
shown in the following figure. Features ar e described after
the figure.
Left side features
A
– AC power port B – PC card slot C – PC card eject button
D
– Earphone microphone jack
AC Power Por t — lets you connect the AC adapter to run
your unit on AC power.
PC card Slot — lets you install one Type I or Type II PC
card.
PC Card Eject Button — allows you to remove an
installed PC car d.
Earpho ne Micr ophone Jac k — lets you connect the
earphone microphone acces sory to your NEC MobilePro.
Introducing the NEC MobilePro 2-7
Page 45

Around the Right Side of the System
The right side of your NEC MobilePro offers the features
shown in the following figure. Features ar e described after
the figure.
Right side features
A
– Modem port B – Styl us slot C – CompactFlash card eject button
D
– Comp actFl ash car d slot E – Kensington lock
Modem Port — provides connect ion access to the internal
modem using the RJ-11 telephone cable.
Stylus Slot — houses the unit ’s pointing device.
CompactF las h Card E ject Button — allows you to remove
an installed Co mpactFlash card.
CompactF las h Card Slot — lets you install one
CompactFlash card.
Kensington® Lock — provides additio nal security with the
installatio n of a Kensington Loc k.
2-8 Introducing the NEC MobilePro
Page 46

Around the Bottom of the System
The bottom of the NEC Mo bilePro offers the features shown
in the following figure. Features are descr ibed after t he
figure.
Features on the bottom of the sys tem
A
– ROM/RAM bay cover B– Docking cradle connector
C –
Battery release latch D – Lithium-Ion battery pack
ROM/RAM Bay Cover — protects the ROM/RAM bay
and the installed ROM/RAM modules.
Docking Cradle Connecto r — allows you to connect the
NEC M obilePro to a Docking Crad le .
Battery Release Latch — allows you to release and
remove the battery.
Introducing the NEC MobilePro 2-9
Page 47

Lithium-Ion Battery Pack — provides battery power to the
NEC MobilePro when away from an AC power source.
Opening the Display Panel
Follow these st eps to op en t he displa y pa ne l.
1. Slid e the display pa nel latch to the right .
2. Lift the display panel up and toward s the back of the
system.
!
CAUTION
When the NEC MobilePr o is not in use or when
you are carrying it , keep the display panel
closed. This helps prevent accidental damage to
the touch screen or key boar d.
Dropping the MobilePro may cause display panel
damage.
Using the Stylus
Follow these st eps t o use the stylus.
1.
Open the MobilePro display panel.
2.
Locate the stylus holder on the lower right of the base
unit. To remove the stylus, slide it away fro m the unit.
2-10 Introducing the NEC MobilePro
Page 48

!
CAUTION
Although you can use your fingertip to activate
the touch screen, never use hard-pointed or
sharp objects. These obj ec ts can damage the
touch screen.
3.
Gently touch the pointed tip of the stylus to the screen to
select an object. When you are done using the stylus,
return it to its conv enie nt ho lder in the MobileP ro.
Using MobilePro’s Power Sources
The NEC MobilePro 880 can be powered using the AC
adapter or the syst em's main battery, making it a truly
portable system. The Mo bilePr o also contains an internal data
backup battery that recharges whenever t he unit is connected
to an AC power source. Read the following sect ions for
info rmation about using the NEC Mo bilePr o's power sources.
Determi ning Batter y Sta tu s
You can determine battery status by using the battery icon on
the left side of the display panel or through the power icon on
the lower right side of the taskbar. The icon on the taskbar
displays as an electrical plug when the battery is fully
charged (battery charging LED lights green) or as a battery
while charging (batt ery charging LED lights amber).
To display battery status, use one of the following methods:
Tap the battery icon on the left side of the MobilePro
display panel.
Double tap the battery/plug icon on the taskbar, if present.
Introducing the NEC MobilePro 2-11
Page 49

Recharging the Main Battery Pack
The main battery pack contains rechargeable Lithiu m-Io n
cells. Recharge a batt er y pack when the syst em displays a
low battery warning.
To recharge a battery pack insta lled in the batter y bay,
connect the AC adapter. See “Connecting the AC Adapter” in
Chapter 1.
The battery charg ing LED indica tes the charging stat us o f the
main battery pack when the NEC MobilePro is connected to
an AC power source. The LED st at u s displa ys a s follows:
Lights amber while charging.
Lights green when fully charged.
It takes approximately 4.5 hours to recharge a fully depleted
battery pack regardless of the system's power st ate. However,
if the main battery has been depleted for a prolonged period,
you must also allow time for the backup battery to fully
recharge (see the section, “Recharging the Backup Battery").
Note:
a battery pack gradually declines. Depending
upon use, a battery pack shoul d r ec har ge from
full depletion approximately 300 times during the
life of the batter y . Should you notice that the
battery does not stay c har ged as l ong as
expected, it i s probably necessary to replace the
battery wit h a new one. Please refer to the
section “Bat tery Replacement” later in t h is
chapter.
Through normal use, the capacit y of
2-12 Introducing the NEC MobilePro
Page 50

Recharging the Backup Battery
The backup battery charges while the main battery is
charging. It usually takes approximately 4.5 hours to recharge
both the ma in and backup batteries together.
A full 10 hours charging time is required under e ither of these
circumstances:
this is the first time you have used your MobilePro
the main battery has been in a depleted state for a
prolonged period.
In these cases allow ten hours for bot h the main and backup
batteries to charge, even if the LED indicator on the front of
the MobilePro light s gr een before the full ten hours are
passed.
To protect your data, do not use the system until the backup
battery is charged.
To recharge the main and backup batteries, connect the AC
adapter. See the section, “Connecting the AC Adapter” in
Chapter 1.
MobilePro Power Management
When your MobilePro is connected to an AC power source
and the main battery is removed from the system, be sure to
replace the main batter y before disco nnecting the AC adapter
to prevent possible data loss.
Introducing the NEC MobilePro 2-13
Page 51

!
The MobilePro’s i nternal data backup battery
provides power to maintain the memory contents
for a limited period of time when the main battery
is removed and the unit is not c onnec ted to an
AC power source. The back up batt er y does not
provide suffic ient power to operate the system.
Do not remove the main battery from the unit for
an extended period of tim e unless the uni t is
connected to an AC power source. The backup
battery is not user replaceable.
Battery Replacement
Note the following when replacing batteries:
If the main batter y becomes weak, the MobilePro
automatically tur ns o ff. Recharge or replace the main
bat tery immed ia te ly if the pow e r goe s off.
The MobilePro has a built-in backup battery that maintains
your data for several hours whenever the main battery is
depleted or removed. The backup battery is recharged
whenever the unit is connected to an AC power source.
CAUTION
If you fail to replace a depleted main battery for an
extended period of time and the back-up battery is weak,
the contents of the MobilePro memory and all user dat a
may be lo st.
Removing and Inserting the Battery Pack
Should you notice the life of a charged battery pack is short,
replace it with a new one. Follow these instructions to replace
a battery pack.
2-14 Introducing the NEC MobilePro
Page 52

1. Save your data, turn off unit power, and close the display
panel. Disconnect any cables at tached to the unit, such as
the serial cable.
Note:
that both the main battery and the backup battery
are very low, immediately connect the AC
adapter to charge both batteries.
If you receive messages indicating
2. Have a Lithium-Ion battery pack available.
3. Remove the batt ery pack as follows:
Locate the release latch o n t he bott om of the system.
Slide the release latch in the direction of its arrow and
hold it.
Remove the battery fro m its bay.
Remo ving the battery pack
A
– Battery connectors B - Battery release latch C - Lithium-Ion battery pack
Introducing the NEC MobilePro 2-15
Page 53

4. Insert a new batt er y pack as follows:
Insert the new Lithium-Ion battery pack in the bay
and slide the battery in the direction of the arrow, as
indicated in the following figure.
Inserti ng the bat ter y pac k
A
– Battery connectors B - Battery release latch C - Lithium-Ion battery pack
Firmly press the batter y until it is securel y connect ed
in the bay.
5. Charge the battery. See t he sect ions earlier in this chapter,
"Recharging the Main Battery" and "Recharging the
Backup Battery."
2-16 Introducing the NEC MobilePro
Page 54

Battery Precautions
Read the following battery handling precautions to ensure
yo ur safe ty.
Adhere to these warnings when handling
batteries. Failure to do so may result in personal
injury.
There is a danger of explosion if the battery is
incorrectly replaced. Replace only wit h the
same type recommended by the
manufacturer.
Discard used batteries according to the
manufacturer' s instructions. Never dispose of
batteries by bur ning them.
Dispose of used batteries promptly.
Keep batteries away from children.
Do not subject batteries to impact.
Do not subject batteries to heat sources
including dir ec t sunlight, open fires,
microwave ov ens, and high-voltage
containers.
!
WARNING
Do not recharge batteries unless they are
specifical ly desi gned for recharging.
Do not disassemble batteries.
Do not solder or puncture batteries.
Do not use a battery that is damaged or
deformed, has any rust on it s casing, is
discolored, ov er heats, or emits a foul odor.
Introducing the NEC MobilePro 2-17
Page 55

Caring for the MobilePro
The NEC MobilePro is a durable, dependable unit built for
extensive use and travel. Fo llow these guidelines to maintain
the condition and performance of your MobilePro .
!
CAUTION
Immediately turn off and unplug the MobilePro
under the following conditions:
The power cord is damaged or frayed.
Liquid spills on or into the unit.
Someone drops the unit or damages the
casing.
Precautions
Follow these precautions when using your Mo bilePro and AC
adapter.
Always plug the AC adapter cord into an easily accessible
outlet. It is important to be able to easily shut off power by
unplugging the AC adapter if needed.
Avoid dropping or bumping the MobilePro or the AC
adapter.
Do not stack heavy objects on t he Mo bilePro or the AC
adapter.
When using the AC adapter, make sure the power source
falls within the unit's co mpatible range of 100-240 volts
AC. Never use the AC adapter if the voltage falls outside
of this range. (Watch for this when traveling to other
countries.)
2-18 Introducing the NEC MobilePro
Page 56

Turn off the MobilePro power be fore attaching or
removing devices.
Do not pus h any fo reig n objects into the Mo bilePr o bays,
connectors, and slots.
Avoid using the unit or AC adapter for extended periods in
direct sunlight.
Do not use the unit in humid or dusty environments.
Turn off the MobilePro power befor e cleaning the system.
Avoid exposing the MobilePro or AC adapter to extreme
changes in temperature o r humidity. If it is unavo idable,
allow your MobilePro to adjust to room temperature
befo re use.
When cleaning the system, use a soft, clean, sl ig ht ly damp,
almost dry cloth. Avoid wiping the display surface with
abrasive material, including rough fabric. Do not use a
cleaning solution; this may damage the plastic.
If the AC adapter becomes extremely hot, unplug the
adapter and let it cool.
Keep the AC adapter away from the IrDA port to ensure
stable communicat ion/t r ansfer operations.
Storage Requirements
Store the NEC MobilePro and AC adapter in an environment
that meets the following co nd it ions.
Maintain sto r age temperat ur es bet w een 14°F and 140°F
(-10°C and 60°C).
Introducing the NEC MobilePro 2-19
Page 57

If the temperat ur e of the NEC Mobil eP r o
suddenly rises or f alls (for example, when you
move the system from a cold place to a warm
place) vapor c ondenses inside the system.
Turning on the unit under this condition can
damage the internal system components.
Before turning on t he NE C MobilePro, wait until
the unit's inter nal temperature equalizes with the
new environment and any internal humidity
evaporates.
Keep the storage area free from vibration and magnetic
fields.
Keep the MobilePro and its components away from
organic solvents or corrosive gases.
Avoid leaving the MobilePro and its co mponent s in direct
sunlight or near heat sources.
Routine Cleaning
!
CAUTION
Clean or dust your system as follows.
!
CAUTION
Never use harsh soluti ons, househ old cleaners,
or spray cleaners that c ontain caustic materials
on the MobilePro.
These cleaners are usual ly high in alkalinity,
which is measured in pH. Usi ng these cleaners
can cause the plasti c surf ac e to cr ac k or discolor.
2-20 Introducing the NEC MobilePro
Page 58

Display screen — Carefully wipe the LCD screen with a
soft cloth or a screen wipe designed for that pur po se.
Special screen wipes are avai lable t hrough your local
computer dealer.
Unit case — NECC recommends t hat you carefully wipe
the case with a slightly damp, a lmost dr y cloth.
Introducing the NEC MobilePro 2-21
Page 59

Introducing Windows CE
Windows CE Operating System
Microsoft ActiveSync
Software Applicati ons
Online Help
3
Page 60

Windows CE Operating System
Windo ws CE is the smallest member of t he Windows
operating system family using the Windows 95 interface.
What exactly does smallest mean? It means mobility and
portability provided through a reduced code base. This code
ba s e i s comple te l y 32- b it; it is m ultithr eaded, multita s kin g
and runs on different processors such as the NEC VR4121
MIPS processor.
Yo ur MobilePr o do e s not have a hard disk driv e. The
operating system and preloaded applicat ions are deployed o n
a Read-Only Me mory (ROM) module; files that you work o n
are stor ed in Random Access Memory (RAM) on a RAM
module.
The power of Windows CE is enhanced through its design to
easily link with your host PC to synchronize your data. For
more information about setting up your MobilePro for
synchronization, see the section, “Connecting to Your PC,” in
Chapter 1.
Using Windows CE
Windows CE is similar to Windows 95. However, some
actions are executed d ifferently, as indicated in the following
sections.
Tapping
Your NEC MobilePro comes with a stylus, a pen-like device
that allows you to touch, tap, or double tap objects on the
MobilePro touch screen. The touch, tap, and double t ap act
just like a point, click, and double click of a mouse.
3-2 Introducing Windows CE
Page 61

To simulate the click of the right mouse button, hold down
the
key while you tap or drag the object with the stylus.
Alt
Finally, never use a meta l object in place of the stylus. Metal
objects may scratch the surface of the touch screen.
Selecting Objects
You can select objects in Windows CE by tapping the
object(s) with the stylus. To select multiple cont iguous ite ms,
ho ld dow n the
Shift
To s elect multiple no n-co ntigu ous items, ho ld down the
key while tapping each item.
To move the blinking c ursor wh ile editing t ext in a pro gram,
simply tap the screen at the desired (new) locat ion.
Dragging and Dropping
Dragging and dropping works just like in Windows 95. To
drag an object, tap the object with the stylus and hold the
stylus against t he screen. Continue to hold as you slide t he
object acro ss t he screen. L ift t he stylus from the screen when
the object is in the desired location.
key while tapping the first and last items.
Ctrl
To copy an object, simp ly hold down the
Ctrl
the object, as indicated in the previous section.
Introducing Windows CE 3-3
key as you drag
Page 62

Windows CE Desktop
Windows CE gives you the newest features offered by
Microsoft for your NEC MobilePro and is very similar to
Windows 95.
Windows CE includes a desktop with built-in pocket
applications, a taskbar for quick navigation, online
net wor king functions, and mo re. Your Windo w s CE de s kto p
provides the following icons.
My Ha ndheld PC — Opens Windows CE Explorer to
display all the data on your MobilePro, whether stored in
RAM or on a storage card in the PC card or Compact
Flash card slots. My Handheld PC is much like t he My
Computer icon on the Windows 95 desktop.
My Do cuments — Provides shortcuts to working
documents, and InkWriter and Office t emplates.
Recycle Bin — Gives you a t r ash co nt ainer in which to put
unwa nt e d file s .
3-4 Introducing Windows CE
Page 63

Interne t Expl orer — Provides web access o nce you are
connected to t he Internet via the MobilePro's built-in
modem and an internet service provider.
Inbox — Allows you to send and rece ive e mail messages
on your NEC MobilePro. Refer to Chapter 5, “Setting Up
a Remote Connect ion,” for details about configuring your
MobilePr o to s e nd and r e c eive email.
Calendar — Let s you schedule appointments, meetings,
and other events and provides a variety of ways to display
the stor ed information.
Contacts — Maintains a list of names, both busines s and
personal, for eas y access w hi le at ho me or on the road.
Tasks — Pro vides a portable “to do” list for keeping track
of all of your tasks.
Microsoft Pocket Word — Allows you to create and edit
documents on your MobilePro.
Microsoft Pocket Excel — Allows you to view or draft
spreadsheets.
Microsoft Pocket PowerPoint — Lets you quickly and
easily deliver a professional online presentation.
Microsoft Pocket Access — Allows you to access and
synchronize information fr om other data ba s es.
Microso ft Voice Record er — Allows you to record voice
memos.
NEC Where to Get Help — Provides a comprehensive list
of help resources for your MobilePro, the software,
connections, and more.
Mob ilePro Fax — Allows you to send and receive faxes.
Introducing Windows CE 3-5
Page 64

bUseful Backup Plus — Allows you to backup and restore
your MobilePro data.
bUseful S c ript — Allows you to auto mate tasks such as
logging on to an ISP, retr ieving email, and more.
Note:
are for example, only . Before using the scripts,
modify the scripts to suit your own needs.
In addition, your NEC MobilePro includes addit ional utilities
accessible through the Start, Pro grams menu.
ASL Connect Client for Windows CE — Provid e s
automatic backup, restore, and synchronization features.
Citrix ICA Client — Provides a setup wizard to configure
the Citr ix ICA thin c lient for connectivity to the
MetaFrame server component.
Pocket Applications
While Windows CE applications do not have all the features
you may expect to see in applications on other Windows
systems, these applications provide many powerful features
adapted for the mobile environment.
The bUseful Scripts provided in ROM
Your MobilePro, with its larger keyboard, highly visible
display, and longer battery li f e, a llows you to obtain full
advantage of the CE-based applications. Write complete,
well-formatted reports, take detailed notes, and work on
spreadsheet dat a as you travel.
Microso ft provides a co mplete suite of applications ready for
you to use. These applications are available a s a desktop icon
or accessible t hrough Start, Programs in the Accessor ies,
Communica tio n, or Games folder s .
3-6 Introducing Windows CE
Page 65

Calendar — Allows you to track your appoint ments and
create meeting request s.
Contacts — Lets you store import ant information about
your friends and colleagues.
Inbox — Allows you to send and receive email.
Tasks — Gives you a place to create a portable "to do"
list.
Microsoft Pocket Access — Provides a data base program
for the mobile professional allowing you to update and
query data while you are on the road.
Microsoft Pocket Excel — Provides spreadsh eet and data
base functions for budgeting and other data tasks.
Microsof t I nkWriter® — Lets you create handwritten or
typed notes and drawings.
Microsoft Pocket PowerPoint — Pro v ides an eas y,
portable solution for desktop presentations.
Microso ft Voice Record er — Provides an easy way to
quickly capture thoughts, reminders, ideas, and phone
numbers.
Microsoft Pocket Word — Provides many features of
Microsoft Word including document formatting and spellchecking. Co py do c uments from your hos t PC fo r edit ing
or draft documents on your MobilePro for later completion
on your host PC.
ActiveSync — Let s you in itiate synchronizatio n with your
host PC.
PC Link — Allows you to initiate a co n nectio n w ith yo ur
host PC.
Introducing Windows CE 3-7
Page 66

Remote Networking — Allows you to configure remote
access accounts for connecting to your ISP, your local area
net wor k, and more.
Terminal — Lets you view and download files from a
bulletin board or to send and receive email.
World Clock — Allows you to set the time, date, and
alarm for your home city and a city that you are visiting.
Solitair e — P r ovides entertainment while on the road.
For more informat ion abou t each o f the app lications, just
click the question mark or select the help button when using
each application.
You can also use many other applications with Windows CE
for faxing and data transfer. A number of these are on your
Bonus Softwar e CD. See the section later in this chapter,
“Software Applicat ions,” for more information.
Printing Features
Windows CE provides printing capability using
Hewlett-Packar d (HP) PCL Level 3 and compatible printing
devices that support serial or infrared connect ion. Using a
serial cable or infrared transfer you can print a variety of
high-quality documents directly from the MobilePro
including:
Pocket Word and Pocket Excel files
Contacts and Task lists
A view of your schedule or agenda in Calendar
Inbox messa g e s
3-8 Introducing Windows CE
Page 67

Follow these steps to print documents using your MobilePro.
1. Open the desired Pocket application.
2. Tap File and tap Print .
The print dialog box appears.
3. Select the appropriate printer setting, “PCL Laser,” “PCL
Inkjet,” or “MobilePro Fa x.”
4. Select the appropriate port setting, COM1 : 57600, COM1
: 9600, IrDA, LPT1, or Network.
5. Select other printing attributes as requ ired.
6. Tap OK.
Note:
installation and use of a wider range of
high-speed print er dr ivers.
See the Bonus Software CD for
Note:
(MC-RC3E) connected to the serial port of your
NEC MobilePro, you c an pri nt t o a supported,
high-speed parallel printer.
For information about MobilePro accessories,
access the web site
With the optional print er cable
www.nec-computers.com
.
For additional details about using the IR port for printing and
transferring data, r efer to the sect ion, “Using the IR Port,” in
Chapter 4.
Introducing Windows CE 3-9
Page 68

Network Capabilities
Your MobilePro takes full advantage of the networking
capability offered through Windows CE and the PC card port.
The operating system supports Ethernet LAN and serial line
interface protocol (SLIP) used with Cellu lar D igital Packet
data (CDPD) so you can have cable- or wireless-based
network communications using an Ethernet LAN PC card. In
addition, you can use Co mpactFlash type II Ethernet cards on
your NEC MobilePro.
Creating a Network (Ethernet) Connection
To create a network (Ethernet) connection, you must install
and configure an Ethernet card. The drivers for the card may
already exist on your device. NECC also has included drivers
for the Proxim RangeLAN2.
1. Insert the Ethernet card into your device and connect it to
your network cable. You must have an NE2000compatible Ethernet car d, one o f the wireless Ethernet
cards described above, or have installed drivers supplied
with the card.
You may see a message warning about batt er y power. If
you have an A/C adapter, plug it into your device.
2. In the Settings dialog box, enter the infor mat ion for your
server. Most networks use DHCP, so you should not have
to change these settings. See your network administrator
if you need assistance.
If the Settings dialog box does not appear, go to Start,
Settings, Control Panel, and double tap Network. Select
your Ethernet driver, select Pro p ert ies, and configure t he
appropriate settings.
3-10 Introducing Windows CE
Page 69

3. Tap OK, twice, select the Ident ification tab, and enter
your name, password, and domain. Click OK, then close
the C ontrol Pa nel.
4. Remove and reinsert the Ethernet card when prompted.
Once you have configured your Ethernet connection, use
Internet Explorer on you r MobilePro to su r f the n et or to send
and receive email. For details about configuring email, see
Chapte r 5, "Setting Up a Remote Connection."
Microsoft ActiveSync
The Windows CE operating system and your MobilePr o
provide a powerful, portable extension to your host PC. This
PC-companion capability comes t hrough the Microsoft
ActiveSync softwar e.
Microsoft ActiveSync prov ides the co mmunication link
between your MobilePro and host PC. The ActiveSync
te c hnolo gy provides synchroniza tio n between f iles o n your
MobilePro and host PC keeping up-to-date copies of email
and documents in both locat ions.
You can also backup and restore data and files and install
new applications using Microsoft ActiveSync. For additional
information about Microsoft ActiveSync, double click the
ActiveSync desktop icon on your host PC that appears after
installing ActiveSync.
Introducing Windows CE 3-1 1
Page 70

Backing Up and Restoring Data
To prevent data loss, frequently back up your NEC
MobilePro data. You can backup all data to your host PC in
two convenient ways.
Use Microsoft ActiveSync on your host PC.
Use the bUseful Backup Plus application on your
MobilePr o des ktop.
Using Microsoft ActiveSync
The Microsoft ActiveSync backup and restor e feature cr eat es
a complete duplicate of all data stored on your NEC
Mob ilePro. I f yo u routinel y connect to your host P C , this is
the best method of data backup. The backup file is saved on
the hard disk of your host PC.
When you restore data from a backup file created by
Microsoft ActiveSync, all data on your NEC MobilePro is
replaced by the data in the backup file. All data on your
Mob ilePro is overwritte n including files you created, set tings
that you changed or programs that you installed since the last
backup.
To access the Microsoft ActiveSync backup feature, double
click the Active Sync icon on your ho st PC. C lick To ols, then
click Backup/Restore. Follow the on-screen instructions to
complete the backup process. For more information about
Microsoft ActiveSync backup and restor e, see the online
Help file.
3-12 Introducing Windows CE
Page 71

Using bSQUARE® bUseful™ Backup Plus
bUseful Backup Plus provides a convenient way for you to
back up or restore your MobilePro data while traveling or
away from your host PC. Back up data to a PC card or
CompactFlash card for secure storage.
Follow these steps to use bUseful Backup Plus to backup or
resto r e file s.
1. Double tap the bUseful Backup Plus icon on your
MobilePr o des ktop.
2. Select the backup or restore option when the backup
wizard appears and click Next.
3. Select the type of backup or restore that you want and
click Finish.
4. Click Browse and enter the name of the file(s) that you
wish to backup or restore.
5. Click OK, twice, to initiate the backup or restore.
For more information about bUseful Backup Plus, see the
online He lp file.
Introducing Windows CE 3-1 3
Page 72

Software Applications
A variety of software app lications are provided on the Bonus
Software CD that ships with your NEC MobilePro 880. These
applications let you take full advantage o f your Mo bilePro
capabilities.
Using the Bonus Software CD
Use the Bonus So ftwar e CD to inst all your choice o f the
included software applications. Your NEC MobilePro does
not include a CD-ROM drive. The Bo nus Software CD is
designed for use on your host PC. Befo r e insta lling the
software app lications from the Bonus Softwar e CD, first
conne ct your MobilePro to your host PC. When you install an
application to t he host P C, t he installation process
automatically installs the application to your N EC Mob ile Pro.
Note:
to install additional applications, you must first
install Mic r osoft ActiveSync on your host PC.
Before using the Bonus Software CD
Follow these st eps t o use t he Bo nus Software CD.
1. Insert the Bonus So ftware CD to t he CD-ROM drive in
yo ur ho st PC.
If aut o insert is enabled on your host PC, the CD
automatically plays and t he intro duction screen
appears.
If auto insert is not enabled, tap Start, Run, browse for
the CD-ROM drive, and run the setup file.
2. Move your cursor over the applicat ion list at the left side
of the screen to se lect an application for installation.
3-14 Introducing Windows CE
Page 73

3. Click the selected application title to initiate the
installation p rog ram.
4. Read the license agreement, that o nly appears the first
time that you launch the Bonus Software CD, and click
OK.
5. Follow the o n-screen instructions to install the software
applications.
Note:
from the NEC Bonus Software CD using a
Windows NT host PC, the installation process
may proceed slowly. The progr ess bar that
appears on the screen duri ng installation may
seem to stop for a period of 30 to 90 seconds. Be
patient! This i s normal and the installation
process will complete successfully.
When installing some applic ations
Once installed on you r NEC MobileP ro, the softwa re
application is stored in RAM. Refer to each application's
online help for details about how to use the application.
Note:
pack charged to maintain all applications stored
in RAM.
If your main batt er y pack loses it s char ge,
applicati ons stored in RAM may be lost. Once
lost, you must reinstall the desired software
applications.
Be sure to keep your main battery
Introducing Windows CE 3-1 5
Page 74

Online Help
Your NEC MobilePro and Windows CE provide a variet y of
online help resources. In addition, Microsoft ActiveSync on
your host PC provide s its own online help fi le.
Fo llo w thes e instructions t o find yo ur o nline he lp resources.
NEC Where to Get Help— Double tap the NEC Where to
Get Help icon on your MobilePro desktop.
MobilePro Accessories— Tap Start, Help, and double tap
the MobilePro Accessories link.
Windows CE Main Help — Tap Start, then Help on the
Windows CE taskbar.
Application-specif ic He lp — Just tap the question mark in
the upper right-hand corner of the taskbar in each of the
Pocket applications.
Microsoft ActiveSync Help — On your host PC, double
click the ActiveSync desktop icon, click Help, and select
the Microsoft ActiveSync Help Topics.
3-16 Introducing Windows CE
Page 75

Using the NEC MobilePro
Powering On and Off
Making Display Panel Adjustments
Using the Keyboard
Adjusting MobilePro Settings
Using the Voice Recorder
Using PC Cards
Using CompactFl ash Cards
4
Using the IR Port
Upgrading ROM
Resetting the MobilePro
Page 76

Powering On and Off
Power on the NEC MobilePro as follows.
!
CAUTION
Do not attach a USB mouse to the MobileP r o
system before powering on the system for the
first time. If the USB mouse i s connected, it
prevents you from calibrating the touch screen.
!
CAUTION
If you power off, then quickly power on the NEC
MobilePro, y our system m ay err oneousl y r epor t
the presence of Compact Flash cards.
In addition, repeatedly powering off and quickly
powering on, may cause data loss. NECC
recommends that you wait ten seconds after
powering off, bef or e powering on the NEC
MobilePro.
1.
Slid e the display pa nel latch to the right . Lift the display
panel up towards the rear of the unit.
!
CAUTION
Do not push the display panel bey ond its predesigned stop point as you open the panel.
4-2 Using the NEC MobilePr o
Page 77

2. Locate and press the Po wer butto n. To power off the unit,
press the Po wer butto n a seco nd time.
Powering on and off
A
– Power button
Note:
battery, the M obilePro automatically powers on
when you open the display panel.
The first tim e you power on the MobilePro, the
screen contrast m ay need adjustment. Refer to
the following sect ion, “Making Display Panel
Adjustments,” for details.
The first time you install the main
If the MobilePro is not used for a specific le ngt h o f time, it
automatically shuts o ff. You can select ho w long the unit
remains on, when running on battery power, through the
Po wer selection in the Wi ndows C E Co ntrol Panel. On t he
Windows CE desktop, tap Start, Settings, then select Control
Panel. Double tap the Power icon and select the Power Off
tab to designate a power off t ime.
Using the NEC MobilePro 4-3
Page 78

Note:
frequently back up and synchronize data
between your Mobil eP r o and y our host P C.
Synchroniz ation occurs each time you connect
your MobilePr o to your host P C, once initial
synchronization is configured. For details, see,
“Connecting to Your PC ,” in Chapt er 1.
For detail s about bac ki ng up and r estor ing data,
see the section, “Backing Up and Restoring
Data,” in Chapter 3.
As a general operation rule,
Making Display Panel Adjustments
You can adjust the brightness of the display panel in the NEC
MobilePro using two function keys located at the top right of
the keyboard. Increasing panel brightness can dramatically
lower battery life.
Follow these st eps t o adjust the display panel brightness.
1. Open the display panel and power on the unit.
4-4 Using the NEC MobilePr o
Page 79

2. Press t he brightne s s up or brightnes s down keys as
required.
Backlight
You can conserve bat tery life by co nfiguring your NEC
MobilePro to automatically t urn off the display panel's
backlight.
Adjusting the brightness
A
– Brightness up B – Brightness down
Automatic Off
Follow these steps to configure t he backlig ht for auto mat ic
turn off.
1. Tap Start, Sett ings, then select Control Panel.
2. Double tap the Display icon and select the Back light t ab.
Using the NEC MobilePro 4-5
Page 80

3. Tap the desired selections to place a check beside the
selection. Use the dropdown boxes to select the desired
time settings.
Automatic On
In addition, you can configure the NEC MobilePro to turn on
the backlight auto matically. Follow these steps to configure
the backlight for auto matic turn on.
Backlight settings
1. Tap the Advanced tab, shown in the previous figure, to
access the Advanced backl ig ht set tings.
4-6 Using the NEC MobilePr o
Page 81

2. Tap the desired selections to automatically turn on the
backlight either while on battery power or when
connected to an AC power source.
Advanced backlight settings
!
WARNING
Using auto on while on bat tery power
substantiall y r educes battery life.
Enab ling the Suspend Switch
You can configure your NEC MobilePro to power on or off
by simply opening or closing the display cover. T he Suspend
switch acts as a switch for both the power and the display
panel.
Opening the NEC MobilePro powers on the unit. To power
on the unit while it is open, use the Power button.
Closing the MobilePro powers off the unit and insures that
the backlight is off as well.
Using the NEC MobilePro 4-7
Page 82

Follow these st eps to enab le t he Suspend sw itch.
1. Tap Start, Sett ings, then select Control Panel.
2. Double tap the MobilePro Settings icon to launch the
dialog box shown in the fo llowing figure.
Be sure to select the “LCD Suspe nd/R esume” tab.
Power off settings
3. Select either “Enable suspend while on Battery Power” or
“Enable suspend while on Externa l Power, ” o r both, to
enable the Suspend switch.
Note:
automatic all y suspend during synchr onization,
while running on batt er y power, unless the
battery char ge is at a v ery low status. You may
want to connect your M obilePro to an AC power
source before synchronizing with your host PC.
Your NEC MobilePro will not
4-8 Using the NEC MobilePr o
Page 83

Using the Keyboard
The NEC MobilePro keyboard is equipped with many
features including:
App lication shortc ut keys
Brightness up/down keys
Cur sor control ke ys
Control keys
Windows key
Feature keys are located as shown in the fo llowing figure.
Key operations are described after the figure.
Keyboard
A
- Applications shortcut keys B - Brightness up/down keys
C
- Cursor cont r ol keys D - Control keys E – Windows key
App lication shortc ut keys — Ten applicatio n shortc ut keys
allow you to launch applications direct ly fro m the
keyboard. For details about each key, refer to the section
that follows, “Using Ap plicat ion Sho r tcut Keys.”
Brightness up/down keys — Use the brightness up /do w n
keys to a djust the NEC Mob ilePro's panel brightnes s .
Using the NEC MobilePro 4-9
Page 84

Cur s or Control Keys — C ursor contr ol ke ys let you
position the cursor on the screen where you want. The
cursor indicates where t he next typed text is inserted.
Control Keys —
Ctrl, Alt, Fn
, and
in conjunction with other keys to change their functions.
To use control keys, press and hold the Control key while
pressing another key.
Windows Key — You can use the Windows key to display
the Start menu.
Using Application Shortcut Keys
The NEC MobilePro pro vides application shortcut keys
located at the top of the keyboard. Use these keys to launch
applications directly from the keyboard. The key defaults are
listed in the following table.
are controls used
Shift
4-10 Using the NEC MobilePro
Page 85

Default Applicati on Shortcut Keys
Icon Application
Inbox
Microsoft Internet Explorer
Calendar
Contacts
Tasks
Microsoft Pocket Word
Microsoft Pocket Excel
Microsoft Pocket PowerPoint
Voice Rec order
Microsoft Pocket Access
Ctrl +
Calculator
Brightness Up
Brightness Down
Using the NEC MobilePro 4-11
Page 86

Defaul t Fu nc tion Keys
In addition to the application shortcut keys, your NEC
MobilePro is equipped with default function keys as
described in the fo llowing table.
Default Function Keys
Key Function
Fn + Space Backli g ht On/O ff
Fn + Shift Num Lock
Fn + 4 Pound Key
Fn + 5 Euro
Alt + < Contrast Up
Alt + > Contr ast Down
Alt + Left Arrow Home
Alt + Right Arrow End
Alt + Up Arrow PgUp
Alt + Down Arrow PgDn
Display Panel Icons
The NEC MobilePro 880 is equipped with 10 icons that
provide short cut s to system functions and user-selected
applications.
The left side of the MobilePro’s display panel has five syst em
information ico ns that provide shortcut access to t he
follo w ing fu nc tions:
World Clock
MobilePr o Settings
Battery/Power Status
System Memory
Volume Control
4-12 Using the NEC MobilePro
Page 87

The right side of the MobilePro’s display panel has five user
software icons that provide shortcut access to five userselected app licat ions. To co nfigure t he user software icons,
double tap the MobilePro Settings applet and se lect the Qu ick
Launch tab. Fo r more details, refer to the following section.
Adjusting MobilePro Settings
Your NEC MobilePro is equipped with a desktop icon
labeled MobilePro S ett ings. To access MobilePro Sett ings,
simply tap the M obilePro Settings system information icon
on the left side of the display panel, to display the applet's
window. For more details, simply tap the “?” to view the
on lin e help .
The MobilePro Settings applet allo ws you to configure a
variety of properties on your NEC MobilePro and includes
the following features.
Quick Launch — Allows you to customize the user
softwar e icons.
External Monitor — Allows you to display the same
image on both the display panel and an external monitor.
Color Palett e — Lets you select a 256-color display or the
default 64K color display.
LCD Suspe nd/ Resume — Allows you to designate a
suspend option for the display panel lid, when closed.
Keyboard Layout — Allows you to select for a U.S. or
inte rnational keyboard.
IrDA — Allows you to select the speed for IR transfer.
Built-in Modem — Allows you to specify a country for
use of the built-in modem.
Using the NEC MobilePro 4-13
Page 88

!
CAUTION
Select the appropr iate country setting for your
built-i n modem to ensure compliance with the
country’s telephone lines. An incorrect country
setting may dam age y our device or the
telephone line.
The list of compliant countries outside the U.S.
and Canada is subject to c hange. For the latest
list of compliant countries outside the U.S. and
Canada, refer to NE CC’s web site at
computers.com
.
Assigning User Software Icons
The user software icons located on the right side of the
MobilePro’s display pa nel are ass ig ned t hrough the
Mob ilePro Settings applet in t he C ont rol Panel. Usi ng t his
applet, you can manually assign prog r ams to the icons,
numbered 1-5.
Follow these st eps t o ass ign t he user software icons.
1.
Tap Start, Sett ings, then select Control Panel.
www.nec-
2.
Double tap the MobilePro Settings icon to launch the
dialog box illustrated in the following figure.
3.
Select the Quick Launch tab, if necessary.
4-14 Using the NEC MobilePro
Page 89

4. Scroll or tap, then highlight the number of the user
software icon that you want to assign. Assign an
application using the following butto ns.
Default — selects the factory-assigned applicat ion.
(Shipping default for icons 1- 5 is the MobilePro
Settings applet.)
Browse — opens a directory dialog that allows you to
locate the applicat ion that you want to assign.
Delete — removes the current ly assig ned application.
5. Click OK to complete your a s signments .
Connecting the VGA Cable
The VGA cable lets you connect the MobilePro directly to a
MultiSync monitor t hat has VGA output. Use an external
monitor to enhance your MobilePro display.
Follow these steps to connect the VGA cable.
1. Tap Start, Settings, Control Panel.
2. Double tap the MobilePro Settings icon and select the
External Monitor tab.
3. Tap to place a check mark in the box “Display LCD
on External Monitor,” and t ap OK.
4. Use the soft reset butt on to reset the MobilePro and
implement the new setting. For instructions about
resetting the MobilePro, refer to the section,
“Resetting the MobilePro,” in C hapter 4.
5. Power off t he MobilePro.
6. Locate the VGA port cover on the back of the
MobilePro and open it.
Using the NEC MobilePro 4-15
Page 90

7. Align and attach the connector on the MobilePro
VGA cable to the VGA port on the left side of the
MobilePro.
Connecti ng the VGA ca bl e
A
– VGA port B – VGA cabl e
8. Connect the other end of the VGA cable to the
monitor cable connector.
!
CAUTION
Be sure to properly align the cable connectors
and ports. Incorr ec t connec tion can damage the
MobilePro and t he m onitor.
9. Power on the MobilePro and the external monitor .
!
CAUTION
When the setting, “Displ ay LCD on Ext er nal
Monitor,” is select ed, the MobilePro uses more
power than normal . T o conserv e power, be sure
to deselect thi s setting when not using an
external monitor.
4-16 Using the NEC MobilePro
Page 91

Using the Voice Recorder
The NEC MobilePro features a vo ice recorder application
that lets you record and play voice memos. Recor ding is
dictation quality only and not intended for musical recording.
Recording vo ice memos w ith the NEC MobilePro is easy.
Follow these st eps to r eco r d with the Microsoft Voice
Recorder.
1. Tap Start, Progr a ms, Accesso ries, then select Microso ft
Voice Recorder or double tap the desktop icon on your
MobilePro.
2. Hold your NEC MobilePro with the microphone facing
you.
3. Tap the record button (red dot) and speak into the
microphone.
4. When you are finished recording, tap the Stop button
(black square). A beep sounds when the recor ding stops.
To play back your recording, tap to highlight your selection
and tap the Play button (green triangle) or simply double tap
your selection.
You may want to modify the recording format to improve the
quality of playback. To modify the recording format, tap
Tools, Recording For mat and use the dropdown box to
change the format to PCM and to mod ify the Attr ibutes to a
higher sampling rate.
Using the NEC MobilePro 4-17
Page 92

Note:
the microphone about three inches away from
your mouth whil e speaking.
Memory required for voice memo storage varies
depending on user settings.
Recording works best if you positi on
Menu
The Voice Recorder provides a var iety of menu selections
under the File, Control, and Tools selections. Refer to the
online help provided with the voice recorder application for
details about its use. Just tap the question mark icon in the
upper right-hand corner of the screen to access the online
help.
Using PC Cards
Your NEC MobilePro comes with a PC card slot that
supports one Type I or one Type II PC card. All PC cards are
approximately the same size, have a st andard 68- pin
connector and vary only in thickness. PC car ds add a variety
of storage and communicat ion funct ionalit y to your
MobilePro.
!
CAUTION
Windows CE supports the hot swappi ng of PC
cards. However, to av oid data loss, do not
remove a PC card while in use.
When using a PC card in the MobilePro, we recommend that
you also use AC power. The batter ies alone may not pro v ide
enough power for some PC cards to operate properly.
4-18 Using the NEC MobilePro
Page 93

Note:
when using PC cards or the i nternal modem.
Using the adapter can help you avoid potential
data loss caused by the high-energy
consumption of some PC cards.
We recommend using the AC adapter
Inserting PC Cards
Follow these st eps to install a PC card.
1. With the PC card facing up, insert the card into the PC
card slot on the left side of the system.
Inserting a PC card
2. Verify that the PC card is securely in the slot.
!
CAUTION
Make sure you align the PC card c or r ectly for
insertion. Inserting a PC card incorrectly can
damage the card and/or the NEC MobilePro.
Using the NEC MobilePro 4-19
Page 94

Removing PC Cards
Follow these steps t o r emove a PC card from the MobilePro.
1. Locate the PC card eject button beside the PC card slot
and press it to release the card fro m the slot.
2. Once the card is released, pull it the rest of the way out of
the slot.
Using CompactFlash Cards
Your NEC MobilePro comes with a CompactFlash card slot
that supports one Type I or Type II CompactFlash card. A
CompactFlash card provides a st or age device for your
MobilePro and when insert ed, creates a Storage Card 2
folder. To view the contents of the folder, double tap the My
Handheld PC icon on your MobilePro desktop, then double
tap the Storage Card 2 folder.
!
CAUTION
Windows CE supports the hot swappi ng of
CompactFlash cards. Ho wever, to avoid data
loss, do not remove a CompactFlash card while
in use.
When using a CompactFlash card in the MobilePro, also use
AC power. The batteries alone may not provide enough
power for some CompactF lash cards t o operate properly.
Note:
CompactFlash cards to avoid potential data loss
caused by the high-energy c onsumption of some
CompactFlash c ards.
4-20 Using the NEC MobilePro
Use the AC adapter when using
Page 95

Inserting Compact Fla sh Card s
Follow these st eps to install a CompactFlash card.
1. With the CompactFlash card facing up, insert it into the
CompactFlash card slot on the right side of the system.
Inserting a CompactFlash ca rd
Note:
card, a button pops out of the card bay. Pivot the
button towards the left side of the unit until it fits
into the recessed space nex t to the slot.
When you insert a CompactFlash
2. Verify that the Compact F lash card is securely in the slot.
!
CAUTION
Make sure you align the Com pac tFl ash card
correctly for insertion. Inserting a CompactFlash
card incorr ectly c an dam age the car d and/or the
MobilePro.
Using the NEC MobilePro 4-21
Page 96

Removing CompactFlash Cards
Follow these steps t o remove a CompactFlash card from the
MobilePro.
Note:
out of the recessed space bef or e beginning the
following procedur e.
Pivot the CompactFlash card button
1. Save your data if you are storing it on the inserted
CompactFlash card.
2. Press the butto n beside the CompactFlash card.
3. When the card pops out slightly, pull it out of the slot.
Using the IR Port
With the NEC MobilePro , you can send and receive data to
and from another similarly equipped device using the infrared
(IrDA) communication port. In addition, you can use the IR
port to synchronize data with your host PC, in place of using
the PC Connect (serial) cable.
Before using the NEC MobilePro for IrDA communication,
first configure/enable the IR port on your host system, then
install Microsoft ActiveSync on your host system.
Note:
on your host system after installing Microsoft
ActiveSync, y ou m ust r e-i nstall Microsoft
ActiveSync before establishing IrDA
communication between systems.
4-22 Using the NEC MobilePro
If you configure/enabl e the IrDA port
Page 97

Follow these steps t o use t he IR port to co mmunicat e with
another MobilePro or your host PC.
1. Remove the PC Connect (ser ial) cable from the
MobilePro before attempting IrDA communication.
2. Open the display panels on the two units that yo u want to
use for communication.
3. Position the MobilePro units so that the IR ports face each
other. Position the units from 2 to 20 inches apart.
4. Be sure that nothing obstructs the path between the IR
ports on both units, and that the ports are aligned
properly.
5. Send your data by using the “Send To” select ion in t he
Windows CE Windows Explorer File menu.
6. Highlight the file you want to transfer and choose
“Infrared Recipient” fro m the Send To selections.
Your file is transferred to the other device. The receiving
device uses the File/Receive command to r eceive t he
infrared transmission.
Note:
something bloc k s the path between the two
ports, data may not be sent or r ec eiv ed c or r ectly .
If the units are too far apart or if
Using the NEC MobilePro 4-23
Page 98

Upgrading ROM
You can upgrade the NEC MobilePro ROM by replacing the
currently installed ROM module with an upgraded ROM
module (w hen available) .
Note:
MobilePro dat a with your host PC and perform a
backup of your MobileP r o data before upgrading
your ROM module. You may need to copy som e
files back to your MobilePro following this
upgrade procedure.
Note:
components, discharge electricity from yourself
and your clothi ng by touc hing a nearby metal
surface.
Be sure to synchronize your
Before handling any inter nal
Follow these steps to upgrade your MobilePro ROM module.
1. Save your data to a host PC , power off the Mo bileP ro,
and close the display panel.
2. Disconnect any peripheral devices at tached to the
MobilePro, such as the AC adapter.
3. Remove the batt ery pack. For details, see the section,
“Removing and Inserting the Battery Pack,” in Chapter 2.
4-24 Using the NEC MobilePro
Page 99

4. Turn over the MobilePro and locate t he screw that secures
the R OM bay c over .
5. Using a small screwdriver, remove the screw and the bay
cover. ( The MobileP ro does no t power on w hen the bay
cover is removed.)
ROM bay cover
A
– ROM bay cover
6. With the small screwdriver, remove the two screws on the
ROM module.
7. Gently lift up the ROM module to disconnect it from its
co nnector a nd remo ve it fr om the bay.
8. Insert the upgraded ROM module into the bay, aligning
the connector on the module with the o ne in the bay.
9. Gently press on the module just above the connector s
until the connection is secure.
10. Replace the two screws to secure the upgraded ROM
module.
Using the NEC MobilePro 4-25
Page 100

11. Replace the bay cover and cover screw.
12. Push the full reset button. For det ails about using the full
reset button, refer to the section later in this chapter,
“Usin g the Full Re s e t Button.”
13. After one minute or more, install the battery pack.
Note:
unless the ROM/RAM bay cov er is secure.
The MobilePro does not power on
Resetting the MobilePro
Occasionally you may need to reset your NEC MobilePro.
For instance, you may need to reset after r estor ing data from
your host PC, after modifying the MobilePro's configuration,
when you are unable to power on using the Power button, or
when the operating system stops respo nding.
The NEC MobilePro is equipped with two reset buttons: a
soft reset button and a full reset button. Read the following
descriptions to better understand the functions of and the
differences between the buttons.
Soft Reset Button — The soft reset button allows you to
restart the NEC M obilePro oper ating s ystem while
preserving any saved data. This method is similar to a
“warm boot” on your hos t P C.
Full Reset Button — The full reset button restores your
system to its original shipping configuration, erasing all
info rmation that you have entere d.
4-26 Using the NEC MobilePro
 Loading...