

Page 1

4
Using the NEC
MobilePro
Powering On and Off
Making Display Panel Adjustments
Enabling the Suspend Switch
Using Application Shortcut Keys
Recording Voice Memos
Using PC Cards
Using CompactFlash Cards
Using the IrDA Port
Upgrading ROM
Resetting the MobilePro
Adjusting MobilePro Settings
Using the NEC MobilePro 4-1
Page 2
POWERING ON AND OFF
Power on t he N E C MobilePro a s follows.
Slide the display panel lat c h to the right. L if t the dis-
1.
play panel up towards the rear of the unit.
Do not push the display panel beyond its predesigned stop point as you open the panel.
2.
Locate and press the Power button. To power off the
unit, press t he Power butt on a second time.
Powering on and off
!
CA UT ION
4-2 Using the NEC MobilePro
A
– Power button
Page 3

Note:
tery, the M obilePro aut omatically powers on when
you open the display panel.
The first time you power on the MobilePro, t he
screen contrast may need adjustment. Refer to the
following section, “ M ak ing Display Panel Adjustments,” for detai ls.
The first time you install the main bat-
If the Mob ilePro is not used for a specific length of time, it
automatic ally shu ts off. You can select how long the unit
remains on throu gh the Power selection in the Windows
Control Panel. On the Windows C E desktop, go to S tart,
Settings, Contr ol Panel. Doub le tap the Power ic on and select the Power Off tab to designate a power off time.
Note:
back up and synchronize data between your MobilePro and y our deskt op or notebook comput er .
Synchroni zati on occurs each ti me you connec t your
MobilePro to your desktop or notebook computer,
once initial synchronization is configured. For details, see the section in Chapter 1, “Connecting to
Your PC.”
As a general operation rule, frequently
For det ail s about back ing up and r estori ng data, see
the section i n Chapter 3, “B ackup Up and Restori ng
Data.”
MAKING DISPLAY PANEL ADJUSTMENTS
You ca n adjust the brightness of the display panel in t he
NEC MobilePro using two function keys located at the top
right of the keyboard. Adjust the brightness as follows.
Open the dis play panel and p ower on the unit.
1.
Using the NEC MobilePro 4-3
Page 4
Backlight
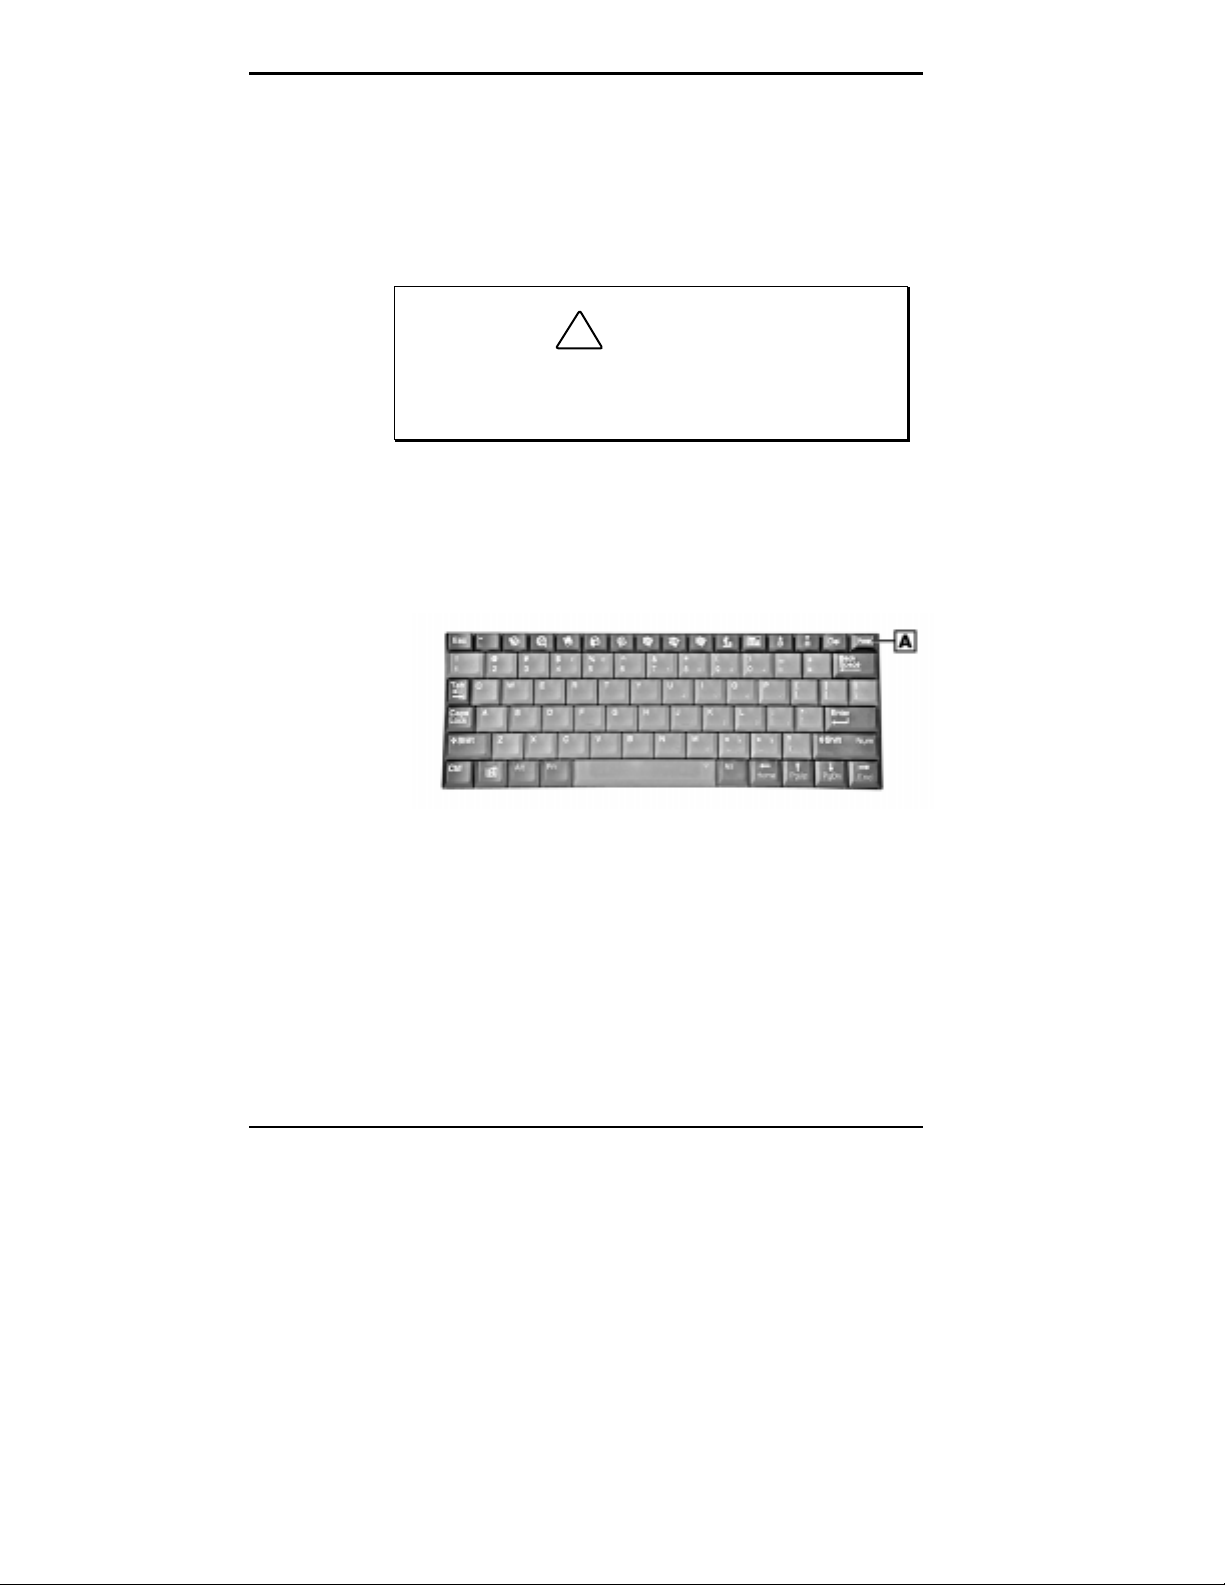
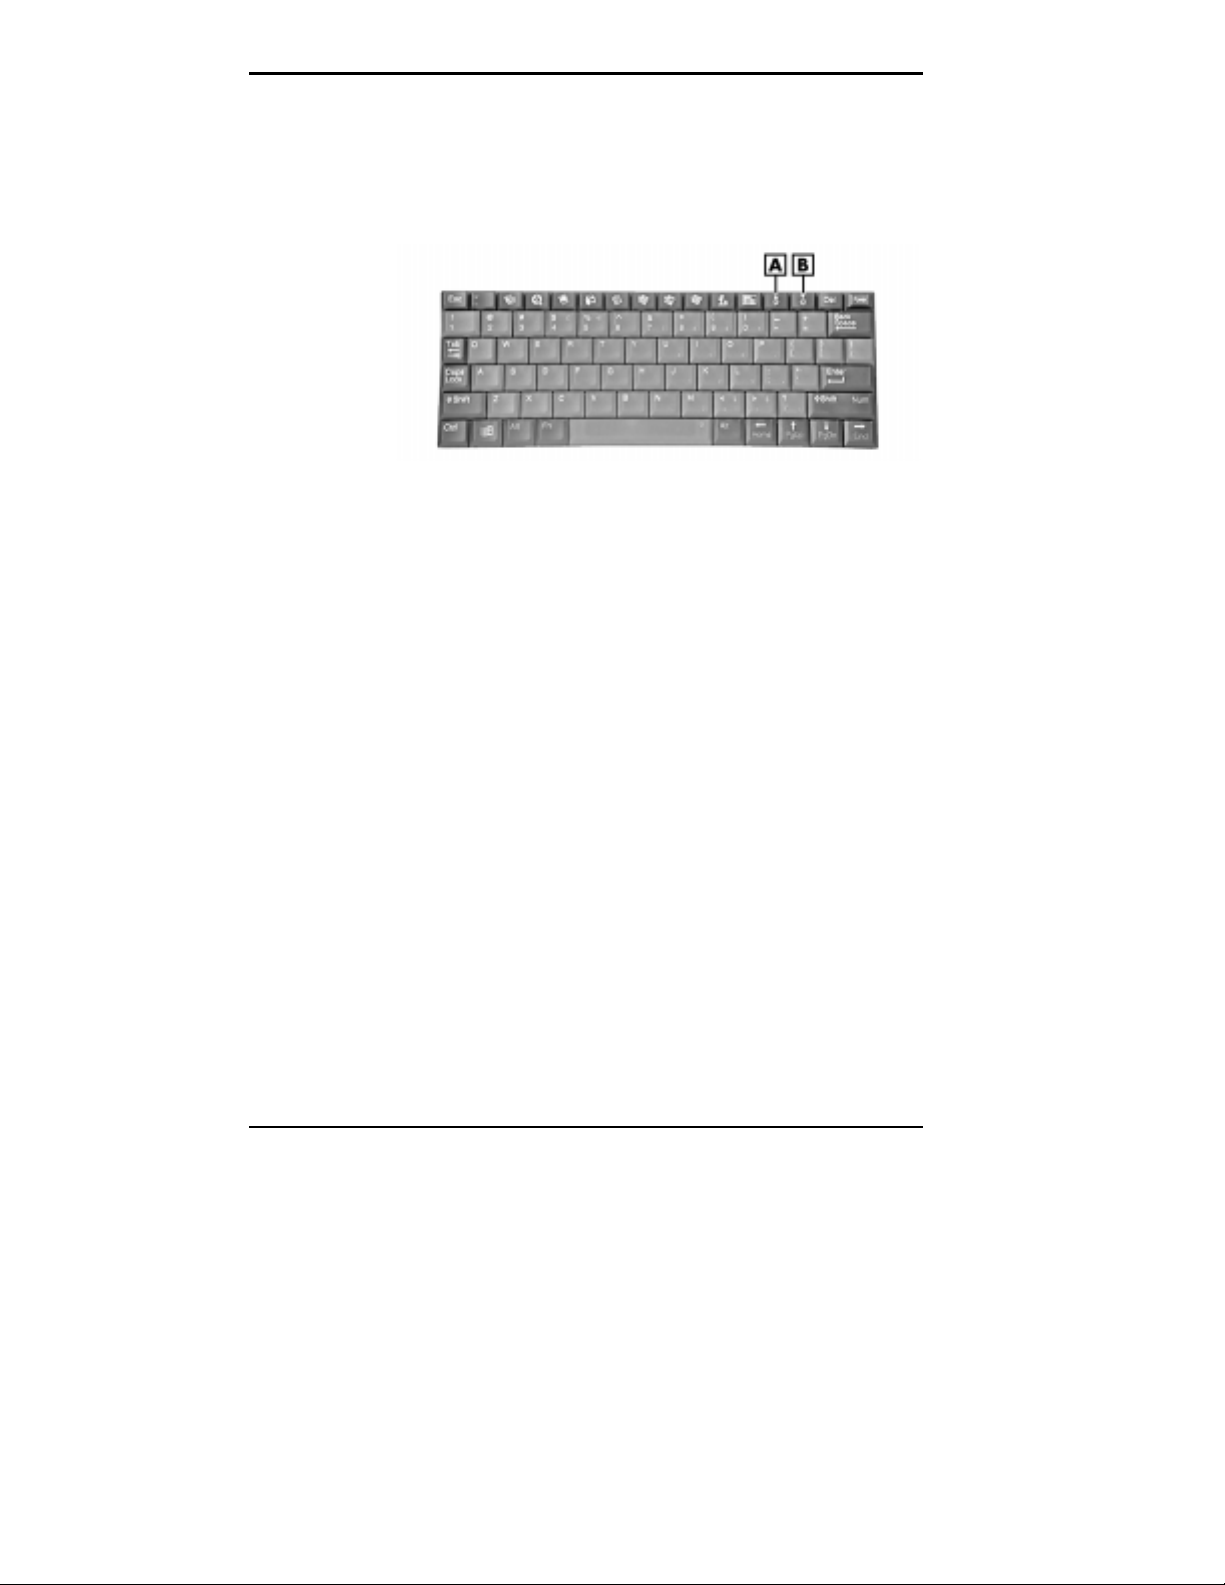
Pr ess the b rightnes s up or brightness down keys as re-
2.
quired
.
Adjusting t he br ightness
A
– Brightness Up B – Brightness Down
You ca n c onserve batt ery life by configuring you r NEC
MobilePro to automatically turn off the display panel’s
backlig h t. Foll ow thes e steps to configure t h e backlight for
automatic turn off.
Go to S tart, Settings, C ontrol P anel.
1.
Double t ap t he Di splay ic on and select the Backlight
2.
tab.
4-4 Using the NEC MobilePro
Page 5

Tap the desired selections to place a c heck beside the
3.
selection.
Backlight s ettings
In addition, you can conf igu re the NE C MobilePro t o turn
on the backlight automatically. Follow these steps to configure the backlight for automatic turn on.
Tap the Advanced tab, shown in pr eviou s figure, t o ac-
1.
cess the adva nc ed backlight prop erties.
Using the NEC MobilePro 4-5
Page 6
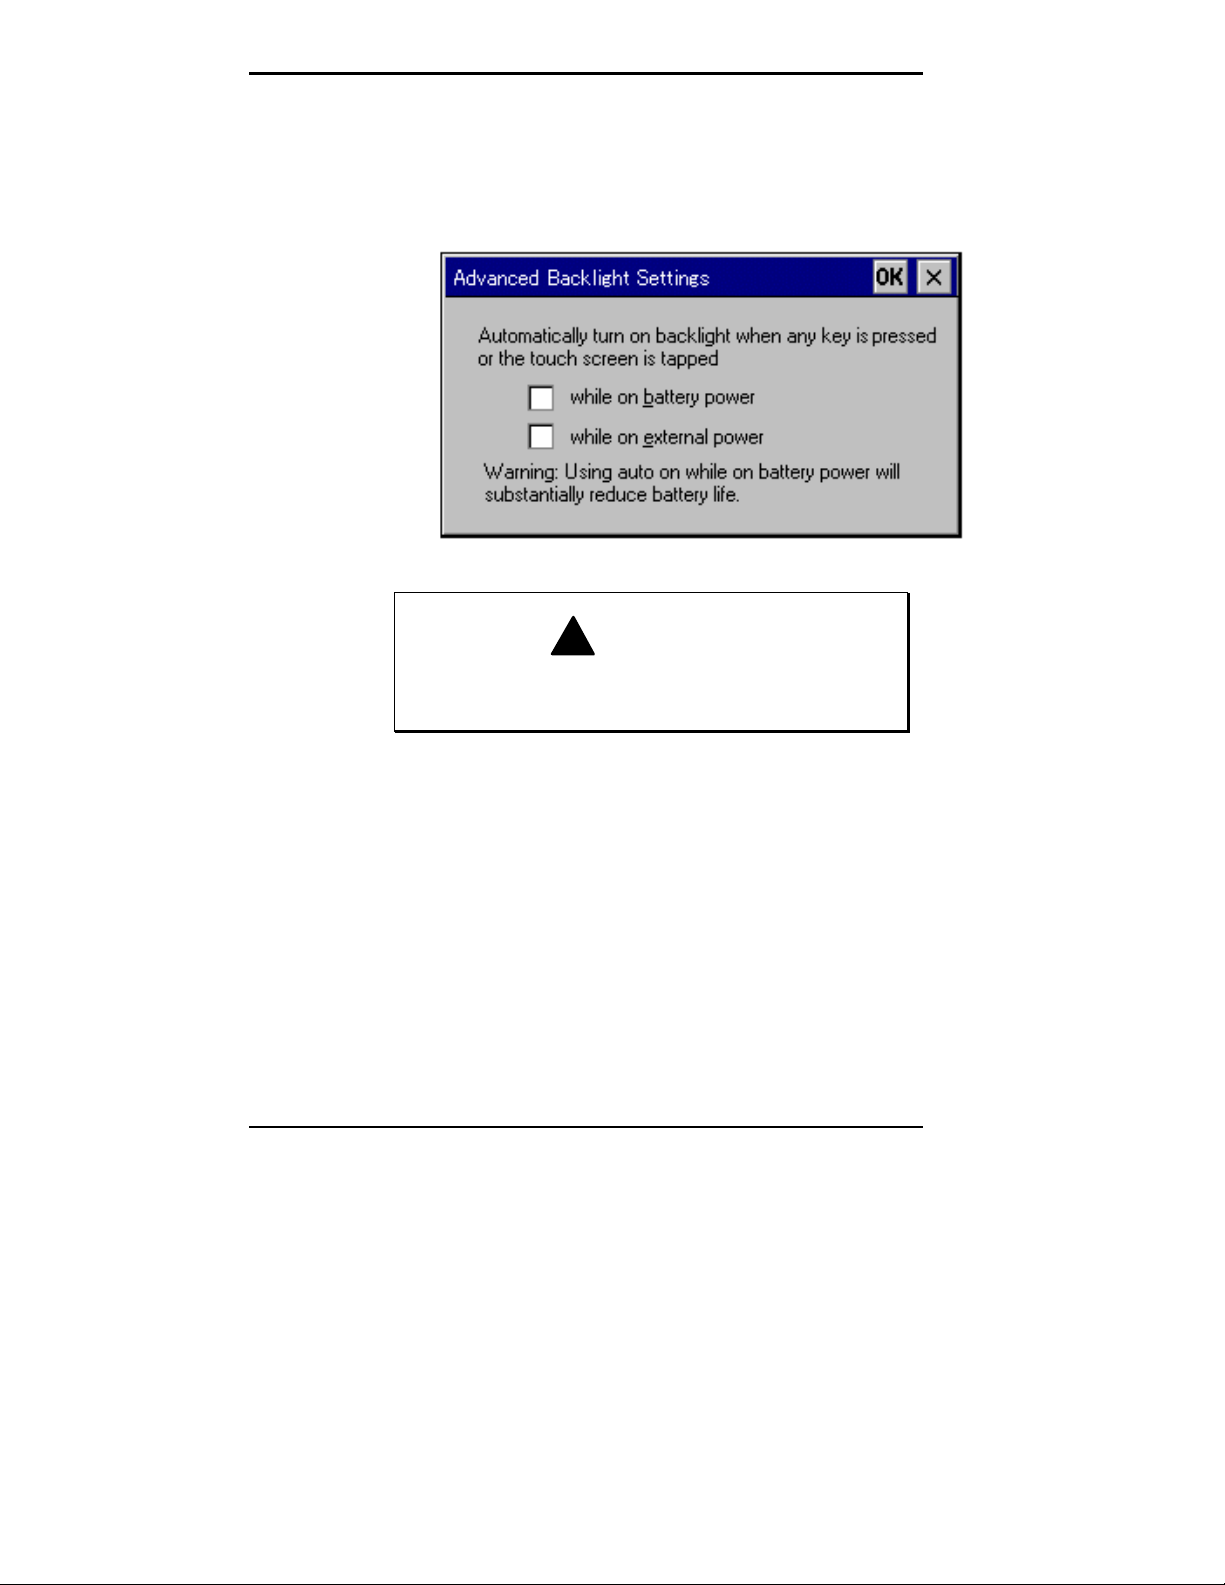
Tap the desired selections to automatically turn on the
2.
backlight.
Advanced backlight settings
!
Using auto on while on battery power substantially
reduces battery l ife.
WARNING
Enabling the Suspend Switch
You ca n c onfigur e you r NEC Mob ilePro H /PC to power on
or off by simply opening or closing the displa y c over. The
suspend switch acts as a switch for both the power and the
display panel.
Opening the NEC MobilePr o powers on the unit. To p ower
on the unit while it is open, use the Power b u tton.
Closing the MobileP ro power s off t he u nit and ins ures that
the bac klight is off as well.
4-6 Using the NEC MobilePro
Page 7
Use t h e followi ng pr ocedure to en abl e the s uspend swi tch.
Tap Start on the Taskbar to access Settings, then select
1.
Control Panel.
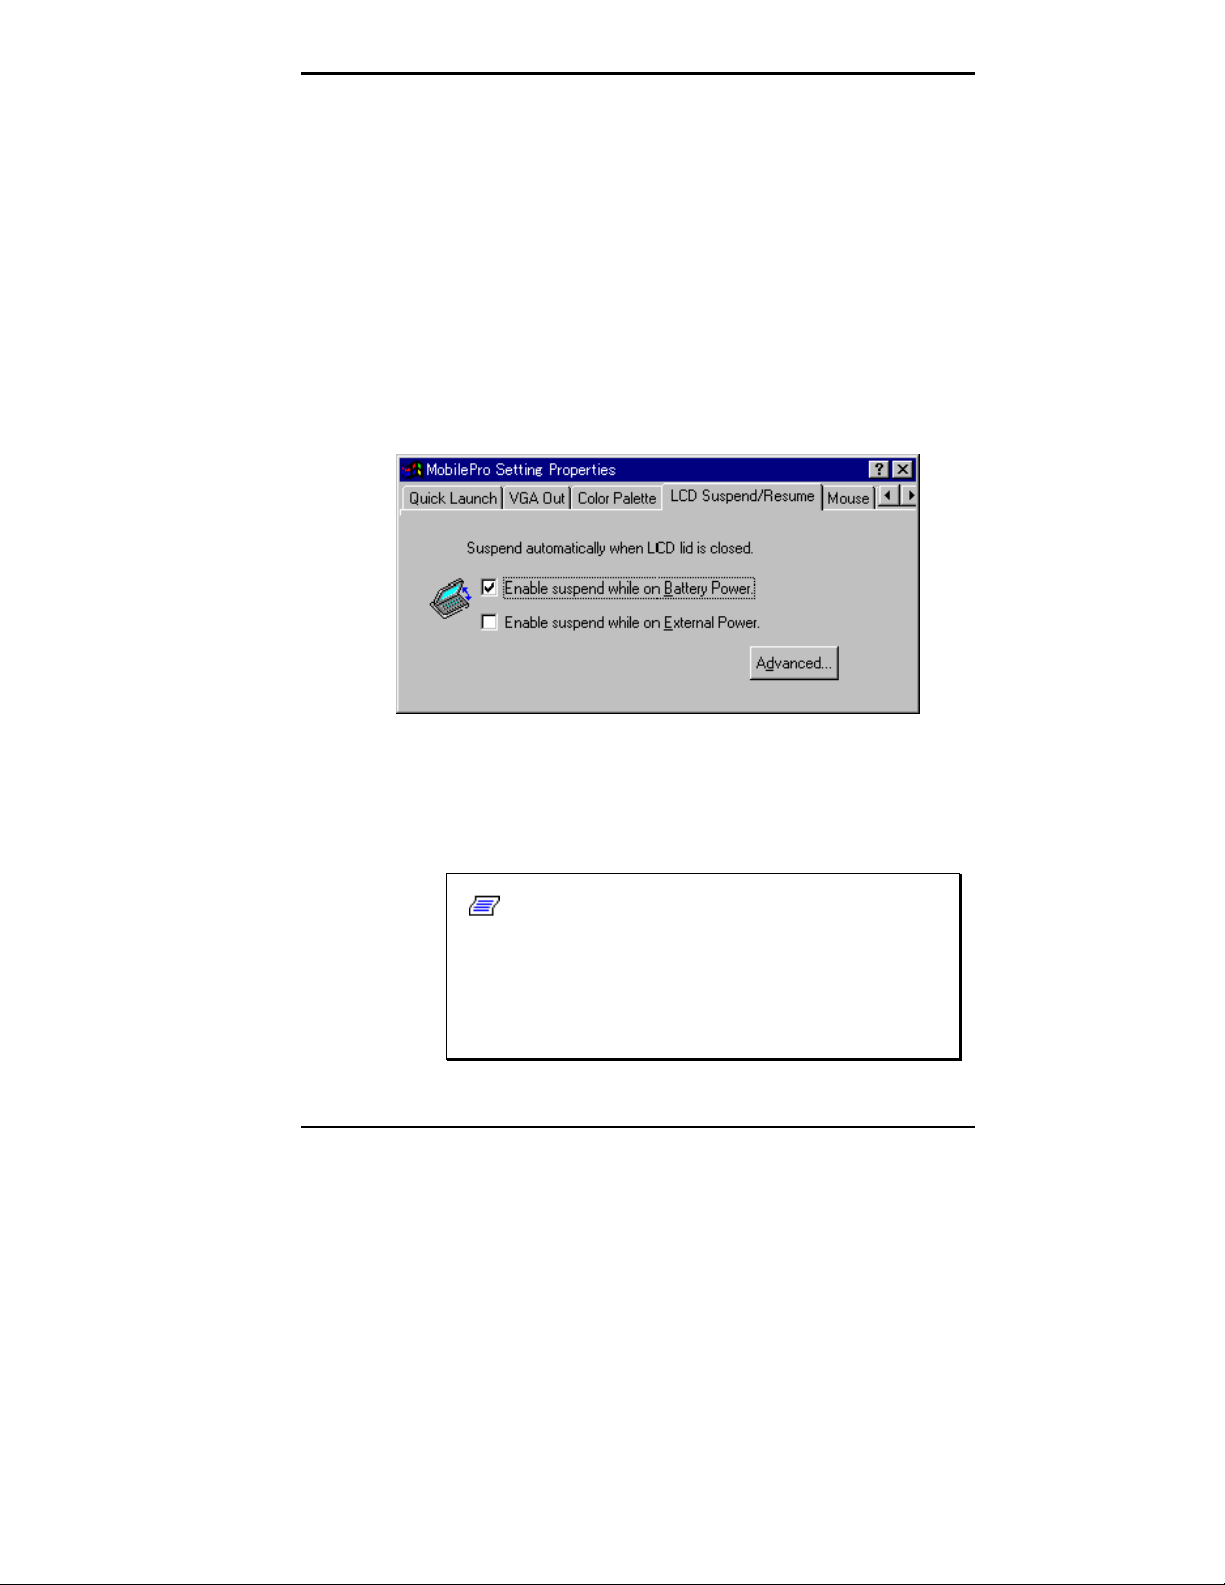
Double t ap on t he M obilePro Settings icon to launch
2.
the dialog box shown in the following figure.
Be sure to select the “LCD Suspend/Resume” tab.
Power off settings
Select eit her “E nable suspend while on batt ery power”
3.
or “Enable suspend while on external power, ” or both
to enable t he dis p lay linkage s wit c h.
Note:
cally suspend while on battery power during synchronizati on, unless the battery charge is at a
low
status. You may want to connect your MobilePro t o an AC power source bef ore synchroni zi ng
with your desktop or notebook c omputer.
Your NEC MobilePro will not automati-
very
Using the NEC MobilePro 4-7
Page 8
USING THE KEYBOARD
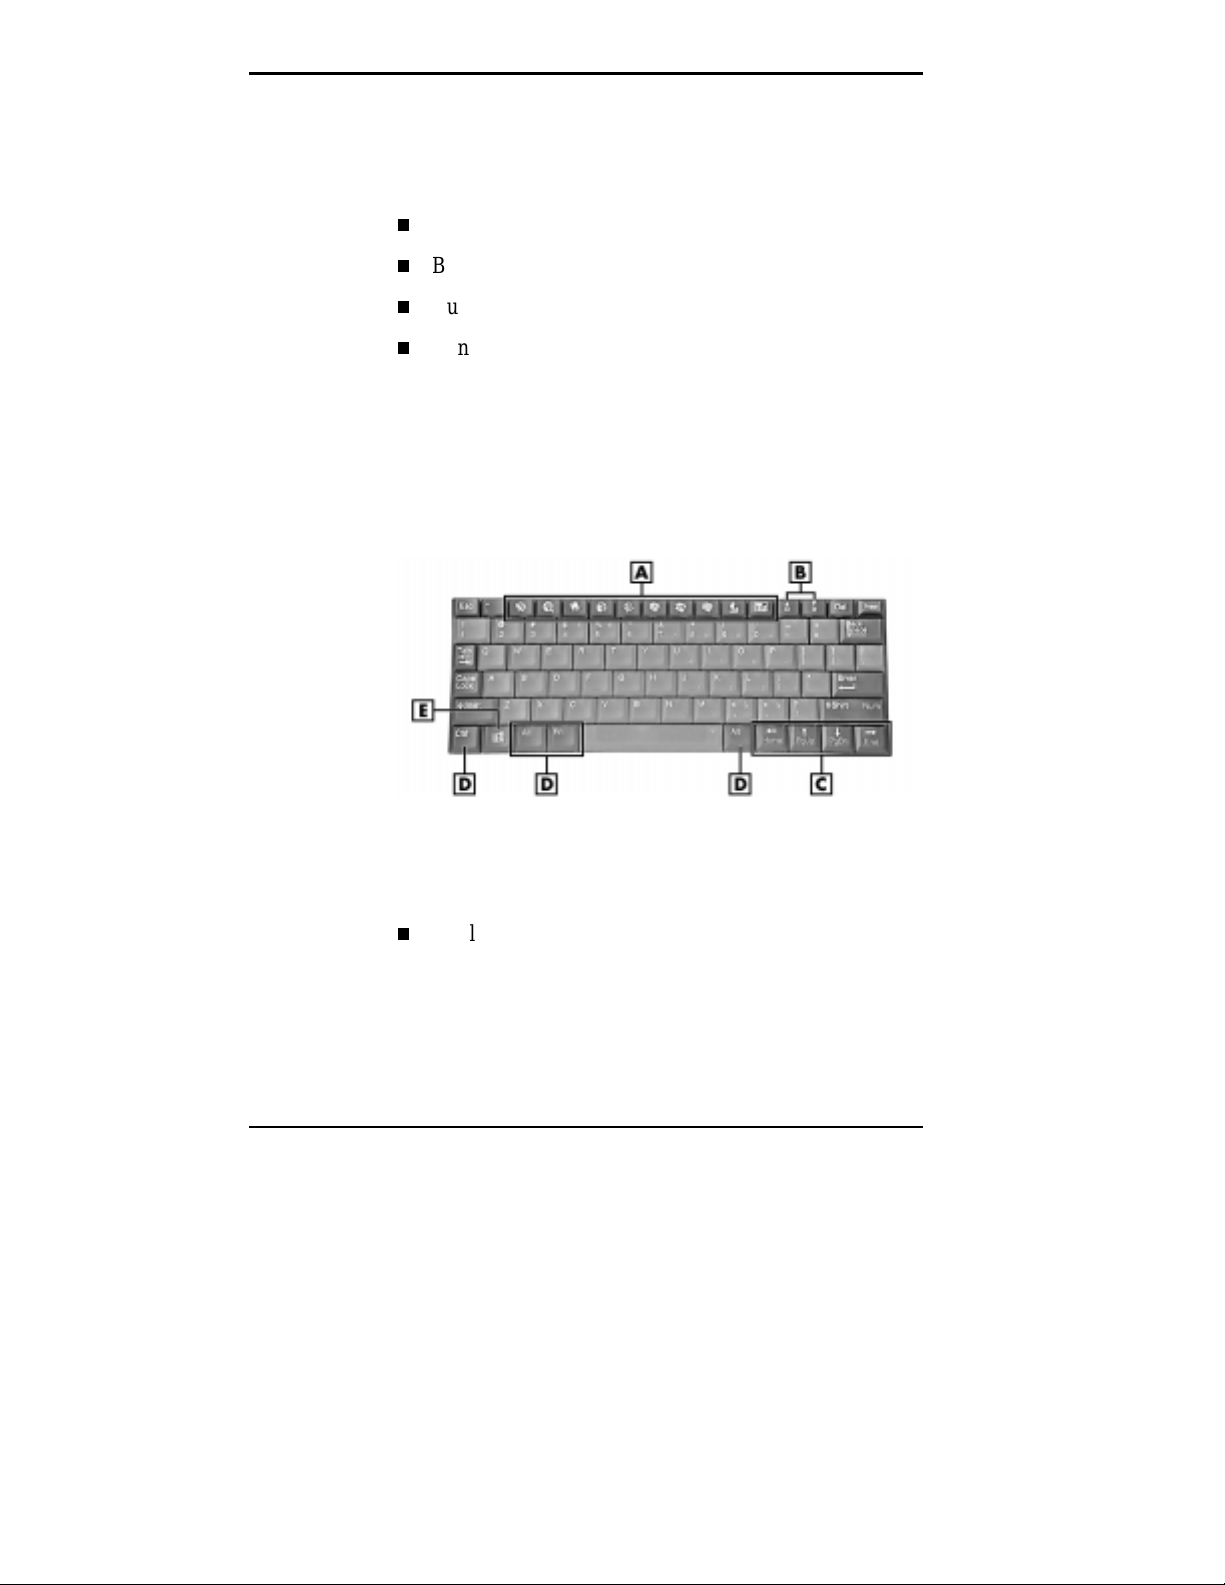
The NE C MobilePro keyboard is equipp ed wit h ma ny features including:
Application s hortcut keys
Bright ness up/down keys
Cursor control keys
Control keys
Featur e keys are loc ated a s shown in the following f i gure.
Key operations are descr ibed after t he fi gure.
A
– Applications short c ut keys B – Brightness up/down keys
C
– Cursor control keys D – Control keys E Wi ndows key
Application s hortcut keys — Ten a pplication shortcut
keys allow you to launc h applic ations directly from the
keyboard. For details about each key, refer to the section that follows, “Using Application Shor tcut Keys. ”
Keyboard
4-8 Using the NEC MobilePro
Page 9

Bright ness up/down keys — Use the brightness
up/ down keys to adju st the N E C Mob ileP ro’s p anel
brightness.
Cursor Control Keys — Cursor control keys let you
position the curs or on the screen where you want. The
cur sor indicates where the next text t yped is inser ted.
Control Keys —
Ctrl, Alt, Fn
, a nd
used in conju nc tion with ot her keys to change their
functions. To us e control keys , pr ess and hold the contr ol key while pressing another key.
Windows K ey — You can use the W indows key to dis -
play the Start menu.
USING APPLICATION SHORTCUT KEYS
The NEC MobilePro provides a pplication launch keys located in the top of the keyboard. Use these keys to launch
applications dir ectly fr om the keyboard. The key defaults
ar e lis ted in the following table.
ar e controls
Shift
Using the NEC MobilePro 4-9
Page 10

Default Application Shortcut Keys
Icon Application
Inbox
Microsoft Internet Pocket Explorer
Calendar
Contacts
Tasks
Microsof t Pocket Word
Microsof t Pocket Excel
Microsoft Pocket PowerPoint
4-10 Using the NEC MobilePro
V oice Reco rder
Calculator
Bri ght ness Up
Bri ght ness Down
Page 11

Default Function Keys
In addition to the applic ation s hortc ut keys, your N EC
MobileP ro is equipped with default f unction keys as descr i bed in the following table.
Default Function Keys
Key Function
Fn + Space Bright ness Change
Fn + Shi f t Num Lock
Fn + 4 Pound key
Fn + 5 Eur o
Al t + < Contrast Up
Al t + > Contrast Down
Alt + Left
Arrow
Alt + Right
Arrow
Al t + Up
Arrow
Al t + Down
Arrow
Home
End
PgUp
PgDn
USING THE VOICE RECORDER
The NEC MobileP ro features a voice recorder applica tion
that lets you record and p lay voice memos. Recording voice
memos with the NEC MobilePro is easy.
Follow these steps to record with the Microsoft Voice Recorder.
Go to Start, Programs, Accessories, Microsoft Voice
1.
Recorder.
Using the NEC MobilePro 4-11
Page 12

Hold your NEC MobilePro with t he microphone fa c i ng
2.
you.
Pr ess the p l ay bu tton (red dot) and sp eak into t he mi-
3.
crophone.
When you are finished recording, pr es s the st op button
4.
(bl ack squar e). A beep s ounds wh en the recording
stops.
To playback your recording, tap to highlight your s elect ion
and press the play button (gr een triangle) or simply dou ble
tap your selection.
You may want to modify the recording for ma t to improve
the qua lity of playbac k. To modify t he recording format,
ta p Tools , Recording Format and us e t he dropdown b ox to
change the format to PCM and to modify the Attributes to a
higher sampling rate.
Note:
microphone about three inches away from your
mouth whil e speaking.
Recording works best if you positi on the
Mem or y r equired for voi c e memo storage vari es
depending on user settings.
Menu
The Voice Rec order p rovides a variety of menu selections
under t he File, Control, and T ools selections . Refer to the
online help provided wit h the voice recor der application for
details about its u se. Just tap the question ma rk icon in the
upper right-hand corner of the screen to access the online
help.
4-12 Using the NEC MobilePro
Page 13

USING PC CARDS
Your NEC MobilePro comes with a PC card slot that supports one Type I or one Type II PC card. All PC cards are
approx ima tely the same size, have a standard 6 8-pin connector and vary only in thicknes s. P C ca rds add
a va riety of stor age and communication f unctionality
to your MobileP ro.
When using a PC c ard in the MobileP ro, we recommend
tha t you a l so use AC power . T he b atteries alone may not
provide enou gh power for some PC cards t o operate properly.
when using PC cards or the internal modem. Using
the adapter can hel p y ou avoi d potential data loss
caused by the high-energy c onsumption of some PC
cards.
Inserting PC Cards
Follow these procedur es to instal l a P C car d .
Note:
We r ec ommend using the AC adapter
With the PC card facing up, insert it into the PC card
1.
slot.
Inserting a PC car d
Using the NEC MobilePro 4-13
Page 14

Verify that the PC card is fitted securely into position.
2.
!
Make sure you align the PC card correctly for insertion. Inserti ng a PC card i ncorrec tl y can dam age t he
card and/or the NEC M obilePro.
Removing PC Cards
Remove a PC card from the NEC MobilePro as f ollows.
Locate the PC card Eject button beside the PC card slot
1.
and press i t to release the card from the slot.
Once the card is released, p ull it the rest of the way out
2.
of the sl ot.
USING COMPACTFLASH CARDS
Your NEC MobilePro comes with a CompactFlash card
slot that supports one Type I or Type II CompactFlash
card. A C omp actFlas h c ard provides a st ora ge device for
your MobilePro and when ins erted, c reates a Storage Card
2 folder. To v i ew the co ntent s of the fo l d er, double t ap the
My Ha ndheld PC icon on your M ob ilePro desktop, then
double t ap the S torag e Ca rd f o l d er.
CA UT ION
When using a Compact Flas h c ard in t he M ob ilePro, we
recommend tha t you also use AC p ower. The ba tteries a lone
may not p rovide enough power for some Compac tFlash
ca rds to oper at e pro per l y .
Note:
when using CompactFl ash cards. Using the adapt er
can help you avoid potential data loss caused by the
high-energy consumption of some CompactFlash
cards.
4-14 Using the NEC MobilePro
We recommend using the AC adapter
Page 15

Inserting CompactFlash Cards
Follow these procedur es to install a C ompactFlas h card.
With the CompactFlash card facing up, insert it into the
1.
CompactFlash card slot.
Inserting a CompactFlash card
Note:
a button pops out of the card bay. Piv ot the button
towards the left side of the unit until it fits into the
recessed space next to the slot.
Verify that the CompactFlash card is fitted securely
2.
When y ou insert a CompactF lash card,
into position.
Using the NEC MobilePro 4-15
Page 16

!
Make sure you al ign the CompactFlash card correctly for insert ion. Inserti ng a CompactFlash card
incorrect ly can damage the card and/or the
MobilePro.
Removing CompactFlash Cards
Remove a CompactFlash card from the NEC MobilePro
as f ollows .
Note:
of the rec essed space before begi nning the f ollowing procedure.
Sa ve you r data if you are storing it on t he ins erted
1.
CompactFlash card.
Piv ot the Com pactF lash c ard butt on out
CA UT ION
Press the button beside the CompactFlash card slot.
2.
When the card pops out slightly, pull it out of t he s lot.
3.
USING THE IR PO RT
With t he N E C MobilePro, you can send and receive dat a to
and from another similarly equipped device using t he
infrared (I rDA) communication p ort. In addition, you can
use t he IR port t o synchronize data with you r deskt op comput er, in p lace of using the PC Connect serial ca ble. C ommunicate with another MobilePr o or your desktop as
follows.
Open the dis play panels on t he t wo u nits t hat you want
1.
to us e f or communication.
4-16 Using the NEC MobilePro
Page 17

Position the Mob ileP ro unit s so that communication
2.
ports face each other. Posit ion the units from 2 to 20
inches apart.
Be sure tha t nothing obstruct s the path b etween the
3.
communicat ion port s on both units, and that the ports
ar e aligned properly.
Send your dat a by using the “ Send To” selection in the
4.
Windows C E Pocket E xplor er File menu.
Highlight the file you wish t o transfer and choose “Infrared
Recipient ” f rom the Send To selections. Your file is transferred to the other MobileP ro. The receiving Mob ilePro
us es th e File/Receive co mmand t o receive the infrared
transmission.
Note:
thing blocks the path between the two ports, data
may not be sent or r ec eiv ed c or r ec tly.
If t he units are too f ar apart or i f some-
UPGRADING ROM
You can upgrade NEC MobilePro ROM by replacing the
cur rently installed ROM module with an upgraded RO M
module.
data with your desktop or notebook computer and
perform a backup of your MobilePro data before
upgrading your ROM module. You may need to
copy some files back to your MobilePro following
this upgrade procedure.
Note:
Be sure to synchroni ze your Mobil ePro
Using the NEC MobilePro 4-17
Page 18

Follow thes e s teps to upgrade your Mob ilePro R OM module.
Sa ve you r data to a not ebook or desktop computer ,
1.
power off the Mob ilePro, and clos e t he dis play p anel.
Disconnec t any p eripher al devices att ached to the Mo-
2.
bilePro, such as the AC adapter.
Remove the battery pack. See the section in Chapter 2,
3.
“R emoving and I nsert ing the Bat tery P ack,” for det ails.
Tu rn over t he M obilePr o and loca te the screw tha t
4.
secures the ROM bay cover.
Using a small sc rewdriver, remove the screw and the
5.
bay c over. ( The Mob ilePro does not power on when t he
bay c over is r emoved.)
ROM bay cover
With the small screwdriver, remove the two screws on
6.
the ROM module.
4-18 Using the NEC MobilePro
A
– ROM bay cover
Page 19

Gently lift up the R O M module to disconnect it from its
7.
connector and remove it from the b ay.
Inser t the up graded R OM module into the bay, aligning
8.
the connector on the module with the one in the bay.
Gently press on the module just above the connectors
9.
until t he connection is secure.
Replace the two screws to secure the upgraded ROM
10.
module.
Replace the b ay cover and cover scr ew.
11.
Push the full reset button. For details about using the
12.
full reset button, refer to the section later in this chapter, “Using the Full Reset button.”
After one minute or more, install the battery pack.
13.
Note:
the ROM bay cover i s secure and the battery lock
is in the l oc k ed posi tion.
The MobilePro will not power on unless
RESETTING THE MOBILE PRO
Occasiona lly you may need to reset your NEC MobilePro.
For insta nc e, you may need to reset after restoring data
from your deskt op or notebook computer, after modifying
the MobilePro’s configuration, when you are u nable to
power on using the Power butt on, or when the operating
system stops responding.
The NEC MobilePro is equi p ped with two reset buttons, designed for use depending up on specific c onditions. The two
reset buttons are:
Using the NEC MobilePro 4-19
Page 20

Soft Reset Button – The soft reset button allows you to
restart the NEC MobilePro operating system while preserving any sa ved data. T his method is similar to a
“wa rm boot” on your desktop or notebook comp uter .
Full Reset Button – The full reset button restores your
syst em to its or iginal shipping configuration, er asing a ll
informa tion tha t you ha ve ent ered.
Note:
at all tim es, you should perform regular backups of
your Mobil ePro inf orm ati on to your desktop or notebook computer. For more information, see the
“Backing Up and Restori ng Dat a” secti on i n Chapter
3.
To ensure the saf ety of your i nf or m ati on
Using the Soft Reset Button
Before using the soft reset button to reset the MobilePro,
close any open files or applic ations , if pos sible. W hen you
soft reset the MobilePro, you ma y lose open/unsaved files.
Use the soft reset button to reset the NEC MobilePro as
follows.
Remove the stylu s from it s holder and open the display
1.
panel.
Power on the MobileP ro.
2.
Turn over the MobilePro.
3.
Locate the soft reset button on the bottom of the Mo-
4.
bilePro.
4-20 Using the NEC MobilePro
Page 21

Using the s tylus, press the soft reset button. ( You may
5.
need to press the button more than once.) This resets
the unit.
Soft reset button
A
– Soft reset button
Using the Full Reset Button
Use the full reset button only when your unit does not re-
spond after doing all of the following.
Inst alling a charged b attery.
Connecting the unit to an AC power source.
Verifying that the battery lock is in the locked position.
Using the soft reset button to reset the system.
Using the NEC MobilePro 4-21
Page 22

!
Using the f ull reset button to reset your MobilePro
returns your unit to its original shipping configuration. All data and applicati ons are erased from RAM .
All open/ unsaved fi les are lost and all user specif ic
data such as contacts, tasks, etc ., are erased.
You can onl y restore data that has been backed up
to your desktop or notebook computer. For more
information, see the “Backing Up and Restoring
Data” section in Chapter 3.
The full reset b utton is located inside of the main bat tery’s
bay. Remove the battery and use the full reset button to reset the NEC Mob ilePro a s follows.
Remove the stylu s from it s holder and open the display
1.
panel.
CA UT ION
4-22 Using the NEC MobilePro
Page 23

Remove the main battery from the unit.
2.
Locate the battery lock and release latch on the bottom
of the system.
Slide the lock t o the unlocked position in the direction
of the a rrow, as indicated in the following figu re.
Slide the r elea se latc h in the direction of the ar row, as
indicat ed in the following figure, a nd hold it.
Remove the battery from the bay.
Removing the bat tery pack
A
– Battery release latch B – Battery release lock C – Battery pack
Using the NEC MobilePro 4-23
Page 24

Locate the full reset button inside of the battery bay, as
3.
indicat ed in the following figure.
Full reset button
A
– Full reset button B – Battery connectors
Using the stylus, press the full reset button. This resets
4.
the unit and res tores your s ys tem to its original shipping
configuration.
You may be able to use a recent backup of your data to
restore your sys tem to a more recent configuration. Refer t o Windows C E Ser vic es on your des ktop or notebook compu ter or the section in Chapter 3, “Ba c king Up
and R es toring You r Da ta” f or deta ils ab out backing up
and r es toring your M obilePro.
ADJUSTING MOBILE SETTINGS
Your NEC MobilePro is equipped with a desktop icon
labeled MobilePro Settings. T he MobilePr o Settings applet
allows you to conf igure a var iety of properties on your
NEC MobilePro and includes the following features.
VGA Out — Allows you to dis play t he s ame image on
both t he dis play panel and a n ex terna l monit or, as well
as, adju st the dis play resoluti on setting.
4-24 Using the NEC MobilePro
Page 25

Color Palette — Lets you select a 256-color display or
the defau lt 64K c olor disp lay.
LCD Sus pend/Res ume — Allows you to designa te a
sus pend option f or the display panel lid, when closed.
Keyboa rd Layout — Allows you to select for a U.S . or
international keyboard.
Built- in Modem — Allows you to specif y a country for
use of the built - in modem.
!
Selec t the appropriate country setting f or your built in modem to ensure compli ance with the country’s
telephone lines. An incorrect country setting may
damage your device or the telephone line.
The l ist of com pliant country’s outside the U.S. and
Canada is subject to change. For the latest list of
compliant countries outside the U.S. and Canada,
refer to NEC CSD’s web site at
.
com
CA UT ION
www.nec-now-
Accessing MobilePro Settings
To access MobilePro Settings, go to Start, Settings, Control
Pa nel, and simply dou ble tap the MobilePro Settings ic on to
display the ap plet’s window. For more deta ils, si mply tap
the “?” to view the onli n e h el p.
Using the NEC MobilePro 4-25
 Loading...