

Page 1

Using this Guide
This guide introduces you to the NEC MobilePro™ Handheld Personal Computer (H/PC) hardware. Read the following
sections.
Chapter 1, Quick Start, provides all the information you need to getting your MobilePro 700 setup and working with
your desktop or notebook system.
Chapter 2, Getting Familiar, introduces you to MobilePro H/PC (also called the MobilePro) features, battery
installation, the display panel, and unit care.
Chapter 3, Using the MobilePro, shows you how to power on and off, make display panel adjustments,
connect external devices, and more.
Chapter 4, Troubleshooting, walks you through some common problems and possible solutions.
Chapter 5, Specifications, details the hardware specifications for your MobilePro.
Read this user’s guide to become familiar with your MobilePro. For software operation details, see the software guide that
comes with the unit.
Text Setup
To make this guide as easy to use as possible, text is set up as follows.
Warnings, cautions, and notes have the following format:
WARNING
Warnings alert you to situations that could result in serious personal injury or loss of life.
CAUTION
Cautions indicate situations that can damage the system hardware or software.
Notes give particularly important information about whatever is being described.
Names of keys are printed as they appear on the keyboard, for example, Ctrl, Alt, or Enter.
Text that you must type or keys that you must press are presented in bold type. For example, type dir and press Enter.
Page 2

Quick Start
Congratulations and thank you for purchasing the NEC MobilePro Handheld PC (H/PC). This chapter shows you how you
can quickly setup and begin to use it either on its own or as a powerful desktop companion.
Quick Feature summary
Your new MobilePro 700 has the following key features:
A backlit display, which you can turn on under dim lighting conditions by pressing the backlight key on the keyboard
A large keyboard for true "touch typing"
A Compact Flash™ slot
A PC Card slot for Type I or Type II PC Cards
8 MB RAM (expandable to 32 MB)
an AC adapter for running your MobilePro H/PC using AC power
A low-power, hardware-based 33.6 Kbps fax/modem
A microphone and speaker for digital voice recording and playback
About Quick Start
The MobilePro 700 H/PC uses the Microsoft Windows CE 2.0 Operating System, which has a user interface very similar to
the Microsoft Windows 95 and Microsoft Windows NT operating systems. This chapter assumes that you are already
familiar with at least one of these operating systems.
Our purpose here is to get you very quickly up to speed and using your new MobilePro. The information in this chapter
has intentionally been kept concise. References are included to the other areas where you can find more detailed
information.
For important product information that was not available for inclusion in this guide, please refer to the Readme file
on the MobilePro H/PC Software Suite or to the Readme First sheet in the carton box.
Using Your MobilePro H/PC for the First Time
The MobilePro requires two type of batteries to operate as a portable computer:
2 AA Alkaline or rechargeable NiMH main batteries
1 CR2032 3-volt coin cell backup battery
CAUTION
When using the MobilePro for the first time, install the main batteries before removing the insulating sheet from the
backup battery compartment.
Page 3
Installing the Batteries
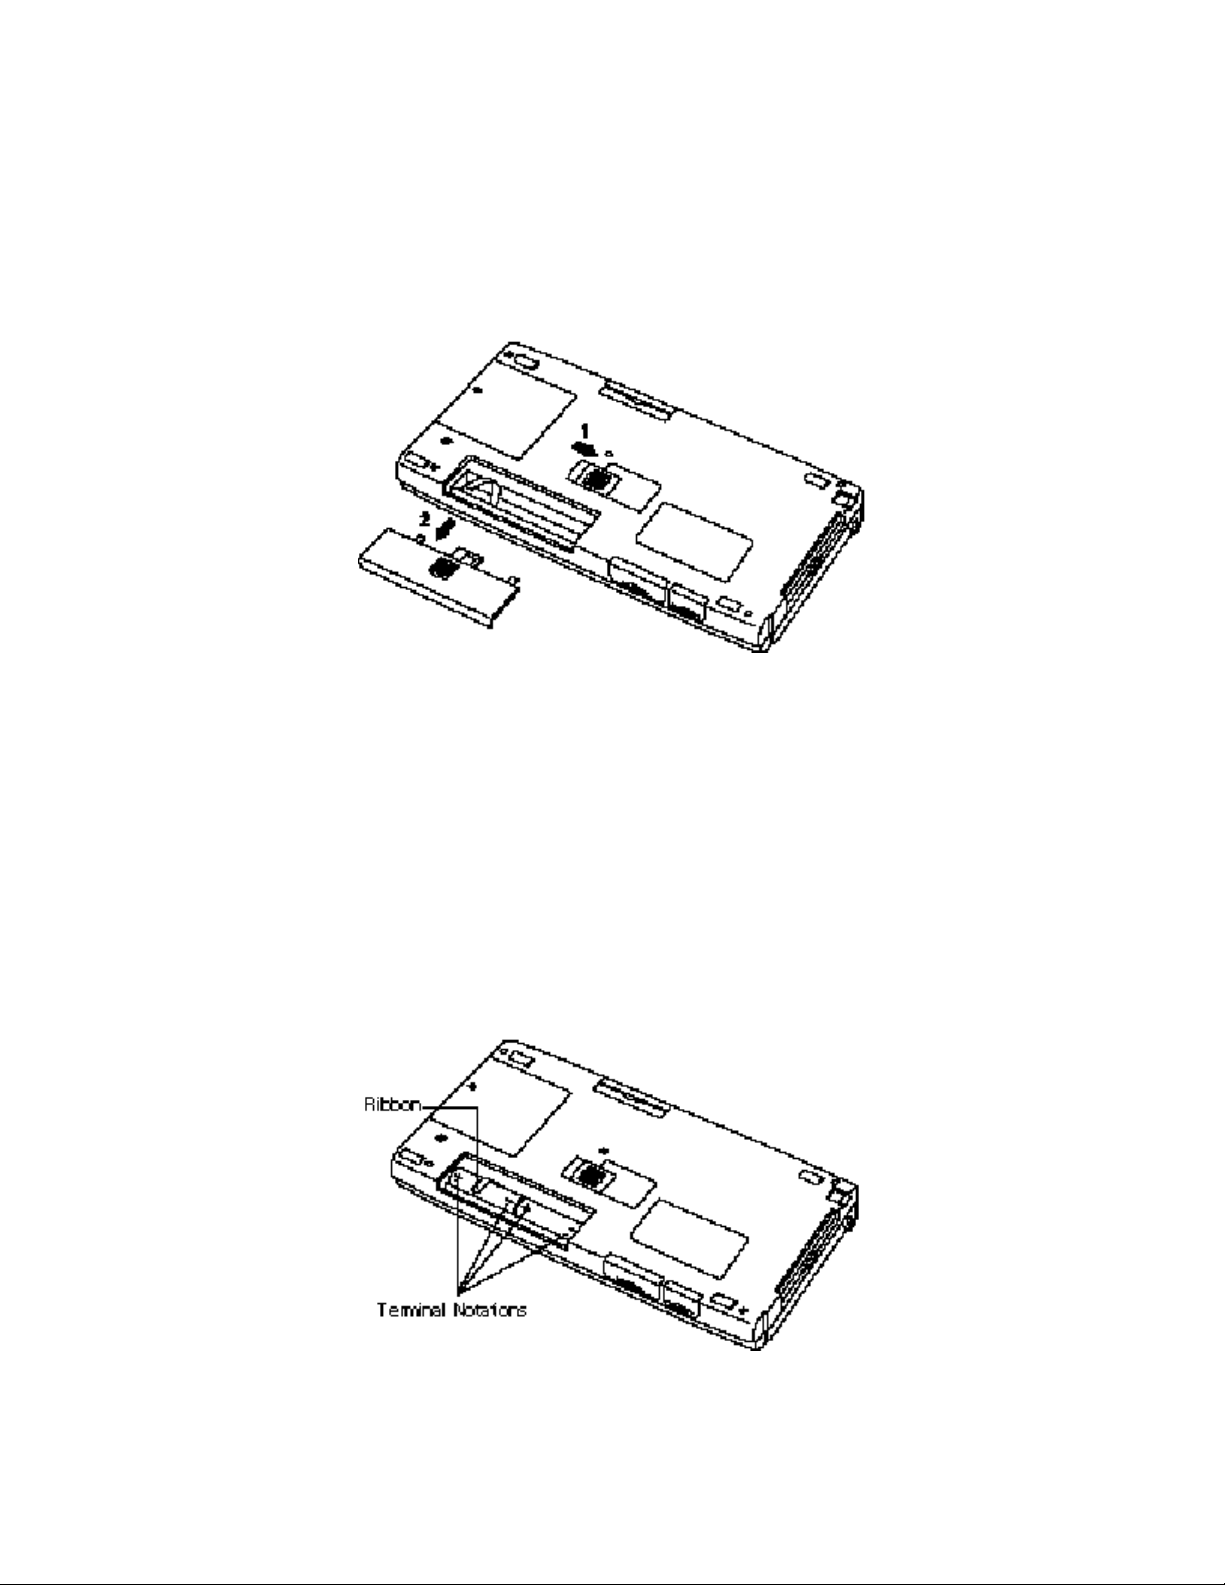
Slide the battery cover lock switch to the MAIN position.
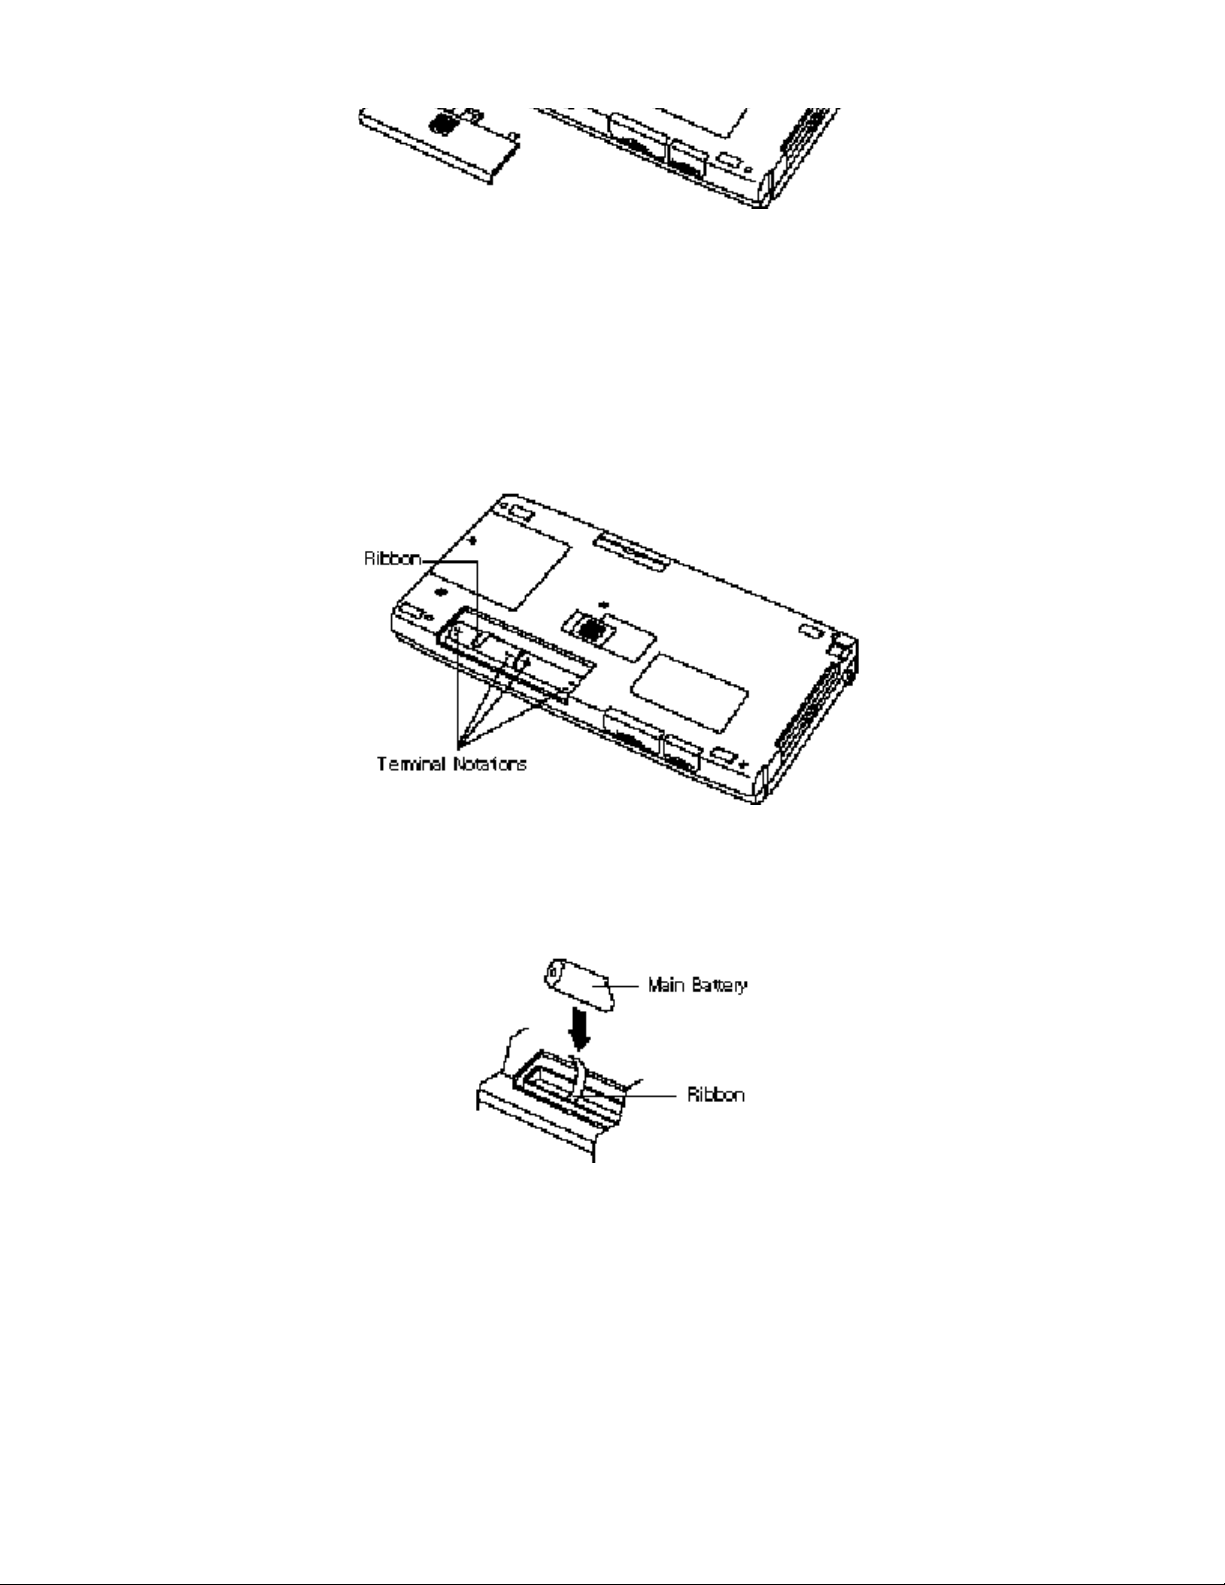
Open the main battery cover on the bottom-rear of your MobilePro.
Opening the battery bay cover
Slide the battery bay cover away from the unit and remove it.
Inside the bay, locate the following:
The battery ribbon. Pull the ribbon gently so that it protrudes out of the bay.
The terminal notations (+ and –).
Locating the ribbon and terminal notations
Page 4
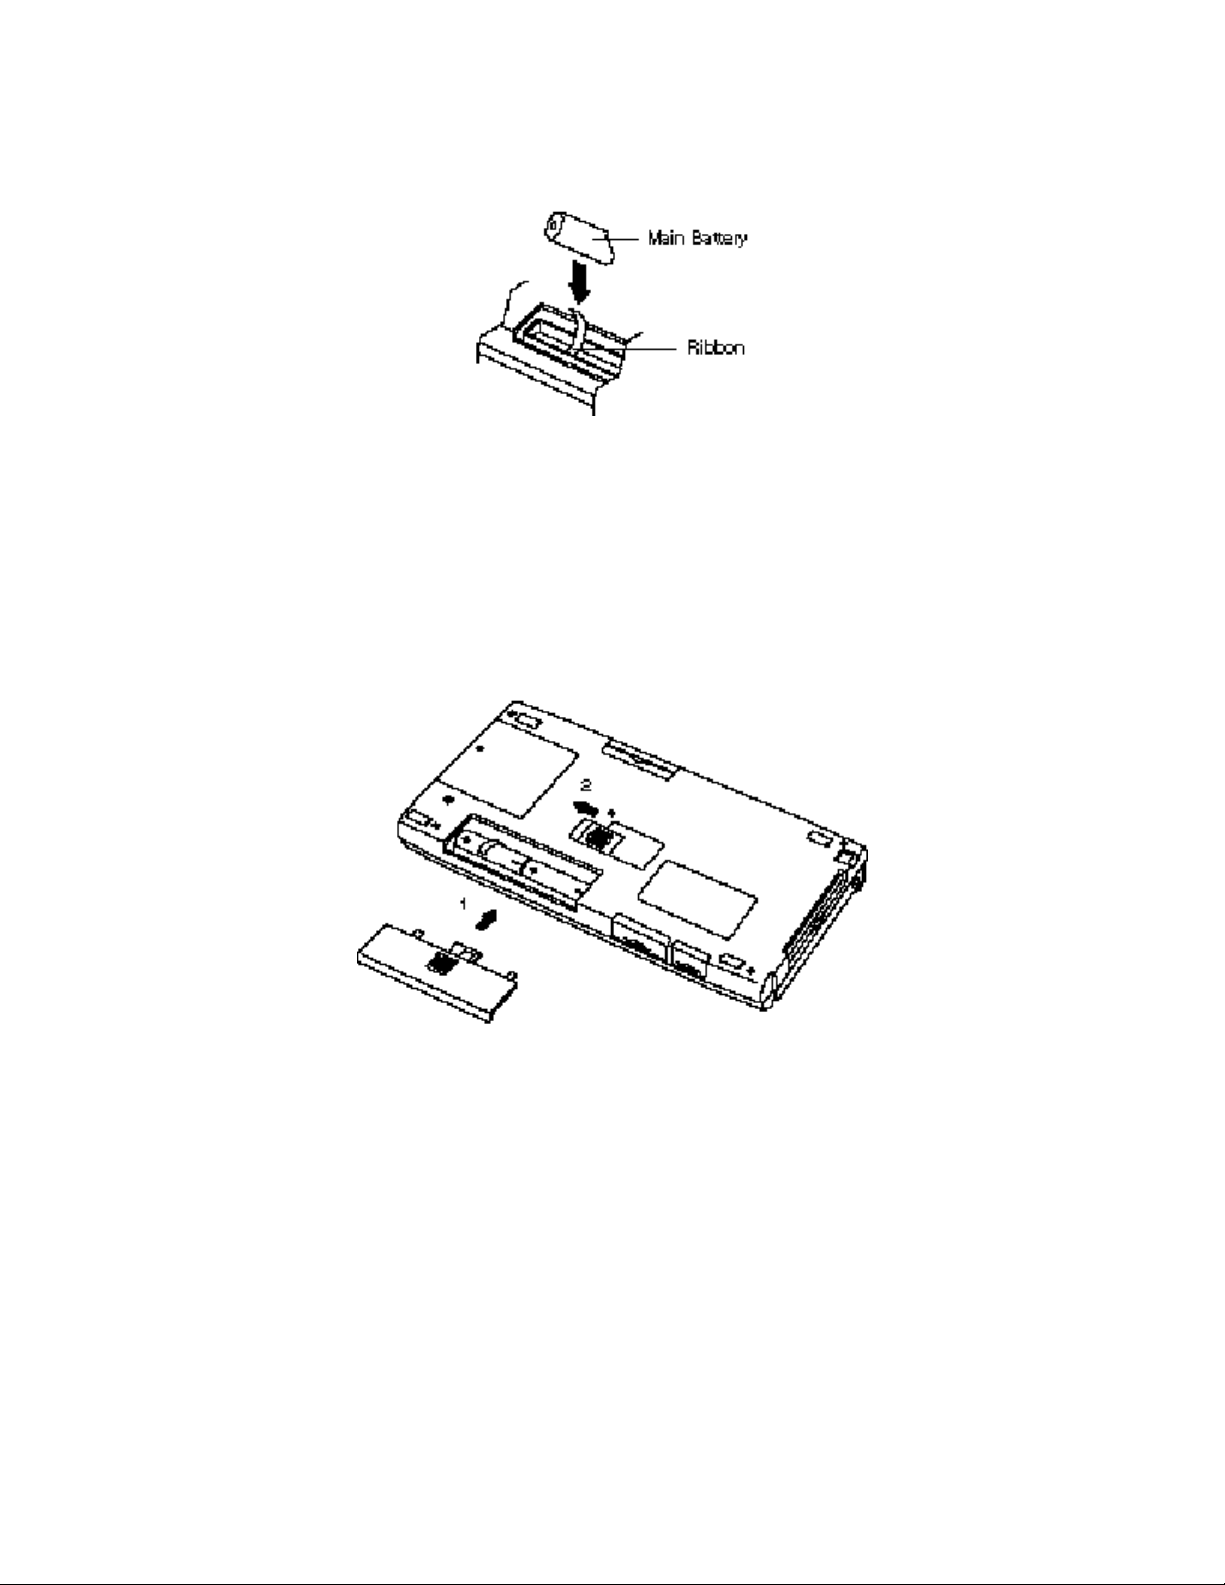
Put the AA batteries on the ribbon in the bay. Align the batteries so that the positive terminal (+) on the battery aligns
with the positive (+) notation in the bay.
Inserting the batteries
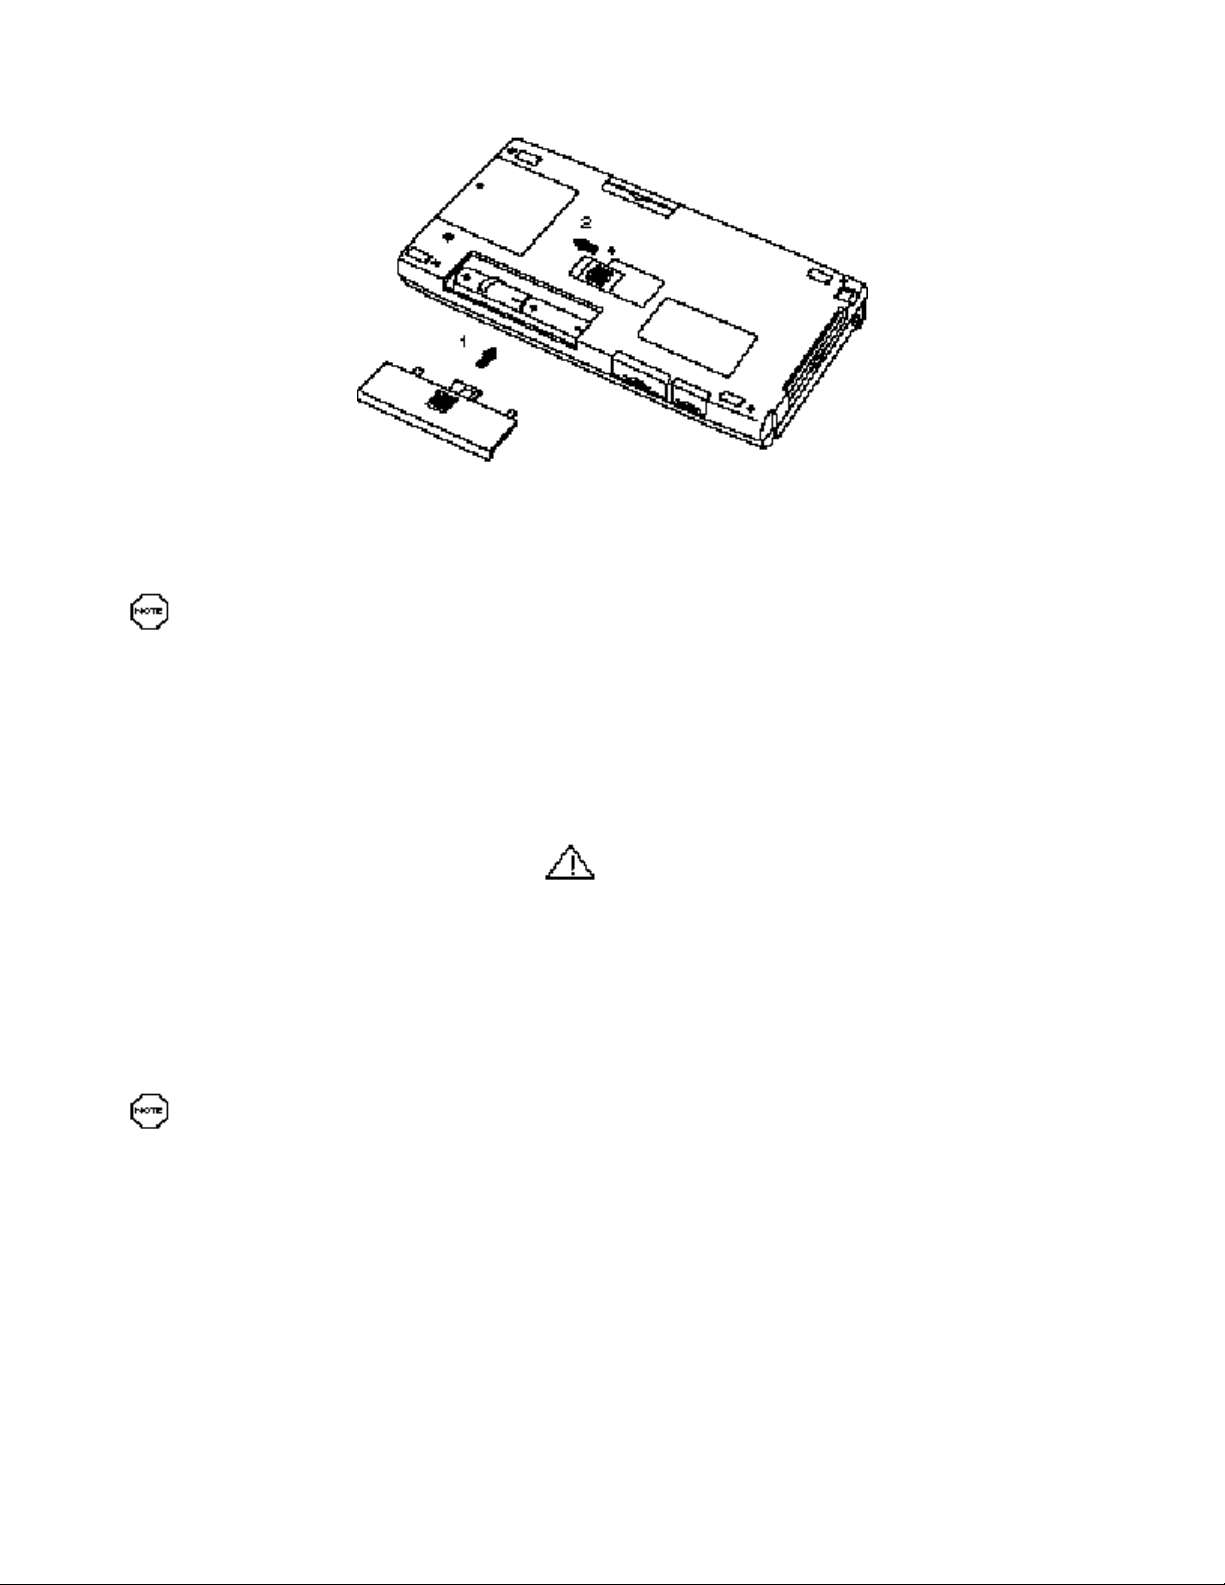
Replace the Main battery bay cover.
Replacing the bay cover
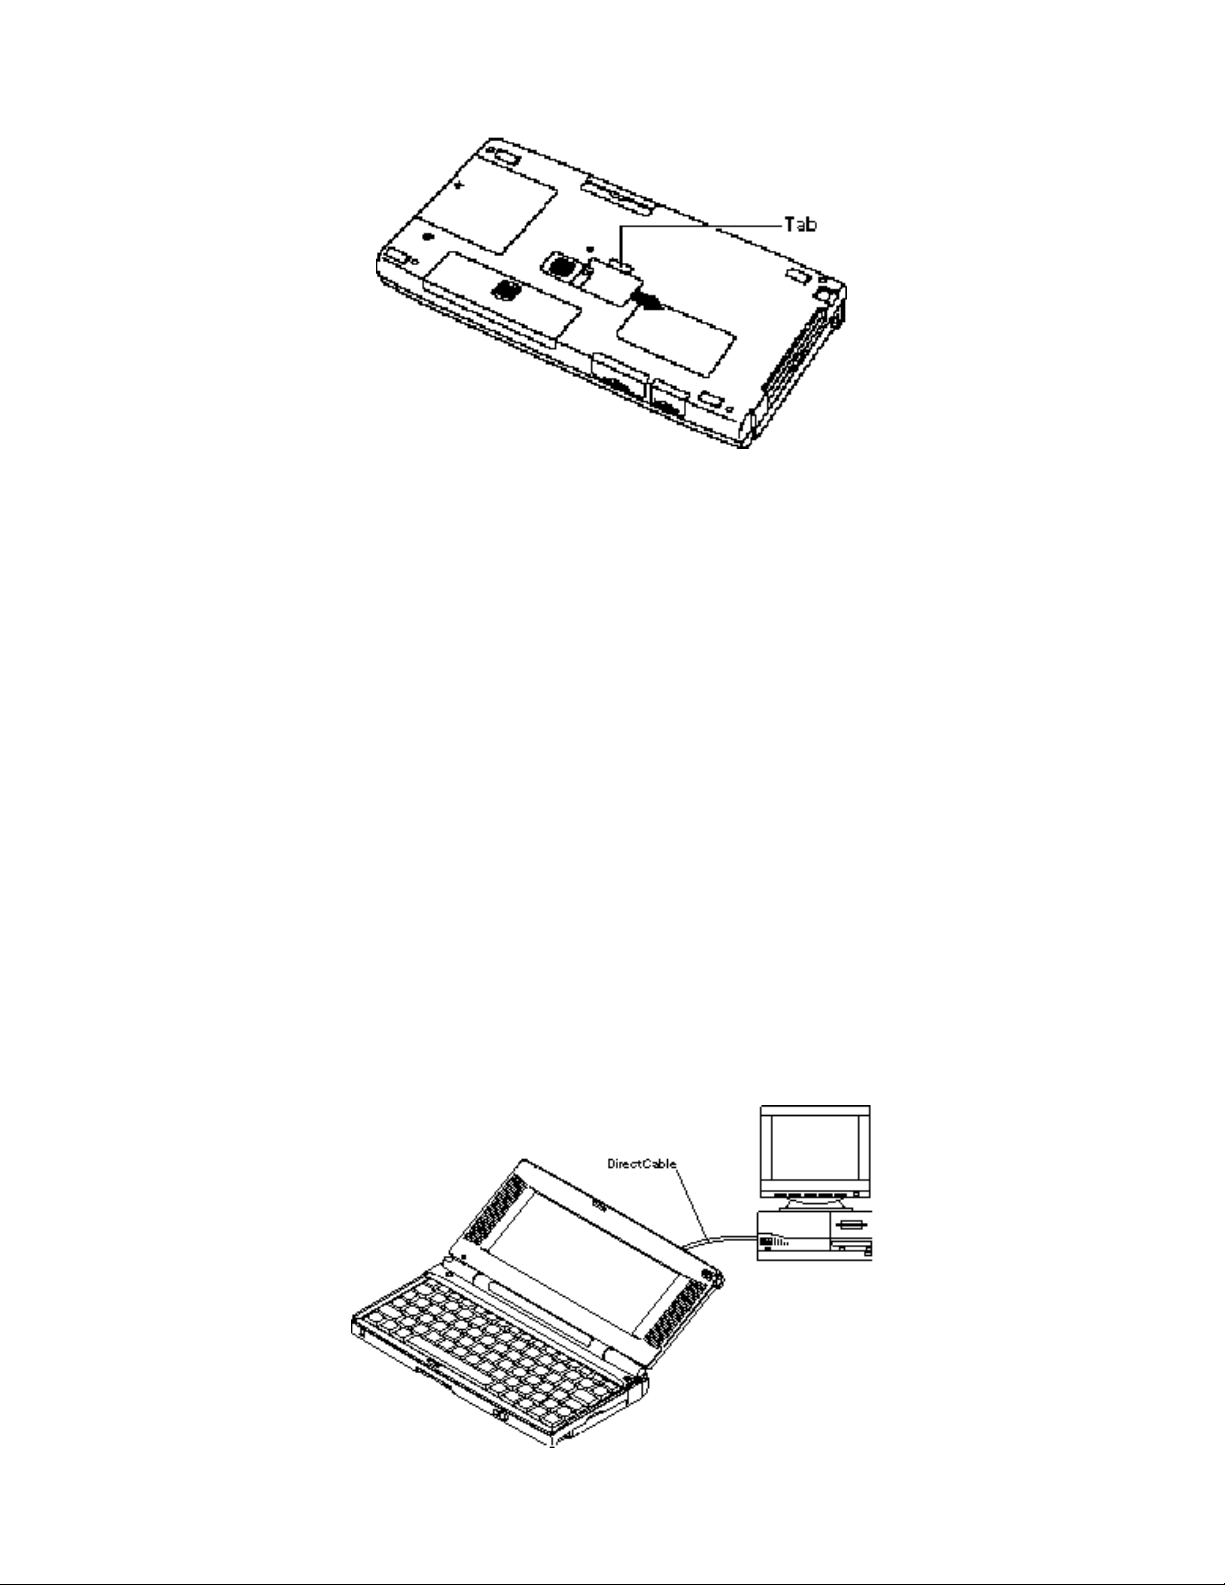
Move the battery cover lock switch back to the ON position.
Remove the backup battery insulating sheet by firmly pulling on the sheet tab that protrudes from the backup battery
compartment.
Page 5
Removing the insulating sheet
MobilePro Quick Configuration
Open your MobilePro so that you can access the keyboard and view the LCD display. The system automatically powers
on and brings you to the Setup Wizard.
The Setup Wizard guides you through the initial configuration of the MobilePro. A step-by-step process lets you:
Calibrate the touch screen
Set your local and visiting Time Zones
Set the system Time and Date
Enter Owner identifying information
After the Setup Wizard completes you are ready to configure the MobilePro to partner with your desktop (or notebook)
computer. Before continuing, connect the MobilePro direct-connect cable to an available 9-pin serial port on your
computer. Plug the other end into the serial port at the back of the MobilePro.
Page 6
Connecting the cable to the computer
Windows CE Services Desktop Software Installation
Your desktop system must be running Windows 95 or Windows NT 4.0 in order to use the Windows CE 2.0
Desktop Services Software.
Insert the "Desktop Software for Microsoft® Windows® CE" CD. If your system is configured for auto insert notification,
the Setup program is automatically launched. Otherwise, manually run the SETUP program in the main directory.
The setup program guides through all steps necessary for setting up your system to communicate with the MobilePro.
MobilePro H/PC Software Suite Installation
Your desktop system must be running Windows 95 or Windows NT 4.0 in order to use the MobilePro H/PC
Software Suite.
Insert the "MobilePro H/PC Software Suite." Run the SETUP program in the main directory.
The setup program guides through all steps necessary for installing the bonus software applications.
An on-line version of the users manual is included in the "MobilePro H/PC Software Suite", as well as other information
that should prove useful as you begin to use your new MobilePro.
Page 7

Getting Familiar with MobilePro
Welcome to the NEC MobilePro™ Handheld PC (H/PC). This H/PC lets you:
Edit, create, send, and receive documents including spreadsheets and e-mail
Manage your schedule and contacts
Access the Internet with the internal modem
Synchronize data with your notebook or desktop computer.
This chapter introduces you to the MobilePro features, display panel, stylus, and complete battery installation procedures.
Before using your MobilePro, read this chapter for details about installing the batteries. Do not attempt to use the
unit without the batteries installed. Be sure you have completed all the steps in Chapter 1, "Quick Start."
What’s in the Box
Your MobilePro ships with a number of accessories. When you unpack the MobilePro, check that you have all of the items
listed next and that they are in good condition. If anything is missing or damaged, immediately contact the vendor who
sold you the unit.
MobilePro 700 (a stylus ships in a holder integrated in the MobilePro)
MobilePro AC Adapter
MobilePro VGA Cable
MobilePro Direct Connection Cable
MobilePro Modem Cable
Two (2) AA alkaline batteries
One (1) CR2032 Back-Up Battery
MicrosoftÒ WindowsÒ CE Services 2.0 compact disc (CD) and MicrosoftÒ WindowsÒ CE PC Companion User’s Guide
MobilePro H/PC Software Suite CD (or diskette) containing NEC Bonus Software applications
MobilePro 700 H/PC User’s Guide (this document)
NEC MobilePro H/PC Resource Guide
Introducing MobilePro Features
The MobilePro provides many features that you can see in the following figures. Feature descriptions follow each figure.
The front and side of the unit is shown first.
Page 8
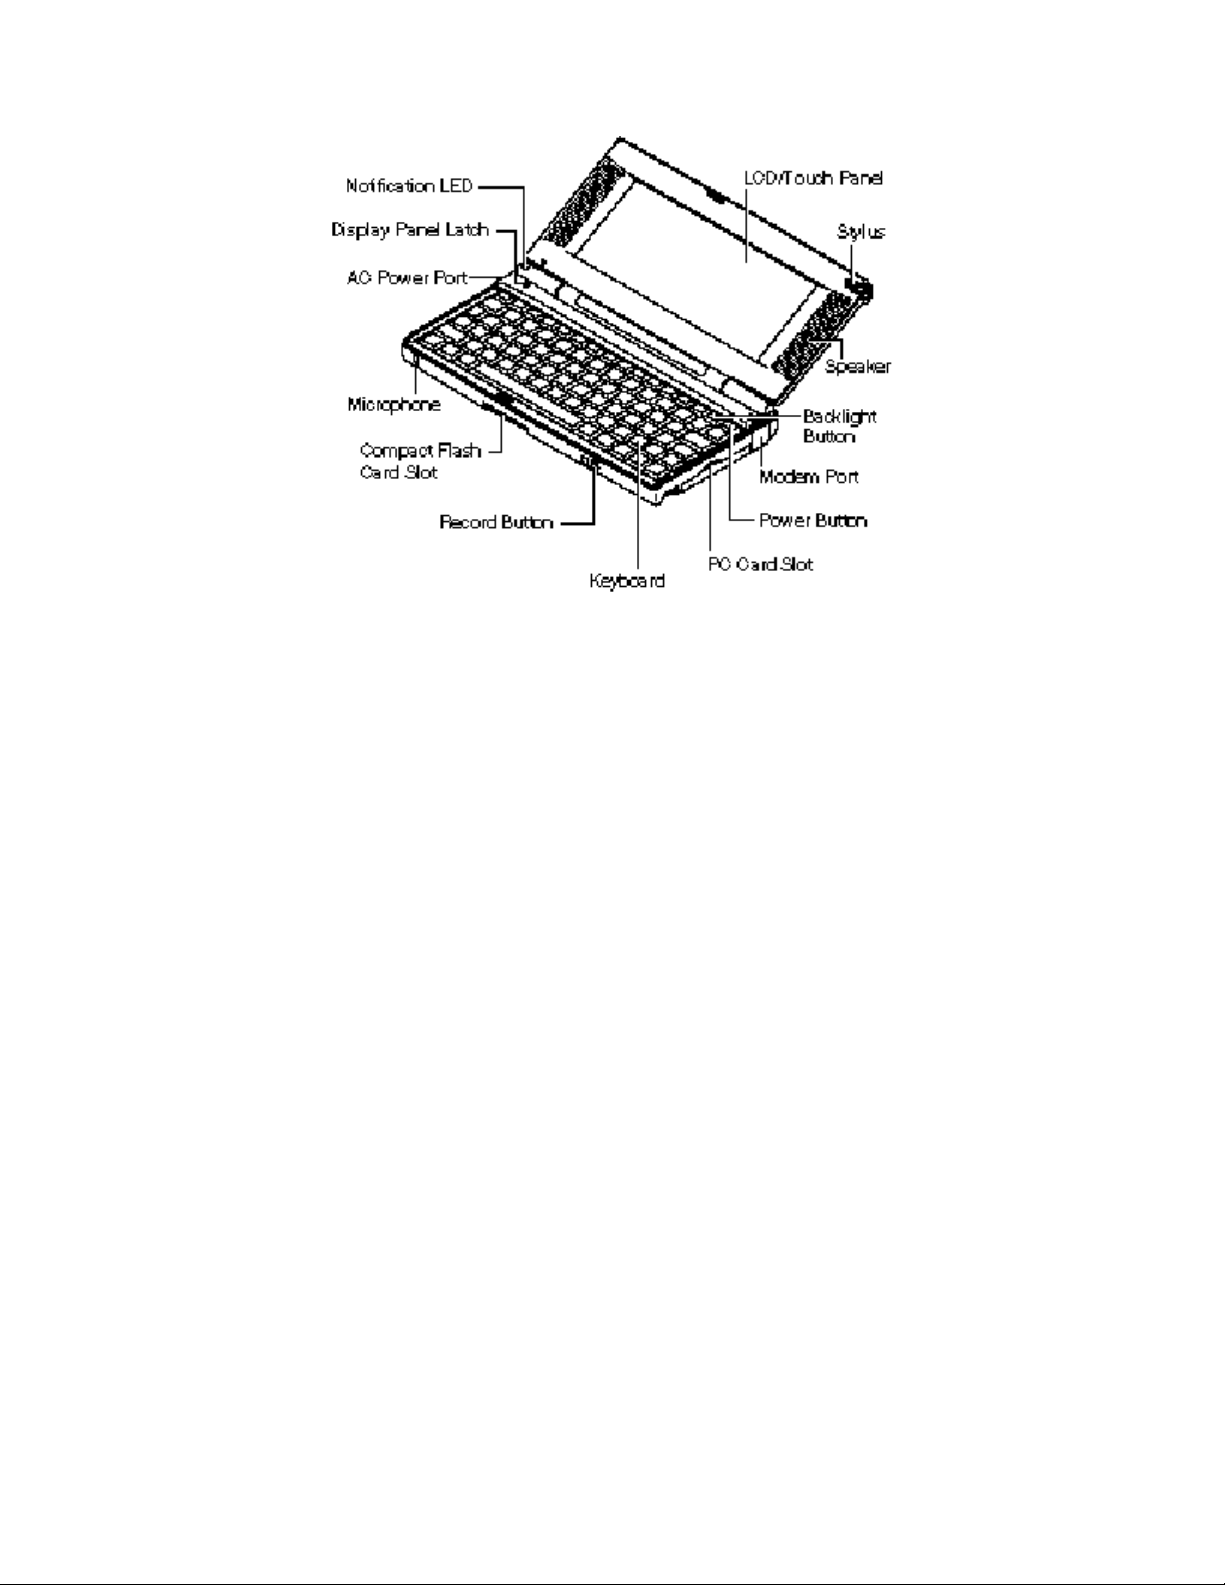
Front and side features
LCD Panel/Touch Panel — provides a clear view of information stored or input into the unit. The touch screen lets you
activate functions by touching the screen with the stylus.
Stylus — provides a means of input to use on the touch screen.
Speaker — lets you listen to digital audio. You can program MobilePro audio to remind you of appointments, notify you of
operation events, or play application-associated sounds. (See your Microsoft Windows CE Handheld PC (H/PC) User’s
Guide for details.)
Backlight Button — turns on the LCD panel backlight for better viewing in dim environments.
Modem Port — provides connection access to the internal modem using the modular modem cable
Power Button — allows you to power on and off the unit when it is open.
PC Card Slot — lets you install one Type II PC card.
Keyboard — gives you a means of entering data using your fingertips.
Record button — allows you to start/stop digital voice recording.
Compact Flash Card Slot — lets you install one Compact Flash card.
Microphone — lets you record your voice.
AC Power Port — lets you connect the AC adapter to run your unit on AC power.
Display Panel Latch — secures the display panel when it is closed.
Notification LED — flashes as a reminder of appointments. (See your Microsoft Windows CE Handheld PC (H/PC) User’s
Page 9
Guide for details.)
The bottom and back of the MobilePro also offer a number of important features. These are shown in the following figure
and described after the figure.
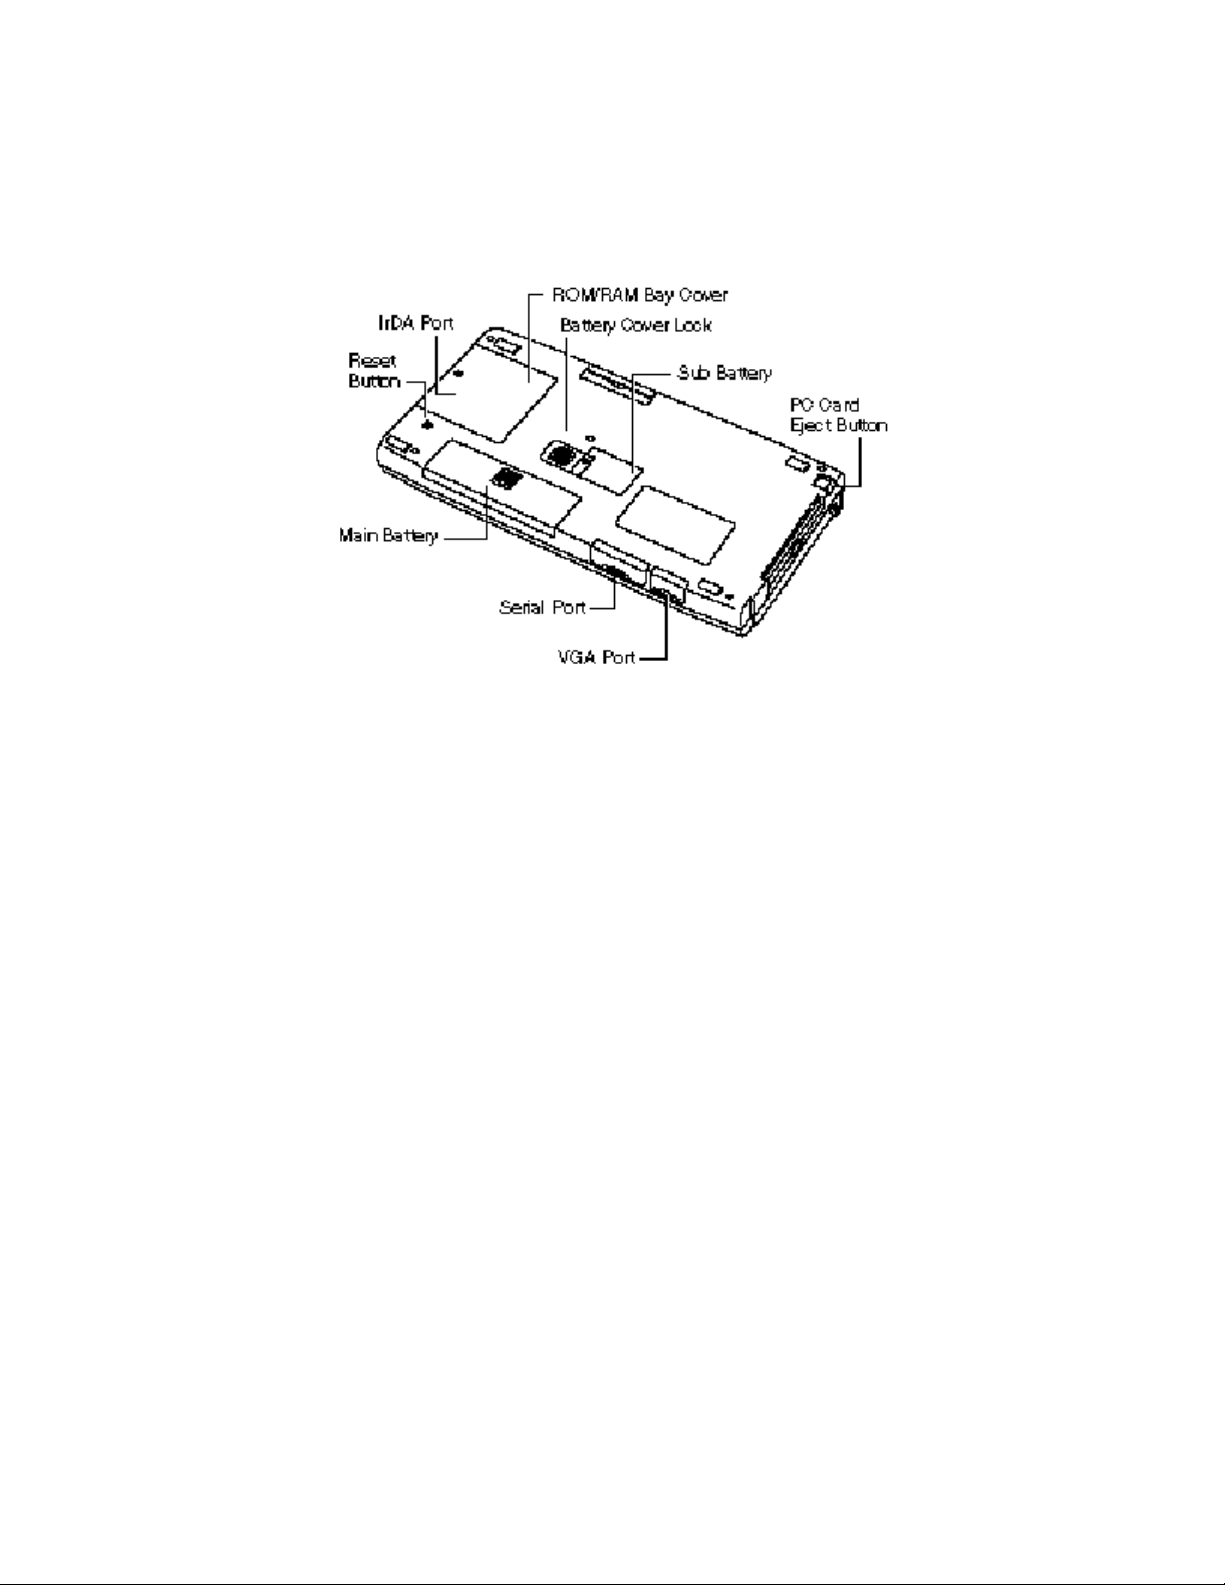
Bottom view
Reset Button — lets you do a "Soft Reset" to the MobilePro in case of malfunctions. Your data is preserved.
Infrared (IrDA) Port — allows the MobilePro to communicate without cables with similarly equipped devices, including
other MobilePros.
ROM/RAM Bay Cover — protects the ROM/RAM memory bay and any installed ROM and RAM boards.
Battery Cover Lock — secures the cover that protects the main battery and back-up battery bays.
Sub Batt (back-up battery) Bay Cover — protects the back-up battery and the back-up battery bay.
PC Card Eject Button — allows you to remove an installed PC card.
VGA Port — provides a connection point for the VGA cable.
Serial Port — provides a connection point for the Direct Connection cable.
Main Batt (Main Battery) Bay Cover — protects the main battery bay and the installed batteries.
Opening the LCD/Touch Panel
Open the LCD/Touch Panel as follows.
Slide the LCD/Touch panel latch to the right.
Lift the LCD/Touch Panel up and towards the back of the unit.
Page 10
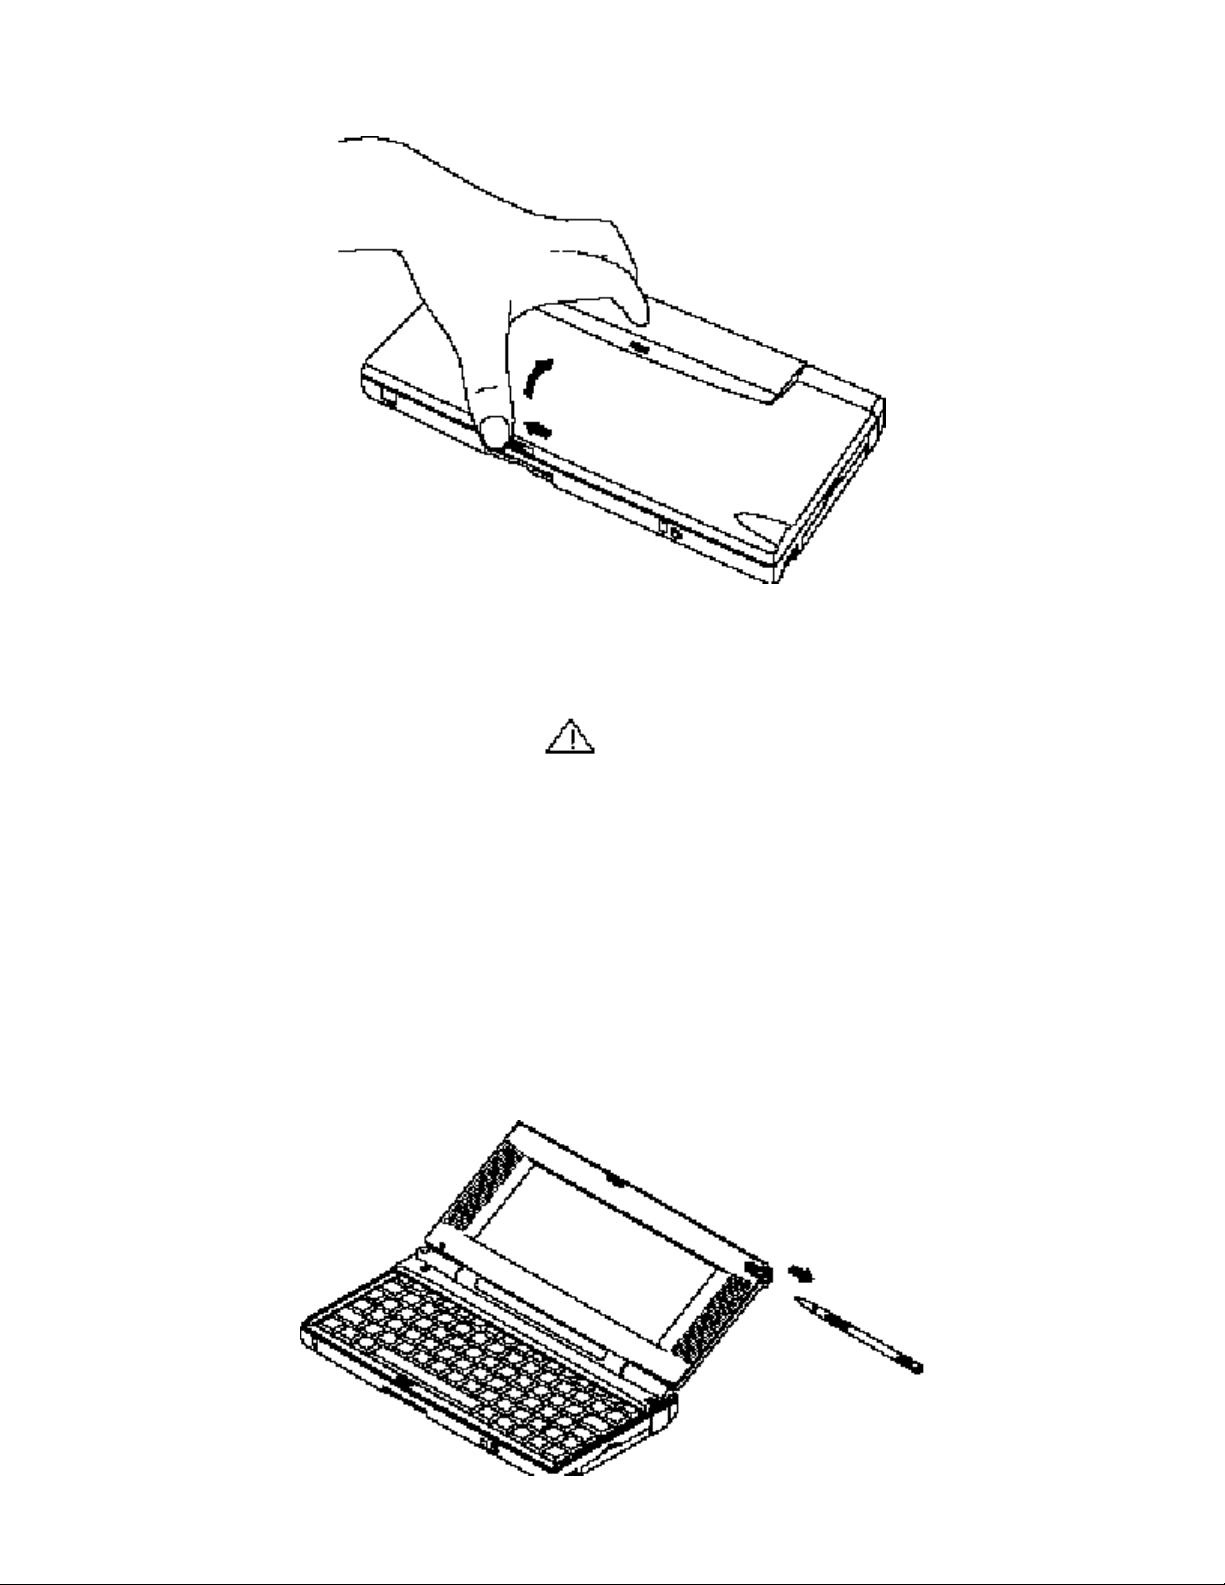
Opening the display panel
CAUTION
When the MobilePro H/PC is not in use or when you are carrying it, keep the display cover closed. This helps prevent
accidental damage to the touch screen or keyboard.
Using the Stylus
To use the stylus, follow these steps.
Open the MobilePro H/PC LCD/Touch Panel.
Locate the stylus and slide it away from the unit to remove it.
Page 11
Using the stylus
CAUTION
Never use a device other than an approved stylus with your MobilePro H/PC. Hard pointed or sharp objects can damage
the touch screen.
Gently touch the pointed tip of the stylus to select an object on the screen. When you are done using the stylus, return it
to its convenient holder on the MobilePro.
Installing Batteries
The MobilePro comes with two AA batteries and one Lithium battery. The AA batteries provide operating power for up to
25 hours with the backlight turned off or up to 7 hours with the backlight turned on. The back-up Lithium battery saves
MobilePro settings. Before operating your MobilePro, you must insert both batteries. The instructions in the following
sections describe how to do so.
Before using your MobilePro, you must install the main batteries and the back-up battery. Do not attempt to use
the unit without the batteries installed.
Optional rechargeable nickel metal-hydride (NiMH) batteries and an optional NiMH battery charger are also available from
your NEC dealer. You can use the NiMH batteries in place of the AA batteries provided as your main power source.
Main Batteries
Before using your MobilePro H/PC for the first time, insert the two AA batteries provided (or an optional rechargeable
nickel metal-hydride (NiMH) battery) as described next.
CAUTION
When using the unit for the first time, install the Main batteries before installing the back-up battery.The backup battery
comes preinstalled with an insulating sheet that must be removed after installing the main batteries. See Chapter 1, "Quick
Start."
Be sure to read the section "Battery Precautions" for important battery handling information.
Locate the Battery Cover Lock on the bottom of the MobilePro H/PC. Slide the lock to the unlocked position.
Slide the battery bay cover away from the unit and remove it.
Page 12
Inside the bay, locate the following:
The battery ribbon. Pull the ribbon gently so that it protrudes out of the bay.
The terminal notations (+ and –).
Opening the battery bay cover
Locating the ribbon and terminal notations
Put the AA batteries on the ribbon in the bay. Align the batteries so that the positive terminal (+) on the battery aligns
with the positive (+) notation in the bay.
Inserting the batteries
Firmly press the batteries into the bay until they are secure.
Replace the Main battery bay cover.
Page 13
Replacing the bay cover
Slide the battery cover lock to the locked position.
The unit only operates when the battery cover lock is in the locked position.
Back-Up Battery
The back-up battery (referred to as the "sub-battery" or "SUB BATT" on the unit) provides back up for the MobilePro
H/PC system memory.
CAUTION
When using the unit for the first time, install the main batteries before removing the insulating sheet. See Chapter 1, "Quick
Start."
Be sure to read the section "Battery Precautions" for important battery handling information.
You can only operate the MobilePro H/PC when the battery cover lock is in the locked position.
For optimum data protection, be sure to install both the main batteries and the back-up battery before turning on the
power.
Battery Replacement
When battery power drains to an unstable level, the MobilePro issues a low battery warning. Always replace the battery
noted in the message immediately, if possible. Keep the following in mind when replacing batteries:
If the batteries installed in the MobilePro become weak, unit power automatically turns off. Replace the batteries
immediately if the power goes off!
When replacing the main batteries, always use two new alkaline batteries of the same type and same manufacturer or one
Page 14

charged optional rechargeable nickel-hydride(NiMH) battery.
When replacing the back-up battery, always use the CR2032.
WARNING
Only use the CR2032 battery as your back-up battery. Installing another battery type can result in an explosion or fire.
See "Battery Precautions" later in this chapter, for more battery handling information.
If you fail to replace drained main batteries for an extended period of time and the back-up battery is weak, the contents of
the MobilePro memory may be lost.
If you use the MobilePro without the back-up battery installed, MobilePro memory may be unstable. The contents of
MobilePro memory may be lost if the main batteries are removed.
Always back up your data onto your notebook or desktop computer before replacing the back-up battery.
Main Batteries
A low battery message appears when battery power has been nearly depleted. Be sure to replace the main batteries
immediately as described next.
When you see the following message, the main battery must be replaced.
Main Batteries Very Low
Save your data, turn off unit power, and close the LCD/Touch Panel. Disconnect any cables attached to the unit, such as
the AC adapter cable.
If you receive messages indicating that both the main battery and the sub-battery (back-up battery) are very low,
replace back-up battery first.
If depleted main batteries are not replaced, the back-up battery drains more quickly than normal.
Have two (2) new AA Alkaline batteries or an optional NiMH battery available.
Locate the Battery Cover Lock on the bottom of the MobilePro H/PC. Slide the lock to the unlocked position.
Slide the Main battery bay cover away from the unit and remove it.
Page 15
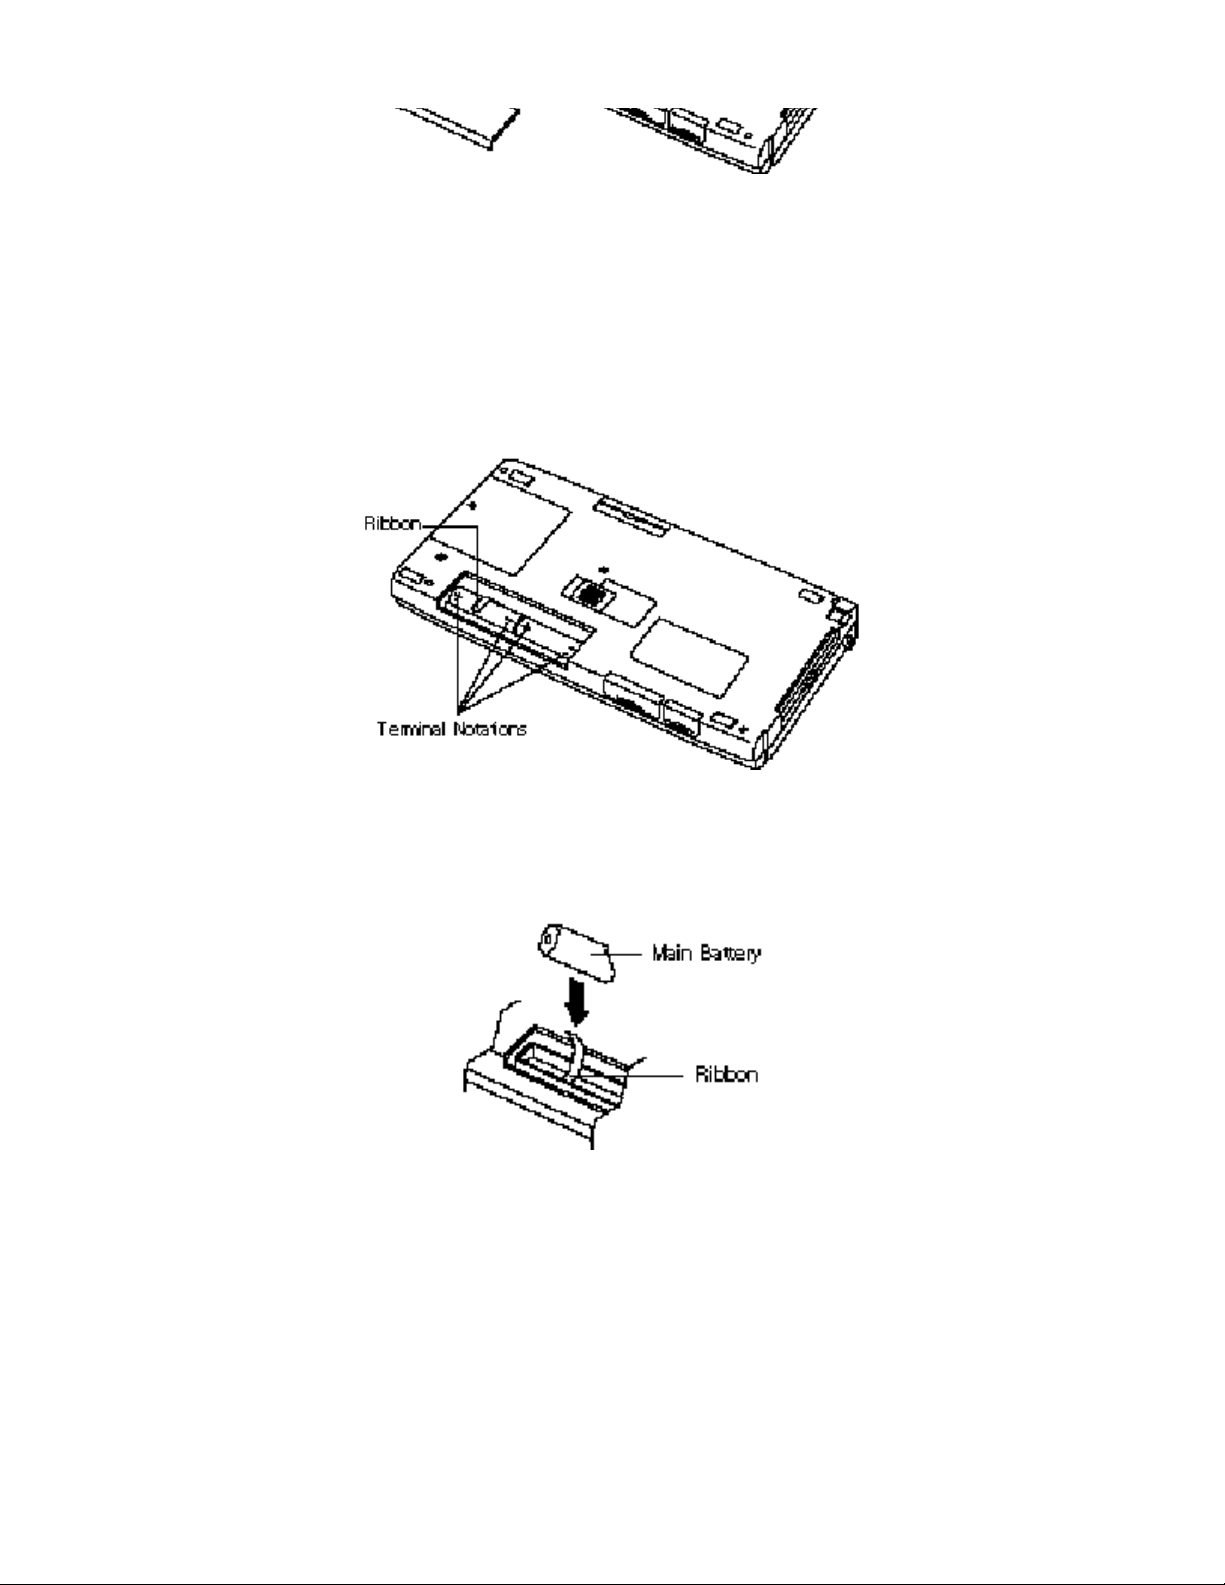
Opening the battery bay cover
Firmly pull on the ribbon to remove the old batteries.
Inside the bay, locate the following:
The battery ribbon. Pull the ribbon gently so that it protrudes out of the bay.
The terminal notations (+ and –).
Locating the ribbon and terminal notations
Put the new batteries on the ribbon in the bay. Align the batteries so that the positive terminal (+) on the battery aligns
with the positive (+) notation in the bay.
Inserting the batteries
Firmly press the batteries into the bay until they are secure.
Replace the Main battery bay cover and slide the battery cover lock to the locked position.
Page 16

Replacing the bay cover
The unit only operates when the lock is in the locked position.
Back-Up Battery
A low battery message appears when back-up battery power is depleted. Be sure to replace the back-up battery
immediately as described next.
When you see the following message, the back-up battery must be replaced.
Backup Battery Very Low
Save your data, turn off unit power, remove the stylus, and close the LCD/Touch Panel.
If you receive messages indicating that both the main battery and the sub battery (back-up battery) are very low,
replace the back-up battery first.
If depleted main batteries are not replaced, the back-up battery drains more quickly than normal.
Disconnect any cables attached to the unit, such as the AC adapter cable.
Have a new back-up battery available.
WARNING
Only replace the back-up battery with the CR2032.
Using another battery type can result in an explosion or fire.
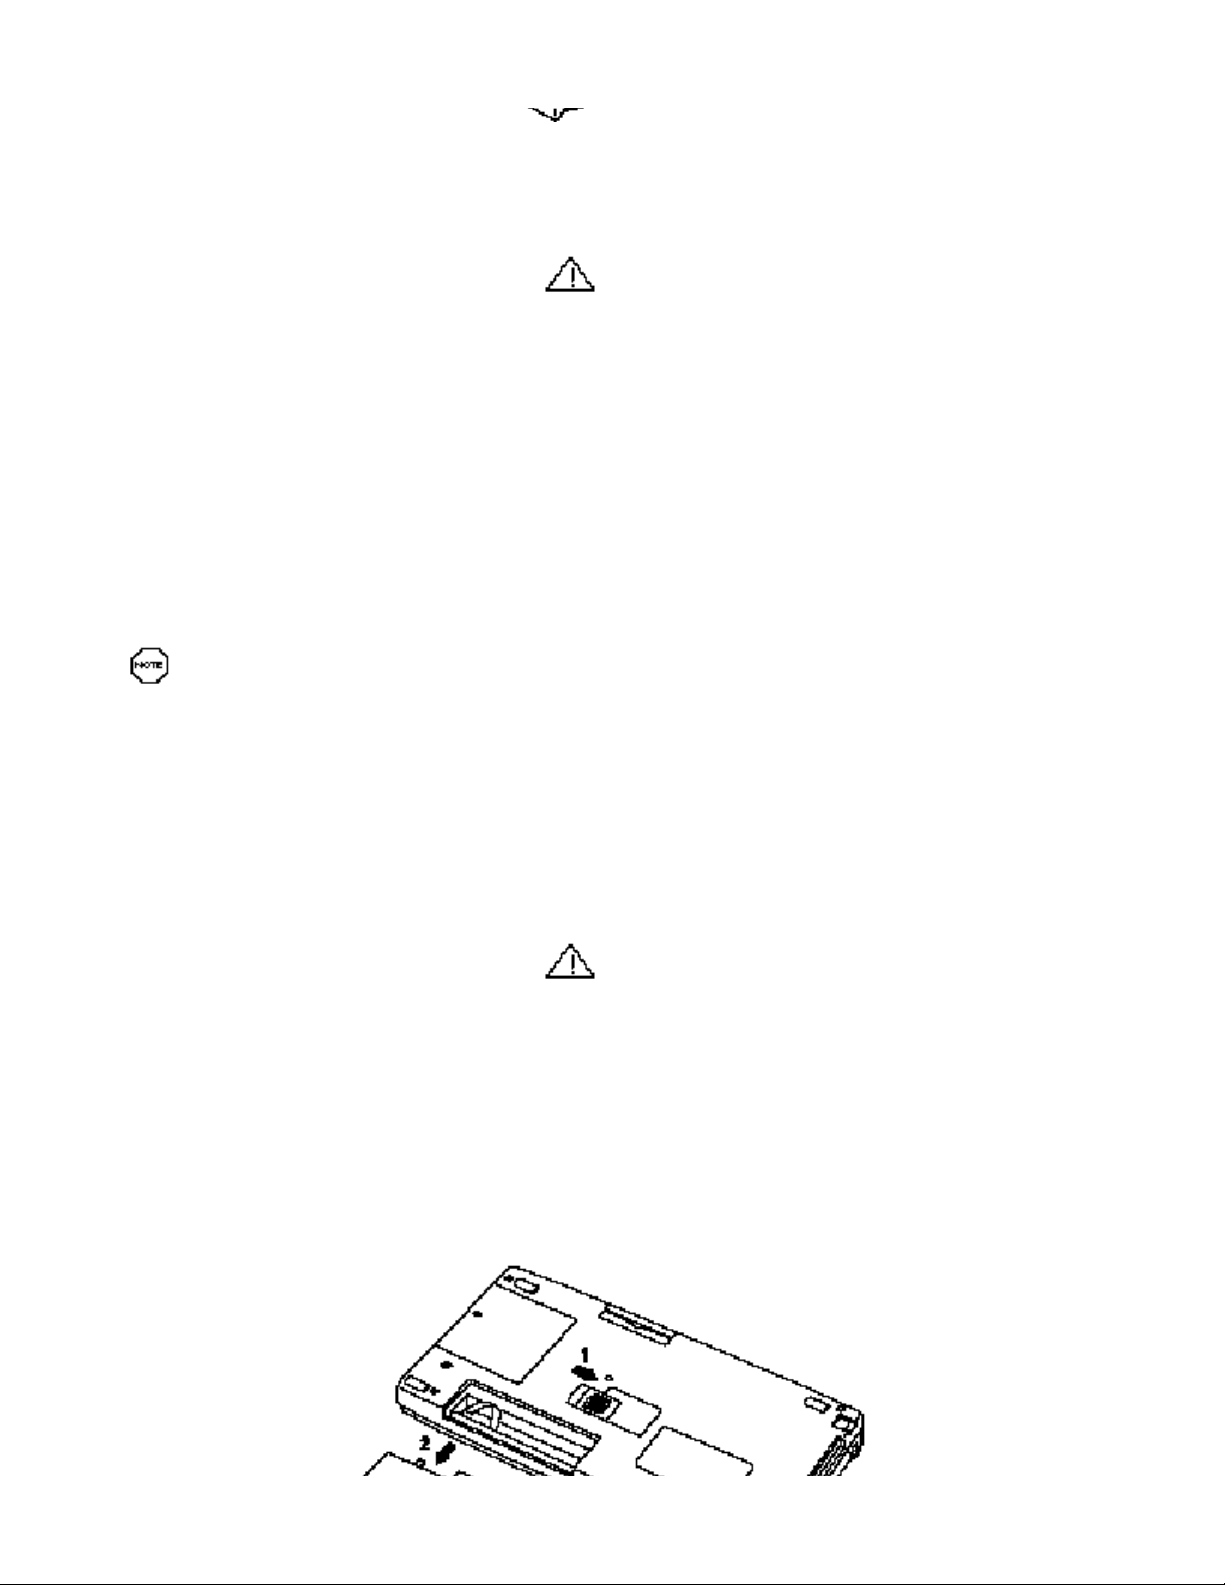
Turn the unit over and locate the Battery Cover Lock on the bottom of the MobilePro. Slide the lock to the unlocked
position.
Page 17

Releasing the Battery Cover Lock
Using a small screwdriver, remove the screw and Sub-battery bay cover.
Removing the bay cover
When you loosen the screw, you can remove the Sub-battery bay cover by loosening the screw for five rounds. It
is not necessary to remove the screw completely.
Use the stylus to remove the drained battery from the bay.
Removing the battery
Angle the new battery into the bay and insert it with the positive (+) notation facing up.
Inserting the battery
Page 18

Tighten the screw to secure the bay cover.
Replace the Sub-battery bay cover and slide the lock to the locked position.
Battery Precautions
Read the following battery handling precautions to insure your safety.
WARNING
Heed these warnings when handling batteries. Failure to do so may result in personal injury.
There is a danger of explosion if the battery is incorrectly replaced. Replace only with the same or equivalent type
recommended by the manufacturer.
The CR2032 battery may explode if mishandled. Do not recharge , disassemble, or dispose of the back-up battery in fire.
Discard used batteries according to the manufacturer’s instructions. Never dispose of batteries by burning them.
Dispose of used batteries promptly.
Keep batteries away from children.
Do not subject batteries to impact.
Do not subject batteries to heat sources including direct sunlight, open fires, microwave ovens, and high-voltage
containers.
Do not recharge batteries unless they are specifically designed for recharging.
Do not disassemble batteries.
Do not solder or puncture batteries.
WARNING (cont'd)
Do not use a battery that is damaged or deformed, has any rust on its casing, is discolored, overheats, or emits a foul odor.
Always use two of the same kind of battery. For example, do not mix Alkaline and NiMH.
To prevent data loss, always replace weak batteries as soon as possible. Replace the back-up battery first. Always use the
MobilePro H/PC with a back-up battery.
Taking Care of the MobilePro
Page 19

The NEC MobilePro is a durable, dependable unit built for extensive use and travel. Follow these guidelines to maintain
the condition and performance of your MobilePro.
CAUTION
Immediately turn off and unplug the MobilePro under the following conditions:
The power cord is damaged or frayed.
Liquid spills on or into the unit.
Someone drops the unit or damages the casing.
Precautions
Follow these precautions when using your MobilePro and AC adapter.
Always plug the AC adapter cord into an easily accessible outlet. It is important to be able to easily shut off power by
unplugging the AC adapter if needed.
Avoid dropping or bumping the MobilePro or the AC adapter.
Do not stack heavy objects on the MobilePro or the AC adapter.
When using the AC adapter, make sure the power source falls within the unit’s compatible range of 100–240 volts AC.
Never use the AC adapter if the voltage falls outside of this range. (Watch for this when traveling to other countries.)
Turn off MobilePro power before attaching or removing devices.
Do not push any foreign objects into the MobilePro bays, connectors, and slots.
Avoid using the unit or AC adapter for extended periods in direct sunlight.
Do not use the unit in humid or dusty environments.
Turn off MobilePro power before cleaning it.
Avoid exposing the MobilePro or AC adapter to extreme changes in temperature or humidity. If it is unavoidable, allow
your MobilePro to adjust to room temperature before use.
When cleaning the system, use a soft, clean, dry cloth. Avoid wiping the display surface with abrasive material, including
rough fabric. Do not use a cleaning solution; this may damage the plastic.
If the AC adapter becomes extremely hot, unplug the adapter and let it cool.
Keep the AC adapter away from the IrDA port to ensure stable communication/transfer operations.
Storage Requirements
Store the MobilePro and AC adapter in an environment that meets the following conditions:
Page 20

Maintain storage temperatures between 14°F and 140°F (–10°C and 60°C).
CAUTION
If the temperature of the MobilePro suddenly rises or falls (for example, when you move the system from a warm place to a
cold place) vapor condenses inside the system. Turning on the unit under this condition can damage the internal system
components.
Before turning on the MobilePro, wait until the unit’s internal temperature equalizes with the new environment and any
internal humidity can evaporate.
Keep the storage area free from vibration and magnetic fields.
Keep the unit and its components away from organic solvents or corrosive gases.
Avoid leaving the unit and its components in direct sunlight or near heat sources.
Routine Cleaning
Clean or dust your system as follows.
CAUTION
Never use harsh solutions, household cleaners, or spray cleaners that contain caustic materials on the MobilePro.
These cleaners are usually high in alkalinity, which is measured in pH. Using these cleaners can cause the plastic surface
to crack or discolor.
Touch Panel screen — Carefully wipe the LCD screen with a soft cloth or a screen wipe designed for that purpose. Special
screen wipes are available through your local computer dealer.
Unit case — NEC recommends that you carefully wipe the case with a slightly damp, almost dry cloth.
Page 21

Using the MobilePro
This chapter details how to use the MobilePro hardware. (See the software manual that came with the unit for software
operating instructions.) Instructions include how to:
Power on and off
Make display panel adjustments
Set application shortcut keys
Record audio
Install PC cards
Install Compact Flash™ cards
Transfer data using the IrDA port
Connect the cables for the modem, VGA, and serial ports
Upgrade ROM/RAM
Reset the MobilePro.
As a general operation rule, frequently back up and synchronize data between your MobilePro H/PC and your
desktop or notebook computer.
Powering On and Off
Power on the MobilePro as follows.
Slide the Display Panel Latch and open the display panel.
Locate and press the Power button. To power off the unit, press the Power button a second time.
Page 22

Powering on and off the MobilePro
The first time you install the main batteries, the MobilePro automatically powers on by opening the display panel.
The first time you power on the MobilePro H/PC, screen contrast may need adjustment. Follow the instructions in
"Making Display Panel Adjustment" to do so.
You can power on or off with the display panel opened or closed. (It depends on the setting.)
If the MobilePro H/PC is not used for a specific length of time, it automatically shuts off. You can select how long the unit
remains on through the Power selection in the Windows Control Panel. On the Windows CE desktop, press the Start
button and select Settings to access the Control Panel. (See the software user’s guide for details.)
Making Display Panel Adjustments
You can adjust the contrast and backlight features in the MobilePro. Make these adjustments as described in the next two
sections, "Contrast" and "Backlight."
Contrast
Adjust the contrast on the MobilePro H/PC to make it darker or lighter as follows.
Open the display panel and power on the unit.
Press the Alt key and either the less-than/F11 key or the greater-than/F12 simultaneously for the following results. :
Alt F11 lightens the screen.
Alt F12 darkens the screen.
Adjusting the contrast
Page 23

You can also adjust the contrast through the Control Panel. See the software user’s guide for details.
Backlight
The MobilePro features a backlight that makes viewing the screen in dimly lit or darkened environments easier. Once you
turn on the backlight, it remains lit until you turn it off or power off the unit. If you power off the MobilePro, the backlight
automatically shuts off.
Keeping the backlight turned on depletes the battery twice as fast as when the backlight is off. Instead of 20 to 25
hours of battery life, you have approximately 4 hours.
Turn on the backlight as follows.
Open the display panel and locate the backlight key on upper-right side of the keyboard.
With power on, press the Backlight key to turn on the backlight. To turn off the backlight, press the Backlight key again.
Turning on and off the backlight
APPLICATION Shortcut KEYs
The MobilePro H/PC has programmable function keys (F1 to F10 keys) that let you launch applications directly. The key
defaults are listed in the following table.
Default Application Shortcut Keys
Key Application
F1 Inbox
F2 Internet Explorer
F3 Calendar
F4 Contacts
F5 Tasks
F6 Microsoft Pocket Word
F7 Microsoft Pocket Excel
Page 24

F8 Microsoft Pocket PowerPoint
F9 Voice Memo
F10 (Default none)
Assigning Application Shortcut Keys
Application launch keys are programmed through the "MobilePro Settings" applet in the Control Panel . Using this
application you can manually assign programs to function keys F1 through F10 as well as CTRL-F1 through CTRL-F10.
A template is included with your MobilePro that you can attach to the keyboard directly above the function keys. This
provides a quick reference for each key’s function.
Use the following steps to assign application shortcut keys.
Tap Start on the Taskbar to access Settings, then select Control Panel.
Double tap on the MobilePro Settings icon to launch the dialog box shown in the follwing figure.
Be sure you have the "Quick Launch" tab selected.
Settings dialog box
Scroll or tap on the shortcut key you wish to select. Assign the application using the following buttons:
Default — selects the factory-assigned application listed in the Default Application Shortcut Keys table.
Browse — opens a directory dialog so you can locate the application you would like to assign.
Page 25

Browse dialog box
Delete — removes the currently assigned application reference so you can select another application.
Enabling the LCD/Touch panel latch
You can configure your MobilePro H/PC to power on or off by simply opening or closing the display cover. The display
panel latch acts as a switch for both the power and the backlight.
Opening the MobilePro powers on the unit. To power on the unit while it is open, use the Power button.
Closing the MobilePro powers off the unit and insures that the backlight is off as well.
Use the following procedure to enable the LCD/Touch Panel latch.
Tap Start on the Taskbar to access Settings, then select Control Panel.
Double tap on the MobilePro Settings icon to launch the dialog box shown in the follwing figure.
Be sure you have the "Power Off" tab selected.
Power off settings
Select either to enable suspend mode with battery power or external AC power.
VOICE RECORDING
Recording Voice Memos with the MobilePro is easy, even with the unit closed:
Hold your MobilePro with the microphone facing you.
Press and hold the record button. A short beep will sound indicating that you should begin speaking.
Page 26

Recording voice memos
When you are finished speaking simply release the button. You will hear a beep indicating that the voice memo has been
saved.
To review or edit your voice memos run the Voice Memo application. Refer to the next section "Using the Voice Recorder."
Recording works best if you position the microphone about three inches away from your mouth while speaking.
Memory required for voice memo storage varies depending on user settings. Refer to "Using the Voice Recorder" for
further details
Using the Voice Recorder
The MobilePro H/PC features a voice recorder application that lets you record and play voice memos.
The following figure shows the audio application.
Sample audio application screen
The application features the following toolbar controls at the top of the screen:
Record button.
Playback button.
Page 27

Delete button.
Menu
The following figure shows the available menu selections.
File
Record New Ctrl + N
Play Ctrl + P
Rename Ctrl + P
Move To Ctrl + M
Delete Ctrl + D
Exit ( X )
Folder
Create New
Rename
Delete
Setting
Audio Properties
The menu selections provide the following functions.
From the File menu, you can perform the following functions.
Record New – create a new voice memo .wav file
Play – play back a voice memo .wav file
Rename – rename a file
Move To – move a file to another folder
Delete – delete a file
Exit – exit the Voice Recorder
Page 28

From the Folder menu, you can perform the following functions.
Create New – create a new folder
Rename – rename a folder
Delete – delete a folder
From the Setting menu, you can perform the following function.
Audio Properties – set up the estimated sampling size and sampling frequency for a new file. You cannot do this for
exisiting files.
PC Cards
Your MobilePro comes with a PC card slot that supports one Type I or one Type II PC card. When using a PC card in the
MobilePro, we recommend that you also use AC power. The batteries alone may not provide enough power for some PC
cards to operate properly.
We recommend using the AC adapter when using PC cards or the internal modem. Using the adapter can help you
avoid potential data loss caused by the high-energy consumption of some PC cards.
Inserting PC Cards
Follow these procedures to install a PC card.
Save your data and power off the MobilePro.
With the PC card facing up, insert it into the PC card slot.
Inserting a PC card
Verify that the PC card is fitted securely into position.
CAUTION
Make sure you align the PC card correctly for insertion. Inserting a PC card incorrectly can damage the card and/or the
Page 29

MobilePro.
Removing PC Cards
Remove a PC card from the MobilePro as follows:
Save your data and power off the MobilePro.
Locate the PC card Eject button and press it to release the card from the slot.
Removing a PC card
Once the card is released, pull it the rest of the way out of the slot.
Compact Flash Cards
Your MobilePro comes with a Compact Flash card slot that supports one Compact Flash card. When using a Compact
Flash card in the MobilePro, we recommend that you also use AC power. The batteries alone may not provide enough
power for some Compact Flash cards to operate properly.
We recommend using the AC adapter when using Compact Flash cards. Using the adapter can help you avoid
potential data loss caused by the high-energy consumption of some Compact Flash cards.
Inserting Compact Flash Cards
Follow these procedures to install a Compact Flash card.
Save your data and power off the MobilePro.
With the Compact Flash card facing up, insert it into the Compact Flash card slot.
Page 30

Inserting a Compact Flash card
Verify that the Compact Flash card is fitted securely into position.
CAUTION
Make sure you align the Compact Flash card correctly for insertion. Inserting a Compact Flash card incorrectly can damage
the card and/or the
MobilePro.
Removing Compact Flash Cards
Remove a Compact Flash card from the MobilePro as follows:
Save your data and power off the MobilePro.
Release the card from the slot by pulling it out with your fingertips.
Page 31

Removing a Compact Flash card
Transferring Data
With the MobilePro H/PC, you can send and receive data to and from another similarly equipped device using the infrared
(IrDA) communication port. Communicate with another MobilePro as follows.
Open the display panels on the two MobilePro units that you want to use for communication.
Position the MobilePro units so that communication ports face each other. Position the units from 0 to 20 inches apart.
Positioning the MobilePros
Be sure that nothing obstructs the path between the communication ports on both units, and that the ports are aligned
properly.
Send your data. (For details about the software procedures for transmitting data, see the software user’s guide that came
with the unit.)
If the units are too far apart or if something blocks the path between the two ports, data may not be sent or received
correctly.
Connecting External devices
A number of external accessories come with your MobilePro to help you optimize unit performance. They include the
following:
AC Adapter
Direct Connection Cable
VGA Cable
Telephone Line
The following sections provide instructions for connecting these accessories.
Page 32

Connecting the AC Adapter
When using your MobilePro H/PC for long periods or when using PC cards or Compact Flash cards, or when using the
internal modem, we recommend using the AC adapter. Using AC power saves battery life for when you are on the go and
helps prevent data loss.
CAUTION
Follow these precautions whenever you use the AC adapter and the MobilePro.
When using the AC adapter, make sure the AC outlet is near the MobilePro and easily accessible.
Keep the main batteries installed when running on AC power. You cannot power up the MobilePro H/PC without the main
batteries installed.
Check that the installed batteries have power. You cannot power on the unit using AC power if a low-battery message
appears.
When communicating or sending transmissions for a long time, use the AC adapter to conserve power.
Connect the AC adapter as follows:
Insert the plug on the AC adapter cable into the AC power port on the left side of the MobilePro.
Plug the AC adapter into a working AC outlet.
Power on the MobilePro.
Connecting the Direct Connection Cable
The Direct Connection Cable lets you connect the MobilePro directly to a desktop or notebook computer. Connect the
cable as follows:
Opening the serial port cover
Locate the serial port cover on the MobilePro, and open it.
Align and attach the connector on the Direct Connection Cable to the serial port on the MobilePro.
Connect the other end of the cable to the serial port on your desktop or notebook computer.
Page 33

Connecting the cable to the computer
CAUTION
Make sure you properly align the cable connectors and ports. Incorrect connection can damage the MobilePro H/PC and
the computer.
Connecting the VGA Cable
VGA Direct Connection Cable lets you connect the MobilePro directly to a MultiSync display which had VGA output.
Connect the cable as follows:
Locate the VGA port cover on the MobilePro and open it.
Opening the serial port cover
Align and attach the connector on the MobilePro monitor cable to the VGA port on the MobilePro.
Connect the other end of the cable to the monitor cable connector.
Page 34

Connecting the cable to the monitor
CAUTION
Make sure you properly align the cable connectors and ports. Incorrect connection can damage the MobilePro H/PC and
the monitor.
Connecting the Internal Modem
Use the following steps to connect a phone cable to the internal modem.
Locate the modem cover on the MobilePro and open it by pullin down from the top of the cover.
Carefully plug the RJ-11 connector into the modem connector.
Connect the other RJ-11 connector into an active (analog) phone jack.
Connecting the telephone line
Page 35

warning
Do not connect the internal modem to a digital private branch exchange connector, or the digital side of an integrated
digital network. Use only analog phone connections. Failure to do so may result in explosion or fire.
WARNING
During thunderstorms be sure to disconnect the modem phone cable from the MobilePro H/PC. Failure to do so may result
in explosion or fire.
UPGRADING ROM/RAM
You can upgrade MobilePro ROM/RAM by replacing the currently installed ROM module with an upgraded ROM/RAM
module.
Changing the RAM or ROM module erases all user data and program memory. Make sure you perform a full backup
to your desktop or notebook before continuing.
Upgrade ROM/RAM as follows:
Save your data to a notebook or desktop computer, power off the MobilePro, and close the display panel.
Disconnect any peripheral devices attached to the MobilePro, such as the AC adapter.
Remove the Main and Back-up batteries. See "Battery Replacement" for details.
Turn the MobilePro over and locate the screw that secures the ROM/RAM bay cover.
Using a small screwdriver, remove the screw and the bay cover. (The MobilePro does not power on while the ROM/RAM
bay cover is removed.)
Using a small screwdriver, remove the screw on the ROM or RAM module.
Gently lift up the ROM or RAM module to disconnect it from its connector and remove it from the bay.
Insert the upgraded ROM or RAM module into the bay, aligning the connector on the module with the one in the bay.
Gently press on the module just above the connectors until the connection is secure.
Replace the bay cover and cover screw.
Install the Main and Back-up batteries. See "Installing Batteries" for details.
The MobilePro will not power on unless the ROM/RAM bay cover is secured.
Page 36

RESETTING the MobilePro
Occasionally, you may need to reset your MobilePro H/PC. Before resetting the MobilePro, back up your data to the
desktop or notebook computer, if possible.
When you reset the MobilePro, you may lose stored data and unit parameter settings.
Reset the MobilePro as follows.
Open the display panel and remove the stylus from its holder.
Power on the MobilePro. (You cannot reset the unit without having the power on.)
Close the display panel and turn the MobilePro over.
Locate the Reset button on the bottom of the MobilePro.
Using the stylus, press the Reset button. This resets the unit.
Resetting the MobilePro
Page 37

Troubleshooting
Your MobilePro H/PC is designed to provide many hours of service while you are at home or on the road.
For optimum performance, frequently back up and synchronize the MobilePro data with your notebook or desktop
computer. Then if something happens, most of your data is still available. If you have problems, check the information in
the following table for possible solutions.
Troubleshooting
Problem Resolution
Check the main batteries.
Check the back-up battery.
The MobilePro has no power.
Nothing appears on the screen.
If you are using an AC adapter, make sure the connections are correct and secure.
Make sure the battery bay cover lock is in the locked position.
Check that the ROM bay cover is properly secure.
Try pressing the Power button again (the unit might have turned itself off if it was not used for a
specified time).
Adjust the contrast.
Check the power connections.
Problem Resolution
Try replacing the batteries.
Nothing appears on the screen. (cont'd)
A low battery message appears. Replace the main batteries.
When using a PC card, such as a
modem, the unit powers off.
Check that the ROM bay cover is properly secure.
Connect the AC adapter to the unit when using PC cards that require large amounts of energy.
Make sure that the main batteries and back-up battery are installed.
The AC adapter doesn't work.
The keyboard doesn't respond. Reset the unit.
The serial port doesn’t work. Check that the cable connections are secure.
Check that the AC adapter connections are secure.
Verify that the AC outlet being used is working. Do this by plugging in another electric device,
such as a lamp.
Page 38

Check that nothing obstructs the path between the transmitting and receiving IR ports.
The IrDA port doesn’t work.
Check the procedure that you are using against the instructions in "Transferring Data" in the
software user’s guide.
Problem Resolution
Make sure the card is inserted correctly and seated properly.
The PC card cannot be accessed.
The touch screen does not respond.
The unit powers off after pushing the
Backlight button.
The Reset button does not respond.
Connect the unit to AC power using the adapter. Some cards do not operate properly unless the
AC adapter is connected.
Calibrate the stylus input. (See the software user’s guide for calibration instructions.)
Reset the unit.
The main batteries are weak. Replace the main batteries.
Remove the main batteries and back-up battery. Reinstall the batteries and make sure they are
seated properly. Try resetting the unit again.
This procedure results in the loss of the memory contents.
Troubleshooting (cont'd)
For further assistance, call NECCSD Customer Service and Technical Support (1-800-632-4525).
Page 39

Specifications
The following specifications are standard except where noted.
Display
640 x 240 gray-scale, backlight, liquid crystal display (LCD) touch-screen
CPU
NEC Vr4102 processor, optimized for Windows CE
User Data Entry Methods
81-key QWERTY keyboard with stylus
Touch panel (input via stylus)
Random Access Memory (RAM)
8 megabytes (MB); expandable (16MB/32MB)
Read-Only Memory (ROM)
16 MB; upgradable
Speaker
One built-in speaker
Infrared (IrDA) Communication
Baud rate: 115.2 Kbps maximum
Distance: 0 to 20 inches
Serial Interface
Baud rate: 115.2 Kbps maximum
I/O Ports
Serial port (Direct Cable connection)
IrDA port
VGA port (output)
Modem
33.6 kbps
Class I fax compatible
Page 40

PC Card Slot
One Type I or Type II slot
Compact Flash Card Slot
One Compact Flash card slot
Power
Main batteries — two AA Alkaline batteries (included). Battery life depends on use as follows:
With backlight off, approximately 20–25 hours.
With backlight constantly on, approximately 7 hours.
Back-Up Battery — one 3V Lithium battery (CR2032) (included)
Memory backup: approx 1 month (with depleted main batteries) at ambient temperature of 73° F (23° C)
Accessories
AC adapter – S1424-11 Listed Direct Plug-In Power Unit, Class 2
Input Voltage: 100 to 240V AC; 60Hz, 8W
Output Voltage: 3V DC 1000 mA
Direct Connection Cable
Modem Cable
VGA Cable
Dimensions
9.7 in. (W) x 4.8 in. (D) x 1.2 in. (H)
Weight
1.5 lb.
Operating Environment
Temperature: 32° to 104° F (0° to 40° C)
Humidity: 35% to 85% (No condensation)
Storage Environment
Temperature: 14° to 140° F (–10° to 60° C)
Page 41

Humidity: 35% to 85% (No condensation)
Available Options
NiMH rechargeable battery (S1424-15)
NiMH battery charger (S1424-16)
Stylus Pack (S1424-17A)
Carrying Case
8/16 MB RAM Module (S1424-18A/18B)
Direct Connection Cable (S1424-12S)
VGA Cable(S1424-12V)
AC Adapter (S1424-11)
Page 42

Parts Breakdown for the MobilePro 700 Series
No. Part Name Part Number Option Number
1 LCD unit 136-242193-001
2 Lower Case unit 136-635973-001
3 SIO Cover 136-635227-001
4 Modem Cover 136-635966-001
5 VGA Cover 136-635967-001
6 Main Battery Cover 136-635969-001
7 Keyboard 808-897324-001
8 Main Board 136-533242
9 ROM Board 136-533173
10 RAM Board (8MB) 136-532860
11 RAM Board (16MB) 136-533176 S1424-18A
12 RAM Board (32MB) 136-533040 S1424-18B
13 Screw RAM Cover 808-802710-101
14 Screw Keyboard 808-802874-001
15 Push Button 136-636246-001
16 Holder 136-636238-001
17 PC Card Shuuter 136-622410-003
18 CF Card Shutter 136-635630-002
19 Shutter Spring 136-622425-003
20 Microphone 808-764227-001
21 Holder Cover 136-635231-001
22 Sub Battery Cover 136-635970-001
23 ROM/RAM Cover 136-6389-009-001
24 Blank Label 136-804006-001
25 Screw (Main) 808-808105-206
26 Screw (C0ver) 808-802852-204
27 Function Label 136-804097-001
28 Tape (Core) 136-638032-001
29 NiMH Rechargeable Battery
NiMH Rechargeable
30
Battery and Charger
31 AC Adapter
32 PC Cable
33 VGA Cable
34 Stylus Pen
S1424-15
S1424-16
S1424-11
S1424-12S
S1424-12V
S1424-17A
 Loading...