

Page 1

NEC
NEC Corporation of America
ML440
Revision 1.0
End User Guide
April 2011
NDA-31193, Revision
(DSX)
1
Page 2

Liability Disclaimer
NEC Corporation of America reserves the right to change the
specifications, functions, or features, at any time, without notice.
NEC Corporation of America has prepared this document for the
xclusive use of its employees and customers. The information
e
contained herein is the property of NEC Corporation of America and
shall not be reproduced without prior written approval from NEC
Corporation of America.
© 2011 NEC Corporation of America
Windows® and Microsoft® are
registered trademarks of Microsoft Corporation.
All other brand or product names are or may be trademarks or
re
gistered trademarks of, and are used to identify products or services
of, their respective owners.
Page 3

Contents
i
Introduction 1-1
About This Document . . . . . . . . . . . . . . . . . . . . . . . . . . . . . . . . . . . . . . . . . . . . 1-1
Important Safety Instructions. . . . . . . . . . . . . . . . . . . . . . . . . . . . . . . . . . . . . . . 1-1
Manual Conventions . . . . . . . . . . . . . . . . . . . . . . . . . . . . . . . . . . . . . . . . . . . . . 1-2
Terms. . . . . . . . . . . . . . . . . . . . . . . . . . . . . . . . . . . . . . . . . . . . . . . . . . . . . . . . . 1-2
Getting Started 2-1
Features . . . . . . . . . . . . . . . . . . . . . . . . . . . . . . . . . . . . . . . . . . . . . . . . . . . . . . 2-1
Charging the Battery . . . . . . . . . . . . . . . . . . . . . . . . . . . . . . . . . . . . . . . . . . . . . 2-1
Powering on the Handset . . . . . . . . . . . . . . . . . . . . . . . . . . . . . . . . . . . . . . . . . 2-3
Attaching the Belt Clip. . . . . . . . . . . . . . . . . . . . . . . . . . . . . . . . . . . . . . . . . . . . 2-3
Basic Operation. . . . . . . . . . . . . . . . . . . . . . . . . . . . . . . . . . . . . . . . . . . . . . . . . 2-4
Keys and Their Functions . . . . . . . . . . . . . . . . . . . . . . . . . . . . . . . . . . . . . . . . . 2-4
Reading the Display and Status LEDs . . . . . . . . . . . . . . . . . . . . . . . . . . . . . . . 2-7
Using the Menus . . . . . . . . . . . . . . . . . . . . . . . . . . . . . . . . . . . . . . . . . . . . . . . 2-10
Main Menu Screen . . . . . . . . . . . . . . . . . . . . . . . . . . . . . . . . . . . . . . . . . . . . . 2-10
Contacts Screen (Local Contacts) . . . . . . . . . . . . . . . . . . . . . . . . . . . . . . . . . 2-10
Central Directory Screen (Global Contacts) . . . . . . . . . . . . . . . . . . . . . . . . . . 2-11
Calls Screen . . . . . . . . . . . . . . . . . . . . . . . . . . . . . . . . . . . . . . . . . . . . . . . . . . 2-11
Connectivity Screen . . . . . . . . . . . . . . . . . . . . . . . . . . . . . . . . . . . . . . . . . . . . 2-12
Alarm Screen . . . . . . . . . . . . . . . . . . . . . . . . . . . . . . . . . . . . . . . . . . . . . . . . . 2-14
Using Common Features 3-1
Making, Receiving, and Transferring Calls . . . . . . . . . . . . . . . . . . . . . . . . . . . . 3-1
ML440 End User Guide - Revision 1
Putting a Call on Hold . . . . . . . . . . . . . . . . . . . . . . . . . . . . . . . . . . . . . . . . . . . . 3-2
Page 4

ii Contents
Changing the Volume . . . . . . . . . . . . . . . . . . . . . . . . . . . . . . . . . . . . . . . . . . . . 3-2
Earpiece and Speaker Volume . . . . . . . . . . . . . . . . . . . . . . . . . . . . . . . . . . . . . 3-2
Ring Volume . . . . . . . . . . . . . . . . . . . . . . . . . . . . . . . . . . . . . . . . . . . . . . . . . . . 3-2
Using the Call Lists . . . . . . . . . . . . . . . . . . . . . . . . . . . . . . . . . . . . . . . . . . . . . . 3-3
Using the Contact List and Central Directory . . . . . . . . . . . . . . . . . . . . . . . . . . 3-3
Functions Common to Both Lists . . . . . . . . . . . . . . . . . . . . . . . . . . . . . . . . . . . 3-4
Local Contact List Functions. . . . . . . . . . . . . . . . . . . . . . . . . . . . . . . . . . . . . . . 3-4
Assigning Contacts to a Speed Dial Number . . . . . . . . . . . . . . . . . . . . . . . . . . 3-5
Voice Mail Waiting Indicator . . . . . . . . . . . . . . . . . . . . . . . . . . . . . . . . . . . . . . . 3-5
Using an Optional Headset . . . . . . . . . . . . . . . . . . . . . . . . . . . . . . . . . . . . . . . . 3-6
Locking the Keypad. . . . . . . . . . . . . . . . . . . . . . . . . . . . . . . . . . . . . . . . . . . . . . 3-6
Changing the PIN . . . . . . . . . . . . . . . . . . . . . . . . . . . . . . . . . . . . . . . . . . . . . . . 3-7
Using Alarms. . . . . . . . . . . . . . . . . . . . . . . . . . . . . . . . . . . . . . . . . . . . . . . . . . . 3-7
Setting the Alarm . . . . . . . . . . . . . . . . . . . . . . . . . . . . . . . . . . . . . . . . . . . . . . . 3-7
Important Information 4-1
AC Adapter and Battery Information . . . . . . . . . . . . . . . . . . . . . . . . . . . . . . . . . 4-1
Rechargeable Battery Information . . . . . . . . . . . . . . . . . . . . . . . . . . . . . . . . . . 4-2
Troubleshooting. . . . . . . . . . . . . . . . . . . . . . . . . . . . . . . . . . . . . . . . . . . . . . . . . 4-2
Weak or Hard to Hear Audio. . . . . . . . . . . . . . . . . . . . . . . . . . . . . . . . . . . . . . . 4-3
Noise or Static on the Line . . . . . . . . . . . . . . . . . . . . . . . . . . . . . . . . . . . . . . . . 4-3
Resetting Handsets. . . . . . . . . . . . . . . . . . . . . . . . . . . . . . . . . . . . . . . . . . . . . . 4-4
Compliance Information . . . . . . . . . . . . . . . . . . . . . . . . . . . . . . . . . . . . . . . . . . 4-4
FCC Part 15 Information . . . . . . . . . . . . . . . . . . . . . . . . . . . . . . . . . . . . . . . . . . 4-4
Industry Canada (I.C.) Notice . . . . . . . . . . . . . . . . . . . . . . . . . . . . . . . . . . . . . . 4-5
ML440 End User Guide - Revision 1
Page 5

Figures
Figure Title Page
iii
2-1 Remove Battery Cover . . . . . . . . . . . . . . . . . . . . . . . . . . . . . . . . . . . . . . 2-2
2-2 Align Battery . . . . . . . . . . . . . . . . . . . . . . . . . . . . . . . . . . . . . . . . . . . . . . 2-2
2-3 Replace Battery Cover. . . . . . . . . . . . . . . . . . . . . . . . . . . . . . . . . . . . . . . 2-2
2-4 Spare Battery Placement. . . . . . . . . . . . . . . . . . . . . . . . . . . . . . . . . . . . . 2-3
2-5 Keys and Their Functions . . . . . . . . . . . . . . . . . . . . . . . . . . . . . . . . . . . . 2-4
2-6 Four-Way Key . . . . . . . . . . . . . . . . . . . . . . . . . . . . . . . . . . . . . . . . . . . . . 2-6
2-7 Soft Key Description . . . . . . . . . . . . . . . . . . . . . . . . . . . . . . . . . . . . . . . . 2-6
2-8 Entering Text . . . . . . . . . . . . . . . . . . . . . . . . . . . . . . . . . . . . . . . . . . . . . . 2-7
2-9 Main Menu Screen. . . . . . . . . . . . . . . . . . . . . . . . . . . . . . . . . . . . . . . . . 2-10
3-1 Installing a Headset . . . . . . . . . . . . . . . . . . . . . . . . . . . . . . . . . . . . . . . . . 3-6
ML440 End User Guide - Revision 1
Page 6

iv Figures
ML440 End User Guide - Revision 1
Page 7

Tables
v
Table Title Page
1-1 Terms and Definitions . . . . . . . . . . . . . . . . . . . . . . . . . . . . . . . . . . . . . . . 1-2
2-1 Key Names and Descriptions . . . . . . . . . . . . . . . . . . . . . . . . . . . . . . . . . 2-5
2-2 Icons . . . . . . . . . . . . . . . . . . . . . . . . . . . . . . . . . . . . . . . . . . . . . . . . . . . . 2-7
2-3 Charger LEDs . . . . . . . . . . . . . . . . . . . . . . . . . . . . . . . . . . . . . . . . . . . . . 2-8
2-4 Handset LEDs . . . . . . . . . . . . . . . . . . . . . . . . . . . . . . . . . . . . . . . . . . . . . 2-8
2-5 STATUS LED Settings. . . . . . . . . . . . . . . . . . . . . . . . . . . . . . . . . . . . . . . 2-9
2-6 Contacts and Soft Keys . . . . . . . . . . . . . . . . . . . . . . . . . . . . . . . . . . . . . 2-11
2-7 Contact List More Options . . . . . . . . . . . . . . . . . . . . . . . . . . . . . . . . . . . 2-11
2-8 Calls Screen Soft Keys . . . . . . . . . . . . . . . . . . . . . . . . . . . . . . . . . . . . . 2-12
2-9 Call List More Options . . . . . . . . . . . . . . . . . . . . . . . . . . . . . . . . . . . . . . 2-12
2-10 Connectivity Screen Operations . . . . . . . . . . . . . . . . . . . . . . . . . . . . . . 2-12
2-11 Settings Screen Operation. . . . . . . . . . . . . . . . . . . . . . . . . . . . . . . . . . . 2-13
2-12 Audio Screen Settings . . . . . . . . . . . . . . . . . . . . . . . . . . . . . . . . . . . . . . 2-14
2-13 Alarm Screen Settings . . . . . . . . . . . . . . . . . . . . . . . . . . . . . . . . . . . . . . 2-15
3-1 Make, Receive, Transfer Calls. . . . . . . . . . . . . . . . . . . . . . . . . . . . . . . . . 3-1
3-2 Call Lists Actions . . . . . . . . . . . . . . . . . . . . . . . . . . . . . . . . . . . . . . . . . . . 3-3
3-3 Contact List Characteristics . . . . . . . . . . . . . . . . . . . . . . . . . . . . . . . . . . . 3-3
3-4 Common Functions . . . . . . . . . . . . . . . . . . . . . . . . . . . . . . . . . . . . . . . . . 3-4
4-1 Adapter/Battery Information. . . . . . . . . . . . . . . . . . . . . . . . . . . . . . . . . . . 4-1
4-2 Troubleshooting Handset Issues . . . . . . . . . . . . . . . . . . . . . . . . . . . . . . . 4-3
4-3 Static or Noise Reduction . . . . . . . . . . . . . . . . . . . . . . . . . . . . . . . . . . . . 4-3
ML440 End User Guide - Revision 1
Page 8

vi Tables
ML440 End User Guide - Revision 1
Page 9

1
IMPORTANT
CAUTION
Introduction
About This Document
This document explains how to use the ML440 handsets; for information
on system configuration and base installation, see the ML440 and AP20
System Installation Guide.
The following topics are included in this chapter:
Chapter Topics • About This Document
• Important Safety Instructions
• Manual Conventions
• Terms
1-1
Important Safety Instructions
Save these instructions.
To reduce the risk of fire, electric shock, or injury to persons, follow the
basic safety precautions listed below when using your handset:
•This unit is not waterproof. Do not expose th
moisture.
• Do not use this product near water, for example, near a bath tub,
wa
sh bowl, kitchen sink or laundry tub, in a wet basement or near a
swimming pool.
• Use only the power cord and batteries i
• Do not dispose of batteries in a fire. They may explode. Check with
loca
l codes for possible special disposal instructions.
• Do not place the handset in any charging
installed and the battery cover securely in place.
Risk of explosion if battery is replaced by an incorrect type! Dispose of used
batteries according to the instructions. Do not open or mutilate the battery.
Disconnect the battery before shipping this product.
is unit to rain or
dicated in this manual.
n
cradle without the battery
ML440 End User Guide - Revision 1
Page 10

1-2 Introduction
Manual Conventions
This document uses several different type styles to help you distinguish
between different parts of the system.
•
• indicates a soft key on the handset.
• Italics indicate text on the display, such as menu op
• ALL CAPS BOLD TYPE
Terms
This document uses the terms and abbreviations listed in Table 1 - 1 .
Bold underlined text indicates a key on the unit itself or a button on
a configuration screen.
Reverse out
tions, prompts,
and confirmation messages.
indicates a status light on the handset or
base.
Table 1-1
Terms and Definitions
Ter m Definition
Base
Charger
During a call
Handset The cordless handset that you use to dial and talk to callers.
In standby The handset is inactive or idle.
The main part of the system that connects to the VoIP network and
manages calls. All handsets must be registered to a base before
use.
The cradle that stores and charges the handset; it also contains a
spare battery charger.
The station is currently on a call or has activated a dial tone.
ML440 End User Guide - Revision 1
Page 11

2
Getting Started
This chapter covers how to prepare the handset for use, basic handset
operation, and menus.
Chapter Topics
• Features
• Charging the Battery
• Basic Operation
• Using the Menus
2-1
Features
ML440 handsets possess the following features:
•Roaming
• Seamless handover between bases
• Programmable feature keys
• Multi-line capability
• Call transfer, conference, call forwarding, and call park
• User-friendly interface with context sensitive soft keys
• Shared central directory with 200 entries
• Personal contacts list with up to 100 entries
• Call log that records the last 50 cal
• Nine speed dial keys (numbers
Charging the Battery
Follow the steps below to charge the battery.
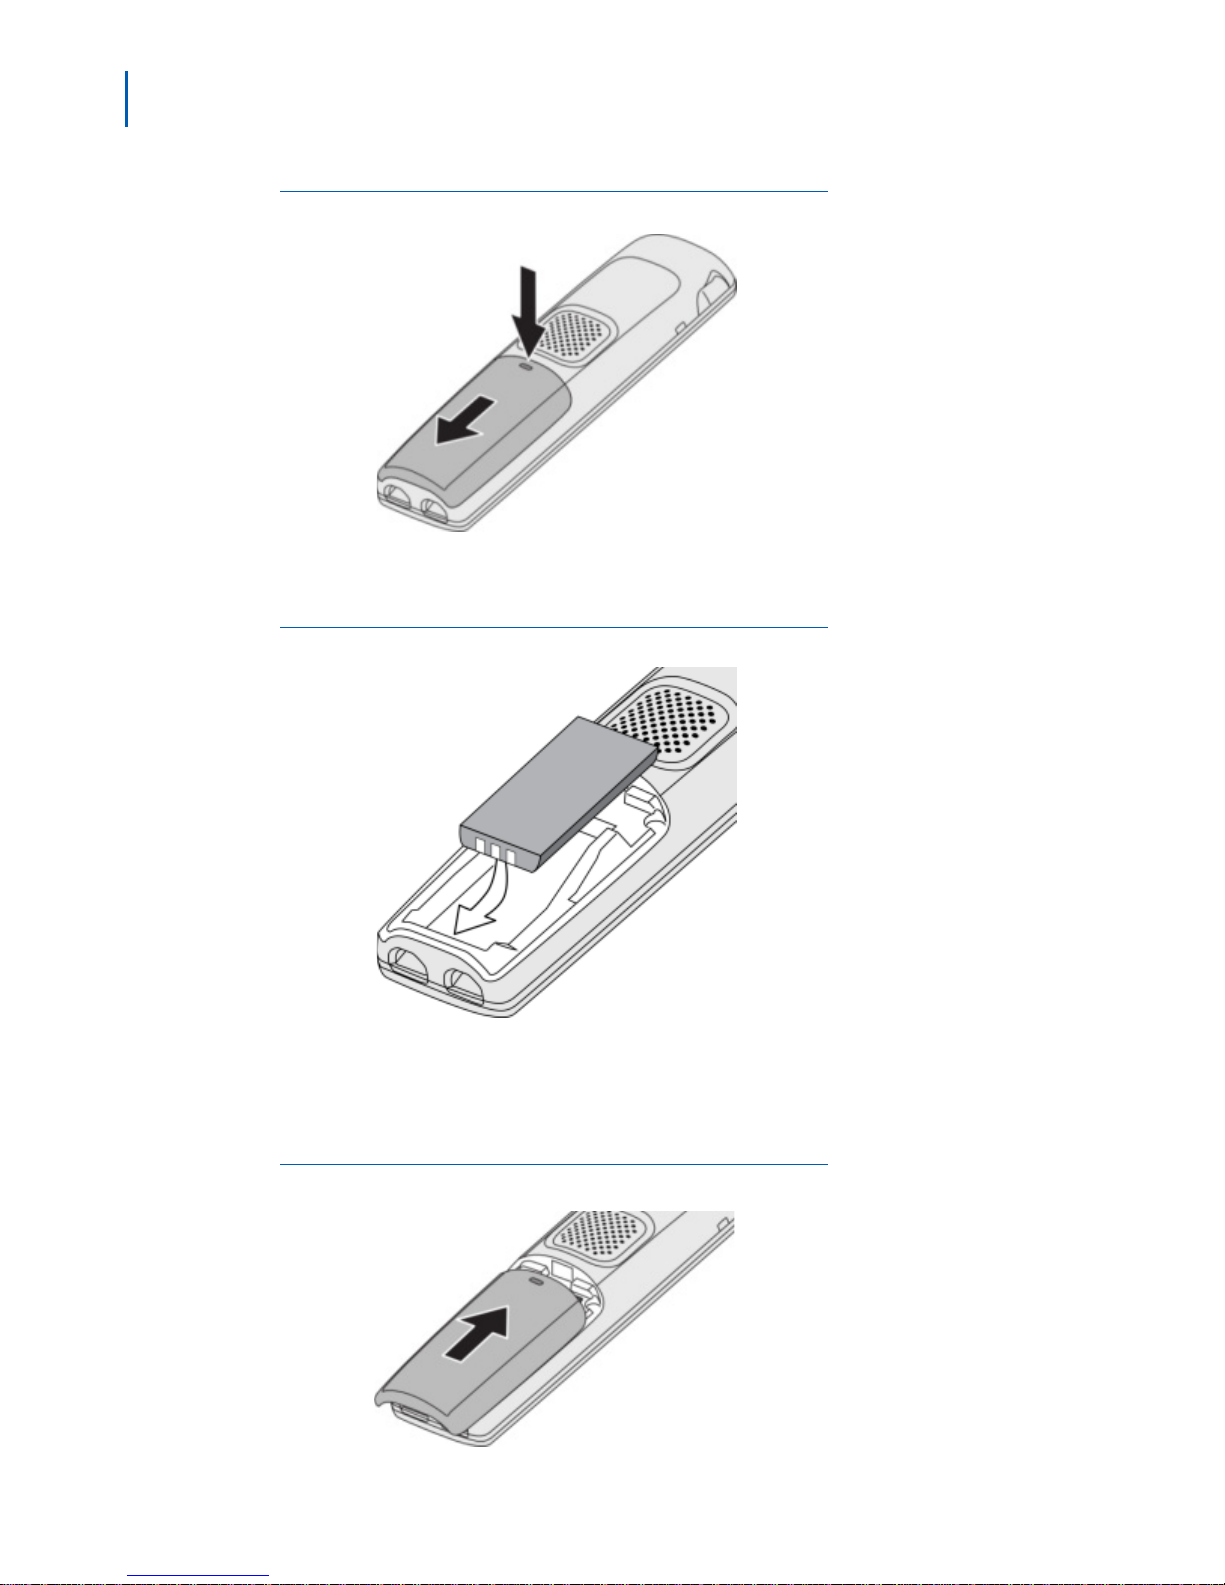
Step 1 Unpack the handset, battery, and battery cover. If the battery cover is
ls, incoming and outgoing
2 through 9 on the twelve-key dial pad
already on the handset, press in on the notch and slide the cover down
and off (Figure 2-1).
ML440 End User Guide - Revision 1
Page 12
2-2 Getting Started
Figure 2-1
Figure 2-2
Remove Battery Cover
Step 2 Align the battery so that the contacts face the bottom of the handset and
the flat side faces up (Figure 2-2).
Align Battery
Step 3 Insert the bottom of the battery first, then lay the battery down and push it
Step 4 Replace the cover and slide it up into place (Figure 2-3).
Figure 2-3
Replace Battery Cover
gently until it snaps into place.
ML440 End User Guide - Revision 1
Page 13
Getting Started 2-3
NOTE
Step 5 Connect the charger AC adapter to the charger’s AC jack.
Step 6 Plug the other end of the adapter into a standard 120V AC power outlet.
Step 7 Place the handset in the charger with the display facing forward. The
display on the handset should light up and the charger LED should turn
on. If it doesn't, reseat the handset or try plugging the AC adapter into a
different outlet.
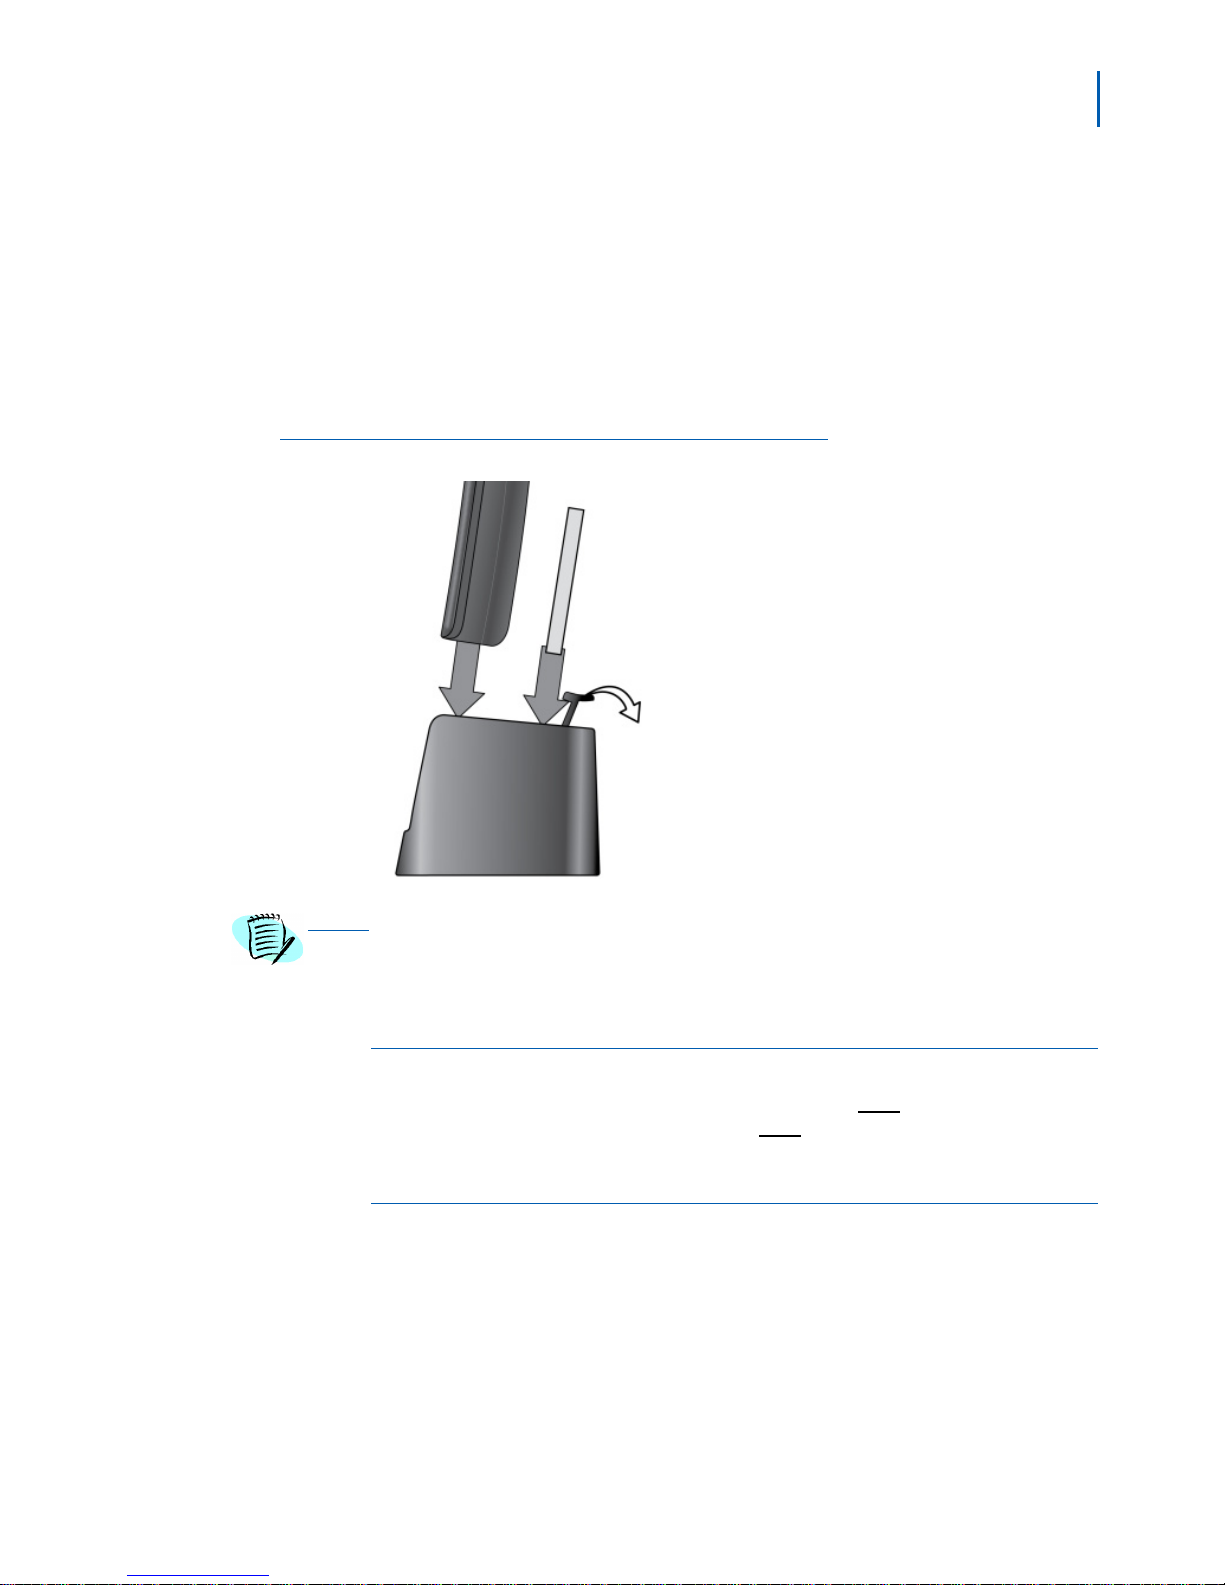
Step 8 Place the spare battery in the back section of the charger. (Pull the
battery latch back to insert the battery (Figure 2-4).
Figure 2-4
Spare Battery Placement
Charge each battery completely (approximately 10 hours) before use.
Powering on the Handset
To power up the handset, press and release the End key. (To power
down the handset, press and hold the
Attaching the Belt Clip
Line up the holes on each side of the handset. Insert the belt clip into
the holes on each side of the handset. Press down until it clicks.
To remove the belt clip, pull either side
tabs from the holes.
ML440 End User Guide - Revision 1
End key.)
of the belt clip to release the
Page 14
2-4 Getting Started
Basic Operation
Keys and Their Functions
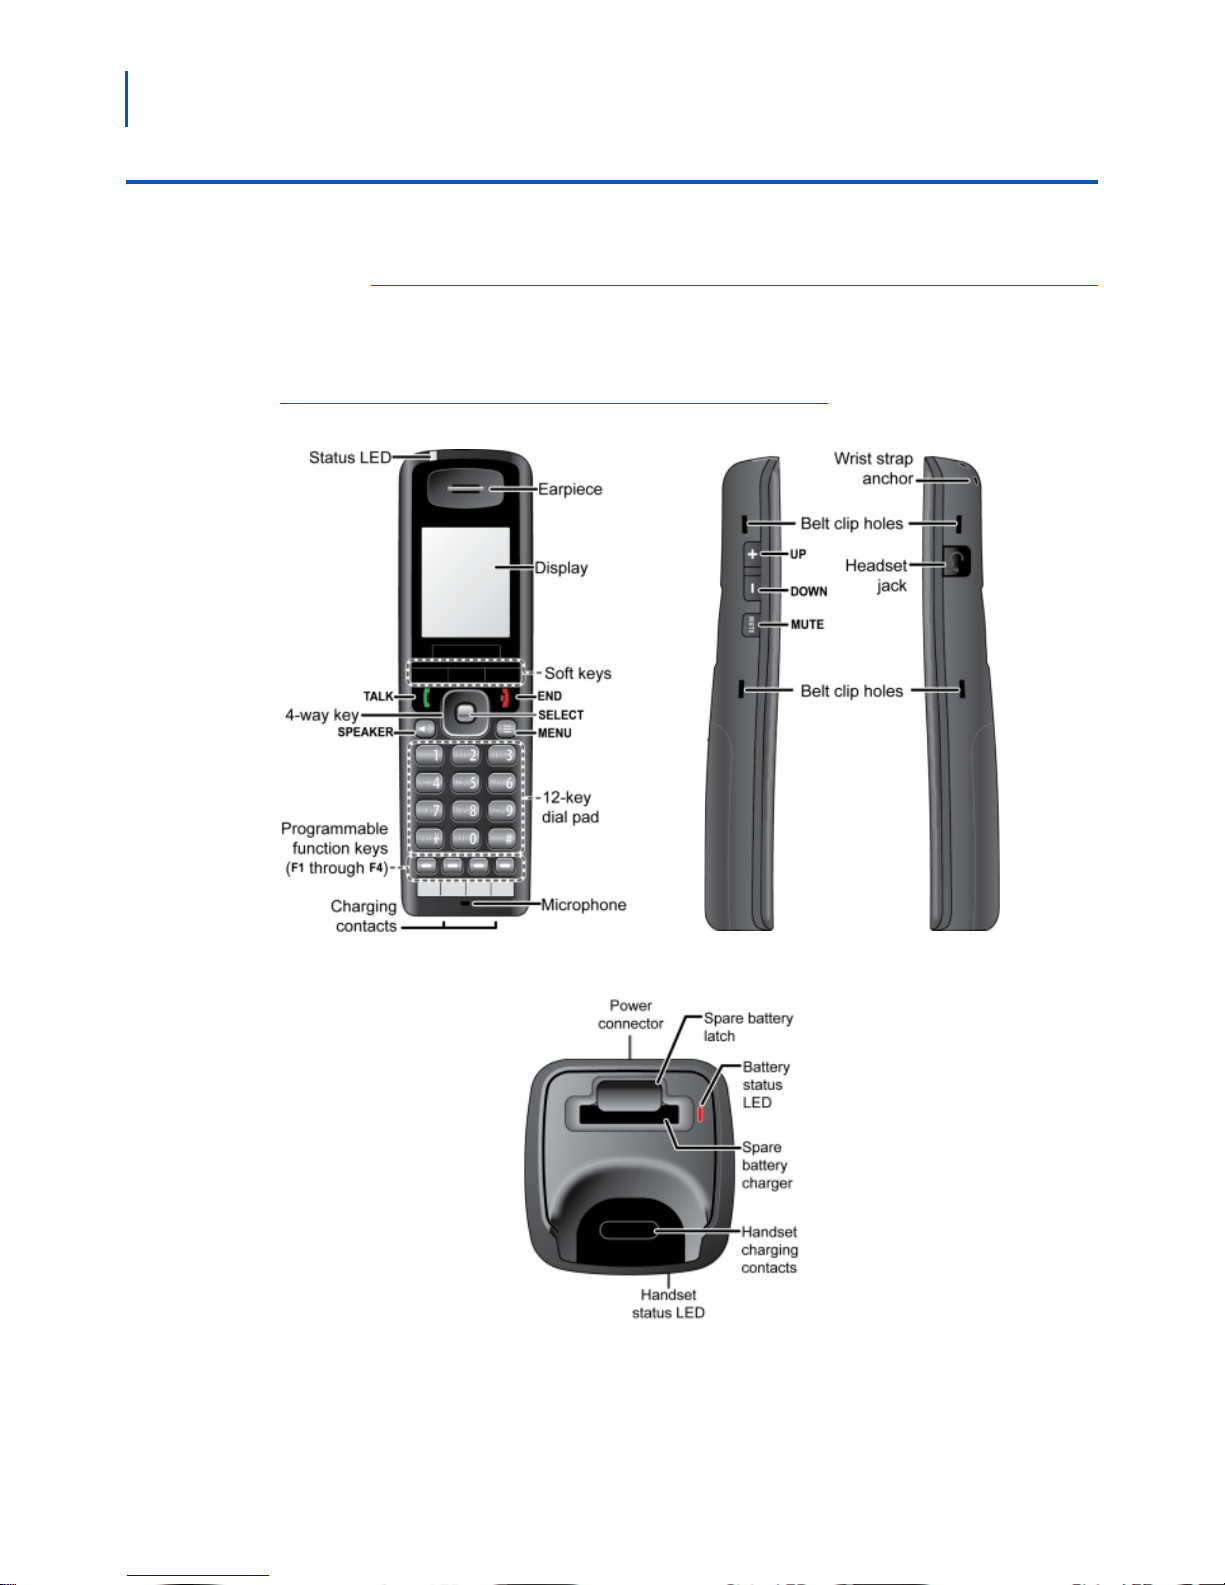
Figure 2-5 provides a diagram of the various keys and their functions.
Tab l e 2 - 1lists the key name along with a brief description of its function.
Figure 2-5
Keys and Their Functions
ML440 End User Guide - Revision 1
Page 15
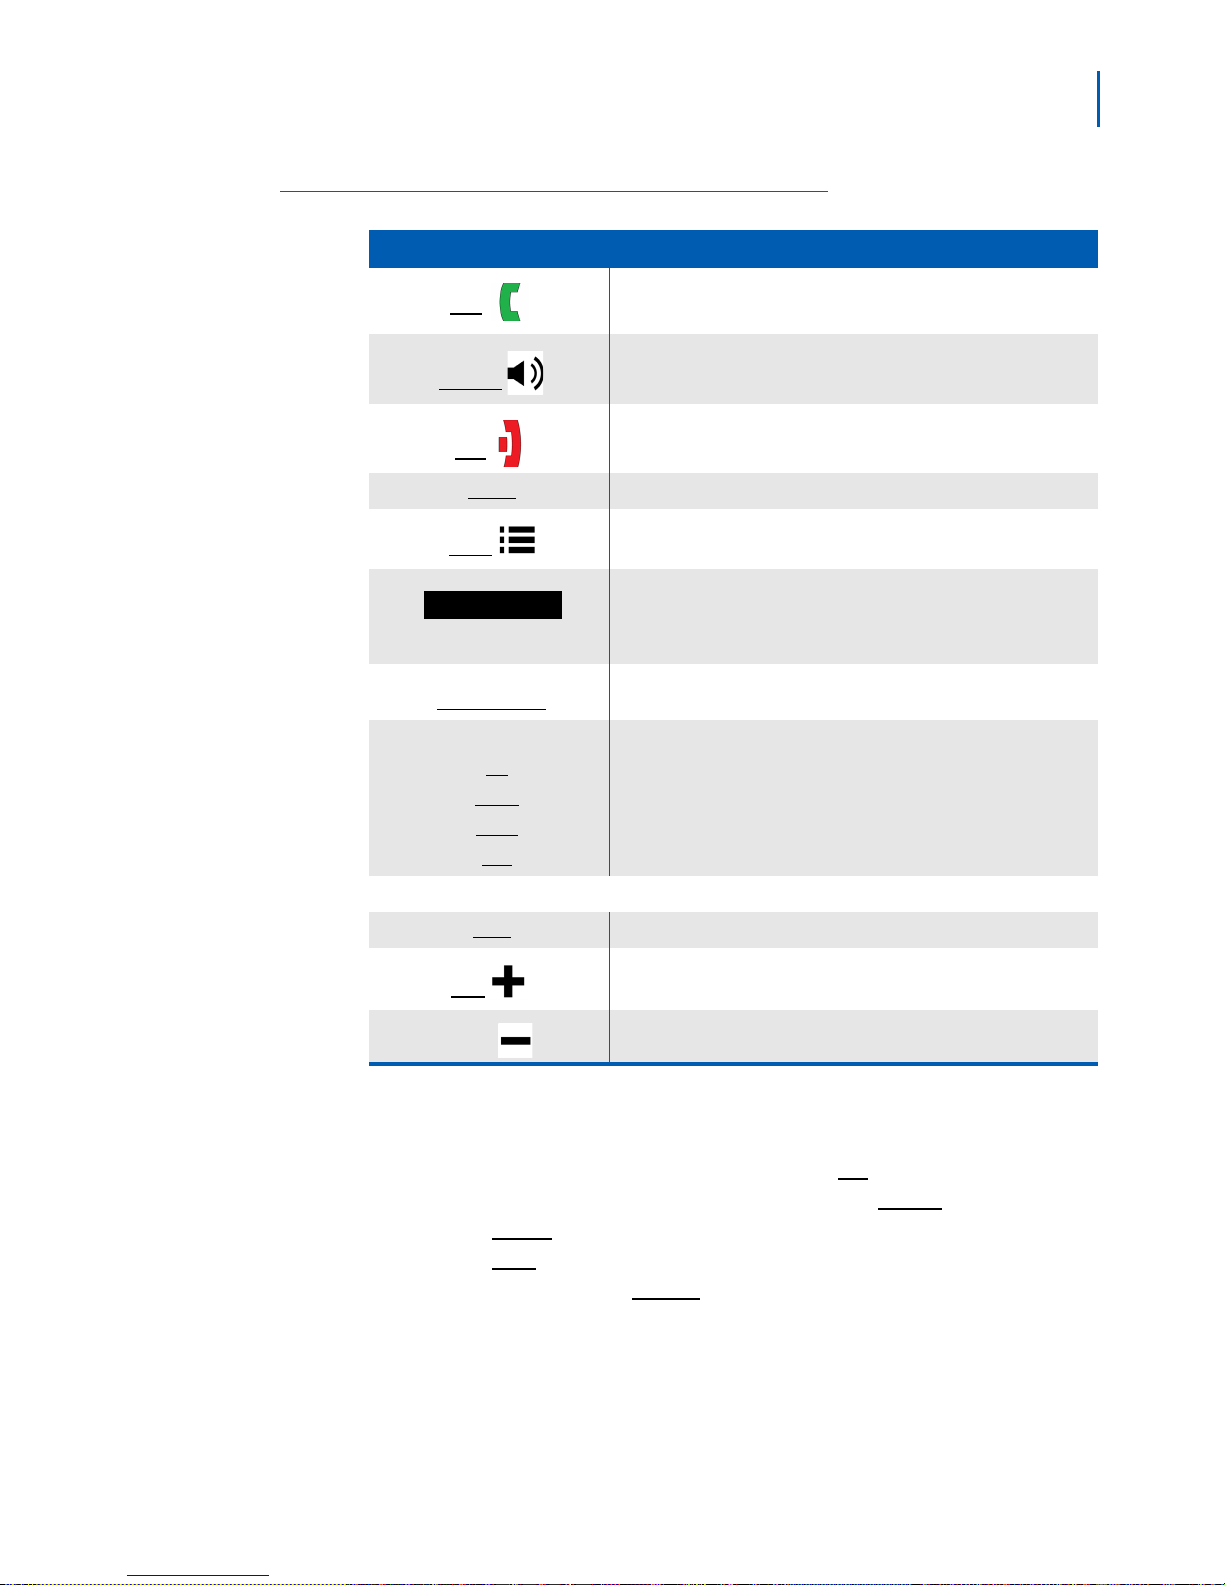
Table 2-1 Key Names and Descriptions
Soft Keys
Key Name (Icon) What it Does
Tal k
Getting Started 2-5
• In standby: start a telephone call.
• During a call: switch to a waiting call.
Speaker
End
Select • In the menu or any list: select the highlighted item.
Menu
Function keys 1 through 4
(
F1 through F4)
Four-way key:
-
Up
- Down
- Right
- Left
Side Keys:
Mute • During a call: mute the microphone.
• Switch a call to the speakerphone (and back).
• During a call: hang up.
• In the menu or any list: go back one screen.
• Open or close the menu.
The soft keys automatically change their function based on what
you are doing. See “Using Soft Keys” on page 2-6".
The four function keys are programmed at the PBX: contact your
system administrator for details.
- Move the cursor up one line.
- Move the cursor down one line.
- Move the cursor to the right.
- Move the cursor to the left.
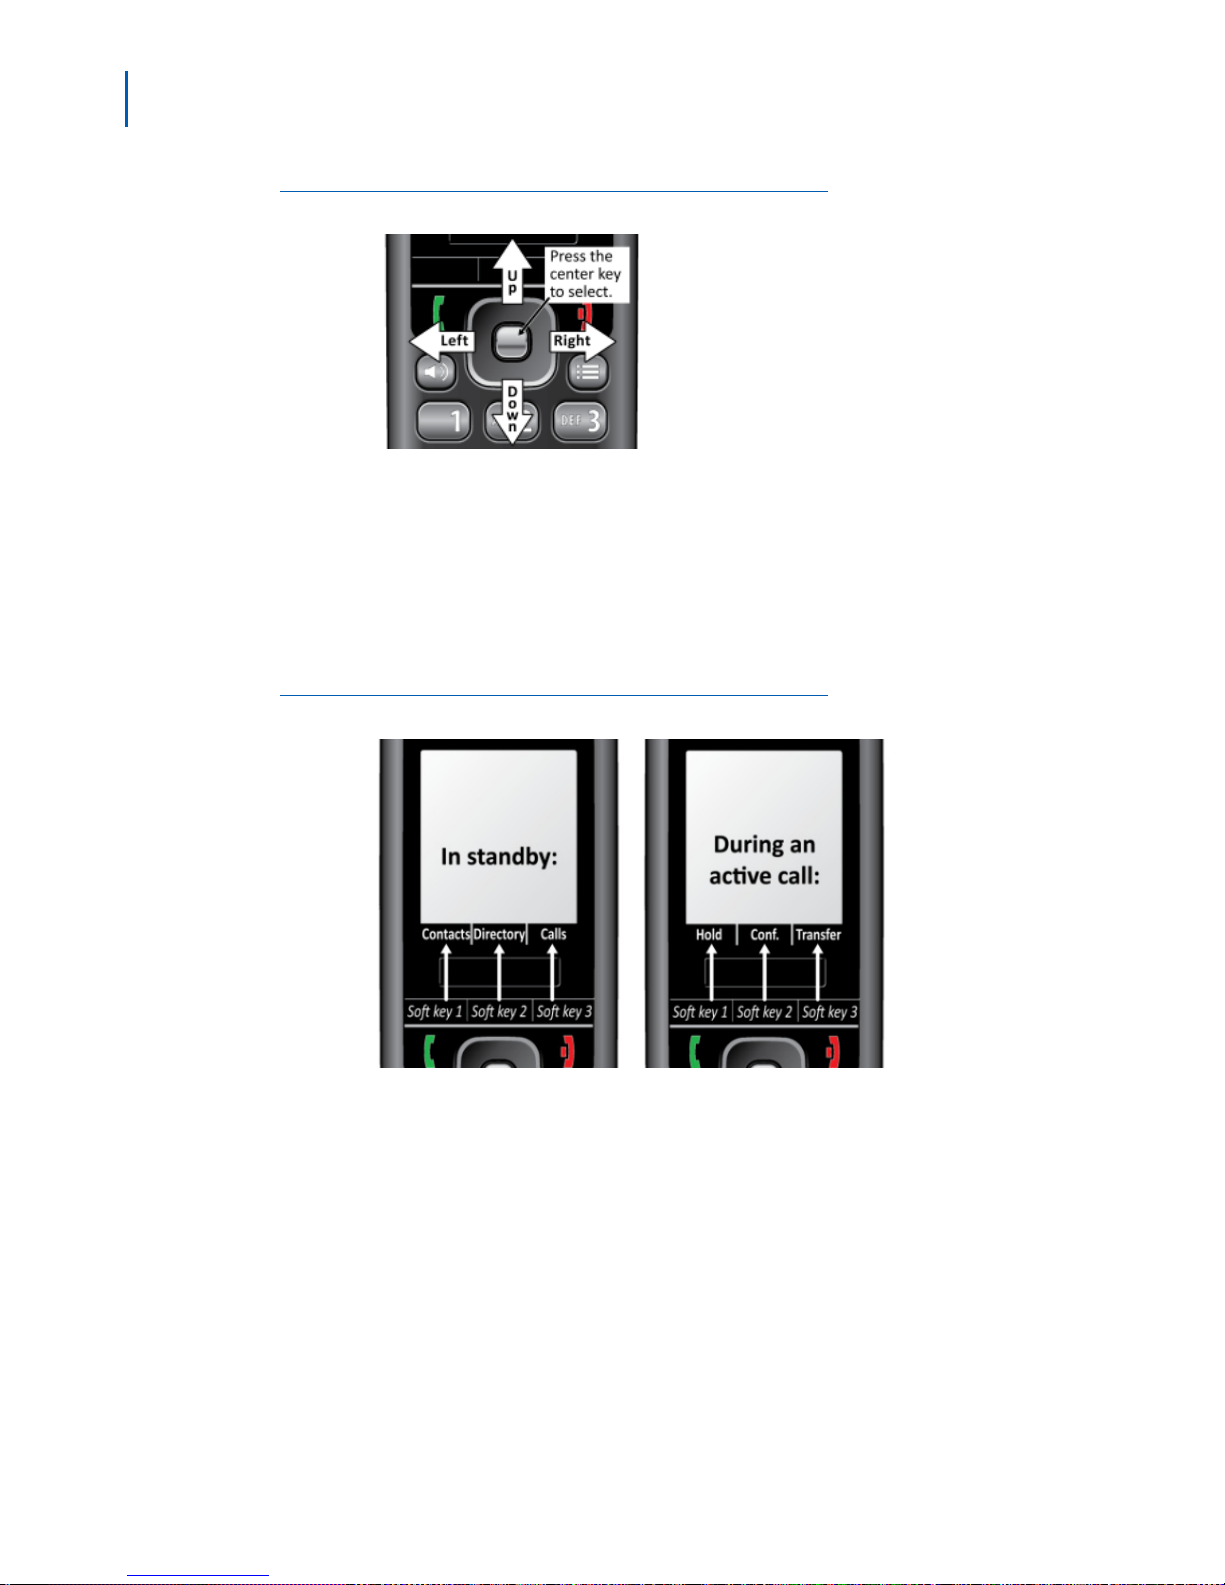
Using the Four-Way Key
The four-way key (Figure 2-6) can be used in the following ways:
• Press the top of the key to move the cursor
• Press the bottom of the key to move the cursor
•Press the
•Press the
• Press the center key to
ML440 End User Guide - Revision 1
Plus
Minus
• During a call: increase the call volume.
• During a call: decrease the call volume.
Up.
Down.
Right side of the key to move the cursor to the right.
Left side of the key to move the cursor to the left.
Select the currently highlighted item.
Page 16
2-6 Getting Started
Figure 2-6
Figure 2-7
Four-Way Key
Using Soft Keys
Soft keys are controlled by the software. They will automatically change
their function depending on what you are currently doing.
The description of the soft key’s current fu
of the display directly above the corresponding key. If the description for
a soft key is blank, that key does not currently have a function. Figure
an example of soft key’s description.
2-7 is
Soft Key Description
nction appears in the bottom
Sometimes, the current function of a soft key can duplicate the function
of a regular key. If this happens, you can press either key.
Entering Text on the Handset
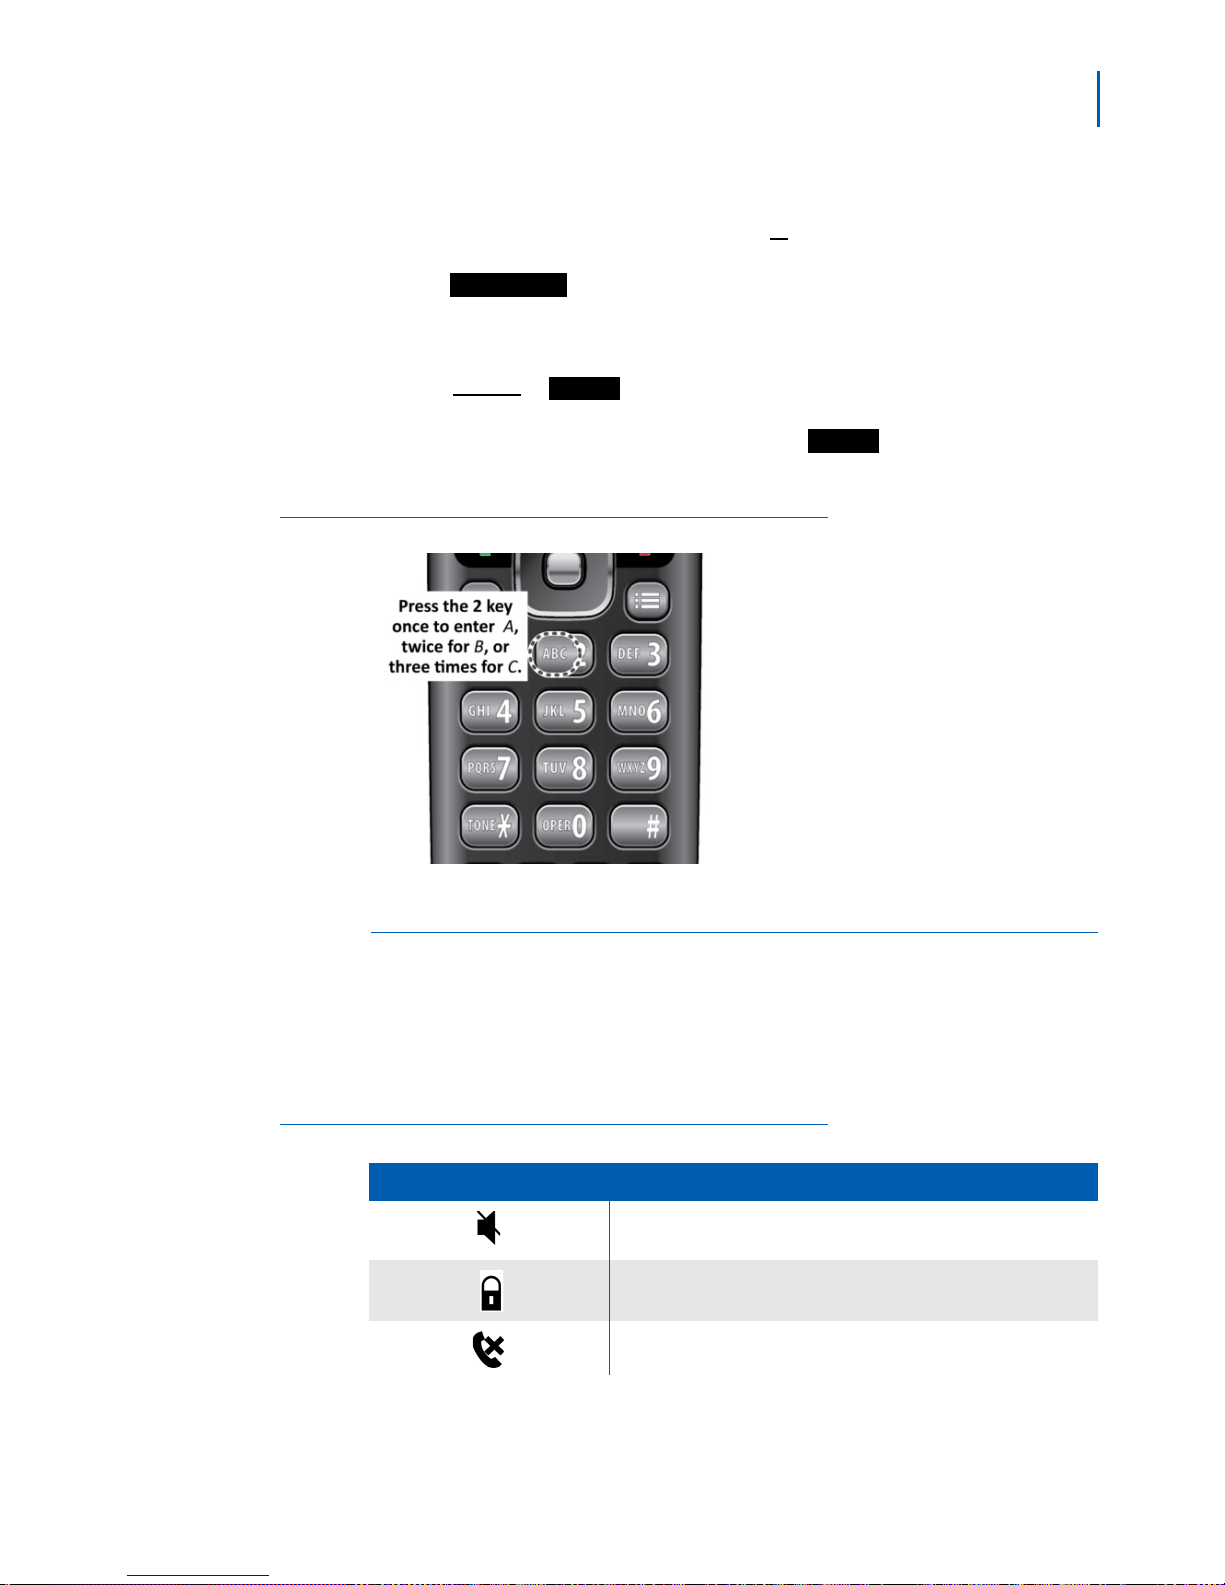
To enter text in the handset (for example, entering a name in the
contact list), press the number key that corresponds to the letter you
want to enter. Refer to Figure 2-8 for an example.
• Press the key once to enter the first
• Press the key twice to enter the second letter, and three times to
ente
• Press the key a fourth time to enter the number on the key.
• The list of letters for each key appears in the lower right corner of the
displa
letter
on the number key.
r the third.
y so you can see what letter you are about to enter.
ML440 End User Guide - Revision 1
Page 17
Getting Started 2-7
• The handset uses capital letters as the first character and lower case
letters after that. To switch between upper case characters, lower
case characters, and numbers, press
#.
• To enter a symbol, press 1 to cycle through the available symbols or
press
• If two letters in a row use the same number key
and select the symbol you want to enter.
Symbol
, enter the first letter.
Wait for the cursor to move to the next position, then enter the
second letter.
•Press
Select or when you're finished.
Save
• If you make a mistake while entering a name, move the cursor to
righ
t of the incorrect character and press .The handset deletes
Clear
the character to the left of the cursor (like the backspace key on a
keyboard).
Figure 2-8
Entering Text
Save
Reading the Display and Status LEDs
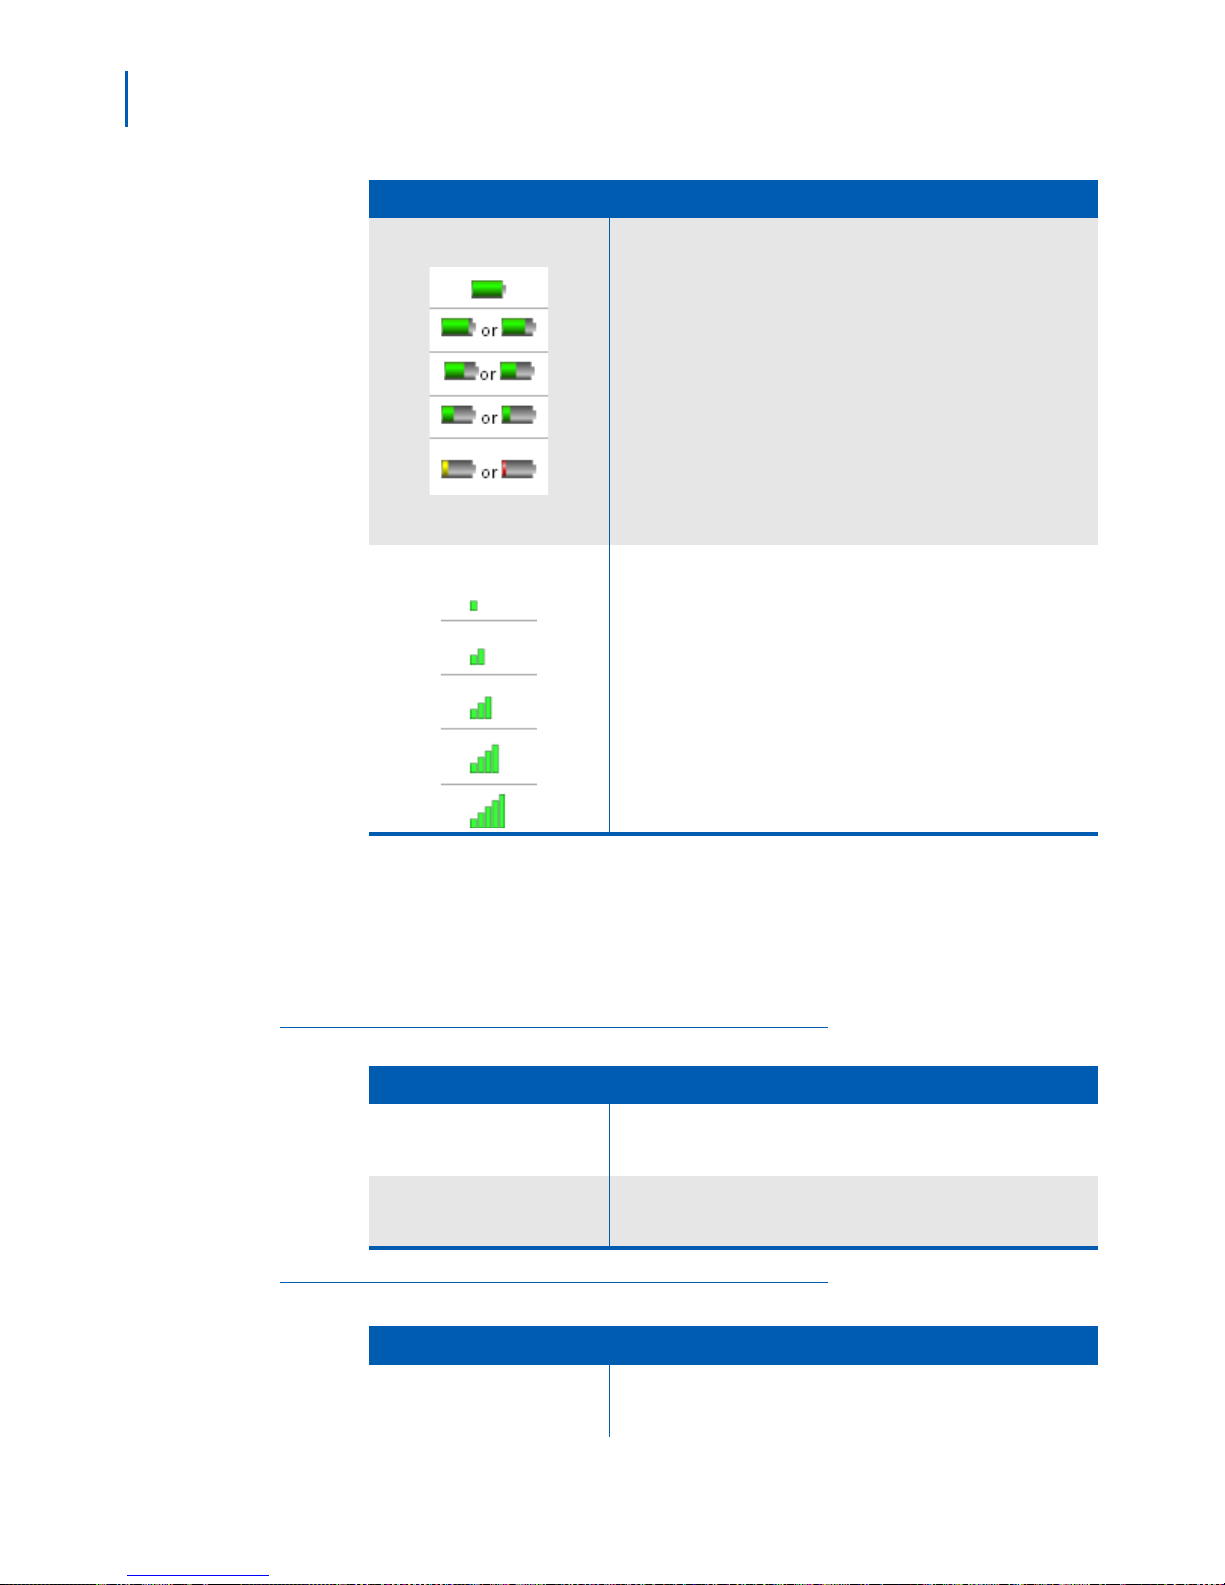
Display Icons and Their Meaning
Since the icons appear based on what you are doing with handset, you
will never see all of the icons at one time. Tabl e 2 - 2 lists the icons and
their meaning.
Table 2-2 Icons
ML440 End User Guide - Revision 1
Icon Meaning
The ringer is turned off. This handset will not ring when a call comes
in.
The keys are locked. See “Locking the Keypad” on page 3-6".
The microphone is muted, and the caller can’t hear you.
Page 18
2-8 Getting Started
Icon Meaning
Battery Status
The battery is fully charged.
The battery is more than half charged.
The battery is about half charged.
The battery is getting low.
The battery is very low. Change the battery or put the handset in the
charger
Rotating icons
Signal Status
LED States and Their Meaning
Tab l e 2 - 3 lists the charger LEDs and provides a brief description of their
meaning.
Tab l e 2 - 4 lists the handset LEDs and provides a brief description of their
meaning.
Table 2-3 Charger LEDs
Charger LEDs Meaning
The battery is charging.
The signal from the base is very weak.
The signal from the base is weak.
The signal from the base is good.
The signal from the base is strong.
The signal from the base is excellent.
Table 2-4 Handset LEDs
HANDSET STATUS
-On: the handset is properly seated in the charger.
-Off: the handset is not in the charger or is not properly seated.
-On: the spare battery is charging.
BATTERY STATUS
-Off: the spare battery is completely charged.
Handset LEDs Meaning
-Slow Flashing (Red) - Voice Mail Message Waiting.
STATUS
- Fast Flashing (Red) - Handset is ringing.
ML440 End User Guide - Revision 1
Page 19

Getting Started 2-9
Handset LEDs Meaning
F1 (in function key 1)
F2 (in function key 2)
F3 (in function key 3)
These four LEDs are controlled by the PBX: contact your system
administrator for information on the available LED states and what
each one means.
F4 (in function key 4)
Configuring the STATUS LED on the Handset
The STATUS LED at the top of the handset has three available colors:
red, green and yellow; green and yellow are configurable by the user.
You can specify what color the STATUS LED turns when you miss a call,
have a new voice message, or need to recharge the battery. Follow the
steps below the configure the STATUS LED.
Step 1 Press Menu to open the main menu screen.
Step 2 Select the General Settings icon, then select LED signal.
Step 3 Select Green LED, then choose what you want the green LED to mean.
Step 4 Press End to go back one menu level, then repeat the same selection
with the Yellow LED.
Step 5 For future reference, use Table 2-5 to record your settings. For example,
if you set the LED to turn yellow when you miss a call, place an X under
Missed
Table 2-5 STATUS LED Settings
call on the YELLOW LED row.
LED Color Missed Call Voice Mail Low Battery None (Off)
GREEN
YELLOW
ML440 End User Guide - Revision 1
Page 20
2-10 Getting Started
Using the Menus
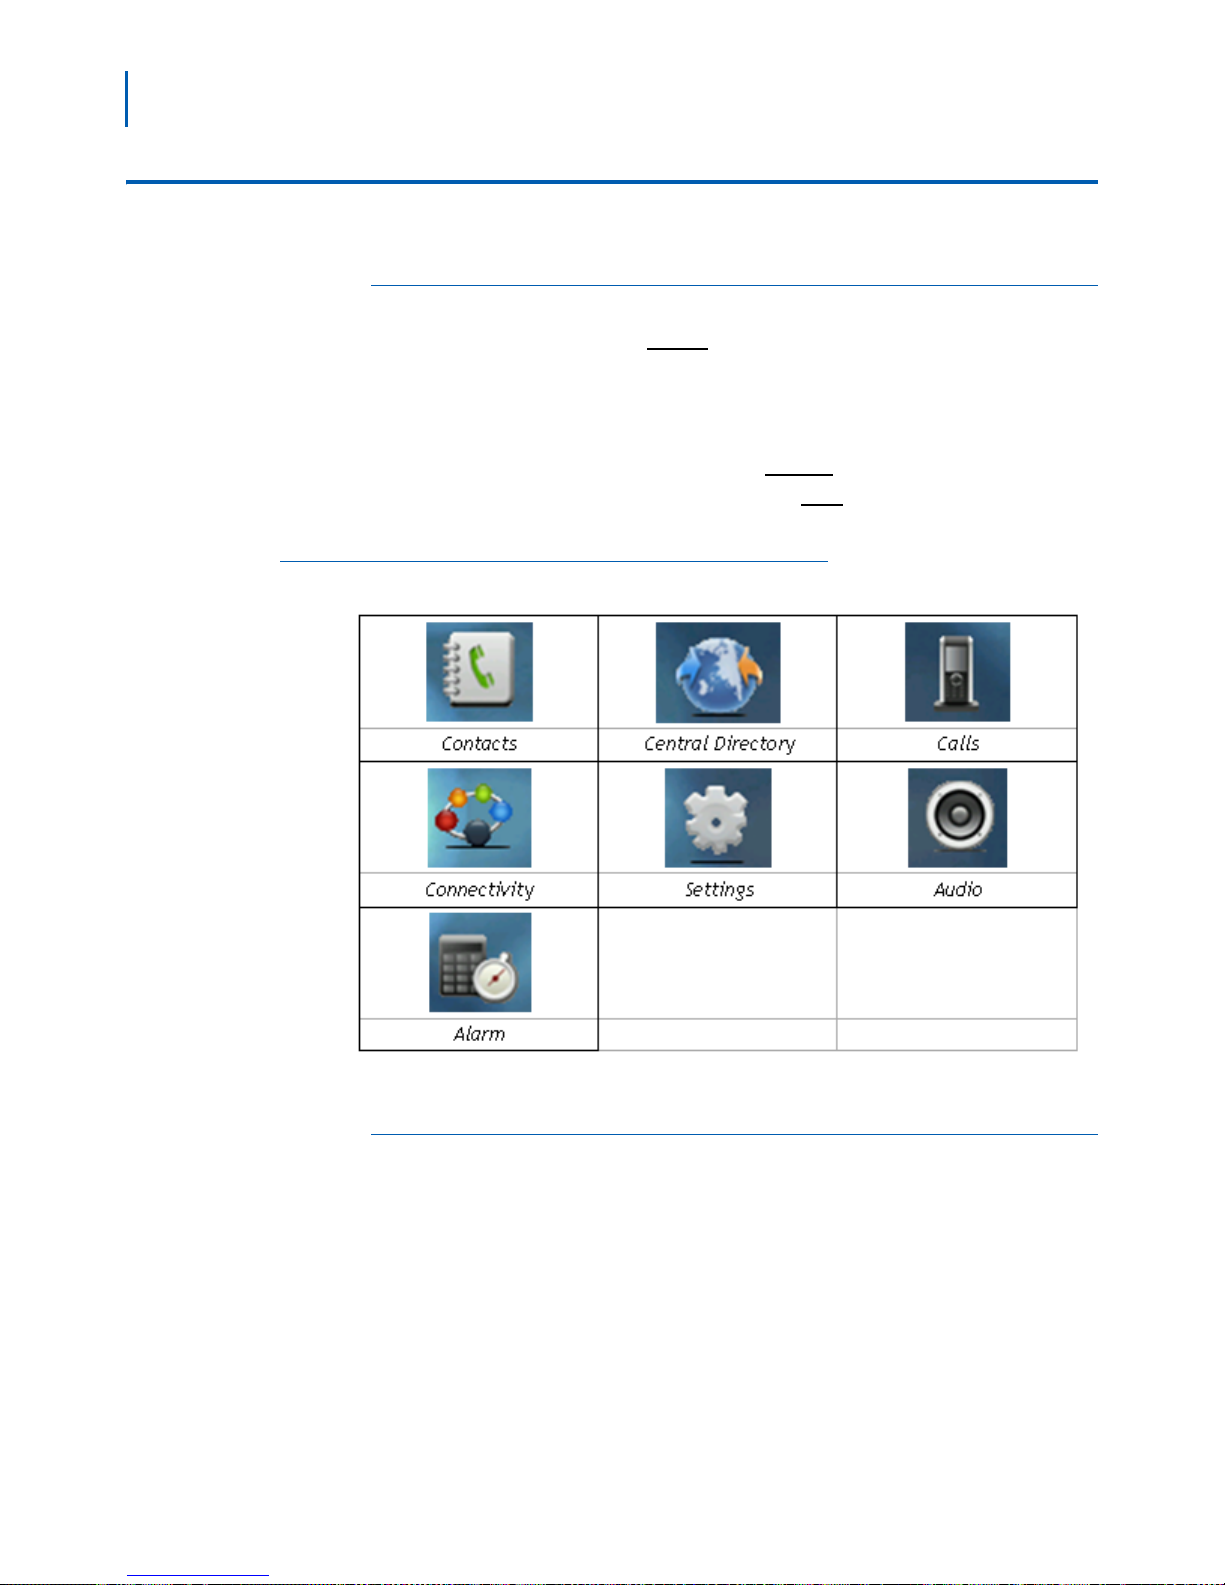
Main Menu Screen
• To open the menu, press Menu. The handset displays the main menu
screen (Figure 2-9).
• Use the four-way key to move the cursor and highlight items. When
yo
u highlight each item, the handset shows the current setting for
that item in the display.
• To select the highlighted item, press
• To go back one level in the menu, press
• If you don't press any keys for 1 minute, the handset exits the menu.
Select.
End.
Figure 2-9
Main Menu Screen
Contacts Screen (Local Contacts)
The main Contacts screen shows the list of contacts stored locally on
this handset. When you highlight a contact, you can use one of the soft
keys described in Tabl e 2 - 6 .
ML440 End User Guide - Revision 1
Page 21
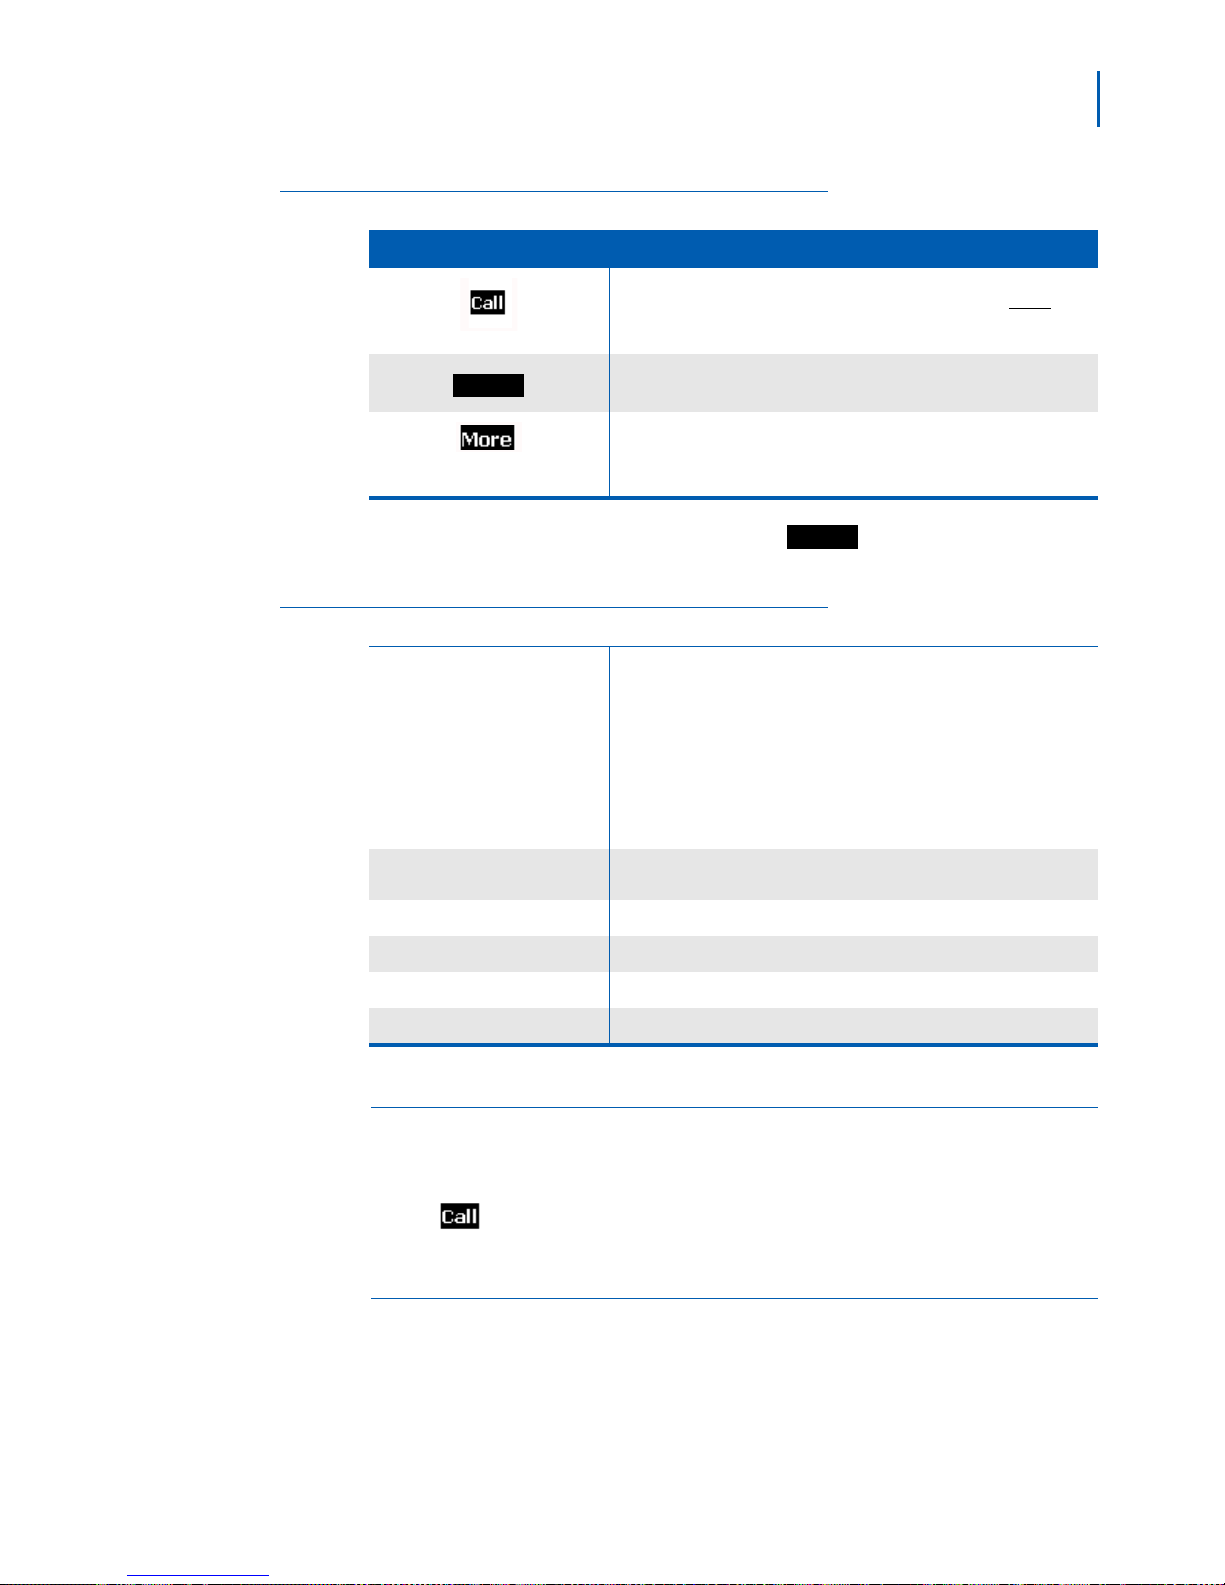
Table 2-6 Contacts and Soft Keys
Edit
More
Soft Key Operation
Getting Started 2-11
Dial the phone number showing on the display. (Press Right to
scroll through each phone number saved for this contact.)
Edit the selected contact’s information.
See more options for the contact list.
To see options for the contact list, press
described in Ta b l e 2 - 7.
Table 2-7 Contact List More Options
Add contact
Edit before call
Edit contact
Delete contact Delete the selected contact.
Delete all contacts
Speed dial Assign the selected contact to a speed dial number.
. These options are
Add a contact to the list. You can enter the following information:
•Name
• Up to four phone numbers (Work, Mobile, Home, and Other); you
must enter at least one phone number
.
• Ringtone
If the contact list is empty, this is the only available option.
Edit the selected contact’s phone number before you dial it. This will
not edit the number in the contact’s list.
Edit the selected contact’s information.
Erase the entire contact list.
Central Directory Screen (Global Contacts)
The main Central Directory screen shows the list of contacts stored
globally on the system. When you highlight a contact in the directory,
press
Calls Screen
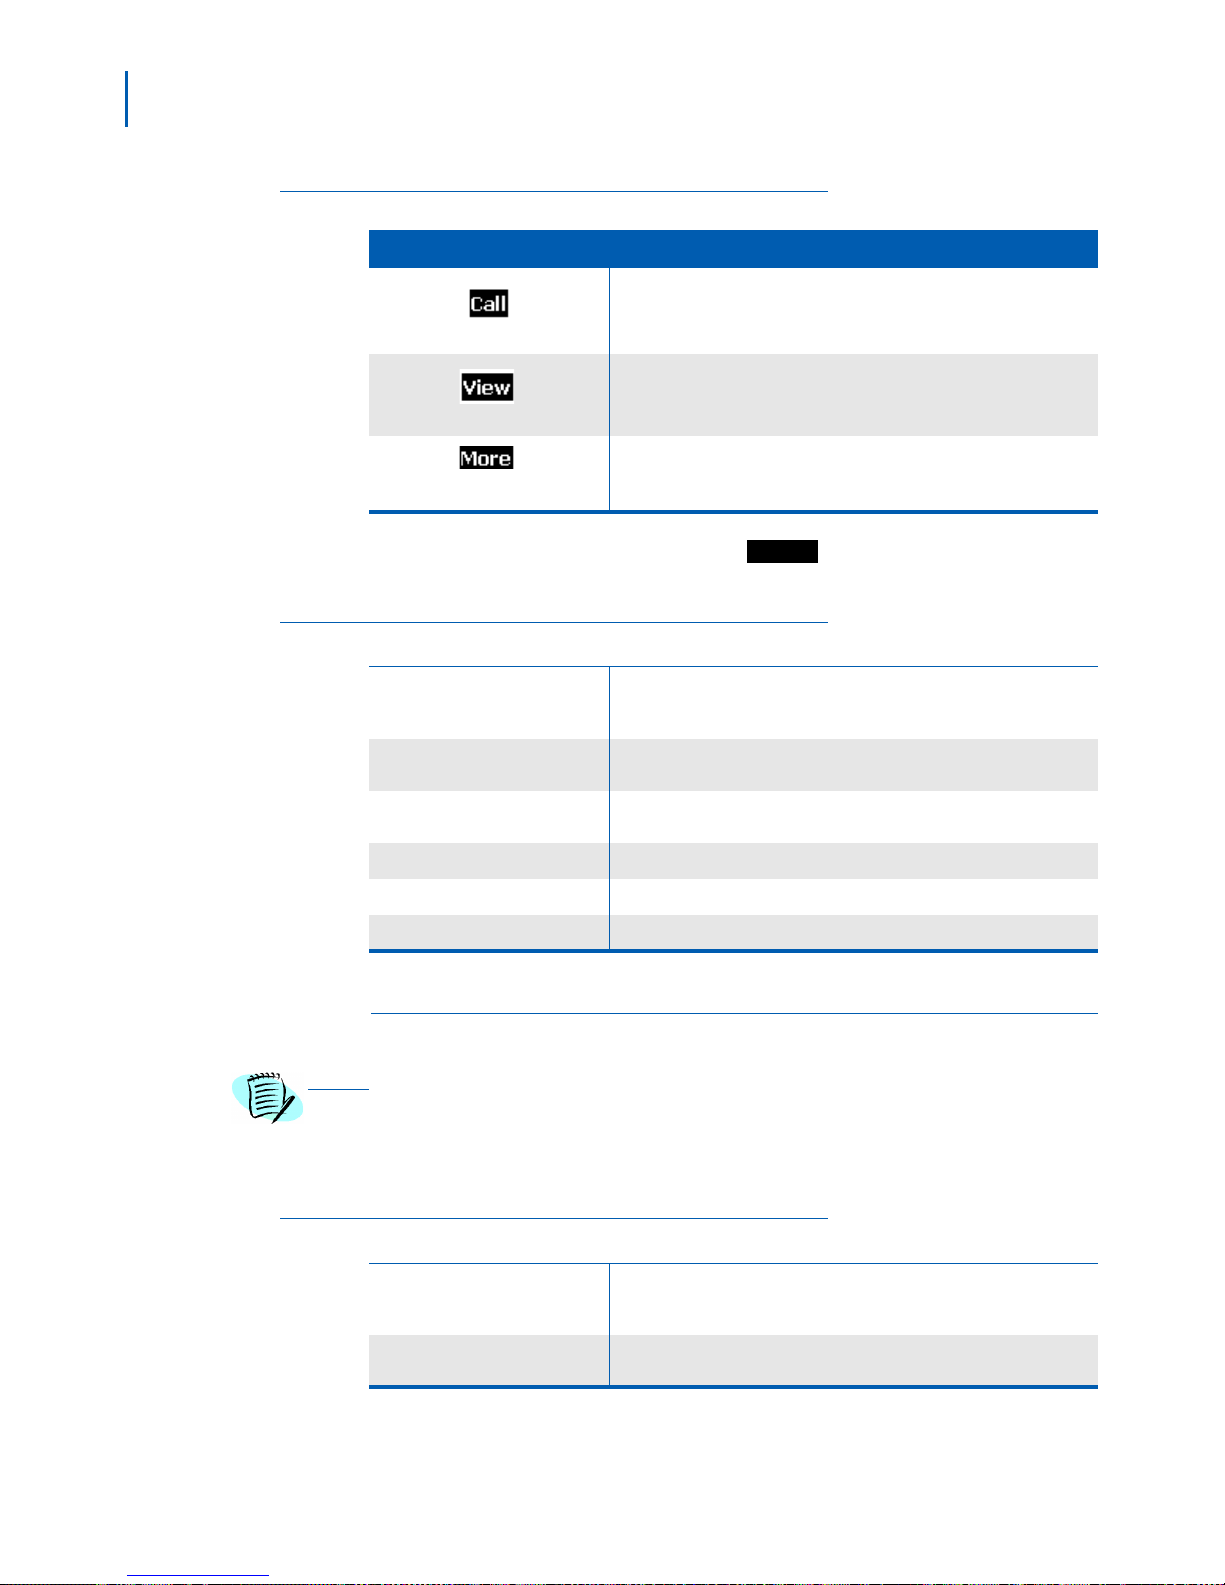
The main Calls screen shows the last 50 calls (whether incoming or
outgoing) on this handset. When you highlight a call on the list, you can
use one of the soft keys listed in Table 2 - 8 .
ML440 End User Guide - Revision 1
to dial that contact.
Page 22
2-12 Getting Started
More
NOTE
Table 2-8 Calls Screen Soft Keys
Soft Key Operation
Return the selected call.
See more details about the selected call.
See more options for the call list.
To see options for the call list, press
described in Ta b l e 2 - 9.
Table 2-9 Call List More Options
View Details
Save as contact
Append to contact
Edit before call Edit the selected phone number before you dial it.
Delete item
Delete all items Erase all records from call list.
Connectivity Screen
The operations on this screen require administrator-level access to the base.
Contact your system administrator before selecting any of these operations. See the
ML440 and AP20 System Installation Guide for more information.
. These options are
View details about the call such as who it was from, the CID
information if available, was it answered or missed, and the time and
date of the call.
Add the name and phone number from the selected call record as a
new contact.
Add the number from the selected call record to an existing contact;
the handset prompts you to select a contact and phone number slot.
Delete the selected call record.
Table 2-10 and Table 2-11 provide a list of the available operations and
a brief description.
Table 2-10 Connectivity Screen Operations
Register
Deregister
Register the handset to a base. This option only functions if the
handset is not currently registered and displays a Deregistered
message
Clear the handset's registration information. Once the handset is
deregistered, it will not function until it is registered to a base.
ML440 End User Guide - Revision 1
Page 23

Table 2-11 Settings Screen Operation
Time & Date
Language
LED signal
Security
Getting Started 2-13
Select the format you prefer for time and date display:
• Time format: Select 24 hour or AM/PM
• Date format: Select one of six standard data formats
Select the handset's display language. As you highlight each
language, the display changes to that language. When you see the
language you want to use, press
Select.
Configure what color the STATUS LED turns when you miss a call,
have a new voice message, or need to recharge the b
“LED States and Their Meaning” on page 2-8"
for more information.
attery. See
• Automatic keylock: Lock the keypad when the handset remains
idle for a designated period of time.
• Change PIN: Change the 4-digit PIN used for registration and
deregistration.
Handset name
Reset settings
Status
Auto answer
Silent charg
ing
Change the name the handset displays on the standby screen.
Reset all the options on this handset to factory default values (see
“Resetting Handsets” on page 4-4").
The status screen displays the following information (you will have
to scroll down to see all the fields):
•
The hardware version and software version of the base this
handset is regist
ered to.
• The hardware version and the software version of this handset.
• The current band DECT radio band the handset is operating in.
Choose how you want the handset to answer incoming calls:
• Normal (default): you must press
Tal k to answer calls.
• Any key: you can press any key to answer calls.
• Automatic: the handset answers all calls after 5 seconds.
Choose how the handset responds to incoming calls while it is
chargi
ng:
• Off: The handse
t rings normally and displays the incoming call
screen.
• Disconnect: The handset does
• Silent: The handset
does not ring, but it does display the incoming
not respond to incoming calls at all.
call screen.
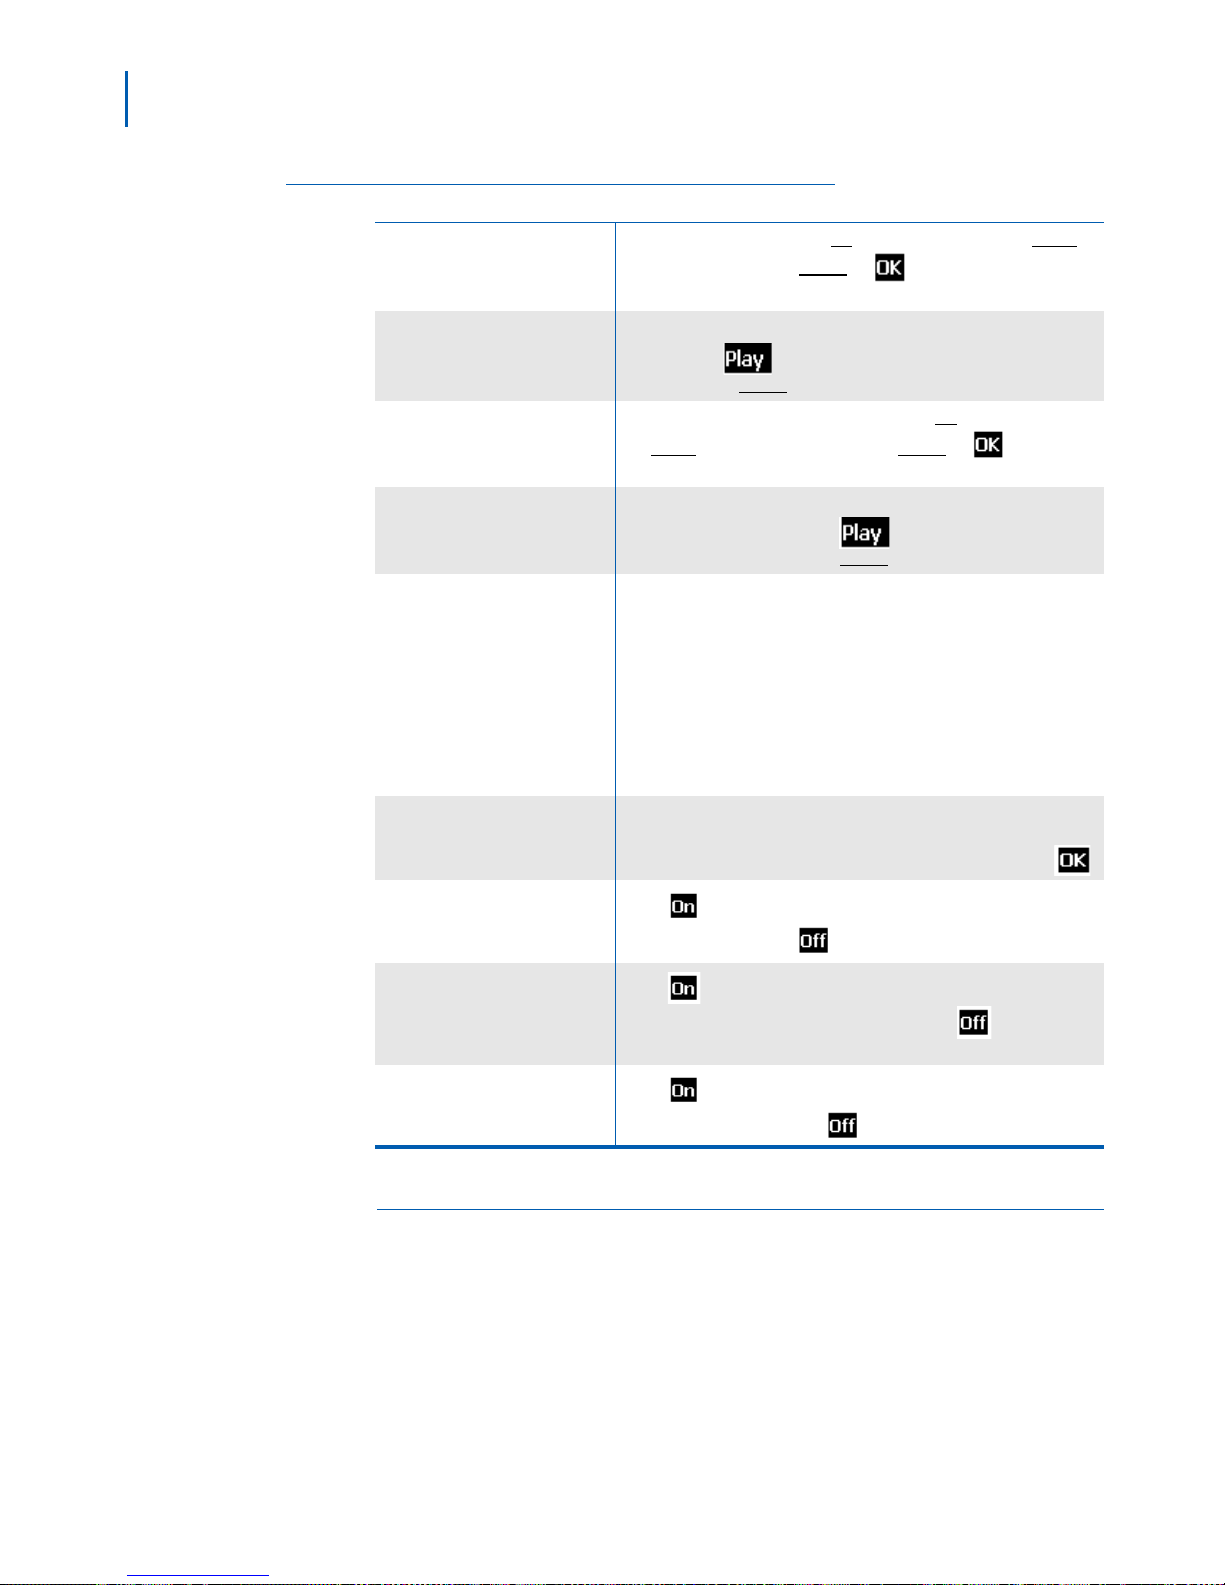
The audio screen is where the volume and ringer tone are set. Table 2 -
12 describes the
ML440 End User Guide - Revision 1
functions and how to use them.
Page 24
2-14 Getting Started
Table 2-12 Audio Screen Settings
Ring volume
Ring melody
Alert volume
Alert tone
Vibrator
Key sound
Set the ringer volume. Press
lower the volume. Press
Up to raise the volume and Down to
Select or when you're satisfied with
the volume setting.
Choose this handset's ring melody. As you highlight each ring
melody, press
you want, press
Set the volume for notification tones. Press
and
Down to lower the volume. Press Select or when you're
to hear a sample. When you hear the melody
Select.
Up to raise the volume
satisfied with the volume setting.
Choose the tone this handset uses for alerts and notifications. As
you highlight each tone, press
hear the tone you want, press
Have the handset vibrate on an incoming call or a notification. Se
to hear a sample. When you
Select.
lect
one of the following:
• Off: The handset will not vibrate at all.
• Vibrate then ring: The handset will vibrate first, then sound the
tone or melody on the second ring.
•
Vibrate only: The handset will only vibrate, not ring.
• Vibrate and ring: The handset will vibrate and ring at the same
time.
Have the keypad sound a tone when you press a key. Choose one
of two sounds (Click or Tone) or select Silent to turn off the keypad
tone off. The tone will be activated after you press Select or
.
Confirmation sound
Press
change a setting. Press
if you want the handset to sound a tone each time you
to disable this tone.
Press if you want the handset to sound a warning when you
Coverage warning
approach the edge of the base’s range. Press
to disable this
tone.
Charger warning
Press
battery is getting low. Press
if you want the handset to sound a warning when the
to disable this tone.
Alarm Screen
See “Setting the Alarm” on page 3-7" for more information on setting
alarms on the handset. Table 2-13 lists the types of alarms and provides
a brief description.
ML440 End User Guide - Revision 1
Page 25

Table 2-13 Alarm Screen Settings
Getting Started 2-15
Alarm
Recurrent alarm
Snooze time
Set a one-time alarm on this handset. Enter the time you want the
alarm to sound and press
.
Set an alarm to sound on specific days of the week. Enter the time
you want the alarm to sound and press Press
. The handset
then prompts you to select which days you want the alarm to sound.
Select the amount of time alarms remain snoozed before rin
ging
again. Choose from 1 through 10 minutes, in one minute
increments; the default is 10 minutes.
ML440 End User Guide - Revision 1
Page 26

2-16 Getting Started
ML440 End User Guide - Revision 1
Page 27
3
Using Common Features
This chapter covers common features associated with the ML440
handset and contains the following topics.
Chapter Topics
• Making, Receiving, and Transferring Calls
• Changing the Volume
• Using the Call Lists
• Using the Contact List and Central Directory
• Voice Mail Waiting Indicator
• Using an Optional Headset
• Locking the Keypad
• Changing the PIN
• Using Alarms
3-1
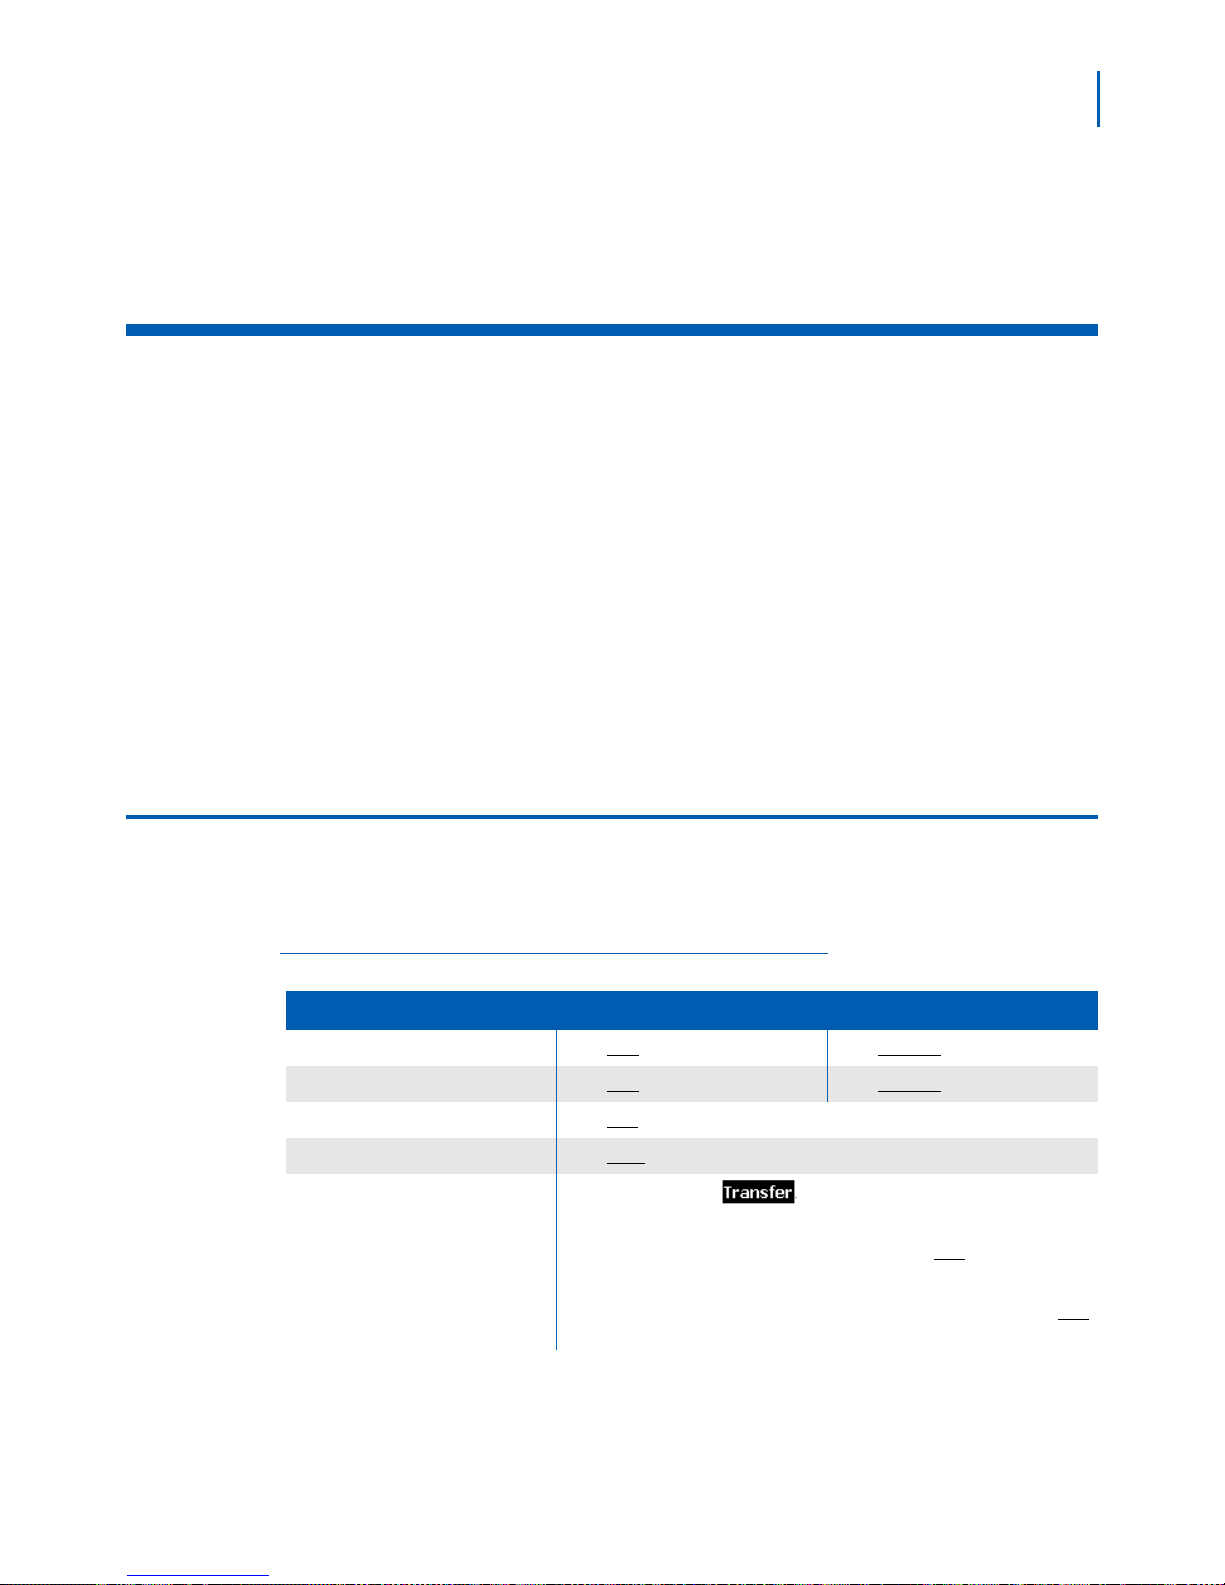
Making, Receiving, and Transferring Calls
Tab l e 3 - 1 below lists ways to perform common actions from both the
earpiece and a speakerphone.
Table 3-1 Make, Receive, Transfer Calls
To..... From the earpiece From the speakerphone
Make a call Press Tal k then dial the number. Press Speaker then dial the number.
Answer a call Press Talk. Press Speaker.
Hang up Press
Mute the microphone during a call Press Mute. Press again to turn the microphone back on.
Transfer a call
End.
• During a call, press
• Enter the extension to which you want to transfer the call.
• Wait until the other extension answers and press
•OR
• If you don't want to wait until the other extension answers, just press
immediately.
.
End.
End
ML440 End User Guide - Revision 1
Page 28

3-2 Using Common Features
NOTE
To..... From the earpiece From the speakerphone
Start a conference call
• During a call, press .
• Enter the extension with which you want to conference.
• Wait until the other extension answers, then press
conference.
to start the
Switch between the speakerphone
and earpiece
Putting a Call on Hold
Press . If the call remains on hold for longer than the hold time, it
rings again.
To return to a call on hold:
• For an internal call, press the Intercom Feature Key.
• For an external call, press the line key.
Feature Keys are programmed in the DSX. See your system administrator for more
details.
Changing the Volume
Press
Speaker.
Earpiece and Speaker Volume
Each handset has individual volume settings for the earpiece, the
speakerphone, and the headset jack: press
of the item you are currently listening to and
handset saves the volume setting.
Plus to increase the volume
Minus to decrease it. The
Ring Volume
You can also set the ring volume for each handset. When the handset is
in standby, press
Use the
volume. If you turn the ring volume all the way down, the ringer turns
off.
Left and Right cursor key to increase or decrease the ring
Menu, select Audio Settings then Ring Volume.
ML440 End User Guide - Revision 1
Page 29
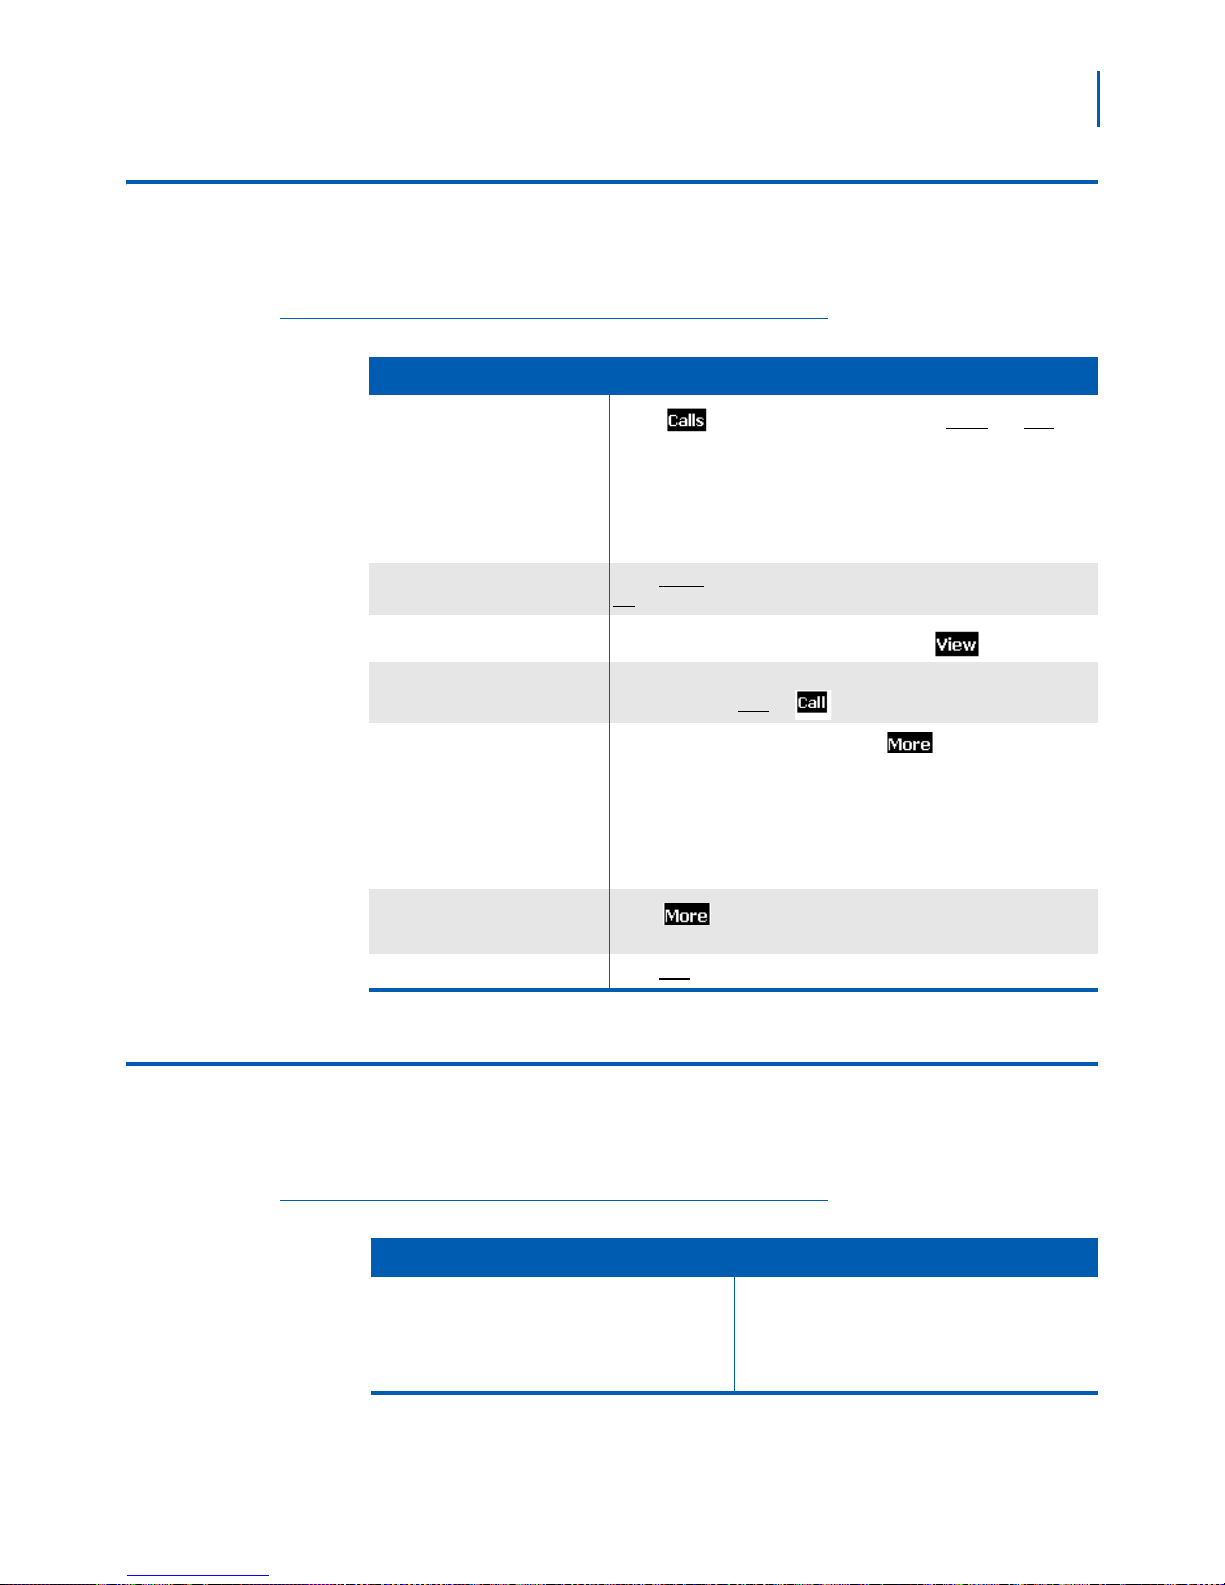
Using the Call Lists
Table 3-2 Call Lists Actions
Using Common Features 3-3
The handset saves the last 50 calls (whether incoming or outgoing) to
the call list. Ta b l e 3-2 lists actions and the steps to perform that action.
To.... Press
Open the call list
Scroll through the list
See details on a call
Dial a number
Add a number to the contact list
Delete records from the call list
Close the list Press
Press
select the specific call list you want to review:
• Answered calls
• Dialed calls (numbers dialed from this handset)
• Missed calls
Press Down to scroll through the list from newest to oldest. Press
Up to scroll from oldest to newest.
Highlight the call record in the list and press
(Answered and Dialed calls only) Highlight the call record you want
to dial and press
• Highlight the call record and press
• Select Append to a contact to add this phone number
existing contact.
OR
• select Add to contact list to create a new contact for this call
record
Press . Select Delete item to erase the selected call record;
select Delete all items to erase all records on the list.
to see all calls on the lists. Use Right and Left to
.
Tal k or .
.
to an
End.
Using the Contact List and Central Directory
Tab l e 3 - 3 lists characteristics of both the local Contact List and global
Contact List.
Table 3-3 Contact List Characteristics
• Up to 100 entries
• Unique to each handset
• Stored locally: can be edited by the end user of
the handset
ML440 End User Guide - Revision 1
Contact List (local) Central Directory
• Up to 200 entries
• Shared by all users on the system
• Stored on the system
Page 30
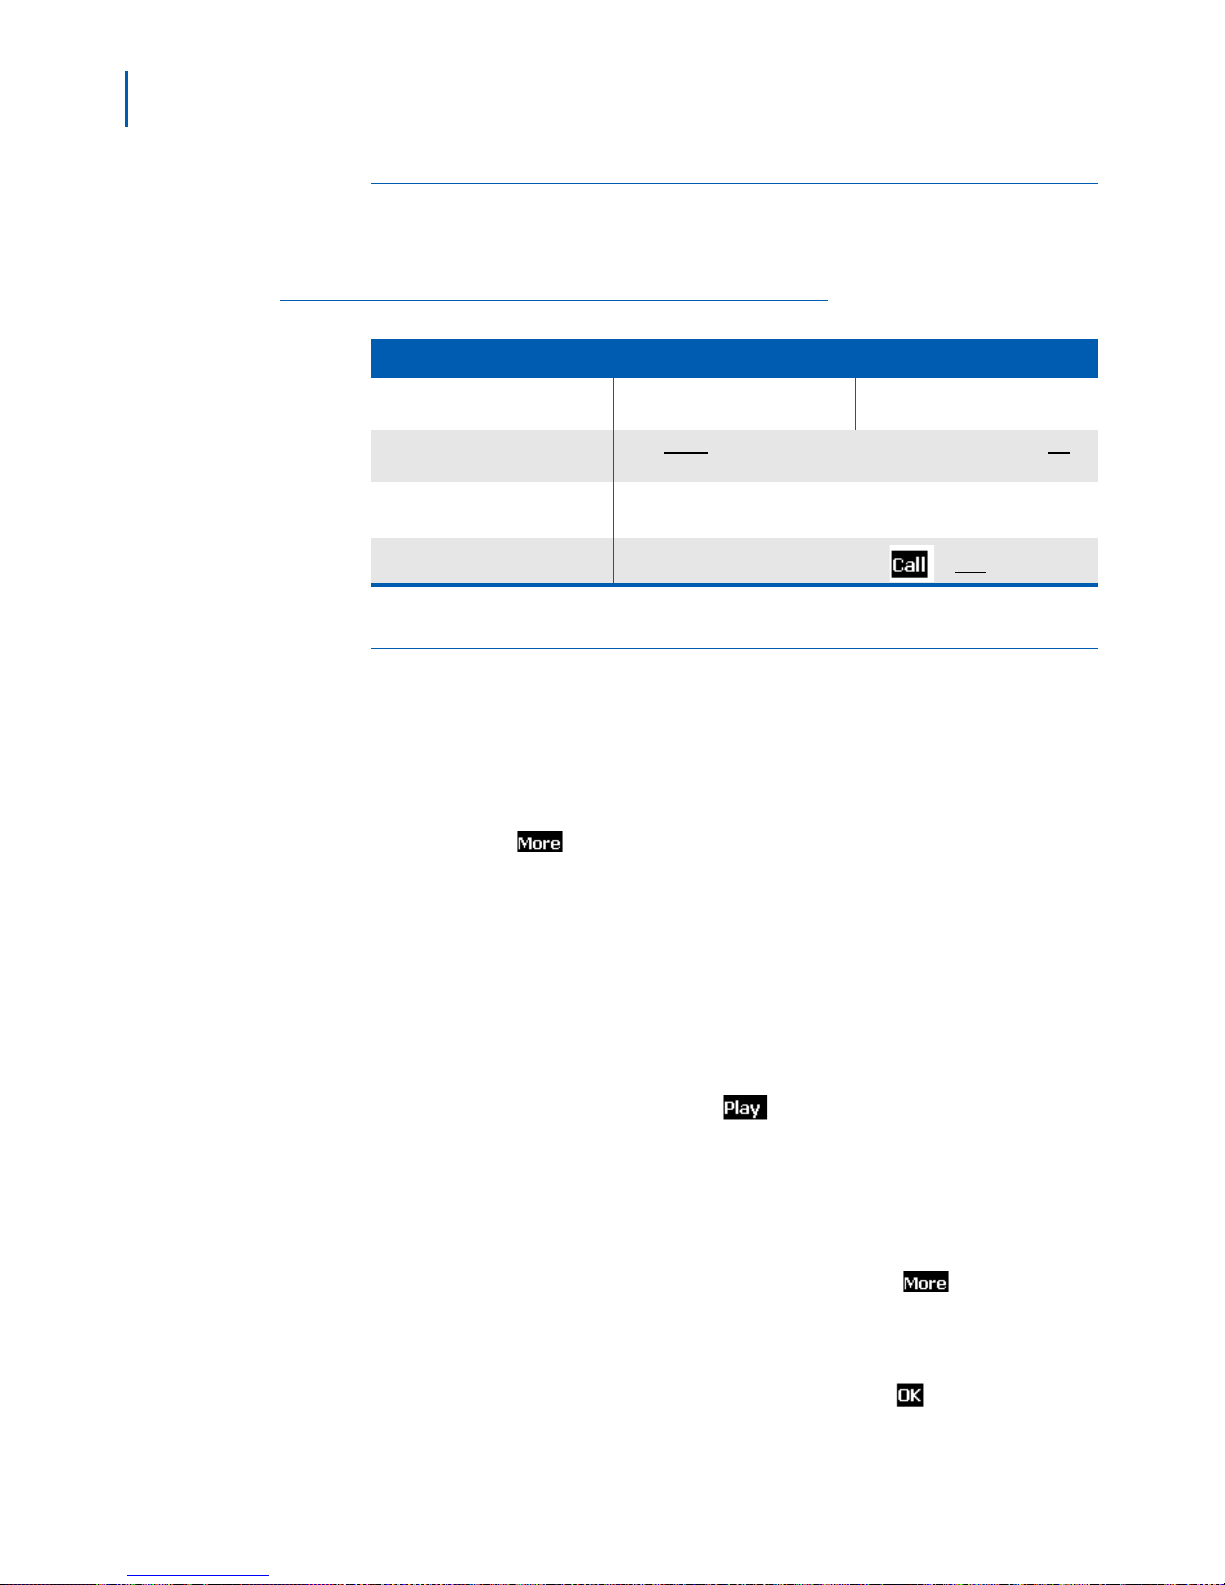
3-4 Using Common Features
Functions Common to Both Lists
Tab l e 3 - 4 lists the functions that are common between the contact list
and the central directory.
Table 3-4 Common Functions
To. .. From the contact list... From the central directory...
Open or close the list
Scroll through the entries
Jump to entries that start with a
certain letter
Dial a contact
Open the main menu and select
the Contacts icon.
Press Down to scroll through the contact list from A to Z or Up to
scroll from Z to A.
Press the number key corresponding to the letter you want to jump
to.
Find the contact you want, and press or Tal k.
Open the main menu and select
the Central Directory icon.
Local Contact List Functions
Adding Contacts
Follow the steps below to add contacts to the local contact list.
Step 1 Open the main menu screen and select the Contacts icon.
Step 2 Press and select Add contact. (If the contact list is empty, this is
the only available option.)
Step 3 Select Name and enter the name you want to use for this contact.
Step 4 Select one of the four phone number slots (Work, Mobile, Home, or
Other) and enter the phone number you want to use for this contact. You
must enter at least one phone number, but it doesn't matter which of the
slots you use.
Step 5 To set a special ringtone for this contact, select Ringtone and choose the
Deleting Contacts
Follow the steps below to delete contracts from the local contact list.
Step 1 Open the main menu screen and select the Contacts icon.
Step 2 Highlight the contact you want to erase and press .
Step 3 To erase this contact only, select Delete contact; to erase all contacts
Step 4 When the handset prompts you to confirm, press .
ringtone you want the handset to use when this contact calls. (To hear a
sample of the ringtone, press
.)
from this local list, select Delete all contacts.
ML440 End User Guide - Revision 1
Page 31

Using Common Features 3-5
NOTE
Editing a Contact’s Phone Number Before Dialing
Follow the steps below to edit a contact’s phone number before dialing.
Step 1 Open the main menu screen and select the Contacts icon.
Step 2 Highlight the contact you want to erase and press .
Step 3 Select Edit before dial, then edit the phone number.
Step 4 When you're finished editing the number, press or Tal k.
This will not change the phone number stored in the contact list.
Assigning Contacts to a Speed Dial Number
You can assign one of eight number keys on the twelve key dial pad (2
through
below to perform this procedure.
9) to a contact and use it as a speed dial. Follow the steps
Step 1 Open the main menu screen and select the Contacts icon.
Step 2 Highlight the contact you want to assign, and press .
Step 3 Select Speed dial. The handset shows the list of speed dial numbers and
what contacts are assigned.
Step 4 Select the speed dial number you want to assign this contact to and
press
to erase the existing assignment or press
assignment with the new contact.
Making a Call From a Speed Dial Number
Press and hold the number key that you assigned the contact to. The
handset automatically dials the first phone number on that contact
record.
Voice Mail Waiting Indicator
When you have new messages, the STATUS LED turns green or yellow,
according to the settings you selected in the LED signal menu (see
“Configuring the STATUS LED on the Handset” on page 2-9). After you
listen to all new messages, the ST
. If the number you select is already assigned, press
to overwrite the
A
TUS LED turns off.
ML440 End User Guide - Revision 1
Page 32
3-6 Using Common Features
NOTE
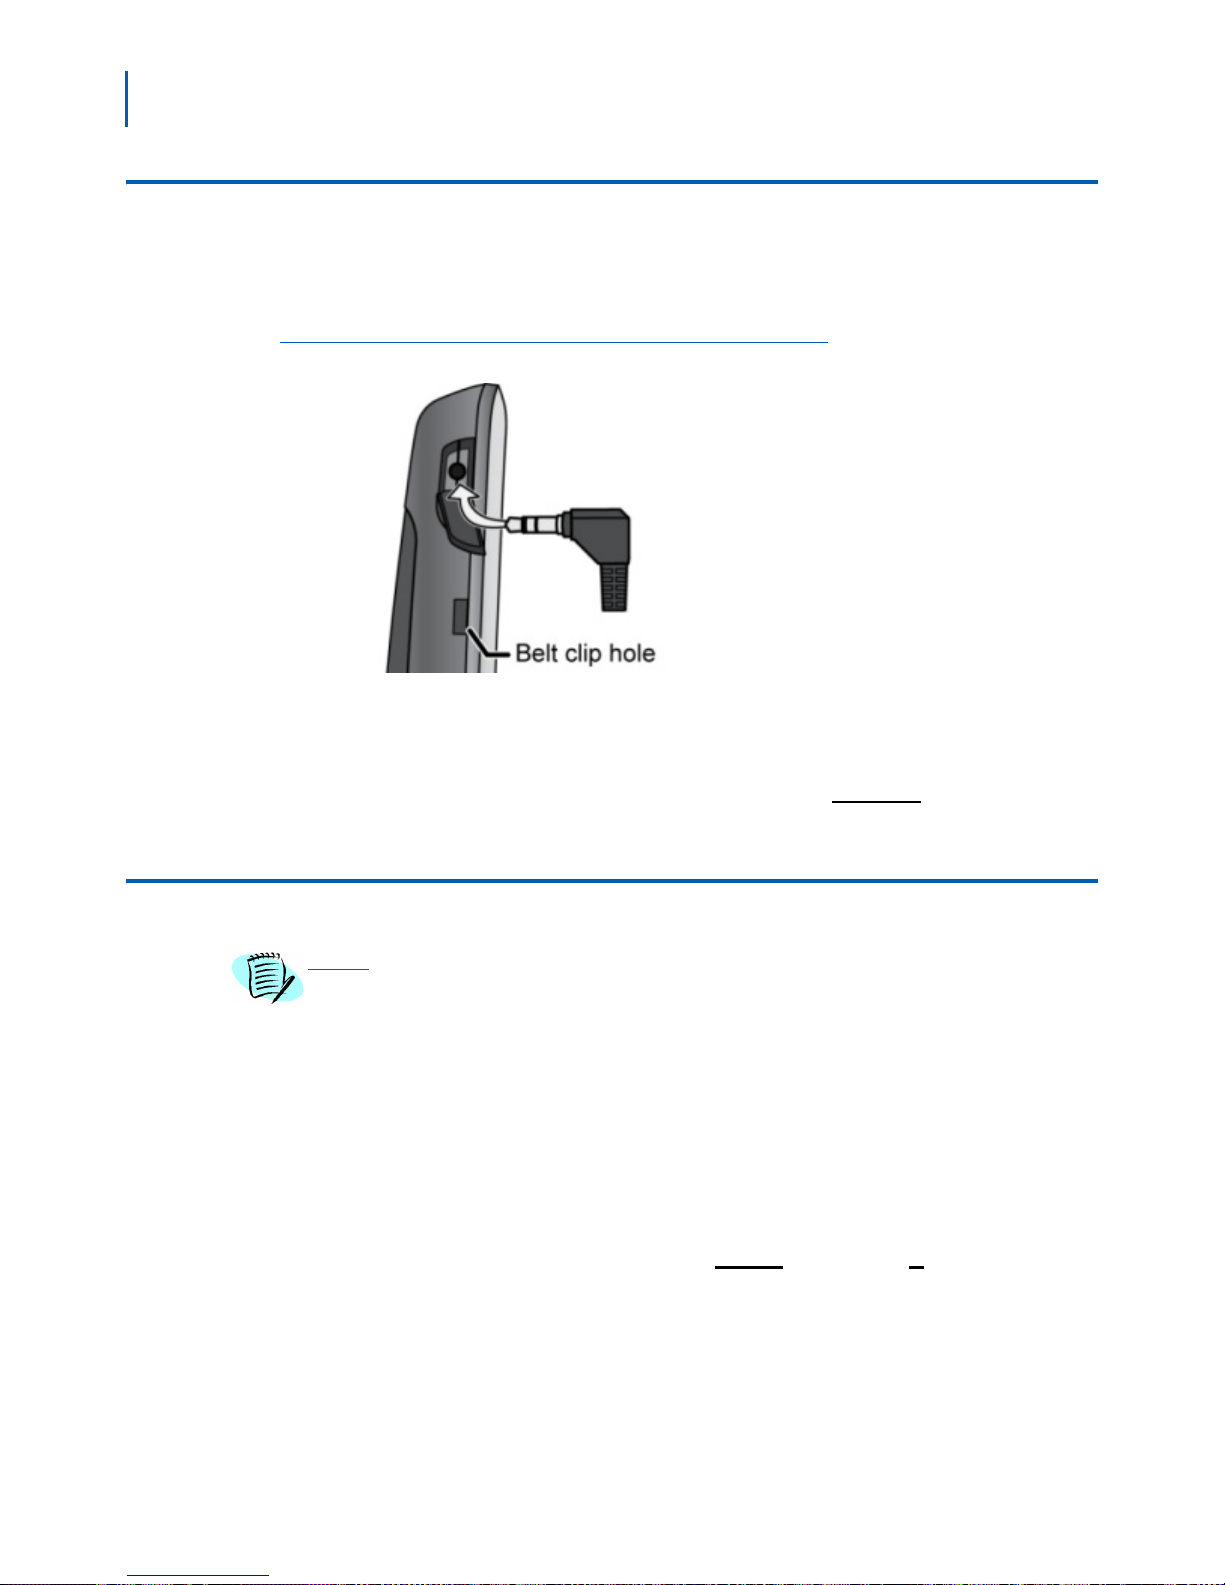
Using an Optional Headset
You can use a standard 2.5 mm telephone headset with your handset.
To install a headset, remove the headset jack cover and insert the
headset plug into the jack (Figure 3-1).
Figure 3-1
Installing a Headset
Make and receive calls as usual, and plug in your headset to talk to the
caller after the call connects.
When you connect a headset, the handset automaticall
earpiece and speaker. To re-activate the earpiece, just unplug the
headset. To switch to speaker handset, press
Locking the Keypad
y mutes the
Speaker.
While the keys are locked, you will not be able to use any handset functions that
require a key press, including making and receiving calls. You can still dial
emergency numbers (911) while the keys are locked.
Follow the steps below to lock the keypad.
Step 1 From the main menu screen, select the Settings icon.
Step 2 On the Settings screen, select Security, then select Automatic keylock.
Step 3 Select the amount of time (from 15 seconds to 5 minutes) you want the
handset to wait before it locks the keypad, or select Off to have the
handset never lock the keypad.
of
If the handset is idle for the amount
keys. To unlock the keypad, press
time you selected, it locks the
Select followed by *. The keypad will
remain unlocked until it remains inactive for the amount time selected
above.
ML440 End User Guide - Revision 1
Page 33

Changing the PIN
NOTE
Using Common Features 3-7
Changing the PIN will prevent the handset from deregistering correctly (not
registering correctly).
Follow the steps below to change the PIN. You will have to enter the PIN
to reset the handset back to factory default settings.
Step 1 From the main menu screen, select the Settings icon.
Step 2 On the Settings screen, select Security.
Step 3 Select Change PIN. The handset prompts you to enter the current PIN
(Default 0000).
Step 4 Enter the four digits of the current PIN and press Select. The handset
prompts you to enter the new PIN.
Step 5 Enter the four digits you want to use as the new PIN and press Select.
Using Alarms
You can set two alarms on your handset: a one-time alarm and a
recurring alarm.
Setting the Alarm
Follow the steps below to set the alarm.
Step 1 From the main menu screen, select the Alarms icon.
Step 2 For a one-time alarm, select Alarm; for a repeating alarm, select
Recurrent alarm.
Step 3 Set the time you want the alarm to sound.
—Enter the time using the twelve-key dial pad, or use
select the time.
—Select AM or PM.
—
Press
Step 4 For a recurrent alarm, the handset prompts you to select the days of the
when you're finished.
week you want the alarm to sound.
Up and Down to
ML440 End User Guide - Revision 1
—To select a day, highlight the day and press
show a check mark beside the name.
—To clear a day, highlight the day and press
—When you're finished, press
.
; selected days
.
Page 34

3-8 Using Common Features
Step 5 Select Snooze time to change how long the handset waits when you
Step 6 When the alarm rings, press to silence the alarm; press
Step 7 One-time alarms automatically turn themselves off after ringing.
snooze an alarm. Choose from 1 minute through 10 minutes, in oneminute increments. (The default is 10 minutes.)
if you want the alarm to ring again after
10 minutes. (To change the
length of time the handset waits, select Snooze time and choose from 1
minute through 10 minutes, in one-minute increments.)
Recurring alarms will ring again on the next selected day. To turn off an
alarm, select the alarm and press
.
ML440 End User Guide - Revision 1
Page 35

4
Important Information
This chapter contains important information regarding adapter and
battery settings, compliance information, and warranty information.
The following topics are included in this chapter:
Chapter Topics • AC Adapter and Battery Information
• Troubleshooting
• Compliance Information
4-1
AC Adapter and Battery Information
Tab l e 4 - 1 provides adapter and battery information.
Table 4-1 Adapter/Battery Information
Part number
Input voltage 120V AC, 60 Hz
Output voltage 8V AC @ 300mA
Part number
Capacity 500mAh, 2.4V DC
• Use only the supplied AC adapters. Be sure to use the proper adapter
for the
• Do not place the power cord where it create
could become chafed and create a fire or electrical hazard.
• Do not place the base in direct sunlig
temperatures.
• Fully charged, the battery should prov
and about 7 days of standby time. For best results, return the handset
to the charger after each call to keep it fully charged.
• When the battery gets too low, the handset shows a low battery alert.
If
the low battery alert, finish your conversation as quickly as possible
and return the handset to the charger. If the handset is in standby,
none of the keys will operate.
base and any chargers.
ou hear a strange beep during a call, check the display: if you see
y
AC Adapter
Battery Pack
s a trip hazard or where it
ht or subject it to high
ide about 8 hours of talk time
ML440 End User Guide - Revision 1
Page 36

4-2 Important Information
CAUTION
NOTE
• With normal use, the battery should last about one year. Replace the
battery when the talk time becomes short even when the battery is
charged.
Rechargeable Battery Information
out
Risk of explosion if battery is replaced by an incorrect type! Dispose of used
batteries according to the instructions. Do not open or mutilate the battery.
Disconnect the battery before shipping this product.
• This equipment contains a rechargeable Lithium-Ion (Li-Ion) battery.
• The battery is not user-serviceable. Do not attempt to open the
batt
ery cell. In case of exposure to the cell contents, wash the
affected area thoroughly and seek medical attention.
• Do not expose the battery to temperatures in excess of 140º F (60º
C).
• Do not short-circuit the battery.
• Exercise care when handling the battery around conducting materials
such as ri
the battery, and the battery or conductor can overheat and cause
burns.
• When charging this equipment, only use the charger designed to
c
h
arge the battery pack as specified in the owner's manual: using any
other charger may damage the product or cause the battery pack to
explode.
• Before placing the handset in the charger
installed and the battery cover is securely in place.
• Do not place the batteries in your regular trash. All batteries must be
recycled or
your local waste management officials for information and regulations
on the proper collection, recycling, and disposal of batteries.
ngs
, bracelets, and buttons: conducting materials can short
,
make sure the battery is
disposed of in an environmentally sound manner. Contact
Rechargeable batteries must be recycled or disposed of properly.
Troubleshooting
If you have any trouble with your handset, try the steps listed in Ta b l e
4-2.
ML440 End User Guide - Revision 1
Page 37

Table 4-2 Troubleshooting Handset Issues
If.... Try....
A handset can’t make or receive calls Moving the handset closer to the base
A handset can make calls, but it won’t ring Make sure the ringer is turned on
Important Information 4-3
A handset is not working
A handset displays Searching Moving the handset closer to the base
• Charging the battery for 15-20 hours
• Checking the battery connection
Weak or Hard to Hear Audio
If a caller's voice sounds weak or soft, the signal might be blocked by
large metal objects or walls; you might also be too far from the base, or
the handset's battery may be weak.
• Try moving around while you're on a call or moving closer to the base
l
to see if the sound gets
• Make sure the handset's battery is fully
• Try adjusting the earpiece volume.
ouder.
charged.
Noise or Static on the Line
Interference is the most common cause of noise or static on a cordless
handset. Here are some common sources of interference:
• electrical appliances, especially microwave ovens
• computer equipment, especially wireless LAN equipment and DSL
modems
• radio-based wireless devices, such as room monitors, wireless
controllers,
• florescent light fixtures (especially if they give off a buzzing noise)
• other services that use your handset line, like alarm systems,
intercom sy
Tab l e 4 - 3 lists steps for eliminating noise on the line.
or wireless headsets or speakers
stems, or broadband Internet service
Table 4-3 Static or Noise Reduction
Check nearby for one of the common interference
sources
Try moving the handset away from a suspected
source, or try moving the suspected source to it’s
not between the handset and the base.
ML440 End User Guide - Revision 1
If the static is on 1 handset or in 1
location
If the static is on all handsets or in all
locations
Check near the base for the source of
interference
Trying moving the base away from a suspected
source, or turn off the source if possible.
Page 38

4-4 Important Information
If the static is on 1 handset or in 1
location
If the static is on all handsets or in all
locations
There is always more noise at the edges of the
base’s range. If th
e handset displays Searching,
try moving closer to the base.
Resetting Handsets
You can reset all the handset options back to the default values; any
customized settings (language, ring tones, volume, etc.), will be lost.
(Resetting a handset will not deregister the handset from its base.)
Follow the steps below to reset the handset.
Step 1 On the handset, press Menu.
Step 2 From the main menu screen, select the Settings icon.
Step 3 On the Settings screen, select Reset settings.
Step 4 When the handset asks you to confirm, press to continue the reset;
press
Step 5 When the handset asks you to enter the PIN, enter the 4-digit code used
to access this handset. (Default 0000)
or to cancel.
Step 6 The handset reboots and restores all user settings to their default value.
Compliance Information
FCC Part 15 Information
Note: This equipment has been tested and found to comply with the
limits for a Class B digital device, pursuant to part 15 of the FCC Rules,
which establishes limits to provide reasonable protection against
harmful interference in a residential installation. This equipment
generates and can radiate radio frequency energy; if not installed and
used in accordance with the instructions, it may cause harmful
interference to radio communications. However, even in proper
installations, there is no guarantee that interference will not occur. If
you suspect this equipment is causing harmful interference to a radio or
television receiver, try to correct the interference through the following
steps:
Step 1 Turn the equipment off and on to confirm interference.
Step 2 Increase the separation between this equipment and the receiver.
Step 3 Connect this equipment to an outlet on a different circuit from that to
which the receiver is connected.
ML440 End User Guide - Revision 1
Page 39

Important Information 4-5
IMPORTANT
Step 4 Reorient or relocate the antenna on the receiver.
Step 5 Consult the dealer or an experienced radio/TV technician for help.
Changes or modifications not expressly approved by the party responsible for
compliance could void your authority to operate this equipment.
RF Exposure Information
This product complies with FCC radiation exposure limits under the
following conditions:
• The base must be placed to allow a minimum of 20 cm (8 inches)
between the
• The base must not be co-located or operated in conjunction with any
other ante
• The handset is designed for body-worn operation and meets FCC RF
exposure guidelines w
other accessory supplied with this product.
• All necessary accessories are included
or optional accessories are not required for compliance with the
guidelines.
• Third party accessories (unless approved by the manufacturer) should
be a
oided as these might not comply with FCC RF exposure
v
guidelines.
antenna and all persons during normal operation.
nna or transmitter.
hen used with any belt clip, carrying case, or
in the packag
e; any additional
Industry Canada (I.C.) Notice
The term IC before the radio certification number only signifies that
Industry Canada technical specifications were met. Operation is subject
to the following two conditions: (1) this device may not cause
interference, & (2) this device must accept any interference, including
interference that may cause undesired operation of the device. "Privacy
of communications may not be ensured when using this telephone".
ML440 End User Guide - Revision 1
Page 40

4-6 Important Information
ML440 End User Guide - Revision 1
Page 41

For additional information or support on this NEC Corporation of America
product, contact your NEC Corporation of America representative.
Page 42

ML440 End User Guide
NEC
NEC Corporation of America
NDA-31193, Revision 1
 Loading...