


MH240 Wireless IP Telephone
USER’S GUIDE
Model: IP3NA-8WV(USA) / IP3AT-8WV(Australia) / IP3PH-8WV(EU)
Before using your product, read this User’s Guide thoroughly to ensure
correct handling.
After reading the User’s Guide, keep it in a place that is accessible for read
reference.
A50-017158-001 Issue1.2, January 2009


LIABILITY DISCLAIMER
NEC Infrontia Corporation reserves the right to change the specifications,
functions, or features, at any time, without notice.
NEC Infrontia Corporation has prepared this document for use by its
employees and customers. The information contained herein is the property
of NEC Infrontia Corporation and shall not be reproduced without prior
written approval from NEC Infrontia Corporation. All brand names and
product names on this document are trademarks or registered trademarks of
their respective companies.
Copyright 2009
NEC Infrontia Corporation


User Safety Protocol
---------------------------------------------------------------------------
Important: Read this information before using your MH240 Phone.
Read the following instructions for the safe use of this product to prevent you and other people from
possible injury, and possible damage to property. Improper handling may cause heat, explosion, and/or
fire.
Danger
● Recharge the battery with the matching battery charger only (see battery label description).
● Use the battery only for this MH240 phone system. Do not use it with other electrical devices.
● To prevent the battery pack from overheating, exploding, or catching fire:
● Do not throw the battery pack into fire.
● Do not solder the battery pack directly.
● Do not short the positive (+) and negative (-) terminal of the battery pack with metal.
● Do not poke the battery or otherwise damage the battery.
● Do not disassemble or modify the battery pack. It has a safety circuit and if damaged may cause
heat, explosion, and fire.
● The internal liquid of the battery pack has strong acid. If the battery liquid gets into your eye,
rinse your eye well with water and consult with a doctor.
● Do not use, leave, or recharge the battery pack near fire or under the direct sunlight. High
temperature may damage the internal safety circuit and may cause a recharge malfunction,
overheating, exploding, or catching fire.

Warning
● Do not use the unit if you notice smoke, a strange smell or other unusual happenings. It may
cause fire if continuously used. Turn off the power switch of the phone system immediately. For
the recharger, disconnect the power plug immediately. Make sure that the smoke stops, and then
contact the nearest NEC service office. Never attempt to repair the unit yourself.
● If unit is damaged, turn off the power of the phone system immediately. For the recharger,
disconnect the power plug immediately. Contact the nearest NEC service office. If you keep
using the unit, it may cause fire or electrical shock.
● If water gets into the unit, turn off the power of the phone system immediately. For the recharger,
disconnect the power plug immediately. Contact with the nearest NEC service office. If you keep
using the unit, it may cause fire or electrical shock.
● Do not insert flammable or metal objects into the unit. If a foreign object is accidentally placed
into the unit, turn off the power of the phone system and disconnect the power adapter. Contact
the nearest NEC service office. If you keep using the unit, it may cause fire or electrical shock.
Keep out of reach from children.
● Do not attempt to disassemble or modify the unit. It may cause fire, electrical shock, or system
malfunction. Modification by a user is prohibited by law.
● Do not open the unit. It may cause electrical shock or system malfunction. For test adjustments or
repairs, contact the nearest NEC service office.
● Do not twist, put heavy objects on top of, or push the phone system. Such actions may cause
damage, fire, or injuries.
● Do not place containers with water such as a vase, a plant pot, a cup, cosmetics, or chemicals on
top of the unit. Splashing water over the unit may cause fire or electrical shock.
● Do not use the unit in a high humid area such as a bathroom or near a humidifier. It may cause
fire, electrical shock, or system malfunction.
● Only use the specified power adapter, which is attached to the unit. Other adapters may cause fire
or system malfunction.
● Do not damage or modify the power adapter cord. Kinking, pulling, twisting, bundling, heating or
putting heavy objects on it may cause fire, electrical shock, or system malfunction. Contact the
nearest NEC service office if you have a damaged adapter cord.
● Do not touch the power plug with a wet hand. It may cause electrical shock or system
malfunction.
● Do not touch the unit or replace a battery with a wet hand. It may cause electrical shock or system
malfunction.
● When you hear thunder outside during use of the phone system, immediately stop using it and
move to a safe place.
● Do not use multiple plugs in a single outlet. It may cause fire or electrical shock.

● Follow the instruction below when you use a battery pack. They may cause heating, explosion,
and fire;
● Do not put the battery pack into a microwave oven or a pressure chamber.
● Do not use other batteries with this battery pack.
● If the internal battery liquid gets onto your skin or clothes, immediately rinse it with clean water
to prevent chemical damage to your skin and clothes.
● Do not use the phone or recharge the battery in a place where fire or explosion may occur.
● This phone system does not have explosion protection. Do not use it where a flammable gas
such as propane and gasoline are stored. Turn off the power of the phone immediately. Do
not recharge the battery in such a place.
● Do not use near microwave ovens, medical equipment and industrial equipment.

This page is for your notes.

FCC Portion
---------------------------------------------------------------------------
This equipment has been tested and found to comply within the limits for a Class B digital device,
pursuant to Part 15 of the FCC rules. These limits are designed to provide reasonable protection
against harmful interference in a residential installation. This equipment generates, uses, and can
radiate radio frequency energy and, if not installed and used in accordance with the instructions, may
cause harmful interference to radio communications. However, there is no guarantee that interference
will not occur in a particular installation. If this equipment does cause harmful interference to radio or
television reception, which can be determined by turning the equipment off and on, the user is
encouraged to try to correct the interference by one or more of the following measures:
● Reorient or relocate the receiving antenna.
● Increase the separation between the equipment and receiver.
● Connect the equipment into an outlet on a circuit different from that to which the receiver is
connected.
● Consult the dealer or an experienced radio/TV technician for help.
This device complies with Part 15 of the FCC Rules. Operation is subject to the following two
conditions: (1) This device may not cause harmful interference, and (2) This device must accept any
interference received, including interference that may cause undesired operation.
Caution:
Any changes or modifications not expressly approved by the party responsible for product compliance
could void the user's authority to operate the equipment.
To comply with FCC RF exposure compliance requirements, this device must not be co-located or
operating in conjunction with any other antenna or transmitter.
Important Note:
This equipment complies with FCC radiation exposure limits.
FCC Rule Parts
Frequency Range(MHz) Output Watts
15C 2412.0-2462.0 0.100
Power Output is Conducted. Body-worn operations are restricted to belt clips, holsters or similar
accessories that have no metallic component in the assembly. End users must be informed of the body
worn requirements for satisfying RF Exposure compliance. The highest reported SAR values are:
Body-worn 0.15W/kg.

Industry Canada Portion
---------------------------------------------------------------------------
Canada Regulatory Compliance Statement
This Class B digital apparatus complies with Canadian ICES-003.
Cet appareil numériqué de la classe B est conformé à la norme NMB-003 du Canada.
For Customers in Canada
This device complies with RSS 210 of Industry Canada (IC).
Operation is subject to the following two conditions:
● This device may not cause interference, and
● This device must accept any interference, including interference that may cause undesired
operation of this device.
L’utilisation de ce dispositif est autorisée seulement aux conditions suivantes:
● il ne doit pas produire de brouillage et
● l’ utilisateur du dispositif doit étre prêt a accepter tout brouillage radioélectrique reçu, même
si ce brouillage est susceptible de compromettre le fonctionnement du dispositif.
Exposure to radio frequency radiation
The installer of this radio equipment must ensure that the antenna is located or pointed such that it
does not emit RF field in excess of Health Canada limits for the general population; consult Safety
Code 6, obtainable from Health Canada’s website at
www.hc-sc.gc.ca/rpb.

European Union Information
---------------------------------------------------------------------------
Notice to the user
The handset described in this manual is intended to be used in combination with NEC Assured
Mobility concept for Wireless Local Area Networks.
Country specific limitation
Italy
General authorization is required when this handset is used outside own premises.
For more information contact :
France
This handset should not be used in an outdoor environment.
Declaration of conformity
Hereby, “NEC Infrontia Corporation”, declares that this IP3PH-8WV (Commercial name: MH240) is
in compliance with the essential requirements and other relevant provisions of Directive 1999/5/EC.
For details, please access the following URL.
http://www.nec-philips.com/doc
www.comunicazioni.it

European Union Information
---------------------------------------------------------------------------
Product disposal information
For countries in the European Union
In order to facilitate separate disposal and environmentally sound recycling arrangements have been
made for local collection and recycling. In case your electrical and electronic products need to be
disposed of please refer to your supplier or the contractual agreements that your company has made
upon acquisition of these products.
At
www.nec-philips.com/weee you can find information about separate disposal and environmentally
sound recycling.
For countries outside the European Union
Disposal of electrical and electronic products in countries outside the European Union should be done
in line with the local regulations. If no arrangement has been made with your supplier, please contact
the local authorities for further information.
Battery information
Defect or exhausted batteries should never be disposed of as municipal waste. Return old batteries to
the battery supplier, a licensed battery dealer or a designated collection facility. Do not incinerate
batteries. This product uses Lithium-Ion batteries. Do not use any other type.
For battery replacement or removal instructions please refer to the related chapter in this manual.
The symbol depicted here has been affixed to your product in order to
inform you that electrical and electronic products should not be disposed of
as municipal waste. Electrical and electronic products including the cables,
plugs and accessories should be disposed of separately in order to allow
proper treatment, recovery and recycling. These products should be taken to
a designated facility where the best available treatment, recovery and
recycling techniques are available. Separate disposal has significant
advantages: valuable materials can be re-used and it prevents the dispersion
of unwanted substances into the municipal waste stream. This contributes to
the protection of human health and the environment. Please be informed
that a fine may be imposed for illegal disposal of electrical and electronic
products via the general municipal waste stream.

TABLE OF CONTENTS
0.PRECAUTION
• SIGNAL WORDS..........................................................................................1
• SAFETY SYMBOLS.....................................................................................1
• IMPORTANT SAFETY INFORMATION...................................................2
1.INTRODUCTION
• WHAT IS MH240?........................................................................................5
• ABOUT THIS GUIDE...................................................................................5
• KEYS AND PARTS......................................................................................6
• ICONS.............................................................................................................7
• STANDBY MODE.........................................................................................8
• MAIN MENU..................................................................................................8
2.GETTING STARTED
• HOW TO INSERT THE BATTERY............................................................9
• HOW TO REPLACE THE BATTERY .......................................................9
• HOW TO CHARGE THE BATTERY.......................................................10
3.BASIC OPERATION
• TO POWER ON THE PHONE (STANDBY MODE) .............................13
• TO POWER OFF THE PHONE................................................................13
• TO ANSWER A CALL...............................................................................14
• TO MAKE A CALL.....................................................................................14
• TO PLACE A CALL ON HOLD................................................................14
• TO TRANSFER A CALL...........................................................................14
• TO REDIAL (LAST NUMBER REDIAL).................................................15
• TO USE MUTE MODE...............................................................................15
• TO USE A HEADSET................................................................................16
• TO USE SOFT KEYS.................................................................................16
• TO USE WHILE CHARGING ...................................................................16
4.FEATURES
• TO USE CONFERENCE (3-WAY CALL)...............................................17
• TO USE SPEAKERPHONE......................................................................17
• TO ADJUST CALL VOLUME ..................................................................17
• TO USE COURTESY MODE....................................................................18
• TO USE KEY LOCK...................................................................................18
• TO RECONNECT TO NETWORK...........................................................18
i

5.CALL HISTORY
• TO VIEW CALL HISTORY........................................................................19
• TO MAKE A CALL FROM CALL HISTORY.........................................20
• TO ADD PHONE NUMBER TO DIRECTORY ......................................20
• TO DELETE A CALL HISTORY..............................................................23
• TO DELETE ALL CALL HISTORIES.....................................................23
6.DIRECTORY
• TO VIEW DIRECTORY..............................................................................25
• TO SEARCH DIRECTORY.......................................................................25
• TO SETUP GROUP ...................................................................................28
• TO ADD A NEW ENTRY...........................................................................29
• TO DELETE A RECORD..........................................................................31
• TO DELETE ALL RECORDS...................................................................31
• TO MAKE A CALL FROM DIRECTORY...............................................31
• TO EDIT AN ENTRY.................................................................................. 32
• TO CONFIRM YOUR PHONE NUMBER...............................................32
7.SPEED DIAL/PRESET DIAL
• TO USE SPEED DIAL...............................................................................33
• TO ENABLE SPEED DIAL.......................................................................33
• TO USE PRESET DIAL.............................................................................34
• TO ENABLE PRESET DIAL ....................................................................34
• TO ADD NEW ENTRY/EDIT ....................................................................34
8.SETTING
• RING VOLUME...........................................................................................37
• RING TONE.................................................................................................37
• INCOMING POPUP .................................................................................... 38
• ILLUMINATION...........................................................................................38
• PRIVATE CALL..........................................................................................39
• VIBRATION SETTING...............................................................................39
• INCOMING MODE......................................................................................40
• HEADSET....................................................................................................40
• OFFHOOK RING........................................................................................41
• RTP ALARM................................................................................................42
• HOLD MUSIC..............................................................................................42
• CALL VOLUME ..........................................................................................43
• HANDOVER TONE....................................................................................43
• TALK START VIBRATION SETTING ....................................................44
• LCD CONTRAST........................................................................................44
• BACK LIGHT...............................................................................................45
ii

• FONT SIZE ..................................................................................................45
• LANGUAGE ................................................................................................46
• MY NAME ....................................................................................................46
• DISPLAY PATTERN..................................................................................47
• CHANGE PASSWORD.............................................................................47
• KEY TOUCH TONE ...................................................................................48
• SPEAKER MONITOR................................................................................48
• DATE ............................................................................................................49
• TIME..............................................................................................................49
• TIME FORMAT............................................................................................50
• DAYLIGHT SAVING ..................................................................................50
• NTP SETTING.............................................................................................51
• NTP SERVER..............................................................................................51
• TIME ZONE..................................................................................................52
9.INFORMATION
• TO DISPLAY STATUS..............................................................................53
• TO DISPLAY WIRELESS STATUS........................................................53
• TO DISPLAY IP ADDRESS......................................................................54
• TO DISPLAY SIP STATUS ......................................................................54
10.PASSWORD LOCK
• TO USE MANUAL LOCK .........................................................................55
• TO UNLOCK YOUR PHONE ...................................................................55
• TO ENBLE MANUAL LOCK....................................................................55
• TO USE OUTSIDE LOCK.........................................................................56
• TO USE POWER OFF LOCK ..................................................................56
11.PREFIX DIAL
• TO USE PREFIX DIAL ..............................................................................57
• TO REGISTER PREFIX NO.....................................................................58
12.FAVORITES
• TO USE FAVORITES ................................................................................59
• TO ENTRY A MENU TO FAVORITES ...................................................59
• TO DELETE A MENU FROM FAVORITES...........................................59
13.MENU LIST
• MENU LIST..................................................................................................61
• CHARACTER CODE LIST .......................................................................68
iii

14.TROUBLE SHOOTING
• MESSAGE MEANINGS AND SUGGESTIONS....................................69
• TIPS AND SUGGESTIONS......................................................................70
15.SPECIFICATIONS
• TECHNICAL SPECIFICATIONS .............................................................71
• LED SPECIFICATIONS.............................................................................72
16.LICENSE
iv
0.PRECAUTION
To avoid serious injury or death, follow the safety information in this section.
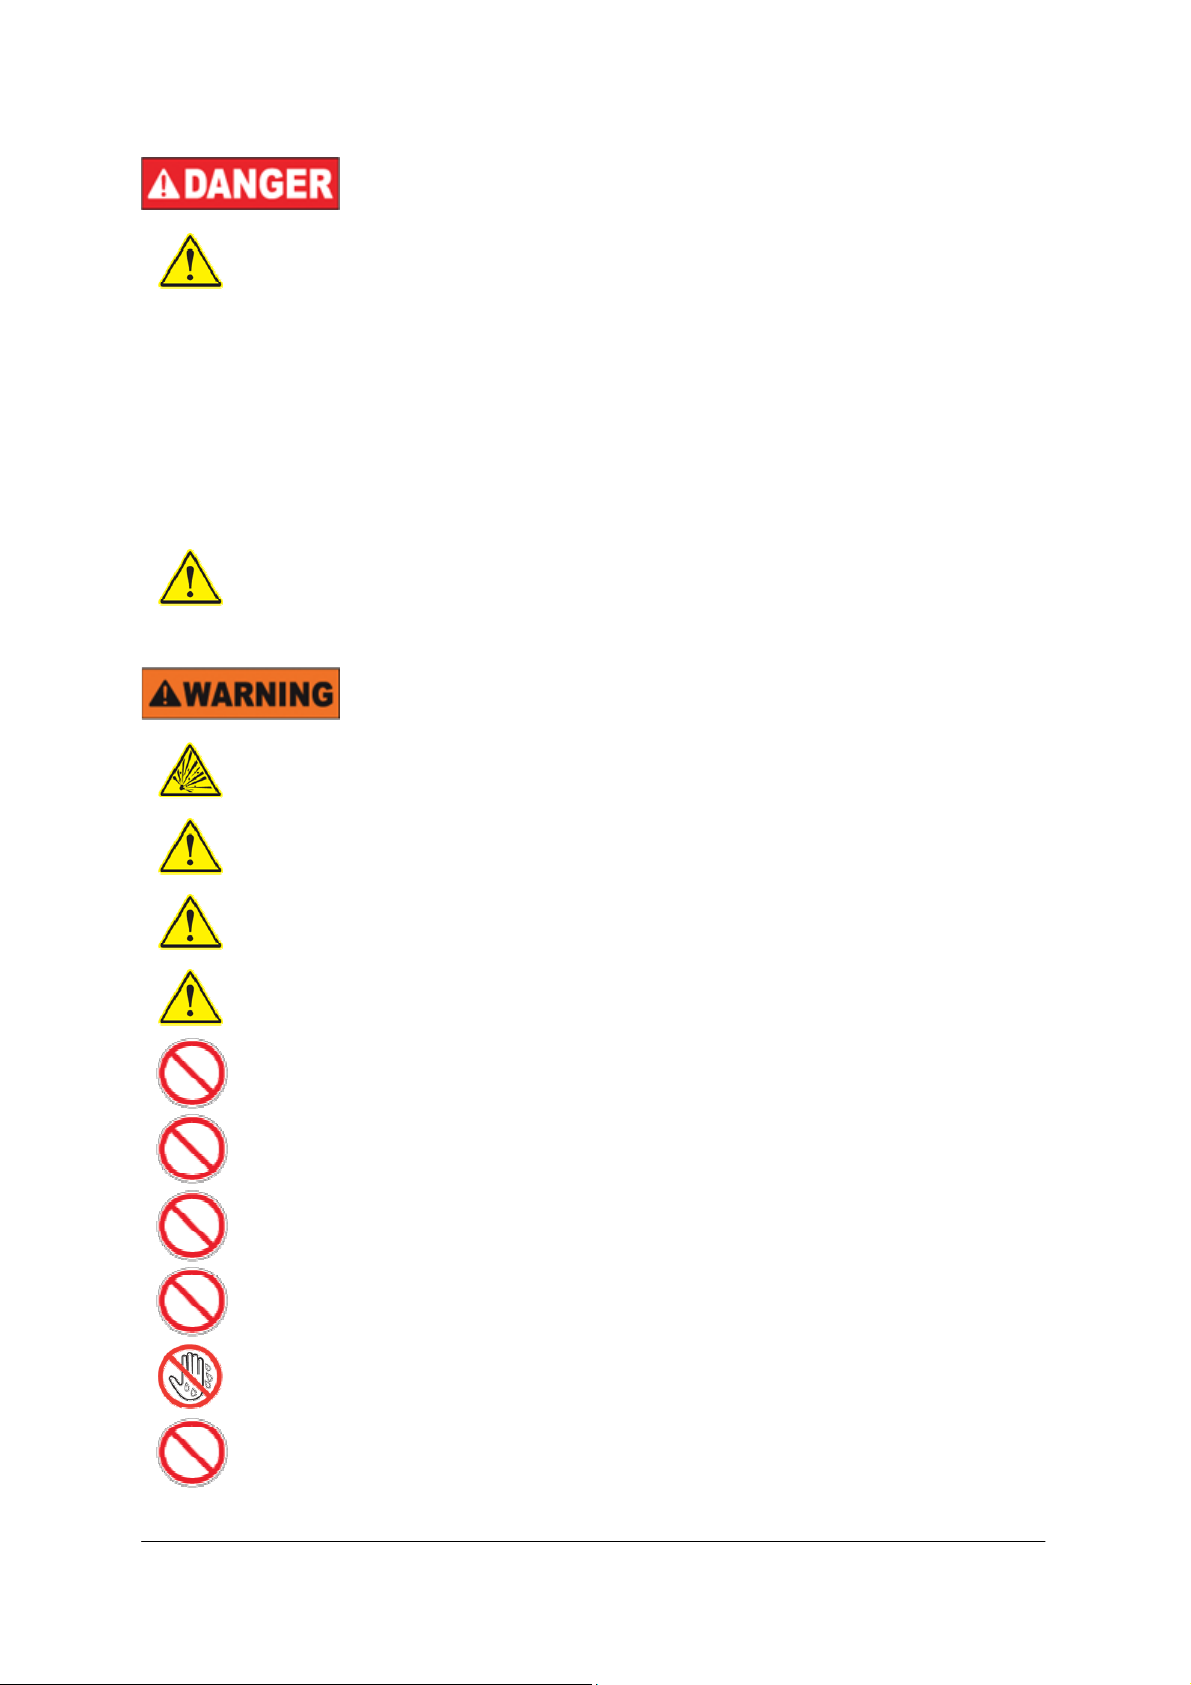
• SIGNAL WORDS
DANGER indicates a hazardous situation which, if not avoided, will
result in death or serious injury.
WARNING indicates a hazardous situation which, if not avoided, could
result in death or serious injury.
CAUTION, used with the safety alert symbol, indicates a hazardous
situation which, if not avoided, could result in minor or moderate injury.
NOTICE is used to address practices not related to personal injury.
• SAFETY SYMBOLS
Hazard Alerting:
This type of safety symbol conveys information primary related to the nature of hazard.
Prohibition:
This type of safety symbol conveys actions that should not be taken.
Mandatory Action:
This type of safety symbol conveys actions that should be taken to avoid hazards.
1
• IMPORTANT SAFETY INFORMATION
Observe these precautions when using a lithium-ion battery pack.
● Never charge the pack from other than the phone or the appropriate charger.
● The lithium-ion battery pack has a specified connector orientation. When
inserting the pack into the phone, observe the correct connector orientation.
● Use a specified type of lithium-ion battery pack. Do not use the specified type of
lithium-ion battery pack for any other device.
● Do not dispose of the lithium-ion battery pack in fires or heat it.
● Do not make direct soldering connections to the lithium-ion battery pack.
● Do not disassemble or tamper with the lithium-ion battery pack.
● Do not carry or store the lithium-ion battery pack together with metallic
products, which could cause the pack to leak, heat or blast.
If the internal fluid in the lithium-ion battery pack should contact the eyes, it could
threaten vision. Flush the eyes with plenty of fresh water immediately, without rubbing
them, and obtain medical attention promptly.
Do not remove the armor of the lithium-ion battery pack or scratch it, which could cause
the pack to leak, heat or blast.
If the internal fluid in the lithium-ion battery pack should contact the skin or clothes, it
could cause physical harm to the skin. Flush with plenty of fresh water immediately.
Do not soak the lithium-ion battery pack in water, seawater or moisten it, which could
cause the pack to heat or rust.
Discontinue using the lithium-ion battery pack whenever any signs of abnormality, such
as leaking, discoloration or deformation, are noticed.
Do not use the lithium-ion battery pack in bathrooms or shower rooms, which could cause
the pack to short-circuit, resulting in fires or electrical shock hazards.
Do not use the lithium-ion battery pack in a place where it may be splashed or wetted with
water, which could cause the pack to short-circuit, resulting in fires or electrical shock
hazards.
Do not disassemble or tamper the products, which could result in fires ore electrical shock
hazards.
Do not allow water inside the lithium-ion battery pack or wet it with water, which could
cause the pack to short-circuit, resulting in fires or electrical shock hazards.
Do not operate or make connections to the products, which could result in electrical shock
hazards.
Do not put flower vases, plant pots, cups, cosmetics, containers filled with chemicals or
water or small metallic objects near by the products, which could result in fires or
electrical shock hazards if they spill or penetrate the interiors of the products.
2

Do not insert metallic objects or put metallic objects into the interiors of the products
through openings, which could result in fires, electrical shock hazards or failures.
If it is necessary to use an AC adapter, use one of the specified type; otherwise, fires,
electrical shock hazards or failures could result.
Do not give violent shock to the lithium-ion battery pack or throw it.
Keep the lithium-ion battery pack out of reach of infants and children.
Do not leave the lithium-ion battery pack in the place exposed to direct sunlight or in a
hot place. A heightened internal temperature could result in fires.
Do not place the products in a place where it could be splashed with heated oils or
exposed to steam, such as near a cooking table, or in a dusty place, which could result in
fires or electrical shock hazards.
Do not mount the products on a rickety table or in an inclined or unstable place, which
could cause the products to tumble down out of balance or fall to cause physical injury.
Do not place the products in a place where it is liable to frequent vibration or impact,
which could cause the products to fall or tumble down, resulting in physical injury.
Do not short-circuit the charging terminals.
Do not charge the phone seated in the cradle while the charging terminals are wet.
If foreign matter or water should penetrate the interior of the phone, disconnect AC
adapter immediately and contact your dealer.
To use the products safely and properly, avoid installing it in these places:
● Places in which there is excessive dust or vibration.
● Places that are filled with vaporized chemicals or the products may be exposed
to chemicals.
● Places close to radios, TV receivers or sources of intense magnetic fields.
● Places in which there are sources of high-frequency interference nearby, such as
high-frequency sewing machines or electric welders.
● Distance the phone more than 50cm from Access Point.
3

This page is for your notes.
4
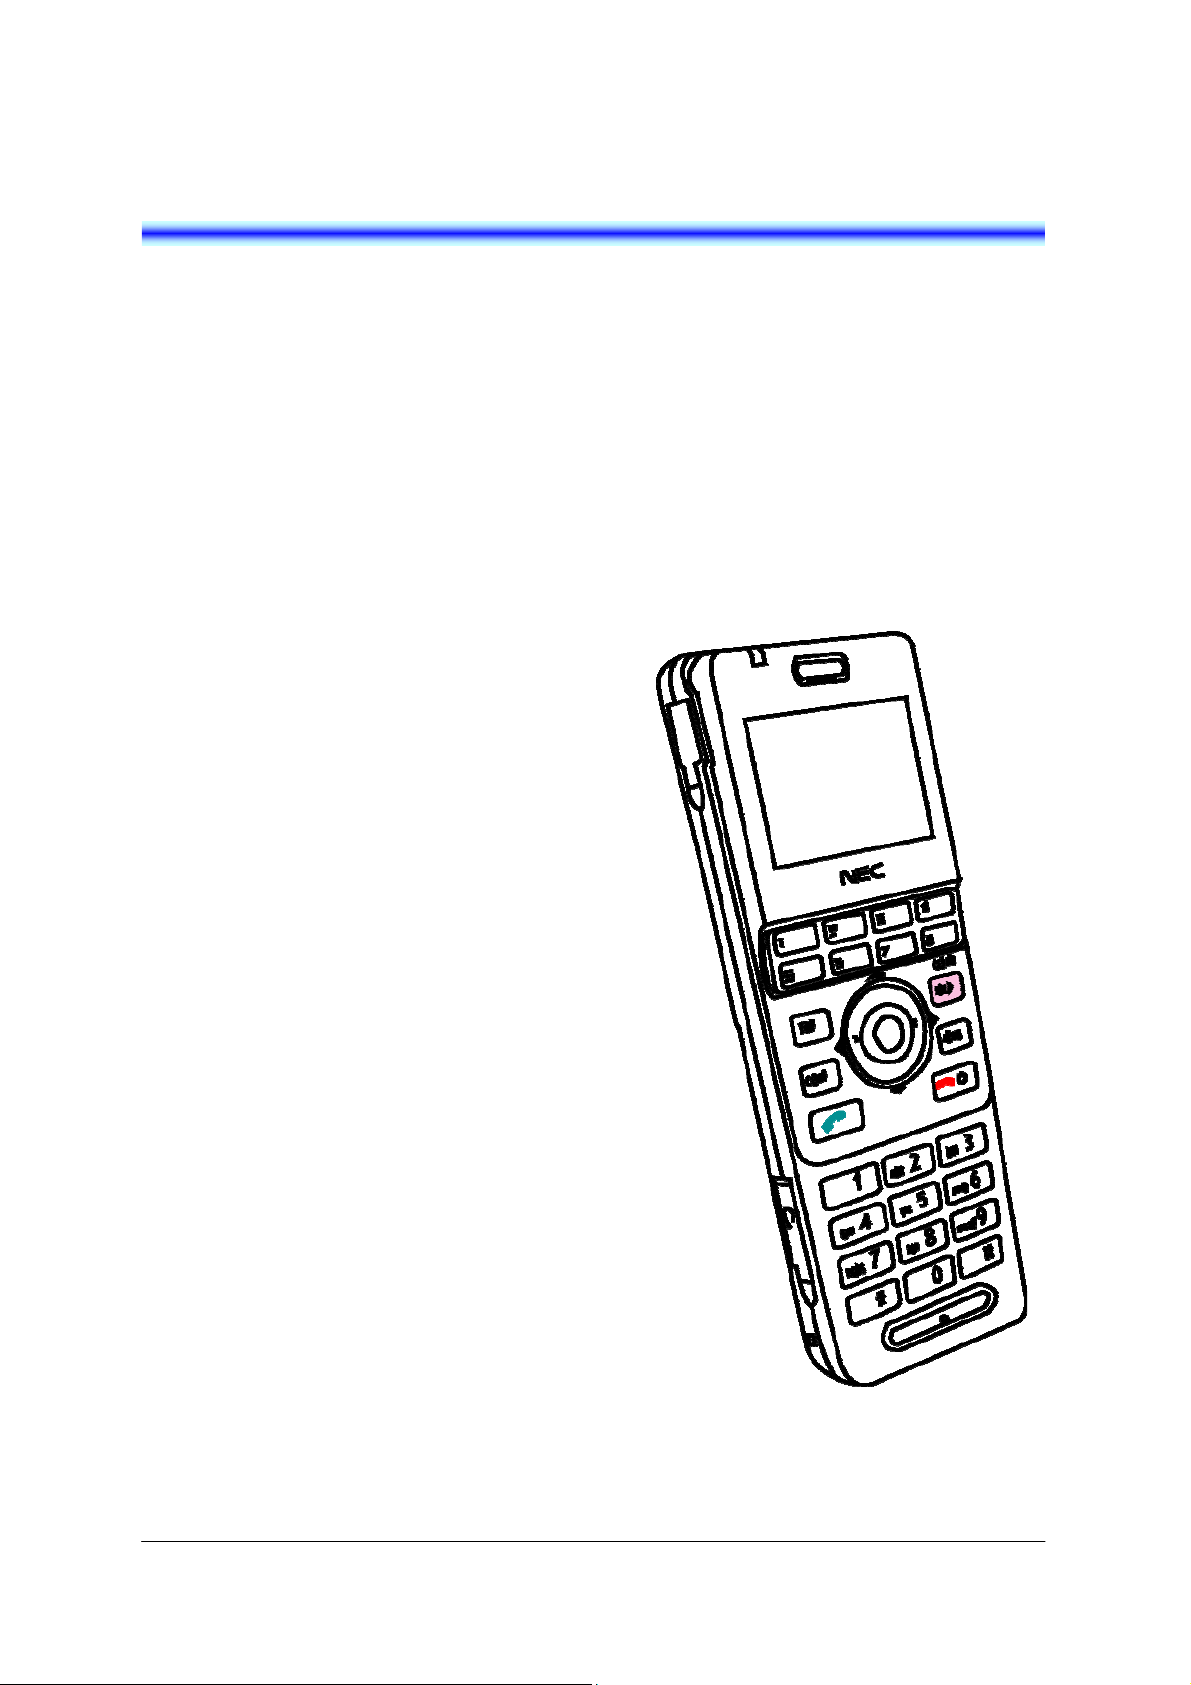
1.INTRODUCTION
• WHAT IS MH240?
MH240 is a wireless VoIP phone that complies
with IEEE 802.11b/g specifications. MH240 has
the following features:
- MH240 dedicated features are available
such as Call History, Directory, Password
Lock, Favorites, Speed Dial, Speaker
monitor and Courtesy Mode.
• ABOUT THIS GUIDE
This guide explains operations, overview and
specifications of MH240. But, some operations
and display views may be different from actual
operations and display views depending on your
system. In this case, please contact your network
administrator.
MH240
5
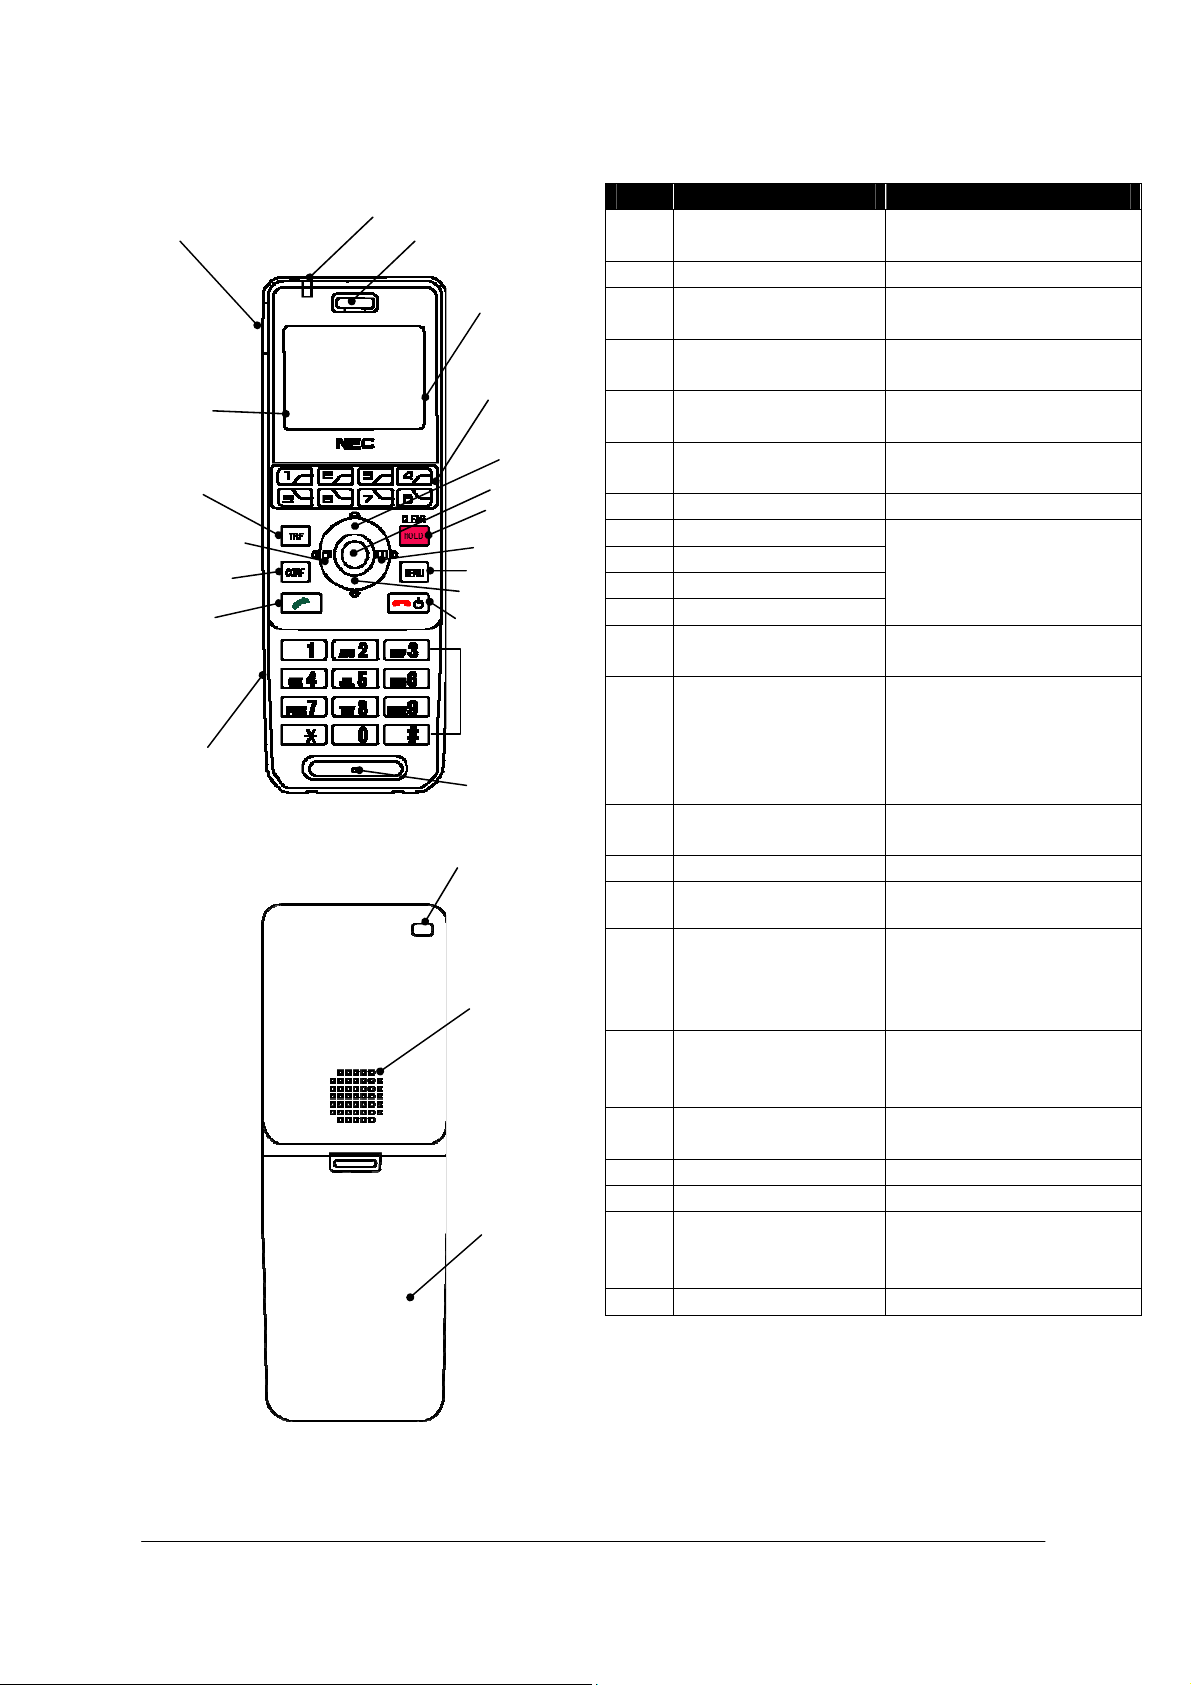
• KEYS AND PARTS
y
(19)
(18)
(20)
(21)
(22)Sp
r
(23)
r
The phone has the following keys and parts.
(5)Soft Keys
(12)TRANSFER Key
(10)LEFT Key
(14)CONFERENCE Key
(16)OFF HOOK Key
Headset Connector
Delete Save Back
(1)Info LED
(2)Ear Speaker(3)USB Connector
(4)Display
(6)Multi Function Keys
(8)UP Key
(7)OK Key
(13)HOLD/
CLEAR Ke
(11)RIGHT Key
(15)MENU Key
(9)DOWN Key
(17)POWER/
ON HOOK Key
Dial Pad
Microphone
Strap Hole
eake
Battery Cove
No. PARTS REMARK
(1) Info LED Display charging status
and receiving a call
(2) Ear Speaker (3) USB Connector Charge the power via AC
adapter
(4) Display Monochrome LCD,
120
×90 pixels
(5) Soft Keys Display soft keys depend
on the phone status
(6) Multi Function Keys Assign various function
by System
(7) OK Key *Note Select Middle soft key
(8) UP Key
(9) DOWN Key
(10) LEFT Key
Select a value from the
list and move the cursor
in edit mode
(11) RIGHT Key
(12) TRANSFER Key
*Note
(13) HOLD/CLEAR Key
*Note
Transfer the ongoing call
or select Left soft key
Place the ongoing call in
hold, return to the
previous screen, delete
input character/digit or
select Right soft key
(14) CONFERENCE Key
*Note
Enter the conference
mode (3-way call)
(15) MENU Key *Note Display Menu screen
(16) OFF HOOK Key
*Note
(17) POWER/ON HOOK
Key
Make/answer a call
Terminate an active call,
power on/off the phone or
exit a menu without
making changes
(18) Headset Connector Connect headset had
JEITA RC-5240 plug or
conversion cable
(19) Dial Pad *Note Input dial number or
characters
(20) Microphone (21) Strap Hole Attach hand strap
(22) Speaker Ring when receiving a
call or listen to voice
when speaker monitor
(23) Battery Cover -
* Note In case that key touch tone is
enabled, you hear key touch
tone twice when you press and
hold the key for about 2
seconds.
6
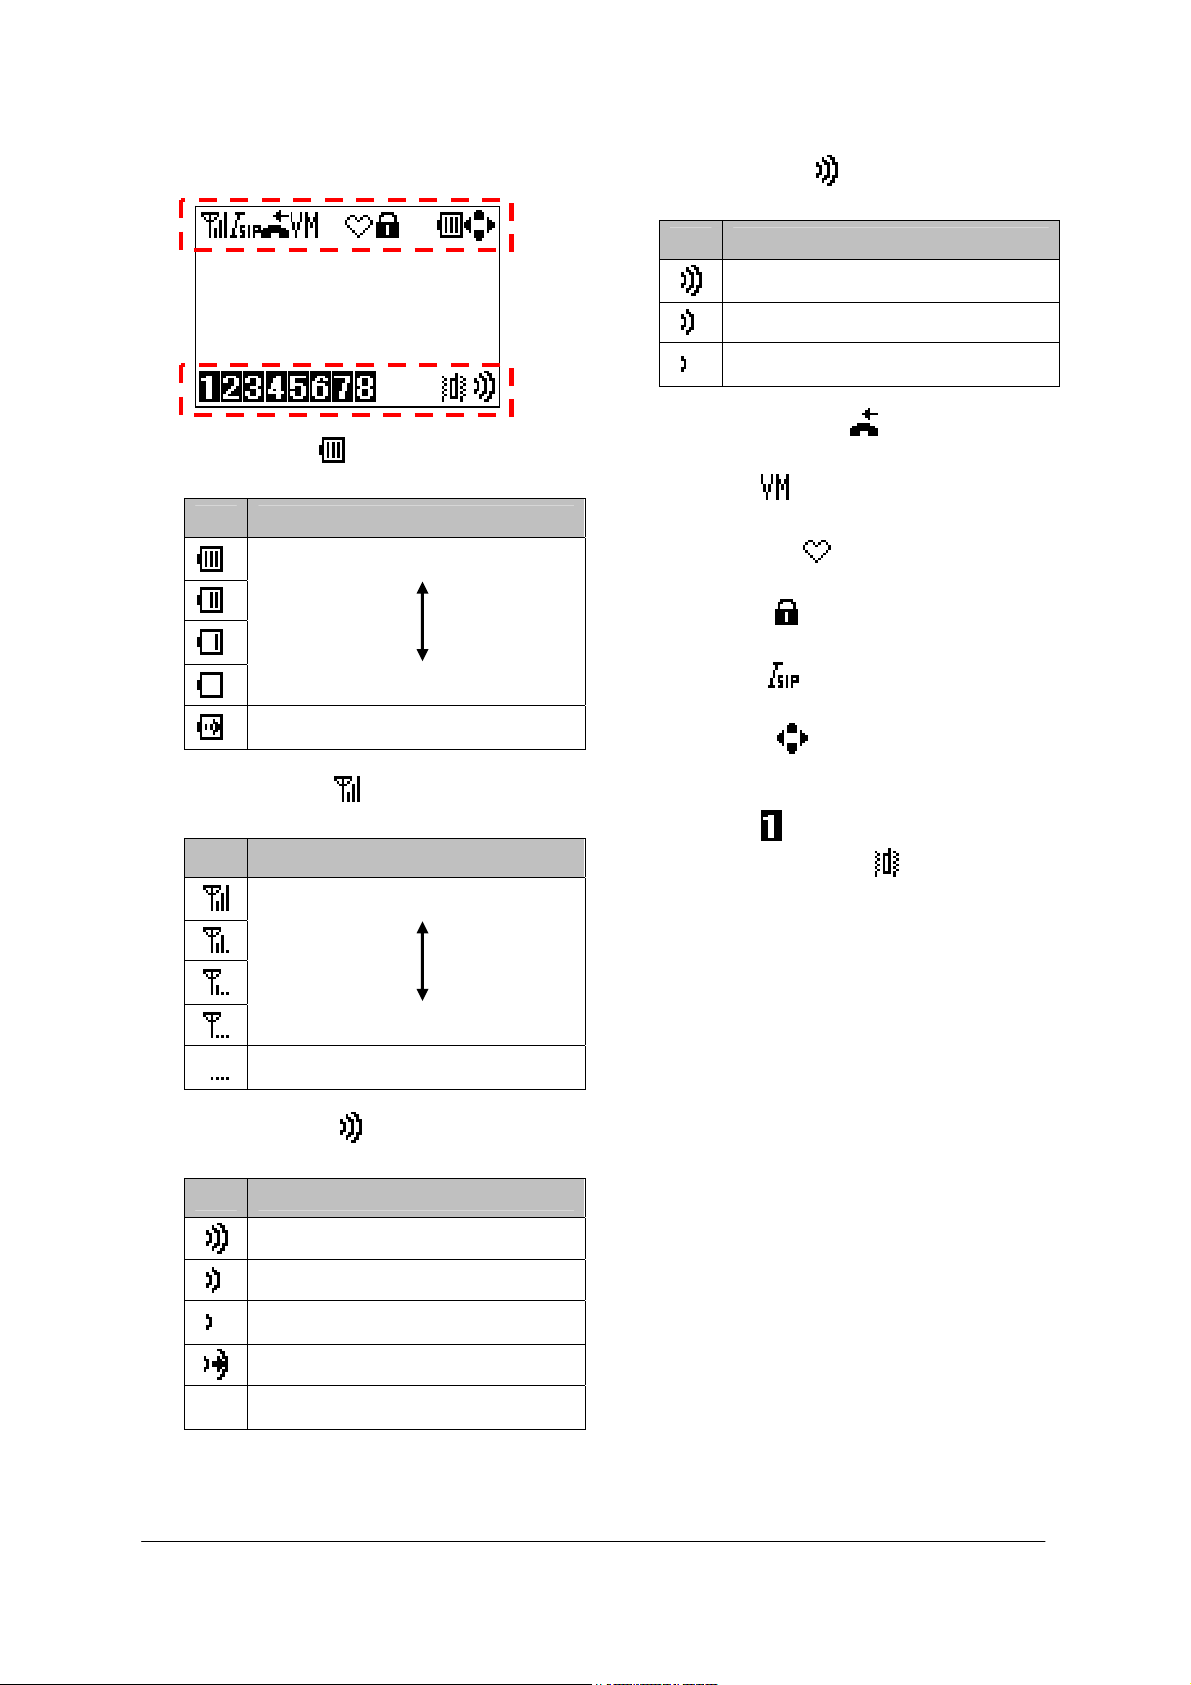
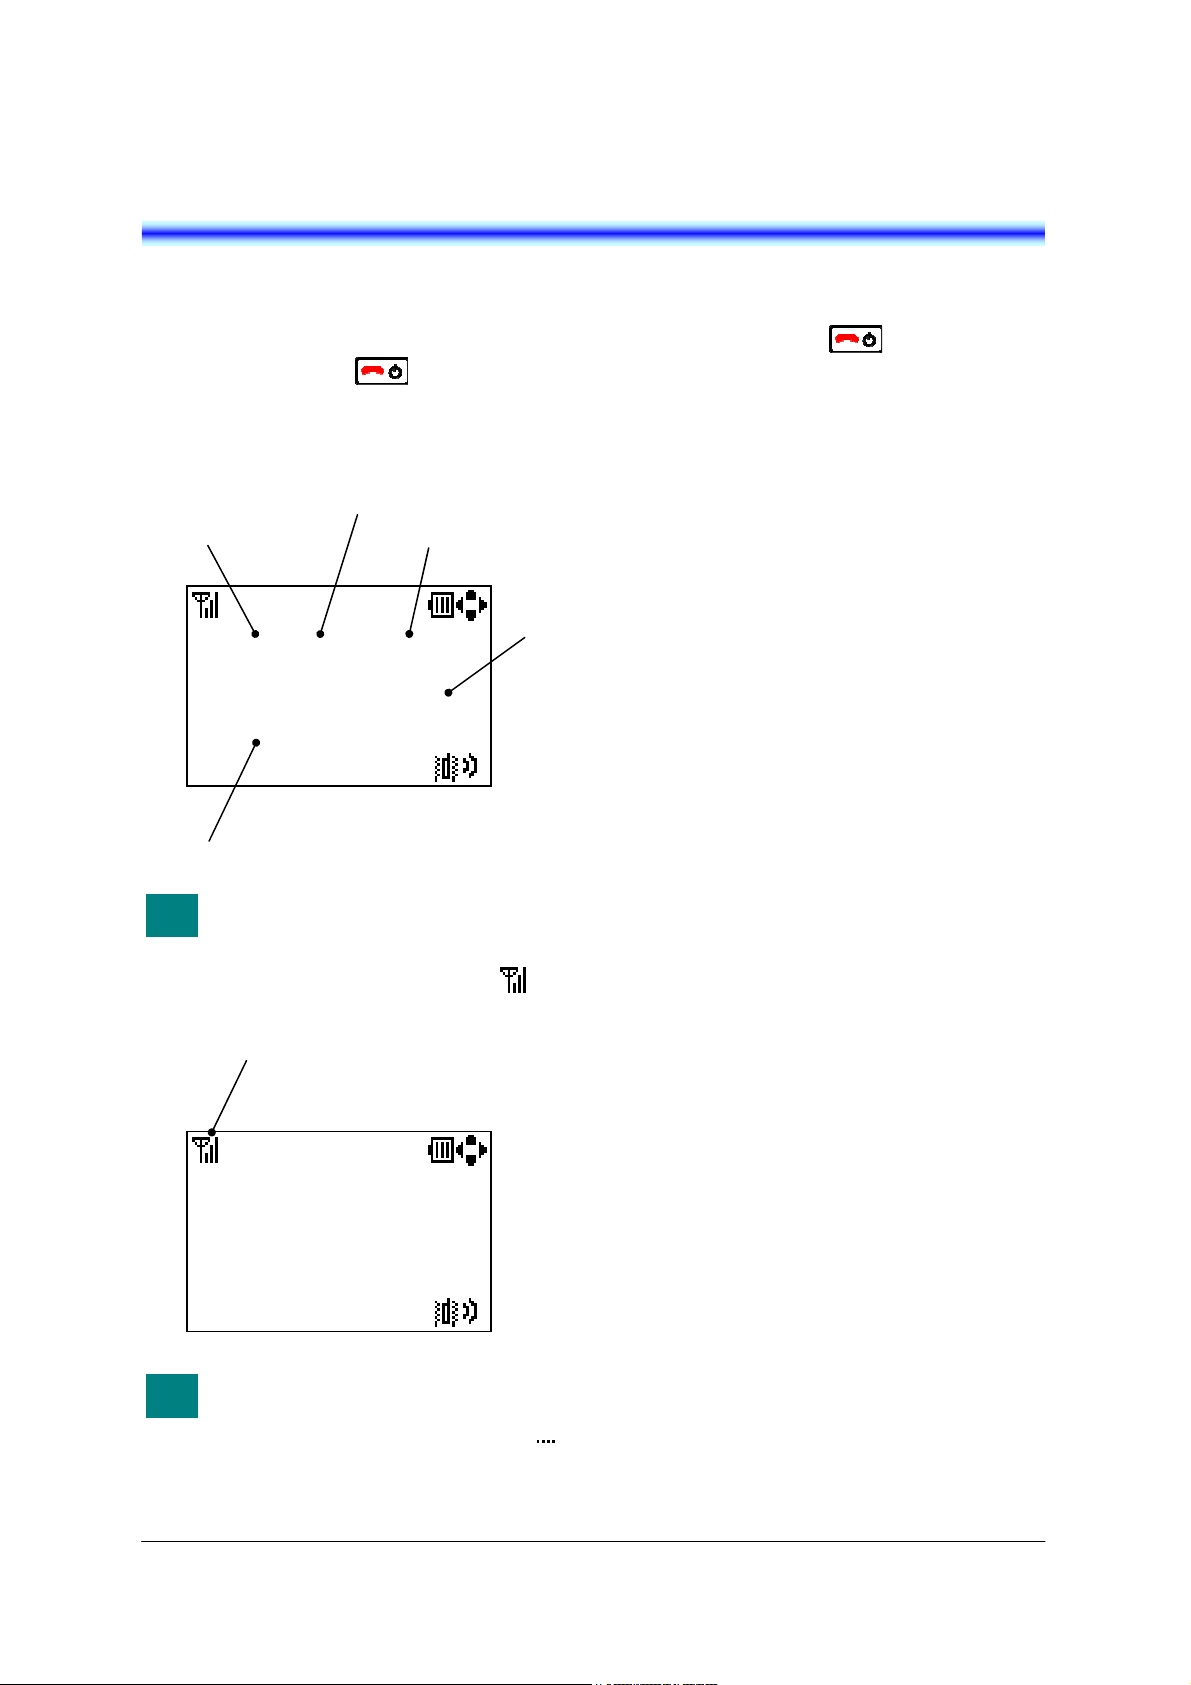
• ICONS
The phone has the following icons.
- Power icon ( ): indicates the battery
- Antenna icon ( ): indicates the radio
- Volume icon ( ): indicates the ring
1/ 1 Tue 12:00AM
240 MH240
charge level.
Icon Battery Charge Level
signal strength by your phone.
Icon Radio Signal Strength
volume when Standby mode.
Icon Ring Volume
Out of service area
Full
Empty
Charging
Strong
Weak
Loud
Medium
Soft
Increasing Ring
Off
- Volume icon ( ): indicates the call
volume in the receiver.
Icon Call Volume
- Missed call icon ( ): indicates your
missed call(s).
- VM icon ( ): indicates you have voice
mail(s).
- Courtesy icon ( ): indicates your phone
is in courtesy mode
- Lock icon ( ): indicates your phone is
locked.
- I-SIP icon ( ): indicates NEC Enhanced
SIP is enabled.
- Cursor icon ( ): indicates active direction
keys (UP, DOWN, LEFT or RIGHT)
depend on the phone status.
- Line icon ( ): indicates line key status.
- Vibration setting icon ( ): indicates your
phone is vibration setting mode.
Loud
Medium
Soft
7

• STANDBY MODE
Your phone starts up in this mode after being
powered on. Your phone displays the first screen
similar to the following.
1/ 1 Tue 12:00AM
240 MH240
• MAIN MENU
Press the key when your phone is in
Standby mode. The following main menu will be
displayed.
0.information
1.Call History
2.Directory
3.Tools
4.Voice Mail
The menu list attached at the end
TIP
of this guide shows all available
items with the default value.
See “13.MENU LIST” for more
information.
Menu
8
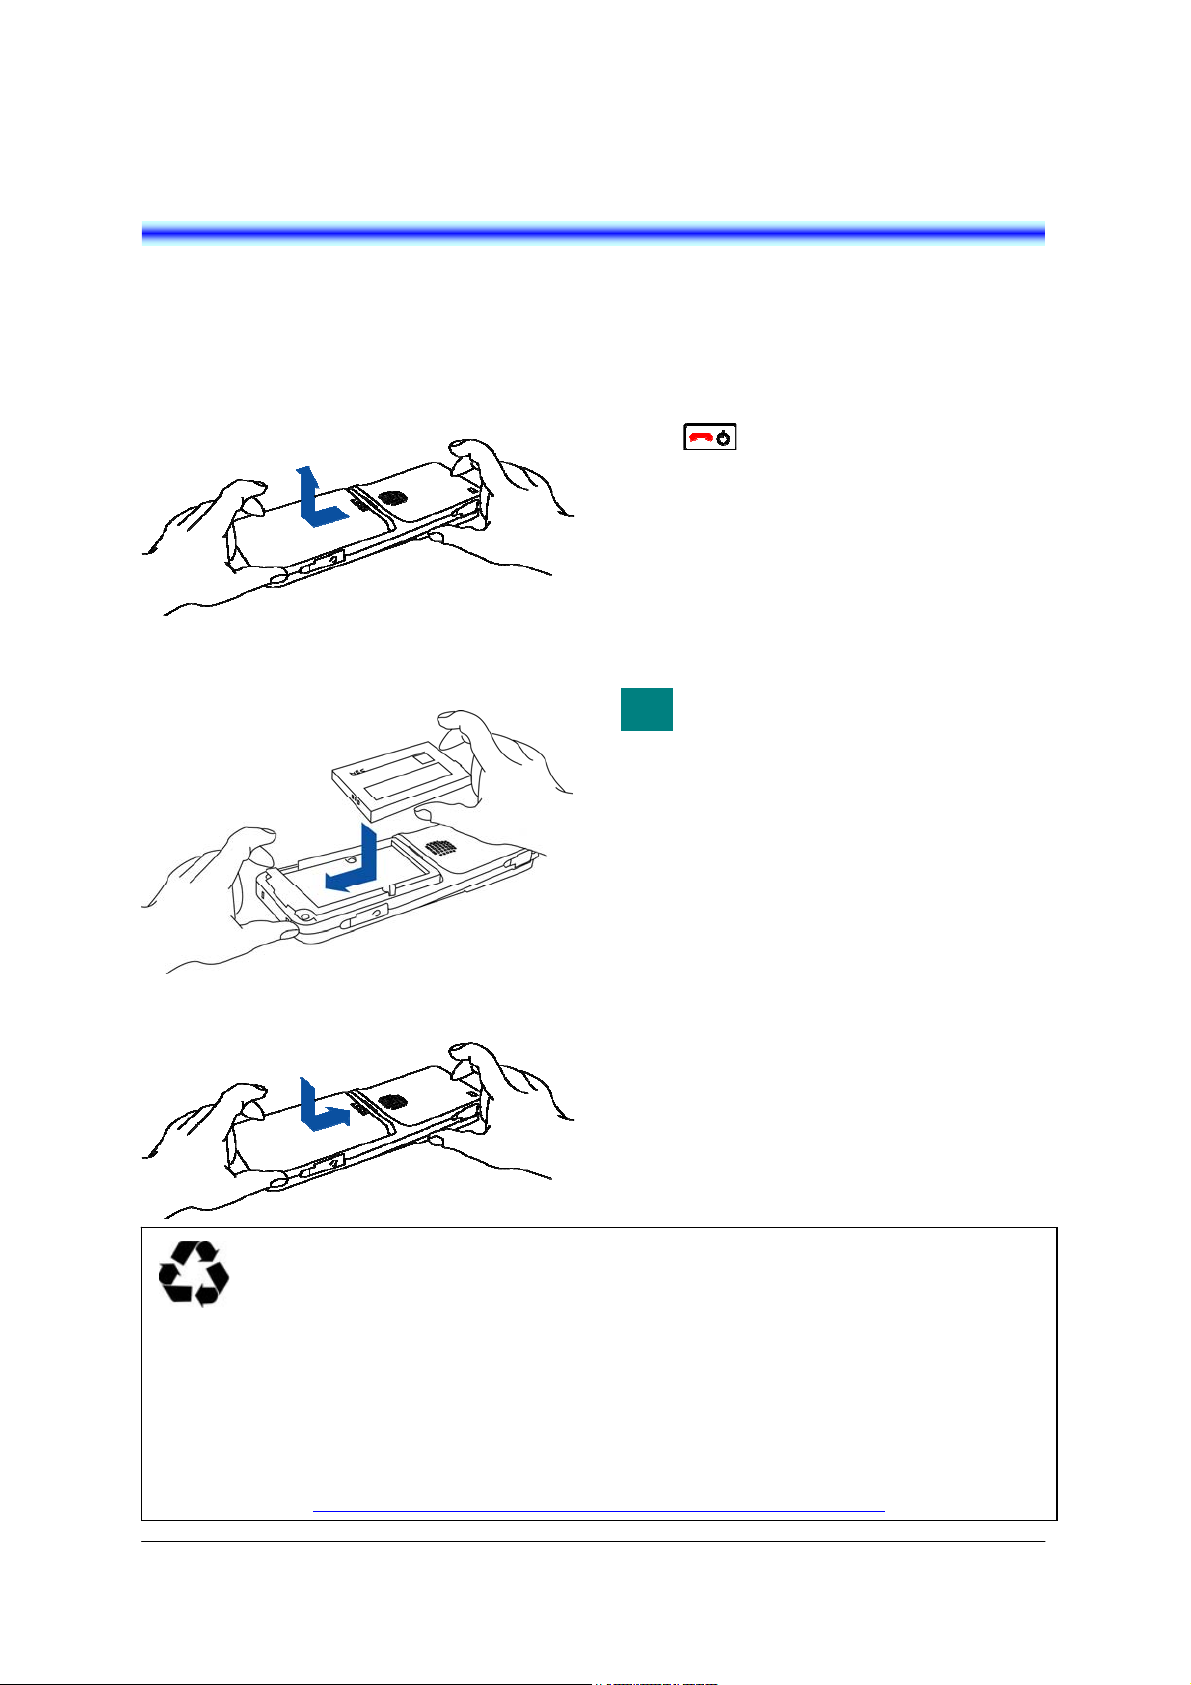
2.GETTING STARTED
m
• HOW TO INSERT THE
BATTERY
• HOW TO REPLACE THE
BATTERY
Insert the battery into the unit as follows.
(1) Remove the battery cover from the phone.
(2) Place the battery into the unit so that the
label faces toward you.
(3) Attach the battery cover again.
This product is powered by a lithium-ion battery.
Lithium-ion Battery: 3.7V 850mAh
The lithium-ion battery is a recyclable resource.
In recycling batteries that have been replaced or that have been unloaded from a used product, take
notice of this precaution to avoid smoking and firing:
● Bring batteries to our repair counter with the contacts being taped to prevent shorts or enclosed
individually in plastic bags.
<Our repair counter> For more details, visit the NEC Infrontia Environment Website.
http://www.necinfrontia.co.jp/english/company/environment/index.ht
Replace the battery of the phone as follows.
(1) Power off the phone by pressing and holding
the key for 2 seconds or more.
(2) Wait until the Info LED on the phone is off.
(3) Remove the battery cover from the phone.
(4) Remove the Battery.
(5) Place the new battery in to the unit so that the
label faces toward you.
(6) Attach the battery cover again.
The battery loaded in your phone
TIP
has a useful life of about 2 years,
though it is a parameter of on how
your phone has been used. If the
battery voltage diminishes quickly
after the battery has been charged
for a long time, replace with a new
battery (optional). For more detail,
ask your dealer.
9
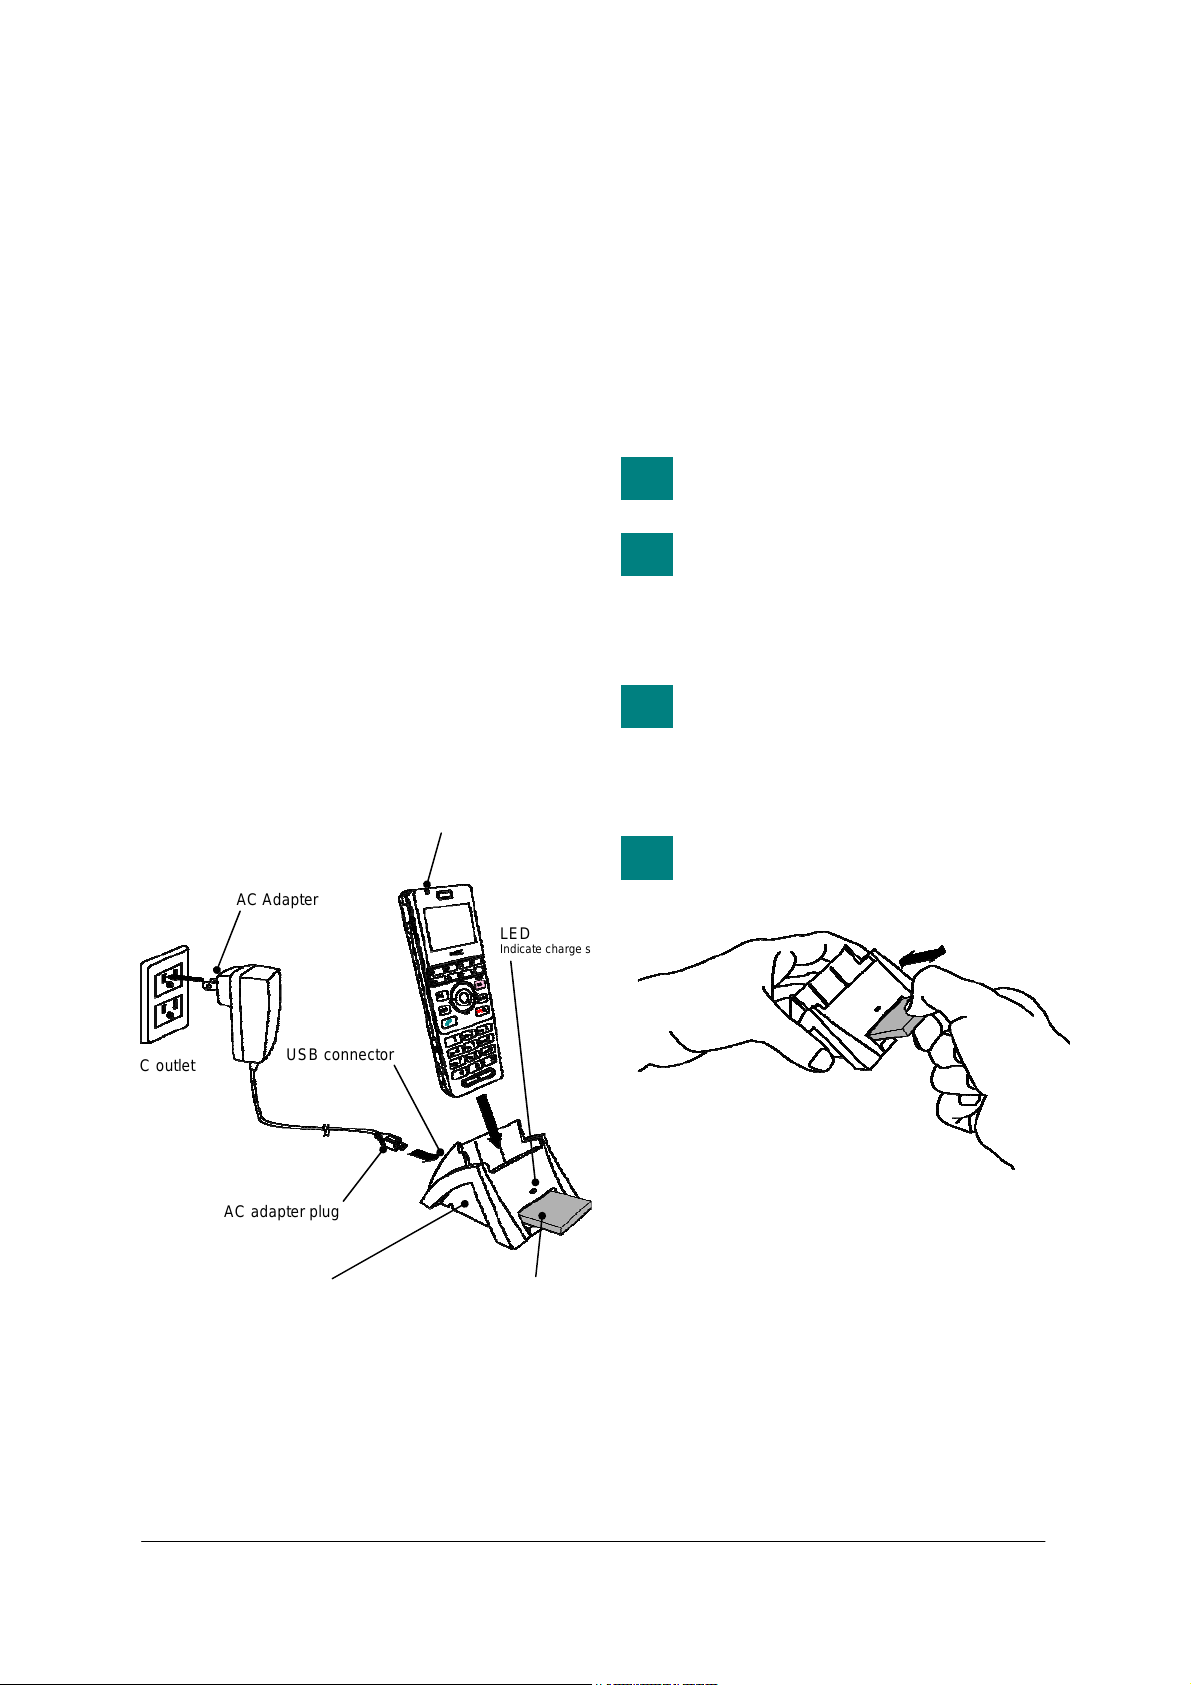
• HOW TO CHARGE THE
BATTERY
Be sure to charge the battery before using the
phone for the first time. Use one of the
following:
● Cradle
● AC Adapter (direct connection)
By using the Cradle:
The phone can be charged by using the cradle.
You can also charge the battery by inserting the
battery pack alone in the slot on the cradle. This
is useful when you have a spare battery.
(1) Insert the AC adapter plug (mini USB) into
the USB connector in the back of the cradle.
(2) Plug in the AC adapter into an appropriate
AC outlet.
(3) Place the phone and/or the spare battery
pack as shown below. When placing a
battery pack into the slot, insert it so that the
label faces downward.
AC outlet
Note: Face the label of the battery pack
AC adapter plug
Cradle (Battery Charger)
downward when inserting the battery
pack.
AC Adapter
USB connector
Info LED
Indicate charge status
Spare Battery (optional)
LED
Indicate charge status
(4) The LED on the cradle lights red, indicating
the battery is being charged. When the
phone battery is not being charged the Info
LED turns off.
(5) The LED on the cradle lights green when the
spare battery is fully charged. After this,
charging to the phone battery will start and
the Info LED lights red.
(6) The Info LED lights green when the phone
battery is fully charged.
An empty battery pack can be fully
TIP
charged in about 4 hours.
If any abnormality is found in the
TIP
battery, the LED on the cradle
lights off. In this case, please
contact your network
administrator.
In the case you place the phone on
TIP
the cradle and insert the spare
battery in the slot at the same time,
the spare battery will be charged
first.
Please insert the spare battery in
TIP
the slot on the cradle or remove it
as following figure.
10
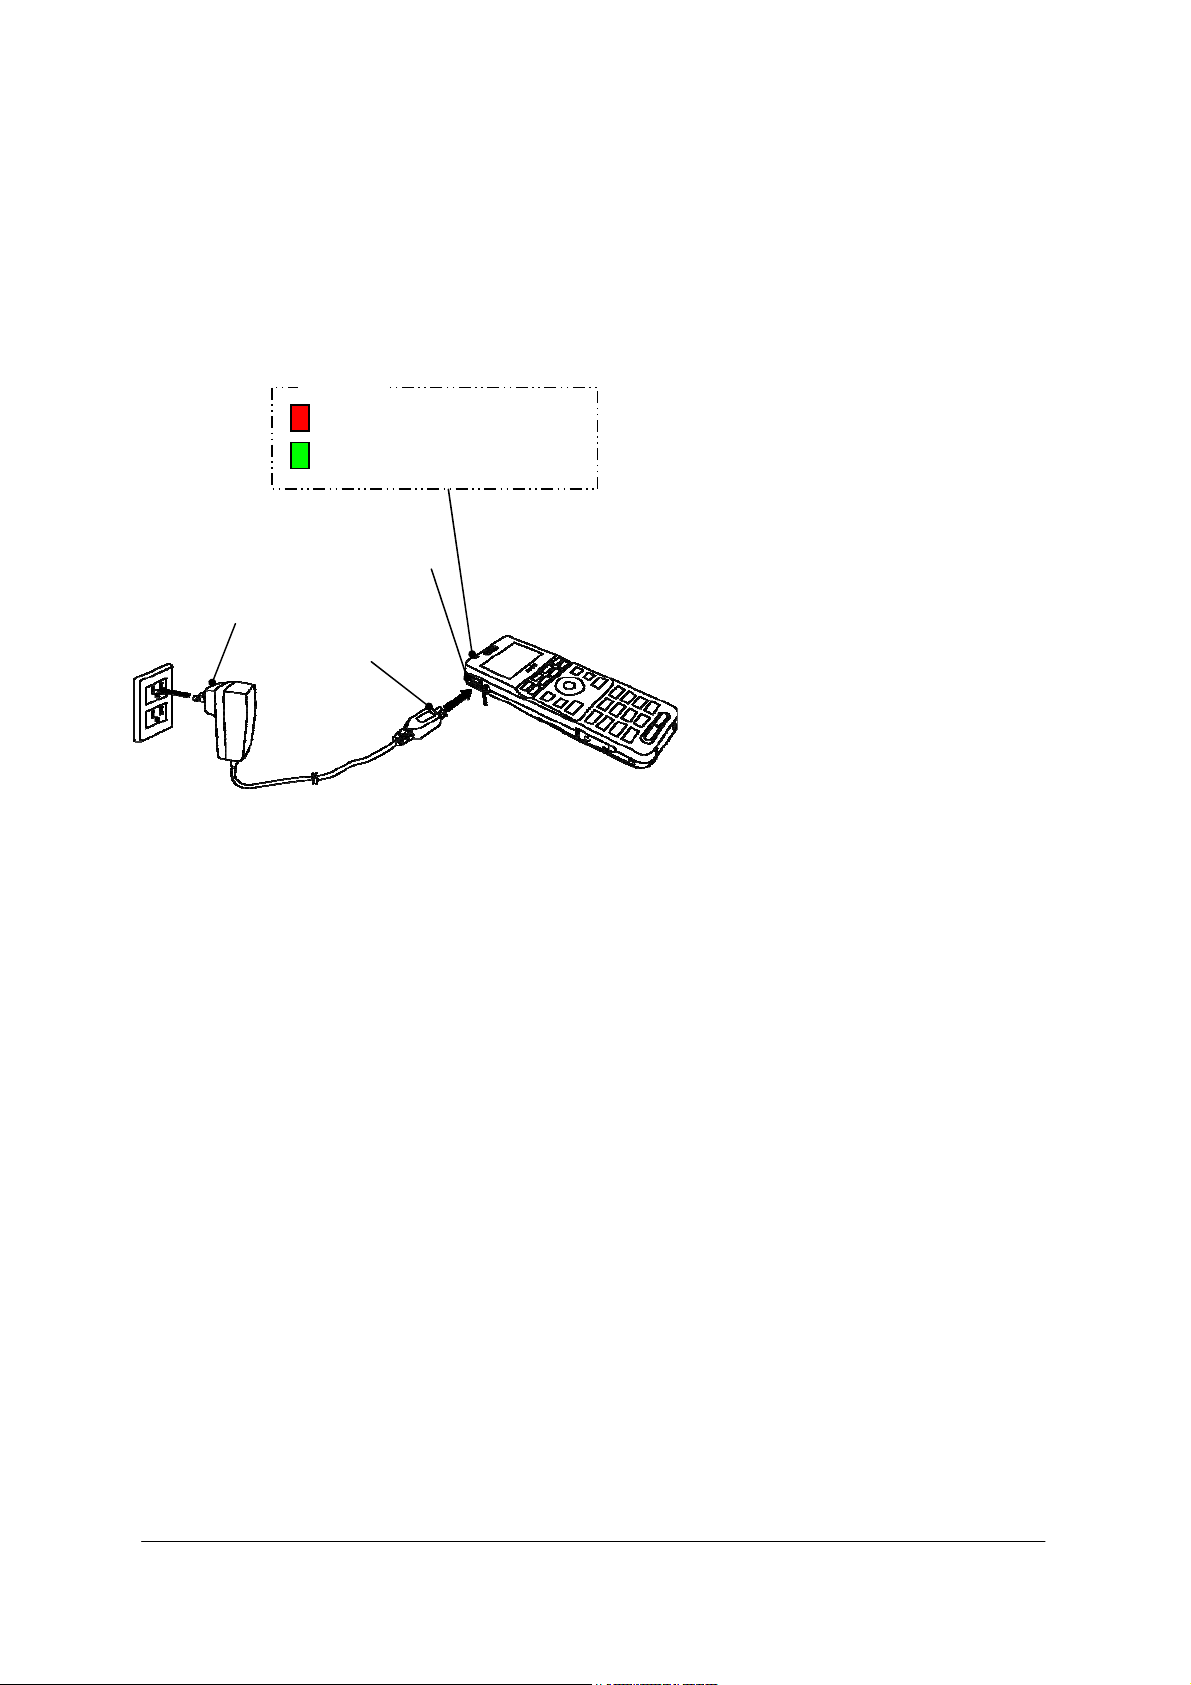
By using the AC Adapter:
To charge the phone using the AC adapter:
(1) Insert the AC adapter into an appropriate AC
outlet.
(2) Insert the AC adapter plug (mini USB) into
USB connector of the phone.
Info LED
: Light red (Charging)
: Light green (Charging is completed)
USB connector
AC Adapter
AC adapter plug
AC outlet
11

This page is for your notes.
12
3.BASIC OPERATION
A
• TO POWER ON THE PHONE
(STANDBY MODE)
- Press and hold the key for 2 seconds
or more. The start screen appears and the
Info LED flashes. After that your phone
displays the following initial screen.
Current Date
- Make sure the Antenna icon ( ) is
9/2 Tue 08:27AM
223 Mike
Standby mode
Phone Number
This initial screen is called
TIP
Standby mode in this guide.
displayed on your phone as follows.
Antenna icon
9/2 Tue 08:27AM
223 Mike
Antenna icon indicates you can
TIP
use the phone. If Antenna icon
indicates out of service area ( ),
please contact your network
administrator.
day of the week
Current Time
My Name
• TO POWER OFF THE PHONE
- Press and hold the key for 2 seconds
or more. “Power Off” is displayed and the
Info LED flashes.
13
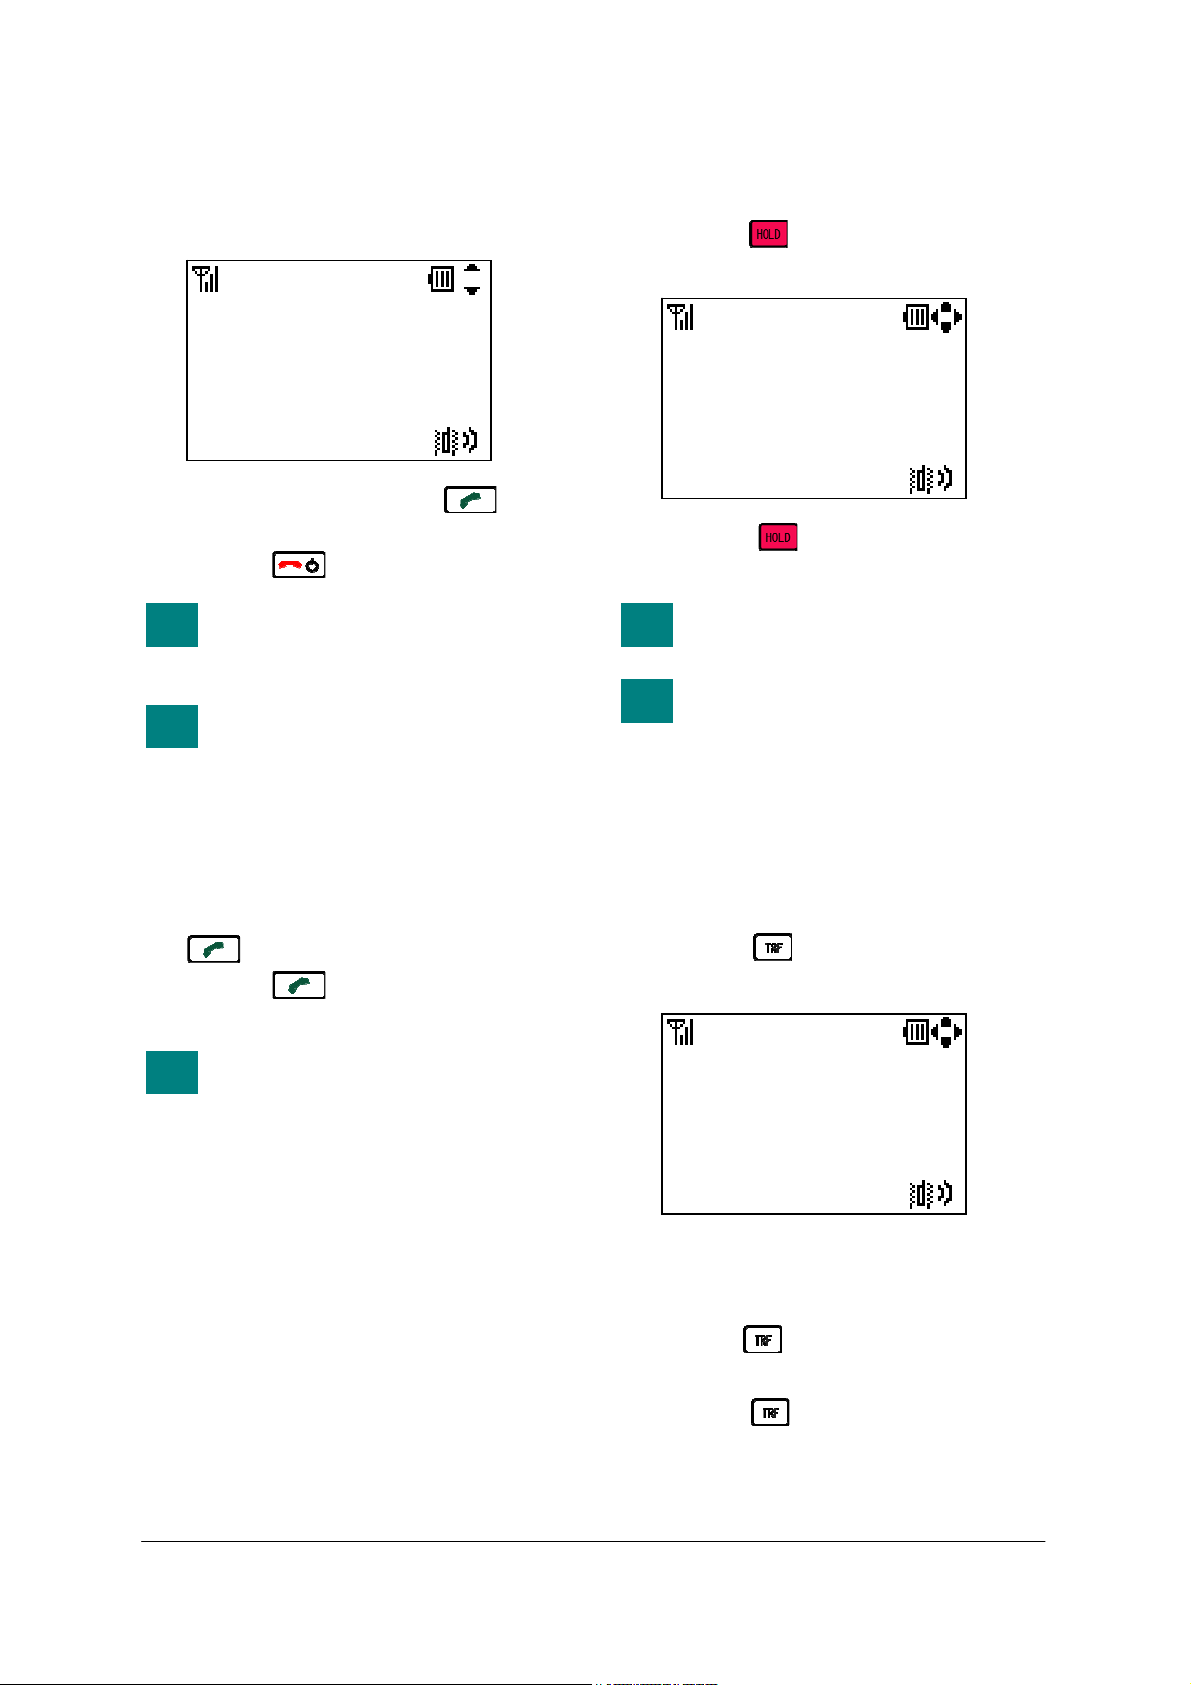
• TO ANSWER A CALL
• TO PLACE A CALL ON HOLD
When receiving an incoming call, the display
automatically changes to Incoming Call screen.
- To answer the call, press the key.
- To stop the ring without answering the call,
9/2 Tue 08:30AM
CALLFROM MH240
press the key.
When the calling party has been
TIP
already registered in the Directory,
the registered Name is displayed.
When the calling party also uses
TIP
MH240, My Name of MH240 is
displayed.
• TO MAKE A CALL
During an active call, you can hold the call.
- Press the key to hold the line. Your
phone displays as follows.
- Press the key again to retrieve the
TIP
TIP
00:00:29
HOLD MH240
line.
During hold, Info LED blinks
orange.
This operation is different
depending on your system. Please
contact your network
administrator.
• TO TRANSFER A CALL
To make a phone call, do either of the following;
- Enter the phone number and then press the
key. (Preset Dialing)
- Press the key and then enter the
phone number. (Overlap Dialing)
By pressing CLEAR key, you can
TIP
delete the last digit of the dialed
number that is currently displayed
on the phone when Preset Dialing
is used.
During an active call, you can transfer the call to
other phone.
- Press the key during the call. Your
phone displays as follows.
- After hearing Second Dial Tone, enter the
- The called party answers the call, and then
- Press the key before the called party
00:00:29
HOLD MH240
phone number to transfer the call.
press the key. (Attended Transfer )
or
answers. (Unattended Trans fer)
14

• TO REDIAL (LAST NUMBER
REDIAL)
You can make a call from the Outgoing Call
History menu. A maximum of 50 calls can be
automatically recorded.
Registered number:
- Press the key while in Standby mode.
Your phone displays Call History of
Outgoing calls similar to the following.
9/ 2 8:30 240
9/ 1 22:11 Eric
9/ 1 14:56 John
8/31 9:42 Pat
Delete Save Back
- Press the key to select the desired
party you want to redial.
9/ 2 8:30 240
9/ 1 22:11 Eric
9/ 1 14:56 John
8/31 9:42 Pat
Delete Save Back
- Press the key. Your phone displays
the phone number list as followed if the
selected party has been already registered in
the Directory.
1.14581234567
2.12621234567
3.200
Prefix Call Back
- Press the key or “Call” soft key to
redial the party after you select a phone
number by pressing the key.
Outgoing
Outgoing
Number
Unregistered number:
- Press the key while in Standby mode.
Your phone displays Call History of
Outgoing calls similar to the following.
9/ 2 8:30 240
9/ 1 22:11 Eric
9/ 1 14:56 John
8/31 9:42 Pat
Delete Save Back
- Press the key to select the desired
party you want to redial.
- Press the key. Your phone displays
the phone number as followed.
- Press the key to redial the party.
9/2 Tue 08:32AM
240
Prefix Add Clear
Outgoing
• TO USE MUTE MODE
During an active call, you can use Mute mode.
When entering Mute mode, your voice is not
heard by the called party.
- Press the key to enter Mute mode.
Your phone displays as follows.
- Press the key again to exit Mute mode.
[MUTE]
00:00:50
TALKING MH240
15

• TO USE A HEADSET
• TO USE WHILE CHARGING
When a headset is inserted to the Headset
connector, your phone is in headset call mode.
- Connect a headset to the phone.
- When the phone receives a call, you can
hear ringing from the headset or speaker
(configurable). If vibration is set to enable,
it is also available.
- Press the key to answer the call.
- You can talk using the microphone and ear
phone of the headset.
- Press the key to end the call.
This phone has a JEAITA RC-5240
TIP
jack as a headset connector. If
Ø2.5 plug, you
TIP
your headset has an
can connect the headset to the
phone by using a conversion
cable.
Receiver and microphone do not
work when a conversion cable is
connected.
• TO USE SOFT KEYS
You will often use soft keys when you operate
this phone. You can use soft keys as follows.
9/ 1 22:00 Eric
9/ 1 9:25 222
8/31 10:12 Tom
8/31 10:03 Tom
Delete Save Back
Incoming
You can operate MH240 while charging as
following figure. But, the battery may become
empty when you talk for long time.
16

4.FEATURES
This section explains how to use the features on
your phone.
• TO USE CONFERENCE
(3-WAY CALL)
You can establish a Conference call (3-way call).
- During an active call, press the key to
hold the line.
- After hearing Second Dial Tone, enter the
phone number that you want to join the call.
- When the called party answers the call,
press the key. Your phone displays as
follows.
00:00:35
CONF 240
This operation is different
TIP
depending on your system. Please
contact your network
administrator.
• TO USE SPEAKERPHONE
• TO ADJUST CALL VOLUME
You can increase or decrease the receiver
volume in Standby mode or during a call. The
volume can be set in 3 steps (From Level 1
[Soft] to Level 3 [Loud]). The factory default
value is Level 2 [Medium].
During a call:
Press the key to select an appropriate
volume and then press the “OK” soft key or wait
timeout while talking with your phone.
Large
OK Back
In Standby mode:
- Press the key while in Standby mode.
Your phone displays the main menu.
- Press the key to select “5.Setting” and
then press the key.
- Press the key to select “1.User Setting”
and then press the key.
- Press the key to select “2.Talk” and
then press the key.
Call Volume
During an active call, you can use Speakerphone.
When entering Speakerphone mode, you can
hear the called party’s voice from the speaker of
your phone.
- Press and hold the key for 2 seconds
or more to enter Speakerphone mode.
- Press and hold the key again for 2
seconds or more to exit Speakerphone
mode.
Note: To use Speakerphone, you need to
enable this feature. See “8.SETTINGS”
for more information.
- Press the key to select “3.Call Volume”
and then press the key.
- Press the key to select an appropriate
volume and then press the “OK” soft key.
You can reach the Call Volume
TIP
menu by pressing the following
keys.
To go to the Call Volume menu:
17

• TO USE COURTESY MODE
You can set your phone to Courtesy Mode.
When your phone is placed in this mode, your
phone displays the Courtesy icon ( ).
- Press and hold the key for 1 second
or more to enter Courtesy Mode.
- Press and hold the key again for 1
second or more to exit Courtesy Mode.
COURTESY
TONE/VIB.
Key Touch Tone OFF
Ring OFF
Demo Sound OFF
Vibrator ON
When your phone enters Courtesy
TIP
Mode, vibration setting works
instead of speaker ringing.
ON OFF
Depends on
each setting.
• TO USE KEY LOCK
You can set your phone to Key Lock Mode.
When your phone is placed in this mode, you
can not operate any key and your phone displays
“Key Lock”.
- Press and hold the key for 2 seconds
or more to enter Key Lock Mode.
- Press and hold the key again for 2
seconds or more to exit Key Lock Mode.
Even if your phone enters Handy
TIP
Key Lock Mode, you can answer
an incoming call.
• TO RECONNECT TO
NETWORK
You can reconnect to your network.
- Press and hold the key for 3 seconds
or more to reconnect.
18

5.CALL HISTORY
Your phone can record recent Call History in the
following 3 lists up to 50 records for each list.
You can open each list from the main menu or
by pressing the associated key while in Standby
mode.
● Outgoing Calls (Press the key )
● Incoming Calls (Press the key
twice)
Outgoing Calls show a list of Dialed Numbers
and Incoming Calls show that of Received Calls.
You can make a call from the list and also add a
Call History entry into the Directory as required.
• TO VIEW CALL HISTORY
- Press the key while in Standby mode.
Your phone displays the main menu.
- Press the key to select “1.Call History”
and then press the key. Your phone
displays as follows.
1.Missed
2.Outgoing
3.Incoming
4.All Delete
- Press the key to select a history you
want to view on the list and then press the
__ key
- Your phone displays the following when
you select “3.Incoming”.
9/ 1 22:00 Eric
9/ 1 9:25 222
8/31 10:12 Tom
8/31 10:03 Tom
Delete Save Back
Call History
Incoming
TIP
TIP
TIP
You can find missed calls easily
from the list of Incoming Calls by
missed call icon ( ).
Once you see a list of Missed Calls
and close the screen, the records
are cleared automatically. You can
find those records from the list of
Incoming Calls.
You can reach each Call History by
pressing the following keys.
To View Missed Calls:
To View Outgoing Calls:
To View Incoming Calls:
19

• TO MAKE A CALL FROM CALL
HISTORY
• TO ADD PHONE NUMBER TO
DIRECTORY
- Press the key while in Standby mode.
Your phone displays the main menu.
- Press the key to select “1.Call History”
and then press the key.
- Press the key to select a history you
want to view on the list and then press the
___ key.
- Press the key to select a desired party
you want to call.
9/ 1 22:00 Eric
9/ 1 9:25 222
8/31 10:12 Tom
8/31 10:03 Tom
Delete Save Back
- Press the key. Your phone displays
the following phone number list if the
selected party has been already registered in
the Directory.
1.14581238901
2.12621238901
3.250
Prefix Call Back
- Press the key or the “Call” soft key
to make the call after you select a phone
number by pressing the key.
Incoming
Number
- Press the key while in Standby mode.
Your phone displays the main menu.
- Press the key to select “1.Call History”
and then press the key.
- Press the key to select a history you
want to view on the list and then press the
_ key.
- Press the key to select a phone number
you want to add to Directory.
9/ 1 22:00 Eric
9/ 1 9:25 222
8/31 10:12 Tom
8/31 10:03 Tom
Delete Save Back
- Press the “Save” soft key.
1.New
2.Add
OK Back
In case of a new number:
- Press the key to select “1.New” and then
press the “OK” soft key.
Name
Group
222
Tel #2
Save Edit Back
Incoming
Incoming
Edit
20

- Press the key to select an item you
want to edit and then press the “Edit” soft
key as required. In this example, Name and
Group will be edited.
- Edit the data in edit display.
Ken
ab OK Clear
- Press the “OK” soft key and you will go
back to the previous screen.
Ken
Group
222
Tel #2
Save Edit Back
- Press the key to select “Group” and
then press the “Edit” soft key.
- Press the key to select an appropriate
group.
01.Default
02.Colleagues
03.VIPs
04.Family
OK Back
- Press the “OK” soft key and you will go
back to the previous screen.
Ken
Colleagues
222
Tel #2
Save Edit Back
Name
Edit
Group
Edit
- Press the “Save” soft key to save the data to
the Directory. The display returns to the
previous screen.
Name information is required to
TIP
save the data.
Adding a phone number entry:
- Press the key to select “2.Add” and
then press the “OK” soft key.
- Press the key to select a search way you
want. (In this case, to search by Name.)
1.Group
2.Name
3.Tel Number
4.Others
- Press the key and then input the name
you want to search.
Ken
ab OK Clear
- Press the “OK” soft key to search.
002.Ken
003.Kenny
Detail Back
Search
Name
Name
21

- Press the “Detail” soft key and then press
the key to select a phone number input
area you want to add.
14581237654
OK Back
If you save to an already existing
TIP
entry, it will be overwritten by the
new phone number.
- Press the “OK” soft key.
Name
22

• TO DELETE A CALL HISTORY
- Press the key while in Standby mode.
Your phone displays the main menu.
- Press the key to select “1.Call History”
and then press the key.
- Press the key to select a history you
want to view on the list and then press the
_ key.
- Press the key to select a phone number
you want to delete and then press the
“Delete” soft key.
8/31 10:03 Tom
8/31 9:25 Privat
8/30 19:53 Kenny
8/30 15:44 Eric
Delete Save Back
- Press the key to select “2.OK” and then
press the “OK” soft key.
Delete this entry?
1.Cancel
2.OK
OK Back
You can press the key to
TIP
delete the entry instead of the
above operation.
Incoming
Delete
Incoming
• TO DELETE ALL CALL
HISTORIES
- Press the key while in Standby mode.
Your phone displays the main menu.
- Press the key to select “1.Call History”
and then press the key.
- Press the key to select “4.All Delete”
and then press the key.
- Press the key to select a history you
want to delete and then press the “OK” soft
key.
1.Outgoing
2.Incoming
3.All
OK Back
- Press the key to select “2.OK” and then
press the “OK” soft key.
Del. all histories?
1.Cancel
2.OK
OK Back
If you delete all Incoming Call
TIP
histories, Missed Call histories
also are deleted.
You can delete all call histories by
TIP
pressing the following keys.
To Delete Outgoing Call Histories:
To Delete Incoming Call Histories:
To Delete All Call Histories:
All Delete
All Delete
23

This page is for your notes.
24

6.DIRECTORY
You can save, edit, delete and view up to 500
record entries.
• TO VIEW DIRECTORY
- Press the key while in Standby mode.
- Your phone displays as follows.
001.John
002.Ken
003.Kenny
004.Aaron
Delete Detail Back
By pressing the key while
TIP
displaying the Directory, you can
scroll through a list.
All <> ABC <> DEF <> GHI<> JKL
<> MNO <> PQRS <> TUV <>
WXYZ <> Other <>
Pressing the to key
TIP
and holding it for about 1 second
in Standby mode will start
Alphabet Search.
• TO SEARCH DIRECTORY
- Press the key while in Standby mode.
Your phone displays the main menu.
- Press the key to select “2.Directory”
and then press the key.
- Press the key to select “1.Search” and
then press the key.
All
- Press the key. Your phone displays the
Search menu.
1.Group
2.Name
3.Tel number
4.Others
To Search by Group:
- Press the key to select “1.Group” and
then press the key.
- Press the key to select a Group you
want to search and then press the “OK” soft
key.
01.Default
02.Colleagues
03.VIPs
004.Family
OK Back
- Your phone displays searched records.
005.Eric
001.John
002.Ken
003.Kenny
Delete Detail Back
Search
Group
Group
25

To Search by Name:
To Search by Memory ID:
- Press the key to select “2.Name” and
then press the key.
- Enter a name or letter you want to search
and then press the “OK” soft key.
Name
Ken
ab OK Clear
- Your phone displays searched records.
002.Ken
003.Kenny
Name
Delete Detail Back
To Search by Tel number:
- Press the key to select “3.Tel number”
and then press the key.
- Press the key to select “4.Others” and
then press the key.
- Press the key to select “1.Memory ID”
and then press the key.
- Enter a Memory ID (3 digits) you want to
search and then press the “OK” soft key.
Memory ID
003
12 OK Clear
- Your phone displays searched records.
Memory ID
003.Kenny
Delete Detail Back
To Search by Alphabet:
- Enter a phone number you want to search
and then press the “OK” soft key.
Tel Number
222
12 OK Clear
- Your phone displays searched record.
Tel Number
002.Ken
Delete Detail Back
- Press the key to select “4.Others” and
then press the key.
- Press the key to select “2.Alphabet”
and then press the key.
- Press the key to select an Alphabet you
want to search and then press the “OK” soft
key.
Alphabet
2.ABC
3.DEF
4.GHI
5.JKL
OK Back
26

- Your phone displays searched records.
001.John
002.Ken
003.Kenny
Delete Detail Back
To Search by Company:
- Press the key to select “4.Others” and
then press the key.
- Press the key to select “3.Company”
and then press the key.
- Enter a Company name you want to search
and then press the “OK” soft key.
NEC
ab OK Clear
- Your phone displays searched records.
004.Aaron
001.John
002.Ken
003.Kenny
Delete Detail Back
JKL
Company
Company
27
TIP
You can reach each Search menu
by pressing the following keys.
To go to the Group Search menu:
To go to the Name Search menu:
To go to the Tel Number Search
menu:
To go to the Memory ID Search
menu:
To go to the Alphabet Search
menu:
To go to the Company Search
menu:

• TO SETUP GROUP
- Press the key while in Standby mode.
Your phone displays the main menu.
- Press the key to select “2.Directory”
and then press the key.
- Press the key to select “3.Group
Setting” and then press the key. Your
phone displays the Group Setting menu.
01.Default
02.Colleagues
03.VIPs
04.Family
05.Friends
You can reach the Group Setting
TIP
menu by pressing the following
keys.
To go to the Group Setting menu:
- Press the key to select a Group you
want to setup and then press the key.
1.Name
2.Ring Tone
3.Illumination
4.Vibrator
GroupSetting
GroupSetting
To Edit Group Name:
- Press the key to select “1.Name” and
then press the key.
- Enter a Group Name you want and then
press the “OK” soft key.
Customer
ab OK Clear
- The display returns to the previous screen.
To Setup Group Ring Tone:
- Press the key to select “2.Ring Tone”
and then press the key.
- Press the key to select a Group Ring
Tone you want and then press the “OK”
soft key.
01.Disable
02.Default
03.Tone Type1
04.Tone Type2
Play OK Back
- The display returns to the previous screen.
By pressing the “Play” or “Stop”
TIP
soft key, you can hear the Ring
Tone while you select a Group
Ring Tone.
Ring Tone
Name
28

To Setup Group Illumination:
- Press the key to select “3.Illumination”
and then press the key.
- Press the key to select a Group
Illumination you want and then press the
“OK” soft key.
1.Disable
2.Default
3.Red
4.Green
On OK Back
- The display returns to the previous screen.
By pressing the “On” or “Stop”
TIP
soft key, you can view the
Illumination while you select a
Group Illumination.
To Setup Group Vibration setting:
- Press the key to select “4.Vibrator” and
then press the key.
- Press the key to select the Group
Vibration setting you want and then press
the “OK” soft key.
1.Disable
2.Default
3.Pattern1
4.Pattern2
Conf OK Back
- The display returns to the previous screen.
By pressing the “Conf” or “Stop”
TIP
soft key, you can confirm the
Vibration setting pattern while you
select a Group Vibration setting.
Illumination
Vibrator
• TO ADD A NEW ENTRY
- Press the key while in Standby mode.
Your phone displays the main menu.
- Press the key to select “2.Directory”
and then press the key.
- Press the key to select “2.Edit” and then
press the key. Your phone displays the
Edit menu.
Name
Group
Tel #1
Tel #2
Edit Back
- Press the key to select an Item you
want to edit and then press the “Edit” soft
key.
- Edit the selected item. In the following
example, Name data is edited.
Donald E.
ab OK Clear
Name information is minimum
TIP
requirement to save the data.
- Press the “OK” soft key to write the data.
The display returns to the previous screen.
Donald E.
Group
Tel #1
Tel #2
Save Edit Back
Edit
Name
Edit
29

- Press the key to select an Item you
want to edit and then press the “Edit” soft
key.
- Edit the selected item. In the following
example, Tel #1 data is edited.
14581233333
12 OK Clear
- Press the “OK” soft key to write the data.
The display returns to the previous screen.
Donald E.
Group
14581233333
Tel #2
Save Edit Back
- Repeat these steps as required for the new
entry.
- When all of the editing is completed, press
the “Save” soft key.
You can reach the Directory Edit
TIP
menu by pressing the following
keys.
To go to the Directory Edit menu:
Tel #1
Edit
30

• TO DELETE A RECORD
You can delete a record from the Directory.
- Press the key while in Standby mode.
- Your phone displays as follows.
001.John
002.Ken
003.Kenny
004.Aaron
Delete Detail Back
- Press the key to select a record you
want to delete and then press the “Delete”
soft key.
- Press the key to select the “OK” soft
key.
Delete this entry?
1.Cancel
2.OK
OK Back
You can press the key to
TIP
delete instead of above operation.
All
Directory
• TO DELETE ALL RECORDS
- Press the key while in Standby mode.
Your phone displays the main menu.
- Press the key to select “2.Directory”
and then press the key.
- Press the key to select “5.All Delete”
and then press the key.
- Press the key to select “2.OK” and then
press the “OK” soft key.
Del. all Directory?
1.Cancel
2.OK
OK Back
All Delete
You can delete all the records in
TIP
the Directory by pressing the
following keys.
To Delete All Directory:
• TO MAKE A CALL FROM
DIRECTORY
- Press the key while in Standby mode.
- Your phone displays as follows.
001.John
002.Ken
003.Kenny
004.Aaron
Delete Detail Back
- Press the key to select a party you want
to make a call to and then press the
_ key. Your phone displays the phone
number list as follows.
1.14581234567
2.12621234567
3.200
Prefix Call Back
- Press the key or the “Call” soft key
to make the call after you select a phone
number by pressing the key.
31
All
Number

• TO EDIT AN ENTRY
You can edit a registered Directory.
- Press the key while in Standby mode.
- Your phone displays as follows.
001.John
002.Ken
003.Kenny
004.Aaron
Delete Detail Back
- Press the key to select a record you
want to edit and then press the “Detail” soft
key.
Kenny
Colleagues
14581234567
12621234567
Edit Back
- Press the key to select an item you
want to edit and then press the “Edit” soft
key.
- When all of the editing is completed, press
the “Save” soft key.
All
Directory 003
• TO CONFIRM YOUR PHONE
NUMBER
- Press the key while in Standby mode.
Your phone displays the main menu.
- Press the key to select “2.Directory”
and then press the key.
- Press the key to select “4.Own Number”
and then press the key. Your phone
displays as follows.
Back
You can confirm your phone
TIP
number by pressing the following
keys.
To Confirm Your Phone Number:
Own Number
223
32

7.SPEED DIAL/PRESET DIAL
You can use Speed Dial assigned multi function
keys (up to 8 entries) and Preset Dial assigned
dial keys (up to 10 entries).
• TO USE SPEED DIAL
- In Standby mode, press a function key
( to ) to select one Speed Dial
entry that has already registered in your
phone. For example, press the key to
make a call to “F3.Ken” that is listed as the
F3 entry.
F1.John
F2.Eric
F3.Ken
F4.Kenny
OK Back
Assign Dial
• TO ENABLE SPEED DIAL
- Press the key while in Standby mode.
Your phone displays the main menu.
- Press the key to select “5.Setting” and
then press the key.
- Press the key to select “1.User Setting”
and then press the key.
- Press the key to select “6.Keypad
Mode” and then press the key.
- Press the key to select “2.Function
Key” and then press the key. Your
phone displays the Function Key menu.
1.System
2.Speed Dial
OK Back
Function Key
- Press the key to select “2.Speed Dial”
and then press the “OK” soft key.
You can enable Function Keys as
TIP
Speed Dial by pressing the
following keys.
To Enable Speed Dial:
When you enable Function Keys
TIP
as Speed Dial, Function Keys will
not work as system function keys.
33

• TO USE PRESET DIAL
- In Standby mode, press a dial pad
( to ) to select one of the
Preset Dial entries that have already
registered in your phone. For example,
press the key and hold for about 1
second to make a call to “D3.Tom” that is
listed as D3 entry.
D1.Aaron
D2.Donald E.
D3.Tom
D4.Jim
OK Back
- Press the key to make the call.
In case that key touch tone is
TIP
enabled, you hear error tone when
you press unassigned dial key and
hold for about 1 second.
Assign Dial
• TO ENABLE PRESET DIAL
- Press the key while in Standby mode.
Your phone displays the main menu.
- Press the key to select “5.Setting” and
then press the key.
- Press the key to select “1.User Setting”
and then press the key.
- Press the key to select “6.Keypad
Mode” and then press the key.
- Press the key to select “3.Dial Key”
and then press the key. Your phone
displays the Dial Key menu.
1.Alphabet Search
2.Preset Dial
OK Back
- Press the key to select “2.Preset Dial”
and then press the “OK” soft key.
Dial Key
You can enable the Dial Keys as
TIP
Preset Dials by pressing the
following keys.
To Enable Preset Dial:
When you set the Dial Keys as
TIP
Preset Dial, Dial Keys will not work
as Alphabet Search function keys.
• TO ADD NEW ENTRY/EDIT
- Press the key while in Standby mode.
Your phone displays the main menu.
- Press the key to select “5.Setting” and
then press the key.
- Press the key to select “1.User Setting”
and then press the key.
- Press the key to select “6.Keypad
Mode” and then press the key.
- Press the key to select “4.Assign Dial”
and then press the key. Your phone
displays the Assign Dial menu.
F7.
F8.
D1.Aaron
D2.Donald E.
OK Back
- Press the key to select a key you want
to add/edit and then press the “OK” soft
key.
1.Name
2.TEL
OK Back
- Press the key to select an item you
want to edit and then press the “OK” soft
key.
34
Assign Dial
F7.

- When all of the editing is completed, press
the “Back” soft key.
F7.Bill
F8.
D1.Aaron
D2.Donald E.
OK Back
You can reach the Assign Dial
TIP
menu by pressing the following
keys.
To go to the Assign Dial menu:
Assign Dial
35

This page is for your notes.
36

8.SETTING
Various settings such as Incoming Call, Talk,
Display, Password, Password Lock, Keypad
Mode and Date & Time can be modified as
required on your phone.
• RING VOLUME
• RING TONE
Factory Default: Tone Type1 (All kind)
You can select ring tone on a call kind basis
(External Ring, Internal Ring, IM and
Non-notification).
Factory Default: Middle
You can adjust ring tone volume.
- Press the key while in Standby mode.
Your phone displays the main menu.
- Press the key to select “5.Setting” and
then press the key.
- Press the key to select “1.User Setting”
and then press the key.
- Press the key to select “1.Incoming
Call” and then press the key.
- Press the key to select “1.Ring Volume”
and then press the key.
- Ring Volume can be set in 5 levels (Off,
Graduate, Small, Middle and Large).
- Press the key to select an appropriate
volume and then press the “OK” soft key.
Large
OK Back
You can reach the Ring Volume
TIP
menu by pressing the following
keys.
To go to the Ring Volume menu:
Ring Volume
- Press the key while in Standby mode.
Your phone displays the main menu.
- Press the key to select “5.Setting” and
then press the key.
- Press the key to select “1.User Setting”
and then press the key.
- Press the key to select “1.Incoming
Call” and then press the key.
- Press the key to select “2.Ring Tone”
and then press the key.
- Press the key to select a call kind you
want to change a ring tone and then press
the key.
1.External Ring
2.Internal Ring
3.IM
4.Non-notification
- Press the key to select a ring tone you
want and then press the “OK” key.
01.Tone Type1
02.Tone Type2
03.Tone Type3
04.Tone Type4
Play OK Back
By pressing the “Play” or “Stop”
TIP
soft key, you can hear the Ring
Tone while you select a Ring Tone.
Ring Tone
Ring Tone
37

You can reach the Ring Tone
TIP
menu by pressing the following
keys.
To go to the Ring Tone menu:
• INCOMING POPUP
Factory Default: Disable
Your phone can display a popup window while
ringing.
- Press the key while in Standby mode.
Your phone displays the main menu.
- Press the key to select “5.Setting” and
then press the key.
- Press the key to select “1.User Setting”
and then press the key.
- Press the key to select “1.Incoming
Call” and then press the key.
- Press the key to select “3.Incoming
Popup” and then press the key.
- Press the key to select “1.Disable” or
“2.Enable” and then press the “OK” soft
key.
1.Disable
2.Enable
OK Back
When a caller is not registered in
TIP
your Directory, your phone does
not display a popup window even
if this feature is enabled.
When your phone displays I-SIP
TIP
icon, this feature may not work
depending on system setting. In
this case, please contact your
network administrator.
You can reach the Incoming
TIP
Popup menu by pressing the
following keys.
To go to the Incoming Popup
menu:
Popup
• ILLUMINATION
Factory Default: Green (All kind)
You can select an illumination color of the Info
LED on a call kind basis (External Ring, Internal
Ring, IM and Non-notification).
- Press the key while in Standby mode.
Your phone displays the main menu.
- Press the key to select “5.Setting” and
then press the key.
- Press the key to select “1.User Setting”
and then press the key.
- Press the key to select “1.Incoming
Call” and then press the key.
- Press the key to select “4.Illumination”
and then press the key.
- Press the key to select a call kind you
want to change an illumination and then
press the key.
1.External Ring
2.Internal Ring
3.IM
4.Non-notification
- Press the key to select an illumination
you want and then press the “OK” key.
1.Disable
2.Red
3.Green
4.Orange
On OK Back
By pressing the “On” or “Stop”
TIP
soft key, you can view the
Illumination while you select an
Illumination.
You can reach the Illumination
TIP
menu by pressing the following
keys.
To go to the Illumination menu:
Illumination
Illumination
38

• PRIVATE CALL
• VIBRATION SETTING
Factory Default: Allow Incoming
Your can block incoming calls without Caller
ID.
- Press the key while in Standby mode.
Your phone displays the main menu.
- Press the key to select “5.Setting” and
then press the key.
- Press the key to select “1.User Setting”
and then press the key.
- Press the key to select “1.Incoming
Call” and then press the key.
- Press the key to select “5.Private Call”
and then press the key.
- Press the key to select “1.Allow
Incoming” or “2.Block Incoming” and then
press the “OK” soft key.
1.Allow Incoming
2.Block Incoming
OK Back
You can reach the Private Call
TIP
menu by pressing the following
keys.
To go to the Private Call menu:
Private Call
Factory Default: Pattern1 (All kind)
You can select a vibration setting pattern on a
call kind basis (External Ring, Internal Ring, IM
and Non-notification).
- Press the key while in Standby mode.
Your phone displays the main menu.
- Press the key to select “5.Setting” and
then press the key.
- Press the key to select “1.User Setting”
and then press the key.
- Press the key to select “1.Incoming
Call” and then press the key.
- Press the key to select “6.Vibrator” and
then press the key.
- Press the key to select a call kind you
want to change the vibration setting for and
then press the _ key.
1.External Ring
2.Internal Ring
3.IM
4.Non-notification
- Press the key to select the vibration
setting you want and then press the “OK”
key.
1.Disable
2.Pattern1
3.Pattern2
Conf OK Back
By pressing the “Conf” or “Stop”
TIP
soft key, you can sample the
Vibration setting while you select a
Vibration setting.
You can reach the Vibration
TIP
setting menu by pressing the
following keys.
To go to the Vibrator menu:
Vibrator
Vibrator
39

• INCOMING MODE
• HEADSET
Factory Default: Both
You can select an incoming mode of Ring and
Vibration.
- Press the key while in Standby mode.
Your phone displays the main menu.
- Press the key to select “5.Setting” and
then press key.
- Press the key to select “1.User Setting”
and then press key.
- Press the key to select “1.Incoming
Call” and then press the key.
- Press the key to select “7.Incoming
Mode” and then press the key.
- Press the key to select “1.Both”,
“2.Ring Vib” or “3.Vib Ring” and
then press the “OK” soft key.
1.Both
2.Ring Vib
3.Vib Ring
OK Back
You can reach Incoming Mode
TIP
menu by pressing the following
keys.
To go to the Incoming Mode menu:
IncomingMode
Factory Default: Headset (Ring Tone
Sending), None (Auto response)
Your can modify a headset mode.
- Press the key while in Standby mode.
Your phone displays the main menu.
- Press the key to select “5.Setting” and
then press the key.
- Press the key to select “1.User Setting”
and then press the key.
- Press the key to select “1.Incoming
Call” and then press the key.
- Press the key to select “8.Headset” and
then press the___ key. Your phone displays
as follows.
1.Ring Tone Sending
2.Auto Response
Ring Tone Sending:
- Press the key to select “1.Ring Tone
Sending” and then press the key.
- Press the key to select “1.Headset”or
“2.Speaker” and then press the “OK” soft
key.
1.Headset
2.Speaker
OK Back
- The display returns to the previous screen.
You can reach the Ring Tone
TIP
Sending of Headset menu by
pressing the following keys.
To go to the Ring Tone Sending
menu:
Headset
Ring Sending
40

Auto Response:
- Press the key to select “2.Auto
Response” and then press the key.
- Press the key to select an auto response
times you want and then press the “OK”
soft key.
3 times
OK Back
- The display returns to the previous screen.
You can reach the Auto Response
TIP
of Headset menu by pressing the
following keys.
To go to the Auto Response menu:
AutoResponse
• OFFHOOK RING
Factory Default: Enable
Your can accept a second incoming call.
- Press the key while in Standby mode.
Your phone displays the main menu.
- Press the key to select “5.Setting” and
then press the key.
- Press the key to select “1.User Setting”
and then press the key.
- Press the key to select “1.Incoming
Call” and then press the key.
- Press the key to select “9.Offhook
Ring” and then press the key.
- Press the key to select “1.Disable” or
“2.Enable” and then press the “OK” soft
key.
1.Disable
2.Enable
OK Back
This feature does not work
TIP
depending on your system.
You can reach the Offhook Ring
TIP
menu by pressing the following
keys.
To go to the Offhook Ring menu:
Offhook Ring
41

• RTP ALARM
• HOLD MUSIC
Factory Default: Disable
Your phone can provide an alarm if RTP packet
loss is suspected.
- Press the key while in Standby mode.
Your phone displays the main menu.
- Press the key to select “5.Setting” and
then press the key.
- Press the key to select “1.User Setting”
and then press the key.
- Press the key to select “2.Talk” and
then press the key.
- Press the key to select “1.RTP Alarm”
and then press the key.
- Press the key to select “1.Disable” or
“2.Enable” and then press the “OK” soft
key.
1.Disable
2.Enable
OK Back
You can reach the RTP Alarm
TIP
menu by pressing the following
keys.
To go to the RTP Alarm menu:
RTP Alarm
Factory Default: Tone Type12
You can select the music that is provided while
your phone is in hold status.
- Press the key while in Standby mode.
Your phone displays the main menu.
- Press the key to select “5.Setting” and
then press the key.
- Press the key to select “1.User Setting”
and then press the key.
- Press the key to select “2.Talk” and
then press the key.
- Press the key to select “2.Hold Music”
and then press the key.
- Press the key to select a music you
want and then press the “OK” soft key.
09.Tone Type9
10.Tone Type10
11.Tone Type11
12.Tone Type12
Play OK Back
By pressing the “Play” or “Stop”
TIP
soft key, you can hear the Music
while you select Music.
You can reach the Hold Music
TIP
menu by pressing the following
keys.
To go to the Hold Music menu:
Hold Music
42

• CALL VOLUME
• HANDOVER TONE
Factory Default: Middle
You can adjust receiver volume.
- Press the key while in Standby mode.
Your phone displays the main menu.
- Press the key to select “5.Setting” and
then press the key.
- Press the key to select “1.User Setting”
and then press the key.
- Press the key to select “2.Talk” and
then press the key.
- Press the key to select “3.Call Volume”
and then press the key.
- Call Volume can be set in 3 levels (Small,
Middle and Large).
- Press the key to select an appropriate
volume and then press the “OK” soft key.
Large
OK Back
You can reach the Call Volume
TIP
menu by pressing the following
keys.
To go to the Call Volume menu:
Call Volume
Factory Default: Disable
Your phone can provide a warning tone when
handover takes place.
Handover is the process of
TIP
transferring a wireless phone user
from one Access Point to another.
- Press the key while in Standby mode.
Your phone displays the main menu.
- Press the key to select “5.Setting” and
then press the key.
- Press the key to select “1.User Setting”
and then press the key.
- Press the key to select “2.Talk” and
then press the key.
- Press the key to select “4.Handover
Tone” and then press the key.
- Press the key to select “1.Disable” or
“2.Enable” and then press the “OK” soft
key.
1.Disable
2.Enable
OK Back
You can reach the Handover Tone
TIP
menu by pressing the following
keys.
To go to the Handover Tone menu:
HandoverTone
43

• TALK START VIBRATION
SETTING
Factory Default: Disable
Vibrator can work as talk start notification when
a called party answers your call.
- Press the key while in Standby mode.
Your phone displays the main menu.
- Press the key to select “5.Setting” and
then press the key.
- Press the key to select “1.User Setting”
and then press the key.
- Press the key to select “2.Talk” and
then press the key.
- Press the key to select “5.Talk Start
Vib” and then press the key.
- Press the key to select “1.Disable” or
“2.Enable” and then press the “OK” soft
key.
1.Disable
2.Enable
OK Back
You can reach the Talk Start Vib
TIP
menu by pressing the following
keys.
To go to the Talk Start Vib menu:
TalkStartVib
• LCD CONTRAST
Factory Default: 3
You can adjust LCD contrast.
- Press the key while in Standby mode.
Your phone displays the main menu.
- Press the key to select “5.Setting” and
then press the key.
- Press the key to select “1.User Setting”
and then press the key.
- Press the key to select “3.Display” and
then press the key.
- Press the key to select “1.LCD
Contrast” and then press the key.
- LCD Contrast can be set in 5 levels (1 to 5).
- Press the key to select an appropriate
contrast and then press the “OK” soft key.
L H
OK Back
You can reach the LCD Contrast
TIP
menu by pressing the following
keys.
To go to the LCD Contrast menu:
LCD Contrast
44

• BACK LIGHT
• FONT SIZE
Factory Default: 5sec
You can adjust a timer until the LCD back light
is off.
- Press the key while in Standby mode.
Your phone displays the main menu.
- Press the key to select “5.Setting” and
then press the key.
- Press the key to select “1.User Setting”
and then press the key.
- Press the key to select “3.Display” and
then press the key.
- Press the key to select “2.Back Light”
and then press the key.
- Back Light can be set 5 to 30 seconds.
- Edit an appropriate timer value and then
press the “OK” soft key.
10
S
12 OK Clear
You can reach the Back Light
TIP
menu by pressing the following
keys.
To go to the Back Light menu:
Back Light
Factory Default: Standard
You can select a font size.
- Press the key while in Standby mode.
Your phone displays the main menu.
- Press the key to select “5.Setting” and
then press the key.
- Press the key to select “1.User Setting”
and then press the key.
- Press the key to select “3.Display” and
then press the key.
- Press the key to select “3.Font Size”
and then press the key.
- Press the key to select “1.Standard” or
“2.Large” and then press the “OK” soft key.
1.Standard
2.Large
OK Back
Font size does not change in edit
TIP
screen even if you set font size to
large.
You can reach the Font Size menu
TIP
by pressing the following keys.
To go to the Font Size menu:
Font Size
45

• LANGUAGE
• MY NAME
Factory Default: English
The information on the LCD can be displayed in
English or Japanese. You can select from the 7
languages by doing the following.
- Press the key while in Standby mode.
Your phone displays the main menu.
- Press the key to select “5.Setting” and
then press the key.
- Press the key to select “1.User Setting”
and then press the key.
- Press the key to select “3.Display” and
then press the key.
- Press the key to select “4.Language”
and then press the key.
- Press the key to select language you
want and then press the “OK” soft key.
1.Japanese
2.English
3.German
4.Italian
OK Back
You can reach the Language menu
TIP
by pressing the following keys.
To go to the Language menu:
Language
Factory Default: MH240
Your phone can display specific strings (up to 10
characters) such as your name in Standby mode.
- Press the key while in Standby mode.
Your phone displays the main menu.
- Press the key to select “5.Setting” and
then press the key.
- Press the key to select “1.User Setting”
and then press the key.
- Press the key to select “3.Display” and
then press the key.
- Press the key to select “5.My Name”
and then press the key.
- Edit strings you want to display in Standby
mode. Then press the “OK” soft key.
Mike
ab OK Clear
You can reach the My Name menu
TIP
by pressing the following keys.
To go to the My Name menu:
My Name
46

• DISPLAY PATTERN
• CHANGE PASSWORD
Factory Default: Normal
Your phone can display reversed LCD pattern.
- Press the key while in Standby mode.
Your phone displays the main menu.
- Press the key to select “5.Setting” and
then press the key.
- Press the key to select “1.User Setting”
and then press the key.
- Press the key to select “3.Display” and
then press the key.
- Press the key to select “6.Display
Pattern” and then press the key.
- Press the key to select “1.Normal” or
“2.Reversing” and then press the “OK” soft
key.
1.Normal
2.Reversing
OK Back
You can reach the Display Pattern
TIP
menu by pressing the following
keys.
To go to the Display Pattern menu:
Disp Pattern
Factory Default: -
You can change the password that is used for
Password Lock.
Please contact your network
TIP
administrator to receive your
password.
Use 4 numeric characters for a
TIP
password.
- Press the key while in Standby mode.
Your phone displays the main menu.
- Press the key to select “5.Setting” and
then press the key.
- Press the key to select “1.User Setting”
and then press the key.
- Press the key to select “4.Change
Password” and then press the key.
- Enter your current password and then press
the “OK” soft key.
Old Password:
****
12 OK Clear
- Enter the new password you want and then
press the “OK” soft key.
New Password:
1234
12 OK Clear
You can reach the Change
TIP
Password menu by pressing the
following keys.
To go to the Change Password
menu:
Change Pass.
Change Pass.
47

• KEY TOUCH TONE
• SPEAKER MONITOR
Factory Default: Disable
You can unmute or mute a tone that is provided
when you press any key on your phone.
- Press the key while in Standby mode.
Your phone displays the main menu.
- Press the key to select “5.Setting” and
then press the key.
- Press the key to select “1.User Setting”
and then press the key.
- Press the key to select “6.Keypad
Mode” and then press the key.
- Press the key to select “1.Key Touch
Tone” and then press the key.
- Press the key to select “1.Disable” or
“2.Enable” and then press the “OK” soft
key.
1.Disable
2.Enable
OK Back
You can reach the Key Touch Tone
TIP
menu by pressing the following
keys.
To go to the Key Touch Tone
menu:
KeyTouchTone
Factory Default: Disable
You can use the Speaker monitor while talking
as required. When entering Speaker monitor
mode, you can hear the called party’s voice from
the speaker of your phone.
- Press the key while in Standby mode.
Your phone displays the main menu.
- Press the key to select “5.Setting” and
then press the key.
- Press the key to select “1.User Setting”
and then press the key.
- Press the key to select “6.Keypad
Mode” and then press the key.
- Press the key to select “5.Speaker
monitor” and then press the key.
- Press the key to select “1.Disable” or
“2.Enable” and then press the “OK” soft
key.
1.Disable
2.Enable
OK Back
You can reach the Speaker
TIP
monitor menu by pressing the
following keys.
To go to the Speaker monitor
menu:
Spk monitor
48

• DATE
• TIME
Factory Default: 2008/ 1/ 1 (YYYY/MM/DD)
You can adjust the date information of your
phone as required.
- Press the key while in Standby mode.
Your phone displays the main menu.
- Press the key to select “5.Setting” and
then press the key.
- Press the key to select “1.User Setting”
and then press the key.
- Press the key to select “7.Date & Time”
and then press the key.
- Press the key to select “1.Date” and
then press the key.
- Press the key to adjust Year, Month and
Day and then press the “OK” soft key.
2008/ 9/ 2
OK Back
You can set date from 2000/1/1 to
TIP
2030/12/31.
You can reach the Date menu by
TIP
pressing the following keys.
To go to the Date menu:
Date
Factory Default: 0: 0 (HH:MM)
You can adjust time information of your phone
as required.
- Press the key while in Standby mode.
Your phone displays the main menu.
- Press the key to select “5.Setting” and
then press the key.
- Press the key to select “1.User Setting”
and then press the key.
- Press the key to select “7.Date & Time”
and then press the key.
- Press the key to select “2.Time” and
then press the key.
- Press the key to adjust Hour and
Minute and then press the “OK” soft key.
16: 0
OK Back
You can reach the Time menu by
TIP
pressing the following keys.
To go to the Time menu:
Time
49

• TIME FORMAT
• DAYLIGHT SAVING
Factory Default: 12hour
You can select a time format (12hours, 12hours
(AM0:00) and 24hours) as required.
- Press the key while in Standby mode.
Your phone displays the main menu.
- Press the key to select “5.Setting” and
then press the key.
- Press the key to select “1.User Setting”
and then press the key.
- Press the key to select “7.Date & Time”
and then press the key.
- Press the key to select “3.Time Format”
and then press the key.
- Press the key to select “1.12hours”,
“2.12hours(AM0:00)” or “3.24hours” and
then press the “OK” soft key.
1.12hours
2.12hours(AM0:00)
3.24hours
OK Back
You can reach the Time Format
TIP
menu by pressing the following
keys.
To go to the Time Format menu:
Time Format
Factory Default: Disable
You can use daylight saving as required.
- Press the key while in Standby mode.
Your phone displays the main menu.
- Press the key to select “5.Setting” and
then press the key.
- Press the key to select “1.User Setting”
and then press the key.
- Press the key to select “7.Date & Time”
and then press the key.
- Press the key to select “4.Daylight
Saving” and then press the key.
- Press the key to select “1.Disable” or
“2.Enable” and then press the “OK” soft
key.
1.Disable
2.Enable
OK Back
You should not set daylight saving
TIP
to enable when your phone
displays I-SIP icon.
You can reach the Daylight Saving
TIP
menu by pressing the following
keys.
To go to the Daylight Saving
menu:
Daylight Sav
50

• NTP SETTING
• NTP SERVER
Factory Default: Disable
You can use NTP server in your network as
required.
- Press the key while in Standby mode.
Your phone displays the main menu.
- Press the key to select “5.Setting” and
then press the key.
- Press the key to select “1.User Setting”
and then press the key.
- Press the key to select “7.Date & Time”
and then press the key.
- Press the key to select “5.NTP Setting”
and then press the key.
- Press the key to select “1.Disable” or
“2.Enable” and then press the “OK” soft
key.
1.Disable
2.Enable
OK Back
Please confirm your network
TIP
administrator whether you can use
NTP Server.
You can reach the NTP Setting
TIP
menu by pressing the following
keys.
To go to the NTP Setting menu:
NTP Setting
Factory Default: -
You can set a NTP server in your network as
required.
- Press the key while in Standby mode.
Your phone displays the main menu.
- Press the key to select “5.Setting” and
then press the key.
- Press the key to select “1.User Setting”
and then press the key.
- Press the key to select “7.Date & Time”
and then press the key.
- Press the key to select “6.NTP Server”
and then press the key.
- Edit an appropriate NTP Server Address (IP
or FQDN) and then press the “OK” soft
key.
time.xxxx.com
ab OK Clear
Please contact your network
TIP
administrator to retrieve your NTP
Server Address.
You can reach the NTP Server
TIP
menu by pressing the following
keys.
To go to the NTP Server menu:
NTP Server
51

• TIME ZONE
Factory Default: Depending on country
You can set time offset in the range -12:00 to
+14:00, which specifies time offset between
GMT and your area.
- Press the key while in Standby mode.
Your phone displays the main menu.
- Press the key to select “5.Setting” and
then press the key.
- Press the key to select “1.User Setting”
and then press the key.
- Press the key to select “7.Date & Time”
and then press the key.
- Press the key to select “7.Time Zone”
and then press the key.
- Press the key to adjust an appropriate
time offset and then press the “OK” soft
key.
GMT-08:00
OK Back
You can reach the Time Zone
TIP
menu by pressing the following
keys.
To go to the Time Zone menu:
Time Zone
52

9.INFORMATION
You can confirm the information of your phone
such as Phone Number, IP address and MAC
address.
• TO DISPLAY STATUS
• TO DISPLAY WIRELESS
STATUS
You can confirm the Wireless Status of your
phone by:
You can confirm the Status of your phone by:
● SIP Status
● Wireless Status
- Press the key while in Standby mode.
Your phone displays the main menu.
- Press the key to select “0.Information”
and then press the key.
- Press key to select “1.Status” and then
press the key.
SIP Status
Wireless Status
Connected
Back
You can view the Status by
TIP
pressing the following keys.
To View the Status:
Status
Registered
● BSSID
● ESSID
● Channel
● MAC address
● Security
● Rate
- Press the key while in Standby mode.
Your phone displays the main menu.
- Press the key to select “0.Information”
and then press the key.
- Press the key to select “2.Wireless” and
then press the key.
1.BSSID
00:0D:02:11:22:33
2.ESSID
default
Back
You can view the Wireless Status
TIP
by pressing the following keys.
To View the Wireless Status:
Wireless
53

• TO DISPLAY IP ADDRESS
• TO DISPLAY SIP STATUS
You can confirm the IP Address of your phone
by:
● IP Address
● Net Mask
● Gateway
● DNS Primary
● DNS Secondary
- Press the key while in Standby mode.
Your phone displays the main menu.
- Press the key to select “0.Information”
and then press the key.
- Press the key to select “3.IP Address”
and then press the key.
1.IP Address
172.16.1.240
2.Net Mask
255.255.0.0
Back
You can view the IP Address by
TIP
pressing the following keys.
To View the IP Address:
IP Address
You can confirm the SIP Status of your phone
by:
● SIP Status
● Phone No.
● SIP Proxy
● SIP Port
● Registrar
● Registrar Port
- Press the key while in Standby mode.
Your phone displays the main menu.
- Press the key to select “0.Information”
and then press the key.
- Press the key to select “4.SIP” and then
press the key.
1.SIP Status
Registered
2.Phone No.
223
Back
You can view the SIP Status by
TIP
pressing the following keys.
To View the SIP Status:
SIP
54

10.PASSWORD LOCK
You can lock your phone against unauthorized
usage. This is also useful for guarding your
phone against inadvertent button presses.
• TO USE MANUAL LOCK
• TO ENBLE MANUAL LOCK
Factory Default: Disable
- Press the key while in Standby mode.
Your phone displays the main menu.
- Press and hold the key for 2 seconds
or more to lock your phone in Standby
mode.
- Your phone is locked and displays a lock
icon ( ).
You can make an Emergency Call
TIP
even if your phone is locked.
• TO UNLOCK YOUR PHONE
- Press any key except key and digit
key and then input your password (4 digits).
****
12 OK Clear
- Your phone is unlocked and a lock icon
( ) disappears.
Please contact your network
TIP
administrator to receive your
password.
Input Passwd
- Press the key to select “5.Setting” and
then press the key.
- Press the key to select “1.User Setting”
and then press the key.
- Press the key to select “5.Password
Lock” and then press the key.
- Press the key to select “1.Manual lock”
and then press the key.
- Press the key to select “2.Enable” and
then press the “OK” soft key.
1.Disable
2.Enable
OK Back
You can reach the Manual lock
TIP
menu by pressing the following
keys.
To go to the Manual lock menu:
Manual
55

• TO USE OUTSIDE LOCK
• TO USE POWER OFF LOCK
Factory Default: 0sec (Disable)
When your phone is in out of service area, your
phone is locked automatically expire timer you
set.
- Press the key while in Standby mode.
Your phone displays the main menu.
- Press the key to select “5.Setting” and
then press the key.
- Press the key to select “1.User Setting”
and then press the key.
- Press the key to select “5.Password
Lock” and then press the key.
- Press the key to select “2.Auto lock”
and then press the key.
- Press the key to select “1.Outside Lock”
and then press the key.
- Edit an appropriate timer value (0:disable to
3600sec) and then press the “OK” soft key.
10
S
12 OK Clear
You can reach the Outside Lock
TIP
menu by pressing the following
keys.
To go to the Outside Lock menu:
Outside Lock
Factory Default: Disable
When your phone is turned on after power off,
your phone is locked automatically.
- Press the key while in Standby mode.
Your phone displays the main menu.
- Press the key to select “5.Setting” and
then press the key.
- Press the key to select “1.User Setting”
and then press the key.
- Press the key to select “5.Password
Lock” and then press the key.
- Press the key to select “2.Auto lock”
and then press the key.
- Press the key to select “2.Power Off
Lock” and then press the key.
- Press the key to select “2.Enable” and
then press the “OK” soft key.
1.Disable
2.Enable
OK Back
You can reach the Power Off Lock
TIP
menu by pressing the following
keys.
To go to the Power Off Lock menu:
PowerOffLock
56

11.PREFIX DIAL
You can add Prefix Dial to phone number when
you make a call.
• TO USE PREFIX DIAL
You can use Prefix Dial as follows.
To Make a Call by preset dialing:
- Enter the phone number and then press the
“Prefix” soft key.
- Press the key to select Prefix and then
9/ 2 Tue 09:42AM
356551234
Prefix Add Clear
press the “Call” soft key.
Prefix
1
8
9
01181
Call Back
You can not make a call when total
TIP
digits of preset dial and prefix are
more than 32.
To Make a Call from Call History:
- Press the key to view a call history you
- Press the key and then press the
- Press the key to select Prefix and then
want and then press the key to select a
phone number you want.
“Prefix” soft key.
9/ 2 Tue 09:44AM
4581212
Prefix Add Clear
press the “Call” soft key.
Prefix
1
8
9
01181
Call Back
57

To Make a Call from Directory:
- Press the key to view Directory and
then press the key to select a called
party you want.
- Press the key and then press the
_ key to select a phone number you want.
1.4581234444
2.1234555
Prefix Call Back
- Press the “Prefix” soft key.
- Press the key to select Prefix and then
press the “Call” soft key.
1
8
9
01181
Call Back
Number
Prefix
• TO REGISTER PREFIX NO.
Factory Default: -
- Press the key while in Standby mode.
Your phone displays the main menu.
- Press the key to select “5.Setting” and
then press the key.
- Press the key to select “1.User Setting”
and then press the key.
- Press the key to select “2.Talk” and
then press the key.
- Press the key to select “6.Reg. Prefix
No.” and then press the key.
- Press the key to select a registered area
and then press the key.
1.<Prefix1>
2.<Prefix2>
3.<Prefix3>
4.<Prefix4>
- Edit prefix number you want and then press
the “OK” soft key.
1
12 OK Clear
You can reach Register Prefix No.
TIP
menu by pressing the following
keys.
To go to the Register Prefix No.
menu:
Prefix
Prefix
58

12.FAVORITES
You can use favorites menu that you can
customize.
• TO USE FAVORITES
- Press the key while in Standby mode.
Your phone displays the main menu.
- Press the key to select “#.Favorites”
and then press the key.
- Press the key to select a menu you want
to use and then press the “OK” soft key.
1.Information
2.Group Setting
3.Own Number
4.RTP Alarm
Delete OK Back
You can reach the Favorites menu
TIP
by pressing the following keys.
To go to the Favorites menu:
Favorites
• TO ENTRY A MENU TO
FAVORITES
- Press the key while in Standby mode.
Your phone displays the main menu.
- Press the key to select “#.Favorites”
and then press the key.
- Press the key to select an entry area and
then press the “Save” soft key.
1.Language
2.<No Record>
3.<No Record>
4.<No Record>
Save Back
- Press the key and the key to select
a menu you want to entry and then press the
“Save” soft key.
Favorites
• TO DELETE A MENU FROM
FAVORITES
- Press the key while in Standby mode.
Your phone displays the main menu.
- Press the key to select “#.Favorites”
and then press the key.
- Press the key to select an entry area and
then press the “Delete” soft key.
1.Information
2.Group Setting
3.Own Number
4.RTP Alarm
Delete OK Back
- Press the key to select the “OK” soft
key.
Favorites
59

This page is for your notes.
60

13.MENU LIST
• MENU LIST
The following shows the menu list of MH240 with the default values and remarks as required.
Category Menu Default Remarks
MENU
0.Information
1.Call History
2.Directory
3.Tools
4.Voice Mail
5.Setting
#.Favorites
This is main menu of the phone.
61

Category Menu Default Remarks
0.Information
1.Status
2.Wireless
3.IP Address
4.SIP
1.Call History
1.Missed No Data
2.Outgoing No Data
3.Incoming No Data
4.All Delete 1.Outgoing
2.Directory
1.Search
1.Personal
1.Group 01.Default to
2.Name (alphanumeric characters)
3.Tel Number (32 digits)
4.Others
1.Memory ID 001 to 500
2.Alphabet 2.ABC
3.Company
SIP Status
Not Registered /
Registering / Registered
Wireless Status
Not Connected /
Searching / Authenticating
/ Getting IP / Connecting /
Connected
BSSID
xx:xx:xx:xx:xx:xx
ESSID
Channel
1 to 11
MACAddress
xx:xx:xx:xx:xx:xx
Security
OPEN / WEP / WPA-PSK
/ WPA2-PSK / WPA
/WPA2
Rate
1 to 54 Mbps
IP Address
xxx.xxx.xxx.xxx
Net Mask
xxx.xxx.xxx.xxx
Gateway
xxx.xxx.xxx.xxx
DNS Primary
xxx.xxx.xxx.xxx
DNS Secondary
xxx.xxx.xxx.xxx
SIP Status
Not Registered /
Registering/ Registered
Phone No.
SIP Proxy
SIP Port
xxxxx
Registrar
Registrar Port
xxxxx
(when no record)
(when no record)
(when no record)
2.Incoming
3.All
20.Group20
3.DEF
4.GHI
5.JKL
6.MNO
7.PQRS
8.TUV
9.WXYZ
*.Other
#.All
(alphanumeric characters)
62
Up to 50 entries
Up to 50 entries
Up to 50 entries
32bytes
32bytes
32bytes

Category Menu Default Remarks
2.Edit
Name (alphanumeric characters) blank 32bytes
Group 01.Default to
Tel #1 (32 digits) blank 32bytes
Tel #2 (32 digits) blank 32bytes
Tel #3 (32 digits) blank 32bytes
Company Name (alphanumeric characters) blank 32bytes
Ring Tone 01.Disable
Illumination 1.Disable
Vibrator 1.Disable
3.Group Setting
01.Default
02.Colleagues
03.VIPs
04.Family
05.Friends
06.Group6
07.Group7
08.Group8
09.Group9
10.Group10
11.Group11
12.Group12
13.Group13
14.Group14
15.Group15
16.Group16
17.Group17
18.Group18
19.Group19
20.Group20
4.Own Number Own Number
5.All Delete (Delete all Directory)
1.Name (alphanumeric characters) blank 32bytes
2.Ring Tone 01.Disable
3.Illumination 1.Disable
4.Vibrator
20.Group20
02.Default
03.Tone Type1
04.Tone Type2
05.Tone Type3
06.Tone Type4
07.Tone Type5
08.Tone Type6
09.Tone Type7
10.Tone Type8
11.Tone Type9
12.Tone Type10
13.Tone Type11
14.Tone Type12
15.Tone Type13
16.Download1
17.Download2
18.Download3
2.Default
3.Red
4.Green
5.Orange
2.Default
3.Pattern1
4.Pattern2
02.Default
03.Tone Type1
04.Tone Type2
05.Tone Type3
06.Tone Type4
07.Tone Type5
08.Tone Type6
09.Tone Type7
10.Tone Type8
11.Tone Type9
12.Tone Type10
13.Tone Type11
14.Tone Type12
15.Tone Type13
16.Download1
17.Download2
18.Download3
2.Default
3.Red
4.Green
5.Orange
1.Disable
2.Default
3.Pattern1
4.Pattern2
01.Default
02.Default
2.Default
2.Default
02.Default
2.Default
2.Default
63

3.Tools
1.Sitte Survey
1.AP Scan (Chanel 1 to 11) 1
2.Ping
4.Voice Mail
5.Setting
1.User Setting
1.Incoming Call
Category Menu Default Remarks
(xxx.xxx.xxx.xxx) blank
1.Ring Volume Large
2.Ring Tone
1.External Ring
2.Internal Ring
3.IM
4.Non-notification
3.Incoming Popup 1.Disable
4.Illumination
1.External Ring
2.Internal Ring
3.IM
4.Non-notification
5.Private Call 1.Allow Incoming
6.Vibrator
1.External Ring
2.Internal Ring
3.IM
4.Non-notification
7.Incoming Mode 1.Both
8.Headset
1.Ring Tone Sending 1.Headset
2.Auto Response
9.Offhook Ring
Middle
Small
Gently
Off
01.Tone Type1
02.Tone Type2
03.Tone Type3
04.Tone Type4
05.Tone Type5
06.Tone Type6
07.Tone Type7
08.Tone Type8
09.Tone Type9
10.Tone Type10
11.Tone Type11
12.Tone Type12
13.Tone Type13
14.Download1
15.Download2
16.Download3
2.Enable
1.Disable
2.Red
3.Green
4.Orange
2.Block Incoming
1.Disable
2.Pattern1
3.Pattern2
2.Ring-->Vib
3.Vib-->Ring
2.Speaker
None
1 time
2 times
3 times
4 times
5 times
1.Disable
2.Enable
Middle
01.Tone Type1
1.Disable
3.Green
1.Allow Incoming
2.Pattern1
1.Both
1.Headset
None
2.Enable
64

Category Menu Default Remarks
2.Talk
1.RTP Alarm 1.Disable
2.Hold Music 01.Tone Type1
3.Call Volume Large
4.Handover Tone 1.Disable
5.Talk Start Vib 1.Disable
6.Reg. Prefix No.
3.Display
1.LCD Contrast (Level 1 to 5) 3
2.Enable
02.Tone Type2
03.Tone Type3
04.Tone Type4
05.Tone Type5
06.Tone Type6
07.Tone Type7
08.Tone Type8
09.Tone Type9
10.Tone Type10
11.Tone Type11
12.Tone Type12
13.Tone Type13
14.Download1
15.Download2
16.Download3
Middle
Small
2.Enable
2.Enable
1.<Prefix1>
2.<Prefix2>
3.<Prefix3>
4.<Prefix4>
1.Disable
12.Tone Type12
Middle
1.Disable
1.Disable
blank 31bytes
2.Back Light (5 to 30 sec) 5 sec
3.Font Size 1.Standard
4.Language 1.Japanese
5.My Name (alphanumeric characters) MH240 10bytes
6.Display Pattern
4.Change Password
Old Password (4 digits) blank 4bytes
New Password (4 digits) blank 4bytes
5.Password Lock
1.Manual Lock 1.Disable
2.Auto Lock
1.Outside Lock (0 to 3600 sec) 0 (Disable)
2.Power Off Lock
2.Large
2.English
3.German
4.Italian
5.Dutch
6.Spanish
7.Norwegian
1.Normal
2.Reversing
2.Enable
1.Disable
2.Enable
1.Standard
2.English
1.Normal
1.Disable
1.Disable
65

Category Menu Default Remarks
6.Keypad Mode
1.Key Touch Tone 1.Disable
2.Function Key 1.System
3.Dial Key 1.Alphabet Search
4.Assign Dial
5.Speaker Monitor
7.Date & Time
1.Date (YYYY/MM/DD) 2008/ 1/ 1
F2.
F3.
F4.
F5.
F6.
F7.
F8.
D1.
D2.
D3.
D4.
D5.
D6.
D7.
D8.
D9.
D0.
1.Name (alphanumeric characters) blank 16bytes F1.
2.TEL
2.Enable
2.Speed Dial
2.Preset Dial
(32 digits) blank 32bytes
1.Disable
2.Enable
1.Disable
2.Speed Dial
1.Alphabet Search
1.Disable
2.Time (HH:MM) 0: 0
3.Time Format 1.12hour
4.Daylight Saving 1.Disable
5.NTP Setting 1.Disable
6.NTP Server (xxx.xxx.xxx.xxx or FQDN) blank 40bytes
7.Time Zone
2.12hour(AM0:00)
3.24hour
2.Enable
2.Enable
GMT-12:00 / -11:00 /
-10:00 / -09:30 / -09:00 /
-08:00 / -07:00 / -06:00 /
-05:00 / -04:00 / -03:30 /
-03:00 / -02:00 / -01:00 /
+00:00 / +01:00 / +02:00 /
+03:00 / +03:30 / +04:00 /
+04:30 / +05:00 / +05:30 /
+05:45 / +06:00 / +06:30 /
+07:00 / +08:00 / +08:45 /
+09:00 / +09:30 / +10:00 /
+10:30 / +11:00 / +11:30 /
+12:00 / +12:45 / +13:00 /
+14:00
1.12hour
1.Disable
1.Disable
Depending on
country
66

2.Download
1.Download Files 1.Directory
2.Download Address (xxx.xxx.xxx.xxx or FQDN) 172.16.254.1 40bytes
3.FTP Settings
3.Maintenance
1.Config (Need Config Password)
2.Check
3.PC Port 1.Close
4.USB Connect
#.Favorites
Category Menu Default Remarks
2.Call History
3.User Setting
4.Config
5.Certificate
6.Download1
7.Download2
8.Download3
1.User ID (characters) blank 40bytes
2.Password (characters) blank 40bytes
3.Folder (characters) mh240 40bytes
Password (4 digits) blank 4bytes
1.Network Setting 1.Profile
2.SIP Setting
1.NEC-SETUP
2.<SIP Prof2>
3.<SIP Prof3>
4.<SIP Prof4>
5.<SIP Prof5>
6.<SIP Prof6>
7.<SIP Prof7>
8.<SIP Prof8>
9.<SIP Prof9>
3.Config Password
Old Password (4 digits) blank 4bytes
New Password
1.Monitoring
1.QoS
1.QoS Monitor LostPacket:
2.Refresh Timer
2.Ping
2.Information
1.Status
2.Wireless
3.IP Address
4.SIP
2.Hand-off List
3.1st Connect
1.Profile Name
2.SIP Proxy
3.SIP Port
4.Registrar
5.Registrar Port
6.User ID
7.User Password
8.Phone No.
9.I-SIP Port
0.Advanced
(4 digits) blank 4bytes
Codec:
Payload:
(0 to 30 sec) 5 sec
(xxx.xxx.xxx.xxx) blank
Same as “0.Information”
2.Open
1.Language
2.<No Record>
3.<No Record>
4.<No Record>
5.<No Record>
6.<No Record>
7.<No Record>
8.<No Record>
9.<No Record>
0.<No Record>
1.Close
67

• CHARACTER CODE LIST
The following shows character code list when your phone is in edit mode.
Character Code List
1st 2nd 3rd 4th 5th 6th 7th 8th 9th 10th 11th 12th 13th
? ! * # ”
A B C a b c
D E F d e f
G H I g h i
J K L j k l
M N O m n o
P Q R S p q r s
T U V t u v
W X Y Z w x y z
space
. @ / ( ) , - _ : ’ ~ & \
68

14.TROUBLE SHOOTING
• MESSAGE MEANINGS AND SUGGESTIONS
The following shows the meanings and suggestions of messages that may be displayed on your phone.
Message Meaning & Suggestion
[Password]
UnAuthorized!
[Low Battery]
Please charge it
[Directory]
No Input Name
[Directory]
Directory is Full
[Handy Key Lock]
Handy Key Lock Enabled
[Handy Key Lock]
Handy Key Lock Disabled
[Password Lock]
PASSWORD Lock Enabled
[Setting]
X to Y is input
The entered password is incorrect. Enter the correct
password.
Battery charge level is low. Charge the battery.
You didn’t edit the Name of Directory. Edit the Name.
The number of entries reached the maximum. To add new
entries, delete some entries in advance.
Displayed when your phone is locked.
Displayed when your phone is unlocked.
Displayed when your phone is locked with a password.
Entered value is out of range. Enter the value of X to Y.
69

• TIPS AND SUGGESTIONS
The following shows suggestions on how to resolve MH240 operation problems. Confirm the
following before making a call:
● Is the power ON?
● Is the battery charged?
● Is the Antenna icon ( ) displayed?
Symptom Suggestion
- Press the key and hold more than 2 seconds.
Can not power on the phone…
Can not operate keys on the
phone…
Communication is lost, audio
break-up occurs…
Can not see Antenna Icon ( )…
Can not sustain battery power…
- Insert the battery to your phone properly.
- Charge the battery.
- Unlock your phone if lock icon ( ) is displayed.
- Unlock your phone if “Handy Key Lock” is displayed.
- Check the receiving signal strength.
- Check the battery when is indicated.
- Distance your phone more than 50cm from Access
Point.
- When you are in area where sufficient signal can not
be obtained, move to other area.
- SIP server registration is incomplete. If this occurs,
please contact your network administrator.
- Insert the battery to your phone properly.
- Place the battery on the proper position of your
cradle.
- Replace the battery.
Can not make or receive a call…
The phone does not ring…
- Make sure that phone number of your phone. To
change the phone number, please contact your
network administrator.
- When your phone is placed in courtesy mode,
cancel it. Courtesy icon ( ) appears when your
phone is in this mode.
- Check ring volume and adjust except “Off”.
70

15.SPECIFICATIONS
• TECHNICAL SPECIFICATIONS
The following shows the technical specifications of MH240.
Item Specifications
Wireless Interface IEEE802.11b/g
Codec G.711u-Law, G.711A-Law, G.729A, G.729B, G.729AB
Payload Size: 20 to 80 ms
Control Protocol NEC Enhanced SIP, SIP (RFC3261) *Note,
Authentication IEEE802.1X (EAP-TLS, PEAP)
Encryption WEP (64 bit / 128 bit), TKIP, AES
LCD Monochrome LCD, 120 × 82 pixels
Main Feature Call History, Directory, Speed Dial, Courtesy Mode
Ringer Ring Tone : selectable from 16 kinds
Ring Volume : selectable from 5 levels
Battery Lithium Ion Battery, 3.7 V - 850 mAh
Battery Life Talk Time : up to 3 hours
Standby Time : up to 80 hours
AC Adapter INPUT : AC 100 V to 240 V, 50/60 Hz, 0.25 A
OUTPUT : DC 5 V, 1 A
DC Plug : miniUSB (typeB) plug
Operation Temperature
Operating Humidity 10 to 90 %
Dimension 135.0 × 48.0 × 17.8 mm
Weight 94.36 g
Certification and
Compliance
*Note In case of using a SIP server except SIP servers recommended by NEC, a
connection test is required.
0 to 40 oC (Under charging : 0 to 35 oC)
<USA / Industry Canada>
CSA60950-1
FCC Part 15 Class B
RSS-210
HAC
<Europe>
Directive 1999/5/EC
EN 60950-1
EN 300 328
EN 301 489-17
EN 50360
<Australia / New Zealand>
AS/NZS 60950.1
AS/NZS 4268
AS/ACIF S004
AS/NZS CISPR 22 2006
PTC220
Radiocommunications (Electromagnetic Radiation-Human Exposure)
Standard 2003
NZS 2772.1:1999
71

• LED SPECIFICATIONS
The following shows the LED specifications of MH240 and Cradle.
Condition LED Status
MH240
Power ON Status *Note1
1.Power OFF Blink all color
2.Receiving a call *Note2 Blink Green (100ms ON – 100ms OFF)
3.Holding a call *Note2 Blink Orange (500ms ON – 500ms OFF)
4.You have a voice mail *Note2 Blink Orange (50ms ON – 2000ms OFF)
5.Charge Status
Not charging Light Off
Charging Light Red
Charging is completed Light Green
Any abnormality is found in the battery Blink Red (500ms ON – 500ms OFF)
Power OFF Status *Note1
1.Power ON Blink all color
2.Charge Status
Not charging Light Off
Charging Light Red
Charging an empty battery Blink Orange (50ms ON – 950ms OFF)
Charging is completed Light Green
Any abnormality is found in the battery Blink Red (500ms ON – 500ms OFF)
Cradle
1.Charge Status
Charging Light Red
Charging an empty battery Light Orange
Charging is completed Light Green
Any abnormality is found in the battery Light Off
*Note1 LED status depends on the order in above table when MH240 is in more than 2
conditions.
*Note2 LED status depend on your system when MH240 displays I-SIP icon.
72

16.LICENSE
This product uses the software of GPL/LGPL, and we will inform that the customer has the right of
obtaining the source code of that software, the modification, and the re-distribution.
Please contact the nearest NEC service office about the method of obtaining the source code.
73

GNU GENERAL PUBLIC LICENSE
Version 2, June 1991
Copyright (C) 1989, 1991 Free Software Foundation, Inc.
59 Temple Place, Suite 330, Boston, MA 02111-1307 USA
Everyone is permitted to copy and distribute verbatim copies
of this license document, but changing it is not allowed.
Preamble
The licenses for most software are designed to take away your
freedom to share and change it. By contrast, the GNU General Public
License is intended to guarantee your freedom to share and change free
software--to make sure the software is free for all its users. This
General Public License applies to most of the Free Software
Foundation's software and to any other program whose authors commit to
using it. (Some other Free Software Foundation software is covered by
the GNU Library General Public License instead.) You can apply it to
your programs, too.
When we speak of free software, we are referring to freedom, not
price. Our General Public Licenses are designed to make sure that you
have the freedom to distribute copies of free software (and charge for
this service if you wish), that you receive source code or can get it
if you want it, that you can change the software or use pieces of it
in new free programs; and that you know you can do these things.
To protect your rights, we need to make restrictions that forbid
anyone to deny you these rights or to ask you to surrender the rights.
These restrictions translate to certain responsibilities for you if you
distribute copies of the software, or if you modify it.
For example, if you distribute copies of such a program, whether
gratis or for a fee, you must give the recipients all the rights that
you have. You must make sure that they, too, receive or can get the
source code. And you must show them these terms so they know their
rights.
We protect your rights with two steps: (1) copyright the software, and
(2) offer you this license which gives you legal permission to copy,
distribute and/or modify the software.
Also, for each author's protection and ours, we want to make certain
that everyone understands that there is no warranty for this free
software. If the software is modified by someone else and passed on, we
want its recipients to know that what they have is not the original, so
that any problems introduced by others will not reflect on the original
authors' reputations.
Finally, any free program is threatened constantly by software
patents. We wish to avoid the danger that redistributors of a fr ee
program will individually obtain patent licenses, in effect making the
program proprietary. To prevent this, we have made it clear that any
patent must be licensed for everyone's free use or not licensed at all.
The precise terms and conditions for copying, distribution and
modification follow.
GNU GENERAL PUBLIC LICENSE
TERMS AND CONDITIONS FOR COPYING, DISTRIBUTION AND MODIFICATION
0. This License applies to any program or other work which contains
a notice placed by the copyright holder saying it may be distributed
under the terms of this General Public License. The "Program", below,
refers to any such program or work, and a "work based on the Program"
means either the Program or any derivative work under copyright law:
that is to say, a work containing the Program or a portion of it,
either verbatim or with modifications and/or translated into another
language. (Hereinafter, translation is included without limitation in
the term "modification".) Each licensee is addressed as "you".
Activities other than copying, distribution and modification are not
covered by this License; they are outside its scope. The act of
running the Program is not restricted, and the output from the Program
is covered only if its contents constitute a work based on the
Program (independent of having been made by running the Program).
Whether that is true depends on what the Program does.
74

1. You may copy and distribute verbatim copies of the Program's
source code as you receive it, in any medium, provided that you
conspicuously and appropriately publish on each copy an appropriate
copyright notice and disclaimer of warranty; keep intact all the
notices that refer to this License and to the absence of any warranty;
and give any other recipients of the Program a copy of this License
along with the Program.
You may charge a fee for the physical act of transferring a copy, and
you may at your option offer warranty protection in exchange for a fee.
2. You may modify your copy or copies of the Program or any portion
of it, thus forming a work based on the Program, and copy and
distribute such modifications or work under the terms of Section 1
above, provided that you also meet all of these conditions:
a) You must cause the modified files to carry prominent notices
stating that you changed the files and the date of any change.
b) You must cause any work that you distribute or publish, that in
whole or in part contains or is derived from the Program or any
part thereof, to be licensed as a whole at no charge to all third
parties under the terms of this License.
c) If the modified program normally reads commands interactively
when run, you must cause it, when started running for such
interactive use in the most ordinary way, to print or display an
announcement including an appropriate copyright notice and a
notice that there is no warranty (or else, saying that you provide
a warranty) and that users may redistribute the program under
these conditions, and telling the user how to view a copy of this
License. (Exception: if the Program itself is interactive but
does not normally print such an announcement, your work based on
the Program is not required to print an announcement.)
These requirements apply to the modified work as a whole. If
identifiable sections of that work are not derived from the Program,
and can be reasonably considered independent and separate works in
themselves, then this License, and its terms, do not apply to those
sections when you distribute them as separate works. But when you
distribute the same sections as part of a whole which is a work based
on the Program, the distribution of the whole must be on the terms of
this License, whose permissions for other licensees extend to the
entire whole, and thus to each and every part regardless of who wrote it.
Thus, it is not the intent of this section to claim rights or contest
your rights to work written entirely by you; rather, the intent is to
exercise the right to control the distribution of derivative or
collective works based on the Program.
In addition, mere aggregation of another work not based on the Program
with the Program (or with a work based on the Program) on a volume of
a storage or distribution medium does not bring the other work under
the scope of this License.
3. You may copy and distribute the Program (or a work based on it,
under Section 2) in object code or executable form under the terms of
Sections 1 and 2 above provided that you also do one of the following:
a) Accompany it with the complete corresponding machine-readable
source code, which must be distributed under the terms of Sections
1 and 2 above on a medium customarily used for software interchange; or,
b) Accompany it with a written offer, valid for at least three
years, to give any third party, for a charge no m ore than your
cost of physically performing source distribution, a complete
machine-readable copy of the corresponding source code, to be
distributed under the terms of Sections 1 and 2 above on a medium
customarily used for software interchange; or,
c) Accompany it with the information you received as to the offer
to distribute corresponding source code. (This alternative is
allowed only for noncommercial distribution and only if you
received the program in object code or executable form with such
an offer, in accord with Subsection b above.)
The source code for a work means the preferred form of the work for
making modifications to it. For an executable work, complete source
75

code means all the source code for all modules it contains, plus any
associated interface definition files, plus the scripts used to
control compilation and installation of the executable. However, as a
special exception, the source code distributed need not include
anything that is normally distributed (in either source or binary
form) with the major components (compiler, kernel, and so on) of the
operating system on which the executable runs, unless that component
itself accompanies the executable.
If distribution of executable or object code is made by offering
access to copy from a designated place, then offering equivalent
access to copy the source code from the same place counts as
distribution of the source code, even though third parties are not
compelled to copy the source along with the object code.
4. You may not copy, modify, sublicense, or distribute the Program
except as expressly provided under this License. Any attempt
otherwise to copy, m odify, sublicense or distribute the Program is
void, and will automatically terminate your rights under this License.
However, parties who have received copies, or rights, from you under
this License will not have their licenses terminated so long as such
parties remain in full compliance.
5. You are not required to accept this License, since you have not
signed it. However, nothing else grants you permission to modify or
distribute the Program or its derivative works. These actions are
prohibited by law if you do not accept this License. Therefore, by
modifying or distributing the Program (or any work based on the
Program), you indicate your acceptance of this License to do so, and
all its terms and conditions for copying, distributing or modifying
the Program or works based on it.
6. Each time you redistribute the Program (or any work based on the
Program), the recipient automatically receives a license from the
original licensor to copy, distribute or modify the Program subject to
these terms and conditions. You may not impose any further
restrictions on the recipients' exercise of the rights granted herein.
You are not responsible for enforcing compliance by third parties to
this License.
7. If, as a consequence of a court judgment or allegation of patent
infringement or for any other reason (not limited to patent issues),
conditions are imposed on you (whether by court order, agreement or
otherwise) that contradict the conditions of this License, they do not
excuse you from the conditions of this License. If you cannot
distribute so as to satisfy simultaneously your obligations under this
License and any other pertinent obligations, then as a consequence you
may not distribute the Program at all. For example, if a patent
license would not permit royalty-free redistribution of the Program by
all those who receive copies directly or indirectly through you, then
the only way you could satisfy both it and this License would be to
refrain entirely from distribution of the Program.
If any portion of this section is held invalid or unenforceable under
any particular circumstance, the balance of the section is intended to
apply and the section as a whole is intended to apply in other
circumstances.
It is not the purpose of this section to induce you to infringe any
patents or other property right claims or to contest validity of any
such claims; this section has the sole purpose of protecting the
integrity of the free software distribution system, which is
implemented by public license practices. Many people have made
generous contributions to the wide range of software distributed
through that system in reliance on consistent application of that
system; it is up to the author/donor to decide if he or she is willing
to distribute software through any other system and a licensee cannot
impose that choice.
This section is intended to make thoroughly clear what is believed to
be a consequence of the rest of this License.
8. If the distribution and/or use of the Program is restricted in
certain countries either by patents or by copyrighted interfaces, the
original copyright holder who places the Program under this License
may add an explicit geographical distribution limitation excluding
those countries, so that distribution is permitted only in or among
countries not thus excluded. In such case, this License incorporates
76

the limitation as if written in the body of this License.
9. The Free Software Foundation may publish revised and/or new versions
of the General Public License from time to time. Such new versions will
be similar in spirit to the present version, but may differ in detail to
address new problems or concerns.
Each version is given a distinguishing version number. If the Program
specifies a version number of this License which applies to it and "any
later version", you have the option of following the terms and conditions
either of that version or of any later version published by the Free
Software Foundation. If the Program does not specify a version number of
this License, you may choose any version ever published by the Free Software
Foundation.
10. If you wish to incorporate parts of the Program into other free
programs whose distribution conditions are different, write to the author
to ask for permission. For software which is copyrighted by the Free
Software Foundation, write to the Free Software Foundation; we sometimes
make exceptions for this. Our decision will be guided by the two goals
of preserving the free status of all derivatives of our free software and
of promoting the sharing and reuse of software generally.
NO WARRANTY
11. BECAUSE THE PROGRAM IS LICENSED FREE OF CHARGE, THERE IS NO WARRANTY
FOR THE PROGRAM, TO THE EXTENT PERMITTED BY APPLICABLE LAW. EXCEPT WHEN
OTHERWISE STATED IN WRITING THE COPYRIGHT HOLDERS AND/OR OTHER PARTIES
PROVIDE THE PROGRAM "AS IS" WITHOUT WARRANTY OF ANY KIND, EITHER EXPRESSED
OR IMPLIED, INCLUDING, BUT NOT LIMITED TO, THE IMPLIED WARRANTIES OF
MERCHANTABILITY AND FITNESS FOR A PARTICULAR PURPOSE. THE ENTIRE RISK AS
TO THE QUALITY AND PERFORMANCE OF THE PROGRAM IS WITH YOU. SHOULD THE
PROGRAM PROVE DEFECTIVE, YOU ASSUME THE COST OF ALL NECESSARY SERVICING,
REPAIR OR CORRECTION.
12. IN NO EVENT UNLESS REQUIRED BY APPLICABLE LAW OR AGREED TO IN WRITING
WILL ANY COPYRIGHT HOLDER, OR ANY OTHER P ARTY WHO MAY MODIFY AND/OR
REDISTRIBUTE THE PROGRAM AS PERMITTED ABOVE, BE LIABLE TO YOU FOR DAMAGES,
INCLUDING ANY GENERAL, SPECIAL, INCIDENTAL OR CONSEQUENTIAL DAMAGES ARISING
OUT OF THE USE OR INABILITY TO USE THE PROGRAM (INCLUDING BUT NOT LIMITED
TO LOSS OF DATA OR DATA BEING RENDERED INACCURATE OR LOSSES SUSTAINED BY
YOU OR THIRD PARTIES OR A FAILURE OF THE PROGRAM TO OPERATE WITH ANY OTHER
PROGRAMS), EVEN IF SUCH HOLDER OR OTHER PAR TY HAS BEEN ADVISED OF THE
POSSIBILITY OF SUCH DAMAGES.
END OF TERMS AND CONDITIONS
How to Apply These Terms to Your New Programs
If you develop a new program, and you want it to be of the greatest
possible use to the public, the best way to achieve this is to make it
free software which everyone can redistribute and change under these terms.
To do so, attach the following notices to the program. It is safest
to attach them to the start of each source file to most effectively
convey the exclusion of warranty; and each file should have at least
the "copyright" line and a pointer to where the full notice is found.
<one line to give the program's name and a brief idea of what it does.>
Copyright (C) <year> <name of author>
This program is free software; you can redistribute it and/or modify
it under the terms of the GNU General Public License as published by
the Free Software Foundation; either version 2 of the License, or
(at your option) any later version.
This program is distributed in the hope that it will be useful,
but WITHOUT ANY WARRANTY; without even the implied warranty of
MERCHANTABILITY or FITNESS FOR A PARTICULAR PURPOSE. See the
GNU General Public License for more details.
You should have received a copy of the GNU General Public License
along with this program; if not, write to the Free Software
Foundation, Inc., 59 Tem ple Place, Suite 330, Boston, MA 02111-1307 USA
Also add information on how to contact you by electronic and paper mail.
77

If the program is interactive, make it output a short notice like this
when it starts in an interactive mode:
Gnomovision version 69, Copyright (C) year name of author
Gnomovision comes with ABSOLUTELY NO WARRANTY; for details type `show w'.
This is free software, and you are welcome to redistribute it
under certain conditions; type `show c' for details.
The hypothetical commands `show w' and `show c' should show the appropriate
parts of the General Public License. Of course, the commands you use may
be called something other than `show w' and `show c'; they could even be
mouse-clicks or menu items--whatever suits your program.
You should also get your employer (if you work as a programmer) or your
school, if any, to sign a "copyright disclaimer" for the program, if
necessary. Here is a sample; alter the names:
Yoyodyne, Inc., hereby disclaims all copyright interest in the program
`Gnomovision' (which makes passes at compilers) written by James Hacker.
<signature of Ty Coon>, 1 April 1989
Ty Coon, President of Vice
This General Public License does not permit incorporating your program into
proprietary programs. If your program is a subroutine library, you may
consider it more useful to permit linking proprietary applications with the
library. If this is what you want to do, use the GNU Library General
Public License instead of this License.
78

GNU LESSER GENERAL PUBLIC LICENSE
Version 2.1, February 1999
Copyright (C) 1991, 1999 Free Software Foundation, Inc.
59 Temple Place, Suite 330, Boston, MA 02111-1307 USA
Everyone is permitted to copy and distribute verbatim copies
of this license document, but changing it is not allowed.
[This is the first released version of the Lesser GPL. It also counts
as the successor of the GNU Library Public License, version 2, hence
the version number 2.1.]
Preamble
The licenses for most software are designed to take away your
freedom to share and change it. By contrast, the GNU General Public
Licenses are intended to guarantee your freedom to share and change
free software--to make sure the software is free for all its users.
This license, the Lesser General Public License, applies to some
specially designated software packages--typically libraries--of the
Free Software Foundation and other authors who decide to use it. You
can use it too, but we suggest you first think carefully about whether
this license or the ordinary General Public License is the better
strategy to use in any particular case, based on the explanations below.
When we speak of free software, we are referring to freedom of use,
not price. Our General Public Licenses are designed to make sure that
you have the freedom to distribute copies of free software (and charge
for this service if you wish); that you receive source code or can get
it if you want it; that you can change the software and use pieces of
it in new free programs; and that you are informed that you can do
these things.
To protect your rights, we need to make restrictions that forbid
distributors to deny you these rights or to ask you to surrender these
rights. These restrictions translate to certain responsibilities for
you if you distribute copies of the library or if you modify it.
For example, if you distribute copies of the library, whether gratis
or for a fee, you must give the recipients all the rights that we gave
you. You must make sure that they, too, receive or can get the source
code. If you link other code with the library, you must provide
complete object files to the recipients, so that they can relink them
with the library after making changes to the library and recompiling
it. And you must show them these terms so they know their rights.
We protect your rights with a two-step method: (1) we copyright the
library, and (2) we offer you this license, which gives you legal
permission to copy, distribute and/or modify the library.
To protect each distributor, we want to make it very clear that
there is no warranty for the free library. Also, if the library is
modified by someone else and passed on, the recipients should know
that what they have is not the original version, so that the original
author's reputation will not be affected by problems that might be
introduced by others.
Finally, software patents pose a constant threat to the existence of
any free program. We wish to make sure that a company cannot
effectively restrict the users of a free program by obtaining a
restrictive license from a patent holder. Therefore, we insist that
any patent license obtained for a version of the library must be
consistent with the full freedom of use specified in this license.
Most GNU software, including some libraries, is covered by the
ordinary GNU General Public License. This license, the GNU Lesser
General Public License, applies to certain designated libraries, and
is quite different from the ordinary General Public License. We use
this license for certain libraries in order to permit linking those
libraries into non-free programs.
When a program is linked with a library, whether statically or using
a shared library, the combination of the two is legally speaking a
combined work, a derivative of the original library. The ordinary
General Public License therefore permits such linking only if the
entire combination fits its criteria of freedom. The Lesser General
Public License permits more lax criteria for linking other code with
79

the library.
We call this license the "Lesser" General Public License because it
does Less to protect the user's freedom than the ordinary General
Public License. It also provides other free software developers Less
of an advantage over competing non-free programs. These disadvantages
are the reason we use the ordinary General Public License for many
libraries. However, the Lesser license provides advantages in certain
special circumstances.
For example, on rare occasions, there may be a special need to
encourage the widest possible use of a certain library, so that it becomes
a de-facto standard. To achieve this, non-free programs must be
allowed to use the library. A more frequent case is that a free
library does the same job as widely used non-free libraries. In this
case, there is little to gain by limiting the free library to free
software only, so we use the Lesser General Public License.
In other cases, permission to use a particular library in non-free
programs enables a greater number of people to use a large body of
free software. For example, permission to use the GNU C Library in
non-free programs enables many more people to use the whole GNU
operating system, as well as its variant, the GNU/Linux operating
system.
Although the Lesser General Public License is Less protective of the
users' freedom, it does ensure that the user of a program that is
linked with the Library has the freedom and the wherewithal to run
that program using a modified version of the Library.
The precise terms and conditions for copying, distribution and
modification follow. Pay close attention to the difference between a
"work based on the library" and a "work that uses the library". The
former contains code derived from the library, whereas the latter must
be combined with the library in order to run.
GNU LESSER GENERAL PUBLIC LICENSE
TERMS AND CONDITIONS FOR COPYING, DISTRIBUTION AND MODIFICATION
0. This License Agreement applies to any software library or other
program which contains a notice placed by the copyright holder or
other authorized party saying it may be distributed under the terms of
this Lesser General Public License (also called "this License").
Each licensee is addressed as "you".
A "library" means a collection of software functions and/or data
prepared so as to be conveniently linked with application programs
(which use some of those functions and data) to form executables.
The "Library", below, refers to any such software library or work
which has been distributed under these terms. A "work based on the
Library" means either the Library or any derivative work under
copyright law: that is to say, a work containing the Library or a
portion of it, either verbatim or with modifications and/or translated
straightforwardly into another language. (Hereinafter, translation is
included without limitation in the term "modification".)
"Source code" for a work means the preferred form of the work for
making modifications to it. For a library, complete source code means
all the source code for all modules it contains, plus any associated
interface definition files, plus the scripts used to control compilation
and installation of the library.
Activities other than copying, distribution and modification are not
covered by this License; they are outside its scope. The act of
running a program using the Library is not restricted, and output from
such a program is covered only if its contents constitute a work based
on the Library (independent of the use of the Library in a tool for
writing it). Whether that is true depends on what the Library does
and what the program that uses the Library does.
1. You may copy and distribute verbatim copies of the Library's
complete source code as you receive it, in any medium, provided that
you conspicuously and appropriately publish on each copy an
appropriate copyright notice and disclaimer of warranty; keep intact
all the notices that refer to this License and to the absence of any
warranty; and distribute a copy of this License along with the
Library.
80

You may charge a fee for the physical act of transferring a copy,
and you may at your option offer warranty protection in exchange for a
fee.
2. You may modify your copy or copies of the Library or any portion
of it, thus forming a work based on the Library, and copy and
distribute such modifications or work under the terms of Section 1
above, provided that you also meet all of these conditions:
a) The modified work must itself be a software library.
b) You must cause the files modified to carry prominent notices
stating that you changed the files and the date of any change.
c) You must cause the whole of the work to be licensed at no
charge to all third parties under the terms of this License.
d) If a facility in the modified Library refers to a function or a
table of data to be supplied by an application program that uses
the facility, other than as an argument passed when the facility
is invoked, then you must make a good faith effort to ensure that,
in the event an application does not supply such function or
table, the facility still operates, and performs whatever part of
its purpose remains meaningful.
(For example, a function in a library to compute square roots has
a purpose that is entirely well-defined independent of the
application. Therefore, Subsection 2d requires that any
application-supplied function or table used by this function must
be optional: if the application does not supply it, the square
root function must still compute square roots.)
These requirements apply to the modified work as a whole. If
identifiable sections of that work are not derived from the Library,
and can be reasonably considered independent and separate works in
themselves, then this License, and its terms, do not apply to those
sections when you distribute them as separate works. But when you
distribute the same sections as part of a whole which is a work based
on the Library , the distribution o f the whole m ust be on the terms of
this License, whose permissions for other licensees extend to the
entire whole, and thus to each and every part regardless of who wrote
it.
Thus, it is not the intent of this section to claim rights or contest
your rights to work written entirely by you; rather, the intent is to
exercise the right to control the distribution of derivative or
collective works based on the Library.
In addition, mere aggregation of another work not based on the Library
with the Library (or with a work based on the Library) on a volume of
a storage or distribution medium does not bring the other work under
the scope of this License.
3. You may opt to apply the terms of the ordinary GNU General Public
License instead of this License to a given copy of the Library. To do
this, you must alter all the notices that refer to this License, so
that they refer to the ordinary GNU General Public License, version 2,
instead of to this License. (If a newer version than version 2 of the
ordinary GNU General Public License has appeared, then you can specify
that version instead if you wish.) Do not make any other change in
these notices.
Once this change is made in a given copy, it is irreversible for
that copy, so the ordinar y GNU General Public License applies to all
subsequent copies and derivative works made from that copy.
This option is useful when you wish to copy part of the code of
the Library into a program that is not a library.
4. You may copy and distribute the Library (or a portion or
derivative of it, under Section 2) in object code or executable form
under the terms of Sections 1 and 2 above provided that you accompany
it with the complete corresponding machine-readable source code, which
must be distributed under the terms of Sections 1 and 2 above on a
medium customarily used for software interchange.
If distribution of object code is made by offering access to copy
81

from a designated place, then offering equivalent access to copy the
source code from the same place satisfies the requirement to
distribute the source code, even though third parties are not
compelled to copy the source along with the object code.
5. A program that contains no derivative of any portion of the
Library, but is designed to work with the Library by being compiled or
linked with it, is called a "work that uses the Library". Such a
work, in isolation, is not a derivative work of the Library, and
therefore falls outside the scope of this License.
However, linking a "work that uses the Library" with the Library
creates an executable that is a derivative of the Library (because it
contains portions of the Library), rather than a "work that uses the
library". The executable is therefore covered by this License.
Section 6 states terms for distribution of such executables.
When a "work that uses the Library" uses material from a header file
that is part of the Library, the object code for the work may be a
derivative work of the Library even though the source code is not.
Whether this is true is especially significant if the work can be
linked without the Library, or if the work is itself a library. The
threshold for this to be true is not precisely defined by law.
If such an object file uses only numerical parameters, data
structure layouts and accessors, and small macros and small inline
functions (ten lines or less in length), then the use of the object
file is unrestricted, regardless of whether it is legally a derivative
work. (Executables containing this object code plus portions of the
Library will still fall under Section 6.)
Otherwise, if the work is a derivative of the Library, you may
distribute the object code for the work under the terms of Section 6.
Any executables containing that work also fall under Section 6,
whether or not they are linked directly with the Library itself.
6. As an exception to the Sections above, you may also com bine or
link a "work that uses the Library" with the Library to produce a
work containing portions of the Library, and distribute that work
under terms of your choice, provided that the terms permit
modification of the work for the customer's own use and reverse
engineering for debugging such modifications.
You must give prominent notice with each copy of the work that the
Library is used in it and that the Library and its use are covered by
this License. You must supply a copy of this License. If the work
during execution displays copyright notices, you must include the
copyright notice for the Library among them, as well as a reference
directing the user to the copy of this License. Also, you must do one
of these things:
a) Accompany the work with the complete corresponding
machine-readable source code for the Library including whatever
changes were used in the work (which must be distributed under
Sections 1 and 2 above); and, if the work is an executable linked
with the Library, with the complete machine-readable "work that
uses the Library", as object code and/or source code, so that the
user can modify the Library and then relink to produce a modified
executable containing the modified Library. (It is understood
that the user who changes the contents of definitions files in the
Library will not necessarily be able to recompile the application
to use the modified definitions.)
b) Use a suitable shared library mechanism for linking with the
Library. A suitable mechanism is one that (1) uses at run time a
copy of the library already present on the user's computer system,
rather than copying library functions into the executable, and (2)
will operate properly with a modified version of the library, if
the user installs one, as long as the modified version is
interface-compatible with the version that the work was made with.
c) Accompany the work with a written offer, valid for at
least three years, to give the same user the materials
specified in Subsection 6a, above, for a charge no more
than the cost of performing this distribution.
d) If distribution of the work is made by offering access to copy
from a designated place, offer equivalent access to copy the above
82

specified materials from the same place.
e) Verify that the user has already received a copy of these
materials or that you have already sent this user a copy.
For an executable, the required form of the "work that uses the
Library" must include any data and utility programs needed for
reproducing the executable from it. However, as a special exception,
the materials to be distributed need not include anything that is
normally distributed (in either source or binary form) with the major
components (compiler, kernel, and so on) of the operating system on
which the executable runs, unless that component itself accompanies
the executable.
It may happen that this requirement contradicts the license
restrictions of other proprietary libraries that do not normally
accompany the operating system. Such a contradiction means you cannot
use both them and the Library together in an executable that you
distribute.
7. You may place library facilities that are a work based on the
Library side-by-side in a single library together with other library
facilities not covered by this License, and distribute such a combined
library, provided that the separate distribution of the work based on
the Library and of the other library facilities is otherwise
permitted, and provided that you do these two things:
a) Accompany the combined library with a copy of the same work
based on the Library, uncombined with any other library
facilities. This must be distributed under the terms of the
Sections above.
b) Give prominent notice with the combined library of the fact
that part of it is a work based on the Library, and explaining
where to find the accompanying uncombined form of the same work.
8. You may not copy, modify, sublicense, link with, or distribute
the Library except as expressly provided under this License. Any
attempt otherwise to copy, modify , sublicense, link with, or
distribute the Library is void, and will automatically terminate your
rights under this License. However, parties who have received copies,
or rights, from you under this License will not have their licenses
terminated so long as such parties remain in full compliance.
9. You are not required to accept this License, since you have not
signed it. However, nothing else grants you permission to modify or
distribute the Library or its derivative works. These actions are
prohibited by law if you do not accept this License. Therefore, by
modifying or distributing the Library (or any work based on the
Library), you indicate your acceptance of this License to do so, and
all its terms and conditions for copying, distributing or modifying
the Library or works based on it.
10. Each time you redistribute the Library (or any work based on the
Library), the recipient automatically receives a license from the
original licensor to copy , distribute, link with or modify the Library
subject to these terms and conditions. You may not impose any further
restrictions on the recipients' exercise of the rights granted herein.
You are not responsible for enforcing compliance by third parties with
this License.
11. If, as a consequence of a court judgment or allegation of patent
infringement or for any other reason (not limited to patent issues),
conditions are imposed on you (whether by court order, agreement or
otherwise) that contradict the conditions of this License, they do not
excuse you from the conditions of this License. If you cannot
distribute so as to satisfy simultaneously your obligations under this
License and any other pertinent obligations, then as a consequence you
may not distribute the Library at all. For example, if a patent
license would not permit royalty-free redistribution of the Library by
all those who receive copies directly or indirectly through you, then
the only way you could satisfy both it and this License would be to
refrain entirely from distribution of the Library.
If any portion of this section is held invalid or unenforceable under any
particular circumstance, the balance of the section is intended to apply,
and the section as a whole is intended to apply in other circumstances.
83

It is not the purpose of this section to induce you to infringe any
patents or other property right claims or to contest validity of any
such claims; this section has the sole purpose of protecting the
integrity of the free software distribution system which is
implemented by public license practices. Many people have made
generous contributions to the wide range of software distributed
through that system in reliance on consistent application of that
system; it is up to the author/donor to decide if he or she is willing
to distribute software through any other system and a licensee cannot
impose that choice.
This section is intended to make thoroughly clear what is believed to
be a consequence of the rest of this License.
12. If the distribution and/or use of the Library is restricted in
certain countries either by patents or by copyrighted interfaces, the
original copyright holder who places the Library under this License may add
an explicit geographical distribution limitation excluding those countries,
so that distribution is permitted only in or among countries not thus
excluded. In such case, this License incorporates the limitation as if
written in the body of this License.
13. The Free Software Foundation may publish revised and/or new
versions of the Lesser General Public License from time to time.
Such new versions will be similar in spirit to the present version,
but may differ in detail to address new problems or concerns.
Each version is given a distinguishing version number. If the Library
specifies a version number of this License which applies to it and
"any later version", you have the option of following the terms and
conditions either of that version or of any later version published by
the Free Software Foundation. If the Library does not specify a
license version number, you may choose any version ever published by
the Free Software Foundation.
14. If you wish to incorporate parts of the Library into other free
programs whose distribution conditions are incompatible with these,
write to the author to ask for permission. For software which is
copyrighted by the Free Software Foundation, write to the Free
Software Foundation; we sometimes make exceptions for this. Our
decision will be guided by the two goals of preserving the free status
of all derivatives of our free software and of promoting the sharing
and reuse of software generally.
NO WARRANTY
15. BECAUSE THE LIBRARY IS LICENSED FREE OF CHARGE, THERE IS NO
WARRANTY FOR THE LIBRARY, TO THE EXTENT PERMITTED BY APPLICABLE LAW.
EXCEPT WHEN OTHERWISE STATED IN WRITING THE COPYRIGHT HOLDERS AND/OR
OTHER PARTIES PROVIDE THE LIBRARY "AS IS" WITHOUT WARRANTY OF ANY
KIND, EITHER EXPRESSED OR IMPLIED, INCLUDING, BUT NOT LIMITED TO, THE
IMPLIED WARRANTIES OF MERCHAN TABILITY AND F ITN ESS FOR A PARTICUL AR
PURPOSE. THE ENTIRE RISK AS TO THE QUALITY AND PERFORMANCE OF THE
LIBRARY IS WITH YOU. SHOULD THE LIBRARY PROVE DEFECTIVE, YOU ASSUME
THE COST OF ALL NECESSARY SERVICING, REPAIR OR CORRECTION.
16. IN NO EVENT UNLESS REQUIRED BY APPLICABLE LAW OR AGREED TO IN
WRITING WILL ANY COPYRIGHT HOLDER, OR ANY OTHER PARTY WHO MAY MODIFY
AND/OR REDISTRIBUTE THE LIBRARY AS PERMITTED ABOVE, BE LIABLE TO YOU
FOR DAMAGES, INCLUDING ANY GENERAL, SPECIAL, INCIDENTAL OR
CONSEQUENTIAL DAMAGES ARISING OUT OF THE USE OR INABILITY TO USE THE
LIBRARY (INCLUDING BUT NOT LIMITED TO LOSS OF DATA OR DATA BEING
RENDERED INACCURATE OR LOSSES SUSTAINED BY YOU OR THIRD PARTIES OR A
FAILURE OF THE LIBRARY TO OPERATE WITH ANY OTHER SOFTWARE), EVEN IF
SUCH HOLDER OR OTHER PARTY HAS BEEN ADVISED OF THE POSSIBILITY OF SUCH
DAMAGES.
END OF TERMS AND CONDITIONS
How to Apply These Terms to Your New Libraries
If you develop a new library, and you want it to be of the greatest
possible use to the public, we recommend making it free software that
everyone can redistribute and change. You can do so by permitting
redistribution under these terms (or, alternatively , under the terms of the
ordinary General Public License).
To apply these terms, attach the following notices to the library. It is
84
 Loading...