

Page 1

ND-91822 (E)
ISSUE 1.0
WLPS1(E)-A
MH210 Setup Guide
NEC Corporation
Page 2

ND-91822 (E)
Issue 1.0
Purpose of the Manual
This manual describes setting procedures necessary to use the Wireless LAN voice terminal MH210.
Read this manual carefully and understand its content to handle the product properly.
Manual Configuration
Section 1: Overview of MH210
This section describes the appearance of MH210 and names and functions of each part.
Section 2: Start-up Procedure for MH210
This section describes how to start up MH210.
Section 3: Configuration for MH210
This section describes the configuration for MH210.
Section 4: Firmware Download Procedure for MH210
This section describes how to download firmware to MH210.
Section 5: List of Configuration Menu
This section lists configuration menu in the system setting mode.
Page 3

ND-91822 (E)
Issue 1.0
Contents
1. Overview of MH210.......................................................................................................1
2. Start-up Procedure for MH210...................................................................................2
3. Configuration for MH210.............................................................................................3
3.1 Settings from MH210..............................................................................................3
3.1.1 Factory reset.....................................................................................................4
3.1.2 Net setting.........................................................................................................5
3.1.2.1 Network mode............................................................................................5
3.1.2.2 IP address....................................................................................................5
3.1.2.3 Subnet mask...............................................................................................5
3.1.2.4 Gateway.......................................................................................................6
3.1.3 SIP setting.........................................................................................................6
3.1.3.1 Server...........................................................................................................6
3.1.3.2 Proxy.............................................................................................................8
3.1.3.3 User account...............................................................................................9
3.1.4 WLAN setting..................................................................................................10
3.1.4.1 Network ......................................................................................................10
3.1.4.2 ESSID..........................................................................................................11
3.1.4.3 Channel......................................................................................................11
3.1.4.4 Rate.............................................................................................................11
3.1.4.5 WEP select................................................................................................11
3.1.5 Information......................................................................................................11
3.1.5.1 Phone number..........................................................................................12
3.1.5.2 IP address..................................................................................................12
3.1.5.3 MAC ID........................................................................................................12
3.1.5.4 Firmware ver.............................................................................................12
3.1.5.5 Hardware ver............................................................................................12
4. Firmware Download Procedure for MH210..........................................................13
5. List of Configuration Menu.......................................................................................18
- i -
Page 4
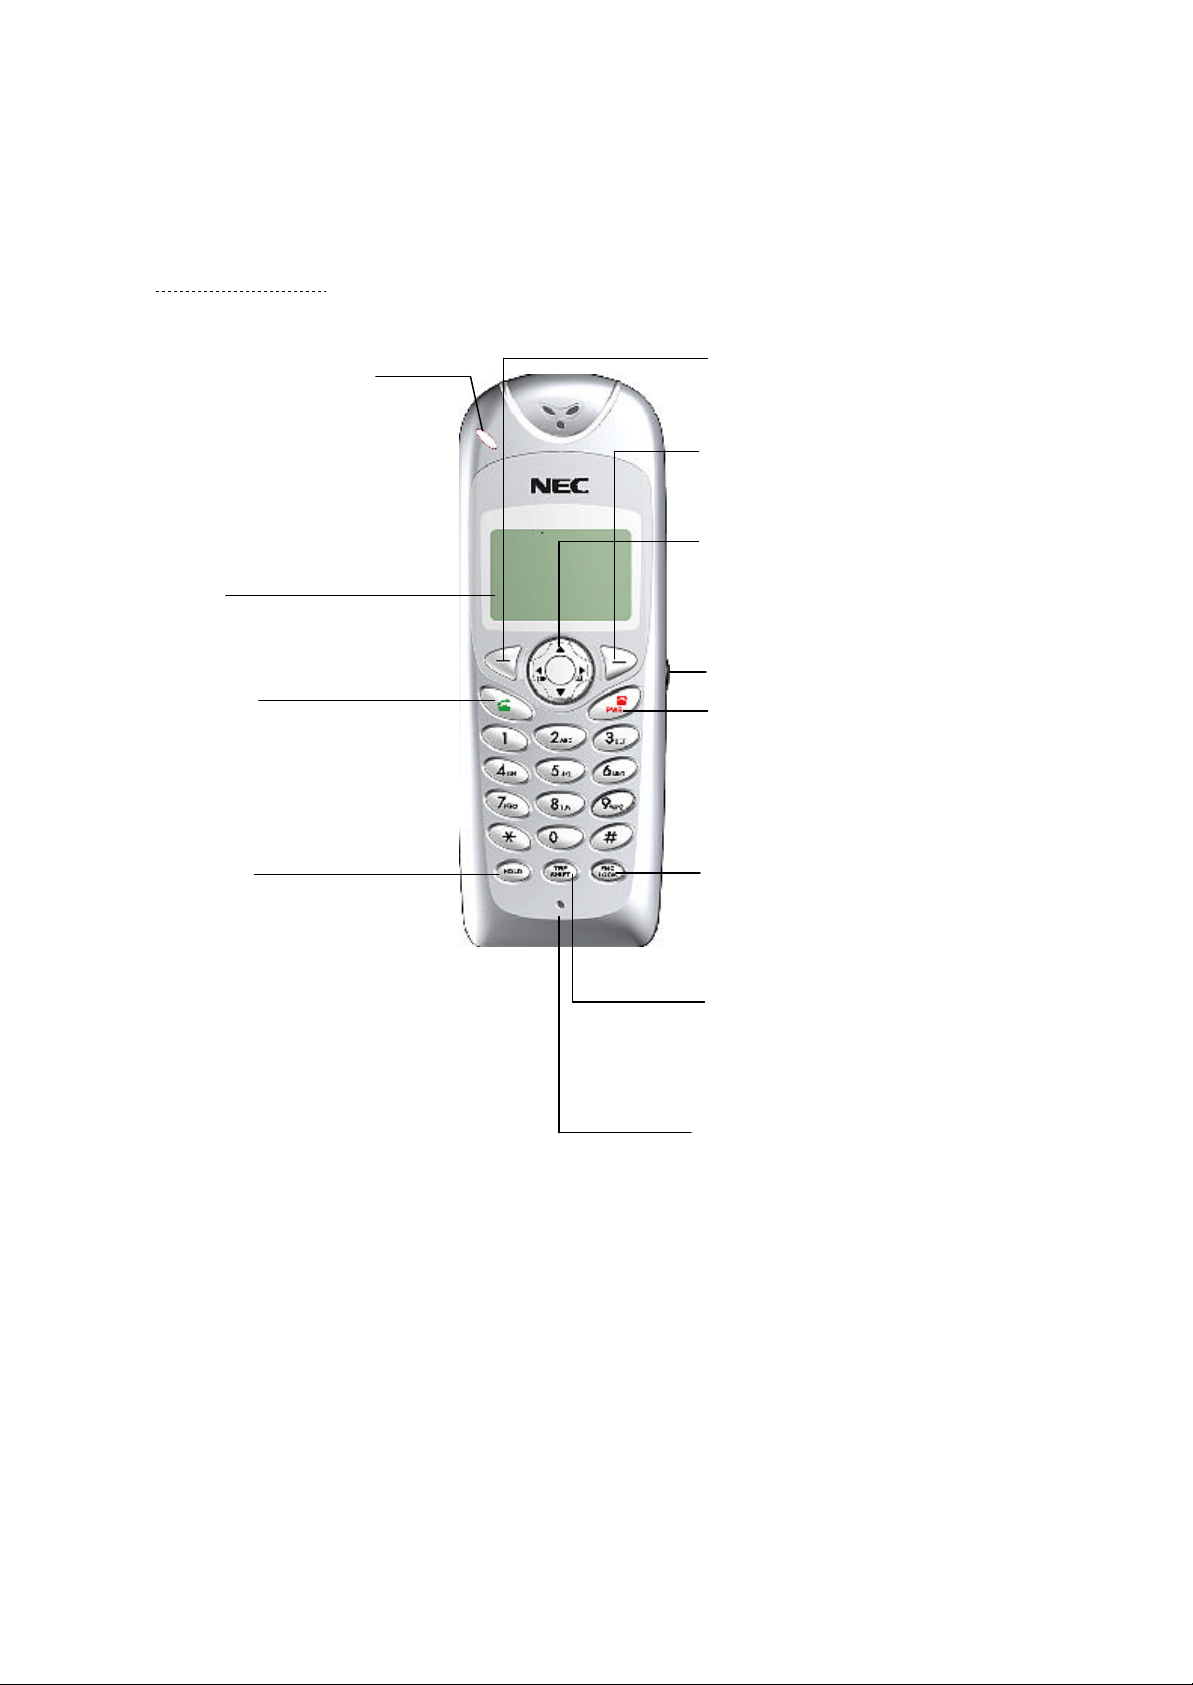
1. Overview of MH210
LED Ring Indicator
HOLD
Press to place a call
Offhook
Press to originate/answer
LCD
Softkey 1
Softke
y 2
Press to select the softkey menu
Scroll key
END/PWR
Push once to end a call. Press for
FNC/LOCK
TRF/SHIFT
Appearance of MH210 and functions of each part
THE BASICS
DISPLAYS AND KEYS
Red light indicates
incoming call
(Liquid Crystal Display)
a call.
on hold.
ND-91822 (E)
Issue 1.0
Press to select the softkey menu
(left).
(right).
Press to activate numerous
telephone functions.
Headset jack
(End/Power On/Off Key)
more than three seconds to turn
power on and off.
Press to confirm the settings.
Press to control Keylock On/Off.
Press to transfer a call.
Press to switch small/ capital letter.
Microphone
- 1 -
Page 5
ND-91822 (E)
Issue 1.0
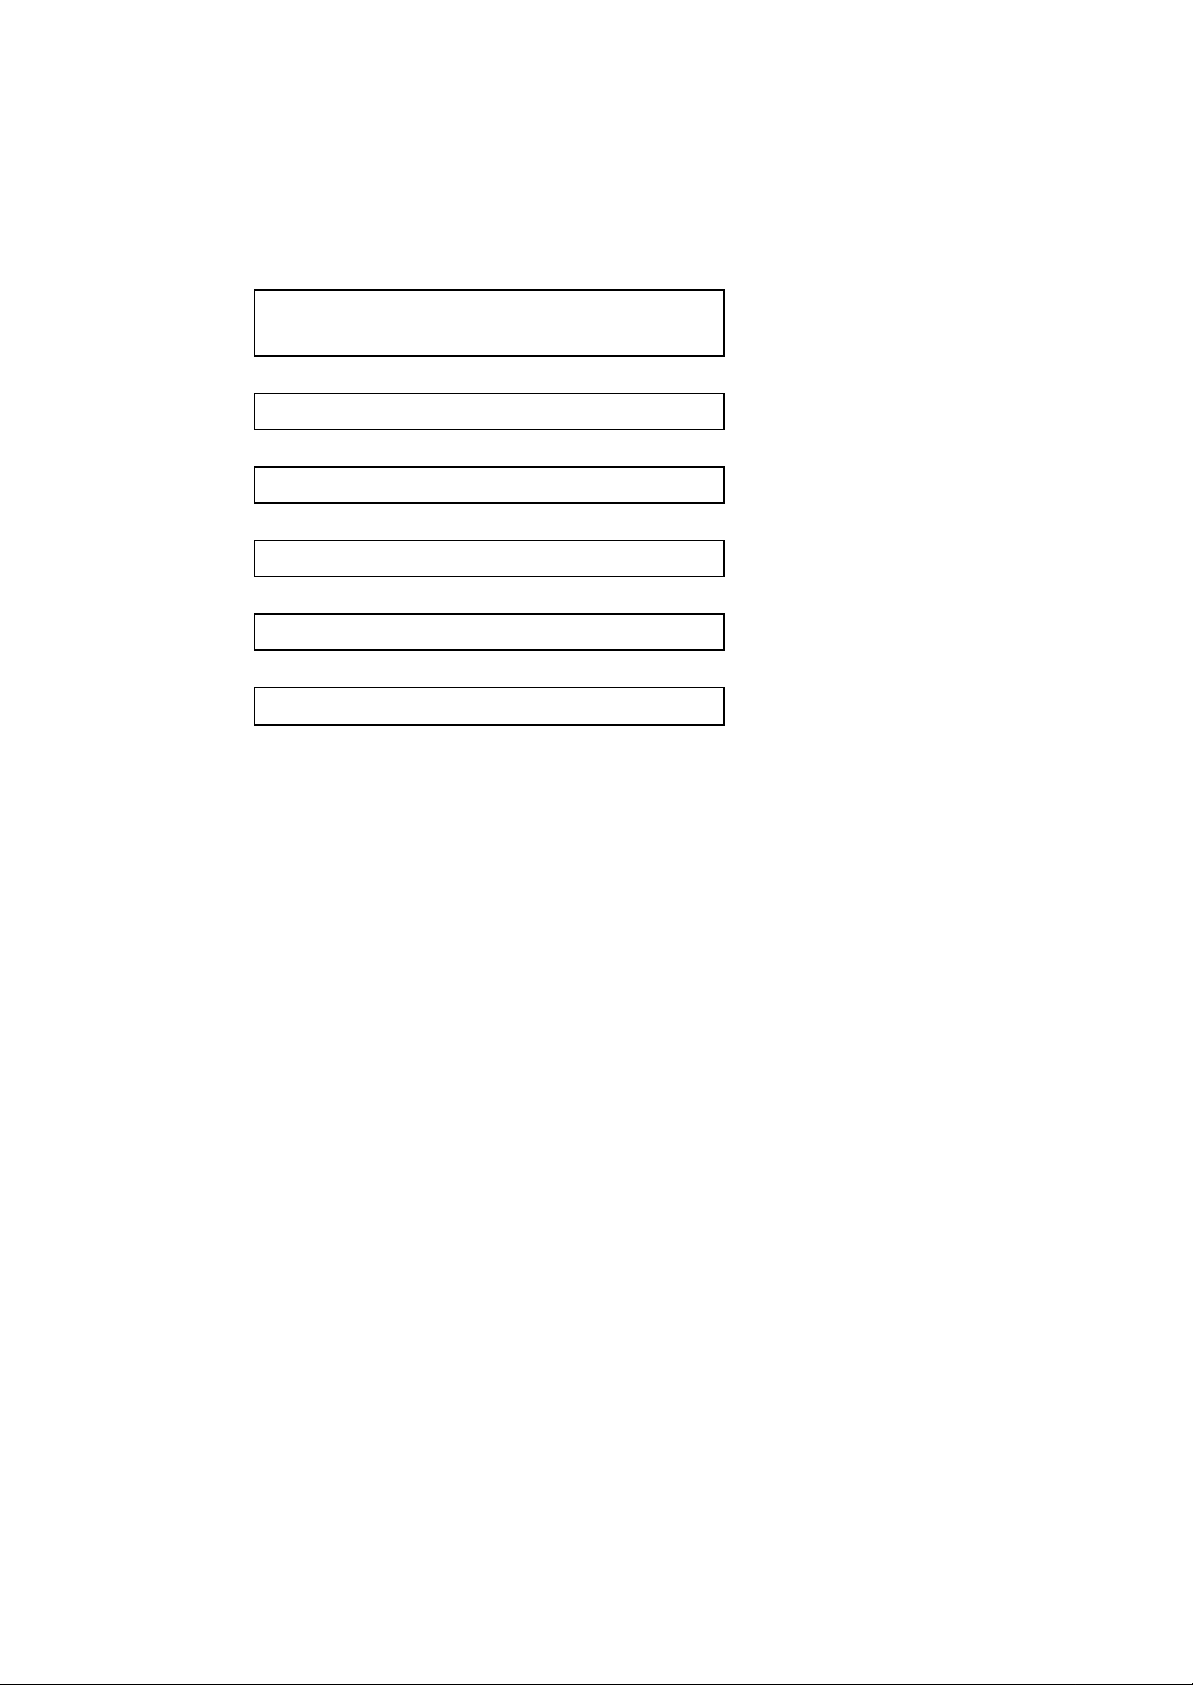
2. Start-up Procedure for MH210
Procedure for MH210 until starting operation
Initialization of configuration parameters
(Return parameters to the state at shipment)
3.1.1. Factory reset
↓
Network parameter setting 3.1.2. Net setting
↓
SIP parameter setting 3.1.3. SIP setting
↓
WLAN parameter setting 3.1.4. WLAN setting
↓
Verification of registered parameters 3.1.5. Information
↓
Power off → Power on to start operation
- 2 -
Page 6

ND-91822 (E)
Issue 1.0
3. Configuration for MH210
The following two methods are available for the configuration of MH210.
(1) Settings from MH210
(2) Settings from Web browser
3.1 Settings from MH210
By starting MH210 in the system setting mode, the configuration data can be registered, displayed,
and modified.
Procedure for starting MH210 in the system setting mode
(1) “Power off” state
(2) Simultaneously press [4]+[9]+[遧] to power on MH210.
“System Setting” displays.
(3) Press [FNC].
Menu items display.
寛ⅴ渧橳ⅸ A 淏寘
[1]Information
[2]Net setting
[3]SIP setting
---------------------------
Back Select
* MH210 remains in the system setting m ode until power-off.
Items that can be selected from the system setting menu are as follows:
[1] Information -- Verification of settings
[2] Net setting -- Registration and modification of network parameters
[3] SIP setting -- Registration and modification of SIP pa rameters
[4] WLAN setting -- Registration and modification of WLAN parameters
* Be sure to perform [2] to [4] at the initial start-up of MH210.
- 3 -
Page 7

ND-91822 (E)
Issue 1.0
3.1.1 Factory reset
Procedures for resetting all configuration parameters to the state at shipment from the factory are as
follow.
Be sure to perform them at the initial start-up of MH210.
Factory reset procedure
(1) “Power off” state
(2) Simultaneously press [4]+[9]+[郞]+[遧] to power on MH210.
“Load Default IP ” followed by “System Setting” displays.
Now, all configuration parameters are returned to the state at the shipment from the factory.
Initial Values of Configuration Parameters at Shipment from Factory
Parameter Default Value
Network mode Fixed IP
IP address 192.168.0.2
Subnet mask 255.255.255.0
Gateway 192.1 68.0.1
Server DNS IP 192.168.0.3
Port 5061
Expire time 360
Proxy Proxy IP 192.168.0.255
Proxy port 5061
User account Phone number 3
User name NEC
User password 1111
Network mode Public
ESSID NEC
Channel Auto
Rate Auto
WEP select None
* MH210 remains in the system setting mode until power-off.
- 4 -
Page 8
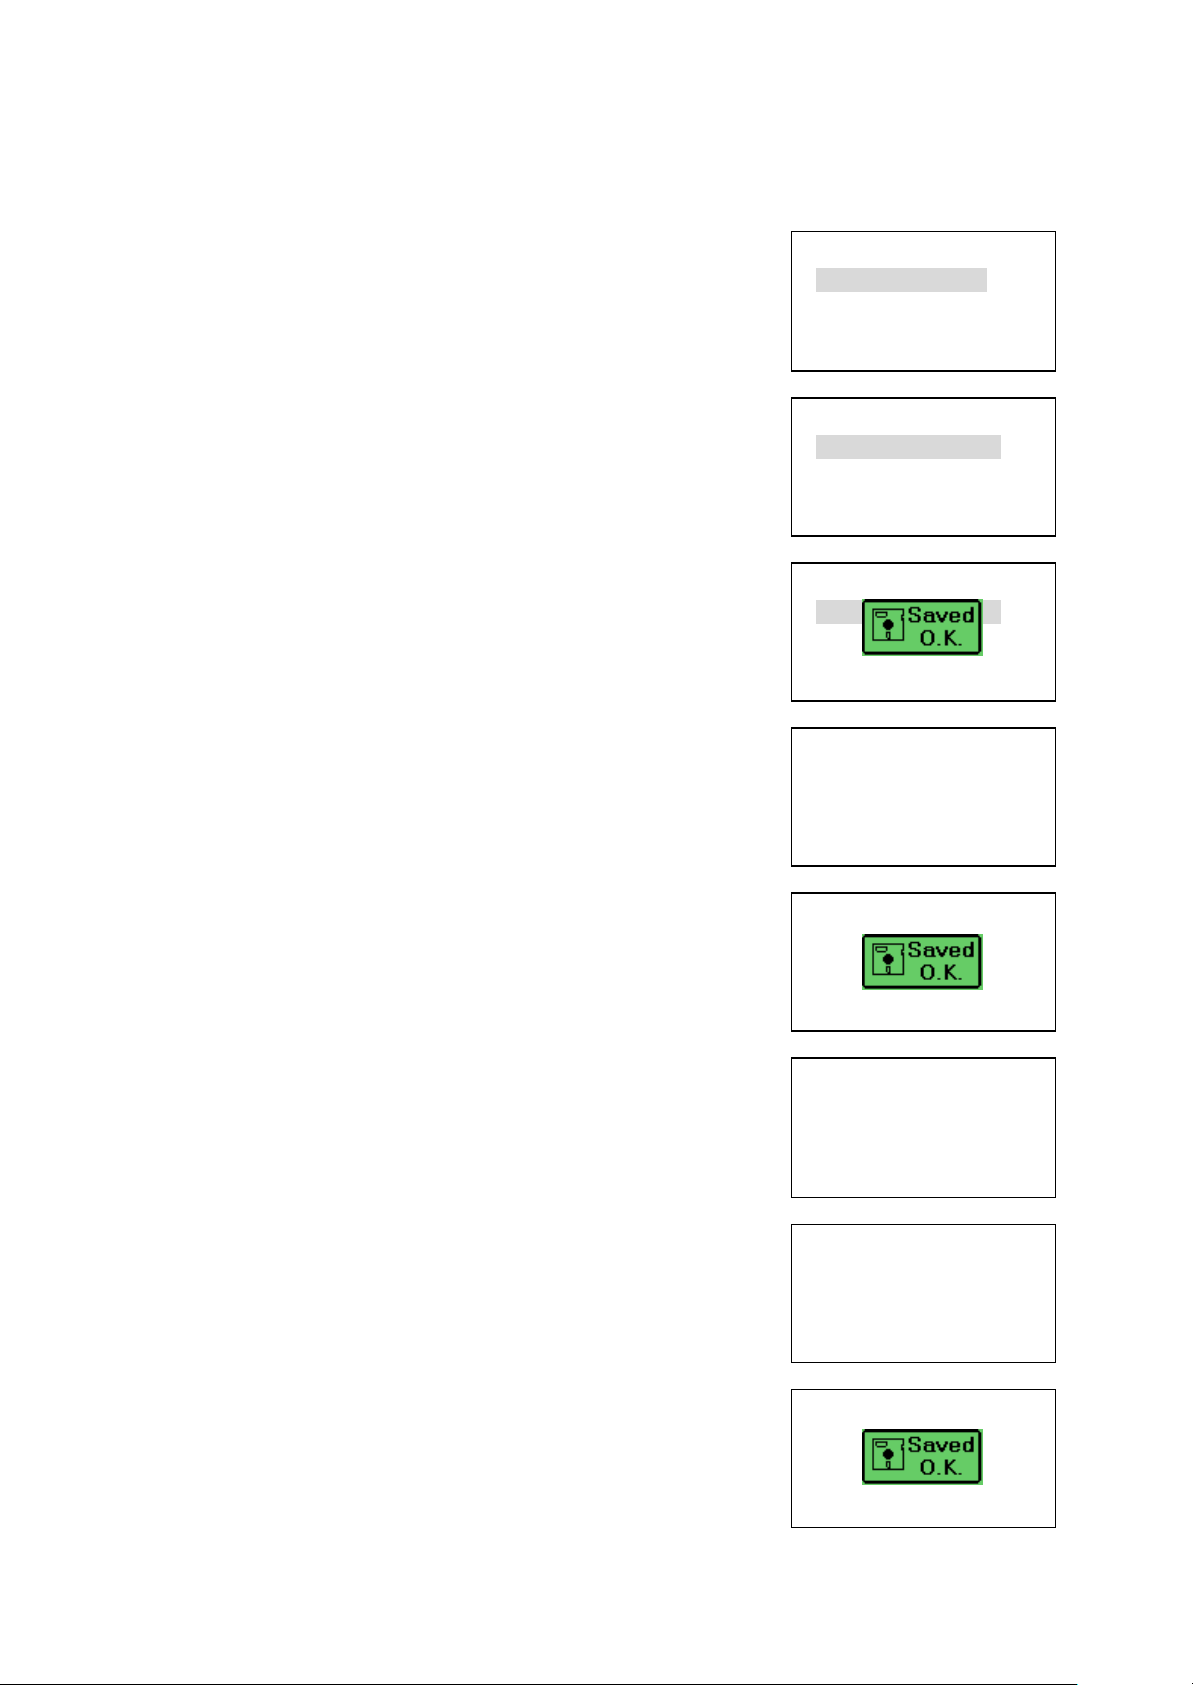
3.1.2 Net setting
3.1.2.1 Network mode
3.1.2.2 IP address
3.1.2.3 Subnet mask
After System setting mode,
Press [榘]/[暠] or [2]ð to select Net setting.
Press [榘]/[暠] or press [1],[2]
ðSelect the Network mode of handset.
If select Fixed IP, refer to 3.1.2.2.
Press Select [鄧] ð to confirm the setting.
Input the IP address of handset.
Press Ok [鄕] ð to confirm the setting.
Input the Subnet mask of handset.
or Press [SHIFT] ðinput the Subnet mask of
handset.
Press Ok [鄧] ð to confirm the setting.
ND-91822 (E)
Issue 1.0
Net setting
[1]Network mode
[2]IP address
[3]Subnet mask
---------------------------
Back Select
Net setting
[1]DHCP v
[2]Fixed IP
---------------------------
Back Select
Net setting
[1]DHCP v
[2]Fixed IP
---------------------------
Back Select
Net setting
IP:
192.168.0.2|
---------------------------
Clear Ok
Net setting
IP:
192.168.0.2
---------------------------
Clear Ok
Net setting
Subnet mask:
255.255.255.0|
---------------------------
Clear Ok
Net setting
Subnet mask:
www.|
---------------------------
Clear Ok
Net setting
Subnet mask:
255.255.255.0
---------------------------
Clear Ok
- 5 -
Page 9
ND-91822 (E)
to set DNS IP
Issue 1.0
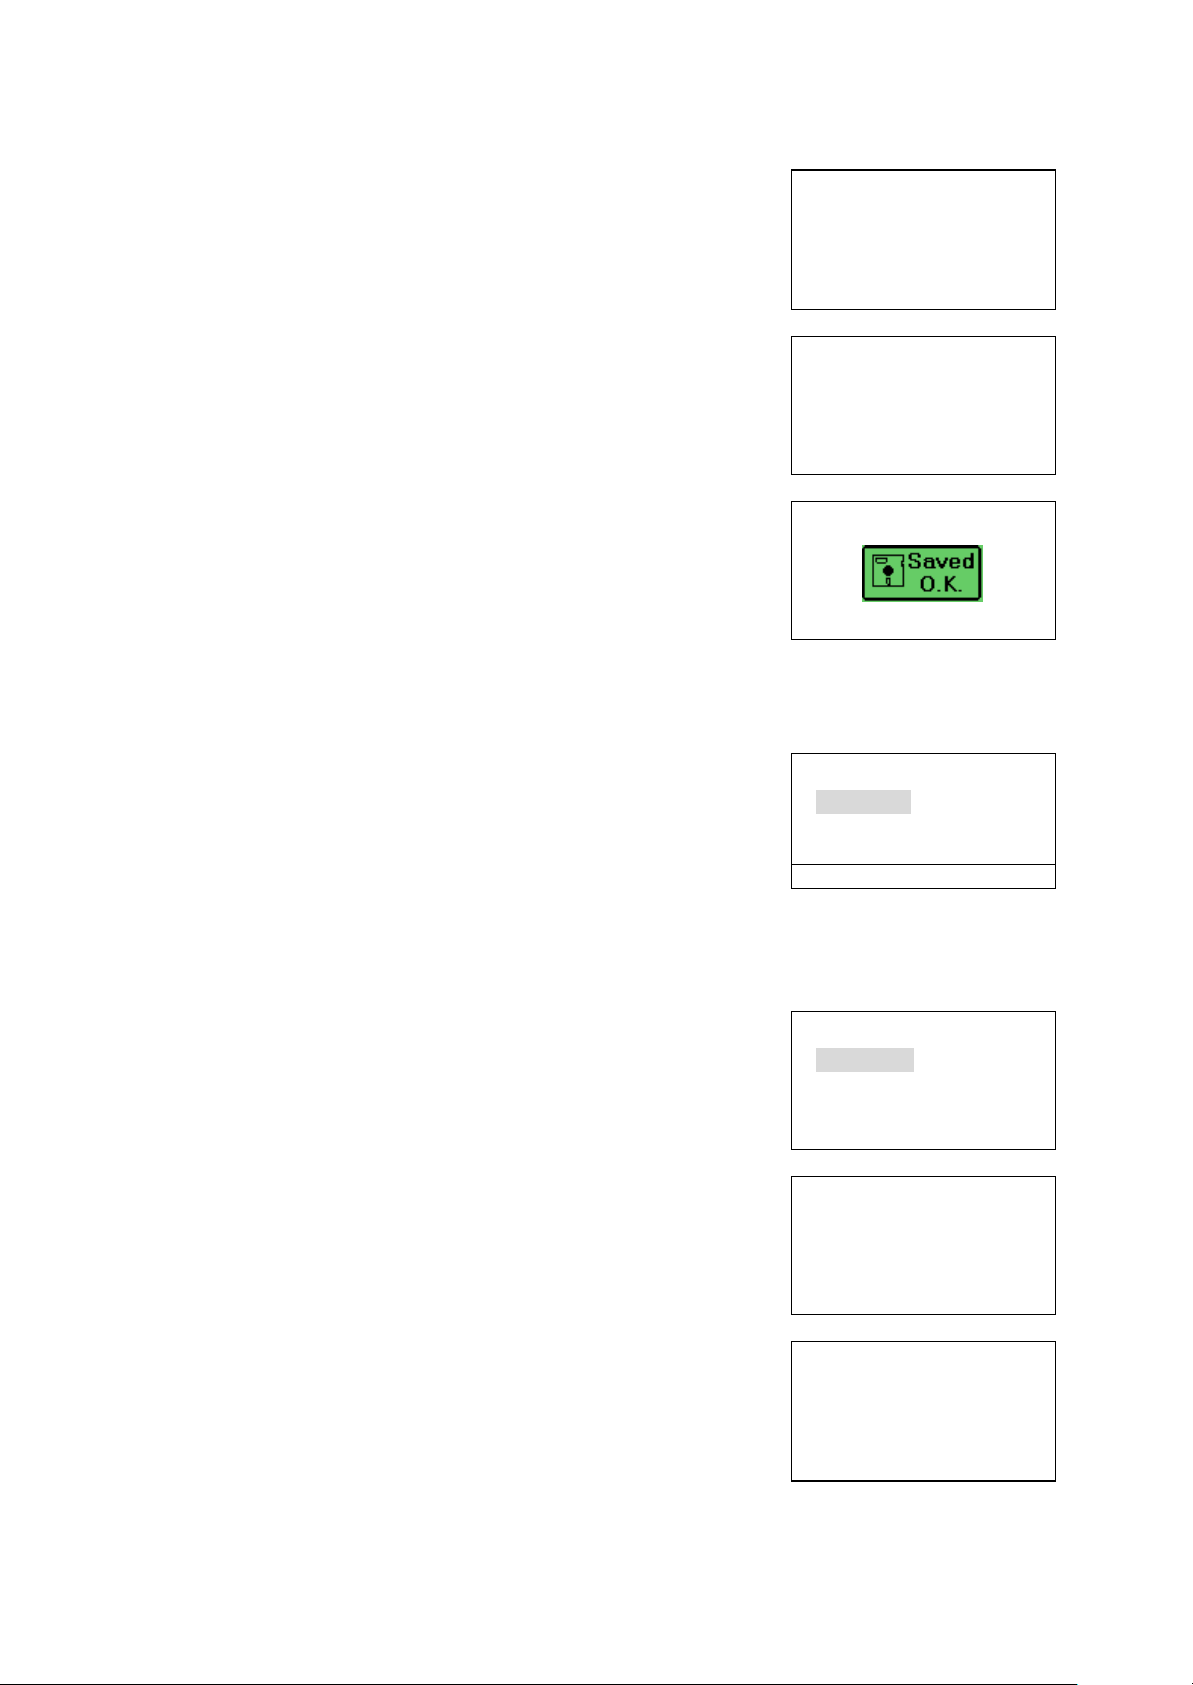
3.1.2.4 Gateway
3.1.3 SIP setting
Input the Gateway of handset.
or Press [SHIFT] ðinput the Gateway of
handset.
Press Ok [鄧] ðto confirm the setting.
After System setting mode,
Press [榘]/[暠] or [3] ð to select SIP setting
Net setting
Gateway:
192.168.0.1|
---------------------------
Clear Ok
Net setting
Gateway:
www.|
---------------------------
Clear Ok
Net setting
Gateway:
192.168.0.1
---------------------------
Clear Ok
SIP setting
[1]Server
[2]Proxy
[3]User account
Back Select
3.1.3.1 Server
uDNS setting
[1] Server — setup server value “DNS IP”/ “Port” / “Expire time”
[2] Proxy— setup SIP server setting, Proxy value “Proxy IP”/ “Proxy port”
[3] User account— setup User account “Phone number ”/ “User name” /
“User password”
Press [榘]/[暠] Or press [1]ð
number
Press Select [鄧] ðto confirm the select
Press [0]~[9] ð to input the DNS IP
number.
Ex. 192.168.0.3
Press Clear[鄕] ð to modify the number.
or Press [SHIFT] ðinput the DNS IP of
handset.
SIP setting
[1]DNS IP
[2]Port
[3]Expire time
---------------------------
Back Select
SIP setting
DNS IP:
192.168.0.3|
---------------------------
Clear Ok
SIP setting
DNS IP:
www.|
---------------------------
Clear Ok
- 6 -
Page 10
ND-91822 (E)
Issue 1.0
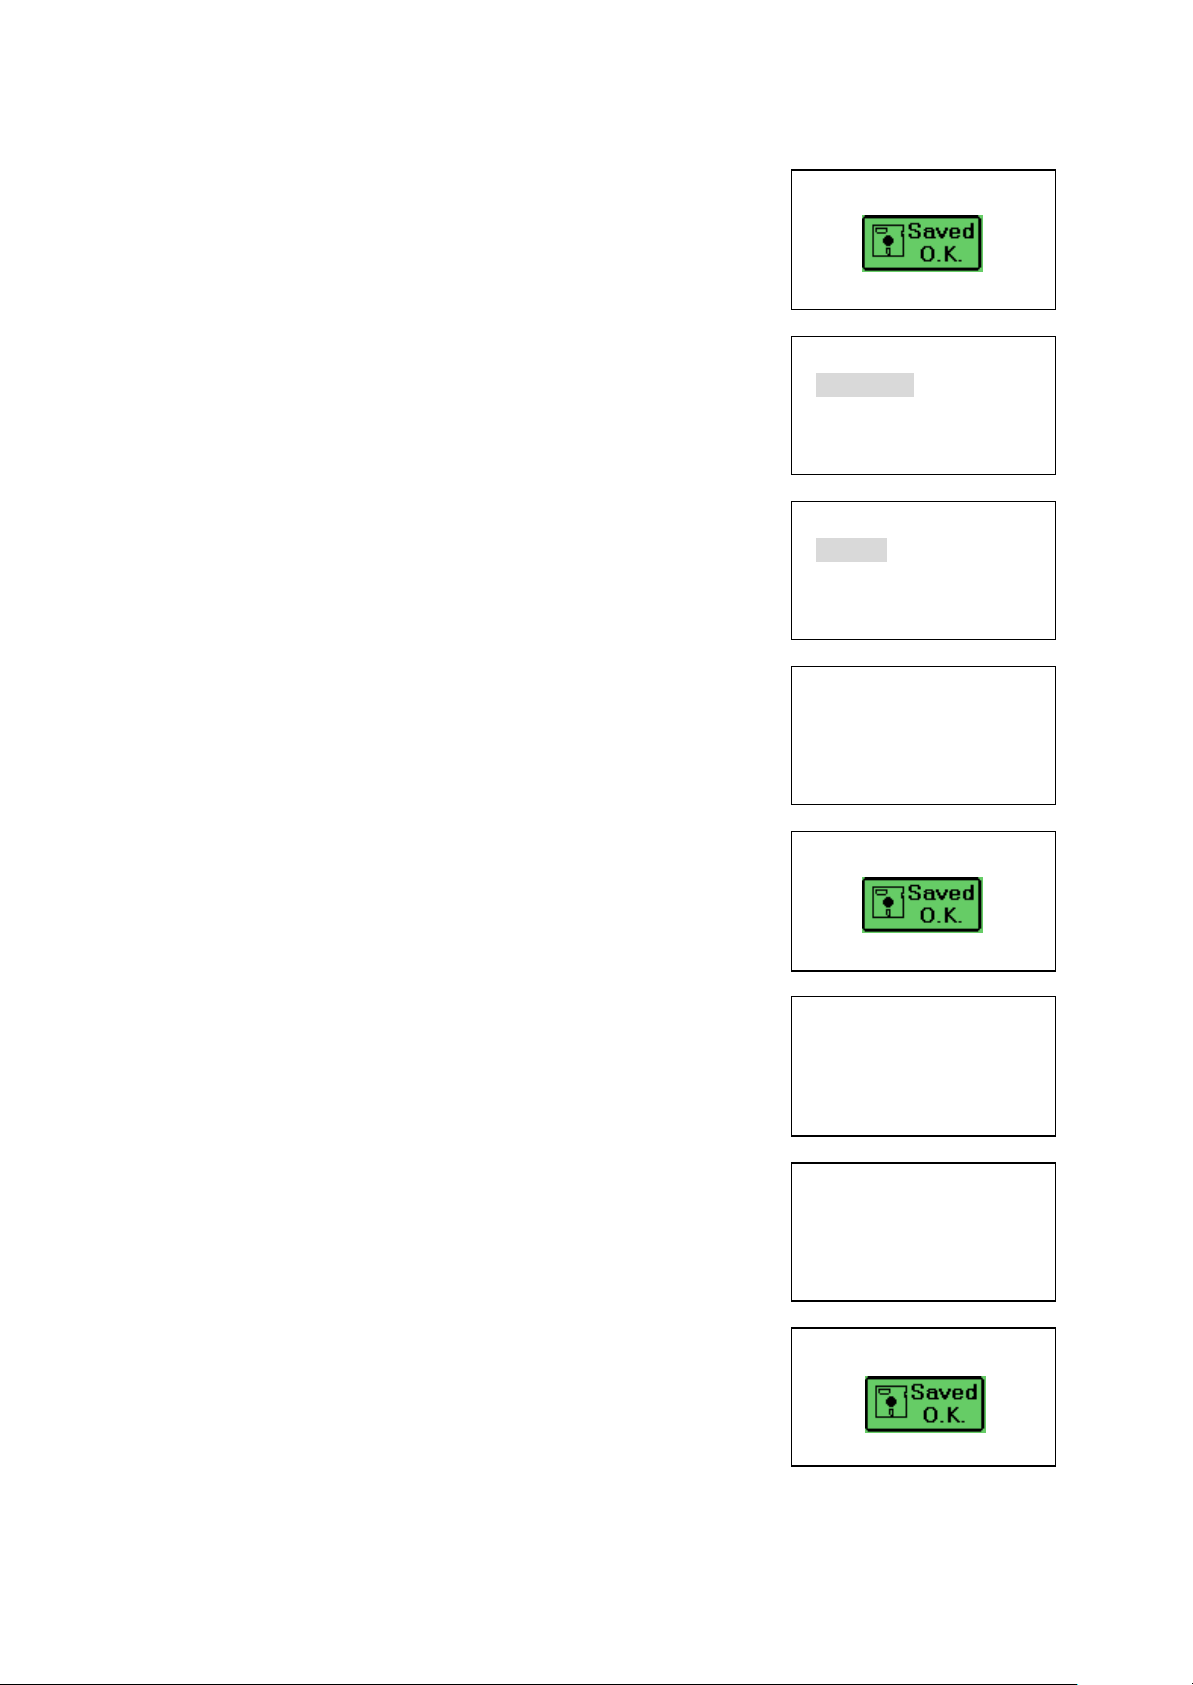
Press Ok [鄧] ð to confirm the setting.
Then the LCD shows.
uPort
Press [榘]/[暠] Or press [2] ðto set Port
number
Press Select [鄧] ðto confirm the select
Press [0]~[9] ð to input the Port number.
Ex. 5061
Press Clear[鄕] ð to modify the number.
Press Ok [鄧] ð to confirm the setting.
uExpire time
Press [榘]/[暠] Or press [3]ðto set Expire
time
Press Select [鄧] ðto confirm the select
Press [0]~[9] ð to input the Expire time.
Ex. 360
Press Clear [鄕] ð to modify the number.
Press Ok [鄧] ð to confirm the setting.
SIP setting
DNS IP:
192.168.0.3|
---------------------------
Clear Ok
SIP setting
[1]DNS IP
[2]Net setting
[3]SIP setting
---------------------------
Back Select
SIP setting
[2]Port
[3]Expire time
[1]DNS IP
---------------------------
Back Select
SIP setting
Port:
5061|
---------------------------
Clear Ok
SIP setting
Port:
5061|
---------------------------
Clear Ok
SIP setting
[3]Expire time
[1]DNS IP
[2]Port
---------------------------
Back Select
SIP setting
Expire time:
360|
---------------------------
Clear Ok
SIP setting
Expire time:
360|
---------------------------
Clear Ok
- 7 -
Page 11
ND-91822 (E)
to set Proxy port
Issue 1.0
3.1.3.2 Proxy
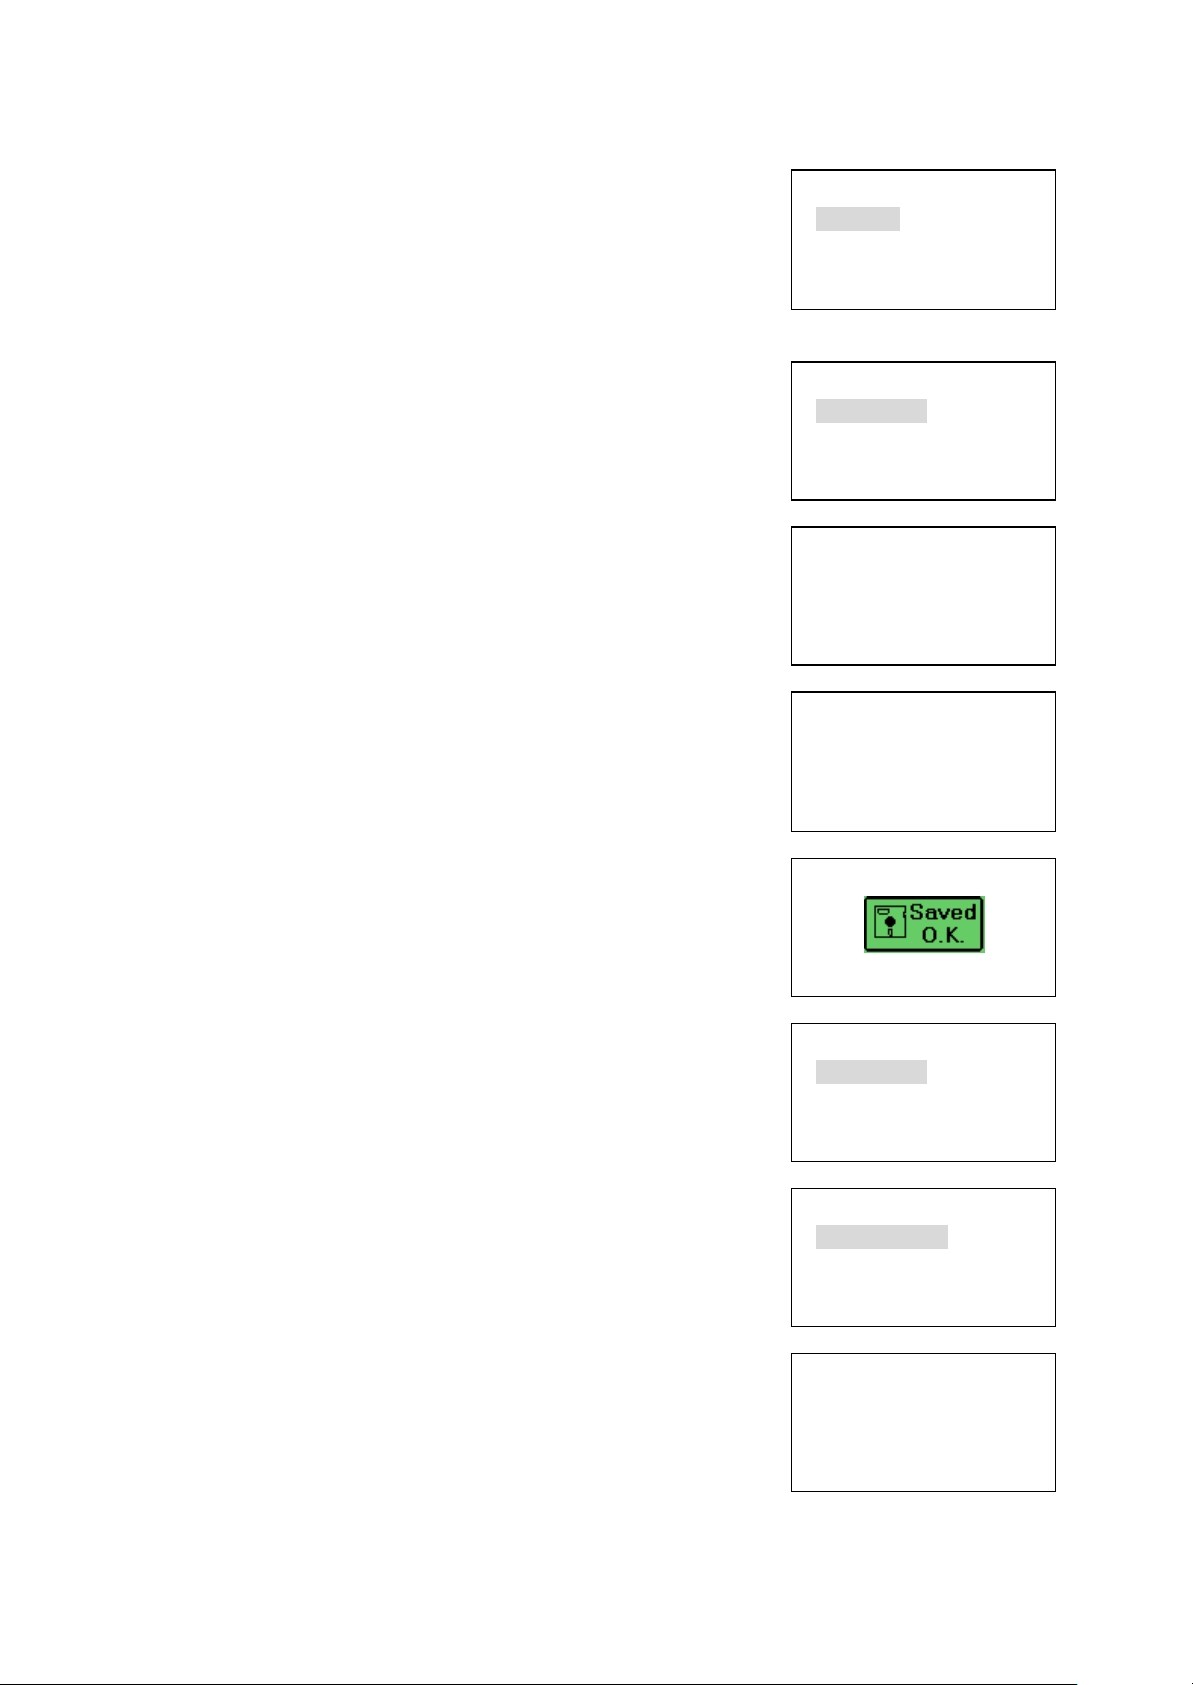
Press [榘]/[暠] Or press [2]ð to choose
“Proxy” mode.
Press Select [鄧] ðto confirm the setting.
uProxy IP
Press [榘]/[暠] Or press [1] ðto set Proxy
IP number
Press Select [鄧] ðto confirm the select
Press [0]~[9] ð to input the Proxy IP number.
Ex. 192.168.0.255
Press Clear [鄕] ð to modify the number.
or Press [SHIFT] ðinput the Proxy IP of
handset.
Press Ok [鄧] ð to confirm the setting.
Then the LCD shows.
uProxy port
Press [榘]/[暠] Or press [2]ð
number
Press Select [鄧] ðto confirm the select
Press [0]~[9] ð to input the Proxy port
number.
Press Clear [鄕] ð to modify the number.
SIP setting
[2]Proxy
[3]User account
[1]Server
---------------------------
Back Select
SIP setting
[1]Proxy IP
[2]Proxy port
---------------------------
Back Select
SIP setting
Proxy IP:
192.168.0.255|
---------------------------
Clear Ok
SIP setting
Proxy IP:
www.|
---------------------------
Clear Ok
SIP setting
Proxy IP:
192.168.0.255
---------------------------
Clear Ok
SIP setting
[1]Proxy IP
[2]Proxy port
---------------------------
Back Select
SIP setting
[2]Proxy port
[1]Proxy IP
---------------------------
Back Select
SIP setting
Proxy port:
5061|
---------------------------
Clear Ok
- 8 -
Page 12
ND-91822 (E)
User
Issue 1.0
3.1.3.3 User account
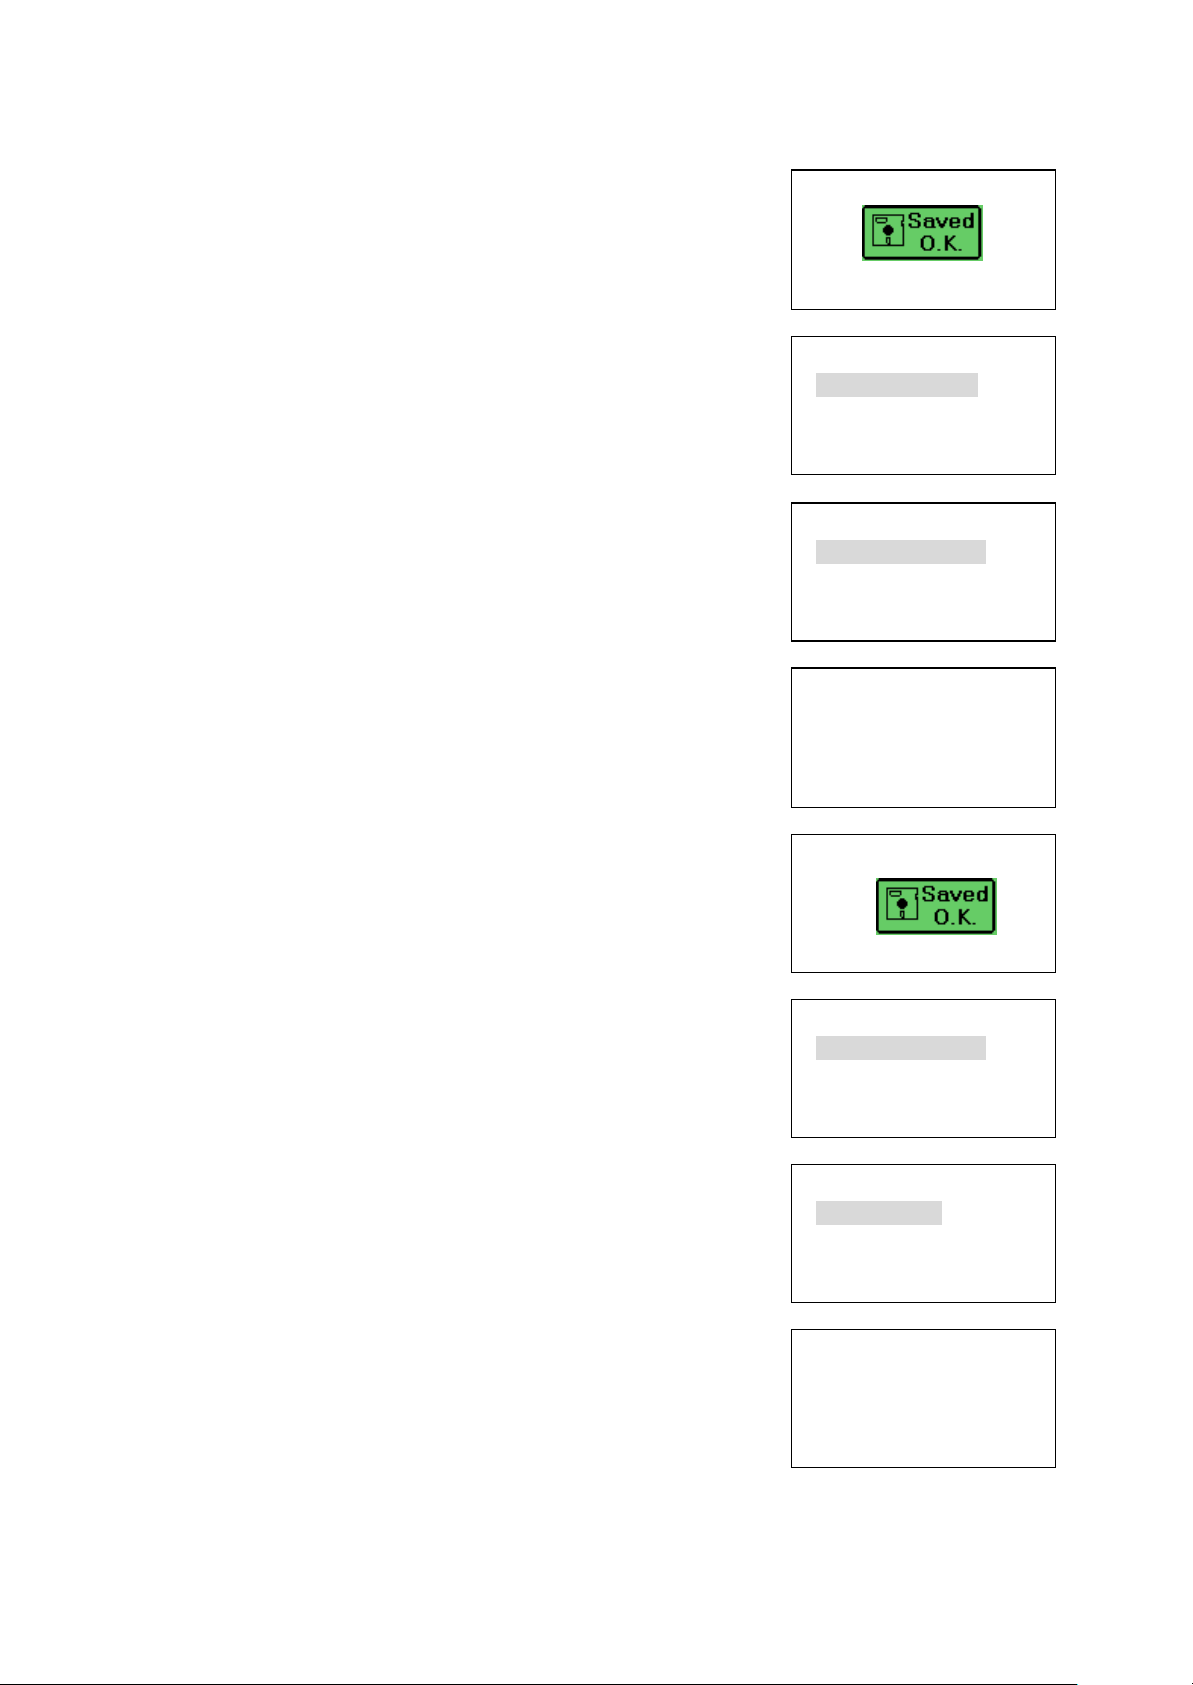
uPhone number setting
uUser name setting
Press Ok [鄧] ð to confirm the setting.
Press [榘]/[暠] Or press [3]ð to choose “
account” mode.
Press Select [鄧] ðto confirm the setting.
Press [榘]/[暠] Or press [1]ðto set Phone
number
Press Select [鄧] ðto confirm the select
Press [0]~[9] ð to input the Phone number.
Ex. 2341
Press Clear [鄕] ð to modify the number.
Press Ok [鄧] ð to confirm the setting.
Then the LCD shows.
Press [榘]/[暠] Or press [2]ðto set Username
Press Select [鄧] ðto confirm the select
Input user name.
Ex. bnet
Press Clear [鄕] ð to modify the number.
SIP setting
Proxy port:
5061|
---------------------------
Clear Ok
SIP setting
[3]User account
[1]Server
[2]Proxy
---------------------------
Back Select
SIP setting
[1]Phone number
[2]Username
[3]User password
---------------------------
Back Select
SIP setting
Phone number:
2341|
---------------------------
Clear Ok
SIP setting
Phone number:
2341|
---------------------------
Clear Ok
SIP setting
[1]Phone number
[2]Username
[3]User password
---------------------------
Back Select
SIP setting
[2]Username
[3]User password
[1]Phone number
---------------------------
Back Select
寛ⅴ渧橳ⅸ A 淏寘
User name:
bnet|
---------------------------
Clear Ok
Press [SHIFT] to change the lower case or upper case mode or numeral mode
during editing.
- 9 -
Page 13
ND-91822 (E)
[1]Network mode
Issue 1.0
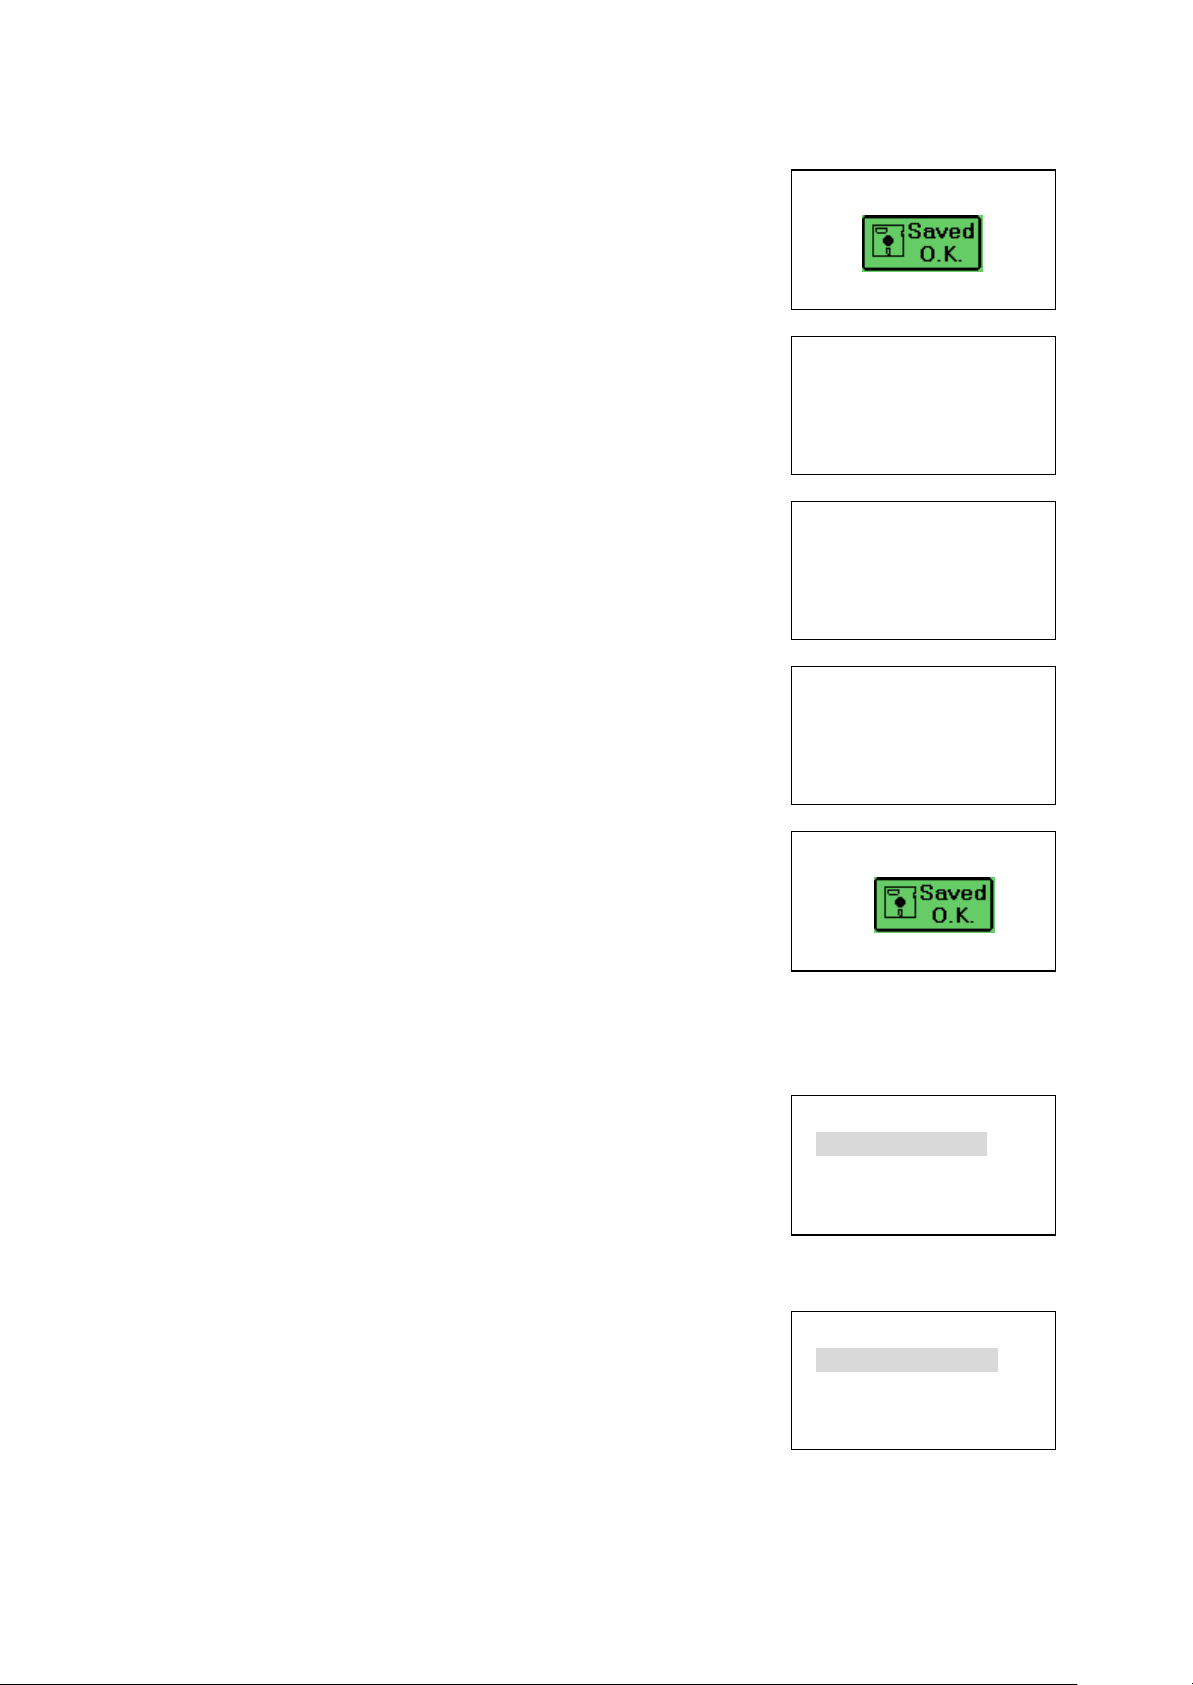
uUser password
3.1.4 WLAN setting
Press Ok [鄧] ð to confirm the setting.
Press [榘]/[暠] Or press [3]ðto set User
password
Press Select [鄧] ðto confirm the select
Input user password.
Ex. 1234
Press Clear [鄕] ð to modify the number.
Input user password again.
Ex. 1234
Press Clear [鄕] ð to modify the number.
Press Ok [鄧] ð to confirm the setting.
寛ⅴ渧橳ⅸ A 淏寘
User name:
bnet|
---------------------------
Clear Ok
SIP setting
[3]User password
[1]Phone number
[2]User name
---------------------------
Back Select
寛ⅴ渧橳ⅸ A 淏寘
New password:
1234|
---------------------------
Clear Ok
寛ⅴ渧橳ⅸ A 淏寘
Input again:
1234|
---------------------------
Clear Ok
寛ⅴ渧橳ⅸ A 淏寘
Input again:
1234|
---------------------------
Clear Ok
3.1.4.1 Network
After System setting mode,
Press [榘]/[暠] or [4]ð to select WLAN
setting
Press [榘]/[暠] Or [1], [2], [3], [4]
ð to select[1]Network mode/ [2]ESSID/ [3]Channel/ [4]Rate/ [5]WEP select
Press [1]ðto select Public
- 10 -
WLAN setting
[2]ESSID
[3]Channel
---------------------------
Back Select
SIP setting
[1]Public v
---------------------------
Back Select
Page 14
ND-91822 (E)
Issue 1.0
3.1.4.2 ESSID
3.1.4.3 Channel
3.1.4.4 Rate
3.1.4.5 WEP select
3.1.5 Information
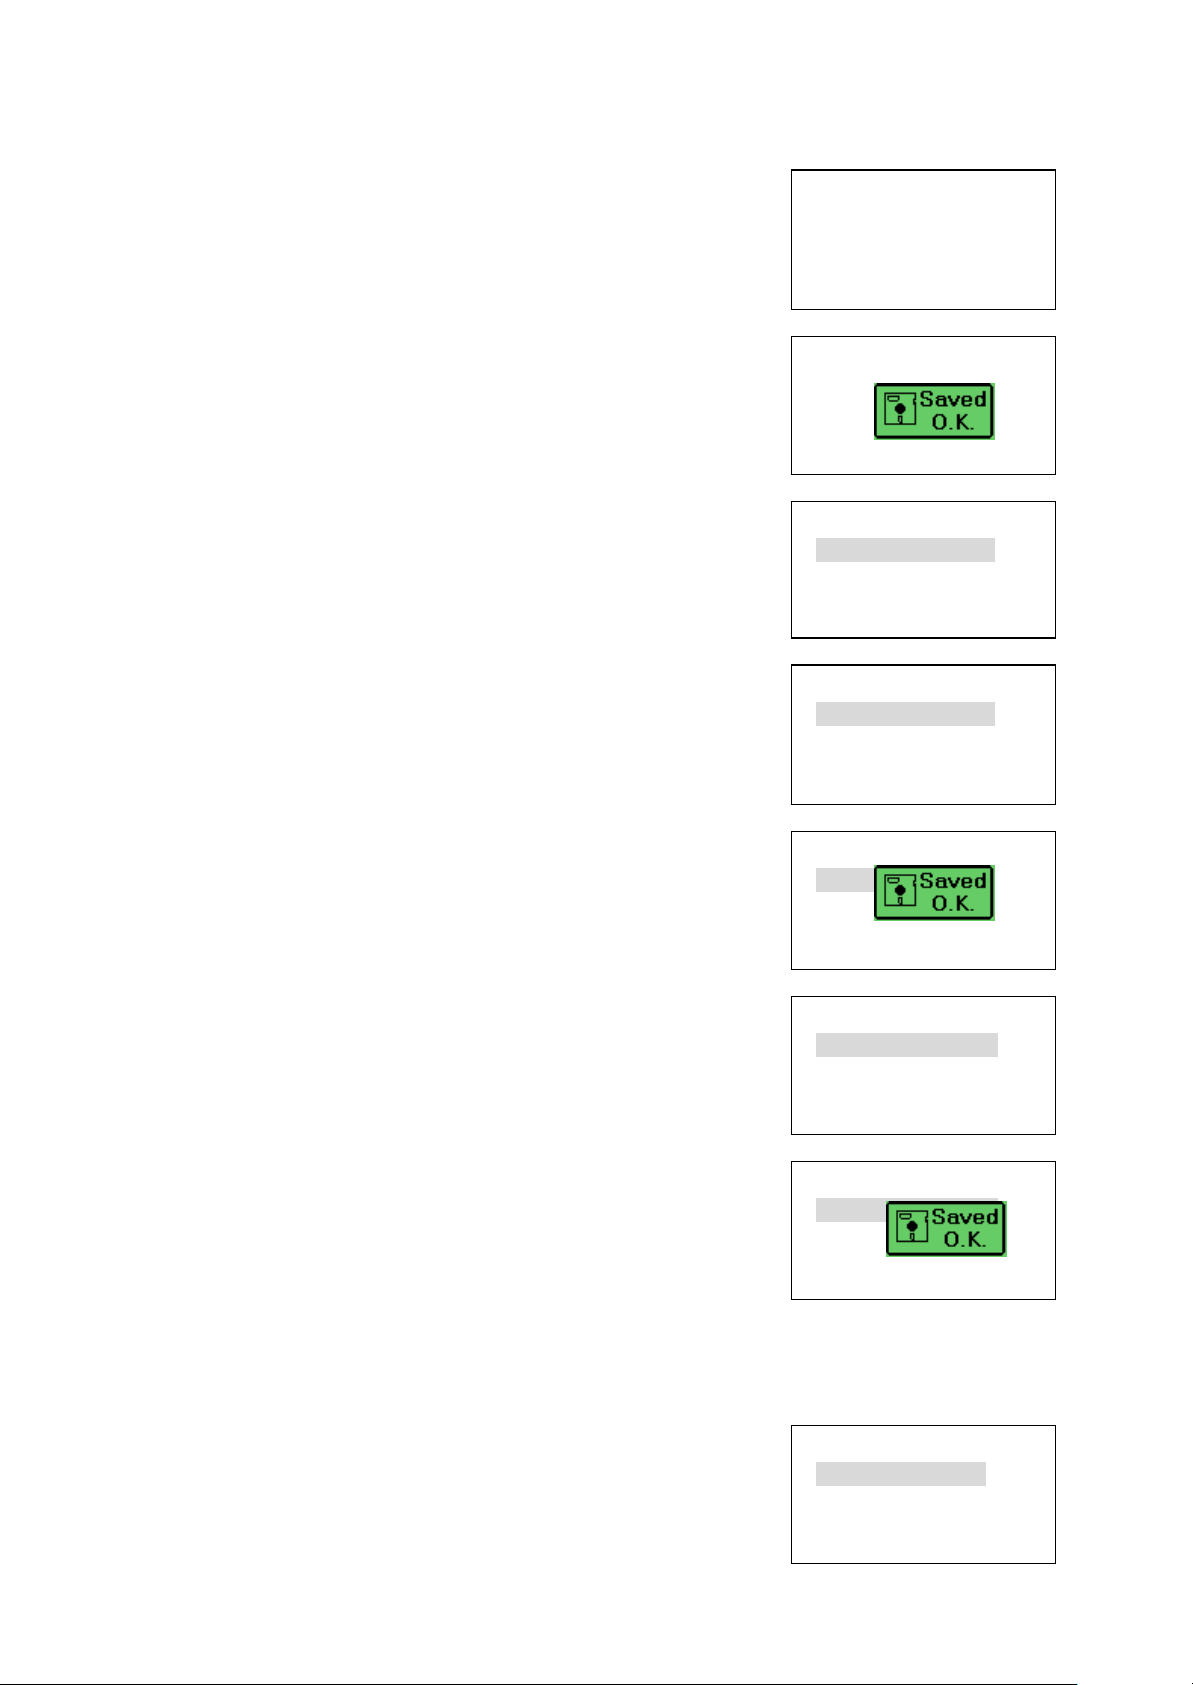
Input ESSID number.
Ex. dbtel
Press Clear [鄕] ð to modify the number.
Press Ok [鄧] ð to confirm the setting.
Press [1]ðto select Auto
ð to setup Rate.
Press [榘]/[暠] Or [1], [2], [3], [4], [5]
ð to select[1]Auto/ [2]1M/ [3]2M/ [4]5.5M/
[5]11M
Press Select [鄧] ð to confirm the setting.
ð to setup WEP select.
Press [榘]/[暠] Or [1], [2], [3]
ð to select[1]None/ [2]64bits/ [3]128bits
Press Select[鄧] ð to confirm the setting.
寛ⅴ渧橳ⅸ A 淏寘
ESSID:
dbtel|
---------------------------
Clear Ok
寛ⅴ渧橳ⅸ A 淏寘
ESSID:
dbtel|
---------------------------
Clear Ok
SIP setting
[1]Auto v
---------------------------
Back Select
寛 SIP setting
[1]Auto v
[2]1M
[3]2M
---------------------------
Back Select
寛 SIP setting
[1]Auto v
[2]1M
[3]2M
---------------------------
Back Select
寛 SIP setting
[1]None v
[2]64bits
[3]128bits
---------------------------
Back Select
寛 SIP setting
[1]None v
[2]64bits
[3]128bits
---------------------------
Back Select
After System setting mode,
Press [榘]/[暠] or [1]ð to select Information
- 11 -
Information
[1]Phone number
[2]IP address
[3]MAC ID
---------------------------
Back Select
Page 15
ND-91822 (E)
Issue 1.0
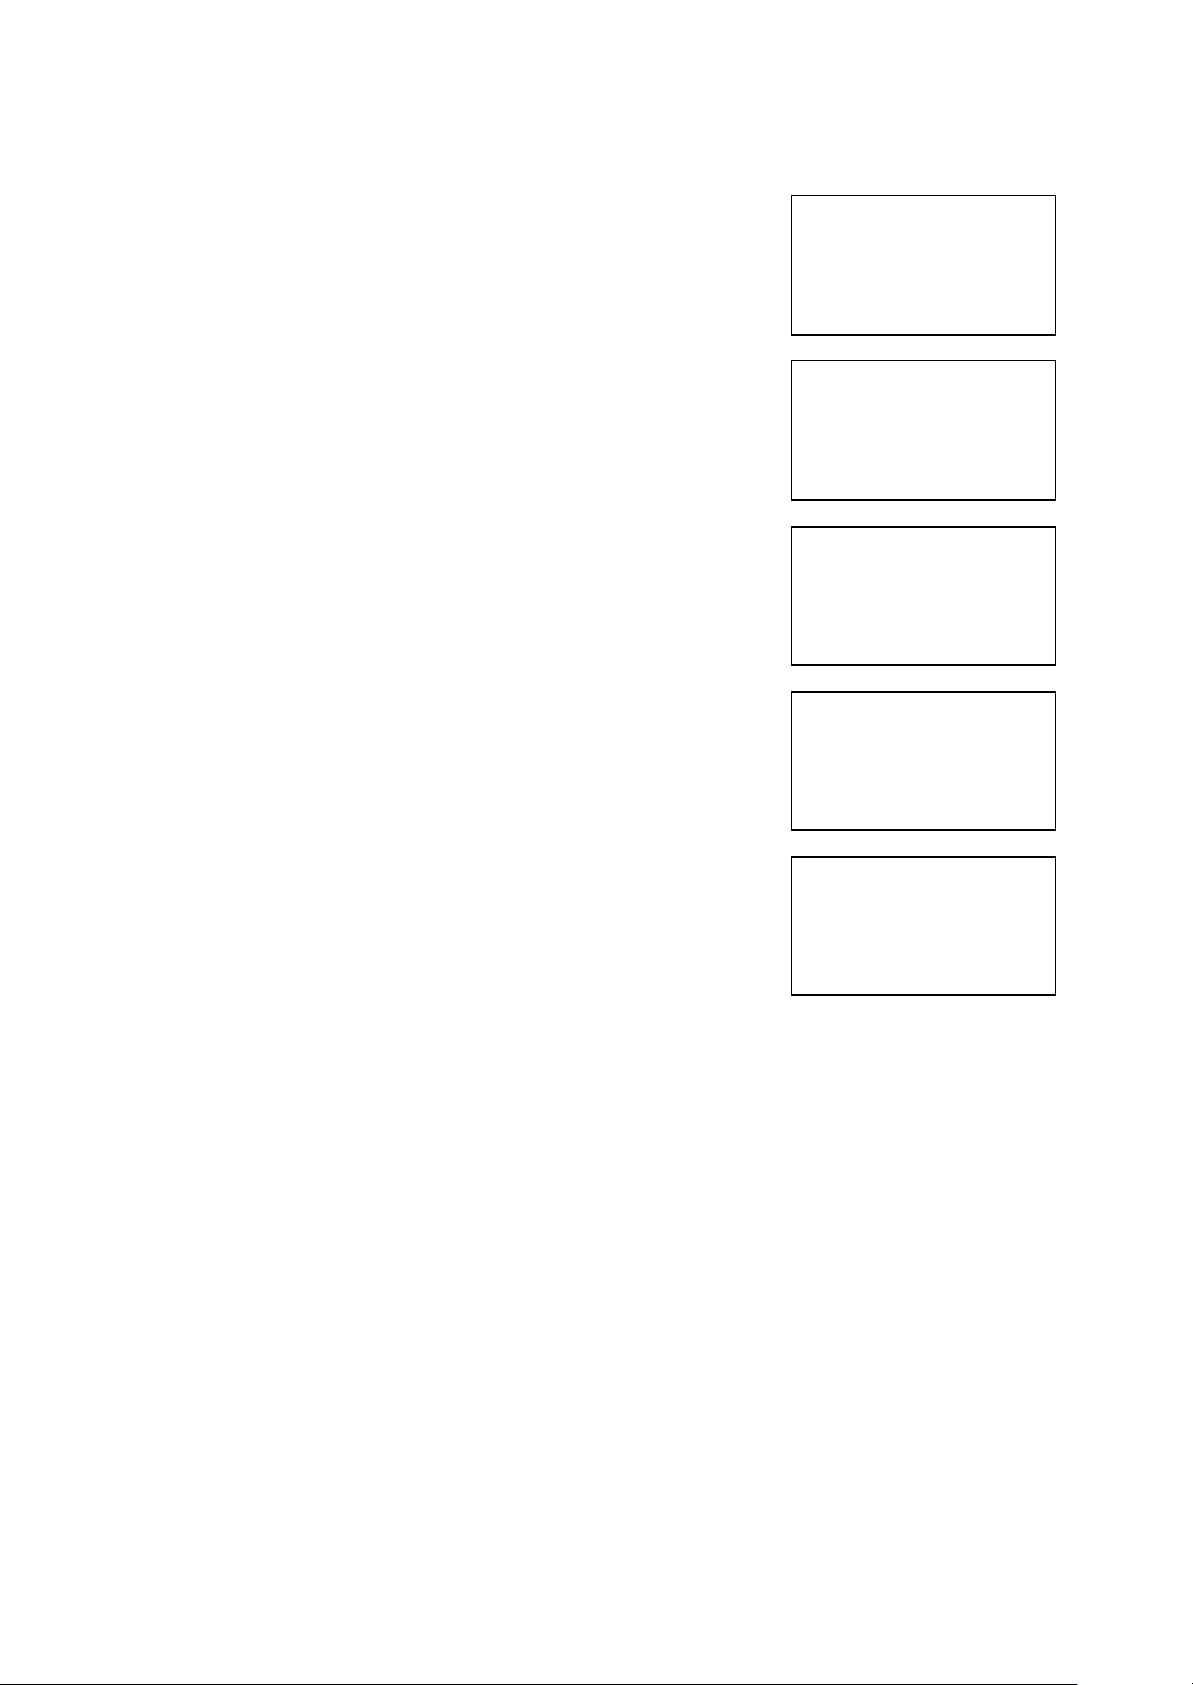
3.1.5.1 Phone number View the phone number of handset.
Ex. The phone number is 3
3.1.5.2 IP address View the IP address of handset.
Ex. The IP address is 192.168.0.2
3.1.5.3 MAC ID View the MAC ID of handset.
Ex. The MAC ID is 00026bff0123
3.1.5.4 Firmware ver. View the Firmware version of handset.
Ex. The Firmware version is WD.00.0A
3.1.5.5 Hardware ver. View the Hardware version of handset.
Ex. The Hardware version is DB168 ver0.1
Information
Phone number:
3
---------------------------
Back Select
Information
IP address:
192.168.0.2
---------------------------
Back Select
Information
MAC ID:
00026bff0123
---------------------------
Back Select
Information
Firmware ver:
WD.00.0A
---------------------------
Back Select
Information
Hardware ver:
DB168 REV:0.1
---------------------------
Back Select
- 12 -
Page 16
ND-91822 (E)
Issue 1.0
4. Firmware Download Procedure for MH210
To download firmware to MH210, a Web Browser (Internet Explorer version6.0 or later) is required.
How to update firmware via Web browser (For later than WD000B3)
1. Turn on the handset and ensure the AP signal is connected.
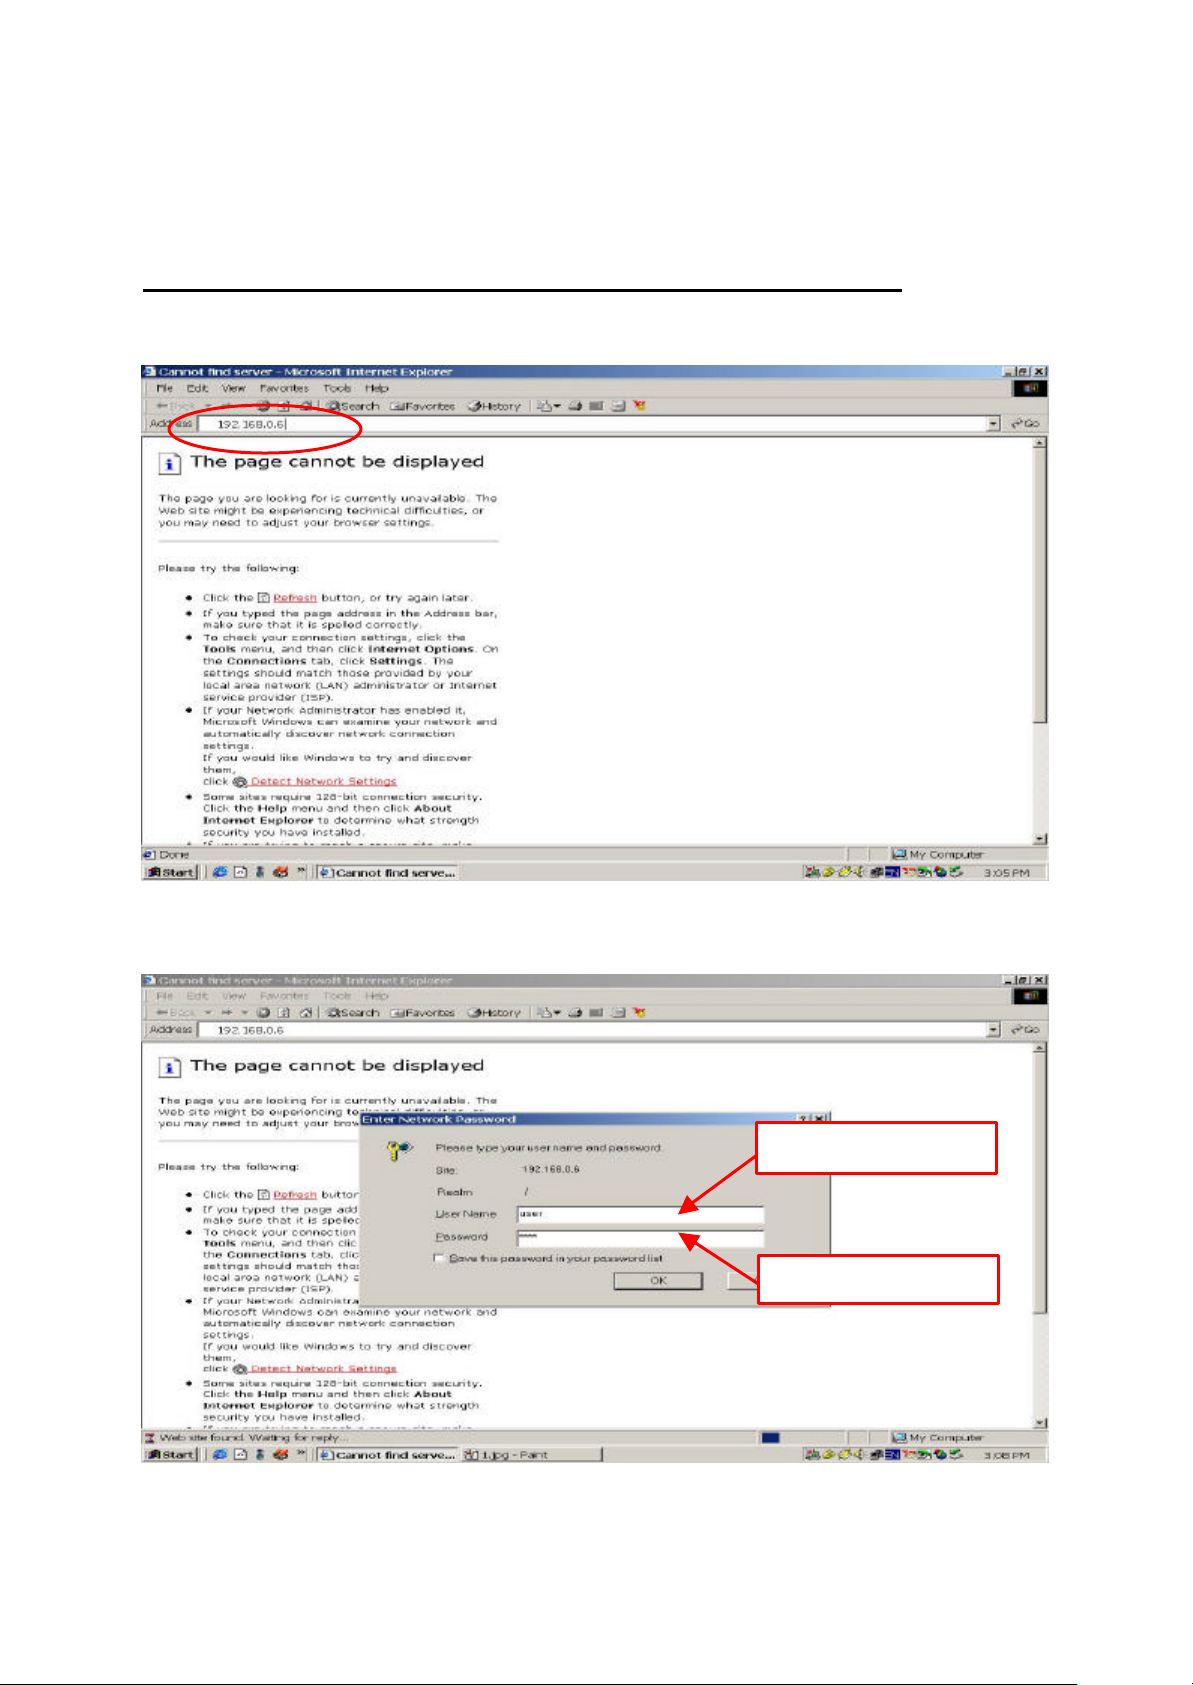
2. Browse wit h the handset IP address, for example 192.168.0.6
3. There comes up the screen: User Name: user, Password: 1111.
Click OK after entering user name and password.
User name: user
Password: 1111
- 13 -
Page 17
ND-91822 (E)
1.
Enter
the IP address of the
PC.
3.
Click 512 (Do
not
Issue 1.0
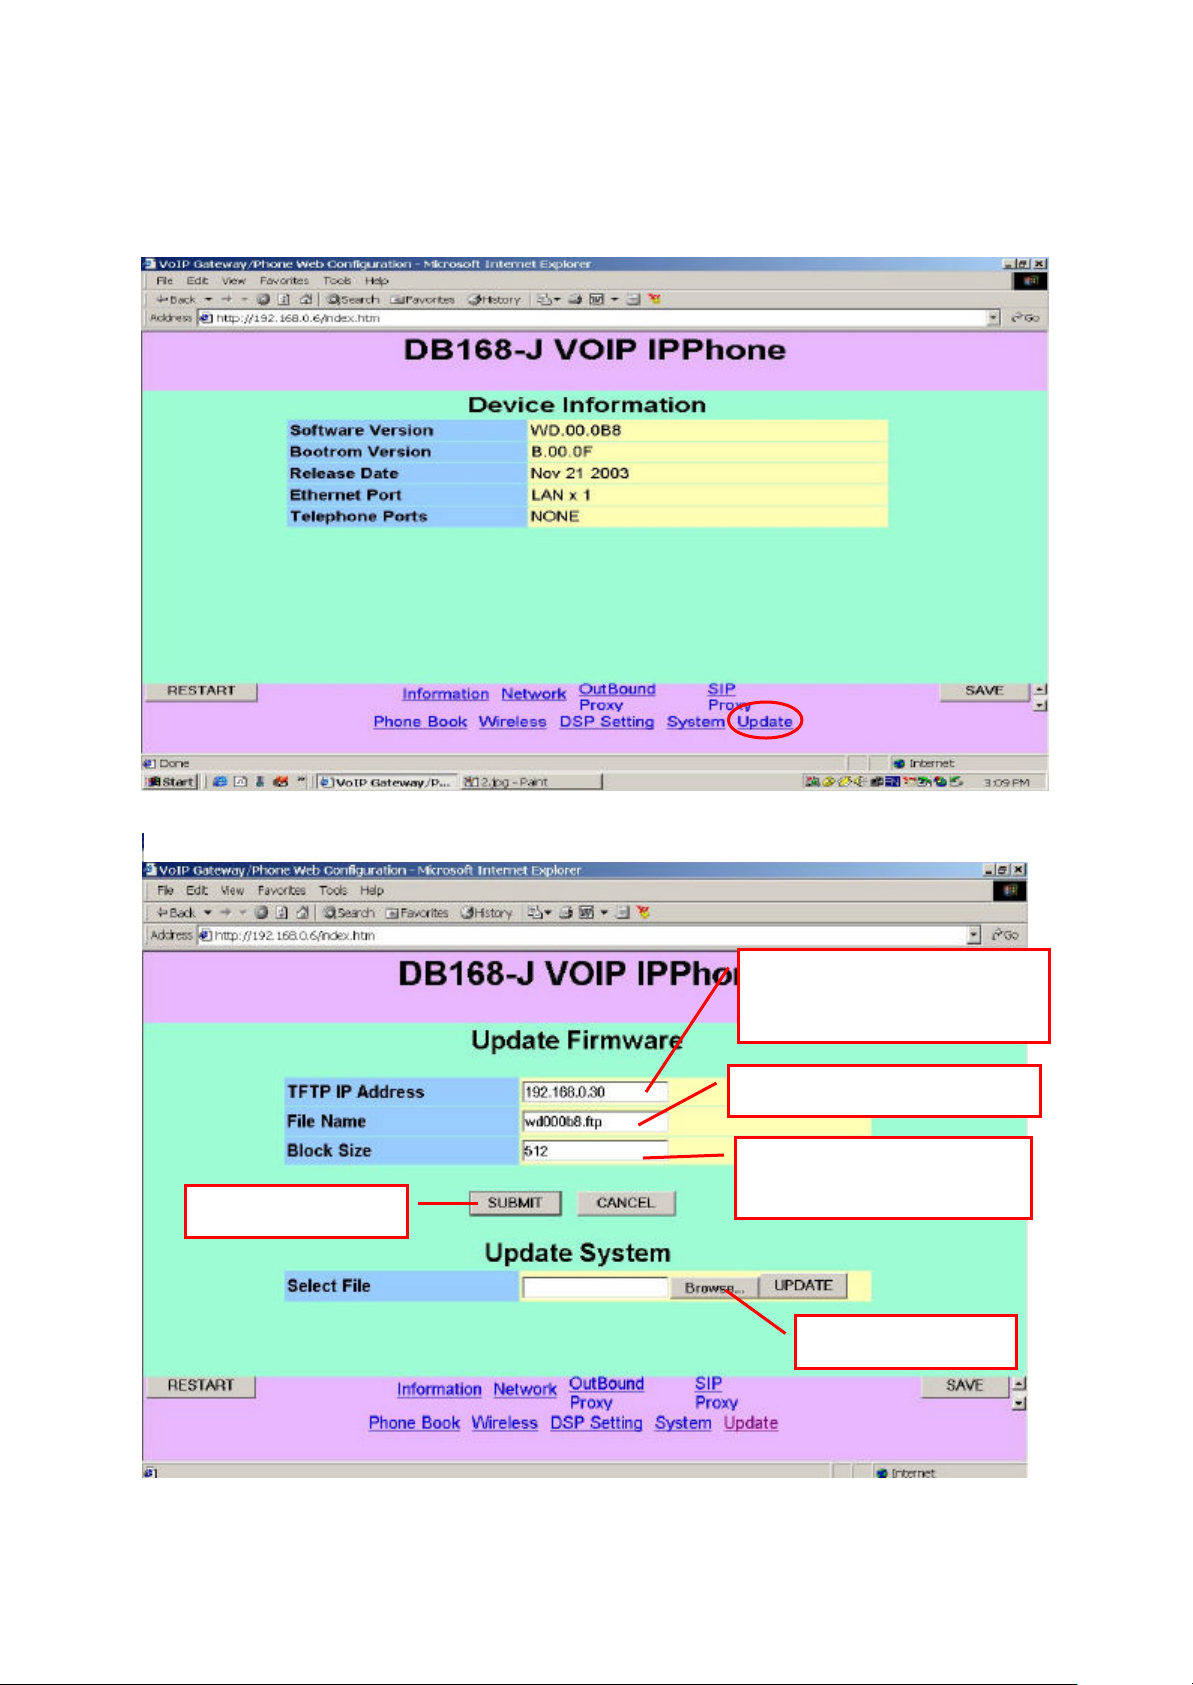
4. The setting screen comes up. The screen contains the contents of the Information folder of the
handset.
Click “Update” to display the update setting screen.
5. The Update setting screen:
Please be advised the IP address is
NOT the address of AP.
2.Enter the firmware name (*.ftp)
change the digits)
4.Click SUBMIT
5.Click Browse
- 14 -
Page 18
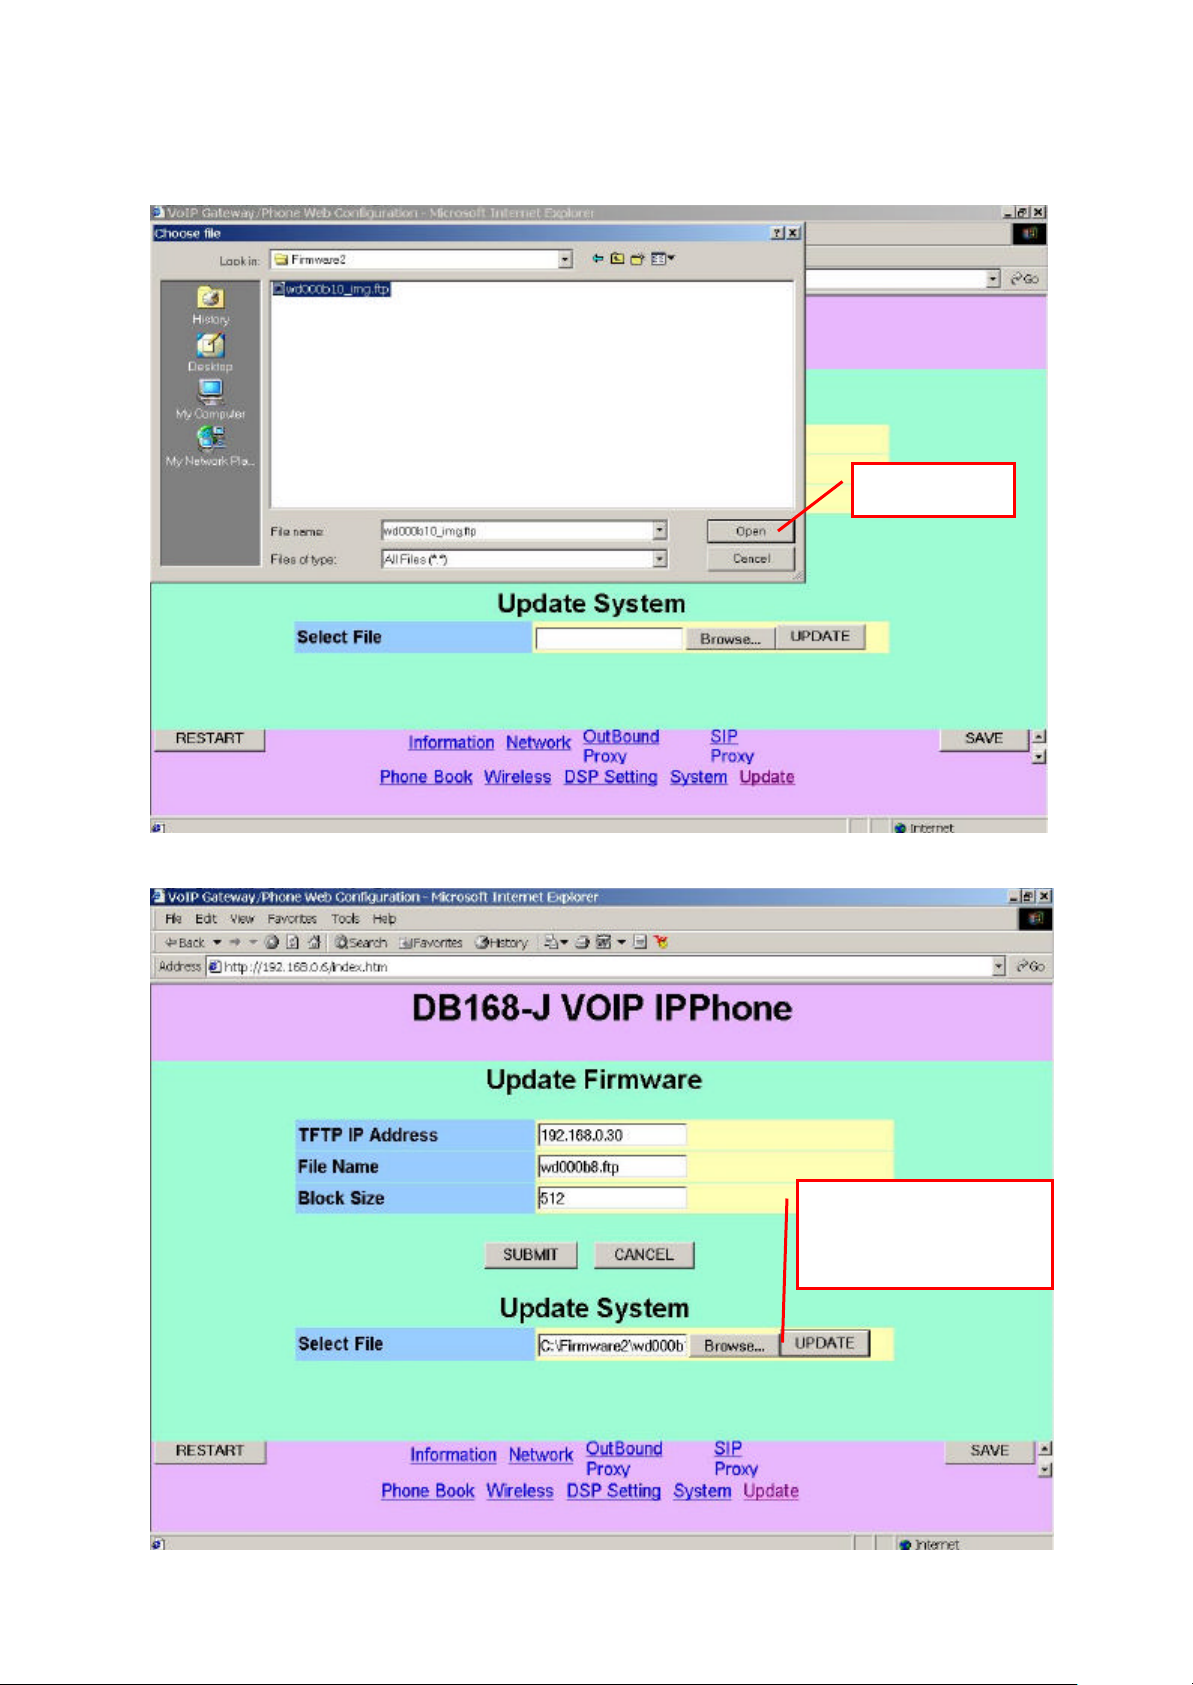
Update procedure
6. Specify the route that the firmware is to be updated.
7. The update procedure starts when clicking UPDATE.
ND-91822 (E)
Issue 1.0
Click Open
takes 3-5 minutes,
after clicking.
- 15 -
Page 19
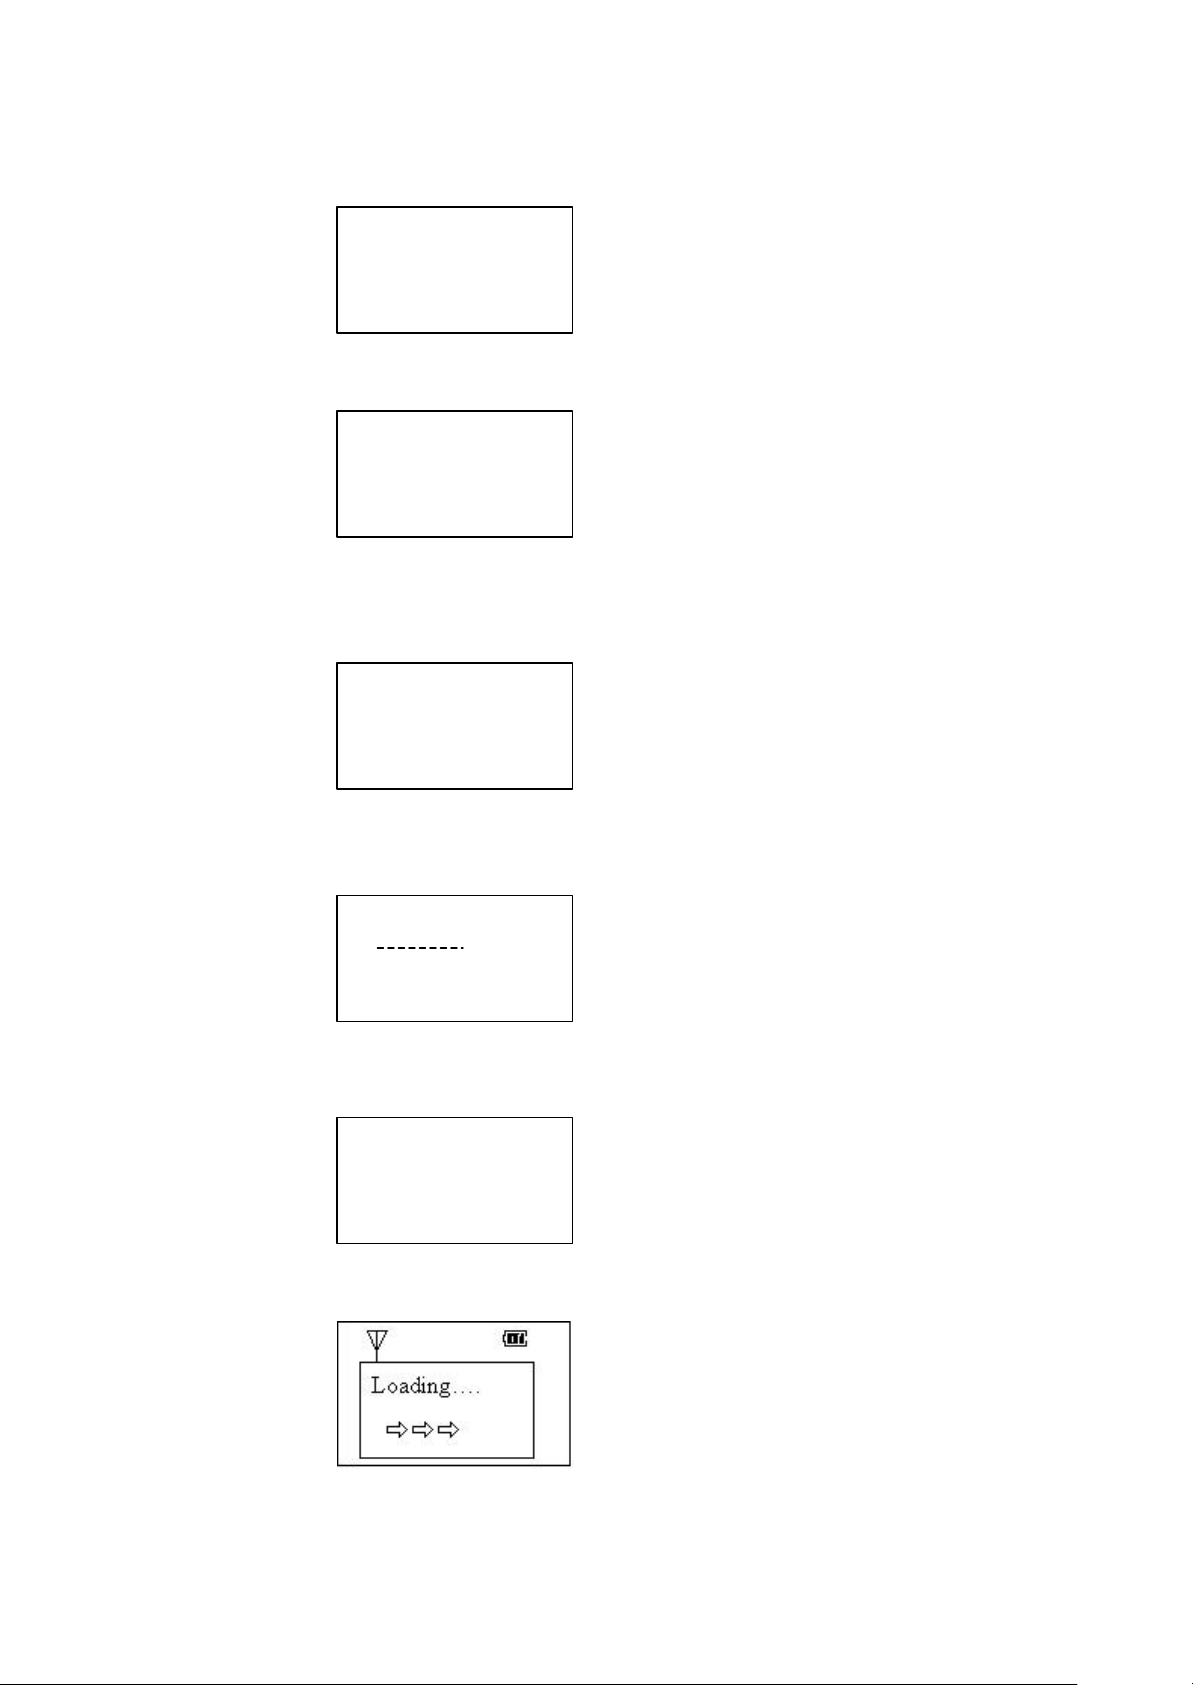
ND-91822 (E)
****************
Update Completed
Issue 1.0
8. The handset displays the below screen when the update starts:
9. When the update is completed (100%), the handset show up; please wait for seconds.
10. The following procedure takes about 40 seconds; Please ensure not to turn off the handset, and
ensure the power supply is sufficient for running procedure. To shutdown the power during this
procedure might cause the fatal damage to the FLASH.
11. The icon “arrow” runs left to right about 10 seconds. Please ensure not to turn off the handset, and
ensure the power supply is sufficient for running procedure.
12. The below screen tells the update procedure is completed. The handset will re-start. Please ensure
not to turn off the handset, and ensure the power supply is sufficient for running procedure..
13. After the handset starts, the below screen comes up and the handset will restart again.:
wd000b4_img.ftp
completed:0%
Please wait
Cal Checksum
Please wait
Erase Sec.. 0
Don’t Lose Power
。
Don’t Lose Power
Wait reboot
Don’t Lose Power
* The handset restarts again.
14. After the second handset re-start is finished, the complete update procedure is finished.
- 16 -
Page 20
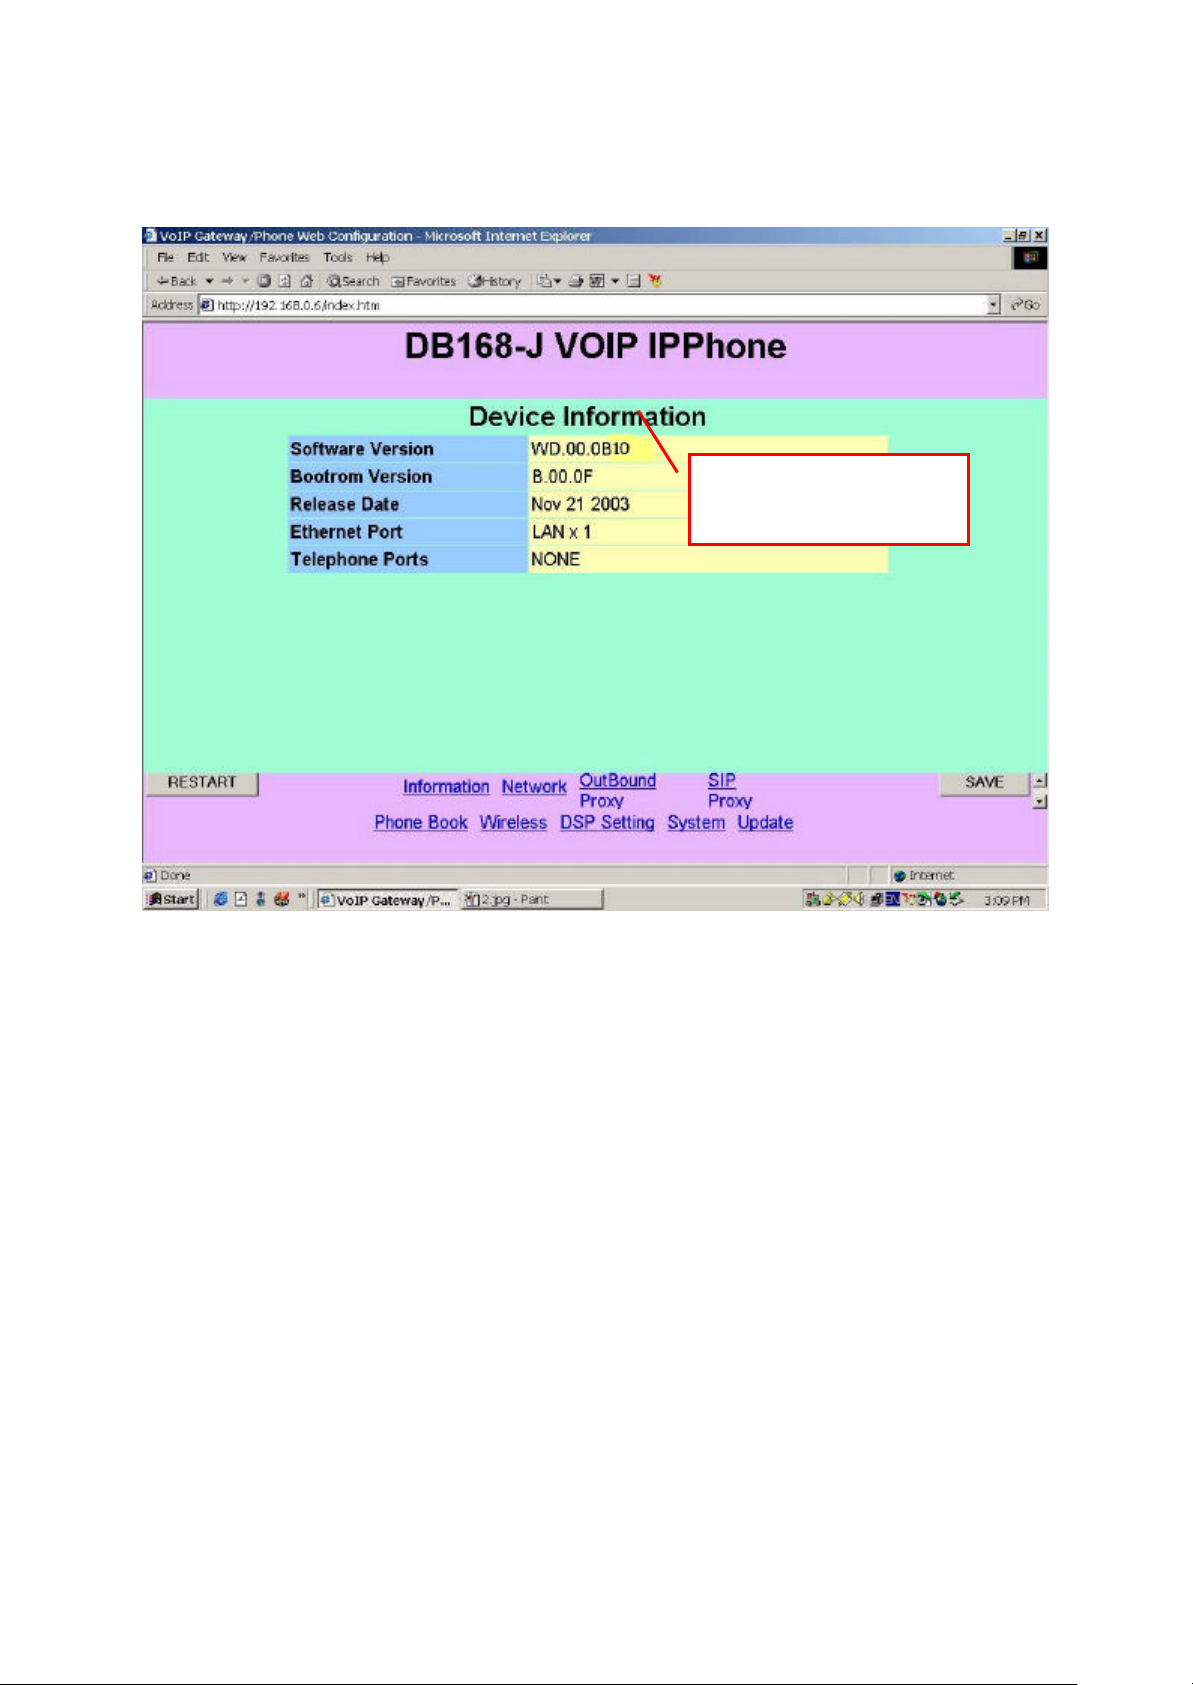
ND-91822 (E)
The
“
Update version
”
procedure accomplished
Issue 1.0
15. Please click the “Information” to ensure the Software Version item is changed to the new version
of the update firmware.
shows the UPDATE
- 17 -
Page 21
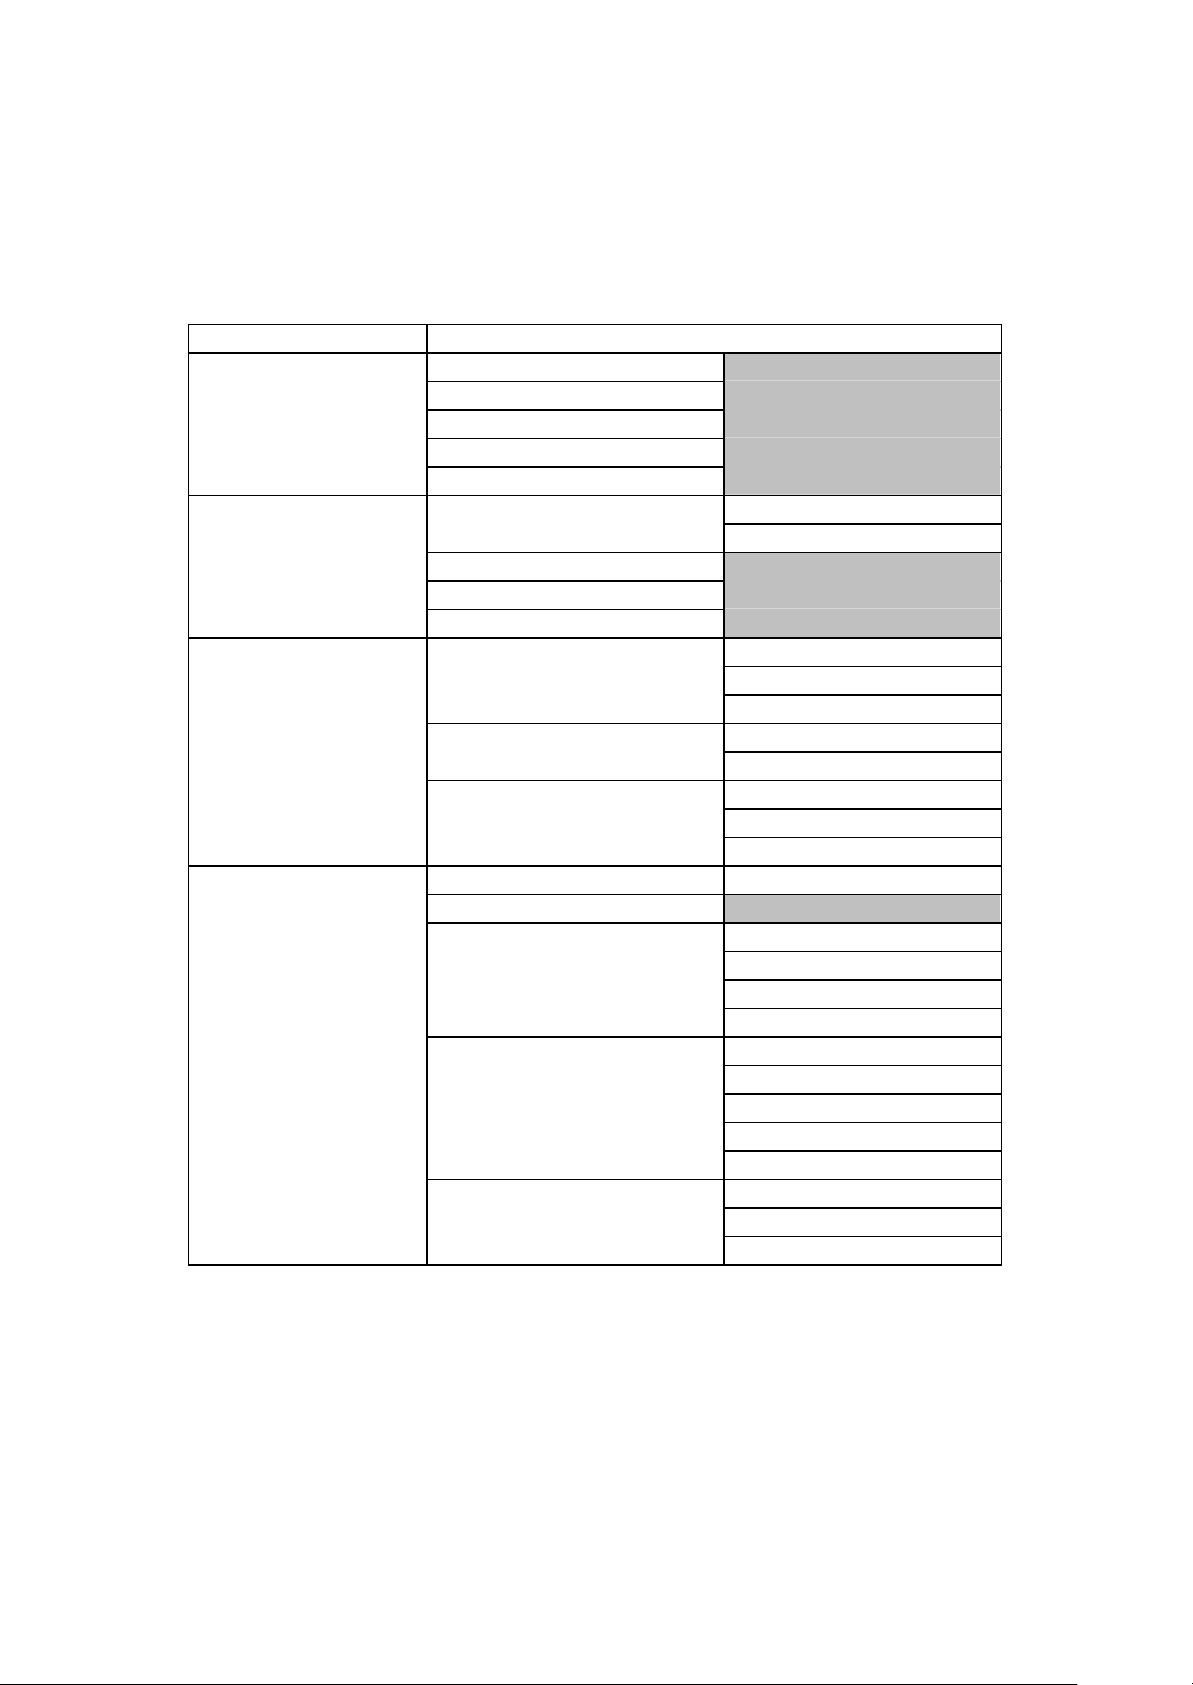
ND-91822 (E)
Issue 1.0
5. List of Configuration Menu
Simultaneously press [4]+[9]+[遧] at the “Power off” state, then press [FNC] to display configuration
menu.
Menu Parameter
[1] Information [1] Phone number
[2] IP address
[3] MAC ID
[4] Firmware ver.
[5] Hardware ver.
[2] Net setting [1] Network mode [1] DHCP
[2] Fixed IP
[2] IP address (Note)
[3] Subnet mask (Note)
[4] Gateway (Note)
[3] SIP setting [1] Server [1] DNS IP
[2] Port
[3] Expire time
[2] Proxy [1] Proxy IP
[2] Proxy port
[3] User account [1] Phone number
[2] User name
[3] User password
[4] WLAN setting [1] Network mode [1] Public
[2] ESSID
[3] Channel Channel 1
Channel 2
:
Channel 11
[4] Rate [1] Auto
[2] 1M
[3] 2M
[4] 5.5M
[5] 11M
[5] WEP select [1] None
[3] 128 bits
[2] 64 bits
Note: When DHCP is selected, this item cannot be edited.
- 18 -
Page 22

ND-91822 (E)
Issue 1.0
Federal Communication Commission Interference
Statement
This equipment has been tested and found to comply with the limits for a Class B
digital device, pursuant to Part 15 of the FCC Rules. These limits are designed to
provide reasonable protection against harmful interference in a residential installation.
This equipment generates, uses and can radiate radio frequency energy and, if not
installed and used in accordance with the instructions, may cause harmful
interference to radio communications. However, there is no guarantee that
interference will not occur in a particular installation. If this equipment does cause
harmful interference to radio or television reception, which can be determined by
turning the equipment off and on, the user is encouraged to try to correct the
interference by one of the following measures:
- Reorient or relocate the receiving antenna.
- Increase the separation between the equipment and receiver.
- Connect the equipment into an outlet on a circuit different from that
to which the receiver is connected.
- Consult the dealer or an experienced radio/TV technician for help.
This device complies with Part 15 of the FCC Rules. Operation is subject to the
following two conditions: (1) This device may not cause harmful interference, and (2)
this device must accept any interference received, including interference that may
cause undesired operation.
FCC Caution: Any changes or modifications not expressly approved by the party
responsible for compliance could void the user's authority to operate this equipment.
IMPORTANT NOTE:
FCC Radiation Exposure Statement:
This equipment complies with FCC radiation exposure limits set forth for an
uncontrolled environment. End users must follow the specific operating instructions
for satisfying RF exposure compliance.
This transmitter must not be co-located or operating in conjunction with any other
antenna or transmitter.
Body-worn operations are restricted to beltclips, holsters or similar accessories that have no
metallic component in the assembly.
- 19 -
 Loading...