

Page 1

Memory Editor
User Guide for
Windows 2000
Page 2

Legal Notice
No part of this publication may be reproduced, transmitted, transcribed, stored in a retrieval
system, or translated into any computer language, in any form or by any means, without the
express written permission of NEC America, Inc. (“NEC”).
NEC is a registered trademark of NEC Corporation, Inc.
Microsoft and Windows are registered trademarks of Microsoft Corporation in the United States
and other countries. WinZip is a registered trademark of WinZip Computing, Inc.
All other company and product names are trademarks of their respective owners.
The content of this guide is provided on an “as-is” basis. Except as required by applicable
law, no warranties of any kind either express or implied including, but not limited to, the
implied warranty of merchantability or fitness for a particular purpose, are made
regarding the completeness, accuracy, or content of this guide. NEC reserves the right to
revise or rescind this guide at any time without prior notice. In addition, NEC reserves the
right to make changes or improvements to the wireless phone or products described in this
guide without prior notice.
The most recently revised copy of any NEC Wireless Phone user guides and Memory Editor
Frequently Asked Questions document can be found at the website www.nechdm.com.
NEC is not responsible for any loss or corruption of data, loss of income or business, or any
consequential, incidental, or special damage, however caused.
NOTE: Use of the NEC Memory Editor requires the purchase of an optional NEC Authorized
Accessory, the NEC USB cable. Your service provider can tell you where to purchase
this USB cable. WARNING: Use of anything other than an NEC Authorized
Accessory approved for your model of wireless phone may void your wireless phone
warranty and may be dangerous.
This guide contains pictures that were captured from live Windows during procedures of
installing NEC Memory Editor and NEC USB Drivers software. Windows 2000 may display
other dialog boxes and screens (not shown in the guide) during installation and setup procedures
that provide information or request information during processing. Windows displays a variety
of these screens depending upon the configuration that you have already setup and use on your
computer. You should provide the information that these screens request and follow the wizard
process.
Version 1
Document Number: WED-933T-MAN-302-09-1.0
Copyright© 2003 NEC America, Inc. All rights reserved.
ii
Page 3

Table of Contents
NEC Memory Editor....................................................................................................................... 1
What is Memory Editor?............................................................................................................. 1
Frequently Asked Questions Document ..................................................................................... 2
NEC Declaration and Terms of Use ........................................................................................... 2
NEC Declaration..................................................................................................................... 2
Terms of Use........................................................................................................................... 3
What Is Needed to Make Memory Editor Work?........................................................................... 4
Equipment................................................................................................................................... 4
Software...................................................................................................................................... 4
Service......................................................................................................................................... 4
System Requirements...................................................................................................................... 5
Hardware Requirements.............................................................................................................. 5
Software Requirements............................................................................................................... 5
Technical Support and Assistance.................................................................................................. 6
Memory Editor Installation............................................................................................................. 7
Creating a “MemoryEd” Folder.................................................................................................. 7
Copying Memory Editor............................................................................................................. 7
Installing Memory Editor............................................................................................................ 9
Uninstall Memory Editor Process............................................................................................. 18
NEC USB Drivers......................................................................................................................... 19
What are the NEC USB Drivers?.............................................................................................. 19
Copying the NEC USB Drivers................................................................................................ 20
Connecting the USB Cable To the NEC Wireless Phone......................................................... 22
Installing the NEC USB Drivers............................................................................................... 23
Uninstall NEC USB Drivers Process........................................................................................ 29
Memory Editor Setup.................................................................................................................... 30
Identify COM Port Number...................................................................................................... 30
COM Port Setup........................................................................................................................ 33
Using Memory Editor................................................................................................................... 35
Reasons to Transfer Resource Data.......................................................................................... 37
Accessing Memory Editor ........................................................................................................ 38
iii
Page 4

Downloading Resource Data .................................................................................................... 39
Saving All Resource Data......................................................................................................... 40
Previewing Resource Data........................................................................................................ 41
Previewing Downloaded Data .............................................................................................. 41
Previewing Uploaded Data................................................................................................... 42
Removing Unwanted Resource Data........................................................................................ 43
Changing a File Name .............................................................................................................. 44
Saving Selected Resource Data to PC ...................................................................................... 45
Saving a Single Resource File .................................................................................................. 45
Uploading Computer Files........................................................................................................ 46
Transfer .mef files................................................................................................................. 46
Transfer Picture or Audio files ............................................................................................. 47
Final Transfer to NEC Wireless Phone................................................................................. 48
Clearing the Destination List.................................................................................................... 49
Changing the Font Style............................................................................................................ 50
Connection Error....................................................................................................................... 50
Closing Memory Editor ............................................................................................................ 50
Memory Editor Messages............................................................................................................. 51
NEC Wireless Phone Locked.................................................................................................... 51
SIM Card Removed .................................................................................................................. 51
Protected Copyright.................................................................................................................. 52
Unrecognized File Format ........................................................................................................ 52
Individual File Size Too Large................................................................................................. 53
Total File Size Too Large......................................................................................................... 53
Deleted File on Computer......................................................................................................... 54
iv
Page 5

NEC Memory Editor
This section provides information regarding:
• NEC Memory Editor (“Memory Editor” or “Memory Editor Software”)
• Memory Editor Frequently Asked Questions document location
• NEC Declaration and Terms of Use
What is Memory Editor?
Memory Editor is a software tool to download or upload picture and audio files between
your computer and an NEC Wireless Phone utilizing an NEC approved USB cable. The
picture files may be used as a wallpaper or caller identification picture in an NEC
Wireless Phone. The audio files may be used as a ring tune in an NEC Wireless Phone.
Memory Editor allows you to:
• Change the file name.
• View data size of a file.
• Transfer graphic files from your computer to your NEC Wireless Phone.
• Transfer all graphic and audio files from your NEC Wireless Phone to one .mef
file on your computer.
• Transfer a graphic file from your NEC Wireless Phone as a selected file format to
your computer.
• Transfer audio files from your computer to your NEC Wireless Phone.
• Transfer an audio file from your NEC Wireless Phone as a selected file format on
your computer.
The following table provides the type of file formats and data size allowed using Memory
Editor.
File
Format
Picture Maximum
Data Size
JPEG 64 Kb SMAF 32 Kb
GIF87a 64 Kb SMF 32 Kb
GIF89a (contains animated GIF) 64 Kb AMR 32 Kb
WBMP 64 Kb iMelody 128 bytes
PNG 64 Kb
Audio Maximum
Data Size
1
Page 6

Frequently Asked Questions Document
Memory Editor Frequently Asked Questions and Glossary document can be found at the
website www.nechdm.com.
NEC Declaration and Terms of Use
Please read the following declaration and terms of use before you proceed to download
the software.
NEC Declaration
Before using the NEC Memory Editor, please remember that you have the sole
responsibility for ensuring that you have all necessary rights ad permissions to copy,
download, store, edit, upload and/or use in any manner any material or content which you
generate or obtain from any third party.
1. You are solely responsible for ensuring that all material and content including, but not
limited to ring tones, music, sounds, graphics, photographs or text downloaded or
uploaded through the Memory Editor do not or will not infringe any intellectual
property rights of any third parties, including but not limited to patents, copyrights,
trademarks or service marks; and that such material and content is not illegal or
unlawful, threatening, libelous or harmful.
2. NEC DISCLAIMSANY AND ALL LIABILITY WITH RESPECT TO ANY
MATERAILS OR CONTENT, WHICH YOU DOWNLOAD OR UPLOAD
THROUGH THE MEORY EDITOR AND IN NO EVENT SHALL NEC BE
LIABLE FOR ANY DAMAGES, INCLUDING BUT NOT LIMITED TO
CONSEQUENTIAL, INCIDENTAL, SPECIAL OR PUITIVE DAMAGES, OR THE
CLAIMS OF ANY THIRD PARTIES (INCLUDING YOU) RESULTING FROM
USAGE OF THE MEMORY EDITOR, EVEN IF NEC KNEW OF THE
LIKELIHOOD OF SUCH DAMAGES OR CLAIMS.
2
Page 7

Terms of Use
The Memory Editor Software is subject to the following Terms of Use. NEC expressly
reserves the right to update or revise the Terms of Use at any time without prior notice to
you.
1. This Memory Editor Software is the copyrighted work of NEC. Use of the Memory
Editor Software is governed by the terms of the end user license agreement, which is
included with the Memory Editor Software ("License Agreement"). You will be
unable to install the Memory Editor Software, unless you first agree to the terms and
conditions of the License Agreement.
2. Unless otherwise specified, the Memory Editor Software is provided solely for your
personal and non-commercial use. You may not modify, copy, distribute, transmit,
display, perform, reproduce, publish, license, reverse engineer, create derivative
works from, transfer, or sell the Memory Editor Software. Any use, reproduction or
redistribution of the Memory Editor Software not in accordance with the License
Agreement is expressly prohibited. Violators will be prosecuted to the maximum
extent permitted by law.
3. EXCEPT FOR THE LIMITED WARRANTY PROVIDED IN THE LICENSE
AGREEMENT, IF ANY, NEC EXPRESSLY DISCLAIMS ALL WARRANTIESOF
ANY KIND, EXPRESS OR IMPLIED, WITH RESPECT TO THE MEMORY
EDITOR SOFTWARE, INCLUDING BUT OT LIMITED TO THE IMPLIED
WARRANTIES OF MERCHANTABILITY, FITNESS FOR A PARTICULAR
PURPOSE, TITLE AND NON-INFRINGEMENT.
3
Page 8

What Is Needed to Make Memory Editor Work?
This section provides the equipment, software, and service necessary to install the NEC
Memory Editor and the NEC USB Drivers.
Equipment
The equipment that is required includes:
• NEC Wireless Phone.
• NEC approved USB cable to connect the NEC Wireless Phone to the computer.
• Desktop computer or laptop with the system requirements stated on the next page.
Software
The software that is required includes:
• NEC Memory Editor
(Location instructions are provided in Copying Memory Editor on page 7.)
Service
The service that is required:
WARNING: To use the features described in this guide, the phone must be turned on.
• NEC USB Drivers
(Location instructions are provided in Copying the NEC USB Drivers on page
20.)
• WinZip©
To copy and extract the necessary NEC USB Drivers from the NEC website
requires the assistance of WinZip software. You can obtain WinZip from the
website: www.winzip.com.
• ISP (Internet Service Provider) service to access and download Memory Editor
and NEC USB Drivers software.
Do not turn on or use the wireless phone when such use may cause radio
frequency interference with equipment or dangerous situations. Refer to
the NEC Wireless Phone User Guide, Safety and Performance section.
4
Page 9

System Requirements
The lists below describe the computer system requirements for installing NEC Memory
Editor and NEC USB Drivers on a personal computer or laptop.
Hardware Requirements
• Processor: 133 Mhz (minimum) or higher
• RAM: 32 MB for Windows® 2000
• Drives: Hard disk with 20 MB available
• Supported Connections: USB
Software Requirements
• Microsoft® Window 2000
• NEC Memory Editor
• NEC USB Drivers
• WinZip
5
Page 10

Technical Support and Assistance
For technical support and assistance regarding Memory Editor or the NEC USB Drivers
software, during regular business hours (Central Standard Time), contact NEC at:
1-800-637-5917, Option 3
6
Page 11
Memory Editor Installation
This section provides the information of:
• Why do I need to create a folder on the C:\ drive called MemoryEd?
• How do I copy Memory Editor?
• How do I install Memory Editor?
• How do I uninstall Memory Editor?
Creating a “MemoryEd” Folder
Create a folder on the C:\ drive called MemoryEd.
The Memory Editor and NEC USB Drivers will be copied to the MemoryEd folder to
make it easier to find the downloaded software for the installation process.
Copying Memory Editor
To copy Memory Editor from the NEC website:
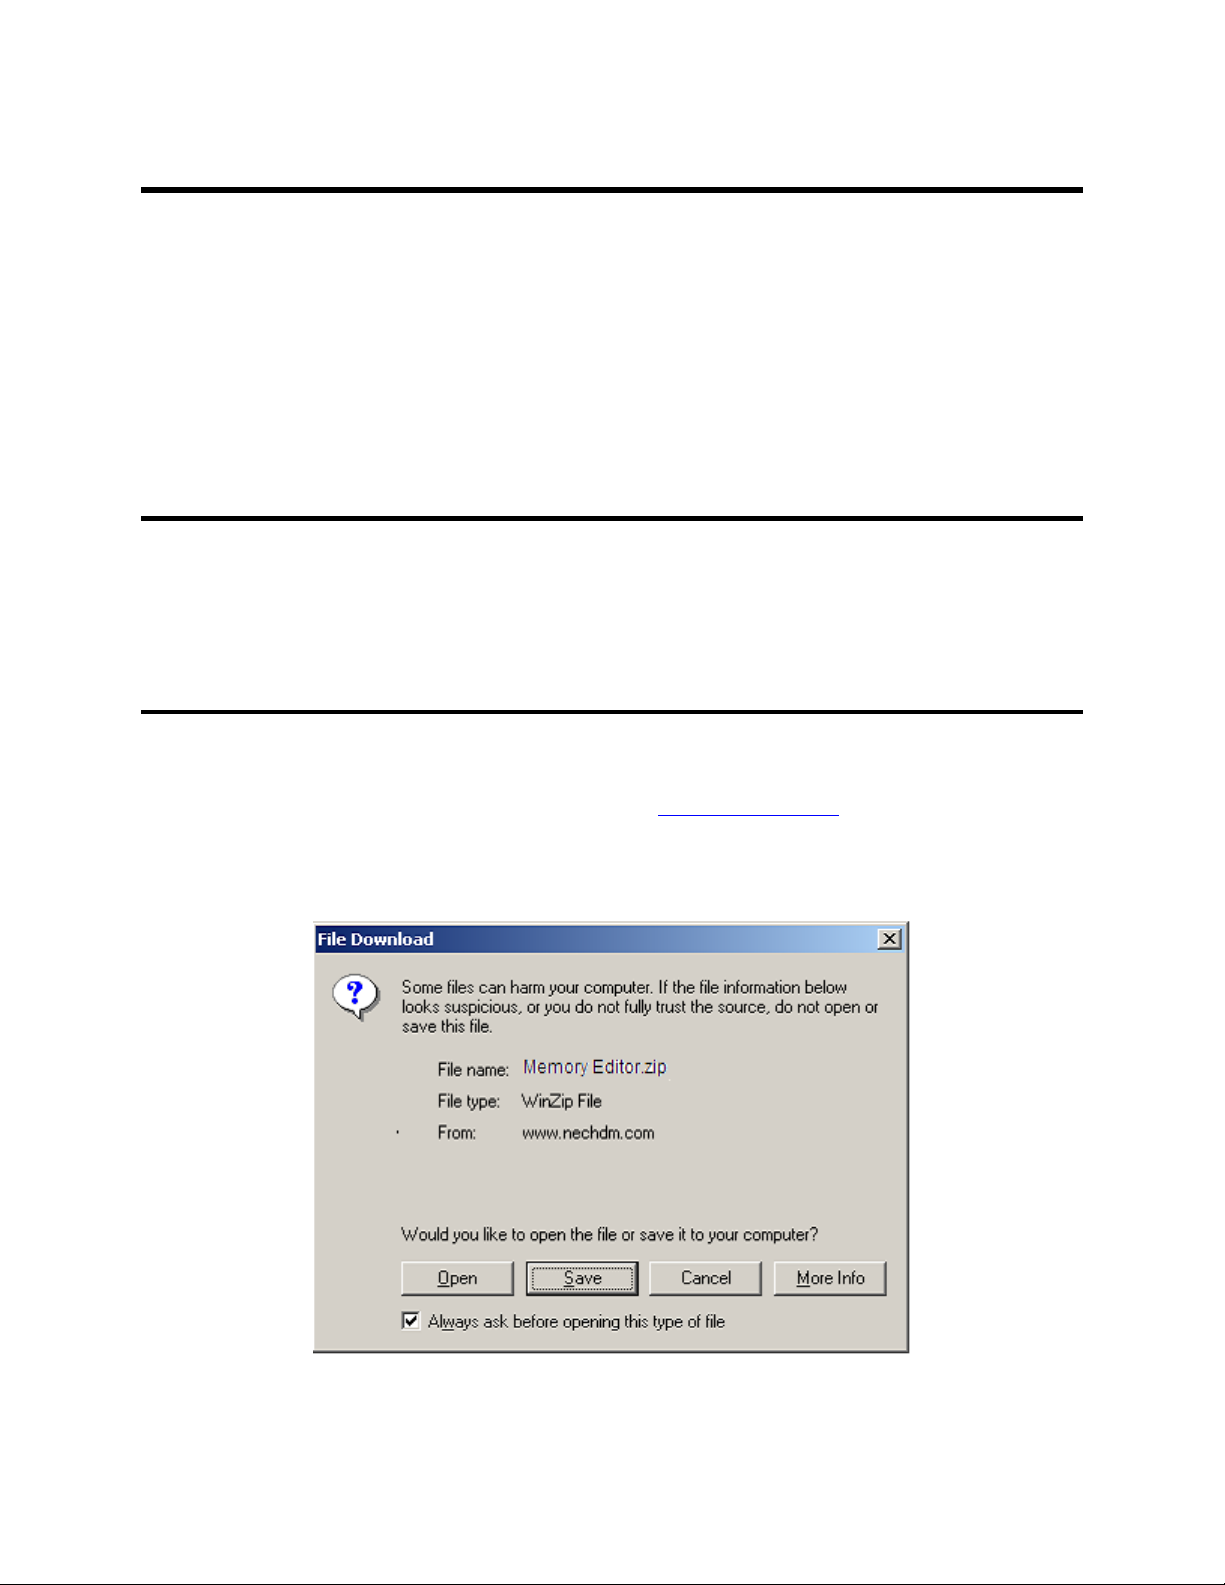
1. Locate the Memory Editor at the website: www.nechdm.com. Select Toolbox and
Memory Editor.
2. Click on Install Memory Editor. The File Download dialog box displays.
3. Click the Save button. The Save As dialog box displays.
7
Page 12
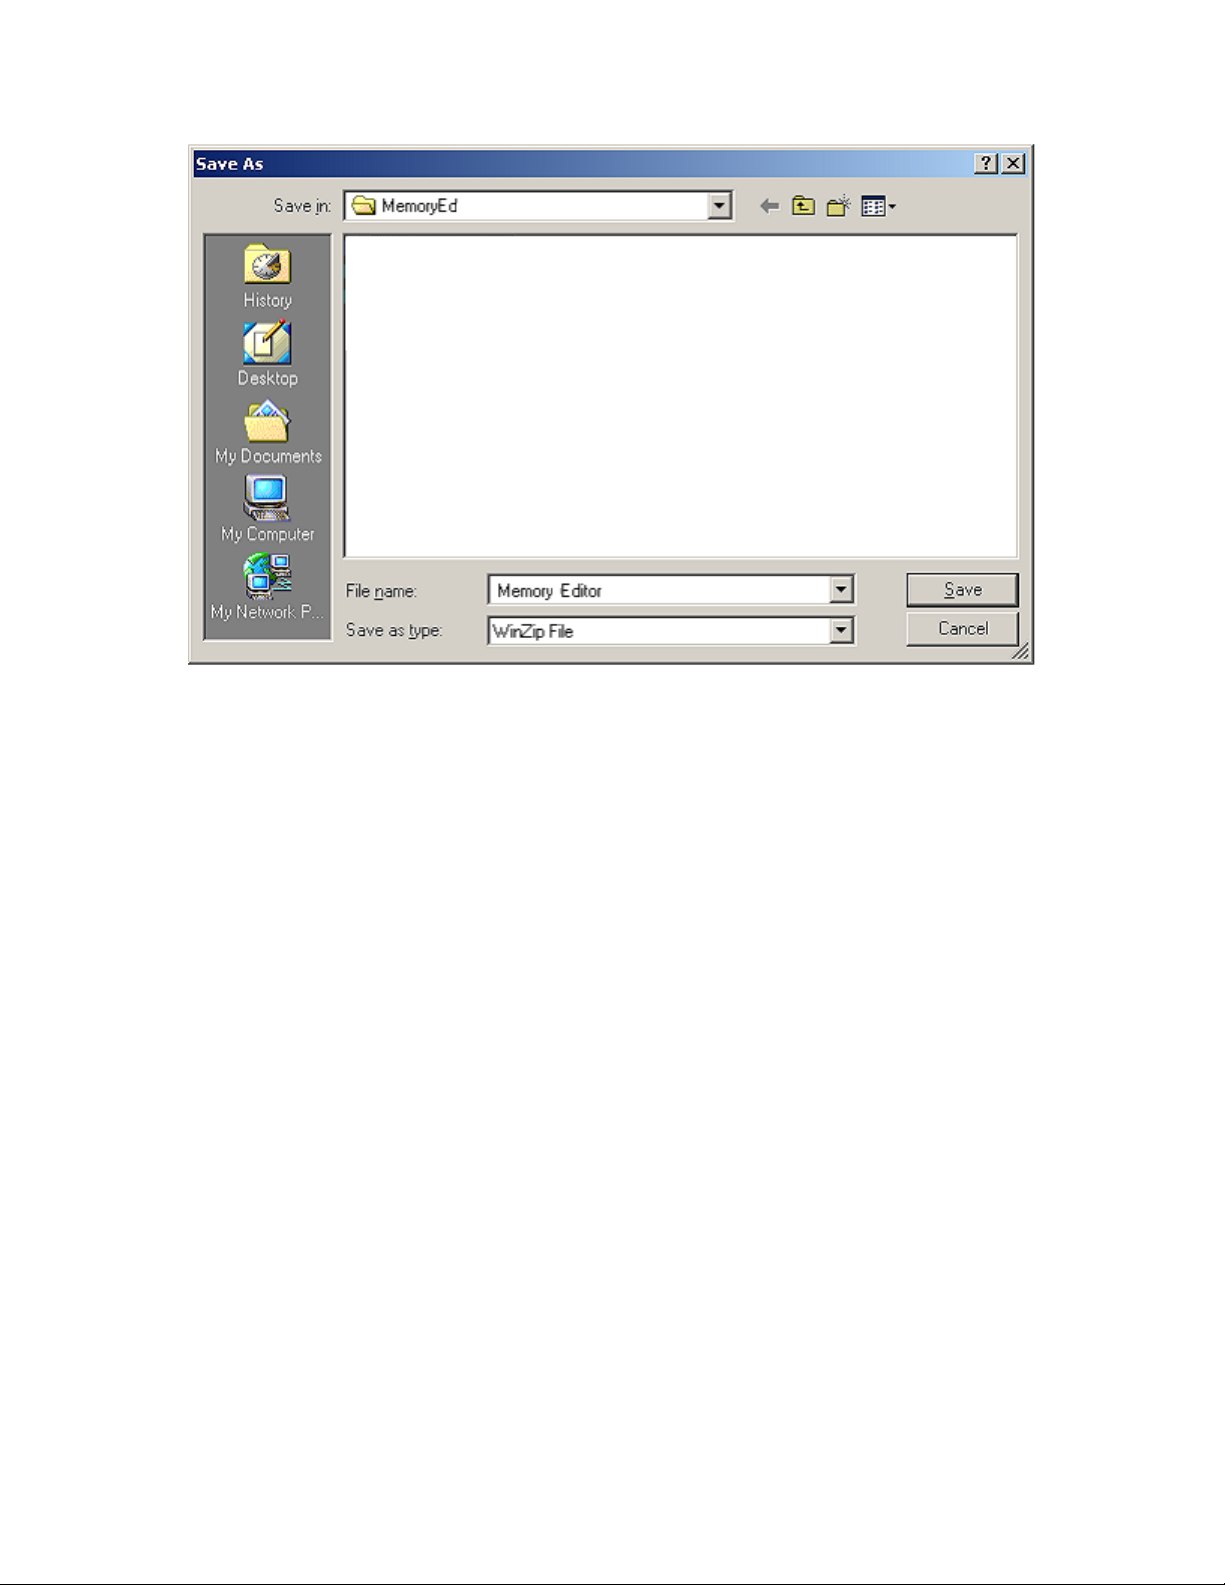
4. Select MemoryEd folder to display in the Save in: field and click the Save button.
The zip file is saved to the MemoryEd folder.
5. Close the Internet window. Open Windows Explorer or My Computer. Open the
MemoryEd folder.
6. Double-click MemoryEditor 525 zip icon.
For Classic mode, the WinZip window displays with a list of files. Click on the
Extract button to display the Extract dialog box. Make sure that the All files button
is selected and the Use folder names box is checked. Extract the files to the
MemoryEd folder.
For Wizard mode, the files are automatically saved to the specified folder.
8
Page 13
Installing Memory Editor
To install Memory Editor:
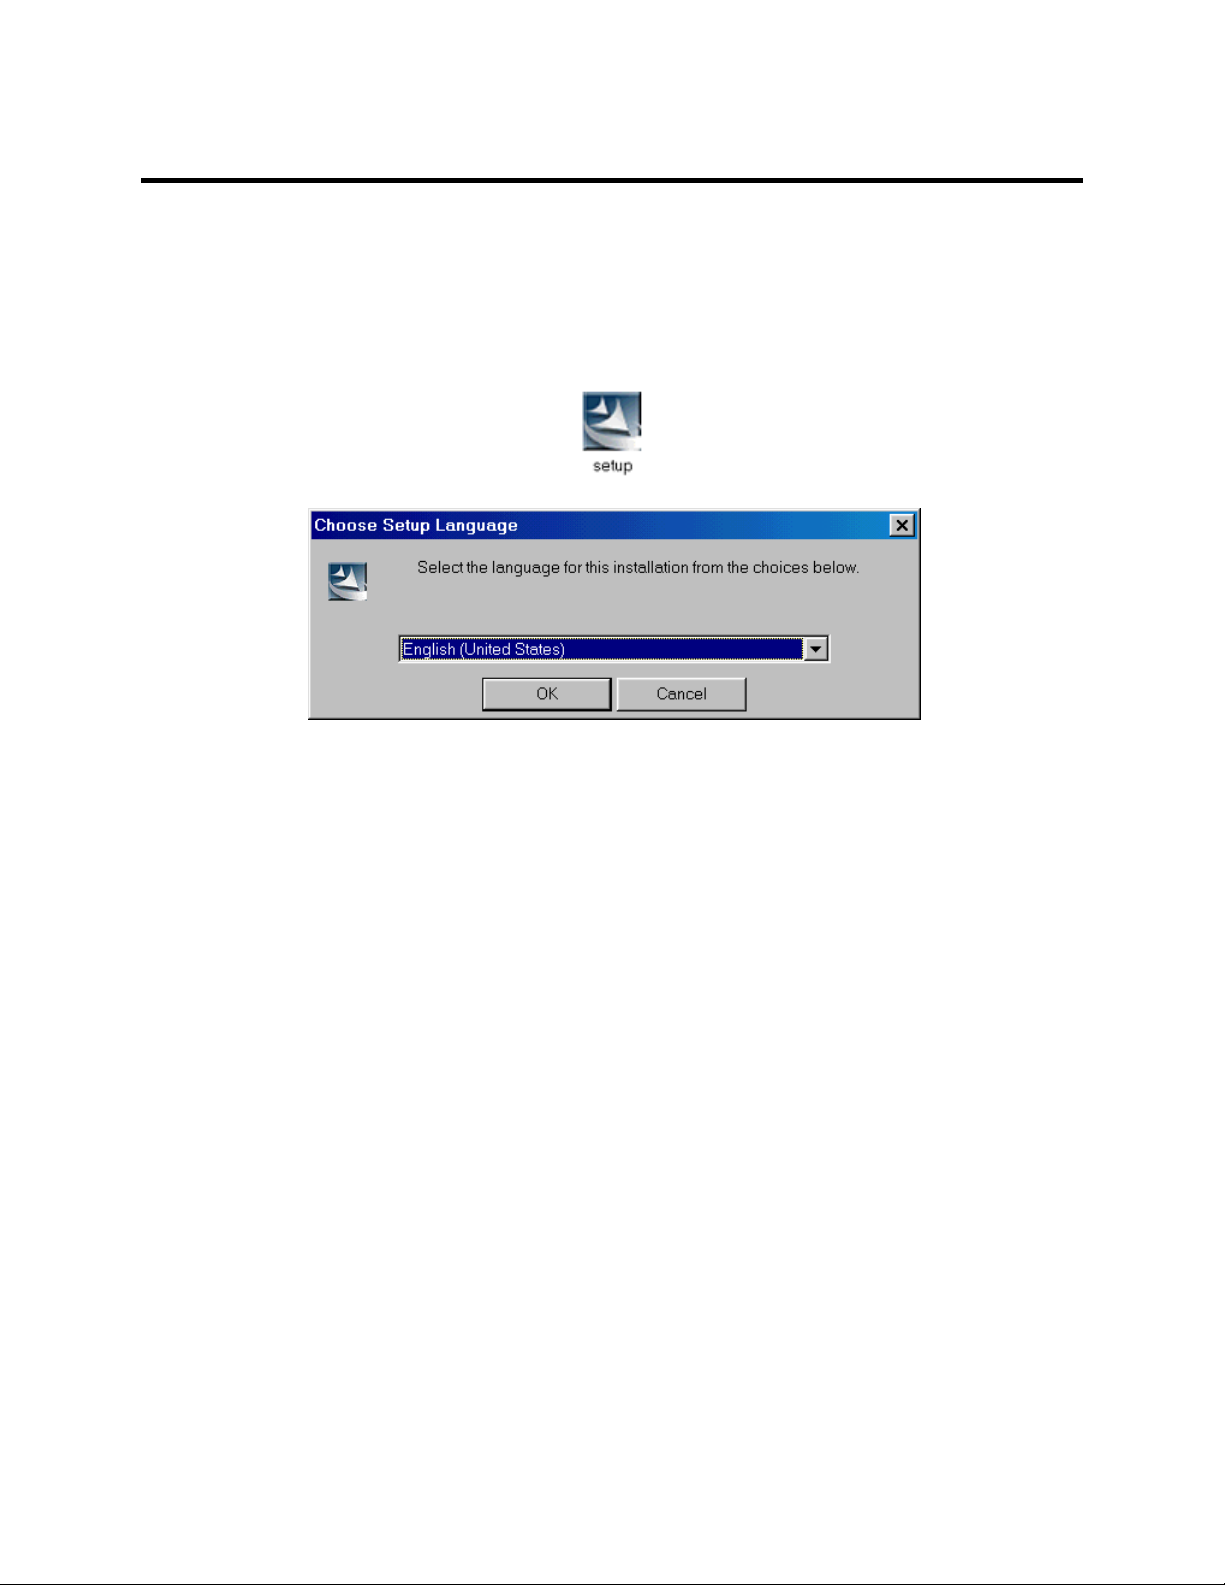
1. Go to My Computer or Windows Explorer, C:\MemoryEd, and MemoryEditor
a525 folder.
2. Double-click on the Setup icon. The Choose Setup Language dialog box displays.
3. Select the language that you are using in the NEC Wireless Phone. Click OK. The
InstallShield Wizard screen displays.
9
Page 14
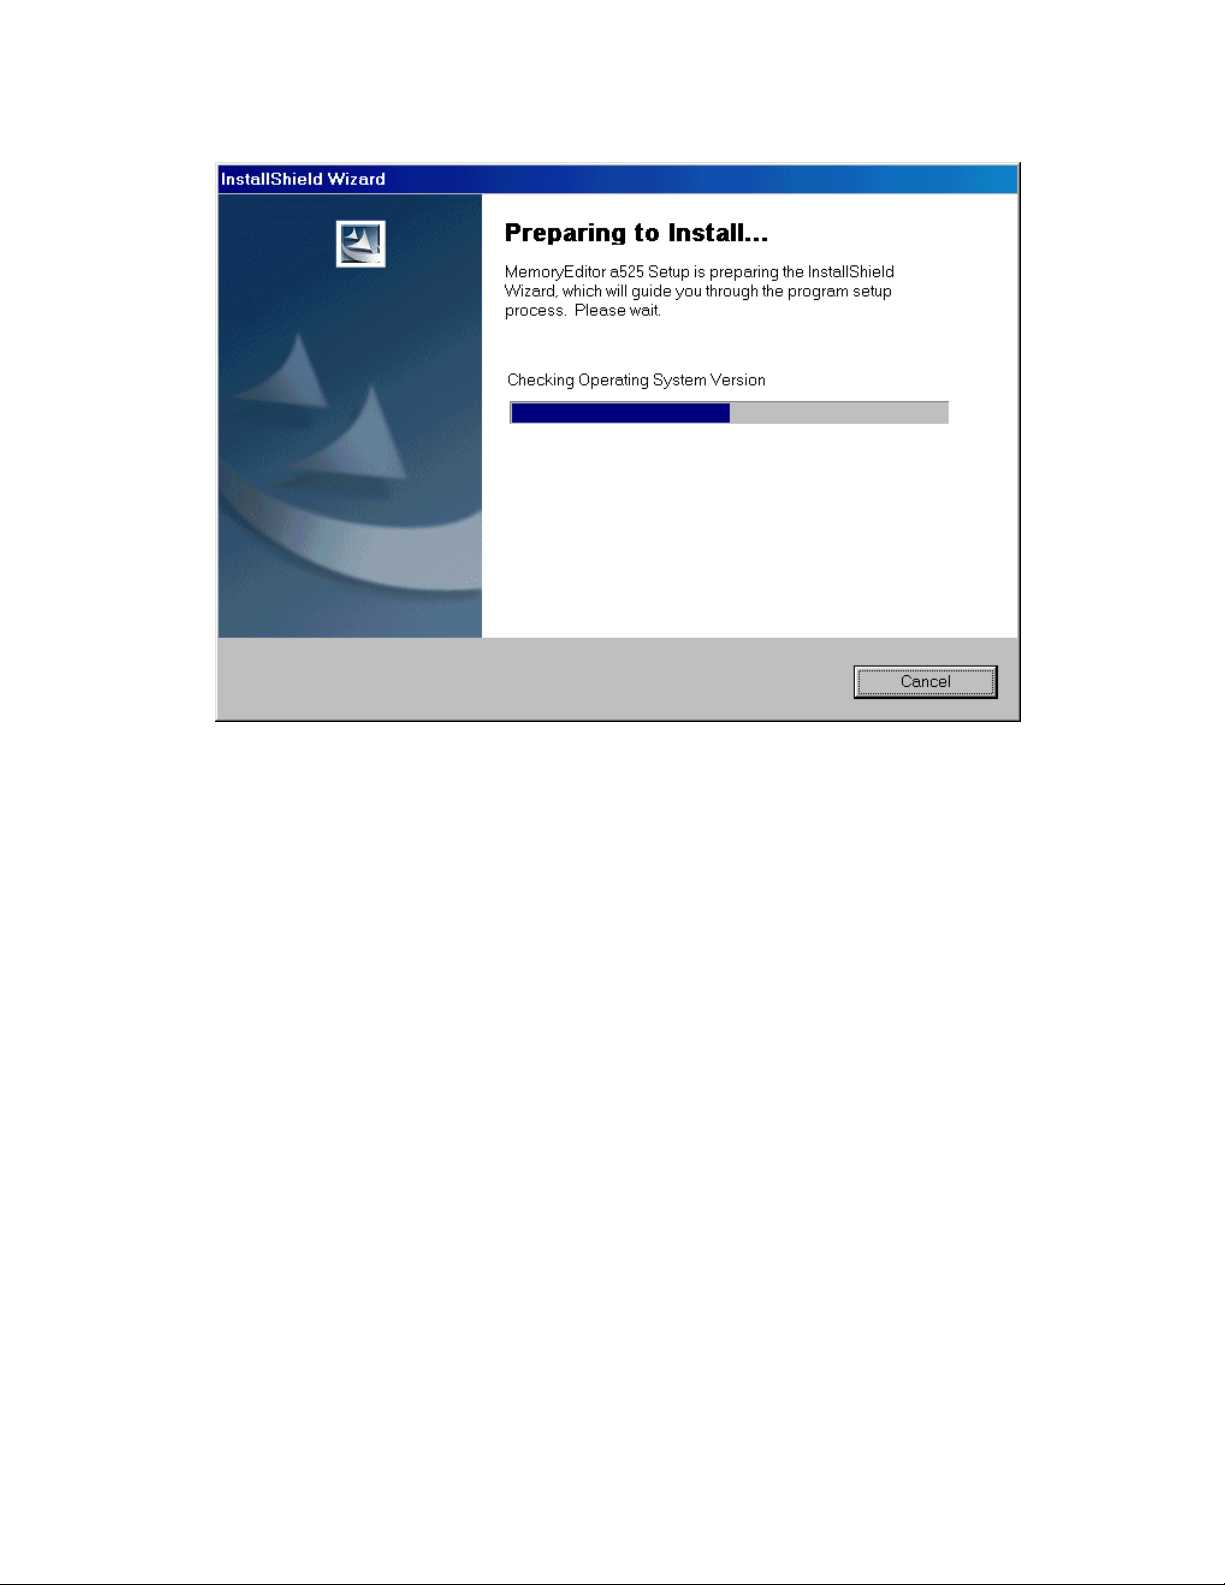
4. The InstallShield Wizard displays three tasks above the progress bar: Checking
Operating System Version, Configuring Windows Installer, and Preparing to
Install….
When the three tasks are completed, the next InstallShield Wizard screen displays.
10
Page 15

5. Click Next. The License Agreement displays.
11
Page 16
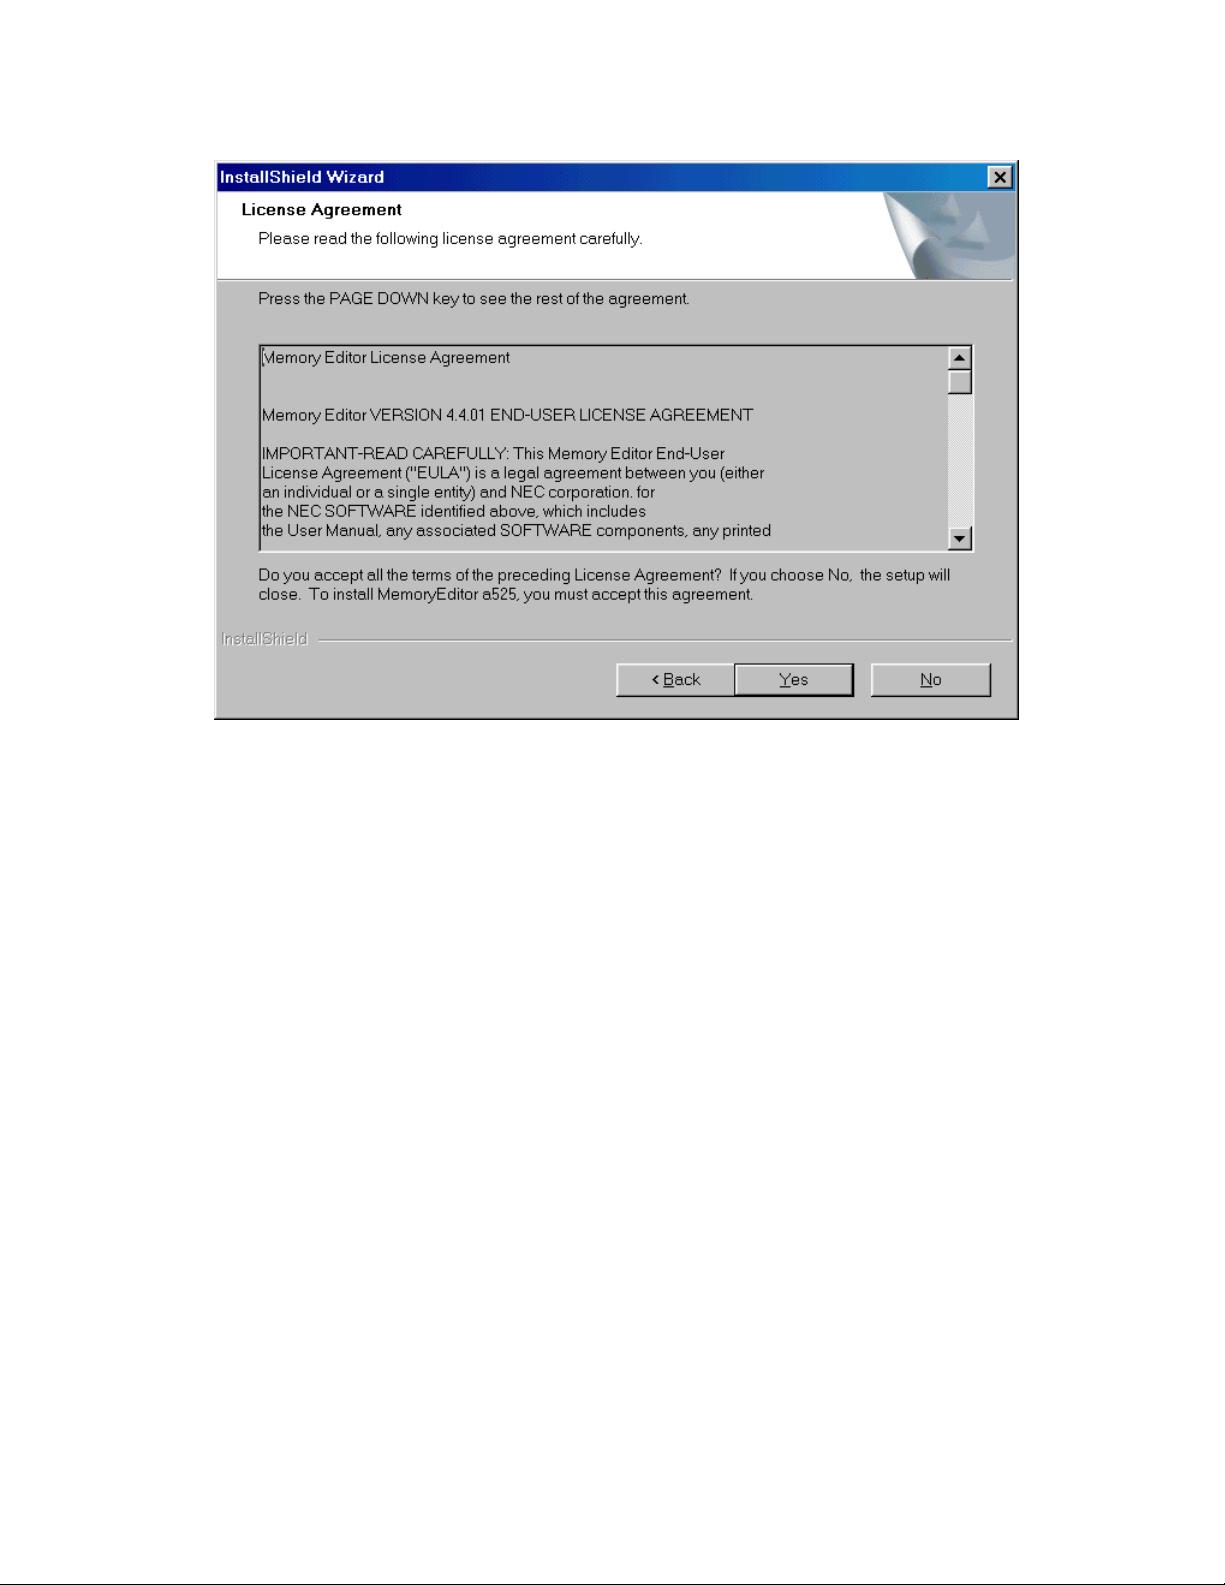
6. Read the License Agreement. If you agree with the terms, click Yes to continue the
installation process.
If you disagree with the terms, click No to exit the installation process. The software
will not be installed.
12
Page 17
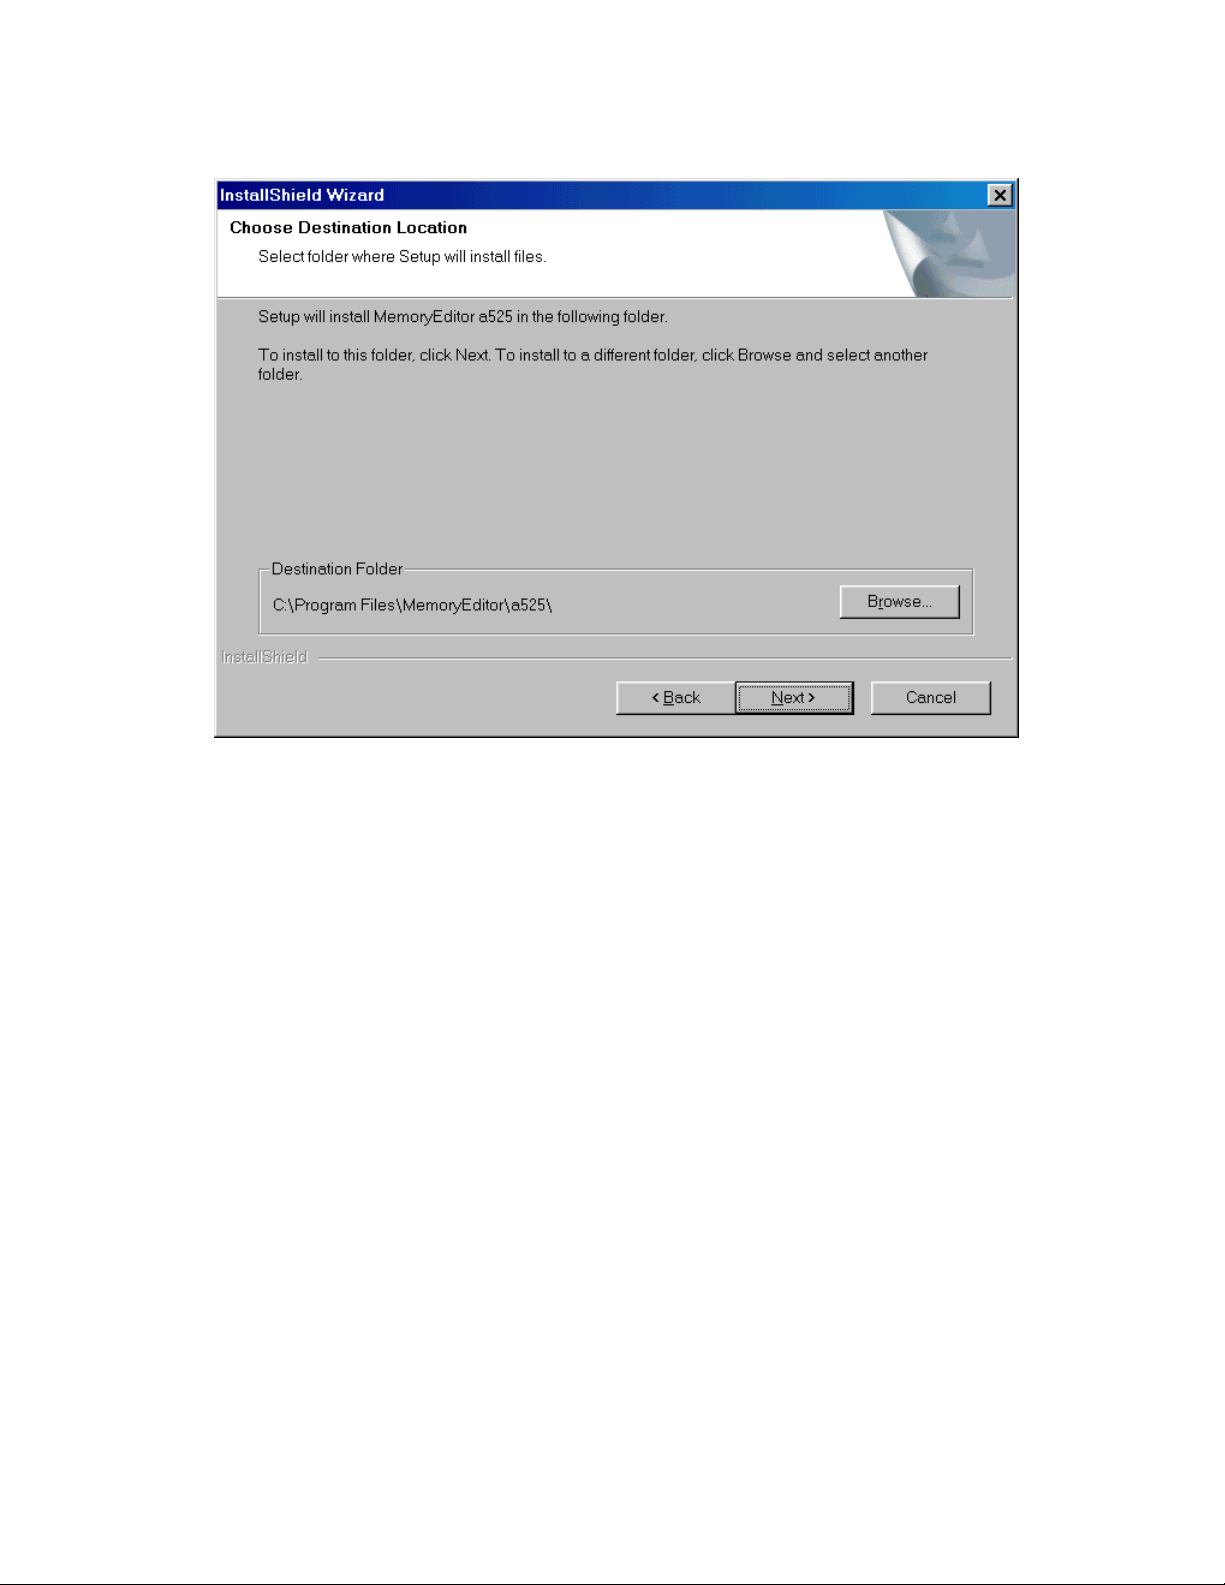
7. Click the Browse button. The Browse box displays. Find and click on Program
Files. The folder name Program Files is highlighted. Click OK and return to the
wizard screen.
8. Click the Next button. The next wizard screen displays.
13
Page 18
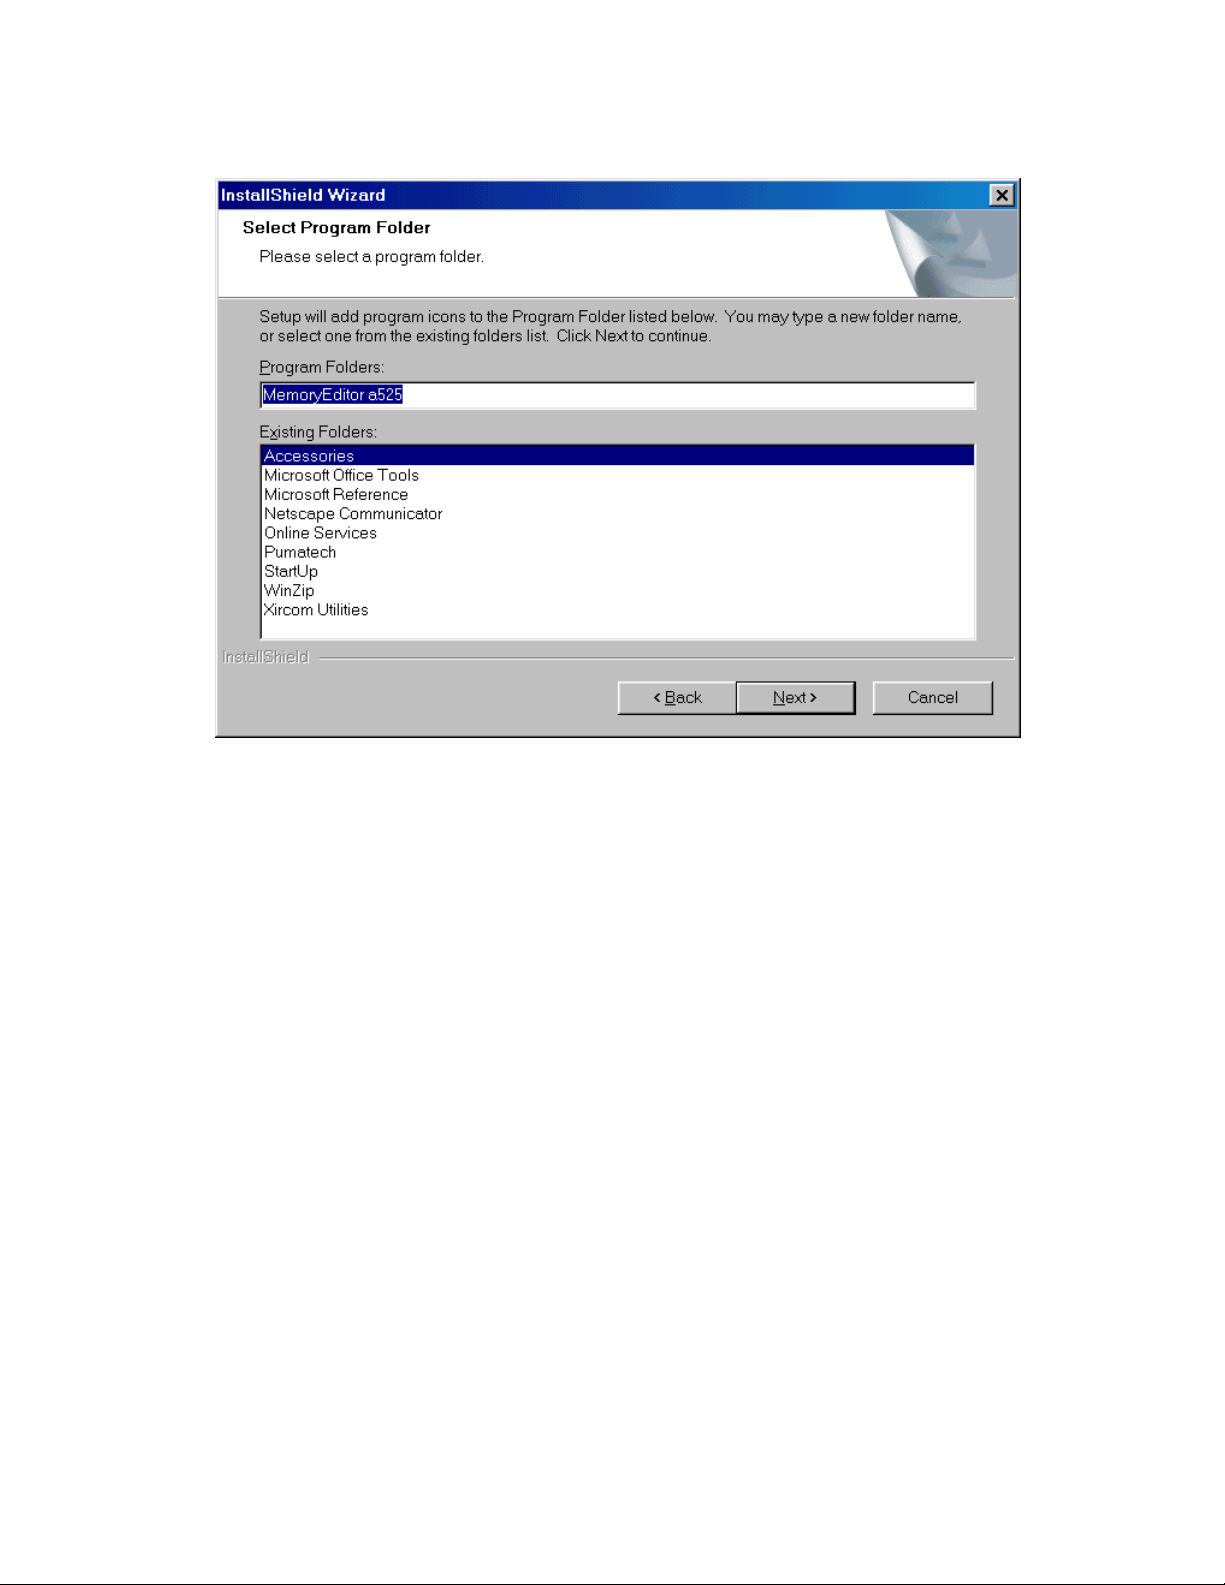
9. The name of the folder is MemoryEditor a525. You may change the folder name.
Click Next to continue the installation process.
14
Page 19

10. If you are satisfied with the settings, click Next to continue the installation process.
15
Page 20

11. After all files are installed, the final screen displays.
16
Page 21

12. Select the Yes or No option to restart your computer.
13. Click Finish.
Memory Editor is added to your Program Files and a Memory Editor icon is added to
your desktop.
17
Page 22

Uninstall Memory Editor Process
To uninstall the Memory Editor from your computer:
1. Select Start, Control Panel, and Add/Remove Programs.
2. At the Add/Remove Programs window, highlight MemoryEditor a525.
3. Click the Add/Remove button. The InstallShield wizard displays.
4. Click on the Remove option and click the Next button. The Confirm Uninstall dialog
box displays.
5. Click OK to continue the uninstall process.
6. When the uninstall process is completed, the wizard displays the final window. Click
Finish
Memory Editor software is removed from your Program Files and the Memory Editor
icon is removed from your desktop.
18
Page 23

NEC USB Drivers
This section provides the information of:
• What are the NEC USB Drivers?
• How do I copy the required NEC USB Drivers for Windows 2000?
• How do I connect the USB cable and NEC Wireless Phone to the computer?
• How do I install the NEC USB Drivers?
• How do I uninstall the NEC USB Drivers?
What are the NEC USB Drivers?
The NEC USB Drivers contain the files that assist with the bi-directional flow of data
between the NEC Wireless Phone and your computer’s Windows 2000 operating system
when connected utilizing an NEC approved USB cable.
NOTE: If you have already installed the NEC USB Drivers for the synchronization
process to use Intellisync software or GPRS Dial Up, you DO NOT NEED
TO RE-INSTALL THE NEC USB DRIVERS FOR MEMORY EDITOR.Y
You may skip the Copying the NEC USB Drivers section. Follow the
instructions in the Connecting the USB Cable To the NEC Wireless Phone
section on page 22, then continue with the Memory Editor Setup section on
page 30.
If you would like to use the synchronization function, refer to the NEC Wireless Phone
®
User Guide, Intellisync
Intellisync
®
Lite For NEC Wireless Phones User Guide for synchronization information.
Lite For NEC Wireless Phones Installation Guide, and
19
Page 24

Copying the NEC USB Drivers
To copy the NEC USB Drivers from the NEC website to MemoryEd folder:
1. Locate the NEC USB Drivers at the website: www.nechdm.com. Select Toolbox and
Memory Editor.
2. Click on Install USB Drivers. The File Download dialog box displays.
3. Click the Save button. The Save As dialog box displays.
20
Page 25

4. Select MemoryEd folder to display in the Save in: field and click the Save button.
The zip file is saved to the MemoryEd folder.
5. Close the Internet window. Open Windows Explorer or My Computer. Open the
MemoryEd folder.
6. Double-click UsbDriverVer1-1-1 zip icon.
For WinZip Classic mode, the WinZip window displays with a list of files. Click on
the Extract button to display the Extract dialog box. Make sure that the All files
button is selected and the Use folder names box is checked. Extract the files to the
MemoryEd folder.
For WinZip Wizard mode, the files are automatically saved to the specified folder.
The files are saved to 3 folders (UnInst, Win98, and WinXP_2000) within the USB
Driver Ver1.1.1 folder of MemoryEd.
21
Page 26

Connecting the USB Cable To the NEC Wireless Phone
Before installing the NEC USB Drivers, connect the USB cable to your computer and the
NEC Wireless Phone.
1. Find the location of the USB port on your computer.
2. Insert the computer end of the USB cable into the computer’s USB port.
3. Gently squeeze the release clips on each side of the USB plug and insert the plug into
the adapter port of the NEC Wireless Phone.
• Be sure that the rectangular opening on the connector is lined up with the
rectangular opening in the phone. The plug will slide easily into the opening. DO
NOT FORCE THE PLUG!
Plug into USB Port
on PC
Insert
Release
Clips
4. Press the
(End/On-Off) key to power-on the NEC Wireless Phone. The Found
New Hardware Wizard displays.
NOTE: Check that the NEC Wireless Phone’s battery level icon in the status bar of the
Idle screen shows to be fully charged.
The USB cable does not charge the phone’s battery.
22
Page 27

Installing the NEC USB Drivers
After you connect the USB cable to your computer, plug the cable into your NEC
Wireless Phone, and power-on the phone, the Found New Hardware Wizard displays.
5. Click Next to continue to the next wizard screen.
23
Page 28

6. Click on the Search for a suitable driver for my device button. Click Next to
continue to the next wizard screen.
24
Page 29

7. Click on the Specify a location box
• Remove any checkmarks beside Floppy disk drives, CD-ROM drives, or
Microsoft Windows Update.
8. Click Next to continue to the next wizard screen.
25
Page 30

9. Click the Browse button. The Browse box displays. Find and click on WinXP_2000
in C:\MemoryEd\USB Driver Ver1.1.1. The folder name WinXP_2000 is
highlighted. Click OK and return to the wizard screen.
10. Click the Next button. The next wizard screen displays.
11. Click Next to continue the installation process. While the software is installing, the
Digital Signature Not Found dialog box may display.
26
Page 31

12. Click Yes. The software continues to install. The next wizard screen displays when
installing is finished.
NOTE: You will need to select Yes to continue the installation process.
NEC America and independent testing companies have tested the drivers
on Windows 2000.
27
Page 32

13. Click Finish. The Found New Hardware Wizard displays again to install the next
NEC USB Drivers.
14. Windows 2000 will display two (2) more sets of the Found New Hardware Wizard
screens to install the remaining NEC USB Drivers. Follow the previous NEC USB
Drivers instructions for each set of the Found New Hardware Wizard screens.
NOTE: The second and third wizard screens will report “unknown device.” This is part
of the normal installation process. The title “NEC Portable Phone USB
Modem” displays at the end of the installation of the second driver. The title
“NEC Portable Phone USB OBEX Port” displays for the third driver.
28
Page 33

Uninstall NEC USB Drivers Process
To uninstall the NEC USB Drivers from your computer:
1. Open Windows Explorer or My Computer.
2. Open the UnInst folder located in C:\MemoryEd\USB Driver Ver1.1.1.
3. Double-click UNINWNUS icon.
4. Follow the wizard screen instructions.
NOTE: If you uninstall the NEC USB Drivers using any other method (for example,
using the Remove Hardware Wizard) and decide to re-install the drivers at a
later time, you will encounter installation problems. Therefore, be sure to
follow the instructions above to uninstall the NEC USB Drivers.
29
Page 34

Memory Editor Setup
This section provides the information of:
• How do I identify the COM port number to use with Memory Editor?
• How do I setup the COM port to use with Memory Editor?
NOTE: If you use the same USB port each time when you insert the USB cable to your
computer, the COM port setup is completed only one time.
If you switch to another USB port, the NEC USB Drivers must be installed for
the new USB port and the COM port setup must be completed again. Therefore,
it is recommended that you insert the USB cable into the same USB port each
time when you use Memory Editor.
Identify COM Port Number
First, you must determine the COM port that the NEC Portable Phone USB Modem is
assigned.
You may access the Device Manager window through System in the Control Panel, but
using the instructions provided requires fewer steps to find the necessary COM
information.
1. Go to Start and Control Panel.
2. Select Modems. The Modem Properties window displays.
30
Page 35

3. Select NEC Portable Phone USB Modem and click on the Properties button. The
Modem Properties window displays.
31
Page 36

4. Check for the COM port that it is assigned to NEC Portable Phone USB Modem.
This is the COM number that you will select to setup for Memory Editor.
NOTE: Your computer may not assign the same COM port as shown in the picture
depending upon your own computer’s system configuration.
32
Page 37

COM Port Setup
To complete the COM port setup for Memory Editor:
1. Double-click on the desktop Memory Editor icon or go to Start, Programs, Memory
Editor, and MemoryEditor a525.
The following message box may display when you access Memory Editor for the first
time.
2. Check that the USB cable is connected to your computer and the NEC Wireless
Phone.
3. Check that the NEC Wireless Phone is powered on.
4. Click the Next button.
33
Page 38

5. Highlight the COM port that the NEC USB Drivers has been assigned. Click Finish.
The Memory Editor window displays.
To view the selected COM port in the Memory Editor window, select Option and Port.
Continue with the Using Memory Editor instructions.
34
Page 39

Using Memory Editor
This section provides the information of:
• Why would I want to transfer resource data (picture and audio files) between the
NEC Wireless Phone and my computer?
• How do I access Memory Editor software?
• How do I download resource data from the NEC Wireless Phone to my computer?
• How do I save all resource data from the NEC Wireless Phone to my computer?
• How do I preview resource data?
• How do I remove unwanted resource data from the Destination List before final
transfer?
• How do I change a file name in Memory Editor?
• How do I save selected resource data from the NEC Wireless Phone to my
computer?
• How do I save a single resource file from the NEC Wireless Phone to my
computer?
• How do I upload files from my computer to the NEC Wireless Phone?
• How to clear the Destination List and not save the resource data files?
• How do I change the font style on the Memory Editor window?
• How will I know that the USB cable is not connected or the NEC Wireless Phone
is powered off?
• How do I close the Memory Editor software?
35
Page 40

You are allowed to transfer:
• All resource data (picture or audio files) from the NEC Wireless Phone as a .mef
(Memory Editor file) file to your computer.
• Selected resource data from the NEC Wireless Phone as a .mef file to your
computer.
• A specific resource data file from your NEC Wireless Phone to your computer.
This file will not be a .mef file. The file format to select depends upon your
computer’s configuration and the software that you use on your computer.
• A .mef file previously saved to your computer back to the NEC Wireless Phone.
• Selected graphic or audio files from your computer to the NEC Wireless Phone.
NOTE: The NEC Wireless Phone automatically powers off after each transfer. A
transfer occurs when you download resource data (from NEC Wireless Phone to
your computer) or upload files (from your computer to NEC Wireless Phone.
You must turn the phone back on to do another transfer or use the NEC Wireless
Phone.
Resource data from the NEC Wireless Phone must be displayed in the Destination List
before saving to your computer.
Files from your computer must be displayed in the Destination List before uploading to
the NEC Wireless Phone.
36
Page 41

Reasons to Transfer Resource Data
You may want to save resource data from the NEC Wireless Phone to your computer
after:
• Using the NEC Wireless Phone as a camera and saving a picture taken.
• Receiving and saving a picture or audio file attached to an email.
• Receiving and saving a picture or audio file attached to an MMS message.
You may want to transfer picture or audio files from your computer to the NEC Wireless
Phone after:
• Saving a picture taken on a digital camera to your computer.
• Creating an audio file on your computer.
You may want to save resource data from the NEC Wireless Phone as backup in the
event that resource data is accidentally lost in the NEC Wireless Phone. This could
happen during a software update to the phone.
NOTE: You may discover other reasons for resource data transfers depending upon your
imagination and level of skill and ability using computers.
37
Page 42

Accessing Memory Editor
Each time that you want to use Memory Editor:
1. Check the NEC Wireless Phone’s battery level icon in the status bar of the Idle screen
for sufficient charge. The USB cable does not charge the phone’s battery.
2. Insert the computer end of the USB cable into the computer’s USB port. Always use
the same computer USB port.
3. Gently squeeze the release clips on each side of the USB plug ad insert into the
adapter port of the NEC Wireless Phone.
• Be sure that the rectangular opening on the connection is lined up with the
rectangular opening in the wireless phone. The plug will slide easily into the
opening. DO NOT FORCE THE PLUG!
4. Press the (End/On-Off) key to power-on the NEC Wireless Phone.
5. Double-click on the Memory Editor icon on the desktop or go to Control Panel,
Programs, Memory Editor, and MemoryEditor a525. The Memory Editor
window displays.
The USB cable must be connected to your computer and NEC Wireless Phone, the NEC
Wireless Phone powered on, and the Memory Editor window displayed in order to
transfer any files.
38
Page 43

Downloading Resource Data
To download resource data from the NEC Phone to your computer:
1. Select (File and HHP to PC). A dialog box displays.
2. Click OK. You can view the downloading progress in the status bar. When
downloading is completed, all the files from the NEC Wireless Phone display in the
Destination List and the NEC Wireless Phone has automatically powered off.
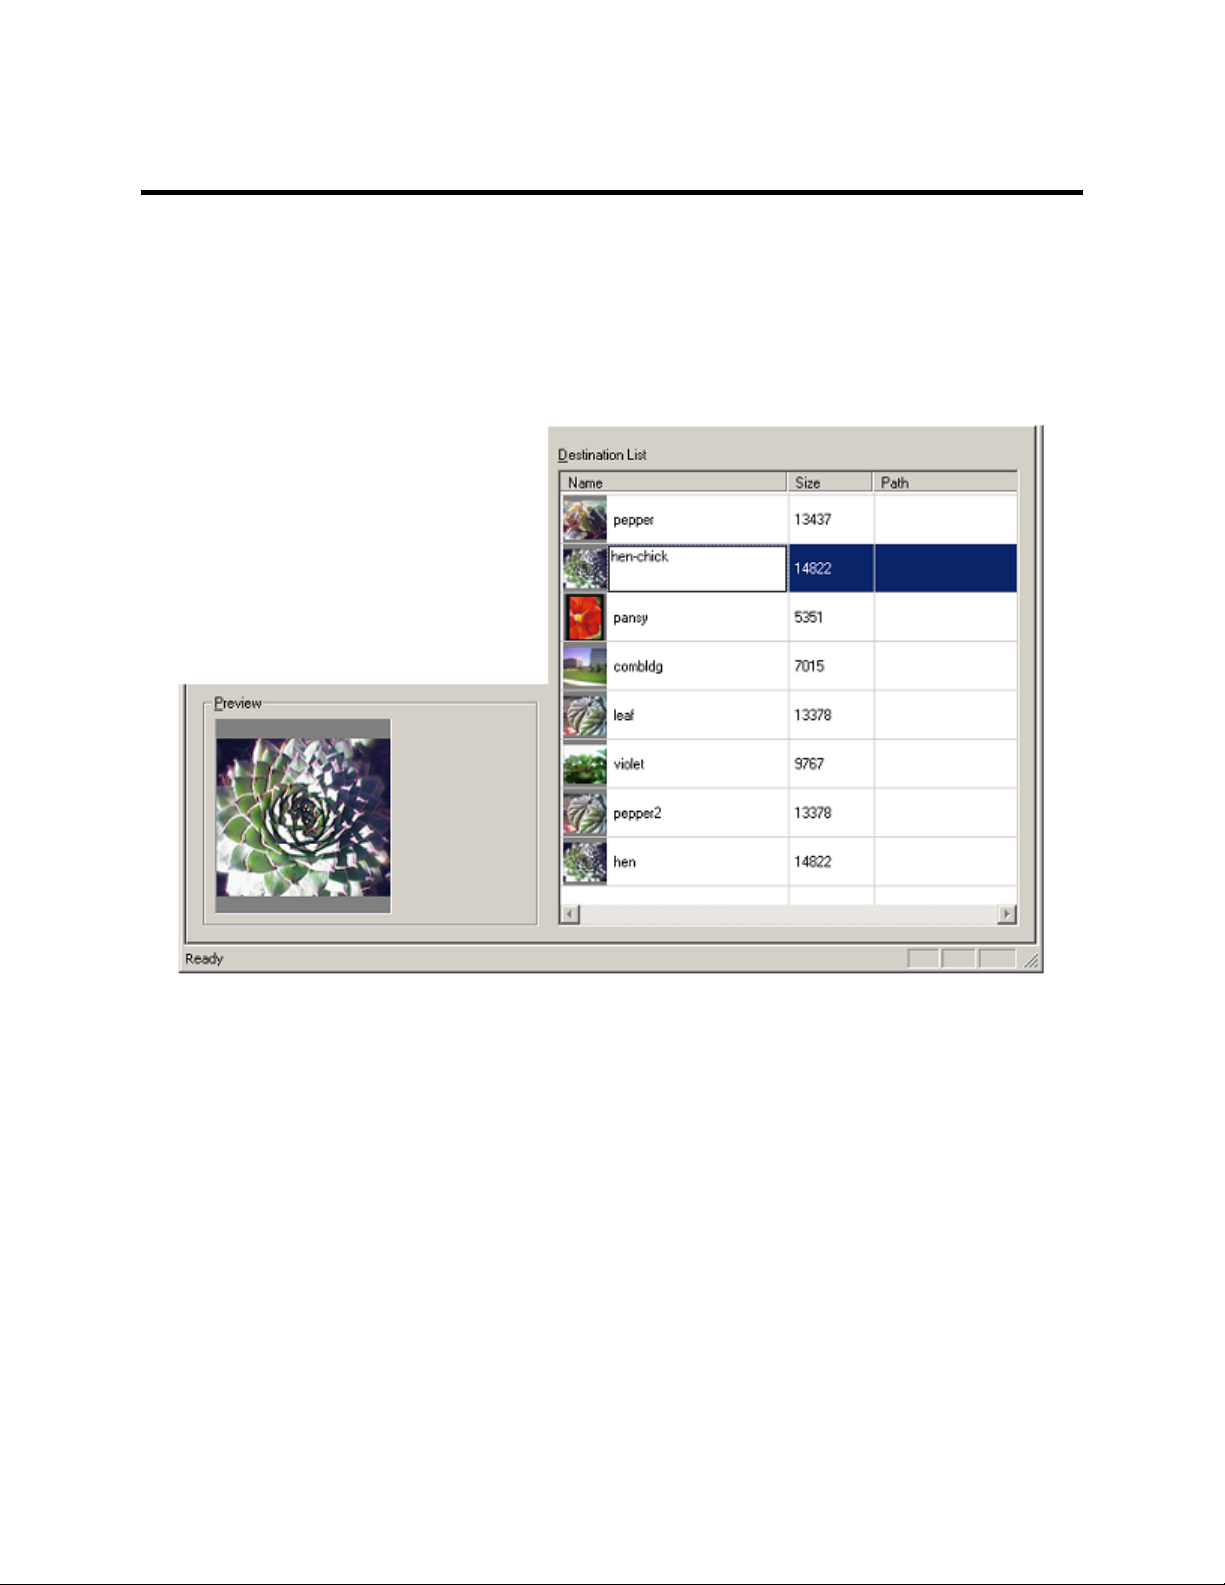
The Destination List provides a picture icon, file name, and byte size for each picture
file; a music note icon, file name, and byte size for each audio file. The information
is provided in table format (rows and columns).
The resource data (pictures and ring tunes) that were installed by the manufacturer do not
download. Only the resource data that you have added to the NEC Wireless Phone are
downloaded.
39
Page 44

Saving All Resource Data
To save all resource data downloaded from your NEC Wireless Phone and displayed in
the Destination List (no files are removed from the Destination List):
1. Select (File and Save). The Save As box displays.
2. Select or create the folder that you prefer to save the resource data within.
3. Enter a name for the file in the File name field.
4. Click the Save button. The resource data is saved as a .mef file format (Memory
Editor file).
40
Page 45
Previewing Resource Data
You may select a file to display in the Preview box (for download and upload).
Previewing Downloaded Data
To preview resource data downloaded from the NEC Wireless Phone:
1. Download the NEC Wireless Phone’s resource data to the Destination List.
2. Click on the row area (icon, file name, file size, etc.) of the resource. The resource
row is highlighted.
When a picture file is highlighted, the picture displays in the Preview box.
When an audio file is highlighted, a music note displays in the Preview box.
41
Page 46

Previewing Uploaded Data
To preview resource data transferred from your computer that will be uploaded to the
NEC Wireless Phone, you may select an item in the Source List or the Destination List
to display in the Preview box.
42
Page 47
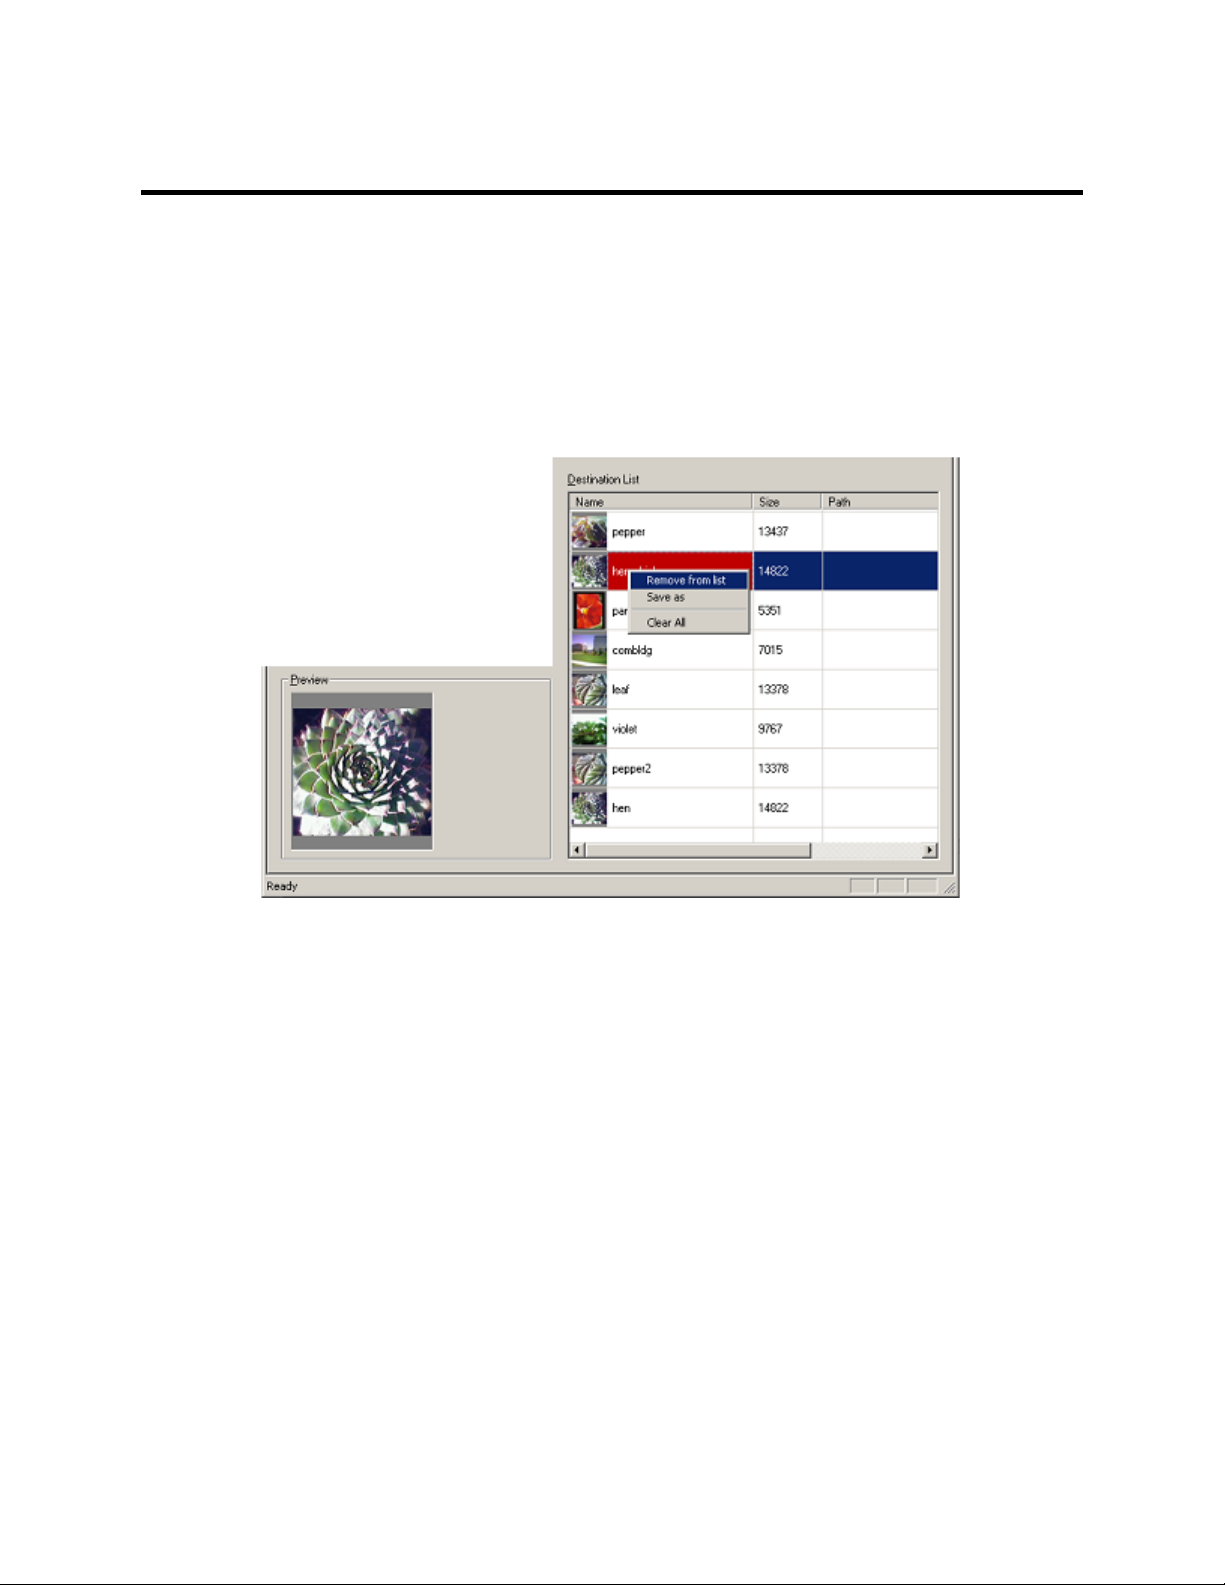
Removing Unwanted Resource Data
To remove unwanted resource data from the Destination List before the final transfer:
1. Download the NEC Wireless Phone’s resource data or transfer computer files to the
Destination List.
2. Right click on the row area (icon, file name, file size, etc.) of unwanted resource data.
The resource row is highlighted, resource item appears in the Preview box, and a
drop-down menu appears.
3. Select Remove from list in the drop-down menu. The unwanted resource is removed
from the Destination List.
43
Page 48

Changing a File Name
You may change to name of resource data placed in the Destination List.
To change the file name:
1. Download the NEC Wireless Phone’s resource data or transfer computer files to the
Destination List.
2. Double-click on the icon or file name area of the resource data to be changed.
3. Input the new name and press the Enter key.
44
Page 49

Saving Selected Resource Data to PC
After removing unwanted resource data files downloaded from the NEC Wireless Phone,
you may save the remaining resource data to your computer as a .mef file.
1. Download the NEC Wireless Phone’s resource data to the Destination List.
2. Preview and remove the unwanted resource data files.
3. When you are satisfied with the remaining resource data, select (File and Save).
4. Save the selected resource data as a .mef file. Follow the same instructions steps of
Saving All Resource Data on page 40.
Saving a Single Resource File
To save a single resource file from the NEC Wireless Phone to your computer:
1. Download the NEC Wireless Phone’s resource data to the Destination List.
2. Right click on the icon or file name of the desired resource file. The resource file is
highlighted, appears in the Preview box, and a drop-down menu appears.
3. Select Save As in the drop-down menu. The Save as box displays.
4. Select or create the folder that you prefer to save the resource data within.
5. Enter a name for the file in the File name field.
6. At the Save as type field, select the file format to save the selected file as.
The file format options provided in the list depend upon the type of resource file
selected (picture or audio), your computer’s configuration settings, and software that
you have used on your computer.
7. Click the Save button. The resource file is saved to the selected folder with the new
name and in the selected file format.
45
Page 50

Uploading Computer Files
The computer file(s) must first be displayed in the Destination List before the final
transfer to the NEC Wireless Phone. There are two methods to transfer the computer
file(s) to the Destination List.
Transfer .mef files
NOTE: You can only transfer .mef type files using this method. You cannot open
graphic or audio file formats.
To transfer a .mef file of previously saved resource data:
1. Click (File and Open). The Open box displays.
2. Find and select the desired .mef file.
3. Click Open. The resource data displays in the Destination List.
46
Page 51

Transfer Picture or Audio files
To transfer computer picture or audio files (that are not a .mef file):
1. Click the Browse button. The Browse for Folder box displays.
2. Find and select the folder that contains the desired files to transfer.
3. With the folder name highlighted, click OK. The folder path displays in the
Directory field and the files contained in the selected folder display in the Source
List.
4. Select an item in the Source List and click the >> button to copy the file to the
Destination List.
The Destination List provides a picture icon, file name, byte size, and file path for
each picture file; a music note icon, file name, byte size, and file path for each audio
file. The information is provided in table format (rows and columns).
47
Page 52

Final Transfer to NEC Wireless Phone
Before the final transfer to the NEC Wireless Phone, you may edit the Destination List.
Editing the list includes previewing files, removing unwanted files, and changing file
names.
For the final transfer to copy and upload the computer files to the NEC Wireless Phone:
1. Click (File and PC to HHP). A dialog box displays.
2. Click OK. The files are reviewed and another dialog box displays.
3. Click Yes to continue uploading. You can view the uploading progress in the status
bar. When the uploading is completed, all the computer files in the Destination List
have been copied to the NEC Wireless Phone and the NEC Wireless Phone has
automatically powered off.
48
Page 53

Clearing the Destination List
To clear the Destination List of downloaded resource data or computer files to upload:
1. Right click anywhere on a row that contains a resource file. A drop-down menu
displays.
If you right click on an empty row, nothing happens.
2. Select Clear All in the drop-down menu. All resource files are removed from the
Destination List.
49
Page 54

Changing the Font Style
You may personalize the Memory Editor window by selecting a preferred font style.
To select a font style:
1. Select Option in the menu bar and Font. The Font window displays.
2. Select the preferred Font name, style, and size. Click OK. Memory Editor screen
changes to the preferred font, except for the title bar, menu bar, and status bar.
Connection Error
Whenever the USB cable is not properly connected or you forget to turn on the NEC
Wireless Phone, the following error message displays. Click OK to close the error
message box. Check the USB cable connections and check that the NEC Wireless Phone
is powered on.
Closing Memory Editor
To close the Memory Editor software:
1. Click (File and Exit). A message box displays.
2. Click OK and exit Memory Editor.
50
Page 55

Memory Editor Messages
This section provides information of possible messages, the reasons why they occur, and
what to do to continue using Memory Editor.
NEC Wireless Phone Locked
If you have set the auto-power-up lock or phone lock security for your NEC Wireless
Phone and attempt to transfer data using Memory Editor, the following message displays.
You must unlock the NEC Wireless Phone and select OK in the message box to complete
any data transfer with Memory Editor.
NOTE: The error message code for auto-power up lock is (0x20000042L). The error
message code for phone lock security is (0x20000041L).
SIM Card Removed
If your have removed and forgot to re-insert the SIM card back into the NEC Wireless
Phone and attempt to transfer data using Memory Editor, the following message displays.
You must insert the SIM card into the NEC Wireless Phone and select OK in the
message box to complete any data transfer with Memory Editor.
51
Page 56

Protected Copyright
If you select a file in the Source List to move to the Destination List that is copyright
protected, the following message displays.
The file cannot be moved to the Destination List. Select OK in the message box. Select
another file in the Source List to move to the Destination List.
Unrecognized File Format
If you select a file in the Source List with an unrecognized file format, the following
message displays and a question mark displays in the Preview box.
The file cannot be moved to the Destination List. Select OK in the message box. Select
another file in the Source List to move to the Destination List.
52
Page 57

Individual File Size Too Large
If you select a file in the Source List that is bigger than the allowed file size in the NEC
Wireless Phone, the following message displays.
The file cannot be moved to the Destination List. Select OK in the message box. Select
another file in the Source List to move to the Destination List.
Total File Size Too Large
When the total file size of all the items in the Destination List is larger than the storage
capacity allowed in the NEC Wireless Phone, the following message displays during the
transfer from your computer to the NEC Wireless Phone.
Select OK in the message box. Remove some of the items in the Destination List before
attempting the transfer again.
53
Page 58

Deleted File on Computer
When you have listed a computer file in the Source List and inadvertently deleted the file
from your computer, the following message box displays when you select that file to
move it to the Destination List.
Select OK in the message box. Select another file in the Source List to move to the
Destination List.
54
 Loading...