

Page 1
LCD1701
User’s Manual
UÏivatelská pfiíruãka
Bedienerhandbuch
Οδηγίες Χρήσης
Manual del usuario
Manuel Utilisateur
Manuale utente
Gebruikershandleiding
Podr´cznik u˝ytkownika
Руководство пользователя
Kullan∂c∂ Klavuzu
00Cover_all.p65 30/10/2002, 11:311
Page 2

For the Customer to use in U.S.A. or Canada
Canadian Department of Communications Compliance Statement
DOC: This Class B digital apparatus meets all requirements of the Canadian Interference-Causing Equipment Regulations.
Cet appareil numérique de la classe B respecte toutes les exigences du Règlement sur le matériel brouiller du Canada.
C-UL: Bears the C-UL Mark and is in compliance with Canadian Safety Regulations according to CSA C22.2 No. 950.
Ce produit porte la marque ‘C-UL’ et se conforme aux règlements de sûrele Canadiens selon CAN/CSA C22.2 No. 950.
FCC Information
1. Use the attached specified cables with the LCD1701 colour monitor so as not to interfere with radio and television
reception.
(1) The power supply cord you use must have been approved by and comply with the safety standards of U.S.A.,
and meet the following condition.
Power supply cord Non shield type, 3-conductor
Length 2.0 m
Plug shape
U.S.A
(2) Shielded video signal cable. Use of other cables and adapters may cause interference with radio and television
reception.
2. This equipment has been tested and found to comply with the limits for a Class B digital device, pursuant to part 15 of
the FCC Rules. These limits are designed to provide reasonable protection against harmful interference in a residential
installation. This equipment generates, uses, and can radiate radio frequency energy, and, if not installed and used in
accordance with the instructions, may cause harmful interference to radio communications. However, there is no
guarantee that interference will not occur in a particular installation. If this equipment does cause harmful interference
to radio or television reception, which can be determined by turning the equipment off and on, the user is encouraged
to try to correct the interference by one or more of the following measures:
• Reorient or relocate the receiving antenna.
• Increase the separation between the equipment and receiver.
• Connect the equipment into an outlet on a circuit different from that to which the receiver is connected.
• Consult your dealer or an experienced radio/TV technician for help.
If necessary, the user should contact the dealer or an experienced radio/television technician for additional
suggestions. The user may find the following booklet, prepared by the Federal Communications Commission, helpful:
“How to Identify and Resolve Radio-TV Interference Problems.” This booklet is available from the U.S. Government
Printing Office, Washington, D.C., 20402, Stock No. 004-000-00345-4.
Declaration of Conformity
This device complies with Part 15 of FCC Rules. Operation is subject to the following two conditions. (1) This device may not
cause harmful interference, and (2) this device must accept any interference received, including interference that may cause
undesired operation.
U.S. Responsible Party: NEC-Mitsubishi Electronics Display of America, Inc.
Address: 1250 N. Arlington Heights Road
Itasca, Illinois 60143-1248
Tel. No.: (630) 467-3000
Type of Product: Display Monitor
Equipment Classification: Class B Peripheral
Model: LCD1701
We hereby declare that the equipment specified above conforms
to the technical standards as specified in the FCC Rules.
00Cover_all.p65 30/10/2002, 11:312
Page 3
TCO’99
Congratulations! You have just purchased a
TCO’99 approved and labeled product! Your
choice has provided you with a product developed
for professional use. Your purchase has also
contributed to reducing the burden on the
environment and also to the further development
of environmentally adapted electronics products.
Why do we have environmentally labelled computers?
In many countries, environmental labelling has become an
established method for encouraging the adaptation of goods and
services to the environment. The main problem, as far as
computers and other electronics equipment are concerned, is that
environmentally harmful substances are used both in the products
and during the manufacturing. Since it has not been possible for
the majority of electronics equipment to be recycled in a
satisfactory way, most of these potentially damaging substances
sooner or later enter Nature.
There are also other characteristics of a computer, such as energy
consumption levels, that are important from the viewpoints of both
the work (Internal) and natural (external) environments. Since all
methods of conventional electricity generation have a negative
effect on the environment (acidic and climate-influencing
emissions, radioactive waste, etc.), it is vital to conserve energy.
Electronics equipment in offices consume an enormous amount of
energy since they are often left running continuously.
What does labelling involve?
This product meets the requirements for the TCO’99 scheme
which provides for international and environmental labelling of
personal computers. The labelling scheme was developed as a
joint effort by the TCO (The Swedish Confederation of Professional
Employees), Svenska Naturskyddsforeningen (The Swedish
Society for Nature Conservation) and Statens Energimyndighet
(The Swedish National Energy Administration).
The requirements cover a wide range of issues: environment,
ergonomics, usability, emission of electrical and magnetic fields,
energy consumption and electrical and fire safety.
The environmental demands concern restrictions on the presence
and use of heavy metals, brominated and chlorinated flame
retardants, CFCs (freons) and chlorinated solvents, among other
things. The product must be prepared for recycling and the
manufacturer is obliged to have an environmental plan which must
be adhered to in each country where the company implements its
operational policy. The energy requirements include a demand that
the computer and/or display, after a certain period of inactivity,
shall reduce its power consumption to a lower level in one or more
stages. The length of time to reactivate the computer shall be
reasonable for the user.
Labelled products must meet strict environmental demands, for
example, in respect of the reduction of electric and magnetic fields,
physical and visual ergonomics and good usability.
Environmental Requirements
Flame retardants
Flame retardants are present in printed circuit boards, cables,
wires, casings and housings. In turn, they delay the spread of fire.
Up to thirty percent of the plastic in a computer casing can consist
of flame retardant substances. Most flame retardants contain
bromine or chloride and these are related to another group of
environmental toxins, PCBs, which are suspected to give rise to
severe health effects, including reproductive damage in fisheating
birds and mammals, due to the bioaccumulative* processes. Flame
retardants have been found in human blood and researchers fear
that disturbances in foetus development may occur.
TCO’99 demand requires that plastic components weighing more
than 25 grams must not contain flame retardants with organically
bound chlorine and bromine. Flame retardants are allowed in the
printed circuit boards since no substitutes are available.
Lead**
Lead can be found in picture tubes, display screens, solders and
capacitors. Lead damages the nervous system and in higher
doses, causes lead poisoning.
TCO’99 requirement permits the inclusion of lead since no
replacement has yet been developed.
Cadmium**
Cadmium is present in rechargeable batteries and in the
colourgenerating layers of certain computer displays. Cadmium
damages the nervous system and is toxic in high doses.
TCO’99 requirement states that batteries, the colourgenerating
layers of display screens and the electrical or electronics
components must not contain any cadmium.
Mercury**
Mercury is sometimes found in batteries, relays and switches,
Mercury damages the nervous system and is toxic in high
doses.
TCO’99 requirement states that batteries may not contain any
Mercury. It also demands that no mercury is present in any of
the electrical or electronics components associated with the
display unit.
CFCs (freons)
CFCs (freons) are sometimes used for washing printed circuit
boards. CFCs break down ozone and thereby damage the ozone
layer in the stratosphere, causing increased reception on Earth
of ultraviolet light with consequent increased risks of skin cancer
(malignant melanoma).
The relevant TCO’99 requirement; Neither CFCs nor HCFCs
may be used during the manufacturing and assembly of the
product or its packaging.
*Bio-accumulative is defined as substances which accumulate
within living organisms.
**Lead, Cadmium and Mercury are heavy metals which are
Bio-accumulative.
To obtain complete information on the environmental criteria
document, order from:
TCO Development Unit
SE-114 94 Stockholm
SWEDEN
FAX Number: +46 8 782 92 07
E-mail (Internet): development@tco.se
You may also obtain current information on TCO’99 approved
and labelled products by visiting their website at:
http://www.tcodevelopment.com
00Cover_all.p65 30/10/2002, 11:313
Page 4
Index
Warning, Caution ............................... English-1
Declaration ......................................... English-1
Contents............................................. English-2
Quick Start ......................................... English-2
Controls .............................................. English-6
Recommended use ............................ English-9
Varování, Upozornûní........................... âesky-1
Prohlá‰ení ............................................ âesky-1
Obsah .................................................. âesky-2
Rychl˘ start ........................................... âesky-2
Ovládací prvky...................................... âesky-6
Provozní pokyny................................... âesky-9
Warnung, Vorsicht ............................. Deutsch-1
Erklärung........................................... Deutsch-1
Inhalt ................................................. Deutsch-2
Kurzanleitung ....................................Deutsch-2
Bedienelemente ................................Deutsch-6
Einsatzempfehlungen........................ Deutsch-9
ΠΡΟΕΙ∆ΟΠΟΙΗΣΗ, ΠΡΟΣΟΧΗ ..... Ελληνικά-1
∆ήλωση ......................................... Ελληνικά-1
Περιεχµενα ................................. Ελληνικά-2
Γρήγορη Εκκίνηση ....................... Ελληνικά-2
Πλήκτρα Ελέγχου ........................ Ελληνικά-6
Προτεινµενη Χρήση .................. Ελληνικά-9
Advertencia, Peligro .......................... Español-1
Declaración ....................................... Español-1
Contenido.......................................... Español-2
Inicio rápido ....................................... Español-2
Controles........................................... Español-6
Uso recomendado............................. Español-9
Avertissement, Attention .................. Français-1
Déclaration ....................................... Français-1
Sommaire......................................... Français-2
Mise en marche rapide .................... Français-2
Commandes..................................... Français-6
Conseils d’utilisation ........................ Français-9
Avvertenza, Attenzione ...................... Italiano-1
Dichiarazione ..................................... Italiano-1
Contenuto .......................................... Italiano-2
Guida rapida ...................................... Italiano-2
Controlli .............................................. Italiano-6
Uso consigliato................................... Italiano-9
Waarschuwing, Let op!................ Nederlands-1
Kennisgeving............................... Nederlands-1
Inhoud ......................................... Nederlands-2
Snel aan de slag .......................... Nederlands-2
Besturingselementen ................... Nederlands-6
Aanbevolen gebruik ..................... Nederlands-9
Uwagi dotyczàce zasilania monitora .... Polski-1
Ostrze˝enie, Uwaga ............................. Polski-2
Deklaracja ............................................ Polski-2
ZawartoÊç opakowania ........................ Polski-3
Pod∏àczenie monitora .......................... Polski-3
Przyciski ............................................... Polski-7
Zalecenia eksploatacyjne ..................... Polski-9
Предупреждение, Внимание ......... Русский-1
Заявление ....................................... Русский-1
Содержимое ................................... Русский-2
Краткое руководство по
началу работы ................................ Русский-2
Органы управления........................ Русский-6
Рекомендации по эксплуатации.... Русский-9
D∂kkat, Uyari ....................................... Türkçe-1
Bildirim ................................................ Türkçe-1
∑çindekiler ............................................ Türkçe-2
H∂zl∂ Baµlama ...................................... Türkçe-2
Kontroller ............................................. Türkçe-6
Tavsiye Edilen Kullan∂m ...................... Türkçe-9
00Cover_all.p65 30/10/2002, 11:314
Page 5
English
âesky
Deutsch
Ελληνικά
Español
Français
Italiano
Nederlands
Polski
Русский
01b_XChapterOpener 30/10/2002, 11:311
Türkçe
Page 6
01b_XChapterOpener 30/10/2002, 11:312
Page 7

WARNING
TO PREVENT FIRE OR SHOCK HAZARDS, DO NOT EXPOSE THIS UNIT TO RAIN OR MOISTURE. ALSO, DO NOT
USE THIS UNIT’S POLARIZED PLUG WITH AN EXTENSION CORD RECEPTACLE OR OTHER OUTLETS UNLESS
THE PRONGS CAN BE FULLY INSERTED.
REFRAIN FROM OPENING THE CABINET AS THERE ARE HIGH VOLTAGE COMPONENTS INSIDE. REFER
SERVICING TO QUALIFIED SERVICE PERSONNEL.
CAUTION
RISK OF ELECTRIC SHOCK • DO NOT OPEN
CAUTION: TO REDUCE THE RISK OF ELECTRIC SHOCK, DO NOT REMOVE COVER (OR BACK). NO USER
SERVICEABLE PARTS INSIDE. REFER SERVICING TO QUALIFIED SERVICE PERSONNEL.
This symbol warns user that uninsulated voltage within the unit may have sufficient magnitude to cause
electric shock. Therefore, it is dangerous to make any kind of contact with any part inside this unit.
This symbol alerts the user that important literature concerning the operation and maintenance of this unit
has been included. Therefore, it should be read carefully in order to avoid any problems.
Caution:
When operating the LCD1701 with a 220-240V AC power source in Europe, use the power cord provided with the monitor.
In the UK, a BS approved power cord with a moulded plug has a Black (five Amps) fuse installed for use with this equipment.
If a power cord is not supplied with this equipment please contact your supplier.
For all other cases, use a power cord that matches the AC voltage of the power outlet and has been approved by and
complies with the safety standard of your particular country.
English
Declaration
Declaration of the Manufacturer
We hereby certify that the colour monitor
LCD1701 (L172EN) is in compliance with
Council Directive 73/23/EEC:
– EN 60950
Council Directive 89/336/EEC:
– EN 55022
– EN 61000-3-2
– EN 61000-3-3
– EN 55024
As an ENERGY STAR® Partner, NEC-Mitsubishi Electric Visual Systems Corp. has determined that this product meets the ENERGY
STA R guidelines for energy efficiency. ENERGY STAR is a U.S. registered mark.
ErgoDesign is a registred trademark of NEC-Mitsubishi Electric Visual Systems Corporation in Austria, Benelux, Denmark,
France, Germany, Italy, Norway, Spain, Sweden, U.K..
IBM PC/XT/AT, PS/2, MCGA, VGA, 8514/A and XGA are registered trademarks of International Business Machines
Corporation.
Apple and Macintosh are registered trademarks of Apple Computer Inc.
Microsoft and Windows are registered trademarks of the Microsoft Corporation.
NEC is a registered trademark of NEC Corporation.
All other trademarks or registered trademarks are property of their respective owners.
and marked with
NEC-Mitsubishi Electric Visual
Systems, Corp.
MS Shibaura Bldg., 13-23,
Shibaura 4-chome,
Minato-Ku, Tokyo 108-0023, Japan
01_English 30/10/2002, 11:311
English-1
Page 8

Contents
Your new NEC LCD monitor box* should contain the following:
• LCD1701 monitor with tilt base
• Power Cord
• Video Signal Cable
• User’s Manual
• CD ROM (includes complete User’s Manual in PDF format).
To see the User’s Manual, Acrobat Reader 4.0 must be installed on your PC.
*
Remember to save your original box and packing material to transport or ship the monitor.
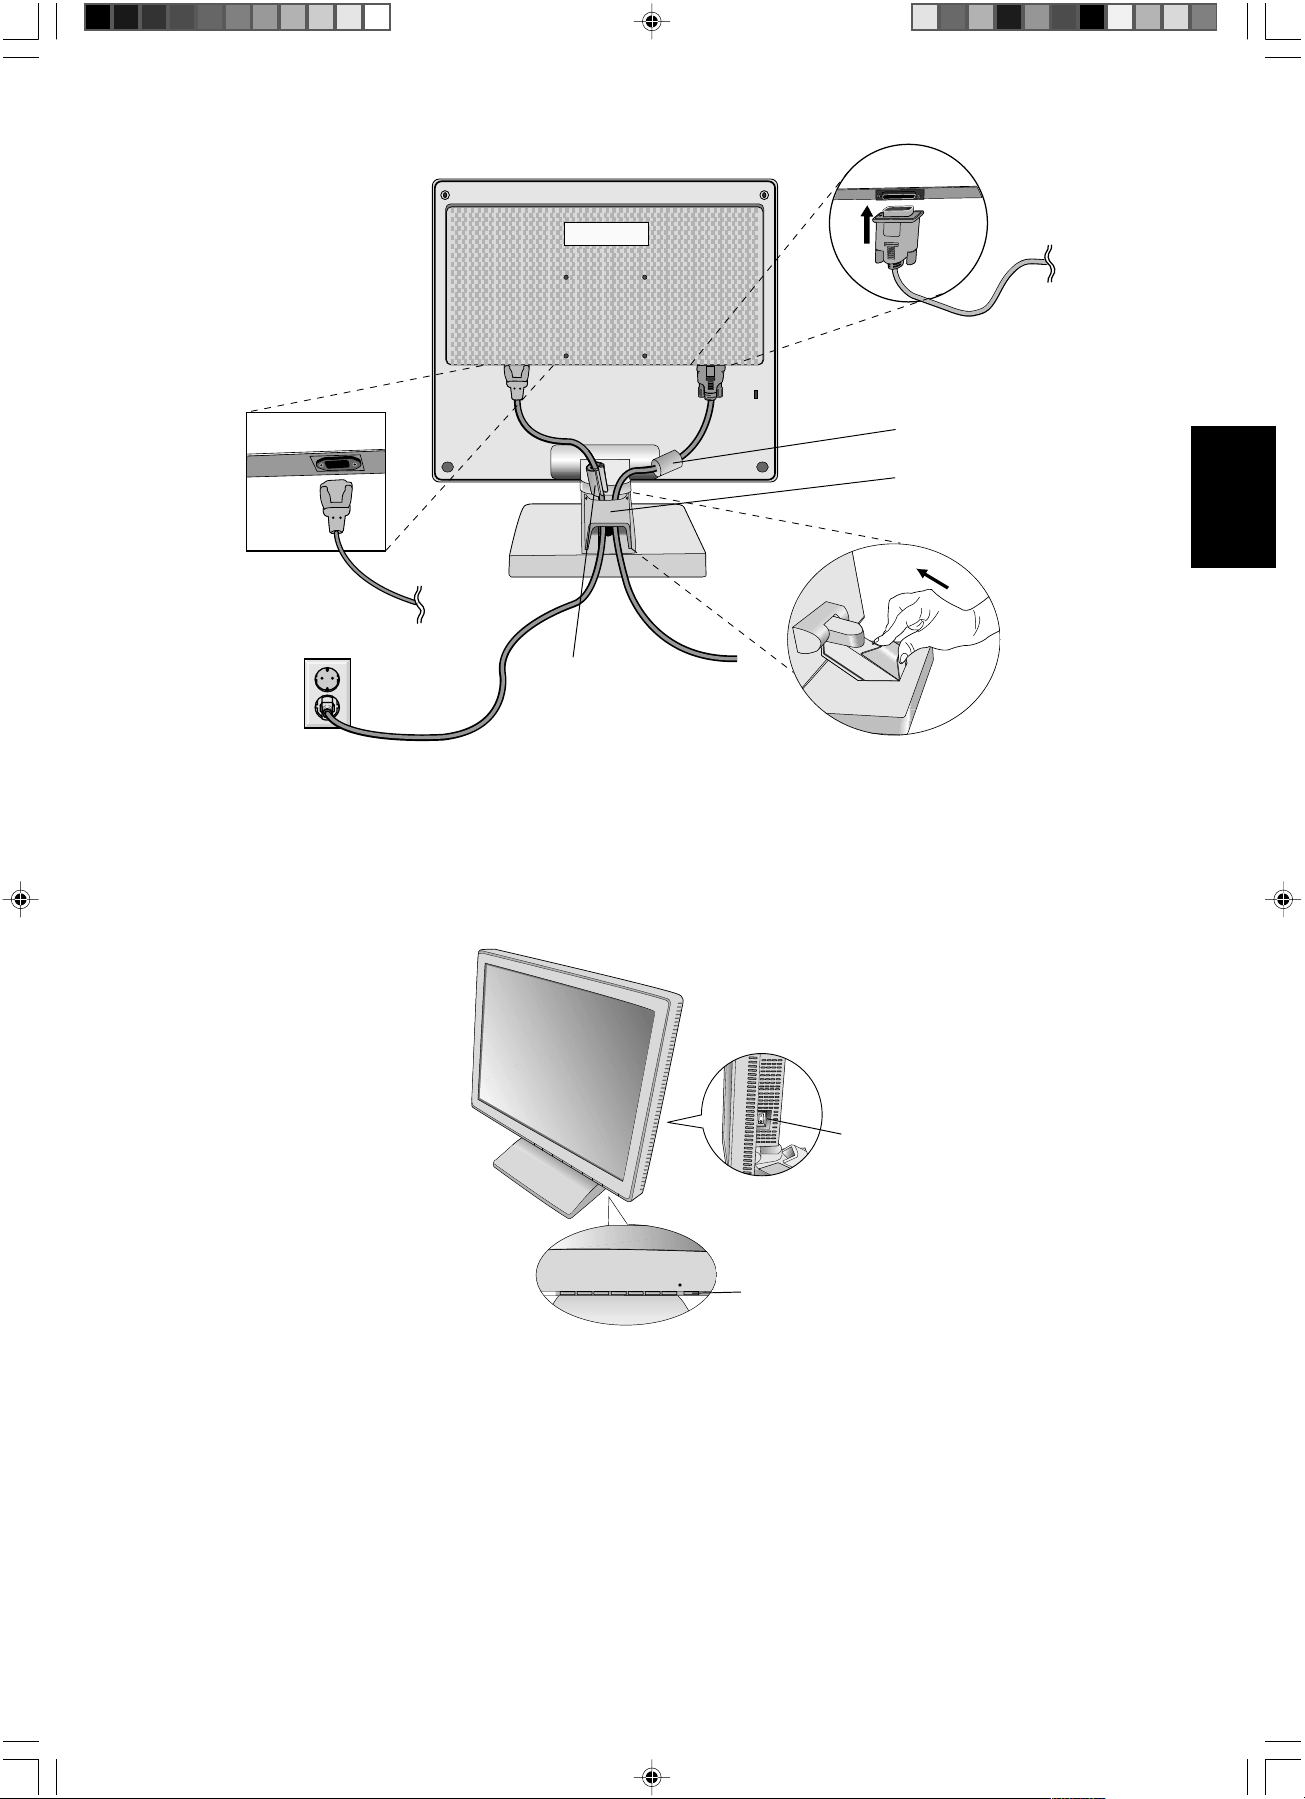
Quick Start
To attach the LCD monitor to your system, follow these instructions:
1. Turn off the power to your computer.
2. Remove cable cover.
3. For PC: Connect the 15-pin mini D-SUB of the appropriate signal cable to the connector for the display card in your
system (Figure A.1). Tighten all screws.
For Mac: Connect the LCD1701 Macintosh cable adapter to the computer (Figure B.1). Attach the 15-pin mini D-SUB end
of the appropriate signal cable to the LCD1701 Macintosh cable adapter (Figure B.1). Tighten all screws.
Macintosh
Cable Adapter
(not included)
Macintosh G3 and G4
do not need a Macintosh
cable adapter
Figure A.1
Figure B.1
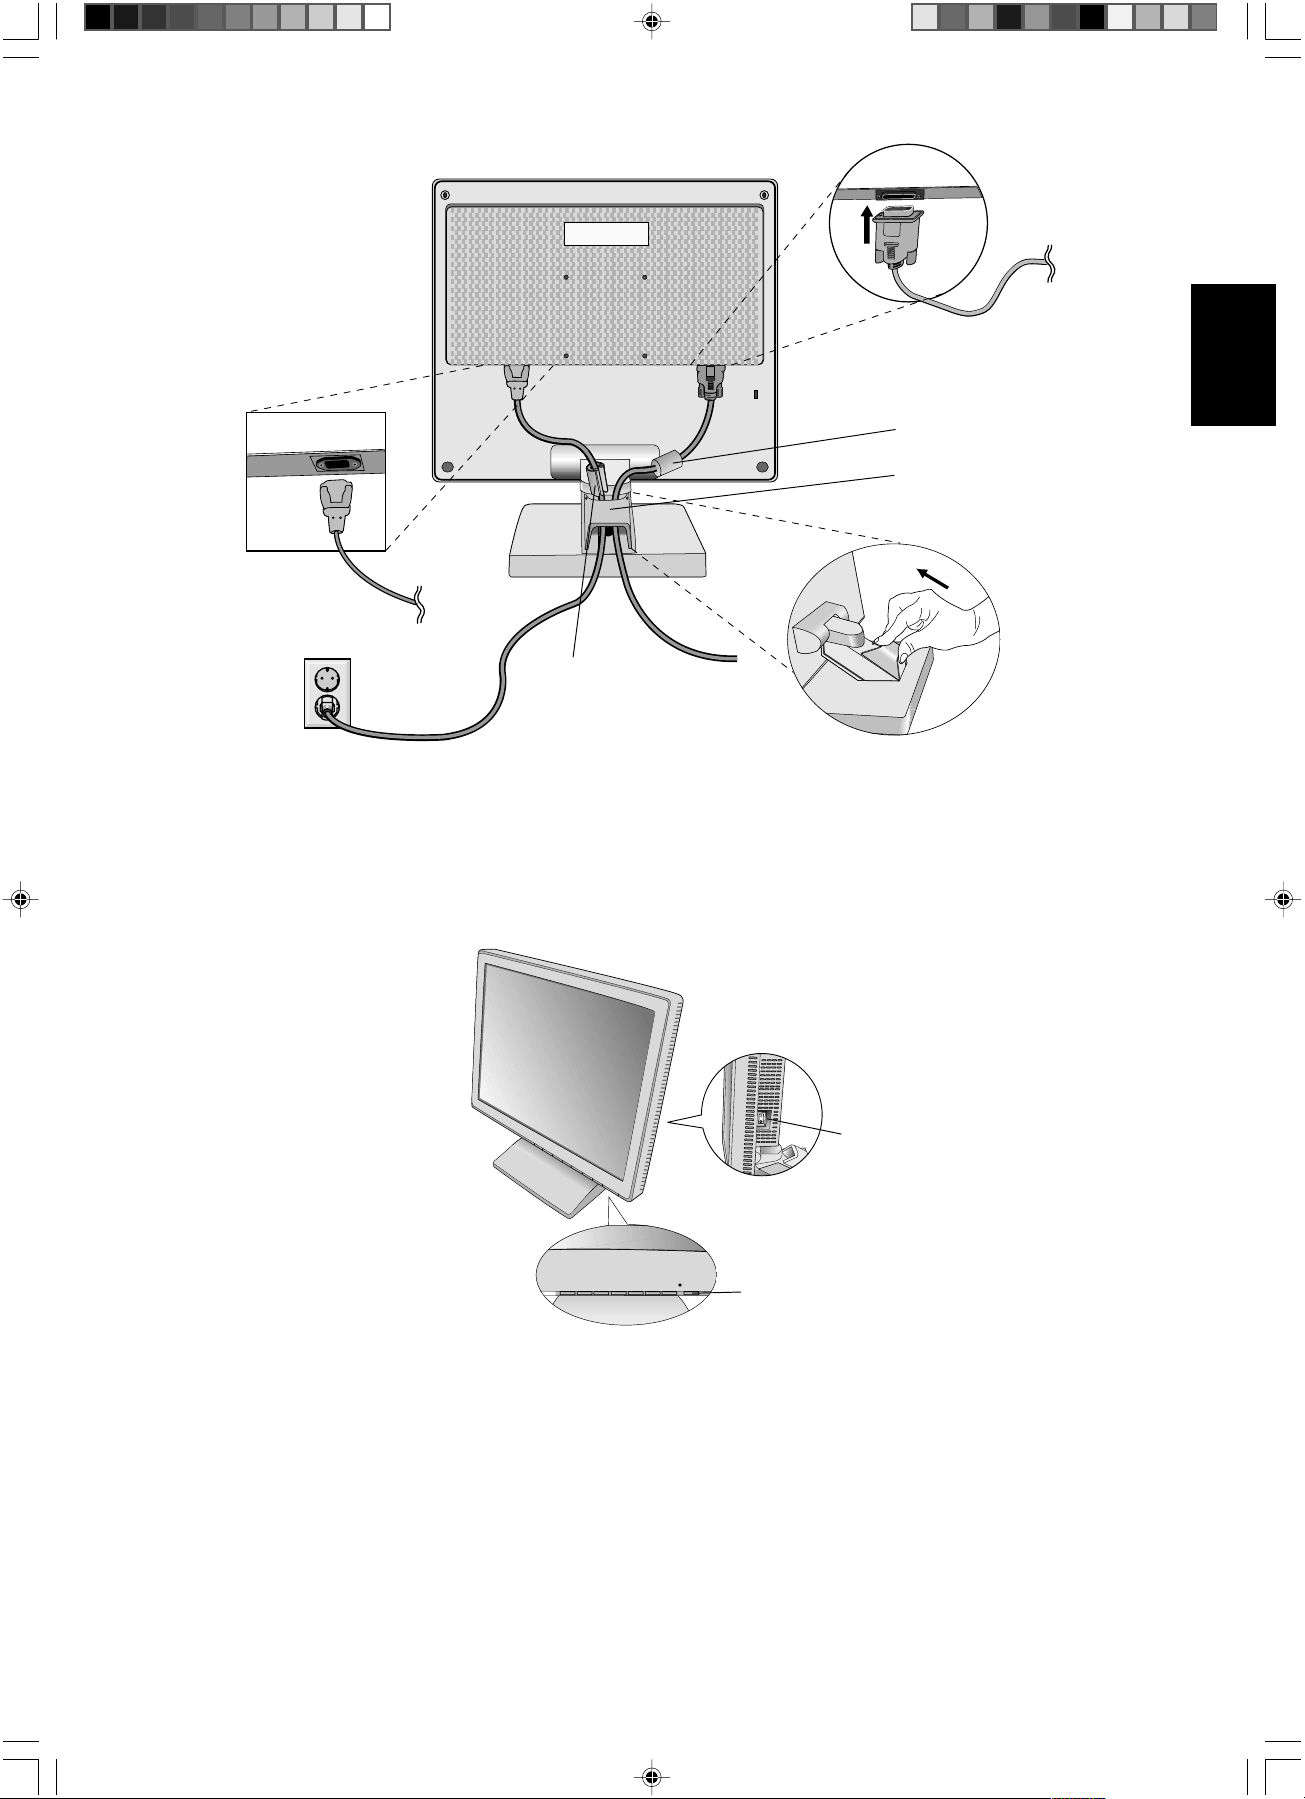
4. Connect the 15-pin mini D-SUB of the video signal cable to the appropriate connector on the back of the monitor
(Figure C.1).
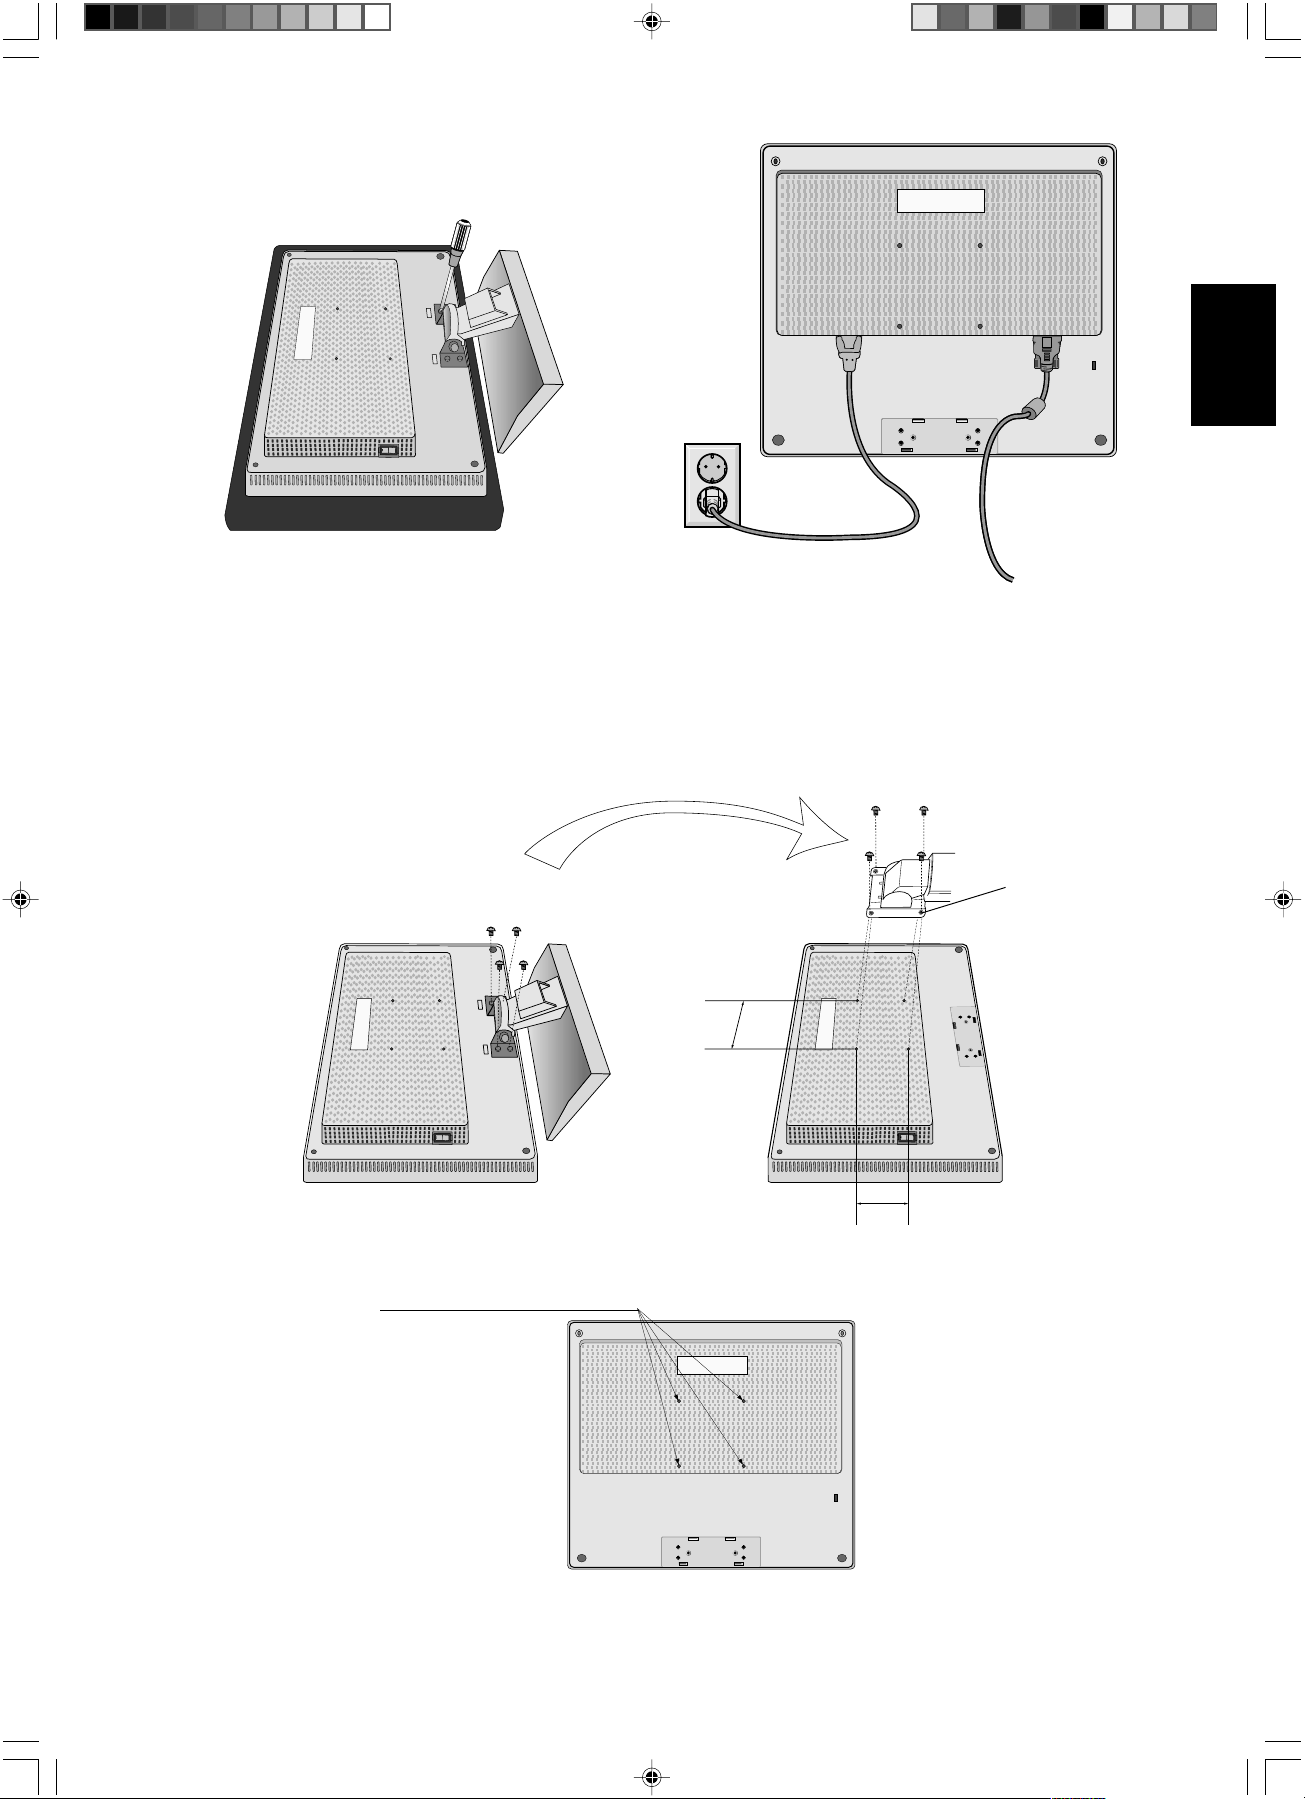
5. Connect one end of the power cord to the LCD1701 monitor and the other end to the power outlet. Place the video signal
cable and AC power cord under the cable cover (Figure C.1). Replace cable cover.
NOTE: Adjust the position of the cable under the cable cover to avoid damage for cable or monitor.
As indicated (Figure C.1) please adjust the cables to place the ferrite core and stopper above the cubic cover.
NOTE: Please refer to Caution section of this manual for proper selection of AC power cord.
English-2
01_English 30/10/2002, 11:312
Page 9
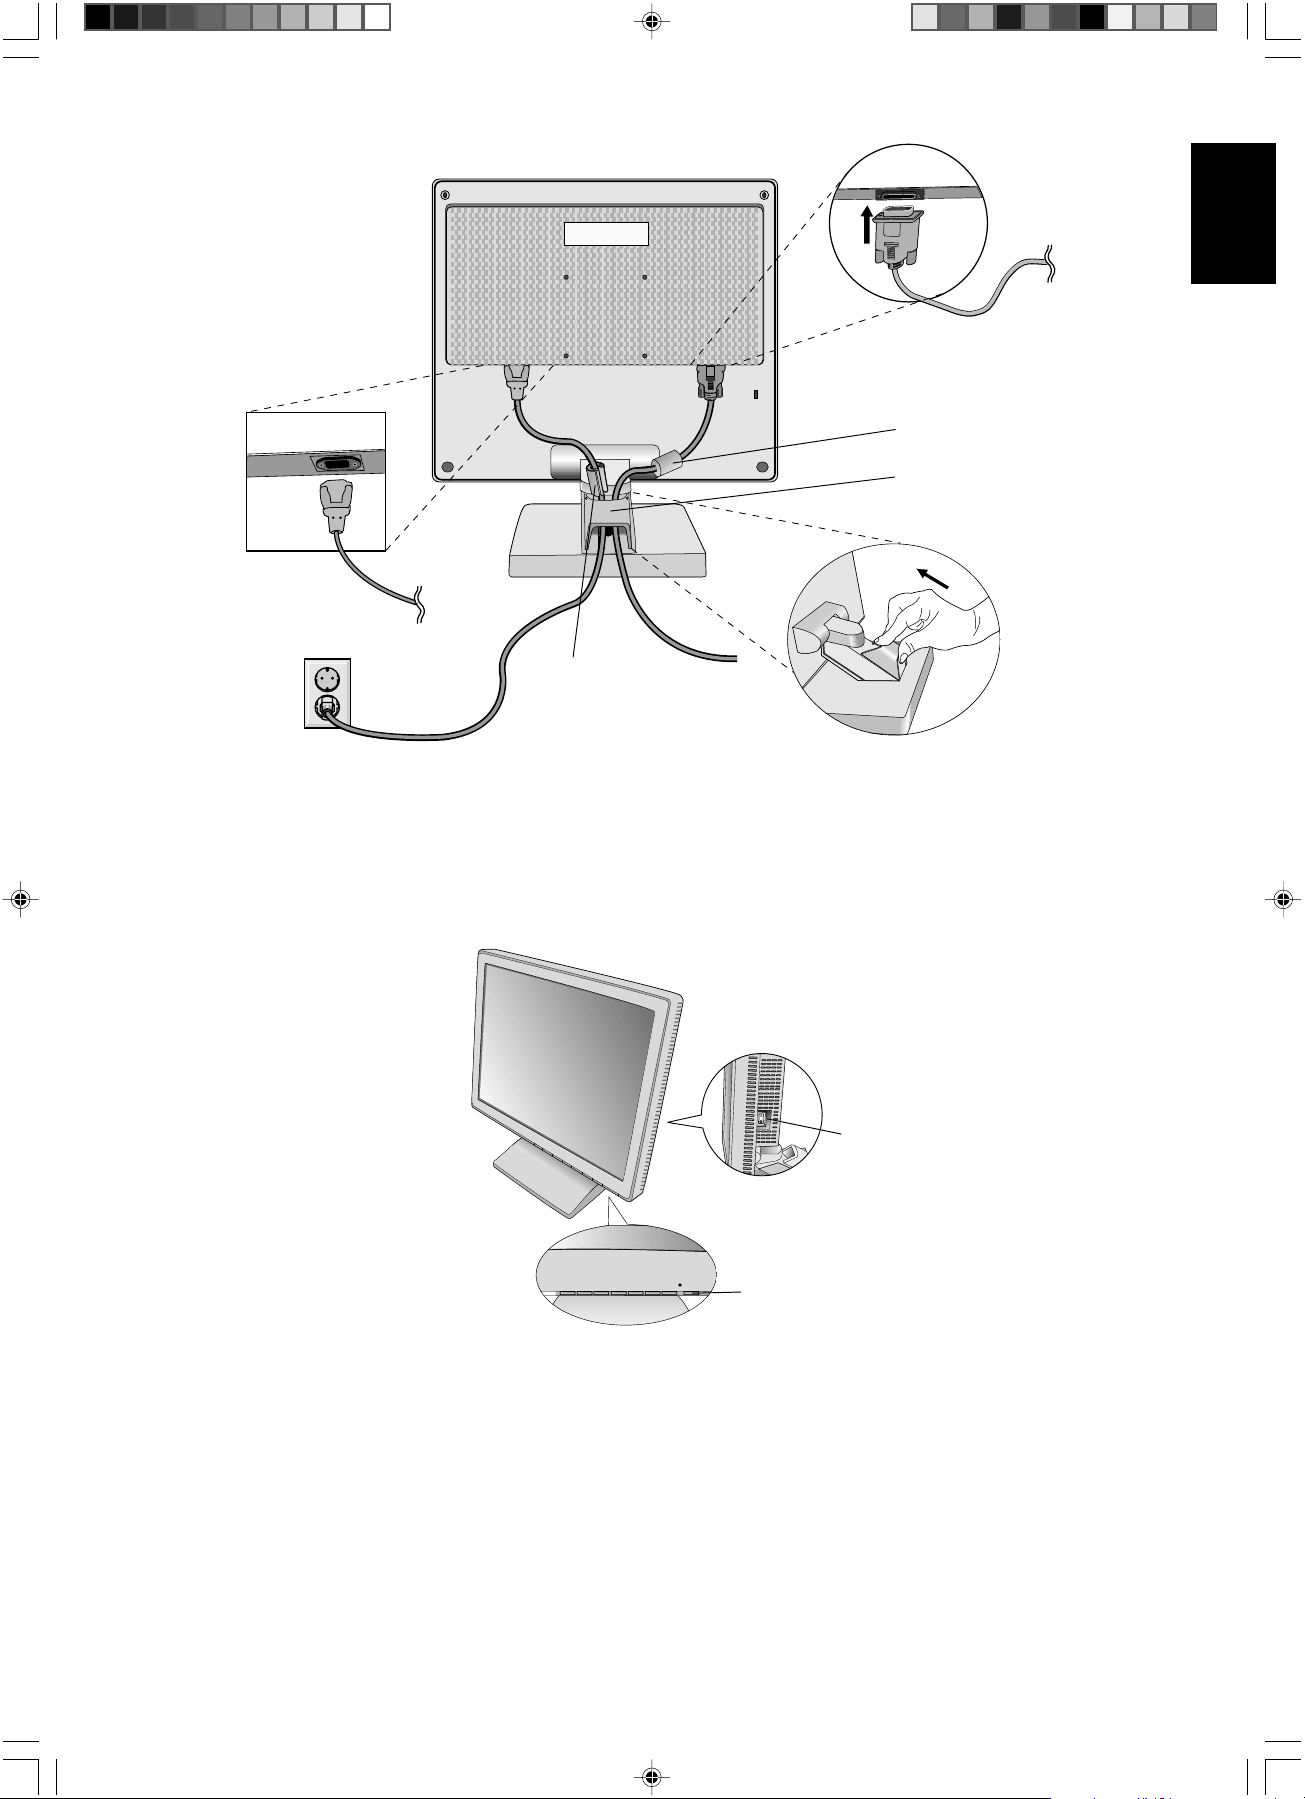
Stopper
English
Ferrite core
Cable Cover
Figure C.1
6. The Vacation Switch on the right side of the monitor must be turned on (Figure D.1). Turn on the monitor with the Power
Button and the computer.
NOTE: The Vacation Switch is a true on/off switch. If this switch is on the OFF position, the monitor cannot be turned on
using the front button DO NOT switch on/off repeatedly.
Vacation Switch
Power Button
Figure D.1
7. No-touch auto adjust automatically adjusts the monitor to optimal settings upon initial setup for most timings. For further
adjustments, use the following OSM controls:
• Auto Adjust Contrast
• Auto Adjust
Refer to the Controls section of this User’s Manual for a full description of these OSM controls.
NOTE: If you have any problems, please refer to the Troubleshooting section of this User’s Manual.
English-3
01_English 30/10/2002, 11:313
Page 10

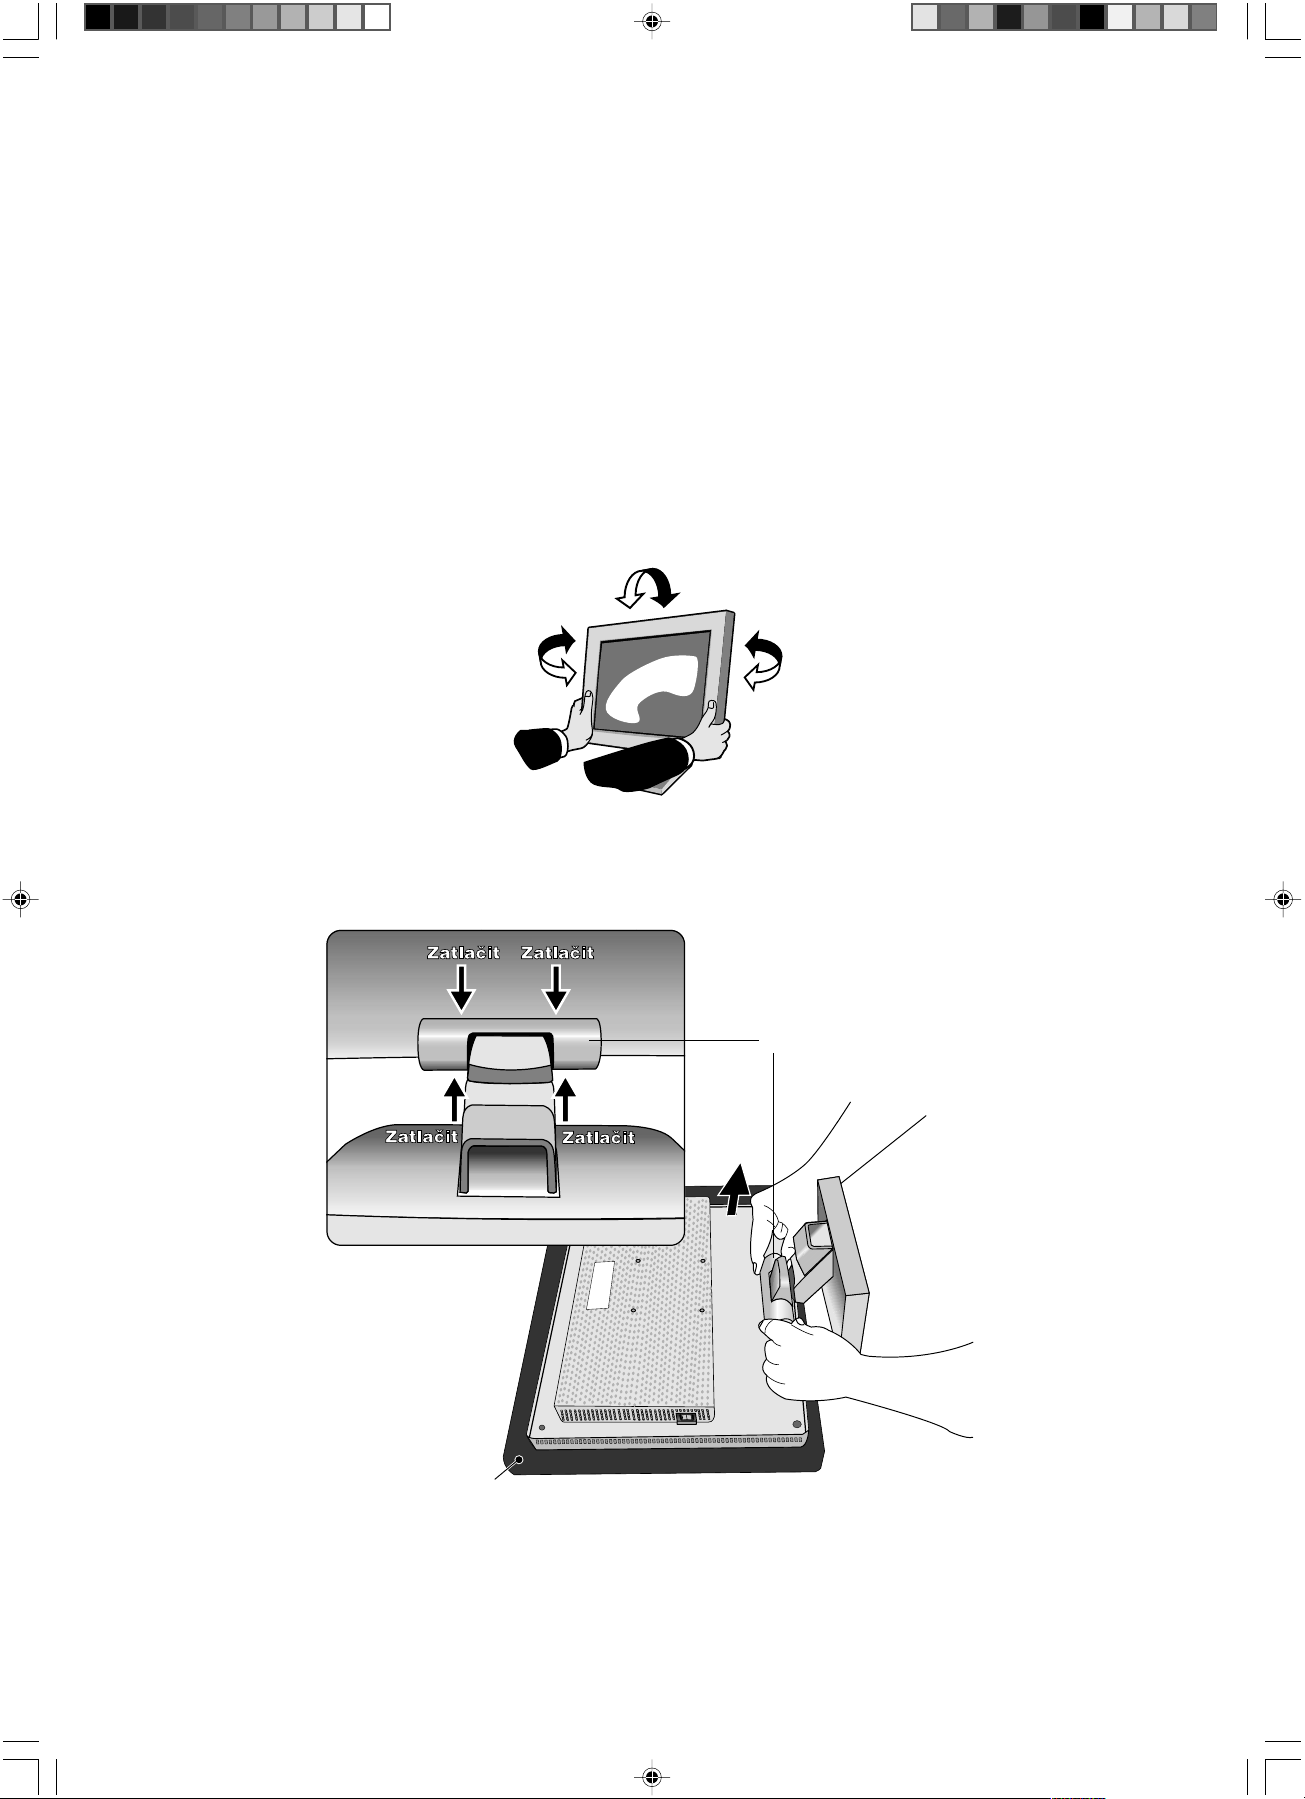
Tilt and Swivel
Grasp both sides of the monitor screen with your hands and adjust the tilt and swivel as desired (Figure TS.1).
Remove Monitor Stand for Mounting
To prepare the monitor for alternate mounting purposes:
1. Disconnect all cables.
2. Place monitor face down on a non-abrasive surface (Figure R.1).
3. Remove the hinge cover (Figure R.1).
4. Remove the 4 screws connecting the monitor to the stand and lift off the stand assembly (Figure R.2) the monitor is now
ready for mounting in an alternate manner.
5. Connect the AC cord and signal cable to the back of the monitor (Figure R.3).
6. Reverse this process to reattach stand.
NOTE: Use only VESA-compatible alternative mounting method.
Handle with care when removing monitor stand.
Figure TS.1
Hinge cover
01_English 30/10/2002, 11:314
Non-abrasive surface
Figure R.1
English-4
Page 11

English
Figure R.2
Figure R.3
7. This LCD monitor is designed for use with a flexible arm. Please use the attached screws (4pcs) when mounting. To meet
the safety requirements the monitor must be mounted to an arm which guaranties the necessary stability under
consideration of the weight of the monitor. The LCD monitor shall only be used with an approved arm (e.g. GS mark).
Replace screws
Thickness of bracket (arm)
2.0 ~ 3.2 mm
Tighten all screws
100 mm
Specifications
01_English 30/10/2002, 11:315
100 mm
4 SCREWS (M4)
(MAX depth: 8.5 mm)
If use other
screw, check
depth of hole.
Weight of LCD assembly: 4.6kg (MAX)
English-5
Page 12
Controls
OSM (On-Screen-Manager) Controls
The OSM controls on the front of the monitor function as follows:
To access OSM press any of the control buttons (<, >, -, +, EXIT).
Control
EXIT
< / >
- / +
SELECT
RESET
NOTE: When RESET is pressed in the main and sub-menu, a warning window will appear allowing you to cancel the
RESET function by pressing the EXIT button.
Menu
Exits the OSM controls.
Exits to the OSM main menu.
Moves the highlighted area left/right to select control menus.
Moves the highlighted area up/down to select one of the controls.
Moves the bar left/right to increase or decrease the adjustment.
Active Auto Adjust function. Enter the OSM controls.
Enter the OSM sub menu.
Resets the highlighted control menu to the factory setting.
Brightness/Contrast Controls
BRIGHTNESS
Adjusts the overall image and background screen brightness.
CONTRAST
Adjusts the image brightness in relation to the background.
AUTO ADJUST
Adjusts the image displayed for non-standard video inputs.
Auto Adjust
Automatically adjusts the Image Position, the H. Size and Fine setting.
Position Controls
LEFT/RIGHT
Controls Horizontal Image Position within the display area of the LCD.
DOWN/UP
Controls Vertical Image Position within the display area of the LCD.
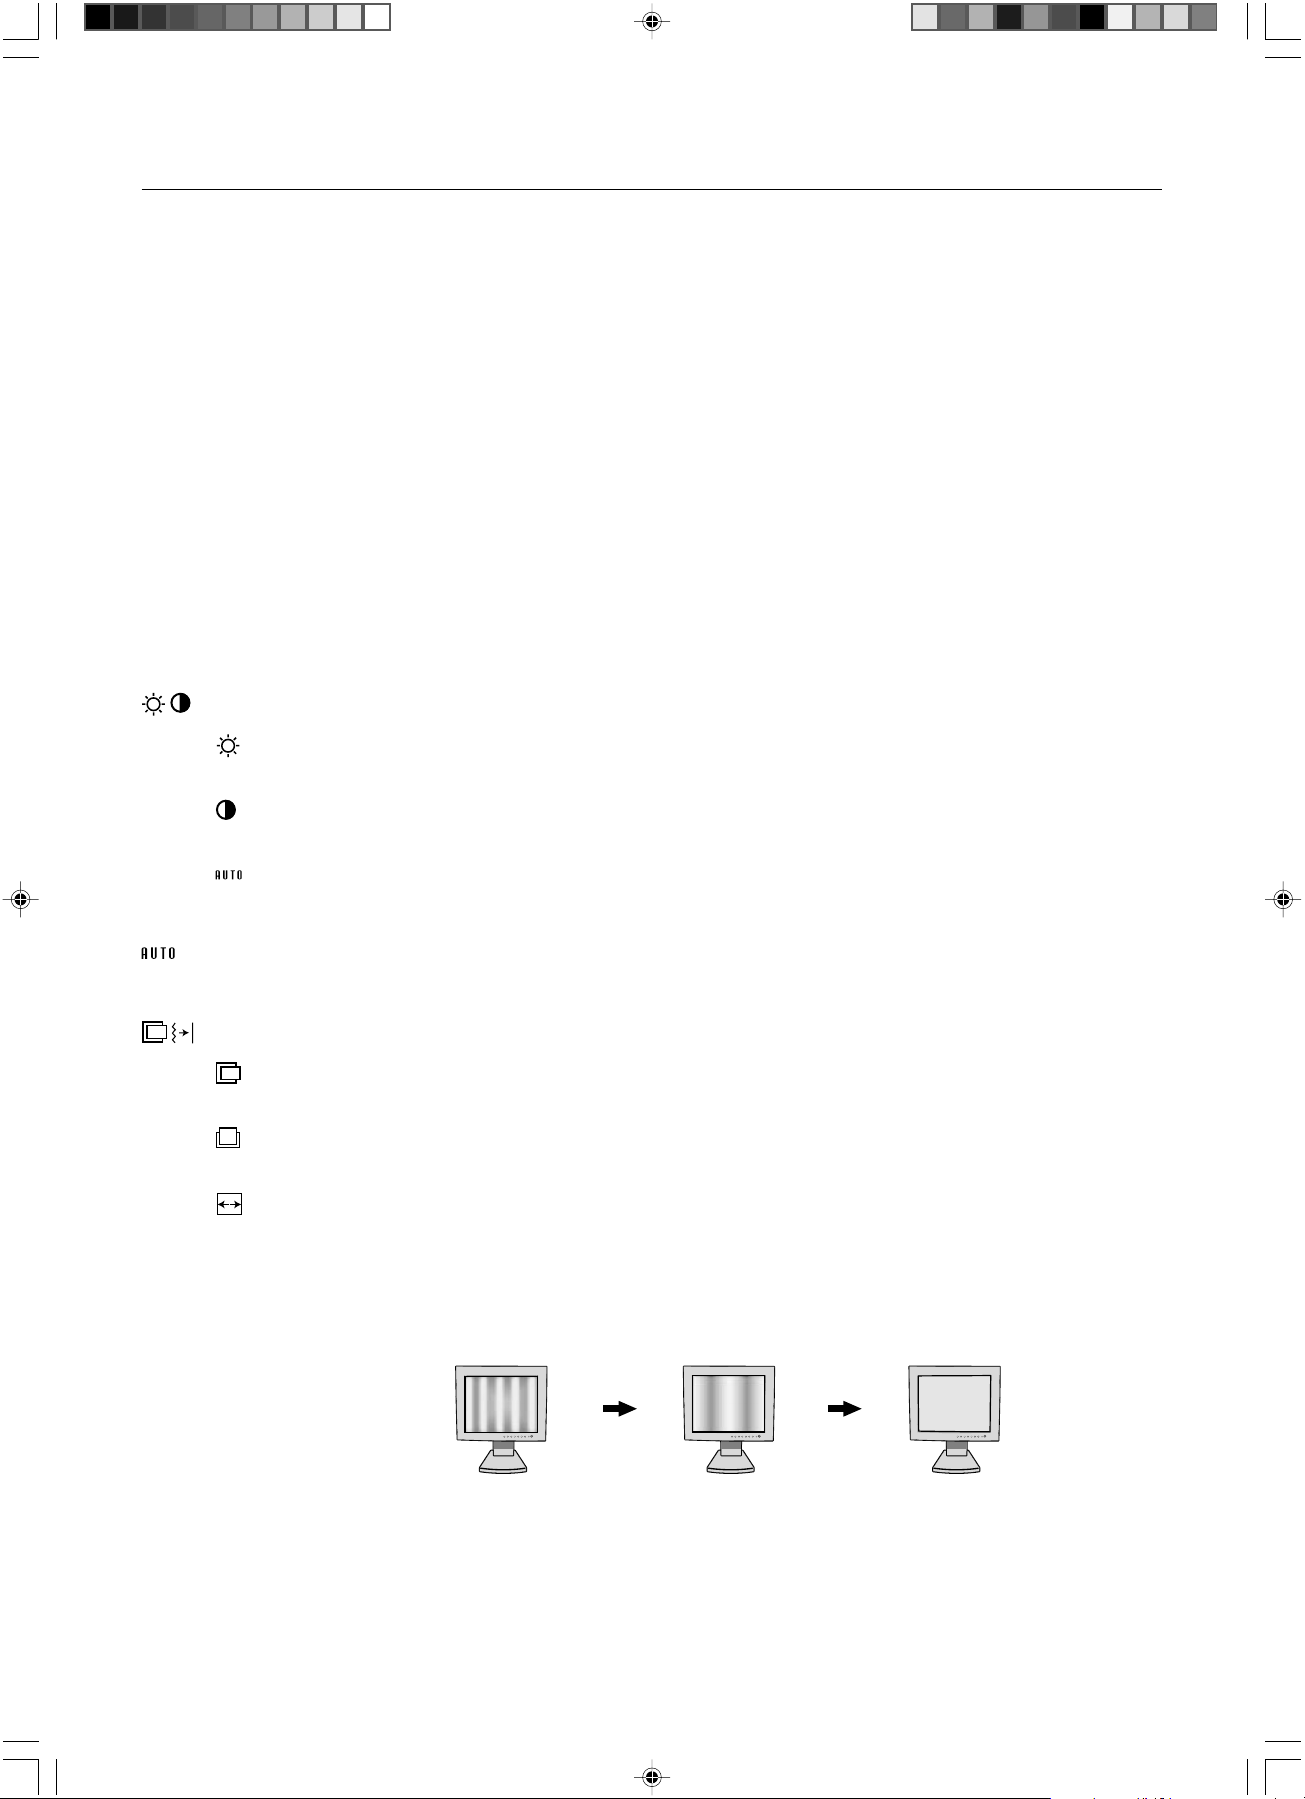
H. SIZE
Adjusts the horizontal size by increasing or decreasing this setting.
Should the “AUTO Adjust function” do not give you a satisfactory picture setting, a further tuning can be
performed using the “H.Size” function (dot clock). For this a Moiré test pattern could be used. This function
may alter the width of the picture. Use Left/Right Menu to center the image on the screen. If the H.Size is
wrongly calibrated, the result would look like on the left drawing. The image should be homogeneous.
When H.SIZE value is
wrong.
When H.SIZE value is
improved.
When H.SIZE value is
correct.
01_English 30/10/2002, 11:316
English-6
Page 13
FINE
Improves focus, clarity and image stability by increasing or decreasing this setting.
Should the “Auto Adjust function” and the “H.Size” function do not give you a satisfactory picture setting, a
fine tuning can be performed using the “Fine” function. It improves focus, clearity and image stability by
increasing or decreasing this setting.
For this a Moiré test pattern could be used. If the Fine value is wrongly calibrated, the result would look like
on the left drawing. The image should be homogeneous.
English
Colour Control Systems
Six colour presets select the desired colour setting (sRGB and NATIVE colour presets are standard and
cannot be changed).
R, G, B
Increases or decreases Red, Green or Blue colour depending upon which is selected. The change in colour
will appear on screen and the direction (increase or decrease) will be shown by the bars.
sRGB
sRGB mode dramatically improves the colour fidelity in the desktop environment by a single standard RGB
colour space. With this colour supported environment, the operator could easily and confidently
communicate colours without further colour management overhead in the most common situations.
NATIVE
Original colour presented by the LCD panel that is unadjustable.
Tools
LANGUAGE
OSM control menus are available in seven languages.
OSM POSITION
You can choose where you would like the OSM control image to appear on your screen. Selecting OSM
Location allows you to manually adjust the position of the OSM control menu left, right, down or up.
When FINE value is
wrong.
When FINE value is
correct.
OSM TURN OFF
The OSM control menu will stay on as long as it is use. In the OSM Turn Off submenu, you can select how
long the monitor waits after the last touch of a button to shut off the OSM control menu. The preset choices
are 10, 20, 30, 45, 60 and 120 seconds.
OSM LOCK OUT
This control completely locks out access to all OSM control functions without Brightness and Contrast.
When attempting to activate OSM controls while in the Lock Out mode, a screen will appear indicating the
OSM controls are locked out. To activate the OSM Lock Out function, press SELECT, then “+” key and hold
down simultaneously. To de-activate the OSM Lock Out, press SELECT, then “+” key and hold down
simultaneously.
RESOLUTION NOTIFIER
This optimal resolution is 1280 x 1024. If ON is selected, a message will appear on the screen after
30 seconds, notifying you that the resolution is not at 1280 x 1024.
HOT KEY
You can adjust the brightness and contrast directly. When this function is set to ON, you can adjust the
contrast with + or -, brightness with < or > key, while the OSM menu is off. The standard OSM menu can
be accessed with the EXIT button.
OFF TIMER
Monitor will automatically power-down when the end user has selected a pre-determined amount of time.
English-7
01_English 30/10/2002, 11:317
Page 14

FACTORY PRESET
Selecting Factory Preset allows you to reset all OSM control settings back to the factory settings. The
RESET button will need to be held down for several seconds to take effect. Individual settings can be reset
by highlighting the control to be reset and pressing the RESET button.
Information
DISPLAY MODE
Indicates the current display resolution and frequency setting of the monitor.
MONITOR INFO.
Indicates the model and serial numbers of your monitor.
OSM Warning
OSM Warning menus disappear with Exit button.
NO SIGNAL: This function gives a warning when there is no signal present. After power is turned on or
when there is a change of input signal or video is inactive, the No Signal window will appear.
RESOLUTION NOTIFIER: This function gives a warning of use with optimized resolution. After power is
turned on or when there is a change of input signal or the video signal doesn’t have proper resolution, the
Resolution Notifier window will open. This function can be disabled in the TOOL menu.
OUT OF RANGE: This function gives a recommendation of the optimized resolution and refresh rate. After
the power is turned on or there is a change of input signal or the video signal doesn’t have proper timing,
the Out Of Range menu will appear.
01_English 30/10/2002, 11:318
English-8
Page 15
Recommended use
Safety Precautions and Maintenance
FOR OPTIMUM PERFORMANCE, PLEASE NOTE
THE FOLLOWING WHEN SETTING UP AND
USING THE LCD COLOUR MONITOR:
• DO NOT OPEN THE MONITOR. There are no user serviceable parts inside and opening or removing covers may expose
you to dangerous shock hazards or other risks. Refer all servicing to qualified service personnel.
• Do not spill any liquids into the cabinet or use your monitor near water.
• Do not insert objects of any kind into the cabinet slots, as they may touch dangerous voltage points, which can be harmful
or fatal or may cause electric shock, fire or equipment failure.
• Do not place any heavy objects on the power cord. Damage to the cord may cause shock or fire.
• Do not place this product on a sloping or unstable cart, stand or table, as the monitor may fall, causing serious damage to
the monitor.
• Do not place any objects onto the monitor and do not use the monitor outdoors.
• The inside of the flourescent tube located within the LCD monitor contains mercury. Please follow the bylaws or rules of
your municipality to dispose of the tube properly.
Immediately unplug your monitor from the wall outlet and refer servicing to qualified service personnel under the following
conditions:
• When the power supply cord or plug is damaged.
• If liquid has been spilled, or objects have fallen into the monitor.
• If the monitor has been exposed to rain or water.
• If the monitor has been dropped or the cabinet damaged.
• If the monitor does not operate normally by following operating instructions.
• Do not bend power cord.
• Do not use monitor in high temperatured, humid, dusty, or oily areas.
• Do not cover vent on monitor.
• If monitor is broken, do not come in contact with the liquid crystal.
• If glass is broken. Handle with care.
• Allow adequate ventilation around the monitor so that heat can properly dissipate. Do not block
ventilated openings or place the monitor near a radiator or other heat sources. Do not put anything on
top of monitor.
CAUTION
• Image Persistence: Image persistence is when a residual or “ghost” image of a previous image remains visible on the
screen. Unlike CRT monitors, LCD monitors’ image persistence is not permanent, but constant images being displayed for
a long period of time should be avoided.
To alleviate image persistence, turn off the monitor for as long as the previous image was displayed. For example, if an
image was on the monitor for one hour and a residual image remains, the monitor should be turned off for one hour to
erase the image.
NOTE: As with all personal display devices, NEC-Mitsubishi Electronics Display-Europe recommends using a moving
• The power cable connector is the primary means of detaching the system from the power supply. The
monitor should be installed close to a power outlet which is easily accessible.
• Handle with care when transporting. Save packaging for transporting.
screen saver at regular intervals whenever the screen is idle or turning off the monitor when not in use.
English
CORRECT PLACEMENT AND ADJUSTMENT OF THE MONITOR CAN
REDUCE EYE, SHOULDER AND NECK FATIGUE. CHECK THE
FOLLOWING WHEN YOU POSITION THE MONITOR:
• For optimum performance, allow 20 minutes for warm-up.
• Adjust the monitor height so that the top of the screen is at or slightly below eye level.
Your eyes should look slightly downward when viewing the middle of the screen.
• Position your monitor no closer than 40 cm and no further away than 70 cm from your
eyes. The optimal distance is 50 cm.
• Rest your eyes periodically by focusing on an object at least 6 m away. Blink often.
• Position the monitor at a 90° angle to windows and other light sources to minimize glare
and reflections. Adjust the monitor tilt so that ceiling lights do not reflect on your screen.
• If reflected light makes it hard for you to see your screen, use an antiglare filter.
• Clean the LCD monitor surface with a lint-free, non-abrasive cloth. Avoid using any
cleaning solution or glass cleaner!
• Adjust the monitor’s brightness and contrast controls to enhance readability.
• Use a document holder placed close to the screen.
01_English 30/10/2002, 11:319
English-9
Page 16
• Position whatever you are looking at most of the time (the screen or reference material) directly in front of you to minimize
turning your head while you are typing.
• Get regular eye checkups.
Ergonomics
To realize the maximum ergonomics benefits, we recommend the following:
• Use the preset Size and Position controls with standard signals.
• Use the preset Colour Setting.
• Use non-interlaced signals with a vertical refresh rate between 60-75 Hz.
• Do not use primary colour blue on a dark background, as it is difficult to see and may produce eye fatigue to insufficient
contrast.
01_English 30/10/2002, 11:3110
English-10
Page 17

VAROVÁNÍ
CHRA≈TE ZA¤ÍZENÍ P¤ED DE·TùM A VLHKEM. ZABRÁNÍTE TAK NEBEZPEâÍ POÎÁRU NEBO ÚRAZU
ELEKTRICK¯M PROUDEM. POLARIZOVANOU ZÁSTRâKU JEDNOTKY NEPOUÎÍVEJTE VE SPOJENÍ SE ZÁSUVKOU
PRODLUÎOVACÍ ·≈ÒRY NEBO JIN¯MI ZÁSUVKAMI, POKUD KOLÍKY NELZE ZCELA ZASUNOUT.
UVNIT¤ ZA¤ÍZENÍ SE NACHÁZÍ VYSOKONAPùËOVÉ KOMPONENTY, PROTO SK¤Í≈ NEOTEVÍREJTE. SERVIS
SVù¤TE KVALIFIKOVANÉ OSOBù.
UPOZORNùNÍ
RIZIKO ÚRAZU ELEKTRICK¯M PROUDEM • NEOTVÍRAT
UPOZORNùNÍ: VZHLEDEM K RIZIKU ÚRAZU ELEKTRICK¯M PROUDEM NEODNÍMEJTE KRYT (NEBO ZADNÍ âÁST).
UVNIT¤ SE NENACHÁZEJÍ DÍLY, DO KTER¯CH UÎIVATEL MÒÎE ZASAHOVAT. SERVIS SVù¤TE
KVALIFIKOVANÉ OSOBù.
Tento symbol upozorÀuje uÏivatele na neizolované napûtí v rámci jednotky, jehoÏ intenzita mÛÏe b˘t
dostateãnû vysoká, aby zpÛsobila úraz elektrick˘m proudem. Jak˘koli kontakt s libovoln˘m dílem uvnitfi
jednotky je proto nebezpeãn˘.
Tento symbol upozorÀuje uÏivatele na dÛleÏitou literaturu t˘kající provozu a údrÏby jednotky dodanou spoleãnû
s tímto zafiízením. Chcete-li pfiedejít problémÛm, doporuãujeme peãlivé proãtení pfiíslu‰n˘ch materiálÛ.
Upozornûní:
Pfii provozu monitoru LCD1701 v síti se stfiídav˘m napûtím 220-240 V v Evropû pouÏívejte napájecí ‰ÀÛru dodávanou
smonitorem.
Ve Spojeném království se smí pouÏívat k tomuto monitoru jen schválená ‰ÀÛra BS se zalitou zástrãkou a s ãernou pojistkou
(5A). Není-li napájecí ‰ÀÛra souãástí zafiízení, spojte se s dodavatelem.
Ve v‰ech ostatních pfiípadech pouÏívejte napájecí ‰ÀÛru, která se shoduje se stfiídav˘m napûtím zásuvky a která vyhovuje
bezpeãnostním pfiedpisÛm dané zemû.
âesky
Prohlá‰ení
Prohlá‰ení v˘robce
Zde tímto prohla‰ujeme, Ïe barevn˘ monitor
LCD1701 (L172EN) je v souladu se
smûrnicemi 73/23/EEC:
– EN 60950
smûrnicemi 89/336/EEC:
– EN 55022
– EN 61000-3-2
– EN 61000-3-3
– EN 55024
Spoleãnost NEC-Mitsubishi Electric Visual Systems Corp. jako partner E
smûrnic ENERGY STAR pro efektivní vyuÏití energie. ENERGY STAR je v USA registrovaná známka.
ErgoDesign je registrovaná ochranná známka spoleãnosti NEC Mitsubishi Electric Visual Systems Corporation v Rakousku,
Beneluxu, Dánsku, Francii, Nûmecku, Itálii, Norsku, ·panûlsku, ·védsku a Spojeném království.
IBM PC/XT/AT, PS/2, MCGA, VGA, 8514/A a XGA jsou registrované obchodní znaãky spoleãnosti International Business
Machines Corporation.
Apple a Macintosh jsou registrované ochranné známky spoleãnosti Apple Computer Inc.
Microsoft a Windows jsou registrované ochranné známky spoleãnosti Microsoft Corporation.
NEC je registrovaná ochranná známka spoleãnosti NEC Corporation.
V‰echny ostatní ochranné známky nebo registrované ochranné známky jsou majetkem pfiíslu‰n˘ch vlastníkÛ.
a je opatfien oznaãením
NEC-Mitsubishi Electric Visual
Systems, Corp.
MS Shibaura Bldg., 13-23,
Shibaura 4-chome,
Minato-Ku, Tokyo 108-0023, JAPAN
NERGY STAR
®
urãila, Ïe tento produkt splÀuje poÏadavky
02_Czech 30/10/2002, 11:311
âesky-1
Page 18

Obsah
Dodávka nového monitoru LCD1701 NEC* by mûla obsahovat následující poloÏky:
• monitor LCD1701 se naklánûcím podstavcem,
• napájecí ‰ÀÛra,
• kabel pro video signál,
• uÏivatelská pfiíruãka,
• CD-ROM (zahrnuje kompletní uÏivatelskou pfiíruãku ve formátu PDF).
Pro zobrazení uÏivatelské pfiíruãky musíte mít na poãítaãi nainstalovanou
aplikaci Acrobat Reader 4.0.
* PÛvodní krabici a balicí materiál uschovejte pro pfiípadnou pfiepravu nebo odeslání monitoru.
Rychl˘ start
Monitor LCD pfiipojíte k poãítaãi následujícím postupem:
1. Vypnûte poãítaã.
2. Sundejte kryt kabelu.
3. PC: V poãítaãi pfiipojte odpovídající 15kolíkovou mini-zástrãku D-SUB signálního kabelu ke konektoru grafické karty
(ObrázekA.1). Dotáhnûte v‰echny ‰rouby.
Mac: Pfiipojte kabelov˘ adaptér Macintosh monitoru LCD1701 k poãítaãi (Obrázek B.1). Zapojte 15kolíkovou mini-zástrãku
D-SUB signálního kabelu do adaptéru Macintosh monitoru LCD1701 (Obrázek B.1). Dotáhnûte v‰echny ‰rouby.
Adaptér kabelu
Macintosh (není
souãástí v˘bavy)
Poãítaãe Macintosh G3 a
G4 adaptér kabelu
Macintosh nevyÏadují
Obrázek A.1
Obrázek B.1
4. 15kolíkovou mini-zástrãku D-SUB kabelu pro video signál pfiipojte k odpovídajícímu konektoru na zadní stranû monitoru
(ObrázekC.1).
5. Pfiipojte napájecí ‰ÀÛru k monitoru LCD1701 a druh˘ konec zapojte do elektrické zásuvky. Umístûte kabel pro video signál a
napájení pod kryt kabelu (ObrázekC.1). Nasaìte zpût kryt kabelu.
POZNÁMKA: Upravte polohu kabelu pod krytem, aby nemohlo dojít k po‰kození kabelu nebo monitoru.
Upravte kabely dle obrázku tak, aby bylo feritové jádro a zaráÏka nad krytem kabelu (Obrázek C.1).
POZNÁMKA: V ãásti Upozornûní této pfiíruãky najdete pokyny k v˘bûru správné napájecí ‰ÀÛry.
âesky-2
02_Czech 30/10/2002, 11:312
Page 19
Feritové jádro
Kryt kabelu
ZaráÏka
Obrázek C.1
6. Hlavní vypínaã na pravé stranû monitoru musí b˘t v poloze zapnuto (ObrázekD.1). Zapnûte pomocí tlaãítka napájení
monitor a poãítaã.
POZNÁMKA: Hlavní vypínaã pfiedstavuje skuteãn˘ vypínaã. Pokud je tento vypínaã v poloze vypnuto, monitor nelze zapnout
pfiedním tlaãítkem. NEP¤EPÍNEJTE vypínaã opakovanû.
âesky
Hlavní vypínaã
Tlaãítko napájení
Obrázek D.1
7. Pfii úvodní instalaci u vût‰iny ãasování funkce bezdotykového auto-sefiízení automaticky nastaví vhodnû monitor. K dal‰ímu
sefiízení pouÏijte následující ovladaãe OSM:
• automatické upravení kontrastu,
• automatické sefiízení.
Úpln˘ popis tûchto ovladaãÛ OSM je uveden v kapitole Ovladaãe v této uÏivatelské pfiíruãce.
POZNÁMKA: Vyskytnou-li se potíÏe, proãtûte si kapitolu OdstraÀování problémÛ dále v této pfiíruãce.
âesky-3
02_Czech 30/10/2002, 11:313
Page 20
Naklánûní a otáãení
Uchopte obû strany obrazovky monitoru a upravte sklon a natoãení podle poÏadavkÛ (Obrázek TS.1).
Odstranûní podstavce monitoru pro jiné umístûní
Pfiíprava monitoru pro jiné moÏnosti umístûní:
1. Odpojte v‰echny kabely.
2. Monitor umístûte obrazovkou dolÛ na hladk˘ povrch (Obrázek R.1).
3. Sundejte kryt závûsu (Obrázek R.1).
4. OdstraÀte 4 ‰roubky spojující monitor s podstavcem a sejmûte sestavu podstavce (Obrázek R.2), Monitor je nyní pfiipraven
pro alternativní uchycení.
5. Pfiipojte napájecí ‰ƒÛru a signální kabel do zadní ãásti monitoru (Obrázek R.3).
6. Pro upevnûní podstavce pouÏijte obrácen˘ postup.
POZNÁMKA: Jako alternativní montáÏní postup pouÏívejte pouze metodu kompatibilní s normou VESA.
Pfii sejmutí podstavce monitoru zacházejte se zafiízením opatrnû.
Obrázek TS.1
Kryt závûsu
02_Czech 30/10/2002, 11:314
Hladk˘ povrch
Obrázek R.1
âesky-4
Page 21
Obrázek R.3Obrázek R.2
7. Tento displej je navrÏen k pouÏití spolu s pruÏn˘m ramenem. PfiimontáÏi pouÏijte pfiiloÏené ‰rouby (4 ks). Aby byly splnûny
bezpeãnostní poÏadavky, musí b˘t monitor namontován na rameno, které zaruãuje nezbytnou stabilitu s ohledem na
hmotnost monitoru. Monitor LCD je moÏno pouÏívat pouze se schválen˘m ramenem (napfi. znaãky GS).
Vyjmutí ‰roubÛ
Tlou‰Èka nosníku (ramene)
je 2,0 - 3,2 mm
âesky
Technické údaje
4 ·ROUBY (M4)
(max. délka: 8,5 mm)
PouÏijete-li jin˘ vrut,
zkontrolujte hloubku
otvoru.
Dotáhnûte
v‰echny ‰rouby
100 mm
100 mm
02_Czech 30/10/2002, 11:315
Hmotnost kompletu LCD: 4,6 kg (max.)
âesky-5
Page 22

Ovládací prvky
Ovladaãe OSM (On-Screen Manager)
Ovládací prvky OSM na pfiední stranû monitoru mají následující funkce:
Chcete-li spustit ovládání OSM, stisknûte kterékoli z ovládacích tlaãítek (<, >, -, +, EXIT).
Ovládací prvek
EXIT
< / >
- / +
SELECT (V˘bûr)
RESET
POZNÁMKA: Stisknete-li RESET v hlavní nebo dílãí nabídce, objeví se dialogové okno s varováním, které umoÏní zru‰it funkci
Nabídka
V˘stup z nabídky ovládacích prvkÛ OSM.
Pfiejde do hlavní nabídky OSM.
Posunuje vyznaãenou plochu vlevo nebo vpravo a zvolí nûkterou z nabídek ovládacích prvkÛ.
Posunuje vyznaãenou oblast nahoru nebo dolÛ a zvolí nûkter˘ z ovládacích prvkÛ.
Posunutím li‰ty doleva nebo doprava se zvy‰uje nebo sniÏuje hodnota nastavení.
Funkce aktivního automatického sefiízení. Vstup do nabídky ovládacích prvkÛ OSM.
Vstup do podnabídky OSM.
Znovu nastaví zv˘raznûnou ovládací nabídku na nastavení z v˘roby.
RESET pomocí tlaãítka EXIT.
Prvky pro ovládání jasu a kontrastu
BRIGHTNESS (Jas)
Nastavuje celkovou svûtlost a jas pozadí obrazovky.
CONTRAST (Kontrast)
Nastavuje jas obrazu vzhledem k pozadí.
AUTO ADJUST (Automatické sefiízení)
Nastaví obraz pro nestandardní video vstupy.
Automatické sefiízení
Automaticky nastaví pozici obrazu, vodorovn˘ rozmûr ajemné nastavení.
Poziãní ovládací prvky
LEFT/RIGHT (Vlevo nebo vpravo)
Ovládá vodorovnou polohu obrazu na zobrazovací plo‰e monitoru LCD.
DOWN/UP (Nahoru nebo dolÛ)
Ovládá svislou polohu obrazu na zobrazovací plo‰e monitoru LCD.
H.SIZE (Vodorovn˘ rozmûr)
Upraví vodorovn˘ rozmûr zv˘‰ením nebo sníÏením hodnoty tohoto nastavení.
Pokud funkce “AUTO Adjust” nezajistí uspokojivé nastavení obrazu, mÛÏete obraz doladit pomocí funkce
“H.Size” (synchronizace bodu). K tomu lze pouÏít zkou‰ku na vzor moaré. Tato funkce mÛÏe zmûnit ‰ífiku
obrazu. Pomocí nabídky Left/Right umístûte obraz do stfiedu. Pokud je vodorovn˘ rozmûr H.Size nastaven
‰patnû, bude v˘sledek vypadat jako na ilustraci vlevo. Obraz by mûl b˘t jednolit˘.
Hodnota H.SIZE je
‰patná.
Hodnota H.SIZE je lep‰í. Hodnota H.SIZE je
správná.
02_Czech 30/10/2002, 11:316
âesky-6
Page 23

FINE (Jemné doladûní)
Zlep‰í zaostfiení, jasnost a stabilitu obrazu zv˘‰ením nebo sníÏením hodnoty tohoto nastavení.
Pokud funkce “Auto Adjust” a “H.Size” nezajistí uspokojivé nastavení obrazu, mÛÏete obraz doladit pomocí
funkce “Fine”. Zlep‰í zaostfiení, jasnost a stabilitu obrazu zv˘‰ením nebo sníÏením hodnoty tohoto nastavení.
K tomu lze pouÏít zkou‰ku na vzor moaré. Pokud je hodnota Fine nastavena ‰patnû, bude v˘sledek vypadat
jako na ilustraci vlevo. Obraz by mûl b˘t jednolit˘.
âesky
Systém fiízení barev
·est pfiedvoleb barev slouÏí k volbû poÏadovaného nastavení barvy (pfiedvolby barev sRGB a NATIVE jsou
standardní a nelze je mûnit).
R, G, B
Zv˘‰í nebo sníÏí obsah ãervené, zelené nebo modré barvy v závislosti na provedené volbû. Na obrazovce se
objeví zmûna barvy a na li‰tách je vidût smûr (zv˘‰ení nebo sníÏení intenzity barev).
sRGB
ReÏim sRGB znaãnû zlep‰uje vûrnost barev v prostfiedí stolního poãítaãe pomocí jediného barevného
prostoru RGB. S tímto prostfiedím s podporou barev mÛÏe obsluha snadno a s jistotou pfiená‰et barvy bez
dal‰í správy barev nutné ve vût‰inû bûÏn˘ch situací.
NATIVE (PÛvodní)
PÛvodní barva zobrazená na panelu LCD, kterou nelze upravit.
Nástroje
LANGUAGE (JAZYK)
Nabídka OSM je k dispozici v sedmi jazycích.
OSM POSITION (Poloha OSM)
Na obrazovce lze zvolit poÏadovanou polohu zobrazení ovladaãe OSM. Volba polohy OSM umoÏÀuje ruãnû
nastavit polohu ovládací nabídky OSM smûrem doleva, doprava, dolÛ nebo nahoru.
Hodnota FINE je
‰patná.
Hodnota FINE je
správná.
OSM TURN OFF (VYPNUTÍ OSM)
Nabídka ovládání OSM zÛstane zobrazena, dokud se pouÏívá. V dílãí nabídce OSM Turn Off (Vypnutí OSM)
lze nastavit prodlevu monitoru pro vypnutí nabídky ovládání OSM po posledním stisknutí tlaãítka.
Zpfiednastaven˘ch hodnot mÛÏe vybrat tyto prodlevy: 10, 20, 30, 45, 60 a 120 sekund.
OSM LOCK OUT (UZAMÃENÍ OSM)
ZnemoÏÀuje pfiístupu ke v‰em funkcím OSM, kromû funkce ztlumení, nastavení zvuku, jasu a kontrastu.
Pfii pokusu o aktivaci ovládání OSM v reÏimu uzamãení se na obrazovce objeví sdûlení, Ïe funkce OSM
jsou uzamãeny. K uzamãení funkcí OSM stisknûte a podrÏte tlaãítko SELECT a souãasnû stisknûte “+”.
K odemãení OSM stisknûte a podrÏte tlaãítko SELECT a souãasnû stisknûte “+”.
RESOLUTION NOTIFIER (Upozornûní na rozli‰ení)
Optimální rozli‰ení je 1280 x 1024. Je-li zvolena poloÏka ON (Zapnuto), objeví se po 30 sekundách na
obrazovce zpráva oznamující, Ïe rozli‰ení není 1280 x 1024.
HOT KEY (Rychlá volba)
Jas a kontrast lze upravit pfiímo. Pokud je tato funkce nastavena na ON (Zapnuto), lze jas nastavit pomocí
tlaãítek < nebo >, kontrast pomocí + nebo -, i kdyÏ je nabídka OSM vypnuta. Pfiístup do standardní nabídky
OSM se provede tlaãítkem EXIT.
âesky-7
02_Czech 30/10/2002, 11:317
Page 24
OFF TIMER (Nastavení ãasu vypnutí)
Monitor se automaticky vypne po uplynutí ãasu nastaveného uÏivatelem.
FACTORY PRESET (Nastavení z v˘roby)
Volba Factory Preset (Nastavení z v˘roby) umoÏÀuje vrátit v‰echna nastavení ovladaãÛ OSM na hodnoty
nastavené z v˘roby. Tlaãítko RESET je tfieba podrÏet stisknuté nûkolik vtefiin. K individuálnímu nastavení
selze vrátit oznaãením pfiíslu‰n˘ch ovládacích prvkÛ astisknutím tlaãítka RESET.
Informace
DISPLAY MODE (ReÏim zobrazení)
Indikuje aktuální rozli‰ení obrazu a nastavení kmitoãtu monitoru.
MONITOR INFO. (Informace o monitoru)
Zobrazí model monitoru a jeho sériové ãíslo.
Upozornûní OSM
Nabídky upozornûní OSM zmizí po stisknutí tlaãítka Exit.
NO SIGNAL (Není signál): Tato funkce v pfiípadû nepfiítomnosti signálu zobrazí upozornûní. Po zapnutí
monitoru nebo do‰lo-li ke zmûnû vstupního signálu nebo není-li video aktivní, zobrazí se okno No Signal.
RESOLUTION NOTIFIER (Upozornûní na rozli‰ení): Tato funkce upozorní na pouÏití optimalizovaného
rozli‰ení. Po zapnutí monitoru nebo pokud do‰lo ke zmûnû vstupního signálu nebo video signál není ve
správném rozli‰ení, otevfie se okno Resolution Notifier Tuto funkci lze deaktivovat v nabídce TOOL
(Nástroje).
OUT OF RANGE (Mimo rozsah): Tato funkce doporuãuje optimalizované rozli‰ení a obnovovací kmitoãet.
Po zapnutí monitoru nebo pokud do‰lo ke zmûnû vstupního signálu nebo video signál není ve správném
kmitoãtu, otevfie se okno Out Of Range.
02_Czech 30/10/2002, 11:318
âesky-8
Page 25
Provozní pokyny
Bezpeãnostní opatfiení a údrÏba
CHCETE-LI DOSÁHNOUT OPTIMÁLNÍ FUNKCE BAREVNÉHO
MONITORU LCD MULTISYNC, POSTUPUJTE P¤I INSTALACI
A NASTAVOVÁNÍ PODLE NÁSLEDUJÍCÍCH POKYNÒ:
• MONITOR NEOTVÍREJTE. Uvnitfi monitoru nejsou Ïádné souãástky, které by si mohl uÏivatel sám opravit. Pfiiotvírání nebo
odstraÀování krytÛ se vystavujete nebezpeãí úrazu elektrick˘m proudem a jin˘m rizikÛm. Ve‰keré zásahy tohoto druhu pfienechejte
odborníkÛm.
• Dbejte, aby se do monitoru nedostaly tekutiny a nepouÏívejte ho vblízkosti vody.
• Do mezer obalu nezasouvejte Ïádné pfiedmûty. Mohly by se dotknout nebezpeãn˘ch ãástí pod napûtím, coÏ mÛÏe zpÛsobit úraz
elektrick˘m proudem, poÏár nebo selhání zafiízení.
• Na napájecí ‰ÀÛru nepokládejte Ïádné tûÏké pfiedmûty. Po‰kození izolace mÛÏe zpÛsobit úraz elektrick˘m proudem nebo poÏár.
• Produkt neumísÈujte na ‰ikmé a nestabilní vozíky, stojany nebo stoly; monitor se mÛÏe pádem váÏnû po‰kodit.
• NeumisÈujte na monitor Ïádné pfiedmûty a nepouÏívejte monitor venku.
• Fluorescenãní trubice v monitoru LCD obsahuje rtuÈ. Pfii likvidaci této trubice se fiiìte normami a pfiedpisy va‰ich úfiadÛ.
V níÏe popsan˘ch pfiípadech je nutno okamÏitû odpojit monitor ze sítû apfiivolat odborného technika:
• Dojde k po‰kození napájecí ‰ÀÛry.
• Do monitoru se dostane kapalina nebo monitor upadne na zem.
• Monitor byl vystaven de‰ti nebo vodû.
• Monitor upadne nebo se po‰kodí jeho obal.
• Monitor fiádnû nefunguje, pfiestoÏe jste dodrÏeli v‰echny pokyny.
• Neoh˘bejte síÈovou ‰ÀÛru.
• NepouÏívejte monitor na pfiíli‰ teplém, vlhkém nebo pra‰ném místû.
• Nezakr˘vejte vûtrací otvory na monitoru.
• JestliÏe monitor praskne, nedot˘kejte se tekut˘ch krystalÛ.
• Pfii rozbití skla. Buìte opatrní.
• Zajistûte kolem monitoru odpovídající odvûtrávání, aby se nepfiehfiíval. Nezakr˘vejte vûtrací otvory a neumísÈujte
monitor do blízkosti topidel a jin˘ch tepeln˘ch zdrojÛ. Nepokládejte na monitor Ïádné pfiedmûty.
UPOZORNùNÍ
• Dosvit obrazu: Dosvitem obrazu se oznaãuje zbytkov˘ obraz (“duchy”) pfiedchozího obrazu, kter˘ zÛstane viditeln˘ na obrazovce.
Narozdíl od bûÏn˘ch monitorÛ není dosvit obrazu na displeji LCD permanentní, ale pfiesto by se mûlo pfiedejít zobrazení jednoho
obrazu po dlouhou dobu.
Chcete-li zmírnit dosvit obrazu, vypnûte monitor na stejnû dlouhou dobu, po jakou byl poslední obraz zobrazen. JestliÏe byl
napfiíklad obraz na obrazovce hodinu a zÛstal po nûm zbytkov˘ obraz, mûli byste vypnout monitor opût na hodinu, aby obraz zmizel.
POZNÁMKA: Stejnû jako u v‰ech osobních zobrazovacích zafiízení doporuãuje firma NEC-Mitsubishi Electronics Display pravidelné
pouÏívání spofiiãÛ obrazovky pfii neãinnosti a vypnutí monitoru v dobû, kdy se nepouÏívá.
• Konektor napájecí ‰ÀÛry je hlavním prostfiedkem pro odpojení systému od pfiívodu elektrického napûtí. Monitor je
tfieba nainstalovat blízko elektrické zásuvky, k níÏ máte snadn˘ pfiístup.
• Pfii dopravû a manipulaci zacházejte se zafiízením opatrnû. Obal uschovejte pro pfiípadnou pfiepravu.
âesky
SPRÁVN¯M UMÍSTùNÍM A NASTAVENÍM MONITORU MÒÎETE P¤EDEJÍT
ÚNAVù OâÍ, BOLESTEM RAMEN A ·ÍJE. P¤I UMÍSËOVÁNÍ MONITORU
• Pro dosaÏení optimálního v˘konu nechejte monitor 20 minut zahfiát.
• Umístûte monitor do takové v˘‰ky, abyste horní ãást obrazovky mûli mírnû pod úrovní oãí.
Pohled na stfied obrazovky by mûl smûfiovat mírnû dolÛ.
• Doporuãená minimální vzdálenost monitoru od oãí je 40 cm, maximální 70 cm. Optimální
vzdálenost je 50 cm.
• Pfii práci zamûfiujte zrak pravidelnû na nûjak˘ pfiedmût vzdálen˘ nejménû 6 m, sníÏí tak
namáhání va‰eho zraku. âasto mrkejte.
• Umístûte monitor v úhlu asi 90° k oknu a jin˘m svûteln˘m zdrojÛm tak, aby se neodráÏely na
obrazovce. Monitor sklopte tak, aby se na obrazovce neodráÏela stropní svûtla.
• JestliÏe se nelze odrazu svûtla na obrazovce vyhnout, pouÏívejte filtr jako stínidlo.
• Povrch monitoru LCD ãistûte jemnou látkou, která nepou‰tí vlákna a není agresivní.
Rozhodnû nepouÏívejte ãisticí roztoky nebo ãistiãe skel!
• Jas a kontrast nastavte tak, aby byla zaji‰tûna optimální ãitelnost.
• Stojan na dokumenty pouÏívejte v blízkosti obrazovky.
• Obrazovku nebo referenãní materiál, se kter˘m pracujete, umístûte pfied sebe, abyste pfii psaní museli co nejménû otáãet hlavou.
• Rozhodnû nezobrazujte nehybné vzory na dlouhou dobu, abyste zabránili dosvitu obrazu (magnetické zpoÏdûní obrazu).
• Choìte pravidelnû na prohlídky k oãnímu lékafii
POSTUPUJTE PODLE NÁSLEDUJÍCÍCH POKYNÒ:
.
âesky-9
02_Czech 30/10/2002, 11:319
Page 26
Ergonomika
Pro maximální ergonomickou pohodu doporuãujeme:
• VyuÏívejte v˘robcem nastavenou velikost a polohu (Size a Position) se standardním signálem.
• PouÏijte pfiedvolbu nastavení barev.
• PouÏívejte neprokládané signály s vertikální obnovovací frekvencí vrozsahu 60-75 Hz.
• NepouÏívejte primárnû modrou barvu na tmavém pozadí; je ‰patnû vidût a zpÛsobuje únavu oãí v dÛsledku nedostateãného
kontrastu.
02_Czech 30/10/2002, 11:3110
âesky-10
Page 27
WARNUNG
SETZEN SIE DAS GERÄT WEDER REGEN NOCH FEUCHTIGKEIT AUS, DA ES ANDERNFALLS ZU FEUER ODER
STROMSCHLÄGEN KOMMEN KANN. VERWENDEN SIE DEN NETZSTECKER DIESES GERÄTS KEINESFALLS MIT
EINEM VERLÄNGERSKABEL ODER EINER STECKDOSENLEISTE, WENN DIE STECKERSTIFTE NICHT
VOLLSTÄNDIG EINGEFÜHRT WERDEN KÖNNEN.
ÖFFNEN SIE DAS GEHÄUSE NICHT, DA SICH IM INNEREN KOMPONENTEN BEFINDEN, DIE UNTER HOCHSPANNUNG
STEHEN. LASSEN SIE WARTUNGSARBEITEN VON QUALIFIZIERTEN WARTUNGSTECHNIKERN DURCHFÜHREN.
VORSICHT
STROMSCHLAGGEFAHR • NICHT ÖFFNEN
VORSICHT: ENTFERNEN SIE KEINESFALLS ABDECKUNG ODER RÜCKSEITE, DAMIT ES NICHT ZU
STROMSCHLÄGEN KOMMT. IM INNEREN BEFINDEN SICH KEINE VOM BENUTZER ZU WARTENDEN
KOMPONENTEN. LASSEN SIE WARTUNGSARBEITEN VON QUALIFIZIERTEN
WARTUNGSTECHNIKERN DURCHFÜHREN.
Dieses Symbol weist den Benutzer auf nicht isolierte spannungsführende Komponenten im Gerät hin, die
Stromschläge verursachen können. Aus diesem Grund dürfen Sie keinesfalls Kontakt mit einer
Komponente im Geräteinneren herstellen.
Dieses Symbol weist den Benutzer auf wichtige Informationen zu Betrieb und Pflege dieses Geräts hin.
Die Informationen sollten sorgfältig gelesen werden, um Probleme zu vermeiden.
Vorsicht:
Wird der LCD1701 in Europa an einem Wechselstromnetz mit 220-240 V betrieben, muss das mit dem Monitor gelieferte
Netzkabel verwendet werden.
In Großbritannien ist ein BS-zugelassenes Netzkabel mit diesem Monitor zu verwenden. Das Netzkabel muss mit einem
Spritzgussstecker mit schwarzer Sicherung (5 A) ausgestattet sein. Setzen Sie sich mit Ihrem Händler in Verbindung, wenn
der Monitor ohne Netzkabel geliefert wurde.
In allen anderen Ländern ist ein für die Spannung des Stromnetzes geeignetes und zugelassenes Netzkabel zu verwenden,
dass den Sicherheitsstandards des betreffenden Landes entspricht.
Deutsch
Erklärung
Erklärung des Herstellers
Wir bestätigen hiermit, dass der Farbmonitor
LCD1701 (L172EN) folgenden Richtlinien
entspricht:
EG-Direktive 73/23/EG:
– EN 60950
EG-Direktive 89/336/EG:
– EN 55022
– EN 61000-3-2
– EN 61000-3-3
– EN 55024
NEC-Mitsubishi Electric Visual Systems Corp. hat als ENERGY STAR®-Partner festgestellt, dass dieses Gerät den ENERGY STAR -
Richtlinien für Energieeffizienz entspricht. ENERGY STAR ist eine eingetragene Marke in den USA.
ErgoDesign ist eine eingetragene Marke der NEC-Mitsubishi Electric Visual Systems Corporation in Österreich, Benelux,
Dänemark, Frankreich, Deutschland, Italien, Norwegen, Spanien, Schweden und Großbritannien.
IBM PC/XT/AT, PS/2, MCGA, VGA, 8514/A und XGA sind eingetragene Marken der International Business Machines
Corporation.
Apple und Macintosh sind eingetragene Marken von Apple Computer Inc.
Microsoft und Windows sind eingetragene Marken der Microsoft Corporation.
NEC ist eine eingetragene Marke der NEC Corporation.
Alle anderen Marken oder eingetragenen Marken sind Eigentum der jeweiligen Unternehmen.
und mit folgendem Siegel gekennzeichnet ist:
NEC-Mitsubishi Electric Visual
Systems, Corp.
MS Shibaura Bldg., 13-23,
Shibaura 4-chome,
Minato-Ku, Tokyo 108-0023, JAPAN
03_German 30/10/2002, 11:311
Deutsch-1
Page 28

Inhalt
Der Karton* mit Ihrem neuen NEC LCD-Monitor sollte folgende Komponenten enthalten:
• Monitor LCD1701 mit verstellbarem Fuß
• Netzkabel
• Signalkabel
• Bedienungsanleitung
• CD-ROM (enthält die vollständige Bedienungsanleitung im PDF-Format)
Um die Bedienungsanleitung anzeigen und drucken zu können, muss auf
dem Computer Acrobat Reader 4.0 installiert sein.
Bewahren Sie den Originalkarton und das Verpackungsmaterial für spätere Transporte des Monitors auf.
*
Kurzanleitung
Gehen Sie folgendermaßen vor, um den LCD-Monitor an Ihr System anzuschließen:
1. Schalten Sie Ihren Computer aus.
2. Entfernen Sie die Kabelabdeckung.
3. PC: Verbinden Sie den Mini-D-SUB-Stecker (15 Stifte) des Signalkabels mit dem Anschluss der Grafikkarte in Ihrem
System (Abbildung A.1). Ziehen Sie die Schrauben fest.
Mac: Schließen Sie den Macintosh-Kabeladapter für den LCD1701 an den Computer an (Abbildung B.1). Stecken Sie
den Mini-D-SUB-Stecker (15 Stifte) des Signalkabels in den Macintosh-Kabeladapter für den LCD1701 (Abbildung B.1).
Ziehen Sie alle Schrauben fest.
MacintoshKabeladapter
(nicht mitgeliefert)
Für die Modelle
Macintosh G3 und G4
wird kein MacintoshKabeladapter benötigt
Abbildung A.1
Abbildung B.1
4. Stecken Sie den Mini-D-SUB-Stecker (15 Stifte) des Signalkabels in die entsprechende Buchse auf der Rückseite des
Monitors (Abbildung C.1).
5. Stecken Sie ein Ende des Netzkabels in den LCD1701-Monitor und das andere Ende in die Steckdose ein. Platzieren Sie
Signal- und Netzkabel unter die Kabelabdeckung (Abbildung C.1). Bringen Sie die Kabelabdeckung wieder an.
HINWEIS: Bringen Sie die Kabel so unter der Kabelabdeckung an, dass weder Kabel noch Monitor beschädigt werden können.
Richten Sie bitte die Kabel so aus, dass sich der Ferritkern und der Stopper oberhalb der Kabelabdeckung
befinden (Abbildung C.1).
HINWEIS: Beachten Sie zur Auswahl des richtigen Netzkabels den entsprechenden Sicherheitshinweis in dieser
Bedienungsanleitung.
Deutsch-2
03_German 30/10/2002, 11:312
Page 29
Ferritkern
Kabelabdeckung
Stopper
Abbildung C.1
6. Der Vacation-Schalter auf der rechten Seite des Monitors muss sich in der Position ON befinden (Abbildung D.1).
Schalten Sie Monitor und Computer mit den jeweiligen Netzschaltern ein.
HINWEIS:
Der Vacation-Schalter ist ein echter Ein-/Aus-Schalter. Befindet sich der Schalter in der Position OFF, kann der
Monitor mit dem Schalter auf der Vorderseite nicht eingeschaltet werden. Drücken Sie den Schalter NICHT mehrmals.
Deutsch
Vacation-Schalter
Netzschalter
Abbildung D.1
7. Die berührungslose Einstellungsautomatik passt den Monitor beim ersten Setup automatisch an die meisten Timings an.
Weitere Anpassungen werden mit den folgenden OSM-Steuerungen vorgenommen:
• Automatische Kontrasteinstellung
• Automatische Einstellung
Im Abschnitt Bedienelemente dieser Bedienungsanleitung finden Sie eine ausführliche Beschreibung der OSM-Steuerungen.
HINWEIS: Treten Probleme auf, beachten Sie das Kapitel Fehlerbehebung dieser Bedienungsanleitung.
Deutsch-3
03_German 30/10/2002, 11:313
Page 30

Neigen und Schwenken
Fassen Sie den Monitor an beiden Seiten und neigen bzw. drehen Sie ihn nach Bedarf (Abbildung TS.1).
Entfernen des Monitorfußes für die Montage
So bereiten Sie den Monitor für eine alternative Montage vor:
1. Ziehen Sie alle Kabel ab.
2. Legen Sie den Monitor mit der Vorderseite nach unten auf eine weiche Oberfläche (Abbildung R.1).
3. Nehmen Sie die Gelenkabdeckung ab (Abbildung R.1).
4. Entfernen Sie die 4 Schrauben, mit denen der Fuß am Monitor befestigt ist, und heben Sie den Fuß ab (Abbildung R.2).
Der Monitor kann jetzt auf andere Art montiert werden.
5. Schließen Sie Netz- und Signalkabel auf der Rückseite des Monitors an (Abbildung R.3).
6. Führen Sie die Schritte in umgekehrter Reihenfolge aus, um den Fuß wieder anzubringen.
HINWEIS: Verwenden Sie ausschließlich VESA-kompatible Montagemethoden.
Entfernen Sie den Monitorfuß vorsichtig.
Abbildung TS.1
Gelenkabdeckung
03_German 30/10/2002, 11:314
Weiche Oberfläche
Abbildung R.1
Deutsch-4
Page 31

Abbildung R.3Abbildung R.2
7. Dieser LCD-Monitor kann mit einem Tragarm verwendet werden. Verwenden Sie die beigefügten Schrauben (4 Stück) für
die Montage. Die Sicherheitsvorschriften verlangen, dass der Monitor an einem Tragarm montiert wird, der für das Gewicht
des Monitors ausreichend stabil ist. Der LCD-Monitor darf nur auf einem zugelassenen Arm montiert werden, der
beispielsweise mit einem GS-Zeichen versehen ist.
Schrauben anbringen
Stärke der
Befestigungsklammer:
2,0~3,2 mm
Alle Schrauben
festziehen
100 mm
Deutsch
Technische Daten
03_German 30/10/2002, 11:315
100 mm
4 SCHRAUBEN (M4)
(maximale Tiefe: 8,5 mm)
Prüfen Sie bei
Verwendung der
anderen Schraube
die Tiefe der Bohrung.
Gewicht des LCD-Monitors komplett: 4,6 kg (max.)
Deutsch-5
Page 32

Bedienelemente
OSM-Steuerungen (On-Screen-Manager)
Die OSM-Steuerungen auf der Vorderseite des Monitors besitzen folgende Funktion:
Sie können auf das OSM-Menü zugreifen, indem Sie eine der Steuerungstasten (<, >, -, +, EXIT) drücken.
Steuerung
EXIT
< / >
- / +
SELECT
RESET
HINWEIS: Wenn Sie RESET im Haupt- oder im Untermenü drücken, wird ein Fenster mit einer Warnung angezeigt, in dem
Sie die Funktion RESET mit der Taste EXIT abbrechen können.
Menü
Schließt das OSM-Menü.
Rückkehr zum OSM-Hauptmenü.
Verschiebt die Markierung nach links oder rechts, um die Menüs auszuwählen.
Verschiebt die Markierung nach oben oder unten, um eine der Steuerungen auszuwählen.
Verschiebt die Markierung nach rechts oder links, um den Wert zu erhöhen bzw. verringern.
Aktiviert die Funktion „Automatische Einstellung“. Öffnen von OSM-Steuerungen.
Öffnen des OSM-Untermenüs.
Setzt das markierte Steuerungsmenü auf die Werkseinstellungen zurück.
Helligkeit-/Kontrast-Steuerungen
HELLIGKEIT
Bild- und Hintergrundhelligkeit des Bildschirms anpassen.
KONTRAST
Ändert die Bildhelligkeit im Verhältnis zum Hintergrund.
AUTOM. EINST
Passt das angezeigte Bild bei Verwendung nicht dem Standard entsprechender Eingangssignale an.
Autom. Einst
Stellt Bildposition sowie die Werte für „Bildpunkte“ und „Stabilität“ automatisch ein.
Positionssteuerungen
LINKS/RECHTS
Steuert die horizontale Bildposition im Anzeigebereich des LCD.
UNTEN/OBEN
Steuert die vertikale Bildposition im Anzeigebereich des LCD.
BILDPUNKTE
Durch Erhöhen oder Verringern dieses Werts wird das Bild breiter bzw. schmaler.
Sollte das mit der Funktion „Automatische Einstellung“ erhaltene Bild nicht lhren Wünschen entsprechen,
können Sie eine weitere Optimierung durchführen, indem Sie die Funktion „Bildpunkte“ verwenden
(Pixelfrequenz). Dazu können Sie ein Moiré-Testmuster verwenden. Diese Funktion kann die Breite des
Bildes verändern. Verwenden Sie das Menü „Links/Rechts“, um das Bild auf dem Bildschirm zu zentrieren.
Wenn die Funktion „Bildpunkte“ falsch kalibriert ist, entspricht das Bild dem in der Abbildung links
gezeigten Ergebnis. Das Bild sollte homogen sein.
03_German 30/10/2002, 11:316
BILDPUNKTE-Wert ist
falsch
BILDPUNKTE-Wert wurde
optimiert
Deutsch-6
BILDPUNKTE-Wert ist
richtig
Page 33

STABILITÄT
Optimiert Schärfe, Deutlichkeit und Bildstabilität durch Erhöhen oder Verringern dieses Werts.
Sollte das mit den Funktionen „Automatische Einstellung” und „Bildpunkte” erhaltene Bild nicht lhren
Wünschen entsprechen, können Sie eine weitere Optimierung durchführen, indem Sie die Funktion
„Stabilität” verwenden. Mit dieser Funktion optimieren Sie die Schärfe, Deutlichkeit und Bildstabilität durch
Erhöhen oder Verringern des Wertes. Dazu können Sie ein Moiré-Testmuster verwenden. Wenn die
Funktion „Stabilität” falsch kalibriert ist, entspricht das Bild dem in der Abbildung links gezeigten Ergebnis.
Das Bild sollte homogen sein.
Farbsteuerungssysteme
Mit sechs vordefinierten Farbeinstellungen kann die gewünschte Farbeinstellung aktiviert werden (sRGB
und ORIGIN. sind Standardeinstellungen und können nicht angepasst werden).
R, G, B
Hier können die Werte für die Farben Rot, Grün und Blau erhöht oder verringert werden. Die Änderungen
der Farben ist auf dem Bildschirm sichtbar. Die Balken zeigen die Veränderung des Farbwerts (Erhöhung
oder Verringerung).
sRGB
Mit dem Modus sRGB wird die Wiedergabetreue der Farbdarstellung in der Desktop-Umgebung bedeutend
verbessert. Dabei wird nur ein einziger RGB-Farbraum verwendet. Diese Farbunterstützung ermöglicht es
dem Benutzer, Farbwerte einfach und zuverlässig zu übermitteln. In den meisten Situationen ist keine
zusätzliche Farbverwaltung erforderlich.
ORIGIN.
Original-Farbdarstellung des LCD-Bildschirms. Diese Einstellung kann nicht geändert werden.
Werkzeuge
SPRACHAUSWAHL
Die OSM-Menüs sind in sieben Sprachen verfügbar.
STABILITÄT-Wert ist
falsch
STABILITÄT-Wert ist
richtig
Deutsch
OSM POSITION
Sie können festlegen, wo das OSM-Steuerungsfenster auf dem Bildschirm angezeigt werden soll. Die
Position kann nach oben, unten, links oder rechts verschoben werden.
OSM ANZEIGEDAUER
Das OSM-Steuerungsmenü wird ausgeblendet, wenn es nicht mehr verwendet wird. Im Untermenü „OSM
Anzeigedauer“ können Sie festlegen, nach welchem Zeitraum das OSM-Steuerungsmenü ausgeblendet
wird, wenn der Benutzer keine Taste drückt. Verfügbar sind die Optionen 10, 20, 30, 45, 60 und 120
Sekunden.
OSM ABSCHALTUNG
Mit „OSM Abschaltung“ werden alle OSM-Funktionen bis auf „Helligkeit“ und „Kontrast“ gesperrt. Wenn Sie
im Modus „OSM Abschaltung“ auf die OSM-Steuerungen zugreifen, wird ein Bildschirm angezeigt, der auf
die Sperre der OSM-Steuerungen hinweist. Um die Abschaltungsfunktion zu aktivieren, halten Sie die
Taste SELECT gedrückt und drücken gleichzeitig die Taste „+“. Sie können die OSM-Abschaltungsfunktion
wieder deaktivieren, indem Sie erneut die Taste SELECT und gleichzeitig die Taste „+“ drücken.
AUFLÖSUNGSANZEIGE
Die optimale Auflösung beträgt 1280 x 1024 Pixel. Wenn Sie EIN wählen, wird in einer Bildschirmmeldung
nach 30 Sekunden darauf hingewiesen, dass nicht die Auflösung 1280 x 1024 Pixel verwendet wird.
DIREKTZUGRIFF
Helligkeit und Kontrast konnen direkt eingestellt werden. Wenn diese Funktion eingeschaltet ist, können Sie
bei ausgeschaltetem OSM-Menü die Helligkeit mit < oder > und den Kontrast mit „+“ oder „–“ einstellen.
Über die Taste EXIT können Sie auf das Standard-OSM-Menü zugreifen.
03_German 30/10/2002, 11:317
Deutsch-7
Page 34

ABSCHALT-TIMER
Der Monitor schaltet sich nach der vom Benutzer eingestellten Zeit automatisch aus.
WERKSEINSTELLUNG
Mit der OSM-Steuerung „Werkseinstellung“ werden alle OSM-Einstellungen auf die Werkseinstellungen
zurückgesetzt. Sie müssen die Taste RESET mehrere Sekunden halten, um die Rücksetzung
durchzuführen. Einzelne Einstellungen können durch Markieren der betreffenden Steuerung und
anschließendes Drücken der Taste RESET zurückgesetzt werden.
Information
GRAFIK MODUS
Gibt die aktuellen Einstellungen für Auflösung und Bildwiederholfrequenz des Monitors an.
MONITORINFORMATION
Die Modell- und die Seriennummer des Monitors.
OSM Warnung
Die Menüs der OSM-Warnungen können mit der Taste „Exit“ ausgeblendet werden.
KEIN SIGNAL: Diese Funktion gibt eine Warnung aus, wenn kein Signal verfügbar ist. Das Fenster Kein
Signal wird nach dem Einschalten oder einem Wechsel des Eingangssignals und außerdem angezeigt,
wenn kein Videosignal verfügbar ist.
AUFLÖSUNGSANZEIGE: Diese Funktion warnt Sie, wenn nicht die optimale Auflösung verwendet wird.
Nach dem Einschalten, nach einer Änderung des Videosignals oder wenn das Videosignal nicht die
richtige Auflösung besitzt, wird das Fenster Auflösungsanzeige angezeigt. Diese Funktion kann im
Hilfsfunktionenmenü deaktiviert werden.
FREQUENZ ZU HOCH: Diese Funktion empfiehlt die optimale Auflösung und Bildwiederholrate. Nach dem
Einschalten, nach einer Änderung des Videosignals oder wenn das Videosignal nicht die richtige Auflösung
besitzt, wird das Fenster Frequenz zu hoch angezeigt.
03_German 30/10/2002, 11:328
Deutsch-8
Page 35

Einsatzempfehlungen
Sicherheitsvorkehrungen und Pflege
BEACHTEN SIE ZUR ERZIELUNG OPTIMALER LEISTUNG
DIE FOLGENDEN HINWEISE ZUM EINRICHTEN UND
NUTZEN DES MULTISYNC LCD-FARBMONITORS:
•ÖFFNEN SIE DEN MONITOR NICHT. Es befinden sich keine vom Benutzer zu wartenden Teile im Inneren. Das Öffnen oder
Abnehmen der Abdeckungen kann zu gefährlichen Stromschlägen oder anderen Gefährdungen führen. Lassen Sie alle
Wartungsarbeiten von qualifizierten Wartungstechnikern durchführen.
• Lassen Sie keine Flüssigkeiten in das Gehäuse gelangen und stellen Sie den Monitor in trockenen Räumen auf.
• Führen Sie keinesfalls Objekte in die Gehäuseschlitze ein, da spannungsführende Teile berührt werden können, was zu
schmerzhaften oder gefährlichen Stromschlägen, zu Feuer oder zu Beschädigungen des Geräts führen kann.
•
Legen Sie keine schweren Objekte auf das Netzkabel. Beschädigungen des Kabels können zu Stromschlägen oder Feuer führen.
• Stellen Sie dieses Produkt nicht auf wackelige oder instabile Flächen, Wagen oder Tische, da der Monitor fallen und dabei
schwer beschädigt werden könnte.
• Stellen Sie keine Objekte auf den Monitor und setzen Sie den Monitor nicht außerhalb umbauter Räume ein.
• Im Inneren der Fluoreszentröhre des LCD-Monitors befindet sich Quecksilber. Beachten Sie zur Entsorgung der Röhre die
örtlichen Vorschriften und Richtlinien.
Unter den folgenden Bedingungen müssen Sie den Monitor sofort vom Stromnetz trennen und sich mit einem qualifizierten
Wartungstechniker in Verbindung setzen:
• Das Netzkabel oder der Netzstecker ist beschädigt.
• Flüssigkeit wurde über den Monitor gegossen oder Gegenstände sind in das Gehäuse gefallen.
• Der Monitor wurde Regen oder Wasser ausgesetzt.
• Der Monitor wurde fallen gelassen oder das Gehäuse wurde beschädigt.
• Der Monitor arbeitet trotz Beachtung der Bedienungsanleitung nicht ordnungsgemäß.
• Knicken Sie das Netzkabel nicht.
• Verwenden Sie den Monitor nicht in heißen, feuchten, staubigen oder öligen Bereichen.
• Decken Sie die Lüftungsschlitze des Monitors nicht ab.
• Berühren Sie die Flüssigkristalle nicht, wenn der Monitor zerbrochen ist.
• Lassen Sie Vorsicht walten, wenn das Glas zerbrochen ist.
• Achten Sie auf ausreichende Luftzufuhr, damit die entstehende Wärme abgeführt werden kann. Decken Sie
die Lüftungsschlitze nicht ab und stellen Sie den Monitor nicht neben Heizkörpern oder anderen
Wärmequellen auf. Stellen Sie keine Gegenstände auf den Monitor.
VORSICHT
•
Bildschatten: Bildschatten sind verbleibende oder sogenannte „Geister“-Bilder, die vom vorhergehenden Bild sichtbar auf dem
Bildschirm bleiben. Im Unterschied zu CRT-Monitoren ist der Bildschatten auf LCD-Monitoren nicht dauerhafter Natur, aber die
Anzeige von Standbildern über eine längere Zeit sollte vermieden werden.
Sie können den Bildschatten beseitigen, indem Sie den Monitor so lange ausschalten, wie das vorherige Bild angezeigt wurde.
Wurde auf dem Monitor beispielsweise eine Stunde lang ein Standbild angezeigt und bleibt ein „Geister“-Bild sichtbar, sollte der
Monitor mindestens eine Stunde ausgeschaltet werden, damit der Bildschatten verschwindet.
HINWEIS: NEC-Mitsubishi Electronic Displays empfiehlt die Aktivierung eines Bildschirmschoners auf allen Anzeigegeräten, wenn
sich das Bild längere Zeit nicht verändert. Schalten Sie den Monitor aus, wenn Sie ihn nicht verwenden.
• Durch Ziehen des Netzkabelsteckers kann das Gerät vom Stromnetz getrennt werden. Der Monitor muss in
der Nähe einer Steckdose aufgestellt werden, die leicht zugänglich ist.
• Transportieren Sie den Monitor vorsichtig. Bewahren Sie die Verpackung für spätere Transporte auf.
Deutsch
DURCH RICHTGE AUFSTELLUNG UND EINSTELLUNG DES MONITORS KÖNNEN
ERMÜDUNGSERSCHEINUNGEN VON AUGEN, SCHULTERN UND NACKEN VERMIEDEN
WERDEN. BEACHTEN SIE BEI DER AUFSTELLUNG DES MONITORS FOLGENDES:
• Optimale Leistung wird erst nach ca. 20 Minuten Aufwärmzeit erzielt.
• Stellen Sie den Monitor so auf, dass sich die Oberkante des Bildschirms auf Augenhöhe
oder knapp darunter befindet. Ihre Augen sollten leicht nach unten gerichtet sein, wenn Sie
auf die Bildschirmmitte blicken.
• Platzieren Sie den Monitor in einem Abstand von 40-70 cm von Ihren Augen. Der optimale
Abstand beträgt 50 cm.
• Entspannen Sie Ihre Augen regelmäßig, indem Sie ein Objekt fokussieren, dass sich in
einer Entfernung von mindestens 6 m befindet. Blinzeln Sie häufig.
• Stellen Sie den Monitor in einem 90-Grad-Winkel zu Fenstern und anderen Lichtquellen
auf, um Blendung und Reflexionen zu verhindern. Neigen Sie den Monitor in einem Winkel,
der Reflexionen der Deckenleuchten auf dem Bildschirm verhindert.
• Ist das dargestellte Bild aufgrund von Reflexionen nur schwer lesbar, sollten Sie einen
Blendschutzfilter verwenden.
• Reinigen Sie die Oberfläche des LCD-Monitors mit einem fusselfreien, weichen Tuch. Verwenden Sie weder Reinigungsmittel
noch Glasreiniger!
•
Stellen Sie Helligkeit und Kontrast des Monitors mit den entsprechenden Steuerungen ein, um die Lesbarkeit zu optimieren.
• Stellen Sie neben dem Monitor einen Dokumentenhalter auf.
Deutsch-9
03_German 30/10/2002, 11:329
Page 36

• Platzieren Sie das beim Tippen häufiger betrachtete Objekt (Monitor oder Dokumentenhalter) direkt vor sich, damit Sie den Kopf
seltener drehen müssen.
• Vermeiden Sie die längerfristige Darstellung gleichbleibender Muster auf dem Bildschirm, um Bildschatten zu vermeiden.
• Lassen Sie Ihre Augen regelmäßig untersuchen.
Ergonomie
Wir empfehlen folgendes Vorgehen, um eine ergonomisch optimale Arbeitsumgebung einzurichten:
• Verwenden Sie bei Standardsignalen die vordefinierten Größen- und Positionseinstellungen.
• Verwenden Sie die vordefinierte Farbeinstellung.
• Verwenden Sie Signale ohne Zeilensprung (Non-Interlaced) mit einer vertikalen Wiederholfrequenz von 60-75 Hz.
• Verwenden Sie die Primärfarbe Blau nicht auf schwarzem Hintergrund, da dies die Lesbarkeit beeinträchtigt und aufgrund des
geringen Kontrasts zu starker Ermüdung der Augen führen kann.
03_German 30/10/2002, 11:3210
Deutsch-10
Page 37

ΠΡΟΕΙ∆ΟΠΟΙΗΣΗ
ΓΙΑ ΝΑ ΑΠΟΦΥΓΕΤΕ ΤΟΝ ΚΙΝ∆ΥΝΟ ΠΥΡΚΑΓΙΑΣ Ή ΗΛΕΚΤΡΟΠΛΗΞΙΑΣ, ΜΗΝ ΕΚΘΕΤΕΤΕ ΑΥΤΗ ΤΗ ΣΥΣΚΕΥΗ ΣΕ ΒΡΟΧΗ
Ή ΥΓΡΑΣΙΑ. ΕΠΙΣΗΣ, ΜΗ ΧΡΗΣΙΜΟΠΟΙΕΙΤΕ ΤΟ ΠΟΛΩΜΕΝΟ ΦΙΣ ΑΥΤΗΣ ΤΗΣ ΣΥΣΚΕΥΗΣ ΜΕ ΥΠΟ∆ΟΧΗ ΚΑΛΩ∆ΙΟΥ
ΕΠΕΚΤΑΣΗΣ 'Η ΑΛΛΕΣ ΕΞΟ∆ΟΥΣ ΕΑΝ ΟΙ ΑΚΡΟ∆ΕΚΤΕΣ ΤΟΥ ΦΙΣ ∆ΕΝ ΜΠΟΡΟΥΝ ΝΑ ΕΙΣΑΧΘΟΥΝ ΠΛΗΡΩΣ.
ΑΠΟΦΥΓΕΤΕ ΝΑ ΑΝΟΙΓΕΤΕ ΤΗ ΣΥΣΚΕΥΗ ΚΑΘΩΣ ΣΤΟ ΕΣΩΤΕΡΙΚΟ ΥΠΑΡΧΟΥΝ ΕΞΑΡΤΗΜΑΤΑ ΜΕ ΥΨΗΛΗ ΤΑΣΗ. ΓΙΑ
ΤΟ ΣΕΡΒΙΣ ΑΠΕΥΘΥΝΘΕΙΤΕ ΣΤΟ ΕΞΟΥΣΙΟ∆ΟΤΗΜΕΝΟ ΠΡΟΣΩΠΙΚΟ ΤΟΥ ΣΕΡΒΙΣ.
ΠΡΟΣΟΧΗ
ΚΙΝ∆ΥΝΟΣ ΗΛΕΚΤΡΟΠΛΗΞΙΑΣ • ΜΗΝ ΑΝΟΙΓΕΤΕ
ΠΡΟΣΟΧΗ: ΓΙΑ ΝΑ ΜΕΙΩΣΕΤΕ ΤΟΝ ΚΙΝ∆ΥΝΟ ΗΛΕΚΤΡΟΠΛΗΞΙΑΣ, ΜΗΝ ΑΦΑΙΡΕΙΤΕ ΤΟ ΚΑΛΥΜΜΑ (ΜΠΡΟΣΤΙΝΟ
'Η ΠΙΣΩ). ∆ΕΝ ΥΠΑΡΧΟΥΝ ΕΞΑΡΤΗΜΑΤΑ ΣΤΟ ΕΣΩΤΕΡΙΚΟ ΤΗΣ ΣΥΣΚΕΥΗΣ ΤΑ ΟΠΟΙΑ ΜΠΟΡΕΙ ΝΑ
ΕΠΙΣΚΕΥΑΣΕΙ Ο ΧΡΗΣΤΗΣ. ΓΙΑ ΤΟ ΣΕΡΒΙΣ ΑΠΕΥΘΥΝΘΕΙΤΕ ΣΤΟ ΕΞΟΥΣΙΟ∆ΟΤΗΜΕΝΟ ΠΡΟΣΩΠΙΚΟ
ΤΟΥ ΣΕΡΒΙΣ.
Αυτ το σύµβολο προειδοποιεί το χρήστη τι στο εσωτερικ της συσκευής υπάρχουν εξαρτήµατα
χωρίς µνωση µε αρκετά υψηλή τάση ώστε να προκληθεί ηλεκτροπληξία. Συνεπώς, είναι
επικίνδυνο να αγγίζετε τα εξαρτήµατα στο εσωτερικ της συσκευής.
Αυτ το σύµβολο προειδοποιεί το χρήστη τι περιλαµβάνονται σηµαντικές οδηγίες σχετικά µε τη
λειτουργία και τη συντήρηση αυτής της συσκευής. Συνεπώς, πρέπει να τις διαβάσετε προσεκτικά
ώστε να αποφύγετε τυχν προβλήµατα.
Προσοχή:
Oταν χρησιµοποιείτε την οθνη LCD1701 µε µία πηγή Εναλλασσµενου Ρεύµατος 220-240 V στην Ευρώπη
χρησιµοποιήστε το καλώδιο ρεύµατος που παρέχεται µε την οθνη.
Στη Μεγάλη Βρετανία, ένα εγκεκριµένο καλώδιο BS µε διαµορφωµένο βύσµα διαθέτει µία µαύρη ασφάλεια (5A)
εγκατεστηµένη για χρήση µε αυτήν την οθνη. Εάν η οθνη δεν συνοδεύεται απ καλώδιο ρεύµατος, απευθυνθείτε
στον προµηθευτή σας.
Σε λες τις άλλες περιπτώσεις, χρησιµοποιήστε ένα καλώδιο ρεύµατος το οποίο νααντιστοιχεί στην τάση του
Εναλλασσµενου Ρεύµατος και το οποίο να είναι εγκεκριµένο και να συµµορφώνεται µε τα πρτυπα ασφαλείας
αυτής της χώρας.
Ελληνικά
∆ήλωση
∆ήλωση του Κατασκευαστή
Με το παρν πιστοποιούµε τι η έγχρωµη
οθνη LCD1701 (L172EN) συµµορφώνεται µε
Οδηγία του Ευρωπαϊκού Συµβουλίου 73/23/ΕΟΚ:
– EN 60950
Οδηγία του Ευρωπαϊκού Συµβουλίου 89/336/ΕΟΚ:
– EN 55022
– EN 61000-3-2
– EN 61000-3-3
– EN 55024
Ως εταίρος της ENERGY STAR®, η NEC-Mitsubishi Electric Visual Systems Corp. έχει αποφασίσει τι αυτ το προïν
συµµορφώνεται µε τις γενικές οδηγίες της ENERGY STAR για αποδοτικτητα της ενέργειας. ENERGY STAR είναι σήµα
κατατεθέν για τις Η.Π.Α.
ErgoDesign είναι σήµα κατατεθέν της NEC-Mitsubishi Electric Visual Systems Corporation στην Αυστρία, τις Κάτω
Χώρες, τη ∆ανία, τη Γαλλία, τη Γερµανία, την Ιταλία, τη Νορβηγία, την Ισπανία, τη Σουηδία και την Αγγλία.
Οι ροι IBM PC/XT/AT, PS/2, MCGA, VGA, 8514/A και XGA είναι σήµατα κατατεθέντα της International Business
Machines Corporation.
Apple και Macintosh είναι σήµατα κατατεθέντα της Apple Computer Inc.
Microsoft και Windows είναι σήµατα κατατεθέντα της Microsoft Corporation.
NEC είναι σήµα κατατεθέν της NEC Corporation.
Ολα τα άλλα σήµατα ή σήµατα κατατεθέντα είναι ιδιοκτησία των αντίστοιχων κατχων.
Ελληνικά-1
και φέρει την ένδειξη
NEC-Mitsubishi Electric Visual
Systems, Corp.
MS Shibaura Bldg., 13-23,
Shibaura 4-chome,
Minato-Ku, Tokyo 108-0023, JAPAN
04_Greek 30/10/2002, 11:321
Page 38

Περιεχµενα
Η συσκευασία* της νέας σας οθνης NEC LCD πρέπει να περιλαµβάνει τα ακλουθα:
• Οθνη LCD1701 µε βάση κλίσης
• Καλώδιο Ρεύµατος
• Καλώδιο Οπτικού Σήµατος
• Οδηγίες Χρήσης
• CD ROM (περιλαµβάνει πλήρεις Οδηγίες Χρήσης σε µορφή PDF).
Για να δείτε τις Οδηγίες Χρήσης, θα πρέπει να έχετε εγκαταστήσει
στον υπολογιστή σας το πργραµµα Acrobat Reader 4.0.
* Θυµηθείτε να φυλάξετε το αρχικ κουτί και τα υλικά συσκευασίας για να τα χρησιµοποιήσετε σε περίπτωση
µεταφοράς ή αποστολής της οθνης.
Γρήγορη Εκκίνηση
Για να συνδέσετε την οθνη LCD στο σύστηµά σας, ακολουθήστε τις παρακάτω οδηγίες:
1. Κλείστε τον διακπτη λειτουργίας του υπολογιστή σας.
2. Αφαιρέστε το κάλυµµα του καλωδίου.
3. Για Υπολογιστή PC: Συνδέστε το φις mini D-SUB 15-ακίδων του αντίστοιχου καλωδίου σήµατος στο συνδετήρα της
κάρτας οθνης του υπολογιστή σας (Σχήµα A.1). Σφίξτε λες τις βίδες.
Για Macintosh: Συνδέστε το καλώδιο προσαρµογής του LCD1701 Macintosh στον υπολογιστή σας (Σχήµα B.1).
Συνδέστε το φις mini D-SUB 15-ακίδων του αντίστοιχου καλωδίου σήµατος στο καλώδιο προσαρµογής LCD1701
Macintosh (Σχήµα B.1).
Καλώδιο
προσαρµογής για
Macintosh (δεν
περιλαµβάνεται)
Οι Macintosh G3 και G4
δεν χρειάζονται
καλώδιο προσαρµογής
Σχήµα A.1
Σχήµα Β.1
για Macintosh
4. Συνδέστε το βύσµα mini D-SUB 15 ακίδων του καλωδίου οπτικού σήµατος στον αντίστοιχο συνδετήρα που
βρίσκεται στο πίσω µέρος της οθνης (Σχήµα Γ.1).
5. Συνδέστε το ένα άκρο του καλωδίου ηλεκτρικού ρεύµατος στην οθνη LCD1701 και το άλλο άκρο στην πρίζα.
Τοποθετήστε το καλώδιο οπτικού σήµατος και το καλώδιο Εναλλασσµενου Ρεύµατος κάτω απ το κάλυµµα του
καλωδίου (Σχήµα Γ.1). Τοποθετήστε πάλι το κάλυµµα του καλωδίου.
ΣΗΜΕΙΩΣΗ: Ρυθµίστε τη θέση του καλωδίου κάτω απ το κάλυµµα του καλωδίου για να αποφύγετε την πρκληση
βλάβης στο καλώδιο ή την οθνη. Οπως φαίνεται στο Σχήµα Γ.1, προσαρµστε τα καλώδια ώστε να
τοποθετήσετε τον πυρήνα απ φερρίτη και το στοπ πάνω απ το κάλυµµα του καλωδίου.
ΣΗΜΕΙΩΣΗ: Παρακαλούµε συµβουλευτείτε το κεφάλαιο Προσοχή αυτού του εγχειριδίου για τη σωστή επιλογή του
καλωδίου Εναλλασσµενου Ρεύµατος.
Ελληνικά-2
04_Greek 30/10/2002, 11:322
Page 39

Πυρήνας φερρίτη
Κάλυµµα καλωδίων
Στοπ
Σχήµα Γ.1
6. Ο ∆ιακπτης Εκκένωσης στη δεξιά πλευρά της οθνης πρέπει να είναι ανοικτς (Σχήµα ∆.1). Θέστε σε λειτουργία
την οθνη µε το ∆ιακπτη Λειτουργίας και τον υπολογιστή.
ΣΗΜΕΙΩΣΗ: Ο ∆ιακπτης Εκκένωσης είναι πραγµατικς διακπτης εντς/εκτς λειτουργίας. Αν ο διακπτης αυτς
είναι στη θέση ΕΚΤΟΣ ΛΕΙΤΟΥΡΓΙΑΣ (OFF), η οθνη δεν µπορεί να τεθεί εντς λειτουργίας µε τη χρήση
του µπροστινού κουµπιού. ΜΗΝ θέτετε εντς/εκτς λειτουργίας επανειληµµένα.
∆ιακπτης Εκκένωσης
Ελληνικά
∆ιακπτης Λειτουργίας
Σχήµα ∆.1
7. Η αυτµατη ρύθµιση ρυθµίζει αυτµατα την οθνη στις βέλτιστες ρυθµίσεις κατά την αρχική εγκατάσταση για
τους περισστερους χρονισµούς. Για περαιτέρω ρυθµίσεις, χρησιµοποιήστε τα ακλουθα πλήκτρα ελέγχου OSM:
• Αυτµατη Ρύθµιση Αντίθεσης
• Αυτµατη Ρύθµιση
Συµβουλευτείτε το κεφάλαιο Πλήκτρα Ελέγχου στις Οδηγίες Χρήσης για µια πλήρη περιγραφή αυτών των πλήκτρων
ελέγχου OSM.
ΣΗΜΕΙΩΣΗ: Εάν αντιµετωπίσετε οποιοδήποτε πρβληµα, συµβουλευτείτε το κεφάλαιο Εντοπισµσ Βλαβών στις
Οδηγίες Χρήσης.
Ελληνικά-3
04_Greek 30/10/2002, 11:323
Page 40

Κλίση και Περιστροφή
Κρατήστε µε τα δύο χέρια την οθνη και ρυθµίστε στην επιθυµητή κλίση (Σχήµα ΤΣ.1).
Αφαιρέστε τη Βάση Στερέωσησ τησ Οθνησ
Για να προετοιµάσετε την οθνη για διαφορετικούς τρπους στερέωσης:
1. Αποσυνδέστε λα τα καλώδια.
2. Τοποθετήστε την οθνη µε την πρσοψη προς τα κάτω, επάνω σε µία λεία επιφάνεια (Σχήµα Ρ.1).
3. Αφαιρέστε το κάλυµµα του άξονα περιστροφής (Σχήµα Ρ.1).
4. Αφαιρέστε τις 4 βίδες που συνδέουν την οθνη µε τη βάση της και ανασηκώστε το συγκρτηµα της βάσης
(Σχήµα Ρ.2) η οθνη είναι τώρα έτοιµη για στερέωση µε διαφορετικ τρπο.
5. Συνδέστε το καλώδιο Εναλλασσµενου Ρεύµατος και το καλώδιο σήµατος στο πίσω µέρος της οθνης (Σχήµα Ρ.3).
6. Ακολουθήστε αντίστροφα αυτή τη διαδικασία για να επανατοποθετήσετε τη βάση.
ΣΗΜΕΙΩΣΗ: Χρησιµοποιήστε µνο τη συµβατή κατά VESA εναλλακτική µέθοδο στερέωσης.
Να είστε προσεκτικοί κατά την αφαίρεση της βάσης της οθνης.
Σχήµα TΣ.1
Κάλυµµα του µεντεσέ
04_Greek 30/10/2002, 11:324
Λεία επιφάνεια
Σχήµα Ρ.1
Ελληνικά-4
Page 41

Σχήµα Ρ.3Σχήµα Ρ.2
7. Αυτή η οθνη LCD έχει σχεδιαστεί για χρήση µε εύκαµπτο βραχίονα. Παρακαλείσθε να χρησιµοποιήσετε τις
παρεχµενες βίδες (4 τεµάχια) κατά τη στερέωση. Για να πληρούνται οι απαιτήσεις ασφαλείας η οθνη πρέπει να
στερεωθεί σε ένα βραχίονα ο οποίος θα εξασφαλίζει την απαραίτητη σταθερτητα λαµβάνοντας υπ' ψη το βάρος
της οθνης. Η οθνη LCD πρέπει να χρησιµοποιηθεί µνο µε έναν εγκεκριµένο βραχίονα (π.χ. µε ένδειξη GS).
Επανατοποθετήστε τις βίδες
Πάχος του
υποστηρίγµατος (βραχίονα)
2,0 ~ 3,2 mm
Σφίξτε λες τις
βίδες
100 mm
100 mm
Προδιαγραφέσ
Ελληνικά
04_Greek 30/10/2002, 11:325
4 ΒΙ∆ΕΣ (4M)
(MΕΓ. βάθος: 8,5 mm)
Αν χρησιµοποιήσετε
άλλη βίδα, ελέγξτε
το βάθος της οπής.
Βάρος του συγκροτήµατος LCD: 4,6 kg (MΕΓ.)
Ελληνικά-5
Page 42

Πλήκτρα ελέγχου
Πλήκτρα Ελέγχου OSM (On-Screen Manager – ∆ιαχειριστήσ Οθνησ)
Τα πλήκτρα ελέγχου OSM που βρίσκονται στο µπροστιν µέρος της οθνης παρέχουν τις ακλουθες λειτουργίες:
Για πρσβαση στις λειτουργίες OSM πατήστε κάποιο απ τα πλήκτρα ελέγχου (<, >, -, +, EXIT).
Πλήκτρο ελέγχου
EXIT (ΕΞΟ∆ΟΣ)
>
< /
- / +
SELECT (ΕΠΙΛΟΓΗ)
RESET (ΕΠΑΝΑΦΟΡΑ)
ΣΗΜΕΙΩΣΗ: Οταν πιέσετε το πλήκτρο RESET στο κύριο µενού και στο υποµενού, εµφανίζεται ένα προειδοποιητικ
παράθυρο, το οποίο σας επιτρέπει να ακυρώσετε τη λειτουργία RESET πατώντας το κουµπί EXIT.
Μενού
Εξοδος απ τα µενού ελέγχου OSM.
Εξοδος προς το κύριο µενού OSM.
Μετακίνηση της επιλεγµένης περιοχής αριστερά/δεξιά για την επιλογή των µενού ελέγχου.
Μετακίνηση της επιλεγµένης περιοχής πάνω/κάτω για την επιλογή ενς πλήκτρου ελέγχου.
Μετακίνηση της µπάρας αριστερά/δεξιά για αύξηση ή µείωση της ρύθµισης.
Ενεργοποίηση της λειτουργίας Αυτµατης Ρύθµισης. Είσοδος στα µενού ελέγχου OSM.
Είσοδος στο υποµενού OSM.
Επαναφορά του επιλεγµένου µενού ελέγχου στην εργοστασιακή ρύθµιση.
Πλήκτρα ελέγχου Φωτειντητασ/Αντίθεσησ
BRIGHTNESS (ΦΩΤΕΙΝΟΤΗΤΑ)
Ρυθµίζει τη συνολική φωτειντητα της εικνας και του φντου της οθνης.
CONTRAST (ΑΝΤΙΘΕΣΗ)
Ρυθµίζει τη φωτειντητα της οθνης σε σχέση µε το φντο.
AUTO ADJUST (ΑΥΤΟΜΑΤΗ ΡΥΘΜΙΣΗ)
Ρυθµίζει την εικνα που εµφανίζεται για µη συµβατικά σήµατα εισδου εικνας.
Αυτµατη Ρύθµιση
Ρυθµίζει αυτµατα τη Θέση της Εικνας, το Οριζντιο Μέγεθος και τη Μικρορύθµιση.
Πλήκτρα Ελέγχου Θέσησ
LEFT/RIGHT (ΑΡΙΣΤΕΡΑ/∆ΕΞΙΑ)
Ελέγχει την Οριζντια Θέση της Εικνας µέσα στην επιφάνεια απεικνισης της οθνης LCD.
DOWN/UP (ΚΑΤΩ/ΕΠΑΝΩ)
Ελέγχει την Κάθετη Θέση της Εικνας µέσα στην επιφάνεια απεικνισης της οθνης LCD.
H. SIZE (OΡIZONTIO ΜΕΓΕΘΟΣ)
Ρυθµίζει το οριζντιο µέγεθος αυξάνοντάς το ή µειώνοντάς το.
Στην περίπτωση που η λειτουργία "Auto Adjust" (Αυτµατη Ρύθµιση) δεν έχει ικανοποιητικ
αποτέλεσµα ως προς τις ρυθµίσεις της εικνας, µπορείτε να τη ρυθµίσετε περαιτέρω
χρησιµοποιώντας τη λειτουργία "H-Size" (Οριζντιο µέγεθος) (ρολι κουκίδας). Για το σκοπ αυτ
µπορεί να χρησιµοποιηθεί το µοτίβο της δοκιµής Moirι. Αυτή η λειτουργία ενδέχεται να µεταβάλει
το πλάτος της εικνας. Χρησιµοποιήστε το µενού Αριστερά/∆εξιά για να κεντράρετε την εικνα
στην οθνη. Αν οι τιµές για το Οριζντιο Μέγεθος δεν έχουν βαθµονοµηθεί σωστά, το αποτέλεσµα
θα µοιάζει µε την εικνα του αριστερού σχήµατος. Η εικνα θα πρέπει να είναι οµοιογενής.
04_Greek 30/10/2002, 11:326
Οταν η τιµή για το
Οριζντιο Μέγεθος δεν
είναι σωστή.
Οταν η τιµή για το
Οριζντιο Μέγεθος
Ελληνικά-6
βελτιώνεται.
Οταν η τιµή για το
Οριζντιο Μέγεθος
είναι σωστή.
Page 43

FINE (ΜΙΚΡΟΡΥΘΜΙΣΗ)
Βελτιώνει την εστίαση, την ευκρίνεια και τη σταθερτητα της εικνας αυξάνοντας ή µειώνοντας τη
ρύθµιση.
Στην περίπτωση που οι λειτουργίες "Auto Adjust" (Αυτµατη Ρύθµιση) και "H.Size" (Οριζντιο
Μέγεθος) δεν έχουν ικανοποιητικ αποτέλεσµα ως προς τις ρυθµίσεις της εικνας, µπορείτε να
χρησιµοποιήσετε τη λειτουργία "Fine" (Μικρορύθµιση). Μπορείτε να βελτιώσετε την εστίαση, την
ευκρίνεια και τη σταθερτητα της εικνας αυξάνοντας ή µειώνοντας την τιµή αυτής της ρύθµισης.
Για το σκοπ αυτ µπορεί να χρησιµοποιηθεί το µοτίβο της δοκιµής Moirι. Αν οι τιµές για τη
Μικρορύθµιση δεν έχουν βαθµονοµηθεί σωστά, το αποτέλεσµα θα µοιάζει µε την εικνα του
αριστερού σχήµατος. Η εικνα θα πρέπει να είναι οµοιογενής.
Οταν η τιµή για τη
Μικρορύθµιση δεν
είναι σωστή.
Συστήµατα Ελέγχου Χρωµάτων
Η επιθυµητή ρύθµιση των χρωµάτων γίνεται µέσα απ έξι προκαθορισµένα χρώµατα (τα
προκαθορισµένα χρώµατα sRBG και NATIVE είναι βασικά και δεν µπορούν να αλλαχθούν).
R, G, B (Κκκινο, Πράσινο, Μπλε)
Αυξάνει ή µειώνει τα χρώµατα Κκκινο, Πράσινο ή Μπλε ανάλογα µε την επιλογή που έχετε κάνει.
Η αλλαγή του χρώµατος θα εµφανιστεί στην οθνη και η κατεύθυνση (αύξηση ή µείωση) θα φαίνεται
απ τις µπάρες.
sRGB (ΛΕΙΤΟΥΡΓΙΑ sRGB)
Η λειτουργία sRGB βελτιώνει σηµαντικά την ακρίβεια των χρωµάτων στο περιβάλλον της
επιφάνειας εργασίας µε µια απλή σταθερή περιοχή χρωµάτων RGB (Κκκινο-Πράσινο-Μπλε). Σε
αυτ το περιβάλλον που υποστηρίζεται απ αυτά τα χρώµατα, ο χειριστής µπορεί εύκολα και
αξιπιστα να χειρίζεται τα χρώµατα χωρίς περαιτέρω διαχείριση των χρωµάτων στις πιο κοινές
περιπτώσεις.
NATIVE (ΦΥΣΙΚΟ)
Τα αρχικά χρώµατα που εµφανίζονται στην οθνη LCD τα οποία δεν είναι δυνατ να µεταβληθούν.
Εργαλεία
LANGUAGE (Γλώσσα)
Τα µενού ελέγχου OSM υπάρχουν σε επτά γλώσσες.
Οταν η τιµή για τη
Μικρορύθµιση είναι
σωστή.
Ελληνικά
OSM POSITION (ΘΕΣΗ ΟSM)
Μπορείτε να επιλέξετε την περιοχή της οθνης στην οποία θέλετε να εµφανίζεται η εικνα ελέγχου
του ∆ιαχειριστή Οθνης OSM. Επιλέγοντας OSM Location (Θέση OSM), έχετε τη δυναττητα να
ρυθµίσετε χειροκίνητα τη θέση του µενού ελέγχου OSM αριστερά, δεξιά, πάνω ή κάτω.
OSM TURN OFF (ΑΠΕΝΕΡΓΟΠΟΙΗΣΗ ΟSM)
Το µενού ελέγχου του OSM θα παραµείνει ανοικτ για σο χρονικ διάστηµα το χρησιµοποιείτε. Στο
υποµενού OSM Turn Off (Aπενεργοποίηση OSM), µπορείτε να επιλέξετε το χρονικ διάστηµα
αναµονής της οθνης, ύστερα απ το τελευταίο πάτηµα κάποιου πλήκτρου, για να κλείσει το µενού
ελέγχου του OSM. Οι προεπιλεγµένες τιµές είναι: 10, 20, 30, 45, 60 και 120 δευτερλεπτα.
OSM LOCK OUT (ΚΛΕΙ∆·ΜΑ OSM)
Αυτ το πλήκτρο ελέγχου απαγορεύει κάθε πρσβαση στις λειτουργίες ελέγχου OSM, πλην του
ελέγχου της Φωτειντητας και της Αντίθεσης. Οταν επιχειρήσετε να ενεργοποιήσετε τα πλήκτρα
ελέγχου του OSM ενώ αυτ είναι κλειδωµένο, εµφανίζεται µία οθνη που σας ενηµερώνει τι τα
πλήκτρα ελέγχου OSM έχουν κλειδωθεί. Για να ενεργοποιήσετε τη λειτουργία κλειδώµατος του
OSM, πιέστε το πλήκτρο SELECT, στη συνέχεια πιέστε το πλήκτρο "+" και κρατήστε τα πατηµένα
ταυτχρονα. Για να απενεργοποιήσετε τη λειτουργία κλειδώµατος του OSM, πιέστε το πλήκτρο
SELECT, στη συνέχεια πιέστε το πλήκτρο "+" και κρατήστε τα πατηµένα ταυτχρονα.
Ελληνικά-7
04_Greek 30/10/2002, 11:327
Page 44

RESOLUTION NOTIFIER (ΓΝΩΣΤΟΠΟΙΗΣΗ ΑΝΑΛΥΣΗΣ)
Η βέλτιστη ανάλυση είναι 1280 x 1024. Αν έχετε επιλέξει το ON, ύστερα απ 30 δευτερλεπτά θα
εµφανιστεί στην οθνη ένα µήνυµα το οποίο θα σας γνωστοποιεί τι η ανάλυση δεν είναι 1280 x 1024.
HOT KEY (Πλήκτρο Αµεσησ Λειτουργίασ)
Μπορείτε να ρυθµίσετε απευθείας τη φωτειντητα και την αντίθεση. Οταν είναι ενεργή αυτή η
λειτουργία, µπορείτε να ρυθµίσετε τη φωτειντητα µε τα πλήκτρα < ή > και την αντίθεση µε τα
πλήκτρα + ή -, ενώ το µενού OSM είναι ανενεργ. Το πλήκτρο EXIT παρέχει πρσβαση στο βασικ
µενού OSM.
OFF TIMER (Χρονοδιακπτησ θέσησ εκτσ λειτουργίασ)
Η οθνη θα τεθεί αυτµατα εκτς λειτουργίας αν ο χρήστης έχει επιλέξει µια προκαθορισµένη
χρονική περίοδο.
FACTORY PRESET (ΕΡΓΟΣΤΑΣΙΑΚΗ ΡΥΘΜΙΣΗ)
Επιλέγοντας την Εργοστασιακή Ρύθµιση (Factory Preset), µπορείτε να επαναφέρετε λες τις
ρυθµίσεις ελέγχου του ∆ιαχειριστή Οθνης (OSM), στις εργοστασιακές ρυθµίσεις. Για να
ενεργοποιηθεί το πλήκτρο RESET πρέπει να κρατηθεί πατηµένο για µερικά δευτερλεπτα.
Μπορείτε να επαναφέρετε επιµέρους ρυθµίσεις επιλέγοντας τη λειτουργία ελέγχου που θέλετε να
επαναφέρετε και πιέζοντας το πλήκτρο RESET.
Πληροφορίεσ
DISPLAY MODE (ΤΡΟΠΟΣ ΛΕΙΤΟΥΡΓΙΑΣ ΟΘΟΝΗΣ)
∆είχνει την τρέχουσα ανάλυση και τη ρύθµιση συχντητας της οθνης.
MONITOR INFO. (ΠΛΗΡΟΦΟΡΙΕΣ ΟΘΟΝΗΣ)
∆ηλώνει το µοντέλο και τους αριθµούς σειράς της οθνης σας.
OSM Warning (Προειδοποίηση OSM)
Τα Προειδοποιητικά µενού του OSM εξαφανίζονται αν πιέσετε το κουµπί EXIT.
NO SIGNAL (∆ΕΝ ΥΠΑΡΧΕΙ ΣΗΜΑ): Αυτή η λειτουργία δίνει µια προειδοποίηση ταν δεν υπάρχει
καθλου σήµα. Οταν θέσετε τον υπολογιστή σε λειτουργία ή ταν υπάρξει αλλαγή στην είσοδο
σήµατος ή η εικνα είναι ανενεργή, θα εµφανιστεί το παράθυρο No Signal (∆εν υπάρχει σήµα).
RESOLUTION NOTIFIER (ΓΝΩΣΤΟΠΟΙΗΣΗ ΑΝΑΛΥΣΗΣ): Αυτή η λειτουργία προειδοποιεί για χρήση
µε βελτιστοποιηµένη ανάλυση. Οταν θέσετε τον υπολογιστή σε λειτουργία ή ταν υπάρξει αλλαγή
στην είσοδο σήµατος ή το οπτικ σήµα δεν έχει την κατάλληλη ανάλυση, θα εµφανιστεί το
παράθυρο Resolution Notifier (Γνωστοποίηση Ανάλυσης). Αυτή η λειτουργία µπορεί να
απενεργοποιηθεί απ το µενού TOOL (ΕΡΓΑΛΕΙΑ).
OUT OF RANGE (ΕΚΤΟΣ ΠΕΡΙΟΧΗΣ): Αυτή η λειτουργία προτείνει τις βέλτιστες τιµές ανάλυσης και
ρυθµού ανανέωσης. Οταν θέσετε τον υπολογιστή σε λειτουργία ή ταν υπάρξει αλλαγή στην είσοδο
σήµατος ή το οπτικ σήµα δεν έχει το σωστ χρονισµ, θα εµφανιστεί το µενού Out Of Range
(Εκτς Περιοχής).
04_Greek 30/10/2002, 11:328
Ελληνικά-8
Page 45

Προτεινµενη Χρήση
Προφυλάξεισ Ασφαλείασ και Συντήρηση
ΓΙΑ ΒΕΛΤΙΣΤΗ ΑΠΟ∆ΟΣΗ, ΟΤΑΝ ΡΥΘΜΙΖΕΤΕ ΚΑΙ ΧΡΗΣΙΜΟΠΟΙΕΙΤΕ ΤΗΝ
• ΜΗΝ ΑΝΟΙΓΕΤΕ ΤΗΝ ΟΘΟΝΗ. ∆εν υπάρχουν εξαρτήµατα στο εσωτερικ της οθνης τα οποία µπορεί να επισκευάσει ο χρήστης.
Αν ανοίξετε ή αφαιρέσετε τα καλύµµατα µπορεί να πάθετε ηλεκτροπληξία ή να εκτεθείτε σε άλλους κινδύνους. Για κάθε
επισκευή απευθυνθείτε στο εξουσιοδοτηµένο προσωπικ του σέρβις.
• Μη χύνετε υγρά µέσα στο περίβληµα και µην χρησιµοποιείτε την οθνη κοντά σε νερ.
•
Μην εισάγετε οποιοδήποτε αντικείµενο µέσα στις σχισµές του περιβλήµατος, επειδή µπορεί να έρθει σε επαφή µε σηµεία υψηλής
καιεπικίνδυνης τάσης, και να προκληθούν ζηµιές ή ατυχήµατα, πως ηλεκτροπληξία, πυρκαγιά ή βλάβη του εξοπλισµού.
• Μην τοποθετείτε βαριά αντικείµενα πάνω στο καλώδιο ρεύµατος. Ανκαταστραφεί το καλώδιο, µπορεί να προκληθεί
ηλεκτροπληξία ή πυρκαγιά.
• Μην τοποθετείτε την οθνη πάνω σε κεκλιµένη ή ασταθή βάση ή τραπέζι, επειδή µπορεί να πέσει και να προκληθούν σοβαρές
βλάβες στην οθνη.
• Μην τοποθετείτε αντικείµενα επάνω στην οθνη και µη χρησιµοποιείτε την οθνη σε εξωτερικ χώρο.
• Το εσωτερικ της λυχνίας φθορισµού που βρίσκεται µέσα στην οθνη LCDπεριέχει υδράργυρο. Παρακαλούµε να ακολουθείτε
τους τοπικούς κανονισµούς σχετικά µε τη σωστή απρριψη αυτής της λυχνίας.
Αν συµβεί κάποιο απ τα παρακάτω, αποσυνδέστε αµέσως την οθνη απ την πρίζα και ζητήστε βοήθεια απ το έµπειρο προσωπικ
του σέρβις:
• Αν καταστραφούν το καλώδιο ρεύµατος ή το φις.
• Εάν χυθούν υγρά ή πέσουν αντικείµενα µέσα στην οθνη.
• Αν η οθνη εκτεθεί στη βροχή ή πέσει πάνω της νερ.
• Αν η οθνη πέσει κάτω ή υποστεί ζηµιά το περίβληµά της.
• Αν, παρά τη συµµρφωση προς τις οδηγίες χρήσης, η οθνη δε λειτουργεί κανονικά.
• Μη λυγίζετε το καλώδιο ρεύµατος.
•
Μη χρησιµοποιείτε την οθνη σε περιοχές µε υψηλή θερµοκρασία, υγρασία, σκνη και σε περιοχές που περιέχουν λάδια ή γράσα.
• Μην καλύπτετε τα ανοίγµατα εξαερισµού της οθνης.
• Αν σπάσει η οθνη, αποφύγετε την επαφή µε τους υγρούς κρυστάλλους.
• Αν σπάσει το κρύσταλλο. Μεταχειριστείτε µε προσοχή.
• Αφήστε αρκετ χώρο γύρω απ την οθνη για επαρκή αερισµ και διάχυση της θερµτητας. Μην καλύπτετε
τα ανοίγµατα αερισµού και µην τοποθετείτε την οθνη κοντά σε σώµατα καλοριφέρ ή άλλες πηγές
θερµτητας. Μην τοποθετείτε κανένα αντικείµενο στο πάνω µέρος της οθνης.
ΠΡΟΣΟΧΗ
• Παραµονή ειδώλου: "Παραµονή ειδώλου" ονοµάζεται το φαινµενο κατά το οποίο συνεχίζει να υπάρχει στην οθνη ένα είδωλο ή
σκιές µιας προηγούµενης εικνας. Σε αντίθεση µε τις οθνες καθοδικού σωλήνα (CRT), στις οθνες υγρών κρυστάλλων (LCD) η
παραµονή ειδώλου δεν είναι µνιµη, αλλά θα πρέπει να αποφεύγεται η απεικνιση σταθερών εικνων για µεγάλο χρονικ διάστηµα.
Για να διορθώσετε την παραµονή του ειδώλου, κλείστε την οθνη για χρονικ διάστηµα ίσο µε το χρνο που εµφανιζταν η
προηγούµενη εικνα στην οθνη. Για παράδειγµα, αν εµφανιζταν µια εικνα στην οθνη για µία ώρα και παραµένει το είδωλο
της εικνας, για να εξαφανίσετε το είδωλο θα πρέπει να κλείσετε την οθνη για µία ώρα.
ΣΗΜΕΙΩΣΗ: Οπως και µε λες τις συσκευές απεικνισης για προσωπική χρήση, η NEC-Mitsubishi Electronics Display-Europe
συνιστά τη χρήση προγράµµατος προφύλαξης οθνης κατά τακτά διαστήµατα ταν η οθνη παραµένει ανενεργή ή τη θέση της
οθνης εκτς λειτουργίας ταν δεν χρησιµοποιείται.
• Ο συνδετήρας του καλωδίου τροφοδοσίας αποτελεί το κύριο µέσο αποσύνδεσης του συστήµατος απ το
ρεύµα. Η οθνη πρέπει να εγκατασταθεί κοντά σε πρίζα παροχής ρεύµατος ώστε να είναι εύκολη η πρσβαση.
• Μεταχειρίζεστε µε προσοχή την οθνη κατά τις µεταφορές. Φυλάξτε τα υλικά της συσκευασίας για
τιςµεταφορές.
ΕΓΧΡΩΜΗ ΟΘΟΝΗ ΥΓΡΩΝ ΚΡΥΣΤΑΛΛΩΝ MULTISYNC,
ΕΧΕΤΕ ΥΠΟΨΗ ΣΑΣ ΤΑ ΕΞΗΣ:
Ελληνικά
Η ΣΩΣΤΗ ΘΕΣΗ ΚΑΙ ΡΥΘΜΙΣΗ ΤΗΣ ΟΘΟΝΗΣ ΜΠΟΡΕΙ ΝΑ ΜΕΙΩΣΕΙ ΤΗΝ ΚΟΠΩΣΗ ΤΩΝ ΜΑΤΙΩΝ, ΤΩΝ ΩΜΩΝ
• Για τη βέλτιστη απδοση της συσκευής αφήστε την να προθερµανθεί για 20 λεπτά.
• Ρυθµίστε το ύψος της οθνης έτσι ώστε η κορυφή της να βρίσκεται στο ίδιο ύψος ή λίγο
χαµηλτερα απ το ύψος των µατιών. Το ύψος της οθνης να είναι τέτοιο ώστε ταν
κοιτάζετε το κέντρο της, να βλέπετε µε κλίση προς τα κάτω.
• Τοποθετήστε την οθνη σε απσταση απ τα µάτια σας µεταξύ 40 και 70 εκατοστά.
Ηβέλτιστη απσταση είναι 50 cm εκατοστά.
• Περιοδικά, να ξεκουράζετε τα µάτια σας εστιάζοντας σε κάποιο αντικείµενο που βρίσκεται
τουλάχιστον 6 µέτρα µακριά. Ανοιγοκλείνετε τα µάτια σας συχνά.
• Τοποθετήστε την οθνη υπ γωνία 90° ως προς το παράθυρο ή άλλες πηγές φωτισµού για
να ελαχιστοποιήσετε το θάµπωµα και τις αντανακλάσεις. Ρυθµίστε την κλίση της οθνης
έτσι ώστε να µην αντανακλάται πάνω της ο φωτισµς απ την οροφή.
• Αν το ανακλώµενο φως σας εµποδίζει να βλέπετε την εικνα της οθνης, χρησιµοποιήστε
ένα κατάλληλο φίλτρο.
• Καθαρίστε την επιφάνεια της οθνης LCD µε ένα µαλακ ύφασµα χωρίς χνούδια.
Αποφύγετε τη χρήση διαλυτικών και καθαριστικών για τζάµια!
• Ρυθµίστε τα πλήκτρα ελέγχου BRIGHTNESS (φωτειντητας) και CONTRAST (αντίθεσης) της οθνης για να βελτιώσετε την
αναγνωσιµτητά της.
• Χρησιµοποιήστε εξάρτηµα συγκράτησης των εγγράφων, τοποθετώντας τοδίπλα στην οθνη.
• Τοποθετήστε αυτ που κοιτάζετε πολύ συχνά (την οθνη ή τα έγγραφά σας) κατευθείαν µπροστά σας ώστε να ελαχιστοποιήσετε
τις στροφές της κεφαλής ταν πληκτρολογείτε.
ΚΑΙ ΤΟΥ ΑΥΧΕΝΑ. ΚΑΤΑ ΤΗΝ ΕΠΙΛΟΓΗ ΘΕΣΗΣ ΤΗΣ ΟΘΟΝΗΣ ΕΛΕΓΞΤΕ ΤΑ ΕΞΗΣ:
Ελληνικά-9
04_Greek 30/10/2002, 11:329
Page 46

• Αποφεύγετε να εµφανίζετε στην οθνη κάποιο αµετάβλητο µοτίβο για µεγάλες χρονικές περιδους για να αποφύγετε το
φαινµενο της παραµονής της εικνας (µετείκασµα).
• Εξετάζετε τακτικά τα µάτια σας στον οφθαλµίατρο.
Εργονοµία
Για να επιτύχετε τα µέγιστα οφέλη απ την εργονοµία, σας συνιστούµε τα εξής:
• Χρησιµοποιήστε τις εργοστασιακές ρυθµίσεις των πλήκτρων ελέγχου SIZE (Μεγέθους) και POSITION (Θέσης) µε τυποποιηµένα
σήµατα.
• Χρησιµοποιήστε την εργοστασιακή Ρύθµιση Χρώµατος.
• Χρησιµοποιήστε σήµατα "non-interlaced" µε κάθετη συχντητα ανανέωσης µεταξύ 60-75 Hz.
• Μη χρησιµοποιείτε ως πρωτεύον χρώµα το µπλε σε σκούρο φντο, επειδή θα είναι δύσκολο να διαβάσετε την οθνη και µπορεί
να προκληθεί κπωση στα µάτια λγω ανεπαρκούς αντίθεσης φωτειντητας.
04_Greek 30/10/2002, 11:3210
Ελληνικά-10
Page 47

ADVERTENCIA
PARA PREVENIR EL PELIGRO DE INCENDIO O DESCARGAS ELÉCTRICAS, NO EXPONGA ESTE PRODUCTO A LA LLUVIA O
LA HUMEDAD. TAMPOCO UTILICE EL ENCHUFE POLARIZADO DE ESTE PRODUCTO CON UN RECEPTÁCULO DEL CABLE
DE EXTENSIÓN U OTRAS TOMAS A MENOS QUE LAS PROLONGACIONES SE PUEDAN INSERTAR COMPLETAMENTE.
NO ABRA LA CAJA DEL MONITOR, YA QUE CONTIENE COMPONENTES DE ALTO VOLTAJE. DEJE QUE SEA EL
PERSONAL DE SERVICIO CUALIFICADO QUIEN SE ENCARGUE DE LAS TAREAS DE SERVICIO.
PELIGRO
RIESGO DE DESCARGAS ELÉCTRICAS • NO ABRIR
PELIGRO: PARA REDUCIR EL RIESGO DE DESCARGAS ELÉCTRICAS, NO RETIRE LA CUBIERTA (O LA PARTE
POSTERIOR). EL MONITOR NO CONTIENE PIEZAS QUE DEBA MANIPULAR EL USUARIO. DEJE QUE
SEA EL PERSONAL DE SERVICIO CUALIFICADO QUIEN SE ENCARGUE DE LAS TAREAS DE SERVICIO.
Este símbolo advierte al usuario de que el producto puede contener suficiente voltaje sin aislar como para
causar descargas eléctricas. Por tanto, evite el contacto con cualquier pieza del interior del monitor.
Este símbolo advierte al usuario de que se incluye documentación importante respecto al funcionamiento
y el mantenimiento de este producto. Por ello, debería leerla atentamente para evitar problemas.
Peligro:
Cuando utilice LCD1701 en una fuente de alimentación de corriente alterna de 220-240V en Europa, utilice el cable de
potencia que se suministra con el monitor.
En el Reino Unido, utilice un cable de potencia autorizado BS con enchufe moldeado que tenga un fusible negro (cinco
amperios) instalado para utilizarlo con este equipo. Si el equipo se le ha suministrado sin cable de potencia, póngase en
contacto con su proveedor.
En los demás casos, utilice un cable de potencia compatible con la corriente alterna de la salida de potencia que esté
autorizado y cumpla las normas de seguridad del país correspondiente.
Español
Declaración
Declaración del fabricante
Por la presente certificamos que este monitor
LCD1701 (L172EN) en color cumple la
Directiva 73/23/CEE:
– EN 60950
Directiva 89/336/CEE:
– EN 55022
– EN 61000-3-2
– EN 61000-3-3
– EN 55024
Como socio de E
directrices de ENERGY STAR en cuanto al rendimiento energético. ENERGY STAR es una marca registrada de EE.UU.
ErgoDesign es una marca registrada de NEC-Mitsubishi Electric Visual Systems Corporation en Austria, los países del
Benelux, Dinamarca, Francia, Alemania, Italia, Noruega, España, Suecia y el Reino Unido.
IBM PC/XT/AT, PS/2, MCGA, VGA, 8514/A y XGA son marcas registradas de International Business Machines Corporation.
Apple y Macintosh son marcas registradas de Apple Computer Inc.
Microsoft y Windows son marcas registradas de Microsoft Corporation.
NEC es una marca registrada de NEC Corporation.
Las demás marcas comerciales o marcas registradas son propiedad de sus respectivas empresas.
NERGY STAR
®
, NEC-Mitsubishi Electric Visual Systems Corp. ha determinado que este producto cumpla las
y lleva la marca
NEC-Mitsubishi Electric Visual
Systems, Corp.
MS Shibaura Bldg., 13-23,
Shibaura 4-chome,
Minato-Ku, Tokyo 108-0023, JAPÓN
05_Spain 30/10/2002, 11:321
Español-1
Page 48

Contenido
Su nueva caja* de monitor LCD NEC debería contener:
• Monitor LCD1701 con base inclinada
• Cable de potencia
• Un cable de señal de vídeo
• Un manual del usuario
• Un CD ROM (incluye el manual del usuario completo en formato PDF).
Para poder acceder al manual del usuario, debe tener Acrobat Reader
4.0 instalado en su PC.
*
Recuerde conservar la caja original y el material de embalaje para poder transportar el monitor en el futuro.
Inicio rápido
Para conectar el monitor LCD a su sistema, siga estas indicaciones:
1. Desconecte su ordenador.
2. Retire el conducto del cable.
3. Para PC: conecte el mini D-SUB de 15 clavijas del cable de señal adecuado al conector de la tarjeta de visualización de
su sistema (figura A.1). Apriete todos los tornillos.
Para Mac: conecte el adaptador de cable para Macintosh LCD1701 al ordenador (figura B.1). Conecte el extremo del
mini D-SUB de 15 clavijas del cable de señal adecuado al adaptador de cable para Macintosh del LCD1701 (figura B.1).
Adaptador
de cable para
Macintosh
(no incluido)
Los Macintosh G3 y G4
no necesitan adaptador
de cable para Macintosh
Figura A.1
Figura B.1
4. Conecte el mini D-SUB de 15 clavijas del cable de señal de vídeo al conector adecuado en la parte posterior del monitor
(figura C.1).
5. Conecte un extremo del cable de alimentación al monitor LCD1701 y el otro a la toma de corriente. Coloque el cable de
señal de vídeo y el cable de alimentación por debajo del conducto del cable (figura C.1). Vuelva a colocar el conducto del
cable.
NOTA: coloque bien el cable por debajo del conducto para evitar que se dañe éste o el monitor. Ajuste los cables para
colocar el núcleo de ferrita y la tapa por encima del conducto para cables tal como se indica en la figura C.1.
NOTA: consulte el apartado Peligro de este manual para asegurarse de que selecciona el cable de alimentación de
corriente alterna adecuado.
05_Spain 30/10/2002, 11:322
Español-2
Page 49

Ta p a
Núcleo de ferrita
Conducto para cables
Figura C.1
6. El interruptor de desconexión prolongada situado en el lado derecha del monitor debe estar conectado (figura D.1).
Encienda el monitor con el botón de potencia y conecte el ordenador.
NOTA: el interruptor de desconexión prolongada es un interruptor tipo on/off (encendido/apagado). Si este interruptor está
en la posición OFF, el monitor no se puede conectar utilizando el botón frontal. NO lo conecte y desconecte varias
veces seguidas.
Interruptor de desconexión prolongada
Botón de potencia
Figura D.1
Español
7. Con el auto ajuste No-touch el monitor busca automáticamente la configuración óptima una vez configuradas la mayoría
de las cadencias. Para llevar a cabo otros ajustes, utilice los siguientes controles de OSM:
• Contraste de auto ajuste
• Auto ajuste
Consulte el apartado Controles de este manual del usuario si desea obtener una descripción detallada de estos controles OSM.
NOTA: si surgiera algún problema, consulte el apartado Solución de problemas de este manual del usuario.
Español-3
05_Spain 30/10/2002, 11:323
Page 50

Base inclinable y giratoria
Sujete la pantalla del monitor con las dos manos para ajustarla y orientarla como desee (Figura TS.1).
Cómo retirar el soporte del monitor para el montaje
Para preparar el monitor para montajes alternativos:
1. Desconecte todos los cables.
2. Coloque el monitor boca abajo sobre una superficie no abrasiva (figura R.1).
3. Retire la cubierta de goznes (figura R.1).
4. Retire los 4 tornillos que unen el monitor al soporte y levante el equipo del soporte (figura R.2); el monitor ya se puede
montar de otra forma.
5. Conecte el cable de CA y el cable de señal a la parte posterior del monitor (figura R.3).
6. Repita el proceso en sentido inverso para volver a instalar el soporte.
NOTA: utilice sólo métodos de montaje alternativos compatibles con VESA.
Retire el soporte del monitor con cuidado.
Figura TS.1
Cubierta de goznes
Superficie no abrasiva
05_Spain 30/10/2002, 11:324
Figura R.1
Español-4
Page 51

Figura R.3Figura R.2
7. Este monitor LCD está diseñado para ser utilizado con un brazo flexible. Para el montaje utilice los tornillos (4) que se
suministran con el producto. Para cumplir las normas de seguridad, el monitor debe estar montado a un brazo que
garantice la estabilidad necesaria teniendo en cuenta el peso del monitor. El monitor LCD sólo se podrá utilizar con un
brazo autorizado (por ejemplo, de la marca GS).
Especificaciones
4 TORNILLOS (M4)
(Profundidad MÁX.:8,5 mm)
Si utiliza otros tornillos,
compruebe la profundidad
del orificio.
Sustituya los tornillos
100 mm
Español
Grosor de la
abrazadera (brazo)
2,0 ~ 3,2 mm
Apriete todos los tornillos
100 mm
05_Spain 30/10/2002, 11:325
Peso del equipo LCD: 4,6kg (MÁX.)
Español-5
Page 52

Controles
Controles OSM (On-Screen-Manager: gestor de pantalla)
Los controles OSM situados en la parte frontal del monitor funcionan del siguiente modo:
Para acceder a OSM, pulse cualquiera de los botones de control (<, >, -, +, EXIT).
Control
EXIT
< / >
- / +
SELECT
RESET
NOTA: al pulsar RESET en el menú principal y el submenú, aparece una ventana de advertencia que le permitirá cancelar
la función RESET pulsando el botón EXIT.
Menú
Con él se sale de los controles OSM.
Regreso al menú principal de OSM.
Desplaza la zona resaltada a izquierda/derecha para seleccionar los menús de control.
Desplaza la zona resaltada hacia arriba/abajo para seleccionar uno de los controles.
Desplaza la barra a la izquierda/derecha para aumentar o reducir el ajuste.
Permite el acceso a los controles OSM.
Sirve para acceder al menú secundario de OSM.
Restablece la configuración de fábrica del menú de control resaltado.
Controles de brillo/contraste
BRILLO
Ajusta el brillo de la imagen global y del fondo.
CONTRASTE
Ajusta el brillo de la imagen respecto al fondo.
AUTO AJUSTE
Ajusta la imagen que aparece para las entradas de vídeo no estándar.
Auto ajuste
Ajusta automáticamente la configuración de Image Position (Posición de la imagen), Aproximado y Fino.
Controles de posición
IZQ./DERECHA
Controla la posición horizontal de la imagen en el área de visualización de la pantalla de cristal líquido.
ABAJO/ARRIBA
Controla la posición vertical de la imagen en el área de visualización de la pantalla de cristal líquido.
APROXIMADO
Ajusta el tamaño horizontal aumentando o reduciendo esta configuración.
Si no se consigue una imagen satisfactoria con la función “Auto ajuste”, puede ajustarla aún más con la
función “Aproximado” (frecuencia de punto). Para ello se puede utilizar un moiré de prueba. Esta función
puede alterar el ancho de la imagen. Utilice el menú lzq./Derecha para centrar la imagen en la pantalla.
Este dibujo muestra el resultado de una calibración incorrecta del Aproximado. La imagen debería ser
homogénea.
APROXIMADO incorrecto APROXIMADO corregido APROXIMADO correcto
05_Spain 30/10/2002, 11:326
Español-6
Page 53

FINO
Mejora el enfoque, la claridad y la estabilidad de la imagen aumentando o reduciendo esta configuración.
Si no consigue una imagen satisfactoria con la función “Auto ajuste” y “Aproximado”, puede realizar un
ajuste más preciso utilizando la función “Fino”. Mejora el enfoque, la claridad y la estabilidad de la imagen
aumentando o reduciendo sus valores.
Para ello se puede utilizar un moiré de prueba. El dibujo de la izquierda muestra una calibración incorrecta
del valor de Fino. La imagen debería ser homogénea.
FINO incorrecto FINO correcto
Sistemas de control del color
El preajuste de seis colores selecciona la configuración del color deseada (las configuraciones del color
sRBG y NATIVO son estándar y no se pueden modificar).
R, G, B
Aumenta o disminuye el color rojo, verde o azul en función del que se seleccione. La modificación del color
aparecerá en la pantalla y la dirección (aumento o disminución) se mostrará en las barras.
sRGB
El modo sRGB aumenta extraordinariamente la fidelidad del color en el entorno del escritorio con un solo
segmento de color RGB estándar. Con este entorno de color, el operario puede comunicar los colores fácil
y cómodamente, por lo general sin la ayuda de expertos.
NATIVO
Color original representado en el panel del LCD y que no se puede ajustar.
Herramientas
LENGUAJE
Los menús del control OSM están disponibles en siete idiomas.
LOCALIZACIÓN OSM
Puede decidir dónde desea que aparezca la ventana de control OSM en su pantalla. Seleccionando OSM
Location (Ubicación OSM), podrá ajustar manualmente la posición del menú de control OSM a la izquierda,
derecha, arriba o abajo.
ACTIVIDAD OSM
El menú de control de OSM permanecerá encendido mientras se esté utilizando. En el submenú Actividad
OSM puede indicar cuánto tiempo debe transcurrir desde que se toca un botón por última vez hasta que
se desconecta el menú de control de OSM. Los valores preseleccionados son 10, 20, 30, 45, 60 y 120
segundos.
BLOQUEO OSM
Este control bloquea totalmente el acceso a todas las funciones de control de OSM sin Brillo y Contraste.
Si se intenta activar los controles OSM mientras está activado el modo de Bloqueo, aparecerá una ventana
indicando que los controles OSM están bloqueados. Para activar la función Bloqueo OSM, pulse SELECT,
y la tecla “+” simultáneamente. Para desactivar la función Bloqueo OSM, pulse SELECT, y la tecla “+”
simultáneamente.
Español
RESOLUCIÓN NO NATIVA
Esta resolución óptima es 1280 x 1024. Si se selecciona ENCENDIDO, aparecerá un mensaje en la
pantalla después de 30 segundos advirtiendo de que la resolución no es 1280 x 1024.
TECLA DIRECTA
Sirve para ajustar el brillo y el contraste directamente. Cuando esta función está en ENCENDIDO, puede
ajustar el brillo con con < o >, y el contraste con la tecla + o – , mientras el menu de OSM esté apagado.
Para acceder al menú estándar de OSM, pulse EXIT.
TIEMPO DESACTIV.
El monitor se apaga automáticamente una vez transcurrido el tiempo que ha fijado el usuario final.
05_Spain 30/10/2002, 11:327
Español-7
Page 54

CONF. DE FÁBRICA
Seleccionando Conf. de fábrica podrá restablecer todas las configuraciones de control de OSM originales.
Mantenga pulsado el botón RESET durante unos segundos para que se active la función. Podrá
restablecer cada configuración resaltando el control correspondiente y pulsando el botón RESET.
Información
MODO VISUALIZACIÓN
Indica la configuración de la resolución y frecuencia de la visualización actual del monitor.
INFORMACIÓN MONITOR
Indica los números de modelo y de serie del monitor.
Precaución OSM
Los menús de Precaución OSM desaparecen con el botón Exit.
NO HAY SEÑAL: esta función avisa al usuario cuando no se recibe ninguna señal. Una vez conectada la
alimentación, cuando se modifica la señal de entrada o el vídeo no está activo, aparecerá la ventana No
hay señal.
RESOLUCIÓN NO NATIVA: esta función advierte de que se debe optimizar la resolución. Una vez
conectada la alimentación, cuando se modifica la señal de entrada o la resolución de la señal de vídeo no
es la adecuada, aparecerá la ventana de Resolución no nativa. Esta función se puede desactivar en el
menú TOOL (Herramientas).
FUERA DE RANGO: esta función recomienda optimizar la resolución y la velocidad de regeneración de la
imagen. Una vez conectada la alimentación, cuando se modifica la señal de entrada o la cadencia de la
señal de vídeo no es la adecuada, aparecerá el menú Fuera de rango.
05_Spain 30/10/2002, 11:328
Español-8
Page 55

Uso recomendado
Medidas de seguridad y mantenimiento
PARA GARANTIZAR EL RENDIMIENTO ÓPTIMO DEL PRODUCTO,
TENGA EN CUENTA LAS SIGUIENTES INSTRUCCIONES AL
CONFIGURAR Y UTILIZAR EL MONITOR EN COLOR MULTISYNC LCD:
• NO ABRA EL MONITOR. El monitor no contiene piezas que deba manipular el usuario. Si se abren o retiran las cubiertas, existe
el riesgo de sufrir descargas eléctricas peligrosas u otros daños. Las tareas de servicio deberá realizarlas personal de servicio
cualificado.
• No vierta ningún líquido en la caja ni utilice el monitor cerca del agua.
• No inserte objetos de ningún tipo en las ranuras de la caja, porque podrían tocar puntos con tensión peligrosos y ser dañinos o
letales, o causar descargas eléctricas, fuego o fallos en el equipo.
• No coloque objetos pesados en el cable de potencia. Si éste quedara dañado, podrían producirse descargas o fuego.
• No coloque este producto sobre un carro, soporte o mesa inclinado o inestable, ya que el monitor podría caerse y producirse
daños graves.
• No coloque objetos sobre el monitor ni utilice el monitor al aire libre.
• El interior del tubo fluorescente situado en la pantalla de cristal líquido contiene mercurio. Respete las ordenanzas de su
municipio a la hora de desechar el tubo.
Si se da algunas de estas circunstancias, desenchufe inmediatamente el monitor de la toma de corriente y contacte con el personal
de servicio cualificado:
• Si el cable de alimentación o el enchufe está dañado.
• Si se ha derramado líquido o han caído objetos dentro del monitor.
• Si el monitor ha estado expuesto a la lluvia o el agua.
• Si el monitor se ha caído o se ha dañado la caja.
• Si el monitor no funciona con normalidad y ha seguido las instrucciones de servicio.
• No doblegue el cable de potencia.
• No utilice el monitor en zonas con altas temperaturas, húmedas, con polvo o con grasa.
• No cubra la abertura del monitor.
• Si se rompe el monitor, no toque el cristal líquido.
• Si se rompe el cristal. Trátelo con cuidado.
• Coloque el monitor en un lugar debidamente ventilado para permitir que el calor se disipe sin problemas.
No bloquee las aberturas ventiladas ni coloque el monitor cerca de un radiador u otras fuentes de calor.
No coloque nada sobre el monitor.
PELIGRO
• Persistencia de la imagen: La persistencia de la imagen se produce cuando en la pantalla permanece la “sombra” o el remanente
de una imagen. A diferencia de los monitores CRT, la persistencia de la imagen de los monitores con pantalla de cristal líquido no
es permanente, pero se debe evitar visualizar patrones fijos en el monitor durante largos períodos de tiempo.
Para eliminar la persistencia de la imagen, tenga apagado el monitor tanto tiempo como el que haya permanecido la imagen en la
pantalla. Por ejemplo, si ha habido una imagen en el monitor durante una hora y aparece una “sombra” de esa imagen, debería
tener el monitor apagado durante una hora para borrarla.
NOTA: Como en todos los dispositivos de visualización personales, NEC-Mitsubishi Electronic Display-Europe recomienda utilizar
con regularidad un salvapantallas con movimiento siempre que la pantalla esté inactiva o apagar el monitor si no se va a utilizar.
• El conector del cable de alimentación es el principal modo de desconectar el sistema de la tensión de
alimentación. El monitor debería estar instalado cerca de una caja de enchufe de fácil acceso.
• Trate con cuidado el monitor al transportarlo. Guarde el embalaje. Podría necesitarlo para futuros transportes.
Español
SI EL MONITOR ESTÁ SITUADO Y AJUSTADO CORRECTAMENTE, EL USUARIO SENTIRÁ
MENOR FATIGA EN LOS OJOS, HOMBROS Y CUELLO. CUANDO COLOQUE EL
• Para garantizar el óptimo rendimiento, deje el monitor en marcha durante 20 minutos para
que se caliente.
• Ajuste la altura del monitor de forma que la parte superior de la pantalla esté a la altura de
los ojos o ligeramente por debajo. Sus ojos deben mirar ligeramente hacia abajo al observar
el centro de la pantalla.
• Coloque el monitor a 40 cm de distancia de los ojos como mínimo y a 70 cm como máximo.
La distancia óptima es de 50 cm.
• Descanse la vista periódicamente enfocándola hacia un objeto situado a 6 m como mínimo.
Parpadee con frecuencia.
• Coloque el monitor en un ángulo de 90° respecto a las ventanas u otras fuentes de luz para
evitar al máximo los brillos y reflejos. Ajuste la inclinación del monitor de modo que las luces
del techo no reflejen en la pantalla.
• Si el reflejo de la luz le impide ver adecuadamente la pantalla, utilice un filtro antirreflectante.
• Limpie la superficie del monitor con pantalla de cristal líquido con un paño sin hilachas y no abrasivo. No utilice líquidos
limpiadores ni limpiacristales.
• Ajuste los controles de brillo y contraste del monitor para mejorar la legibilidad.
• Utilice un atril para documentos y colóquelo cerca de la pantalla.
• Coloque aquello en lo que más fija la vista (la pantalla o el material de referencia) directamente en frente de usted para evitar
tener la cabeza girada al teclear.
MONITOR, COMPRUEBE LO SIGUIENTE:
Español-9
05_Spain 30/10/2002, 11:329
Page 56

• Evite visualizar patrones fijos en el monitor durante largos períodos de tiempo. De ese modo, evitará la persistencia de la imagen
(efectos post-imagen).
• Revise su vista con regularidad.
Ergonomía
Para conseguir las máximas ventajas ergonómicas, recomendamos que:
• Utilice los controles Tamaño y Posición predefinidos con señales estándar.
• Utilice la configuración de color predefinida.
• Utilice señales no entrelazadas con un velocidad de regeneración de la imagen vertical de 60-75 Hz.
• No utilice el color azul primario en un fondo oscuro, ya que no se ve fácilmente y dado que el contraste es insuficiente, podría
provocarle fatiga en los ojos.
05_Spain 30/10/2002, 11:3210
Español-10
Page 57

AVERTISSEMENT
POUR ÉVITER LES RISQUES D’INCENDIE OU D’ÉLECTROCUTION, N’EXPOSEZ PAS L’APPAREIL À LA PLUIE OU À
L’HUMIDITÉ. DE MÊME, N’UTILISEZ PAS LA PRISE POLARISÉE DE CET APPAREIL AVEC UNE RALLONGE OU
D’AUTRES PRISES SI ELLES NE PEUVENT ÊTRE TOTALEMENT ENFONCÉES.
N’OUVREZ PAS LE BOÎTIER CAR IL CONTIENT DES COMPOSANTS À HAUTE TENSION. CONFIEZ TOUS LES
TRAVAUX DE DÉPANNAGE AU PERSONNEL TECHNIQUE QUALIFIÉ.
ATTENTION
RISQUE D’ÉLECTROCUTION • NE PAS OUVRIR
ATTENTION : POUR RÉDUIRE LES RISQUES D’ÉLECTROCUTION, N’ENLEVEZ PAS LE CAPOT (OU L’ARRIÈRE).
VOUS NE POUVEZ RÉPARER AUCUNE PIÈCE INTERNE. CONFIEZ TOUS LES TRAVAUX DE
DÉPANNAGE AU PERSONNEL TECHNIQUE QUALIFIÉ.
Ce symbole prévient l’utilisateur qu’une tension non isolée dans l’appareil peut être suffisante pour provoquer
une électrocution. Il est donc dangereux d’établir le moindre contact avec une pièce dans cet appareil.
Ce symbole prévient l’utilisateur que des documents importants sur l’utilisation et le dépannage de cet
appareil ont été inclus. Ils doivent donc être lus attentivement pour éviter tout problème.
Attention :
Pour utiliser le modèle LCD1701 avec une alimentation 220-240 V CA en Europe, utilisez le cordon d’alimentation livré avec
le moniteur.
Au Royaume Uni, un cordon d’alimentation approuvé BS avec prise moulée est équipé d’un fusible noir (5 A) installé pour
l’utilisation avec cet équipement. Si le cordon d’alimentation n’a pas été livré avec cet équipement, veuillez contacter votre
fournisseur.
Dans tous les autres cas, utilisez un cordon d’alimentation conforme aux normes de sécurité et à la tension en vigueur dans
votre pays.
Déclaration
Déclaration du constructeur
Nous certifions par le présent document
que le moniteur couleur LCD1701 (L172EN)
est conforme à
la directive européenne 73/23/EEC :
– EN 60950
la directive européenne 89/336/EEC :
– EN 55022
– EN 61000-3-2
– EN 61000-3-3
– EN 55024
En tant que partenaire d’ENERGY STA R®, NEC-Mitsubishi Electric Visual Systems Corp. juge ce produit conforme aux directives
d’ENERGY STA R sur l’efficacité énergétique. ENERGY STAR est une marque déposée aux États-Unis.
ErgoDesign est une marque déposée de NEC-Mitsubishi Electric Visual Systems Corporation en Autriche, au Bénélux, au
Danemark, en France, en Allemagne, en Italie, en Norvège, en Espagne, en Suède, et au Royaume-Uni.
IBM PC/XT/AT, PS/2, MCGA, VGA, 8514/A et XGA sont des marques commerciales déposées d’International Business
Machines Corporation.
Apple et Macintosh sont des marques déposées d’Apple Computer Inc.
Microsoft et Windows sont des marques déposées de Microsoft Corporation.
NEC est une marque déposée de NEC Corporation.
Toutes les autres marques commerciales ou déposées appartiennent à leurs propriétaires respectifs.
sous la marque suivante :
NEC-Mitsubishi Electric Visual
Systems, Corp.
MS Shibaura Bldg., 13-23,
Shibaura 4-chome,
Minato-Ku, Tokyo 108-0023, JAPON
Français
06_French 30/10/2002, 11:321
Français-1
Page 58

Sommaire
L’emballage* de votre nouveau moniteur LCD NEC doit contenir les éléments suivants :
• Moniteur LCD1701 avec socle inclinable
• Cordon d’alimentation
• Câble de signal vidéo
• Manuel de l’utilisateur
• CD-ROM (comprenant le manuel utilisateur complet au format PDF).
Vous devez disposer de la version 4.0 d’Acrobat Reader sur votre PC
pour afficher le manuel de l’utilisateur.
*
N’oubliez pas de conserver la boîte et le matériel d’emballage d’origine pour transporter ou expédier le moniteur.
Mise en marche rapide
Pour connecter le moniteur LCD à votre système, suivez ces instructions :
1. Éteignez votre ordinateur.
2. Retirez le couvercle du câble.
3. Pour PC: Branchez le mini-connecteur D-SUB à 15 broches du câble vidéo approprié sur le connecteur de la carte vidéo
de votre ordinateur (Figure A.1). Serrez toutes les vis.
Pour Mac: Branchez l’adaptateur de câble pour Macintosh du LCD1701 à l’ordinateur (Figure B.1). Branchez le
mini-connecteur D-SUB à 15 broches du câble vidéo approprié à l’adaptateur de câble pour Macintosh du LCD1701
(Figure B.1). Serrez toutes les vis.
Adaptateur de
câble pour Mac
(non fourni)
Les Macintosh G3 et G4
n’ont pas besoin d’un
adaptateur de câble pour
Figure A.1
4. Branchez le mini-connecteur D-SUB à 15 broches du câble vidéo au connecteur approprié à l’arrière du moniteur
(Figure C.1).
5. Connectez une extrémité du cordon d’alimentation au moniteur LCD1701 et l’autre à la prise de courant. Placez le câble de
signal vidéo et le cordon d'alimentation CA sous le couvercle du câble (Figure C.1). Reposez le couvercle du câble.
REMARQUE : Réglez la position du câble sous le couvercle du câble pour éviter d’endommager le câble ou le moniteur.
Comme indiqué (Figure C.1) veuillez régler les câbles pour placer le noyau de ferrite et le bouchon au-dessus
du cache du câble.
REMARQUE : Reportez-vous à la section Attention de ce manuel pour le choix d’un cordon d’alimentation CA adapté.
Français-2
06_French 30/10/2002, 11:322
Figure B.1
Macintosh
Page 59

Noyau de ferrite
Cache-câbles
Bouchon
Figure C.1
6. L’interrupteur de vacances sur le coté droit du moniteur doit être mis (Figure D.1) en marche. Allumez le moniteur avec le
bouton d’alimentation et l’ordinateur.
REMARQUE : L’interrupteur de vacances est un vrai interrupteur marche/arrêt. Si cet interrupteur est sur la position ARRET,
le moniteur ne peut pas être allumé en utilisant le bouton frontal. Ne pas changer de position à plusieures
reprises.
Français
Interrupteur de vacances
Bouton d’alimentation
Figure D.1
7. Le réglage automatique sans touche règle automatiquement le moniteur avec les paramètres optimaux en fonction de la
configuration initiale pour la plupart des résolutions. Pour des réglages supplémentaires, utilisez les commandes OSM
suivantes :
• Contraste automatique
• Réglage automatique
Reportez-vous à la section Commandes de ce manuel de l’utilisateur pour une description complète de ces commandes OSM.
REMARQUE : Si vous rencontrez des problèmes, veuillez vous reporter à la section Résolution des problèmes de ce
manuel de l’utilisateur.
Français-3
06_French 30/10/2002, 11:323
Page 60

Inclinaison et pivotement
Maintenez les deux côtés du moniteur, puis ajustez l’inclinaison et l’orientation à votre convenance (Figure TS.1).
Dépose du support du moniteur pour montage
Pour préparer le moniteur à un autre montage :
1. Déconnectez tous les câbles.
2. Placez le moniteur face vers le bas sur une surface non abrasive (Figure R.1).
3. Retirez le couvercle à charnières (Figure R.1).
4. Déposez les quatre vis connectant le moniteur au support et soulevez l’ensemble support (Figure R.2), vous pouvez
maintenant monter autrement le moniteur.
5. Connectez le cordon d’alimentation AC et le câble de signal à l’arrière du moniteur (Figure R.3).
6. Inversez cette procédure pour fixer à nouveau le support.
REMARQUE : Utilisez uniquement une méthode de montage alternative compatible VESA.
Manipulez avec soin, en retirant le support du moniteur.
Figure TS.1
Couvercle
06_French 30/10/2002, 11:324
Surface non abrasive
Figure R.1
Français-4
Page 61

Figure R.3Figure R.2
7. Ce moniteur LCD est conçu pour être utilisé avec une bras fléxible. Veuillez utiliser les vis fournies (4) pour le montage.
Afin de respecter les prescriptions relatives à la sécurité, le moniteur doit être monté sur un bras garantissant la stabilité
nécessaire en fonction du poids du moniteur. Le moniteur LCD doit être uniquement utilisé avec un bras homologué (par
exemple, portant la marque GS).
Replacez les vis
Epaisseur du
support (bras)
2,0 à 3,2 mm
Serrez toutes les vis
100 mm
Français
Spécifications
06_French 30/10/2002, 11:325
100 mm
4 VIS (M4)
(Profondeur MAX. : 8,5 mm)
Avec d’autres vis,
vérifier la profondeur
du trou.
Poids de l’assemblage du LCD : 4,6kg (MAXI.)
Français-5
Page 62

Commandes
Les commandes OSM (On-Screen-Manager – Gestionnaire à l’écran)
Les commandes OSM à l’avant du moniteur fonctionnent comme suit :
Pour accéder à l’OSM, pressez l’un de ces boutons de commande (<, >, -, +, EXIT).
Commande
EXIT
>
< /
- / +
SELECT
RESET
REMARQUE : Quand vous appuyez sur RESET dans le menu principal ou dans un sous-menu, une fenêtre d’avertissement
Menu
Quitte les commandes OSM.
Revient au menu principal OSM.
Déplace la zone en surbrillance vers la gauche ou la droite pour choisir un menu de commande.
Déplace la zone en surbrillance vers le haut ou vers le bas pour choisir l’une des commandes.
Déplace la barre vers la gauche ou la droite pour augmenter ou diminuer le réglage.
Active la fonction de réglage automatique. Entrez les commandes OSM.
Entrez le sous-menu de OSM.
Réinitialise le menu de commandes en surbrillance aux réglages d’usine.
apparaît pour vous permettre d’annuler la fonction de réinitialisation en appuyant sur le bouton EXIT.
Commandes de luminosité et de contraste
LUMINOSITÉ
Règle la luminosité globale de l’image et du fond de l’écran.
CONTRASTE
Règle la luminosité de l’image en fonction du fond.
RÉGLAGE AUTO
Règle l’image affichée pour des entrées vidéo non standard.
Réglage automatique
Règle automatiquement la position de l’image, la dimension horizontale et la finesse.
Commandes de position
GAUCHE/DROITE
Contrôle la position horizontale de l’image dans la zone d’affichage du LCD.
BAS/HAUT
Contrôle la position verticale de l’image dans la zone d’affichage du LCD.
SIMPLE
Règle la largeur en augmentant ou diminuant ce paramètre.
Si la fonction « Réglage auto » ne vous donne pas un réglage satisfaisant de l’image, il est possible
d’effectuer un réglage supplémentaire avec la fonction « Largeur » (par points). Pour cela, un motif de test
moiré peut être utilisé. Cette fonction peut modifier la largeur de l’image. Utilisez le menu gauche/droite
pour centrer l’image sur l’écran. Si la largeur est mal calibrée, le résultat sera semblable à celui du dessin
ci-contre. L’image doit être homogène.
Lorsque SIMPLE est
incorrect.
Lorsque SIMPLE est
amélioré.
Lorsque SIMPLE est
correct.
06_French 30/10/2002, 11:326
Français-6
Page 63

FIN
Améliore le point, la clarté et la stabilité de l’image en augmentant ou diminuant ce paramètre.
Si les fonctions « Réglage auto » et « Largeur » ne vous donnent pas un réglage satisfaisant de l’image,
vous pouvez la régler avec précision à l'aide de la fonction « Fin ». Vous pouvez améliorer la netteté, la
clarté et la stabilité de l’image en augmentant ou diminuant ce paramétre.
Pour cela, un motif de test moiré peut être utilisé. Si la valeur fine est mal calibrée, le résultat sera
semblable à celui du dessin ci-contre. L’image devrait être homogéne.
Lorsque la valeur FIN
est incorrecte.
Système de contrôle des couleurs
Six préréglages des couleurs vous permettent de sélectionner le réglage des couleurs de votre choix (les
préréglages sRGB et NATIVE sont des standards et ne peuvent pas être modifiés).
R, V, B
Augmente ou diminue le niveau des couleurs Rouge, Vert ou Bleu, suivant celui qui a été sélectionné.
Le changement de couleur apparaît à l’écran et le sens ( augmentation ou diminution ) est indiqué par les
barres.
sRGB
Le mode sRGB améliore considérablement la fidélité des couleurs dans l’environnement du bureau par un
seul espace de couleurs RVB standard. Avec cet environnement de couleurs pris en charge, l’opérateur
peut facilement communiquer des couleurs en toute confiance sans recourir à la gestion étendue des
couleurs, dans la plupart des situations courantes.
NATIVE
La couleur d’origine présentée par le panneau LCD et qui est indéréglable.
Outils
LANGAGE
Les menus des commandes OSM sont disponibles en sept langues.
Lorsque la valeur FIN
est correcte.
Français
POSITION DE L’OSM
Vous pouvez choisir l’emplacement de la fenêtre de commandes OSM à l’écran. En choisissant Position
OSM, vous pouvez régler manuellement la position du menu des commandes OSM : gauche, droit, haut ou
bas.
EXTINCTION DE L’OSM
Le menu des commandes OSM reste à l’écran aussi longtemps qu’il est utilisé. Dans le sous-menu
Extinction OSM, vous pouvez choisir la durée d’attente du moniteur entre la dernière pression de touche et
l’extinction du menu des commandes OSM. Les choix possibles sont : 10, 20, 30, 45, 60 et 120 secondes.
VERROUILLAGE OSM
Cette commande bloque totalement l’accès à toutes les fonctions des commandes OSM, sauf la luminosité
et le contraste. Si l’on essaye d’activer des commandes OSM en mode VERROUILLE, un écran apparaît
indiquant que les commandes OSM sont verrouillées. Pour activer la fonction de verrouillage OSM,
appuyez sur SELECT, puis sur les touches « + » et maintenez-les enfoncés. Pour désactiver la fonction de
verrouillage OSM, appuyez sur SELECT, et sur les touches « + » et maintenez-les enfoncés.
ERREUR RESOLUTION
La résolution optimale est de 1280 x 1024. Si MARCHE est choisi, un message apparaît à l’écran après
30 secondes, vous avertissant que la résolution n’est pas à 1280 x 1024.
TOUCHE DE RACCOURCI
Vous pouvez régler directement la luminosité et le contraste. Lorsque le menu est activé, vous pouvez régler
la luminosité avec < ou >. Lorsque le menu est désactivé, utilisez les touches + ou - pour régler le contraste.
Le menu OSM par défaut est accessible à l’aide du bouton EXIT.
06_French 30/10/2002, 11:327
Français-7
Page 64

PROGRAMMATEUR ARRÊT
Le moniteur sera mis automatiquement hors tension lorsque l'utilisateur final sélectionne un laps de temps
préréglé.
PRÉRÉGLAGE USINE
En choisissant Préréglage usine, vous pouvez rétablir les réglages d’usine pour tous les paramètres des
commandes OSM. Pour ce faire, maintenez enfoncé le bouton RESET plusieurs secondes. Les réglages
individuels peuvent être réinitialisés en mettant la commande concernée en surbrillance et en appuyant sur
le bouton RESET.
Informations
MODE D’AFFICHAGE
Indique la résolution d’affichage et les paramètres de fréquence en cours pour le moniteur.
INFORMATION ÉCRAN
indique le nom du modèle et les numéros de série de votre moniteur.
Avertissements OSM
Les menus Avertissements OSM disparaissent avec le bouton Exit.
PAS DE SIGNAL : Cette fonction vous avertit quand il n’y a pas de signal. Si l’alimentation est allumée, s’il
y a modification du signal d’entrée ou si la vidéo est inactive, le message Pas de signal apparaît.
ERREUR RESOLUTION : Cette fonction vous avertit de l’utilisation en résolution optimisée. Si
l’alimentation est allumée, s’il y a modification du signal d’entrée ou si le signal vidéo ne présente pas de
résolution appropriée, la fenêtre ERREUR RESOLUTION apparaît. Cette fonction peut être désactivée
dans le menu OUTILS.
HORS LIMITE : Cette fonction vous renseigne sur la résolution optimisée et le taux de rafraîchissement. Si
l’alimentation est allumée, s’il y a modification du signal d’entrée ou si le signal vidéo ne présente pas de
calage approprié, le menu Hors limite apparaît.
06_French 30/10/2002, 11:328
Français-8
Page 65

Conseils d’utilisation
Consignes de sécurité et d’entretien
POUR UN FONCTIONNEMENT OPTIMAL, VEUILLEZ RESPECTER
LES INDICATIONS SUIVANTES SUR LE RÉGLAGE ET
L’UTILISATION DU MONITEUR COULEUR MULTISYNC LCD :
• N’OUVREZ JAMAIS LE BOÎTIER DU MONITEUR. Aucune pièce interne ne peut être réparée par l’utilisateur et l’ouverture ou la
dépose des capots peut vous exposer à des risques d’électrocution ou autres. Confiez tous les travaux de dépannage à du
personnel technique qualifié.
• Ne renversez pas de liquides dans le moniteur et ne l’utilisez pas près d’une source d’eau.
• N’introduisez pas d’objets de quelque nature que ce soit dans les fentes du boîtier car ceux-ci pourraient toucher des endroits
sous tension dangereuse, ce qui peut provoquer des blessures, voire être fatal, ou peut occasionner une décharge électrique, un
incendie ou une panne de l’appareil.
• Ne placez pas d’objets lourds sur le cordon d’alimentation. Un cordon endommagé peut occasionner une décharge électrique ou
un incendie.
• Ne placez pas cet appareil sur un chariot, un support ou une table inclinés ou instables, car si le moniteur tombe, il peut être
sérieusement endommagé.
• Ne placez aucun objet sur le moniteur et ne l’utilisez pas en extérieur.
• L’intérieur du tube fluorescent situé dans le moniteur LCD contient du mercure. Veuillez suivre les lois ou réglementations de
votre localité pour jeter correctement ce tube.
Débranchez immédiatement le moniteur de la prise murale et confiez la réparation à du personnel technique qualifié dans les cas
suivants :
• Si le cordon d’alimentation ou la prise est endommagé(e).
• Si du liquide a été renversé ou si des objets sont tombés à l’intérieur du moniteur.
• Si le moniteur a été exposé à la pluie ou à de l’eau.
• Si le moniteur est tombé ou si le boîtier est endommagé.
• Si le moniteur ne fonctionne pas normalement en suivant les directives d’utilisation.
• Ne pliez pas le cordon d’alimentation.
• N’utilisez pas votre moniteur dans des endroits à hautes températures, humides, poussiéreux ou huileux.
• N’obstruez pas les aérations du moniteur.
• Si le moniteur est cassé, ne touchez pas le cristal liquide.
• Si le verre est cassé, manipulez le moniteur avec précaution.
• Prévoyez une aération suffisante autour du moniteur pour que la chaleur puisse se dissiper correctement.
N’obstruez pas les ouvertures de ventilation et ne placez pas le moniteur près d’un radiateur ou d’une autre
source de chaleur. Ne posez rien sur le moniteur.
ATTENTION
• Persistance de l’image : la persistance de l’image se présente lorsqu’une image résiduelle ou « fantôme » d’une image
précédente reste visible sur l'écran. Contrairement aux moniteurs à tube cathodique, la persistance de le l’image des moniteurs
LCD n'est pas permanente, mais l’affichage d'images constantes pendant une longue période de temps doit être évitée.
Pour remédier à la persistance de l’image, mettez le moniteur hors tension pendant une durée égale à celle de l’affichage de
l’image précédente. Par exemple, si une image est restée affichée sur l’écran pendant une heure et qu’il reste une image
résiduelle, le moniteur doit être mis hors tension pendant une heure pour effacer l’image.
REMARQUE : Comme pour tous les équipements d’affichage personnels, NEC-Mitsubishi Electronics Display-Europe
recommande l’utilisation d’un économiseur d’écran mobile à des intervalles réguliers, à chaque fois que l'écran est en veille, ou
d'éteindre le moniteur lorsqu’il n’est pas utilisé.
• La prise du cordon d’alimentation est le moyen principal de débrancher le système de l’alimentation électrique.
Le moniteur doit être installé à proximité d’une prise de courant facilement accessible.
• Manipulez avec soin lors du transport. Conservez l’emballage pour le transport.
UNE POSITION ET UN RÉGLAGE CORRECTS DU MONITEUR PEUVENT
RÉDUIRE LA FATIGUE DES YEUX, DES ÉPAULES ET DE LA NUQUE.
APPLIQUEZ CE QUI SUIT POUR POSITIONNER LE MONITEUR :
Français
• Pour une performance optimale, laissez le moniteur chauffer pendant 20 minutes.
• Réglez la hauteur du moniteur pour que le haut de l’écran soit au niveau ou légèrement au-
dessous du niveau des yeux. Vos yeux doivent pointer légèrement vers le bas pour regarder
le milieu de l’écran.
• Positionnez le moniteur au minimum à 40 cm et au maximum à 70 cm de vos yeux. La
distance optimale est 50 cm.
• Reposez vos yeux régulièrement en regardant un objet situé à au moins 6 mètres. Clignez
souvent des yeux.
• Placez le moniteur à un angle de 90° par rapport aux fenêtres et autres sources de lumière
pour réduire au maximum les reflets et l’éblouissement. Réglez l’inclinaison du moniteur
pour que l’éclairage du plafond ne soit pas reflété par l’écran.
• Si une lumière réfléchie rend la vision de l’écran difficile, utilisez un filtre antireflet.
• Nettoyez le moniteur LCD avec un chiffon sans peluches et non abrasif. N’utilisez pas de
solution de nettoyage ou de nettoyant pour vitres !
• Réglez les commandes de luminosité et de contraste du moniteur pour améliorer la lisibilité.
• Utilisez un support de documents placé près de l’écran.
• Positionnez ce que vous regardez le plus souvent (l’écran ou les documents de référence) directement devant vous pour
minimiser les mouvements de la tête lorsque vous tapez.
Français-9
06_French 30/10/2002, 11:329
Page 66

• Evitez d’afficher des motifs fixes sur l’écran pendant de longues périodes pour éviter la rémanence (persistance de l’image).
• Consultez régulièrement un ophtalmologiste.
Ergonomie
Pour obtenir une ergonomie maximale, nous recommandons ce qui suit :
• Utilisez les commandes de taille et de position préprogrammées avec des signaux standard.
• Utilisez le réglage couleur préprogrammé.
• Utilisez des signaux non entrelacés avec une fréquence de rafraîchissement vertical de 60 à 75 Hz.
• N’utilisez pas du bleu primaire sur un fond sombre car cela rend la lecture difficile et peut occasionner une fatigue oculaire par un
contraste insuffisant.
06_French 30/10/2002, 11:3210
Français-10
Page 67

AVVISO
PER EVITARE PERICOLO DI INCENDI O DI SCOSSE ELETTRICHE, NON ESPORRE L’UNITA’ A PIOGGIA O UMIDITA’.
INOLTRE, NON USARE LA SPINA POLARIZZATA DELL’UNITA’ CON UNA PRESA DI CAVO DI PROLUNGA O ALTRE
PRESE, A MENO CHE I POLI DELLA SPINA SI INSERISCANO COMPLETAMENTE.
NON APRIRE LA CARROZZERIA POICHE’ ALL’INTERNO VI SONO COMPONENTI SOTTO ALTA TENSIONE. PER LA
MANUTENZIONE RIVOLGERSI A PERSONALE DI MANUTENZIONE QUALIFICATO.
ATTENZIONE
PERICOLO DI SCOSSA ELETTRICA • NON APRIRE
ATTENZIONE: PER EVITARE IL RISCHIO DI SCOSSA ELETTRICA, NON TOGLIERE IL COPERCHIO (O LA
COPERTURA POSTERIORE). ALL’INTERNO NON VI SONO PARTI MANUTENIBILI DALL’UTENTE. PER
LA MANUTENZIONE RIVOLGERSI A PERSONALE DI MANUTENZIONE QUALIFICATO.
Questo simbolo avverte l’utente che tensioni non isolate all’interno dell’unità possono essere
sufficientemente elevate da provocare scossa elettrica. Pertanto è pericoloso avere qualsiasi tipo di
contatto con un componente interno all’unità.
Questo simbolo avverte l’utente che sono state incluse importanti informazioni relative al funzionamento
ed alla manutenzione dell’unità. Pertanto esse devono essere lette attentamente al fine di evitare
l’insorgere di problemi.
Attenzione:
Quando si lavora con il LCD1701 con alimentazione da 220-240 V c.a. in Europa, utilizzare il cavo di alimentazione fornito
insieme al monitor.
In UK utilizzare il cavo di alimentazione con spina fusa approvato BS con tappo stampato, dotato di un fusibile nero (5 A)
installato per l’uso insieme a questa apparecchiatura. Se con l’apparecchiatura non viene fornito tale cavo di alimentazione,
contattare il proprio fornitore.
Per tutti gli altri casi, utilizzare un cavo di alimentazione adatto alla tensione alternata della presa di alimentazione, approvato
e conforme allo standard di sicurezza del proprio Paese.
Dichiarazione
Dichiarazione del Costruttore
Qui si certifica che il monitor a colori LCD1701
(L172EN) corrisponde alle norme
Direttiva del Consiglio Europeo 73/23/CEE:
– EN 60950
Direttiva del Consiglio Europeo 89/336/CEE:
– EN 55022
– EN 61000-3-2
– EN 61000-3-3
– EN 55024
In qualità di partner ENERGY STA R®, NEC-Mitsubishi Electric Visual Systems Corp. ha stabilito che questo prodotto soddisfa le
direttive di efficienza energetica ENERGY STAR . ENERGY STA R è un marchio registrato U.S.A.
ErgoDesign è un marchio registrato di NEC-Mitsubishi Electric Visual Systems Corporation in Austria, Benelux, Danimarca,
Francia, Germania, Italia, Norvegia, Spagna, Svezia e Regno Unito.
IBM PC/XT/AT, PS/2, MCGA, VGA, 8514/A e XGA sono marchi registrati di International Business Machines Corporation.
Apple and Macintosh sono marchi registrati di Apple Computer Inc.
Microsoft e Windows sono marchi registrati di Microsoft Corporation.
NEC è un marchio registrato di NEC Corporation.
Tutti gli altri marchi di fabbrica o marchi registrati sono proprietà dei loro rispettivi proprietari.
Italiano-1
ed è contrassegnato con
NEC-Mitsubishi Electric Visual
Systems, Corp.
MS Shibaura Bldg., 13-23,
Shibaura 4-chome,
Minato-Ku, Tokyo 108-0023, Japan
Italiano
07_Italian 30/10/2002, 11:321
Page 68

Contenuto
La confezione del vostro nuovo monitor LCD NEC* deve contenere quanto segue:
• Monitor LCD1701 con base inclinabile
• Cavo di alimentazione
• Cavo segnali video
• Manuale Utente
• CD ROM (contiene il Manuale Utente completo in formato PDF).
Per visualizzare il manuale utente occorre installare Acrobat Reader 4.0
sul proprio PC.
*
Conservare la confezione ed il materiale di imballaggio originali dopo il trasporto o la spedizione del monitor.
Guida rapida
Per collegare il monitor LCD al sistema, seguire le seguenti istruzioni:
1. Spegnere il computer.
2. Rimuovere la copertura cavi.
3. Per PC: Collegare il mini D-SUB a 15 pin del cavo segnale appropriato al connettore della scheda video del sistema
(Figura A.1). Serrare tutte le viti.
Per Mac: Collegare l’adattatore cavo LCD1701 Macintosh al computer (Figura B.1). Collegare il connettore del mini
D-SUB a 15 pin del cavo segnale appropriato all’adattatore cavo LCD1701 Macintosh (Figura B.1). Stringere tutte le viti.
Adattatore cavo
Macintosh (non
incluso)
I Macintosh G3 e G4 non
necessitano di un
adattatore cavo Macintosh
Figura A.1
Figura B.1
4. Collegare il mini D-SUB a 15 pin del cavo segnali video all’appropriato connettore sul retro del monitor (Figura C.1).
5. Collegare un’estremità del cavo di alimentazione al monitor LCD1701 e l’altra estremità alla presa di alimentazione. Mettere il
cavo segnali video e il cavo di alimentazione c.a. sotto la copertura cavi (Figura C.1). Sostituire la copertura cavi.
NOTA: Regolare la posizione del cavo sotto la copertura cavi per evitare di danneggiare il cavo o il monitor.
Come si vede dalla figura C.1, posizionare i cavi in modo da collocare il nucleo di ferrite e il fermo sopra la
copertura del cavo.
NOTA: Fare riferimento alla sezione “Attenzione” di questo manuale per una scelta corretta del cavo di alimentazione c.a.
Italiano-2
07_Italian 30/10/2002, 11:322
Page 69

Nucleo di ferrite
Coperchio cavi
Fermo
Figura C.1
6. L’interruttore “Vacanza” sul lato destro del monitor deve essere in condizione ON (Figura D.1). Accendere il monitor e il
computer con il pulsante di alimentazione.
NOTA: L’interruttore “Vacanza” è un vero e proprio interruttore. Se l’interruttore è sulla posizione OFF, il monitor non può
essere attivato usando il pulsante della parte frontale. NON premerlo ripetutamente.
Interruttore “Vacanza”
Pulsante di alimentazione
Figura D.1
7. La regolazione completamente automatica imposta automaticamente il monitor in modo ottimale in base alla configurazione
iniziale per la maggior parte delle frequenze di scansione. Per ulteriori regolazioni, usare i seguenti controlli OSM:
• Regolazione automatica del contrasto
• Regolazione automatica
Vedi la sezione Controlli di questo Manuale Utente per una descrizione completa di questi controlli OSM.
NOTA: Per qualsiasi problema, vedere la sezione Ricerca guasti di questo manuale utente.
Italiano-3
Italiano
07_Italian 30/10/2002, 11:323
Page 70

Inclinabile e girevole
Afferrare con le mani i due lati dello schermo del monitor e inclinare e ruotare a piacere (Figura TS.1).
Rimozione del supporto monitor per montaggio
Per predisporre il monitor a un diverso montaggio:
1. Scollegare tutti i cavi.
2. Sistemare il monitor a faccia in giù su una superficie non abrasiva (Figura R.1).
3. Rimuovere la copertura della cerniera (Figura R.1).
4. Togliere le 4 viti che fissano il monitor al supporto e sollevare il gruppo supporto (Figura R.2), il monitor ora è pronto per
un diverso montaggio.
5. Collegare il cavo AC e il cavo segnali sul retro del monitor (Figura R.3).
6. Per rimontare sul supporto, ripetere queste operazioni nell’ordine inverso.
NOTA: Utilizzare esclusivamente un metodo di fissaggio alternativo compatibile VESA.
Manipolare con cura quando si rimuove il supporto del monitor.
Figura TS.1
Copertura della cerniera
Superficie non abrasiva
07_Italian 30/10/2002, 11:324
Figura R.1
Italiano-4
Page 71

Figura R.3Figura R.2
7. Il monitor LCD è progettato per uso con braccio flessibile. Per il montaggio utilizzare le viti fornite (4 pezzi). Per adempiere
ai requisiti di sicurezza, il monitor deve essere montato su un braccio che garantisca la necessaria stabilità in
considerazione del peso del monitor. Il monitor LCD deve essere utilizzato esclusivamente con un braccio di tipo
approvato (per es. marchio GS).
Sostituire le viti
Spessore
del supporto (braccio)
2,0 ~ 3,2 mm
Serrare tutte le viti
100 mm
Italiano
Specifiche tecniche
07_Italian 30/10/2002, 11:325
100 mm
4 VITI (M4)
(MASSIMA profondità: 8,5 mm)
Se si utilizza un’altra
vite, verificare la
profondità del foro.
Peso del gruppo LCD: 4.6kg (MASSIMO)
Italiano-5
Page 72

Controlli
Controlli OSM (On-Screen-Manager)
I controlli OSM sul davanti del monitor operano come segue:
Per accedere all’OSM premere qualunque pulsante di comando (<, >, -, +, EXIT).
Controllo
EXIT
>
< /
- / +
SELECT
RESET
NOTA: Quando si preme RESET nel menu principale e nel sottomenu, compare la finestra di avviso che permette di
annullare la funzione di RESET premendo il pulsante EXIT.
Menu
Esce dai controlli OSM.
Esce dal menu principale OSM.
Sposta l’area evidenziata a sinistra o a destra per selezionare i menu di controllo.
Sposta l’area evidenziata in alto/in basso per selezionare uno dei comandi.
Sposta la barra a sinistra o destra per aumentare o diminuire la regolazione.
Avvia la funzione AUTO AGGIUST. Avvia i controlli OSM.
Avvia il sotto menu OSM.
Ripristina il menu di comando selezionato alle impostazioni di fabbrica.
Controlli Luminosità/Contrasto
LUMINOSITÀ
Regola la luminosità dell’immagine e dello schermo.
CONTRASTO
Regola la luminosità dell’immagine in relazione allo sfondo.
AUTO AGGIUST
Regola l’immagine visualizzata per input video non standard.
Regolazione automatica
Regola automaticamente la posizione immagine, la dimensione orizzontale e la regolazione di precisione.
Controlli di posizione
SIN./DEST.
Controlla la posizione orizzontale dell'immagine all’interno dell'area di visualizzazione dell’LCD.
GIÙ/SU
Controlla la posizione verticale dell’immagine all’interno dell'area di visualizzazione dell’LCD.
RAPIDA
Aumentando o diminuendo questa impostazione, si regola la dimensione orizzontale.
Nel caso in cui la funzione di “AUTO AGGIUST” non dovesse fornire un livello soddisfacente di regolazion
delle immagini, è possible eseguire la sintonizzazione utilizzando la fuzione “Dimens. Orizz.” (dot clock).
Per questa funzione si può utilizzare la configurazione di test Moiré. Questa funzione può modificare la
larghezza dell'immagine. Usare il menu Sin./Dest. per centrare l’immagine sullo schermo. Se la funzione
Dimens. Orizz. non viene calibrata correttamente, il risultato può risultare molto simile a quanto riportato in
questo disegno. L’immagine deve risultare omogenea.
07_Italian 30/10/2002, 11:326
Quando Dimens. Orizz. è
errata.
Quando Dimens. Orizz. è
migliorata.
Italiano-6
Quando Dimens. Orizz. è
corretta.
Page 73

FINE
Aumentando o diminuendo questa impostazione, si migliorano messa a fuoco, nitidezza e stabilità
dell’immagine.
Nel caso in cui la funzione AUTO AGGIUST. e la funzione DIMENS. ORIZZ. non dovessero fornire
un’impostazione soddisfacente dell’immagine, è possible eseguire una sintonizzazione di precisione
usando la funzione “FINE”. Aumentando o diminuendo questa impostazione, si migliorano la messa a
fuoco, la nitidezza e la stabilità dell’immagine.
Per questa funzione si può utilizzare la configurazione di test Moiré. Se la funzione FINE non viene
calibrata correttamente, il risultato portrebbe essere molto simile a quanto riportato a sinistra in questo
disegno. L’immagine deve risultare omogenea.
Quando il valore FINE è
Sistemi di controllo del colore
L’impostazione di colore desiderata è selezionata attraverso la predisposizione di sei colori (le impostazioni
sRGB e NATIVO sono standard e non possono essere modificate).
R, G, B
Aumenta o diminuisce il rosso, il verde o il blu a seconda dell’elemento selezionato. Il cambiamento del
colore compare sullo schermo e la direzione (aumento o diminuzione) sarà evidenziata dalle barre.
sRGB
In ambiente desktop la modalità sRGB aumenta notevolmente la fedeltà del colore di un singolo spazio
colore standard RGB. Con questo ambiente a colori, l’operatore può comunicare i colori nelle situazioni più
comuni ed in modo estremamente semplice senza il bisogno di una gestione dei colori a livello superiore.
NATIVO
Colore originale non regolabile presentato dal pannello LCD.
Strumenti
LINGUA
I menu di controllo OSM sono disponibili in sette diverse lingue.
POSIZIONE OSM
Si può scegliere dove si desidera venga visualizzata l’immagine di controllo OSM sullo schermo.
Selezionando la posizione OSM si può posizionare manualmente il menu di controllo OSM a sinistra, a
destra, in alto o in basso.
errato.
Quando il valore FINE è
corretto.
Italiano
TEMPO DI SPEGN. OSM
Il menu di controllo OSM rimarrà visualizzato finché è in uso. Nel sottomenu tempo di spegn. OSM, è
possibile selezionare l'intervallo di tempo passato il quale, nel caso non venga premuto nessun tasto,
scompare il menu OSM. Le scelte preimpostate sono di 10, 20, 30, 45, 60 e 120 secondi.
OSM BLOCCATO
Questo comando blocca l’accesso a tutte le funzioni di comando OSM ad eccezione di Luminosità e
Contrasto. Se si cerca di attivare i comandi OSM in modalità di blocco, compare una schermata indicante
che i comandi OSM sono bloccati. Per attivare la funzione di OSM bloccato, premere SELECT, quindi il
tasto “+” e tenerli premuti simultaneamente. Per disattivare la funzione di OSM bloccato, premere SELECT,
quindi il tasto “+” e tenerli premuti simultaneamente.
NOTIF. RISOLUZIONE
La risoluzione ottimale è di 1280 x 1024. Se è selezionato ON, sullo schermo dopo 30 secondi apparirà un
messaggio di notifica relativamente al fatto che la risoluzione non è 1280 x 1024.
TASTO SCELTA RAP.
La luminosità e il contrasto possono essere regolati direttamente. Quando questa funzione è abilitata,
si può regolare la luminosità con < o >, il contrasto con il tasto + o - mentre il menu OSM è disattivato.
È possibile accedere al menu OSM standard con il pulsante EXIT.
07_Italian 30/10/2002, 11:327
Italiano-7
Page 74

TEMPO SPEGN. AUT.
Il monitor si spegne automaticamente quando l'utente finale seleziona un predeterminato intervallo di
tempo.
CONFIG. DI FABBRICA
Selezionando Config. di fabbrica è possibile resettare tutte le impostazioni dei comandi OSM riportandole
alle configurazioni di fabbrica. Il pulsante RESET deve essere tenuto premuto per alcuni secondi per avere
effetto. È possibile resettare impostazioni individuali selezionando il relativo comando e premendo il
pulsante RESET.
Informazioni
MODALITÀ DISPLAY
Indica la risoluzione del display e l’impostazione in frequenza del monitor corrente.
MONITOR INFO.
Indica il modello e i numeri di serie del monitor.
Avvertenza OSM
I menu di avvertenza OSM scompaiono quando si preme il pulsante Exit.
NESSUN SEGNALE: Questa funzione avverte in caso non vi sia nessun segnale presente. Dopo
l’accensione o quando vi è un cambiamento del segnale di input o il video è inattivo, apparirà la finestra
Nessun Segnale.
NOTIF. RISOLUZIONE: Questa funzione consiglia l’utilizzo di una risoluzione ottimizzata. Dopo
l’accensione o quando vi è una variazione di segnale di input o il segnale video non ha la risoluzione
opportuna, si aprirà la finestra Notif. risoluzione. Questa funzione può essere disattivata nel menu
STRUMENTI.
FUORI TOLLERANZA: Questa funzione suggerisce la risoluzione e la frequenza di rinfresco ottimali. Dopo
aver attivato l’alimentazione, in caso di modifica del segnale di ingresso o se il segnale video non ha una
temporizzazione adatta, apparirà il menu Fuori tolleranza.
07_Italian 30/10/2002, 11:328
Italiano-8
Page 75

Uso consigliato
Precauzioni di sicurezza e manutenzione
PER UNA RESA OTTIMALE, ATTENERSI ALLE SEGUENTI
ISTRUZIONI PER L’INSTALLAZIONE E L’UTILIZZO
DEL MONITOR LCD A COLORI MULTISYNC:
• NON APRIRE IL MONITOR. All’interno non ci sono parti manutenibili dall’utente e l’apertura o la rimozione di coperture può
esporre a scosse pericolose o ad altri rischi. Per la manutenzione fare riferimento a personale di manutenzione qualificato.
• Non versare alcun liquido all’interno della carrozzeria, né usare il monitor vicino all’acqua.
• Non inserire alcun tipo di oggetto nelle fessure della carrozzeria, poiché esso potrebbe venire a contatto con punti a tensione
pericolosa, il che può essere dannoso o fatale o può causare scosse elettriche, incendio o guasto dell’apparecchiatura.
• Non appoggiare oggetti pesanti sul cavo di alimentazione. Il danneggiamento del cavo può provocare scosse o incendio.
• Non posare il prodotto su un carrello, un supporto o un tavolo inclinato o instabile. Il monitor potrebbe cadere
danneggiandosi seriamente.
• Non posare alcun oggetto sul monitor e non usarlo all’aperto.
• Il tubo fluorescente collocato nel monitor LCD contiene mercurio. Attenersi alle leggi o regolamenti dell’amministrazione
locale per smaltire adeguatamente questo tubo.
Scollegare immediatamente il monitor dalla presa a muro e rivolgersi a personale di manutenzione qualificato se si verificano
le seguenti condizioni:
• Il cavo di alimentazione o la presa sono danneggiati.
• E’ stato versato del liquido o sono caduti oggetti nel monitor.
• Il monitor è stato esposto a pioggia o acqua.
• Il monitor è stato fatto cadere o la carrozzeria è danneggiata.
• Il monitor non funziona regolarmente seguendo le istruzioni d’uso.
• Non piegare il cavo di alimentazione.
• Non usare il monitor in ambienti con alta temperatura, umidità, polverosi o oleosi.
• Non coprire le prese d’aria del monitor.
• Se il monitor è rotto, non toccare i cristalli liquidi.
• Se il vetro è rotto. Maneggiare con cura.
• Lasciare spazio attorno al monitor per una adeguata ventilazione per permettere la dissipazione del
calore. Non ostruire le aperture di ventilazione o mettere il monitor vicino a radiatori o altre fonti di calore.
Non mettere nulla sopra il monitor.
ATTENZIONE
• Persistenza dell’immagine: La persistenza dell’immagine si ha quando un residuo o un “fantasma” di un’immagine
precedente sono ancora visibili sulla schermo. A differenza dei monitor CRT, la persistenza immagine dei monitor LCD non
è permanente, ma bisogna evitare di visualizzare immagini costanti per lungo tempo.
Per eliminare la persistenza dell’immagine, spegnere il monitor per il tempo di visualizzazione dell’immagine precedente.
Ad esempio, se un’immagine è rimasta sul monitor per un’ora, lasciando un’immagine residua, il monitor deve essere
spento per un’ora per cancellare l’immagine.
NOTA: Come per tutti i dispositivi di visualizzazione, NEC-Mitsubishi Electronic Display Europe raccomanda di utilizzare a
intervalli regolari uno screen saver mobile quando lo schermo non è attivo o spegnere il monitor quando non viene
utilizzato.
• Il connettore del cavo di alimentazione è il mezzo principale per scollegare il sistema dalla rete di
alimentazione. Il monitor deve essere posto vicino ad una presa di alimentazione facilmente accessibile.
• Maneggiare con cura durante il trasporto. Conservare l’imballo per il trasporto.
IL CORRETTO POSIZIONAMENTO E REGOLAZIONE DEL
MONITOR RIDUCE L’AFFATICAMENTO DI OCCHI, SPALLE E COLLO.
NEL POSIZIONARE IL MONITOR, CONTROLLARE QUANTO SEGUE:
Italiano
• Per ottenere le prestazioni ottimali, attendere 20 minuti per il riscaldamento.
• Regolare l’altezza del monitor in modo che la parte alta dello schermo sia a livello degli
occhi o leggermente sotto. Guardando il centro dello schermo, gli occhi devono essere
rivolti leggermente verso il basso.
• Posizionare il monitor ad almeno 40 cm e a non più di 70 cm dagli occhi. La distanza
ottimale è 50 cm.
• Far riposare periodicamente gli occhi guardando un oggetto lontano almeno 6 metri.
Chiudere sovente gli occhi.
• Posizionare il monitor ad un angolo di 90° rispetto a finestre o altre sorgenti di luce per
ridurre il riflesso della luce sullo schermo. Regolare l’inclinazione del monitor in modo
che le luci del soffitto non si riflettano sullo schermo.
• Se la luce riflessa rende difficoltosa la visione dello schermo, usare un filtro anti riflesso.
• Pulire la superficie del monitor LCD con un panno senza pelo e non abrasivo. Non usare detersivi o pulivetro!
• Regolare i controlli di luminosità e contrasto del monitor per migliorare la leggibilità.
• Usare un supporto per documenti posto vicino allo schermo.
• Posizionare ciò che viene osservato più spesso (lo schermo o il materiale di riferimento) direttamente davanti, per girare il
meno possibile la testa quando si digita.
Italiano-9
07_Italian 30/10/2002, 11:329
Page 76

• Non visualizzare immagini fisse sullo schermo per lungo tempo per evitare la loro persistenza (effetti post-immagine).
• Fare regolarmente esami della vista.
Ergonomia
Per ottenere il massimo beneficio ergonomico, si raccomanda di:
• Utilizzare i controlli di dimensione e posizione preimpostati con segnali standard.
• Utilizzare i colori preimpostati.
• Utilizzare segnali non interallacciati con una frequenza di rinfresco verticale compresa tra 60-75 Hz.
• Non usare come colore primario il blu su uno sfondo scuro poiché è difficile da vedere e può affaticare gli occhi per
contrasto insufficiente.
07_Italian 30/10/2002, 11:3210
Italiano-10
Page 77

WAARSCHUWING
STEL DEZE EENHEID NIET BLOOT AAN REGEN OF VOCHT, OM ZO DE KANS OP BRAND OF ELEKTRISCHE SCHOKKEN TE
VERMIJDEN. GEBRUIK DE GEPOLARISEERDE STEKKER VAN DEZE EENHEID NIET MET EEN VERLENGSNOER OF
CONTACTDOOS OF ANDERE STOPCONTACTEN TENZIJ U DE POLEN VOLLEDIG IN HET CONTACTPUNT KUNT PLAATSEN.
OPEN DE BEHUIZING NIET. DEZE BEVAT ONDERDELEN DIE ONDER HOGE SPANNING STAAN. HET ONDERHOUD
MAG ALLEEN WORDEN UITGEVOERD DOOR BEVOEGDE EN HIERVOOR OPGELEIDE ONDERHOUDSTECHNICI.
LET OP!
KANS OP ELEKTRISCHE SCHOKKEN • NIET OPENEN
LET OP! VERWIJDER DE BEHUIZING NIET (NOCH DE ACHTERZIJDE) OM DE KANS OP ELEKTRISCHE
SCHOKKEN TE BEPERKEN. BEVAT GEEN INTERNE ONDERDELEN DIE DOOR DE GEBRUIKER
KUNNEN WORDEN VERVANGEN OF ONDERHOUDEN. HET ONDERHOUD MAG ALLEEN WORDEN
UITGEVOERD DOOR BEVOEGDE EN HIERVOOR OPGELEIDE ONDERHOUDSTECHNICI.
Dit symbool waarschuwt de gebruiker dat de eenheid een niet-geïsoleerde voltagebron bevat die sterk genoeg
is om elektrische schokken te veroorzaken. Het is bijgevolg gevaarlijk de onderdelen in deze eenheid aan te raken.
Dit symbool wijst de gebruiker op belangrijke informatie over de werking en het onderhoud van deze
eenheid. Lees deze informatie altijd zorgvuldig om eventuele problemen te vermijden.
Let op!
Als u in Europa de LCD1701 gebruikt met een wisselstroomvoeding van 220-240 V, dient u de voedingskabel te gebruiken die
bij de monitor is meegeleverd.
Gebruikers in Groot-Brittannië dienen een door het BS goedgekeurde voedingskabel met gietstekker en ingebouwde zwarte
zekering (5 A) voor het apparaat te gebruiken. Als bij dit apparaat geen voedingskabel is meegeleverd, neemt u contact op
met uw leverancier.
In alle andere situaties gebruikt u een voedingskabel die overeenkomt met de spanning van de wisselstroombron waarop u
het apparaat aansluit. Deze voedingskabel moet zijn goedgekeurd en moet voldoen aan de veiligheidsnormen die in uw land
van toepassing zijn.
Kennisgeving
Kennisgeving van de fabrikant
Hierbij verklaren wij dat de kleurenmonitor
LCD1701 (L172EN) in overeenstemming is met
Richtlijn 73/23/EEC van de Europese Commissie:
– EN 60950
Richtlijn 89/336/EEC van de Europese Commissie:
– EN 55022
– EN 61000-3-2
– EN 61000-3-3
– EN 55024
Als ENERGY STA R®-partner heeft NEC-Mitsubishi Electric Visual Systems Corp. bepaald dat dit product beantwoordt aan de
ENERGY STA R-richtlijnen voor een efficiënt energiegebruik. ENERGY STAR is een in de Verenigde Staten geregistreerd merk.
ErgoDesign is een geregistreerd handelsmerk van NEC-Mitsubishi Electric Visual Systems Corporation in de Benelux,
Denemarken, Duitsland, Frankrijk, Italië, Noorwegen, Oostenrijk, Spanje, Verenigd Koninkrijk en Zweden.
IBM PC/XT/AT, PS/2, MCGA, VGA, 8514/A en XGA zijn geregistreerde handelsmerken van International Business Machines
Corporation.
Apple en Macintosh zijn geregistreerde handelsmerken van Apple Computer Inc.
Microsoft en Windows zijn geregistreerde handelsmerken van Microsoft Corporation.
NEC is een geregistreerd handelsmerk van NEC Corporation.
Alle overige handelsmerken of geregistreerde handelsmerken zijn het eigendom van hun respectieve eigenaren.
Nederlands-1
en het volgende keurmerk heeft:
NEC-Mitsubishi Electric Visual
Systems, Corp.
MS Shibaura Bldg., 13-23,
Shibaura 4-chome,
Minato-Ku, Tokyo 108-0023, Japan
Nederlands
08_Dutch 30/10/2002, 11:321
Page 78

Inhoud
De doos* van uw nieuwe NEC LCD-monitor bevat de volgende voorwerpen:
• LCD1701-monitor met kantelvoetstuk
• Voedingskabel
• Kabel voor beeldsignaal
• Gebruikershandleiding
• Cd-rom (met de volledige gebruikershandleiding in PDF-indeling)
Als u de gebruikershandleiding wilt bekijken, moet Acrobat Reader 4.0
op de computer zijn geïnstalleerd.
*
Bewaar de originele doos en het verpakkingsmateriaal zodat u de monitor later probleemloos kunt vervoeren of verzenden.
Snel aan de slag
Volg de onderstaande instructies om de LCD-monitor op uw computersysteem aan te sluiten:
1. Zet de computer uit.
2. Verwijder de kabelbehuizing.
3. Voor PC: sluit de 15-pins mini D-SUB-connector van de juiste signaalkabel aan op de connector van de videokaart in uw
systeem (zie illustratie A.1). Draai alle schroeven vast.
Voor de Macintosh: sluit de LCD1701 Macintosh-kabeladapter aan op de computer (zie illustratie B.1). Sluit de 15-pins mini
D-SUB-connector van de juiste signaalkabel aan op de LCD1701 Macintosh-kabeladapter (zie illustratie B.1). Draai alle
schroeven vast.
Macintoshkabel-adapter
(niet standaard
meegeleverd)
Voor de Macintosh G3
en G4 hebt u geen
Macintosh-kabeladapter
Illustratie A.1
Illustratie B.1
nodig
4. Sluit de 15-pins mini D-SUB-connector van de beeldsignaalkabel aan op de juiste connector aan de achterzijde van de
monitor (zie illustratie C.1).
5. Sluit het uiteinde van de voedingskabel aan op de LCD1701-monitor en steek de stekker van de voedingskabel in het
stopcontact. Plaats de beeldsignaalkabel en de voedingskabel onder de kabelbehuizing (zie illustratie C.1). Plaats de
kabelbehuizing terug.
OPMERKING: wanneer u de kabel onder de kabelbehuizing plaatst, moet u zorgen dat de kabel of de monitor niet
beschadigd kunnen raken. Plaats de kabels zodanig dat de ferrietkern en stop zich boven de kabelbehuizing
bevinden (zie illustratie C.1).
OPMERKING: raadpleeg de sectie Let op in deze handleiding voor de juiste voedingskabel.
Nederlands-2
08_Dutch 30/10/2002, 11:322
Page 79

Ferrietkern
Kabelbehuizing
Stop
Illustratie C.1
6. De Vacation-schakelaar aan de richterkant van de monitor moet zich in de stand ON bevinden (Illustratie D.1). Gebruik de
aan/uit-knop om de monitor in te schakelen en zet de computer aan.
OPMERKING: de Vacation-schakelaar is een echte aan/uit-knop. Als deze knop zich in de stand ON bevindt, kan de monitor
niet worden ingeschakeld met de knop aan de voorzijde. Gebruik de aan/uit-knop NIET herhaaldelijk na elkaar.
Aan/uit-knop
Vacation-schakelaar
Illustratie D.1
7. Bij de eerste installatie stelt de functie No-touch Auto Adjust voor de meeste timings de monitor automatisch in op de
meest optimale instellingen, zonder een druk op een knop. Voor verdere aanpassingen gebruikt u de volgende OSMbesturingselementen:
• Auto Adjust Contrast
• Auto Adjust
De sectie OSM-besturingselementen van deze gebruikershandleiding bevat een volledige omschrijving van deze OSMbesturingselementen.
OPMERKING: in geval van problemen raadpleegt u de sectie Problemen oplossen in deze Gebruikershandleiding.
Nederlands-3
Nederlands
08_Dutch 30/10/2002, 11:323
Page 80

Kijkhoek instellen
Plaats uw handen aan beide zijden van het beeldscherm en stel de gewenste hoek in (zie illustratie TS.1).
Monitorvoet verwijderen voor permanente montage
Ga als volgt te werk om de monitor voor te bereiden voor andere montagedoeleinden:
1. Koppel alle kabels los.
2. Plaats de monitor met de voorzijde omlaag op een niet-schurend oppervlak (zie Illustratie R.1).
3. Verwijder de scharnierkap (zie Illustratie R.1).
4. Verwijder de vier schroeven waarmee de monitor op de voet is bevestigd en til de hele voet omhoog (zie illustratie R.2).
U kunt de monitor nu op een andere manier monteren.
5. Sluit de voedingskabel en de signaalkabel aan op de achterzijde van de monitor (zie illustratie R.3).
6. Als u de voet opnieuw wilt bevestigen, voert u deze procedure in omgekeerde richting uit.
OPMERKING: gebruik alleen VESA-compatibele alternatieve montagemethoden.
Ga voorzichtig te werk als u de monitorvoet verwijdert.
Illustratie TS.1
Scharnierkap
Niet-schurend oppervlak
08_Dutch 30/10/2002, 11:324
Illustratie R.1
Nederlands-4
Page 81

Illustratie R.3Illustratie R.2
7. Deze LCD-monitor is ontworpen voor gebruik met een zwenkarm. Gebruik de meegeleverde schroeven (4 stuks) voor de
montage. Om te beantwoorden aan de veiligheidsvoorschriften, moet u de monitor monteren op een arm die de nodige
stabiliteit garandeert in overeenstemming met het gewicht van de monitor. Gebruik de LCD-monitor alleen in combinatie
met een goedgekeurde arm (bijvoorbeeld met GS-keurmerk).
Plaats de schroeven terug
Dikte van beugel (arm)
2,0 ~ 3,2 mm
Draai alle
schroeven vast
100 mm
Specificaties
08_Dutch 30/10/2002, 11:325
100 mm
Nederlands
4 SCHROEVEN (M4)
(maximale diepte: 8,5 mm)
Controleer de diepte van
het schroefgat bij gebruik
van andere schroeven.
Gewicht van gemonteerde LCD: 4,6kg (max.)
Nederlands-5
Page 82

Besturingselementen
OSM-besturingselementen (On-Screen-Manager)
U gebruikt de OSM-besturingselementen aan de voorzijde van de monitor als volgt:
U opent de OSM (On-Screen Manager) door te drukken op een van de besturingsknoppen (<, >, -, +, EXIT).
Knop
EXIT
>
< /
- / +
SELECT
RESET
OPMERKING: wanneer u in het hoofdmenu of een submenu op de knop RESET drukt, verschijnt een venster waarin u de
Menu
Hiermee verlaat u het menu met de OSM-besturingselementen.
Hiermee schakelt u over naar het OSM-hoofdmenu.
Hiermee verplaatst u de markeringsbalk naar links of naar rechts om een optie in het menu te selecteren.
Hiermee verplaatst u de markeringsbalk naar boven of naar beneden om een optie in het menu te selecteren.
Hiermee verplaatst u de markeringsbalk naar links of naar rechts om de waarde te vergroten of te verkleinen.
Hiermee activeert u de functie Auto Adjust. Hiermee opent u het menu met de OSM-besturingselementen.
Hiermee activeert u het OSM-submenu.
Hiermee stelt u voor de gemarkeerde optie in het menu opnieuw de fabrieksinstelling in.
functie RESET alsnog kunt annuleren door op de knop EXIT te drukken.
Helderheid/contrast
BRIGHTNESS (Helderheid)
Hiermee stelt u de algemene helderheid van het beeld en de achtergrond op het scherm in.
CONTRAST
Hiermee stelt u de helderheid van het beeld ten opzichte van de achtergrond in.
AUTO ADJUST (Automatisch)
Hiermee stelt u het weergegeven beeld voor niet-standaard beeldsignaal-inputs in.
Automatische regeling
Hiermee past u automatisch de besturingselementen voor beeldpositie, breedte en fijnafstelling aan.
Positie
LEFT/RIGHT (Links/rechts)
Hiermee stelt u de horizontale positie van het beeld binnen het weergavegebied van het LCD in.
DOWN/UP (Omhoog/omlaag)
Hiermee stelt u de verticale positie van het beeld binnen het weergavegebied van het LCD in.
H. SIZE (Breedte)
U past de breedte aan door de waarde van dit besturingselement te verhogen of te verlagen.
Als de beeldinstelling die u met de functie “Auto Adjust” (Automatische regeling) bereikt niet aan uw
wensen beantwoordt, kunt u de beeldinstelling nog verfijnen met de functie “H.Size” (Breedte) (dot clock).
Hiervoor kunt u een moiré-testpatroon gebruiken. Deze functie wijzigt mogelijk de breedte van het beeld.
Centreer het beeld op het scherm met de menuknoppen Links/Rechts. Als de breedte verkeerd is
gekalibreerd, ziet het beeld eruit zoals in de linkerillustratie. Het beeld moet homogeen zijn.
De waarde voor H.SIZE is
verkeerd.
De waarde voor H.SIZE is
beter.
De waarde voor H.SIZE is
correct.
08_Dutch 30/10/2002, 11:326
Nederlands-6
Page 83

FINE (Fijnafstelling)
U verbetert de scherpte, zuiverheid en stabiliteit van het beeld door de waarde van deze instelling te
verhogen of te verlagen.
Als de beeldinstelling die u met de functie “Auto Adjust” (Automatische regeling) en de functie “H.Size”
(Breedte) bereikt niet aan uw wensen beantwoordt, kunt u de beeldinstelling nog verfijnen met de functie
“Fine” (Fijnafstelling). U verbetert de scherpte, zuiverheid en stabiliteit van het beeld door de waarde van
deze instelling te verhogen of te verlagen.
Hiervoor kunt u een moiré-testpatroon gebruiken. Als de fijnafstelling verkeerd is gekalibreerd, ziet het
beeld eruit zoals in de linkerillustratie. Het beeld moet homogeen zijn.
Kleurenbeheersystemen
U kunt de gewenste kleuren instellen met behulp van zes vooraf ingestelde kleurensets (de kleurensets
sRGB en NATIVE zijn altijd aanwezig en kunnen niet worden gewijzigd).
R, G, B
Verhoogt of verlaagt de kleur rood, groen of blauw, afhankelijk van de kleur die is geselecteerd. Als u een
kleur verandert, is dit onmiddellijk zichtbaar op het scherm. De instelling (hoger of lager) wordt door de
balken aangegeven.
sRGB
De modus sRGB biedt een enorme verbetering van de kleurengetrouwheid in desktopomgevingen omdat
slechts één standaard RGB-kleurenruimte wordt gebruikt. Dankzij deze standaard kunt u voor de meeste
toepassingen makkelijk en met een gerust hart kleuren doorsturen (bijvoorbeeld naar het servicebureau)
zonder dat verder kleurenbeheer (en de overeenkomstige kosten) vereist is.
NATIVE (STANDAARD)
De oorspronkelijke kleur die door het LCD wordt weergegeven. Deze kleur kan niet worden gewijzigd.
Hulpmiddelen
LANGUAGE (TAAL)
De menu’s van de OSM-besturingselementen zijn beschikbaar in zeven talen.
De waarde voor FINE is
verkeerd.
De waarde voor FINE is
correct.
OSM POSITION (Positie OSM)
U bepaalt zelf waar u het menu met de OSM-besturingselementen op het scherm wilt laten verschijnen.
Als u OSM Position selecteert, kunt u handmatig de positie van het menu met de OSMbesturingselementen naar links, naar rechts, omhoog of omlaag verschuiven.
OSM TURN OFF (OSM UITSCHAKELEN)
Het menu met de OSM-besturingselementen blijft op het scherm zolang u het gebruikt. In het submenu
OSM Turn Off kunt u opgeven hoe lang de inactiviteit op de monitor moet duren (nadat u voor het laatst
een knop hebt ingedrukt) voordat het menu met de OSM-besturingselementen automatisch verdwijnt.
De vaste instellingen in dit menu zijn 10, 20, 30, 45, 60 en 120 seconden.
OSM LOCK OUT (OSM VERGRENDELEN)
Hiermee vergrendelt u de toegang tot alle OSM-functies. Alleen de helderheid en het contrast kunnen nog
worden gewijzigd. Als u probeert de OSM-besturingselementen opnieuw te gebruiken wanneer de
beveiligde modus is geactiveerd, verschijnt een venster op het scherm met de melding dat de OSMbesturingselementen zijn vergrendeld. Als u de functie OSM Lock Out (OSM vergrendelen) wilt
inschakelen, drukt u eerst op de knop SELECT en vervolgens op “+”. Houd beide knoppen tegelijk
ingedrukt. Als u de functie OSM Lock Out (OSM vergrendelen) wilt uitschakelen, drukt u eerst op de knop
SELECT en vervolgens op “+”. Houd beide knoppen tegelijk ingedrukt.
RESOLUTION NOTIFIER (Resolutiemelding)
De optimale resolutie is 1280 x 1024. Als ON is geselecteerd, verschijnt na 30 seconden een bericht op het
scherm met de melding dat de resolutie niet op 1280 x 1024 is ingesteld.
Nederlands-7
Nederlands
08_Dutch 30/10/2002, 11:327
Page 84

HOT KEY (Sneltoets)
U kunt de helderheid en het contrast rechtstreeks aanpassen. Wanneer deze functie op ON (AAN) is
ingesteld, kunt u de helderheid aanpassen met < of > en het contrast met + of - wanneer het OSM-menu is
uitgeschakeld. Het standaard OSM-menu kan worden geopend met de knop EXIT.
OFF TIMER (UIT-TIMER)
De monitor wordt automatisch uitgeschakeld als de eindgebruiker een voorafbepaalde duur heeft ingesteld.
FACTORY PRESET (Fabrieksinstelling)
Als u de optie Factory Preset kiest, worden voor alle OSM-besturingselementen opnieuw de fabrieksinstellingen
geladen. Hiertoe dient u de knop RESET enkele seconden ingedrukt te houden. U kunt de instellingen
afzonderlijk aanpassen door de gewenste functie te selecteren en op de knop RESET te drukken.
Informatie
DISPLAY MODE (Weergavemodus)
Hiermee kunt u de huidige weergaveresolutie en de frequentie-instelling van de monitor opvragen.
MONITOR INFO. (Monitorgegevens)
Geeft de naam van het model en het serienummer van de monitor weer.
OSM-waarschuwing
OSM-waarschuwingsmenu's verdwijnen wanneer u op de knop Exit drukt.
NO SIGNAL (Geen signaal): Deze functie geeft een waarschuwing weer wanneer er geen signaal
aanwezig is. Het venster No Signal verschijnt nadat de voeding is ingeschakeld, wanneer een ander
ingangssignaal wordt geselecteerd of het videosignaal inactief is.
RESOLUTION NOTIFIER (Resolutiemelding): Deze functie geeft een waarschuwing weer voor het
gebruik van de optimale resolutie. Het venster Resolution Notifier verschijnt nadat de voeding is
ingeschakeld, wanneer een ander ingangssignaal wordt geselecteerd of het videosignaal niet de juiste
resolutie heeft. Deze functie kan worden uitgeschakeld in het menu TOOLS.
OUT OF RANGE (Buiten bereik): Deze functie geeft een suggestie voor de optimale resolutie en
verversingsfrequentie. Het menu Out of Range verschijnt nadat de voeding is ingeschakeld, wanneer een
ander ingangssignaal wordt geselecteerd of het videosignaal niet de juiste timing heeft.
08_Dutch 30/10/2002, 11:328
Nederlands-8
Page 85

Aanbevolen gebruik
Veiligheidsmaatregelen en onderhoud
EN HET GEBRUIK VAN DE MULTISYNC LCD-KLEURENMONITOR IS HET
• OPEN NOOIT DE MONITOR. De monitor bevat geen interne onderdelen die door de gebruiker kunnen worden vervangen of
onderhouden. Bovendien loopt u het risico op elektrische schokken of andere gevaren wanneer u de monitor opent of de
behuizing verwijdert. Het onderhoud mag alleen worden uitgevoerd door bevoegde en hiervoor opgeleide onderhoudstechnici.
• Mors geen vloeistoffen op het raster van de monitor en gebruik de monitor niet in de buurt van water.
• Steek geen voorwerpen in de ventilatiegleuven. Deze kunnen in aanraking komen met onderdelen die onder hoogspanning
staan, wat kan leiden tot elektrische schokken, brand, een defect van het apparaat of ernstige verwondingen en zelfs de dood.
• Plaats geen zware voorwerpen op de voedingskabel. Een beschadigde voedingskabel kan elektrische schokken of brand tot
gevolg hebben.
• Plaats dit toestel niet op een hellende of onstabiele ondergrond, houder of tafel. De monitor zou dan kunnen vallen en zo
ernstig beschadigd raken.
• Plaats geen objecten op de monitor en gebruik de monitor niet buitenshuis.
• De binnenzijde van de fluorescerende beeldbuis in de LCD-monitor bevat kwik. Neem de plaatselijke verordeningen of
reglementeringen voor afvalverwerking in acht wanneer u de beeldbuis weggooit.
Haal in de volgende situaties de stekker van de voedingskabel van uw monitor onmiddellijk uit het stopcontact en laat het
onderhoud of de reparatie uitvoeren door bevoegde onderhoudstechnici:
• Als de voedingskabel of stekker beschadigd is.
• Als u een vloeistof op de monitor hebt gemorst of voorwerpen in de monitor hebt laten vallen.
• Als de monitor is blootgesteld aan regen of insijpelend water.
• Als de monitor is gevallen of de behuizing beschadigd is.
• Als de monitor niet correct functioneert hoewel u de normale gebruiksinstructies in acht hebt genomen.
• Buig de voedingskabel niet.
• Gebruik de monitor niet bij hoge temperaturen of in vochtige, stoffige of vettige omgevingen.
• Dek de ventilatieopeningen van de monitor niet af.
• Raak de vloeibare kristallen niet aan ingeval de monitor breekt.
• Bij glasbreuk. Ga voorzichtig te werk.
• Zorg voor een goede ventilatie rond de monitor, zodat de warmte goed kan worden afgevoerd. Controleer
altijd of de ventilatieopeningen vrij zijn en plaats de monitor niet in de buurt van een radiator of andere
warmtebronnen. Plaats nooit voorwerpen op de monitor.
LET OP!
• Ingebrand beeld: Een inbranding wordt duidelijk wanneer de “geest” van een vorig beeld op het scherm zichtbaar blijft. In
tegenstelling tot CRT-monitoren is een inbranding op een LCD-monitor niet van blijvende aard, maar de weergave van nietveranderende beelden gedurende langere tijd moet worden vermeden.
U maakt de inbranding ongedaan door de monitor net zo lang uitgeschakeld te laten als het vorige beeld op het scherm is
weergegeven. Als een beeld bijvoorbeeld gedurende één uur is weergegeven en de “geest” van dat beeld blijft achter, schakelt
u de monitor één uur uit om het ingebrande beeld ongedaan te maken.
OPMERKING: zoals bij alle andere persoonlijke weergaveapparaten raadt NEC-Mitsubishi Electronics Display-Europe u aan
regelmatig gebruik te maken van een bewegende schermbeveiliging wanneer het scherm inactief is of de monitor uit te
schakelen als u deze niet gebruikt.
• U kunt het beste de monitor van de stroombron loskoppelen door de stekker van de voedingskabel uit het
stopcontact te nemen. Plaats de monitor dicht bij een stopcontact dat makkelijk bereikbaar is.
• Ga voorzichtig te werk als u de monitor moet verplaatsen of vervoeren. Bewaar de verpakking voor een
eventueel transport.
VOOR EEN OPTIMAAL RESULTAAT BIJ DE INSTALLATIE
BELANGRIJK DAT U DE ONDERSTAANDE INSTRUCTIES VOLGT:
U KUNT VERMOEIDHEID VAN UW OGEN, SCHOUDERS EN NEK TOT EEN MINIMUM
BEPERKEN DOOR DE MONITOR CORRECT TE PLAATSEN EN GOED AF TE STELLEN.
CONTROLEER DE VOLGENDE PUNTEN WANNEER U DE MONITOR INSTALLEERT:
• Voor een optimaal resultaat laat u de monitor eerst 20 minuten opwarmen.
• Stel de hoogte van de monitor zodanig in dat de bovenzijde van het scherm zich op of net
onder ooghoogte bevindt. Uw ogen zouden licht omlaag moeten zijn gericht wanneer u
naar het midden van het scherm kijkt.
• Plaats de monitor niet dichter dan 40 cm en niet verder dan 70 cm van uw ogen
verwijderd. De optimale afstand voor de monitor is 50 cm.
• Ontspan uw ogen door af en toe naar een voorwerp te kijken dat minstens 6 meter van u
is verwijderd. Knipper vaak met de ogen.
• Plaats de monitor in een hoek van 90 graden ten opzichte van ramen en andere
lichtbronnen, om eventuele reflecties op het scherm te voorkomen. Stel de hellingshoek van
de monitor zodanig in, dat de plafondverlichting niet op het scherm wordt gereflecteerd.
• Als u door het gereflecteerde licht de gegevens op het scherm moeilijk kunt lezen, breng
dan een antireflectiefilter op het scherm aan.
• Maak het oppervlak van de LCD-monitor schoon met een pluisvrije, niet-schurende doek.
Gebruik geen reinigingsvloeistoffen of glasreinigers.
• Gebruik de instellingen voor helderheid en contrast om de leesbaarheid te verhogen.
• Gebruik een documenthouder en plaats deze dicht bij de monitor.
Nederlands-9
08_Dutch 30/10/2002, 11:329
Nederlands
Page 86

• Plaats het voorwerp waar u het meeste naar kijkt (het scherm of het referentiemateriaal) direct voor u, zodat u uw hoofd zo
weinig mogelijk hoeft te draaien.
• Geef nooit lange tijd vaste patronen op de monitor weer. Zo vermijdt u dat het beeld inbrandt.
• Laat uw ogen regelmatig door een arts onderzoeken.
Ergonomie
De volgende aanbevelingen bieden maximale ergonomische resultaten:
• Gebruik de fabrieksinstellingen voor de grootte en positie van het beeld, en standaardsignalen.
• Gebruik de vooraf ingestelde waarden voor de kleureninstellingen.
• Gebruik non-interlaced signalen met een verticale beeldverversingsfrequentie van 60-75 Hz.
• Kies bij een donkere achtergrond niet de primaire kleur blauw om te vermijden dat u moeilijk leest en uw ogen sneller
vermoeid raken.
08_Dutch 30/10/2002, 11:3210
Nederlands-10
Page 87

Uwagi dotyczàce zasilania monitora
• Od∏àczenie urzàdzenia od sieci zasilania nast´puje po wyciàgni´ciu wtyczki sznura sieciowego z gniazda, które powinno byç
usytuowane wpobli˝u urzàdzenia i byç ∏atwo dost´pne.
• Dla wype∏nienia warunków przepisów IEC 60950 (tzn. równie˝ PN-93/T-42107) w zakresie bezpieczeƒstwa u˝ytkownika
zobowiàzuje si´ instalatora urzàdzenia do wyposa˝enia instalacji elektrycznej budynku (pomieszczenia), gdzie b´dzie
pracowaç, w rezerwowà ochron´ przed zwarciami w przewodzie fazowym za pomocà bezpiecznika 10A.
UWAGA: Urzàdzenie musi byç zasilane z gniazda z przy∏àczonym obwodem ochronnym (gniazdo z bolcem). Przed
w∏o˝eniem wtyczki do gniazda nale˝y sprawdziç miejsce przy∏àczenia przewodów fazowego izerowego w
gnieêdzie. Je˝eli lokalizacja przewodów nie jest zgodna zrysunkiem, to dla bezpieczeƒstwa u˝ytkowania
musi byç dokonana odpowiednia zmiana. Przeprowadzenie powy˝szych czynnoÊci nale˝y zleciç specjaliÊcie
elektrykowi. Wspó∏pracujàce ze sobà urzàdzenia komputerowe (komputer, drukarka, monitor itp.) muszà byç
zasilane ztego samego êród∏a z zachowaniem powy˝szych zasad.
zero (bolec)
zero
faza
Widok gniazda od strony wtyczki
09_Polish 30/10/2002, 11:321
Polski
Polski-1
Page 88

OSTRZE˚ENIE
W CELU UNIKNI¢CIA NIEBEZPIECZE¡STWA PO˚ARU LUB PORA˚ENIA PRÑDEM NIE NALE˚Y WYSTAWIAå
MONITORA NA DESZCZ LUB NA DZIA¸ANIE WILGOCI. NALE˚Y TAK˚E SPRAWDZIå, CZY BOLCE WTYCZKI KABLA
ZASILAJÑCEGO SÑ PRAWID¸OWO W¸O˚ONE DO GNIAZDA ZASILAJÑCEGO LUB GNIAZDA PRZED¸U˚ACZA.
WTYCZKI NIE NALE˚Y WK¸ADAå DO GNIAZDA NA SI¸¢.
NIE NALE˚Y OTWIERAå OBUDOWY, PONIEWA˚ WEWNÑTRZ ZNAJDUJÑ SI¢ ELEMENTY POD WYSOKIM
NAPI¢CIEM. WSZELKIE PRACE SERWISOWE MO˚E WYKONYWAå JEDYNIE WYKWALIFIKOWANY PERSONEL.
UWAGA
NIEBEZPIECZE¡STWO PORA˚ENIA PRÑDEM ELEKTRYCZNYM • NIE OTWIERAå
UWAGA: ZDJ¢CIE OBUDOWY GROZI PORA˚ENIEM PRÑDEM ELEKTRYCZNYM. WEWNÑTRZ MONITORA NIE
MA ˚ADNYCH ELEMENTÓW, KTÓRE U˚YTKOWNIK MÓG¸BY SAMODZIELNIE NAPRAWIAå.
WSZELKIE PRACE SERWISOWE MO˚E WYKONYWAå JEDYNIE WYKWALIFIKOWANY PERSONEL.
Ten symbol ostrzega u˝ytkownika, ˝e nieizolowane elementy wewnàtrz znajdujà si´ pod tak du˝ym
napi´ciem, ˝e mo˝e ono spowodowaç pora˝enie pràdem elektrycznym. Jakikolwiek bezpoÊredni kontakt z
dowolnym elementem wewnàtrz obudowy jest niebezpieczny.
Ten symbol ostrzega u˘ytkownika, ˝e istotne informacje dotyczàce pracy i obs∏ugi monitora znajdujà si˝ w
za∏àczonej literaturze. W zwiàzku z tym nale˝y si´ szczegó∏owo z nimi zapoznaç w celu unikni´cia problemów.
Ostrze˝enie:
Pod∏àczajàc monitor LCD1701 w Europie do pràdu zmiennego o napi´ciu 220-240 V, nale˝y wykorzystaç kabel zasilajàcy
dostarczony wraz z monitorem.
W Wielkiej Brytanii do zasilania monitora nale˝y stosowaç przewód zgodny ze standardem brytyjskim z zaprasowanà wtyczkà
zawierajàcà czarny bezpiecznik (5 A), którego parametry zosta∏y dobrane do pracy z tym sprz´tem. Je˝eli przewód zasilajàcy
nie zosta∏ dostarczony razem z monitorem, nale˝y skontaktowaç si´ z dostawcà.
We wszystkich pozosta∏ych przypadkach nale˝y stosowaç przewód zasilajàcy odpowiedni do parametrów sieci zasilajàcej pràdu
zmiennego oraz zgodny ze standardami bezpieczeƒstwa danego kraju.
Deklaracja
Deklaracja producenta
Niniejszym stwierdza si´, ˝e monitor kolorowy
LCD1701 (L172EN) spe∏nia wymagania zawarte
w nast´pujàcych dokumentach:
Dyrektywà Rady 73/23/EEC:
– EN 60950
Dyrektywà Rady 89/336/EEC:
– EN 55022
– EN 61000-3-2
– EN 61000-3-3
– EN 55024
Jako partner E
ENERGY STAR w zakresie sprawnoÊci energetycznej. ENERGY STAR to znak zarejestrowany w Stanach Zjednoczonych.
ErgoDesign jest zarejestrowanym znakiem handlowym firmy NEC Mitsubishi Electric Visual Systems Corporation w Austrii, Beneluksie,
Danii, Francji, Niemczech, na Wloszech, w Norwegii, Hiszpanii, Szwecji oraz w Wielkiej Brytanii.
IBM PC/XT/AT, PS/2, MCGA, VGA, 8514/A I XGA sà zarejestrowanymi znakami handlowymi firmy International Business
Machines Corporation.
Apple i Macintosh sà zarejestrowanymi znakami handlowymi firmy Apple Computer Inc.
Microsoft i Windows sà zarejestrowanymi znakami handlowymi firmy Microsoft Corporation.
NEC STAR jest zarejestrowanym znakiem handlowym firmy NEC Corporation.
Wszystkie inne znaki handlowe lub zarejestrowane znaki handlowe stanowià w∏asnoÊç ich w∏aÊcicieli.
NERGY STA R
®
, firma NEC-Mitsubishi Electric Visual Systems Corp. deklaruje, ˝e ten monitor spe∏nia zalecenia
i oznaczony
NEC-Mitsubishi Electric Visual
Systems, Corp.
MS Shibaura Bldg., 13-23,
Shibaura 4-chome,
Minato-Ku, Tokyo 108-0023, Japan
Polski-2
Znak B przyznany
przez POLSKIE
CENTRUM BADA¡ I
CERTYFIKACJI
09_Polish 30/10/2002, 11:322
Page 89

ZawartoÊç opakowania
Wewnàtrz kartonu* z Twoim nowym monitorem NEC LCD1701 powinny znajdowaç si´ nast´pujàce elementy:
• Monitor LCD1701 z przechylanà podstawà
• Przewód zasilajàcy
• Kabel sygna∏owy
• Podr´cznik u˝ytkownika
• CD ROM zawierajàcy kompletny Podr´cznik u˝ytkownika w formacie PDF.
Aby otworzyç Podr´cznik u˝ytkownika w formacie PDF, nale˝y zainstalowaç
w komputerze program Acrobat Reader 4.0.
* Zalecamy zachowaç oryginalne opakowanie, które mo˝e si´ przydaç w przypadku transportu monitora (serwis, przesy∏ka
kurierska, itp.).
Pod∏àczenie monitora
Aby pod∏àczyç monitor LCD do Twojego systemu, post´puj wed∏ug poni˝szych wskazówek:
1. Turn off the power to your computer.
2. Nale˝y zdjàç pokryw´ kabla.
3. Dla komputerów PC: Pod∏àcz 15-pinowy przewód sygna∏owy mini D-SUB do gniazda w karcie graficznej (Rysunek A.1).
Dokr´ç wszystkie Êruby.
Dla komputerów Mac: W∏àcz przejÊciówk´ monitora LCD1701 Macintosh do komputera (Rysunek B.1). Pod∏àcz
15-pinowà koƒcówk´ mini D-SUB kabla sygna∏owego do przejÊciówki monitora LCD1701 w komputerze Macintosh
(Rysunek B.1). Dokr´ç wszystkie Êruby.
Adapter do
komputera
Macintosh
(wyposa˝enie
dodatkowe)
W przypadku komputerów
Macintosh G3 i G4 nie ma
koniecznoÊci stosowania
Rysunek A.1
Rysunek B.1
adaptera kablowego
Macintosh
Polski
4. Pod∏àczyç 15-pinowà koƒcówk´ mini D-SUB kabla sygna∏owego wideo do w∏aÊciwego z∏àcza w tylnej cz´Êci monitora
(Rysunek C.1).
5. Pod∏àcz jeden koniec przewodu zasilajàcego do monitora LCD1701, a drugi w∏àcz do kontaktu elektrycznego. UmieÊciç
kabel sygna∏owy wideo oraz kabel zasilajàcy pod pokrywà kabla (Rysunek C.1). Za∏o˝yç pokryw´ kabla.
UWAGA: Kabel nale˝y umieÊciç pod pokrywà w taki sposób, aby uniknàç uszkodzeƒ kabla lub monitora.
Jak pokazano na rysunku (Rysunek C.1), nale˝y u∏o˝yç przewody, umieszczajàc rdzeƒ ferrytowy i zatyczk´ na
os∏onà przewodu.
UWAGA: Nale˝y zapoznaç si´ z cz´Êcià UWAGI niniejszej instrukcji obs∏ugi w celu wyboru kabla zasilajàcego zgodnego z
wymaganiami.
09_Polish 30/10/2002, 11:323
Polski-3
Page 90

Rdzeƒ ferrytowy
Pokrywa kabla
Zatyczka
Rysunek C.1
6. Wy∏àcznik z prawej strony monitora nale˝y w∏àczyç (Rysunek D.1). W∏àcz monitor i komputer, u˝ywajàc przycisku zasilania
(Power Button).
UWAGA: Wy∏àcznik w∏àcza i wy∏àcza urzàdzenie. JeÊli znajduje si´ on w pozycji OFF, nie mo˝na w∏àczyç monitora przy
pomocy przycisku z przodu. NIE WOLNO zbyt szybko w∏àczaç i wy∏àczaç monitora.
Wy∏àcznik
Przycisk zasilania
Rysunek D.1
7. Automatyczna regulacja bezdotykowa optymalizuje ustawienia monitora w zakresie podstawowej konfiguracji
cz´stotliwoÊci.Do dodatkowej regulacji u˝yj nast´pujàcych funkcji OSM:
• Autoregulacja kontrastu
• Autoregulacja
Dok∏adny opis dzia∏ania poszczególnych funkcji menu ekranowego znajduje si´ w rozdziale Uk∏ad Sterowania niniejszej
Instrukcji Obs∏ugi.
UWAGA: W razie problemów nale˝y zajrzeç do Podr´cznika U˝ytkownika rozdzia∏: “Usuwanie usterek”.
Polski-4
09_Polish 30/10/2002, 11:324
Page 91

Przechylanie i obracanie
Chwyç d∏oƒmi monitor z obu stron i ustaw go w odpowiednim po∏o˝eniu (Rysunek TS.1).
Usuƒ podstaw´ monta˝owà monitora
W celu zamontowania monitora w inny sposób post´puj wed∏ug poni˝szych wskazówek:
1. Od∏àcz wszystkie kable.
2. Ustaw monitor ekranem w dó∏ na mi´kkiej powierzchni (Rysunek R.1).
3. Nale˝y zdjàç pokryw´ przegubu (Rysunek R.1).
4. Usuƒ 4 Êruby ∏àczàce monitor z podstawà i wyciàgnij go z podstawy (Rysunek R.2) monitor jest teraz przygotowany do
zamontowania w inny sposób.
5. Pod∏àcz kabel zasilajàcy i kabel sygna∏u z ty∏u monitora (Rysunek R.3).
6. W celu odwrócenia tego procesu nale˝y wykonaç powy˝sze czynnoÊci w odwrotnej kolejnoÊci.
UWAGA: U˝ywaj wy∏àcznie metod monta˝u zgodnych z VESA.
Podczas zdemontowania podstawy nale˝y ostro˝nie obchodziç si´ z monitorem.
Rysunek TS.1
Pokrywa przegubu
Polski
Powierzchnia nie Êcieralna
09_Polish 30/10/2002, 11:325
Rysunek R.1
Polski-5
Page 92

Rysunek R.3Rysunek R.2
7. Ten monitor LCD przeznaczony jest do u˝ytku z ramieniem elastycznym. Podczas monta˝u nale˝y stosowaç za∏àczone
wkr´ty (4 sztuki). W celu spe∏nienia wymagaƒ bezpieczeƒstwa, monitor musi zostaç przymocowany do ramienia, które
zapewnia niezb´dnà stabilnoÊç wzgl´dem wagi monitora. Monitor LCD mo˝na stosowaç wy∏àcznie z zatwierdzonym
ramieniem (np. GS mark).
UmieÊç ponownie Êruby
GruboÊç ramienia -
2,0 ~ 3,2 mm
Dokr´ç wszystkie Êruby
100 mm
Warunki techniczne
09_Polish 30/10/2002, 11:326
100 mm
4 ÂRUBY (M4)
(MAX g∏´bokoÊç: 8.5 mm)
JeÊli u˝ywana jest inna
Êruba, sprawdê
g∏´bokoÊç otworu.
Waga zestawu LCD: 4.6kg (MAX)
Polski-6
Page 93

Przyciski
Sterowanie OSM (On-Screen-Manager)
Przyciski sterowania OSM znajdujàce si´ z przodu monitora majà nast´pujàce funkcje:
Menu ekranowe OSM uruchamia si´ po naciÊni´ciu przycisków (<, >, -, +, EXIT).
Control
EXIT
< / >
- / +
SELECT
RESET
UWAGA: Po naciÊni´ciu przycisku RESET w menu g∏ównym i podmenu, pojawi si´ okno z komunikatem ostrzegawczym, które
umo˝liwia anulowanie polecenia przywrócenia ustawieƒ fabrycznych poprzez naciÊni´cie przycisku EXIT.
Menu
WyjÊcie z menu OSM.
WyjÊcie z podmenu i powrót do menu g∏ównego.
Przesuwa podÊwietlenie w lewo/prawo w celu wybrania opcji.
Przesuwa podÊwietlony obszar w gór´ lub w dó∏ w celu wybrania jednego z parametrów.
Przesuwa podÊwietlenie w lewo /prawo w celu zwi´kszenia lub zmniejszenia regulacji.
Aktywna funkcja autoregulacji. WejÊcie do funkcji menu OSM.
WejÊcie do podmenu OSM.
Przywraca ustawienia w obr´bie podÊwietlenia do ustawieƒ fabrycznych.
Regulacja jasnoÊci/kontrastu
BRIGHTNESS (JASNOÂå)
Umo˝liwia pe∏nà regulacj´ jasnoÊci obrazu i t∏a.
CONTRAST (KONTRAST)
Regulacja jasnoÊci obrazu w stosunku do t∏a.
AUTO ADJUST (AUTOREGULACJA)
Regulacja wyÊwietlanego obrazu pochodzàcego z niestandardowych sygna∏ów wejÊciowych video.
Autoregulacja
Regulacja wyÊwietlanego obrazu pochodzàcego z niestandardowych sygna∏ów wejÊciowych video.
Regulacja po∏o˝enia
LEFT/RIGHT (LEWO/PRAWO)
Regulacja poziomego po∏o˝enia obrazu w granicach wyÊwietlacza LCD.
DOWN/UP (POZYCJA/PIONOWA)
Regulacja pionowego po∏o˝enia obrazu w granicach wyÊwietlacza LCD.
H. SIZE (ROZMIAR POZIOMY)
Regulacja poziomego rozmiaru przez zwi´kszenie lub zmniejszenie tego ustawienia.
JeÊli autoregulacja nie gwarantuje odpowiedniej jakoÊci obrazu, mo˝na dok∏adniej skonfigurowaç ustawienia
za pomocà funkcji “Rozmiar poziomy” (taktowanie punktowe). W tym celu mo˝na u˝yç wzoru testowego do
usuwania mory. Funkcja ta mo˝e zmieniaç szerokoÊç obrazu. Obraz mo˝na wyÊrodkowaç na ekranie za
pomocà menu w lewo/prawo. JeÊli rozmiar poziomy zostanie ustawiony nieprawid∏owo, obraz mo˝e
wyglàdaç tak, jak na rysunku po lewej stronie. Obraz musi byç jednolity.
Rozmiar poziomy jest
nieprawid∏owy.
Polski
Rozmiar poziomy jest lepszy. Rozmiar poziomy jest
prawid∏owy.
09_Polish 30/10/2002, 11:327
Polski-7
Page 94

FINE (DOK¸ADNIE)
Polepsza zogniskowanie, czystoÊç oraz stabilnoÊç obrazu przez zwi´kszenie lub zmniejszenie tego ustawienia.
JeÊli autoregulacja i funkcja “Rozmiar poziomy” nie gwarantuje odpowiedniej jakoÊci obrazu, mo˝na
dok∏adniej skonfigurowaç ustawienia za pomocà funkcji “Dok∏adnoÊç”. Dzi´ki temu mo˝na polepszyç
zogniskowanie, czystoÊç oraz stabilnoÊç obrazu przez zwi´kszenie lub zmniejszenie tego ustawienia.
W tym celu mo˝na u˝yç wzoru testowego do usuwania mory. JeÊli ustawienia zostanà dostrojone
nieprawid∏owo, obraz mo˝e wyglàdaç tak, jak na rysunku po lewej stronie. Obraz musi byç jednolity.
Uk∏ad sterowania kolorami
Ustawienia fabryczne szeÊciu kolorów zapewniajà ˝àdane ustawienie kolorów (ustawienia fabryczne kolorów
sRGB i NATIVE sà standardowe i nie mo˝na ich zmieniç).
R, G, B
Zwi´kszenie lub zmniejszenie Czerwonej, Zielonej lub Niebieskiej sk∏adowej koloru w zale˝noÊci od wyboru.
Zmiana koloru pokazana zostanie na ekranie, a kreski poka˝à kierunek tych zmian (zwi´kszanie lub
zmniejszanie).
sRGB
Tryb sRGB zdecydowanie poprawia wiernoÊç kolorów pulpitu przez pojedyncze, standardowe
rozmieszczenie kolorów RGB. Dzi´ki tej obs∏udze kolorów u˝ytkownik mo˝e z ∏atwoÊcià i pewnoÊcià siebie
przekazywaç kolory bez koniecznoÊci dodatkowego zarzàdzania kolorami w najbardziej typowych
przypadkach.
NATIVE (USTAWIENIA STANDARDOWE)
Oryginalne, fabryczne ustawienie kolorów dla wyÊwietlaczy LCD, bez mo˝liwoÊci regulacji.
Narz´dzia
LANGUAGE (J¢ZYK)
Menu ekranowe OSM jest dost´pne w siedmiu j´zykach.
DOK¸ADNOÂå jest
nieprawid∏owa.
DOK¸ADNOÂå jest
prawid∏owa.
OSM POSITION (PO¸O˚ENIE MENU OSM)
Mo˝na wybraç dowolne miejsce na ekranie, w którym ma zostaç wyÊwietlone menu OSM. Stosujàc funkcj´
Po∏o˝enia menu OSM (OSM Location) mo˝na r´cznie, komendami prawo, lewo, dó∏, góra ustawiç po∏o˝enie
menu.
OSM TURN OFF (CZAS WY¸ÑCZENIA OSM)
Menu OSM b´dzie tak d∏ugo wyÊwietlane na ekranie, jak d∏ugo b´dzie u˝ywane. W podmenu Turn Off
mo˝na ustawiç czas wy∏àczenia menu po ostatnim naciÊni´ciu przycisku. Do wyboru sà ustawienia: 10, 20,
30, 45, 60 oraz 120 sekund.
OSM LOCK OUT (ZABLOKOWANIE MENU)
Ta funkcja ca∏kowicie blokuje dost´p do wszystkich funkcji menu OSM, z wyjàtkiem jasnoÊci i kontrastu. Przy
próbie otwarcia menu znajdujàcego si´ w stanie zablokowanym na ekranie pojawi si´ informacja, ˝e funkcje
menu zosta∏y zablokowane. Aby w∏àczyç blokad´ menu OSM, nale˝y nacisnàç przycisk SELECT, a
nast´pnie przycisk “+” i przytrzymaç je jednoczeÊnie. Aby wy∏àczyç blokad´ menu OSM, nale˝y nacisnàç
przycisk SELECT, a nast´pnie przycisk “+” i przytrzymaç je jednoczeÊnie.
RESOLUTION NOTIFIER (INFORMACJA O ROZDZIELCZOÂCI)
Optymalnà rozdzielczoÊcià jest 1280 x 1024. W razie wybrania opcji ON, po 30 minutach na ekranie zostanie
wyÊwietlona informacja o tym, ˝e rozdzielczoÊç jest inna ni˝ 1280 x 1024.
HOT KEY (PRZYCISK DOST¢PU)
JasnoÊç i kontrast mo˝na wyregulowaç bezpoÊrednio. Po w∏àczeniu tej funkcji mo˝na wyregulowaç jasnoÊç
u˝ywajàc przycisków < lub >, oraz kontrast u˝ywajàc przycisków + lub -, przy wy∏àczonym menu OSM.
Dostep do standardowej oferty OSM wykonujemy przyciskiem EXIT.
09_Polish 30/10/2002, 11:328
Polski-8
Page 95

OFF TIMER (WY¸ÑCZNIK CZASOWY)
Monitor wy∏àczy si´ automatycznie, je˝eli u˝ytkownik wprowadzi czas wy∏àczenia.
FACTORY PRESET (USTAWIENIA FABRYCZNE)
Wybranie Ustawieƒ fabrycznych w menu OSM umo˝liwia zresetowanie wi´kszoÊci ustawieƒ do ustawieƒ
fabrycznych. Nale˝y nacisnàç przycisk RESET na kilka sekund. Poszczególne parametry mogà byç
przywracane do ustawieƒ fabrycznych poprzez wybranie ich (podÊwietlenie) i naciÊni´cie przycisku RESET.
Informacje
DISPLAY MODE (TRYB PRACY)
Dzi´ki tej funkcji mo˝liwe jest otrzymanie informacji o aktualnej rozdzielczoÊci wyÊwietlanego obrazu oraz
aktualnych cz´stotliwoÊciach odchylania poziomego i pionowego.
MONITOR INFO. (INFORMACJE O MONITORZE)
WyÊwietla nazw´ modelu i numer seryjny monitora.
OSM Warning (ostrze˝enie OSM)
Po naciÊni´ciu przycisku EXIT ostrze˝enie OSM zniknie.
NO SIGNAL (brak sygna∏u): Informacja, ˝e nie ma ˝adnego sygna∏u. Okno z tà informacjà pojawia si´ po
w∏àczeniu zasilania, po zmianie sygna∏u wejÊciowego lub, gdy sygna∏ wideo jest nieaktywny.
RESOLUTION NOTIFIER (informacja o rozdzielczoÊci): Ostrze˝enie o uruchomieniu optymalizacji
rozdzielczoÊci. Po w∏àczeniu zasilania lub, gdy nie ma sygna∏u wejÊciowego albo, je˝eli sygna∏ wideo ma
niew∏aÊciwà rozdzielczoÊç wówczas na ekranie zostanie otwarte okno RozdzielczoÊç. Ta funkcja mo˝e
zostaç wy∏àczona w menu Narz´dzia (TOOLS).
OUT OF RANGE (poza zakresem): Zalecenie optymalizacji rozdzielczoÊci i cz´stotliwoÊci odÊwie˝ania.
Po w∏àczeniu zasilania lub po zmianie sygna∏u wejÊciowego video albo, je˝eli sygna∏ wejÊciowy nie jest
w∏aÊciwie taktowany zostanie wyÊwietlone menu Przekroczenie zakresu (Out Of Range).
Zalecenia eksploatacyjne
Zasady bezpieczeƒstwa i utrzymania
NALE˚Y PRZESTRZEGAå NAST¢PUJÑCYCH ZASAD W CELU
UTRZYMANIA OPTYMALNYCH PARAMETRÓW PRACY
MONITORA KOLOROWEGO MULTISYNC LCD:
• NIE OTWIERAå MONITORA. Wewnàtrz monitora nie ma ˝adnych elementów, które móg∏by naprawiç lub obs∏ugiwaç u˝ytkownik.
Zdj´cieobudowy grozi pora˝eniem pràdem elektrycznym oraz innymi niebezpieczeƒstwami. Wszelkie prace serwisowe mo˝e
wykonywaç jedynie wykwalifikowany personel.
• Nie wolno rozlewaç cieczy na obudow´ monitora, ani u˝ywaç go wobli˝uwody.
•
Nie wolno wk∏adaç ˝adnych przedmiotów w szczeliny obudowy, poniewa˝ mogà dotykaç elementów znajdujàcych si´ pod napi´ciem,
como˝e spowodowaç zagro˝enie dla zdrowia lub ˝ycia, pora˝enie pràdem elektrycznym, po˝ar lub uszkodzenie sprz´tu.
• Nie stawiaç ci´˝kich przedmiotów na przewodzie zasilajàcym. Uszkodzenie przewodu zasilajàcego mo˝e spowodowaç pora˝enie
pràdem lub po˝ar.
• Nie wolno stawiaç monitora na pochy∏ych lub niestabilnych wózkach, stojakach lub sto∏ach, poniewa˝ monitor mo˝e spaÊç i w
rezultacie ulec zniszczeniu lub niebezpiecznej awarii.
• Nie wolno k∏aÊç ˝adnych przedmiotów na monitorze i nie wolno eksploatowaç go pod go∏ym niebem.
• Lampa fluorescencyjna znajdujàca si´ wewnàtrz monitora LCD zawiera rt´ç. Nale˝y post´powaç zgodnie z miejscowymi przepisami
o ochronie Êrodowiska podczas likwidacji monitora.
W razie zaistnienia nast´pujàcych okolicznoÊci nale˝y niezw∏ocznie od∏àczyç komputer od gniazdka zasilajàcego i zwróciç si´ do
wykwalifikowanego serwisu technicznego:
• Przewód zasilajàcy lub gniazdo sieciowe sà uszkodzone.
• Na monitor spad∏ ci´˝ki przedmiot.
• Monitor by∏ wystawiony na dzia∏anie deszczu lub wody.
• Monitor upad∏ i jego obudowa zosta∏a uszkodzona.
• Monitor nie dzia∏a normalnie pomimo stosowania si´ do zaleceƒ zawartych w instrukcji obs∏ugi.
• Nie zginaç przewodu zasilajàcego.
• Nie nale˝y eksploatowaç monitora w miejscach o wysokiej temperaturze, du˝ej wilgotnoÊci, du˝ym zapyleniu lub du˝ym
zabrudzeniu smarami czy olejami.
• Nie zakrywaç otworów wentylacyjnych monitora.
• W razie uszkodzenia monitora nie wolno dotykaç ciek∏ych kryszta∏ów.
• W razie rozbicia szk∏a. Ostro˝nie.
Polski
09_Polish 30/10/2002, 11:329
Polski-9
Page 96

• Nale˝y zapewniç wystarczajàcà wentylacj´ wokó∏ monitora w celu w∏aÊciwego rozproszenia ciep∏a; Nie wolno
zas∏aniaç otworów wentylacyjnych oraz ustawiaç monitora w pobli˝u grzejników lub innych êróde∏ ciep∏a. Nie
wolno k∏aÊç ˝adnych przedmiotów na górnà cz´Êç monitora.
OSTRZE˚ENIE
• Wyjmujàc wtyczk´ kabla zasilajàcego od∏àczamy monitor od zasilania; Monitor powinien byç zainstalowany
wpobli˝u gniazdka, do którego jest ∏atwy dost´p.
• Podczas transportu nale˝y ostro˝nie obchodziç si´ zmonitorem. Opakowanie nale˝y zachowaç na wypadek
transportu monitora w przysz∏oÊci.
• DoÊwietlenie obrazu: DoÊwietleniem obrazu rozumiemy obraz resztkowy (“cienie”) poprzedniego obrazu, który zostanie widzialny
na kineskopie. W odró˝nieniu od normalnych monitorów nie jest doÊwietlenie obrazu na wyÊwietlaczu LCD sta∏e, ale pomimo tego
powinniÊmy zapobiec zobrazowaniu jednego obrazu w d∏u˝szym czasie.
Je˝eli masz zamiar ograniczyç doÊwietlenie obrazu, wy∏àcz monitor na taki sam czas, w jakim by∏ zobrazowany ostatni obraz. Je˝eli
na przyk∏ad by∏ obraz na kineskopie zobrazowany godzin´ a zosta∏ na nim obraz resztkowy, powinieneÊ wy∏àczyç monitor tak˝e na
godzin´, aby obraz zniknà∏.
UWAGA: Tak samo jako w razie wszystkich osobistych urzàdzeƒ zobrazowujàcych poleca firma NEC-Mitsubishi Electronics Display
systematyczne stosowanie Êciemniaczy kineskopu przy nieczynnoÊci oraz wy∏àczenie monitora w czasie, kiedy nie jest u˝ywany.
PRAWID¸OWE USTAWIENIE MONITORA ORAZ ODPOWIEDNIA REGULACJA
ZMNIEJSZAJÑ ZM¢CZENIE OCZU, RAMION i SZYI. ZALECA SI¢ STOSOWANIE
DO PONI˚SZYCH WSKAZÓWEK:
• Po w∏àczeniu zaleca si´ pozostawiç monitor na 20 minut w celu nagrzania si´.
• Nale˝y tak ustawiç wysokoÊç monitora, aby górna cz´Êç ekranu znajdowa∏a si´ troch´ poni˝ej
linii wzroku. Oczy powinny byç skierowane lekko w dó∏ podczas patrzenia w Êrodek ekranu.
• Monitor nale˝y umieÊciç nie bli˝ej ni˝ 40cm i nie dalej ni˝ 70 cm od oczu. Optymalna odleg∏oÊç
wynosi 50 cm.
• Okresowo nale˝y daç oczom odpoczàç patrzàc na przedmiot oddalony o przynajmniej 6 m.
Nale˝y cz´sto mrugaç powiekami.
• Ustawiç monitor pod kàtem 90° do okna lub innych êróde∏ Êwiat∏a, aby zminimalizowaç odbicie
Êwiat∏a. Ustawiç przechy∏ monitora tak, aby Êwiat∏o emitowane przez oÊwietlenie umieszczone
na suficie nie odbija∏osi´ od ekranu.
Je˝eli odbijajàce si´ Êwiat∏o utrudnia patrzenie na ekran, nale˝y zastosowaç filtr antyodblaskowy.
•
• Do czyszczenia ekranu monitora u˝ywaj mi´kkiej szmatki. Plamy trudne do usuni´cia mo˝na
wyczyÊciç mi´kkà szmatkà lekko zwil˝onà ∏agodnym roztworem naturalnych detergentów, np.
wodà z myd∏em. Nie nale˝y stosowaç silnych rozpuszczalników, takich jak rozpuszczalniki do lakierów, benzyna czy tez inne Êrodki
czyszczàce!
• Nale˝y ustawiç jasnoÊç i kontrast monitora w celu uzyskania optymalnej widzialnoÊci.
• Uchwyty na dokumenty nale˝y ustawiaç blisko ekranu.
• Przedmioty, na które najcz´Êciej kierowany jest wzrok (ekran lub dokumenty nale˝y ustawiç naprzeciwko siebie w celu zmniejszenia
kr´cenia g∏owà podczas pisania.
• Nie zaleca si´ d∏ugotrwale wyÊwietlaç ten sam obraz poniewa˝ mo˝e pojawiç si´ efekt poÊwiaty.
• Nale˝y regularnie kontrolowaç wzrok.
Ergonomia
W celu zapewnienia maksymalnej ergonomii zaleca si´ stosowanie do poni˝szych wskazówek:
• Przy korzystaniu ze standardowych sygna∏ów nale˝y ustawiç wartoÊci fabryczne rozmiaru i pozycji.
• Ustawiç fabrycznie wartoÊci kolorów.
• Nale˝y stosowaç sygna∏ bez przeplotu z szybkoÊcià odÊwie˝ania pionowego w zakresie 60-75 Hz.
• Nale˝y unikaç u˝ywania koloru niebieskiego na ciemnym tle, poniewa˝ jest on trudno widoczny i powoduje zm´czenie oczu z
powodu ma∏ego kontrastu.
09_Polish 30/10/2002, 11:3210
Polski-10
Page 97

ПРЕДУПРЕЖДЕНИЕ
ВО ИЗБЕЖАНИЕ ВОЗГОРАНИЯ ИЛИ ПОРАЖЕНИЯ ЭЛЕКТРИЧЕСКИМ ТОКОМ НЕ ПОДВЕРГАЙТЕ АППАРАТ
ВОЗДЕЙСТВИЮ ДОЖДЯ ИЛИ ВЛАГИ. КРОМЕ ТОГО, НЕ ВСТАВЛЯЙТЕ ПОЛЯРНУЮ ВИЛКУ УСТРОЙСТВА В
РОЗЕТКУ УДЛИНИТЕЛЯ ИЛИ ДРУГИЕ РОЗЕТКИ, ЕСЛИ ЕЕ ШТЫРЬКИ НЕ ВХОДЯТ ПОЛНОСТЬЮ.
НЕ ОТКРЫВАЙТЕ КОРПУС, ТАК КАК ВНУТРИ НАХОДЯТСЯ ДЕТАЛИ ПОД ВЫСОКИМ НАПРЯЖЕНИЕМ. ПО
ВОПРОСАМ ОБСЛУЖИВАНИЯ ОБРАТИТЕСЬ К КВАЛИФИЦИРОВАННОМУ СПЕЦИАЛИСТУ.
ВНИМАНИЕ
ОПАСНОСТЬ ПОРАЖЕНИЯ ЭЛЕКТРИЧЕСКИМ ТОКОМ • НЕ ОТКРЫВАТЬ
ВНИМАНИЕ. ЧТОБЫ УМЕНЬШИТЬ РИСК ПОРАЖЕНИЯ ЭЛЕКТРИЧЕСКИМ ТОКОМ, НЕ СНИМАЙТЕ КРЫШКУ
(ИЛИ ЗАДНЮЮ ПАНЕЛЬ). ВНУТРИ АППАРАТА НЕТ ДЕТАЛЕЙ, ОБСЛУЖИВАНИЕ КОТОРЫХ
МОЖЕТ ВЫПОЛНЯТЬ ПОЛЬЗОВАТЕЛЬ. ПО ВОПРОСАМ ОБСЛУЖИВАНИЯ ОБРАТИТЕСЬ К
КВАЛИФИЦИРОВАННОМУ СПЕЦИАЛИСТУ.
Этот знак предупреждает пользователей о том, что внутри устройства находятся неизолированные
детали под высоким напряжением, которые могут стать причиной поражения электрическим током.
Поэтому ни в коем случае нельзя прикасаться к каким-либо деталям внутри устройства.
Этот знак предупреждает пользователей о том, что имеется важная документация по эксплуатации
и обслуживанию этого устройства. Поэтому ее необходимо внимательно прочитать, чтобы избежать
возможных проблем.
Внимание.
Если монитор LCD1701 работает от стандартного в Европе источника питания переменного тока 220-240 В,
используйте кабель питания, прилагаемый к монитору.
В Великобритании с этим монитором необходимо использовать кабель питания, одобренный BS, с вилкой в литом
корпусе, в которую вмонтирован черный предохранитель (5 A). Если кабель питания не входит в комплект этого
устройства, обратитесь к поставщику.
Во всех остальных случаях используйте кабель питания, соответствующий напряжению электрической сети
переменного тока и стандартам безопасности Вашей страны.
Заявление
Заявление изготовителя
Мы настоящим подтверждаем, что цветной
монитор LCD1701 (L172EN) соответствует
Директиве Совета 73/23/EEC:
– EN 60950
Директиве Совета 89/336/EEC:
– EN 55022
– EN 61000-3-2
– EN 61000-3-3
– EN 55024
Будучи партнером программы ENERGY STAR®, NEC-Mitsubishi Electric Visual Systems Corp. утверждает, что этот продукт
соответствует директивам программы ENERGY STA R в отношении эффективности использования энергии. ENERGY STAR - это
марка, зарегистрированная в США.
IBM PC/XT/AT, PS/2, MCGA, VGA, 8514/A и XGA являются зарегистрированными товарными знаками International Business
Machines Corporation.
Apple и Macintosh являются зарегистрированными товарными знаками Apple Computer Inc.
Microsoft и Windows являются зарегистрированными товарными знаками Microsoft Corporation.
NEC - зарегистрированный товарный знак NEC Corporation.
ErgoDesign зарегистрированный товарный знак NEC-Mitsubishi Electric Visual Systems Corporation в Австрии, странах
Бенилюкс, Дании, Франции, Германии, Италии, Норвегии, Испании, Швеции и Великобритании.
Все остальные товарные знаки или зарегистрированные товарные знаки являются собственностью соответствующих
владельцев.
и содержит отметку
NEC-Mitsubishi Electric Visual
Systems, Corp.
MS Shibaura Bldg., 13-23,
Shibaura 4-chome,
Minato-Ku, Tokyo 108-0023, Japan
BZ 02
Русский
10_Russian 30/10/2002, 11:321
Русский-1
Page 98

Содержимое
В упаковочной коробке* нового монитора NEC LCD1701 должно быть следующее:
• Монитор LCD1701 с наклоняемой опорой
• Кабель питания
• Кабель видеосигнала
• Руководство пользователя
• CD ROM (содержащий полное руководство пользователя в формате
PDF). Для просмотра руководства пользователя необходимо, чтобы
на ПК была установлена программа Acrobat Reader 4.0.
* Обязательно сохраните коробку и упаковочный материал для транспортировки или перевозки монитора.
Краткое руководство по началу работы
Чтобы подключить монитор LCD к системе, выполните следующие инструкции:
1. Отключите питание компьютера.
2. Снимите крышку кабеля.
3. Для PC: Подсоедините 15-штырьковый миниразъем D-SUB соответствующего кабеля видеосигнала к разъему
платы видеоадаптера в компьютере (Рисунок A.1). Затяните все винты.
Для Mac: Подсоедините адаптер кабеля для Macintosh монитора LCD1701 к компьютеру (Рисунок B.1).
Подсоедините конец кабеля соответствующего сигнала с 15-штырьковым миниразъемом
D-SUB к адаптеру кабеля для Macintosh монитора LCD1701 (Рисунок B.1). Затяните все винты.
Адаптер кабеля
для Macintosh
(не входит в
комплект)
Для Macintosh G3 и G4
не требуется адаптер
кабеля Macintosh
Рисунок A.1
Рисунок B.1
4. Подсоедините 15-штырьковый миниразъем D-SUB кабеля видеосигнала к соответствующему разъему на задней
панели монитора (Рисунок C.1).
5. Подсоедините один конец кабеля питания к монитору LCD1701 а другой - к розетке электропитания. Закрепите
кабель видеосигнала и кабель питания переменного тока под крышкой кабеля (Рисунок C.1). Установите крышку
кабеля на место.
ПРИМЕЧАНИЕ. Отрегулируйте положение кабеля под крышкой, чтобы предотвратить повреждение кабеля или
монитора. Расположите кабели так, чтобы ферритовый сердечник и ограничитель находились над
крышкой кабелей, как показано на рисунке (Рисунок C.1).
ПРИМЕЧАНИЕ.
10_Russian 30/10/2002, 11:322
Чтобы правильно подобрать кабель питания переменного тока, см. раздел “Внимание” этого руководства.
Русский-2
Page 99

Ферритовый сердечник
Крышка кабеля
Ограничитель
Рисунок C.1
6. Выключатель с правoй стороны монитора должен быть включен (Рисунок D.1). Включите монитор с помощью
кнопки питания и компьютер.
ПРИМЕЧАНИЕ. Выключатель включает/отключает питание. Если этот выключатель находится в положении OFF
(ВЫКЛ), монитор нельзя включить с помощью кнопки на передней панели. ЗАПРЕЩАЕТСЯ часто
переключать этот выключатель.
Выключатель
Кнопка питания
Рисунок D.1
7. Функция бесконтактной настройки выполняет автоматическую подстройку оптимальных параметров монитора при
первоначальной настройке для параметров синхронизации. Для дальнейших настроек используйте следующие
параметры OSM:
• Auto Adjust Contrast (Автонастройка контрастности)
• Auto Adjust (Автонастройка)
Полное описание этих параметров OSM см. в разделе “Органы управления” этого руководства пользователя.
ПРИМЕЧАНИЕ. В случае каких-либо неполадок обратитесь к разделу Устранение неисправностей этого
руководства пользователя.
Русский-3
Русский
10_Russian 30/10/2002, 11:323
Page 100

Настройка шарнирной опоры
Установите требуемый наклон экрана монитора, придерживая его руками с обеих сторон (Рисунок TS.1).
Отсоединение подставки монитора перед установкой
Чтобы подготовить монитор к установке в другом положении:
1. Отсоедините все кабели.
2. Положите монитор экраном вниз на неабразивную поверхность (Рисунок R.1).
3. Снимите крышку шарнира (Рисунок R.1).
4. Отвинтите 4 винта, крепящие монитор к подставке, и снимите сборную подставку (Рисунок R.2). Теперь монитор
готов к установке в другом положении.
5. Подсоедините кабель питания переменного тока и кабель сигнала к задней панели монитора (Рисунок R.3).
6. Повторите процесс в обратном порядке, чтобы снова подсоединить подставку.
ПРИМЕЧАНИЕ. Другие используемые методы установки должны удовлетворять требованиям VESA.
Соблюдайте осторожность при снятии подставки монитора.
Рисунок TS.1
Крышка шарнира
Неабразивная поверхность
10_Russian 30/10/2002, 11:324
Рисунок R.1
Русский-4
 Loading...