

Page 1
USER'S MANUAL
®
MultiSync
™
L C D17 00M
To learn about other spec ial offers, register online at www.necmitsubishi.com/ productregistration
Page 2

Index
Warning.................................................................................................. 1
Contents ............................................................................................... 2
Hardware Installation ........................................................................3
Software Installation......................................................................... 5
Adjusting the Monitor ....................................................................... 6
Monitor Security Lock Installation ................................................ 6
Recommended Use .............................................................................. 7
Specifications...................................................................................... 9
Troubleshooting.................................................................................10
References .......................................................................................... 11
Limited Warranty .............................................................................. 12
Avertissment ......................................................................................13
Contenu ...............................................................................................14
Installation De Quincaillerie........................................................... 15
Installation Logicielle ...................................................................... 17
Ajustant l’Écran ................................................................................. 18
Sécurité D’Écran Verrouille Installation ......................................18
Usage recommandé...........................................................................19
Fiche technique ................................................................................. 21
Dépannage ......................................................................................... 22
Références ......................................................................................... 23
Garantie limitée................................................................................ 24
Page 3
WARNING
TO PREVENT FIRE OR SHOCK HAZARDS, DO NOT EXPOSE THIS UNIT TO RAIN OR MOISTURE. ALSO, DO NOT USE
THIS UNIT'S POLARIZED PLUG WITH AN EXTENSION CORD RECEPTACLE OR OTHER OUTLETS UNLESS THE PRONGS
CAN BE FULLY INSERTED.
REFRAIN FROM OPENING THE CABINET AS THERE ARE HIGH VOLTAGE COMPONENTS INSIDE. REFER SERVICING
TO QUALIFIED SERVICE PERSONNEL.
CAUTION
CAUTION: TO REDUCE THE RISK OF ELECTRIC SHOCK, MAKE SURE POWER CORD IS UNPLUGGED FROM
WALL SOCKET. TO FULLY DISENGAGE THE POWER TO THE UNIT, PLEASE DISCONNECT THE POWER
CORD FROM THE AC OUTLET.DO NOT REMOVE COVER (OR BACK). NO USER SERVICEABLE PARTS
INSIDE. REFER SERVICING TO QUALIFIED SERVICE PERSONNEL.
This
symbol warns user that uninsulated voltage within the unit may have sufficient magnitude to cause
electric shock. Therefore, it is dangerous to make any kind of contact with any part inside this unit.
This symbol alerts the user that important literature concerning the operation and maintenance of this
unit has been included. Therefore, it should be read carefully in order to avoid any problems.
Canadian Department of Communications Compliance Statement
DOC: This Class B digital apparatus meets all requirements of the Canadian
Interference-Causing Equipment Regulations.
Cet appareil numérique de la classe B respecte toutes les exigences du Règlement
sur le matériel brouiller du Canada.
C.S.A.:
Bears the C.S.A. Mark and is in compliance with Canadian Safety Regulations
according to C.S.A. C22.2 No. 950.
Ce produit porte la marque ‘C.S.A.’ et se conforme aux règlements de sûrele
Canadiens selon CAN/CSA C22.2 No. 950.
FCC Information
1.
This equipment has been tested and found to comply with the limits for a Class B digital
device, pursuant to part 15 of the FCC Rules. These limits are designed to provide
reasonable protection against harmful interference in a residential installation. This
equipment generates, uses, and can radiate radio frequency energy, and, if not installed
and used in accordance with the instructions, may cause harmful interference to radio
communications. However, there is no guarantee that interference will not occur in a
particular installation. If this equipment does cause harmful interference to radio or
television reception, which can be determined by turning the equipment off and on, the user
is encouraged to try to correct the interference by one or more of the following measures:
• Reorient or relocate the receiving antenna.
• Increase the separation between the equipment and receiver.
• Connect the equipment into an outlet on a circuit different from that to which the receiver
is connected.
• Consult your dealer or an experienced radio/TV technician for help.
If necessary, the user should contact the dealer or an experienced radio/television technician
for additional suggestions. The user may find the following booklet, prepared by the Federal
Communications Commission, helpful: ”How to Identify and Resolve Radio-TV Interference
Problems.“ This booklet is available from the U.S. Government Printing Office, Washington,
D.C., 20402, Stock No. 004-000-00345-4.
1
Page 4
Contents
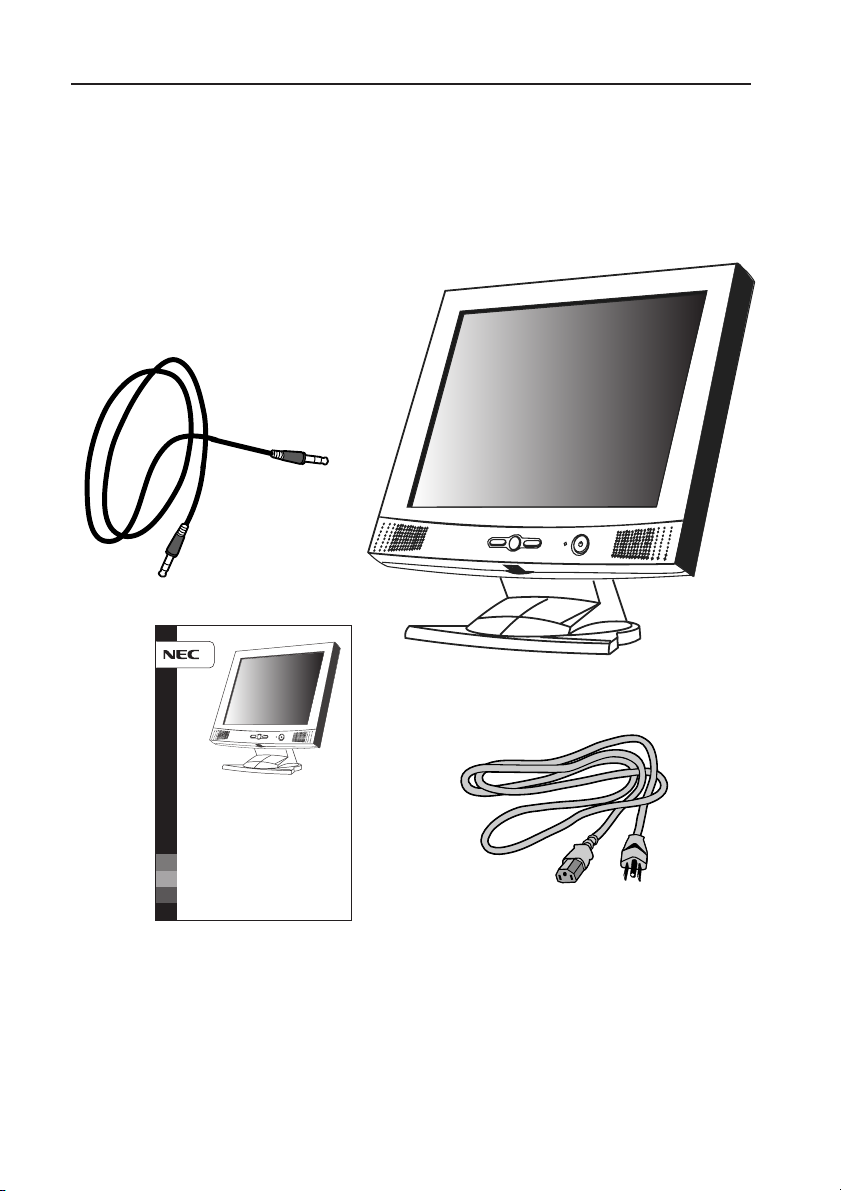
Your new NEC MultiSync® monitor box* should contain the
following:
• MultiSync LCD1700M Monitor
• Power Cord
• Audio Cable
• User’s Manual
Audio Cable
USER'S MANUAL
MultiSync
LCD1 700M
To learn about other special offers, register online at www.necmitsubishi.com/ productregistration
®
™
Power Cord
User’s Manual
* Remember to save your original box and packing material to transport or ship the monitor.
2
Page 5
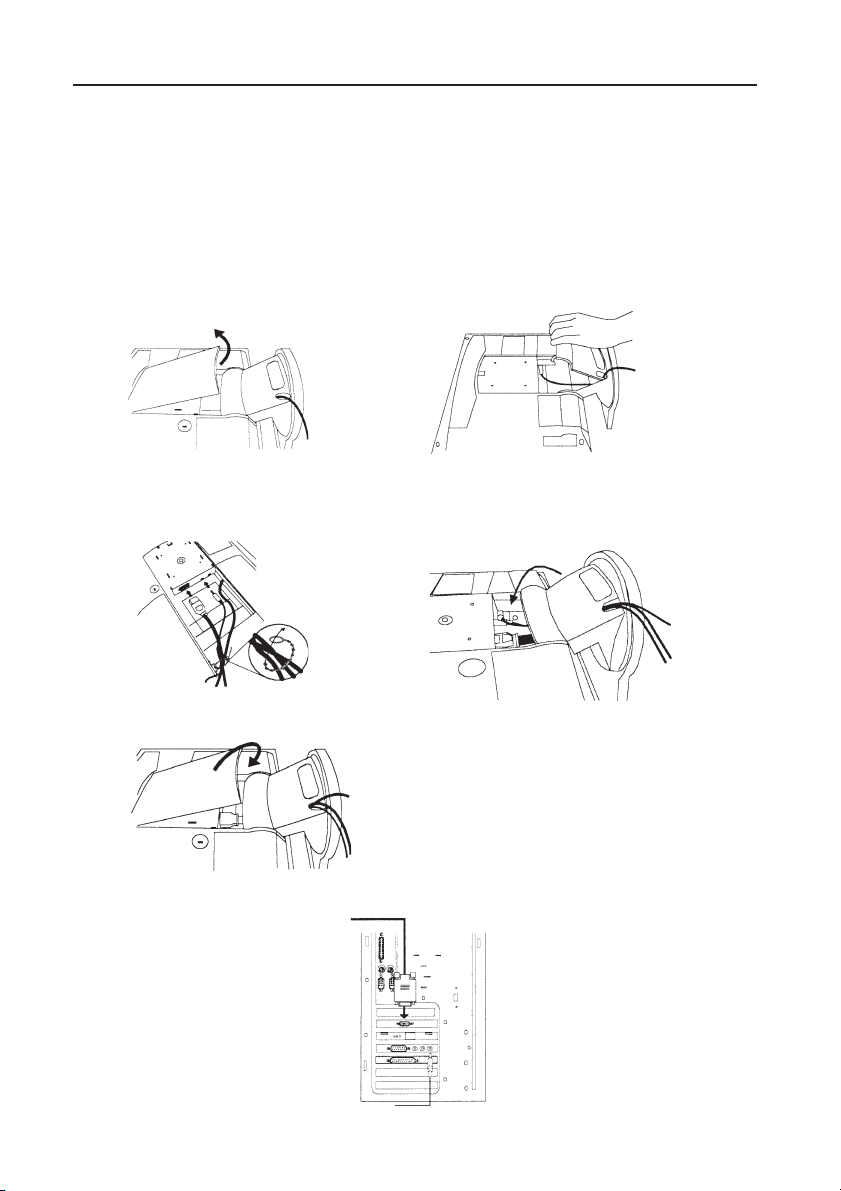
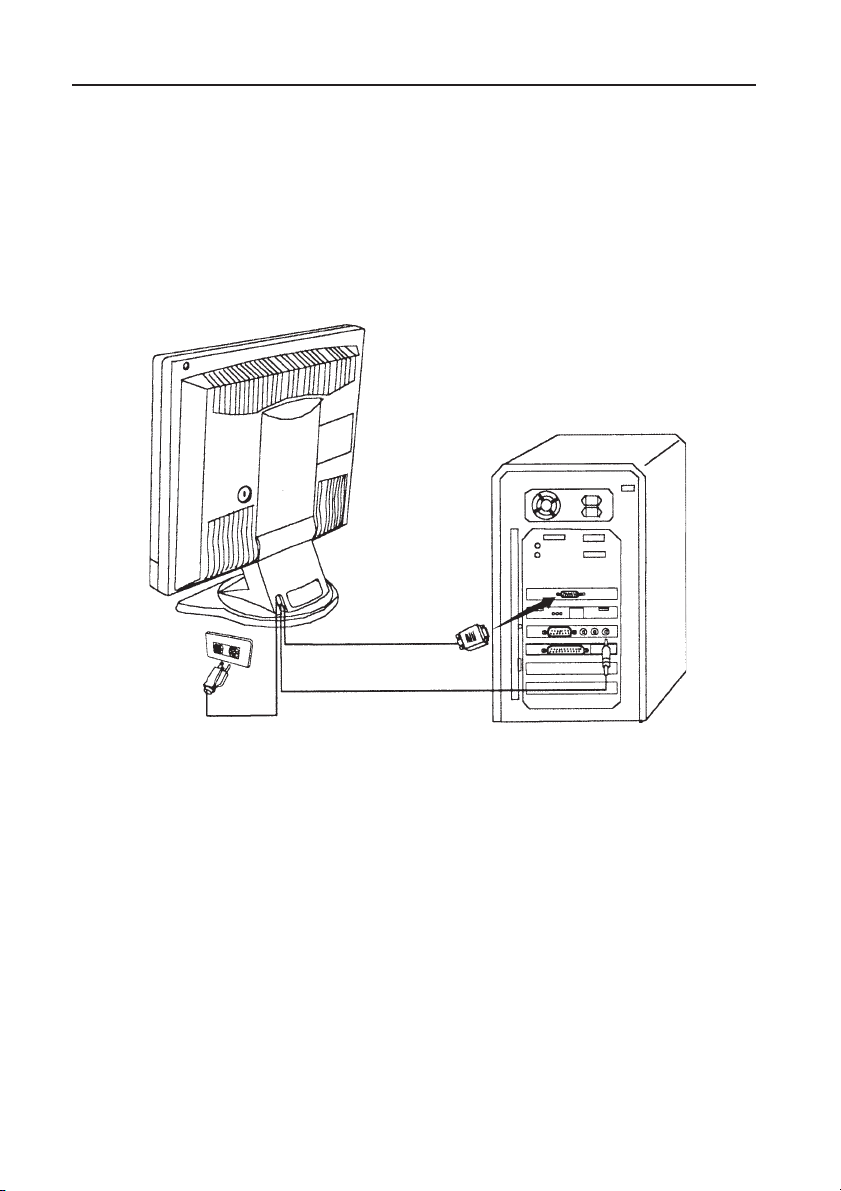
Hardware Installation
To attach the MultiSync® monitor to your system, follow these
instructions:
1. Make sure that the computer and monitor’s power are both turned off. Please
follow the steps to install your LCD monitor.
a. Take off the rear cover, then the base cover.
b. Connect the power cord to your LCD monitor. Then connect the audio
cable into the Audio Input of the monitor. Reattach base cover.
c. Put rear cover back.
d. Plug the 15-pin Mini D-SUB cable into the signal connector of the computer.
3
Page 6
Hardware Installation –continued
2. Connect the power cord at the back of the monitor to an AC power socket.
Please make sure, that the socket is not blocked or covered, so you can disconnect
the unit from AC supply if you need to. Your monitor is equipped with an automatic power supply for a voltage range from 100 to 240 Volt at a frequency of 50
to 60 Hz. Be sure that your local power is within the supported range. If you are
unsure, ask your electricity supplier.
4
Page 7

Software Installation
Choosing the best resolution
Due to the technology of a LCD monitor, it always provides a fixed resolution. For
this monitor, it is a resolution of 1280x1024. This is called the native resolution,
which also represents the maximum resolution. Lower resolutions are displayed on
a full screen through an interpolation circuit. Flaws do occur with the interpolated
resolution compared to the native resolution. If you want to have all the advantages of LCD technology you must use the native resolution. Using Windows 95/
98/2000 you can change the resolution as follows:
1. Double-click the “Display” icon in the control panel.
2. From the “Display properties” window, select the “Settings” tab. There is a
slider on the right-hand side in the middle of the window. There you can alter
the resolution.
3. Set a resolution of 1280x1024.
4. In the subsequent window press: “Apply”, “OK” and “Yes”.
5. You can now close “Display Properties”.
Refresh Rate Selection
There is no need to choose the highest possible refresh rate on a LCD monitor. It is
not technically possible for a LCD display to flicker. Even at a refresh rate of 60 Hz
you will get an absolutely flicker-free image. More important is that you make sure
that you use one of the factory modes. In contrast to a modern CRT monitor, which
is a multi-scan monitor, this model is a multi-frequency monitor. This means, the
best results are only obtained by using the factory modes. You will find a table
with the factory modes in this user guide. For the native resolution of 1280x1024,
these, for example, are 60, 70 and 75 Hz, not 72 Hz. In Windows 95/98/2000
you can change the refresh rate as follows:
1. Double click the “Display” icon in the control panel.
2. From the “Display properties” window, select the”Settings” tab. Click the
“Advanced properties” button in the bottom right corner.
3. Select the “Adapter” tab. The refresh rate selection field is located in the
center at the bottom of the window.
4. Choose a refresh rate from the table with the factory modes, which can be
found in the user’s guide, and select this in the settings field.
5. In the subsequent window press: “Apply”, “OK” and “Yes”.
6. You can now close “Display Properties”.
5
Page 8
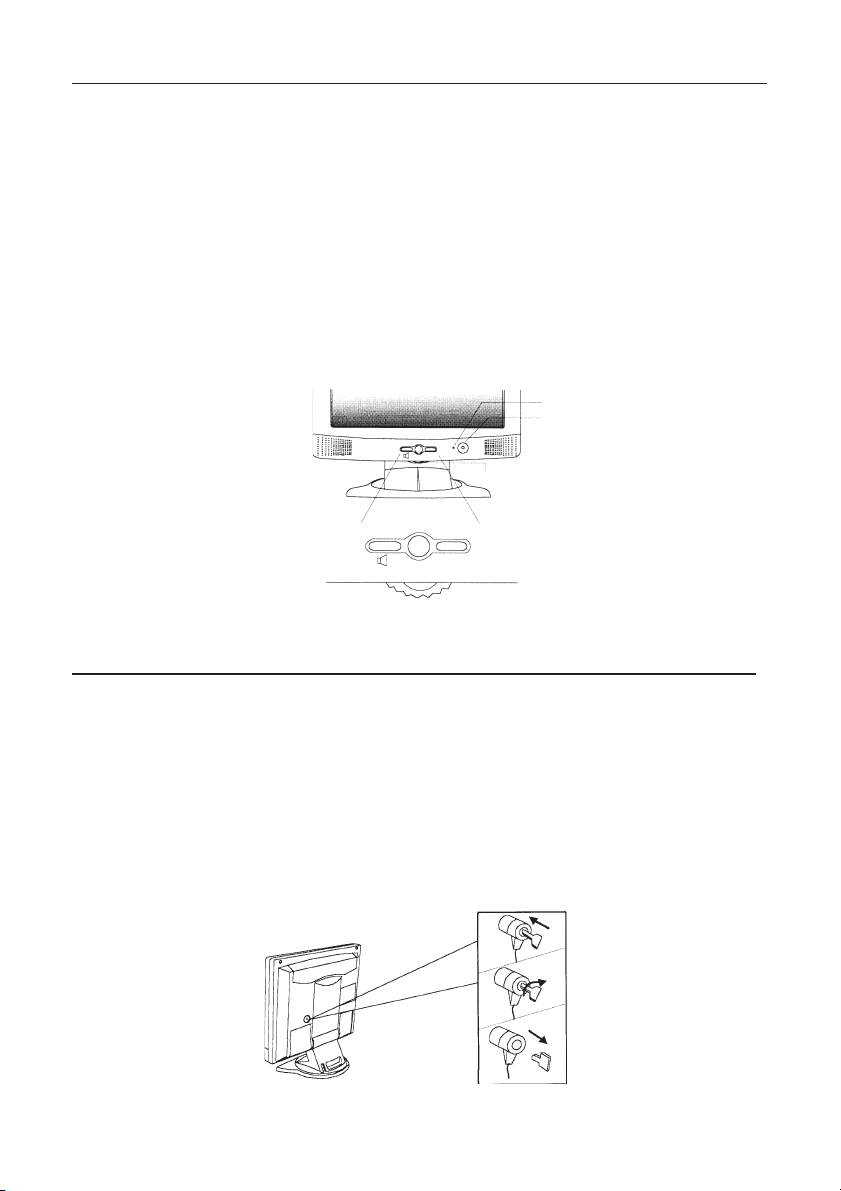
Adjusting the Monitor
There are 4 keys & one wheel for user’s control that includes Power, Auto, Exit,
Enter and a wheel. The following descriptions are the introduction of these
keys & fly wheel.
1. Power: Turn the power on or off.
2. Auto: Adjust vertical position , phase, horizontal position and pixel clock
automatically.
3. Exit key: Back to main menus ; Entering “save menu”; Exit OSD menu without
saving. Hot key for Audio volume adjustment.
4. Enter key: Enter sub-menus ; select items ; save menu.
5. Fly-wheel: Left/right adjustment. Hot key for Brightness/Contrast adjustment.
Power Indicator
Power
Exit Auto Enter
Fly-wheel
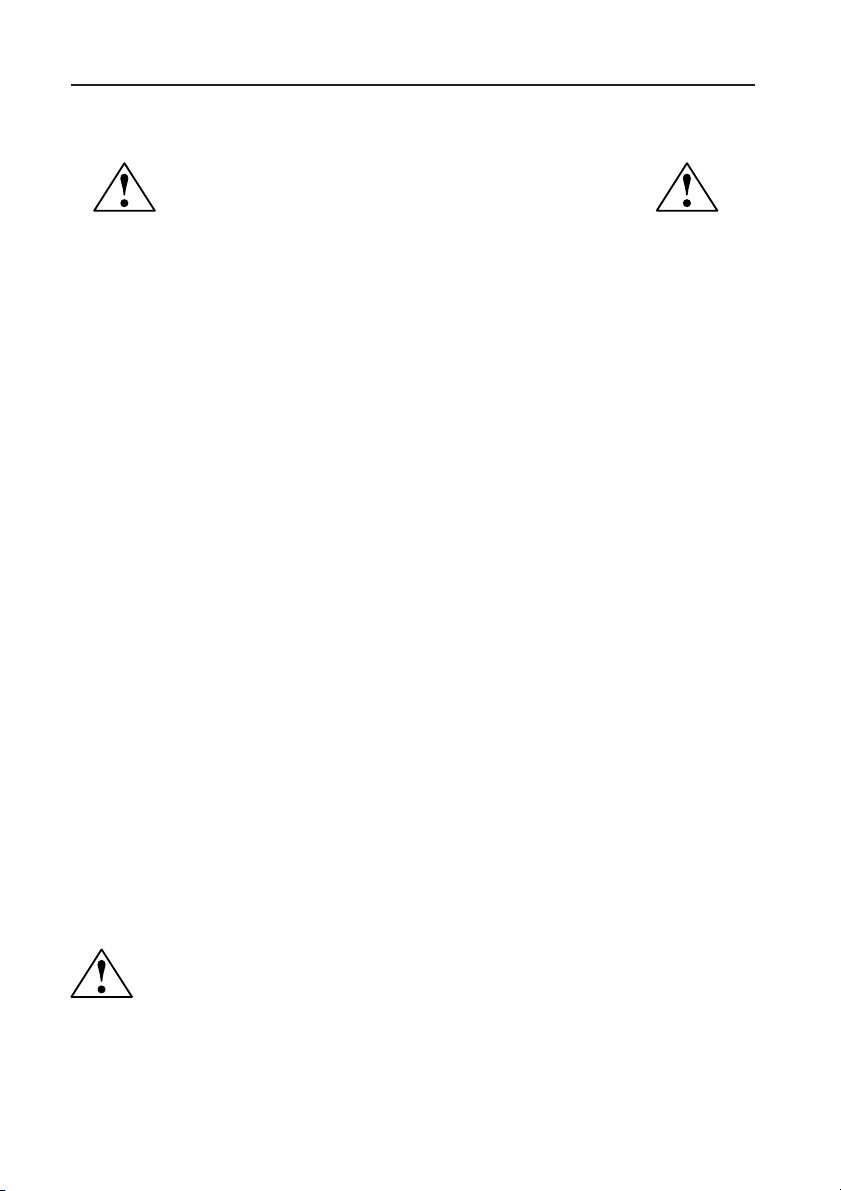
Monitor Security Lock Installation
The monitor can be secured to your desk or any other fixed objects with
Kensington lock security products. The cable can be attached to a slot located on
the rear of your monitor.
1. Insert the lock in the slot located on the rear of the monitor.
2. Turn the key to lock the Security Lock.
3. Remove the key and store it in a safe place.
The Kensington lock is not NEC-Mitsubishi Electronics Display Accessory. It
cannot be ordered from NEC-Mitsubishi Electronics Display. Contact your
reseller for more information.
6
Page 9
Recommended Use
Safety Precautions and Maintenance
FOR OPTIMUM PERFORMANCE, PLEASE NOTE THE
FOLLOWING WHEN SETTING UP AND USING
THE MULTISYNC® LCD1700M COLOR MONITOR:
• DO NOT OPEN THE MONITOR. There are no user serviceable parts inside and opening or removing
covers may expose you to dangerous shock hazards or other risks. Refer all servicing to qualified
service personnel.
• Do not spill any liquids into the cabinet or use your monitor near water.
• Do not insert objects of any kind into the cabinet slots, as they may touch dangerous voltage points,
which can be harmful or fatal or may cause electric shock, fire or equipment failure.
• Do not place any heavy objects on the power cord. Damage to the cord may cause shock or fire.
• Do not place this product on a sloping or unstable cart, stand or table, as the monitor may fall,
causing serious damage to the monitor.
• When operating the MultiSync LCD monitor with its AC 220-240V power supply, use a power
supply cord that matches the power supply voltage of the AC power outlet being used. The power
supply cord you use must have been approved by and comply with the safety standards of your
country. (Type HOSVV-F should be used in UK)
• Do not place any objects onto the monitor and do not use the monitor outdoors.
• The inside of the flourescent tube located within the LCD monitor contains mercury.
Please follow the bylaws or rules of your municipality to dispose of the tube properly.
• In UK, use a BS-approved power cord with molded plug having a black (SA) fuse installed for use
with this monitor. If a power cord is not supplied with this monitor, please contact your supplier.
Immediately unplug your monitor from the wall outlet and refer servicing to
qualified service personnel under the following conditions:
• When the power supply cord or plug is damaged.
• If liquid has been spilled, or objects have fallen into the monitor.
• If the monitor has been exposed to rain or water.
• If the monitor has been dropped or the cabinet damaged.
• If the monitor does not operate normally by following operating instructions.
• Do not bend power cord.
• Do not use monitor in high temperatured, humid, dusty, or oily areas.
• Do not cover vent on monitor.
• If monitor or glass is broken, do not come in contact with the liquid crystal and handle with care.
• Allow adequate ventilation around the monitor so that heat can properly dissipate. Do
not block ventilated openings or place the monitor near a radiator or other heat sources.
Do not put anything on top of monitor.
CAUTION
• The power cable connector is the primary means of detaching the system from the power
supply. The monitor should be installed close to a power outlet which is easily accessible.
• Handle with care when transporting. Save packaging for transporting.
7
Page 10

Recommended Use –continued
CORRECT PLACEMENT AND ADJUSTMENT OF THE MONITOR
CAN REDUCE EYE, SHOULDER AND NECK FATIGUE. CHECK THE
FOLLOWING WHEN YOU POSITION THE MONITOR:
• For optimum performance, allow 20 minutes for
warm-up.
• Adjust the monitor height so that the top of the screen
is at or slightly below eye level. Your eyes should look
slightly downward when viewing the middle of the
screen.
•
Position your monitor no closer than 16 inches and
no further away than 28 inches from your eyes. The
optimal distance is 21 inches.
• Rest your eyes periodically by focusing on an object
at least 20 feet away. Blink often.
• Position the monitor at a 90° angle to windows and
other light sources to minimize glare and reflections. Adjust the monitor tilt so that ceiling
lights do not reflect on your screen.
• If reflected light makes it hard for you to see your screen, use an anti-glare filter.
• Clean the LCD monitor surface with a lint-free, non-abrasive cloth. Avoid using any cleaning
solution or glass cleaner!
• Adjust the monitor’s brightness and contrast controls to enhance readability.
• Use a document holder placed close to the screen.
• Position whatever you are looking at most of the time (the screen or
reference material) directly in front of you to minimize turning your head
while you are typing.
• Avoid displaying fixed patterns on the monitor for long periods of time to avoid image
persistence (after-image effects).
• Get regular eye checkups.
Ergonomics
To realize the maximum ergonomics benefits, we recommend the following:
•
Adjust the Brightness until the background raster disappears
•
Do not position the Contrast control to its maximum setting
•
Use the preset Size and Position controls with standard signals
•
Use the preset Color Setting
•
Use non-interlaced signals with a vertical refresh rate between 60-75Hz
•
Do not use primary color blue on a dark background, as it is difficult to see and
may produce eye fatigue to insufficient contrast
For more detailed information on setting up a healthy work environment, call NECMitsubishi Electronics Display at (800) 632-4662, NEC FastFacts™ information at
(630) 467-4363
for Human Factors Engineering of Visual Display Terminal Workstations – ANSI-HFS
Standard No. 100-1988 – The Human Factors Society, Inc. P.O. Box 1369, Santa Monica,
California 90406.
and request document #900108 or write the American National Standard
8
Page 11

Specifications
Monitor MultiSync® LCD1700M Notes
Specifications Monitor
Picture Tube Diagonal: 17.0 inch Active Matrix; Thin Film Transistor (TFT),
Input Signal Video: ANALOG 0.7 Vp-p/75 Ohms
Display Colors Analog input: Over 16 Million Colors Depends on display card used.
Synchronization Horizontal: 31 kHz to 81 kHz Automatically
Range Vertical: 56 Hz to 76 Hz Automatically
Resolutions Supported 640 x 480 @ 60 to 75 Hz
Resolution based on
vertical frequencies only
Active Display Area Horizontal:
(Full Scan) Vertical:
Power Supply
Current Rating 1,2 A @ 100
Dimensions
Weight 7.3 kg
Environmental Considerations
Viewable Image Size: 17.0 inch Liquid Crystal Display (LCD), 0.264mm
Native Resolution (Pixel Count): 1280x1024 dot pitch; XtraView
Sync: Separate sync. TTL Level
Horizontal sync. Positive/Negative
Vertical sync. Positive/Negative
horizontal and
Operating Temperature: 0°C to + 40°C
Humidity: 20% to 80%
Storage Temperature: -20°C to +60°C
Humidity: 5% to 95%
800 x 600 @ 56 to 75 Hz
832 x 624 @ 56 to 75 Hz
1024 x 768 @ 56 to 75 Hz
1152 x 870 @ 56 to 75 Hz
1280 x 1024 @ 56 to 75 Hz .....................
338 mm/13.3 inches Dependent upon signal timing used,
270 mm/10.6 inches and does not include border area.
AC 100 – 240 V, 50-60 Hz
–
120 V/0,5 A @ 220–240 V
422 mm (W) x 451 mm (H) x 208 mm (D)
17 inches (W) x 18 inches (H) x 8.2 inches (D)
16.1 lbs
Feet: 0 to 10,000 Feet
Feet: 0 to 40,000 Feet
white luminance; 200:1 contrast ratio, typical.
Some systems may not support
all modes listed.
NEC-Mitsubishi Electronics Display cites
recommended resolution at
75Hz for optimal display performance.
TM
Technology; 200cd/m2,
NOTE: Technical specifications are subject to change without notice.
9
Page 12

Troubleshooting
The image is blurred
• Refer to the Installation/Adjustment chapter and then select the correct
resolution, refresh rate and make adjustments based on these instructions.
• Do you use a VGA extension cable?
Remove the extension cable for the test. Is the image now in focus? If not,
optimize the image working on the description in the chapter, Installation/
Adjustment. It is normal for blurring to occur due to conduction losses in
extension cables. You can minimize these losses by using an extension cable
with better conduction quality or with a built-in booster.
• Does the blurring only occur at resolutions lower than the native (maximum)
resolution?
Refer to the Installation/Adjustment chapter. Select the native resolution.
The image has a faulty color appearance:
• It has a yellow, blue or pink appearance.
On the monitor press the “Enter” button and using the Fly-wheel move to the
“color settings” menu. Select the “Recall” item and press “Enter”. If the image is
still not correct and the OSD also has a fault color appearance, then one of the
three primary colors is missing in the signal input. Now check the VGA cable
contacts. If any pins are bent or broken off, then contact your dealer or read
the chapters for additional help and service.
No image can be seen
• Is the prompt on the display illuminated in green?
If the LED is illuminated in green, then press the “Exit” button on the monitor to
access the On Screen Display. If the message “NON PRESET MODE” appears
there, read the chapter Installation/Adjustment.
• Is the prompt on the display illuminated in orange?
If the LED is illuminated in orange, then the power management mode is active.
Press a button on the computer keyboard or move the mouse. If that does not
help, then check the VGA cable contacts. If any pins are bent or broken off,
then contact your dealer or read the chapters for additional help and service.
• Is the prompt on the display not illuminated at all?
Check the power supply mains socket, the external power supply and the main
switch.
The image is or distorted, flashes or flickers
• Refer to the Installation/Adjustment chapter and select the correct
resolution, refresh rate and make adjustments based on these instructions.
The image is displaced in one direction:
• Refer to the Installation/Adjustment chapter and then select the correct
resolution, refresh rate and make adjustments based on these instructions.
10
Page 13

References
• BBS (978) 742-8706
NEC-Mitsubishi Electronics Display of America Remote Bulletin Board System
is an electronic service accessible with your system and a modem. Communication parameters are: 300/1200/2400/9600/14.4k/28.8k/33.6k bps, no
parity, 8-data bits, 1 stop bit
• Customer Service/Technical Support (800) 632-4662
Fax (978) 742-7049
• Electronic Channels:
NEC-Mitsubishi Electronics Display of America Remote Bulletin Board System
Internet e-mail: tech-support@necmitsubishi.com
Internet ftp site: ftp.necmitsubishi.com
World Wide Web: http://www.necmitsubishi.com
Product Registration: http://www.necmitsubishi.com/productregistration
European Operations: http://www.nec-monitors.com
Windows® 95/98/2000 INF File:
• FastFacts™ Information (630) 467-4363
INFORMATION DESCRIPTION DOCUMENT #
Glossary Definition of terms related 900203
More Information Names and addresses of 900204
Macintosh Connection Detailed information on 153006
Healthy Work Environment Detailed information on 900108
http://support.necmitsubishi.com/software.htm
then download the file NECMSINF.ZIP
to functions, features and
installation of the
MultiSync® monitor
other groups involved in
standards and features of
the MultiSync monitor
connecting the MultiSync
monitor to a Macintosh
setting up a healthy work
environment
• Literature & Sales Info (800) NEC-INFO [(800) 632-4636]
• MultiSync Fulfillment (800) 820-1230
[For software & accessories]
• TeleSales (800) 284-4484
11
Page 14

Limited Warranty
NEC-Mitsubishi Electronics Display of America, Inc. (hereinafter “NMD-A”) warrants this
Product to be free from defects in material and workmanship and, subject to the conditions set
forth below, agrees to repair or replace (at NMD-A’s sole option) any part of the enclosed unit
which proves defective for a period of three (3) years from the date of first consumer purchase.
Spare parts are warranted for ninety (90) days. Replacement parts or unit may be new or
refurbished and will meet specifications of the original parts or unit.
This warranty gives you specific legal rights and you may also have other rights, which vary
from state to state. This warranty is limited to the original purchaser of the Product and is not
transferable. This warranty covers only NMD-A-supplied components. Service required as a
result of third party components is not covered under this warranty. In order to be covered
under this warranty, the Product must have been purchased in the U.S.A. or Canada by the
original purchaser. This warranty only covers Product distribution in the U.S.A. or Canada by
NMD-A No warranty service is provided outside of the U.S.A. or Canada. Proof of Purchase
will be required by NMD-A to substantiate date of purchase. Such proof of purchase must be
an original bill of sale or receipt containing name and address of seller, purchaser, and the
serial number of the product.
It shall be your obligation and expense to have the Product shipped, freight prepaid, or
delivered to the authorized reseller from whom it was purchased or other facility authorized
by NMD-A to render the services provided hereunder in either the original package or a
similar package affording an equal degree of protection. All Products returned to NMD-A for
service MUST have prior approval, which may be obtained by calling 1-800-632-4662. The
Product shall not have been previously altered, repaired, or serviced by anyone other than a
service facility authorized by NMD-A to render such service, the serial number of the product
shall not have been altered or removed. In order to be covered by this warranty the Product
shall not have been subjected to displaying of fixed images for long periods of time resulting
in image persistence (afterimage effects), accident, misuse or abuse or operated contrary to
the instructions contained in the User’s Manual. Any such conditions will void this warranty.
NMD-A SHALL NOT BE LIABLE FOR DIRECT, INDIRECT, INCIDENTAL, CONSEQUENTIAL,
OR OTHER TYPES OF DAMAGES RESULTING FROM THE USE OF ANY NMD-A PRODUCT
OTHER THAN THE LIABILITY STATED ABOVE. THESE WARRANTIES ARE IN LIEU OF ALL
OTHER WARRANTIES EXPRESS OR IMPLIED, INCLUDING, BUT NOT LIMITED TO, THE
IMPLIED WARRANTIES OF MERCHANTABILITY OR FITNESS FOR A PARTICULAR PURPOSE.
SOME STATES DO NOT ALLOW THE EXCLUSION OF IMPLIED WARRANTIES OR THE
LIMITATION OR EXCLUSION OF LIABILITY FOR INCIDENTAL OR CONSEQUENTIAL DAMAGES SO THE ABOVE EXCLUSIONS OR LIMITATIONS MAY NOT APPLY TO YOU.
This Product is warranted in accordance with the terms of this limited warranty. Consumers
are cautioned that Product performance is affected by system configuration, software, the
application, customer data, and operator control of the system, among other factors. While
NMD-A Products are considered to be compatible with many systems, specific functional
implementation by the customers of the Product may vary. Therefore, suitability of a Product
for a specific purpose or application must be determined by consumer and is not warranted
by NMD-A.
For the name of your nearest authorized NEC-Mitsubishi Electronics Display service facility,
contact NEC-Mitsubishi Electronics Display at 1-800-632-4662.
12
Page 15

AVERTISSEMENT
AFIN D’ÉVITER TOUT RISQUE D’INCENDIE OU D’ÉLECTROCUTION, NE PAS EXPOSER CET APPAREIL À LA PLUIE OU À
L’HUMIDITÉ. NE PAS UTILISER LA FICHE D’ALIMENTATION POLARISÉE AVEC UNE PRISE DE CORDON DE RALLONGE
OU AUTRE PRISE SAUF SI LES BROCHES PEUVENT ÊTRE ENTIÈREMENT INTRODUITES.
NE PAS OUVRIR LE BOÎTIER, LEQUEL CONTIENT DES COMPOSANTS À HAUTE TENSION. CONFIER TOUS TRAVAUX
À DU PERSONNEL TECHNIQUE QUALIFIÉ.
ATTENTION
RISQUE DE DÉCHARGE ÉLECTRIQUE • NE PAS OUVRIR
ATTENTION : POUR ÉVITER TOUT RISQUE D'ÉLECTROCUTION, NE PAS OUVRIR LE COUVERCLE (L'ARRIÈRE). À L'INTÉRIEUR, AUCUNE
PIÈCE NE NÉCESSITE L'INTERVENTION DE L'UTILISATEUR. EN CAS DE PROBLÈME, S'ADRESSER À DU PERSONNEL TECHNIQUE QUALIFIÉ.
Ce symbole est une mise en garde contre les risques d'électrocution que présentent certaines parties dépourvues
d'isolation à l'intérieur de l'appareil. Il est donc dangereux d'établir le moindre contact avec ces parties
Ce symbole prévient l'utilisateur que des directives d'utilisation et de maintenance de cet appareil sont fournies avec
ce guide d’utilisateur. Par conséquent, celles-ci doivent être lues attentivement pour éviter tout incident.
.
Déclaration de conformité – Département des Communications du Canada
DOC: Cet appareil numérique de classe B respecte toutes les exigences du Règlement
sur le matériel à l'origine d'interférences du Canada.
C.S.A.:Ce produit porte la marque «C.S.A.» et est conforme aux règlements de sécurité
canadiens selon CAN/C.S.A. 22.2 No. 950.
Informations FCC
1.
Cet appareil a été testé et s’avère conforme avec les spécifications d'équipements de Classe B, section 15
de la réglementation FCC. Ces spécifications ont été établies pour garantir une protection raisonnable
contre les interférences nuisibles dans une installation résidentielle. Cet appareil génère, utilise et peut
émettre des fréquences radio et, s'il n'est pas installé et utilisé selon les directives de ce guide, il peut
perturber les communications radio. Cependant, il n'est pas garanti qu'aucune interférence ne se produira
dans une installation donnée.
Si cet appareil provoque des interférences nuisibles à la réception radio ou télévision, ce que vous pouvez
déterminer en allumant et en éteignant l'appareil, essayez de remédier au problème en prenant une ou
plusieurs des mesures suivantes :
• Réorienter ou repositionner l'antenne de réception.
• Augmenter la distance entre l'appareil et le récepteur.
• Connecter l'appareil à une prise de courant sur un circuit différent de celui sur lequel le récepteur
est connecté.
• Consulter son revendeur ou un technicien radio/TV pour obtenir de l'aide.
Si nécessaire, l'utilisateur doit contacter le revendeur ou un technicien radio/TV afin d'obtenir des
informations supplémentaires. L'utilisateur peut se procurer le livret utile suivant, préparé par la Federal
Communications Commission : «How to Identify and Resolve Radio-TV Interference Problems» (Comment
cerner et résoudre les problèmes d’interférences radio/TV). Ce livret est disponible auprès du U.S.
Government Printing Office, Washington, D.C., 20402, Stock No. 004-000-00345-4.
13
Page 16

Contenu
La boîte* de votre nouveau moniteur NEC-Mitsubishi MultiSync
contient :
• Moniteur MultiSync LCD1700M
• Cordon d'alimentation
• Câble d’audio
• Manuel de l’utilisateur
Câble d’audio
MC
avec socle inclinable
®
USER'S MANUAL
MultiSync
LCD1 700M
To learn about other special offers, register online at www.necmitsubishi.com/ productregistration
®
™
Cordon d'alimentation
Manuel de l’utilisateur
* Ne pas oublier de conserver la boîte et le matériel d'emballage d'origine pour transporter ou expédier le moniteur.
14
Page 17

Installation De Quincaillerie
À adjoindre le MultiSyncMC l’écran à votre système, suis ces instructions:
1. Assure que l’ordinateur et écran s power sommes des et. Please suivez pour
installer vos LCD l’écran les étapes.
a. Enlève l’arrière de l’étui, l’étui puis bas.
b. Relie le pouvoir du cordon à vos LCD l’écran. Puis relie le son le câble dans
l’Entrée Sonore de l’écran. Reattach base de l’étui.
c. Remets de l’étui arrière.
d. Prise 15 l’épingle la Mini D SUB cable dans le signal connecteur
d’informatique.
15
Page 18

Installation De Quincaillerie (suite)
2. Relie le 15 épingle SUB de D Mini cable, qui directement est adjoint à l’écran,
au VGA sorti des données des graphismes carte sur informatique.
3. Relie le pouvoir du cordon au dos de l’écran à un AC power prise. Please
assurez, que bloqué ou la prise pas couvrez, que tellement vous pouvez
déconnecter l’unité de AC fournissez si vous need ! Votre écran est équipé sur un
power supply automatique pour un voltage range de 100 à 240 Volt à une
fréquence de 50 à 60 Hz. Sommes sûr que votre pouvoir local est au-dedans le
soutenu éventail. Si vous êtes unsure, demande vos de l’électricité le fournisseur.
16
Page 19

Installation Logicielle
Choisissant la la plus meilleure résolution
Au compte de la technologie d’un LCD contrôle, le toujours fournit fixe une
résolution. Pour le cet écran, c’est une résolution de 1280x1024. Ça s’appelle soidisant natif de la résolution, qui aussi représente maximal la résolution. Des
résolutions plus basses sont affichées un écran dessus plein à travers d’un circuit
d’interpolation. Des défauts supportent arriver que l’interpolé résolution compared
to la résolution native. Si vous voulez avoir tout les avantages de technologie de
LCD que vous devez utiliser la résolution native. Utiliser Windows 95/98/2000
ou ou vous pouvez transformer comme il suit la résolution:
1. Le sosie clique que l’icône “d’Affichage” dans le réglage panel.
2. De la fenêtre, de propriétés” “d’Affichage sélectionne les “Réglages” patte.
There a un glisseur sur la main droite le côté au sein de la fenêtre. Là vous
pouvez modifier la résolution.
3. Mets une résolution de 1280x1024.
4. Dans la fenêtre subséquente presse: “Appliquer,” “OK” et “Oui”.
5. Vous pouvez maintenant près “Affichage des Propriétés”.
Rafraîchis Taux Sélection
There est no need pour choisir le haut possible rafraîchis taux sur un
n’est pas que possible pour un LCD affiche techniquement pour vaciller. Égalise à
rafraîchis taux de 60 Hz que vous obtiendrez un complètement vacille image gratuite.
Plus important est one of factory que vous vous assurez que vous utilisez des modes. In
contrast to a modern CRT monitor, which is a multi-scan monitor, this model is a multifrequency monitor. Ce moyen, les les plus meilleurs résultats ne sont obtenus by qu’en
utilisant les modes factory. Vous trouverez une table sur dedans les modes factory le
guide de l’utilisateur. Pour la résolution native de
60, 70 Hz et 75, pas 72, cependant. Dans Windows 95/98/2000 ou ou vous pouvez
se transformer le rafraîchis comme il suit taux:
1. Le sosie clique que l’icône “d’Affichage” dans le réglage panel.
2. De la fenêtre, de propriétés” “d’Affichage sélectionne les Réglages” patte. Clic
les propriétés” “Avancées boutonnent dans le coin inférieur droit.
3. “L’Adaptateur” sélectionne patte. Le rafraîchis taux de la sélection field est
localisé centralement au bas de la fenêtre.
4. Choisis rafraîchir taux de la table sur les modes factory, qui sont trouvées dans
le guide, de l’utilisateur et à bidon sélectionne ça dans les réglages field.
5. Dans la fenêtre subséquente presse : “Appliquer,” “OK” et “Oui”.
6. Vous pouvez maintenant près “Affichage des Propriétés”
1280x1024
17
LCD contrôle
, ceux-ci, sommes ainsi,
. Ça
Page 20

Ajustant l’Écran
There a 4 clés et un volant pour l’utilisateur contrôle qu’inclut Pouvoir, Auto, Sortie,
Enter et un volant. Ce qui suivi des descriptions sont l’introduction de ces clés et
mouche volant.
1. Auto : Ajuste de la position verticale, phase, position horizontale et pixel
chronomètre automatiquement.
3. Sortie adapte : Back à menus ; Pénétrant save menu de OSD sans épargne
principaux menu ; Sort. Hot clé pour le volume Sonore adjustment.
4. Menus ; de sub de Enter de clé : de Enter sélectionnent que des articles ;
économisent menu.
5. Vole Left/right ou très volant : adjustment. Clé chaude pour la luminosité ou
contraste du réajustement.
Power Indicateur
Pouvior
Sortie Auto Enter
La Mouche Pousse
Sécurité D’Écran Verrouille Installation
L’écran peut être arrimé à votre bureau ou plus autrement réparai la sécurité à de
verrouiller des produits des objets sur Kensington. Le câble peut être adjoint à une
rainure localisai sur l’arrière de votre écran.
1. Encart l’enferme la rainure localisai sur arrière de l’écran.
2. Tourne la Sécurité pour verrouiller Verrou la clé.
3. La clé de Remove et le stockent dans un endroit safe.
Le Kensington ne verrouille pas n’est pas un NEC Accessoire. Ça cannot être
ordered de NEC. Touche votre reseller pour la plus nombreuse information.
18
Page 21

Usage recommandé
Consignes de sécurité et d’entretien
POUR UN FONCTIONNEMENT OPTIMAL, PRIÈRE DE NOTER
CE QUI SUIT POUR LE RÉGLAGE ET L'UTILISATION DU
MONITEUR COULEUR MULTISYNC® LCD :
• NE PAS OUVRIR LE MONITEUR. Aucune pièce intérieure ne nécessite l'intervention de l'utilisateur,
et l'ouverture ou la dépose des couvercles peut entraîner des risques de décharges électriques
dangereuses ou d'autres risques. Confier tous travaux à du personnel technique qualifié.
• Ne pas renverser de liquides dans le boîtier, ni utiliser le moniteur près de l'eau.
• Ne pas introduire d'objets de quelque nature que ce soit dans les fentes du boîtier car ceux-ci
pourraient toucher des endroits sous tension dangereuse, ce qui peut provoquer des blessures,
voire être fatal, ou peut occasionner une décharge électrique, un incendie ou une panne de
l'appareil.
• Ne pas placer d'objets lourds sur le cordon d'alimentation. Un cordon endommagé peut
occasionner une décharge électrique ou un incendie.
• Ne pas placer cet appareil sur un chariot, un support ou une table inclinée ou instable, afin
d'éviter que le moniteur ne tombe, occasionnant de sérieux dommages au moniteur.
• Pour l'utilisation du moniteur MultiSync LCD avec l'alimentation CA mondiale de
220-240 V, utiliser un cordon d'alimentation qui correspond à la tension de l'alimentation fournie
à la prise de courant CA. Le cordon d'alimentation utilisé doit être agréé et en conformité avec les
normes de sécurité de son pays. (Type H05VV-F à utiliser sauf au Royaume-Uni.)
• Ne placer aucun objet sur le moniteur et ne pas l’utiliser en extérieur.
• L’intérieur du tube fluorescent situé dans le moniteur contient du mercure. Pour l’élimination
appropriée, observez les règlements en vigueur dans votre région.
• Au R, –U., utilisez avec ce moniteur un cordon d’alimrntation approuvé BS avec fiche moulée d’un
fusible noir (SA). Si un cordon d’alimentation n’a pas été fourni avec ce moniteur, veuillez
contacter votre fournisseur.
Débrancher immédiatement le moniteur de la prise murale et confier la réparation à du personnel
technique qualifié dans les cas suivants :
• Lorsque le cordon d'alimentation ou la fiche est endommagé(e).
• Si du liquide a été renversé ou des objets sont tombés à l'intérieur du moniteur.
• Si le moniteur a été exposé à la pluie ou à de l'eau.
• Si le moniteur est tombé ou le boîtier est endommagé.
• Si le moniteur ne fonctionne pas normalement en suivant les directives d'utilisation.
• Ne courbe pas le pouvoir du cordon.
• N’utilise pas votre écran dans de hautes températures humides poussiéreuses près d’huile ou.
• Ne couvre pas l’armoire fente ou usage rayonnai mauvaise chaleur.
•
Si écran ou verre est rodé, ne supporter pas ne venir pas touche le liquide crystal et manche sur soin
• Prévoir une aération suffisante autour du moniteur pour que la chaleur puisse se
dissiper correctement. Ne pas obstruer les ouvertures de ventilation ni placer le
moniteur près d'un radiateur ou autre source de chaleur. Ne rien poser sur le
moniteur.
AVERTISSEMENT
• La fiche du cordon d'alimentation est le moyen principal de débrancher le système
de l'alimentation. Le moniteur doit être installé à proximité d'une prise de courant
facilement accessible.
•
Manipuler avec soin lors du transport. Conserver l'emballage pour le transport.
.
19
Page 22

Usage recommandé (suite)
LA MODIFICATION DE LA POSITION ET DU RÉGLAGE DU MONITEUR PEUT
RÉDUIRE LA FATIGUE DES YEUX, DES ÉPAULES ET DE LA NUQUE. OBSERVER
LES DIRECTIVES CI-APRÈS LORS DU POSITIONNEMENT DU MONITEUR:
• Pour une performance optimale, laissez le moniteur se réchauffer pendant 20 minutes.
• Régler la hauteur du moniteur de sorte que le dessus
de l'écran soit au niveau ou légèrement en-dessous
du niveau des yeux. Les yeux doivent regarder
légèrement vers le bas lorsque l'on regarde le milieu
de l'écran.
• Positionner le moniteur à une distance minimale de
40 cm (16 po) et maximale de 70 cm (28 po) des yeux.
La distance optimale est de 53 cm (21 po).
• Reposer ses yeux régulièrement en regardant vers un
objet situé à au moins 6 m (20 pieds). Cligner
régulièrement.
• Positionner le moniteur à un angle de 90° par rapport aux fenêtres et autres sources de
lumière, afin de réduire au maximum les reflets et l'éblouissement. Régler l'inclinaison
du moniteur de sorte que l'éclairage du plafond ne soit pas reflété sur l'écran.
• Si une lumière réfléchie rend la vision de l'écran difficile, utiliser un filtre anti-reflet.
• Nettoyer régulièrement le moniteur. Utiliser un chiffon sans peluches et non abrasif et
une solution de nettoyage sans alcool, neutre, non abrasive ou un produit nettoyant
pour vitres pour éliminer au maximum la poussière.
•
Régler les commandes de luminosité et de contraste du moniteur pour améliorer la lisibilité.
• Utiliser un support de document placé près de l'écran.
• Positionner ce que l'on regarde le plus souvent (l'écran ou les documents de référence)
directement devant soi pour réduire au maximum les mouvements de la tête lorsque
l'on dactylographie.
• Pour éviter la persistance d’images (images rémanentes), n’affichez pas des motifs fixes
sur le moniteur pendant de longues périodes.
• Consulter régulièrement un ophtalmologiste.
Ergonomie
Pour optimiser les avantages ergonomiques, observez les directives suivantes :
• Régler la luminosité jusqu’à ce que la trame de fond disparaisse.
• Ne pas placer la commande de contrate à son réglage maximum.
• Utiliser les commandes de format et position préprogrammées avec signaux standard .
• Utiliser le réglage couleur et les commandes gauche/droite préprogrammés.
•
Utiliser des signaux non entrelacés avec fréquence de rafraîchissement vertical de 60 à 75 Hz
• Ne pas utiliser la couleur bleu primaire sur fond foncé car cela rend la lecture difficile
et peut occasionner de la fatigue oculaire en raison de contraste insuffisant.
Pour des informations plus détaillées sur l'établissement d'un environnement de travail sain, appeler NEC au
(800) 820-1230, demander le service d’information par télécopieur NEC FastFacts au (800) 366-0476 et
demander le document no 900108 ou écrire à American National Standard for Human Factors Engineering
of Visual Display Terminal Workstations - ANSI-HFS Standard No. 100-1988 - The Human Factors Society,
Inc. P.O. Box 1369, Santa Monica, California 90406.
20
.
Page 23

Fiche technique
Caractér. techn. Moniteur MultiSync®Remarques
du moniteur LCD1700M
Module LCD Diagonale : 17,0 po Matrice active; transistor à film fin (TFT);
Résolution (nombre de pixels) : 1280 x 1024 pas 0,264 mm; technologie XtraViewMC;
Signal d'entrée Vidéo : ANALOGIQUE O,7 Vp-p/75 Ohms
Couleurs d'affichage Entrée analogique : Sur 16 million de couleurs Dépend de la carte vidéo utilisée.
Gamme de Horizontale : 31 kHz à 81 kHz Automatique
synchronisation Verticale : 56 Hz à 75 Hz Automatique
Résolutions acceptées 640 x 480 @ 60 Hz à 75 Hz
Zone d'affichage active Horizontale :
Alimentation
Tension d'alimentation 1,2 A @ 100–120 V/0,5 A @ 220–240 V
Dimensions
Poids 7,3 kg
Considérations environnementales
Température de fonctionnement : 5 °C à +34 °C
Température de stockage : -20 °C à +60 °C
Surface utile : 17,0 po affichage à cristaux liquides (LCD);
Sync : Synchro séparée niveau TTL.
Positif/négatif sync. horizontale
Positif/négatif sync. verticale
800 x 600* @ 56 Hz à 75 Hz
832 x 624* @ 56 Hz à 75 Hz
1024 x 768* @ 56 Hz à 75 Hz
1152 x 870 @ 56 Hz à 75 Hz
1280 x 1 024 @ 56 Hz à 75 Hz ....................
Verticale :
Humidité : 20 % à 80 %
Altitude : 0 à 10 000 pieds
Humidité :5 % à 95 %
Altitude : 0 à 40 000 pieds
338 mm/13,3 po
270 mm/10,6 po
AC 100–120 V, 50-60 Hz
422mm (L) x 451 mm (H) x 208 mm (P)
19,6 po (L) x 19,7 po (H) x 9,7 po (P)
16,1 livres
MC
luminance blanche 200 cd/m2; taux de
contraste caractéristique 200:1.
NEC-Mitsubishi Electronics Display
recommande une résolution à 75 Hz
pour des performances d'affichage optimales.
NOTA : Les spécifications techniques sont susceptibles d’être modifiées sans préavis.
21
Page 24

Dépannage
L’image s’est estompée :
• Lis le chapitre, installation ou réajustement ultérieurement select correct la résolution,
rafraîchit taux et fais des réajustements basai sur ces instructions.
• Est-ce que vous utilisez VGA du rallongement cable ?
Le rallongement de Remove câble pour l’épreuve. Est-ce que l’image est maintenant
dans foyer? Si n’optimise pas l’image ouvrière sur la description dans le chapitre,
installation ou réajustement. C’est normal pour estompant pour arriver au compte de
pertes de conduction dans rallongement des câbles. Vous pouvez minimiser en utilisant
un rallongement du câble sur meilleure conduction ou intégré ces pertes par qualité sur
un booster.
• Fait estompant qu’arrive à des résolutions bas que la résolution native (maximale) ? Lis
le chapitre installation ou réajustement. L’indigène sélectionne de la résolution.
L’image a une tenue incorrecte color
•Ça a jaune, du bleu ou rose la tenue.
Sur l’écran presse le “Enter” bouton et utilisant Fly volant mouvement à “color des
réglages” menu. Sélectionne aussi le “Rappel” et presse “Enter”. Si l’image est le OSD
l’alambic pas rectifie aussi et fait à colorer la tenue, un travers puis one of le trois
primaire colore est en train de manquer dans le signal input. Maintenant contrôle le
VGA des contacts cable. Si plus épingle sommes bent ou détachés, puis touche votre
stockiste ou lis les chapitres pour l’aide supplémentaire et révise.
• Image aucune peut être vue :
Est-ce que le prompt est sur l’affichage illuminai dans vert ?
Si MENÉ s’est illuminé dans vert, puis presse la “Sortie” bouton sur l’écran à accéde le
Sur Écran Affichage. Si le “NON de de de message PRÉRÉGLAI MODE” apparaît voilà,
lis le chapitre de l’installation ou.
• Est-ce que le prompt est sur l’affichage illuminai dans orange ?
If the LED is illuminated in orange, then the power management mode is active. Un
bouton de presse sur le clavier informatique ou déplace la souris. Si ça n’aide pas, puis
contrôle le VGA du câble des contacts. Si plus épingle sommes bent ou détachés, puis
touche votre stockiste ou lis les chapitres pour l’aide supplémentaire et révise.
• Est-ce que le prompt est sur l’affichage pas du tout illuminai ?
La prise, de canalisations de power supply de chèque le power supply externe et
l’interrupteur principal.
L’image ou est déformée, flamboie ou vacille:
• Lis le chapitre, installation ou réajustement ultérieurement select correct la résolution,
rafraîchit taux et fais des réajustements basai sur ces instructions.
L’image est déplacée dans un direction :
• Lis le chapitre, installation ou réajustement ultérieurement select correct la
résolution, rafraîchit taux et fais des réajustements basai sur ces instructions.
22
Page 25

Références
• BBS (978) 742-8706
Le système de babillard électronique NEC-Mitsubishi Electronics Display of
America, Inc. est un service électronique accessible avec votre système et un
modem. Les paramètres de communication sont : 300/1200/2400/9600/
1,4 k/28,8 k/33,6 k bps, pas de parité, 8 bits de données, 1 bit d'arrêt
• Service à la clientèle/
Assistance technique (800) 632-4662
Télécopieur (978) 742-7049
• Canaux électroniques :
Courrier électronique
Internet (e-mail) : tech-support@necmitsubishi.com
Site internet ftp : ftp.necmitsubishi.com
World Wide Web : http://www.necmitsubishi.com
Produit enregistré:
Opérations Européennes: www.nec-monitors.com
Fichier INF Windows® 95/98/2000:http://support.necmitsubishi.com/software.htm
• Informations FastFacts
INFORMATION DESCRIPTION N° DOCUMENT
Glossaire Définition des termes en relation 900203
Informations complémentaires Noms et adresses d'autres 900204
Connexion Macintosh Informations détaillées sur le 153006
Environnement de travail sain Informations détaillées sur 900108
• Info docum. & vente (800) NEC-INFO [(800) 632-4636]
• Commande de produits MultiSync (800) 820-1230
• Téléventes (800) 284-4484
http://www.necmitsubishi.com/productregistration
Ensuite, télécharger le fichier NECMSINF.ZIP
MC
(630) 467-4363
avec les fonctions, les caractéristiques
et l'installation du moniteur
MultiSync
groupes impliqués dans les
normes et les fonctions
du moniteur MultiSync
raccordement du moniteur MultiSync
à un Macintosh
l'établissement d'un environnement
de travail sain
®
[Pour logiciels et accessoires]
23
Page 26

Garantie limitée
NEC-Mitsubishi Electronics Display of America, Inc. (ci-après «NMD-A») garantit que ce
produit est exempt de vice de fabrication et de main-d’oeuvre et, selon les conditions énoncées
ci-dessous, accepte de réparer ou remplacer, à sa discrétion, toute pièce de l’appareil concerné
qui s’avérerait défectueuse et ce, pendant une période de trois (3) ans à partir de la date d’achat
initial. Les pièces de rechange sont garanties pendant quatre-vingt dix (90) jours. Les pièces
de rechange ou unités peuvent être neuves ou reconditionnées et seront conformes aux
spécifications des pièces et des unités d’origine. Cette garantie vous accorde des droits légaux
spécifiques auxquels peuvent s’ajouter d’autres droits pouvant varier d’une juridiction à l ’autre.
Cette garantie est limitée à l’acheteur d’origine du produit et n’est pas transférable. Cette
garantie couvre uniquement les composants fournis par NMD-A. Une réparation requise à la
suite de l’utilisation des pièces provenant d’un tiers n’est pas couverte par cette garantie. Pour
être couvert par cette garantie, le produit doit avoir été acheté aux États-Unis ou au Canada
par l’acheteur d’origine. Cette garantie couvre uniquement la distribution du produit aux États-
Unis ou au Canada par NMD-A. Aucune garantie n’est offerte à l’extérieur des États-Unis et
du Canada. La preuve d’achat sera exigée par NMD-A pour prouver la date d’achat. Une telle
preuve d’achat doit être une facture de vente d’origine ou un reçu reprenant le nom et l’adresse
du vendeur, de l’acheteur et le numéro de série du produit.
Pour obtenir un service au titre de la garantie, vous devez expédier le produit en port prépayé
ou le déposer chez le revendeur agréé qui vous l’a vendu ou dans un autre centre autorisé par
NMD-A, soit dans l’emballage d’origine, soit dans un emballage similaire procurant un
niveau équivalent de protection. Avant de retourner tout produit à NMD-A, vous devez
d’abord obtenir une autorisation de retour de marchandise en composant le 1-800-632-
4662. Le produit ne pourra avoir été enlevé ou modifié, réparé ou entretenu au préalable par
personne d’autre que du personnel technique autorisé par NMD-A, et le numéro de série du
produit ne pourra pas avoir été enlevé. Pour être couvert par cette garantie, le produit ne
pourra pas avoir été soumis à l’affichage d’une image fixe pendant de longues périodes de
temps résultant en une persistance de l’image, un accident, une utilisation incorrecte ou
abusive ou une utilisation contraire aux directives contenues dans le guide de l’utilisateur. Une
seule de ces conditions annulera la garantie.
NMD-A NE POURRA ÊTRE TENUE RESPONSABLE DE DOMMAGES DIRECTS, INDIRECTS,
ACCIDENTELS, SECONDAIRES OU D’AUTRES TYPES DE DOMMAGES RÉSULTANT DE
L’UTILISATION D’UN PRODUIT QUI N’ENTRENT PAS SOUS LA RESPONSABILITÉ DÉCRITE
CI-DESSUS. CES GARANTIES REMPLACENT TOUTE AUTRE GARANTIE EXPLICITE OU
IMPLICITE, Y COMPRIS, MAIS SANS S’Y LIMITER, TOUTE GARANTIE DE QUALITÉ
MARCHANDE OU D’APTITUDE À UNE FIN PARTICULIÈRE. CERTAINES JURIDICTIONS NE
PERMETTANT PAS L’EXCLUSION DE GARANTIES IMPLICITES OU LA LIMITATION OU
L’EXCLUSION DE RESPONSABILITÉ POUR DOMMAGES ACCIDENTELS OU SECONDAIRES,
LES EXCLUSIONS OU LIMITATIONS CI-DESSUS POURRAIENT NE PAS S’APPLIQUER DANS
VOTRE CAS.
Ce produit est garanti selon les termes de cette garantie limitée. Les consommateurs doivent
savoir que les performances du produit peuvent varier selon la configuration du système, le
logiciel, l’application, les données du client et la manière dont le produit est utilisé par
l’opérateur, ainsi que d’autres facteurs. Bien que les produits NMD-A soient considérés
compatibles avec de nombreux systèmes, la mise en oeuvre fonctionnelle du produit peut
varier d’un client à l ’autre. Par conséquent, l’adéquation d’un produit à un besoin ou une
application spécifique doit être déterminée par le consommateur et n’est pas garantie par
NMD-A.
Pour connaître le nom du centre de service technique agréé NEC-Mitsubishi Electronics
Display le plus proche, appeler NEC-Mitsubishi Electronics Display au 1-800-632-4662.
24
Page 27

Série LCD NEC
AVIS DE PROPRIÉTÉ EXCLUSIVE ET DE DÉGAGEMENT DE RESPONSABILITÉ
Les informations contenues dans ce document, y compris tous les designs et matériel s'y rapportant, sont la propriété de
NEC-Mitsubishi Electronics Display et/ou ses concédants. NEC-Mitsubishi Electronics Display se réserve les droits de
fabrication brevetée, les droits d’auteurs et autres propriétés exclusives à ce document, y compris tous les droits de design,
de fabrication, de reproduction, d'utilisation et de vente y afférent, à condition que ces droits n'ont pas été directement
délivrés à d'autres.
Les produits de NEC-Mitsubishi Electronics Display dont il est question dans ce document sont garantis conformément
aux termes de la déclaration de garantie limitée accompagnant chaque produit. Cependant, les performances réelles
de chaque produit dépendent de facteurs tels que la configuration du système, les données du client et la manière dont
le produit est utilisé. Étant donné que la mise en oeuvre fonctionnelle du produit peut varier d’un client à l’autre,
l'adéquation et l'application de configurations spécifiques du produit peuvent être déterminées par le client et ne sont
pas garanties par NEC-Mitsubishi Electronics Display.
Afin de permettre l'amélioration du design et des caractéristiques techniques, les informations contenues dans ce
document sont sujettes à modifications sans préavis. La reproduction totale ou partielle de ce document sans l'accord
préalable de NEC-Mitsubishi Electronics Display est interdite.
DÉCLARATION DE CONFORMITÉ
Cet appareil est conforme à l'article 15 du règlement de la FCC. L'utilisation est soumise à deux conditions. 1) Cet appareil
ne peut pas occasionner d'interférences nuisibles, et 2) cet appareil doit accepter toutes interférences reçues, y compris
les interférences qui peuvent occasionner un mauvais fonctionnement.
Partie responsable américaine : NEC-Mitsubishi Electronics Display of America, Inc.
Adresse : 1250 N. Arlington Heights Road
o
N
tél. : (630) 467-3000
Itasca, Illinois 60143-1248
Type de produit : Moniteur d'ordinateur
Classification de l'appareil : Périphérique classe B
Modèle : MultiSync LCD
1700M
Nous déclarons par la présente que les appareils mentionnés ci-dessus sont
conformes aux normes techniques spécifiées dans le règlement de la FCC.
Windows est une marque déposée de Microsoft Corporation. NEC est une marque déposée de NEC Corporation. ENERGY STAR est une
marque déposée aux États-Unis. Tous les autres noms de marques et de produits sont des marques de commerce ou des marques déposées
de leurs propriétaires respectifs.
En tant que partenaire ENERGY STAR®, NEC-Mitsubishi Electronics Display of America a veillé à ce que ce produit respecte les normes
ENERGY STAR en matière de rendement énergétique. Le logo ENERGY S TAR ne représente aucun aval par l’EPA de quelque produit ou
service que ce soit.
No de pièce 49.L0701.031
Doc No. M0010A-LCD1700MT9
Imprimé au Taiwan
Page 28

NEC MultiSync® Series
The information disclosed in this document, including all designs and related materials, is the valuable property of NECMitsubishi Electronics Display and/or its licensors, as appropriate, reserve all patent, copyright and other proprietary
rights to this document, including all design, manufacturing, reproduction, use and sales rights thereto, except to the
extent said rights are expressly granted to others.
The NEC-Mitsubishi Electronics Display product(s) discussed in this document are warranted in accordance with the terms
of the Limited Warranty Statement accompanying each product. However, actual performance of each such product is
dependent upon factors such as system configuration, customer data and operator control. Since implementation by
customers of each product may vary, the suitability of specific product configurations and applications must be
determined by the customer and is not warranted by NEC-Mitsubishi Electronics Display.
To allow for design and specification improvements, the information in this document is subject to change at any time
without notice. Reproduction of this document or portions thereof without prior approval of NEC-Mitsubishi Electronics
Display is prohibited.
DECLARATION OF CONFORMITY
This device complies with Part 15 of FCC Rules. Operation is subject to the following two conditions. (1) This device may
not cause harmful interference, and (2) this device must accept any interference received, including interference that may
cause undesired operation.
U.S. Responsible Party: NEC-Mitsubishi Electronics Display of America, Inc.
PROPRIETARY NOTICE AND LIABILITY DISCLAIMER
Address: 1250 N. Arlington Heights Road
Tel. No.: (630) 467-3000
Type of Product: Computer Monitor
Equipment Classification: Class B Peripheral
Models: LCD1700M
Itasca, Illinois 60143
We hereby declare that the equipment specified above
conforms to the technical standards as specified in the FCC Rules.
MultiSync, FastFacts, FullScan and OSM are trademarks of NEC-Mitsubishi Electronics Display in the U.S. and Canada. NEC is a registered
trademark of NEC Corporation Copyright 2000. OSM Display Screens Copyright 2000 by NEC-Mitsubishi Electronics Display. Windows is
a registered trademark of Microsoft Corporation. ENERGY STAR is a U.S. registered trademark. All other brands and product names are
trademarks or registered trademarks of their respective owners.
As an ENERGY STAR® Partner, NEC-Mitsubishi Electronics Display has determined that this product meets the ENERGY STAR guidelines
for energy efficiency. The ENERGY STAR emblem does not represent EPA endorsement of any product or service.
Part No. 49.L0701.031
Doc No. M0010A-LCD1700MT9
Printed in Taiwan
 Loading...