

Page 1

FT
A
N
DigitalTalk™
DR
NEX Series 3200
Owner’s Manual Draft
Page 2

NEX Series 3200
Table of Contents
Chapter 1: Getting Started . . . . . . . . . . . . . . . . . . . . . . . . . . . . . . . . 1
Phone Activation . . . . . . . . . . . . . . . . . . . . . . . . . . . . . . . . . . . . . . . . . . . . . . . . . 1
Phone Safety & Performance. . . . . . . . . . . . . . . . . . . . . . . . . . . . . . . . . . . . . . . . 1
Voice Mail Messaging & Text Messaging . . . . . . . . . . . . . . . . . . . . . . . . . . . . . . 1
NEC Authentic Accessories™ . . . . . . . . . . . . . . . . . . . . . . . . . . . . . . . . . . . . . . . 1
Connecting & Disconnecting the Battery . . . . . . . . . . . . . . . . . . . . . . . . . . . . . . . 1
Charging and Recharging the Battery . . . . . . . . . . . . . . . . . . . . . . . . . . . . . . . . . 2
Battery Level Indicator . . . . . . . . . . . . . . . . . . . . . . . . . . . . . . . . . . . . . . . . . . . . . 2
Phone Care and Maintenance . . . . . . . . . . . . . . . . . . . . . . . . . . . . . . . . . . . . . . . 3
Battery Care . . . . . . . . . . . . . . . . . . . . . . . . . . . . . . . . . . . . . . . . . . . . . . . . . . . . . 3
Battery Disposal . . . . . . . . . . . . . . . . . . . . . . . . . . . . . . . . . . . . . . . . . . . . . . . . . . 3
Chapter 2: Basic Operation. . . . . . . . . . . . . . . . . . . . . . . . . . . . . . . . 4
Controls and Features . . . . . . . . . . . . . . . . . . . . . . . . . . . . . . . . . . . . . . . . . . . . . 4
Turning On the Phone . . . . . . . . . . . . . . . . . . . . . . . . . . . . . . . . . . . . . . . . . . . . . 4
Turning Off the Phone . . . . . . . . . . . . . . . . . . . . . . . . . . . . . . . . . . . . . . . . . . . . . 4
Making a Call . . . . . . . . . . . . . . . . . . . . . . . . . . . . . . . . . . . . . . . . . . . . . . . . . . . . 5
Receiving a Call . . . . . . . . . . . . . . . . . . . . . . . . . . . . . . . . . . . . . . . . . . . . . . . . . . 5
Time and Date . . . . . . . . . . . . . . . . . . . . . . . . . . . . . . . . . . . . . . . . . . . . . . . . . . . 5
Last Number Redial . . . . . . . . . . . . . . . . . . . . . . . . . . . . . . . . . . . . . . . . . . . . . . . 5
Viewing Your Phone Number . . . . . . . . . . . . . . . . . . . . . . . . . . . . . . . . . . . . . . . 5
Using the Phone Book . . . . . . . . . . . . . . . . . . . . . . . . . . . . . . . . . . . . . . . . . . . . . 5
Standby Mode Display Indicators. . . . . . . . . . . . . . . . . . . . . . . . . . . . . . . . . . . . . 6
Conversation Mode Display Indicators . . . . . . . . . . . . . . . . . . . . . . . . . . . . . . . . 7
Chapter 3: Menu Navigation and Overviews . . . . . . . . . . . . . . . . . 8
Soft Keys . . . . . . . . . . . . . . . . . . . . . . . . . . . . . . . . . . . . . . . . . . . . . . . . . . . . . . . 8
Scroll Key . . . . . . . . . . . . . . . . . . . . . . . . . . . . . . . . . . . . . . . . . . . . . . . . . . . . . . 8
Clear Keys . . . . . . . . . . . . . . . . . . . . . . . . . . . . . . . . . . . . . . . . . . . . . . . . . . . . . . 8
User Prompts . . . . . . . . . . . . . . . . . . . . . . . . . . . . . . . . . . . . . . . . . . . . . . . . . . . . 8
Main Menu Overview . . . . . . . . . . . . . . . . . . . . . . . . . . . . . . . . . . . . . . . . . . . . . . 9
Audio . . . . . . . . . . . . . . . . . . . . . . . . . . . . . . . . . . . . . . . . . . . . . . . . . . . . . . . . . . 9
View Menu Categories . . . . . . . . . . . . . . . . . . . . . . . . . . . . . . . . . . . . . . . . . . . . 20
Dialing Options Menu . . . . . . . . . . . . . . . . . . . . . . . . . . . . . . . . . . . . . . . . . . . . 24
Save Menu . . . . . . . . . . . . . . . . . . . . . . . . . . . . . . . . . . . . . . . . . . . . . . . . . . . . 27
Chapter 4: Scrollpad and Phone Book . . . . . . . . . . . . . . . . . . . . . 28
Storing to Scrollpad . . . . . . . . . . . . . . . . . . . . . . . . . . . . . . . . . . . . . . . . . . . . . . 28
Storing to Phone Book . . . . . . . . . . . . . . . . . . . . . . . . . . . . . . . . . . . . . . . . . . . . 28
Text Messages, Voice Mail Messages, and Pages . . . . . . . . . . . . . . . . . . . . . . 31
Retrieving Voice Mail . . . . . . . . . . . . . . . . . . . . . . . . . . . . . . . . . . . . . . . . . . . . . 35
Chapter 5: Safety Information. . . . . . . . . . . . . . . . . . . . . . . . . . . . . 36
Safety Precautions . . . . . . . . . . . . . . . . . . . . . . . . . . . . . . . . . . . . . . . . . . . . . . 36
Chapter 6: Troubleshooting . . . . . . . . . . . . . . . . . . . . . . . . . . . . . . 39
Phone Has No Power or Does Not Work . . . . . . . . . . . . . . . . . . . . . . . . . . . . . . 39
Maintaining Service During A Conversation . . . . . . . . . . . . . . . . . . . . . . . . . . . 39
Chapter 7: Limited Warranty & Technical Information . . . . . . . . 40
Limited Warranty . . . . . . . . . . . . . . . . . . . . . . . . . . . . . . . . . . . . . . . . . . . . . . . . 40
Technical Information . . . . . . . . . . . . . . . . . . . . . . . . . . . . . . . . . . . . . . . . . . . . 42
NEC Service Support . . . . . . . . . . . . . . . . . . . . . . . . . . . . . . . . . . . . . . . . . . . . 42
NEC Wireless Marketing . . . . . . . . . . . . . . . . . . . . . . . . . . . . . . . . . . . . . . . . . . 42
DR
A
FT
i
Page 3
NEX Series 3200
Chapter 1: Getting Started
Phone Activation
Before you can use your new NEC cellular telephone, the phone must be activated by a cellular service provider. Please contact your local cellular service
provider for any questions regarding phone activation. For additional information on over-the-air activation, see “Over-Air Activate” on page12.
Phone Safety & Performance
Prior to operating your cellular phone, please read this manual thoroughly
including “Chapter 5: Safety Information” on page36.
Voice Mail Messaging & Text Messaging
Voice mail messaging and text messaging services, when available, are provided by your cellular service provider. Before you can receive either voice or
text messages with your phone, you must subscribe to these cellular service
provider options. Contact your cellular service provider for information on
availability and setup of these services.
NEC Authentic Accessories™
NEC recommends using only NEC Authentic Accessories with your cellular
phone to ensure optimum quality performance.
Connecting & Disconnecting the Battery
Your phone is powered by a rechargeable battery. (See “Battery Care” on
page3 and “Battery Disposal” on page3 for important battery information.) To
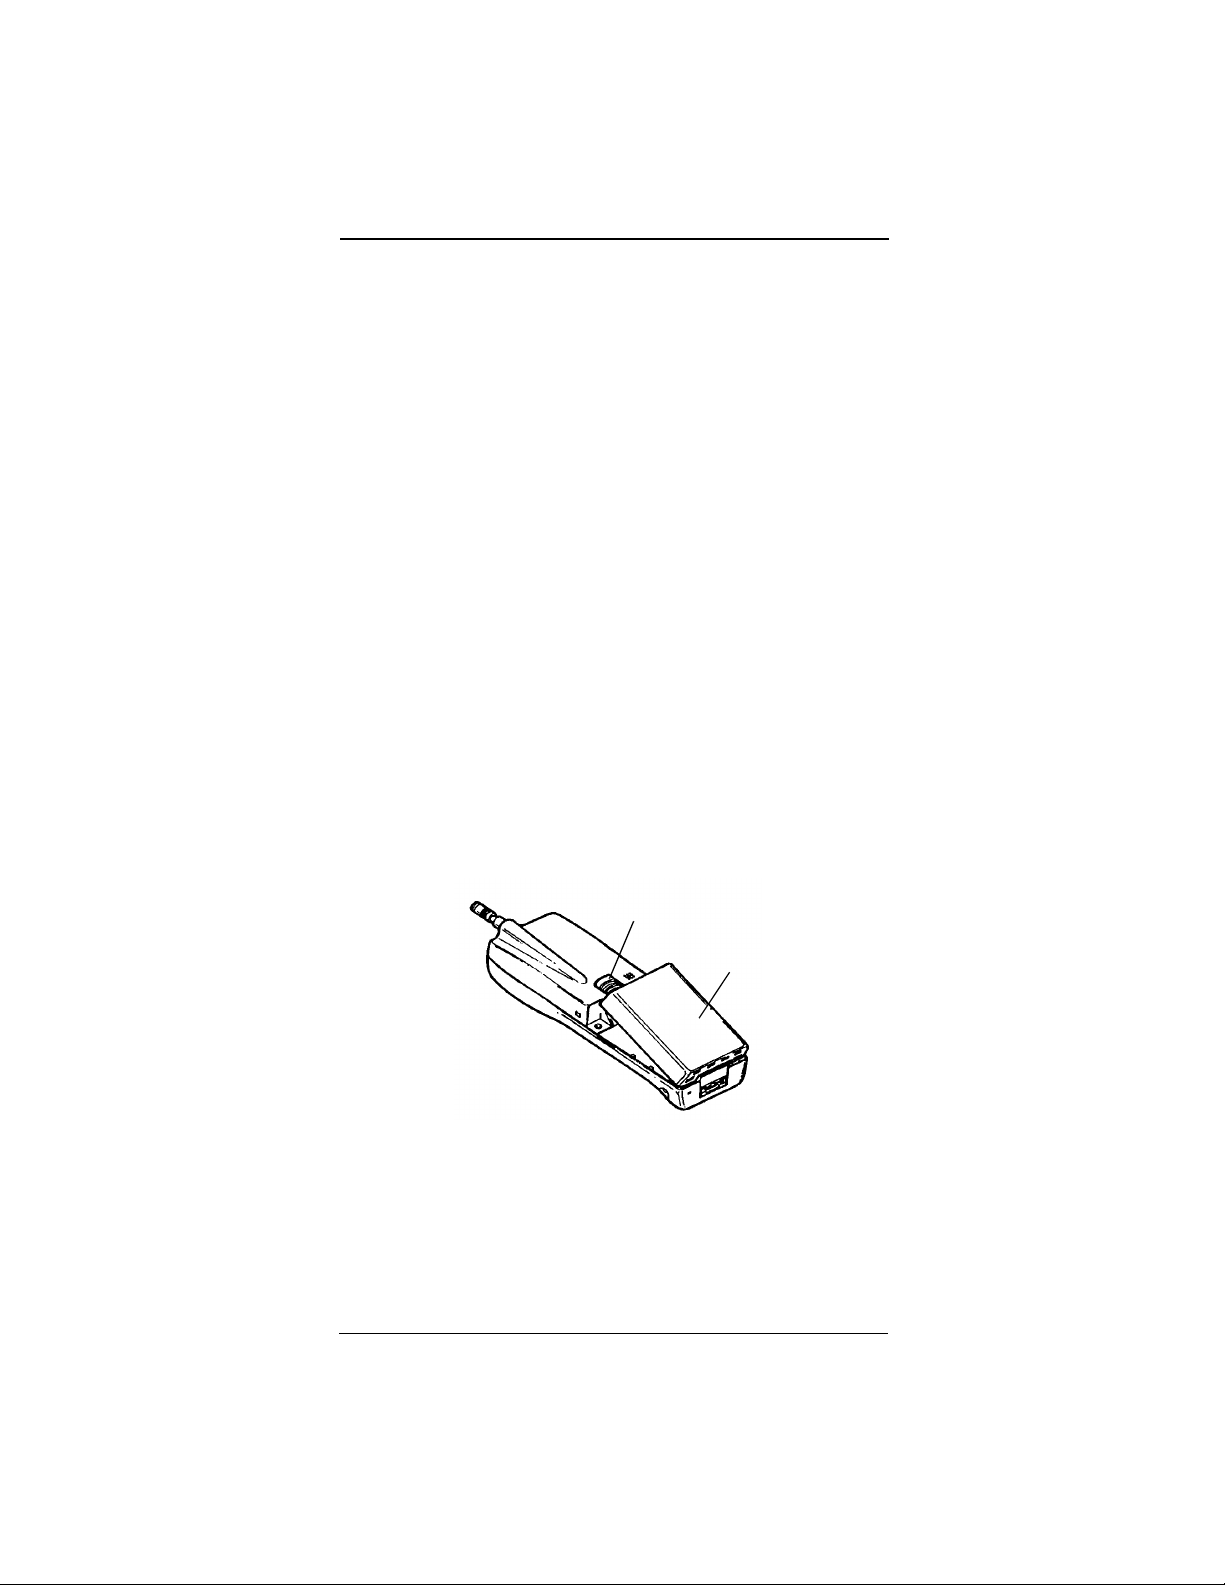
connect the battery to your phone, place the grooved end of the battery
against the base of the phone. Lower the battery toward the phone to lock into
place. To remove the battery, check that the phone is turned off. Slide the
locking latch located above the battery upward and carefully lift the battery
away from the phone.
DR
A
FT
Battery
Locking Latch
1
Battery
Page 4

NEX Series 3200
Charging and Recharging the Battery
The DigitalTalk 3200 telephone accepts either the 4.8 V Nickel-Cadmium
(NiCd) battery or Nickel-Metal Hydride (NiMH) battery. A new battery must be
fully charged before being used for the first time.
To charge using the Standard Charger Adapter Only:
1. Insert the AC adapter into a standard 110 V AC outlet.
2. Insert the adapter plug into the jack located on the side of the phone.
The red LED indicator on the top right corner of the phone is on during
charging and then turns off when charging is complete. The red LED
indicator also occasionally flashes during the charging process.
To charge using the Standard or Rapid Charger Adapter and Charging
Stand:
1. Plug the AC adapter into a standard 110 V AC outlet.
2. Insert the AC adapter plug into the jack on the charging stand.
3. Place either the phone with battery connected or battery pack only
upright in the charging stand, making sure that the battery charging contacts on the bottom of the battery align with the contacts on the charging
stand. A red light on the charging stand illuminates to indicate proper
seating of the battery pack. The red light indicator turns off when the
battery is charged.
DR
NiMH and NiCd Battery
With Standard Charger
NiMH 7 hours 2 hours
NiCd 6 hours 1.5 hours
A fully charged NiMH battery provides approximately 170 minutes of talk time
in the digital mode and 75 minutes of talk time in the analog mode.
Charging Times
A
FT
With Rapid Charger
Battery Level Indicator
The Battery Level indicator displays in standby, dial, and conversation
modes. The Battery Level indicator is visible to the right of center of the display. (Please see “I. Battery Indicator:” on page6). When the battery falls to a
preset level, the empty battery indicator flashes on and off to signal a low battery. The low battery alert tone sounds and “RECHARGE BATTERY” displays
on the screen. You may press Proceed to continue using the phone; however, in Conversation Mode, this continuation is brief.
The remote power indicator replaces the battery indicator on the display
when the phone is operating on external power or charging. The red LED in
the upper right corner of the phone face also illuminates while the phone is
charging.
2
Page 5

NEX Series 3200
Phone Care and Maintenance
Your DigitalTalk 3200 is a product of superior design and craftsmanship, and should be
treated with care. The suggestions below will help you enjoy this product for many years.
Keep it dry. (Water contains minerals that will corrode electronic circuits.) Avoid all liquid
spills. Any form of liquid will cause permanent damage to your phone.
Do not store the phone in a hot area. High temperatures can shorten the life of electronic devices, damage batteries, and warp or melt certain plastics.
Do not drop it. This might cause permanent damage. The internal circuit boards can be
broken.
Do not use or store in dusty, dirty areas. This will cause permanent damage in moving
parts.
Do not use harsh chemicals, cleaning solvents, or strong detergents to clean it.
Wipe it with a soft cloth (slightly dampened) in a mild soap-and-water solution. If the
unit is not working properly, take it to your nearest authorized dealer. The personnel
there will assist you, and, if necessary, arrange for service.
Battery Care
For best results, follow these precautions:
• Do not allow the battery to discharge completely, as this may damage
the battery.
• Before storing the phone for two weeks or more, remove the battery
pack from the phone and store it in a cool, dry place.
• The battery pack is a sealed unit with no serviceable parts inside. Do
not attempt to open the case.
Battery Disposal
DO NOT DISPOSE OF USED BATTERIES IN THE REGULAR TRASH.
NICKEL-CADMIUM (NiCd) BATTERIES MUST BE COLLECTED, RECYCLED, OR DISPOSED OF IN AN ENVIRONMENTALLY SOUND MANNER.
DR
A
FT
The incineration, landfilling, or mixing of these batteries with any municipal
solid waste stream is PROHIBITED BY LAW in most areas.
Return this battery to a federal or state-approved NiCd (“sealed lead”) or
NiMH battery recycler. This may be where you purchased the battery or a
local seller of automotive batteries. In all states, call 1-800-822-8837, except
in Minnesota. For disposal information in Minnesota, call 1-800-225-PRBA.
Contact local waste management officials for further information regarding the
environmentally sound collection, recycling, and disposal of this battery.
3
Page 6

NEX Series 3200
Chapter 2: Basic Operation
Controls and Features
Turning On the Phone
• Press and hold the PWR key down for approximately two seconds to
turn on the phone. The following screen appears:
Feb 1 Mon
12:30 pm
Menu View
Turning Off the Phone
• Press and hold down the PWR key for approximately two seconds to
turn off the phone. The “POWER DOWN TIME” message displays on
the screen.
A
FT
DR
4
Page 7

NEX Series 3200
Making a Call
1. Key in the phone number.
Note: If you make a mistake, press the CLR key briefly to delete the last
keystroke (as you would use a backspace); or press and hold the
2. Press SEND.
3. Press END to end the call.
CLR key to clear the whole display.
Receiving a Call
1. Press SEND to answer an incoming call. An incoming call is indicated by
the phone ringing, “CALL” flashing on the display, and the alert indicator
flashing.
2. When you have finished your conversation, press END.
FT
Time and Date
When the phone is on in digital service areas, it automatically displays the
local time and date received through the network. In analog only service
areas, the phone automatically uses its internal clock to display the time and
date. If you need to set the clock time and date, refer to “Clocks” on page11.
A
Last Number Redial
To automatically redial the last number called:
• Press SEND. The phone displays and redials the last phone number
called when the one-touch option is set to Call.
• If the one-touch option is not set to call, the last number dialed is dis-
played when SEND is pressed. Review the number, apply dialing
options (Opts), or press SEND again to connect the call.
DR
Viewing Your Phone Number
To view your phone number:
1. Press View 4 (Own Phone Number). The screen displays the current
NAM and the associated phone number.
2. Press Return or press CLR to return to the Standby mode.
Using the Phone Book
The Phone Book stores up to 99 entries. By accessing information stored in
your phone book, you can place calls quickly. You can access the phone book
using one of the following methods:
• Press and hold the View key to access the Phone Book in one step.
• Press View 3 (Phone Book).
• Press and hold 3 (Phone Book Shortcut key) to access the Phone
Book in one step (only if “One-Touch” is turned on).
For more information on using the Shortcut keys, please see “One-Touch” on
page16.
To save names and numbers to the phone book:
1. Enter the phone number to store in the phone book.
2. Press the Save soft key.
3. Select Auto for the phone to find the next empty location or Manual to
enter the memory location. If Manual is selected, the phone displays
“Loc Free” if that location is empty (otherwise, the name stored in the
location is displayed). Use the arrow keys or Next to scroll through the
list and find an empty location.
4. Select OK to save.
5. To add a name associated with the phone number, press Now. Enter the
characters of the name using the phone keys; press Opts 3 to save.
5
Page 8
NEX Series 3200
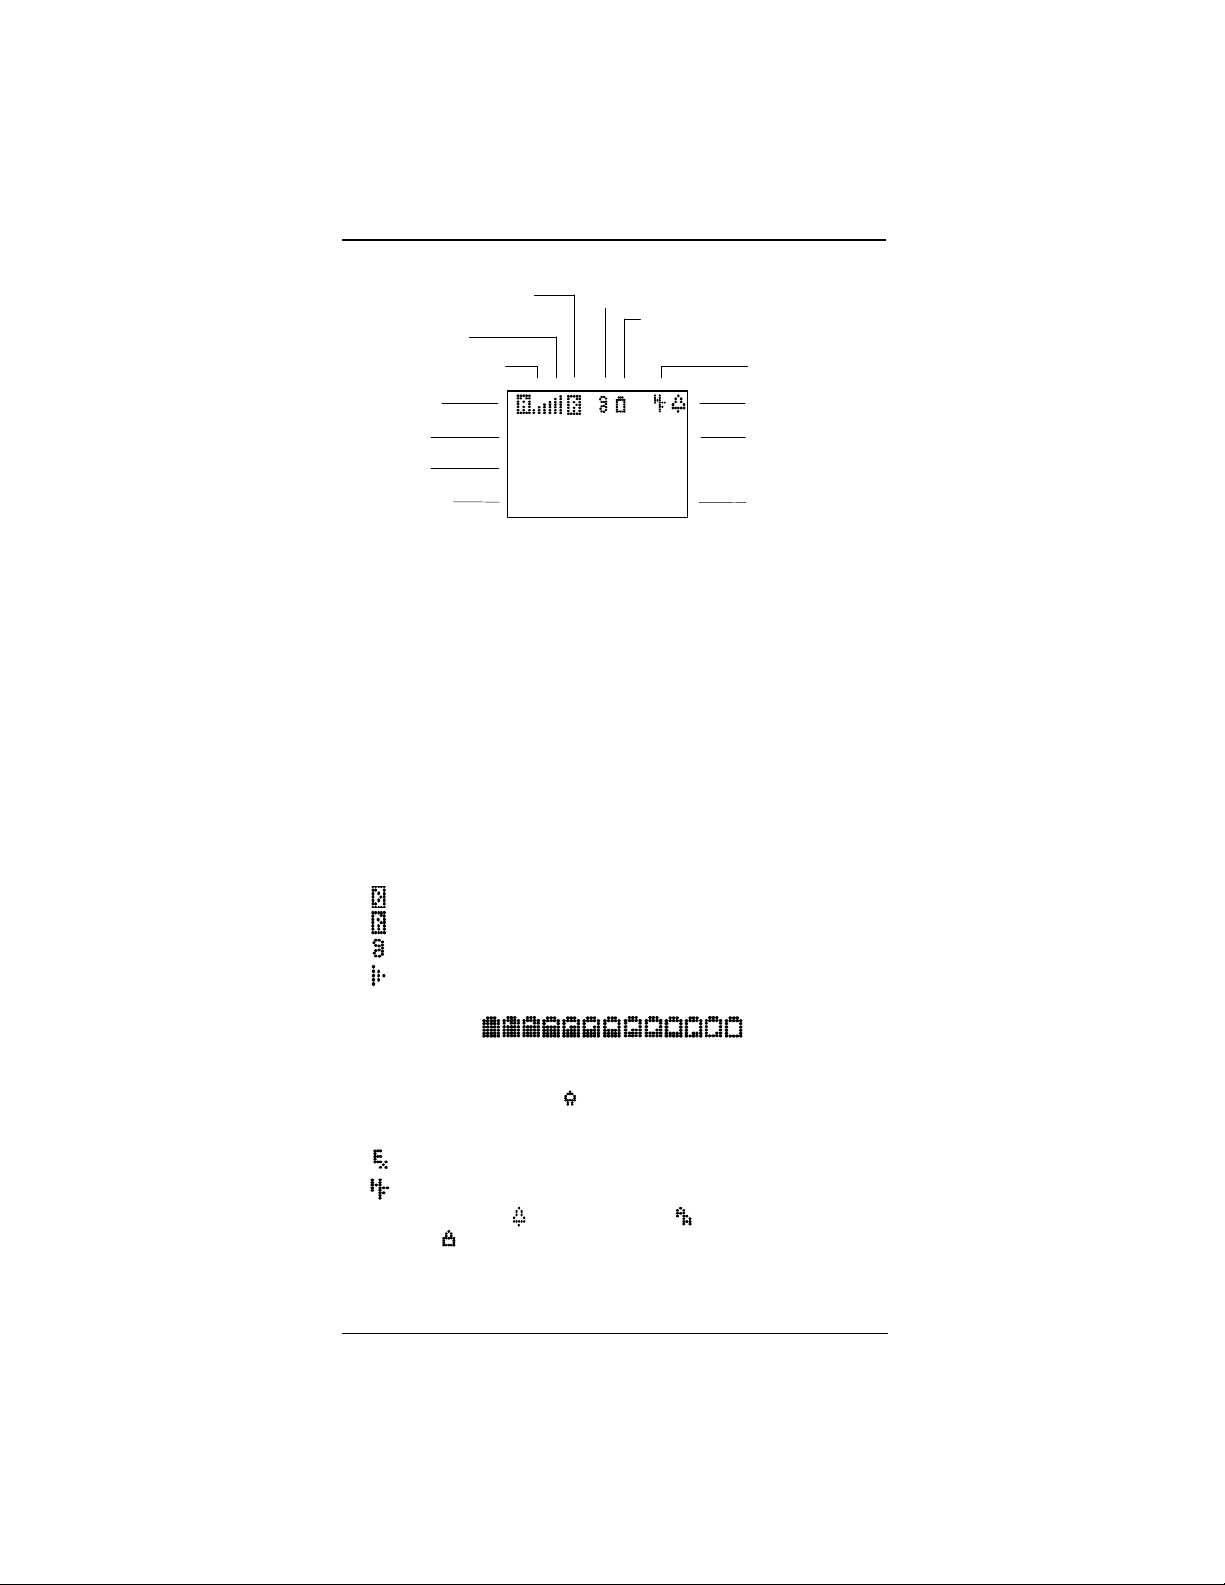
Standby Mode Display Indicators
G. Service Area Indicator
F. Signal Strength
E. Mode Indicator
D. System Indicator
C. Current Date
B. Current Time
A. Left Soft Key (Menu)
A. Main menu (Left Soft Key):
Press Menu to access Menu options.
B. Current Time:
Displays hours, minutes, a.m./p.m. when set.
C. Current Date:
Displays abbreviated month and date.
D. System Indicator:
A or B
E. Mode Indicator:
! if Digital, blank if Analog
F. Signal Strength:
(updated every 2 seconds)
Minimum = 0 dB
Maximum = 35 dB
G: Service Area Indicators:
, Home
$ Roam
H. User Alert Indicators:
Message Pending
Replies Pending
Voice Mail Pending
Missed Calls
I. Battery Indicator:
D
Nov 18 Mon
12:30 pm
Menu View
DR
H. User Alert Indicator
I. Battery Level
FT
A
J. External Devices
K. Ringer Indicator
(or Lock if in Lock mode)
L. Day of Week
(or ALM if alarm is set)
M. Right Soft Key (View)
Full
The Empty Battery icon flashes to signal low battery.
External Power/Charging: (Phone plugged into outlet or vehicle
adapter.)
J. External Devices:
Modem or other device
Hands Free
K. Ringer Indicator or Auto Answer :
Lock icon overrides in Lock Mode. This icon changes for different user
states.
L. Day of the Week, or “ALM” if Alarm is set
M. View Key Indicator:
Press the View Key to access View options when View is displayed.
6
Empty
Page 9
NEX Series 3200
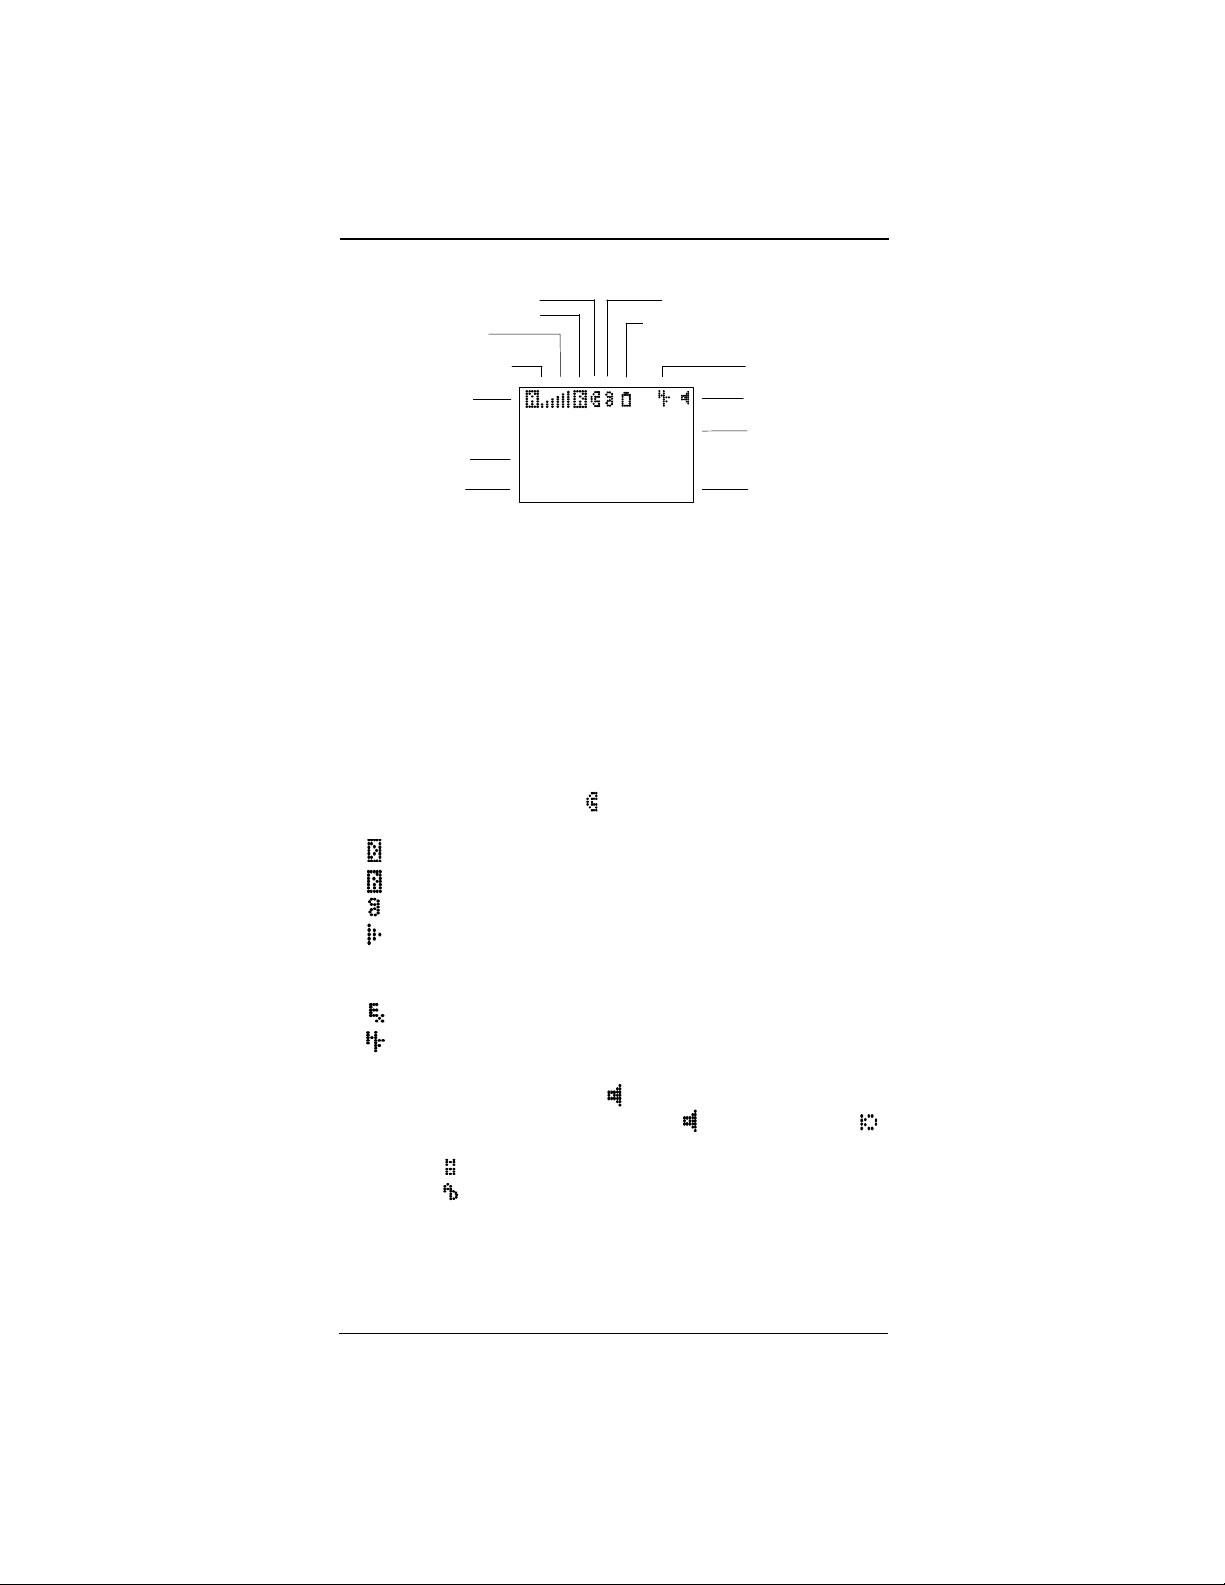
Conversation Mode Display Indicators
G. In-use Indicator (Phone)
F. Service Area Indicator
E. Signal Strength
D. Mode Indicator
C. System Indicator
D
45m59s
B. Status Line
A. Left Soft Key (Menu)
A. Main menu (Left Soft) Key
B. Status Line contents:
Displays phone number of connected party
C. System Indicator:
A or B
D. Transmission Mode Indicator:
! if Digital, blank if Analog (same as in Standby mode)
E. Signal Strength (same as in Standby mode)
F. Service Area Indicators
, Home
$ Roam
G. In-Use Indicator (Phone):
H. User Alert Indicators:
Message Pending
Replies Pending
Voice Mail Pending
Missed Calls
I. Battery Level (same as in Standby mode)
J. External Devices:
Modem or other device
Hands Free
K. Mute Indicator shows Mute status as follows:
Microphone Mute: Speaker icon displays.
No Mute: Alternate display of Speaker icon and Microphone icon
every two seconds.
On Hold:
Autodial:
L. Talk Time of Call in Progress:
Displays shortly after call is sent and updates every second; disappears
when you press CLR or either soft key after the call is ended.
M. View Key Indicator:
Press View to access View options.
2146533937
Menu View
DR
H. User Alert Indicator
I. Battery Level
FT
A
J. External Devices
K. Mute Indicator
L. Talk Time of Call in Progress
M. Right Soft Key (View)
7
Page 10

NEX Series 3200
Chapter 3: Menu Navigation and
Overviews
Soft Keys
Soft keys are keys or buttons that perform different functions depending on
the current operational status of the phone or current menu accessed. The
soft keys current functions appear on the bottom line of the display above
each of the two soft keys.The left soft key is the Menu key when the phone is
in standby or during a conversation. The Main Menu is used to review and/or
change the phone settings and capabilities. (See “Main Menu Overview” on
page9 for features accessed through the Main Menu.) The right soft key is
the View key when the phone is in standby or during a conversation. The
View Menu provides access and review of information that changes as the
phone is used, such as phone book names and numbers, messages, and call
activity. (See “View Menu Categories” on page20 for information on the View
Menu contents.)
Scroll Key
In addition to pressing the soft keys, the scroll key can be used to scroll
through the menu items, Phone Book information, or messages.
1. The down arrow scrolls menu pages forward.
2. The up arrow scrolls menu pages backward.
3. Hold down the key for repeat scrolling.
Clear Keys
Press CLR to return to the previous screen or press and hold CLR to return
directly to the standby mode. While in editing functions, this key is used to
erase incorrectly entered characters (like a backspace key).
User Prompts
The following prompts, displayed in the upper right corner of the screen, provide editing and navigating assistance within menus.
# - Enter digits
αα - Enter alphanumeric data
- Scroll forward to the next menu page.
- Scroll back to the previous menu page.
- Scroll forward or back within a menu.
DR
A
FT
8
Page 11
NEX Series 3200
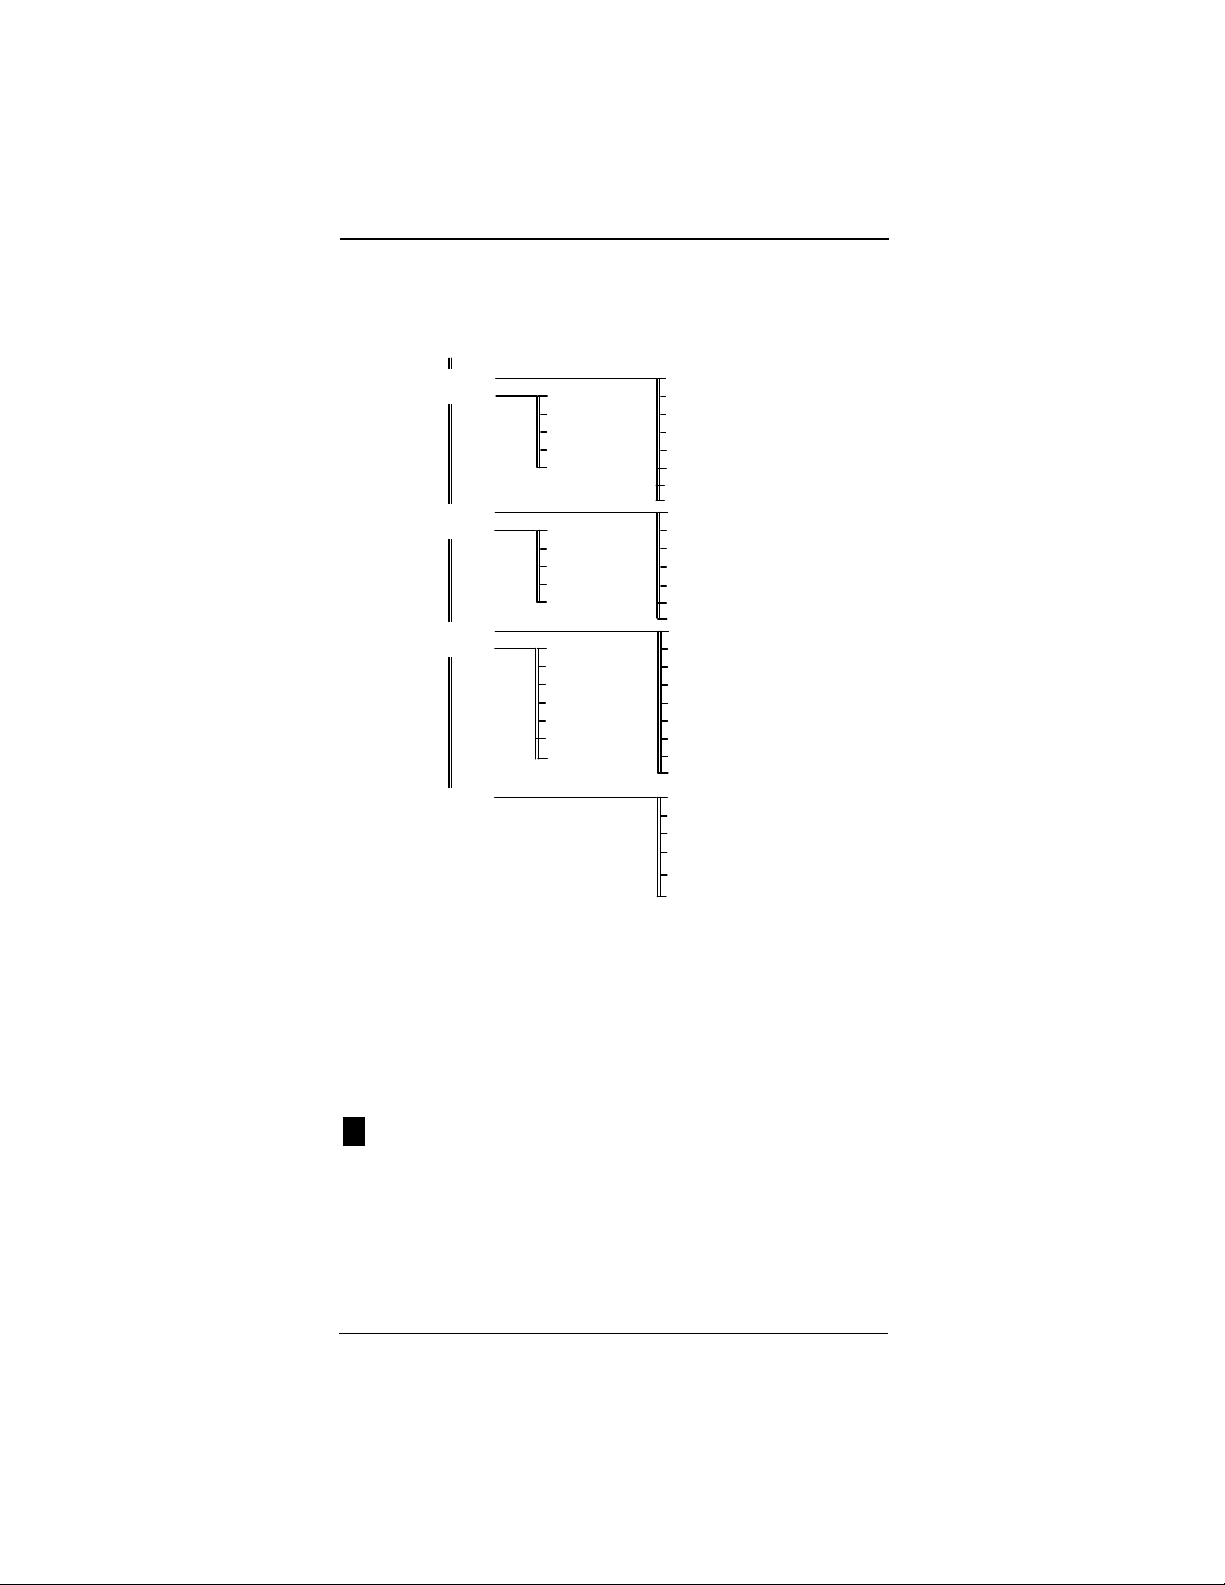
Main Menu Overview
This menu is accessible in Standby and Conversation Modes. Use this menu
to program the phone and change settings.
Main menu
1 Audio
2 Clocks
3 Features
4 Reset
5 Locking
6 Options
DR
7 System
1 Time Set
2 Date Set
3 Alarm
4 Power Off
5 Power On
1 Calls
2 Messages
3 Settings
4 Usage Totals
5 ScrollPad
1 One-Touch
2 Auto Answer
3 Any Key
4 External Control
5 Backlight
6 Screen Saver
7 Fixed Dial
1 Ring Volume
2 Ring Type
3 TouchTone Length
4 TouchTone
5 Minute Alert
6 Srvce Tone
7 Quiet Key
8 (Un) Mute
FT
1 Call Frwd
2 Call Frwd Type
3 Over-Air Activate
A
4 User Alert
5 B'cast Message Filter
6 B'cast Storage
7 Send #
1 Phone
2 Auto
3 Perm Code
4 Temp Code
5 Call Out
6 Call In
7 Memo
8 Auto PIN
9 Lock Keys
1 NAM
2 Mode
3 Prefer Sys
4 Power on Message
5 Phone Info
6 Feature Codes
Audio
1RingVolume
The ring volume selection is used to set the incoming alert volume. The ring volume
selection adjusts the ring volume of incoming call alerts, alert tones for messages and
pages, service tones, and the alarm clock.
1. Press Menu 1 1 (Audio - Ring Volume).
2. Press Next to hear each ring volume level selection.
3. Press OK to save the desired setting.
4. Press CLR to exit the audio submenu.
2
Ring Type
The ring type selection is used to set the incoming call alert ring.
1. Press Menu 1 2 (Audio - Ring Type).
2. Press Next to hear each ring type selection.
3. Press OK to save the desired setting.
4. Press CLR to exit the audio submenu.
9
Page 12

NEX Series 3200
3
Touch Tone Length
When the touch tones (DTMF signals) are on, the duration of the tones can
be set to short or long. Short tones make a sound for a fixed duration regardless of how long you hold the key down.
• Long tones make a sound while you hold down the key (up to two seconds). There may be some automated systems that require the tone
length to be set to long.
To select the touch tone length:
1. Press Menu 1 3 (Audio - DTMF Type).
2. Press Next to toggle between Short and Long.
3. Press OK to save.
FT
4
Touch Tone
With the touch tone selection set to on, numbers can be sent and received
with the phone in the conversation mode.
To turn the Touch Tone selection on or off:
1. Press Menu 1 4 (Audio - Touch Tone).
2. Press Next to toggle touch tones on or off.
3. Press OK to save.
Note: Turning on the Quiet Key turns off the touch tones. Numbers sent as
touch tones from secure locations in the Phone Book, however, automatically transmit without keytone feedback.
5
Minute Alert
When the minute alert selection is turned on, an alert sounds every 60 seconds through the earpiece during a conversation. The selection can be
turned on or off with the phone in either the standby mode or the conversation mode.
To set the minute alert:
1. Press Menu 1 5 (Audio - Call Tone).
2. Press Next to toggle Call Tone on or off.
3. Press OK to save.
DR
A
6
Service Tone
When the service tone selection is activated, an alert tone sounds whenever
there is a service change, including:
• System change (A/B)
• Status change from service to no service status or from no service to
service
• Loss of service such as a dropped call
• Network system change from analog to digital or from digital to analog
To activate the service tone setting:
1. Press Menu 1 6 (Audio - SrvceTone).
2. Press Next to toggle Service Tone on and off.
3. Press OK to save.
1. Press Menu 1 6 (Audio - SrvceTone).
2. Press Next to toggle Service Tone on and off.
3. Press OK to save.
7
Quiet Key On/OFf
The Quiet Key On/Off selection toggles the key tone on or off.
10
Page 13

NEX Series 3200
To turn on or off the quiet key:
1. Press Menu 1 7 (Audio - Quiet Key).
2. Press Next to toggle Quiet Key on and off.
3. Press OK to save.
8
Mute/(Un)Mute
The Mute/Unmute selection toggles the microphone on or off when the phone
is in the conversation mode.
1. Press Menu 1 8 (Audio - Mute).
2. Press Next to toggle microphone on and off.
3. Press OK to save.
Clocks
1
Time Set
1. Press Menu 2 1 (Clocks - Time). Enter the hour.
2. Press Next.
3. Enter the minutes.
4. Press Next.
5. Press am or pm to toggle a.m. or p.m.
6. Press Next to display the OK command.
7. Press OK to save.
2
Date Set
1. Press Menu 2 2 (Clocks - Date).
2. Enter the month.
3. Press Next.
4. Enter the day.
5. Press Next.
6. Enter the year.
7. Press Next to display the OK command.
8. Press OK to save.
DR
A
FT
3
Alarm
The phone can be used as an alarm clock by setting the alarm selection to the
desired alarm time. Note that the alarm only sounds at the set time; the alarm
does not sound at the set time every day unless the alarm is reset each day.
To set the Alarm:
1. Press Menu 2 3 (Clock - Alarm).
2. If the desired alarm time is already displayed, press Set.
If the desired alarm time is not displayed, press On. Enter the hour;
press Next. Enter the minutes.; press Next. Press am or pm to toggle
a.m. or p.m; press Next to display the OK command.
3. Press OK to save.
OR
11
Page 14

NEX Series 3200
4 5
Auto Power Off/On
The automatic power off/power on selections enable the phone to power off
or power on automatically at a specified time each day. These settings are
used to extend battery life if the phone is not being recharged. The selection
can be set for the phone to automatically power off at night when the phone is
not in use, and then automatically power on again in the morning.
To set Auto Power Off/On:
1. Press Menu 2 4 (Clock - Power Off) or Menu 2 5 (Clock - Power On).
2. If the desired auto power off/on time is already displayed, press Set.
If the desired auto power off/on time is not displayed, press On. Enter
the hour; press Next. Enter the minutes.; press Next. Press am or pm
to toggle a.m. or p.m; press Next to display the OK command.
3. Press OK to save.
Features
1
Call Forward
The Call Forward selection forwards calls to a specified phone number or to
voice mail, or deactivates call forwarding.
To turn Call Forwarding on or off:
1. Press Menu 3 1 (Features - Call Forwarding).
2. Press Next to select Phone Number, Voice Mail, or Off.
3. Press OK to select the setting. The phone displays an asterisk (*) fol-
lowed by a 2-digit or 3-digit call forwarding prefix code.
4. Press SEND to activate call forwarding.
Note: Calling Codes such as Call Forwarding, Block Caller I.D., Cancel Call Waiting, etc., may vary from market to market and require that the codes the phone provides be edited before use. Contact the local wireless carrier to get the correct
Calling Codes.
2
Call Forward Type
The call forward type selection sets the call forwarding feature to Busy/No
Answer, Always, Busy, or No Answer.
To select the Call Forward Type:
1. Press Menu 3 2 (Features - Call Forward Type).
2. Press Next to select Busy/No Ans, Always, Busy, or No Answer.
3. Press OK to accept the setting.
4. Press CLR to save.
3
Over-Air Activate
The over-the-air activation selection automatically activates the phone with
the wireless phone network service. Over-the-air activation is dependent on
the network capability. Please check with your network service provider for
availability.
To activate the system:
1. Press Menu 3 3 (Features - Over-Air Activate).
2. Press Next to select System A or B.
3. Press Next while viewing the “Save NAM” display to toggle between
NAM 1 and NAM 2 before making the selection.
4. Respond to the screen prompt to assign the phone number to the NAM
by pressing OK.
5. Press OK to begin activation.
6. Wait for the phone number to display then press Proceed.
DR
OR
FT
A
For information on selecting a NAM, see “NAM Selection” on page18.
12
Page 15

NEX Series 3200
4
User Alert
The user alert selection can be used to turn on or off the display of user alerts.
(See “H. User Alert Indicators:” on page6 to view alert indicators.) These
silent alerts display on the screen in the standby mode to signal the receipt of
new messages, pages, voice mail, and/or missed calls.
To turn the User Alert indication on or off:
1. Press Menu 3 4 (Features - User Alert).
2. Press Next to toggle User Alert on or off.
3. Press OK to save.
5
B’cast (Broadcast) Message Filter
The broadcast message filter selection can be set to filter broadcast messages for Emergency and/or Normal status. “Emergency” allows only emergency broadcast messages to be received; “Normal” allows all broadcast
messages to be received.
To set the broadcast message filter:
1. Press Menu 3 5 (Features - Broadcast Message Filter).
2. Press Next to toggle between Normal or Emergency.
3. Press OK to save.
For more information on filtering messages, see “Broadcast Message Filter”
on page34.
6
B’cast (Broadcast) Storage
The broadcast storage selection can be set to either on or off.
To toggle the storage option on or off:
1. Press Menu 3 6 (Features - Broadcast Message Storage).
2. Press Next to toggle storage on or off.
3. Press OK to save.
For more information on storing messages, see “Broadcast Message Storage
Option” on page34.
7
Send #
The Send # selection provides the option of sending numbers as touch tones
(DTMF signals) from the phone book or a linked number.
This function is available only during a conversation with Touch Tone set to on
(see “Touch Tone” on page10). The touch tones can be sent by using either
of the following options:
1. With a conversation in progress, press Menu 3 7 (Features - Send #).
2. Enter the memory location.
3. Press OK to save.
??? or Recall a number from the phone book. Press Menu 3 7 to send the
number such as the voice mail pin number.
DR
A
FT
Reset
The Reset menu allows you to clear calls, messages, settings, usage totals,
and the scrollpad.
1
Calls
The calls selection clears all stored calls except any pending or missed calls.
To clear calls:
13
Page 16

NEX Series 3200
1. Press Menu 4 1 (Reset - Calls).
2. Enter the pass code if requested.
3. Press OK to clear all non-pending calls.
4. Press Quit to exit.
2
Messages
The messages selection clears all stored messages except any pending (not
read) or locked messages.
To clear messages:
1. Press Menu 4 2 (Reset - Messages).
2. Enter the pass code if requested.
3. Press OK to clear all messages you have reviewed.
3
Settings
The settings selection resets all user settings in the Main menu to the factory
default settings.
To reset the phone:
1. Press Menu 4 3 (Reset - Phone).
2. Enter the pass code.
3. Press OK to reset the phone.
4
Usage Totals
The usage totals selection clears the talk time counters.
To clear the talk time counters:
1. Press Menu 4 4 (Reset - Usage Totals).
2. Press OK to clear all talk times.
DR
A
FT
5
Scrollpad
The scrollpad selection clears any information stored in the scrollpad.
To erase all information from the scrollpad:
1. Press Menu 4 5 (Reset - Scrollpad).
2. Press OK to clear the scrollpad contents.
Locking
The Locking menu allows you to protect certain settings from unauthorized
use. To bypass a locked feature, enter the permanent pass code when
prompted.
1
Phone
The phone selection locks the phone with a 4-digit lock code to prevent unauthorized operation. Unlocking the phone unlocks all phone features, except
the Call Out, Call In, and Memo options.
To lock the phone:
1. Press Menu 5 1 (Locking - Phone).
2. Press Menu to toggle lock on or off.
3. Press OK to save the new setting or press Quit.
For information on keypad locking, refer to “Lock Keys” on page16.
2
Auto
Auto Lock automatically sets the phone to a locked, secured status when the
phone is turned on.
To turn on or off the auto lock setting:
14
Page 17

NEX Series 3200
1. Press Menu 5 2 (Locking - Auto).
2. Press Menu to toggle Auto Lock on or off.
3. Press OK to save the new setting or press Quit.
3
Perm Code
The perm code selection allows you to change your permanent 4-digit pass
code number to a new 4-digit number.
To enter a new permanent pass code:
1. Press Menu 5 3 (Locking - Perm Code).
2. Enter your current Pass Code if requested.
3. Enter the new Pass Code.
4. Press OK to save or press New to enter a different pass code.
5. To cancel and keep the previous pass code, press CLR.
4
Temp Code
The temp code selection allows you to set a temporary 3-digit pass code to
provide phone locking/securing capability for another person using your
phone without having to reveal your permanent 4-digit pass code. The temporary lock code should not consist of the same 3 digits that were used for the
permanent lock code.
To enter the temporary pass code:
1. Press Menu 5 4 (Locking - Temp Code).
2. Enter the 4-digit, permanent pass code if requested.
3. Enter a 3-digit temporary pass code.
4. Press OK to save; CLR to quit the code change, keep the previous Pass
Code and return to the previous screen; or New to see the previous Pass
Code and enter a different one.
5
Call Out
The call out selection restricts outgoing calls by requiring entry of the pass
code before an outgoing call can be sent.
1. Press Menu 5 5 (Locking - Call Out).
2. Enter the pass code if requested.
3. Press Next to toggle Call Out on or off.
4. Press OK to save the new setting or CLR to cancel.
6
Call In
The call in selection restricts incoming calls by requiring entry of the pass
code before an incoming call can be received.
1. Press Menu 5 6 (Locking - Call In).
2. Enter the pass code if requested.
3. Press Next to toggle Call In on or off.
4. Press OK to save the setting or press CLR.
7
Memo (Lock)
The memo lock selection requires a pass code before displaying phone numbers and messages for reviewing, editing, or storing. In Read Only mode, the
phone displays messages but does not allow editing or deleting of messages.
To secure stored phone numbers and messages:
1. Press Menu 5 7 (Locking - Memo).
2. Enter the pass code if requested.
3. Press Next to toggle between off, read only, or on.
4. Press OK to save the setting or press CLR to cancel.
DR
A
FT
15
Page 18
NEX Series 3200
8
Auto PIN
The auto pin selection provides security by automatically transmitting a PIN
number after the phone number (in analog mode when required by your service provider) without sounding touch tones (DTMF signals) or displaying the
digits on the screen.
To turn on or off the Auto PIN option:
1. Press Menu 5 8 (Locking - Auto PIN).
2. Enter the pass code if requested.
3. Press Next to toggle AutoPIN on or off.
4. Press OK to save the setting or press CLR to cancel.
For information on Transmission Mode Selection, see “Mode Selection” on
page18.
9
Lock Keys
The Lock Keys selection prevents accidental dialing by locking the keypad.
• Press Menu 5 9 to select the Lock Keys option.
• Enter 1 2 3 to unlock the keypad.
For additional phone locking capabilities, see “Locking” on page14.
A
FT
Options
1
One-Touch
One-Touch allows you to change what happens when you press and hold the
1-9 keys. This selection provides modes for Call, Recall, or View, and turns
One-Touch on or off.
• Call retrieves the number stored in its Phone Book location and dials
it.
• Recall retrieves the number stored in its location, but does not dial it.
• View displays the information associated with the icons on each key.
In the View mode, press and hold the digit key to access the corresponding View menu option. For example:
2
ABC
3
DEF
4
GHI
5
JKL
7
PQRS
8
TUV
To set the One-Touch option:
1. Press Menu 6 1 (Options - One-Touch).
2. Press Next to select Call, Recall, View, or Off.
3. Press OK to save.
DR
Call History shortcut.
Phone Book shortcut.
i
Own Phone Number shortcut.
Total Usage shortcut.
Scrollpad shortcut.
Messages History shortcut.
2
Auto Answer
The auto answer selection turns the auto answer capability on or off. Auto
Answer enables the phone to connect the caller automatically after three
16
Page 19

NEX Series 3200
rings. The auto answer setting is only available with the phone in the handsfree mode.
To set Auto Answer:
1. Press Menu 6 2 (Options - Auto Answer).
2. Press Next to select Auto (in Hands-Free mode) or off.
3. Press OK to save.
3
Any Key
Any Key allows you to answer an incoming call by pressing any key (except
PWR or END).
To turn Any Key on or off:
1. Press Menu 6 3 (Options - Any Key).
2. Press Next to turn Any Key Answer on or off.
3. Press OK to save.
4
External Control
The external control setting can be used to select Radio Mute or to turn off
external controls. The external control setting is only available with the phone
in the hands-free mode. Radio Mute automatically mutes the radio in the vehicle when a call comes in.
To turn External Control on or off:
1. Press Menu 6 4 (Options - External Control).
2. Press Next to select Radio Mute or Disable.
3. Press OK; press CLR to save.
5
Backlight
Backlighting provides for the continuous illumination of the keypad and display screen for use in low light conditions. The backlight setting is only available with the phone in the hands-free mode.
To turn on or off the backlight:
1. Press Menu 6 5 (Options - Backlight).
2. Press Next to toggle Backlight Control on and off.
3. Press OK; then press CLR to save.
6
Screen Saver
When the screen saver selection is enabled, the current LCD display is preempted with a screen showing “Press any key to proceed...” after 10 seconds
if a key is not pressed. The screen saver selection corresponds with the backlight operation. If any key is pressed, no action is taken and the previous user
screen is restored.
To turn on or off the Screen Saver option:
1. Press Menu 6 6 (Options - Screen Saver).
2. Press Next to toggle Screen Saver on or off.
3. Press OK; then press CLR to save.
DR
A
FT
7
Fixed Dial
The fixed dial selection restricts the number of digits in telephone numbers
dialed; thus, the types of outgoing calls can be restricted. For example, if the
fixed digit value is set to the default 32, the outgoing calls are not restricted;
however, if the fixed digit value is set to 7, only local calls can be dialed.
To set the Fixed Dial option:
1. Press Menu 6 7 (Locking - Fixed Dial).
2. Enter the pass code if necessary.
17
Page 20

NEX Series 3200
3. Press the digit key(s) to enter a number up to 32.
4. Press OK to save the setting or press CLR to cancel.
System
The system submenu allows you to set up the phone. It is recommended that
the dealer or service provider assist you in the initial setup of your phone.
1
NAM Selection
The NAM selection provides you with the option of selecting one of two Number Assignment Modules (NAMs).
To select a NAM:
1. Press Menu 7 1 (System - NAM).
2. Press Next to select NAM 1 or NAM 2.
3. Press OK; then press CLR to save.
For more information on assigning a phone number to a NAM, refer to “OverAir Activate” on page12.
2
Mode Selection
The phone can operate in one of four transmission modes:
• Analog
• Digital
• “A then D”
• “D then A”
For example, in the “A then D” mode, the phone attempts to acquire analog
service then digital service if analog is not available.
To select the transmission mode:
1. Press Menu 7 2 (System - Transmission Mode).
2. Press Next to scroll through the list of mode options: Analog, Digital, A
then D, or D then A.
3. Press OK, then CLR to save the setting (or press CLR before OK to
cancel).
3
Preferred System Selection
The preferred system selection provides for the selection of one of four Preferred Systems: Standard, Home Only, System A Only, or System B Only. In
the Standard mode, Home is the Preferred System.
To select the Preferred System:
1. Press Menu 7 3 (System - Preferred System).
2. Press Next to select Standard, Home Only, System A Only, or System B
Only.
3. Press OK to save.
4
Power-On Message Personalization
To enter a personalized message that displays during power on:
1. Press Menu 7 4 (System - Power On Message).
2. Enter the first character by pressing an alphanumeric key.
3. Press ABC, abc, and 0-9 to toggle between uppercase letters, lowercase letters, and numbers.
4. Press the corresponding key to enter a character or number. If the same
key is required, press 1 to move to the next space. Press 1 twice to skip
a space.
5. Press Opts 1 to choose punctuation for your text.
6. To delete or replace a previous character, press the CLR key.
7. Press Opts 3 then CLR to save or Opts 4 Edit to cancel changes.
For more information on entering letters or numbers, see “Changing Numbers and Names Saved in the Phone Book” on page30.
DR
A
FT
18
Page 21

NEX Series 3200
5
Feature Codes
The phone automatically receives, through the network, certain default feature
settings that are standard to the area cellular service provider; for example,
the voice mail center phone number. If necessary, the feature settings can
also be customized by using the feature codes selection.
Note: For information on using automated feature codes for call forwarding
and other calling options, contact your cellular service provider to
obtain the applicable code settings.
To change the feature code settings:
1. Press Menu 7 5 (System - Feature Codes).
2. Press the up and down arrow keys to display the feature code selections.
3. With a selection displayed, press Edit and then New to change a feature
code.
4. Enter in the correct feature code setting.
5. Press OK to save the feature code setting.
6. Press and hold CLR to return to the standby mode.
A
FT
DR
19
Page 22
NEX Series 3200
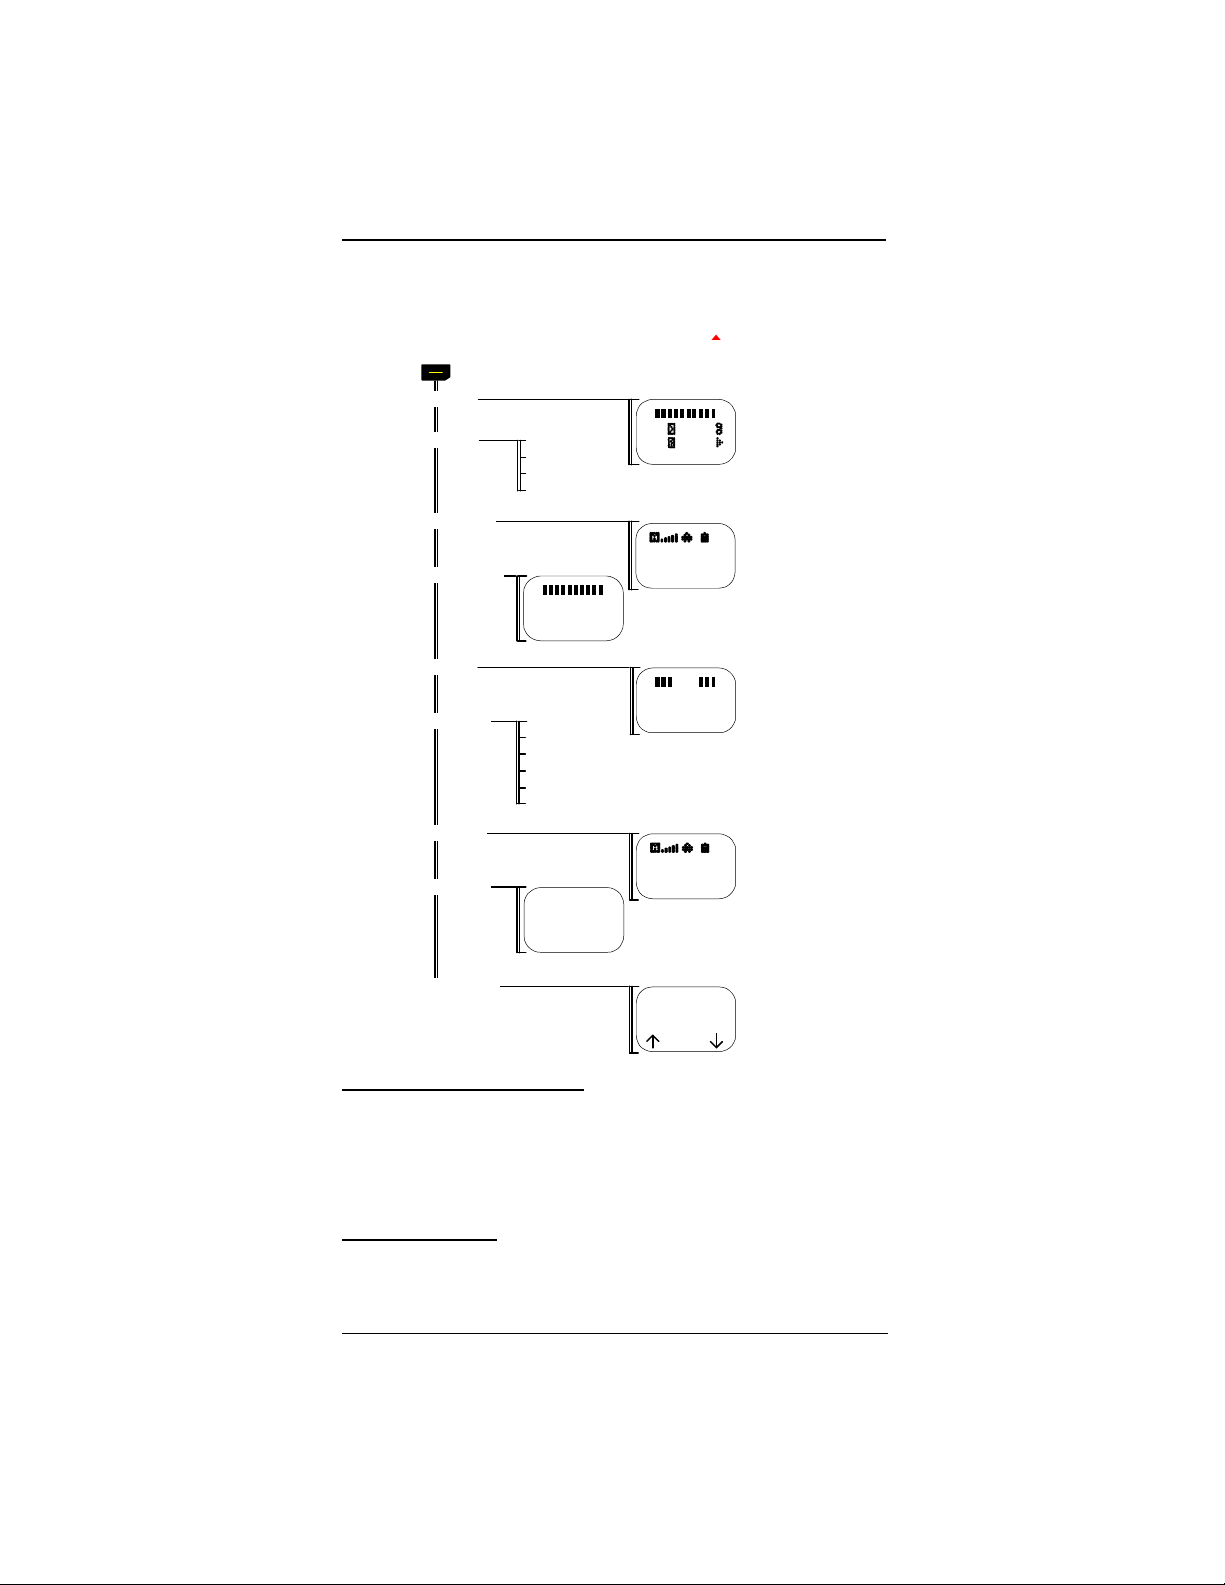
View Menu Categories
1. Press View.
2. Select a menu category.
3. Refer to the following information to access the submenu options.
View menu
1 Pending
2 Calls
3 PhoneBook
4 Own Number
1 All
2 Outgoing
3 Incoming
4 Missed
NAM_1
2145552612
Return
02 02
02 02
Menu View
FT
02) Ring 1
A
Smith, J.
Opts Nbr
5 Usage
6 Messages
7 ScrollPad
8 Voice Mail
9 Mem Usage
DR
1 All
2 Received
3 Sent
4 Pending
5 Last Broadcast
6 Standard
>> Normal
12:17 Tue
04 v-mails
View Play
NAM1
002h 04m H
000h 00m R
Next Back
LN) 214
653 3937
Opts Name
Phone Book
9/25
Messages
View Pending Message
The pending selection displays the total number of calls, pages, messages,
and voice mail messages that have not yet been viewed.
To view the number of pending calls and messages that have not been
viewed:
1. Press View 1 (Pending).
2. Press CLR.
View Call Logs
The calls selection menu displays your call history beginning with the most
recent call. Each call history entry contains the time the call started, the call
log number (1-30), the length of the call, and the phone number of the person
called or of the person calling.
20
Page 23

NEX Series 3200
To view calls:
1. Press View 2 (Calls).
2. Select the group of calls you want to review. Press 1 (All), 2 (Outgoing), 3
(Incoming), or 4 (Missed) to view the type of call.
3. Press the up or down arrow key to scroll through the calls.
4. Access the Options and Save menus by pressing the appropriate soft
key.
View Phone Book Contents
The phone book selection displays the name, phone number, location number, and distinctive ring setting if enabled.
To view the Phone Book entries:
1. Press View 3 (Phone Book).
2. Press Name and Nbr to toggle between Name and Number.
3. Access the Options menu by pressing Opts.
For more information about the Phone Book, see “Storing to Phone Book” on
page28.
1. View Full Number: Provides full phone number viewing.
2. Dial Opts: Provides dialing options (see “Dialing Options Menu” on
page24).
3. Delete: Deletes the current Phone Book entry.
4. Edit: Allows for editing of the current Phone Book entry.
5. Move: Allows you to move the current Phone Book entry to another location
in the Phone Book.
6. Order By Name/Loc: Orders the Phone Book alphabetically or numerically.
7. Set Ring: Sets a distinctive ring for the current phone number.
View Own Number
The own number selection displays your phone number and the current NAM.
To view your phone number:
1. Press View 4 (Own Number).
2. Press Return.
View Total Talk Time Usage
The usage selection displays the total talk times for peak and non-peak
usage, and for Home and Roam usage.
To view call usage:
1. Press View 5 (Usage).
2. Press Next to toggle between the NAM 1 and NAM 2 talk time counters.
3. Press CLR.
View Messages
The messages selection displays all saved messages, beginning with the
most recent message, the nature of the message (Normal, Urgent, Emergency, Interactive), time stamp, and phone number, if available.
Viewing Phone Book Options Menu
DR
A
FT
1
All Messages
The all message selection displays the message summary.
To view all messages:
1. Press View 6 1 (Messages - All Messages).
2. Press View to display the first page of the first message. Use the soft
keys to move up and down through the message. Use the up and down
arrows to move to the next message or back to the previous message.
3. Enter the Pass Code if prompted.
4. Access the Options menu by pressing Opts.
21
Page 24
NEX Series 3200
1. View Full Number: Allows you to view numbers above the last 16
numbers.
2. Dial Opts: Provides dialing options (see “Dialing Options Menu” on
page24).
3. Delete: Deletes the current message.
4. Reply: Sends a reply to the current message if requested.
5. Cancel: Cancels a sent message if not delivered to destination.
6. Resend: Resends a previously sent message.
7. Save number: Saves the phone number to the Phone Book or
scrollpad.
8. (Un)Lock: Toggles current message lock on or off.
9. Home: Returns the display to the previous screen.
Viewing Messages Options Menu
FT
A
2
Received Messages
This option displays received messages, beginning with the most recent
message, the nature of the message (Normal, Urgent, Emergency, Interactive), time stamp, and phone number.
To view received messages:
1. Press View 6 2 (Messages - Received Messages).
2. Press View to display the first page of the first message. Use the soft
keys to move up and down through the message. Use the up and down
arrows to move to the next or back to the previous message.
3. Enter the Pass Code if prompted.
4. Access the Options menu by pressing Opts.
3
Sent Messages
This option displays sent messages, beginning with the most recent message, the nature of the message (Pending, Received), time stamp, and
phone number. (Note: The ability to send text messages may not be available from the cellular service provider at this time.)
To view sent messages:
1. Press View 6 3 (Messages - Sent Messages).
2. Press View to display the first message. Use the soft keys to move up
and down through the message. Use the up and down arrows to move
to the next or back to the previous message.
3. Enter the Pass Code if prompted.
4. Access the Options menu by pressing Opts.
DR
4
Pending
Pending displays only pending messages.
To view only unread messages:
1. Press View 6 4 (Messages - Pending).
2. Press View to display the first message. Use the soft keys to move up
and down through the message. Use the up and down arrows to move
to the next or back to the previous message.
3. Enter the Pass Code if prompted.
4. Access the Options menu by pressing Opts.
22
Page 25

NEX Series 3200
5
Last Broadcast
This option displays the last broadcast message stored in the buffer. (Note:
The broadcast message capability may not be available from the cellular service provider at this time.)
To view broadcast messages:
1. Press View 6 5 (Messages - Broadcast Messages).
2. Press the right and left soft keys to scroll through the screen.
3. Press CLR.
6
Standard
This option displays standard messages for reviewing and editing if changes
are needed before possibly sending a reply.
To view standard messages:
1. Press View 6 6 (Messages - Standard Messages).
2. Press the right and left arrow keys to scroll through the screen and view
the messages.
3. Press Page to scroll through the selected message.
4. Press Edit to change the message.
5. Press Char to move around the message character by character; press
Line to move around the message line by line. Use the right soft key to
switch between the character and line settings. Use the arrows to move
the cursor. To add punctuation, press Opts 1 (Punct). For more information on editing, see “Reviewing and Editing a Standard Message” on
page33.
6. Press Opts 3 (Save) then CLR to save the message, Opts 4 (Exit) to
cancel the changes, or Opts 6 (Home) to return to the previous screen.
7
View Info
The View Info selection enables the User to view an information message
from the Base Station if longer than two LCD lines.
1. Press View 6 7 (Messages - View Info), ???as prompted, to display the
first page of information. Use the up and down arrows to scroll through
the text.
2. Press CLR.
View Scrollpad
The scrollpad function serves as a storage area for numbers entered by the
person on the other end of the conversation. The phone numbers in the scrollpad can be viewed and an identifying nametag, such as the person’s name,
can be entered.
To view the Scrollpad:
1. Press View 7 (Scrollpad).
2. Press the right soft key to toggle between Name and Number.
3. Press the up or down arrow key to scroll the list of phone numbers.
4. Access the Options menu by pressing Opts.
For more information on the Scrollpad, see “Storing to Scrollpad” on page28.
DR
A
FT
23
Page 26

NEX Series 3200
1. View Full Number: Provides full phone number viewing.
2. Dial Opts: Provides dialing options (see “Dialing Options Menu” on
page24).
3. Delete: Deletes the current message.
4. Edit: Enables editing of the current message.
5. Auto Save Number: Automatically saves the phone number to the
Phone Book.
6. Save: Saves the message.
Access Voice Mail
This option enables you to view voice mail status and access voice mail.
To access voice mail messages:
1. Press View 8 (Voicemail).
2. Press View to display whom the message was from and a call back
number if the information is available.
3. Press Play or SEND to connect to the service provider voice mail system and to play the messages.
4. Enter the pass code if prompted.
5. Press END to end the call.
For more information on Voicemail, see “Retrieving Voice Mail” on page35.
View Mem (Memory) Usage
The memory usage selection displays the number of entries in the Phone
Book and the number of available entry locations; and the number of saved
messages and the amount of space used and available (total number of messages that can be saved).
To view Memory Usage:
1. Press View 9 (Memory Usage).
2. Press the right and left soft keys to scroll through the list of usage displays.
Viewing Scrollpad Options Menu
FT
A
DR
Dialing Options Menu
Dialing Options include the following:
• View Full number (please see “View Own Number” on page21 under
Phone Book submenu).
• Add Link (described in this section)
• Add Pause (described in this section)
• Auto Dial (described in this section)
• Forward to (see “Call Forward” on page12)
• Block Caller I.D (described in this section)
• Page (see “Page (Dialing Option Submenu)” on page32)
• Message (see “Message (Dialing Option Submenu)” on page32)
• Long Dist Prefix (described in this section)
Note: Calling Codes such as Call Forwarding, Block Caller I.D., Cancel Call Waiting, etc., may vary from market to market and require that the codes the phone pro-
24
Page 27

NEX Series 3200
vides be edited before use. Contact the local wireless carrier to obtain the correct
Calling Codes.
- Option -
1 View Full
Number
2 Add Link
Access Automated Phone Systems With Link or Pause Dialing
Using your phone to access and perform transactions through automated
phone systems (such as banking or voice mail systems) can be simplified
using the link and pause dialing features. The phone Send # feature combined with the link or pause dialing feature makes communicating with automated systems easier.
The phone communicates with automated systems through transmitted touch
tones (DTMF signals) in response to the FCN 3 (Send #) key sequence under
the following conditions during Conversation mode:
• When the dialed number is linked to a number in the Phone Book
• When the dialed number contains a second number separated by a
manual pause.
The phone transmits the touch tones (DTMF signals) upon connection with
the other party by pressing FCN 3 (Send #) key sequence. Leaving the
Standby mode during conversation disables transmission of the linked number. The location of a number in the Phone Book is requested for transmission
of the linked number.
Add a Link
The Add Link option links a phone number to a second number in the phone
book, which the phone sends as touch tones (DTMF signals). Link numbers
are ideal for sending out confidential numbers such as a pass code or social
security number that is stored in the protected phone book locations. Save the
number to the Phone Book before sending it as a linked number. For information on saving phone numbers to the Phone Book, see “Storing to Phone
Book” on page28.
To add a link:
1. Enter the phone number.
2. Press Opts 2 (Add Links).
3. Enter the corresponding Phone Book location for the linked numbers. To
replace a location number entered incorrectly, press New and enter the
correct location.
4. Press OK to link location to number in dial mode.
5. Press Save to store the phone number and the linked number to the
Phone Book.
6. Press SEND to dial the numbers. After the call is connected, the linked
numbers can be sent by pressing FCN 3 (Send #).
Add a Pause
The Add Pause option enables the phone to add one or more pauses
between the entered phone number and other numbers to be sent out as
touch tones (DTMF signals). Adding pauses between numbers works effectively for accessing automated systems such as company voice mail systems.
For example, one phone book location can store:
“Company Voice Mail Phone Number” P “Voice Mailbox” P “Pass Code”
with P indicating a manual pause.
A combination of linking and pause dialing can be used:
- Option 3 Add Pause
4 Auto Dial
5 Forward To
DR
- Option -
6 Block
Caller ID
7 Page
A
OR
FT
- Option -
8 Message
9 Long Dist
Prefix
25
Page 28

NEX Series 3200
“Company Voice Mail Phone Number” P “Voice Mailbox” L “Pass Code”
where the pass code is stored in a secured phone book location. Each time
the automated system prompts for a response, press FCN 3 to transmit the
next sequence of numbers after the pause or link indicator.
For automated pauses, once the call timer begins, the phone pauses for the
designated duration, and then transmit the digits following the pause as touch
tones (DTMF signals).
To add a pause:
1. Enter the phone number.
2. Press Opts 3 (Add Pause).
3. Press the corresponding digit key to select a pause interval. The phone
adds a “P” after the phone number for each manual pause and a
comma (,) for each 2-second automatic pause.
4. To add another pause, repeat Steps 2 and 3 of this process.
5. Enter the number to send.
6. Press Save to store the phone number and paused number to the
Phone Book.
Auto Dial
When placing a call, if there is no answer or if the phone is busy for up to 30
seconds, the phone redials one minute after ending each try. The phone
attempts autodial twice.
To select Auto Dial:
1. Enter the phone number.
2. Press Opts 4 (Auto Dial).
3. When the other party answers, press Talk.
4. Access menu and View options by pressing the associated soft keys.
5. Finish the conversation.
6. Press END.
Block Caller ID
Block Caller ID prevents the display of your phone number on the other
party’s caller identification system.
To Block Caller ID:
1. Enter the phone number.
2. Press Opts 6 (Caller I.D.). The phone adds the “*67” prefix to the
entered phone number.
3. Press SEND. To cancel the call before sending, hold down CLR.
Long Dist Prefix
This option adds a prefix to the number entered for long distance dialing.
To enable the long distance prefix option:
1. Enter the phone number.
2. Press Opts 9 (Long Dist Prefix). The phone adds the “1” prefix to the
phone number to be dialed.
3. Press SEND to dial.
To save the phone number:
1. Press Save.
2. Choose where you want to save the number (i.e., Auto, Manual, or
Scrollpad).
3. Access Menu and View options by pressing the associated soft keys.
For more information on saving to the Phone Book, see “Storing to Phone
Book” on page28; for more information on saving to the Scrollpad, see “Storing to Scrollpad” on page28.
DR
A
FT
26
Page 29

NEX Series 3200
Save Menu
The Save menu is available in selected review modes when an incoming or
saved phone number is being entered/accessed. It provides options for saving the phone number to the Phone Book or the Scrollpad.
- - - Save - - 1 Auto
2 Manual
3 Scrollpad
For more information on saving to the Phone Book, see “Storing to Phone
Book” on page28.
For more information on saving to the Scrollpad, see “Storing to Scrollpad” on
page28.
FT
A
DR
27
Page 30

NEX Series 3200
Chapter 4: Scrollpad and Phone Book
Storing to Scrollpad
The Scrollpad provides temporary storage of five phone numbers of up to 32
digits each with identifying names of up to 10 characters each. When full, the
scrollpad discards the oldest entry with each new entry.
To store a number to the Scrollpad:
1. Enter a phone number.
2. Press Save 3 (Scrollpad). The phone displays the number as the first
entry in the scrollpad.
3. Press the CLR key at any time to return to the View menu.
To save the scrollpad entry to the Phone Book:
1. Press View 7 (Scrollpad) to recall the phone number from the Scrollpad.
2. Press Opts 5 (Auto Save). This allows you to store the phone number
to the first available location in the Phone Book.
3. Press Opts 6 (Manual Save). This is used to store the entry manually to
the Phone Book.
For more information on this menu, refer to “Saving a Phone Number Manually” on page28.
Applying Dialing Options to a Scrollpad entry:
1. Press Opts 2 (Dialing Mode).
2. Press SEND.
3. Hold down CLR if you need to cancel the call.
Deleting an Entry from the Scrollpad:
1. Press Opts 3 (Delete).
2. Press Yes to proceed and delete the entry.
3. Press No or CLR to cancel.
Editing Names in the Scrollpad:
1. Access the entry in the scrollpad (please see “Storing to Scrollpad” on
page28).
2. Press Opts 4 (Edit).
For more information on editing entries, see “Changing Numbers and Names
Saved in the Phone Book” on page30.
DR
A
Storing to Phone Book
Phone Book storage includes three distinct areas:
One-Touch Area (location 1-9)
These locations are designated for One-Touch use, and numbers are saved
to these locations manually (see “One-Touch” on page16).
Saving a Phone Number Manually
You may use this function to designate the Phone Book location for the saved
phone number (i.e., certain numerical groupings may represent certain
groups of people).
To save a phone number manually:
1. Enter the phone number.
2. Press Save 2 (Manual Save).
3. Designate the two-digit location in the Phone Book for this phone number. The screen prompts for confirmation.
• If the location is empty, then the prompt indicates the condition.
• If the location is occupied, then the entry flashes on the screen.
4. Overwrite the current entry or advance to the next available location.
5. Press OK to save the phone number to the displayed location.
FT
28
Page 31

NEX Series 3200
6. Press Now to enter a name or press Later to enter a name at a later
time.
Note: You may press CLR or Quit to exit the Phone Book without storing an
entry.
For more information on alphanumeric editing, (i.e., names), see “Power-On
Message Personalization” on page18.
Auto-Save Area (Locations 10-89)
Store phone numbers automatically or manually in this area from dial mode.
Saving a Phone Number Using Auto - Save
1. Enter the phone number.
2. Press Save 1 (Auto Save).
The screen displays the first available location in the Phone Book, beginning with the location “10.” (See “Storing to Phone Book” on page28 for
memory location assignments.)
3. Press OK to accept the displayed location.
4. Press Now to enter the name or press Later to enter the name at a later
time.
For more information on alphanumeric editing, (i.e., names), please see
“Power-On Message Personalization” on page18.
Protected Area (Locations 90-99)
Store secure numbers such as access codes or credit card numbers in this
area. Access to this area requires entering the permanent pass code. Transmit secure numbers from this area as touch tones (DTMF signals) without
keytone feedback or digit display using the “FCN”/”Quiet Key”/”Receive #” key
sequence and specifying the location. When a name and number stored in
this area is recalled, the name displays but the number digits are replaced by
asterisks. To view the digits of the number, enter the number mode by using
the right soft key and pressing View; then enter the pass code.
Setting Review Mode (By Name or Location)
The Phone Book displays entries by name (α) and/or numerically by location
(#).
To set Phone Book review by name or location:
• Press Opts 6 (Order by Name/Loc) after entering the phone book.
The other user prompt appears in the upper right corner of the screen.
To switch name and location view quickly:
• Press and hold the left soft key. The phone switches review modes,
and the other prompt appears in the upper right corner of the screen.
To review Sequentially by Location:
1. Begin with the digit user prompt (#) displayed in the upper right corner of
the screen.
2. Press the right arrow key to scroll the Phone Book entries in numerical
order by location (press the left arrow key to scroll backward).
3. Hold down either the left or right arrow key to repeatedly scan entries.
Only the contents of occupied locations are displayed.
To review Directly by Location:
You may access the Phone Book location directly by pressing the corresponding key.
If it is a single digit location (with the digit user prompt (#) displayed in the
upper right corner):
• Press the single digit and wait for the two second time-out.
• Hold the digit for one-half second.
DR
A
OR
FT
29
Page 32

NEX Series 3200
To review by Name:
1. Begin with the alphabetical user prompt (α) displayed in the upper right
corner of the screen.
2. Use the right or left arrow keys to scroll through the Phone Book.
To access by alphabetical group:
1. While in the Phone Book, begin with the alphabetical user prompt (α)
displayed in the upper right corner of the screen.
2. Press a digit (e.g, “2 ABC”) key to display the first name (e.g., “Adam”) in
the list of names (e.g., Adam, Arthur, Brad, Charles) with first letter
matching the first letter (e.g., “A”) in the key group.
3. If a match is not found, then the next letter in the key group (e.g., “B”) is
used until a match is found.
• If a match is not found for any letter in the key group, “no entries
stored” is displayed.
• If a match is found, then press the up and down arrow keys to scroll
through the remaining names in the Phone Book.
4. Press and hold the digit key to display the number of names that begin
with the letters on the key. Use the up and down arrow keys to scroll
through the list.
5. Press SEND to dial the number.
6. Press Back to return to the previous Phone Book review mode or press
Home to find the total number of Phone Book entries.
7. To exit the Phone Book, press CLR.
Changing Numbers and Names Saved in the Phone Book
This option allows you to change names and numbers in the phone book.
To edit a phone number saved in the Phone Book:
1. Enter the Phone Book. Scroll through the Phone Book to find the name
of the person whose phone number you want to edit.
2. Use Nbr to toggle to number view.
3. Press Opts 4 (Edit).
4. Use CLR to delete the number.
5. Enter the correct number.
6. Press Opts 3 (Save) then CLR.
7. To cancel the changes while viewing the Edit screen, press the Opts 4
(Edit).
To edit name saved in the Phone Book:
1. Find the entry in the Phone Book.
2. Press Name if the phone numbers are displayed.
3. Press Opt 4 (Edit).
4. Enter the characters for the name (for editing alpha entries, please see
“Power-On Message Personalization” on page18).
5. Press Opts 3 (Save) then CLR.
6. To cancel the changes while viewing the Edit screen, press Opts 4
(Edit).
Deleting Phone Book Entries
This option allows you to delete entries in the Phone Book.
To delete Phone Book entries:
1. Hold down the View key to access the Phone Book.
2. When the Phone Book screen displays, find the entry to be deleted.
3. Press Opts 3 (Delete). The phone prompts for confirmation.
4. Press Yes to delete the entry or No to cancel the deletion.
DR
A
FT
30
Page 33

NEX Series 3200
Text Messages, Voice Mail Messages, and
Pages
With your DigitalTalk 3200, you can send and receive text messages and
pages as well as receive voice mail when the phone is in digital mode. In analog mode, the phone receives text messages only, and the text message does
not include a date, time stamp, phone number, or priority. (Note: The ability to
send messages or receive broadcast messages may not be available from the
cellular service provider at this time.)
Two distinct types of text messages are available:
• Regular text messages that you can send and receive.
• Broadcast messages transmitted to groups of subscribers. Examples
of broadcast service messages are emergency warnings, traffic
reports, weather conditions, company broadcasts to field personnel,
and advertisements. Broadcast messaging supports both priority and
filter options.
This subsection refers to and treats broadcast messages, regular messages,
and pages as general messages, since pages may contain text messages,
and text messages may contain callback numbers.
Based on available service, the phone supports the following options:
• Text messages up to 255 characters (including overhead) for receiving
and for sending.
• Four levels of priority: Normal, Interactive, Urgent, and Emergency
• Four levels of privacy: Not Restricted, Restricted, Confidential, and
Secret. (The last three options require a pass code to access.)
• Callback or destination numbers up to 32 digits
• Two levels of message filtering for broadcast messages: Normal or
Emergency
• Reply option for incoming messages
• Acknowledgments for outgoing messages
• Alert On Delivery and prompting during Standby mode
• Storage option for broadcast messages (When the memory is full, regular messages overwrite the oldest broadcast message.)
• Storage, review, and delete options for 30 transmit and received messages, including acknowledgments, up to a total of 4,096 characters
• Option to store callback number in Phone Book
• Cancelling and resending transmitted messages
• Message locking
• Originate call to the callback number or a number embedded in message text
• Replies to sent messages are attached to the front of the original text
with a date
• Ten standard user replies, up to a total of 1000 characters
• Standard message editing capability
Voice mail service provides notification of the number of pending voice mails,
time stamp, and callback number and text message.
To use the callback option:
1. View the notification.
2. Press SEND to automatically dial the callback number for retrieval of
voice mail messages.
Voice mail notification and message transmission to the phone should occur
at power-on or within 10 seconds of arrival at the service provider if the phone
is on.
DR
A
FT
31
Page 34

NEX Series 3200
Page and Message Delivery
Message Viewing Options
When new pages or messages arrive, the phone sounds an alert tone and if
the User Alert is on, the phone displays an envelope icon on the status line.
To turn off automatic prompting, see “User Alert” on page13.
To view a message upon receipt:
1. When the new message prompt is displayed, press Now to view messages now (the screen displays the message header for the first pending message - View key flashing).
2. Press View as many times as necessary to scroll down through the
message. (Press the left soft key to scroll up to the beginning of the
message or hold down the soft keys to repeat scrolling of the message.)
3. Press the CLR key to return to the message header.
4. Press the down arrow key to view older messages.
5. Press the up arrow key to review the newer messages. If you have
reached the first or last message, pressing the arrow key causes an
alert tone to sound.
6. Press CLR to return from message review at any time.
To review a message later:
When the new message prompt is displayed, press Later. The phone stores
the message and returns automatically to the standby mode.
Message (Dialing Option Submenu)
This option sends a standard or composed text message to another phone
number.
To compose and send an original message:
1. Enter the phone number.
2. Press Opts 8 (Message) to compose a message.
3. To load a standard message, press Opts 8 5 (Message - Standard
Message).
4. Press the up or down arrow keys to scroll to the desired message.
5. Press OK to select and load the message into the edit buffer. For more
information on editing a message, see “Reviewing and Editing a Standard Message” on page33.
6. Press SEND to display the “submit option” screen.
7. Use Next to move from priority (Normal, Interactive, Urgent, Emergency), to reply option (Reply, No Reply), to restriction (Open,
Restricted, Confidential, Secret) parameters. Use the up and down
arrow keys to activate the desired options for these parameters.
8. Press OK.
Note: The message is saved in the Message Center for an indefinite period
of time until the message is delivered or cancelled by the sender. The
language indicator will be set to the current setting.
Page (Dialing Option Submenu)
This option sends a page to the entered phone number.
• No text option is provided.
To send a page:
1. Enter the phone number.
2. Press Opts 7 (Page) to select page option.
3. Press Next to move from priority (Normal, Interactive, Urgent, Emergency), to reply option (Reply, No Reply), to restriction (Open,
Restricted, Confidential, Secret) parameters. Use the up and down
arrow keys to activate the desired options for these parameters.
4. Press OK to save.
DR
A
FT
32
Page 35

NEX Series 3200
Reviewing and Editing a Standard Message
A standard message area is provided so that you can save commonly used
messages and not have to re-enter the whole message. You may, however,
edit standard messages for your needs.
To edit a standard message:
1. Press View 6 (Messages) to view the first standard message. Use the
arrow keys to scroll to the desired standard message.
2. Press Page to page through the selected message text.
3. Press Edit to change the message.
4. Press Char/Line to switch between moving the cursor character-bycharacter or from line-to-line by pressing the arrow keys to move the cursor.
5. Pressing the digit key or selecting a punctuation mark from the options
menu inserts a character before the cursor (blinking style).
6. Press CLR to erase the character before the cursor. If you are at the start
of a sentence, the character is uppercase; if not, then it is lowercase.
7. Edit the message text as described in “Changing Numbers and Names
Saved in the Phone Book” on page30 (the options menu for cursor
based editing includes two additional options, Home and Load).
8. Press the Opts 3 (Save) to save the edited message.
9. Press Opts 6 (Home) to exit the edit session.
10. Exit without saving changes by pressing Opts 4 (Exit) to return to the
Standard Message Selection menu.
Pending Notification
When new messages arrive, the associated icon displays in the top status line
on the screen as long as the message is unread. A message is pending if you
have not yet reviewed the message.
The screen display indicates message types as follows:
DR
A
FT
Regular/Broadcast Messages/Pages
Acknowledgments of sent messages
Voice mail notification
When more than one type of message is pending, the associated icons display alternately every two seconds. The message icon continues to display if
any messages of that type have not been reviewed.
Receiving a New Message While Reviewing Messages
If new messages or replies arrive while reviewing a message, the alert tone
sounds (if set); however, you are not interrupted except for an Emergency
broadcast. When you exit from reviewing the messages, your phone displays
the “View new msg” menu. Press Now to view the new messages now or
Later to continue without viewing new messages at this time.
Message Area Full
If the message space is full, the following screen displays:
Message
area full.
Proceed
The base station sends the message again later (except broadcast messages) or at power-on. To recover storage and to minimize message rejection,
delete messages in a timely manner.
33
Page 36

NEX Series 3200
Broadcast Message Delivery
Broadcast Message Storage Option
The phone provides the option of turning Broadcast Message Storage on or
off. If on, broadcast messages are stored with your other messages. If off,
only the last broadcast message is saved (the previous broadcast message
is replaced).
To turn Broadcast Message Storage on and off:
1. Press Menu 3 6 (Features - Broadcast Message Storage).
2. Press Next to toggle Broadcast Message Storage on or off.
3. Press OK to save or CLR to cancel.
Broadcast Message Arrival/Storage
The phone sounds an alert upon the arrival of a broadcast message. The
“MESSAGE ARRIVED” screen displays briefly; the phone then displays the
broadcast message header.
To review the broadcast message:
1. Use View to scroll forward through the message. Press the left soft key
to scroll back or hold down either key to repeat scrolling of the message.
2. Press the CLR key to restore the previous screen.
If the broadcast message storage option is off, then “Not Saved” appears in
the status field of the message text and only the last (saved) broadcast message is accessible.
If the message broadcast storage option is on, the message is saved and
reviewed in the same manner as regular messages, and the callback number
field displays “**B’cast.” The last broadcast is saved in a special location
even if the message is stored to the general message area.
Broadcast Message Filter
The phone provides the option of filtering broadcast messages. When the filter is set for “Emergency,” the phone stores and displays only emergency
broadcast messages. When the filter is set to “Normal,” all broadcast messages are stored.
To set the Broadcast Message Filter:
1. Press Menu 3 5 (Features - Broadcast Message Filter) to display the
“Broadcast Message Filter” screen.
2. Press Next to toggle between “Normal” and “Emergency” priority.
3. Press OK to save or CLR to cancel.
Automatic Deletion of Broadcast Message
If a broadcast message is stored in the message space and a higher priority
broadcast message or any priority regular message arrives, the broadcast
message is deleted and replaced with the new message. If this occurs while
the broadcast message is being reviewed, the phone displays “Message
Arrived” and then “Message Deleted” for the broadcast message that is being
reviewed.
To view a message while a previous message is being reviewed:
• Press Proceed. The new message is displayed with a flashing View
command key to indicate the message text has not yet been viewed.
DR
A
FT
34
Page 37

NEX Series 3200
Retrieving Voice Mail
When a new voice mail notification arrives, the phone sounds an alert tone, if
designated by the message, and the voice mail pending indicator () displays. The voice mail status information is saved including a time stamp, the
callback number, the priority indicator, and an optional alphanumeric message. A prompt is then displayed to view the voice mail status now or later.
This prompt displays when the phone is in standby mode or returns to standby
mode.
Review Voice Mail Immediately Upon Receiving Notification:
With the voice mail alert screen displayed, press SEND (or press Now and
then either Play or SEND) to listen to the voice mail messages immediately.
The phone dials your voice mail center. When you are finished listening to the
voice mail messages, press END.
With the voice mail alert screen displayed, press Now and then View to display information, if available, on the incoming call including caller identification, callback phone number, and message priority and privacy levels. Press
SEND to dial the callback number; or press CLR and then Play or SEND to
call your voice mail center.
Review Voice Mail Messages Later:
1. Upon receiving notification of voice mail, press Later to review messages at a later time.
2. When you are ready to review messages, press View 8 (Voice Mail Sta-
tus).
3. To listen to the voice mail messages, press Play. The phone dials your
voice mail center.
4. When you are finished listening to the voice mail messages, press END.
DR
OR
A
FT
35
Page 38

NEX Series 3200
Chapter 5: Safety Information
Safety Precautions
For safe and efficient operation of the phone, observe the following
guidelines.
The cellular telephone is a radio transmitter and receiver. When the unit is
powered on, the phone receives and sends radio frequency (RF) energy. The
phone operates in the frequency range of 824 MHz to 894 MHz, and employs
commonly used frequency modulation (FM) techniques. When the phone is
in use, the cellular system handling the call controls the power level at which
the phone transmits. The power level can range from 0.006 watt to 0.6 watt.
Exposure to Radio Frequency Energy
In 1991, the Institute of Electrical and Electronics Engineers (IEEE) and in
1992, the American National Standards Institute (ANSI) adopted a standard
for safe levels of human exposure to RF energy. Approximately 120 scientists, engineers, and physicians from universities, government, and industry
developed the standard. In March 1993, the Federal Communications Commission (FCC) proposed the adoption of the standard. The design of your
phone complies with the updated standard. RF exposure can be further limited by controlling the duration of calls and operating the phone in a power
efficient manner.
Efficient Phone Operation
Extend the antenna fully to operate at the lowest power level possible. Calls
can be sent and received with the antenna retracted; however, the phone
operates more efficiently with the antenna fully extended. Hold the cellular
phone in the same manner as a standard telephone is held. While speaking
directly into the mouthpiece, position the antenna up and over your shoulder.
Do not hold the antenna when the phone is in use. Holding the antenna
affects call quality and may cause the phone to operate at a higher power
level than is necessary.
DR
A
FT
Antenna Care and Replacement
Do not use a phone with a damaged antenna. If a damaged antenna comes
into contact with skin, a minor burn could result. Replace a damaged antenna
immediately with a manufacturer-approved antenna. Use only an NEC supplied or approved antenna. Unauthorized antennas, modifications, or attachments could damage the phone and could violate FCC regulations.
Driving
Obey the laws and regulations on the use of cellular telephones while driving.
When using your phone while driving:
• Give full attention to driving.
• Pull off the road and park before making or answering a call if
driving conditions require additional caution.
36
Page 39

NEX Series 3200
Electronic Devices
Most modern electronic equipment is shielded from RF energy; however, RF
energy from cellular telephones may affect some inadequately shielded electronic equipment. RF energy may affect improperly installed or inadequately
shielded electronic operating and entertainment systems in motor vehicles.
Check with manufacturers or manufacturers representatives to determine if
systems are adequately shielded from external RF energy. Consult the manufacturer of any personal medical devices (for example, pacemakers and hearing aids) to determine if the devices are adequately shielded from external RF
energy. Turn off the phone in health care facilities when any regulations
posted in the area forbid use of electronic devices. Hospitals or health care
facilities may be using equipment sensitive to external RF energy.
FT
Aircraft
• Turn off the phone before boarding any aircraft.
• While the plane is on the ground, receive approval from the airline
crew prior to using the cellular phone.
• Do not use the phone while the plane is in the air.
To prevent possible interference with aircraft systems, Federal Aviation
Administration (FAA) regulations require airline crew permission prior to
phone usage. To prevent interference with cellular systems, FCC regulations
prohibit using the phone while an aircraft is in the air.
Children
Do not allow children to play with the phone; the phone is not a toy. Children
could hurt themselves or others. In addition, children could damage the phone
or make calls that result in an increase to the phone bill.
DR
A
Blasting Areas
To avoid interfering in construction projects, turn off the phone when in a blasting area or in areas posted: “Turn Off Two-Way Radio.” Construction crews
often use remote control RF devices to set off explosives.
Air Bags
An air bag inflates with incredible force. Do not place objects, including
installed and portable wireless equipment, in the area of the air bag or in
deployment area of the air bag. If in-vehicle wireless equipment is improperly
installed and the air bag inflates, serious injury could result.
Potentially Explosive Atmospheres
Turn off the phone in an area with a potentially explosive atmosphere.
Although it is rare, the phone or its accessories could generate sparks. Sparks
in certain areas could cause an explosion of fire resulting in bodily injury or
even death.
Areas with a potentially explosive atmosphere are usually, but not always,
clearly marked. Potentially explosive areas include fueling areas such as gas
stations, below deck on boats, and fuel or chemical transfer and storage facilities. Additional areas are atmospheres with chemicals or particles in the air
such as grain, dust, or metal powders; and any area where it is advised to turn
off the vehicle engine.
37
Page 40

NEX Series 3200
Do not transport or store flammable gas, liquids, or explosives in the same
compartment that contains the phone or its accessories.
Vehicles using liquefied petroleum gas, such as propane or butane, must
comply with the National Fire Protection Standard (NFPA-58). For a copy of
the standard, contact the National Fire Protection Association, One Batterymarch Park, Quincy, MA 02269, Attn: Publication Sales Division.
Pacemakers
Research sponsored by Wireless Technology Research (WTR) indicates that
some wireless telephones cause interference with pacemakers. NEC America, Inc., endorses the following recommendations:
• Wireless phones should be kept at a safe distance from a pacemaker. Existing data indicate that the greater the distance
between a pacemaker and a wireless phone, the less the risk of
interference. The data further indicates that six inches is the
proper separation distance for minimal risk.
• Practical steps to achieve the recommended separation distance
include not placing a wireless telephone in the area over the
pacemaker, such as a shirt pocket, when the phone is powered
on. (The unit is considered on when power is being supplied to
the phone by the battery.) Another practical step is to listen into
the phone using the ear opposite the location of the pacemaker.
• Note that no comprehensive data indicates that bystanders with
pacemakers are at risk of interference from another person operating a cellular phone.
DR
A
FT
38
Page 41

NEX Series 3200
Chapter 6: Troubleshooting
Phone Has No Power or Does Not Work
If the power does not come on or stay on:
1. Make sure the battery is installed on the phone properly.
2. Be sure the contacts are clean on the battery and the charger.
3. The battery charge may be too low for operation. Listen for the low battery alarm or check the battery level by looking at the Battery Level Indicator (see “I. Battery Indicator:” on page6) on your screen.
If the power comes on, but the phone does not work:
1. Check the NO Service message (see “F. Signal Strength:” on page6);
you may be out of the cellular service area.
2. Make sure that the antenna is fully extended.
For more information on Service Center assistance, see “NEC Service Support” on page42.
Maintaining Service During A Conversation
Degradation of service quality occurs in a mobile environment due to fading of
the signal. This fading may result in the abrupt interruption of service, referred
to as a “dropped call.”
The following factors may cause fading:
• Phone use in weak signal areas
• Reflection of the signal off of obstacles such as buildings
• Interference from multiple reflections of the signal
Loss of Service
If the phone loses service in either the standby or conversation mode, the signal strength indicator (see “F. Signal Strength:” on page6) continues to display on the screen, but the system and transmission mode indicators do not
display.
• The phone then initiates a search cycle. Following a successful
search, the screen displays the new system and transmission mode.
• Following an unsuccessful search, “NoSrv” replaces the signal
strength indicator to indicate no service.
For information on the service tone (alert), see “Quiet Key On/OFf” on
page10.
If “Drop Call” displays on the screen during a conversation:
1. Press CLR to return to standby mode.
2. Press SEND to retry the call if service is established.
DR
A
OR
FT
39
Page 42

NEX Series 3200
Chapter 7: Limited Warranty & Technical
Information
Limited Warranty
1. What Products May Be Covered By This Limited Warranty?
The following products (the “Products” or the “Product”) purchased
through an NEC America, Inc. (NECAM), Wireless Communications
Division Authorized Dealer (the “Dealer”) in the United States on or
after January 1, 1997, may be covered by this warranty:
[DIGITALTALK MAX™ 3200 CELLULAR TELEPHONE]
2. What Does This Warranty Cover?
NECAM warrants to the original end-user Product purchaser (“You”)
that the Products will conform to the applicable published specifications in effect at the time of shipment from NECAM to the Dealer, and
that the Products will be free from defects in materials or workmanship under normal use and service during the warranty period
described in Paragraph 4.
3. When Does Your Warranty Begin?
The warranty period will begin on the date You purchase the product.
Dated proof of purchase is necessary to accompany and product
returned for warranty service consideration. Valid proof of purchase
must identify the point of purchase, date of purchase, Product model
or trade name, and Electronic Serial Number or Mechanical Serial
Number for transceivers and boosters.
4. How Long Does The Coverage Last?
The warranty period for the Product is:
Any Products repaired or replaced under the terms of this warranty
are covered under the warranty for the remainder of the original warranty period or ninety (90) days from the date of service return shipping, whichever is longer.
DR
[ONE (1) YEAR]
A
FT
5. What Will The Manufacturer Do If The Product Becomes Defective
In Materials Or Workmanship During The Warranty Period?
If any Product covered under this warranty becomes defective in
materials or workmanship during the applicable warranty period,
NECAM will, at its option, either repair the defective product without
charge for parts and labor, or provide a replacement in exchange for
the defective Product.
6. What Is Not Covered By This Warranty?
(a) This warranty does not extend to:
(i) Products which have been subjected to misuse, accident, physical
damage, improper installation, abnormal operation or handling, neglect,
inundation, fire, water, or other liquid intrusion, or;
(ii) Products which have been damaged due to repair, altered, or modified by anyone other than an authorized service warranty componentlevel representative of NECAM, or;
(iii) Defects caused by components, parts, or accessories not compatible with the warranted Product, or;
(iv) Products whose warranty/quality labels, product serial number
plates or electronic serial numbers have been removed, altered, or rendered illegible, or;
(v) Accessory items such as antenna, cables, curl cords, cases, etc., or;
(vi) Products shipped to NECAM for repair from outside the United
States.
40
Page 43

NEX Series 3200
(b) Any other warranties, including but not limited to the implied warranties
of merchantability and fitness for a particular purpose, shall be limited to
the duration of this warranty. Some states do not allow limitations on how
long an implied warranty lasts, so the above limitation may not apply to
you.
(c) NECAM’s total liability for damages for any cause related to or arising
out of the use or inability to use the product, whether in contract, negligence, strict tort, or based on any other legal theory, shall not exceed the
original price paid for the product.
(d) In no case shall NECAM be liable for any indirect, special, incidental, or
consequential damages based upon breach of warranty, breach of contract, negligence, strict tort, or any other legal theory. Such damages
include, but are not limited to, loss of profits, loss of savings or revenues,
inability to use the products or any associated equipment, cost of capital,
cost of any substitute equipment, facilities or services, claims by third
parties other than you, and injury to property. These limitations do not
apply to claims for personal injury. Some states do not allow the exclusion or limitation of incidental or consequential damages, so the above
limitation or exclusion may not apply to you.
7. How Do You Get Warranty Service?
If Your Product requires warranty service, it must be returned to an
NEC Authorized Service Center along with a description of the Product malfunction or difficulty. You are required to substantiate warranty
status with a dated proof of purchase (as explained in item #3), inclusive of Products’s serial number (if applicable). The address of the
nearest NECAM Authorized Service Center may be obtained by calling (800) 637-5917 or (972) 751-7500, or by writing to: NEC America,
Inc., Attention: Service Support & Administration, 1621 Walnut Hill
Lane, Irving, Texas, 75038. NECAM assumes no risk for damage or
loss in transit.
If, in NECAM’s sole opinion, the Product failure is not covered under
this warranty, or proof of purchase does not meet the terms of this
warranty, you will be notified and your authorization will be requested
for any further repair activity. Products repaired under warranty will be
returned to You, transportation prepaid.
8. How Does State Law Apply To This Warranty?
This warranty gives You specific legal rights, and You may also have
other rights which vary from state to state.
9. This Warranty Is The Entire Agreement.
Unless modified in writing, signed by both You and NECAM, this warranty is understood to be the complete and exclusive agreement.
DR
A
FT
REV: LW012097
41
Page 44

NEX Series 3200
Technical Information
Dimensions ???
Weight ???
Transmitting Power Analog: ? E.R.P. Maximum RF Power
Digital: ? E.R.P. Maximum RF Power
Operating Voltage ?
Frequency Band 824.040 to 848.970 MHz (TX)
869.040 to 893.970 MHz (RX)
Standard Battery Capacity ?
Number of Channels
FT
A
Memory Locations 99
Memory Capacity Numeric: 32 digits per location
Alpha: 10 letters per location
NEC Service Support
NEC Service Support can assist you with any additional information
that you may need in the operation your NEC cellular telephone and
NEC Authentic Accessories™. Contact NEC Service Support at the
following telephone number or address.
Telephone: Writing:
1-800-637-5917* NEC America, Inc.
1-972-751-7500 Service Support
*The 800 number listed above also provides access to NEC Repair
Service and Parts Sales.
DR
1621 Walnut Hill Lane
Irving, Texas 75038
NEC Wireless Marketing
NEC Wireless Marketing can be contacted at the following address or
telephone number.
Telephone: Writing:
1-800-421-2141 NEC America, Inc.
Copyright © 1999 by NEC America, Inc.
Manual Part Number: ????
1st Edition June 1999
All specifications and conditions subject to change without notice.
LICENSED UNDER ONE OR MORE OF THE FOLLOWING U.S. PATENTS
4,954,951 4,942,516 4,896,260 4,829,419 4,825,364 4,686,622 4,531,182
4,396,976 4,371,923 4,121,284 4,120,583 4,435,732 4,471,385 4,672,457
4,739,396 4,675,863 4,817,089 4,912,705 5,022,024 5,121,391
All Rights Reserved. Printed in U.S.A.
Wireless Marketing Division
1621 Walnut Hill Lane
Irving, Texas 75038
42
Page 45

A
Access by Alphabetical Group (Phone
Book) 30
Access Voice Mail 24
Activation, Over Air 12
Alarm Set/Day of Week Indicators 6
Alarm Setting 11
Alert, Minute (Call Tone) 10
Alert, User 13
All Messages, Messages (View)
Submenu 21
Any Key 17
Authentic Accessories 1
Auto (Locking Submenu) 14
Auto Answer (Options Submenu) 16
Auto Answer/Ringer Indicator 6
Auto Dial 26
Auto Dial, Dialing Options Menu 26
Auto PIN (Locking Submenu) 11, 16
Auto Power On/Off 12
Auto-Save Area (Memory Location) 29
Auto-Save, Phone Number Saving 29
B
Backlight 17
Battery
Care 3
Connecting 1
Disconnecting 1
Disposal 3
Locking Latch 1
Battery Indicator 6
Battery Level Indicator 2
Block Caller I.D., Dialing Options Menu
26
Broadcast Message Delivery 34
Broadcast Message Filter 13
Broadcast Storage (Features Menu) 13
Broadcast, Last (View/Messages
Submenu) 23
DR
C
Call Forward Type 12
Call Forwarding 12
Call In (Locking Submenu) 15
Call in Progress, Talk Time 7
Call Out (Locking Submenu) 15
Callback Option (SMS Voice mail) 31
Caller I.D., Blocking 26
Calls Submenu (View Menu) 20
Calls, Reset 13
Care and Maintenance, Phone 3
Charging
Using the Charge Stand 2
Using the Standard Charger Only 2
Charging the Battery 2
Charging Times, Battery 2
Clocks Submenu (Main Menu) 11
CLR Key 8
Connecting & Disconnecting the Battery
1
Controls and Features (picture) 4
Conversation Mode Display Indicators 7
NEX Series 3200
Index
Current Date 6
Current Time 6
D
Date, Current 6
Date, Setting 11
Day of Week/Alarm Set Indicators 6
Deleting Phone Book Entries 30
Dialing Options Menu 24
Direct Review by Location (Phone Book)
29
Display Indicators, Conversation Mode 7
Display Indicators, Standby Mode 6
FT
Dropped Calls 39
E
External Control 17
A
External Devices Indicator 7
External Devices Indicators 6
F
Feature codes 19
Features Submenu (Main Menu) 12
Filter, Broadcast Message 13
Forwarding (Call) 12
I
Indicator
Battery 6
Battery Level 2
Day of Week/Alarm Set 6
External Devices 6, 7
In-Use (Phone) 7
Mode 6
Mute 7
Ringer/Auto Answer 6
Service Area 6, 7
Service change 10
Standby mode 6
System 6, 7
Transmission Mode 7
User Alert 7
View Key 6, 7
In-Use Indicator (Phone) 7
L
Last Broadcast, Messages (View)
Submenu 23
Last Number Redial 5
Limited Warranty 40
Lock Icon 6
Lock Keys 16
Lock Mode 6
Locking Latch, Battery 1
Locking Submenu (Main Menu) 14
Long Distance Prefix (Dialing Options
Menu) 26
Loss of Service 39
M
Main Menu 9
Main Menu (Left Soft) Key 6, 7
43
Page 46

NEX Series 3200
Maintaining Service During Conversation
39
Maintenance, Phone 3
Making a Call 5
Marketing, NEC Wireless 42
Memo (Locking Submenu) 13, 15, 17, 23
Memory Location, Auto-Save Area 29
Memory Location, One-Touch Area 28
Memory Location, Protected Area 29
Memory Usage (View Menu) 24
Menu Prompts 8
Menu, Dialing Options 24
Menu, Save 27
Message (Dialing Options Menu) 32
Message Delivery 32
Message Delivery, Broadcast 34
Messages
Text 1
Voice 1
Messages Submenu (View Menu) 21
Messages, All (View/Messages
Submenu) 21
Messages, Received (View/Messages
Submenu) 22
Messages, Reset 14
Messages, Sent (View/Messages
Submenu) 22
Messages, Standard (View/Messages
Submenu) 23
Minute Alert 10
Mode Indicator 6
Mode Selection, Transmission 18
Mute Indicator 7
DR
N
NAM Selection (System Submenu) 18
NEC Authentic Accessories 1
O
One-Touch (Options Submenu) 16
One-Touch Area (Memory Location) 28
Options Menu, Messages (View)
Submenu 22
Options Menu, Phone Book (View)
Submenu 21, 22, 24
Options Submenu (Main Menu) 16
Over Air Activation 12
Own Number (View Menu) 21
Own Phone Number, Viewing 5
P
Page and Message Delivery 32
Page Delivery (Point-to-Point) 32
Page Option (Dialing Options Submenu)
32
Pending (View Menu) 20
Pending, Messages (View) Submenu 22
Performance, Phone 1
Perm Code (Locking Submenu) 15
Phone (Locking Submenu) 14
Phone Activation 1
Phone Book Entries, Deleting 30
Phone Book Submenu (View Menu) 21
Phone Book, Editing Entries 30
Phone Book, Review by Name/Location
29
Phone Book, Setting Review Mode 29
Phone Book, Using 5
Phone Has No Power or Does Not Work
39
Phone Safety & Performance 1
Power-On Message Personalization
(System Submenu) 18
Preferred System Selection (System
Submenu) 18
Prefix, Long Distance 26
FT
Prompts, User 8
Protected Area (Memory Location) 29
Q
A
Quiet Key On/Off 10
R
Received Messages, Messages (View)
Submenu 22
Receiving a Call 5
Recharging the Battery 2
Redial, Last Number Called 5
Reset Submenu (Main Menu) 13
Retrieving Voice Mail 35
Review by Name (Phone Book) 30
Review Mode, Setting (Phone Book) 29
Reviewing and Editing a Standard
Message 33
Ring Type Setting 9
Ringer/Auto Answer Indicators 6
S
Safety, Phone 1
Save Menu 27
Saving a Phone Number Using Auto-
Save 29
Screen Saver (Options Submenu) 17
Scroll Keys 8
Scrollpad 28
Scrollpad, Reset 14
Sent Messages, Messages (View)
Submenu 22
Sequential Review by Location (Phone
Book) 29
Service Area Indicators 6, 7
Service Change Indicator 10
Service Interruption 39
Service Support 42
Service Tone 10
Settings, Reset to Factory Default 14
Signal Strength 6
Soft Keys 8
Standard (Messages Submenu) 23
Standard Message, Reviewing and
Editing 33
Standby Mode Display Indicators 6
Status Line Contents 7
Storage, Broadcast (Features Submenu)
13
System Indicator 6, 7
44
Page 47

System Selection, Preferred 18
System Submenu (Main Menu) 18
T
Talk Time (of Call in Progress) 7
Technical Information 42
Temp Code (Locking Submenu) 15
Temporary Pass Code (Locking
Submenu) 15
Text Messages 1
Time and Date 5
Time, Current 6
Time, Setting 5
Touch Tone (DTMF Signal) Length 10
Touch Tone (for DTMF Signaling
Activation) 10
Transmission Mode Indicator 7
Transmission Mode Selection (System
Submenu) 18
Turning Off the Phone 4
Turning On the Phone 4
U
Usage (View Menu) 21
Usage Totals, Reset 14
User Alert 13
User Alert Indicators 6, 7
User Prompts 8
Using the Phone Book 5
V
View Key Indicator 6, 7
View Menu Categories, Accessing 20
View Own Phone Number 5
Voice Mail
Callback Option 31
Messages 1
Retrieving 35
Setup 1
Voice Mail (View Menu) 24
DR
NEX Series 3200
FT
A
45
 Loading...