

NEC MULTISYNC E900+, E900PLS, JC-1942UMW User Manual
MultiSync
®
E
900+
™
User’s Manual
MultiSync
®
E
900+
™
User’s Manual
NEC Enterprise Series
Contents 1
Quick Start 2-3
Controls 4-6
Recommended Use 7-8
Specifications 9
Features 10
Troubleshooting 11
References 12
Limited Warranty 13
TCO’95 14-15
78133521 5/15/98, 2:16 PM1
TO PREVENT FIRE OR SHOCK HAZARDS, DO NOT EXPOSE THIS UNIT TO RAIN OR MOISTURE. ALSO, DO NOT USE
THIS UNIT'S POLARIZED PLUG WITH AN EXTENSION CORD RECEPTACLE OR OTHER OUTLETS UNLESS THE PRONGS
CAN BE FULLY INSERTED.
REFRAIN FROM OPENING THE CABINET AS THERE ARE HIGH VOLTAGE COMPONENTS INSIDE. REFER SERVICING
TO QUALIFIED SERVICE PERSONNEL.
WARNING
CAUTION
CAUTION: TO REDUCE THE RISK OF ELECTRIC SHOCK, MAKE SURE POWER CORD IS UNPLUGGED FROM WALL
SOCKET. TO FULLY DISENGAGE THE POWER TO THE UNIT, PLEASE DISCONNECT THE POWER CORD
FROM THE AC OUTLET. DO NOT REMOVE COVER (OR BACK) NO USER SERVICEABLE PARTS INSIDE.
REFER SERVICING TO QUALIFIED SERVICE PERSONNEL.
This symbol warns user that uninsulated voltage within the unit may have sufficient magnitude to cause
electric shock. Therefore, it is dangerous to make any kind of contact with any part inside this unit.
This symbol alerts the user that important literature concerning the operation and maintenance of
this unit has been included. Therefore, it should be read carefully in order to avoid any problems.
Canadian Department of Communications Compliance Statement
DOC: This Class B digital apparatus meets all requirements of the Canadian
Interference-Causing Equipment Regulations.
Cet appareil numérique de la classe B respecte toutes les exigences du
Règlement sur le matériel brouiller du Canada.
C-UL: Bears the C-UL Mark and is in compliance with Canadian Safety Regulations
according to C.S.A. 22.2 #950.
Ce produit porte la marque ‘C-UL’ et se conforme aux règlements de sûrele
Canadiens selon CAN/CSA 22.2 No. 950.
FCC Information
1.
Use the attached specified cables with the JC-1942UMW
color monitor so as not to interfere
with radio and television reception.
(1) Please use the supplied power cable or equivalent to ensure FCC compliance.
(2) Shielded captive type signal cable.
Use of other cables and adapters may cause interference with radio and television
reception.
2.
This equipment has been tested and found to comply with the limits for a Class B digital
device, pursuant to part 15 of the FCC Rules. These limits are designed to provide reasonable
protection against harmful interference in a residential installation. This equipment generates, uses, and can radiate radio frequency energy, and, if not installed and used in
accordance with the instructions, may cause harmful interference to radio communications.
However, there is no guarantee that interference will not occur in a particular installation.
If this equipment does cause harmful interference to radio or television reception, which can
be determined by turning the equipment off and on, the user is encouraged to try to correct
the interference by one or more of the following measures:
• Reorient or relocate the receiving antenna.
• Increase the separation between the equipment and receiver.
• Connect the equipment into an outlet on a circuit different from that to which the receiver
is connected.
• Consult your dealer or an experienced radio/TV technician for help.
If necessary, the user should contact the dealer or an experienced radio/television technician
for additional suggestions. The user may find the following booklet, prepared by the Federal
Communications Commission, helpful: ”How to Identify and Resolve Radio-TV Interference
Problems.“ This booklet is available from the U.S. Government Printing Office, Washington,
D.C., 20402, Stock No. 004-000-00345-4.
78133521 5/15/98, 2:16 PM2

— Important —
To help us in our continuing efforts to
better serve and support you, and to bring
you new and innovative products, please
take a few moments to register your new
NEC MultiSync monitor.
By returning this card, we confirm your
date of purchase and records the model
and serial numbers. This facilitates our
ability to process warranty claims,
especially if your original proof of
purchase is lost.
Thank you for your time and for choosing
an NEC MultiSync monitor.
THANK YOU FOR
CHOOSING AN NEC
MultiSync
©
MONITOR
PRODUCT REGISTRATION
SEE, HEAR AND FEEL THE DIFFERENCE.
™
NEC MultiSync Monitors
Your new NEC Technologies MultiSync® E Series monitor box*
should contain the following:
• MultiSync E900+™ (JC-1942UMW) Monitor with tilt/swivel base
• Power Cord
• Captive Signal Cable
• User’s Manual
• Registration Card
Contents
Power Cord
User’s Manual Registration Card
MultiSync
®
E
900+
User’s Manual
MultiSync
®
E
900+
User’s Manual
NEC Enterprise S
eries
1
* Remember to save your original box
and packing material to transport
or ship the monitor.
Captive Signal Cable
Note: You can now register your
product on the Internet at
http://www.prodreg.com/nec
78133521 5/15/98, 2:16 PM3
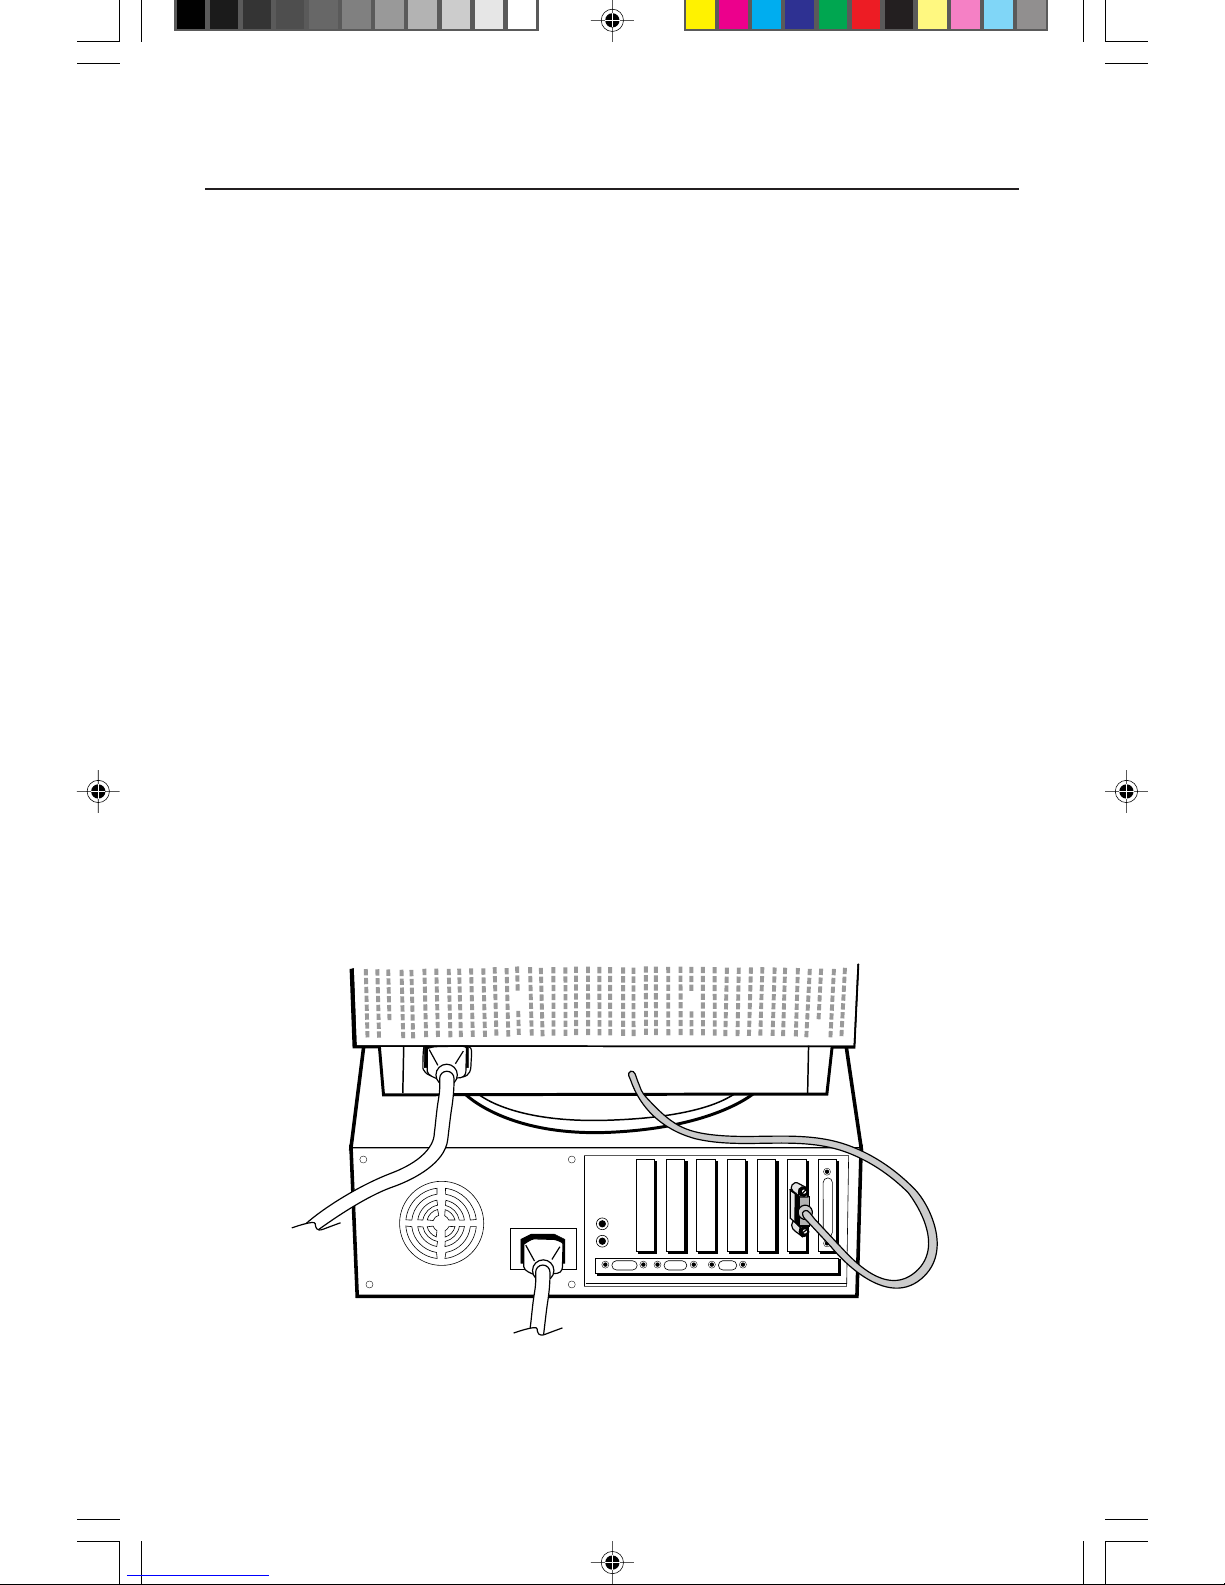
Quick Start
Figure A.1
2
To attach the MultiSync® E900+™ monitor to your system, follow
these instructions:
1. Turn off the power to your computer.
2. If necessary, install the display card into your system. For more information,
refer to the display card manual.
3. For the PC: Connect the 15-pin mini D-SUB of the captive signal cable to the
connector of the display card in your system (Figure A.1). Tighten all screws.
For the Mac: Connect the MultiSync E900+ Macintosh cable adapter (not
included) to the monitor connector on the Macintosh (Figure B.1). Attach the
15-pin mini D-SUB end of the captive signal cable to the MultiSync E900+
Macintosh cable adapter on the computer (Figure B.1). Tighten all screws.
NOTE: To obtain the MultiSync E900+ Macintosh cable adapter, call
NEC Technologies at (800) 820-1230.
4. For download information on the Windows® 95 INF file for your MultiSync
E900+ monitor, refer to the References section of this User’s Manual.
5. Connect one end of the power cord to the MultiSync E900+ monitor and the
other end to the power outlet (Figure C.1).
6. Turn on the monitor (Figure D.1) and the computer.
NOTE: If you have any problems, please refer to the Troubleshooting section of
this User’s Manual.
78133521 5/15/98, 2:16 PM4

Power
Cord
Power Outlet
Figure D.1
RESETPROCEEDEXIT
CONTROL
MultiSync E
900+
Figure C.1
Figure B.1
Quick Start
3
78133521 5/15/98, 2:16 PM5
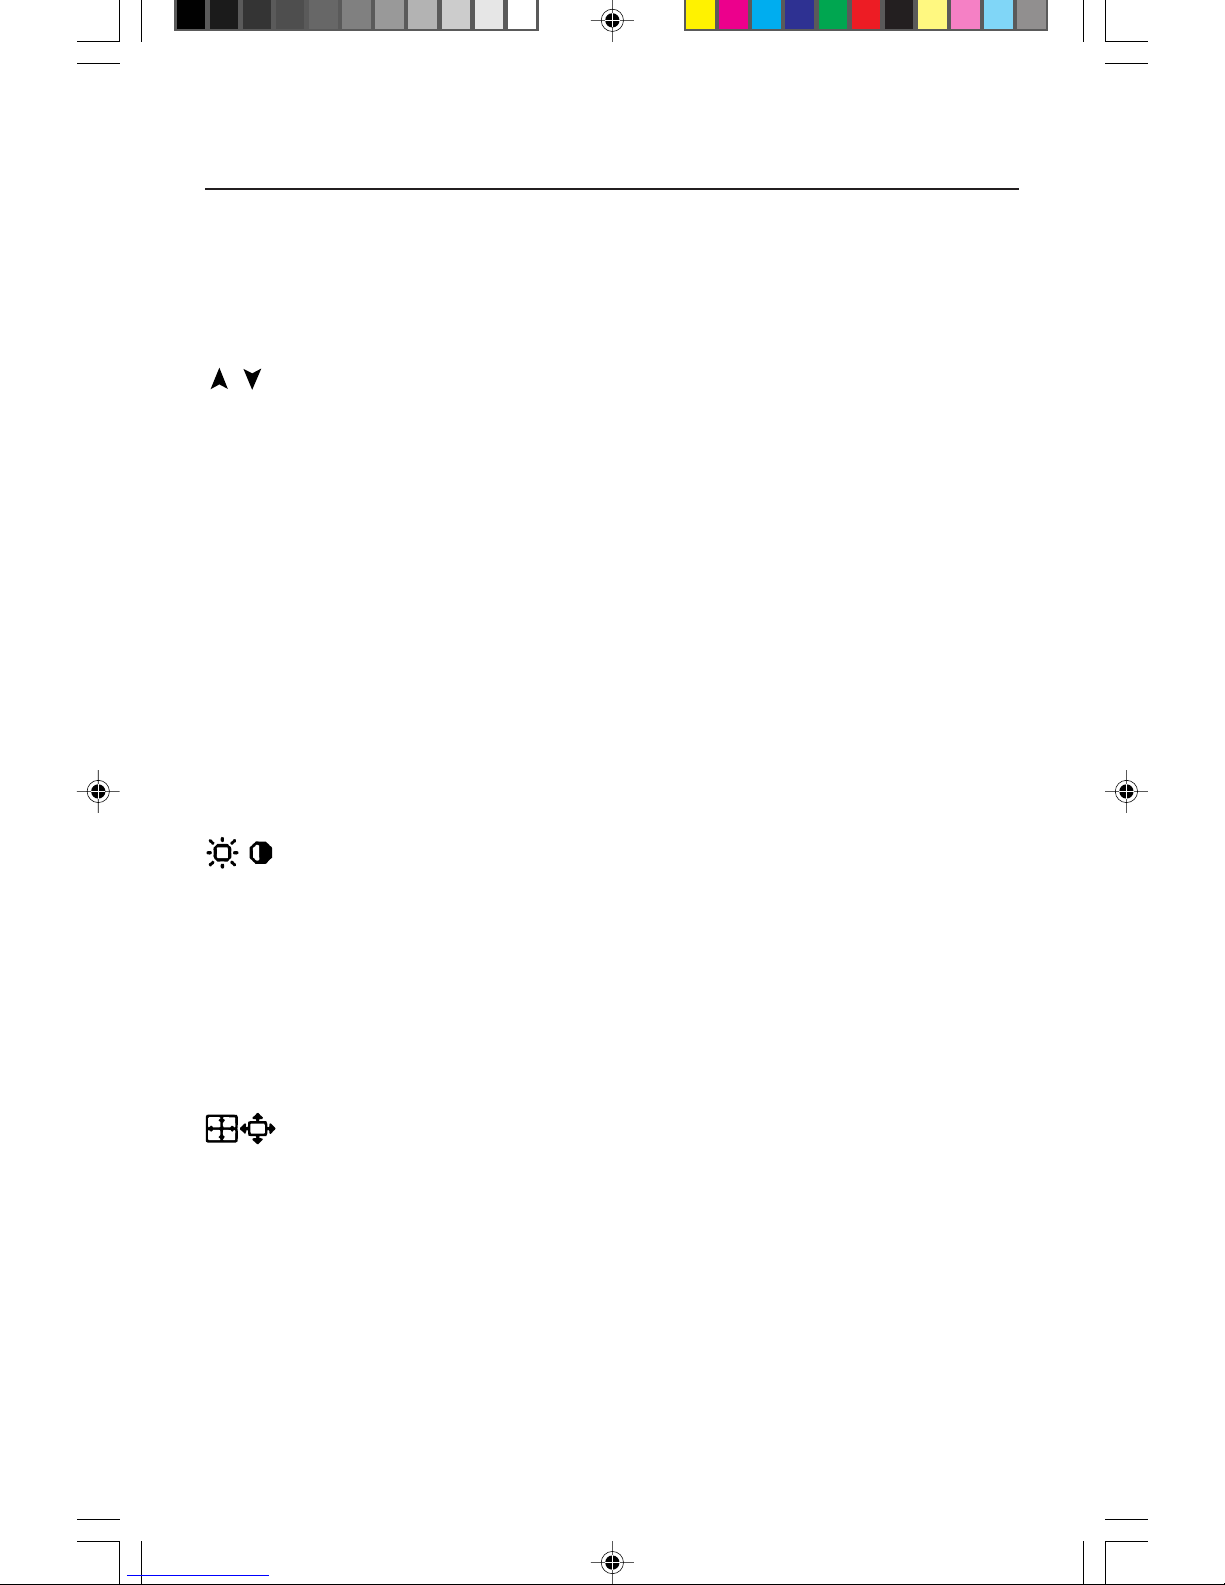
4
Controls
OSM™ (On-Screen Manager) control buttons on the front of the monitor function
as follows:
Main Menu Sub-Menu
EXIT Exits the OSM menu. Exits to the OSM controls
main menu.
CONTROL Moves the highlighted Moves the highlighted area
/ area up/down to select up/down to select one of the
one of the controls. controls.
CONTROL Moves the highlighted Moves the bar in the – or +
–/+ area left/right to select direction to decrease or
one of the controls. increase the adjustment.
PROCEED Has no function. Only executes control
or enters sub, sub-menu.
RESET Resets all the controls within Resets the highlighted control
the highlighted menu to the factory setting.
to the factory setting.
NOTE: When RESET is pressed in the main and sub-menu, a warning
window will appear allowing you to cancel the reset function.
When OSM controls are activated, icons are displayed at the top of the menu.
If an arrow (➔) is displayed in a sub-menu, it indicates further choices are
available. To enter a sub, sub-menu, press PROCEED.
Brightness/Contrast Controls
Brightness: Adjusts the overall image and background screen brightness.
Contrast: Adjusts the image brightness in relation to the background.
Degauss: Eliminates the buildup of stray magnetic fields which alter the correct
scan of the electron beams and affect the purity of the screen colors, focus and
convergence. When activated, your screen image will jump and waver a bit as
the screen is demagnetized.
Caution: Please allow a minimum of 20 minutes to elapse between uses of the
Degauss Control.
Size and Position Controls
Left/Right: Moves the image horizontally (left or right).
Down/Up: Moves the image vertically (up or down).
Narrow/Wide: Decreases or increases the horizontal size of the image.
Short/Tall: Decreases or increases the vertical size of the image.
78133521 5/15/98, 2:16 PM6
 Loading...