

Page 1

Sumer
User Manual
VGA
NEC
-
-
-
Page 2

The marketing and sales of the equipment was reported to the BZT.
(Federal Approvals
Office
for Telecommunications)
The right to retest this equipment to verify compliance with the regulation
was given to BZT.
ES MUSS SICHERGESTELLT WERDEN, DASS DIR VORGESEHENE
NETZSTECKDOSE NAHE AM GERÄT ANGEBRACHT UND
LETCHT ZUGÄNGLICH IST.
Die ergonomischen Anforderungen an Bildschirmgeräte im Bürobereich
nach
ZH1/618
werden in Verbindung mit der
Videokarte: Prisma
Graphic
Sys. VGA RT800
erfüllt. Aus ergonomischen Gründer wird empfohlen, die Grundfarben
Blau und Rot nicht auf dunklem Untergrund zu verwenden (schlechte
Lesbarkeit und erhöhte Augenbelastung bei zu geringem Zeichenkontrast
wären die Folge). Weiterhin muß sichergestellt werden,
daß
die minimale
Bildwiederholfrequenz von
76 Hz bei Positivdarstellung
und
64 Hz bei Negativdarstellung
nicht unterschritten wird (störendes Bildschirmflimmern könnte die Folge
sein).
Page 3

Customer’s
Record
The serial number of this
You should note this serial number in the space provided below and retain
this manual as a permanent
tion in the event of theft or
Model number:
Serial number:
WARNING: To reduce the risk of fire or electric shock, do not expose
this Computer Display to rain or moisture.
product
record
loss.
JC-1431VMB
appears on the back of the unit.
of your purchase to aid in identifica-
Caution
For 120V Operation,
blade, grounding type plug, rated 125V
For 240V Operation,
grounding type plug, rated 250V
Bescheinigung des
Hiermit wird bescheinigt,
Monitor JC-1431VMB
. . . . . . . . . . . . . . . . . . . . . . . . . . . . . . . . . . . . . . . . . . . .
(Gerät, Typ, Bezeichnung)
In Übereinstimmung mit den Bestimmungen der
BMPT Vfg. 243/1991
. . . . . . . . . . . . . . . . . . . . . . . . . . . . . . . . . . . . . .
(Amtsblattverfugung)
use only with power cord plug having a parallel
10A.
use only with power cord having a tandem blade,
5A.
Herstellers/lmporteurs
daß der/die/das
.
. . . . . . . . . . . . . . . . . . . . . . . . . . . . . . . . . . . . . . . . . . . . . . . . . . . . . . . . . . . . . . . . . . . . . . . . . . . . . . . . . . . .
.
.
. . . . . . . . . . . . . . . . . . . . . . . . . . . . . . . . . . . . . . . . . . . . . . . . . . . . . . . . . . . . . . . . . . . . . . . . . . . . . . . . . . . . .
.
.
.
. .. . . .
.
funk-entstört ist.
Dem Bundesamt fur Zulassungen in der Telekommunikation wurde
inverkehrbringen dieses Gerätes
Überprüfung der Serie auf Einhaltung der Bestimmungen eingeräumt.
Declaration
We hereby certify that the
1s
in compliance with the requirement of
RFI
Suppressed.
of the Manufacturer or Importer
. . . . . . . . . . . . . . . . . . . . . . . . . . . . . . . . . . . . . . . . . . . . . . . . . . . . . . . . . . . . . . . . . . . . . . . . . . . . . . . . . .
angezeigt und die Berechtigung
Monitor JC-1431VMB
Equipment, Type, Model-No.
BMPT Vfg.
. . . . . . . . . . . . . . . . . . . . . . . . . . . . . . . . . . . . . . . . . . . . . . . . . . . . . . . .
24311991
das
zur
.
.
Page 4

Contents
1 NEC SVGA Monitor
2 Setting Up
Environment
Connecting the Monitor
3 Using the Monitor
Front Panel Controls
Rear Panel Controls
Tilt/Swivel
Problem Solving
Troubleshooting
Cleaning
.........................
................
...................
Power Switch
Horizontal Size Control
Vertical Size Control
Brightness Control
Contrast Control
.......................
...............
.................
...................
....................
....................
Horizontal Position Control
Vertical Position Control
Base
......................
......................
......................
..............
............................
...........
Ill
2-l
2-2
3-2
3-2
3-2
3-2
3-2
3-2
3-3
3-3
3-3
3-4
3-5
3-6
3-6
4 Reviewing Technical Data
Pin Assignments
Timing Tables
List of Tables
Troubleshooting
SVGA Monitor Specifications
Pin Assignments
Preset Timing
Preset Timing
Preset Timing
. . . . . . . . . . . . . . . . . . . . . .
. . . . . . . . . . . . . . . . . . . . . . . .
.....................
..........
......................
-
VGA
-
SVGA/EVGA
-
VESA VGA
.................
.........
...........
4-3
4-4
3-6
4-l
4-3
4-5
4-6
4-7
Page 5

NEC SVGA
Congratulations on your purchase of the NEC
SVGA color monitor.
a maximum horizontal resolution of 1024
a maximum vertical resolution of 768
NEC’s
Monitor
SVGA Monitor offers
Pixels
Pixels.
by
Additionally, the SVGA Monitor provides
compatibility via the following features:
n
provides automatic adjustment to vertical and
horizontal frequencies including VGA, SVGA,
EVGA, and VESA VGA.
n
displays an infinite number of colors (limited by
hardware and Software applications).
n
horizontal and vertical size and
To properly set up and use your monitor, read the
sections that follow.
Position
System
controls.
Page 6

Setting Up
ENVIRONMENT
The SVGA Monitor shipping
monitor, user manual and power
are missing, contact your NEC
Please save the original box and packing materials
for future transportation 0; shipment of this monitor.
Use
the following guidelines to set up your monitor:
n
Place the monitor in a dry, clean, dust-free
location.
n
Allow adequate Ventilation around the monitor
so that heat generated
n
Place the monitor away from high-capacity
transformers, electric motors. and other strong
magnetic fields.
H
To minimize eye fatigue:
-
do not place the monitor against a bright
background or where sunlight will shine
directly on it.
-
position
the monitorjust below eye level.
carton
contains the
cable.
If these items
dealer.
can
dissipate properly.
Page 7
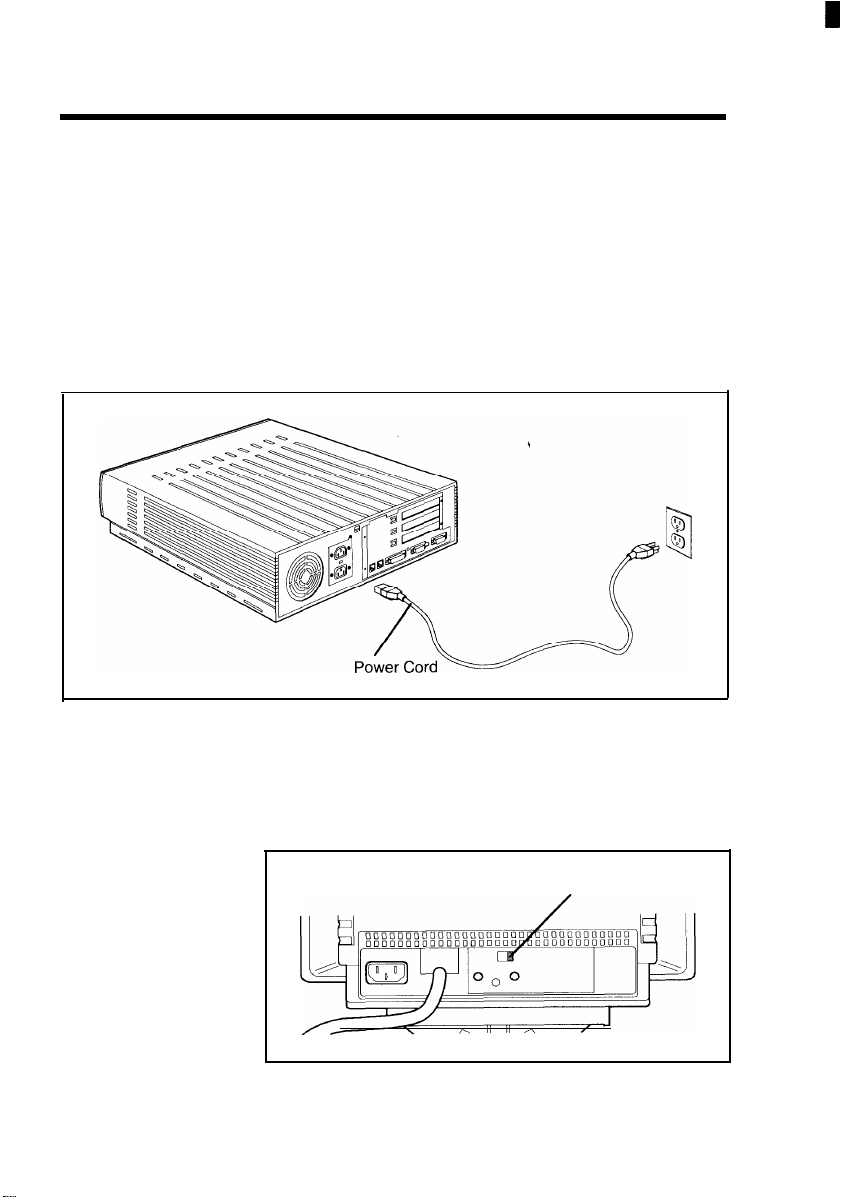
2-2 Setting Up
CONNECTING
THE MONITOR
Unplugging the
Computer
Use the following
Computer.
pur
1. Turn off and unplug the computer’s power
2. The voltage selector is located on the rear of the
steps
to connect the monitor to
Cord.
monitor. Determine the appropriate voltage,
115V
or
23OV,
and set the switch accordingly.
Se tting the
voltage
Voltage Selector
Page 8

Attaching the
signal
ca ble
Setting Up 2-3
signal
3. Attach the monitor
cable to the
connector at the rear of the Computer.
Secure the connection by tightening the two
screws on either side of the
signal
cable’s
connector.
video
Signal Cable
Page 9

2-4 Setting Up
Connecting the
power cable
4. Connect one end of the monitor power cable to
the rear of the monitor. Plug the other end into a
properly grounded
wall outlet.
WARNING: D
object
on the power cable. Darnage to a power cable
can cause
O not place the monitor or any other
fire or electrical
shock.
Page 10

Setting Up 2-5
5. If you are setting up the Computer for the first
time, see your user manual. Otherwise, continue
with the following
step.
6. Plug in the Computer power
If you have any Problems, please refer to the
Troubleshooting section of this mannual.
cable.
Page 11

3
Using the Monitor
This section defines monitor controls and explains
how to use them to your advantage.
adjust
You may
modify specific
and
contrast. Further,
proper positioning of the monitor.
The figure below
the viewing area of the
screen
qualities including brightness
the
tilt/swivel
shows
the front
screen
feature allows
panel
features.
and
Loca ting con
trols
Brightness
Control
Cordrast
Control
Page 12

3-2 Using the Monitor
FRONT PANEL
CONTROLS
Power Switch
Horizontal
Size Control
Vertical
Size Control
Brightness
Control
Read the descriptions that follow to learn how to
panel
operate the front
Press this switch to control power to the monitor-.
The power indicator lights when the monitor power
is on.
This control sets the monitor’s
horizontal width. Move the control counterclockwise
to decrease the horizontal width, and clockwise to
increase the horizontal width. The size of the image
depends on the
This control sets the monitor’s
vertical height. To decrease the vertical length of
the Screen, move the control counterclockwise, to
increase it move the control clockwise. The size of
the image depends on the
Selects the degree of brightness. Move the control
counterclockwise to dim the
make the
the
on-screen
signal
screen
brighter. A brighter
glare and also affect the image quality.
controls.
screen
to the desired
applied to the monitor.
screen
to the desired
signal
applied to the monitor.
screen
and clockwise to
screen
will limit
Contrast
Control
Use the contrast control to select how dark or light
you would like the monitor’s foreground. Move the
control counterclockwise to make the
clockwise to make the
the contrast control does affect the image quality.
screen
lighter. The
screen darker,
position
of
Page 13

Using the Monitor 3-3
REAR PANEL
CONTROLS
Horizontal
Position
Control
Vertical
Position
Control
Loca
ting con trols
Read the description that follows for an understanding of how each control operates. The figure below
locates the rear
Turn the Horizontal Position Control to
image’s horizontal Position.
Turn the Vertical Position Control to
image’s vertical Position.
panel
controls.
adjust
adjust
the
the
Vertical Position Horizontal Position
Control Control
Page 14

3-4 Using the Monitor
TILT/SWIVEL
BASE
Positioning the
monitor
The tilt/swivel base allows you to tilt the
or down, and move it from side to side, 45 degrees to
the right or left.
can
You
-5 degrees forward and
reposition the monitor up to an angle of
+15
degrees backwards.
screen
up
Page 15

Using the Monitor 3-5
PROBLEM
SOLVING
If you encounter a problem with the SVGA Monitor,
can
the problem may be a simple one that you
yourself. Check the items on the following list when
you encounter a
The power switch for the monitor is on.
signal
The
connected.
The monitor is connected to a working electrical
outlet. Test the outlet by plugging in a lamp or
other electrical device.
Check that the
meet the SVGA Monitor’s specifications
(see “Pin Assignments” and “Signal Timing” in
Section 4).
Use the table on the following page to trouble-
shoot your monitor.
problem:
cable and power cord are securely
signal
timing and pin assignments
solve
Page 16

3-6 Using the Monitor
TROUBLESHOOTING
Use the troubleshooting table below to isolate any
problems
action.
If you still cannot determine the
your NEC
Troubleshooting
PROBLEM
No picture appears on
monitor Screen.
The monitor is dark, but the
power indicator is lit.
Image area is not centered.
CLEANING
the
Clean the outside of the monitor as needed. Use the
following precautions as guidelines:
n
Unplug the monitor’s power cord from the outlet
before cleaning.
and respond with the appropriate corrective
problem,
contact
dealer.
CORRECTIVE ACTION
Turn off the
30 seconds and then turn it on again.
Adjust the Brightness and Contrast
controls.
Adjust
Horizontial Position control.
the
Vertical
power switch.
Position control or
Wait at least
n
Use only a damp cloth and mild detergent.
n
DO not attempt to open the unit.
Page 17

Reviewing
Technical Data
The following tables provide specifications, pin
assignments and signal timing:
SVGA Monitor Specifications
ITEM
Physical Dimensions
Height
Width
Depth
Weight
Operating Environment
Temperature
Humidity
Storage Temperatures
Storage Humidity
Power
Power Source
Power Consumption
Picture Tube
Resolution
Horizontal
Vertical
DESCRIPTION
14.4 inches (365 mm)
14.5 inches (367 mm)
15.4 inches (390 mm)
25.3 Ibs. (11.5 kg)
-32°F to 95°F (0°C to 35°C)
10% to 80% (non-condensing)
-4°F to 140°F (-20°C to 60°C)
5% to 95%
AC lOO-125V/200-24OV,
85 W Maximum
90°
14 inches,
1024
pixels
pixels
768
deflection, 0.28 mm dot pitch
(non-interlaced/interlaced)
(non-interlaced/interlaced)
50Hz/60Hz
Page 18

4-2 Reviewing Technical Data
SVGA Monitor Specifications (cont’d)
ITEM
Synchronization
Horizontal
Vertical
Active
Display Area
Horizontal
Vertical
Input Signals
Video
Separate Sync.
Display Colors
Analog Input
DESCRIPTION
31.5
kHz/35.2 kHz/35.5 kHz/37.9
50 Hz to 90 Hz continuous
9.6 inches (246 mm) depends on
timing used
7.2 inches (185 mm) depends on
timing used
Analog 0.7
TTL level: Horizontal, Positive/Negative,
Infinite
or Software)
Vp-p/75
colors
ohm positive
Vertical,
(may be limited by hardware
Positive/Negative
kHz/48 kHz
signal
signal
Page 19

Reviewing Technical Data 4-3
PIN
ASSIGNMENTS
Connector pin
loca tions
The
SVGA monitor uses a
l5-pin,
mini high-density
D-SUB male connector for the input Signal. The figure
below
shows
the connector pin locations. See the
table that follows for connector pin assignments.
Input Signal
Connector
Pin Assignments
PIN NUMBER
SIGNAL
.
10
11
12
13
14
15
Red
Green
Blue
Ground
Ground
R-Ground
G-Ground
8
9
B-Ground
No Connection
Ground
Ground
No Connection
Horizontal Sync.
Vertical
No Connection
Sync.
Page 20

4-4 Reviewing Technical Data
TIMING
TABLES
The following diagram and tables show the preset
timing used in the monitor’s VGA, SVGA, EVGA
and VESA VGA modes.
SEPARATE SYNC.
HORIZONTAL
°° E3
d-f-
4
VERTICAL
J
VIDEO
A
VIDEO
1
\
*
Page 21

Preset Timing
Reviewing Technical Data 4-5
-
VGA
ITEM 640 x 350
fH
(kHz)
A ys (Line time total)
B ys (Sync. pulse width)
C ps (Back porch)
D ps (Active)
E ps (Front
fv
(Hz)
P ms (Frame time total)
Q ms (Sync. pulse width)
R ms (Back porch)
S ms (Active)
T ms (Front porch)
Porch)
3 1.469
3 1.778
3.813 3.813
1.589 1.589
26.058 26.058
0.318 0.318
70.080 70.080
14.268 14.268 16.683
0.064 0.064 0.064
1.716
11.504 13.156
0.985 0.159 0.064
720 x 400
3 1.469 3 1.469
3 1.778
26.05
8
0.890 0.793
640 x 480
3 1.778
3.813
1.589
0.3 18
59.940
15.762
Horizontal Sync. Polarity
Vertical
Sync. Polarity
Interlaced
Separate
Sync.
Positive
Negative
No No No
Separate
Sync. Sync.
Negative Negative
Positive Negative
Separate
Page 22

4-6 Reviewing Technical Data
Preset Timing
-
SVGA/EVGA
ITEM
f-I-I
(kHz)
A ys (Line tirne total)
B ps (Sync. pulse width)
C As (Back porch)
D
/_LS
(Active)
E ps (Front
fv
(Hz)
P ms (Frame time total)
Q ms (Sync. pulse width)
R ms (Back porch)
S ms (Active)
T ms (Front porch)
Porch)
800 x 600
35.156
28.44
2.000
3.556
22.222
0.667
56.250
17.778
0.057
0.626
17.067
0.028
1024x768
35.587
28.100
3.910
1.247
22.760
0.178
86.960
11.499
0.112
0.563
10.824
0.0100
Horizontal Sync. Polarity
Vertical
Interlaced
Sync. Polarity
Separate Sync
Negative
Negative
No
Separate Sync.
Positive
Positive
Yes
Page 23

Reviewing Technical Data 4-7
Preset Timing- VESA Timings
ITEM 640 x 480 800 x 600
fH
(kHz)
A
l.ts
(Line time total)
B
14s
(Sync. pulse width)
C
l_ts
(Back porch)
D ps (Active)
E ps (Front
fv
(Hz)
P ms (Frame time total)
Q ms (Sync. pulse width)
R ms (Back porch)
S ms (Active)
T ms (Front porch)
Porch)
37.860 48.090 48.363
26.4 13
1.270
4.603
20.3 17
0.762
72.809 72.010
13.735
0.079 0.124 0.124
0.740
12.678
0.238
20.794
2.399 2.092
1.279
15.995
1.119
13.887
0.479
12.510
0.772
1024x768
20.677
2.462
15.754
0.369
60.000
16.667
0.600
15.880
0.062
Horizontal Sync. Polarity
Vertical
Interlaced
Sync. Polarity
Separate
Sync.
Negative
Negative
No
Separate
Sync.
Positive
Positive
No
Separate
Sync.
Positive
Positive
No
 Loading...