


AccuSyncTM 500/700/700M/900
Covercontents |
1 |
11/11/03, 1:46 PM |
Index |
|
Warning .................................................................................................................... |
1 |
Contents ................................................................................................................. |
2 |
Quick Start ............................................................................................................. |
3 |
Controls .................................................................................................................. |
6 |
Recommended Use............................................................................................... |
16 |
Specifications ....................................................................................................... |
18 |
Features ............................................................................................................... |
22 |
Troubleshooting .................................................................................................. |
23 |
References ............................................................................................................ |
24 |
Limited Warranty ................................................................................................ |
25 |
Avertissement ..................................................................................................... |
27 |
Contenu................................................................................................................. |
28 |
Mise en marche rapide ...................................................................................... |
29 |
Commandes .......................................................................................................... |
32 |
Usage recommandé ............................................................................................ |
42 |
Fiche Technique ................................................................................................... |
44 |
Fonctions ............................................................................................................. |
48 |
Dépannage ............................................................................................................ |
49 |
Références ........................................................................................................... |
50 |
Garantie limitée ................................................................................................... |
51 |
Covercontents |
2 |
11/11/03, 1:46 PM |
WARNING
TO PREVENT FIRE OR SHOCK HAZARDS, DO NOT EXPOSE THIS UNIT TO RAIN OR MOISTURE. ALSO, DO NOT USE THIS UNIT'S POLARIZED PLUG WITH AN EXTENSION CORD RECEPTACLE OR OTHER OUTLETS UNLESS THE PRONGS CAN BE FULLY INSERTED.
REFRAIN FROM OPENING THE CABINET AS THERE ARE HIGH VOLTAGE COMPONENTS INSIDE. REFER SERVICING TO QUALIFIED SERVICE PERSONNEL.
CAUTION
RISK OF ELECTRIC SHOCK • DO NOT OPEN
CAUTION: TO REDUCE THE RISK OF ELECTRIC SHOCK, DO NOT REMOVE COVER (OR BACK). NO USER SERVICEABLE PARTS INSIDE. REFER SERVICING TO QUALIFIED SERVICE PERSONNEL.
This symbol warns user that uninsulated voltage within the unit may have sufficient magnitude to cause electric shock. Therefore, it is dangerous to make any kind of contact with any part inside this unit.
This symbol alerts the user that important literature concerning the operation and maintenance of this unit has been included. Therefore, it should be read carefully in order to avoid any problems.
Canadian Department of Communications Compliance Statement
DOC: This Class B digital apparatus meets all requirements of the Canadian InterferenceCausing Equipment Regulations.
C-UL: Bears the C-UL Mark and is in compliance with Canadian Safety Regulations according to CAN/CSA C22.2 No.950
FCC Information
1.Use the attached specified cables with the AccuSync color monitor so as not to interfere with radio and television reception.
(1)Please use the supplied power cable or equivalent to ensure FCC compliance.
(2)Please use the supplied shielded video signal cable.
Use of other cables and adapters may cause interference with radio and television reception.
2.This equipment has been tested and found to comply with the limits for a Class B digital device, pursuant to part 15 of the FCC Rules. These limits are designed to provide reasonable protection against harmful interference in a residential installation. This equipment generates, uses, and can radiate radio frequency energy, and, if not installed and used in accordance with the instructions, may cause harmful interference to radio communications. However, there is no guarantee that interference will not occur in a particular installation. If this equipment does cause harmful interference to radio or television reception, which can be determined by turning the equipment off and on, the user is encouraged to try to correct the interference by one or more of the following measures:
• Reorient or relocate the receiving antenna.
• Increase the separation between the equipment and receiver.
• Connect the equipment into an outlet on a circuit different from that to which the receiver is connected.
• Consult your dealer or an experienced radio/TV technician for help.
Changes or modifications not expressly approved by the party responsible for compliance could void the user’s authority to operate the equipment.
If necessary, the user should contact the dealer or an experienced radio/television technician for additional suggestions. The user may find the following booklet, prepared by the Federal Communications Commission, helpful: ”How to Identify and Resolve Radio-TV Interference Problems.“ This booklet is available from the U.S. Government Printing Office, Washington, D.C., 20402, Stock No. 004-000-00345-4.
1
AS500700700M900FINAL2.p65 |
1 |
11/11/03, 1:45 PM |

Contents
Your new NEC AccuSync™ monitor box* should contain the following:
•AccuSync Monitor with tilt/swivel base
•Power Cord
•Captive Signal Cable
•User’s Manual
Captive Signal Cable
Captive Signal
Cable
Power Cord
AccuSyncTM 500/700/700M/900
User’s Manual
*Remember to save your original box and packing material to transport or ship the monitor.
2
AS500700700M900FINAL2.p65 |
2 |
11/11/03, 1:45 PM |

Quick Start
Connecting the Tilt/Swivel stand
1.With the monitor unplugged from your system and the wall outlet, carefully turn the monitor down on a firm table
2.Align the hooks on the tilt/swivel stand with the matching slots in the base of the monitor.
3.Insert the hooks into slots.
4.Slide the tilt/swivel stand toward the front of the monitor until the latches click into the locked position.
NOTE: For correct use of monitor, completely attach tilt/swivel base to the monitor. NOTE: To avoid self injury or damage to the monitor, attach and remove tilt/
swivel base with care.
CAUTION: Make certain that the tilt/swivel base is locked firmly into place before turning the monitor upright.
Slot
Hook
Firm Table
Latch
Hook
Removing the Tilt/Swivel stand
1. With the monitor unplugged from your system and the wall outlet, carefully turn the monitor upside down on a firm table.
2. Push down on the latch of the tilt/swivel base and slide the tilt/swivel base backward from the front of the monitor.
3. Pull out the tilt/swivel base from the slots on the bottom of the monitor.
3
AS500700700M900FINAL2.p65 |
3 |
11/11/03, 1:45 PM |
Quick Start –continued
To attach the AccuSync™ monitor to your system, follow these instructions:
1.Turn off the power to your computer.
2.If necessary, install the display card into your system. For more information, refer to the display card manual.
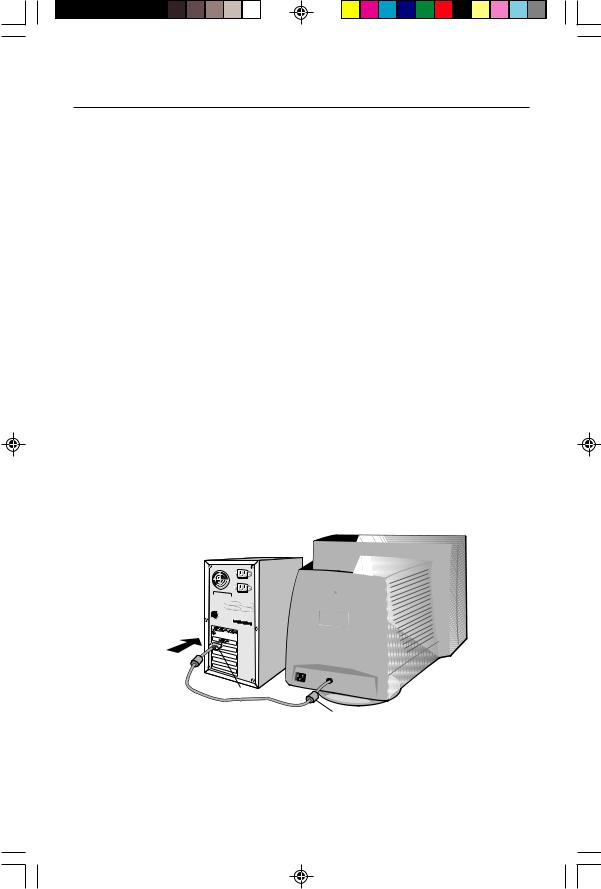
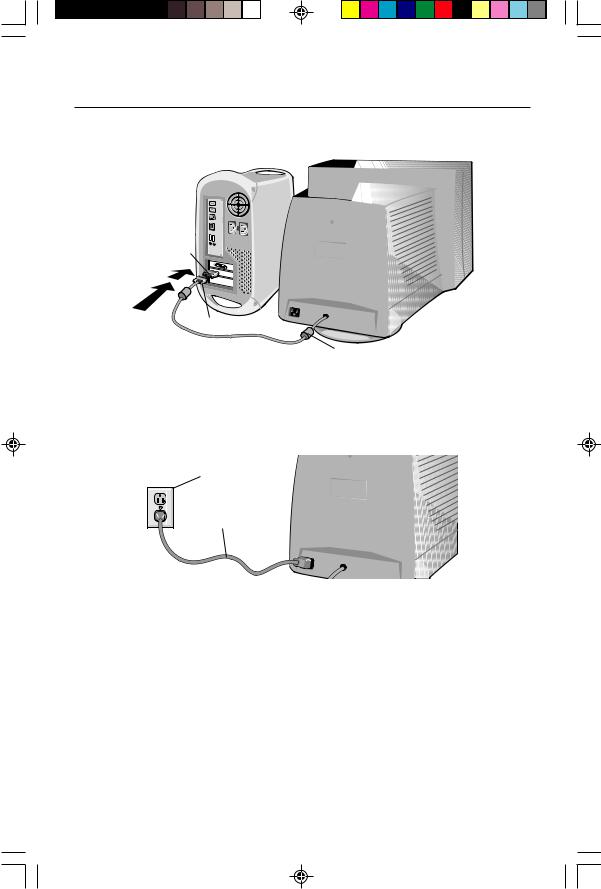
3.For the PC: Plug the end of the video signal cable of the monitor in the video signal connector of the computer. (Figure A.1). Tighten all screws.
For the Mac: Connect the Macintosh cable adapter (not included) to the monitor connector on the Macintosh (Figure B.1). Attach the 15-pin mini D-SUB end of the video signal cable to the Macintosh cable adapter on the computer (Figure B.1). Tighten all screws.
NOTE: To obtain the AccuSync Macintosh cable adapter, call NEC-Mitsubishi Electronics Display of America, Inc. at (800) 632-4662.
4.Connect one end of the power cord to the AccuSync monitor and the other end to the power outlet (Figure C.1).
NOTE: If you use this monitor at AC125-240V, please refer to Recommended Use section of this manual for proper selection of power cord.
5. Turn on the monitor and the computer.
NOTE: If you have any problems, please refer to the Troubleshooting section of this User’s Manual.
Figure A.1
15-pin mini D-SUB
Captive Signal Cable
4
AS500700700M900FINAL2.p65 |
4 |
11/11/03, 1:45 PM |
Quick Start –continued
Figure B.1
Mac Adapter
(Not Included)
15-pin mini D-SUB
Captive Signal Cable
Figure C.1
Power Outlet
Power Cord
5
AS500700700M900FINAL2.p65 |
5 |
11/11/03, 1:45 PM |

Controls (AccuSync 500)
OSD (On Screen Display) control buttons on the front of the monitor function as follows:
|
|
|
|
|
|
|
|
|
|
|
|
|
|
|
|
|
|
|
|
|
|
|
|
|
|
|
|
|
|
|
|
|
|
|
|
|
|
|
|
|
|
|
|
|
|
|
|
|
|
|
|
|
|
|
|
|
|
|
|
|
|
|
|
|
|
|
|
|
|
|
|
|
|
|
|
|
|
|
|
|
|
|
|
|
|
|
|
|
|
|
|
Control |
|
|
|
|
Function |
|
||||||
|
|
|
|
|||||||||||
|
Power Button |
Use this button to turn the monitor on or off. |
|
|||||||||||
Power (DPMS)
Indicator
This Indicator lights up green when the monitor operates normally. If the monitor is in DPMS (Energy Saving) mode, this indicator color changes to amber.
MENU (or OSD) |
Use this button to enter or exit the on screen |
|
Button |
display. |
|
|
||
|
|
|
Buttons |
Use these buttons to choose or adjust items in |
|
the on screen display. |
||
|
||
|
|
|
SELECT (or SET) |
Use this button to enter a selection in the on |
|
Button |
screen display. |
|
|
|
|
|
|
|
Control |
Direct Access Function |
 Button Bring up Contrast adjustment


 Button Bring up Brightness adjustment
The Contrast and Brightness functions are also available in the
On Screen Display (OSD) menu.
6
AS500700700M900FINAL2.p65 |
6 |
11/11/03, 1:45 PM |
Controls –continued (AccuSync 700/900)
OSD (On Screen Display) control buttons on the front of the monitor function as follows:
MENU |
SELECT |
Control |
Function |
Power Button |
Use this button to turn the monitor on or off. |
Power (DPMS)
Indicator
This Indicator lights up green when the monitor operates normally. If the monitor is in DPMS (Energy Saving) mode, this indicator color changes to amber.
MENU (or OSD) |
Use this button to enter or exit the on screen |
|
Button |
display. |
|
|
||
|
|
|
Buttons |
Use these buttons to choose or adjust items in |
|
the on screen display. |
||
|
||
|
|
|
SELECT (or SET) |
Use this button to enter a selection in the on |
|
Button |
screen display. |
|
|
|
|
|
|
|
Control |
Direct Access Function |
 Button Bring up Contrast adjustment
 Button Bring up Brightness adjustment
The Contrast and Brightness functions are also available in the
On Screen Display (OSD) menu.
7
AS500700700M900FINAL2.p65 |
7 |
11/11/03, 1:45 PM |

Controls –continued (AccuSync 700M)
OSD (On-Screen Display) control buttons on the front of the monitor function as follows:
|
|
|
|
|
|
|
|
|
|
|
|
|
|
|
|
|
|
|
|
|
|
|
|
|
|
|
|
|
|
|
|
|
|
|
|
|
|
|
|
|
|
|
|
|
|
|
|
|
|
|
|
|
|
|
|
|
|
|
||||
|
|
|
|
|
|
|
|
|
|
|
||||||||||
|
|
1 2 |
3 |
|
4 |
5 |
6 |
7 |
||||||||||||
|
|
|
|
Control |
|
|
Function |
|
|
|
|
|||||||||
|
|
|
|
|
|
|
|
|
|
|
|
|
|
|
|
|
|
|
|
|
1 |
|
|
Audio Mute |
Use to mute audio source. |
|
|
|
|
||||||||||||
|
|
|
|
|
|
|
|
|||||||||||||
|
|
|
|
|
|
|
|
|
|
|
|
|
|
|
||||||
2 |
|
|
Microphone |
Built-in microphone. |
|
|
|
|
||||||||||||
|
|
|
|
|
|
|
|
|
|
|
|
|
|
|
||||||
3 |
|
|
MENU (or OSD) |
Use this button to enter or exit the on screen |
|
|
||||||||||||||
|
|
Button |
|
|
|
|
|
display. |
|
|
|
|
|
|
||||||
|
|
|
|
|
|
|
|
|
|
|
|
|
|
|
|
|
||||
4 |
|
|
|
|
|
|
Buttons |
Brings up to the audio menu. |
|
|
|
|
||||||||
|
|
|
|
|
|
|
Buttons |
Use these buttons to choose or adjust items in the |
||||||||||||
|
|
|
|
|
|
|
|
|
|
|
|
|
on screen display. |
|
|
|
|
|||
5 |
|
|
SELECT (or SET) |
Use this button to enter a selection in the on |
|
|
||||||||||||||
|
|
Button |
|
|
|
|
|
screen display. |
|
|
|
|
||||||||
|
|
|
|
|
|
|
|
|
|
|
|
|
|
|
|
|
|
|
|
|
6 |
|
|
Power (DPMS) |
This Indicator lights up green when the monitor |
||||||||||||||||
|
|
|
|
Indicator |
operates normally. If the monitor is in DPMS |
|
|
|||||||||||||
|
|
|
|
|
|
|
|
|
|
|
|
|
(Energy Saving) mode, this indicator color changes |
|||||||
|
|
|
|
|
|
|
|
|
|
|
|
|
to amber. |
|
|
|
|
|
|
|
|
|
|
|
|
|
|
|
|
|
|
|
|
|
|||||||
7 |
|
|
Power Button |
Use this button to turn the monitor on or off. |
|
|
||||||||||||||
|
|
|
|
|
|
|
|
|
|
|
|
|
|
|
|
|
|
|
||
|
|
|
|
|
|
|
|
|
|
|
|
|
|
|
|
|
|
|
|
|
|
|
|
|
|
Control |
|
|
Direct Access Function |
|
|
||||||||||
|
|
|
|
|
|
|
|
|
|
|
|
|
|
|
|
|
|
|
|
|
|
|
|
|
|
|
|
|
|
|
|
|
|
|
Buttons |
Bring up Contrast adjustment |
|
|
|||
|
|
|
|
|
|
|
|
|
|
|
|
|
|
|
||||||
|
|
|
|
|
|
|
|
|
|
|
|
|
|
|
|
|
|
|
||
|
|
|
|
|
|
|
|
|
|
|
|
|
|
Buttons |
Bring up Brightness adjustment |
|||||
|
|
|
|
|
|
|
|
|
|
|
|
|
||||||||
|
|
|
|
|
|
|
|
|
|
|
|
|
|
|
|
|
||||
|
|
|
|
|
|
|
|
|
|
|
The Contrast and Brightness functions are also available in the |
|||||||||
|
|
|
|
|
|
|
|
|
||||||||||||
|
|
|
|
|
|
|
|
|
|
|
On Screen Display (OSD) menu. |
|
|
|
|
|||||
|
|
|
|
|
|
|
|
|
|
|
|
|
|
|
|
|
|
|
|
|
|
|
|
|
|
|
|
|
|
|
|
|
|
8 |
|
|
|
|
|
|
|
AS500700700M900FINAL2.p65 |
8 |
11/11/03, 1:45 PM |
Controls –continued (AccuSync 700M)
Side Jacks
Headphone Jack |
Automatically mutes the speaker volume |
|
when the headphones are plugged in. |
Microphone Jack |
Can be used instead of the built-in micro- |
|
phone. |
Rear Panel Jacks
AUDIO |
MIC. |
IN |
OUT |
Audio In -Sky Blue |
Connects to the *LINE OUT jack of the |
|
PC sound card. |
|
|
Mic Out - Pink |
Connects to the microphone jack of the |
|
PC sound card. |
Microphone Operation
Using this jack reduces the length of cable needed to reach the PC's sound card. In order to use the MIC jack, use a cable (supplied) to plug into the rear of the monitor (MIC OUT) and into the MIC input jack of your sound card (if available).
*LINE OUT
A terminal used to connect to the speaker including a built-in amplifier (Amp). Make sure that the connecting terminal of the PC sound card is checked before connecting. If the Audio Out of PC sound card has only Speaker Out, reduce the PC volume. .
NOTE: If the Audio Out of the PC sound card supports both Speaker Out and Line Out, convert to Line Out using the card jumper of the program (Refer to the Sound Card Manual).
9
AS500700700M900FINAL2.p65 |
9 |
11/11/03, 1:45 PM |
Controls –continued
Screen Adjustment
Making adjustments to the image size, position and operating parameters of the monitor is quick and easy with the On Screen Display Control system. A short example is quick and easy given below to familiarize you with the use of the controls. The following section is an outline of the available adjustments and selections you can make using the OSD.
NOTE: Allow the monitor to stabilize for at least 30 minutes before making image adjustments.
To make adjustments in the On Screen Display, follow these steps:
1.Press the MENU (or OSD) Button, then the main menu of the OSD appears.
2.To access a control, use the  or
or  Buttons. When the icon you want becomes highlighted, press the SELECT (or SET) Button.
3.Use the 


 Buttons to adjust the item to the desired level.
4.Accept the changes by pressing the SELECT (or SET) Button.
5.Exit the OSD by Pressing the MENU (or OSD) Button.
10
AS500700700M900FINAL2.p65 |
10 |
11/11/03, 1:45 PM |
Controls –continued
The following table indicates all the On Screen Display control, adjustment, and setting menus.
Main menu |
Sub menu |
|
Reference |
||||||||
|
|
|
|
|
|
|
|
|
|
|
|
|
|
|
|
|
|
Brightness |
|
To adjust the brightness and |
|||
|
|
|
|
|
|
|
|
|
|
|
contrast of the screen |
BRIGHTNESS/ |
|
|
|
|
Contrast |
|
|
|
|||
CONTRAST |
|
|
|
|
|||||||
|
|
|
|
|
|
||||||
|
|
|
|
|
|
V Position |
|
To adjust the position of the screen |
|||
|
|
|
|
|
|
H Position |
|
|
|||
POSITION |
|
|
|||||||||
|
|
|
|
|
|
V Size |
|
|
|
To adjust the size of the screen |
|
|
|
|
|
|
|
H Size |
|
|
|
|
|
|
SIZE |
|
|
|
|
||||||
|
|
|
|
|
|
Tilt |
|
|
|
To adjust the shape of the screen |
|
|
|
|
|
|
|
|
|
|
|||
|
|
|
|
|
|
Side Pincushion |
|
||||
|
|
|
|
|
|
|
|||||
GEOMETRY |
|
|
|||||||||
|
|
|
|
|
|
S Pincushion Balance |
|
|
|||
|
|
|
|
|
|
Parallelogram |
|
|
|||
|
|
|
|
|
|
Trapezoid |
|
|
|||
|
|
|
|
|
|
Top Corner |
|
|
|||
|
|
|
|
|
|
Bottom Corner |
|
|
|||
|
|
|
|
|
|
|
|
|
|
|
|
|
|
|
|
|
|
PRESET |
|
6500K |
|
To customize the color of the |
|
|
|
|
|
|
|
|
|
|
9300K |
|
screen |
COLOR |
|
|
|
||||||||
|
|
|
|
|
|
Temp |
|
|
|
|
|
|
|
|
|
|
|
R/G/B (User Control) |
|
|
|||
|
|
|
|
|
|
|
|
|
|
|
|
|
|
|
|
|
|
Video Level |
|
To customize the screen status for |
|||
|
|
|
|
|
|
|
|||||
|
|
|
|
|
Language |
|
a user's operating environment |
||||
|
SETUP |
|
|||||||||
|
|
|
|
|
|
OSD Time |
|
|
|||
|
|
|
|
|
|
|
|
|
|
|
|
|
|
|
|
|
|
Degauss |
|
|
|
To improve the clarity and stability |
|
|
|
|
|
|
|
|
|
|
|||
|
|
|
|
|
|
Recall |
|
|
|
of the screen |
|
SPECIAL |
|
|
|
||||||||
Reset |
|
|
|
|
|||||||
|
|
|
|
|
|
|
|
|
|
||
|
|
|
|
|
|
Moire |
|
H Moire |
|
|
|
|
|
|
|
|
|
|
|
V Moire |
|
|
|
|
|
|
|
|
|
|
|
|
|
|
: Adjustable |
|
|
|
|
|
|
|
|
|
|
|
|
11
AS500700700M900FINAL2.p65 |
11 |
11/11/03, 1:45 PM |
Controls –continued
Brightness
To adjust the brightness of the screen.
Contrast
To adjust the contrast of the screen.
Vertical Position
To move image up and down.
Horizontal Position
To move image left and right.
Vertical Size
To adjust image height.
Horizontal Size
To adjust image width.
Tilt
To correct image rotation.
Side Pincushion
To correct a concave or convex bowing of the image.
Side Pincushion Balance
To correct the balance of both sides bowing.
Parallelogram
To correctly adjust the skew of the image.
Trapezoid
To correct geometric distortion.
Top Corner Bottom Corner
To correct an irregular distortion of the displayed image.
12
GEOMETRY
AS500700700M900FINAL2.p65 |
12 |
11/11/03, 1:45 PM |
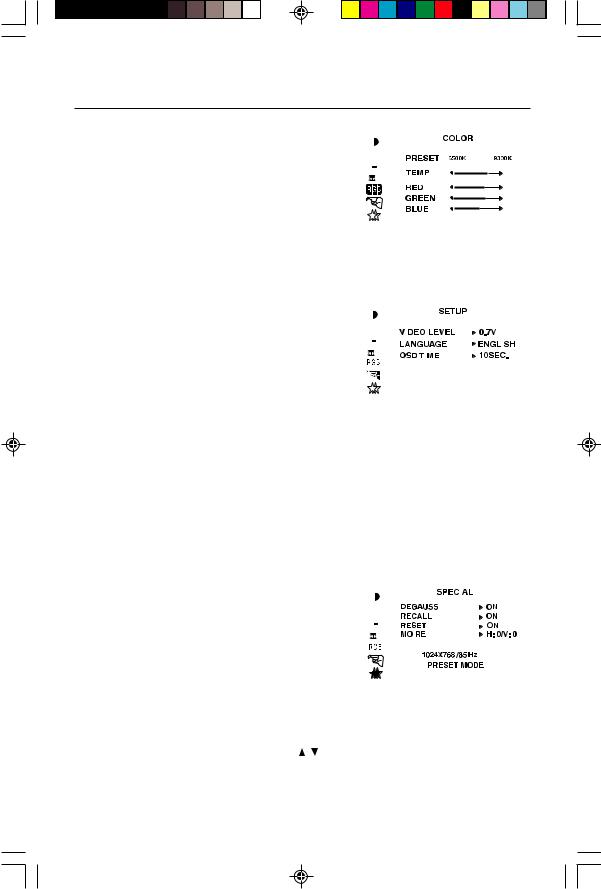
Controls –continued
PRESET |
6500K/ 9300K |
|
|
|
|
|
|
|
|
|
|
|
|
|
|
|
|
|
|
|
|
||
|
Select the screen color. |
|
|
|
|
|
|
|
|
|
|
|
• 6500K: Slightly reddish white. |
|
|
|
|
|
|
|
|
|
|
|
• 9300K: Slightly bluish white. |
|
|
|
|
|
|
|
|
|
|
TEMP |
Select the screen temperature which |
|
|
|
|
|
|
|
|
||
|
|
|
|
|
|
|
|
||||
|
you prefer among reddish or bluish or |
|
|
|
|
||||||
|
any color in between. |
|
|
|
|
|
|
|
|
|
|
RED |
Set your own color levels. |
|
|
|
|
|
|
|
|
|
|
GREEN |
|
|
|
|
|
|
|
|
|
|
|
BLUE |
|
|
|
|
|
|
|
|
|
|
|
VIDEO LEVEL |
This item is used to select the monitor's |
|
|
|
|
|
|
|
|
||
|
|
|
|
|
|
|
|
|
|||
|
input signal level. The normal level |
|
|
|
|
|
|
|
|
||
|
used for most PCs is 0.7V. |
|
|
|
|
|
|
|
|
|
|
|
|
|
|
|
|
|
|
|
|
|
|
|
If the screen becomes suddenly |
|
|
|
|
|
|
|
|
|
|
|
|
|
|
|
|
|
|
|
|
|
|
|
washed-out or blurred, please select |
|
|
|
|
|
|
|
|
|
|
|
1.0V and try again. |
|
|
|
|
|
|
|
|
|
|
LANGUAGE |
|
|
|
|
|
|
|
|
|
|
|
To choose the language in which the |
|
|
|||||||||
|
control names are displayed. |
|
|
|
|
|
|
|
|
|
|
|
OSD Menus are available in 12 |
|
|
|
|
|
|
|
|
|
|
|
languages: English, German, French, |
|
|
||||||||
|
Spanish, Italian, Swedish, Finnish, |
|
|
||||||||
|
Portuguese, Korean, Chinese , Russian |
|
|
||||||||
|
and Polish. |
|
|
|
|
|
|
|
|
|
|
OSD TIME |
Set the OSD time, i.e. the length of |
|
|
||||||||
|
time a menu will remain on-screen |
|
|
||||||||
|
before it shuts off automatically. |
|
|
|
|
|
|
|
|
|
|
|
Adjust the time to 5, 10, 20, 30 |
|
|
|
|
|
|
|
|
|
|
|
or 60 seconds. |
|
|
|
|
|
|
|
|
|
|
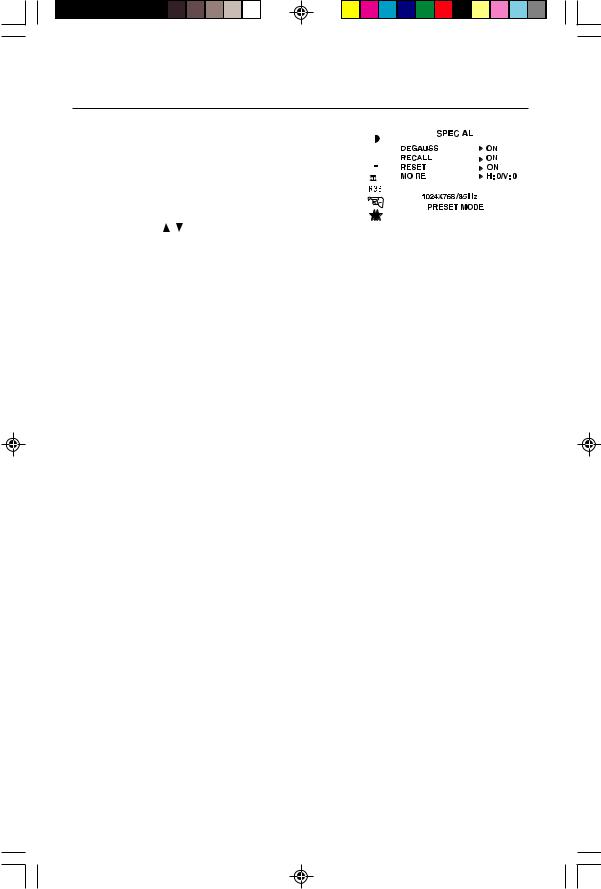
DEGAUSS |
To manually demagnetize the screen to |
|
|
|
|
|
|
|
|
||
|
|
|
|
|
|
|
|
||||
|
avoid showing incorrect images or colors. |
|
|
|
|
|
|
|
|
||
RECALL |
You can use this function to reload the |
|
|
|
|
|
|
|
|
||
|
|
|
|
|
|
|
|
||||
|
modified parameters for screen display |
|
|
|
|
|
|
|
|
||
|
|
|
|
|
|
|
|
|
|||
|
operation, as specified by the user after |
|
|
|
|
|
|
|
|
||
|
|
|
|
|
|
|
|
|
|||
|
purchase: Position, Size, Side Pincushion, |
|
|
|
|
|
|
|
|
||
|
|
|
|
|
|
|
|
|
|||
|
Side Pincushion Balance, Parallelogram, |
|
|
|
|
|
|
|
|
||
|
|
|
|
|
|
|
|
|
|||
|
Trapezoid (These recalled options may |
|
|
||||||||
|
differ depending on the mode selected: |
|
|
||||||||
|
Preset, User, or New). |
|
|
|
|
|
|
|
|
|
|
|
If you don’t want to recall the monitor to |
|
|
||||||||
|
these modified settings, use the |
but- |
|
|
|||||||
|
ton to select CANCEL and then press the |
|
|
||||||||
|
SELECT (or SET) button. |
|
|
|
|
|
|
|
|
|
|
|
13 |
|
|
|
|
|
|
|
|
|
|
AS500700700M900FINAL2.p65 |
13 |
11/11/03, 1:45 PM |
Controls –continued
RESET |
Return to all factory default settings except |
|
|
|
|
|
|
||||||
|
||||||
|
"LANGUAGE": Brightness, Contrast, Tilt, |
|
|
|
|
|
|
Color 9300K, Video Level, OSD Time, |
|
|
|
|
|
|
Moire (These reset options may differ |
|
|
|
|
|
|
|
|
|
|
||
|
depending on the mode selected: Preset, |
|
|
|
|
|
|
|
|
|
|
||
|
User, or New). |
|
|
|
|
|
|
|
|
|
|
||
|
If you don’t want to reset the monitor, use |
|
|
|
|
|
|
the |
button to select CANCEL and |
|
|
|
|
|
|
|
|
|
||
|
then press the SELECT (or SET) button. |
|
||||
MOIRE |
This item allows you to reduce the degree |
|
||||
|
of moire. (Moire is caused by interference |
|
||||
|
Horizontal Scan Line with the periodical |
|
||||
dot screen). It is normally OFF (H:0/V:0). The moire adjustments may affect the focus of the screen.
Moire adjustments may shake slightly while the moire reduction function is on.
14
AS500700700M900FINAL2.p65 |
14 |
11/11/03, 1:45 PM |
Controls –continued (AccuSync 700M)
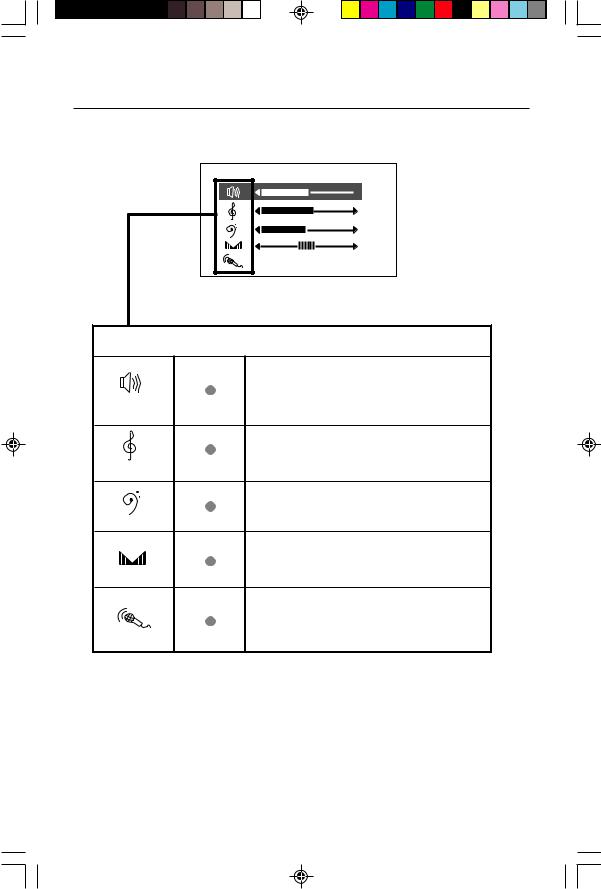
VOLUME
 70
70
 ON
ON
Main Menu |
Description |
Raises or lowers audio level.
VOLUME
Raises or lowers treble level.
TREBLE
Raises or lowers bass level.
BASS
Changes levels of left/right speaker.
BALANCE
Enables or disables microphone usage.
MICROPHONE
 : Adjustable
15
AS500700700M900FINAL2.p65 |
15 |
11/11/03, 1:45 PM |
 Loading...