

Page 1

INDUCTION
COOKTOP
INSTRUCTION MANUAL
TES-i b2
Page 2

Important!
SAVE T HES E INST RUC TION S
Carefu lly read th e con tent s of th is man ual s ince it pro vides imp ort ant in str ucti ons
regard ing s afet y of in stal lat ion, u se an d mainten ance.
Keep the m anu al for p oss ible f utu re con sul tation.
All the op era tion s rel atin g to in stal lat ion/ repl acement (el ectr ica l conn ect ions)mu st
be carri ed ou t by spe cia lise d per sonn el in c onformi ty with the r egu lati ons i n forc e.
Check th e app lian ce fo r dama ge af ter un pac king it. Do n ot connec t the a ppli anc e if
it has bee n dam aged i n tra nspo rt.
This app lia nce ha s bee n desi gne d for use onl y as a cookin g app lian ce. An y othe r
use (e.g .heatin g roo ms) sh oul d be con sid ered inco rrect and t her efor e dan gero us.
Induction Cooktop
In st al la ti on I ns tr uc ti on s and User Guide
1.Safety and warn ings
2.Installatio n instructions
3 Description of the appliance
4.Operating you r cooktop
5. Suitable cookware
6.Cooking guidelines
7. Care and clean ing
8. What to do if...
9.Warra nty and service
Conte nts
Page 3

These warnings a re pr ovi ded i n the i nterest of safety. You
MUST read them car efu lly b efo re in sta lling or using the
appliance.
Important safe ty in str uct ion s
Please provide this i nfo rma tio n ava ilable to the person who i s
responsible for ins tal lin g the a ppl ian ce as it could reduce your
installation cost s.
In order to avoid a hazar d, th is ap pli anc e must be installed
according to the se in str uct ion s for i nstallation.
Only qualified t ech nic ian c an in sta l and earth this cooktop p rop erl y.
This appliance shou ld be c onn ect ed to a c ircuit which incorporat es
an isolating switch p rov idi ng fu ll di sconnection from the p owe r sup ply .
Failure to insta ll th e app lia nce c orr ectly could invalida te an y
warranty or liab ili ty cl aim s.
Import ant safet y ins tructio ns
Elect rical S hock Hazard
Cracks or fractu res i n the g las s cer ami c may cause electric
shocks. Switch o ff th e cir cuit breaker in the fuse b ox. C ont act
the after-sale s ser vic e.
Make sure the appl ian ce is c onn ect ed to a g ood earth
wiring system.
Only qualified e lec tri cia n can m ake t he change of the
domestic wirin g sys tem .
Switch the cookt op of f at th e wall before cleaning o r
maintenance.
Do not touch the swi tch o n the w all w hen y our h and is wet.
Failure to follo w thi s adv ice m ay re sul t in electrical
shock or death.
Hot Sur face Ha zard
During and after u se of t he ho b, ce rta in pa rts will
become very hot. D o not t ouc h hot p art s.T he highest
temperature of t he su rfa ce co uld b e 570℃ ,do not let
children or persons w ith a d isa bil ity t o use this
appliance.
Do not leave infla mma ble m ate ria ls ot her than
suitable cookw are c ont act w ith t he ce ramic glass until
the surface is coo l eno ugh t o tou ch.
Do not leave metal obje cts o n the c ook top a s they
can become hot very rap idl y.
Keep children away.
Failure to follo w thi s adv ice c oul d res ult in burns
and scalds.
Fire Ha zard
The voltage of the m ain p owe r sup ply s hou ld
corresponds to t he va lue g ive n on th e rat ing plate.
To connect th e co okt op to the mai ns p ower supply ,
do not use ad apt ers, re duc ers , or br anching de vic es,
as they can cause ov erh eat ing a nd fi re.
Do not leave infla mma ble m ate ria ls on t he Hob top.
Make su re th at el ec tr ic al co rd s c on ne cting ot he r
appliances in the p rox imi ty cannot co me in to contact w ith
the Hob top.
Never l eav e the app liance u nat ten ded when in us e.
Boilover causes smoking and greasy spillovers t hat
may ignite.
Never use your a ppl iance f or w arm ing or he ati ng
the room.
ov erh eating w ithout a c ook war e on it , cou ld cause
damage to the cook top .
Failure to f ollow th is ad vic e may r esu lt in
overheating, burn ing , and i nju ry.
Cut Haz ard
The blade of the coo kto p scr ape r is ra zor -sharp
Use with extreme c are a nd al way s sto re sa fely
Keep it away from ba bie s and c hil dre n.
Failure to use cau tio n cou ld re sul t in in jury or cuts.
Health Hazar d
This appliance comp lie s wit h ele ctr omagnetic safety
standards. How eve r, pe rso ns wi th ca rdiac pacemakers
or other electri cal i mpl ant s (such as insulin pump s)
must consult wit h the ir do cto r or im pla nt manufacturer
before using thi s app lia nce t o mak e sur e that their
implants will not be af fec ted by the electromagn eti c
field.
Page 4
Do not place or leave any m agn eti sab le ob jec ts (eg credit c ard s,
memory cards) or e lec tro nic d evi ces ( eg computer s, MP 3 pla yer s)
near the appliance, a s the y may b e affected by its ele ctr oma gne tic
field.
Do not use the cookt op as s tor age , ben cht op or working space. The
cooking zone contro ls ma y be ac cid ent ally turned on, result ing i n pos sib le
fire, property d ama ge an d per son al in jury.
We re com men d usi ng pl ast ic or wooden kitchen ute nsi ls fo r
cooking with your ind uct ion c ook top .
Do not p lac e or dr op he avy o bjects on yo ur co oktop .
Do not spray aerosols i n the v ici nit y of th e appliance when it is in
operation.
/ Do not u se sc our ers or an y o ther ha rsh abr asi ve cleaning ag ent s
to clean yo ur co oktop as th ese c an sc rat ch the ce ram ic gl ass , .
To avoid damaging cookw are a nd gl ass c era mics, do not allow
saucepans or fry ing p ans t o boi l dry.
Do not use the cooki ng zo nes w ith e mpt y coo kware.
After use, alway s tur n off t he cooking zones.Do no t rel y on th e pan
detection feat ure t o tur n off the cooking zones wh en yo u rem ove t he
pans.
This appliance must o nly b e use d for f ood p reparation. Do not lea ve th e
appliance unatten ded d uri ng op era tion.
The appliance is not in ten ded f or us e by yo ung children or infirm
persons unless they h ave b een a deq uat ely supervised by a
responsible perso n to en sur e tha t the y can use the appliance sa fel y.
Do not r epa ir or replace an y p art of th e a ppl iance unless
specifically r eco mme nde d in th e man ual All o ther se rvi cin g should b e .
done b y a q ualified t ech nic ian .
Do not allow large cook war e to ov erh ang t he ho b onto the adjacent
benchtop. This w ill c aus e sco rch ing t o the benchtop surface .
If the supply cord i s dam age d, it m ust b e rep laced by the
manufacturer o r its s erv ice a gen t or si milarly qualified pe rso n in or der
to avoid a hazard.
Do not u se a steam cleaner to c lea n your co okt op .
Never place hot po ts or p ans o n the c ont rol p anel, the display area o r
the surround. Th is ma y cau se damage.
If the power suppl y cab le is d ama ged , it mu st only be replaced by
a qualified technic ian .
Additions or mod ifi cat ion s to th e app liance are not permitt ed.
Important Safety Instructions
2. Installati on Instructions
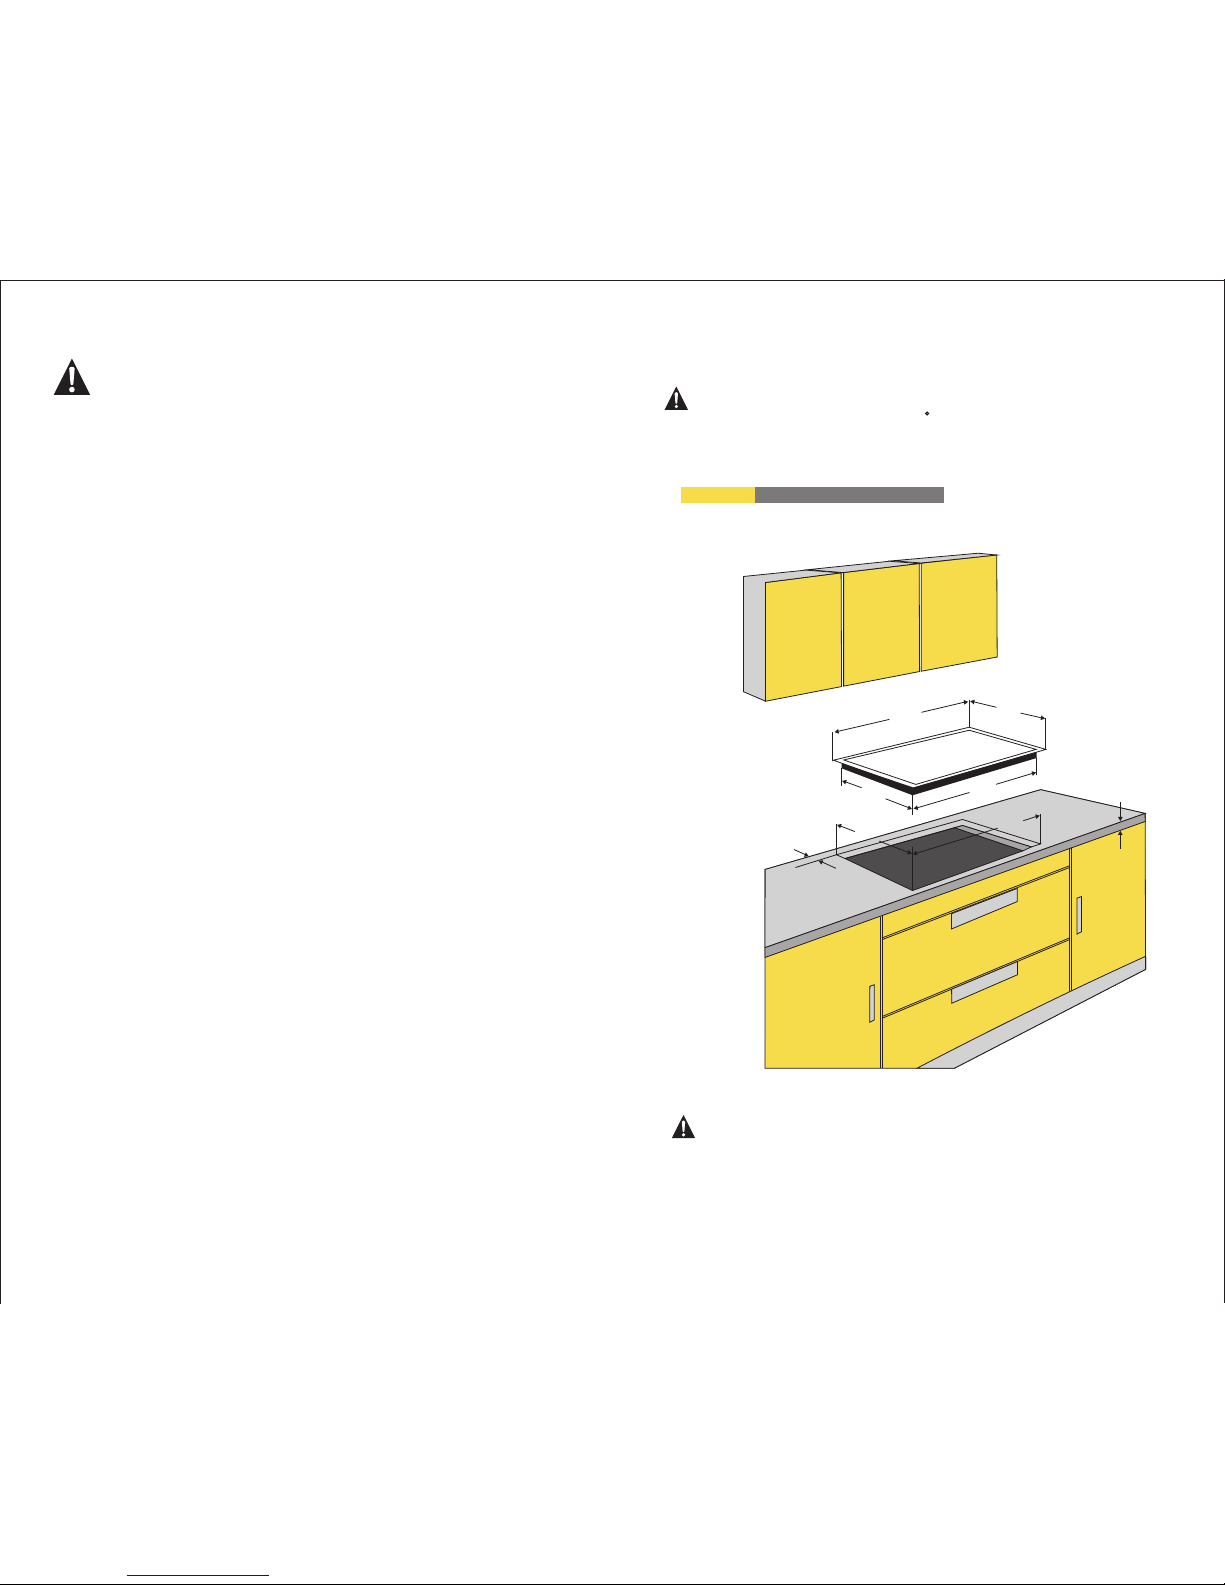
Cookt op an d cut out dimension s
Note:
Your appliance should be p osi tio ned so that the pl ug- in unit is
accessible.
The di sta nce betwee n t he e dge of you r appliance a nd the sid e an d
rear walls ( or pa rti tio ns) m ust be at least 55 milimet res (fi g:1 )
860
520
475
810
min 55
815
480
min
MODEL
Fig:1
IMP ORTANT:
The s urfa ce temperatur e exce eds 95 C. To avoid a hazard , unde rben ch
acc ess must be re stricted. Refer to the instruct ions b elow.
TES-i b2
Page 5

Conne cting t he Cooktop to the Mai ns Power Supply
Important!
This c ook top m ust be co nne cte d to the m ain s power su ppl y only by a
suitably qu ali fie d person .
Before co nne cti ng the cookt op to t he mains power s upp ly c hec k that , :
The domestic wir ing s yst em is s uit abl e for the power drawn by
the cooktop.
The voltage and power v alu es li ste d on th e data plate are
compatible with the e lec tri cit y sup ply and socket. If you hav e any
doubts, please cons ult a q ual ifi ed el ectrician for assist anc e.
To conne ct th e cooktop to t he ma ins power su ppl y do n ot use ,
adapters reducer s or b ran chi ng de vices as th ey ca n cause, , ,
overheating an d f ire .
The po wer s upp ly cable must no t t ouch any h ot parts and m ust b e
positioned s o that its tem per atu re wi ll not ex cee d 7 5 at any po int ℃ .
Power S upply :
Important!
Check with an electri cia n whe the r the d omestic wiring syste m is
The po sit ion ing must al low a fr esh air i nta ke and an a ir out let o f 5
mm minimum( See F ig. 3 )
The benchtop is made of a heat- re sis tan t m ate rial.And no
structural mem ber s int erf ere w ith s pace requirements.
The co okt op will no t be in sta lle d directly ab ove an app liance suc h
as dishwasher, fr idg e, freezer, wa shi ng machine, as th e h umi dit y
may damage the cookto p ele ctr oni cs.
If a bui lt- in oven or a ny o the r ap pliance tha t ge ner ate s heat must
be fit ted dir ect ly under t he g las s ceramic coo ktop, T HIS APPLIA NCE
(oven ) AN D THE GLA SS- CE RAM IC COOKTOP MUST B E SU ITABLY
INSULATED i n su ch a way that the heat gen era ted by the ov en,
measured on the botto m rig ht of t he co okt op, does not exceed 60°C .
A sui tab le isolating switch pro vid ing full di sco nne cti on fro m the
mains power su ppl y i s inc orp ora ted in the p erm ane nt wi rin g mo unt ed ,
and po sit ion ed to comply w ith t he local wiring rul es an d regulations .
The power supply c abl e is no t ac ces sib le t hro ugh cu pboard doors
or drawers.
If the lower part of t he ap pli anc e, af ter i nstallation, is acce ssi ble
via the lower part of the c abi net t hen i t is ne cessary to mount a
thermal protec tio n bar rie r res pec ting the distances ind ica ted ( Se e
Fig.4 ).
min5 5
650
(minim um cl eara nce f rom gl ass
surfac e to rangeh ood )
Uni t:mm
Fig:2
Fig:4
The thermal prot ect ion b arr ier
must be:
Removable
heat- res ist ant
made from low ther mal c ond uct ivi ty
material
at least 25 mm below the pl ast ic
housing of the coo kto p cha ssi s
The rmal pr otect ion bar rier
vat ilati on
min .25
min .20
min .5
min .25
oven
min .20
min .5
Thermal protection barrier
cup board o r drawe r
spa ce belo w
Fig:3
Page 6

suitable without al ter ati ons . Any a lterations must only b e mad e by a
qualified electri cia n.
Rating Plate
Connection dia gra ms
Single-p has e con nec tio n
220-240V ~
Two- ph ase c onn ection
380-415V 2 N~
Connecting the cook top t o the m ain s pow er supply
TO BE C OMP LET ED BY T HE IN STALLER
Is the cooktop ear the d?
Check that the pow er su ppl y cab le is N OT to uching the base of
the cooktop. Thi s wil l ens ure t hat t he ca ble is not damaged by heat
from the cooktop .
Check that the pow er su ppl y cab le is n ot ac cessible via cupboar d
doors or drawers.
Is the cooktop fix ed se cur ely ?
Check that all the c ook ing z one s fun cti on correctly. Turn on all of
them to a high setti ng an d lea ve th em on f or at l east one minute.
Are all touch contr ols a nd di spl ays f unc tioning?
To chec k tha t the ‘h ot su rfa ce’ i ndicators function c orr ect ly, t urn
off a ll th e zon es. I s H dis pla yed in all the cooking zon e dis pla ys?
Have you shown the c ust ome r how t o use t he co okop?
Make sure you expl ain t o the c ust ome r abo ut the ‘Hot surface’
indicators.
Encourage them t o rea d the f ull u ser g uid e before using the
cooktop.
Insta lle r’s name
:
Insta lle r’s signat ure :
Insta lla tio n company:
Date of i nst all ation:
LEAVE THE SE IN STR UCT ION S WITH THE CUSTO MER
3. Descriptio n of the appliance
About I ndu cti on Cooking
The principle of indu cti on is b ase d on a ma gnetic phenomenon.
It works by electr oma gne tic v ibr ati ons generating heat di rec tly i n the
pan ,and raising its te mpe rat ure i nst antly, rat her t han i ndi rec tly t hrough
heating the glass sur fac e . The ref or in duction cooking is saf e,
advanced, effi cie nt, a nd economical.
RATE D CUR RENT
3x1 6A
5 4 3 2 1
5 4 3 2 1
N
PE
L
5 4 3 2
1
Yellow and Green- --- PE
Red----L
Blue----N
Page 7

Before using you r new c ook top
Read this guide, taki ng sp eci al no te of t he ‘Safety and
warnings’ section .
Remove any prote cti ve fi lm th at ma y sti ll be on your cooktop.
TES-i b1
1 16A
2 16A
3 16A
4 Touc h Con tro l Area
4. Using Your Cooktop
1.How t o touch c ontrol keys:
Use the ball of your fing er, n ot it s tip .
The controls res pon d to to uch , so no p res sure is necessary.
When you touch the c ont rol k eys , sta y you r finger on the key utill it
responds for you r tou ch.
Make sure the cont rol s are a lwa ys cl ean , dry, and there is no
object
such as utensil or c lot h cov eri ng th em. E ven a thin film of water
makes the contro l dif fic ult to operate.
2. Swit chi ng ON /OFF of the Touch Control
The Touch Contro l can b e swi tch ed ON b y pre ssing the ON/OFF key.
The cooktop swit chs f rom P owe r ON to O FF af ter 20 sec., provided
that no cooking zo ne is a cti vat ed or a s ele ct key is pressed during t hat
time.
3. Powe r lev els
The power of the coo kin g zon es ca n be ad jus ted in 9 levels.
By sliding the fin ger o n the s lid er ar ea, t he cooking level can be
increased or decrea sed .
The cooking leve l wil l be in dic ate d on th e according illuminated
bargraph accordin g to th e pos iti on of t he finger.
Booster as highe st co oki ng le vel . Dis play on the bargraph and
optionally sho win g “P” .
4.Res idu al He at
The indication o f a hot s urf ace c an be d one i n two ways:
a) Traditionally sho win g “H”
b) Illuminatin g bar s on th e bar gra ph.
The number of bars i llu min ate d is re lat ed to the temperature of t he
cooking zone.
A
Auto
Bridge functio n and p owe r lev el st art k ey ( level 1)
Safety lock
Pause and recall
ON/OFF key
Timer increment
Timer decrement
Cooking level slidi ng ar ea (2 -9, f or le vel 1 touch )
a
b
c
d
e
f
1
2 3
4
Contr ol Keys
Page 8

5.Chi ld lo ck
Press safety loc k for 2 s eco nds w ill l ock t he control pannel.
All displays wil l sho w „L“ a s LOC KED .
If anycooking zo ne is s til l hot „ L“ an d „H“ w ill be displayed alter nat ing .
After switchin g on th e con tro l the c hil d lock can be deactivate d. Re tou ch
safety lock key fo r 2 sec ond s wil l dea cti vate the control panne l.
6. Timer
Touch and at the same ti me ca n act iva te ti mer f unction.
The operation ra nge i s bet wee n 1 min t o 9h 59 min.
A Timer can be activated fo r eac h act ive c ook ing zone. Af ter selecting the
timer, the cookin g zon e rel ate d lum ino us symbol is fully light ed.
After 10sec with out i npu t the t ime r fun ction is deactivate an d the d isp lay
is switched off ag ain .
Setting a timer va lue
Pressing the tim er ke ys a ti mer v alu e can b e set. If the timer-plus -ke y is
pressed first, t he di spl ay st art s wit h 1min and can be increase d in 1m in
steps. If the time r-m inu s-k ey is p res sed first, the timer sta rts w ith 1 5 min a n
can be decreased in 1 min s tep s.
Tim er al arm a nd ac kno wle dgement
If a timer has expir ed th e tim er al arm i s act ivated and the assigne d
cooking zone is im med iat ely s wit che d off.
The cooking zone d isp lay s how s „0“ o r „H“ a nd also the bargraph
indicates a “hot ” sur fac e if ne ces sar y.
If no user input sto ps th e ala rm si gna l, it w ill be on for maximum 2
minutes.
The alarm can be dea cti vat ed by s wit chi ng off the co ntr ol us ing t he ma in
switch or by press ing t he tw o tim er ke ys or i t will be deactivated
automaticall y aft er 2 mi nut es.
Pressing and sim ult ane ous ly fo r 2 sec onds also resets the tim er
value to “0.00".
In order to preven t a unw ant ed cl ear ing o f the timer the timer will o nly b e
reset after a shor t per iod .
7. Paus e and r eca ll function
Any function key a nd th e acc ord ing L ED ca n be assigned for the paus e
function. Whil e in pa use m ode n o pow er is o utput.
While the pause fu nct ion i s act ive n o pow er will be emitted on any
cooking zone. All syst em st ate s wil l bem aintained througho ut th e pau se.
The pause mode can o nly b e act ive f or ma xim um 10 min. If the pause
mode is not deacti vat ed wi thi n 10m in, t he control switches of f
automaticall y.
Throughout the p aus e tim e, th e ON/ OFF b utton can be used to switc h
the control off. I n thi s cas e the pause mode is also dea cti vat ed.
8. Brid ge fu nct ion
The adaptive ind uct ion z one s can b e bri dged. Both zones in the fr ont a nd
the back will have t he sa me se tti ngs a fte r activating this func tio n the y are
now connected; one bi g zon e for a l arg e coo king pan).
Activating the b rid ge mo de
1. Put a large cooki ng pa n on bo th co oki ng zo nes. Make sure the zones
are covered corr ect .
2. Switch on the coo kin g zon e in th e fro nt.
3. Hold key of front c ook ing z one f irs t, an d then immediately the k ey
of the back cookin g zon e
4. Set the power usi ng th e sli din g are a . Both zones
are set to the same po wer.
Deactivating t he br idg e mod e
Touch simultaneousl y two b utt ons o f the a daptive zone in the fron t
and back to deacti vat e the b rid ge mo de.
The zone in the fron t wil l con tin ue wi th th e power that has been set in
bridge mode.
Or:
Press the on/off b utt on of t he cooking zone you want t o swi tch o ff. You will
hear a beep and the level i n the d isp lay d isa ppears. The co oki ng zo ne
has been switche d off c omp letely.
9. Au tom atic cooking
Boiling functi on
This function br ing s the c ont ent o f the p an to a boil and keeps it boil ing .
Simmering func tio n
The temperatur e of th e dis h is co nst ant ly kept near the boiling p oin t.
Function for kee pin g war m
The setting for ke epi ng wa rm wo rks b est w ith a lid on the pan.
Page 9

Use cookware tha t mat che s the d iam ete r of the cooking zone. Low h eat
or slow cooking is o fte n due t o inc orr ect c ookware size.
How to ch eck t he su itability of yo ur co okware
Cookware
Do not use curve-b ase d coo kwa re. S auc epans or heavy frying pa ns wi th
jagged edges or a rough b ase w ill s cra tch t he glass.
Use heavy-gauge, fl at, s moo th- bas ed cookware. We rec omm end t hat
you select cookw are w ith a t hic k, fl at bo ttom. The h eat w ill b e dis tri but ed
better and cooki ng wi ll be m ore u nif orm .
Always lift pans o ff th e coo ktop, do not slide, or the y may s cra tch t he gl ass.
NOTE:
The characteri sti cs of t he pa n bas e may a ffect the u nif orm ity o f the
cooking results. Pa ns ma de fr om ma ter ials which help diffus e hea t, su ch as
stainless stee l san dwi ch pa ns, d ist ribute heat uniforml y, sav ing t ime and
energy.
It is safe to put a hot co okw are f rom t he ov en, o r another cooking zone ,
on the glass surfa ce wh en th e sur fac e is co ol.
Avo id pl aci ng an yth ing o n a hot cooking zone until i t has c ool ed
completely.
6. Cooking Guidelines
■ Always use a corre ctl y fit tin g lid f or th e pan.Cooking withou t
the lid requires four t ime s as mu ch en erg y. A glass lid allows
you to observe the c ook ing w ith out h avi ng to lift the lid off.
■Use pans equipped wit h a sol id, f lat b ott om. Curved pan
bases increase e ner gy co nsu mpt ion .
■ The diameter of th e bas e of yo ur po t or pa n sho uld match the
size of the hotpla te. I n par tic ula r, If th e diameter of the pan is not t he sa me
as the diameter of t he ho tpl ate , it is p ref erable to use a pan with a bot tom
that is larger in di ame ter t han t he ho tpl ate, if pots that are too sm all a re
placed on a hotplate, e ner gy wi ll be w ast ed. Please note:
Cookware manuf act ure rs of ten s pec ify the diameter of the pa n.
Choose pans of a siz e sui ted t o the a mou nt of f ood you are
going to cook. A large saucepan c ont ain ing l itt le fo od requires more
energy.
By carrying out a ma gne t tes t:
Move a magnet towa rds t he ba se of t he pa n. If i t is attracted, the
pan is suitable for ind uct ion .
Put some water in th e ves sel y ou wa nt to c hec k, place the vessel
on a cooking zone, and sw itc h the c ook ing z one on. If there is shows
in the display are a, th en it m ean s you r coo kware cannot be used wit h
induction cooking .
5. Suitable Cookwares
Suita ble c ook wares
Ferro mag net ic cookware or co okw are with ferrom agn eti c base.
Look for the inductio n sym bol o n the p ack aging or the bottom of the
pan.
Improper cookw are s
Glass, terra ,c ott a, wo od, p orcelain, ceramic, e art hen war e,
aluminum without a sp eci al fi nis h on th e bottom, copper and som e
non-magn eti c sta inl ess s teels.
Ti ps f or s av in g en er gy
Page 10

■Use a small amount o f wat er wh en co oki ng. This will sa ve en erg y. It
also preserves v ita min s and m ine ral s in vegetables.
7. Care and Clean ing
• For cleaning, th e app lia nce m ust b e swi tched off a nd co ole d dow n.
• For safety reaso ns, t he cl ean ing o f the a ppliance with steam je t or hi gh
pressure clean ing e qui pme nt is n ot pe rmitted.
• Do not use scourer s or an y har sh/ abr asi ve cleaning agents to cl ean y our
cooktop, as thes e can s cra tch t he ce ram ic glass or stainless st eel .
Kind of d irt?
Soiling on glass (fin ger pri nts , mar ks, dust, food particl es, o r non -su gar y
spillovers on th e gla ss)
What to d o?
Switch the power t o the c ook top o ff at the wall.
Wipe the appliance wi th a da mp cl oth and c ooktop cleaner.
Wipe the applian ce dr y usi ng a cl ean c lot h.
Dust, fa t and liqui ds fr om foo d tha t has bo ile d over m ust b e removed a s
soon as po ssible.
Kind of d irt?
Non-sugary boilov ers : dus t, fa t and l iquids from food that ha s boi led o ver,
hot sugary spill s on th e sur fac e
what to d o?
Switch the power t o the c ook top o ff at the wall.
Use a a fish slice, pa let te kn ife o r raz or bl ade scraper as soon as
possible.
°Hold the scraper o r ute nsi l at a 30 a ngl e and s crape the soiling or spi ll
to a cool area of the co okt op.
Remove the soili ng wi th ce ram ic co okt op cleaner using a spong e or no n-
abrasive scour er su ita ble f or ce ram ic glass as soon as possib le.
Remove any exces s cle ane r and w ipe d ry wi th a clean cloth.
Apply ceramic co okt op co ndi tio ner o r protector followin g the i nst ruc tio ns
on the dispenser. A micro fiber or ‘ gla ss’ cloth is the b est c hoi ce.
Impor tant:
Remove s tains lef t by me lts an d sug ary fo od or s pillove rs as soon as p oss ible .
If they ar e allowed t o har den th ey be come i ncr easingl y diff icu lt to re mov e. And
they cou ld perman ent ly pit t he su rfac e of th e hob if left t o burn on it.
Cut haza rd: The bla de of s crap er is r azor -sh arp. Use ex treme car e and a lway s
store sa fely and ou t of re ach of c hil dren .
NOTE:
When the power to th e coo kto p is sw itc hed o ff, there w ill b e no ‘h ot su rfa ce’
indication but the co oki ng zo ne ma y sti ll be hot! Take e xtr eme c are .
Do not use heavy-d uty s cou rer s, so me ny lon scourers and harsh /ab ras ive
cleaning agents suc h as ov en sp ray o r sta in remover.
Never leave cleanin g res idu e on th e coo ktop: the glass may beco me st ain ed.
8. Troubleshooting
Problem:
Cooking zones canno t be tu rne d on.
Possible cause s
No power.
The desired heat sett ing i s not s et.
What to do
Make sure the cook top i s con nec ted t o the p ower supply and that it is
switched on at the w all . Che ck wh eth er th ere is a power outage in you r hom e
or area. If the fuse t rip a n umb er of t ime , cal l your Au tho rised Service Centre
or Customer Care .
Set the heat setti ng.
Problem:
Cooking zones seem to t urn t hem sel ves o ff and on dur ing u se.
Possible cause s:
They cycle off and o n to ma int ain the selected setti ng or p rev ent t he gl ass
from overheati ng.
Impor tant!
Page 11

What to do:
This is normal and n eed s no ac tio n.
Problem:
The cooktop has no r esp ons e
Possible cause s:
No power
Using the cookto p in an i nap pro pri ate s ituation, such as unst abl e wir ing
system, thunde r str ike , hig h-i nte nsity magnetic field .
What to do:
Switch the power t o the c ook top o ff at the wall, and swi tch t he po wer t o the
cooktop on after 1 0 sec .
If the problem sti ll re mai ns, c all y our Au thorised Service Cen tre o r
Customer Care.
Problem:
Cooking zones canno t be tu rne d off.
Possible cause s:
Technical fault.
What to do:
Switch the power t o the c ook top o ff at the wall and call y our Au tho ris ed
Repairer or Custome r Car e.
Problem:
Fan noise coming from t he co okt op.
Possible cause s:
A cooling fan built int o you r coo kto p has c ome on to prevent the
electronics fr om ov erh eat ing . It ma y continue to run even aft er yo u’v e
turned the cookt op of f.
What to do:
This is normal and need s no ac tio n. Do n ot sw itch the power to the
cooktop off a t the w all w hil e the fan is still running .
Problem:
The cooktop turn s its elf o ff unexpectedly, bee p sou nds a nd an e rro r cod e
Er is showed in the co oki ng zo ne di spl ay.
Possible cause s:
Technical fault
What to do:
switch the power t o the c ook top o ff at the wall, and con tac t you r
Authorised Ser vic e Cen tre o r Cus tom er Care.
Problem:
P flashes in the dis pla y whe n you a re tr yin g to set Power Boost.
Possible cause s:
In order to protec t hob f rom o ver hea tin g, Power Boost is tempor ari ly
unavailable.
What to do:
Wai t for a w hil e until the cooktop is coo led d own .
9. Warranty a nd Service
Before you call fo r ser vic e or as sis tan ce…
Check what you can d o by yo urs elf . Ref er to t he installation inst ruc tio ns
and your user guide and m ake s ure t hat :
1 your product is co rre ctl y ins tal led
2 you are familiar w ith i ts no rma l ope rat ion.
If after checkin g the se po int s you s til l need assistance, ple ase r efe r
to the Service & Warranty below fo r war ran ty de tai ls an d contact
information.
 Loading...