

Page 1
USER MANUAL
W LED SPOT MOVING HEAD
PLEASE READ OVER THIS MANUAL BEFORE OPERATING THE LIGHT FIXTURE
200
Version 1.0
Page 2
1. SAFETY INSTRUCTION
The fixture is designed and manufactured to meet the requirements of People’s Republic
of China and international safety regulations. Modifications to the product could affect
safety and render the product non-compliant to relevant safety standards.
Instructions pertaining to continued protection against fire, electric shock, and injury to
persons are found throughout this manual. Please read all instructions prior to assembling,
mounting, and operating this equipment.
IMPORTANT
ALWAYS READ THE USER MANUAL BEFORE OPERATION. PLEASE CONFIRM THAT
THE POWER SUPPLY STATED ON THE PRODUCT IS THE SAME AS THE MAINS
POWER SUPPLY IN YOUR AREA.
● This product must be installed by a qualified professional.
● Always operate the equipment as described in the user manual.
● A minimum distance of 1m must be maintained between the equipment and combustible
surface.
● The product must always be placed in a well ventilated area.
● Always make sure that the equipment is installed securely.
● DO NOT stand close to the equipment and stare directly into the LED light source.
● Always disconnect the power supply before attempting and maintenance.
● Always make sure that the supporting structure is solid and can support the combined
weight of the products.
ATTENTION
●This product left the place of manufacturer in perfect condition. In order to maintain this
condition and for safe operation, the user must always follow the instructions and safety
warnings described in this user manual.
● Avoid shaking or strong impacts to any part of the equipment.
● Make sure that all parts of the equipment are kept clean and free of dust.
● Always make sure that the power connections are connected correct and secure.
● If there is any malfunction of the equipment, contact us immediately.
● When transferring the product, it is advisable to use the original packaging in which the
product left the factory.
● Shields, lenses or ultraviolet screens shall be changed if they have become damaged to
such an extent that their effectiveness is not conformable.
- 1 -
Page 3
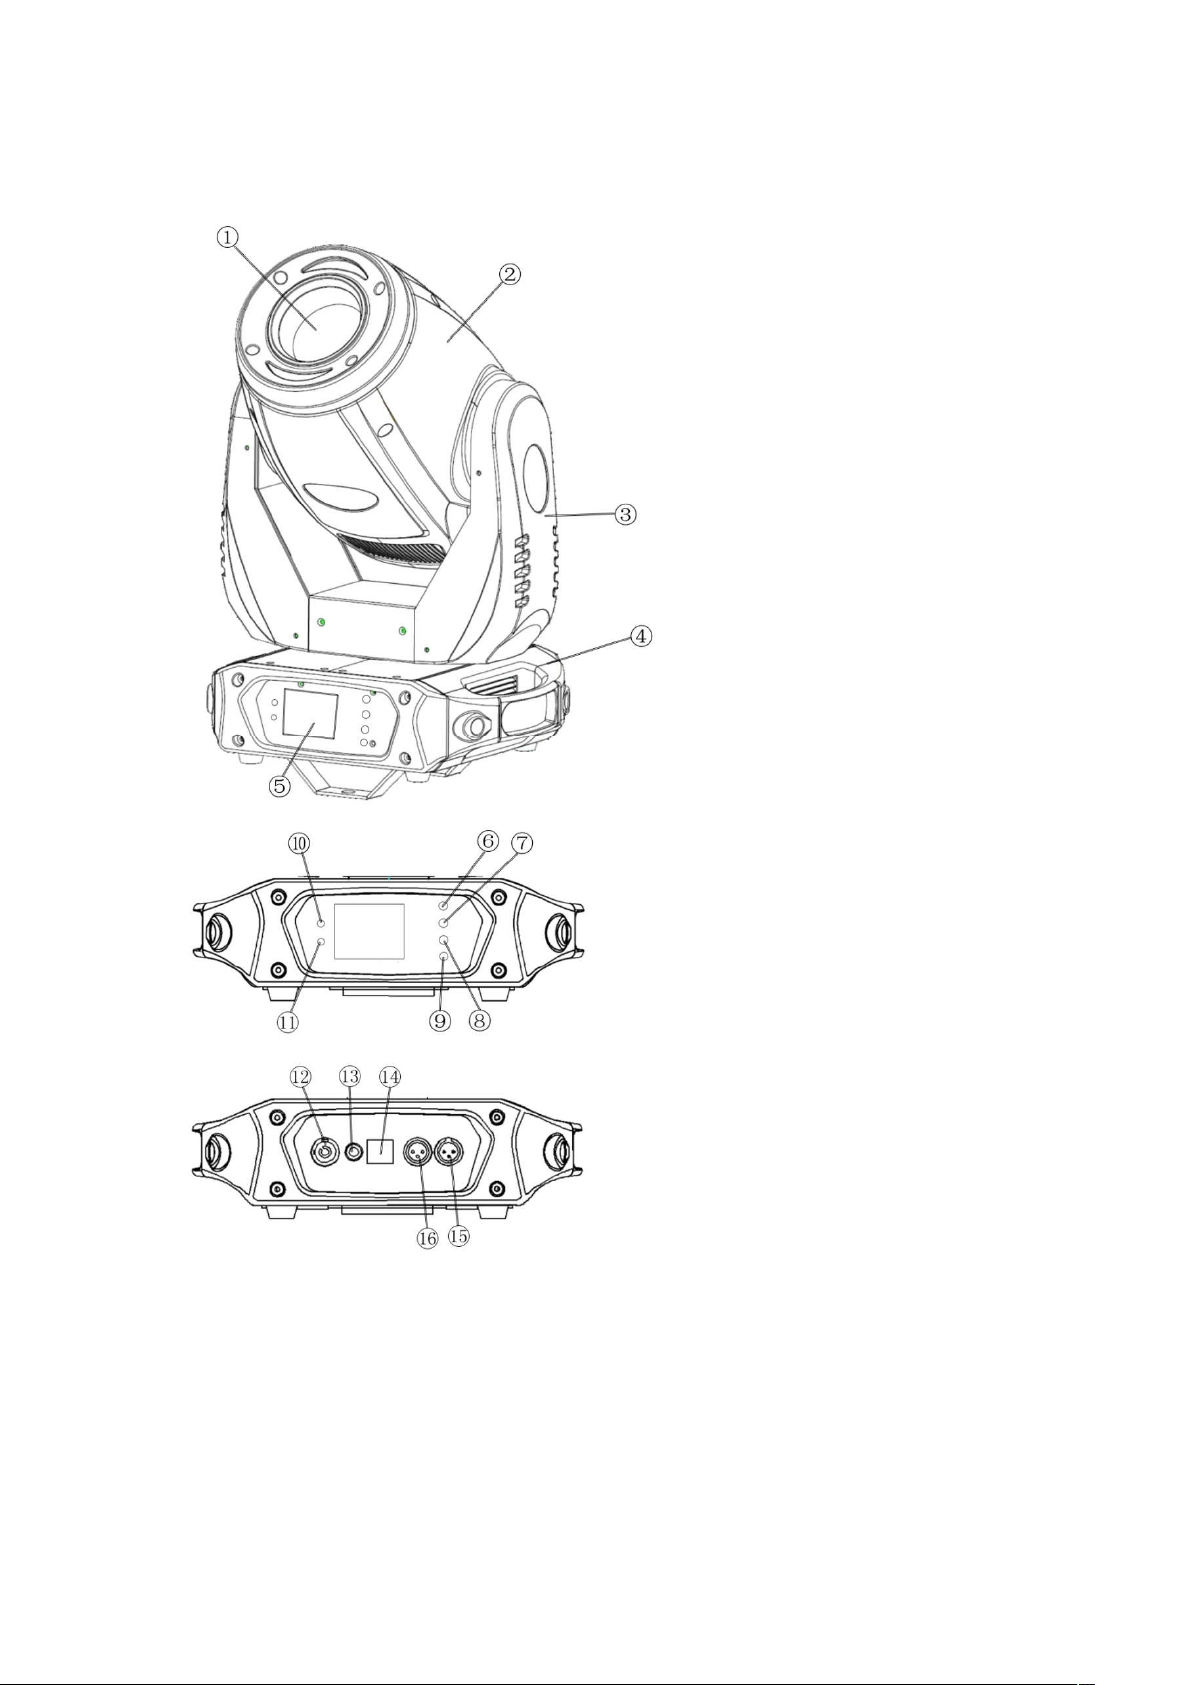
2. PRODUCT INTRODUCTION
① Lens
② Head
③ Arm
④ Botton
⑤ LCD Display
⑥ MENU –Button
⑦ UP–Button
⑧ DOWN-Button
⑨ ENTER-Button
⑩ DMX Indicator Light
⑪ ERR Indicator Light
⑫ POWER
⑬ FASE 3.5A
⑭ Power Switch ON/OFF
⑮ DMX IN
⑯ DMX OUT
- 2 -
Page 4

3. SPECIFICATION
It is a precise, feature-rich moving head spot fixture that produces bright,even beams of
light from its advanced led optical system which includes 200W LED. The combination of
dual gobo wheels, a richly saturated color wheel, and a 3-facet prism enables awesome
effects and totally smooth gobo morphing!
SOURCE
● Light Source: LED 200W
POWER
● Input Voltage: AC90-260V,50/60Hz
● Power Consumption: 400W
OPTICAL SYSTEM
● Pan / Tilt: 540° / 270°
● Prism: 3-facet linear rotating prism
● Dimmer: Variable Electronic Dimmer(0-100%)
● Frost: 1 frost filter
● Zoom: 14-34°
● Strobe: Pulse and random strobe
COLOR
● 7 Dichoric Colors plus open
● Bi-directional variable-speed effect
FIXED GOBOS
● 1 fixed gobo wheel with 8 metal gobos plus open
● Shake / Bi-directional variable-speed effect
ROTATING GOBOS
●1 rotation gobo wheel withb 6 metal gobos and 1 water streak glass gobo
● Interchangeable rotating / Shake / Bi-directional variable-speed rotation effect
CONTROL / CONNECTION
● DMX Channel: 15/19/21CHs
● Control Mode: DMX512, Auto Run,Sound Control, Scene Mode, Master-Slave, WLDMX
● Connection: 3 pin XLR
● PowerCON Power IN
WEIGHT & DIMENSION
Net Weight:13.40kg
●
Dimension:265x341x546mm
●
- 3 -
Page 5
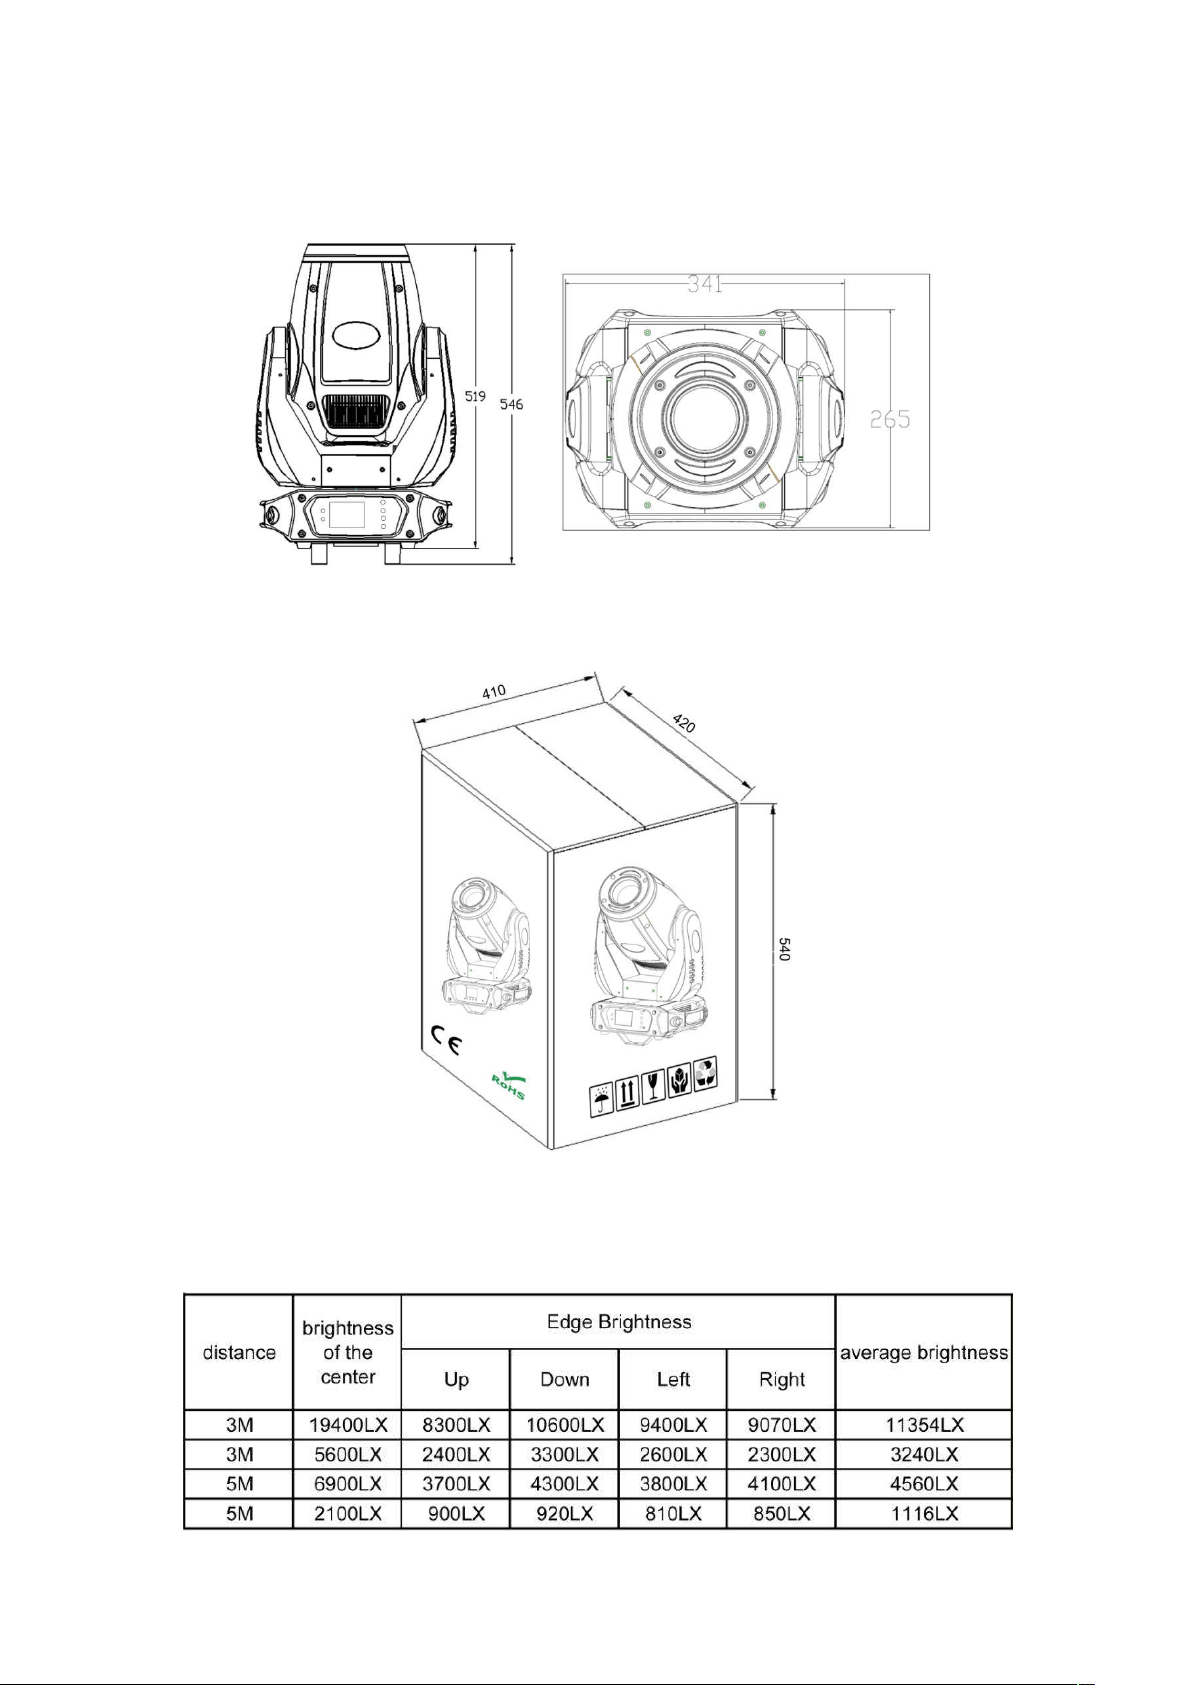
4. DIMENSION (MM)
Carton box dimension:410x420x540mm
5. PHOTOMETRIC DATA
- 4 -
Page 6

6. MOUNTING AND INSTALLATION
6.1 MOUNTING
● The fixture can be mounted in any position.
● Always ensure that mounting surface can withstand 10 times the weight of the fixture.
● Always use a safety cable when mounting the fixture in any elevated position.
t
IMPORTANT SAFETY NOTE!!
Always use a safety cable when installing this unit!!
Be sure that the safety cable is connected to a solid load-bearing structure.
6.2 FUSE REPLACEMENT
● Remove the safety cap by a screwdriver.
● Fetch the old fuse from safety cap.
● Install a new fuse.
● Install the safety cap.
● Fuse:3A,250V
7. DISPLAY PANEL INTRODUCTION
Using the display panel to set the starting DMX address or make other settings. The
functions provided are described in the following sections.
【 MENU 】Scroll through the main menu or exit from the current sub-menu.
【 UP 】Scroll “Up” through the menu list or increase the value of the current function.
【 DOWN 】Scroll “Down” through the menu list or decrease the value of the current
function.
【 ENTER 】 Enter the currently selected menu or confirm the
current function value.
【 DMX Indicator Light】Light on when input DMX signal.
【 ERR Indicator Light】Light on when in Sound Control mode.
- 5 -
Page 7

The classes of each menu are listed in the diagram as below:
- 6 -
Page 8

- 7 -
Page 9

8. DMX CHANNEL ASSIGNMENTS
This product has 15/19/21 DMX channels as below:15 Channels mode
- 8 -
Page 10

- 9 -
Page 11

19 Channels mode
- 10 -
Page 12

- 11 -
Page 13

21 Channels mode
- 12 -
Page 14

- 13 -
Page 15

9. CLEANING
In order to make the fixture in good condition and extend the life time, we suggest a
regular clearning to the fixture.
● Clean the inside and outside lens each week to avoid the weaknesses of the fixture due
to accumulation of the dust.
● Clean the fan each week.
● A detailed electric check by approved electrical engineer each three month, make sure
that the circuit contacts are in good condition, prevent the poor contact of circuit from
overheating.
We recommend a frequent cleaning of the device. Please use a moist, lint-free cloth.
Never use alcohol or solvents. There are no serviceable parts inside the device. Should
you need any spare parts, please order genuine parts from us.
- 14 -
Page 16

- 15 -
 Loading...