

Page 1
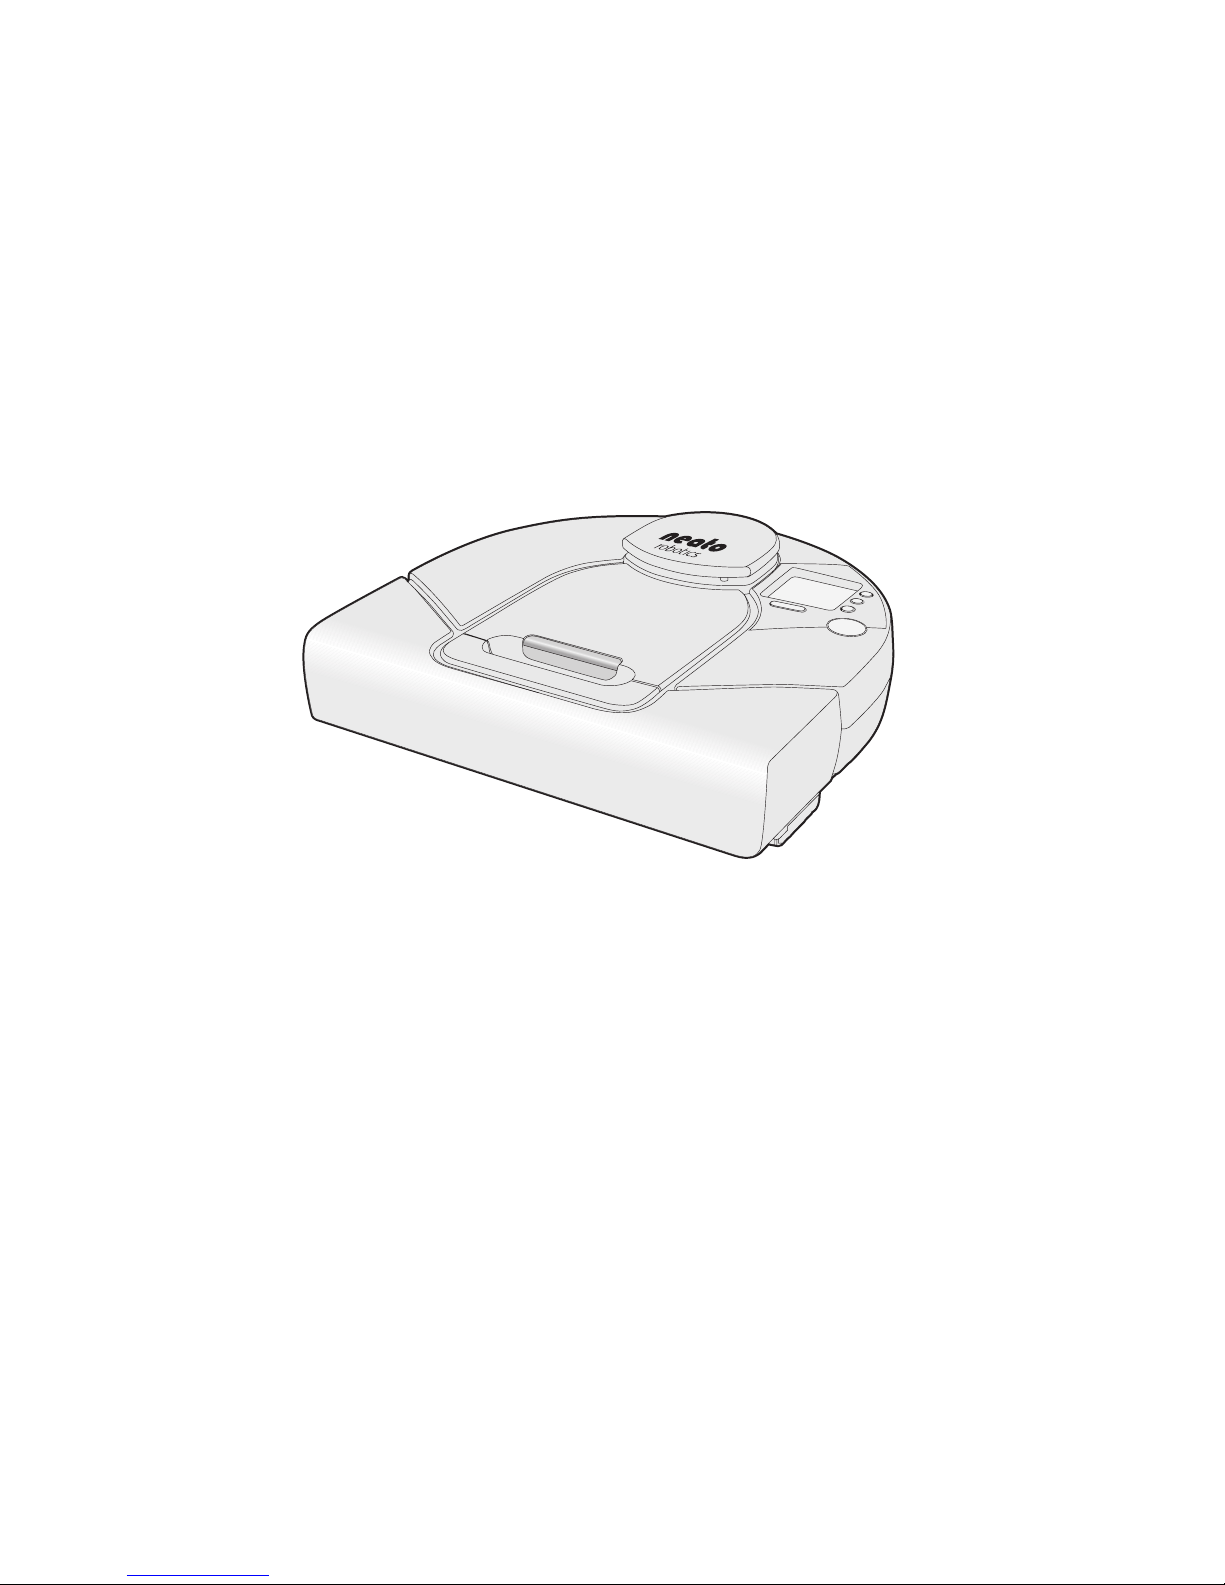
Neato XV-11™ Vacuum
User’s Guide
Page 2
READ ALL INSTRUCTIONS BEFORE USING THIS APPLIANCE.
SAVE THESE INSTRUCTIONS.
PLEASE REFER TO PAGE 10 FOR ADDITIONAL SAFETY INSTRUCTIONS.
1916 Old Middlefield Way Suite A
Mountain View, CA 94043
Copyright © 2009 Neato Robotics, Inc. All rights reserved.
Neato Robotics, Neato XV-11, and Your Future is Neat are trademarks
of Neato Robotics, Inc.
Page 3

Neato XV-11 User’s Guide3
Table of Contents
Welcome!.........................................................................................................................................................5
Anatomy of Your Neato XV-11 Vacuum ................................................................6
Important Safety Instructions ......................................................................... 10
Likes and Dislikes ....................................................................................... 11
Using the Neato XV-11 Vacuum................................................................................................................15
Using the Charging Base................................................................................ 16
Charging without the Charging Base ................................................................. 19
Charging Status .......................................................................................... 21
Optimal Charging................................................................................... 21
Cleaning Mode ........................................................................................... 22
Quick-Start Your Robotic Vacuum .................................................................... 23
Using the Control Center LCD screen ................................................................ 24
Setting the Clock ........................................................................................ 26
Scheduling a Cleaning .................................................................................. 28
To Get the Most of Scheduled Cleanings ............................................................ 30
Ideas for Scheduled Cleanings ........................................................................ 31
Page 4

Neato XV-11 User’s Guide4
Removing a Scheduled Cleaning ...................................................................... 32
Pausing a Cleaning ...................................................................................... 34
Turning off the Lights on Your Vacuum.............................................................. 34
Turning off Your Vacuum .............................................................................. 35
Emptying the Dirt Bin................................................................................... 36
Boundary Markers ....................................................................................... 38
Using boundary markers........................................................................... 38
Communicating with Your Neato XV-11 Vacuum ................................................... 39
LCD Feedback Messages ................................................................................ 40
Filters ..................................................................................................... 42
Customer Support .................................................................................................................................... 43
One Year Warranty (Domestic Use) .................................................................. 44
Compliance Information ............................................................................... 45
Declaration of Conformity ............................................................................. 46
Parts....................................................................................................... 49
Disposal Notices ......................................................................................... 50
Page 5

Neato XV-11 User’s Guide5
Welcome!
Thank you for purchasing your new Neato XV-11 vacuum. And welcome to the home robotics revolution.
This detailed user’s guide will provide all you need to know. It’s easy.
If you are in a hurry, and want to learn the basics to get started right away, you can read the Quick Start
Guide. It’s even easier.
We’re here to help.
If you need help or have any questions, please contact our Customer Service team at
http://www.neatorobotics.com/support
.
We want to keep in touch.
To ensure that we keep you up to date on your new Neato XV-11 vacuum, please register at
http://www.neatorobotics.com/register
.
Neato is developing robotic home maintenance products that promise to free everyone from the drudgery
of household cleaning.
Your Future is Neat™.
Page 6
Neato XV-11 User’s Guide6
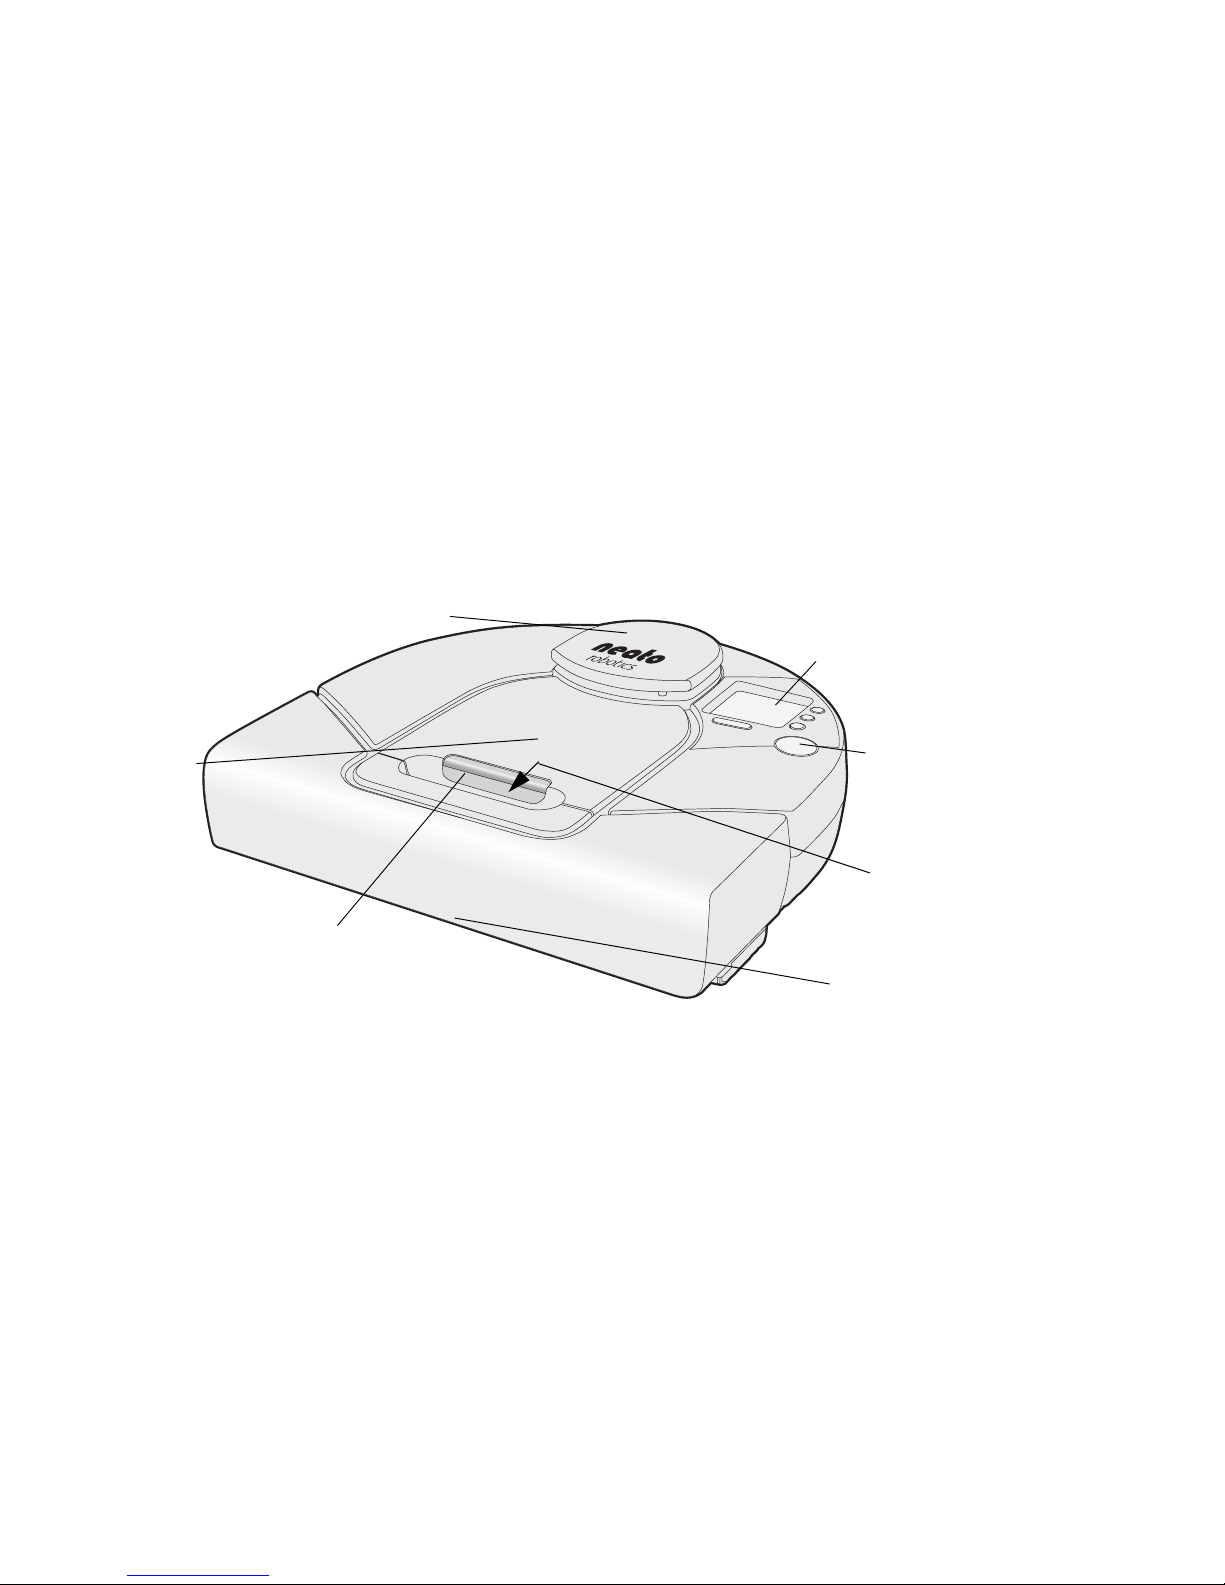
Anatomy of Your Neato XV-11 Vacuum
Top view
Control panel
dirt bin eject
Room Positioning System (RPS)
dirt bin
handle
bumper
(see next page)
—the robot’s “eye”
Start
button
(grasp in
direction
of arrow)
Page 7
Neato XV-11 User’s Guide 7
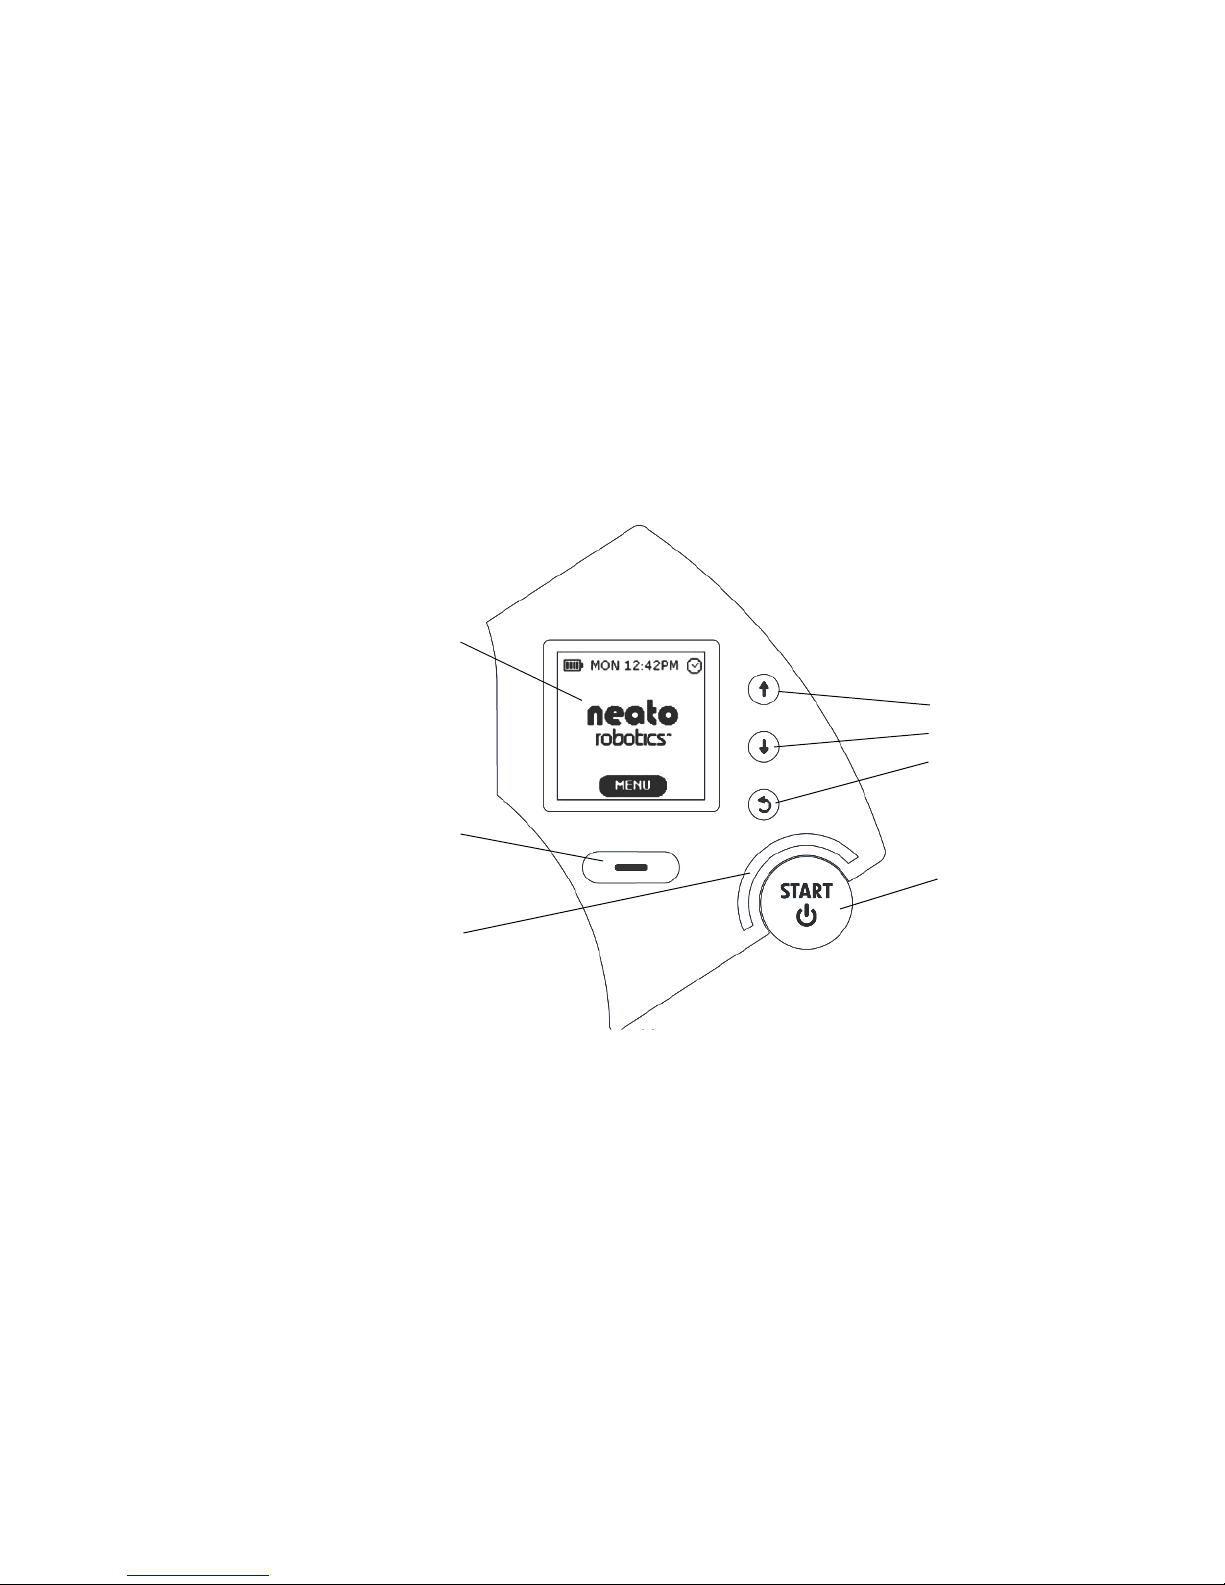
Control panel
Buttons:
Start button
LCD screen
Up
Down
Back
softkey
status
light
Page 8
Neato XV-11 User’s Guide8
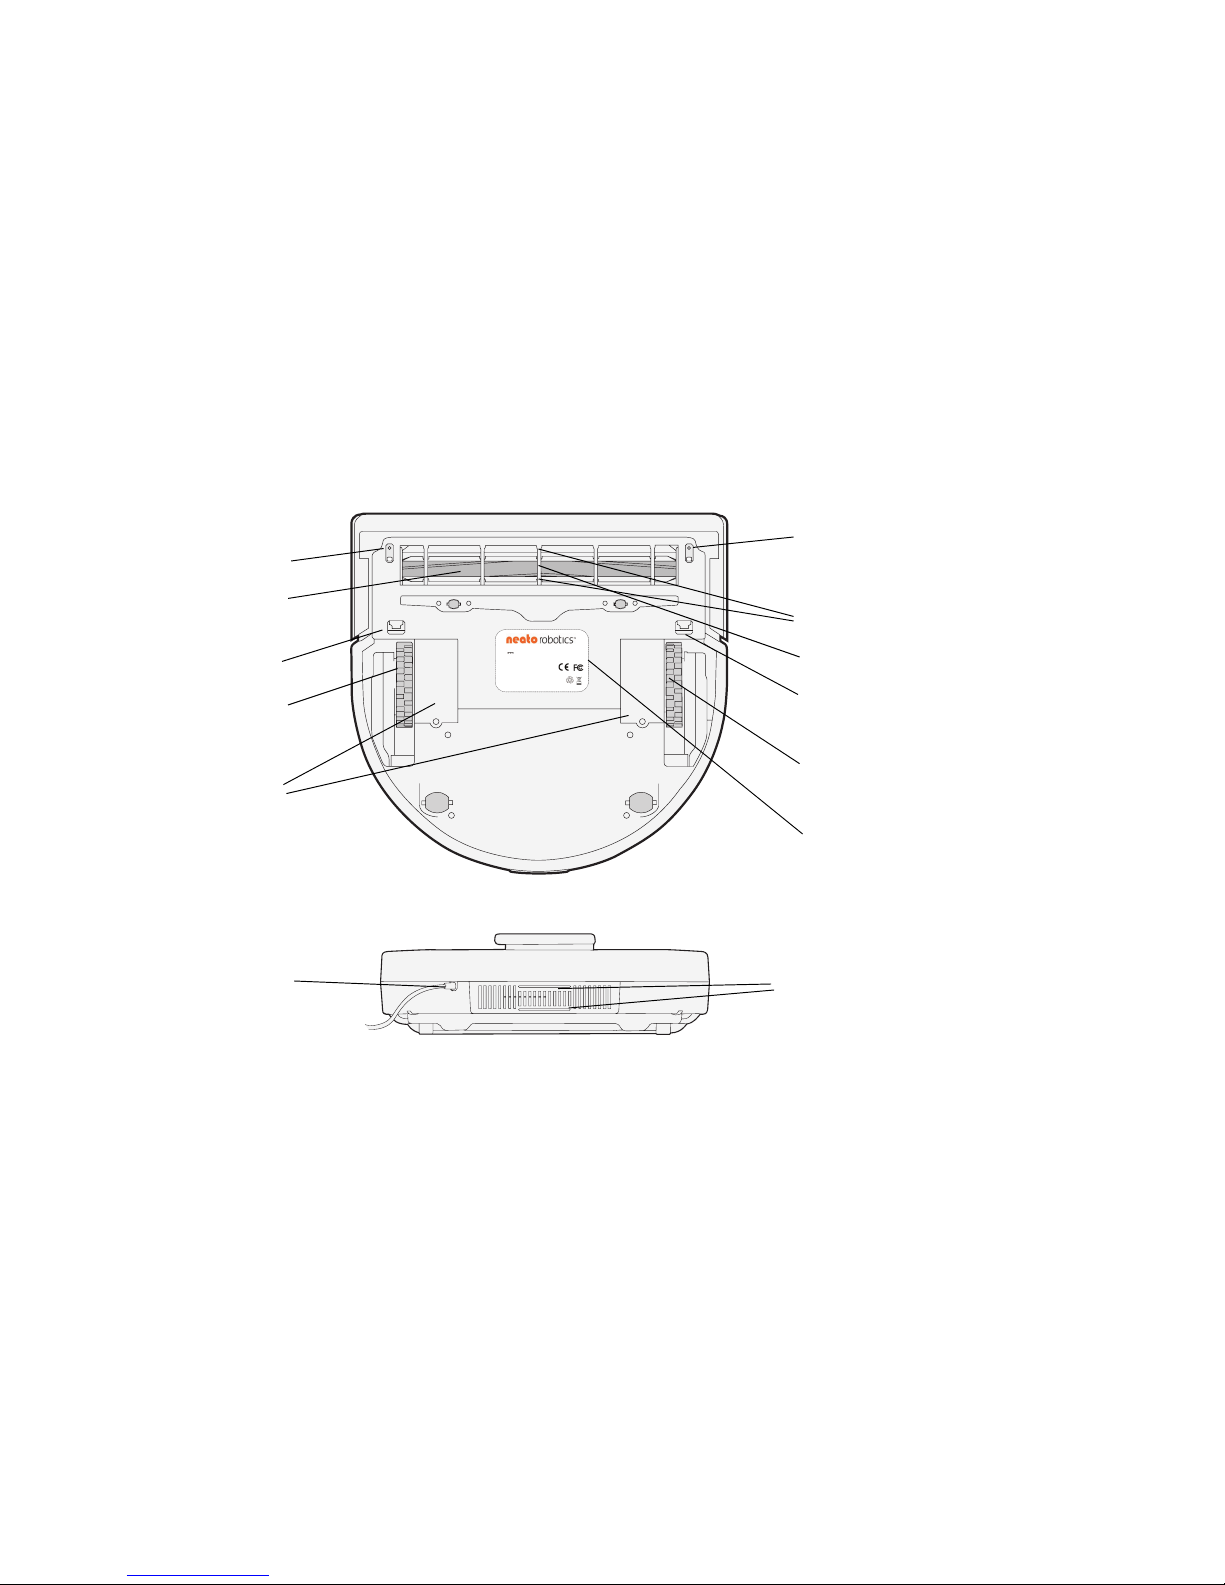
Bottom view
Back View
Thisdevicecomplieswith Part 15 of the FCCRules. Operation is
subjectto the foll owing two con ditions: ( 1) This devi ce may not cause
harmfulinterference, and(2) this devicemust accept any interference
received,including interference thatmay cause un desired operation.
ModelNo. XV-11
SN:VVVV-SSSSSSS-AAANNNNNAA
LID:VVVV-SSSSSSS-AAANNNNNAA
24VDC
2.5A
FCCID:***********
FCCStatement:SeeInstruction Manual
USPatentsPending·Made in China
ClassILaser Product
ComplieswithFDA performance standards for laserproducts
exceptfordeviationspursuant to Laser NoticeNo. 50,
datedJune24, 2007.
1916OldMiddlefield Way, Suite A
MountainView, CA94043
http://www.neatorobotics.com
sweeping brushes
vacuum inlet
wheel
brush guards
battery doors
brush guard
release
drop sensor
window
drop sensor
window
brush guard
release
wheel
information
label
power port
charging
contact points
Page 9
Neato XV-11 User’s Guide 9
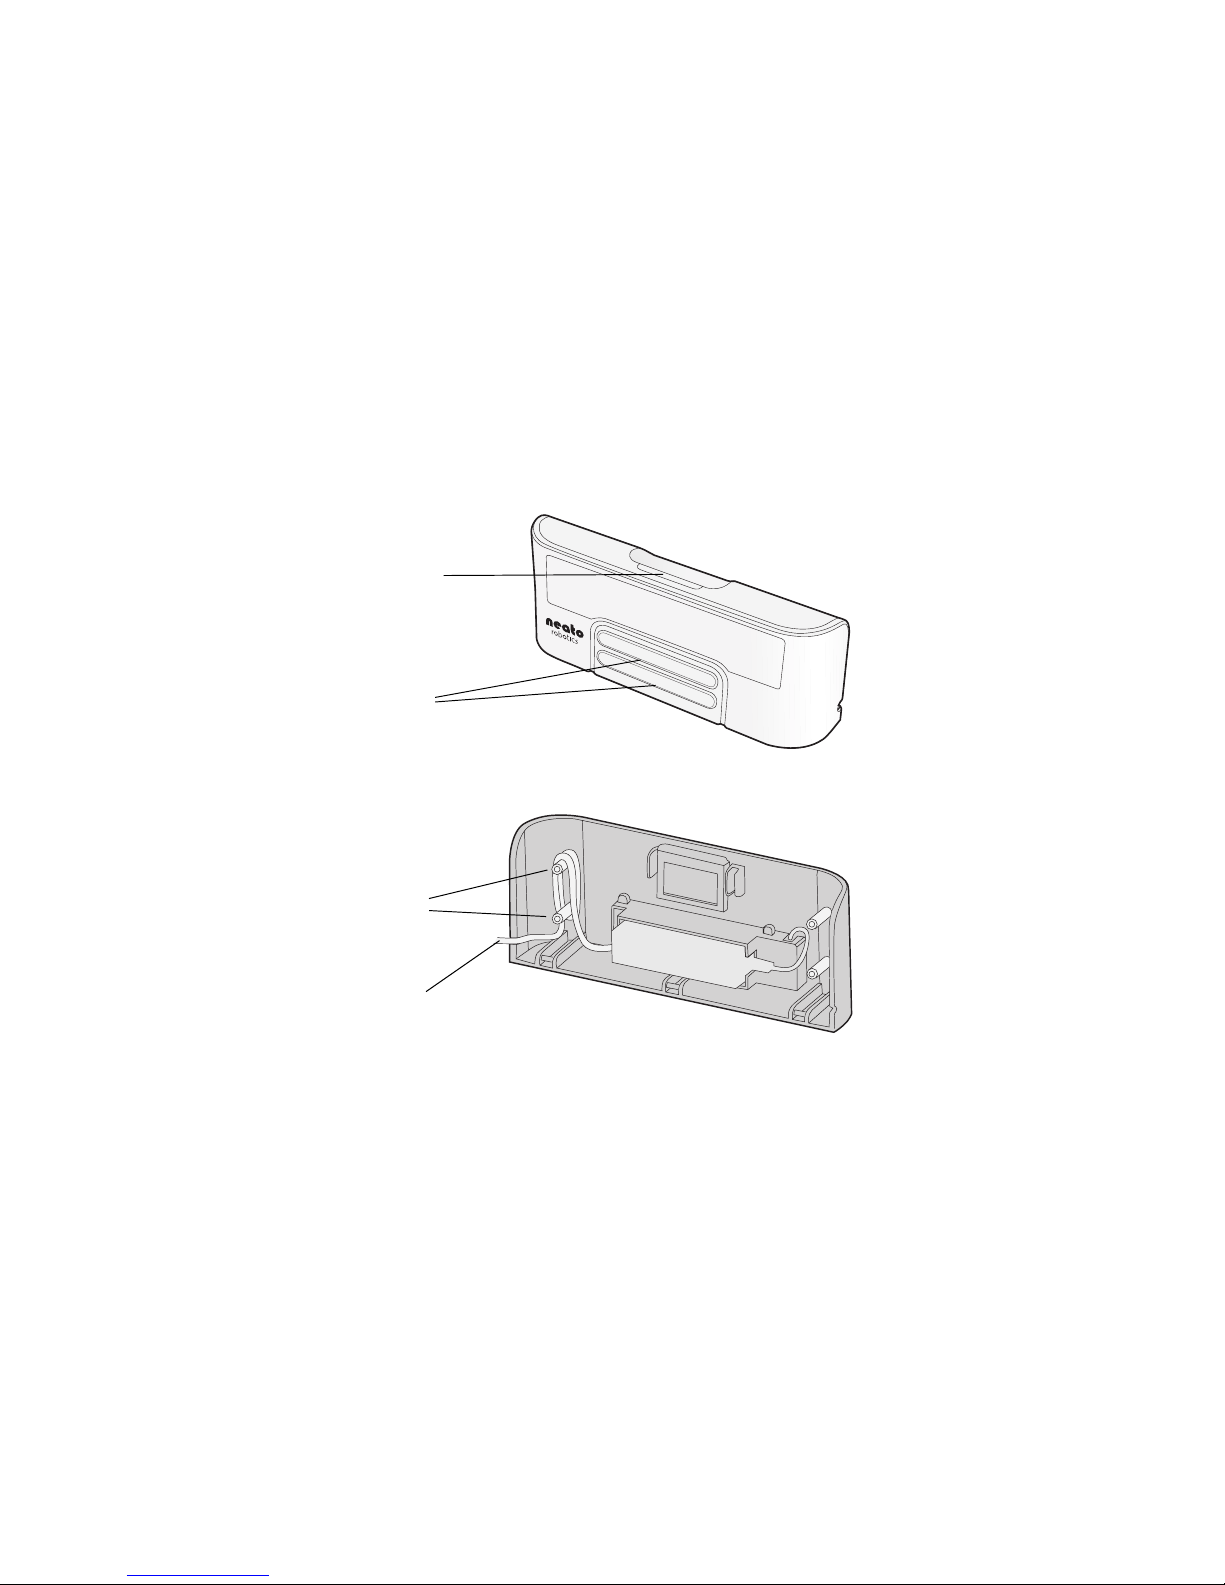
Charging base (external view)
Charging base (internal view)
charging
contact points
release button
cable wrap
pegs
power cable
Page 10

Neato XV-11 User’s Guide10
Important Safety Instructions
Please read all instructions before using this appliance.
Save these instructions for future reference.
Refer all non-routine servicing to Neato Robotics.
The robotic vacuum cleaner shall only be charged using the included power adaptor or
charging base.
The robotic vacuum cleaner shall only be operated using the included batteries. Do not
replace with non-rechargeable batteries. If your batteries run low, replacement
batteries can be purchased at http://www.neatorobotics.com/support.
This appliance is not intended for use by persons (including children) with reduced
physical, sensory or mental capabilities, or lack of experience and knowledge, unless
they have been given supervision or instruction concerning use of the appliance by a
person responsible for their safety. Children should be supervised to ensure that they
do not play with the appliance.
For best performance, empty your dirt bin and clean the vacuum’s brush after each use.
Page 11

Neato XV-11 User’s Guide 11
Likes and Dislikes
There are just a few things to remember that will keep your Neato XV-11 vacuum happy
and successful in your home:
Likes Dislikes
POWER. Charge it when you aren't using
it to ensure that every time you need it,
it will be ready to roll.
WATER, CHEMICALS, or OTHER MOLD
PRODUCING FLUIDS. Do not clean wet
messes with your Neato XV-11. Though it
may seem pet-like, do not bathe or
otherwise submerge your Neato XV-11
vacuum in water. It also doesn’t like
harsh chemicals, or anything that can
permanently stain it. It doesn’t mind
being cleaned and groomed with a damp
cloth, however.
Page 12

Neato XV-11 User’s Guide12
BOUNDARIES. Your Neato XV-11 vacuum
likes to clean everywhere it can reach. If
you want to keep the robot from a
certain area, just put out the boundary
markers (see page 38). The robot will
clean up to the boundary markers but
will not cross over the them.
HANGING CABLES AND LOW TO THE
GROUND TABLECLOTHS. To keep your
robot and your home safe, make sure
that your vacuum cannot get caught on
hanging electric cords, tablecloths, or
other cord-like items.
GROOMING. Because it's down in the dirt
all day long, your Neato XV-11 vacuum
can get a little grungy. After a while,
give it a once over to ensure wheels and
brushes are free of hair and debris and
to keep it running smoothly.
COLD. Exposing your Neato Robotics
vacuum to freezing temperatures may
cause permanent damage, and possibly
hurt its feelings.
OUTDOORS. Your Neato vacuum is a
domestic device and not intended for
outdoor use. Keep it in the house where
it will be happy.
Likes Dislikes
Page 13
Neato XV-11 User’s Guide 13
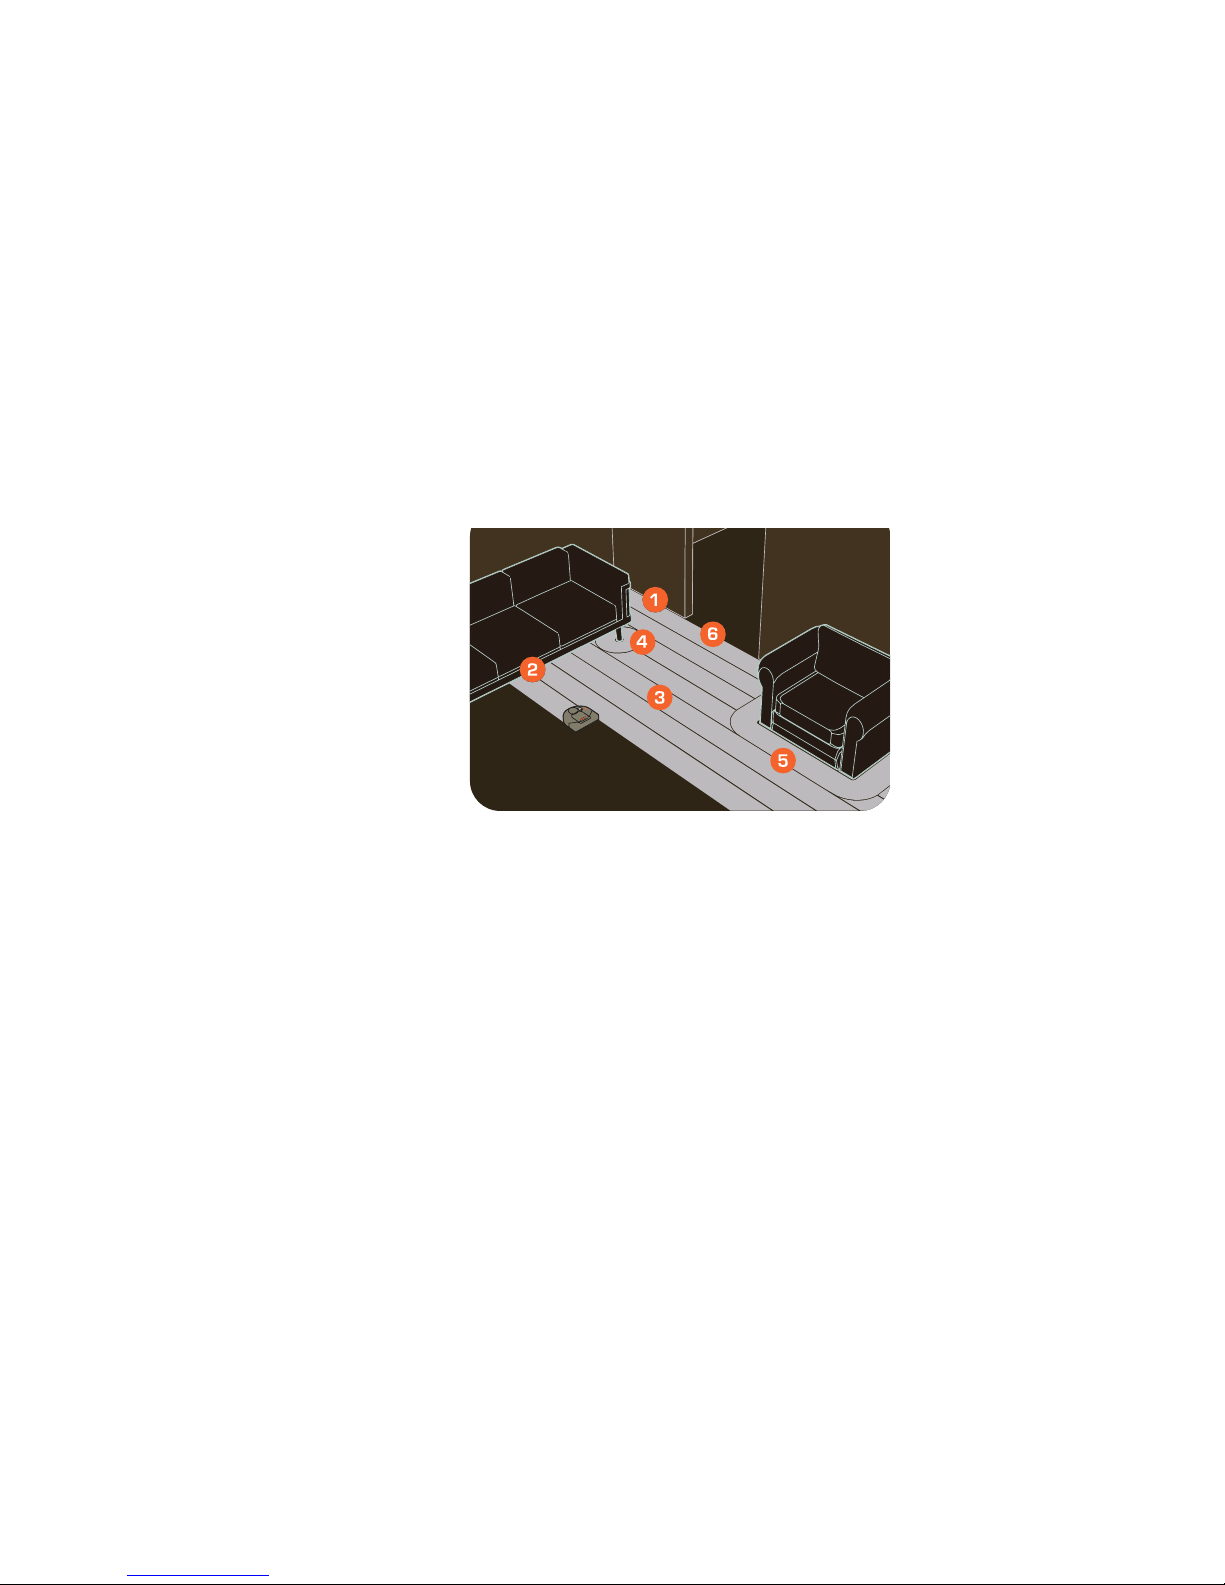
Neato XV-11 vacuum cleaning smarts
1
2
1- Rectangular front design allows vacuuming close to walls and into corners.
2- Low profile allows cleaning under furniture.
3- Always vacuums in straight lines.
4 & 5- Cleans closely around obstacles.
6- Automatic doorway recognition ensures complete cleaning of room before
moving on to the next.
Page 14

Neato XV-11 User’s Guide14
Page 15

Neato XV-11 User’s Guide15
Using the Neato XV-11 Vacuum
The Neato XV-11 vacuum is ready to start cleaning as soon as you charge up its battery.
•To charge the battery, see Using the Charging Base on page 16 or Charging without
the Charging Base on page 19.
•To begin a quick-start cleaning, see Quick-Start Your Robotic Vacuum on page 23.
•To schedule regular cleanings, see Scheduling a Cleaning on page 28.
Page 16

Using the Charging Base
Neato XV-11 User’s Guide16
Using the Charging Base
The Neato XV-11 vacuum has a preinstalled Nickel Metal Hydride (NiMH) rechargeable
battery that has to be fully charged before you can use it for the first time.
You can use the charging base to charge it as described in the steps below, or plug the
charging cable into the vacuum’s power port as described in Charging without the
Charging Base on page 19.
To use the charging base:
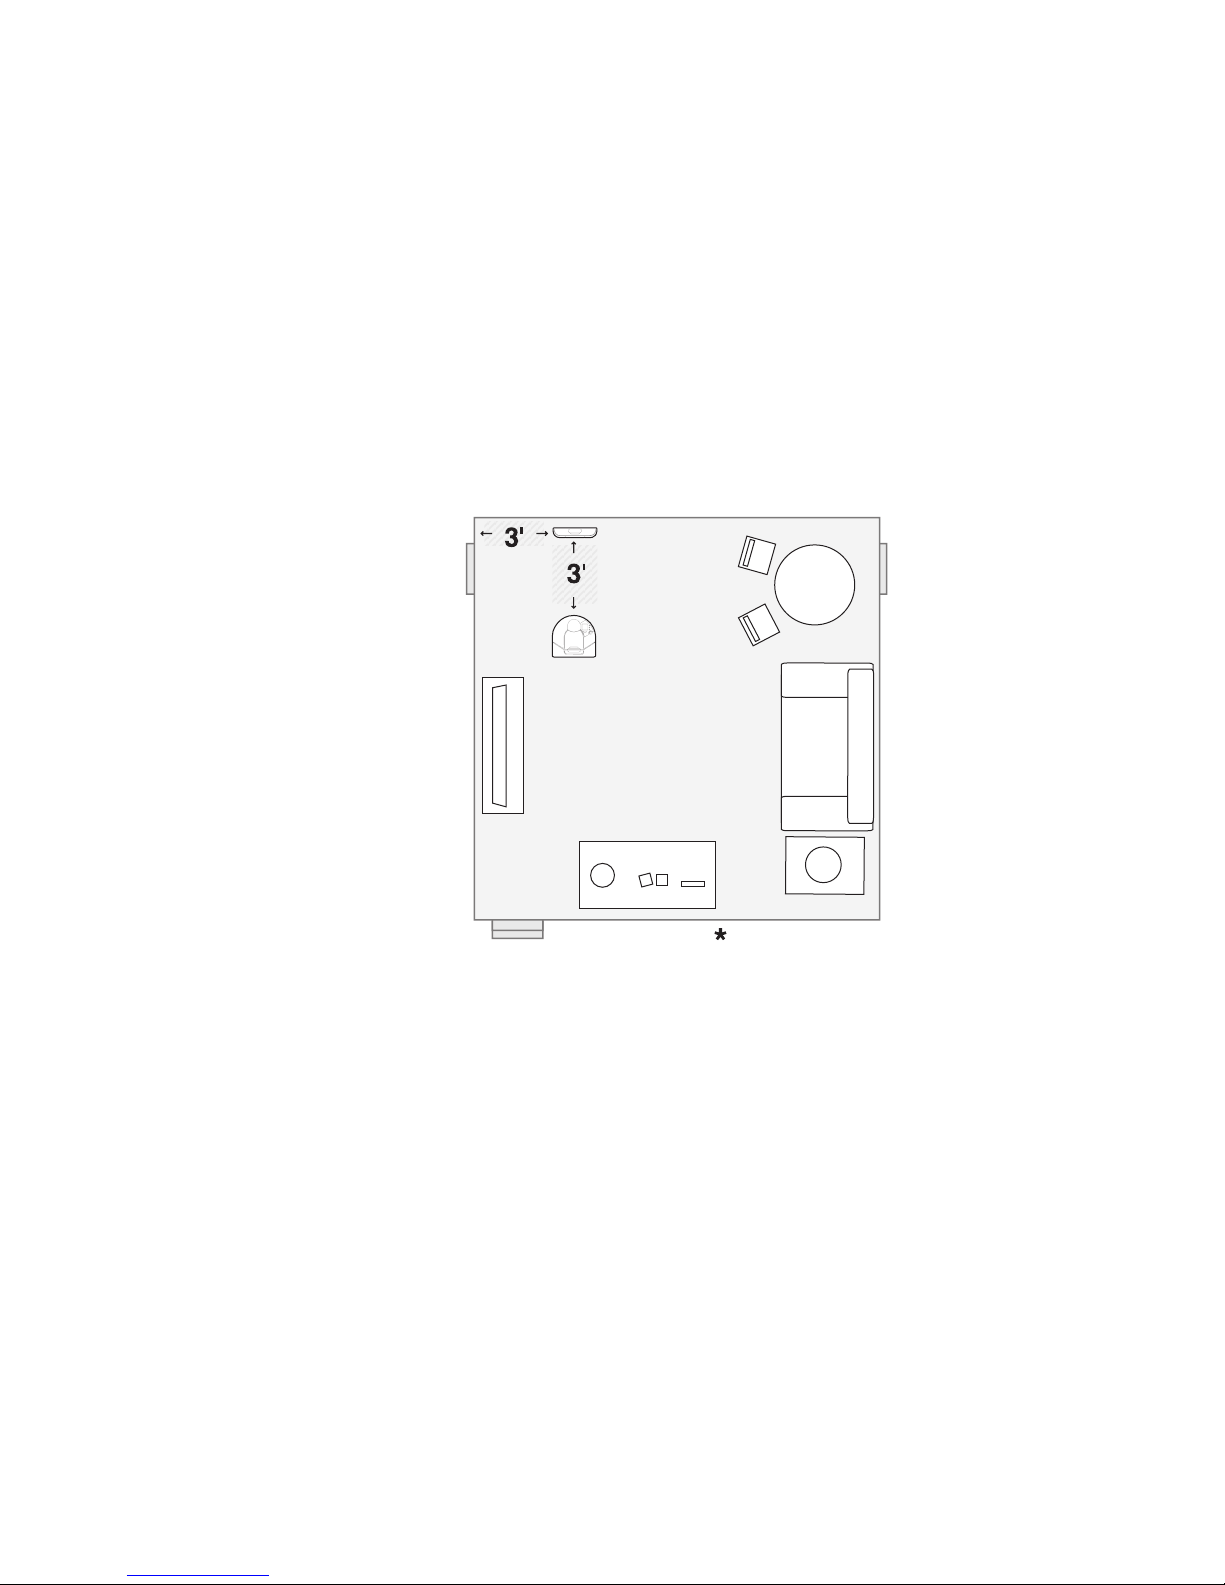
1 Plug your charging base into the wall and place it on the floor in a room:
•that you want to vacuum frequently
•at least 3 feet from a corner of the room
•where the vacuum will have a clear path to return to recharge itself
Page 17
Using the Charging Base
Neato XV-11 User’s Guide 17
Giving the vacuum a clear path to its charger
Page 18
Using the Charging Base
Neato XV-11 User’s Guide18
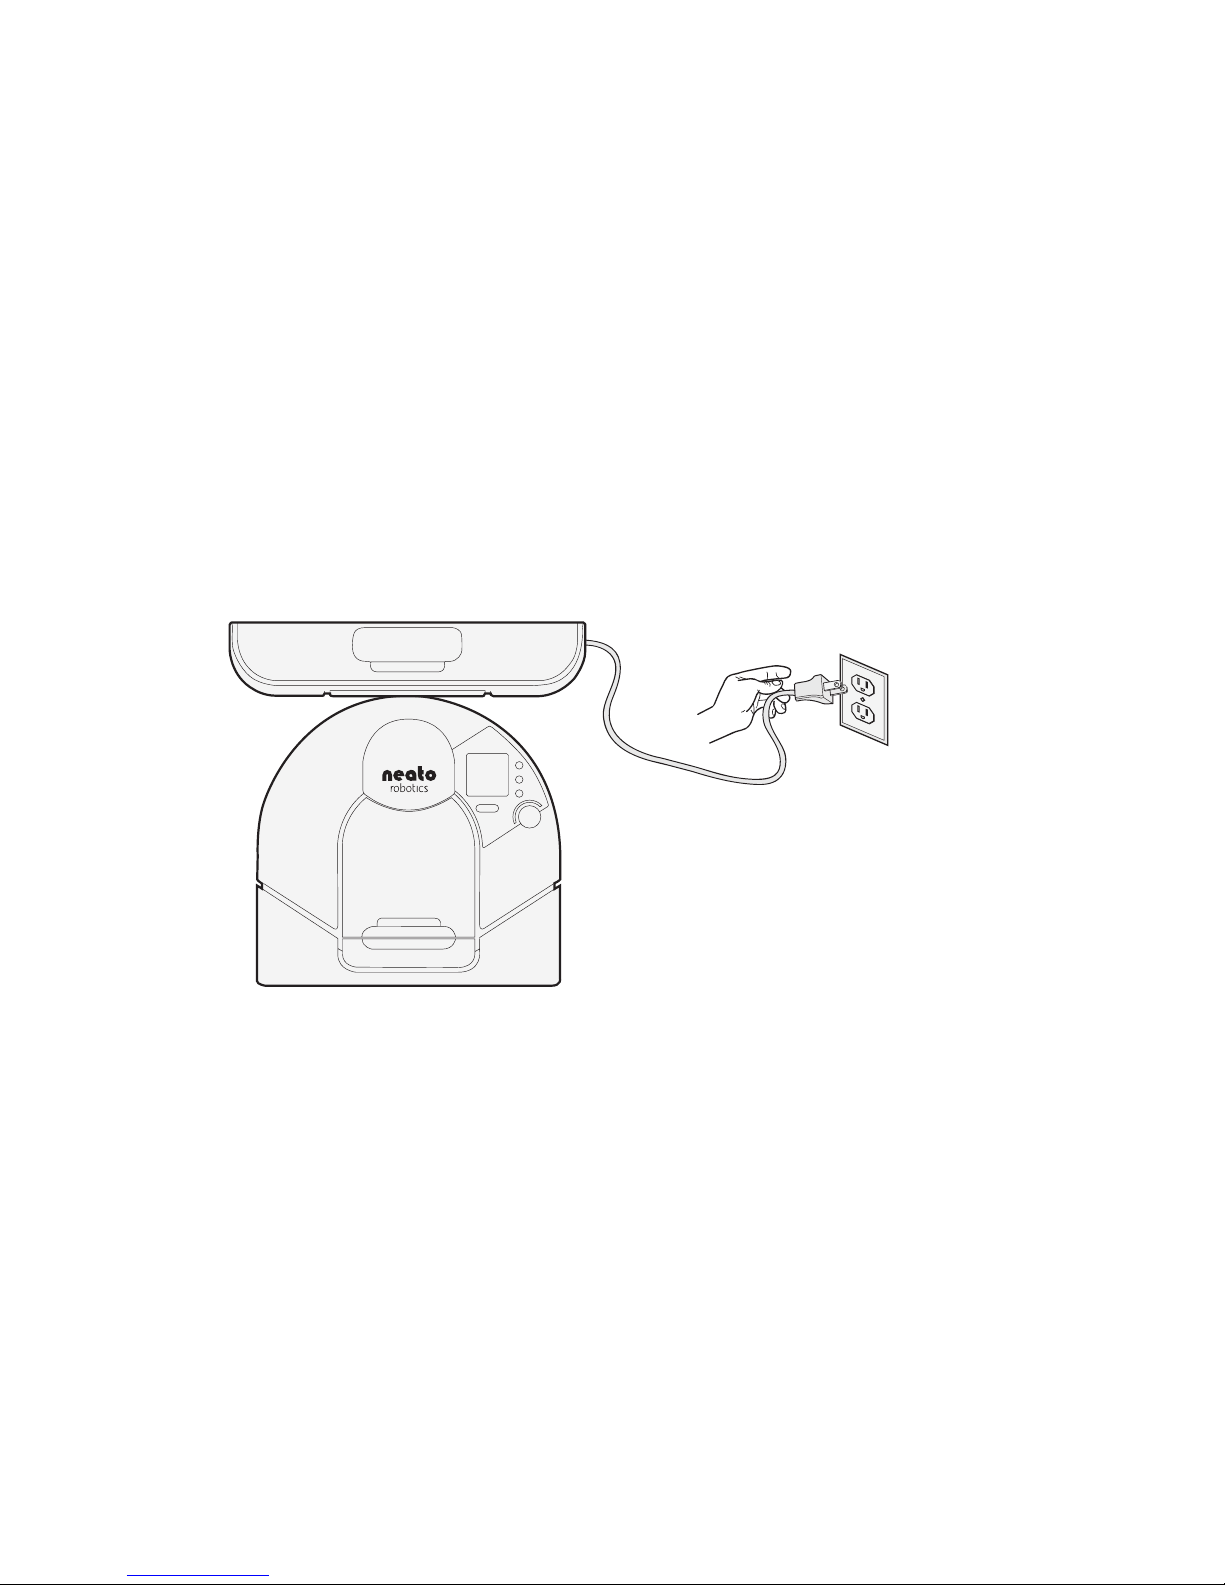
2 Place the Neato XV-11 vacuum’s curved edge up against the charging base so that the
charging base's contact points make contact with the vacuum’s charging contact
points. The status light turns on to show you it is charging.
Neato XV-11 connected to charging base
Page 19
Charging without the Charging Base
Neato XV-11 User’s Guide 19
Charging without the Charging Base
If you’d rather not use the charging base, follow these steps to use the provided power
cable:
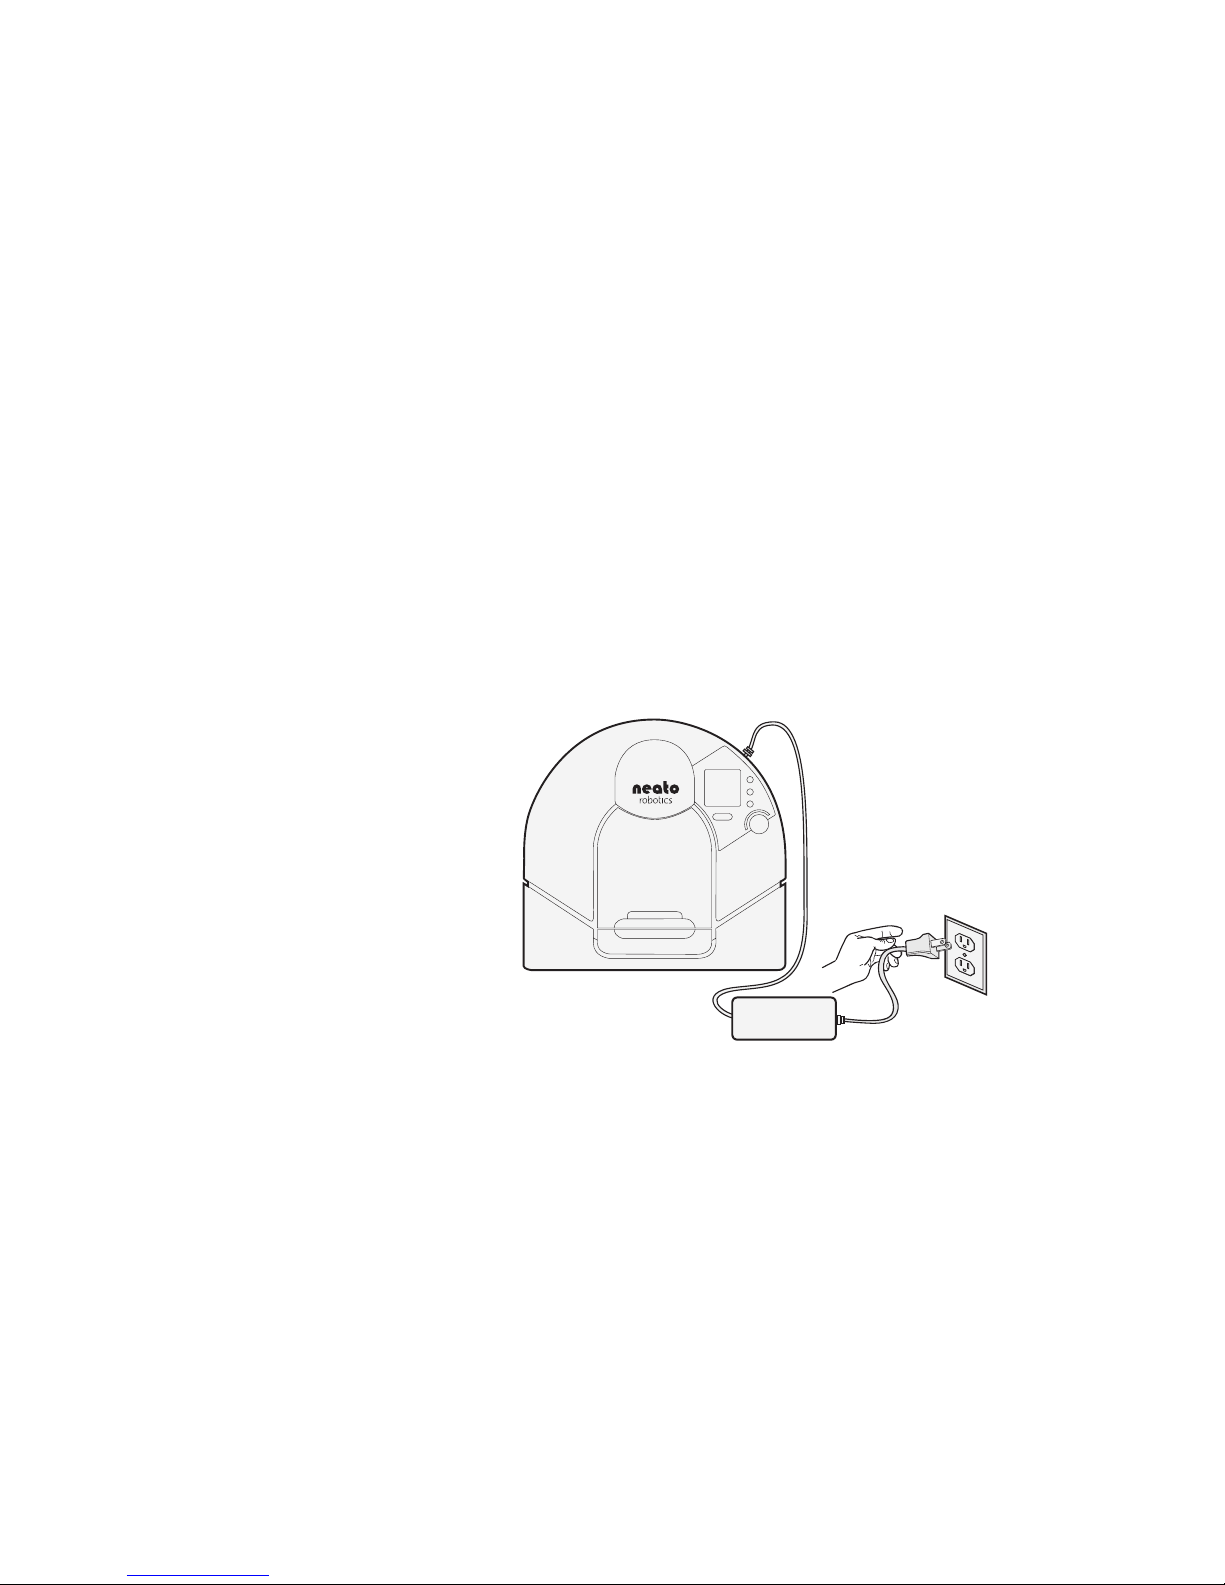
1 Press the release button to open the back of the charging base and remove the power
adapter and cables. Connect the round connector into the power port on the Neato
XV-11 and the other end into a three-prong wall outlet as shown below.
Neato XV-11 charging directly from wall outlet
Page 20
Charging without the Charging Base
Neato XV-11 User’s Guide20
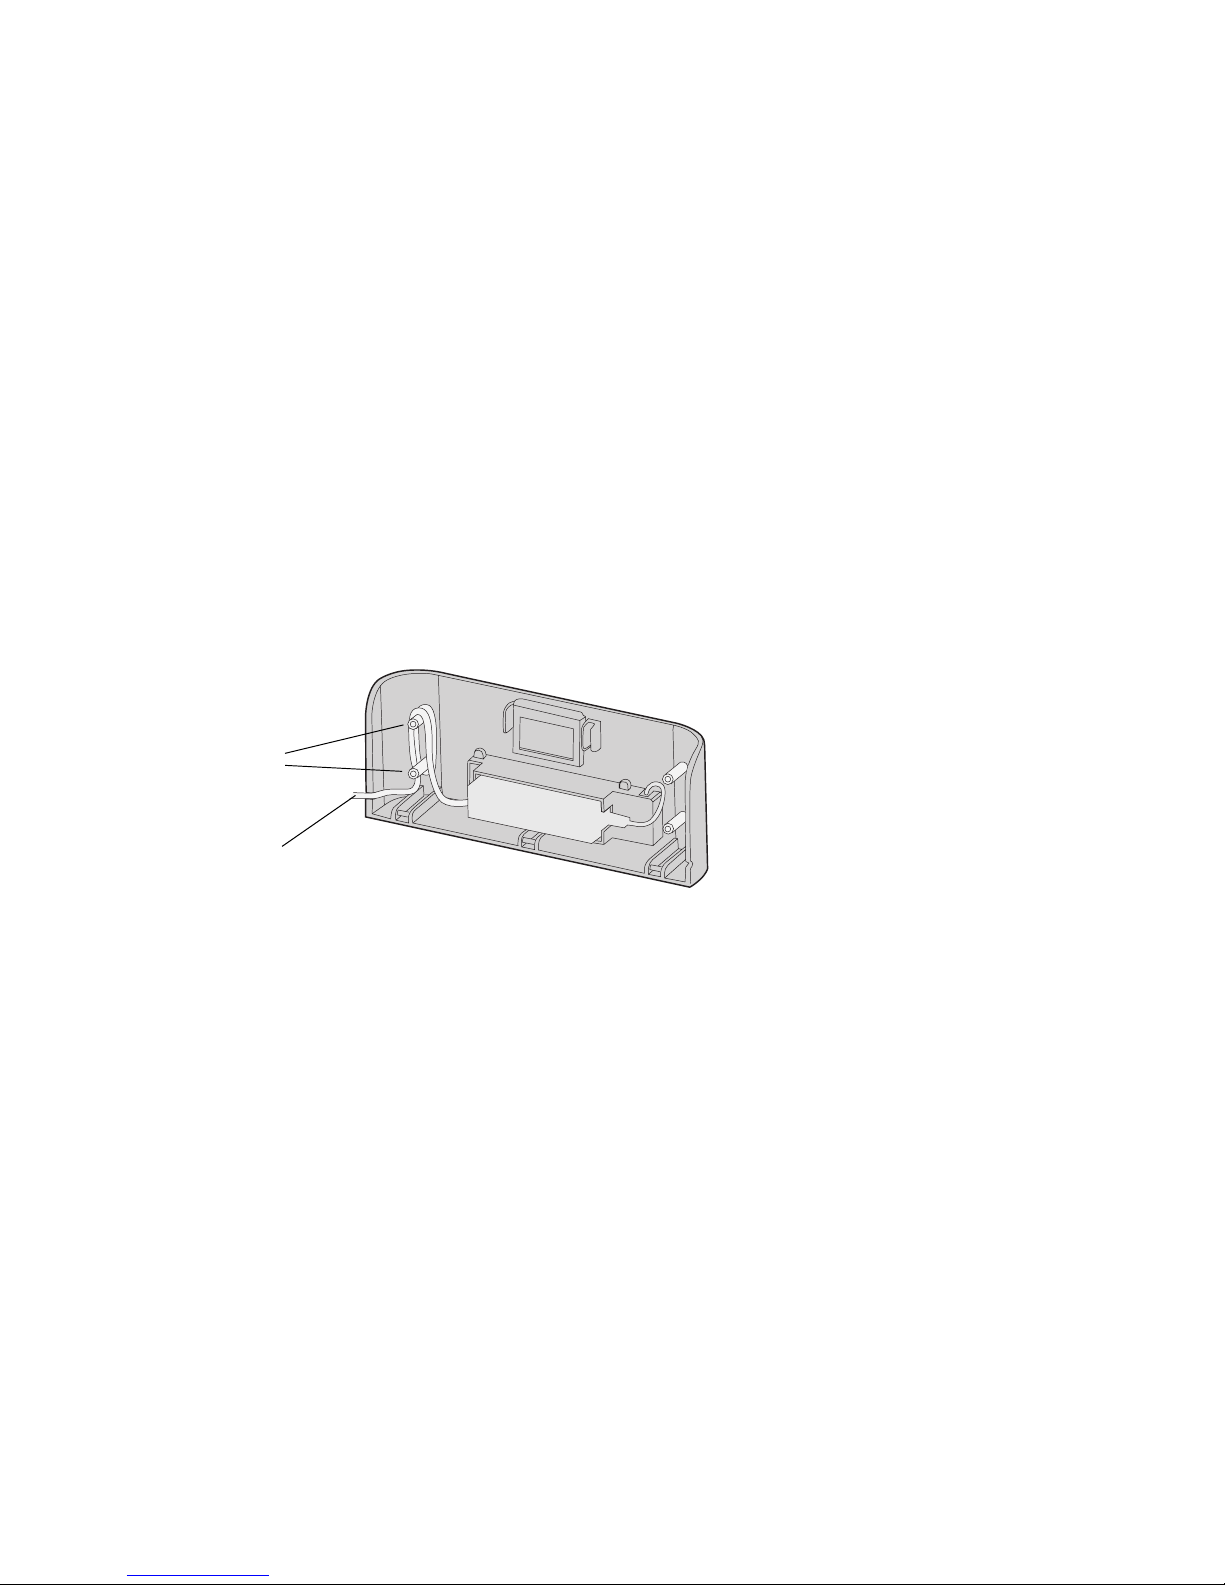
2 To reinstall the power adaptor into the charging base, press the release button on
top of the charging base to open the back of the unit. As shown in the illustration
below, plug the round connector into the receptacle and wrap the cables around the
cable wrap pegs. Then extend the cable out of the side of the charging base and plug
it into a three-prong wall outlet.
Charging base (internal view)
cable wrap
pegs
power cable
Page 21

Charging Status
Neato XV-11 User’s Guide 21
Charging Status
Recharging the battery takes about 2 to 3 hours. The status light lets you know the
current charging state of your Neato XV-11:
Optimal Charging
For optimal performance, we recommend that you charge your Neato XV-11 on the
charging base whenever it is not cleaning. Not only will this make sure the vacuum will
be ready for upcoming cleaning tasks, but it also ensures longer battery life.
Status light color Meaning
Solid green Fully charged and ready to clean
Pulsing green Charging, but ready to clean
Pulsing amber Charging, can’t clean yet
Solid amber Vacuum has an error (see the LCD screen for details, and refer
to Communicating with Your Neato XV-11 Vacuum on page 39)
Page 22

Cleaning Mode
Neato XV-11 User’s Guide22
Cleaning Mode
Your Neato XV-11 vacuum cleans using its powerful vacuum. Just press the START button
and it will vacuum your floors, cleaning them one room at a time and then moving on
to clean the next room. It will clean as many rooms as it can on one battery charge. If
it is scheduled to clean (see (page 28), your vacuum will clean for one full battery
charge, return to base to recharge, and then start cleaning where it left off for one
more cleaning session.
Page 23

Quick-Start Your Robotic Vacuum
Neato XV-11 User’s Guide 23
Quick-Start Your Robotic Vacuum
The Neato XV-11 works best when it performs regularly scheduled cleanings (see
Scheduling a Cleaning on page 28), but you can quick-start the vacuum for immediate
cleaning any time.
To start the Neato XV-11:
1 Charge the vacuum (see Using the Charging Base on pa ge 16 ). The START button light
is green when the vacuum is fully charged.
2 Remove any loose items (such as small toy pieces) that might get caught in the
vacuum’s brushes.
3 Place your Neato XV-11 on the floor.
4 Press the START button. If the vacuum is asleep, that will wake it up! Then press the
button once more to clean your entire house.
5 The Neato XV-11 maps the room and cleans it automatically!
6 When finished, the vacuum returns to where it started—either to the charging base
or to where you manually started it in the room and turns itself off.
Page 24
Using the Control Center LCD screen
Neato XV-11 User’s Guide24
Using the Control Center LCD screen
The Neato XV-11’s LCD Control Center screen is your interface to communicate with the
vacuum. This is where you give the vacuum its cleaning schedule or pause its cleaning
cycle, and it’s also where the vacuum will give you information. For example, it may
tell you that it is returning to its base to recharge. In addition, if your vacuum
encounters a problem, it will tell you what is happening so you can correct the problem.
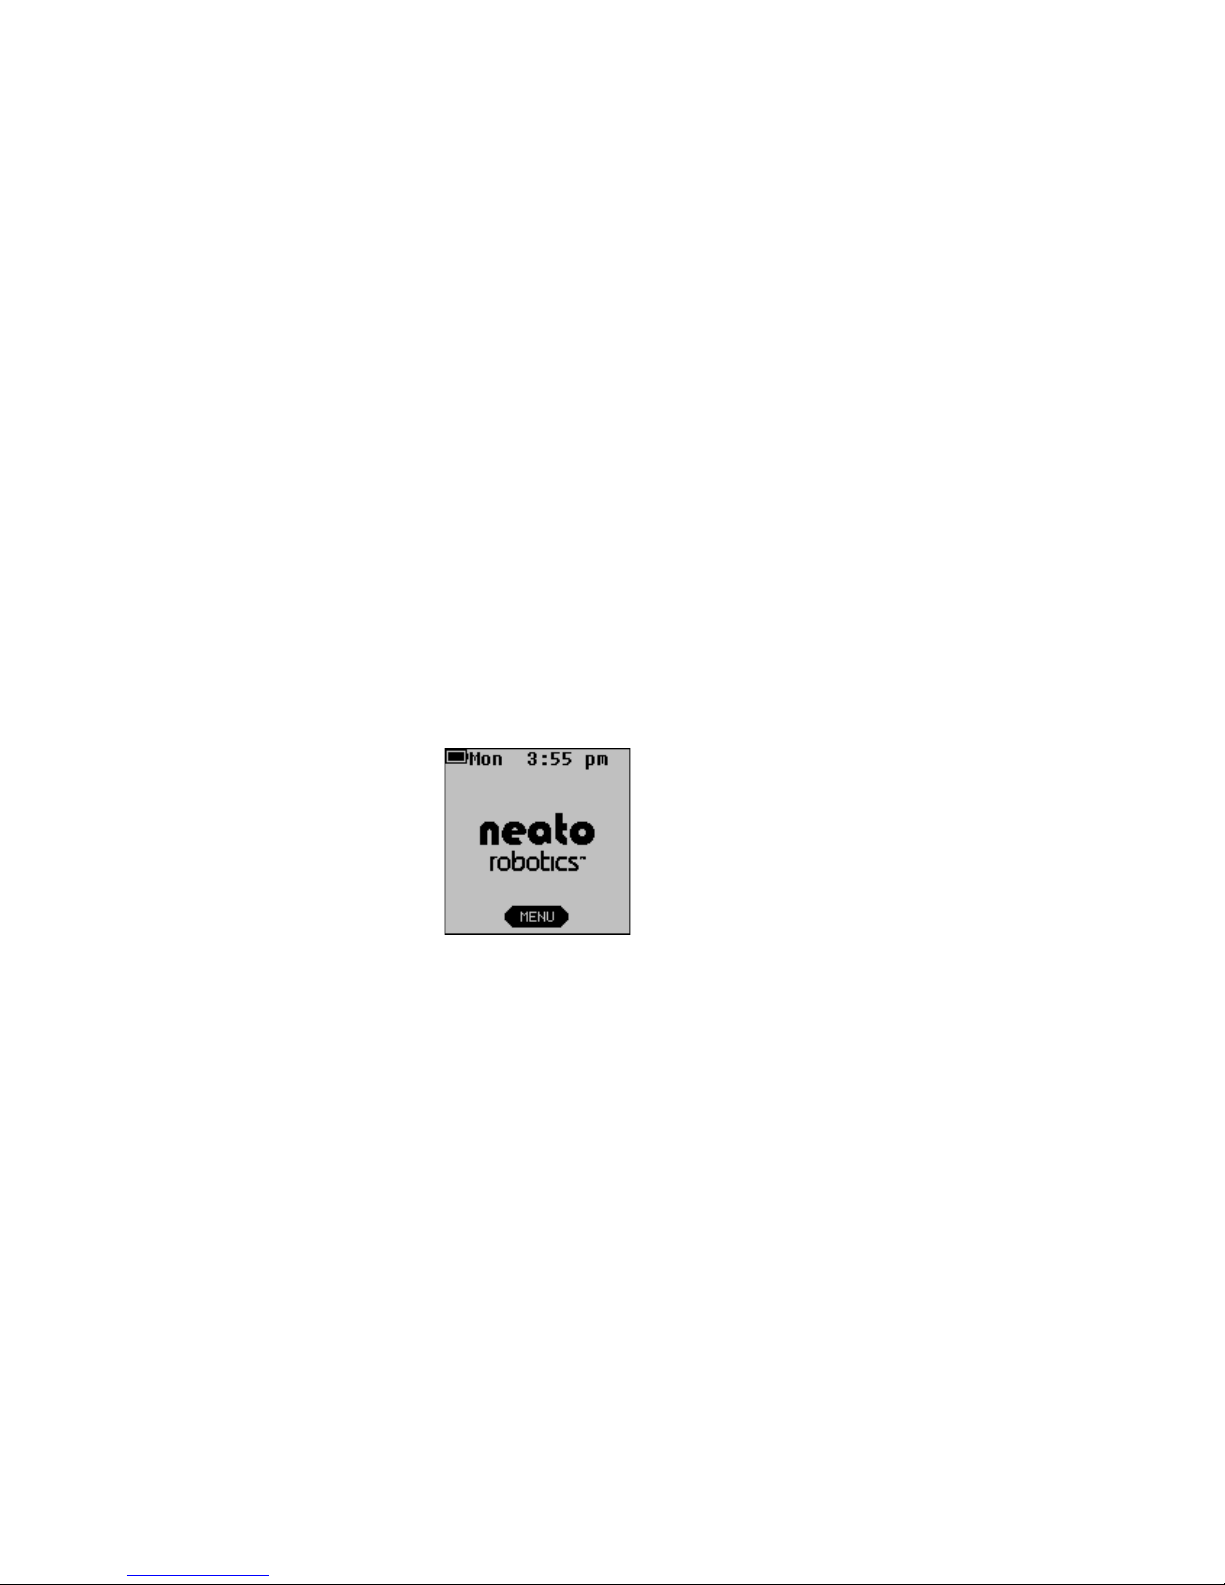
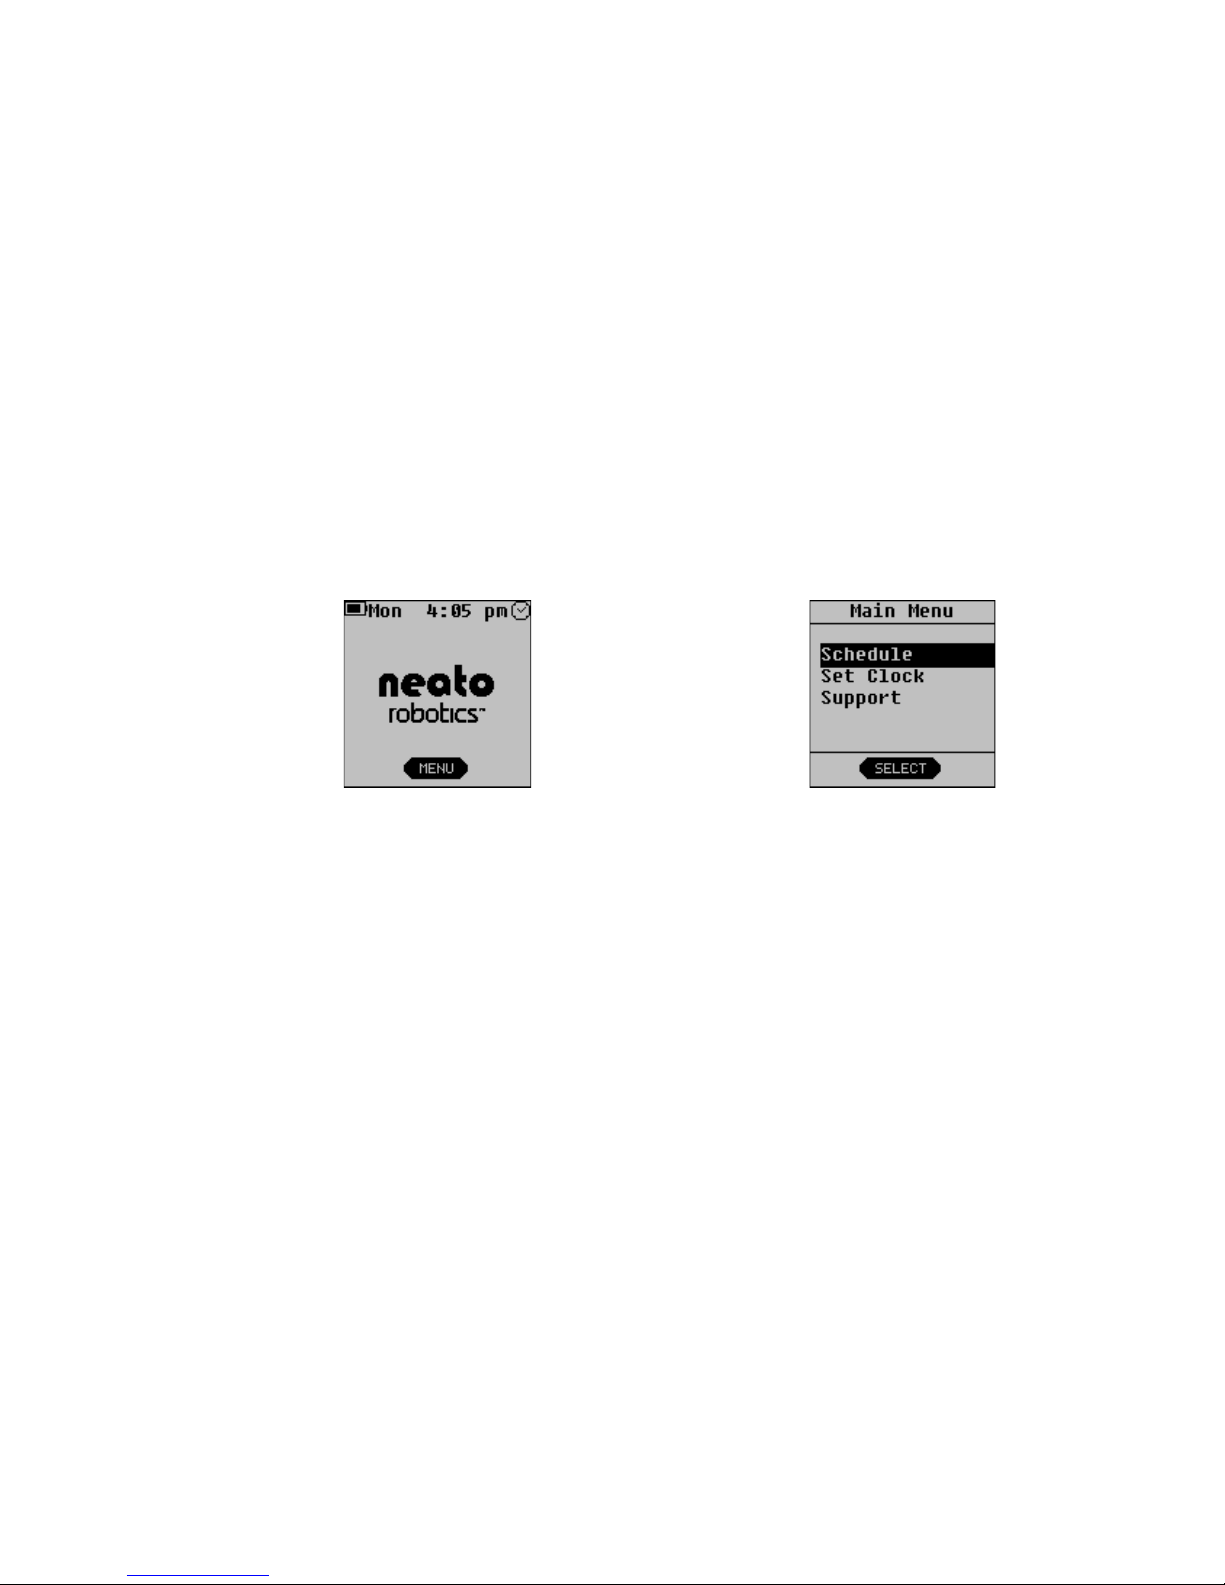
The Welcome screen looks like this:
The button (called a soft key) below the screen performs the action shown above it on
the screen (in this case, MENU, which opens the main menu).
Page 25

Using the Control Center LCD screen
Neato XV-11 User’s Guide 25
Using this screen, you can:
•Set the clock of the Neato XV-11 (see page 26)
•Program the Neato XV-11 to clean on a scheduled basis (see page 28)
•Get feedback from the vacuum on how it is doing and where it might need some
help (see page 39)
•Pause the vacuum (see page 34)
•Turn off the lights on the vacuum (see page 34)
•Turn off power to the vacuum (see page 35)
•Cancel cleaning (see page 34)
•Return the Neato XV-11 to its charging base (see page 34)
•Get support information for Customer Service
Page 26
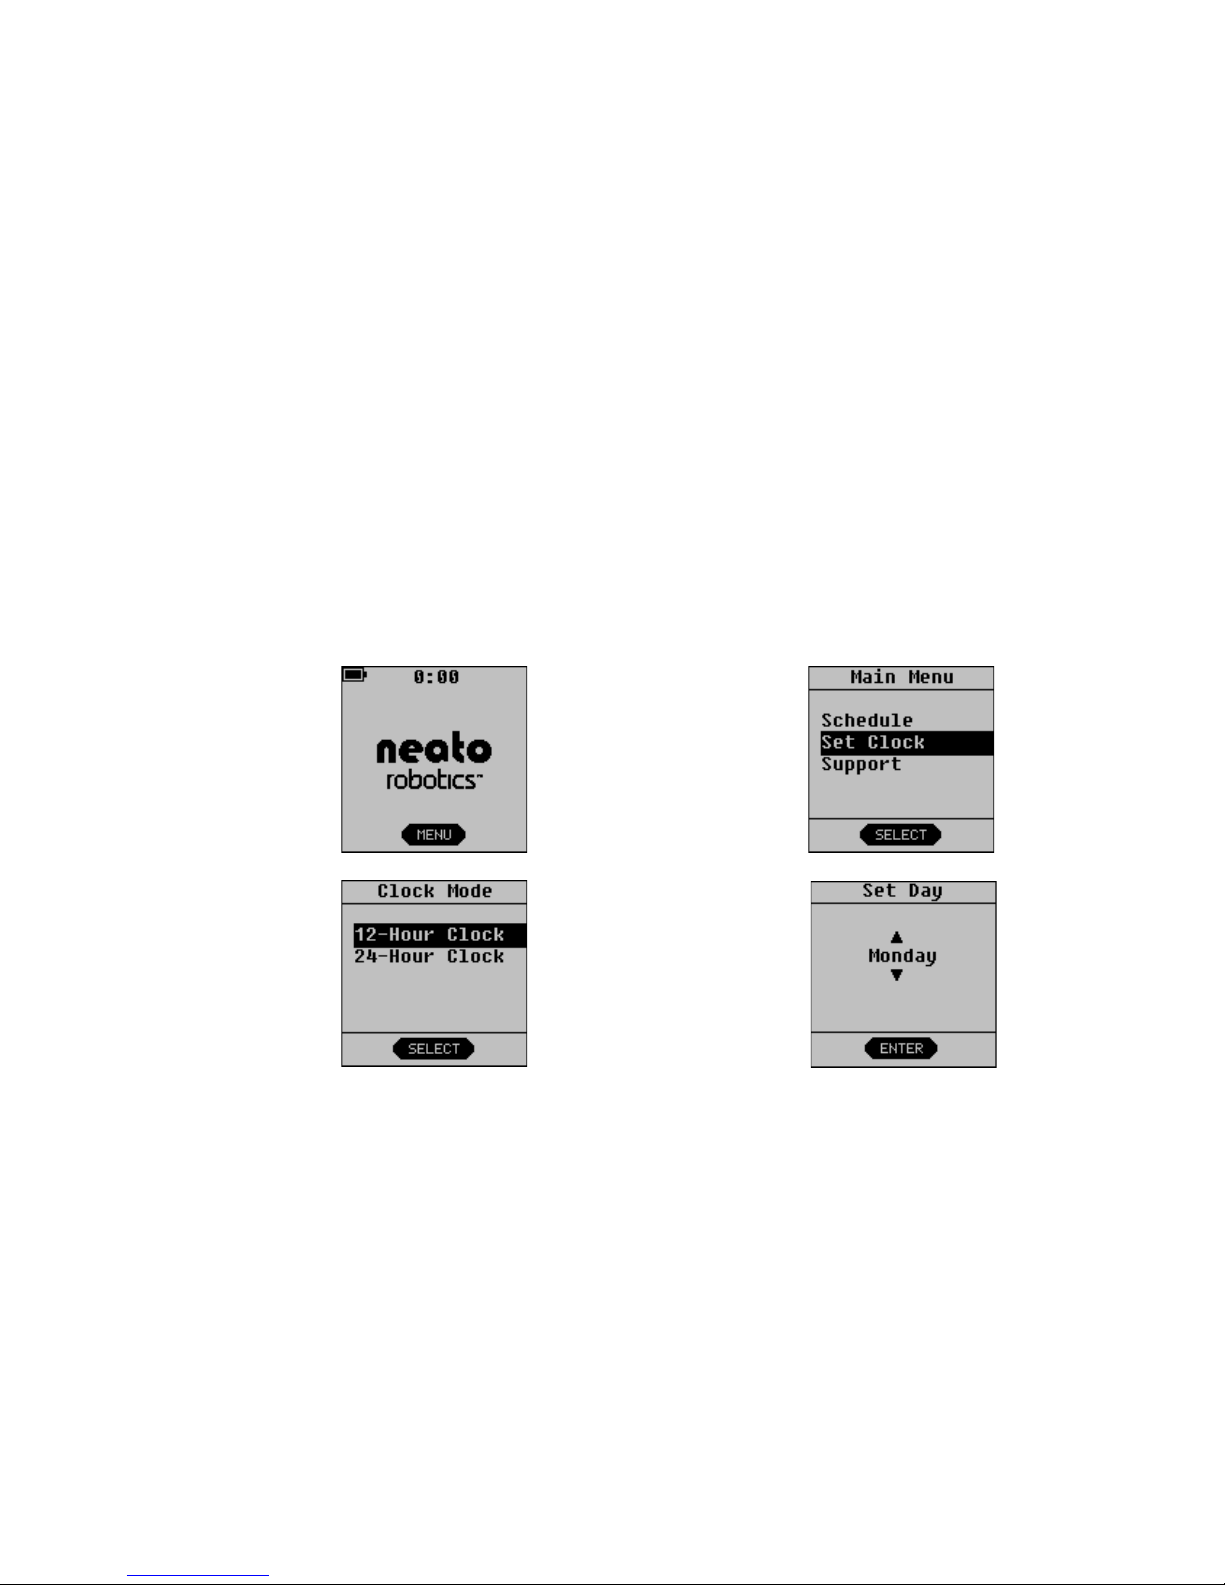
Setting the Clock
Neato XV-11 User’s Guide26
Setting the Clock
Before you can schedule future cleanings, you must set the current day and time on the
vacuum so it knows when to start the next cleaning.
To set the date and time:
1
Press MENU.
2
Press the arrow
buttons to select
Set Clock and
then press
SELECT.
3
Use the arrow
buttons to select
either 12-Hour
Clock or 24-Hour
Clock and then
press SELECT.
4
Use up and down
arrows to select
the current day
of the week and
press ENTER.
Page 27
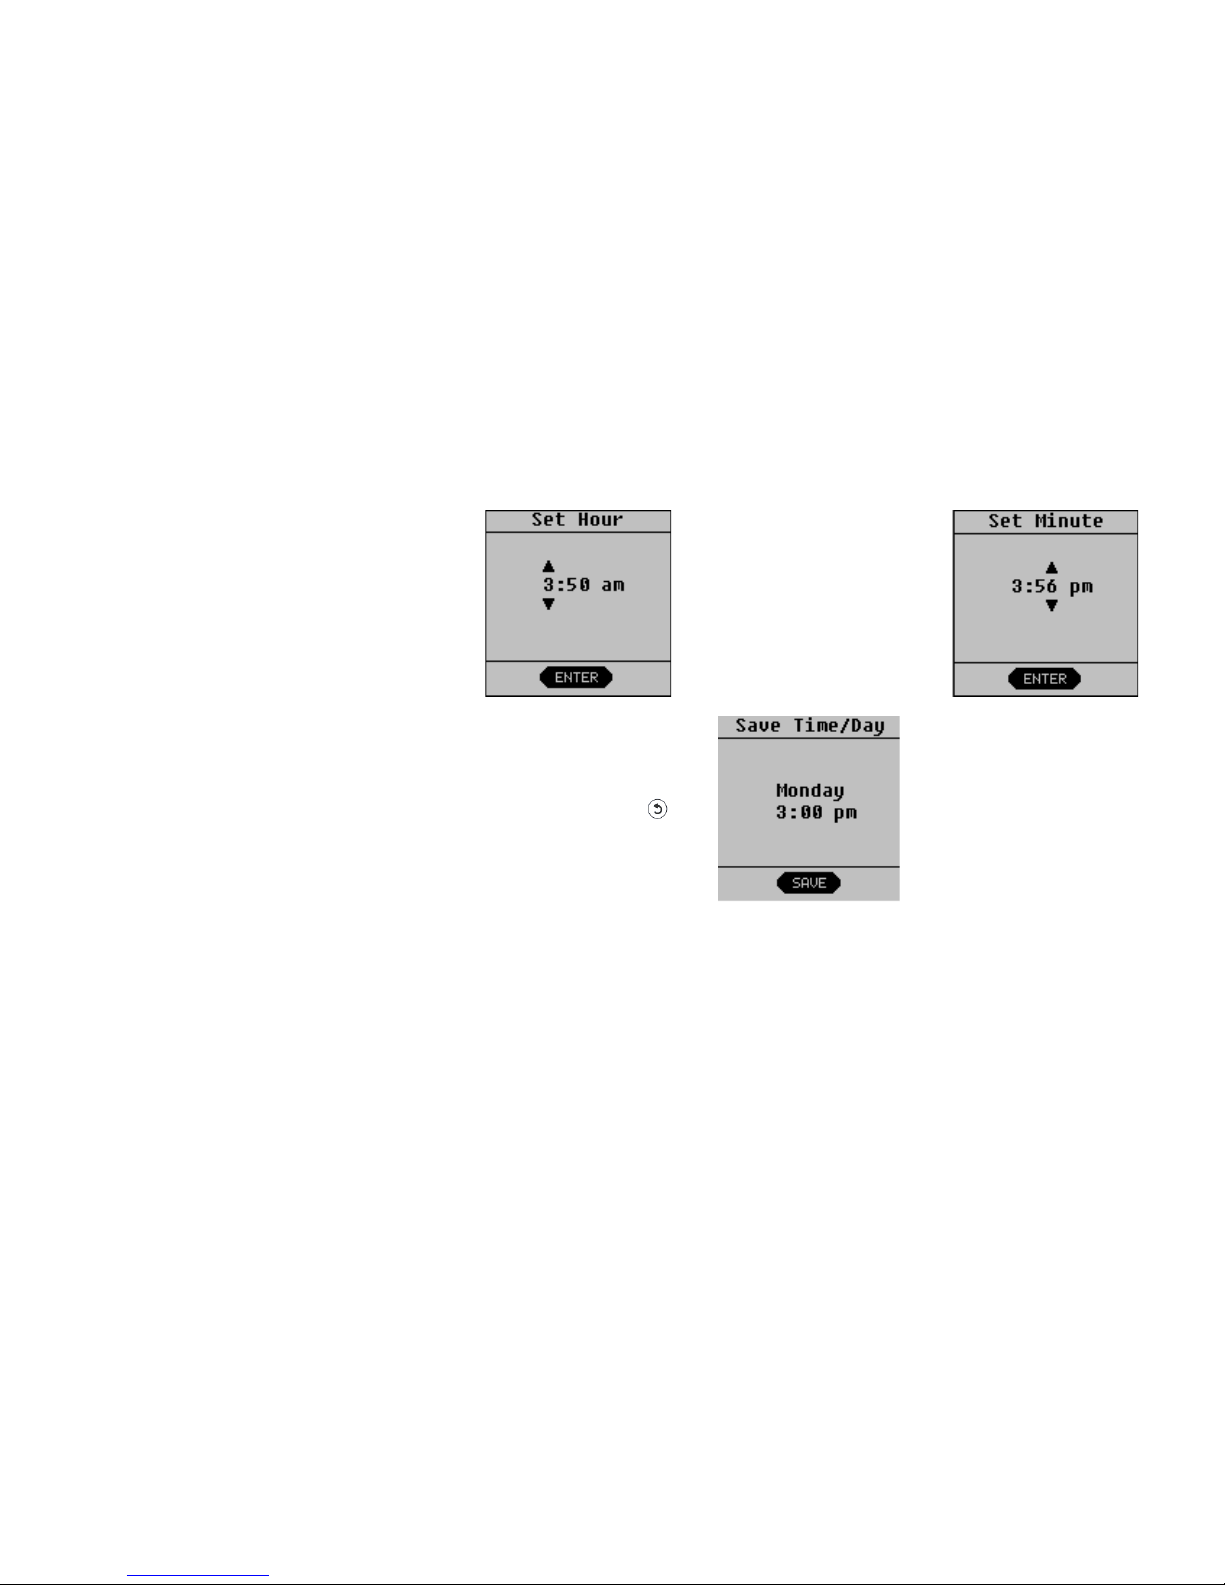
Setting the Clock
Neato XV-11 User’s Guide 27
5
Use the arrow
buttons to select
the current hour
and press ENTER.
Cycle through the
hours to select AM
or PM.
6
Use the arrow
buttons to select
the current
minute and press
ENTER.
7
The current day
and time are
shown. Press the
Back button to
make corrections;
otherwise press
SAVE.
Page 28
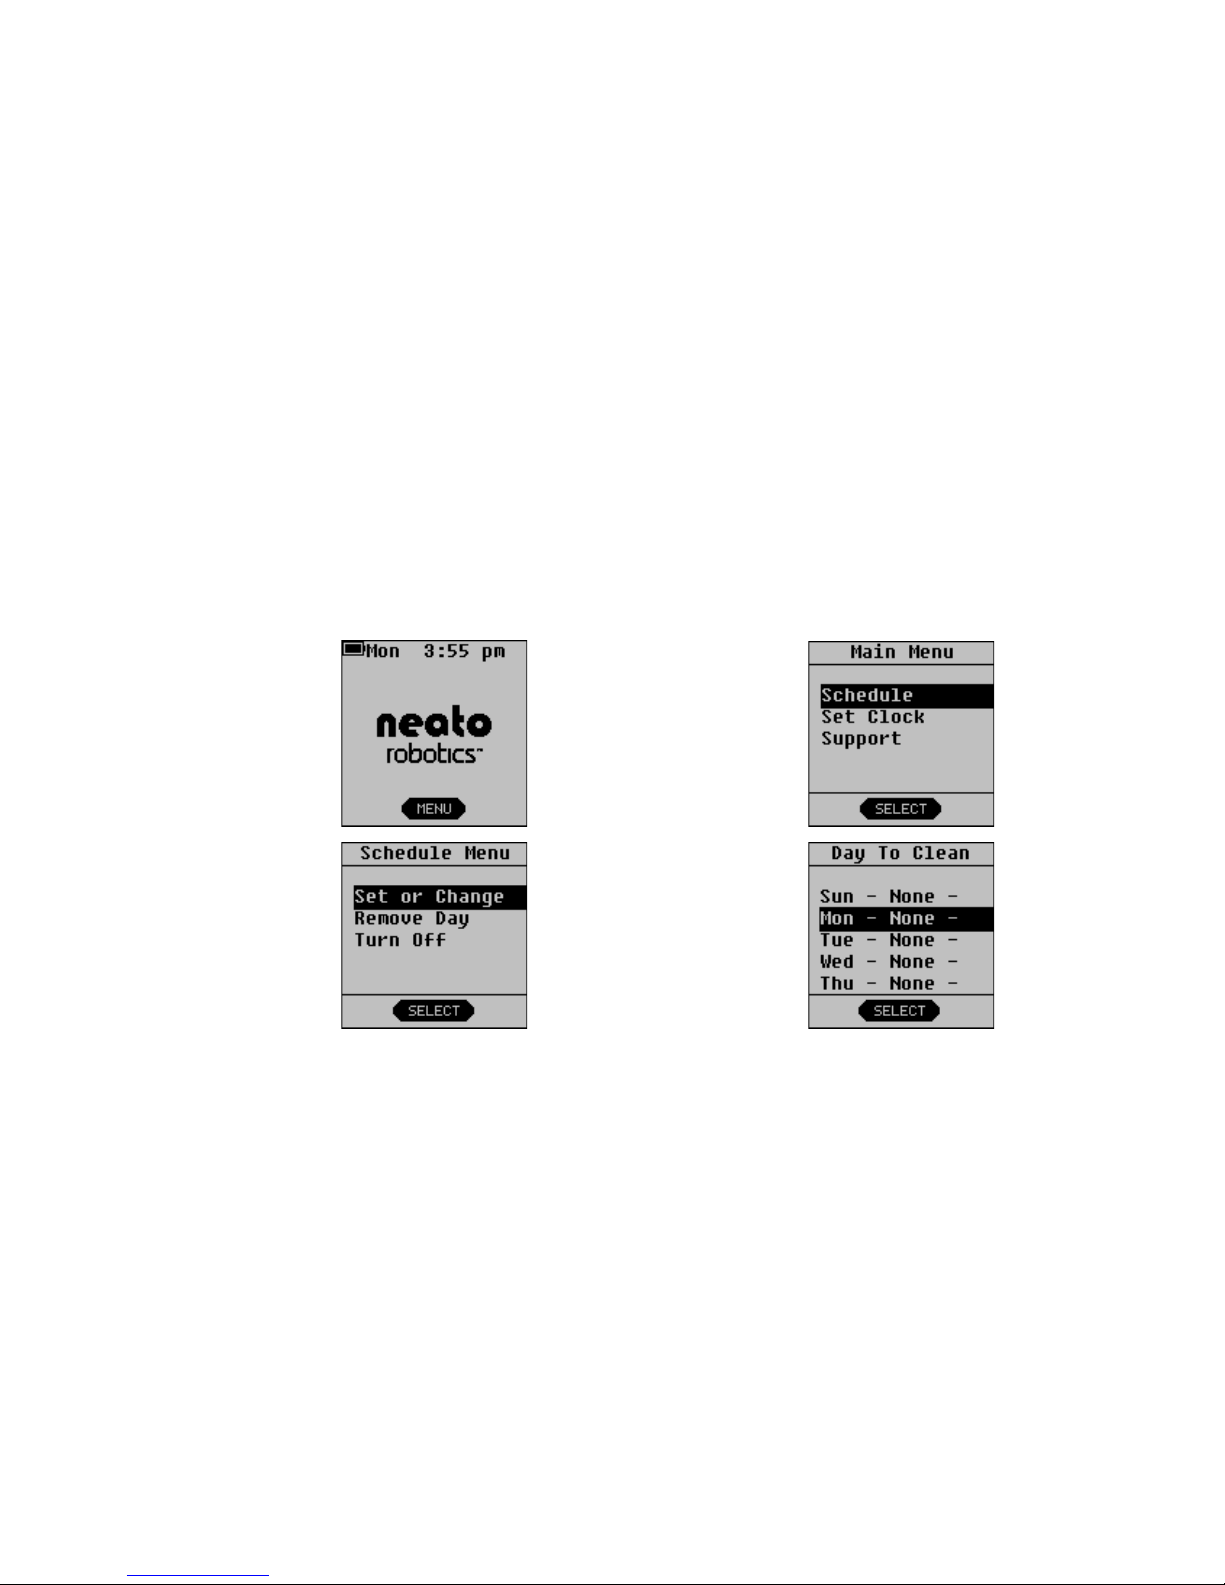
Scheduling a Cleaning
Neato XV-11 User’s Guide28
Scheduling a Cleaning
Before setting a schedule, set the clock as described in Setting the Clock on page 26.
To schedule a cleaning:
1
Press MENU.
2
Press the arrow
buttons to select
Schedule and
then press
SELECT.
3
Use the arrow
buttons to select
Set or Change
and then press
SELECT.
4
Use the arrow
buttons to select
the day you want
your vacuum to
clean and press
SELECT.
Page 29
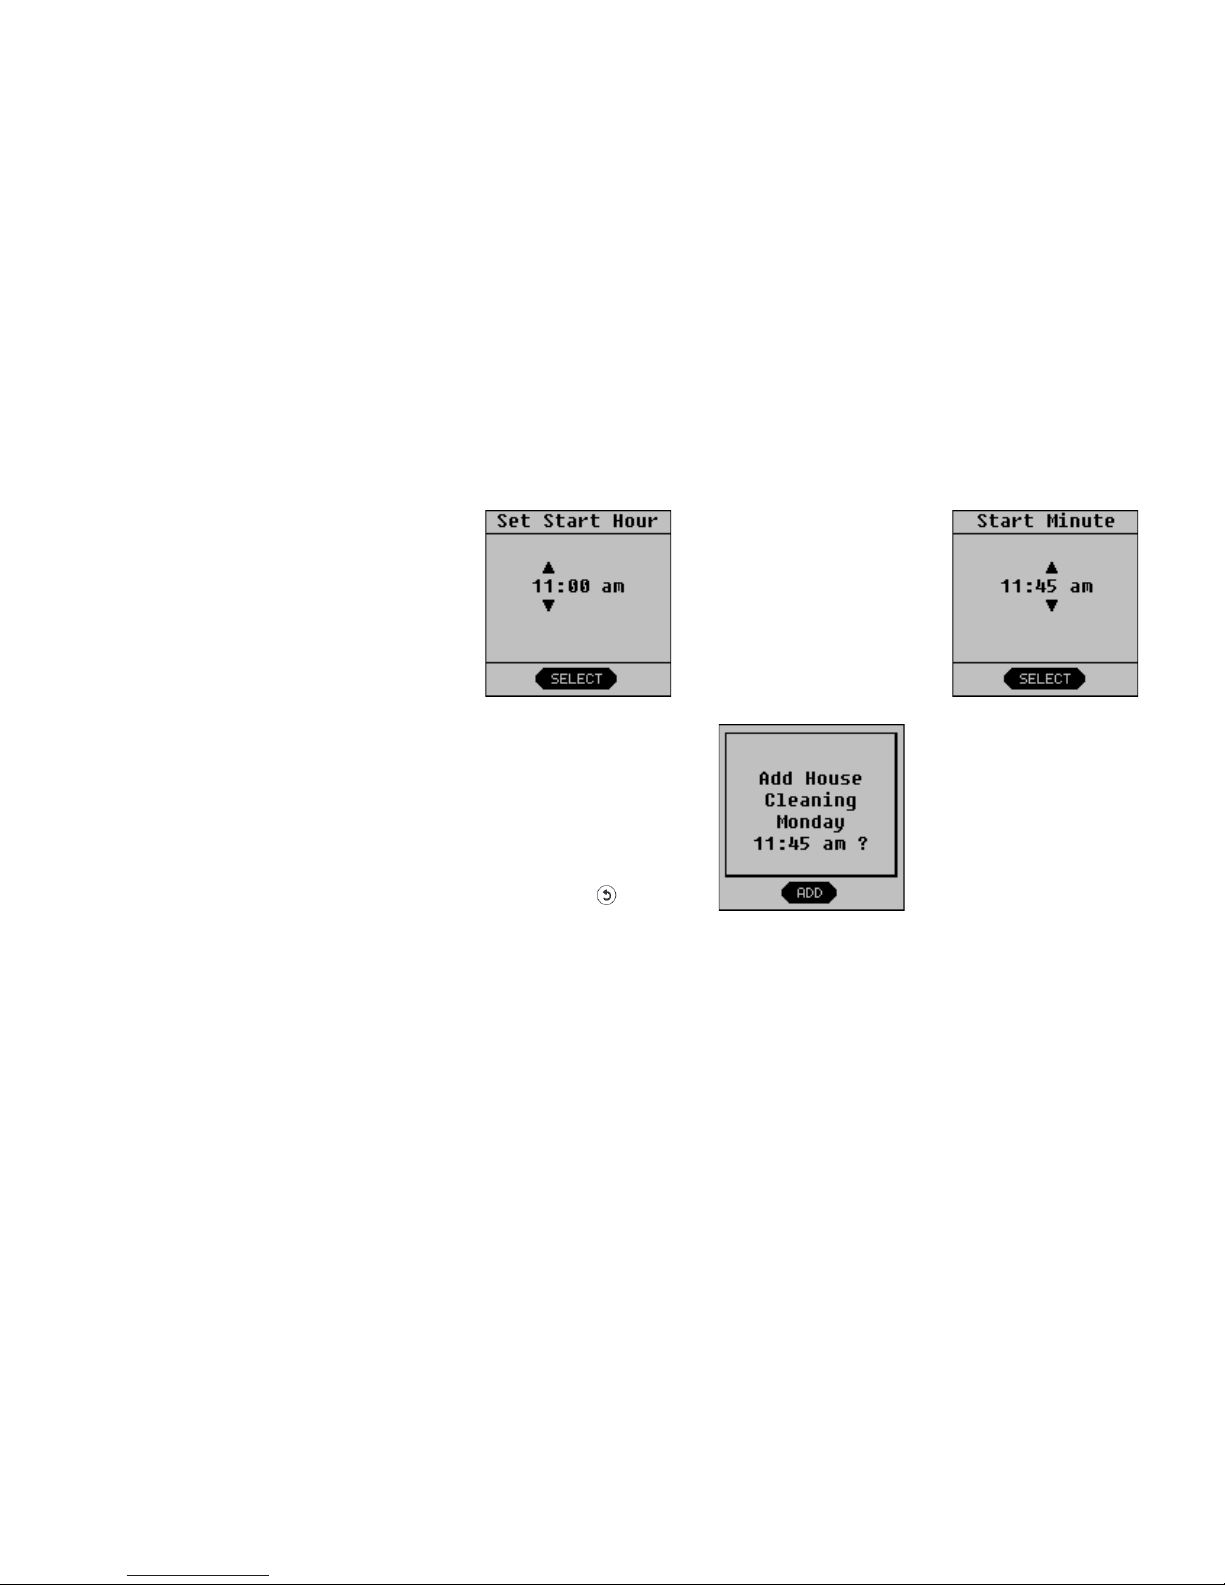
Scheduling a Cleaning
Neato XV-11 User’s Guide 29
Future cleanings will occur at the times and dates you selected. At each scheduled time,
the Neato XV-11 will come off of the charging base and start its scheduled cleaning.
When finished cleaning, the vacuum returns to the charging base to recharge. If the
battery runs low during the scheduled cleaning, the vacuum returns to its base,
recharges, then returns one more time to clean where it left off.
5
Use the arrow
buttons to select
the hour you want
your vacuum to
clean and then
press SELECT.
6
Use the arrow
buttons to select
the minute you
want your
vacuum to clean
and then press
SELECT.
7
Confirm the day,
time, and
cleaning mode by
pressing ADD. To
make changes,
press the Back
button .
Page 30

To Get the Most of Scheduled Cleanings
Neato XV-11 User’s Guide30
If you are not using the charging base, you will need to put the Neato XV-11 out and it
will start its scheduled cleaning when that is the actual time and day of the week. When
you return, you will need to manually place the vacuum on its charging base or plug the
charger directly into the vacuum.
To Get the Most of Scheduled Cleanings
•Use the charging base so that the Neato XV-11 can automatically go back and
recharge itself between cleanings.
•The charging base needs to be located within the area that you want to clean on a
schedule.
•Make sure you empty the dirt bin (see Emptying the Dirt Bin on page 36) between
scheduled cleanings for best results.
•If there is not enough battery power to complete the cleaning cycle, your Neato XV11 vacuum returns to the charging base to recharge, and then will return to where
it left off to finish its cleaning.
Page 31

Ideas for Scheduled Cleanings
Neato XV-11 User’s Guide 31
Ideas for Scheduled Cleanings
Some ways you can take advantage of scheduled cleanings include:
•Clean a specific high-traffic area on a regular basis. For example, you could set up
a schedule to clean your combination kitchen/family room floor once a week at 10
a.m. Using your charging base in the kitchen, the Neato XV-11 comes off its charging
base, cleans the room, and returns to the charging base.
Another way to use scheduled cleanings is to keep an everyday schedule. Then, place
the Neato XV-11 in different rooms of the house on different days to clean those room
at the specified time. You would need to manually put the vacuum back on its base
when you get home.
Page 32
Removing a Scheduled Cleaning
Neato XV-11 User’s Guide32
Removing a Scheduled Cleaning
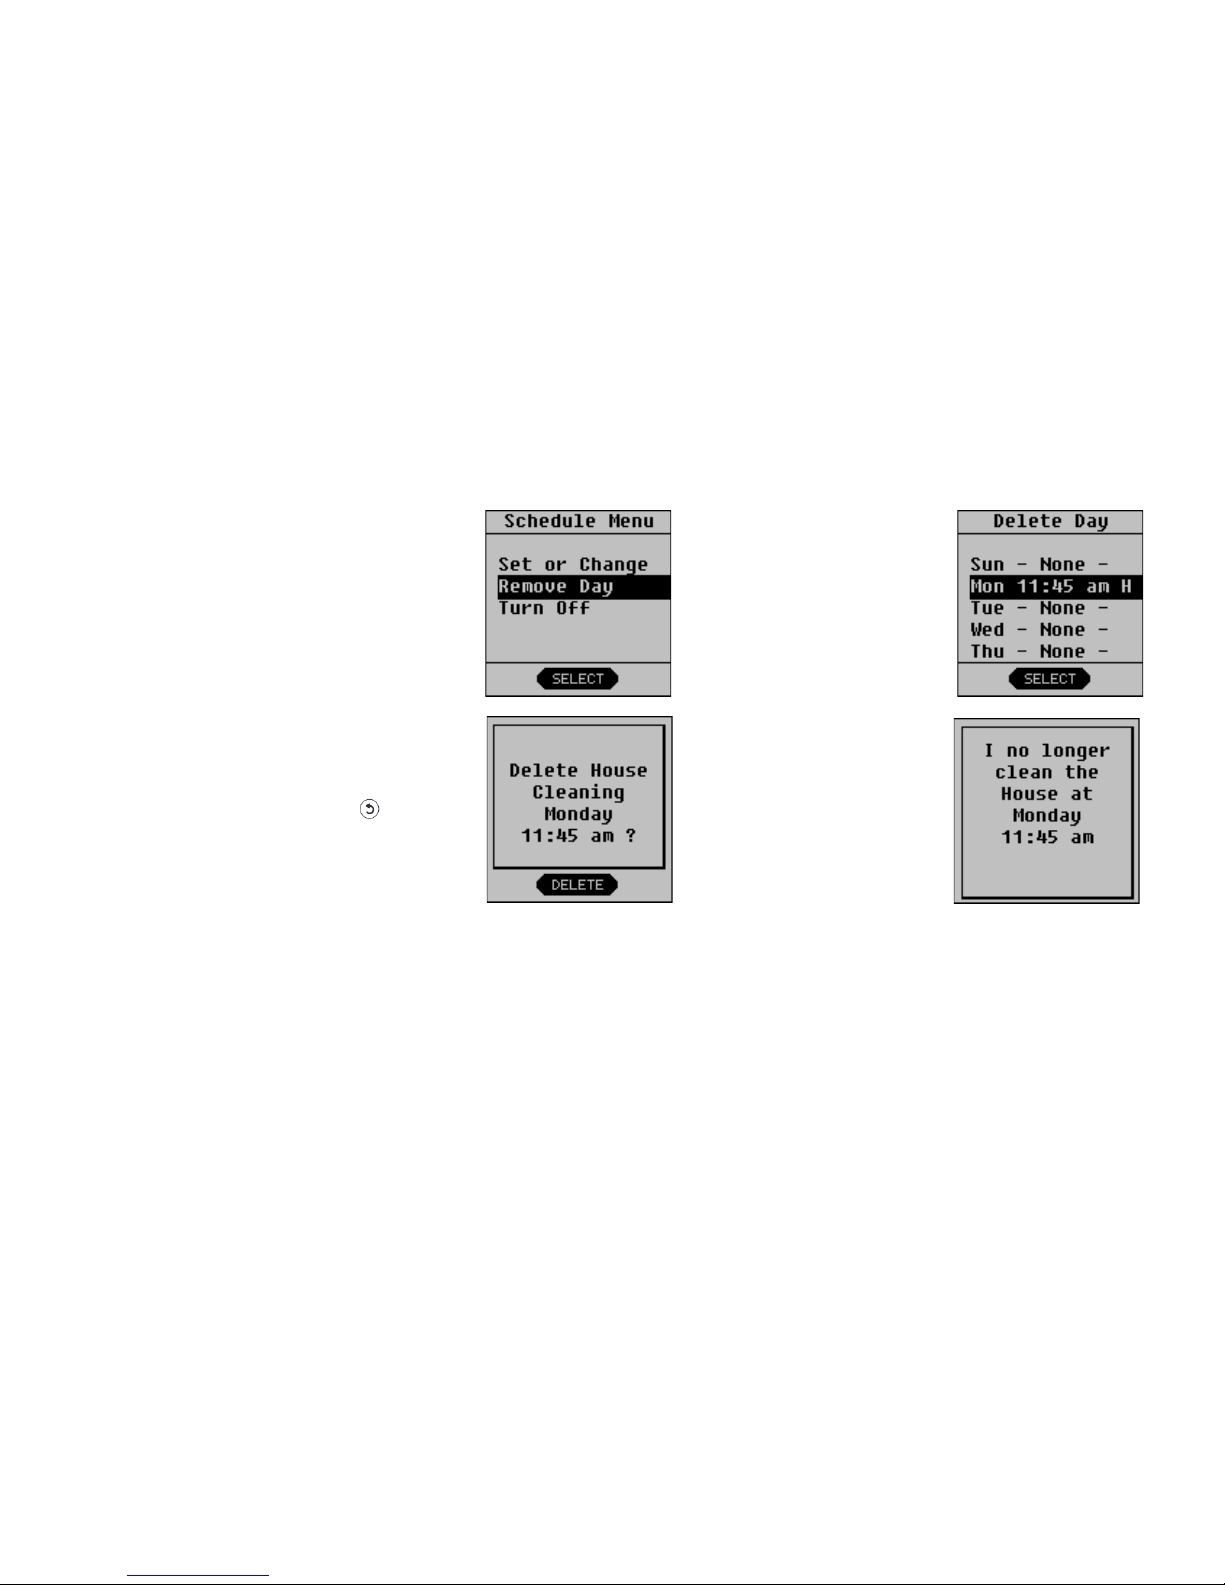
If you need to remove a previously-scheduled cleaning, follow these steps.
1
Press MENU.
2
Press the arrow
buttons to select
Schedule and
then press
SELECT.
Page 33
Removing a Scheduled Cleaning
Neato XV-11 User’s Guide 33
3
Use the arrow
buttons to select
Remove Day and
then press
SELECT.
4
Use the arrow
buttons to choose
the cleaning
event you want to
remove and then
press SELECT.
5
Press DELETE to
confirm deletion.
Use the Back
button if you
made a mistake.
6
A confirmation
message verifies
the scheduled
cleaning that you
removed.
Page 34

Pausing a Cleaning
Neato XV-11 User’s Guide34
Pausing a Cleaning
If at any time you want to pause a cleaning, press any button on the Neato XV-11 and
the vacuum will offer you a PAUSE menu. From the PAUSE menu, press the down arrows
to make the vacuum:
•Pause its current cleaning
•Cancel its current cleaning
•Cancel and return to its charging base
•Resume its current cleaning
Use the up and down arrows and the SELECT button to tell your Neato XV-11 to do any
of the above items.
Turning off the Lights on Your Vacuum
Press and hold the START button for 2 seconds and your Neato XV-11’s lights will go off.
When the vacuum is turned on the next time, the lights will turn on again.
Page 35

Turning off Your Vacuum
Neato XV-11 User’s Guide 35
Turning off Your Vacuum
If you choose to, you can turn off all power to your Neato XV-11. Note that this will
delete your clock settings.
To turn off your vacuum:
1 Select MENU from the LCD screen.
2 Select SUPPORT.
3 Select Shut Down.
To power your vacuum once you have done this, just press the START button and it will
be fully powered again.
NOTE:Your Neato XV-11 cannot be on its charging base or plugged into the wall
when you turn off all power to it.
Page 36
Emptying the Dirt Bin
Neato XV-11 User’s Guide36
Emptying the Dirt Bin
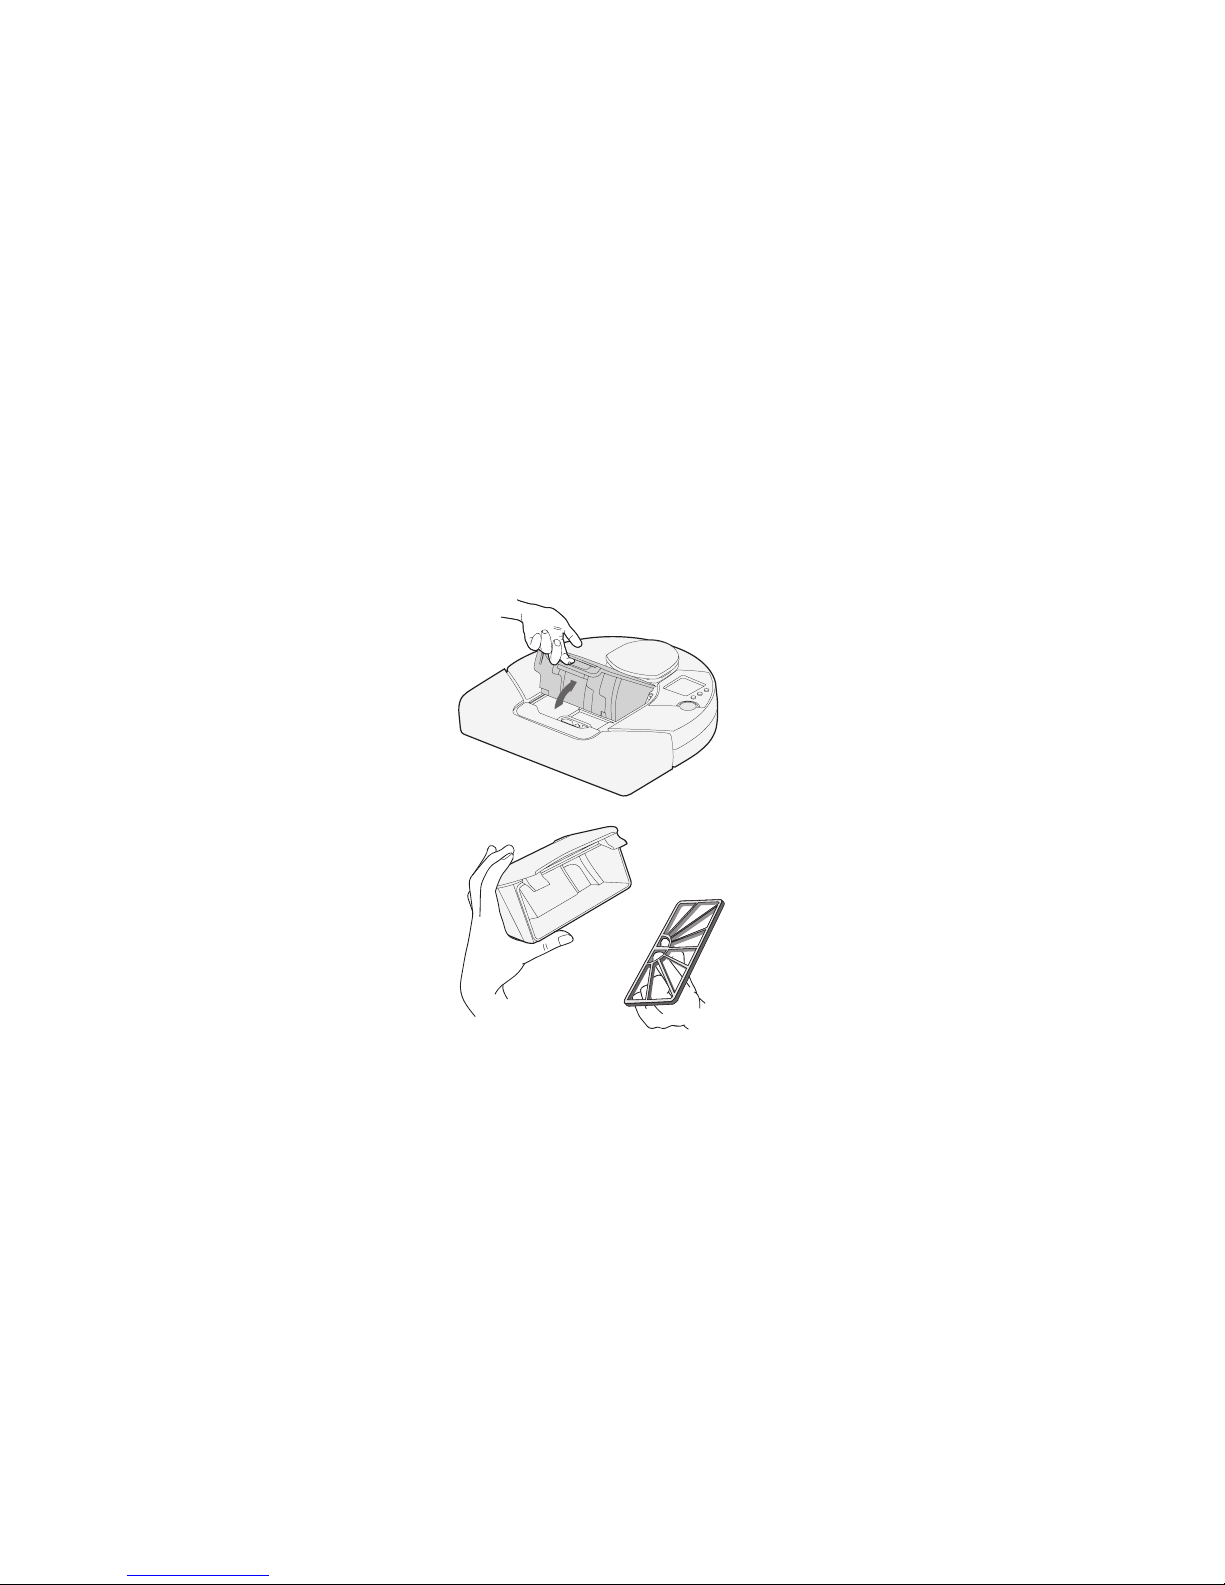
For optimal performance, empty the Neato XV-11’s dirt bin after every use.
1
Remove the dirt bin.
2
Remove the cover and
filter.
Page 37

Emptying the Dirt Bin
Neato XV-11 User’s Guide 37
3
Empty the contents of the
dirt bin into a garbage can.
Tap the filter door and
cover against the garbage
can to get rid of any excess
dirt.
4
Replace the filter and dirt bin cover, then replace the
dirt bin into the top of the Neato XV-11.
Page 38
Boundary Markers
Neato XV-11 User’s Guide38
Boundary Markers
Boundary Markers are useful tools for your Neato XV-11 vacuum. They tell the vacuum
where not to clean.
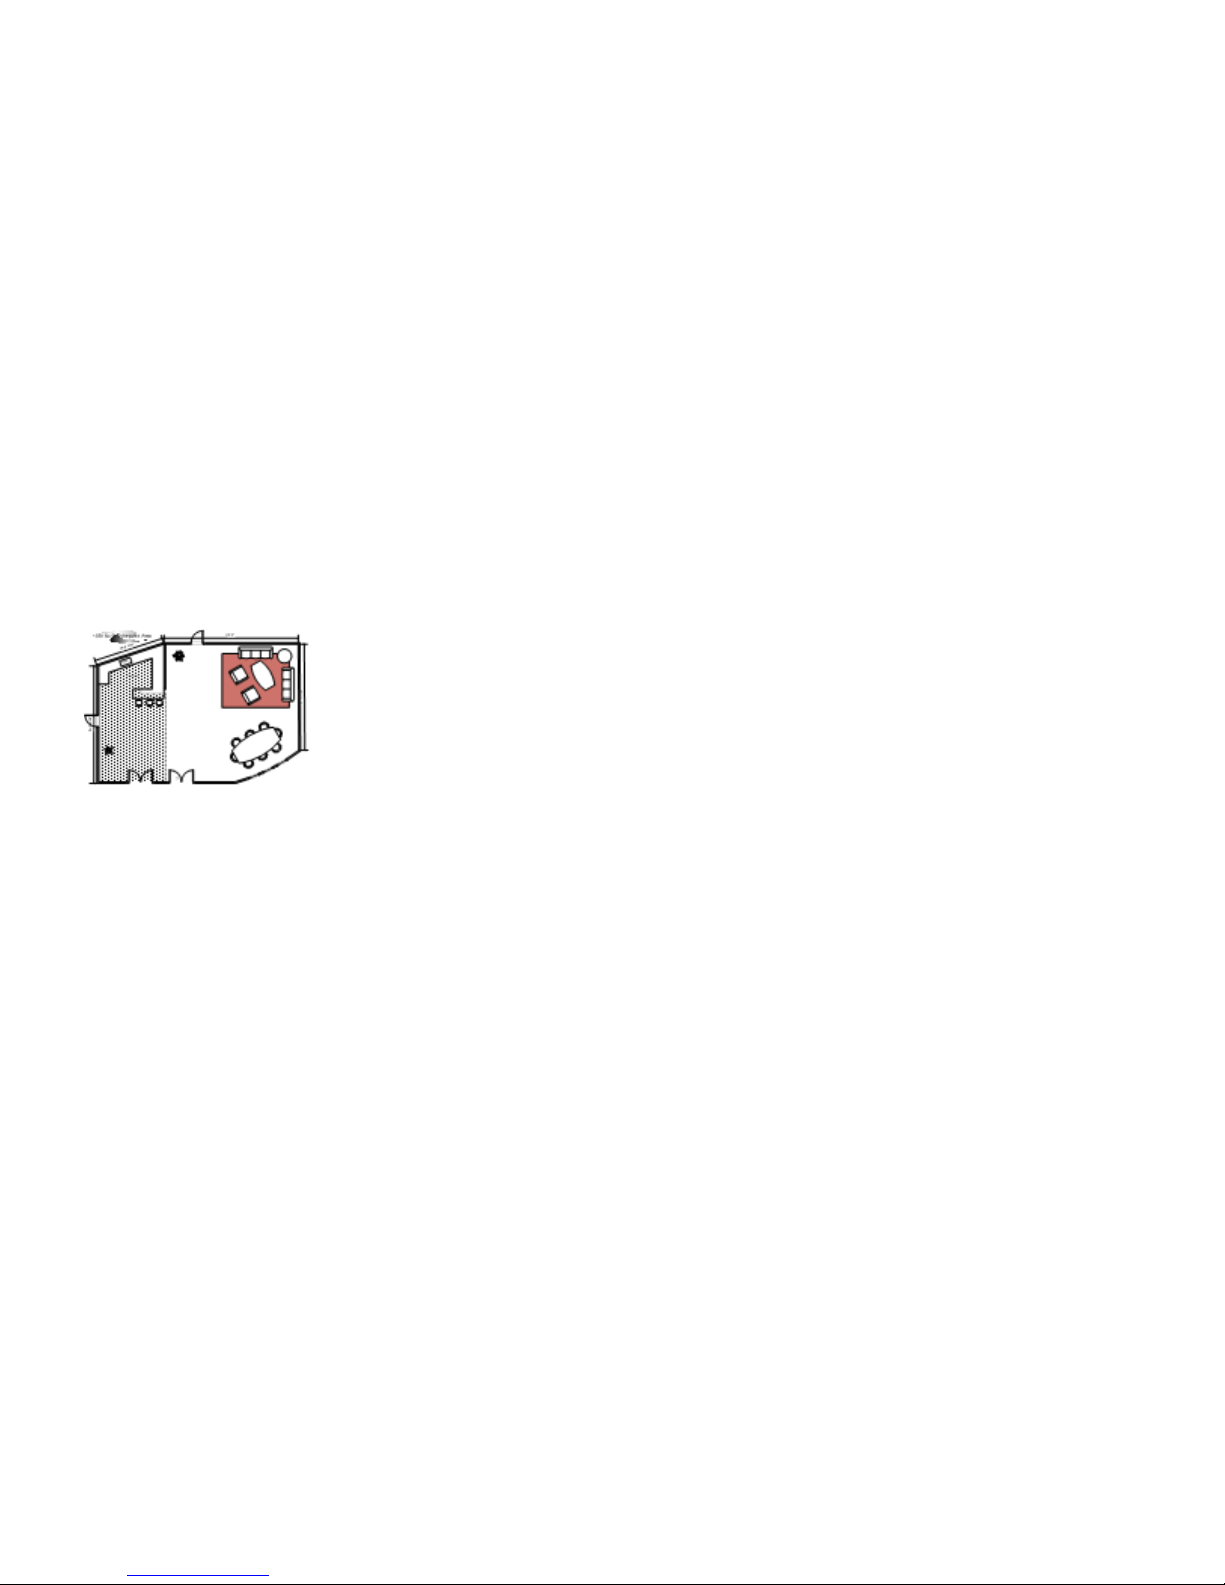
Boundary markers are most helpful when you want to:
• Create a boundary where one does not exist. You might have
a large open plan house where you want to clean a subset of
a large room like the shaded area shown here.
• Keep your Neato XV-11 vacuum away from any item that you
don’t want the vacuum to get near.
Using boundary markers
The Boundary Markers come in one 15-foot section. You can use scissors to cut a shorter
length if needed.
To use the markers, simply lay the boundary marker across the floor from one wall to
the opposite wall to block off an area. The Neato XV-11 will clean the floor on the side
of the boundary marker that it is started on. Place the vacuum within the bounded area
and press START. The vacuum recognizes the boundary markers and will not cross them.
When finished, the vacuum will return to its charging base or to where it started if it
Page 39

Communicating with Your Neato XV-11 Vacuum
Neato XV-11 User’s Guide 39
cannot find its base. (In this case, you will need to start charging the vacuum as soon as
you can.)
Communicating with Your Neato XV-11 Vacuum
Communication is a two-way street, so be sure to listen when your Neato XV-11 is
talking to you!
When it’s charging, the status light around the START button will be GREEN to indicate
your Neato XV-11 is ready for work.
If the status light is AMBER, the Neato XV-11 needs some assistance before going to
work. Just read the LCD control center screen to see what your vacuum needs assistance
with. The vacuum will tell you when to:
• Empty its dirt bin and filter
• Fix its stuck brush
• Unstick its bumper
• Clean its drop sensor windows
...and other feedback too.
Page 40

LCD Feedback Messages
Neato XV-11 User’s Guide40
LCD Feedback Messages
Your vacuum is smart and will let you know when it needs help with anything. Just read
the messages on the LCD to understand what it needs. Here are some specific tips.
LCD Message Remedy
Dirt Bin Full Empty dirt bin and replace into its slot.
Brush Stuck Remove brush guard and clean all hair and
debris from brush. Replace brush and
guard and press START button to resume
cleaning.
Bumper Stuck Jiggle the bumper to loosen.
Brush Slip Make sure all blades on the brush are in
place and not worn down. Make sure the
belt is on the end of the brush gear.
Page 41

LCD Feedback Messages
Neato XV-11 User’s Guide 41
Cannot Charge Make sure the changing cable is plugged
into the base and wall. When vacuum is
initially connected to the base, the status
light will light up to let you know the
power is on.
Battery at Minimum Place vacuum on charging base to charge.
LCD Message Remedy
Page 42

Filters
Neato XV-11 User’s Guide42
Filters
To get the best results, we recommend emptying your dirt bin and cleaning the filter
after every vacuum session as described in Emptying the Dirt Bin on page 36. To clean
your filter, just tap the filter against a garbage can to loosen the debris off of it.
We also recommend changing your filter in your vacuum every 3 months (based on
typical usage; if you use your vacuum more frequently, you may need to change your
filter more often.)
Your package includes extra filters. You can also purchase additional filters online at
http://www.neatorobotics.com.
Page 43

Neato XV-11 User’s Guide43
Customer Support
If you have any questions or comments, contact Neato Robotics, Inc.
•Email [email protected]
•Visit www.NeatoRobotics.com for additional support, accessories, and frequently
asked questions.
•Call 1-877-29-NEATO to talk to a customer care specialist.
Page 44
Neato XV-11 User’s Guide44
One Year Warranty (Domestic Use)
Your Neato XV-11 vacuum is intended to be used in normal household cleaning, in accordance with the
Neato XV-11 Vacuum User’s Guide.
Limited Warranty
Neato Robotics, Inc. warrants to the original purchaser that your Neato Robotics hardware product shall
be free from defects in material and workmanship for the length of time, identified on your product
package and/or contained in your user documentation, from the date of purchase. You may also find this
information by selecting your product in the Online Support section of our website at
http://www.neatorobotics.com/support. Except where prohibited by applicable law, this warranty is
nontransferable and is limited to the original purchaser. This warranty gives you specific legal rights, and
you may also have other rights that vary under local laws.
Neato Robotics, Inc.
1916 Old Middlefield Way Suite A
Mountain View, CA 94043
This device complies with Part 15 of the FCC Rules. Operation is
subject to the following two conditions: (1) This device may not cause
harmful interference, and (2) this device must accept any interference
received, including interference that may cause undesired operation.
Model No. XV-11
RSN: R-AAANNNNNAA-VVVV-SSSSSSS
LSN: L-AAANNNNNAA-VVVV-SSSSSSS
Class 1 Laser Product
Complies with FDA performance standards for laser
products except for deviations pursuant to Laser Notice
No. 50, dated June 24, 2007.
DC 24V 2.5A
FCC ID: ***********
FCC Statement: See Instruction Manual
US Patents Pending · Made in China
1916A Old Middlefield Way
Mountain View, CA 94043
www.neatorobotics.com
Page 45

Neato XV-11 User’s Guide 45
Compliance Information
Room Positioning System: RPS Infrared Laser Distance Sensor
This Laser Product is designated as Class 1 during all procedures of operation.
Human Accessible Laser Parameters:
• Wavelength 785 nm
• Pulse Rep Frequency 1.8 kHz
• Pulse Duration 200 µsec
•Peak Power 2.1 mW
• Beam Diameter 2.3 mm
• Beam Divergence <5.7 mrad
Caution: Use of controls or adjustments or performance of procedures other than those specified herein
may result in hazardous radiation exposure.
Neato Robotics, Inc.
1916 Old Middlefield Way Suite A
Mountain View, CA 94043
No service is allowed by the user. If there are any problems with the RPS laser distance sensor, the robot
should be returned to the factory for any service or repair.
Page 46
Neato XV-11 User’s Guide46
Declaration of Conformity
Manufacturer:
The directives covered by this declaration:
• 2004/108/EC - Electromagnetic Compatibility (EMC) Directive
• 73/23/EEC - Low Voltage Equipment Directive
The products covered by this declaration:
• XV-11 Robotic Vacuum Appliance (all variations manufactured after January 1, 2010)
The basis on which conformity is being declared:
The manufacturer hereby declares under his sole responsibility that the products identified above comply
with the protection requirements of the EMC directive and with the principal elements of the safety
objectives of the Low Voltage Equipment directive, and that the following standards have been applied:
Low Voltage Directive:
• EN 60335-1:2002 + A1 + A2 + A11 + A12 + A13
• IEC/EN 606335-2-2:2003 + A1 + A2
• EN 50366:2003 + A1
Neato Robotics, Inc.
1916 Old Middlefield Way, Suite A
Mountain View, California 94043
United States of America
Page 47

Neato XV-11 User’s Guide 47
EMC Directive:
• EN 55014-1:1997 w/A1:2001 and A2:2002
• EN 55014-2:1997
• EN 61000-3-2:2006 (AC Charger)
• EN 61000-3-3:2008 (AC Charger)
The technical documentation required to demonstrate that the products meet the requirements of the
Low Voltage Equipment directive has been compiled and is available for inspection by the relevant
enforcement authorities. Details of these special measures and limitations to use are available on
request. The
mark was first applied in 2009.
Ken Peters
January 30, 2010
Page 48

Neato XV-11 User’s Guide48
According to 47 CFR, Part 15 of the FCC Rules
The following designated product:
EQUIPMENT: Robotic Vacuum
MODEL NO.: XV-11
is a Class B digital device that complies with 47 CFR Parts 2 and 15 of the FCC Rules. Operation is subject
to the following two conditions: (1) This device may not cause harmful interference, and (2) this device
must accept any interference received, including interference that may cause undesired operation.
January 30, 2010
Page 49

Neato XV-11 User’s Guide 49
Parts
The following are part numbers and descriptions of items in your package.
Part number Description
900-0001 Neato XV-11 Robot
945-0007 Neato XV-11 Charging Base w/power adaptor
285-0001 Neato XV-11 Power Adaptor
945-0005 Neato XV-11 Battery Set (package of 2)
945-0009 Neato XV-11 Boundary Markers
500-0001 Neato XV-11 User Guide
515-0001 Neato XV-11 Quick Start Card
945-0004 Neato XV-11 Filter Replacement Package
Page 50

Neato XV-11 User’s Guide50
Disposal Notices
If you ever dispose of your Neato XV-11, follow these steps:
1 Unplug the Neato XV-11 from any power source, including removing it from its
charging base and removing the power adaptor plug from the Neato XV-11 power
connector.
2 Unscrew the battery doors (shown in the bottom view illustration on page 8) and
unplug and remove the batteries.
3 Take the Neato XV-11 to your nearest waste management electronics recycling
center.
4 Take the batteries to a battery recycling program at your school, place of work, or
your nearest waste management battery recycling center.
 Loading...