

NDS 3Lion LiFePO4, LiFePO4 3L-100, LiFePO4 3L-100-P, LiFePO4 3L-100B, LiFePO4 3L-150-P Installation And Operation Manual

NDS
Installation and operation manual for the
3Lion / 3Link LiFePO4 battery system.
All the Energy You Need!
Distributed in the UK by RoadPro Ltd,
7 Stephenson Close, Daventry, Northants, NN11 8RF, UK.
Tel: 01327 312233 Email: sales@roadpro.co.uk
www.roadpro.co.uk
Version 7.1
181010

SUMMARY
1. SYSTEM COMPONENTS 3Lion + 3Link.
2. SAFETY
3. INTRODUCTION
4. INSTALLATION
4.1 3Link INSTALLATION
4.2 MOUNTING SCHEME
4.3 DISPLAY INSTALLATION
5. OPERATION
5.1 CHARGE
5.2 DISCHARGE
6. OPERATION CHECK
7. VERIFIABLE PROBLEMS
8. TECHNICAL CHARACTERISTICS
9. GUARANTEE
1. SYSTEM COMPONENTS of 3Lion + 3Link
— 3Lion LiFePO4 Battery
— 3Link Controller
— 3Link Display
Display connection cable
Use and maintenance manuals
The supplied items are designed exclusively for this system and are not compatible
with other devices. The product pictures in this manual are for reference only and for
purely explanatory purposes; the product you bought might be different. NDS
Energy reserves the right to make changes to the product at any time without prior
notice and without any obligation to apply these changes to the devices previously
distributed.
Neither NDS Energy nor RoadPro Ltd is responsible for any malfunctions due to
improper use of the product, any installation errors or mistakes present in this
manual.

2. Safety Notes
This manual serves as a guide for the installation, use and maintenance of the 3Lion
+ 3Link system. Whether you are the installer or the end user, please read this manual
carefully and follow the instructions closely.
Keep the device out of the reach of children.
Read this manual carefully and keep it handy, preferably near the 3Lion, for any future
consultation.
The 3Link unit must be installed with the 3Lion battery to get the full advantage of the fast
charging techno logy. However, a 3Lion battery can also be installed as a direct
replacement for a lead acid battery in a caravan for example.
A 3Lion battery can be installed with a maximum inclination of 90° compared to the
normal position (i.e. with the poles facing up).
Do not bump, puncture, disassemble or damage the 3Lion and the 3link. Do not attempt to
open the 3Lion battery.
In the event of electrolyte leakage, do not touch the battery. In case of contact, immediately
flush skin with warm water and seek medical advice immediately.
Be careful when installing, so that the two poles of the 3Lion do not come in contact with
each other. Use isolated equipment and do not place and/or leave metal objects close to
the product.
Always dispose of the battery according to local laws.
Protect the poles of the 3Lion from any contact with electrically conductive objects.
The 3Lion must be protected from direct sunlight or direct heat sources to avoid
overheating.
Do not install the appliance in a sealed environment, otherwise it may overheat.
Make sure that there is air circulation in the area where it is installed.
To avoid the risk of electric shock and/or fire, make sure the power supply is in good
condition.
Do not use the appliance with damaged cables and/or of inadequate cross-section.
Do not use the device in an environment with high humidity or direct contact with splashes
of water and/or liquids or in the rain.
Install the device using cables of the appropriate cross-section as recommended in the
section "INSTALLATION INSTRUCTIONS"
Fully charge the battery right after installing the system or after doing any maintenance on
it. When it is fully charged, the display will show 100% on the battery state of charge
(SOC).
The rated voltage of the 3Lion battery is 12 V. Do not use the system with devices that are
not compatible with this voltage. The company is not responsible for any damage, either
to the equipment or the vehicle caused by incorrect use of the entire system.
3. Introduction
3Lion is an innovative NDS battery and charging system, based on Lithium Ferro Phosphate
Technology (LiFePO4). Combined with the integrated BMS and 3Link system (BMS Manager), a
3Lion battery reliably delivers the exceptional performance that is available from a LiFePO4
battery.
Lithium technology provides significant advantages over traditional lead batteries (AGM, gel & wet
lead acid). For example, a 3Lion battery can withstand high charging currents which results in a
much faster charging speed. It does not suffer from the typical sulphation of lead batteries, it has a
very low self-discharge rate (less than 3% per month), and there's as much as a 60% weight
reduction over a comparable lead-acid battery. With a large number of cycles (2,500+ depending
on usage), it provides greater autonomy without the need for mains hook-up.
The 3Lion battery works in conjunction with the 3Link, which becomes the hub of the energy
system. The engine battery, 3Lion battery and al l electrical equipment, are connected to the
3Link. This allows the system to work efficiently and to achieve maximum charging - up to 75
Amps depending on the alternator - from the alternator when the engine is running. When the
engine is turned off, the 3Lion battery will deliver current for all on-board electrical equipment :
lights, heating, coffee machines, etc.
The 3Link unit communicates with the touch screen display and provides useful information about
the state of the battery, the charging system and how much energy is being used at any given
time.
The LiFePO4 technology used for the 3Lion, unlike other lithium batteries such as Li-Ion or LiPO,
is extremely safe and reliable.
3Lion batteries can be used almost anywhere that a lead-acid leisure battery is being used and, in
almost every case, a 3Lion battery will give significant advantages. However, the fast charging and
discharging abilities of the battery are dependent on the ability of the charging methods being
used.
Before installing any LiFePO4 battery, it's essential to check the output of the vehicle's alternator,
230V mains charger and, if used, the solar regulator, generator and fuel cell.
If any of these charge in a way that is not compatible with a LiFePO4 battery, performance will be
impaired and the battery could be damaged. In short, all charging methods must ensure that the
battery is not charged at more than 14.5V, does not have a “maintenance” mode where the
voltage is in excess of 13.8V or any “de-sulphation” mode.
If a LiFePO4 charging option is available (on most Votronic products, Sterling battery chargers and
NDS products for example) always select it. If a LiFePO4 charging option is not available,
selecting gel or AGM will also charge the battery without risk of damage but not to 100% state of
charge.
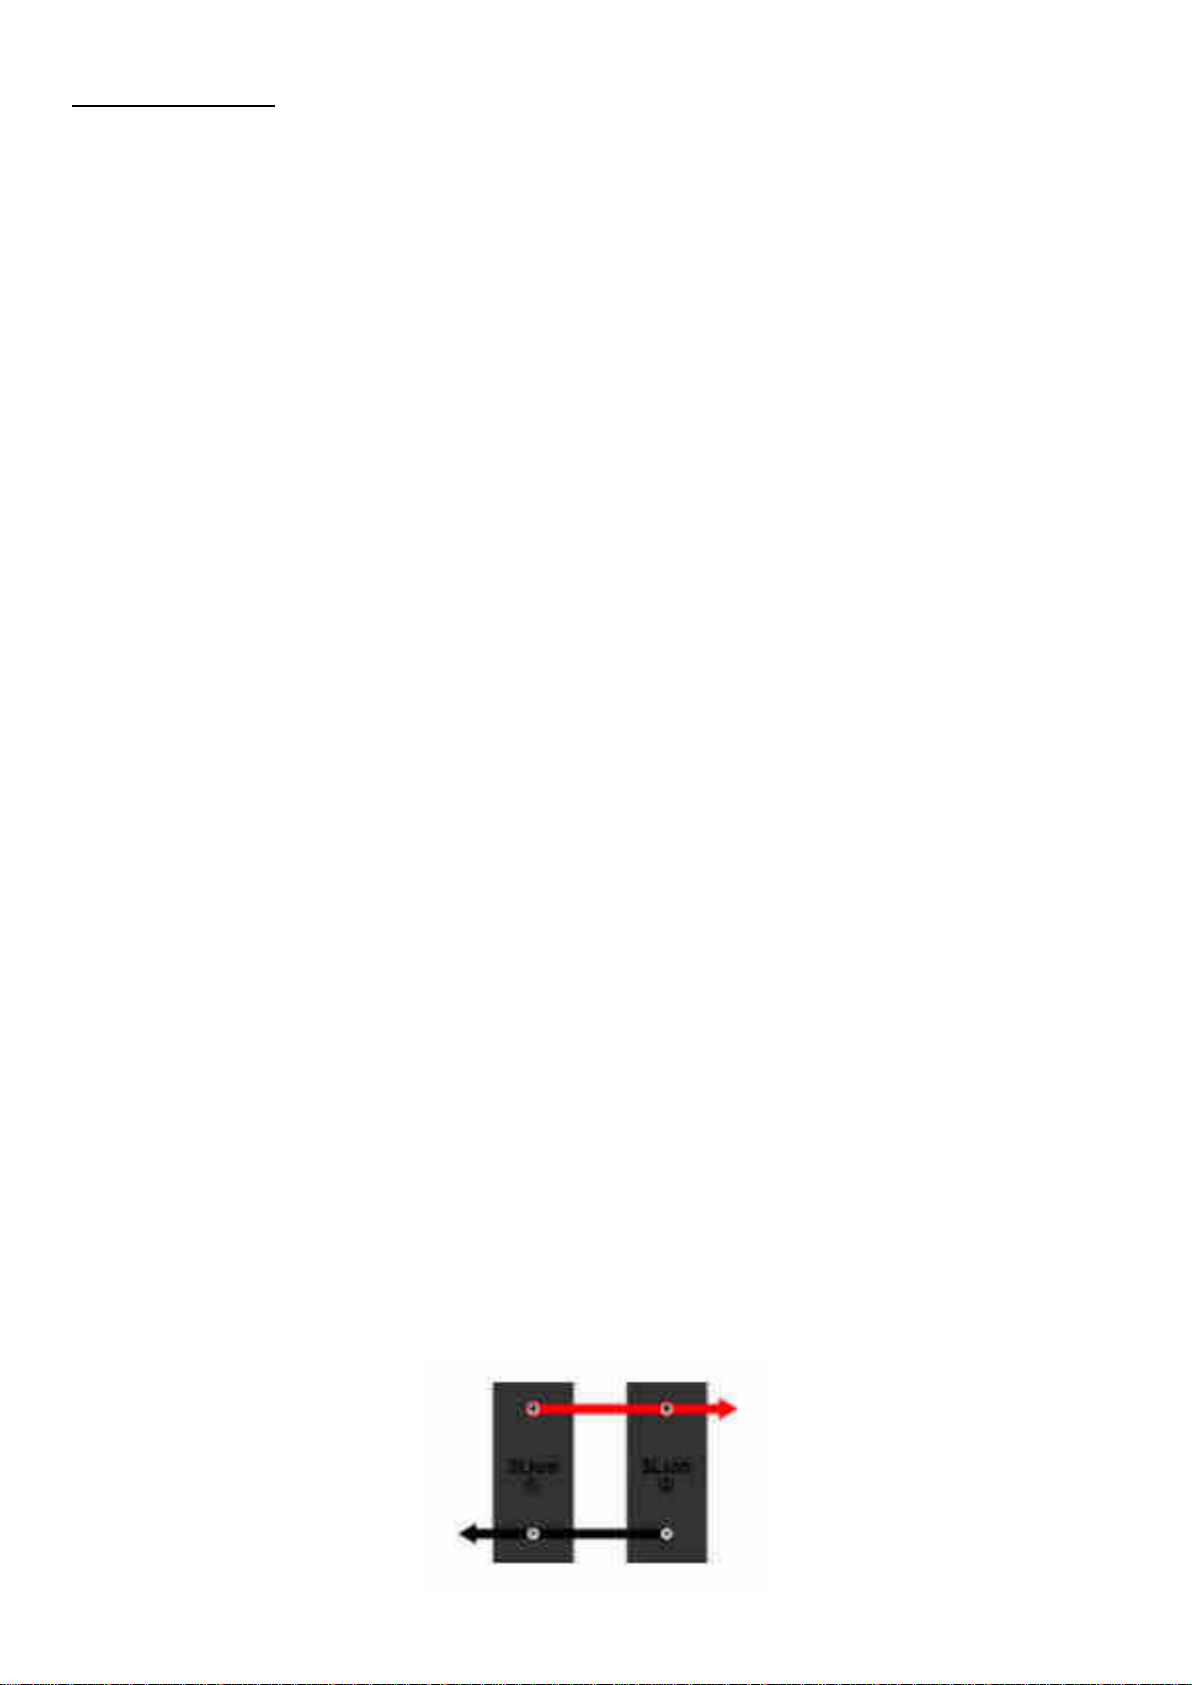
When installing 2 3Lion batteries in parallel, use only one 3Link and place the 2 3Lion batteries in
parallel with cables of a cross-action of at least 35mm2 and place them as close to each other as
possible. Proceed with the installation as shown in the diagram below.
TERMINAL
FUNCTION
4.1 Installation of the 3Link hub
The 3Lion / 3Link system offers maximum performance when used with an alternator rated at 120
Amps or more and with a no-load voltage between 13.8V and 14.7V. No-load voltage is measured
at the terminals of the engine battery, when the engine is on, the engine battery is fully charged, all
the electrical equipment on the vehicle is off (lights, wipers, air-conditioner, etc.) and when the
leisure battery is disconnected from the system.
Find a clean, dry, ventilated place to install the 3Link box, as close as possible to both the 3Lion
battery and the engine battery. Never install the 3Link in the engine compartment.
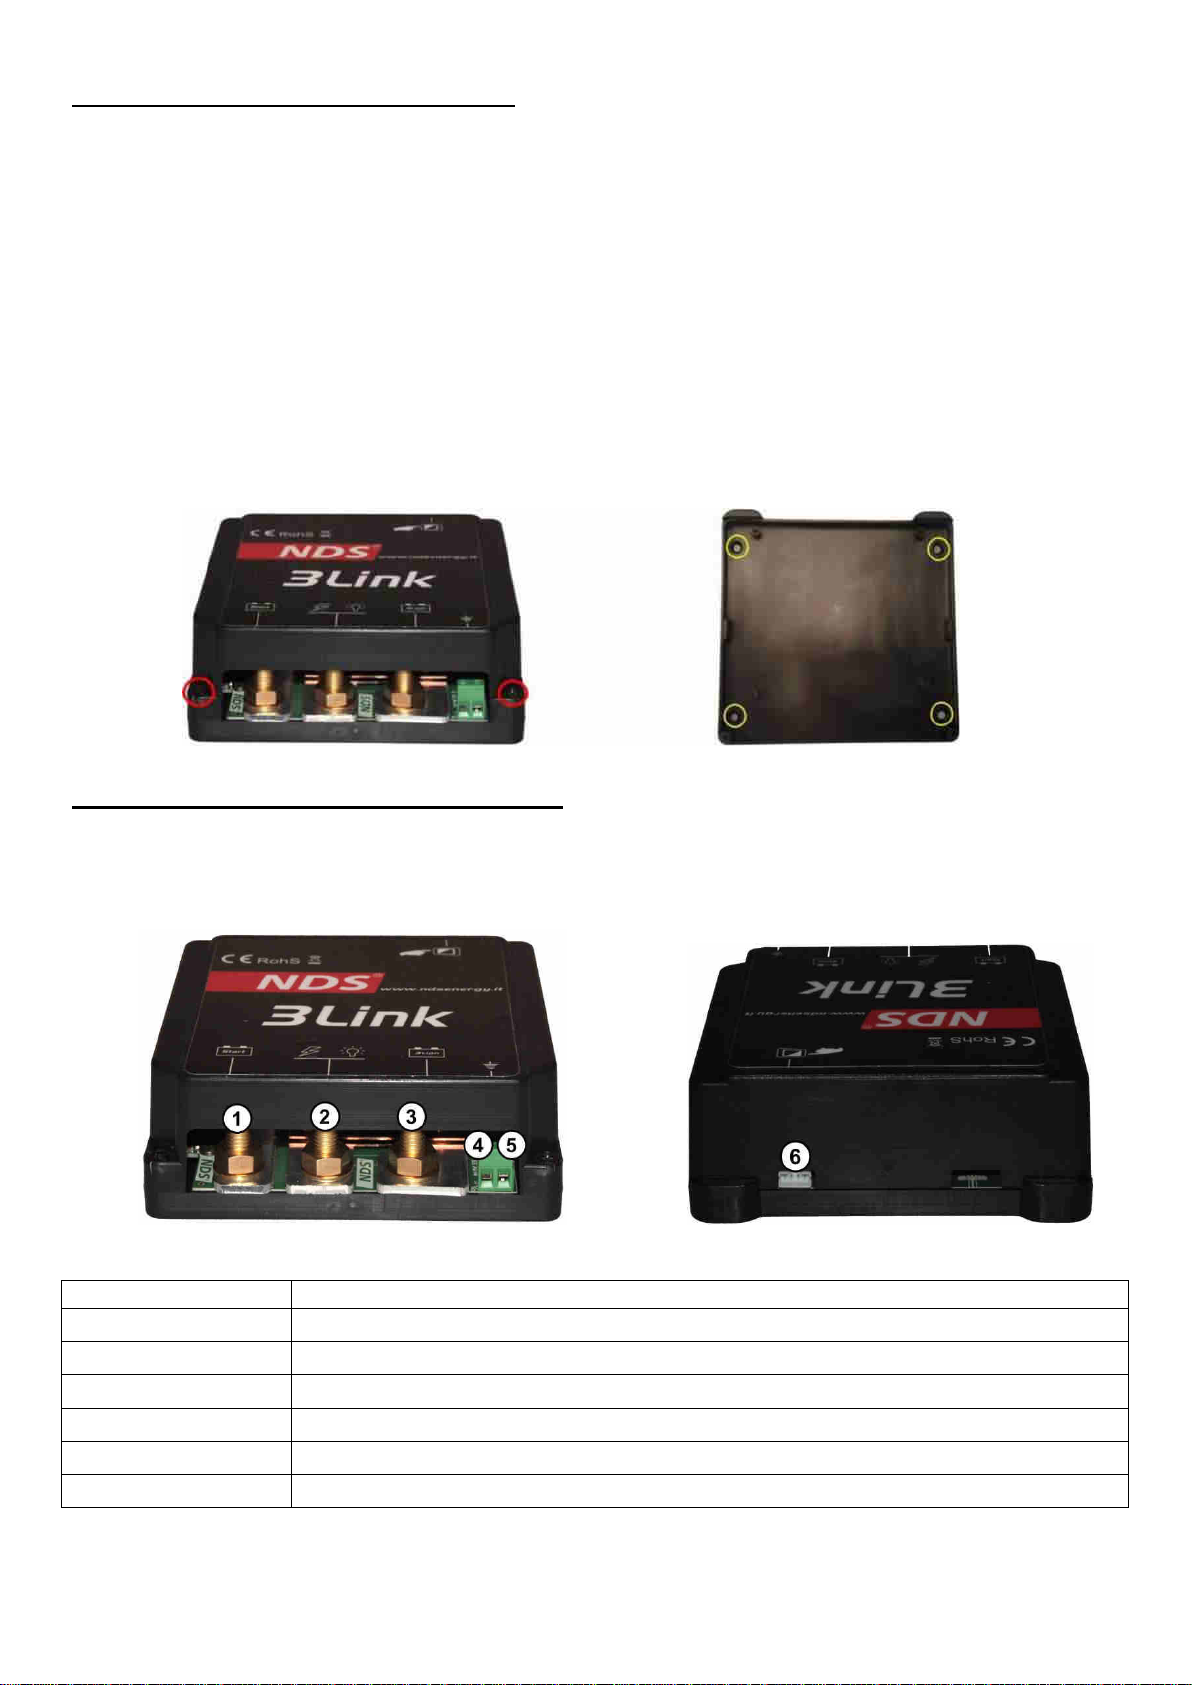
Remove the two screws in the front (highlighted in red in the photo), lift the cover and remove it to
allow convenient access to the connection points. Attach the base of the 3Link to a secure surface
(horizontal or vertical) using 4 self-tapping screws in the appropriate holes on the bottom of the
base (highlighted in yellow in the photo).
4.2 Connecting the cables to 3Link
Before installation, make sure that the vehicle engine and the battery charger are off. Do not make
joins in the cables, always make direct connections.
1
2
3
4
5
6
M8 screw connector for engine battery positive terminal
M8 screw connector for electrical system common positive
M8 Screw Connector for 3Lion battery positive terminal
2-way connector for ground connection
2 way connector for connection of existing electrical control box
Connection to display
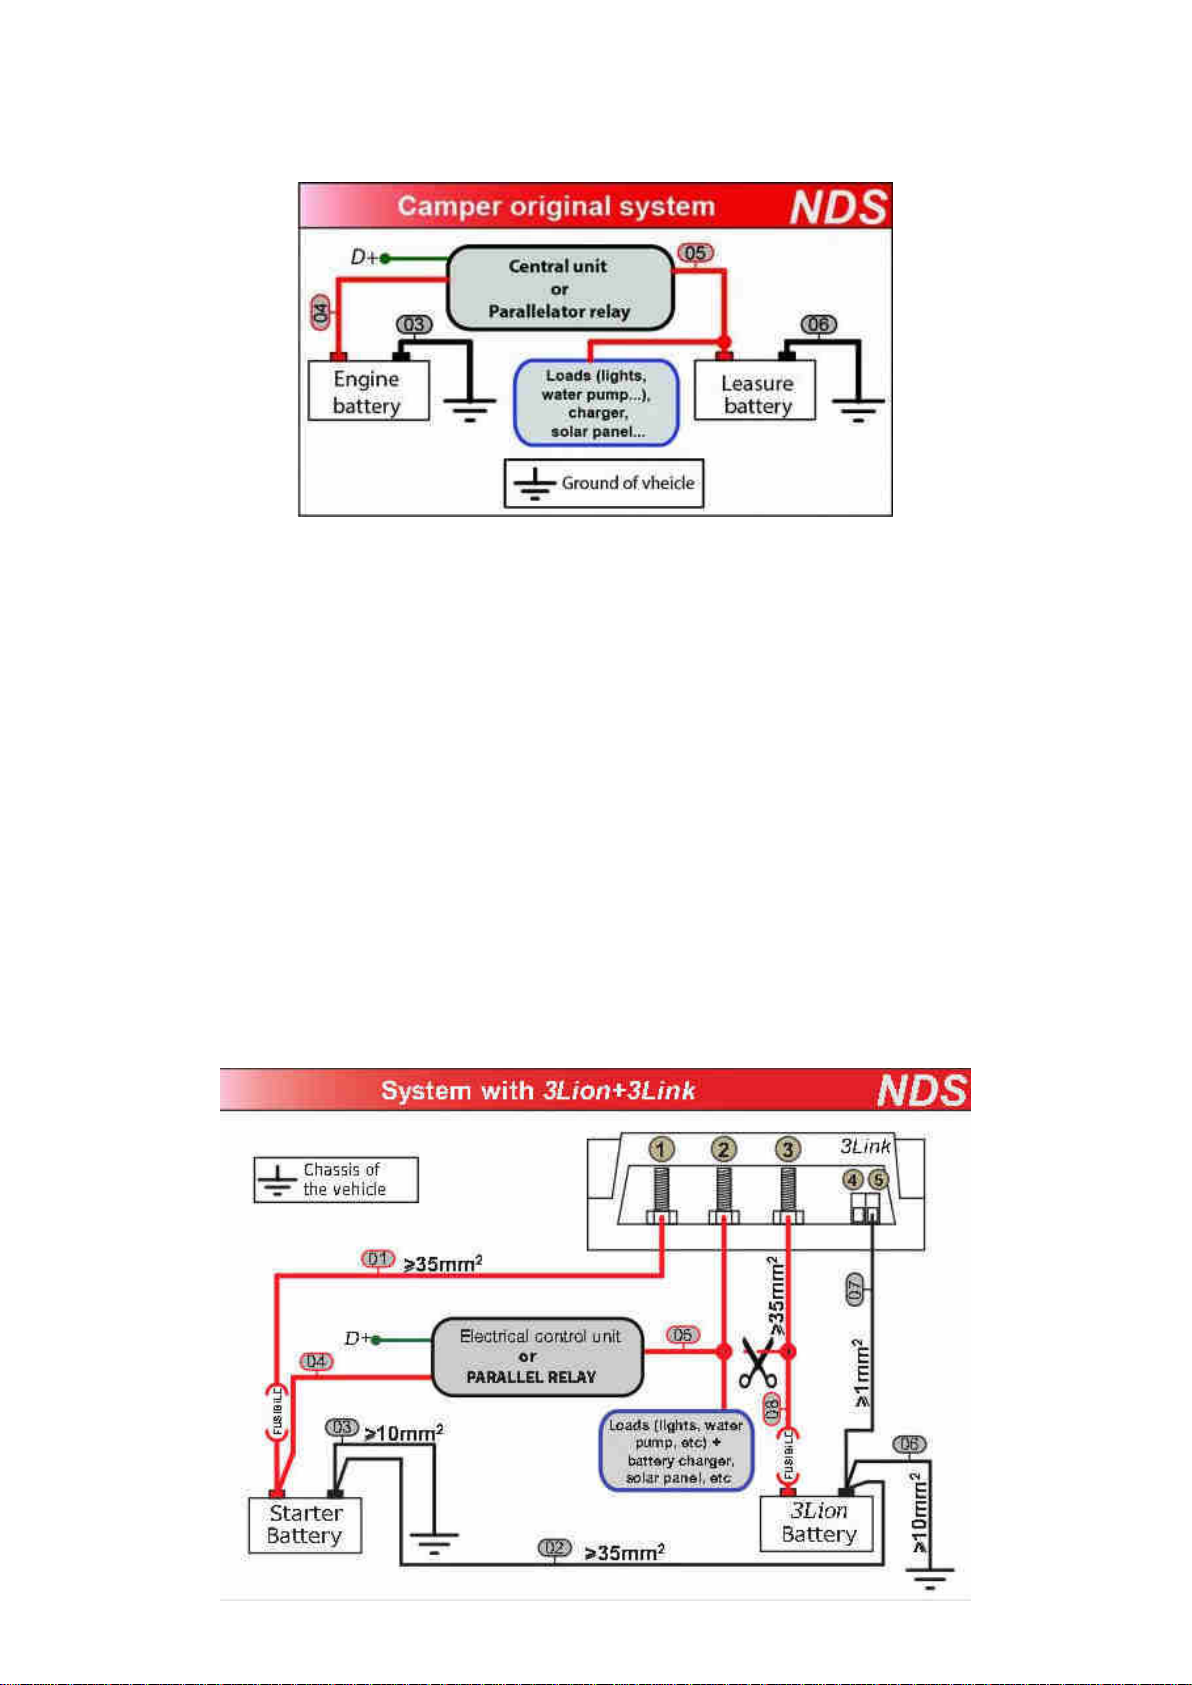
The original electrical system of the motorhome can be represented in a basic manner as a relay
that connects the engine battery (and thus the alternator) to the leisure battery when the vehicle’s
engine is on (i.e. the alternator is in operation and signal D+ is active). As shown here:
The installation of the 3Lion + 3Link is very straightforward.
1. Identify the original cable that goes from the leisure battery’s positive terminal to the split
charge relay or the existing electrical control box - here shown as ”Central unit or Parellator
relay” with cable connection number 05.
2. Disconnect cable 05 from the leisure battery positive terminal, and connect it to terminal 2
of the 3Link.
3. Connect the engine battery’s positive terminal to the 3Link terminal 1 with 35 mm² sq cable
via a 200A fuse. If the vehicle has a battery-to-battery charger then connect the positive
output of the charger to 3Link’s terminal 1. (See note below on battery-to-battery chargers &
smart alternators)
4. Connect the 3Lion battery’s positive terminal to the 3Link’s terminal 3 with 35 mm² cable.
5. Connect 3Link’s terminal 5 to the chassis with 1mm² cable.
6. Connect the cable linking the 3Link to the display.
7. Lastly connect the 3Lion battery’s negative terminal to the vehicle’s chassis using 35mm²
cable.
The diagram below shows the completed installation in a vehicle with a conventional
alternator and without a battery-to-battery charger.
 Loading...