

Page 1

Page 2

2
Introduction
Welcome to NDrive!
This guide was created for two purposes: to p rovide clear explanation of NDrive functions and to
serve as a comprehensive resource for those seeking to get more out of the NDri ve application.
In this guide you can find answers to your questions about your NDrive f or iPhone. You can also
discover new ways to use NDriv e m o re effectively.
General Application Information
NDrive is a GPS applicatio n which brings all the functionality of a stand-alone GP S device to the
iPhone. NDrive provides reliable navigation guidance by way of visual and voice directions.
Directions given include, but are not limited to, names of roads, locations, and door to door
navigation.
Maps
NDrive partners with the best map companies in order to bring you detailed and accurate digital
maps of the whole world. NDrive works with large map providers like Tele Atlas and Navteq, but
also seeks to work with local map providers when available.
Interface and Navigati on
The user interface is simplistic. That makes it more intuitive for the average user. But beneath its
simplicity lay powerful engines and design which deliver superior navigational control directly into
the hands of both experienced and inexperienced users.
As a navigation application, NDrive’s primary purpose is to help you get to your destination safely
and quick, i.e., by searching by initials. You can learn more about how to use NDrive by reading
this guide.
Using NDrive and this User Guide
If you want to search for a specific function in NDrive check the Table of Contents below to find
the appropriate s ection. You can also brows e through the manual for mo re comprehensive details
on all the functions of your new NDrive.
Page 3

3
TABLE OF CONTENTS
1. STARTING NDRIVE ....................................................................... 4
Loading NDrive .................................................................................. 4
Language Selection ............................................................................ 5
Legal Information ............................................................................... 5
Welcome to the Map! ......................................................................... 6
Getting a GPS signal ........................................................................... 6
How to improve GPS signal quality? ..................................................... 7
Factors that limit and reduce GPS signal q uality ................................... 7
2. INTERACTIONS WITH THE MAP SCREEN ..................................... 8
Map Display and Icons ........................................................................ 8
Panning ............................................................................................. 8
Zooming ............................................................................................ 9
Tilting and Rotating ........................................................................... 10
3. USING THE KEYBOARD .............................................................. 11
QWERTY/ABC, Numbers, and extended cha racter sets ........................ 11
4. THE MAIN MENU ........................................................................ 14
First menu interface .......................................................................... 14
5. SETTINGS ................................................................................... 15
Overview .......................................................................................... 16
Basic Settings ................................................................................... 16
Language ......................................................................................... 17
Map Appearance ............................................................................... 18
Routing Options ................................................................................ 20
Traffic Options .................................................................................. 21
Safety Options .................................................................................. 22
System ............................................................................................. 23
GPS .................................................................................................. 24
6. FIND/NAVIGATE ........................................................................ 25
Overview .......................................................................................... 25
Search Methods ................................................................................ 27
The Navigation Display Screen ........................................................... 38
Adventure Mode ................................................................................ 39
Roadbook and Alternatives ................................................................ 39
7. MY NDRIVE ................................................................................. 42
Features Overview ............................................................................ 43
My Account ....................................................................................... 43
Managing Favourites ......................................................................... 46
Managing Itineraries .......................................................................... 51
Communities ..................................................................................... 58
8. CONCLUSION .............................................................................. 62
9. LIST OF IMAGES ......................................................................... 63
Page 4

4
1. STARTING NDRIVE
Information you can find in this section
• Loading NDrive
• Language selection
• Legal information ( can choose not to display on start-up)
• Welcome to the Map!
• Fixing a GPS signal
• How to improve GPS signal quality
• Factors that limit and reduce GPS signal quality
Loading NDri ve
The first time you load NDrive you will see this screen:
Picture 1 - Loading Screen Picture 2 - Use current Locat i on?
You will see a prompt: “Allow NDrive to use your current location?”
By tapping “OK” you are telling the application that it is alright to find your current locat ion. If you
are in a place where you do not receive recepti on (ex: in your house) t hen the application will be
unable to calculate your position, or it will load the last known location until it does receive a
signal. If you are inside it is bette r to choose “Don’t All ow”. If you tap “Don’t Allow” then the GP S
will not activate the first time. You can always turn it on in “Settings” or restart the applicatio n.
Page 5

5
Language Selection
Next you will be prompted to choose the language you would like to use. You can touch the
loudspeaker icons to listen to the different voices. Be sure that the volume on your iPhone is at a
level that is comfortable for you.
Picture 3 - Voice Selecti on
After choosing the language of your choice, click “OK” to continue.
Legal Information
Read this through the first time using the product. It is important.
Picture 4 - Legal Information
Page 6

6
Legal Information contains a disclaimer about liability and s peed data accuracy. You can select to
Picture 5 - Map view
show this menu on start up, or not to display on start up. You can always view it in the About
Menu.
Welcome to the Map!
You should see on your screen the default location for NDrive. The default position will vary by
country. The screen displays the time in the bottom left and a menu screen in the bottom right.
Getting a GPS signal
If you have chosen to let the GPS use your current position it will attempt to gain a GPS signal.
If this is the first time using yo ur GPS it will take many minutes t o gain a signal for the first time,
ranging anywhere from 5minutes to 50 minutes. The time it will take varies highly on where you
are – outs ide with a cle ar vi ew of the sky is best. T his is normal for all GP S systems when boot ing
the first time.
What if the GPS is not locking onto my position?
Your GPS may not lock on for one of two reasons:
• You might have chosen not to allow it to use your current position when first starting the
application.
• You are in a location where it is no t possible to receive GPS reception.
If you selected not to allow the GPS to lock on to your current location you will need to enter
Menu, select settings, scroll down to GPS, and toggle it on with a finger tap.
If you are indoors where the signal is very weak you will need to find a location where you can
receive the signal.
Page 7

7
Once you receive a signal you will see the NDri ve map display ing your current locat ion. (As shown
in the image above)
How to improve GPS signal quality?
GPS works best when it has a clear view of the sky. Clouds, buildings, and other materials will
cause a GPS signal to degrade. GPS works best in open areas.
It is a good idea to sync your phone 3-4 times a week. If you sync your i Phone frequently, GPS
accuracy will increase greatly. The longer you go without synchronizing your iPhone, the less
accuracy and reception quality your iPhone will have.
When using NDrive in the car place it high on the dash, near the windshield. GPS reception will
increase dramatically.
Factors that limit and reduce GPS signal quality
Some cars have athermic heat reflecting windshields, which will prevent GPS signals from being
received. When using GPS in the car be sure that it is placed near the wind shield or by a window,
not far inside the dash, and that your car does not have an athermic heat reflecting windshield.
Signal reception will often be weaker in cities with v ery large buildings. The signal will bounce off
these buildings multiple times before reaching your receiver, resulting in a much weaker signal.
Page 8

8
2. INTERACTIONS WITH THE MAP SCREEN
Picture 6 - Map icon functions
Picture 7 - Auto Zoom and Panning
Information you can find in this section
• Map Display and Icons
• Panning and Sound
• Zooming
• Tilting and Rotating
Map Display an d Icon s
If you slide your finger along the bottom of the screen you can increase the audio level.
Panning
Page 9

9
Zooming
Picture 8 - Pinch to zoom out
Picture 9 - Reverse pinch to zoom in
You can also use pinch gestures to zoo m and rotate the map. Use a regular pinch motion t o zoom
out.
Use a reverse pinch to zoom in. A s ind i ca ted below.
Page 10

10
Tilting and Rotating
To rotate the map you can use a twist gesture. See below.
Picture 10 - Twist to rotate the map
You can tilt the map without using the tilt keys on the left hand side by sliding two
fingers up or down the screen vertically, as shown below.
Picture 11 - Tilting
Page 11

11
3. USING THE KEYBOARD
Information you can find in this section
• How to adjust the Keyboard to your preferences
• How to use the Keyboard efficiently
QWERTY/ABC, Numbers, an d extended character sets
With NDrive you can choose to view the keyboard in either ABC or QWERTY display. The user can
enter alphabet and numerical characters, punctuation, and other characters with the NDrive
keyboard. Access the Keyboard menu via “Settings” > “Languages”. Menu d isplayed below.
Picture 11 - QWERTY and ABC Keyboard Options
Page 12

12
Picture 12 - QWERTY and ABC Display
Pressing “123” button on the QWERTY keyboard will display a keypad with larger numbers
and symbols, as well as buttons to access extended symbols and characters keyboards.
Pressing “123” button on the ABC Keyboard will open up the numbers keyboard, which has
buttons on the bottom that can be used to access the extended keyboard and extended symbols.
Pressing back at anytime while using the application will cause you to exit from the Add ress entry
screen.
It is not possible to capitalize letters where they would not normally be capitalized.
Page 13

13
Picture 13 - Keyboard numbers and symbols
Picture 14 - Extended Character s
You can access extended characters by pressing the ext button, below.
Page 14

14
4. THE MAIN MENU
Picture 15 - Main Menu Options
Information you can find in this section
• Explanation of the first user interface menu
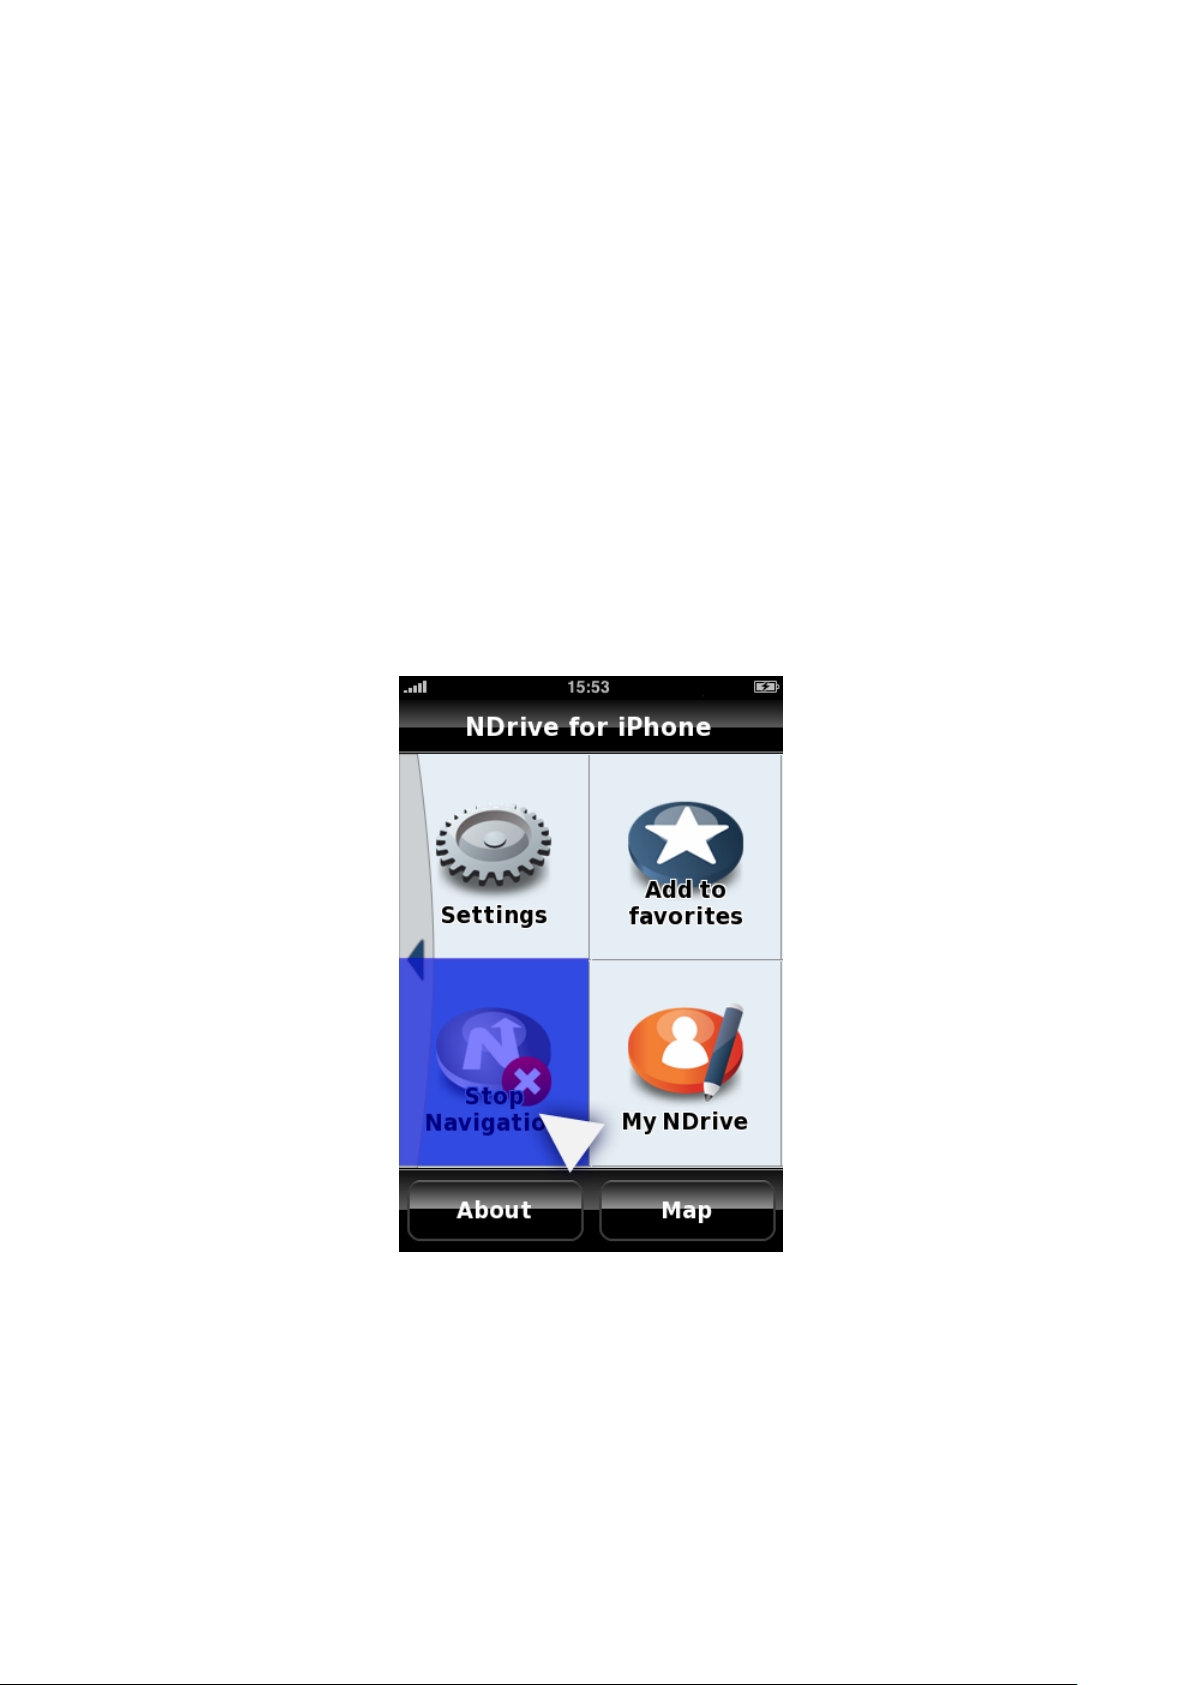
First menu interface
When you first open NDrive ther e w i l l be a few buttons visible on the screen.
• Navigate
• Find
• Settings
• My NDrive
Beneath these buttons there are two more:
• About
• Map
These buttons can be considered the top level of NDrive operation. This guide is organized to
address the functions and sub-processes of each area (Find, Navigate, Settings). “My NDrive” is a n
area where you can keep personalized i nformation that you create while using NDrive. For more
information you can visit the “My NDrive” section of the manual.
By clicking on “About” you can get version, map, privacy and legal information about the software.
Page 15

15
5. SETTINGS
Information you can find in this section
• Basic Settings
a) Speaker
b) Light
• Language
• Map Appearance
a) Auto Zoom
b) Light
c) 3D Landmarks
d) Map Control Buttons
e) Templates
f) Favourites
g) Points of Interest
• Routing Options
a) Fastest
b) Shortest
c) Pedestrian
d) Adventure
e) Tolls
• Traffic Options (Available in select countries)
a) Traffic On/Off
b) Traffic refresh time
• Safety Options
a) Speed Limit Alarm
b) Road Speed Alert
c) Safety Camera Alert
• System
a) 12h/24h format
• GPS
a) On/Off
b) Coordinates Format
Page 16

16
Overview
Picture 16 - Settings Menu
The way NDrive functions is both enabled and restricted by the settings. Having a very strong
understanding of what the different settings do will greatly increase the quality of experience you
will have with NDrive.
The NDrive Menu system is controlled by touch operation. To select an option, tap or pr ess once.
To slide the menu horizontally or vertically, drag your finger across the screen. Opening the
settings tab will display a number of configurable options . *Note – in order to determine if Traffi c
is available in your country refer to the product description in the iTunes store.
Basic Settin gs
Speaker: Allows you to change the NDrive voice instruction vo lume from “Off” to level 5. Always
set a volume level that doesn’t interfere with your driving.
Light: Allows you to manage the backlight, there are two options:
Always on: Backlight stays on
System: Light will dim after ~30 seconds of disuse and then sleep. Navigation will continue, voice
commands will not be given
Page 17

17
Picture 17 - General Settings
Language
In this menu you can set the language and other language related display options such as
Keyboard type (ABC or QWERTY) and KpH/MpH.
Please remember
language of your choice.
, when you change the language the spoken instructions also change to the
Picture 18 - Language Settings
Page 18

18
Map Appearance
Picture 19 - Map Appearance Settings
Changing options in this menu will change how you view the map and its components.
Auto Zoom: Will change the level of zoom according to the speed you are travelling. NDrive
automatically adjusts to allow a better view of the map. By disabling Auto Zoom you can control
manually your zoom level. Zoom will not adjust itself when Auto Zoom is disabled.
3D Landmarks: Allows you to enable or disable 3D buildings which can be found in cities on your
NDrive. When disabled, 3D landmarks will not appear as 3D representations. Some maps do not
have 3D landmarks. Refer to the pr oduct description in iTunes to determine if your country app
has 3D landmarks.
Map Control Buttons: Turning this option on enables tilting and causes two curved arrows to
appear on the middle left hand side of the screen. It also enables zoom buttons. The curved
arrows can be used to manually tilt the screen, or you can sli de two of y our fingers vert ical ly to t ilt
the map.
Disabling the map control buttons remo ves the tilting option. The application will be locked at the
tilt level set before the option was disabled.
Templates: Allows you to choose your map color scheme. There are five template choices:
default, night, balanced, Britannica, and contrast.
Page 19

19
Picture 20 - Day and Night template settings
Picture 21 - Different template views
Favourites: Allows you to add, edit, and remove favourite’s categories. NDrive comes with th ree
categories, personal, friends, and work , but you can create an unlimited number as you like. This
is a unique feature of NDrive.
Points of Interest: You can choose Point of Interest categories and g roups that will be appear as
icons on the map. Use this option to make the POI you are interested in visible and others
invisible.
Page 20

20
Routing Option s
Picture 22 - Routing Options Menu
The configuration of NDrive’s routing options will greatly influence NDrive’s path selection. It is
important to know the preferences of the different modes so that you can understand how the
software will make decisions.
Fastest: Fastest is best for longer routes. NDrive wil l calculate routes by giving high priority to
faster roads, such as highways, minimizing travel time. This option is usually not the best for
travelling short distances, or within cities.
Shortest: Shortest is primarily used for intercity driving or for travelling over short distances.
NDrive will choose the shortest path to the destination by minimizing the miles to drive. This
routing option does not consider the quality of the road, speed limi t, number of stop signs, or any
other attribute that may make the road less desirable.
Pedestri an M ode: NDriv e will calculate routes without considering t raffic signs, such as one-way
signs. In normal auto routing modes NDrive will for bid travell ing down a one way road. This mode
will avoid any road that does not give pedestrian access, such as highways.
Adventure Mode: This mode does not use the normal map. Instead it functions primarily by
using a free roaming mode with waypoints. Extra tools such as t he compass, odometer, and more
are available in adventure Mode. Refer to the “Adventure Mode” sectio n for more details.
Tolls: This option is especially valuable if tolls are an important consideration. There are two
options for tolls.
• Yes: If necessary, NDrive will use toll roads to minimize travel time;
• Avoid: When calculating its route, NDrive will avoid toll roads. If that is not possible, you’ll
hear the phrase “Toll” at the end of the calculation.
Page 21

21
Traffic Options
Picture 23 - Traffic Options Settings
Traffic is only available in select countries. Check the product description to see if it is in yours.
There are two options in this menu.
The first allows you to toggl e traffic updates on and off. Wireless carrier fees will apply. Rates will
vary by carrier.
The second is the rate at which new traffic information will b e downloaded to NDrive. You have 7
options in this second menu: manual, 10minutes, 20minutes, 30minutes, 40minutes, 50minutes,
and 60minutes.
Page 22

22
Safety Options
NDrive only offers Radar and Safety Camera information in some countries.
Picture 24 - Safety Options Settings
There are three other safety options that will help you to avoid speeding tickets and other
penalties.
Speed Limit Alarm: NDrive will activate a sound alarm every t ime you exceed a certain speed
that is predefined by you. The alarm sounds once and is not persistent. In this menu you can set
the speed that you do not want to exceed or turn the alarm off. *Actual speed is always lower
than the speed shown by your vehicle’s speed indicator.
Road Speed Alert: Every road has a legal speed limit. You can choose to be warned each time
you exceed the speed limit of the road you are travelling on. Yo u can select to have visual alar ms,
audio alarms, or both. Know that road speed informat ion comes from a database. This database
may not always have complete information about the legal speed limits of roads in your area.
Hence, you will not receive a warning if no speed limit is listed for that road.
Safety Camera Alert: Enable or disable the
fixed radar alert (where available).
Page 23

23
System
In this menu you can choose to display the time in 12 Hour or 24 Hour format.
There is no need to set the local time. As soon as NDrive fixes a satellite signal, the NDrive
software will automatically set the local time.
Picture 25 - Time Format Settings
Page 24
24
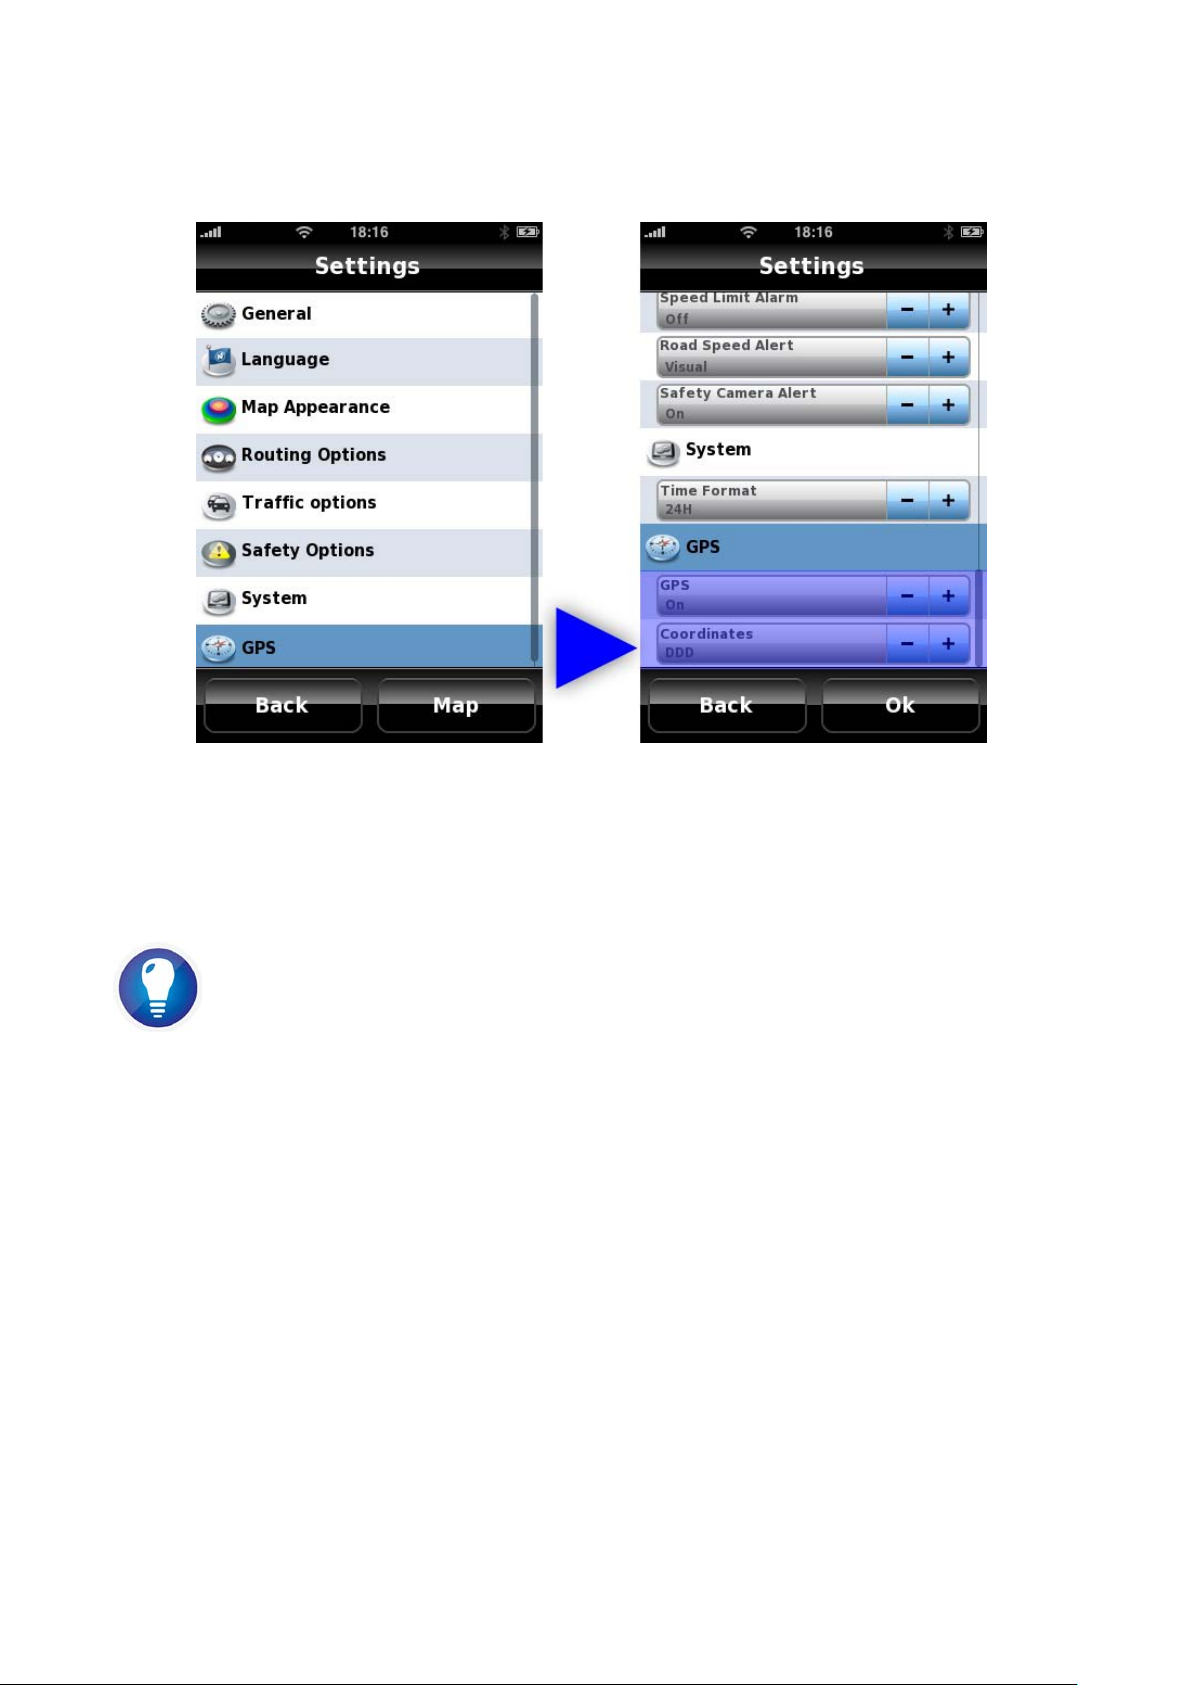
GPS
There are two settings you can change in the GPS section.
Picture 26 - GPS settings
GPS: Here you can turn GPS on and off.
Routing in Simulation Mode
Why would you want to turn off GPS? Because, by turning off GPS you gain the power to explore
the map without being relocated every few seconds by the GPS locking onto your position. You
can also route in simulation mode, which lets navigat e to any location from any location available
on your map.
Normal navigation will only work properly wit h the GPS on. If you are moving and the GPS isn’t
updating this is one of the settings you should check.
Coordinates: Here you can set the coordinates format. This setting also defines the
search/navigate by coordinates format. There are three format types:
• DMS – Degrees, minutes and seconds
• DMM – Degrees and minutes
• DDD – Degrees and decimal degrees
Page 25

25
6. FIND/NAVIGATE
Information you can find i n thi s section
• Search Methods
a) Home
b) Address
c) Points of Interest
d) Nearby Points of Interest
e) Favourites
f) Recent Locations
g) Postcode
h) Coordinates
i) Itineraries
• Road book and Alternatives
Overview
After you define your settings t he next step is to begin using your GPS. Return to the main men u
of NDrive.
Find and Navigate can be used together or independently, depending on what you want to do .
How to use these functions will be explained in detail in this section.
Picture 27 - Navigate/Find Icons
Page 26
26
The major difference between “Navigate” and “Find” is that when you use “Navigate” to search
data, the last action you perform will be t o calculate the rout e. Calculation occurs whe n you either
double click the place you want to go, or press the navigate button at the bottom right of the
screen from within the Navigate destination search submenu.
Conversely, the last action in “Find” is to display the selected point on the map, without any route
calculation occurring.
Find is a tool that you can use to explore all the data on your map. That includes
everything from addresses, postcodes, coordinates, points of interest, favourites, and recent
locations.
Find can also be used to find 3D landmarks, restaurants, gas stations, and other POIs which you
can call or visit on the web with a simple finger tap.
Navigate – is an option to use whenever you want to calculate a route or distance.
If the GPS is set to “On” and you have a valid signal then the navigation mode will activate
automatically once a destination has been chosen, allowing you to visual ize all the instruct ions and
manoeuvres on the way to your destinatio n. To stop navigation simply return to t he second screen
of the main menu and select Stop Navigation.
Picture 28 - Stop Navigation icon
If the iPhone has no GPS signal (inside buildings or closed locations, or where there is ex tensive
interference) NDrive will route in Simulation Mode. Simulation mode s hows all directions until the
destination point.
When you click on Navigate or Find a number of search methods will appear. You can navigate
and search by Address, Recent Location, POI (Point of Interest), Home, Favourite, Nearby POI,
Coordinates and Postcode. There is one more option in the Navi gate submenu that is not in the
“Find” submenu, that is Itinerary.
Page 27
27
Search Methods
IMPORTANT: When searching you can change the country you are searching in by clicking on
the flag to the left of the text entry bar. This only applies if your NDrive application contains
multiple countries.
We will explain each search method individually, starting with Home.
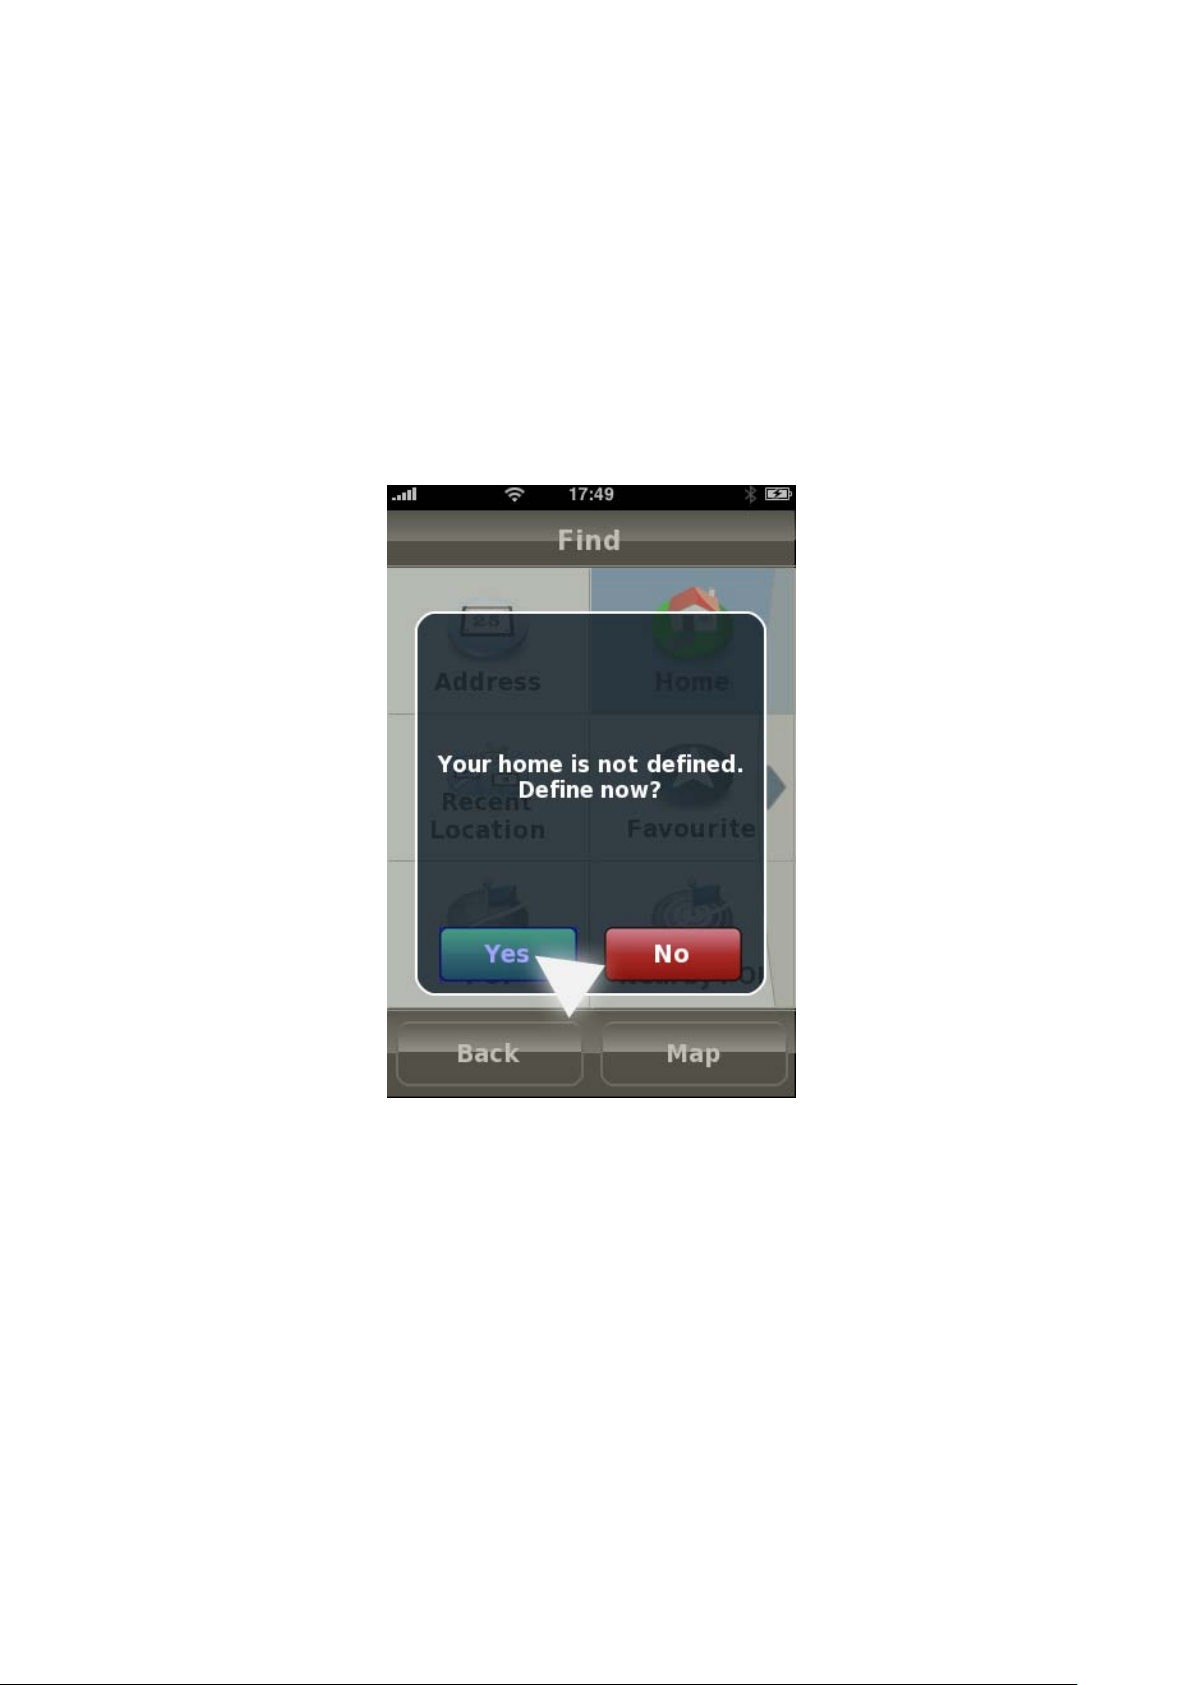
“The Home” key is quite simply a sp ecial favouri te. It can be set for on e l ocatio n that y ou use as a
regular point of departure, like your Home.
If you have not established a Home location then NDrive will ask y ou to the first time you click on
the key.
Picture 29 - Define Home
To set a home location for the first time simply click on “Home” and then use the same search
process that you would for finding a normal location. Once you finish the sear ch, “Home” will be
defined.
Page 28

28
Picture 30 - Defining Home
If you want to modify the “Home” setting you will need to go to “My NDrive” >> (finger slide to
second page) >> “Modify Home”. Then use the same search process again to find your home
location.
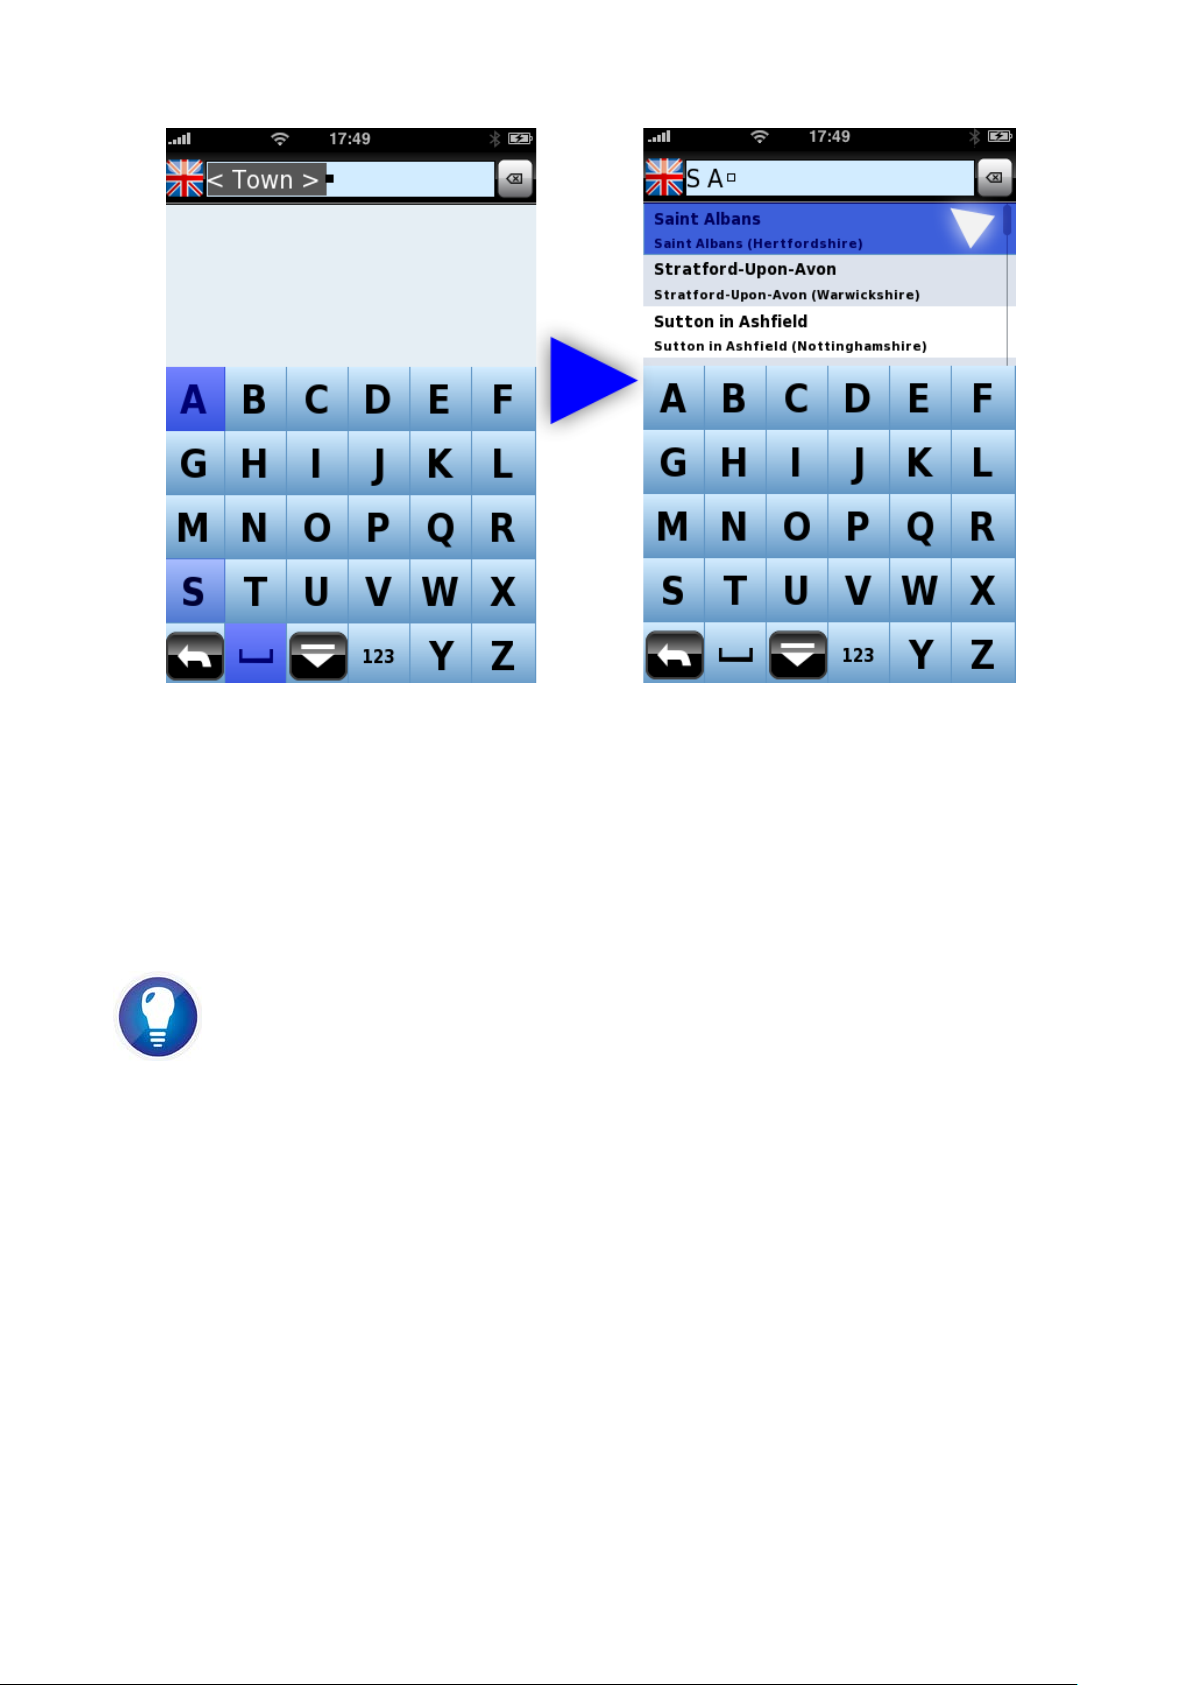
Address search queries will take you to a screen where you can input text.
NDrive will first ask you for the city, then for the street, then for the number or intersection.
You can search by typing in the name of the location, or in the case that your destination has
more than one name NDrive enables you to do a search using initials.
On the top left corner, you can see the flag of the country you are searching in. If you press the
flag icon you will be able to change the country.
Page 29
29
Picture 31 - Searching an Address
There is no need to write the “avenue”, “street”, or “road” type.
Search locations and street names by i nitials, least common name, or full name. W hen searching
for cities the results will be ranked by population.
Whenever you choose l ocations or streets NDrive keeps a record of all your choices in ord er to
accelerate future searches;
Viewing more search results
If you want to see more results of a search, without scrolling, then you can hide the keyboard by
sliding your finger downwards in the area of the screen where the results are shown. You can then
go through all the other results by sliding your finger vertically along the screen.
Points of Interest can be searched in two d ifferent ways. It is possible to search by a given city
(or location) or by proximity (related to the place where you are located on the NDrive map).
You can perform a search of all POIs, or search by Group (ex. Transpo rtation) or even by categ ory
(ex. Railway Station).
Page 30

30
Picture 32 - Finding a POI
Here we have opted to search Lon don for places to visit. In the next menu we focus the search.
Picture 33 - Finding a POI
From the available sub-categories we hav e selected To urist Attract ions. Then we search all to urist
attractions for locations starting with a B. We choose Buckingham Palace.
Once you have selected a POI to visit you will have various options such as contact, get more
information, and navigate. Use the information button at bottom centre to display options.
Page 31

31
Picture 34 - Interactive POI information
Fast and effective POI searching
There is a lot of data in the POI section.
How do you know which category a specific POI will be listed under?
The decision of where to put each type of POI is made by the map provider.
The general rule is that if you don’t know which sub menu a POI may be found in you can expand
your searching range by using more general categories. For instance, searching All Restaurants will
reveal all locations that serve food and have seating. While the Fast Food search will only reveal
the data that the map provider designated as being Fast Food.
So, if you are uncertain of which group a POI can b e found in (ex: Will the Metropolitan Mus eum
of Art in NYC be found in “Tourism” >> “3D landmarks” or in “Culture” >> “Museums”? Actually,
in that case it can be found in either way). If you are uncertain you can use a category that
contains more sub categories, like All POIs. The more general and inclusive the category the
longer the search will t ake.
Nearby POI will enable you to search based on the POI that are nearby. You will have the same
search options as a regular POI search but they will be ranked by proximity to your location. If you
do not have a valid GPS signal NDrive will display the points that are close to the po int select ed on
the map.
Page 32

32
Picture 35 - Searching Nearby POIs
Favourites can be used to store places that are special or frequently visited s o that you can find
them without the need of doing a complete search every time.
Searching by favourites means finding data within the default and/or user defined categories.
Favourites are organized by categories. You can create an unlimited number of categories. (NDrive
comes with three common categories pre-made (Personal, Friends, and Work). Inside each
category you can have an unlimited number of favourites.
Clicking on Favourites will bring you to the “Favourites Menu”. Ours is shown below.
Picture 36 - Navigating to a Favourite
We want to find our friend Kai so we click on the “Friends” category.
Page 33

33
Picture 37 - Favourites within a Favourite Category
Here we show how to find a Favourite to navigate to.
More information on managing, creating, editing, and deleting Favourites can be found in the “My
NDrive” >> “Managing My Favourites” section.
Recent Locations contains a history of all previous searches. This category will save streets,
cities, POIs, postcod e s and co o rdinates.
Picture 38 - List of Recent Lo ca tions
Page 34

34
Postcode - All str eets belong to a specific postcode. You can use the postcode to find a g iven
Picture 39 - Searching by Post Code
street. Sometimes it is faster, more practical and precise to use postcodes instead of city or
location. After entering the postcode NDrive will display the list of streets within that postcode.
NOTE: If a given street spans more than one postcode, NDrive will only display the segment t hat
belongs to the postcode near you.
Coordinates are a great way to search for a location or destination. If you know the coordinat es
of the location to be searched you can input them directly.
Coordinates can be input in any of the three most used format. The format will adjust
automatically to your input as long as lo ng as it is one of t he three recogni z ed format s, or y ou can
adjust from the settings menu.
Picture 40 - Search by Coordinates
Page 35

35
This option can also be used for geo-caching or to search for off-road locations. If you have
Picture 42 - Itinerary Points
pedestrian or auto routing mode enabled NDriv e wil l navigat e to t he nearest street prox imal t o the
coordinate given. If you wish to navi gate directly to the coordinat e then just input the coordinat e
in the correct format and navigate.
Itinerary i s found in the Navigate submenus but not in Find. It is the last option on the second
page.
Picture 41 - Navigating to an Itinerary
The Itineraries feature allows you to plan several stops or waypoints for your trip. When you
choose to Navigate to an Itinerary NDrive will display all created itineraries. You can select the one
you want.
Page 36

36
NDrive will calculate Itinerary routes based on the settings in the “Ro uting Options” Menu.
Please refer to the “My NDrive” >> “Managing My Itineraries” section for information about
adding, editing, and deleting itineraries.
Before beginning to navigate make sure that you have the GPS in the “On” setting, otherwise
NDrive will route in simulation mode.
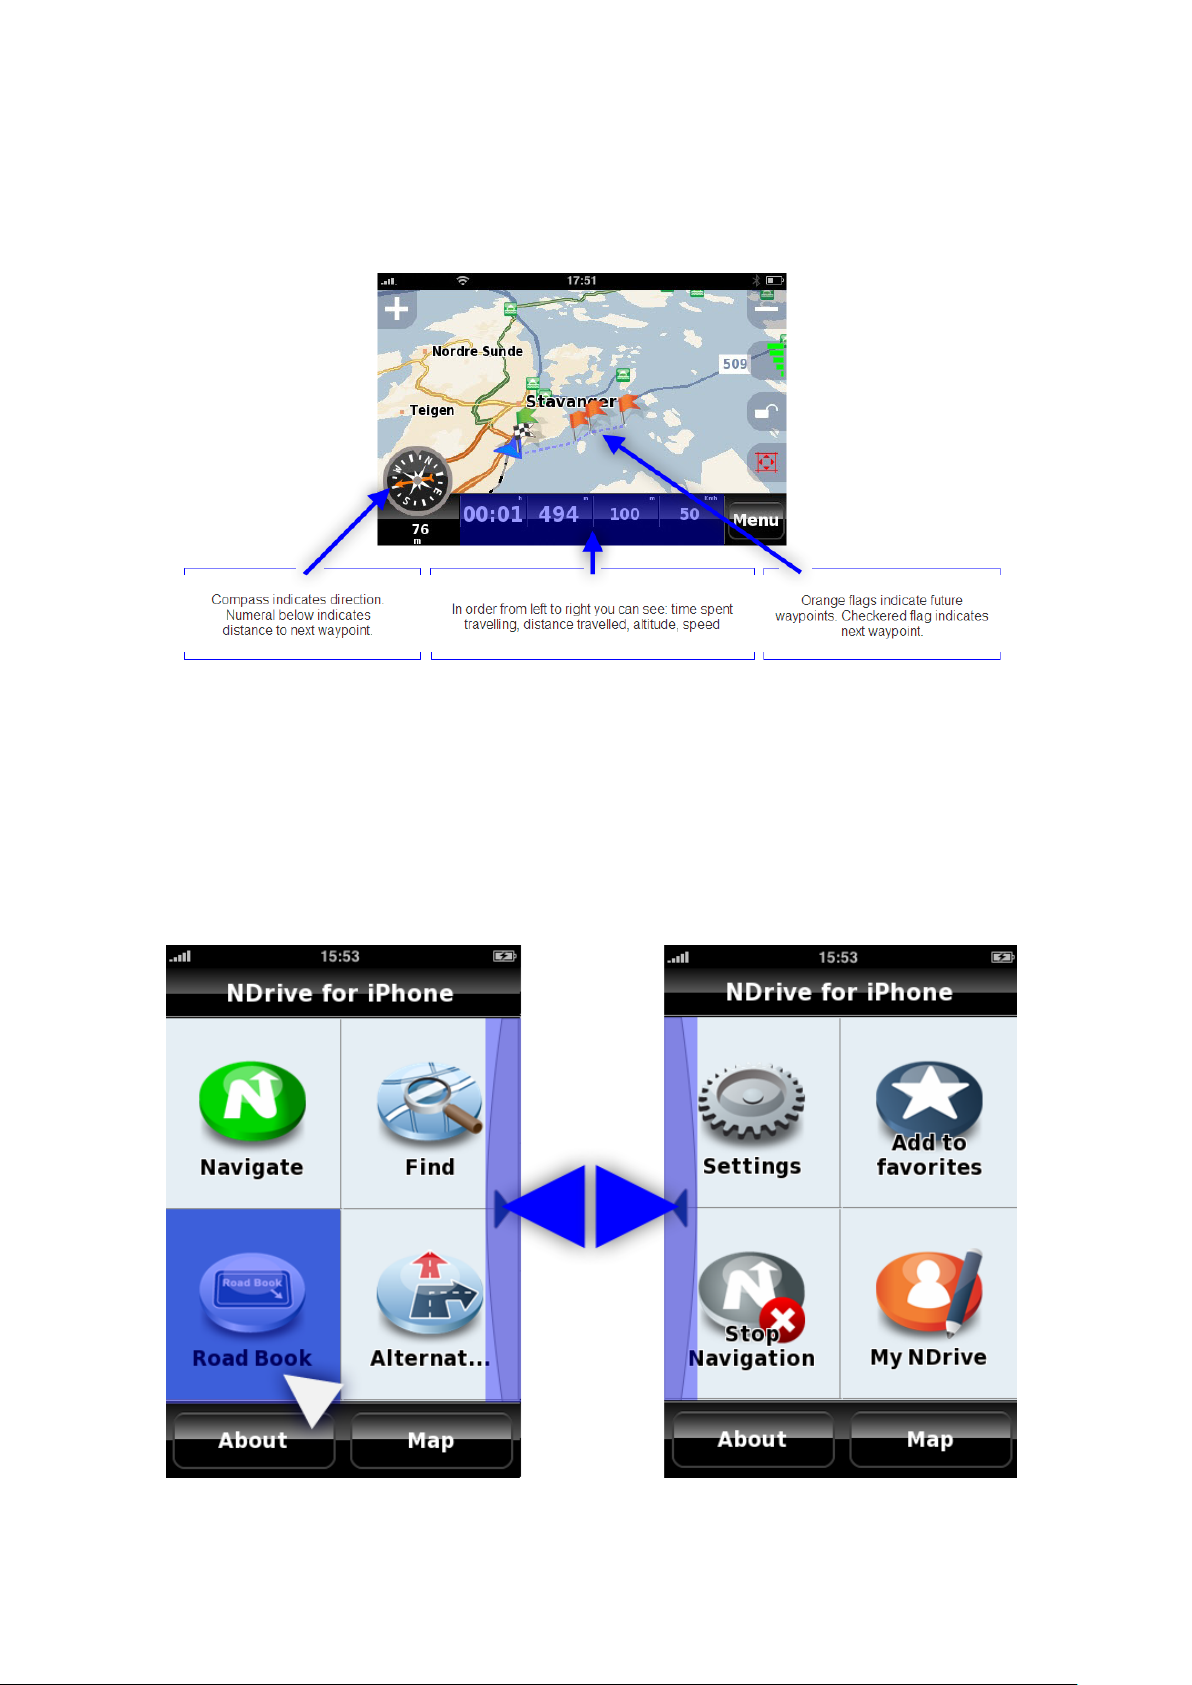
Using an itinerary is like dividing your route into stages. The first waypoint will be the destinat ion
for the first stage of your route. T h e checkered flag is used to indicate the completion of one stage
of your trip. Orange flags indicate other itinerary waypoints that you will navigate to after
completing the first s tage.
Picture 43 - Itinerary Route Calculation and Overview
You can choose to begin navigating to other itinerary points whenever you like by pressing the
“My Itinerary” key.
Page 37

37
Picture 44 - Display current Itinerary
This will display your itinerary. Selecting individual points will yield the following options.
Picture 45 - Changing the Itinerary in-transit
Mark as visited – forces NDrive to skip the selected wa ypoint.
Next Destination – forces NDrive to reroute to the waypoint you chose as the Next Destination.
Page 38

38
Move up – moves the selected itinerary point one place higher in the itinerary. (Ex: if you move
Picture 46 - Navigation screen
the point Oxford two places then the first destination for your trip will be Oxford instead of
Cambridge).
Move down – the reverse of Mov e up. This function changes the order of waypoints to visit by
moving a selected waypoint lower.
Choosing different options will cause NDrive to recalculate your route to get to the new
destination.
You are also able to add itinerary points at any time during your trip via map interface or My
NDrive >> Manage My Itineraries.
The Navigatio n Display Screen
When you choose a place to navigate to, then NDrive will perform the routing calculation and
begin navigating. If the GPS is set to off, then NDrive will run in simulation mode. If the GPS is set
to on then it will navigate normally.
There is a lot of information in the navigation display. The image above describes the information
that you will see. The green flag indicates your starting point.
If you exceed the predefined speed limit then the speedometer will cha nge color and give a voice
warning.
Most of the other control functions have already been described in the Map Interface section.
Navigating with Adventure mode is slightly different.
Page 39
39
Adventure Mode
Picture 47 - Adventure Mode
Adventure mode is a feature unique to NDrive. Routing in adventure mode will disregard any
restrictions and route you directly from one location to another. It’s best for when your outdoors.
With adventure mode you can see different kinds of information, see below.
Roadbook and Al ternatives
Roadbook and route alternatives options only appear during Navigation. The road book indicates
every manoeuvre you will make while on the way to your destination. It lists type of t urn, total
distance to that point, distance to next turn, expected time it will take to reach that turn, and
street information for each manoeuvre.
Picture 48 - Show Road Book
Page 40

40
Picture 49 - Road Book details
Picture 50 - Alternative Route Calculation
Return to the previous menu and choose to “Calculate Alternatives”. When you choose to calculate
alternatives you will see a new menu. This can be used to find other paths to your destination.
From the next menu you can choose to calculate an alternative, calculate original (if you are
already following an alternative path), define a “Roadblock”, or avoid part of the route.
Page 41

41
Picture 51 - Alternatives Menu
If you choose to “Calculate alternative” or the original route, then NDrive will perform the
calculation automatically.
Or you can choose to block sections of the road you know are slow or un-useable via the
“Roadblock” option.
Picture 52 - Road Block Options
The “Avoid Part of the Route” option will enable you to have more control over which specific
roads you want to avoid
during navigation
. The image below demonstrates how to use it.
Page 42

42
Picture 53 - Avoid Part of the Route screen
Pressing recalculate will bring you back to the map screen. You can also click back until you get
the map option to exit without saving changes to your route.
7. MY NDRIVE
Information you can find in this section
• My Account
• Managing Favourites
a) Organizing Favourites
b) Creating Categories
c) Adding Favourites
d) Editing Favourites
e) Deleting Favourites
• Managing Itineraries
a) Creating Itineraries
b) Editing Itineraries
c) Adding/Changing Waypoints in an Itinerary
d) Deleting Itineraries
• Communities
a) Sharing/Publishing to the NDrive Community
b) Downloading Community Information
Page 43

43
Features Overview
Picture 54 - My NDrive Menu
Manage Favourites will allow you to creat e, de lete, ed it, and o rga nize favourit es ca teg ori es. Y ou
can also edit the appearance preferences for each category. With NDrive it is als o poss ible t o share
your favourites using the Communities feature.
Manage Itineraries allows you to create, edit, and delete customized itineraries. This is also the
menu that is used to add waypoints to itineraries.
My Account is used to set up your account. Without an account it is not possible to use
community features.
Communities gives you access to information that has been shared by other users. It also
enables you to share your own favourites.
Define/Modify “Home” lets you change the setting of the special favourite type: “Home”.
My Account
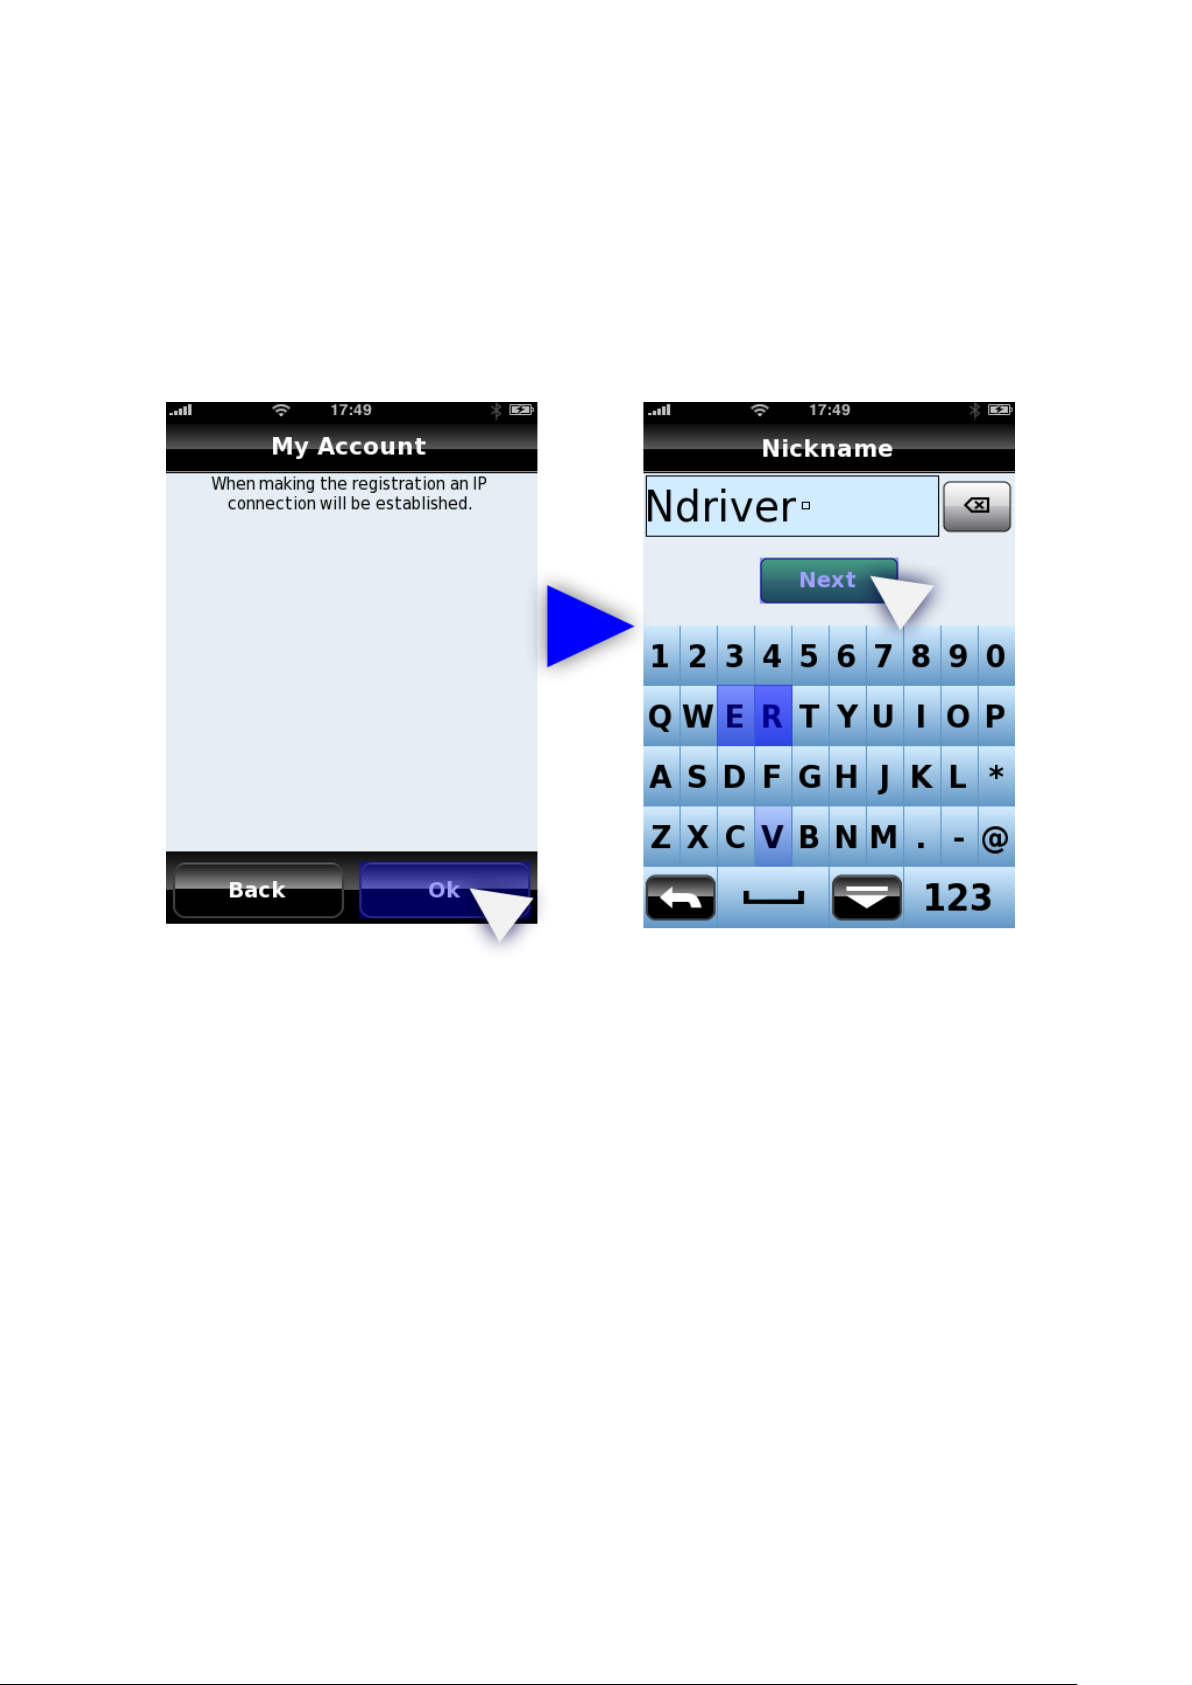
The first thing to do when visiting this menu is to set up your NDrive account.
Having an account enables you to access NDrive community sharing features.
Setting up an account is as simple as establishing a data connectio n, choosing a username and
password, and clicking ok.
Page 44
44
Your username is what other users will see when they see information you’ve posted in
Picture 55 - Setting up an Account
communities, so choose a name with that consideration in mind.
You can always set up a new account with a diff erent username and password by re-entering the
“My Account” menu.
Note: By data connection we mean that you must have a connection to the internet v ia GPRS, 3G,
ActiveSync, or wirel ess network access. Any charges for accessing t his connection are charged by
the internet provider . NDrive does not take part in the process.
Use the screens below as a guide if you have difficulties setting up your account.
Page 45

45
Picture 56 - Setting up an Account (Nickname and Password)
Picture 57 - Account Registration Completion
Page 46

46
Picture 58 - Waiting for Confirmation from server
Managing Favourites
You can store Favourite places on NDrive, such as places that you visit frequently, locations of
personal interest, places to visit, friends´ addresses, client’s addresses, etc.
Any point on the map can be designated as a Favourite, ev en if it is off road. You can store an
unlimited number of favourites on your database and place them inside the default categories
(Personal, Friends, and Work) or create new categories.
As mentioned before you can also share your favourites with other NDrive users via the
Communities feature. However, there are some limitations to what you can share. The default
categories and data that you have already downloaded from other users cannot be published. In
order to share you will need to create a new category.
Please open the “Manage my Favourites” Menu.
Add a new Favourites Category
After having opened the “Manage My Favourites” menu you will see a “+” in the bo ttom cent re of
the screen. Press that icon and you will be given the option to add a new favourite’s category
(Add).
Click the “+” icon.
The next menu you will see is displayed below.
Page 47

47
Picture 59 - Adding a new Favourites Category
There are five adjustable settings for user-made Favourites ca tegories.
• Name
• Visible (on map)
• Minimum Scale (that the icon will be visible at)
• Maximum Scale (that the icon will be visible at)
• Icon
1. Choose a title for your favourite’s category and enter it into the name field.
2. Choose if you would like favourites in that category to be visible on the map.
3. The minimum scale determines at which distance the icon will appear. (Ex: if you set the
minimum scale to 5km, then you will not see any favourite lo cations within that category unless
you are 5km or more away. If you set the minimum distance to 20m then the favouri te will alway s
appear unless you are very close or outside the maximum scale setting.
4. Maximum scale is just the opposite. If you set the maximum scale to 5km and then zoom out so
that you can see the whole state our country the favourite icon will no longer appear.
5. Choose an icon to represent favourites in this group.
Page 48

48
Picture 60 - Entering Favourite Category detail s
Picture 61 - Selecting an Icon for a new Favourites Category
Page 49

49
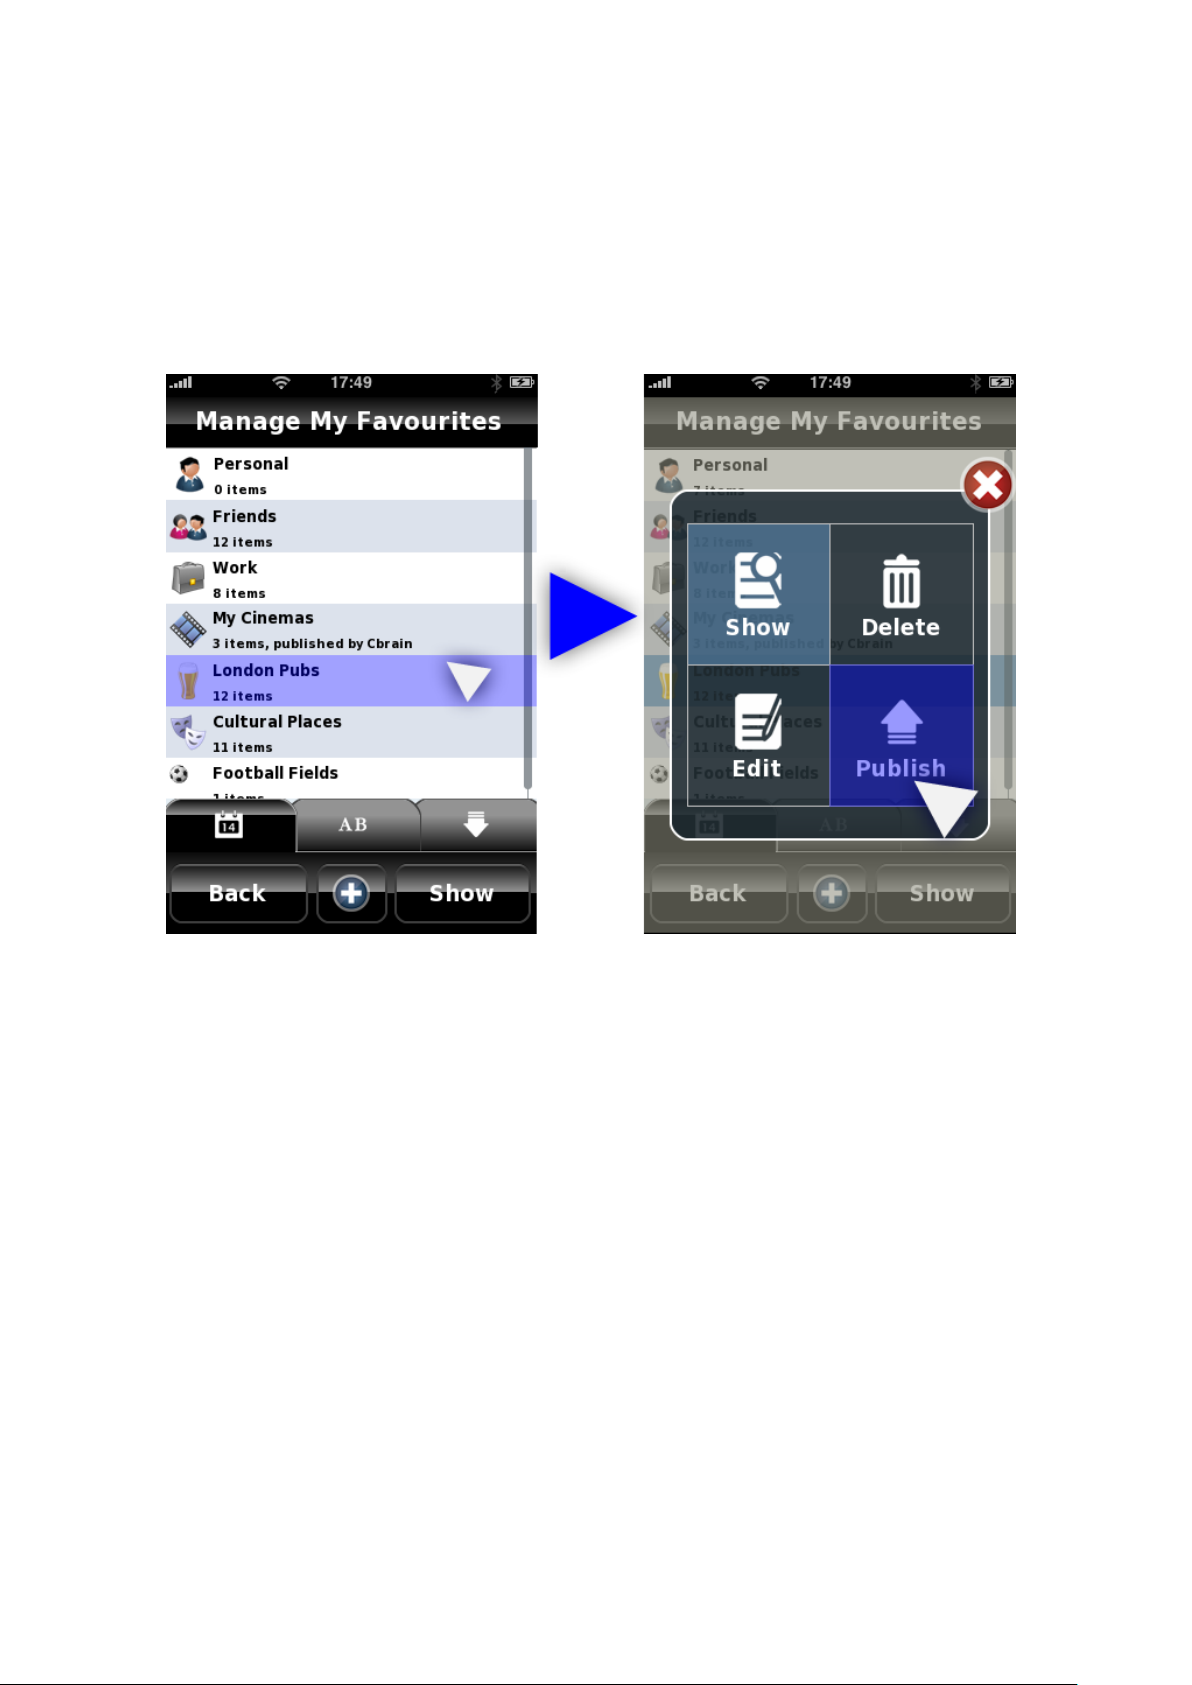
Picture 62 - Favourite Category modification options
Editing a Favourites Category
Whenever you click on a Group of Favourites a new options menu will appear – as above.
Show: Opens the group and shows the Favourites included on that group.
Edit: Edit the group’s definitions.
Delete: Removes the selected group (Only user created groups can be removed).
Publish: Uploads the selected group to NDrive communi ties. (Refer to Communities section)
Choose the “Edit” option. This will once more bring up the menu with five ad justable sett ings. See
“Adding a new Favourites Category” for details
Adding a Favourite
New that you have your favourite categories defi ned it is time to fill them with data point s. There
are two different ways to add a favourite:
• Use Find to search for a location. Once found click the blue star next to Menu.
• Click anywhere on the map. Then click the blue star near Menu.
Page 50

50
Picture 63 - Adding detailed information about a new favourite point
Picture 64 - Updated Favourites Menu
Once you click the blue star a new field will be displayed. In this field you can enter extended
favourites information like the address , phone number, URL, fax, e-mail, and a description. You
must also pick a name for the favourite as well as select the group it will belong to.
Clicking ok will complete the process and your new favourite will be active.
Page 51

51
Editing a Favourite
To edit a favourite follow this path: “My Ndrive” >>> “Manage My Favourites” >>> Choose the
category to which your favourite belongs. Then choose “Show” from the pop-up window.
The contents of that category will appear.
Click on the favourite you want to edit. T here will be a small informat ion i con at the bo tt om centre
of the screen, in between Back and Map. Click the information button and choose to edit.
All the information you enter will enable interactive functions. Wri ting a phone number will enable
you to make calls, having a web address will allow you to navigate to that favourite’s website, etc.
If you do decide to make a call, open a browser, or send an e-mail yo u will need to restart NDrive
afterwards.
Removing a Favourite
To remove a favourite you can follow a process similar to the edit process.
To delete a favourite follow this path: “My Ndrive” >>> “Manage My Favourites” >>> Choose the
category to which your favourite belongs. Choose the “Show” option.
The contents of that category will be shown.
Click on the favourite you want to delete. There will be a small information icon at the bottom
center of the screen, in between Back and Map. Click the information button and choose to delete
the favourite.
Deleting a Favourites Category
To delete a Favouri tes category enter the “My NDrive” section and select Manage My Favourites.
Select the category y ou would like to delete. A menu will appear with options to show, edit, delete,
and publish. Choose to delete the category.
Default categories cannot be deleted.
Managing Itineraries
Itineraries are a means to create a pre-planned route for a trip. One can add via points
(waypoints), and places to stop along the way. Itineraries can be very useful for planning longer
trips, or trips with multiple stops.
You can create as many itineraries as y ou like. You can organize them by date or alphabetically
using the tabs near the bottom of the screen.
Creating Itineraries
To create an itinerary go to “My NDrive” >>> “Manage My Itineraries”.
Page 52

52
Press the “+” (plus sign) at the bottom centre of the screen and you will b e given the option to
“Create” an itinerary.
Picture 65 - Creating a new Itinerary
An “Unnamed Itinerary” with no data points will open. You can add waypoints by pr essing t he “+”
plus sign at the bottom centre of the screen. Press the Add option and you will be taken to the
Add to Itinerary screen.
Page 53

53
Picture 66 - Add waypoints to a new Itinerary
This is similar to the “Find” menu. You can search for itinerary points by Home, Address, POI,
Nearby POI, Favourite, Recent location, Postcode, and Coordinates.
Picture 67 - Selecting the first Waypoint in a new Itinerary
Page 54

54
Choose a waypoint and press “Done” in the bottom right corner. You will be prompted to add a
Picture 68 - Editing Itinerary Name, Icon, and Description
Name, Description, and Icon for the new itinerary.
You can add more waypoints to this itinerary by using the same “+” (plus button).
Editing Itineraries
To edit an itinerary select an itinerary from the Manage my Itineraries menu.
You will see a window with three options: Show, Edit, and Delete.
Please select “Edit”.
In this screen you can change the itinerary name, description and icon.
Page 55

55
Picture 70 - Showing waypoints in an Itinerary
Picture 69 - Managing an Itinerary
Adding/Changing Waypoints in an Itinerary
To add, rearrange, or delete waypoints from an itinerary go to Manage My Itinerar ies and select
an itinerary. When you select an itinerary you will have three options: show, edit, delete. Choose
“Show” to view the waypoints of the it inerary. You can also use the “Show” butt on in the bottom
right corner of the “Manage My Itineraries” menu.
Page 56

56
Picture 71 - Complete Itinerary after adding additional waypo ints
After selecting “Show” you will see your itinerary and all waypoints .
To add a new waypoint you can use the “+” (plus sign) at the bottom centre of the screen. The
point you add will be placed as the last destination in your itinerary.
To change the order of those points, v i ew po i nts on the map, or delete points just select a point. A
new menu will appear. There are seven operations you can perform from this menu. Use “Move
up” or “Move down” to move the waypoint, “Delete” to remove it, and “Above” or “Below” t o add
another waypoint above or below the point selected.
Page 57

57
Picture 72 - Changing the order of Waypoints to visit / Adding new Waypoints
Best way to ad d Itinerary Poin ts
We highly recommend adding points to your itinerary using this method. If you add
waypoints via the “+” or “Above” and “Below” options available in the pop-up menu then the
waypoints will be called by their proper names (ex: House o f Parliament as opposed to unknown
street).
To add waypoints via the map interfa ce exit the Manage My Itineraries menu and return to t he
map screen. Press on the desi red area. Two new icons will appear at the bottom of the screen.
Press the orange flag icon to add the point to an itinerary.
Picture 73 - Adding a Waypoint from the Map Interface
The itineraries menu will open. Select the itinerary to add it to. It will be added as the last
waypoint. You can add points quickly vi a hotkeys on the map interface but the result ing waypoint
will display the closest street or coordinat es and not the name of the waypoint. Hence, the other
method is better.
Deleting an Itinerary
Deleting an Itinerary is quite simple. Just select the iti nerary and choose “Delete” from the pop-up
menu. Confirm and you are finished.
Page 58
58
Communities
You will need to have an account to publish any categories to communities. If you do not have one
yet, please create one now. For instructions see the “My Account” section.
It is very easy to share your favourites with other users.
To share a category, go to the “Manage my Favourites” and select a favourite’s category. The
“Show”, “Edit”, “Delete”, “Publish” menu will appear.
Picture 74 - Publishing a Favourite's Category to NDrive Communities
Choose to publish the favourite’s category. When additional prompts appear click “Yes”.
Page 59

59
Picture 75 - Uploading the London Pubs Category
Picture 76 - Selecting an Icon for the Favourites Category
It will take a couple hours for your favourite to be available on the server for other users to
download.
You can verify that it was uploaded by visiting the Communities Menu and searching for the title.
Page 60

60
You can update your submissions by selecting them and then choosing the update option.
Picture 77 - Community Category Information Display
Picture 78 - Downloading from Communities
Downloading Community Information
To download information from the community go t o “My NDrive” >>> “Communities”. You will see
the following menu.
Select a category that looks interesting and click to download.
Page 61

61
To vote on a category go to the Communities menu. There you will see categories that you have
Picture 79 - Voting on Communities items that you have Downloaded
downloaded (represented by a green arrow pointing downwards). Click on any of these categories
to vote. You can vote on the categ ory at any time. Rat ings help to det ermine usefulness for othe r
community members and for the publisher.
Page 62

62
8. CONCLUSION
This concludes our explanation of NDrive’s features and functions. If your question was not
answered in this guide please contact us at
Product updates will be made available through the iTunes store. Look for features that will be
added in the coming soon section of the product description in iTunes.
We hope you have a wonderful experience using your NDrive product.
support@ndrive.com.
 Loading...