

Page 1

Page 2

1
Table of Contents
Introduction ................................................................................................................... 2
Starting NDrive .............................................................................................................. 3
INTERACTIONS WITH THE MAP SCREEN ..................................................................... 5
USING THE KEYBOARD ................................................................................................ 7
THE MAIN MENU .......................................................................................................... 11
SETTINGS .................................................................................................................... 12
FIND & NAVIGATE ....................................................................................................... 22
MY NDRIVE .................................................................................................................. 41
CONCLUSION .............................................................................................................. 58
UG-N10PND-01-EN-EN-201005
Page 3

2
INTRODUCTION
Welcome to the NDrive 10 user guide for PNDs.
This guide was created with two purposes: to provide clear explanation of NDrive functionalities and
to serve as a comprehensive resource for those seeking to get more out of NDrive.
In this guide you can find answers to your questions about NDrive 10. You can also discover new ways
to use NDrive more effectively.
General Application Information
NDrive is a GPS application which can be used on many devices, like mobile phones, portable
navigation devices, tablets and smartbooks. NDrive provides reliable navigation guidance via visual and
voice directions.
Maps
NDrive partners with the best map companies in order to bring you detailed and accurate digital maps
for all our products. NDrive works with large map providers like Tele Atlas and NAVTEQ, but also with
local map providers.
Interface and Navigation
The user interface is simple and user friendly. That makes it more intuitive for the average user. But
beneath its simplicity lies a powerful engine that delivers superior navigational control directly into the
hands of both experienced and inexperienced users.
As a navigation application, NDrive’s primary purpose is to help you get to your destination safely,
quickly and effortlessly. You can learn more about how to use NDrive by reading this guide.
Using NDrive and this User Guide
If you want to search for a specific function in NDrive check the Table of Contents above to find the
appropriate section. You can also browse through the manual for more comprehensive details on all the
functions of NDrive.
UG-N10PND-01-EN-EN-201005
Page 4

3
Starting NDrive
In this section you will learn…
• How to quickly start using NDrive 10.
• What you have to do in the first steps.
• How the map and location information is displayed.
The first steps
The first time you load NDrive you will see this screen:
Loading screen
Next you will be prompted to choose the language you would like to use. You can tap the loudspeaker
icons to listen to the different voices before choosing. Make sure that the volume on your device is at an
audible level.
Tap on a language
to select it
Language choice screen
Tap on the
loudspeaker icon to
listen to the voice
When finish press
ok to move on
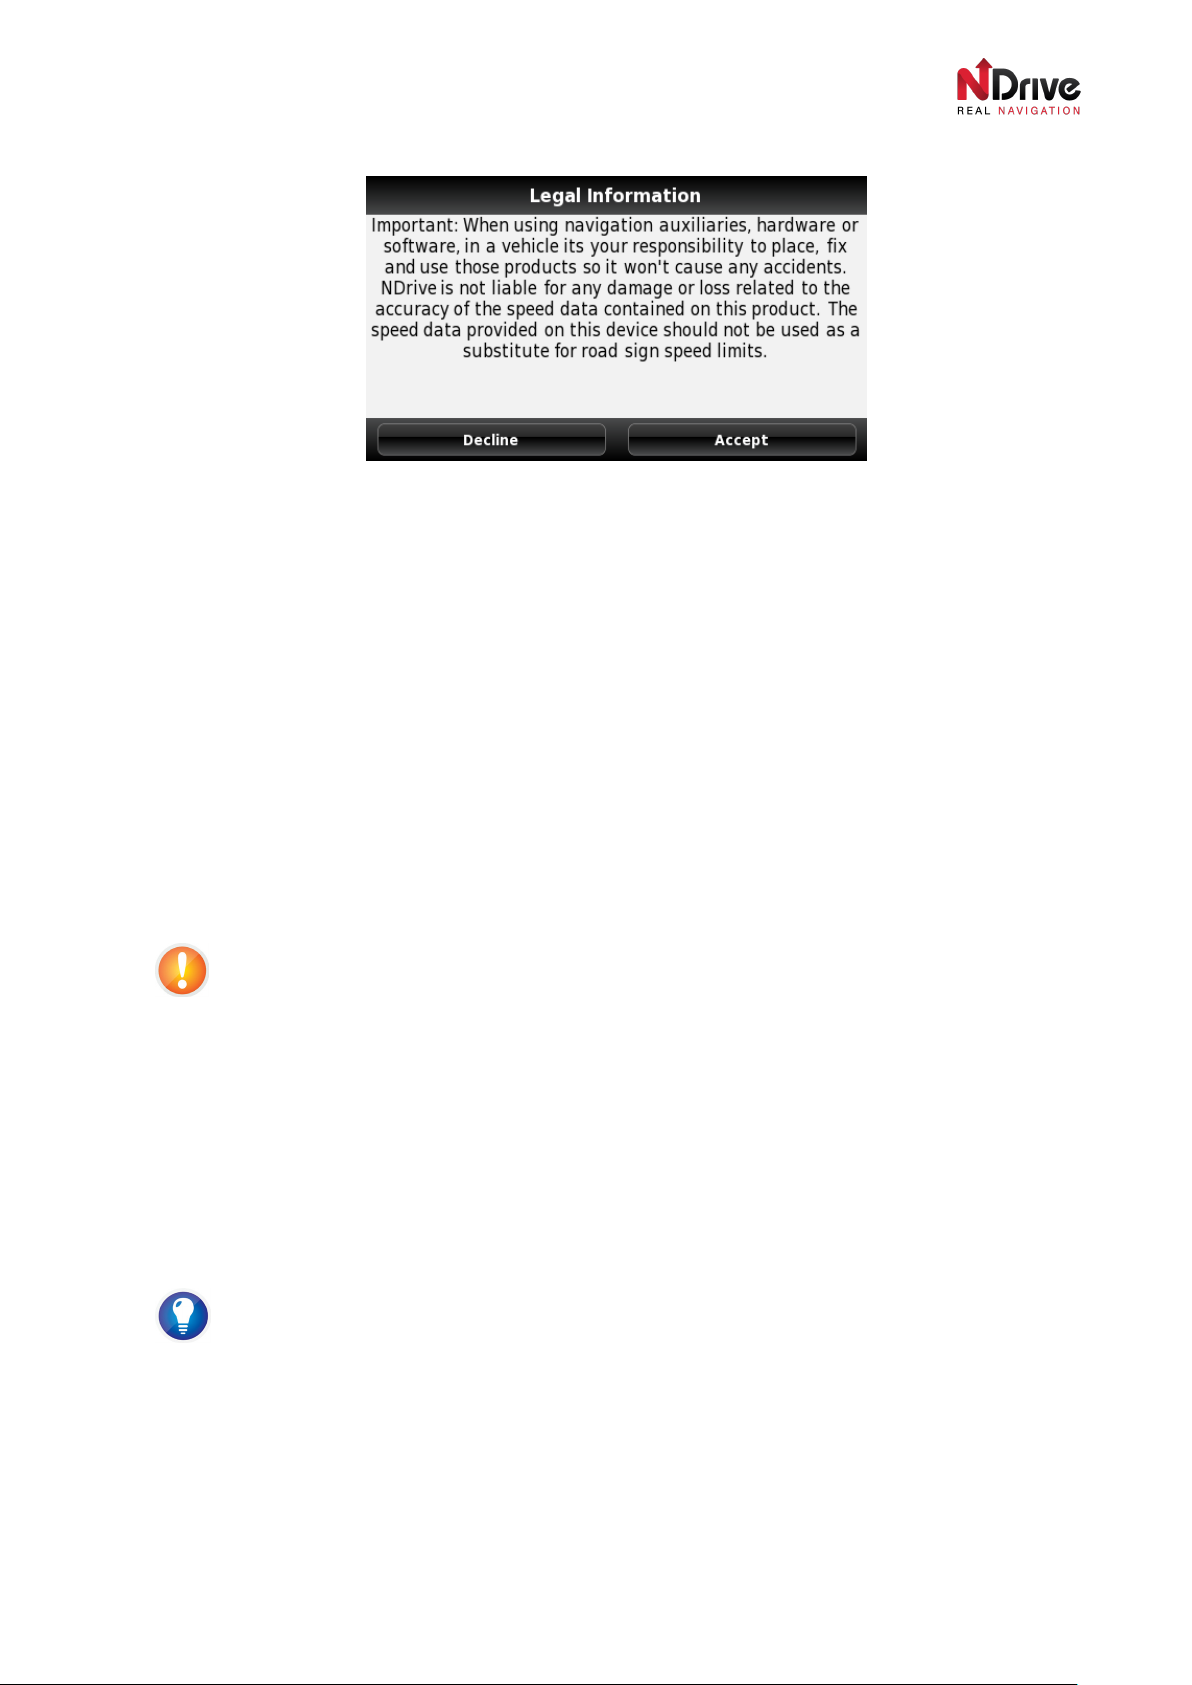
After choosing the language, click “OK” to continue. On the next screen you will see a legal information
screen and an anonymous data collection screen. Read them through the first time you use the product
and choose an option.
UG-N10PND-01-EN-EN-201005
Page 5
4
Legal information screen
The legal Information screen contains a disclaimer about liability and speed data accuracy. You can
select to show/hide this menu on start up. You can always view it in NDrive’s About > Startup Wizard
section.
After these initial steps you will be shown the map.
Getting your position and GPS signal performance
If this is the first time you’re using your NDrive, it may take several minutes to gain a signal, ranging
anywhere from 5 minutes to 25 minutes. The time it will take can vary greatly depending on where your
location. This is normal for all GPS systems when booting for the first time.
Once you receive a signal you will see the NDrive map displaying your current location (as shown in the
next chapter).
What to do if my NDrive cannot get a GPS signal
Your GPS may not lock on because you are in a location where it is not possible to receive GPS
reception. If you are indoors where the signal is very weak you will need to find a location where
you can receive the signal. GPS works best when it has a clear view of the sky. Clouds, fog, rain
and snow are barriers and will cause a GPS signal to degrade.
Signal reception will often be weaker in cities with very large buildings. The signal will bounce off
these buildings multiple times before reaching your receiver, resulting in a much weaker signal.
How to improve GPS signal quality?
When using NDrive in the car, place it high on the dashboard, near the windshield. GPS reception
will increase dramatically.
Some cars have athermic heat reflecting windshields, which will prevent GPS signals from being
received. When using your device under these conditions, please place it closer to your vehicle’s
side windows (non athermic).
UG-N10PND-01-EN-EN-201005
Page 6

5
Zoom in button
Zoom out button
Time/speed /
Map pan/zoom
GPS signal
Bottom display field
Map tilt buttons
INTERACTIONS WITH THE MAP SCREEN
In this section you will learn…
• What types of information can be displayed on a map.
• How to interact with a map using the touch screen of your NDrive.
First look on the map
Map overview
On the Map-Display Screen you will find all important information needed to navigate. Roads, parks,
lakes, rivers and urban areas are all presented in very intuitive way. Amongst all of them, users can find
on the map small colourful icons representing Points of Interest and, in some maps, 3D buildings* and
radar (safety cameras) positions. You can tap any POI icon to get more information about it. You can
also point to any other place on the map to get information about the name of the street, 3D building or
to find the coordinates of the place.
* may be hidden on devices with low performance.
The most important information and meters that you can find on the map are presented on the following
screens.
lock/unlock
distance controls
First look on the map – waiting for GPS signal
strength bar
When you click Menu, you will go directly to the Main Menu, where you can manage your settings, find
new places or start navigation.
When your position is locked on the map, you will see it indicated by a green pointer. Tap on the map
for more options:
UG-N10PND-01-EN-EN-201005
Page 7

6
The two icons on the
bottom are used to add a
point from the map to the
Favourites or itineraries
list.
Icons on the bottom of the screen are used to mark a location as a Favourite, an Itinerary waypoint,
Start Navigation. To learn more how to use them, please check the sections Managing Favourites,
Managing Itineraries in the chapter My NDrive, and refer to Find & Navigate chapter to check how
you can navigate.
Changing the Volume Level
When navigating, you can also change the volume level. If you slide your finger over the bottom of the
screen you can increase/decrease the audio level.
UG-N10PND-01-EN-EN-201005
Page 8

7
USING THE KEYBOARD
In this section you will learn…
• How to adjust the Keyboard to your preferences.
• How to use the Keyboard efficiently.
• How to switch between QWERTY/ABC, numbers and extended character sets.
Using the keyboard
With NDrive you can choose to view the keyboard in either ABC or QWERTY mode. The user can enter
letters, numbers, punctuation, and other characters. Access the keyboard menu via Settings
►Language. You will have a choice between two types of keyboards.
UG-N10PND-01-EN-EN-201005
Switching between QWERTY and ABC ke yboard
Page 9

8
The difference between keyboard sets is presented below.
Difference between keyboards: left - ABC, right – QWERTY
Pressing the “123” button on the QWERTY or ABC keyboards will display a keypad with larger
numbers and symbols, as well as the buttons: “EXT” and “#&?”. Pressing any of the buttons will let
you access extended symbols and characters keyboards.
UG-N10PND-01-EN-EN-201005
Page 10

9
Extended symbols and characters keyboard
Pressing the Back Arrow button at anytime will take you back to the menu.
You can access extended characters by pressing the “Ext” button, as shown below.
UG-N10PND-01-EN-EN-201005
Page 11

10
Extended Characters
Using non-Latin-based alphabets
NDrive provides users with more than one type of alphabet. It is a must when you use a map
from, for example,. Arabic or Russian speaking countries, where the names of the streets need
to be presented with non-Latin characters.
Non-Latin characters are directly connected with the map.
Users can choose the type of the alphabet by selecting between two available map sources. In
order to do so, please go to Menu ► About ► Map , click on the map and then on the Select
button. In this way, not only the keyboard set but also all street names will be displayed and fully
searchable in the new alphabet.
Capitalisation of the letters and country specific characters
NDrive automatically changes the capitalisation of the letters, so there is no need to
worry about addresses which are capitalised in a special way. The search engine will
find them anyway!
The same rule applies to country specific characters. Although some of them are
available on the Extended Characters keypad, the search engine will also find the
address when they are not included.
UG-N10PND-01-EN-EN-201005
Page 12

11
Calculate routes
Explore the map,
Adjust basic
THE MAIN MENU
In this section you will learn…
• How to find your way starting from the Main Menu
• What can you find in the main sections of the Main Menu.
Main menu’s main sections
When you open NDrive you’ll see Menu with buttons visible on the screen
• Navigate
• Find
• My NDrive
• Settings
Tapping the side-button or scrolling the screen to the right, you will find additional buttons:
• Programs (available on selected devices)
• Help
• Games (available on selected devices)
• Exit/Turn Off
• About
and directions
Access Community
features, manage
Favourites and
itineraries
Main Menu Options
POI and Favourite
locations
operational settings
and preferences
All these buttons can be considered the top level of NDrive operation.
Generally the most important sections are Find and Navigate, which are the starting points for most of
users. Settings and My NDrive are mostly connected with setting up and personalisation of the
software.
The next section is a complete guide about all NDrive’s Settings. We recommend you to read it if you
aren’t familiar with navigation software and if you want to take full advantage of NDrive 10.
UG-N10PND-01-EN-EN-201005
Page 13

12
SETTINGS
In this section you will learn…
• How to setup general settings and s ystem language.
• How to change the map appearance.
• How to adjust Favourites and Points of Interest display settings.
• How to choose from different routing modes.
• How to personalise the Safety Options.
• Where to change the time and coordinates format.
• Where to turn on/off GPS reception.
Overview
The way NDrive operates is both enabled and restricted by its Settings. Understanding the different
types of settings will improve NDrive’s usability.
Overview of the Settings Menu
The NDrive Menu system is controlled by a touch screen interface. To select an option, tap on it once.
To slide the menu horizontally or vertically, drag your finger across the screen. Opening the Settings tab
will display a number of configurable options.
UG-N10PND-01-EN-EN-201005
Page 14

13
General and Language Settings
General Settings
Speaker
Speaker toggle allows you to change the NDrive voice instruction volume from “Off” to level “5”.
Light
This toggle allows you to manage the backlight. There are two possible options:
• Smart Power Save: Backlight changes to a brighter level when close to a direction change.
• Light Sensor: Backlight changes according the light sensor (when available).
• System: NDrive uses the predefined Backlight level.
Light dim timing
Light will dim after 30 seconds of disuse and then sleep.
UG-N10PND-01-EN-EN-201005
Page 15

14
Language Menu
In the Language Menu you can set the language and other language related display options such as
keyboard mode (ABC or QWERTY) and KpH/MpH.
Changing the language changes spoken instructions
Please remember, when you change the language the spoken instructions also change
to the language of your choice.
Map Appearance
Changing options in this menu will change how you view the map and its components.
UG-N10PND-01-EN-EN-201005
Map Appearance Settings
Page 16

15
Lane Assistant*
The Lane Assistant informs you which side of the road you should you keep in, in order to easily follow
the calculated route. The Lane Assistant toggle lets you choose between a detailed and simple display
mode for Lane Assistance graphics.
*Available in selected maps.
Templates:
Templates allow you to choose your map colour scheme. There are five template choices: Default,
Night, Balanced, Britannica, and Contrast.
In this panel you can also control auto toggling between Night/Day mode.
Map Appearance Settings
Templates gallery
UG-N10PND-01-EN-EN-201005
Page 17

16
Favourites
Favourites option allows you to add, edit, import/export and remove Favourites categories. NDrive
comes with three categories, Personal, Friends, and Work, but you can create an unlimited number as
required. More information about managing Favourites can be found in the chapter My NDrive, in the
Managing Favourites section.
Points of Interest
POI settings let you choose Point of Interest categories and groups that will be shown as icons on the
map. Use this option to make the POI you are interested in visible and others invisible.
You can tick the
categories to make
them visible on the
map
Clicking in the square
button will enable you
to select/deselect all
categories
Personalisation of displayed P OIs
Routing Options
The configuration of NDrive’s routing options will greatly influence NDrive’s route selection.
UG-N10PND-01-EN-EN-201005
Page 18

17
Picture 1 - Routing Options Menu
It is important to know the behaviour of the different modes so you can understand how the software will
make decisions.
Fastest is best for longer routes. NDrive will calculate routes by giving high priority to faster roads, such
as highways, minimizing travel time. This option is usually not the best for travelling short distances, or
within cities.
Shortest: Shortest is primarily used for in-city driving or for travelling over short distances. NDrive will
choose the shortest path to the destination by minimizing the distance to drive. This routing option does
not consider the quality of the road, speed limit, number of stop signs, or any other attribute that may
make the road less desirable.
Pedestrian Mode: NDrive will calculate routes without considering traffic signs, such as one-way signs.
This mode will avoid any road that does not give pedestrian access, such as highways.
Adventure Mode: This mode does not use the normal map. Instead it functions primarily by using a
free-roaming mode with waypoints. Extra tools such as the compass are available in Adventure Mode.
Refer to the Adventure Mode section in the end of Find & Navigate chapter for more details.
Tolls: This option is especially valuable if tolls are an important consideration. There are two options for
tolls.
• Yes: If necessary, NDrive will use toll roads to minimize travel time.
• Avoid: When calculating its route, NDrive will avoid toll roads. If that is not possible, you’ll hear
the word “Toll” at the end of the calculation.
Safety Options
UG-N10PND-01-EN-EN-201005
Page 19

18
Safety Options Settings
There are three other safety options that will help you to avoid speeding tickets and other penalties:
Speed Limit Alarm
NDrive will activate a sound alarm every time you exceed a certain speed that is predefined by you. The
alarm sounds once and is not persistent. In this menu you can set the speed that you do not want to
exceed or turn the alarm off.
Accuracy of speed indicator
Actual speed may be different than the speed shown by your vehicle’s speed indicator.
Road Speed Alert
Every road has a legal speed limit. You can choose to be warned each time you exceed the speed limit
of the road you are travelling on. You can select to have Visual Alerts, Sound Alerts, or Visual and
Sound Alerts. Road speed information comes from a database. This database may not always have
complete information about the legal speed limits of roads in your area. Hence, you will not receive a
warning if no speed limit is listed for that road.
UG-N10PND-01-EN-EN-201005
Page 20

19
Safety Camera Alert
Enable or disable the fixed radar alerts (safety cameras).
Radar/ Safety Cameras information availability
NDrive only offers Radar and Safety Camera information in a selection of maps.
System
In this menu you can choose to display the time in 12 Hour or 24 Hour format.
You can also use the button Restore Settings, which sets all settings to a default position.
System Settings
Local time settings
There is no need to set the local time. As soon as NDrive fixes a satellite signal, NDrive will
automatically set the local time.
UG-N10PND-01-EN-EN-201005
Page 21

20
GPS Settings
There are two settings you can change in the GPS section.
GPS settings
GPS:
Here you can turn GPS on and off.
Disabling GPS signal reception enables you to use NDrive’s Demo Mode
When the GPS signal reception is disabled, you are able to calculate and start routing in demo
mode. In order to start simulation, you just need to select a travel place in the Navigate section.
Problems with disabled navigation
Normal navigation will only work properly with the GPS on. If you are moving and the GPS isn’t
updating your position, this is one of the settings you should check.
UG-N10PND-01-EN-EN-201005
Page 22

21
Coordinates
Here you can set the coordinates format. This setting also defines the search/navigate by coordinates
format. There are three format types:
• DMS – Degrees, minutes and seconds
• DMM – Degrees and minutes
• DDD – Degrees and decimal degrees
UG-N10PND-01-EN-EN-201005
Page 23

22
FIND & NAVIGATE
In this section you will learn…
• How to search and navigate to an Address, Points of Interest and Favourites.
• How to search or navigate to a location if you only know its coordinates.
• How to quickly navigate to Home.
• How to find recently visited or searched locations.
• How to navigate to a postcode.
• How to create a travel plan using the Itineraries section.
• What the functions Road book and Alternatives do.
Overview
After you define your settings, the next step is to begin using your GPS. Return to NDrive’s Main Menu.
Find and Navigate can be used together or independently, depending on what you want to do. How to
use these functions will be explained in detail in this section.
Navigate/Find Icons
The major difference between Navigate and Find is that when you use Navigate to search for a
location, the last action you perform will be to calculate the route.
Conversely, the last action in Find is to display the selected point on the map, without any route
calculation occurring.
Find is a tool that you can use to explore all the locations on your map. That includes everything from
addresses, postcodes, coordinates, Points of Interest, Favourites, and recent locations.
Find can also be used to find 3D landmarks, restaurants, gas stations, and other POIs.
Navigate is an option to use whenever you want to calculate a route or distance, from your starting
point.
If the GPS is set to “On” and you have a valid signal then the navigation mode will activate
automatically once a destination has been chosen, allowing you to see all the instructions and
manoeuvres on the way to your destination. To stop navigation, simply return to the second screen of
the Main Menu and select Stop Navigation.
UG-N10PND-01-EN-EN-201005
Page 24

23
Search methods
Stop Navigation icon
If NDrive has no GPS signal (inside buildings or closed locations, or where there is extensive
interference) NDrive will ask you if you want to route in Simulation Mode. Simulation mode shows all
directions until the destination point.
When you click on Navigate or Find a number of search methods will appear. You can navigate and
search by Address, Recent Location, POI (Point of Interest), Home, Favourite, Nearby POI, Online
POI, Coordinates and Postcode.
There is one more option in the Navigate submenu that is not in the Find submenu - it is Itinerary.
Search Methods
UG-N10PND-01-EN-EN-201005
Page 25

24
NDrive allows you to search or navigate to:
• Address
• Recent Location
• Favourite
• Home
• POI/Nearby POI/Online POI
• Postcode
• Coordinates
You can also navigate using Itineraries
All search methods are explained individually, starting with Home, in the following subsections. Here we
would like to show you how to effectively use the search engine which is used whenever you want to
search for POI, Address or Coordinates.
Address search queries will take you to a screen where you can input information into three following
fields:
City name ► Street name ► The number of the building or crossing
Other search queries like POI or Postcode search queries will also start by asking you to input a City
name
Below you can see two different search screens (POI and Address search screens)
UG-N10PND-01-EN-EN-201005
POI and Address search screens
Page 26

25
If you want to see more results of a search, without scrolling, then you can hide the keyboard by sliding
your finger downwards in the area of the screen where the results are shown. You can then go through
all the other results by sliding your finger vertically along the screen.
Changing the country and state*
When searching or looking a place where you want to navigate to, you can change the country or
state you are searching in by clicking on the flag on the left of the text entry bar. This only applies
if your NDrive application contains multiple countries or states.
*available on selected countries
Using the names of the streets
There is no need to write the “avenue”, “street”, or “road” type.
When searching for cities the results will be ranked by population. Whenever you choose locations or
streets, NDrive keeps a record of all your choices in order to accelerate future searches.
Searching by Initials
NDrive enables you to search by initials, which means that you don’t have to input the full name of the
city, street, POI etc. In the vast majority of situations, you will be able to choose your destination from
the search list after inputting the first two or three characters of its name.
Searching by Initials
Tip: Initials for long street and city names
Moreover, you can also very easily search for names which consist of more than one word. For
instance: instead of writing “Frankfurt am Main”, you can just input three characters: ”F A M”
and choose the name from the searching list visible below the input text area
UG-N10PND-01-EN-EN-201005
Page 27

26
Searching Points of Interest and Nearby Points of Interest
Points of Interest can be searched in two different ways. It is possible to search within the city (or
location) limits or by proximity (related to the place where you are located on the map).
Just after selecting the City where you would like to perform your search, you will see a selection screen
where it is possible to choose between searching by All POIs, by Groups (e.g. Transportation) or even
by Group Category (e.g. Railway Station).
POI search screen
Below we have opted to search in New York for POI ► Visit ► Tourist Attraction. Then we search for
locations starting with a “St L” which refers to “Statue of Liberty”.
UG-N10PND-01-EN-EN-201005
Places to visit – Tourist attractions – Statue of Liberty
Page 28

27
Fast and effective POI searching
The general rule is that if you don’t know which sub menu a POI may be found in, you can
expand your searching range by using more general categories. For instance, searching All
Restaurants will reveal all locations that serve food and have seating. While the Fast Food
search will only reveal the data designated as being Fast Food.
So, if you are uncertain of which group a POI can be found in (e.g. Will the Metropolitan Museum
of Art in NYC be found in Tourism ► 3D landmarks or in Culture” ► Museums? Actually, in
that case it can be found in either way), you can use a category that contains more sub
categories, like All POIs. The more general and inclusive the category the longer the search will
take.
More information about POI
Once you have selected a POI to visit, you will have different options available such as Contact, Get
More Information, and Navigate. Use the Information button at bottom centre to display the options.
Interactive POI information
Searching for Nearby POI
Nearby POI will enable you to search based on the POI that are closer to your location. You will have
the same search options as a regular POI search but they will be ranked by proximity to your location.
UG-N10PND-01-EN-EN-201005
Page 29

28
Searching Nearby POIs
UG-N10PND-01-EN-EN-201005
Page 30

29
How to search for a Nearby POI while, for example, drinking coffee in a restaurant?
If you do not have a valid GPS signal (e.g. You are indoors or you are simulating a route with disabled
GPS module) NDrive will display the points that are close to the point selected on the map. It may be
useful when you are finishing your lunch downtown and you would like to check where the nearest
bookstore or gas station is. Make sure the point in the map is your current location.
Searching & Navigating to Favourites
Favourites can be used to store places that are special or frequently visited so that you can find them
without the need of doing a complete search every time.
Searching by Favourites means finding data within the default and/or user defined categories.
Favourites are organised by categories. You can create an unlimited number of categories. (NDrive
comes with three pre-made, common categories: Personal, Friends, and Work). Inside each category
you can have an unlimited number of Favourites.
Clicking on Favourites will bring you to the Favourites Menu, which is shown below.
Navigating to a Favourite
After clicking the Friends category you will see a list with all the friends you’ve created. To start
navigating to Adam, just click on his name.
UG-N10PND-01-EN-EN-201005
Page 31

30
This is an example of a
navigate to their location.
Recent locations appear with
Clicking here will clear all
menu shown after clicking
on the Friends category.
You can see: how far your
friends are from you and
Searching for a friend
Where to create, manage and delete Favourites?
If you would like to learn how to create, manage, edit and delete Favourites, please refer to the
Chapter “My NDrive”, where we present more information about that section.
Recent locations
Recent Locations contains a history of all previous searches. This category will keep streets, cities,
POIs, postcodes and coordinates until you clear them.
an icon indicating the type of
location.
Click on any recent location to
find/navigate to it.
recent locations.
List of Recent Locations
Searching by Postcode
All streets belong to a specific postcode. You can use the postcode to find a given street. Sometimes it
is faster, more practical and precise to use postcodes instead of city or location. After entering the
postcode, NDrive will display the list of streets within that postcode.
UG-N10PND-01-EN-EN-201005
Page 32

31
Searching by Postcode
Important: What if one street spans more than one postcode?
In this particular situation NDrive will only display the segment that belongs to the postcode
nearest to you.
Searching by Coordinates
Coordinates are a great way to search for a location or destination. If you know the coordinates of the
location to be searched, you can input them directly.
Coordinates can be input in any of the three most used formats. The format will adjust automatically to
your input as long as it is one of the three recognised formats, or you can preset the desired format in
the Settings menu.
UG-N10PND-01-EN-EN-201005
Page 33

32
Use these toggle buttons to
You can change the
Settings menu
below.
Use this button to delete
If you have any problems understanding any of the fields, you can crosscheck with the next screen.
Insert the coordinates you want
to search here. You must use
the coordinate format indicated
Use this key to go to the
previous screen
Search by Coordinates
indicate direction
Search by Coordinates
inserted characters
coordinates format in the
UG-N10PND-01-EN-EN-201005
Page 34

33
Tip: Usage for coordinates search
This option can also be used for geo-caching or to search for off-road locations. If you have
pedestrian or auto routing mode enabled NDrive will navigate to the nearest street to the
coordinate given. If you wish to navigate directly to the coordinate, the Adventure Mode must be
enabled in the Settings – Routing Options Menu. Then just input the coordinate and navigate.
Navigating to Itineraries
Itinerary is found in the Navigate submenu but not in the Find submenu.
Navigating to an Itinerary
The Itineraries feature allows you to plan several stops or waypoints for your trip. When you choose to
Navigate on an Itinerary, NDrive will display all created itineraries (in this example only one). You can
select the one you want.
UG-N10PND-01-EN-EN-201005
Page 35

34
Itinerary Points
NDrive will calculate Itinerary routes based on the settings in the Routing Options Menu.
Please refer to the My NDrive ► Managing My Itineraries section for information about adding,
editing, importing/exporting and deleting itineraries.
Before beginning to navigate, make sure that you have the GPS in the “On” setting, otherwise NDrive
will route in simulation mode.
Using an itinerary is like dividing your route into stages. The first waypoint will be the destination for the
first stage of your route. The chequered flag is used to indicate the completion of one stage of your trip.
Orange flags indicate other itinerary waypoints that you will navigate to after completing the first stage.
Grey flags represent places already passed.
UG-N10PND-01-EN-EN-201005
Page 36

35
Itinerary Route Calculation and Overview
You can choose to begin navigating to other itinerary points whenever you like by pressing Menu ► My
Itinerary. Here you’ll have the chance to:
Mark as visited – forces NDrive to skip the selected waypoint.
Next Destination – forces NDrive to reroute to the waypoint you chose as the Next Destination.
Move up – moves the selected itinerary point one place higher in the itinerary. Making it the first to be
visited.
Move down – the reverse of Move up. This function changes the order of waypoints to visit by moving a
selected waypoint down.
Choosing different options will cause NDrive to recalculate your route to get to the new destination.
You are also able to add itinerary points at any time during your trip via map interface or My NDrive
►Manage My Itineraries.
The Navigation Screen
Standard Navigation Mode
When you choose a place to navigate to, NDrive will perform the routing calculation and begin
navigating. If the GPS is set to Off, NDrive will run in simulation mode.
Firstly you will have an opportunity to take a short look at the entire route from the top. Then the
application will zoom in to a level more useful for navigation.
UG-N10PND-01-EN-EN-201005
Page 37

36
Top display area
Signposts (1)
Time/distance/speed indicators
Bottom display area
Lane assistance (1)
Lock buttons: zoom/pan
Next manoeuvre area
Navigation screen
(1) Available on selected maps
Your position is displayed as a blue/green, three-cornered indicator. On the screen you will also see a
green flag (representing your starting point) and chequered flag (representing the end of your route).
There is also a lot of additional information that can be displayed on the navigation screen. Some of this
was described in the Map Interface section. In addition, you can find some special fields with
information useful only during driving. The full list of fields is presented below (please refer to the
illustration above):
1. Top Display area - usually displays the name of the street following the next manoeuvre or
direction.
2. Lane Assistance (displayed occasionally) – indicates the lane that you should choose in order to
follow the calculated route.
3. Signpost (displayed occasionally) – shows signposts on roads.
4. Next Manoeuvre area – shows the distance to the next manoeuvre (in miles, yards, kilometres,
meters or feet etc.) and its type (represented by the green curved arrows)
5. Time, distance and speed indicators (see the full list below)
6. Lock buttons: zoom and pan
7. Bottom display area – showing the name of a current street, country-road and system information
UG-N10PND-01-EN-EN-201005
Page 38

37
You can tap on the map and
To make it as simple as possible, NDrive lets you to choose what you would like to have presented on
the screen. Tapping the time, distance and speed controls you can choose to display different
indicators. Below, you can find the complete list of all available indicators:
Estimated time left to
destination
Speed limit on the current
street
Actual speed
Estimated time of arrival to
destination
Distance left to destination or
waypoint
Actual time
If you tap on the map, the bottom display area will display additional icons, also referred in the Map
Interface section. You can use them to add new Favourites or itinerary points to your personal list.
(Please refer to the chapter Interactions with the Map Screen)
add that location to your
Favourites or itineraries.
Navigation after tapping the screen
When navigating, you will also see green and yellow arrows on your route, over the map, indicating
the nearest turnings. Green arrows represents the next manoeuvre, yellow arrows show successive
manoeuvres.
Quick switching between simple and detailed signposts display
There are two modes of displaying signposts information: simple and detailed. You can select
them in Settings ► Map Appearance ► Signpost Display Mode or tap the signpost when
displayed, so it will immediately switch to the other mode.
Adventure Mode
Routing in Adventure Mode will disregard any roads. It’s perfect for off-road navigation, when you need
orientation to a location with no road access. In Adventure Mode, you can see different indicators on the
screen, see below.
UG-N10PND-01-EN-EN-201005
Page 39

38
Compass
Time/distance/speed/altitude
indicators
Adventure Mode
Using the Adventure Mode you will see a compass, distance, speed, and altitude indicators. Below you
can find the complete list of all the available indicators:
Travelled distance
Speed limit on the current street
Actual speed
Time to the next waypoint
Estimated time of arrival
Altitude
Actual time
Distance to destination
Road Book and Alternatives
Road Book, and Route Alternatives options only appear during navigation (not available in Adventure
Mode).
UG-N10PND-01-EN-EN-201005
Page 40

39
From left to right: Manoeuvre
From left to right: distance until
Road Book and Alter native Routes
The Road Book indicates every manoeuvre you will make while on the way to your destination. It lists
the type of turn, total distance to that point, distance to next turn, expected time it will take to reach that
turn, and street information for each manoeuvre.
symbol, exit number (if it’s a
rotary), street name and
number (if available)
Road Book details
the next manoeuvre, total
distance traveled, time
travelled
When you choose to calculate alternatives, you will see a new menu. This can be used to find other
paths to your destination.
From the next menu you can choose to Calculate an alternative, Calculate original (if you are already
following an alternative path), Define a Roadblock, or Avoid part of the route.
UG-N10PND-01-EN-EN-201005
Alternative Route Calculation
Page 41

40
Recalculates the original route
Calculates an alternative route
If you want to take a detour
If an entry is greyed out it
By marking a road with an X
Allows you to define a
roadblock or detour
Alternatives Menu
Avoid specific streets in the
route
You can also choose to block sections of the road you know are slow or unusable via the Roadblock
option.
and return to the main road,
you can use the Roadblock
Choose how long the
roadblock will be and NDrive
will recalculate your route.
function.
Road Block Options
The Avoid Part of the Route option will enable you to have more control over which specific roads you
want to avoid during navigation. The image below demonstrates how to use it.
means you have passed that
street.
The number below indicates
how far you’ve travelled.
Avoid Part of the Route screen
you can choose to avoid it.
NDrive will recalculate the
route based on your
selections.
Pressing Recalculate will bring you back to the map screen. You can also click Back to exit without
saving changes to your route.
UG-N10PND-01-EN-EN-201005
Page 42

41
MY NDRIVE
In this section you will learn…
• How to define your Home location.
• How to create, manage, edit and delete Favourites.
• How to create, manage, edit and delete Itineraries.
Features Overview
My NDrive is an area where you can keep personalised information that you create while using NDrive.
Define/Modify Home lets you change the location of your Home.
Manage Favourites will allow you to create, delete, edit, and organise Favourites categories. You can
also edit the appearance preferences for each category. With NDrive it is also possible to share your
Favourites using the Communities feature.
Manage Itineraries allows you to create, edit, and delete customised itineraries. This is also the menu
that is used to add waypoints to itineraries.
Define/Modify your Home
While setting up your account, it’s also a good idea to set up your Home location.
The Home key is a special Favourite. It can be set for one location that you use as a regular point of
departure, like your Home.
Defining Home
When you start defining Home, you will be directed to a menu similar to the Find Menu. You then have
to decide whether you want to find the location by searching for address, postcode, recent location etc.
Manage Favourites
UG-N10PND-01-EN-EN-201005
Page 43

42
Overview
You can store favourite places on NDrive, such as places that you visit frequently, locations of personal
interest, places to visit, friends’ addresses, clients’ addresses, etc.
Any point on the map can be designated as a Favourite, even if it is off-road. You can store an unlimited
number of Favourites on your database and place them inside the default categories (Personal, Friends,
and Work) or create new categories.
As mentioned before you can also share your Favourites with other NDrive users via Communities.
However, there are some limitations to what you can share. The default categories and data that you
have already downloaded from other users cannot be published. In order to share, you will need to
create a new category.
Adding a new Favourites Category
After having opened the Manage My Favourites menu you will see a “+” in the bottom centre of the
screen. Press that icon and you will be given the option to add a new Favourites category (“Add”).
Then you will see the Add New Category screen, as displayed below:
Adding a new Favourites Category
There are five adjustable settings for user-made Favourites categories.
• Name
• Visible – enable or disable the icon on the map
• Minimum Scale (that the icon will be visible at…)
• Maximum Scale (that the icon will be visible at…)
UG-N10PND-01-EN-EN-201005
Page 44

43
• Icon - personalise the icon
In order to create a new category:
1. Choose a title for your Favourites category and enter it into the name field.
2. Choose if you would like Favourites in that category to be visible on the map.
3. The minimum scale determines at which distance the icon will appear. (e.g. if you set the minimum
scale to 5km, then you will not see any Favourite locations within that category unless you are 5km
or more away. If you set the minimum distance to 20m then the Favourite will always appear unless
you are very close or outside the maximum scale setting.
4. Maximum scale is just the opposite. If you set the maximum scale to 5km and then zoom out so that
you can see the whole state our country, the Favourite icon will no longer appear.
5. Choose an icon to represent Favourites in this group.
All listed above steps, are also presented on the screens below:
UG-N10PND-01-EN-EN-201005
Entering Favourite Categor y details
Page 45

44
Selecting an Icon for a new Favourites Category
Editing a Favourites Category
Whenever you click on a Category of Favourites a new options menu will appear as above.
Show: Opens the group and shows the Favourites included in that group.
Edit: Edit the group’s definitions.
Delete: Removes the selected group (Only user-created groups can be removed).
Publish: Uploads the selected group to NDrive communities. (Refer to Communities section).
UG-N10PND-01-EN-EN-201005
Page 46

45
Favourite Category modification options
Choose the Edit option. This will once more bring up the menu with five adjustable settings
(see Adding a new Favourites Category for details).
Adding a Favourite
Now that you have your Favourite categories defined, it is time to fill them with data points. There are
two different ways to add a Favourite:
• Use Find to search for a location. Once found click the blue star next to Menu.
• Click anywhere on the map. Then click the star next to the Menu button.
UG-N10PND-01-EN-EN-201005
Page 47

46
Adding detailed information about a new Favourite point
Once you click the star, a new field will be displayed. In this field you can enter extended Favourites
information like the address, phone number, URL, fax, e-mail, and a description. You must also
pick a name for the Favourite as well as select the group it will belong to.
Clicking “OK” will complete the process and your new Favourite will be active.
Updated Favourites Menu
Editing a Favourite
To edit a Favourite follow this path: My NDrive ► Manage My Favourites ► Choose the category to
which your Favourite belongs to. Then choose “Show” from the pop-up window.
UG-N10PND-01-EN-EN-201005
Page 48

47
The contents of that category will appear.
Click on the Favourite you want to edit. There will be a small information icon at the bottom centre of the
screen, between Back and Map. Click the information button and choose to Edit.
Removing a Favourite
To remove a Favourite you can follow a process similar to the edit process.
To delete a Favourite follow this path: My NDrive ► Manage My Favourites ►Choose the category
your Favourite belongs to. Choose the “Show” option.
The contents of that category will be shown.
Select the Favourite you want to delete and click the small information icon at the bottom centre of
the screen, in between Back and Map. Click the information button and choose to delete the Favourite.
Deleting a Favourites Category
To delete a Favourites category, enter the My NDrive section and select Manage My Favourites.
Select the category you would like to delete. A menu will appear with options to show, edit, delete, and
publish. Choose to delete the category.
Default categories cannot be deleted.
Managing Itineraries
Overview
Itineraries are used to create a pre-planned route for a trip. One can add via points (waypoints), and
places to stop along the way. Itineraries can be very useful for planning longer trips, or trips with
multiple stops.
You can create as many itineraries as you like. You can organise them by date or alphabetically using
the tabs near the bottom of the screen.
Creating Itineraries
To create an itinerary go to My NDrive ► Manage My Itineraries.
Press the “+” (plus sign) at the bottom centre of the screen and you will be given the option to “Create”
an itinerary.
UG-N10PND-01-EN-EN-201005
Page 49

48
Creating a new Itinerary
An “Unnamed Itinerary” with no data points will open. You can add waypoints by pressing the “+”sign
at the bottom centre of the screen. Press the “Add” option and you will be taken to the Add to Itinerary
screen.
UG-N10PND-01-EN-EN-201005
Page 50

49
Add waypoints to a new Itinerary
This is similar to the Find Menu. You can add to an itinerary points like: Home, Address, POI, Nearby
POI, Favourite, Recent Location, Postcode, and Coordinates.
UG-N10PND-01-EN-EN-201005
Page 51

50
Selecting the first Waypoint in a new Itinerary
Choose a waypoint and press “Done” in the bottom right corner. You will be prompted to add a Name,
Description, and Icon for the new itinerary.
UG-N10PND-01-EN-EN-201005
Page 52

51
Editing Itinerary Name, Icon, and Description
You can add more waypoints to this itinerary by using the same “+” (plus button).
Editing Itineraries
To edit an itinerary select an itinerary from the Manage My Itineraries Menu.
You will see a window with three options: Show, Edit, and Delete.
Select “Edit”.
In this screen you can edit the itinerary name, description and icon.
UG-N10PND-01-EN-EN-201005
Page 53

52
Managing an Itinerary
Adding/Editing Waypoints in an Itinerary
To add, rearrange, or delete waypoints from an itinerary, go to Manage My Itineraries and select an
itinerary. When you select an itinerary you will have three options: show, edit, delete. Choose “Show”
to view the waypoints of the itinerary. You can also use the “Show” button in the bottom right corner of
the Manage My Itineraries menu.
UG-N10PND-01-EN-EN-201005
Page 54

53
Showing waypoints in an Itinerary
After selecting “Show” you will see your itinerary and all waypoints.
To add a new waypoint you can use the “+” (plus sign) at the bottom centre of the screen. The point
you add will be placed as the last destination in your itinerary.
UG-N10PND-01-EN-EN-201005
Page 55

54
Complete Itinerary after adding additional waypoints
To change the order of waypoints, view waypoints on the map, or delete waypoints, just select a
waypoint. A new menu will appear. There are seven operations you can perform from this menu. Use
“Move up” or “Move down” to move the waypoint, “Delete” to remove it, and “Above” or “Below” to
add another waypoint above or below the waypoint selected.
UG-N10PND-01-EN-EN-201005
Page 56

55
Changing the order of Waypoints to visit / Adding new Waypoints
Tip: What is the best way to add Itinerary Points?
We highly recommend adding points to your itinerary using this method. If you add waypoints via
the “+” or “Above” and “Below” options available in the pop-up menu then the waypoints will be
UG-N10PND-01-EN-EN-201005
Page 57

56
The itineraries menu will open. Select the itinerary to add it to. It will be added as the last
waypoint. You can add points quickly via hotkeys on the map interface but the resulting waypoint
will display the closest street or coordinates and not the name of the waypoint. Hence, the other
method is recommended.
Deleting an Itinerary
Deleting an Itinerary is quite simple. Just select the itinerary and choose “Delete” from the pop-up menu.
Confirm and the itinerary will be erased.
UG-N10PND-01-EN-EN-201005
Page 58

57
About and Help Options
In this section you will learn…
• What kind of information you can find in the About section.
• How to change the used map for another choice.
• What happens when you go to the Help section.
About & Help Overview
Inside the About section you can find information about the version of the software and map data. You
can also restart the Startup Wizard. Clicking on the blue icon, you will enable the wizard the next time
the application starts.
Pressing the Help button, will take you to the HTML version of the User Guide.
About section
In the Map subsection you can select a map source (possible if you have maps available in two
alphabets). You can also check if the map data is consistent or read more about its version.
UG-N10PND-01-EN-EN-201005
Page 59

58
CONCLUSION
This concludes our explanation of NDrive 10’s features and functions. If your question was not
answered in this guide please contact us at
We hope you have a wonderful experience using NDrive.
support@ndrive.com.
UG-N10PND-01-EN-EN-201005
 Loading...