


new diagnostic design
EasyOne Air
Operator’s Manual V1.1
© ndd Medizintechnik AG • Technoparkstrasse 1, 8005 Zurich, Switzerland • www.ndd.ch
9000007_01

Preface
1 Preface
1.1 Revision history of the EasyOne Air Operator’s Manual
Revision date Version Description
10 April 2018 V1.1 Revised version with minor changes
27 February 2017 V01 Initial release for market launch
Revision history of the EasyOne Air Operator’s Manual
1.2 Identification and revision of the EasyOne Air spirometer
This revision V1.1 of the EasyOne Air Operator’s Manual applies to
EasyOne Air with a serial number greater than 1,000,000 and with a firmware
version greater than V1.9.0.
If you are in doubt whether this revision of the Operator’s Manual applies to
your particular EasyOne Air sensor, please contact the ndd Servicing
Department.
You can find the most recent revision of this Operator’s Manual on the
ndd website.
Contact information, 4
On www.ndd.ch
For the US, on www.nddmed.com
1.3 Version history of the EasyOne Connect PC software
A comprehensive version history of EasyOne Connect is available on the
ndd website. Simply search for “version history” on the ndd website.
EasyOne Air requires EasyOne Connect V3.0 or later.
On www.ndd.ch
For the US, on www.nddmed.com
1.4 Intended use of the EasyOne Air spirometer
The EasyOne Air spirometer is intended for prescription use only to conduct
diagnostic spirometry testing of adults and pediatric patients over 4 years
old. The EasyOne Air spirometer is used by general practitioners, specialists,
and health care professionals, in hospitals and clinics, in pharmacies, and in
clinical settings in occupational medicine.
Operator’s Manual V1.1 • EasyOne Air • EasyOne Connect
© ndd Medizintechnik AG • Technoparkstrasse 1, 8005 Zurich, Switzerland • www.ndd.ch 2/144
4

Preface
1.5 Intended audience of this Operator’s Manual
This Operator’s Manual is intended for general practitioners, specialists, and
health care professionals. General practitioners, specialists, and health care
professionals are expected to have working knowledge of medical
procedures, practices, and terminology as required to conduct or interpret
diagnostic spirometry tests.
1.6 Using this Operator’s Manual
Read this Operator’s Manual prior to operating EasyOne Air and
EasyOne Connect.
Store the Operator’s Manual in a safe and easily accessible place.
1.7 Application Notes for further information
You can find further information on specialized topics in Application Notes on
the ndd website.
http://AppNotes.ndd.ch
For the US http://AppNotes.nddmed.com
1.8 Legal information
Due to continuing product innovation, specifications in this manual are
subject to change without notice.
© ndd Medizintechnik AG, Zurich, Switzerland. All rights reserved.
No part of this manual may be reproduced without written permission from
ndd.
ndd, ndd new diagnostic design and EasyOne are registered trademarks of
ndd Medizintechnik AG.
Bluetooth® is a registered trademark of Bluetooth SIG, Inc.
PCL® is a registered trademark of Hewlett-Packard Development Company, L.P.
Wi-Fi® is a registered trademark of Wi-Fi Alliance.
Microsoft and Windows are either registered trademarks or trademarks of
Microsoft Corporation in the United States and/or other countries.
Operator’s Manual V1.1 • EasyOne Air • EasyOne Connect
© ndd Medizintechnik AG • Technoparkstrasse 1, 8005 Zurich, Switzerland • www.ndd.ch 3/144
4

Preface
1.9 About electromagnetic interference
This device complies with part 15 of the FCC rules. Operation is subject to the
following two conditions: (1) this device may not cause harmful interference,
and (2) this device must accept any interference received, including
interference that may cause undesired operation.
For the US, see 47 Code of Federal Regulations Sec. 15.19(a)(3)
This Class B digital apparatus complies with Industry Canada RSS standards.
For Canada, see RSS-Gen — General Requirements for Compliance of Radio
Apparatus
1.10 Contact information
ndd Medizintechnik AG ndd Medical Technologies
Technoparkstrasse 1 300 Brickstone Square, Suite 604
CH-8005 Zurich, Switzerland Andover, MA 01810, USA
Tel: +41 44 445 2530 Tel: +1 978 470 0923
Fax: +41 44 445 2531 Fax: +1 978 470 0924
www.ndd.ch www.nddmed.com
1.11 Product registration
Registering EasyOne Air facilitates the handling of warranty claims.
To register EasyOne Air, go to the ndd website.
http://reg.ndd.ch
For the US http://reg.nddmed.com
1.12 Disposal
In the European Union, the product you have purchased should not be
disposed of as unsorted municipal waste. Please make use of your local
WEEE collection facilities to dispose of this product and otherwise observe
all applicable requirements.
Operator’s Manual V1.1 • EasyOne Air • EasyOne Connect
© ndd Medizintechnik AG • Technoparkstrasse 1, 8005 Zurich, Switzerland • www.ndd.ch 4/144
4

Table of contents
1 Preface 2
Revision history of the EasyOne Air Operator’s Manual . . . . . . . . . . . . . . . . . 2
Identification and revision of the EasyOne Air spirometer . . . . . . . . . . . . . . . 2
Version history of the EasyOne Connect PC software . . . . . . . . . . . . . . . . . . . 2
Intended use of the EasyOne Air spirometer . . . . . . . . . . . . . . . . . . . . . . . . . . 2
Intended audience of this Operator’s Manual . . . . . . . . . . . . . . . . . . . . . . . . . 3
Using this Operator’s Manual. . . . . . . . . . . . . . . . . . . . . . . . . . . . . . . . . . . . . . 3
Application Notes for further information . . . . . . . . . . . . . . . . . . . . . . . . . . . . 3
Legal information . . . . . . . . . . . . . . . . . . . . . . . . . . . . . . . . . . . . . . . . . . . . . . . 3
About electromagnetic interference. . . . . . . . . . . . . . . . . . . . . . . . . . . . . . . . . 4
Contact information. . . . . . . . . . . . . . . . . . . . . . . . . . . . . . . . . . . . . . . . . . . . . . 4
Product registration . . . . . . . . . . . . . . . . . . . . . . . . . . . . . . . . . . . . . . . . . . . . . 4
Disposal . . . . . . . . . . . . . . . . . . . . . . . . . . . . . . . . . . . . . . . . . . . . . . . . . . . . . . . 4
2 Safety information 11
Classification. . . . . . . . . . . . . . . . . . . . . . . . . . . . . . . . . . . . . . . . . . . . . . . . . . 11
General safety information . . . . . . . . . . . . . . . . . . . . . . . . . . . . . . . . . . . . . . . 11
Safety information regarding electromagnetic compatibility . . . . . . . . . . . . 14
About requirements for connections to external devices . . . . . . . . . . . . . . . 15
List of equipment icons. . . . . . . . . . . . . . . . . . . . . . . . . . . . . . . . . . . . . . . . . . 16
3 First-time setup 17
List of box contents . . . . . . . . . . . . . . . . . . . . . . . . . . . . . . . . . . . . . . . . . . . . . 17
About compatible printers . . . . . . . . . . . . . . . . . . . . . . . . . . . . . . . . . . . . . . . 19
Setting up the physical components . . . . . . . . . . . . . . . . . . . . . . . . . . . . . . . 20
Setting up the EasyOne Air spirometer . . . . . . . . . . . . . . . . . . . . . . . . . . . . . 24
Installing or updating the EasyOne Connect software on your PC . . . . . . . . 25
Operator’s Manual V1.1 • EasyOne Air • EasyOne Connect
© ndd Medizintechnik AG • Technoparkstrasse 1, 8005 Zurich, Switzerland • www.ndd.ch 5/144
10

4 Introduction 26
Introduction to the EasyOne Air spirometer. . . . . . . . . . . . . . . . . . . . . . . . . . 26
Overview of EasyOne Air . . . . . . . . . . . . . . . . . . . . . . . . . . . . . . . . . . . . . 26
About using the touchscreen . . . . . . . . . . . . . . . . . . . . . . . . . . . . . . . . . 28
Overview of the user interface of EasyOne Air . . . . . . . . . . . . . . . . . . . . 28
Introduction to the EasyOne Connect software . . . . . . . . . . . . . . . . . . . . . . . 33
Overview of features of EasyOne Connect . . . . . . . . . . . . . . . . . . . . . . . 33
Overview of the user interface of EasyOne Connect. . . . . . . . . . . . . . . . 34
List of terms and definitions . . . . . . . . . . . . . . . . . . . . . . . . . . . . . . . . . . . . . . 35
List of tests and parameters . . . . . . . . . . . . . . . . . . . . . . . . . . . . . . . . . . . . . . 36
List of abbreviations . . . . . . . . . . . . . . . . . . . . . . . . . . . . . . . . . . . . . . . . . . . . 39
About sources for predicted normal values . . . . . . . . . . . . . . . . . . . . . . . . . . 39
5 Cybersecurity 40
About cybersecurity. . . . . . . . . . . . . . . . . . . . . . . . . . . . . . . . . . . . . . . . . . . . . 40
About password policies and password expiration. . . . . . . . . . . . . . . . . . . . 40
About periodical software updates and patches. . . . . . . . . . . . . . . . . . . . . . 41
About backups. . . . . . . . . . . . . . . . . . . . . . . . . . . . . . . . . . . . . . . . . . . . . . . . . 41
Escalating in case of a security breach . . . . . . . . . . . . . . . . . . . . . . . . . . . . . 41
Dealing with a lost or stolen EasyOne Air or PC . . . . . . . . . . . . . . . . . . . . . . . 42
Using EasyOne Air securely – general guidelines . . . . . . . . . . . . . . . . . . . . . 42
6 Connectivity and data exchange 44
About connectivity between EasyOne products. . . . . . . . . . . . . . . . . . . . . . . 44
About integration of EMR systems . . . . . . . . . . . . . . . . . . . . . . . . . . . . . . . . . 45
About supported EMR standards . . . . . . . . . . . . . . . . . . . . . . . . . . . . . . 45
About possible workflows with your EMR system . . . . . . . . . . . . . . . . . 45
About using EasyOne Air to process orders . . . . . . . . . . . . . . . . . . . . . . 46
Overview of the integration process. . . . . . . . . . . . . . . . . . . . . . . . . . . . 46
Overview of the plug-ins for EMR systems . . . . . . . . . . . . . . . . . . . . . . . 47
About the HL7 plug-in . . . . . . . . . . . . . . . . . . . . . . . . . . . . . . . . . . . 47
About the GDT plug-in. . . . . . . . . . . . . . . . . . . . . . . . . . . . . . . . . . . 47
About the XML file exchange plug-in . . . . . . . . . . . . . . . . . . . . . . . 48
About custom plug-ins . . . . . . . . . . . . . . . . . . . . . . . . . . . . . . . . . . 48
Working with your EMR system. . . . . . . . . . . . . . . . . . . . . . . . . . . . . . . . 48
Processing orders from your EMR system . . . . . . . . . . . . . . . . . . . 48
Initiating a spirometry test with the direct-start workflow . . . . . . 49
Sending individual test results to your EMR system . . . . . . . . . . . 50
Operator’s Manual V1.1 • EasyOne Air • EasyOne Connect
© ndd Medizintechnik AG • Technoparkstrasse 1, 8005 Zurich, Switzerland • www.ndd.ch 6/144
10

7 Performing spirometry 51
Overview of the spirometry workflow . . . . . . . . . . . . . . . . . . . . . . . . . . . . . . . 51
About preparation of spirometry and instructions for the patient . . . . . . . . 52
About quality messages for trials and quality grades for tests . . . . . . . . . . 53
About posts and bronchodilation. . . . . . . . . . . . . . . . . . . . . . . . . . . . . . . . . . 54
Performing spirometry using EasyOne Air stand-alone. . . . . . . . . . . . . . . . . 54
Choosing a test and adding a new patient . . . . . . . . . . . . . . . . . . . . . . 54
Choosing a test and selecting an existing patient . . . . . . . . . . . . . . . . 55
About the summary screen . . . . . . . . . . . . . . . . . . . . . . . . . . . . . . . . . . . 56
Performing a complete test using EasyOne Air stand-alone . . . . . . . . . 57
Performing spirometry using EasyOne Connect in combination with
EasyOne Air . . . . . . . . . . . . . . . . . . . . . . . . . . . . . . . . . . . . . . . . . . . . . . . . . . . 63
Connecting EasyOne Air to EasyOne Connect . . . . . . . . . . . . . . . . . . . . 63
Performing a complete test using EasyOne Connect together with
EasyOne Air . . . . . . . . . . . . . . . . . . . . . . . . . . . . . . . . . . . . . . . . . . . . . . . 64
Performing a bronchial provocation test using EasyOne Connect in
combination with EasyOne Air . . . . . . . . . . . . . . . . . . . . . . . . . . . . . . . . 71
About interpreting results. . . . . . . . . . . . . . . . . . . . . . . . . . . . . . . . . . . . . . . . 72
List of quality messages and quality grades . . . . . . . . . . . . . . . . . . . . . . . . . 73
About quality messages and quality grades . . . . . . . . . . . . . . . . . . . . . 73
Quality messages for trials . . . . . . . . . . . . . . . . . . . . . . . . . . . . . . . . . . . 73
List of quality grades for tests . . . . . . . . . . . . . . . . . . . . . . . . . . . . . . . . 73
8 Breathing maneuvers for all available tests 75
About breathing maneuvers for all available tests . . . . . . . . . . . . . . . . . . . . 75
Performing the breathing maneuver for the FVC test. . . . . . . . . . . . . . . . . . . 75
Performing the breathing maneuver for the FVL test . . . . . . . . . . . . . . . . . . . 76
About the OSHA test . . . . . . . . . . . . . . . . . . . . . . . . . . . . . . . . . . . . . . . . . . . . 77
About the SSA test. . . . . . . . . . . . . . . . . . . . . . . . . . . . . . . . . . . . . . . . . . . . . . 77
Performing the breathing maneuver for the MVV test . . . . . . . . . . . . . . . . . . 78
Performing the breathing maneuver for the SVC test . . . . . . . . . . . . . . . . . . 79
9 Hygiene and cleaning 80
Avoiding contamination while performing spirometry . . . . . . . . . . . . . . . . . 80
List of cleaning solutions for EasyOne Air . . . . . . . . . . . . . . . . . . . . . . . . . . . 81
Operator’s Manual V1.1 • EasyOne Air • EasyOne Connect
© ndd Medizintechnik AG • Technoparkstrasse 1, 8005 Zurich, Switzerland • www.ndd.ch 7/144
10

10 Working with patient data and reports 82
Working with patient data and reports on EasyOne Air. . . . . . . . . . . . . . . . . 82
Adding a patient to the database on EasyOne Air . . . . . . . . . . . . . . . . . 82
Editing patient data on EasyOne Air. . . . . . . . . . . . . . . . . . . . . . . . . . . . 83
Deleting a patient from the database on EasyOne Air. . . . . . . . . . . . . . 83
Exporting data from EasyOne Air . . . . . . . . . . . . . . . . . . . . . . . . . . . . . . 84
Viewing and printing reports on EasyOne Air . . . . . . . . . . . . . . . . . . . . 85
About the reports menu and the history menu . . . . . . . . . . . . . . . . . . . 85
Working with patient data and reports in EasyOne Connect . . . . . . . . . . . . . 86
Adding patient data to the database of EasyOne Connect . . . . . . . . . . 86
Editing patient data with EasyOne Connect . . . . . . . . . . . . . . . . . . . . . . 86
Merging two patient data records with EasyOne Connect. . . . . . . . . . . 87
Deleting patient data from the database of EasyOne Connect . . . . . . . 87
Copying patient data between EasyOne Air and EasyOne Connect . . . 88
Viewing and printing reports with EasyOne Connect. . . . . . . . . . . . . . . 89
About the trend view with EasyOne Connect . . . . . . . . . . . . . . . . . . . . . 90
Assessing tests retrospectively and entering comments with
EasyOne Connect . . . . . . . . . . . . . . . . . . . . . . . . . . . . . . . . . . . . . . . . . . . 90
About exporting comprehensive data from EasyOne Connect . . . . . . . 91
About exporting XML from EasyOne Connect . . . . . . . . . . . . . . . . . . . . . 91
About exporting from EasyOne Connect to EasyWare . . . . . . . . . . . . . . 92
11 Configuration 93
Configuration of EasyOne Air . . . . . . . . . . . . . . . . . . . . . . . . . . . . . . . . . . . . . 93
Configurations in the settings menu of EasyOne Air . . . . . . . . . . . . . . . 93
Description of device settings of EasyOne Air . . . . . . . . . . . . . . . . 93
Description of spirometry settings of EasyOne Air . . . . . . . . . . . . 94
Description of display settings of EasyOne Air . . . . . . . . . . . . . . . 99
Description of print settings of EasyOne Air . . . . . . . . . . . . . . . . 100
Performing a firmware update with EasyOne Air . . . . . . . . . . . . . . . . . 101
Performing a backup of EasyOne Air . . . . . . . . . . . . . . . . . . . . . . . . . . 102
About the information menu of EasyOne Air . . . . . . . . . . . . . . . . . . . . 103
About the user menu of EasyOne Air . . . . . . . . . . . . . . . . . . . . . . . . . . 104
Configuration of EasyOne Connect . . . . . . . . . . . . . . . . . . . . . . . . . . . . . . . . 104
About saving or discarding configuration changes of
EasyOne Connect . . . . . . . . . . . . . . . . . . . . . . . . . . . . . . . . . . . . . . . . . . 104
About user handling and the default password of EasyOne Connect. 105
Description of general configurations of EasyOne Connect . . . . . . . . 105
Utilities > Configuration > General > Header . . . . . . . . . . . . . . . . 105
Utilities > Configuration > General > Storage . . . . . . . . . . . . . . . 106
Utilities > Configuration > General > System Settings . . . . . . . . 106
Activating user handling and administering user accounts . . . . 107
Description of test configurations of EasyOne Connect . . . . . . . . . . . 107
Operator’s Manual V1.1 • EasyOne Air • EasyOne Connect
© ndd Medizintechnik AG • Technoparkstrasse 1, 8005 Zurich, Switzerland • www.ndd.ch 8/144
10

Utilities > Configuration > Test > General . . . . . . . . . . . . . . . . . . 107
Utilities > Configuration > Test > Predicted . . . . . . . . . . . . . . . . . 108
Recalculating predicted values of previous test results . . . . . . . 112
Utilities > Configuration > Test > FVC / FVL . . . . . . . . . . . . . . . . . 113
Utilities > Configuration > Test > SVC . . . . . . . . . . . . . . . . . . . . . 114
Utilities > Configuration > Test > MVV . . . . . . . . . . . . . . . . . . . . . 114
Utilities > Configuration > Test > CalCheck . . . . . . . . . . . . . . . . . 114
Utilities > Configuration > Test > Provocation . . . . . . . . . . . . . . . 115
Description of device configurations of EasyOne Connect . . . . . . . . . 115
Description of report configurations of EasyOne Connect. . . . . . . . . . 115
Loading and selecting a custom report layout of EasyOne Connect . . 116
Description of printer configurations of EasyOne Connect . . . . . . . . . 116
Description of environment configurations of EasyOne Connect . . . . 117
12 Calibration check 118
About calibration check with EasyOne Air . . . . . . . . . . . . . . . . . . . . . . . . . . 118
Performing a calibration check with EasyOne Air . . . . . . . . . . . . . . . . . . . . 120
13 Servicing and troubleshooting 122
About charging the battery of EasyOne Air . . . . . . . . . . . . . . . . . . . . . . . . . 122
Checking for correct operation of EasyOne Air . . . . . . . . . . . . . . . . . . . . . . 122
List of troubleshooting solutions . . . . . . . . . . . . . . . . . . . . . . . . . . . . . . . . . 122
About reactivating EasyOne Air after storage . . . . . . . . . . . . . . . . . . . . . . . 124
Exporting logging information . . . . . . . . . . . . . . . . . . . . . . . . . . . . . . . . . . . 124
14 Specifications and bibliography 125
List of specifications for EasyOne Air . . . . . . . . . . . . . . . . . . . . . . . . . . . . . . 125
List of specifications for the lithium-ion battery of EasyOne Air. . . . . . . . . 128
List of order numbers and accessories for EasyOne Air . . . . . . . . . . . . . . . 131
List of system requirements for EasyOne Connect. . . . . . . . . . . . . . . . . . . . 132
List of bibliographic references . . . . . . . . . . . . . . . . . . . . . . . . . . . . . . . . . . 132
15 Index 134
Operator’s Manual V1.1 • EasyOne Air • EasyOne Connect
© ndd Medizintechnik AG • Technoparkstrasse 1, 8005 Zurich, Switzerland • www.ndd.ch 9/144
10

A Appendix 140
Electromagnetic Compatibility (EMC). . . . . . . . . . . . . . . . . . . . . . . . . . . . . . 140
General. . . . . . . . . . . . . . . . . . . . . . . . . . . . . . . . . . . . . . . . . . . . . . . . . . 140
Environment. . . . . . . . . . . . . . . . . . . . . . . . . . . . . . . . . . . . . . . . . . 140
EMC conformance . . . . . . . . . . . . . . . . . . . . . . . . . . . . . . . . . . . . . 140
Safety information. . . . . . . . . . . . . . . . . . . . . . . . . . . . . . . . . . . . . . . . . 140
Compliant cables and accessories. . . . . . . . . . . . . . . . . . . . . . . . . . . . 140
Wireless module . . . . . . . . . . . . . . . . . . . . . . . . . . . . . . . . . . . . . . . . . . 141
Electromagnetic emission. . . . . . . . . . . . . . . . . . . . . . . . . . . . . . . . . . . 141
Electromagnetic immunity . . . . . . . . . . . . . . . . . . . . . . . . . . . . . . . . . . 142
Operator’s Manual V1.1 • EasyOne Air • EasyOne Connect
© ndd Medizintechnik AG • Technoparkstrasse 1, 8005 Zurich, Switzerland • www.ndd.ch 10/144
10

Safety information
2 Safety information
2.1 Classification
In this manual, safety information is classified as follows:
WARNING
WARNING …
… indicates a hazard. If not avoided, the hazard can result in death or serious
injury.
CAUTION
CAUTION …
… indicates a potential hazard. If not avoided, the hazard may result in minor
injury and/or product/property damage.
2.2 General safety information
Electric Shock Patients and technicians may be exposed to dangerous voltage.
Connect only medical-grade power supply released by the manufacturer.
To ensure electric safety, connect only equipment, such as printers and networks, that complies with the IEC 60950-1 standard for the electrical safety of
IT equipment.
Patient health
hazard
Cross-
contamination and
adverse reaction
False diagnosis Inadequate qualification of the personnel that operates EasyOne Air can lead
Inadequate qualification of personnel who operate EasyOne Air can put the
patient’s health at risk.
The patient may suffer an asthma attack or a bronchospasm while performing
spirometry.
EasyOne Air must only be used by qualified personnel.
Do not leave the patient unattended while performing spirometry or in between trials.
Intended audience of this Operator’s Manual, 3
After use, the disposable EasyOne Flow Tube can be infectious.
Provide means for proper disposal of infectious waste, according to legal requirements.
to false results, false interpretation, and false diagnosis.
EasyOne Air must only be used by qualified personnel.
Intended audience of this Operator’s Manual, 3
Electric shock Do not open EasyOne Air.
Operator’s Manual V1.1 • EasyOne Air • EasyOne Connect
© ndd Medizintechnik AG • Technoparkstrasse 1, 8005 Zurich, Switzerland • www.ndd.ch 11/144
16

Safety information
False diagnosis EasyOne Air may be damaged when dropped or during transport.
Fire Follow the manufacturer’s recommendation for proper disposal of the battery.
Only use an original battery by the manufacturer.
Do not store EasyOne Air close to flammable materials like paper or textiles.
Disposal, 4
List of order numbers and accessories for EasyOne Air, 131
Perform an incoming inspection when you first receive EasyOne Air. If you detect any damage, contact your EasyOne Air dealer or the ndd Servicing Depart-
ment.
Especially check the battery for visible damage before use.
Do not drop EasyOne Air.
If EasyOne Air has been dropped, check for correct operation of EasyOne Air.
Checking for correct operation of EasyOne Air, 122
Fire due to explosive
or flammable gases
If used in the vicinity of flammable gases, the plastic case may catch fire and
cause burn injuries to the patient.
For preventive measures, make sure that the device is not used near flammable gases (for example, anesthetic agents).
If not in daily use, remove the battery from EasyOne Air and store the battery
in the original packaging.
False diagnosis Environment conditions outside the range described in the specifications can
cause measurement errors.
Use EasyOne Air only within the defined environment specifications for temperature, humidity, and atmospheric pressure/altitude.
Observe the limits of storage conditions.
Setting up the EasyOne Air spirometer, 24
List of specifications for EasyOne Air, 125
Configuration of EasyOne Air, 93
List of specifications for EasyOne Air, 125
About reactivating EasyOne Air after storage, 124
False diagnosis Setup with wrong environment data can cause false results.
Verify the environment data that you have set up.
False diagnosis Electromagnetic fields from other devices may cause disturbances in
EasyOne Air.
False diagnosis Graphs on the display of EasyOne Connect may be misleading due to unclear
curve scaling between different patients.
Only conduct result interpretation of curves with a printed report.
About interpreting results, 72
List of quality messages and quality grades, 73
Operator’s Manual V1.1 • EasyOne Air • EasyOne Connect
© ndd Medizintechnik AG • Technoparkstrasse 1, 8005 Zurich, Switzerland • www.ndd.ch 12/144
16

Safety information
Failed update An update may fail.
False diagnosis For unforeseen reasons, malfunction of EasyOne Air can lead to false results.
Malfunction Viruses, malware, and other hazardous software on your PC may adversely af-
Malfunction Damaged components can lead to false results.
Perform backups of the database of EasyOne Air and EasyOne Connect frequently.
Performing a backup of EasyOne Air, 102
Data loss Data loss may occur for various other reasons and is generally unpredictable.
Backup the database of EasyOne Air frequently.
Performing a backup of EasyOne Air, 102
Perform calibration checks periodically.
Calibration check, 118
Checking for correct operation of EasyOne Air, 122
fect the performance of EasyOne Connect.
Install anti-virus software on your PC.
Make sure that no liquid penetrates into EasyOne Air, for example through the
battery compartment or the USB port.
Leakage of acids
and explosion
Do not connect the battery improperly.
Do not throw the battery into fire.
Remove the battery from the battery compartment if you do not intend to use
EasyOne Air for a longer period.
Avoid mechanical shock to the battery.
If the rechargeable battery is damaged, liquids from the battery must not get
into contact with skin or eyes. In case of contact with skin or eyes, rinse thoroughly with water and consult a physician.
Only charge the battery using EasyOne Air, the power supply released by the
manufacturer, and the cradle.
Follow the manufacturer’s recommendation for proper disposal of the battery.
About charging the battery of EasyOne Air, 122
Disposal, 4
Malfunction Servicing must only be carried out by ndd staff or by qualified service person-
nel of official ndd distributors.
Do not open EasyOne Air.
Malfunction Non-original accessories and disposables, like respiratory tubes, battery,
power adapter, or cables can cause malfunction.
Only use original accessories and disposables by the manufacturer.
List of order numbers and accessories for EasyOne Air, 131
False diagnosis Non-original respiratory tubes can cause measurement error and false results.
You must only use EasyOne Flow Tube respiratory tubes by the manufacturer
ndd to assure accuracy, long-life, and full warranty coverage.
Operator’s Manual V1.1 • EasyOne Air • EasyOne Connect
© ndd Medizintechnik AG • Technoparkstrasse 1, 8005 Zurich, Switzerland • www.ndd.ch 13/144
16

Safety information
Excessive heat Prolonged exposure to direct sunlight, for example in cars, or exposure to oth-
er sources of heat may cause the battery to explode.
Do not store in places that can exceed temperatures of 50°C or 122°F.
Remove the battery and store the battery in the original packaging.
Network connection Connection of EasyOne Connect to an IT network that includes other equip-
ment could result in previously unidentified risks to patients, operators, or
third parties.
Subsequent changes to the IT network could introduce new risks and require
additional analysis.
Changes to the IT network include:
• changes in the IT network configuration,
• connection of additional items to the IT network,
• disconnecting items from the IT network,
• update of equipment connected to the IT network, and
• upgrade of equipment connected to the IT network.
It is your responsibility to identify, analyze, evaluate, and control these risks.
IEC 80001-1:2010 provides guidance to address these risks.
2.3 Safety information regarding electromagnetic compatibility
Influence by HF
surgical equipment
Portable wireless
communications
equipment
Increased emissions
or decreased
immunity
Proximity to other
equipment
Interruption of the
USB connection
Electrical devices with a high RF power output during intended use (e.g. High
frequency (HF) surgical equipment) should not be operated in parallel with
EasyOne Air.
Portable wireless communications equipment such as wireless home network
devices, mobile phones, cordless telephones and their base stations, walkietalkies, etc. can affect EasyOne Air.
Keep a distance of at least 30 cm (12 inches) to any part of EasyOne Air.
Accessories, transducers, and cables other than those specified by the manufacturer or replacement parts for internal components may result in increased
emissions or decreased immunity of EasyOne Air.
EasyOne Air should not be used adjacent to or stacked with other equipment.
Should close proximity or stacking be unavoidable, however, the configuration in which it is used needs to be watched closely to ensure that the equipment is functioning normally.
Electrical fast transient coupling to the USB cable or electrostatic discharge on
the device may cause an interruption of the USB connection, which is indicated to the user. After reconnecting, the USB connection will work as expected.
There is no harm because the data transmission is secured.
See Appendix
Operator’s Manual V1.1 • EasyOne Air • EasyOne Connect
© ndd Medizintechnik AG • Technoparkstrasse 1, 8005 Zurich, Switzerland • www.ndd.ch 14/144
16

Safety information
2.4 About requirements for connections to external devices
EasyOne Connect is installed on a PC or laptop, to which EasyOne Air is
connected via the cradle or wirelessly.
The PC or laptop is not part of the equipment supplied by the manufacturer
and is considered a requisite accessory that is necessary to use EasyOne Air
with the PC software EasyOne Connect.
In your capacity as the operator of the medical electrical device, you are
obliged to ensure that the specific, applicable safety requirements for the
operation of a medical-electrical device are complied with.
The following conditions must be met:
• All equipment operated in the patient environment must meet the
requirements of IEC 60601-1.
• All equipment set up outside the patient environment must meet the
requirements of the applicable IEC or ISO safety standards (e.g.
IEC 60950-1).
Patient environment
If devices that do not fulfill the requirements of IEC standard 60601-1 are
operated in the patient environment, it must be ensured that the maximum
allowed touch currents will not be exceeded.
The following limits are applicable:
• normal condition: 100 μA
• with interruption of the (not permanently connected) protective earth
conductor: 500 μA
Appropriate measures must be taken if these limits are exceeded.
Suggestions:
• additional protective earth connection of the PC or
• isolating transformer for the PC or
• isolating transformer with built-in power outlet strip for the PC and the
devices connected to it
Operator’s Manual V1.1 • EasyOne Air • EasyOne Connect
© ndd Medizintechnik AG • Technoparkstrasse 1, 8005 Zurich, Switzerland • www.ndd.ch 15/144
16

Safety information
EN 60601-1:2006 specifies the requirements for power outlet strips.
Bear in mind that the touch currents may vary with the system configuration.
2.5 List of equipment icons
Follow instructions for use
Do not reuse, i.e., single-patient use (applicable to the
EasyOne Flow Tube)
CE marked per the Medical Device Directive 93/42/EEC since 2008
Product certification for the USA and Canada
®
Medical electric equipment that includes a radio frequency transmitter
and emits non-ionizing radiation
SN
Lot
Manufacturer
Caution: Federal law restricts this device to sale by or on the order of a
licensed healthcare practitioner
In the European Union, the product you have purchased should not be
disposed of as unsorted municipal waste. Please make use of your local
WEEE collection facilities to dispose of this product and otherwise
observe all applicable requirements
Instrument classification: Type BF applied part
Universal Serial Bus (USB)—standard for data transfer, connecting
devices, and battery charging, applies to cables and connectors
Battery
Serial number
Batch code
Operator’s Manual V1.1 • EasyOne Air • EasyOne Connect
© ndd Medizintechnik AG • Technoparkstrasse 1, 8005 Zurich, Switzerland • www.ndd.ch 16/144
16

First-time setup
3 First-time setup
3.1 List of box contents
The box contains the following items:
B
A
A EasyOne Flow Tube respiratory tubes B EasyOne Air spirometer
Box contents – top inlay
Operator’s Manual V1.1 • EasyOne Air • EasyOne Connect
© ndd Medizintechnik AG • Technoparkstrasse 1, 8005 Zurich, Switzerland • www.ndd.ch 17/144
25

First-time setup
E
F
A
B
C
G
D
A Battery B USB Bluetooth adapter
C USB flash drive D 2x USB cable
E Nose clip F ndd power supply
G Cradle
Box contents – bottom inlay
Operator’s Manual V1.1 • EasyOne Air • EasyOne Connect
© ndd Medizintechnik AG • Technoparkstrasse 1, 8005 Zurich, Switzerland • www.ndd.ch 18/144
25

First-time setup
B
A
A USB cable micro to type A B USB cable micro to type B
The different USB connectors of the two USB cables
The box contains the following documents:
• The EasyOne Air Quick Guide
• Certificate of Stability
The USB flash drive contains the following:
• The EasyOne Air Operator’s Manual
• The EasyOne Air Quick Guide
• Instructional movies
• The EasyOne Connect PC software
3.2 About compatible printers
EasyOne Air can print over USB when using the cradle.
To print via the cradle, the printer must support the protocols Direct PDF,
Postscript, or HP PCL 3 Enhanced.
EasyOne Connect can use any printer that is installed on your PC. To print
using EasyOne Connect, connect the printer to your PC and not to the cradle.
Description of print settings of EasyOne Air, 100
Setting up the physical components, 20
Application Note Printer Compatibility List
Application Notes for further information, 3
Operator’s Manual V1.1 • EasyOne Air • EasyOne Connect
© ndd Medizintechnik AG • Technoparkstrasse 1, 8005 Zurich, Switzerland • www.ndd.ch 19/144
25

First-time setup
3.3 Setting up the physical components
WARNING
ELECTRIC SHOCK
Patients and technicians may be exposed to dangerous voltage.
Connect only medical-grade power supply released by the manufacturer.
To ensure electric safety, connect only equipment, such as printers and networks, that complies with the IEC 60950-1 standard for the electrical safety of
IT equipment.
CAUTION
ELECTRIC SHOCK, PATIENT HEALTH HAZARD, AND FALSE DIAGNOSIS
Damage to casing or broken components may expose the patient or technician
to dangerous voltage. Small parts from damaged disposables can be ingested
or inhaled by the patient. Measurement errors can cause false diagnosis.
Check the device and especially the battery for visible damage before on-site
installation and before usage.
1 Unpack EasyOne Air and the battery.
2 Unlock and open the battery compartment by turning the lock screw
clockwise.
Operator’s Manual V1.1 • EasyOne Air • EasyOne Connect
© ndd Medizintechnik AG • Technoparkstrasse 1, 8005 Zurich, Switzerland • www.ndd.ch 20/144
25

First-time setup
3 Insert the battery into the battery compartment of EasyOne Air.
The battery fits easily into the compartment. If the battery does not
seem to fit, check the correct insert direction. Do not apply force.
4 Close and lock the battery compartment by turning the lock screw
counterclockwise.
5 Unpack the cradle and the USB cables.
6 Turn the cradle around so that the back of the cradle is facing towards you.
Operator’s Manual V1.1 • EasyOne Air • EasyOne Connect
© ndd Medizintechnik AG • Technoparkstrasse 1, 8005 Zurich, Switzerland • www.ndd.ch 21/144
25

First-time setup
7 If you want to connect the cradle to a printer, do the following:
a) Connect the smaller plug of the USB cable micro to type B to the left USB
port of the cradle (marked with the printer/PC icon).
b) Connect the larger plug of the USB cable micro to type B to the
corresponding USB port of your printer.
8 If you want to connect the cradle to a PC, do the following:
a) Connect the smaller plug of the USB cable micro to type A to the left USB
port of the cradle (marked with the printer/PC icon).
b) Connect the larger plug of the USB cable micro to type A to a USB port of
your PC.
You can connect the cradle either to a PC or to a printer. If you connect
the cradle to a PC, you can use EasyOne Connect to print.
Operator’s Manual V1.1 • EasyOne Air • EasyOne Connect
© ndd Medizintechnik AG • Technoparkstrasse 1, 8005 Zurich, Switzerland • www.ndd.ch 22/144
25

First-time setup
9 For charging EasyOne Air, always connect the ndd power supply:
a) Plug the ndd power supply into a power outlet.
b) Connect the cable of the ndd power supply to the right USB port of the
cradle (marked with the plug icon).
Setting up the EasyOne Air spirometer, 24
Operator’s Manual V1.1 • EasyOne Air • EasyOne Connect
© ndd Medizintechnik AG • Technoparkstrasse 1, 8005 Zurich, Switzerland • www.ndd.ch 23/144
25

First-time setup
3.4 Setting up the EasyOne Air spirometer
Prerequisite
You have set up the physical components
Setting up the physical components, 20
1 Turn on EasyOne Air.
The region selection screen is displayed.
2 Select your region from the world map.
The language selection screen is displayed.
3 Select your language from the language selection list.
4 Select the date and time format.
5 Enter the date and time and choose Next.
If the battery is removed for more than 8 hours, your need to reenter
date and time.
Configuration of EasyOne Air, 93
Description of print settings of EasyOne Air, 100
Operator’s Manual V1.1 • EasyOne Air • EasyOne Connect
© ndd Medizintechnik AG • Technoparkstrasse 1, 8005 Zurich, Switzerland • www.ndd.ch 24/144
25

First-time setup
3.5 Installing or updating the EasyOne Connect software on your PC
The procedure for installing EasyOne Connect is the same as for updating
EasyOne Connect. If EasyOne Connect is already installed on your PC, the ndd
SmartInstaller performs an update.
Prerequisite
Your PC meets the system requirements for EasyOne Connect.
List of system requirements for EasyOne Connect, 132
CAUTION
FAILED UPDATE
An update may fail unnoticed.
After performing an update, restart EasyOne Air and EasyOne Connect and perform a calibration check.
Calibration check, 118
Checking for correct operation of EasyOne Air, 122
1 Connect the USB flash drive from the box contents to your PC.
2 Choose the file SmartInstaller.exe.
The User Account Control of Microsoft Windows is displayed and asks
for confirmation.
3 In the User Account Control window, choose Yes.
The ndd SmartInstaller is displayed.
4 Choose Install Software.
The required software packages are automatically determined.
5 When required, choose Next repeatedly.
6 When the license agreement is displayed, read the license agreement,
select I Agree, and choose Next.
EasyOne Connect and all required software packages are installed.
7 After the installation has finished, choose Close and/or OK.
The installation is complete.
8 In the ndd SmartInstaller, choose Exit.
Operator’s Manual V1.1 • EasyOne Air • EasyOne Connect
© ndd Medizintechnik AG • Technoparkstrasse 1, 8005 Zurich, Switzerland • www.ndd.ch 25/144
25

Introduction
4 Introduction
4.1 Introduction to the EasyOne Air spirometer
4.1.1 Overview of EasyOne Air
The EasyOne Air spirometer
A
B
C
A EasyOne Flow Tube holder B Touchscreen
C Handles D Power button
Top-view of EasyOne Air
D
C
A
C
D
B
A Speaker B USB port to connect to the cradle
C Lock screw for battery compartment D Battery compartment
Bottom-view of EasyOne Air
Operator’s Manual V1.1 • EasyOne Air • EasyOne Connect
© ndd Medizintechnik AG • Technoparkstrasse 1, 8005 Zurich, Switzerland • www.ndd.ch 26/144
39

Introduction
When EasyOne Air is turned on and not in use, the screensaver and automatic
power-off function are activated to save battery power. You can change the
default configuration in the following menu:
> > > Screensaver after and Power-off after
A low battery message will alert you when battery power falls below 10%.
Data saved in non-volatile memory is not lost when battery power is low or
when batteries are removed.
The EasyOne Flow Tube respiratory tube for single-patient use
The EasyOne Flow Tube respiratory tube
To ensure hygienic testing, the EasyOne Flow Tube respiratory tube is a
disposable for single-patient use. EasyOne Air recognizes the correct position
of the EasyOne Flow Tube in the EasyOne Flow Tube holder and gives feedback
if the EasyOne Flow Tube is not placed correctly. The EasyOne Flow Tube is
designed to work accurately with the ultrasonic sensor of EasyOne Air. For
reliable results, use only the original ndd EasyOne Flow Tube.
CAUTION
FALSE DIAGNOSIS
Non-original respiratory tubes can cause measurement error and false results.
You must only use EasyOne Flow Tube respiratory tubes by the manufacturer
ndd to assure accuracy, long-life, and full warranty coverage.
Operator’s Manual V1.1 • EasyOne Air • EasyOne Connect
© ndd Medizintechnik AG • Technoparkstrasse 1, 8005 Zurich, Switzerland • www.ndd.ch 27/144
39

Introduction
4.1.2 About using the touchscreen
There are some controls and gestures for the touchscreen, which you can use
throughout the system.
Controls and gestures for navigating on the touchscreen
To choose a button or to select a list item, tap on the button or list item on the
touchscreen. For every tap, you hear a clicking sound as audible feedback if
this function is enabled. Also for every tap, the area or the key that you have
tapped is highlighted as visible feedback.
To scroll through lists, a scroll bar is displayed on the right side of lists.
To move a slider on the touchscreen, drag your finger across the touchscreen.
Using the touchscreen with gloves
You can use the touchscreen wearing disposable gloves made of any
material. Standard disposable gloves used in hospitals and general
practioners’ offices work fine with the touchscreen.
4.1.3 Overview of the user interface of EasyOne Air
Basic interface elements are used throughout EasyOne Air for status
information and for navigation in the menus.
HIPAA compliance
EasyOne Air is compliant to the Health Insurance Portability and
Accountability Act. Access to EasyOne Air is password-protected. The internal
database of EasyOne Air is encrypted.
Operator’s Manual V1.1 • EasyOne Air • EasyOne Connect
© ndd Medizintechnik AG • Technoparkstrasse 1, 8005 Zurich, Switzerland • www.ndd.ch 28/144
39

Introduction
The home screen
The home screen is the starting point when working with EasyOne Air.
?
The home screen of EasyOne Air
The home screen displays the following icons:
This icon is a shortcut to the most commonly performed test, the FVC
test.
In the more menu, you can choose from all available tests.
?
In the reports menu, you have access to the reports in chronological
order.
In the patients menu, you have access to patient data and also to the
reports, which are sorted by patient here.
In the tools menu, you can configure EasyOne Air and perform
calibration checks and have access to settings and database
functionalities.
Operator’s Manual V1.1 • EasyOne Air • EasyOne Connect
© ndd Medizintechnik AG • Technoparkstrasse 1, 8005 Zurich, Switzerland • www.ndd.ch 29/144
39

Introduction
In the orders menu, you have access to orders for spirometry tests from
your EMR system.
The patients menu displays the following icons:
With the add patient button, you can add a patient to the database.
With the delete patient button, you can delete a patient from the
database.
With the edit patient data button, you can edit patient data.
In the history menu, you have access to patient data and results.
With the export button, you can export patient data and results.
The tools menu displays the following icons:
In the settings menu, you have access to various settings that are
listed in the table below.
In the calibration check menu, you can perform calibration checks to
verify that EasyOne Air is functioning correctly.
In the update menu, you can perform firmware updates.
In the backup menu, you can backup the patient database, results and
configurations.
Operator’s Manual V1.1 • EasyOne Air • EasyOne Connect
© ndd Medizintechnik AG • Technoparkstrasse 1, 8005 Zurich, Switzerland • www.ndd.ch 30/144
39

Introduction
The information menu displays information about the currently
installed firmware.
In the user menu, you can configure individual users and their
passwords for login.
The settings menu displays the following icons:
In the device settings menu, you have access to device settings, like
speaker volume, empirical or metric units settings, date and time
settings, or Bluetooth settings.
In the spirometry settings menu, you have access to spirometry
settings, like predicted normal values, system interpretation, or the
automatic quality control setting.
In the display settings menu, you have access to settings like
language, date and time format, or settings for how results are
displayed.
In the print settings menu, you can configure the printer that is
connected to the cradle.
In the factory reset menu, you can reset the configuration of
EasyOne Air to its delivery status. However, the patient data will not be
deleted.
Configuration of EasyOne Air, 93
Operator’s Manual V1.1 • EasyOne Air • EasyOne Connect
© ndd Medizintechnik AG • Technoparkstrasse 1, 8005 Zurich, Switzerland • www.ndd.ch 31/144
39

Introduction
The status bar
The status bar on the top of the home screen displays basic status
information.
The status bar on the top
The status bar displays the following icons:
Indicates that Bluetooth is enabled. This icon is not applicable to the
EasyOne Air TL variant.
Indicates that Wi-Fi is enabled. This icon is not applicable to the
EasyOne Air TL variant.
Indicates a connection to a printer.
Indicates a connection to a PC.
Indicates that an SD memory card is inserted.
Indicates that charging level of the battery is very low.
Indicates that EasyOne Air is connected to the ndd power supply and
currently charging. But the charging level is still low.
Indicates that EasyOne Air is connected to the ndd power supply and
currently charging. The charging level is at about 50%.
Indicates that EasyOne Air is connected to a power supply, but cannot
charge.
Check whether EasyOne Air is connected to the ndd power supply or to a
different USB power source.
Only use the ndd power supply.
Indicates that the health of the battery is low.
Consider replacing the battery.
Operator’s Manual V1.1 • EasyOne Air • EasyOne Connect
© ndd Medizintechnik AG • Technoparkstrasse 1, 8005 Zurich, Switzerland • www.ndd.ch 32/144
39

Introduction
The < Back button and the home button
The < Back button is at the bottom left-hand side, and the home button is at the
bottom in the middle.
In any menu, the < Back button is displayed at the bottom left and the home
button at the bottom middle of the touchscreen. To go back to the home
screen, choose the home button. To navigate back in menus, choose the
< Back button.
4.2 Introduction to the EasyOne Connect software
4.2.1 Overview of features of EasyOne Connect
EasyOne Connect offers the same features as EasyOne Air to perform
spirometry, to work with patient data, or to evaluate results, as well as some
additional features.
EasyOne Connect is especially helpful to work with patient data and to
evaluate results because you can use a full-size PC monitor and keyboard.
If you want to perform spirometry with EasyOne Air stand-alone, for example
off-site, EasyOne Connect enables you to enter all relevant patient data
beforehand and synchronize that data to EasyOne Air. Then, after you return
from performing spirometry, you can synchronize the test results back to
EasyOne Connect and evaluate the test results, print reports, and archive the
data on your PC.
To work efficiently with patient data and orders for spirometry tests, you can
link up EasyOne Connect with your EMR system.
Connectivity and data exchange, 44
Operator’s Manual V1.1 • EasyOne Air • EasyOne Connect
© ndd Medizintechnik AG • Technoparkstrasse 1, 8005 Zurich, Switzerland • www.ndd.ch 33/144
39

Introduction
4.2.2 Overview of the user interface of EasyOne Connect
Basic interface elements are used throughout EasyOne Connect for status
information and for navigation in the menus.
The main menu
The main menu is the starting point when working with EasyOne Connect.
The main menu of EasyOne Connect
The main menu displays the following icons:
In the patients menu, you have access to patient data and also to the
reports.
In the test menu, you can choose from all available tests.
In the history menu, you have access to the reports in chronological order.
In the orders menu, you have access to orders for spirometry tests from your
EMR system.
This icon is only displayed if you have configured a connection to your EMR
system.
In the utilities menu, you can configure EasyOne Connect and perform
calibration checks and have access to settings and database
functionalities.
Operator’s Manual V1.1 • EasyOne Air • EasyOne Connect
© ndd Medizintechnik AG • Technoparkstrasse 1, 8005 Zurich, Switzerland • www.ndd.ch 34/144
39

Introduction
The menu bar
The menu bar at the bottom of the screen is visible at all times. In the menu
bar, you can navigate back to the main menu and quickly access the active
patient data or this Operator’s Manual.
The menu bar at the bottom of the screen
The menu bar displays the following areas:
This area displays the name and patient ID of the patient that
you have selected last. To view a summary of the patient’s
demographic data, choose this area.
To open the PDF file of this Operator’s Manual, choose ?.
With the menu area, you can navigate back to the main
menu. The label and function of this area varies between
menus.
4.3 List of terms and definitions
Term Definition
test Short for spirometry test.
A test is an examination that is defined by the breathing maneuver that the patient performs and by
the parameters that are calculated from the measured data.
For each test, a report exists.
trial The performing of one breathing maneuver.
A trial is part of a test.
parameter For each trial, parameters are calculated from its curve.
post Short for post bronchodilator.
A post is performed after the patient is treated with a bronchodilator. Prior to the medication, the
same test has been performed to be compared with the post.
Terms and definitions
Operator’s Manual V1.1 • EasyOne Air • EasyOne Connect
© ndd Medizintechnik AG • Technoparkstrasse 1, 8005 Zurich, Switzerland • www.ndd.ch 35/144
39

Introduction
4.4 List of tests and parameters
The following tables give an overview of the relevant tests and parameters.
The parameters are established in the professional literature and constitute
the results of testing.
Test Test description Available parameters
FVC Forced expiratory vital capacity test BEV, EOTV, FEF10, FEF25, FEF
/FVC, FEF60, FEF75, FEF80, FET, FET
FEF
50
FEV
/FVC, FEV
.5
, FEV3/FVC, FEV6, FVC, FVC6, MEF20, MEF25, MEF40, MEF50,
FEV
3
, MEF75, MEF90, MMEF, PEF, PEFT, t
MEF
60
.75
, FEV
FVL Flow volume loop test BEV, EOTV, FEF10, FEF25, FEF
/FVC, FEF60, FEF75, FEF80, FET, FET
FEF
50
/FVC, FEV
FEV
.5
/FVC, FEV3, FEV3/FVC, FEV6, FIF25, FIF50, FIF50/FEF50, FIF75,
FEV
1
, FIV.5, FIV1, FVC, FVC6, MEF20, MEF25, MEF40, MEF50,
FIV
.25
, MEF75, MEF90, MIF25, MIF50, MIF75, MMEF, PEF, PEFT, t
MEF
60
MVV Maximum voluntary ventilation test MVV, MVV6, MVV
.75
, FEV
time
SVC Slow vital capacity test ERV, IC, IRV, Rf, VC, VCex, VCin, VC
Test s
25-75
/FVC, FEV1, FEV1/FEV6, FEV1/FVC,
.75
25-75
/FVC, FEV1, FEV1/FEV6, FEV1/FIV1,
.75
, Rf
, FEF
, FEF
max
/FVC, FEF40, FEF50,
25-75
, FEV
25-75
0
/FVC, FEF40, FEF50,
25-75
, FEV
25-75
, VT
, FEV.5,
.25
, FEV.5,
.25
0
Parameter Parameter description Unit
BEV Back extrapolated volume L
BTPS
BTPS
ex
in
BTPS factor used for expiration –
BTPS factor used for inspiration –
EOTV End of test volume L
ERV Expiratory reserve volume L
f Breathing frequency 1/min
FEF
FEF
FEF
FEF
FEF
FEF
10
25
25-75
25-75
40
50
Forced expiratory flow at 10% of vital capacity—synonymous with MEF
Forced expiratory flow at 25% of vital capacity—synonymous with MEF
90
75
Forced expiratory flow from 25% to 75% of vital capacity—synonymous with MMEF L/s
/FVC Ratio of FEF
Forced expiratory flow at 40% of vital capacity—synonymous with MEF
Forced expiratory flow at 50% of vital capacity—synonymous with MEF
to FVC 1/s
25-75
60
50
L/s
L/s
L/s
L/s
FEF50/FVC Ratio of FEF50 to FVC 1/s
FEF
FEF
FEF
60
75
80
Forced expiratory flow at 60% of vital capacity—synonymous with MEF
Forced expiratory flow at 75% of vital capacity—synonymous with MEF
Forced expiratory flow at 80% of vital capacity—synonymous with MEF
40
25
20
L/s
L/s
L/s
FET Forced expiratory time s
FET
FEV
25-75
.25
Forced expiratory time between FEF25 and FEF
75
Forced expiratory volume after 0.25 seconds L
s
Parameters
Operator’s Manual V1.1 • EasyOne Air • EasyOne Connect
© ndd Medizintechnik AG • Technoparkstrasse 1, 8005 Zurich, Switzerland • www.ndd.ch 36/144
39

Introduction
Parameter Parameter description Unit
FEV
.5
Forced expiratory volume after 0.5 seconds L
FEV.5/FVC Ratio of FEV.5 to FVC –
FEV
.75
FEV
/FVC Ratio of FEV
.75
FEV
1
FEV1/FEV
FEV1/FIV
Forced expiratory volume after 0.75 seconds L
to FVC –
.75
Forced expiratory volume after 1 second L
Ratio of FEV1 to FEV
6
Ratio of FEV1 to FIV
1
6
1
–
–
FEV1/FVC Ratio of FEV1 to FVC –
FEV1/VC Ratio of FEV1 to VC (VC taken from SVC test) –
FEV
3
Forced expiratory volume after 3 seconds L
FEV3/FVC Ratio of FEV3 to FVC –
FEV
6
FIF
25
FIF
50
FIF50/FEF
FIF
75
FIV
.25
FIV
.5
FIV
1
Forced expiratory volume after 6 seconds L
Forced inspiratory flow at 25% of vital capacity—synonymous with MIF
Forced inspiratory flow at 50% of vital capacity—synonymous with MIF
Ratio of FIF50 to FEF
50
50
Forced inspiratory flow at 75% of vital capacity—synonymous with MIF
75
50
25
Forced inspiratory volume after 0.25 seconds L
Forced inspiratory volume after 0.5 seconds L
Forced inspiratory volume after 1 second L
L/s
L/s
–
L/s
FIVC Forced inspiratory vital capacity L
FVC Forced expiratory vital capacity L
FVC
6
Forced expiratory vital capacity after 6 seconds L
IC Inspiratory capacity from end of tidal breathing L
IRV Inspiratory reserve volume L
Lung Age calculated age of the average healthy individual who would perform similar to tested
Years
patient on spirometry
MEF
20
MEF
25
MEF
40
MEF
50
MEF
60
MEF
75
MEF
90
MIF
25
MIF
50
MIF
75
MMEF Mean mid-expiratory flow—synonymous with FEF
Mean expiratory flow at 80% of vital capacity—synonymous with FEF
Mean expiratory flow at 75% of vital capacity—synonymous with FEF
Mean expiratory flow at 60% of vital capacity—synonymous with FEF
Mean expiratory flow at 50% of vital capacity—synonymous with FEF
Mean expiratory flow at 40% of vital capacity—synonymous with FEF
Mean expiratory flow at 25% of vital capacity—synonymous with FEF
Mean expiratory flow at 10% of vital capacity—synonymous with FEF
Mean inspiratory flow at 75% of vital capacity—synonymous with FIF
Mean inspiratory flow at 50% of vital capacity—synonymous with FIF
Mean inspiratory flow at 25% of vital capacity—synonymous with FIF
25-75
80
75
60
50
40
25
10
75
50
25
L/s
L/s
L/s
L/s
L/s
L/s
L/s
L/s
L/s
L/s
L/s
MVV Maximum voluntary ventilation L/min
Parameters
Operator’s Manual V1.1 • EasyOne Air • EasyOne Connect
© ndd Medizintechnik AG • Technoparkstrasse 1, 8005 Zurich, Switzerland • www.ndd.ch 37/144
39

Introduction
Parameter Parameter description Unit
MVV
MVV
6
time
Maximum voluntary ventilation for 6 seconds L/min
Duration of the trial in seconds s
PEF Peak expiratory flow L/s
PEFT Time to peak flow s
PIF Peak inspiratory flow L/s
Rf Respiratory frequency 1/min
t
0
Back-extrapolated start time of the trial s
VC Vital capacity, from slow expiration L
VC
VC
VC
ex
in
max
Expiratory vital capacity, from slow expiration L
Inspiratory vital capacity, from slow inspiration L
Highest VC value from all trials of one test L
VT Tidal volume L
Parameters
Operator’s Manual V1.1 • EasyOne Air • EasyOne Connect
© ndd Medizintechnik AG • Technoparkstrasse 1, 8005 Zurich, Switzerland • www.ndd.ch 38/144
39

Introduction
4.5 List of abbreviations
Abbreviation Full form
ATP S Ambient temperature pressure saturated—refers to environment conditions, can be converted to BTPS
ATS American Thoracic Society
BTPS Body temperature pressure saturated—refers to converted environment conditions, can be converted
from ATPS
EHR Electronic health record—synonymous to EMR, used in EMR systems
EMC Electromagnetic compatibility
EMR Electronic medical record—synonymous to EHR, used in EMR systems
EMR system Computer software for handling electronic medical records
ERS European Respiratory Society
GDT Gerätedatentransfer—German EMR standard
GLI Global Lung Function Initiative
GOLD Global Initiative for Chronic Obstructive Lung Disease
HIPAA Health Insurance Portability and Accountability Act
HIS Hospital information system
HL7 Health Level 7—international EMR standard
LLN Lower limit of normal
NIOSH National Institute for Occupational Safety and Health
NLHEP National Lung Health Education Program
OSHA Occupational Safety and Health Administration
SD Standard deviation
SEE Standard error of the estimate
SSA Social Security Administration
USB Universal Serial Bus (USB)—standard for data transfer, connecting devices, and battery charging,
applies to cables and connectors
Abbreviations
4.6 About sources for predicted normal values
The available predicted normal values for EasyOne Air are updated as
required through software updates.
You can find the currently used sources for predicted normal values in the
document below.
Application Note Reference Predicted Normal Values
Application Notes for further information, 3
Installing or updating the EasyOne Connect software on your PC, 25
Operator’s Manual V1.1 • EasyOne Air • EasyOne Connect
© ndd Medizintechnik AG • Technoparkstrasse 1, 8005 Zurich, Switzerland • www.ndd.ch 39/144
39

Cybersecurity
5 Cybersecurity
EasyOne Air is protected against cyberattacks. However, to maintain security,
you must follow the guidelines that are laid out in this chapter.
5.1 About cybersecurity
EasyOne Connect can be installed on regular Windows PCs. The operating
institution is responsible for installing an antivirus software and a firewall on
the PC, for installing critical Windows updates regularly, and for keeping the
PC otherwise secure. EasyOne Connect does not run with Windows
administrator privileges.
EasyOne Air itself is not directly connected to the network.
EasyOne Connect can be connected to a network for various purposes, but can
also function stand-alone without network access. The file-based database is
encrypted. Alternatively, it is also possible to connect EasyOne Connect to an
SQL-server-based database.
5.2 About password policies and password expiration
You can use a combination of user name and password in order to control
access to EasyOne Connect. It is the responsibility of the operating institution
to apply the appropriate password policies (for example, password strength
and password renewal intervals).
EasyOne Connect does not include functionality for password strength and
password expiration requirements. In case user handling is deactivated a
default password is used to restrict access to certain functionalities.
Follow these general recommendations on password strength in case your
institution does not have a more specific policy:
• Use a minimum password length of 8 characters.
• Include lowercase and uppercase alphabetic characters, numbers and
symbols.
• Generate passwords randomly where feasible.
Follow this general recommendation for a password renewal interval in case
your institution does not have a more specific policy:
• Passwords should be renewed after 90 days.
About user handling and the default password of EasyOne Connect, 105
Operator’s Manual V1.1 • EasyOne Air • EasyOne Connect
© ndd Medizintechnik AG • Technoparkstrasse 1, 8005 Zurich, Switzerland • www.ndd.ch 40/144
43

Cybersecurity
5.3 About periodical software updates and patches
For secure use, perform software updates regularly.
Contact your EasyOne dealer in order to receive regular notifications of
software updates, or visit the ndd website for information on updates.
Installing or updating the EasyOne Connect software on your PC, 25
Performing a firmware update with EasyOne Air, 101
Contact information, 4
5.4 About backups
Whether or not EasyOne Connect performs backups automatically depends on
whether a file-based database or an SQL-server-based database is used.
When using a file-based database
EasyOne Connect includes a separate backup storage that automatically
stores the current database. The backup is performed each time
EasyOne Connect is shut down.
In addition, the manufacturer recommends that you regularly backup the
database manually to a different storage device and that you store this
additional backup in a separate location.
When using an SQL-server-based database
In this case, no automatic backup is performed. It is the operating
institution’s responsibility to perform backups of the SQL server regularly.
Utilities > Configuration > General > Storage, 106
5.5 Escalating in case of a security breach
In case a security breach has been detected in your institution, do the
following:
1 Immediately disconnect the PC that EasyOne Connect is installed on from
the network.
After you have disconnected the PC that EasyOne Connect is installed
on from the network, you can no longer access an SQL server, but you can
work temporarily with a file-based database that is stored locally on your
PC.
2 Follow all other necessary procedures for a security breach as specified by
your institution’s IT department.
3 If you are uncertain whether EasyOne Air has been compromised, contact
the ndd Servicing Department.
Operator’s Manual V1.1 • EasyOne Air • EasyOne Connect
© ndd Medizintechnik AG • Technoparkstrasse 1, 8005 Zurich, Switzerland • www.ndd.ch 41/144
43

Cybersecurity
5.6 Dealing with a lost or stolen EasyOne Air or PC
In case EasyOne Air or the PC that EasyOne Connect is installed on has been
lost or stolen, do the following:
Prerequisite
The manufacturer strongly recommends that you activate user handling
in order to prevent unauthorized persons from accessing the data stored
on EasyOne Air or in EasyOne Connect.
About the user menu of EasyOne Air, 104
About user handling and the default password of
EasyOne Connect, 105
1 Immediately report the loss or theft of EasyOne Air or of the PC that
EasyOne Connect is installed on to the ndd Servicing Department.
The ndd Servicing Department will ensure that your EasyOne Air or your
installation of EasyOne Connect is not unlocked unintentionally by ndd
staff for anyone else but you.
Contact information, 4
5.7 Using EasyOne Air securely – general guidelines
The manufacturer strongly recommends that you follow these guidelines at all
times.
1 Activate user handling if unauthorized persons might have physical access
to EasyOne Air. To activate user handling, do the following:
a) Choose Utilties > Configuration > General > User Handling.
b) Enter the default password 8005 and choose Login.
c) To add a user, choose Add.
d) Fill out the User ID field, the Password field, and the Repeat Password
field.
e) Optionally, fill out the other fields.
f) Choose OK.
g) Select the User Handling check box.
h) Choose Save.
User handling is activated. Now, users must log in to use EasyOne Air.
Operator’s Manual V1.1 • EasyOne Air • EasyOne Connect
© ndd Medizintechnik AG • Technoparkstrasse 1, 8005 Zurich, Switzerland • www.ndd.ch 42/144
43

Cybersecurity
2 To prevent unauthorized access when EasyOne Air is unattended, activate
automatic log off. To activate automatic log off, do the following:
a) Choose Utilities > Configuration > General > User Handling.
b) Select the Screen times out after check box.
c) In the min field, enter the desired period of inactivity after which
automatic log off is to be activated.
d) Choose Save.
After the period that you have set, EasyOne Air is locked and users must
log in again.
3 Only use network file transfer (pdf, HL7, XML, etc.) in trusted and secured
network environments.
4 In case you use an SQL-server-based database, it is the operating
institution’s responsibility to use appropriate measures to protect the SQL
server as well as the communication channel.
Generally, SQL servers provide functionality for encrypted SSL
connections.
The manufacturer does not take responsibility for the cybersecurity of
the communication channel or the data storage on the SQL server. The SQL
server is considered a third-party product and not within the scope of
EasyOne Air.
About user handling and the default password of EasyOne Connect, 105
Operator’s Manual V1.1 • EasyOne Air • EasyOne Connect
© ndd Medizintechnik AG • Technoparkstrasse 1, 8005 Zurich, Switzerland • www.ndd.ch 43/144
43
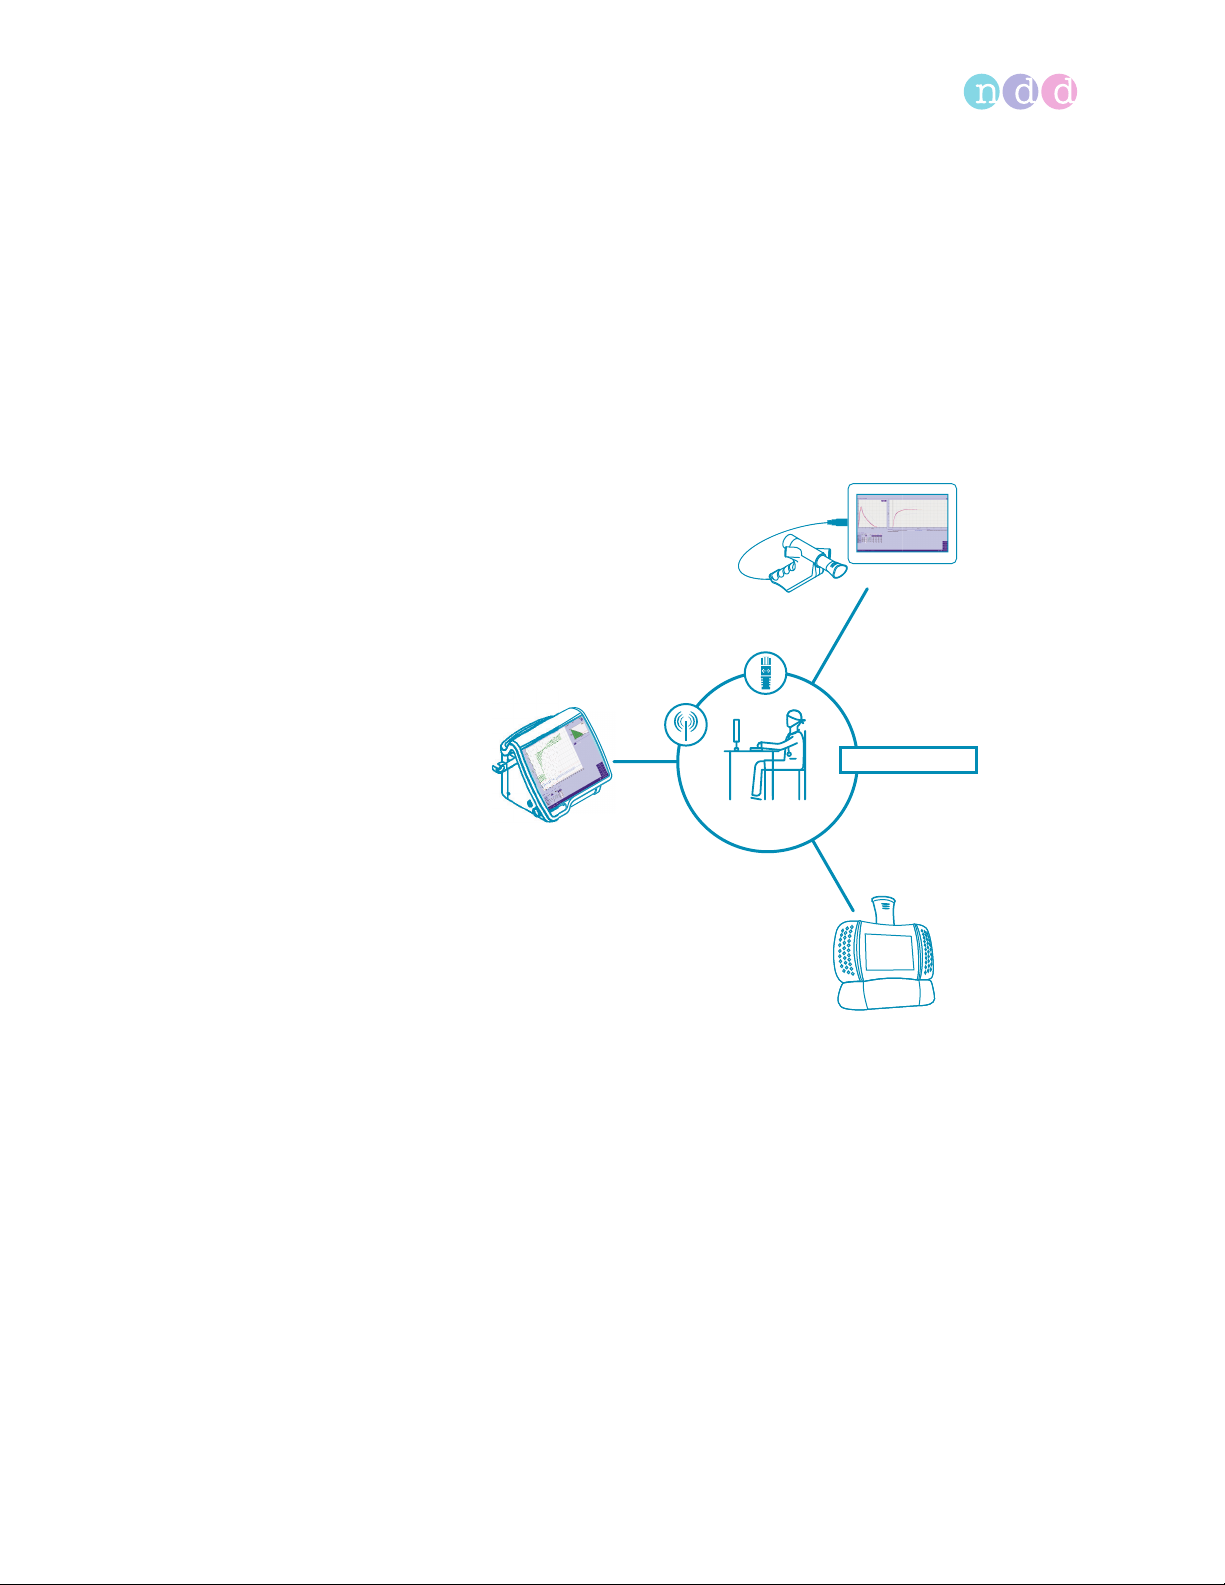
Connectivity and data exchange
6 Connectivity and data exchange
For data exchange, you can connect EasyOne products with the
EasyOne Connect PC software. In addition, you can interface EasyOne Connect
and EasyOne Pro/LAB with the information system in your hospital or practice.
6.1 About connectivity between EasyOne products
Easy on-PC
Connect
EasyOne
Centralized
EasyOne Pro/LAB
Connectivity between EasyOne products
diagnostics
EasyOne Air
All EasyOne products can connect to a shared comprehensive database
through the EasyOne Connect PC software. The EasyOne Pro Respiratory
Analysis System can connect to this shared database independently.
To enable connectivity between EasyOne products, the manufacturer
recommends to set up an SQL-server-based database.
After you have configured an SQL-server-based database, you can review
patient data and reports of all connected EasyOne products on any connected
PC with EasyOne Connect or on any EasyOne Pro/LAB. Access to the server-
based database is password-protected and requires a Microsoft Active
Directory user account.
Operator’s Manual V1.1 • EasyOne Air • EasyOne Connect
© ndd Medizintechnik AG • Technoparkstrasse 1, 8005 Zurich, Switzerland • www.ndd.ch 44/144
50

Connectivity and data exchange
For support with the configuration of an SQL-server-based database, contact
the ndd Servicing Department.
Application Note EasyConnect – Database Connection
Application Notes for further information, 3
Utilities > Configuration > General > Storage, 106
Contact information, 4
6.2 About integration of EMR systems
6.2.1 About supported EMR standards
EasyOne Connect and EasyOne Pro/LAB can be interfaced with your EMR
system.
EMR systems are, for example, hospital information system (HIS) and other
information systems in the health sector that use the electronic medical
record to exchange patient data in a standardized format. EasyOne Connect
and EasyOne Pro/LAB have EMR plug-ins preinstalled:
• HL7 – Health Level 7 is an international EMR standard.
• GDT – Gerätedatentransfer is a German EMR standard.
• XML file exchange – With this plug-in, you can connect your EMR system
using a simple and configurable XML file exchange.
Operator’s Manual of your EMR system
6.2.2 About possible workflows with your EMR system
There are two general possibilities for working with your EMR system: the
order workflow and the direct-start workflow.
The order workflow
For the order workflow, EasyOne Connect or EasyOne Pro/LAB and your EMR
system are connected over the network and exchange so-called orders.
In an additional menu on the main menu, EasyOne Connect and
EasyOne Pro/LAB display the orders from your EMR system. With the order
workflow, you initiate a spirometry test in EasyOne Connect or on
EasyOne Pro/LAB.
You can also send test results to your EMR system manually even if these test
results have not been ordered from your EMR system.
Operator’s Manual V1.1 • EasyOne Air • EasyOne Connect
© ndd Medizintechnik AG • Technoparkstrasse 1, 8005 Zurich, Switzerland • www.ndd.ch 45/144
50

Connectivity and data exchange
The direct-start workflow
Your EMR system is either connected to EasyOne Connect or EasyOne Pro/LAB
over the network, or your EMR system is installed on the same PC as
EasyOne Connect.
Either way, your EMR system can interact and launch EasyOne Connect or
EasyOne Pro/LAB directly. EasyOne Connect or EasyOne Pro/LAB act as an
external device to your EMR system.
This workflow is called direct-start workflow because you initiate a spirometry
test from your EMR system.
Sending individual test results to your EMR system, 50
6.2.3 About using EasyOne Air to process orders
When you synchronize EasyOne Air with EasyOne Connect, orders from your
EMR system are also synchronized with EasyOne Air.
On EasyOne Air, you can select orders from your EMR system in the orders
menu.
6.2.4 Overview of the integration process
Please contact the ndd Servicing Department to start an integration project.
The integration process consists of the following steps:
1 Defining an interface based on clinical requirements, IT requirements, and
security requirements
2 Implementing a configuration in close cooperation with your staff
3 Verifying the implemented configuration
NOTICE
CONNECTION FAILURE
Updates to the EMR system can potentially influence the connection.
When you update the EMR system, you must check the correctness of the
transferred data to connected systems.
Operator’s Manual of your EMR system
SDK – ndd EMR plug-in Software Developer Guide
Contact information, 4
Operator’s Manual V1.1 • EasyOne Air • EasyOne Connect
© ndd Medizintechnik AG • Technoparkstrasse 1, 8005 Zurich, Switzerland • www.ndd.ch 46/144
50

Connectivity and data exchange
6.2.5 Overview of the plug-ins for EMR systems
Utilities > Configuration > EMR
6.2.5.1 About the HL7 plug-in
The HL7 plug-in allows you to work with orders, which you can process as you
choose. This workflow is the order workflow.
Alternatively, you can use the direct-start workflow and initiate spirometry
from your EMR system.
Supported Features
EasyOne Connect and EasyOne Pro/LAB support the following features of HL7:
• Receiving patient demographics from your EMR system
• Sending test results to your EMR system
• Working with orders
• File-based message exchange
• Message acknowledgments
• Sending discrete data
• Sending reports
Application Note EasyConnect: HL7 Connector
Application Notes for further information, 3
Operator’s Manual of your EMR system
Processing orders from your EMR system, 48
Sending individual test results to your EMR system, 50
6.2.5.2 About the GDT plug-in
With the GDT plug-in, you can only use the direct-start workflow and initiate
spirometry from your EMR system. The order workflow is not supported.
Supported Features
EasyOne Connect and EasyOne Pro/LAB support the following features of GDT:
• Receiving patient demographics from your EMR system
• Sending test results to your EMR system
• File-based message exchange
• Sending discrete data
• Sending reports
Operator’s Manual of your EMR system
Initiating a spirometry test with the direct-start workflow, 49
Sending individual test results to your EMR system, 50
Type, 113
Operator’s Manual V1.1 • EasyOne Air • EasyOne Connect
© ndd Medizintechnik AG • Technoparkstrasse 1, 8005 Zurich, Switzerland • www.ndd.ch 47/144
50

Connectivity and data exchange
6.2.5.3 About the XML file exchange plug-in
The XML file exchange plug-in is a simple interfacing tool that allows you to
connect to your EMR system with a simple custom configuration.
The XML plug-in supports the order workflow and the direct-start workflow.
Supported Features
EasyOne Connect and EasyOne Pro/LAB support the following features:
• Receiving patient demographics from your EMR system
• Sending test results to your EMR system
• Working with orders
• File-based message exchange
• Sending discrete data
• Sending reports
Software Developer Guide SDK – ndd EMR plug-in
6.2.5.4 About custom plug-ins
ndd offers a software development kit that enables third parties and
customers to develop customized EMR plug-ins to interface with any EMR
system.
Software Developer Guide SDK – ndd EMR plug-in
6.2.6 Working with your EMR system
6.2.6.1 Processing orders from your EMR system
If you have interfaced your EMR system with EasyOne Connect or EasyOne Pro/
LAB through the HL7 plug-in or a custom EMR plug-in, you can access the
patient data of your EMR system in the orders menu in EasyOne Connect or on
EasyOne Pro/LAB. On the main menu, the additional Orders button is
displayed. This procedure represents the order workflow.
Prerequisite
You have configured the HL7 plug-in, the XML plug-in, or a custom
EMR plug-in.
Additional orders button in the main menu
Operator’s Manual V1.1 • EasyOne Air • EasyOne Connect
© ndd Medizintechnik AG • Technoparkstrasse 1, 8005 Zurich, Switzerland • www.ndd.ch 48/144
50

Connectivity and data exchange
In the orders menu, you process the orders. The orders menu is similar to the
patients menu. However, you cannot edit patient data in the orders menu.
1 Choose Orders.
2 Select an order with the status Pending.
3 Choose Test.
4 Perform spirometry with the patient.
5 To view a completed order, choose View.
6 To delete an order, choose Delete.
7 Repeat steps 2 to 5 until you have completed all pending orders.
8 Choose Close.
All results are transmitted to your EMR system.
Overview of the user interface of EasyOne Connect, 34
6.2.6.2 Initiating a spirometry test with the direct-start workflow
With the direct-start workflow, you initiate spirometry from your EMR system.
All plug-ins support this workflow.
Prerequisite
You have configured any one of the available plug-ins.
About the HL7 plug-in, 47
About the GDT plug-in, 47
About the XML file exchange plug-in, 48
About custom plug-ins, 48
1 Launch your EMR system.
2 Choose the external devices menu.
3 Select either EasyOne Connect or EasyOne Pro/LAB and confirm.
EasyOne Connect is launched automatically.
In EasyOne Connect or on EasyOne Pro/LAB, the screen for entering
patient data is displayed.
4 CAUTION! False diagnosis: The predicted values and the system
interpretation are based on the patient demographic data. Therefore,
wrong patient data can cause false results. Enter patient data
meticulously. Double-check that you have entered the patient data
correctly.
Fill out those fields that are marked with an asterisk (*).
You cannot complete adding patient data without filling out these
fields.
5 In all other fields, enter additional patient data if necessary.
6 Choose OK.
7 Choose the desired test and confirm.
8 Perform spirometry with the patient.
Operator’s Manual V1.1 • EasyOne Air • EasyOne Connect
© ndd Medizintechnik AG • Technoparkstrasse 1, 8005 Zurich, Switzerland • www.ndd.ch 49/144
50

Connectivity and data exchange
9 If required, print an additional report from the test result screen.
10 Choose Finish.
The test results are sent to your EMR system, and EasyOne Connect is
closed automatically.
Your EMR system receives the test results.
11 In your EMR system, confirm the received test results and proceed as
required.
Performing spirometry, 51
6.2.6.3 Sending individual test results to your EMR system
It is possible to send individual test results to your EMR system even if that
test is not part of an order from the EMR system. This enables you to work
without orders from your EMR system and to only send test results to your EMR
system.
Prerequisite
You have configured any one of the available plug-ins.
1 Choose Patients.
2 Select a patient.
3 Choose History.
4 Choose the button.
Hidden buttons are revealed.
5 Choose Send to EMR.
Operator’s Manual V1.1 • EasyOne Air • EasyOne Connect
© ndd Medizintechnik AG • Technoparkstrasse 1, 8005 Zurich, Switzerland • www.ndd.ch 50/144
50

Performing spirometry
7 Performing spirometry
7.1 Overview of the spirometry workflow
Performing spirometry
7.2
Ö
Instruct the patient
7.5.1
Ö
7.5.3
Ö
7.5.4
Ö
Add a new patient
Enter patient data
Repeat trial
Choose a test
Summary screen is displayed
Prepare EasyOne Flow Tube
Set baseline
Patient performs breathing maneuver
No
Quality message OK?
Select existing patient
No
Previous test performed
within 24 h?
Yes
Add trial, add post, or create new test
7.5.2
Ö
Yes
3 successful trials completed?
Yes
End test
Dispose of EasyOne Flow Tube
Print report
General spirometry workflow using EasyOne Air stand-alone
Operator’s Manual V1.1 • EasyOne Air • EasyOne Connect
© ndd Medizintechnik AG • Technoparkstrasse 1, 8005 Zurich, Switzerland • www.ndd.ch 51/144
No
Add trial
74

Performing spirometry
CAUTION
ELECTRIC SHOCK, PATIENT HEALTH HAZARD, AND FALSE DIAGNOSIS
Damage to casing or broken components may expose the patient or technician
to dangerous voltage. Small parts from damaged disposables can be ingested
or inhaled by the patient. Measurement errors can cause false diagnosis.
Check the device and especially the battery for visible damage before on-site
installation and before usage.
7.2 About preparation of spirometry and instructions for the patient
Preparing the patient
Prepare the patient for testing: The patient should loosen tight clothing,
remove dentures, and relax. The patient may sit or stand. If the patient is
standing, perform testing in an area free of sharp table edges or counter
edges, or have a chair available as there is a slight possibility that the patient
faints during the strenuous breathing maneuver of the spirometry test.
Explaining spirometry
Explain that the purpose of the test is to determine how much air a person’s
lungs can hold and how quickly that air can be expelled with a forceful,
maximum effort. Since the spirometry test requires active participation on the
part of the patient, it is very important to demonstrate the breathing
maneuver to the patient.
The most commonly used spirometry test is the FVC test. Emphasize the
essential elements of the breathing maneuver, for example, for the FVC test:
• Filling lungs completely
• Sealing lips around the EasyOne Flow Tube so that there are no leaks,
taking care not to block its opening with the teeth or tongue and not to
bite down excessively
• Blasting out as hard and fast as possible
• Blowing out continuously until the lungs are completely empty
Different breathing maneuvers for different tests
This chapter describes the overall process of performing spirometry with the
FVC test as an example. The different spirometry tests differ only in the
breathing maneuver that the patient has to perform. The overall process of
performing spirometry is the same.
Therefore, to perform the other spirometry tests, familiarize yourself with the
other breathing maneuvers.
Operator’s Manual V1.1 • EasyOne Air • EasyOne Connect
© ndd Medizintechnik AG • Technoparkstrasse 1, 8005 Zurich, Switzerland • www.ndd.ch 52/144
74

Performing spirometry
Carefully watch the patient
It is your responsibility to watch the patient for signs of distress. After several
trials, let the patient take a break. If it is not possible to obtain an adequate
number of good trials, even after repeated attempts, you should let the
patient rest, depending on how the patient feels, or stop the measurement
entirely. After a break, you can still pick up a test and add trials, or print the
report.
Animation program for children
If you use EasyOne Connect in combination with EasyOne Air, an animation
program for children is available. The animation is available for the FVC test,
the FVL test and the SVC test. You can choose between three animations:
balloon, cake, and monkey.
When the animation program is activated, the manufacturer recommends
disabling the manual test stop and working with the automatic test stop. You
can configure manual or automatic test stop under Utilities > Configuration
> Test > General > Test Procedure.
Breathing maneuvers for all available tests, 75
Avoiding contamination while performing spirometry, 80
Test Procedure, 108
7.3 About quality messages for trials and quality grades for tests
Quality messages
To obtain reliable results, an acceptable quality of the trials is necessary. The
quality of a trial depends on cooperation of the patient and this, in turn,
depends on the quality of your instructions. To facilitate giving good
instructions to the patient, an automatic quality control function displays
feedback prompts. After each trial, a message on the screen informs you
whether the trial is acceptable or not. If the trial is not acceptable, the
message will guide you on how to coach the patient to do better.
When you see the Test complete message, you do not need to conduct further
trials.
Quality grades
A quality grading from A to F is displayed at the end of the test. It provides
information on the overall quality of the test. You should keep performing
trials with the patient until the quality grade is an A or a B. Only after several
trials, when the patient is exhausted and if the patient has already had a
break, a quality grade C is sufficient.
List of quality messages and quality grades, 73
Operator’s Manual V1.1 • EasyOne Air • EasyOne Connect
© ndd Medizintechnik AG • Technoparkstrasse 1, 8005 Zurich, Switzerland • www.ndd.ch 53/144
74

Performing spirometry
7.4 About posts and bronchodilation
A test and a post are performed together to determine the response to
bronchodilating asthma medication.
After performing an FVC test or an FVL test, the patient is treated with a
bronchodilator. Approximately 10 to 20 minutes after the medication, when
the bronchodilator shows effect, the test is repeated as a post. The results of
the previous test and the post are then compared on the result screen and on
the test protocol. Posts can only be added to an existing test within 24 hours.
7.5 Performing spirometry using EasyOne Air stand-alone
7.5.1 Choosing a test and adding a new patient
If you wish to register the patient to be tested immediately before conducting
the test, you can start by manually adding a new patient.
1 If you want to perform an FVC test, choose .
The patient selection list is displayed.
2 If you want to perform any other test, do the following:
a) Choose .
b) Choose one of the test icons.
3 Select <Add Patient>.
A dialog is displayed.
The dialog consists of several steps.
4 CAUTION! False diagnosis: The predicted values and the system
interpretation are based on the patient demographic data. Therefore,
wrong patient data can cause false results. Enter patient data
meticulously. Double-check that you have entered the patient data
correctly.
In each step, enter the requested data and choose Next >.
5 In the last step, choose Finish.
The summary screen is displayed.
About the summary screen, 56
Performing a complete test using EasyOne Air stand-alone, 57
?
Operator’s Manual V1.1 • EasyOne Air • EasyOne Connect
© ndd Medizintechnik AG • Technoparkstrasse 1, 8005 Zurich, Switzerland • www.ndd.ch 54/144
74

Performing spirometry
7.5.2 Choosing a test and selecting an existing patient
If you test a patient that you have tested before or if you have transferred
patient data onto EasyOne Air from EasyOne Connect on your PC, start by
selecting an existing patient.
Prerequisites
Previously, you have manually added the patient to EasyOne Air.
Or, you have transfered patient data onto EasyOne Air from
EasyOne Connect on your PC.
Working with patient data and reports on EasyOne Air, 82
Copying patient data between EasyOne Air and EasyOne Connect, 88
1 If you want to perform an FVC test, choose .
The patient selection list is displayed.
2 If you want to perform any other test, do the following:
a) Choose .
b) Choose one of the test icons.
The patient selection list is displayed.
?
3 Select a patient.
If the patient has performed a test within the previous 24 hours, the
question window is displayed. Proceed with step 4.
If the patient has not performed a test before or not within the previous
24 hours, the summary screen is displayed. Step 4 does not apply.
4 If the question window is displayed, do one of the following:
a) To add a trial to the existing test, choose Add Trial.
b) To add a post to the existing test after adminstering a bronchodilator,
choose Add Post.
c) To create a new test that is unrelated to the existing test, choose Create
new.
The summary screen is displayed.
About the summary screen, 56
Performing a complete test using EasyOne Air stand-alone, 57
Operator’s Manual V1.1 • EasyOne Air • EasyOne Connect
© ndd Medizintechnik AG • Technoparkstrasse 1, 8005 Zurich, Switzerland • www.ndd.ch 55/144
74

Performing spirometry
7.5.3 About the summary screen
The summary screen displays common data about the patient, that you have
entered before.
You can edit the data and for example, add the following medical data about
the patient:
• Asthma status
• Dyspnea status
• Smoker status
• Cigarettes per day
• Smoke years
• Profession
• Occupation exposure
• Diagnosis
In addition, you can access reports of previous tests of the patient.
Performing a complete test using EasyOne Air stand-alone, 57
Operator’s Manual V1.1 • EasyOne Air • EasyOne Connect
© ndd Medizintechnik AG • Technoparkstrasse 1, 8005 Zurich, Switzerland • www.ndd.ch 56/144
74

Performing spirometry
7.5.4 Performing a complete test using EasyOne Air stand-alone
Required materials
• A new EasyOne Flow Tube for each patient
• For an FVL test, an MVV test, or an SVC test, a nose clip is required.
Prerequisites
For the FVL test, the MVV test, and the SVC test, you have entered the
environment temperature within 1°C or 1.8°F accuracy.
You have chosen a test and added a new patient.
Or you have chosen a test and selected an existing patient.
The summary screen is displayed.
You are wearing disposable gloves.
You have instructed the patient on how to perform the test before you
start with the test.
Choosing a test and adding a new patient, 54
Choosing a test and selecting an existing patient, 55
About preparation of spirometry and instructions for the patient, 52
WARNING
PATIENT CROSS-CONTAMINATION
If you reuse the EasyOne Flow Tube, contamination from an infected patient
can be deposited on the EasyOne Flow Tube. The contamination from an infected patient can later be passed on to the next patient who is tested.
You cannot clean or disinfect the EasyOne Flow Tube in any way. The
EasyOne Flow Tube is for single-patient use only.
Always replace the EasyOne Flow Tube with a new one between patients or
when performing spirometry on yourself.
Only use an original EasyOne Flow Tube by the manufacturer.
PATIENT HEALTH HAZARD
Performing spirometry can cause an asthma attack or bronchospasm.
If the patient is on medication, check the contraindications for the medication.
CAUTION
PATIENT HEALTH HAZARD
Pulmonary function tests require maximum effort on the part of the patient and
may lead to dizziness.
Make sure the patient cannot be injured by objects in the vicinity if the patient
falls.
Watch the patient for signs of dizziness and support the patient if necessary.
Do not leave the patient unattended during a test.
The EasyOne Flow Tube is a single-patient-use disposable and hygienically
packaged. Visually check the wrapper of a new EasyOne Flow Tube for defects.
Operator’s Manual V1.1 • EasyOne Air • EasyOne Connect
© ndd Medizintechnik AG • Technoparkstrasse 1, 8005 Zurich, Switzerland • www.ndd.ch 57/144
74

Performing spirometry
If the wrapper of the EasyOne Flow Tube has a defect, discard the
EasyOne Flow Tube, take another EasyOne Flow Tube, and visually check the
wrapper of the new EasyOne Flow Tube again for defects.
Visually check the EasyOne Flow Tube for defects before use and between
trials.
Before you use EasyOne Air with the patient, make sure that there are no
obvious or wet residues on EasyOne Air from prior cleaning.
To prepare the test
1 Partly unwrap the EasyOne Flow Tube.
For hygiene reasons, grip the partly unwrapped EasyOne Flow Tube only
with the wrapper at the mouthpiece. Do not touch the EasyOne Flow Tube.
Operator’s Manual V1.1 • EasyOne Air • EasyOne Connect
© ndd Medizintechnik AG • Technoparkstrasse 1, 8005 Zurich, Switzerland • www.ndd.ch 58/144
74

Performing spirometry
2 Fully insert the EasyOne Flow Tube into the EasyOne Flow Tube holder as
depicted below, but keep the partly unwrapped wrapper on the mouthpiece
of the EasyOne Flow Tube.
The shape of the EasyOne Flow Tube and the EasyOne Flow Tube holder
guide the orientation of the EasyOne Flow Tube. You can only insert the
EasyOne Flow Tube fully if it is positioned correctly.
When you insert the EasyOne Flow Tube, avoid direct sunlight as it can
interfere with the automatic recognition of the EasyOne Flow Tube.
Operator’s Manual V1.1 • EasyOne Air • EasyOne Connect
© ndd Medizintechnik AG • Technoparkstrasse 1, 8005 Zurich, Switzerland • www.ndd.ch 59/144
74

Performing spirometry
3 Choose Start test.
The sensor starts buzzing and the user action required window is
displayed for setting the baseline.
4 To set the baseline, seal off one end of the EasyOne Flow Tube with the
wrapper to avoid air flow.
5 Choose OK.
The Please wait… message is displayed while the baseline is set.
After the baseline has been set, a signal sounds, and the BLAST OUT…
message is displayed.
6 Remove the wrapper from the EasyOne Flow Tube.
7 If you want to perform an FVL test, an MVV test, or an SVC test, attach the
nose clip to the patient’s nose.
8 Hand EasyOne Air to the patient.
9 Tell the patient to breathe at rest.
The following procedure To perform the FVC breathing maneuver
represents the breathing maneuver for the FVC test as an example. If you
want to perform any other test, replace the procedure To perform the FVC
breathing maneuver with the breathing maneuver for the required test.
Breathing maneuvers for all available tests, 75
To perform the FVC breathing maneuver
1 Tell the patient to fill the lungs completely.
2 Tell the patient to take the EasyOne Flow Tube into the mouth and to seal
the lips around the EasyOne Flow Tube.
The patient must not block the opening with the tongue or teeth or bite
down excessively on the EasyOne Flow Tube.
Operator’s Manual V1.1 • EasyOne Air • EasyOne Connect
© ndd Medizintechnik AG • Technoparkstrasse 1, 8005 Zurich, Switzerland • www.ndd.ch 60/144
74

Performing spirometry
3 Tell the patient to exhale as hard and as fast as possible and to continue
blowing out until the lungs are completely empty.
While the patient performs the breathing maneuver, a feedback sound
indicates the effort of the patient. The harder the patient exhales, the faster
the feedback sound is repeated. When the patient exhales more slowly
towards the end, the feedback sound also gets slower.
At the end of the trial, another feedback sound indicates whether the
trial is acceptable or not.
4 Tell the patient to take the EasyOne Flow Tube out of the mouth and to
breathe normally again.
If the trial is acceptable, the green quality message is displayed.
If the trial is not acceptable, a yellow or red quality message is
displayed suggesting how to improve the breathing maneuver.
To add trials
1 If you want to look at the details of this trial, choose Data.
The report screen is displayed.
2 Choose Next.
3 Repeat the previous procedure To perform the FVC breathing maneuver
and this procedure To add trials until a green acceptability message is
displayed.
After the third and every following trial, a red or a green acceptability
message is displayed with the quality grade for the test.
After three acceptable trials, the test ends automatically and a green
acceptability message is displayed.
4 Choose Data.
The report screen is displayed.
5 Choose End session.
Operator’s Manual V1.1 • EasyOne Air • EasyOne Connect
© ndd Medizintechnik AG • Technoparkstrasse 1, 8005 Zurich, Switzerland • www.ndd.ch 61/144
74

Performing spirometry
To end the test
1 To remove the EasyOne Flow Tube, do the following:
a) Grip EasyOne Air with both hands, with the backside of EasyOne Air
facing towards you and with the EasyOne Flow Tube pointing up.
b) Press against the protruding lip of the EasyOne Flow Tube with both
thumbs and push the EasyOne Flow Tube out.
c) Do not touch the EasyOne Flow Tube anywhere else than at the
protruding lip.
d) Drop the EasyOne Flow Tube directly into a waste container.
2 WARNING! Patient cross-contamination and infection of the technician:
Always wear disposable gloves. Between patients, always exchange
disposable gloves, clean EasyOne Air, and disinfect hands. / Electric
shock, failure of EasyOne Air, and false diagnosis: Make sure that no fluid
penetrates the EasyOne Flow Tube holder or the inside of EasyOne Air while
cleaning. To clean EasyOne Air, do not fully dip EasyOne Air into any fluid.
To clean EasyOne Air and to disinfect your hands after each patient, do the
following:
a) Use a soft cloth with a cleaning solution according to the list of cleaning
solutions under Hygiene and cleaning, 80 and wipe the handles and
the display of EasyOne Air.
b) Put down EasyOne Air.
c) Take off or change the disposable gloves and disinfect your hands
before you put on new disposable gloves.
3 If you want to print the report immediately, choose Print.
A progress bar is displayed that indicates the progress of the print-out.
Operator’s Manual V1.1 • EasyOne Air • EasyOne Connect
© ndd Medizintechnik AG • Technoparkstrasse 1, 8005 Zurich, Switzerland • www.ndd.ch 62/144
74

Performing spirometry
4 Choose End.
The home screen is displayed.
List of cleaning solutions for EasyOne Air, 81
About interpreting results, 72
About compatible printers, 19
7.6 Performing spirometry using EasyOne Connect in combination with EasyOne Air
7.6.1 Connecting EasyOne Air to EasyOne Connect
To use EasyOne Connect in combination with EasyOne Air, you need to
connect EasyOne Air to your PC over Bluetooth.
Prerequisite
On your PC, Bluetooth is enabled.
A USB Bluetooth adapter is supplied with EasyOne Air in case your PC
does not have Bluetooth built-in.
List of box contents, 17
If EasyOne Air is directly connected to a PC over USB, performing tests is not
possible. Leakage currents could harm the patient. Connect EasyOne Air to
your PC wirelessly, only.
1 On EasyOne Air, choose > > .
2 Select the Bluetooth check box and keep the menu open.
EasyOne Air is discoverable over Bluetooth by other devices.
3 On your PC, navigate to the Bluetooth menu to add Bluetooth devices.
Where to find the Bluetooth menu varies between the versions of
Microsoft Windows. For assistance, open the Control Panel in any Windows
version and press the F1 key.
In the list of available devices, you see “EasyOne Air” followed by its
serial number.
4 On your PC, select EasyOne Air for pairing.
5 Exchange the Bluetooth pairing key as advised by your PC and by
EasyOne Air.
Your PC and EasyOne Air are now paired. Whenever Bluetooth is
enabled on both devices and both devices are within range, your PC and
EasyOne Air reconnect automatically.
Operator’s Manual V1.1 • EasyOne Air • EasyOne Connect
© ndd Medizintechnik AG • Technoparkstrasse 1, 8005 Zurich, Switzerland • www.ndd.ch 63/144
74

Performing spirometry
7.6.2 Performing a complete test using EasyOne Connect together with EasyOne Air
Required materials
A new EasyOne Flow Tube for each patient
For an FVL test, an MVV test, or an SVC test, a nose clip is required.
Prerequisites
You have connected EasyOne Air to EasyOne Connect.
You have added the patient data to the database of EasyOne Connect.
Or the patient data is already in the database of EasyOne Connect.
You are wearing disposable gloves.
You have instructed the patient on how to perform the test before you
start with the test.
Connecting EasyOne Air to EasyOne Connect, 63
Adding patient data to the database of EasyOne Connect, 86
About preparation of spirometry and instructions for the patient, 52
WARNING
PATIENT CROSS-CONTAMINATION
If you reuse the EasyOne Flow Tube, contamination from an infected patient
can be deposited on the EasyOne Flow Tube. The contamination from an infected patient can later be passed on to the next patient who is tested.
You cannot clean or disinfect the EasyOne Flow Tube in any way. The
EasyOne Flow Tube is for single-patient use only.
Always replace the EasyOne Flow Tube with a new one between patients or
when performing spirometry on yourself.
Only use an original EasyOne Flow Tube by the manufacturer.
PATIENT HEALTH HAZARD
Performing spirometry can cause an asthma attack or bronchospasm.
If the patient is on medication, check the contraindications for the medication.
CAUTION
PATIENT HEALTH HAZARD
Pulmonary function tests require maximum effort on the part of the patient and
may lead to dizziness.
Make sure the patient cannot be injured by objects in the vicinity if the patient
falls.
Watch the patient for signs of dizziness and support the patient if necessary.
Do not leave the patient unattended during a test.
The EasyOne Flow Tube is a single-patient-use disposable and hygienically
packaged. Visually check the wrapper of a new EasyOne Flow Tube for defects.
Operator’s Manual V1.1 • EasyOne Air • EasyOne Connect
© ndd Medizintechnik AG • Technoparkstrasse 1, 8005 Zurich, Switzerland • www.ndd.ch 64/144
74

Performing spirometry
If the wrapper of the EasyOne Flow Tube has a defect, discard the
EasyOne Flow Tube, take another EasyOne Flow Tube, and visually check the
wrapper of the new EasyOne Flow Tube again for defects.
Visually check the EasyOne Flow Tube for defects before use and between
trials.
Before you use EasyOne Air with the patient, make sure that there are no
obvious or wet residues on EasyOne Air from prior cleaning.
To prepare the test
1 Partly unwrap the EasyOne Flow Tube.
For hygiene reasons, grip the partly unwrapped EasyOne Flow Tube only
with the wrapper at the mouthpiece. Do not touch the EasyOne Flow Tube.
Operator’s Manual V1.1 • EasyOne Air • EasyOne Connect
© ndd Medizintechnik AG • Technoparkstrasse 1, 8005 Zurich, Switzerland • www.ndd.ch 65/144
74

Performing spirometry
2 Fully insert the EasyOne Flow Tube into the EasyOne Flow Tube holder as
depicted below, but keep the partly unwrapped wrapper on the mouthpiece
of the EasyOne Flow Tube.
The shape of the EasyOne Flow Tube and the EasyOne Flow Tube holder
guide the orientation of the EasyOne Flow Tube. You can only insert the
EasyOne Flow Tube fully if it is positioned correctly.
When you insert the EasyOne Flow Tube, avoid direct sunlight as it can
interfere with the automatic recognition of the EasyOne Flow Tube.
3 On the main menu of EasyOne Connect, choose Patients.
4 Select the patient that you want to test.
5 At the bottom of the screen, choose Test.
6 Choose the test that you want to perform.
7 If the environment conditions screen is displayed, enter the current values
and choose Confirm >>.
For the FVL test, the MVV test, and the SVC test, you must enter the
environment temperature within 1°C or 1.8°F accuracy.
If the patient has already performed a test on the same day, a selection
window is displayed. Proceed with step 8.
If the patient has not performed a test on the same day, the screen of
the selected test is displayed with a pop-up window that asks you to block
the EasyOne Flow Tube. Proceed with step 9.
Operator’s Manual V1.1 • EasyOne Air • EasyOne Connect
© ndd Medizintechnik AG • Technoparkstrasse 1, 8005 Zurich, Switzerland • www.ndd.ch 66/144
74

Performing spirometry
8 If the selection window is displayed, do one of the following:
a) To add a trial to the existing test, choose Add Trial.
b) To add a post to the existing test after administering a bronchodilator,
choose Add Post.
c) To create a new test that is unrelated to the existing test, choose Test.
The screen of the selected test is displayed with a pop-up window that
asks you to block the EasyOne Flow Tube.
9 To set the baseline, seal off one end of the EasyOne Flow Tube with the
wrapper to avoid air flow.
10 Choose OK.
In the colored status bar, Setting baseline: Avoid flow! is displayed.
After the baseline has been set, Start test … is displayed.
11 Remove the wrapper from the EasyOne Flow Tube.
12 If you want to perform an FVL test, an MVV test, or an SVC test, attach the
nose clip to the patient’s nose.
13 Hand EasyOne Air to the patient.
14 Tell the patient to breathe at rest.
The following procedure To perform the FVC breathing maneuver
represents the breathing maneuver for the FVC test as an example. If you
want to perform any other test, replace the procedure To perform the FVC
breathing maneuver with the breathing maneuver for the required test.
Breathing maneuvers for all available tests, 75
Operator’s Manual V1.1 • EasyOne Air • EasyOne Connect
© ndd Medizintechnik AG • Technoparkstrasse 1, 8005 Zurich, Switzerland • www.ndd.ch 67/144
74

Performing spirometry
To perform the FVC breathing maneuver
1 Tell the patient to fill the lungs completely.
2 Tell the patient to take the EasyOne Flow Tube into the mouth and to seal
the lips around the EasyOne Flow Tube.
The patient must not block the opening with the tongue or teeth or bite
down excessively on the EasyOne Flow Tube.
3 Tell the patient to exhale as hard and as fast as possible and to continue
blowing out until the lungs are completely empty.
4 When the message Manually End Test is displayed, you can choose the
Button End Test at your discretion.
You can configure manual test stop or automatic test stop under
Utilities > Configuration > Test > General > Test Procedure.
The test result is displayed.
5 Tell the patient to take the EasyOne Flow Tube out of the mouth and to
breathe normally again.
If the trial is acceptable, the green quality message is displayed.
If the trial is not acceptable, a yellow or red quality message is
displayed suggesting how to improve the breathing maneuver.
To add trials
1 Choose Add Trial.
2 Repeat the previous procedure To perform the FVC breathing maneuver
and this procedure To add trials until the green Session Complete!
message is displayed.
In the Test Information area the quality grade for the test is displayed.
3 Do the following:
a) Review the test quality that is displayed in the Test Information area.
b) Decide whether the test quality is sufficient or not.
c) If necessary, add a trial and repeat the previous procedure To perform
the FVC breathing maneuver.
Operator’s Manual V1.1 • EasyOne Air • EasyOne Connect
© ndd Medizintechnik AG • Technoparkstrasse 1, 8005 Zurich, Switzerland • www.ndd.ch 68/144
74

Performing spirometry
To end the test
1 To remove the EasyOne Flow Tube, do the following:
a) Grip EasyOne Air with both hands, with the backside of EasyOne Air
facing towards you and with the EasyOne Flow Tube pointing up.
b) Press against the protruding lip of the EasyOne Flow Tube with both
thumbs and push the EasyOne Flow Tube out.
c) Do not touch the EasyOne Flow Tube anywhere else than at the
protruding lip.
d) Drop the EasyOne Flow Tube directly into a waste container.
2 WARNING! Patient cross-contamination and infection of the technician:
Always wear disposable gloves. Between patients, always exchange
disposable gloves, clean EasyOne Air, and disinfect hands. / Electric
shock, failure of EasyOne Air, and false diagnosis: Make sure that no fluid
penetrates the EasyOne Flow Tube holder or the inside of EasyOne Air while
cleaning. To clean EasyOne Air, do not fully dip EasyOne Air into any fluid.
To clean EasyOne Air and to disinfect your hands after each patient, do the
following:
a) Use a soft cloth with a cleaning solution according to the list of cleaning
solutions under Hygiene and cleaning, 80 and wipe the handles and
the display of EasyOne Air.
b) Put down EasyOne Air.
c) Take off or change the disposable gloves and disinfect your hands
before you put on new disposable gloves.
3 To print the report immediately, choose Print from the bottom right of the
screen.
The report is generated and sent to the configured printer.
Operator’s Manual V1.1 • EasyOne Air • EasyOne Connect
© ndd Medizintechnik AG • Technoparkstrasse 1, 8005 Zurich, Switzerland • www.ndd.ch 69/144
74

Performing spirometry
4 To preview the report, do the following:
a) Choose Report from the bottom right of the screen.
b) To print the report on the printer that you have configured, choose Print
from the top of the screen.
c) To export the report as a PDF file or to select a different printer, choose
Print Menu from the top of the screen.
d) To return to the test result screen, choose Return from the menu bar.
5 To return to the main menu, choose Main Menu from the menu bar.
List of cleaning solutions for EasyOne Air, 81
About interpreting results, 72
Description of printer configurations of EasyOne Connect, 116
Operator’s Manual V1.1 • EasyOne Air • EasyOne Connect
© ndd Medizintechnik AG • Technoparkstrasse 1, 8005 Zurich, Switzerland • www.ndd.ch 70/144
74

Performing spirometry
7.6.3 Performing a bronchial provocation test using EasyOne Connect in combination with EasyOne Air
Bronchial provocation tests are performed by administering increasing doses
of an airway irritant. The reaction of the respiratory system to these
substances is measured. For example, Mannitol and Methacholine are
available as provocative agents for a number of protocols.
Required materials
A new EasyOne Flow Tube for each patient
A nose clip
Prerequisites
You have configured the appropriate protocol for provocation tests.
You have added the patient data to the database of EasyOne Connect.
Or the patient data is already in the database of EasyOne Connect.
You are wearing disposable gloves.
You have instructed the patient on how to perform the test before you
start with the test.
Utilities > Configuration > Test > Provocation, 115
About preparation of spirometry and instructions for the patient, 52
Performing the breathing maneuver for the FVL test, 76
WARNING
PATIENT HEALTH HAZARD
Performing provocation tests can cause an asthma attack or bronchospasm.
Familiarize yourself with appropriate medication documentation, guidelines,
procedures, and contraindications as to when to stop further testing.
If the patient is on medication, check the contraindications for the medication.
The following must be available on short notice: a physician that is trained in
the treatment of acute bronchospasm, appropriate medication counteracting
the provocative agent, and resuscitation equipment.
Do not leave the patient unattended during a provocation test.
CAUTION
PATIENT HEALTH HAZARD
Pulmonary function tests require maximum effort on the part of the patient and
may lead to dizziness.
Make sure the patient cannot be injured by objects in the vicinity if the patient
falls.
Watch the patient for signs of dizziness and support the patient if necessary.
Do not leave the patient unattended during a test.
Operator’s Manual V1.1 • EasyOne Air • EasyOne Connect
© ndd Medizintechnik AG • Technoparkstrasse 1, 8005 Zurich, Switzerland • www.ndd.ch 71/144
74

Performing spirometry
CAUTION
PATIENT CROSS-CONTAMINATION
If you reuse the EasyOne Flow Tube, DLCO barriette, or FRC barriette, contamination from an infected patient can be deposited on the EasyOne Flow Tube,
on the DLCO barriette, or on the FRC barriette. The contamination from an infected patient can later be passed on to the next patient who is tested.
You cannot clean or disinfect the EasyOne Flow Tube, the DLCO barriette, or
the FRC barriette in any way. The EasyOne Flow Tube, the DLCO barriette, and
the FRC barriette are for single-patient use only.
Always replace the EasyOne Flow Tube, the DLCO barriette, and the
FRC barriette with a new one between patients or when performing lung function test on yourself.
Only use an original EasyOne Flow Tube, DLCO barriette, and FRC barriette by
the manufacturer.
The procedure To perform the FVC breathing maneuver represent the
breathing maneuver for the FVC test. If you use the FVL test for forced
spirometry, replace the procedure To perform the FVC breathing maneuver
with the breathing maneuver for the FVL test.
Breathing maneuvers for all available tests, 75
You can configure whether to use the FVC test or the FVL test for forced
spirometry under Utilities > Configuration > Test > FVC/FVL > Type.
The EasyOne Flow Tube is a single-patient-use disposable and hygienically
packaged. Visually check the wrapper of a new EasyOne Flow Tube for defects.
If the wrapper of the EasyOne Flow Tube has a defect, discard the
EasyOne Flow Tube, take another EasyOne Flow Tube, and visually check the
wrapper of the new EasyOne Flow Tube again for defects.
About interpreting results, 72
7.7 About interpreting results
The quality grades A to C indicate a reliable result. The quality grades D and F
indicate insufficient test quality. The result must then be interpreted with
caution.
On the printed report, parameters that are below the lower limit of normal
(LLN) are marked with an asterisk (*). Unacceptable trials are marked with the
number sign (#). In addition to the marks, EasyOne Air and EasyOne Connect
offer an automatic interpretation aid.
It is possible to deactivate the automatic quality grading function and the
system interpretation function.
List of tests and parameters, 36
List of quality messages and quality grades, 73
Configuration, 93
Operator’s Manual V1.1 • EasyOne Air • EasyOne Connect
© ndd Medizintechnik AG • Technoparkstrasse 1, 8005 Zurich, Switzerland • www.ndd.ch 72/144
74

Performing spirometry
7.8 List of quality messages and quality grades
7.8.1 About quality messages and quality grades
End-of-Test criteria, quality criteria, and quality grading are based upon the
published standards [1], [4], [13], [14].
Quality grading is based on the sources [4], [13], [14].
The main articles [2] and [3] do not numerically define the minimum
expiratory peak flow time (PEFT) that is required for an acceptable test. For
EasyOne Air, 160 ms is used.
List of bibliographic references, 132
7.8.2 Quality messages for trials
Immediately after a trial, quality messages help you to give feedback to the
patient as to whether the trial has been acceptable or not. If the trial has not
been acceptable, a recommendation on how to improve is displayed.
Displaying quality messages for trials
To display the quality message for a trial, choose the trial rank from the
parameter table on the result screen (Patients > select patient > History
> select test). The trial ranks are given in numbers 1, 2, 3, etc. and may be
crossed out.
7.8.3 List of quality grades for tests
Quality grades help you as the operator to assess the quality of a completed
test.
Quality grades for the FVC test, the FVL test, and the OSHA test
Rating Criteria
A At least 3 acceptable trials (for age 6 and under: 2 acceptable) AND the difference between the best two FEV1
and FVC values is equal to or less than 100 mL (80 mL if FVC < 1.0 L) (for age 6 and under: 80 mL or 8% of FVC
whichever is greater)
or FEV
1
B At least 3 acceptable trials (for age 6 and under: 2 acceptable) AND the difference between the best two FEV1
and FVC values is equal to or less than 150 mL (100 mL if FVC < 1.0 L) (for age 6 and under: 100 mL or 10% of
FVC or FEV
C At least 2 acceptable trials AND the difference between the best two FEV1 and FVC values is equal to or less
than 200 mL (150 mL if FVC < 1.0 L) (for age 6 and under: 150 mL or 15% of FVC or FEV
D (1) At least 2 acceptable trials but the results are not reproducible according to 'C'.
Quality message: Result not reproducible
D (2) Only one acceptable trial
Quality message: Only one acceptable trial
F No acceptable trial available
Quality grades for the FVC test, the FVL test, and the OSHA test
whichever is greater)
1
whichever is greater)
1
Operator’s Manual V1.1 • EasyOne Air • EasyOne Connect
© ndd Medizintechnik AG • Technoparkstrasse 1, 8005 Zurich, Switzerland • www.ndd.ch 73/144
74

Performing spirometry
Quality grades for the SSA test
Rating Criteria
A At least 3 acceptable trials AND the difference between the best two FEV1 and FVC values is equal to or less
than 100 mL
B At least 3 acceptable trials AND the difference between the best two FEV1 and FVC values is equal to or less
than 100 mL or 5% of FVC or FEV
F No acceptable trial available
Quality grades for the FVC test, the FVL test, and the OSHA test
, respectively.
1
Quality grades for the SVC test
Rating Criteria
A At least 3 acceptable trials AND the difference between the best VC values is equal to or less than 150 mL.
B At least 2 acceptable trials AND the difference between the best VC values is equal to or less than 150 mL.
D (1) At least 2 acceptable trials but the results are not reproducible according to 'B'.
D (2) Only one acceptable trial
F No acceptable trial available
Quality grades for the SVC test
Operator’s Manual V1.1 • EasyOne Air • EasyOne Connect
© ndd Medizintechnik AG • Technoparkstrasse 1, 8005 Zurich, Switzerland • www.ndd.ch 74/144
74

Breathing maneuvers for all available tests
8 Breathing maneuvers for all available tests
8.1 About breathing maneuvers for all available tests
The overall process of performing spirometry is the same for all spirometry
tests. The tests differ in the breathing maneuver that the patient must
perform.
Performing spirometry, 51
8.2 Performing the breathing maneuver for the FVC test
The forced expiratory vital capacity test is the most commonly used
spirometry test. During the breathing maneuver, the patient must exhale with
a forceful, maximum effort.
1 Tell the patient to breathe at rest.
2 Tell the patient to fill the lungs completely.
3 Tell the patient to take the EasyOne Flow Tube into the mouth and to seal
the lips around the EasyOne Flow Tube.
The patient must not block the opening with the tongue or teeth or bite
down excessively on the EasyOne Flow Tube.
4 Tell the patient to exhale as hard and as fast as possible and to continue
blowing out until the lungs are completely empty.
5 Tell the patient to take the EasyOne Flow Tube out of the mouth and to
breathe normally again.
If the trial is acceptable, the green quality message is displayed.
If the trial is not acceptable, a yellow or red quality message is
displayed suggesting how to improve the breathing maneuver.
Performing spirometry, 51
Operator’s Manual V1.1 • EasyOne Air • EasyOne Connect
© ndd Medizintechnik AG • Technoparkstrasse 1, 8005 Zurich, Switzerland • www.ndd.ch 75/144
79

Breathing maneuvers for all available tests
8.3 Performing the breathing maneuver for the FVL test
With the flow volume loop test, a deep inhalation directly follows the
exhalation maneuver.
Required material
A nose clip
Prerequisite
For this test, you must enter the environment temperature within 1°C or
1.8°F accuracy.
1 Tell the patient to breathe at rest.
2 Tell the patient to fill the lungs completely.
3 Tell the patient to take the EasyOne Flow Tube into the mouth and to seal
the lips around the EasyOne Flow Tube.
The patient must not block the opening with the tongue or teeth or bite
down excessively on the EasyOne Flow Tube.
4 Tell the patient to exhale as hard and as fast as possible and to continue
blowing out until the lungs are completely empty.
5 Tell the patient to keep the EasyOne Flow Tube in the mouth, to breathe in,
and to continue inhaling until the lungs are completely filled again.
6 Tell the patient to take the EasyOne Flow Tube out of the mouth and to
breathe out again.
If the trial has been acceptable, the green quality message is displayed.
If the trial has not been acceptable, a yellow or red quality message is
displayed suggesting how to improve the breathing maneuver.
Performing spirometry, 51
Operator’s Manual V1.1 • EasyOne Air • EasyOne Connect
© ndd Medizintechnik AG • Technoparkstrasse 1, 8005 Zurich, Switzerland • www.ndd.ch 76/144
79

Breathing maneuvers for all available tests
8.4 About the OSHA test
The OSHA test is intended for occupational testing and meets certain
standardization requirements. The OSHA test is only available with US
regional settings.
From the test menu in EasyOne Connect, choose the OSHA test.
On EasyOne Air, choose the OSHA test from the more menu.
The patient performs the same breathing maneuver as for the FVC test.
Reports meet the requirements of the following institutions and standards:
• Occupational Safety and Health Administration (OSHA)
• National Institute for Occupational Safety and Health (NIOSH)
• Cotton Dust standard (29 CFR: 1910.1043 Appendix D)
• Predicted values for adults according to Knudson (1976)
The default configuration for predicted values for adults is NHANES III. To use
predicted values for adults according to Knudson (1976), you need to change
the configuration in the following menu:
> > > Predicted set 1
According to these requirements, the reports contain the following
information:
• The best three tests and volume-time curves are saved and printed.
• The curves are printed in large, in validation size.
• There is no clinical interpretation displayed or printed.
Performing spirometry, 51
Performing the breathing maneuver for the FVC test, 75
Application Note Reference Predicted Normal Values
Application Notes for further information, 3
8.5 About the SSA test
The SSA test is intended to test for social security disabilities. The SSA test is
only available with US regional settings.
The patient performs the same breathing maneuver as for the FVC test. Merely
the quality grades for the SSA are different from the quality grades for the FVC
test.
Performing spirometry, 51
Performing the breathing maneuver for the FVC test, 75
Quality grades for the SSA test, 74
Operator’s Manual V1.1 • EasyOne Air • EasyOne Connect
© ndd Medizintechnik AG • Technoparkstrasse 1, 8005 Zurich, Switzerland • www.ndd.ch 77/144
79

Breathing maneuvers for all available tests
8.6 Performing the breathing maneuver for the MVV test
With the maximum voluntary ventilation test, the patient fully inhales and
fully exhales repeatedly.
Required material
A nose clip
Prerequisite
For this test, you must enter the environment temperature within 1°C or
1.8°F accuracy.
1 Tell the patient to breathe at rest.
2 Tell the patient to fully exhale.
3 Tell the patient to take the EasyOne Flow Tube into the mouth and to seal
the lips around the EasyOne Flow Tube.
The patient must not block the opening with the tongue or teeth or bite
down excessively on the EasyOne Flow Tube.
4 Tell the patient to fully inhale and fully exhale repeatedly for an
uninterrupted period of at least 12 seconds.
5 Tell the patient to take the EasyOne Flow Tube out of the mouth and to
breathe normally again.
Performing spirometry, 51
Operator’s Manual V1.1 • EasyOne Air • EasyOne Connect
© ndd Medizintechnik AG • Technoparkstrasse 1, 8005 Zurich, Switzerland • www.ndd.ch 78/144
79

Breathing maneuvers for all available tests
8.7 Performing the breathing maneuver for the SVC test
The slow vital capacity test serves to determine the vital capacity and the lung
volumes. This test does not require great effort on part of the patient.
Required material
A nose clip
Prerequisite
For this test, you must enter the environment temperature within 1°C or
1.8°F accuracy.
1 Tell the patient to breathe at rest.
2 Tell the patient to take the EasyOne Flow Tube into the mouth and to seal
the lips around the EasyOne Flow Tube.
The patient must not block the opening with the tongue or teeth or bite
down excessively on the EasyOne Flow Tube.
3 Tell the patient to continue breathing at rest.
Typically, three to five breaths are required.
Tidal Breathing is displayed.
4 When Start test … is displayed and when the steady-tidal acoustic signal
sounds, tell the patient to fully inhale and fully exhale.
Instead, the patient can also fully exhale first and then fully inhale.
The patient can take this deep breath slowly and does not need to force
it.
5 Tell the patient to take the EasyOne Flow Tube out of the mouth and to
breathe normally again.
If the trial is acceptable, the green quality message is displayed.
If the trial is not acceptable, a yellow or red quality message is
displayed suggesting how to improve the breathing maneuver.
Performing spirometry, 51
Operator’s Manual V1.1 • EasyOne Air • EasyOne Connect
© ndd Medizintechnik AG • Technoparkstrasse 1, 8005 Zurich, Switzerland • www.ndd.ch 79/144
79

Hygiene and cleaning
9 Hygiene and cleaning
9.1 Avoiding contamination while performing spirometry
When handling the EasyOne Flow Tube, you must be careful not to
contaminate the next EasyOne Flow Tube or EasyOne Air.
The wrapped EasyOne Flow Tube is hygienically wrapped and for single-
patient use only. You must use a new EasyOne Flow Tube for each patient.
WARNING
PATIENT CROSS-CONTAMINATION
If you reuse the EasyOne Flow Tube, contamination from an infected patient
can be deposited on the EasyOne Flow Tube. The contamination from an infected patient can later be passed on to the next patient who is tested.
You cannot clean or disinfect the EasyOne Flow Tube in any way. The
EasyOne Flow Tube is for single-patient use only.
Always replace the EasyOne Flow Tube with a new one between patients or
when performing spirometry on yourself.
Only use an original EasyOne Flow Tube by the manufacturer.
1 To protect yourself and to avoid infection of patients, wear disposable
gloves.
2 Never touch the EasyOne Flow Tube directly, but partly unwrap the wrapper
and grip the EasyOne Flow Tube with the wrapper still around the
mouthpiece.
3 Keep the wrapper while the patient is performing the breathing maneuver.
4 After the patient has completed the breathing maneuver, grip the
EasyOne Flow Tube with the wrapper again and dispose of the
EasyOne Flow Tube together with the wrapper.
Operator’s Manual V1.1 • EasyOne Air • EasyOne Connect
© ndd Medizintechnik AG • Technoparkstrasse 1, 8005 Zurich, Switzerland • www.ndd.ch 80/144
81

Hygiene and cleaning
5 WARNING! Patient cross-contamination and infection of the technician:
Always wear disposable gloves. Between patients, always exchange
disposable gloves, clean EasyOne Air, and disinfect hands. / Electric
shock, failure of EasyOne Air, and false diagnosis: Make sure that no fluid
penetrates the EasyOne Flow Tube holder or the inside of EasyOne Air while
cleaning. To clean EasyOne Air, do not fully dip EasyOne Air into any fluid.
To clean EasyOne Air and to disinfect your hands after each patient, do the
following:
a) Use a soft cloth with a cleaning solution according to the list of cleaning
solutions under Hygiene and cleaning, 80 and wipe the handles and
the display of EasyOne Air.
b) Put down EasyOne Air.
c) Take off or change the disposable gloves and disinfect your hands
before you put on new disposable gloves.
Calibration check, 118
9.2 List of cleaning solutions for EasyOne Air
Do not use just any cleaning solution for EasyOne Air. Only use the listed
cleaning solutions.
CAUTION
ELECTRIC SHOCK, FAILURE OF EASYONE AIR, AND FALSE DIAGNOSIS
Make sure that no fluid penetrates the inside of EasyOne Air while cleaning.
To clean EasyOne Air, do not immerse EasyOne Air in any fluid.
To clean EasyOne Air from environmental dirt, you can use a damp cloth.
After each patient, clean EasyOne Air. You can use a soft cloth with a cleaning
solution according to the following list.
The cradle may be cleansed with the same cleaning solution.
• 70 percent isopropyl alcohol solutions or
• Solutions that contain formaldehyde (only for use outside the USA) or
• Solutions that contain chlorine (e.g. Sani-Cloth Germicidal Disposable
Wipes, EPA Reg# 9480-4)
Operator’s Manual V1.1 • EasyOne Air • EasyOne Connect
© ndd Medizintechnik AG • Technoparkstrasse 1, 8005 Zurich, Switzerland • www.ndd.ch 81/144
81

Working with patient data and reports
10 Working with patient data and reports
CAUTION
FALSE DIAGNOSIS
The predicted values and the system interpretation are based on the patient
demographic data. Therefore, wrong patient data can cause false results.
Enter patient data meticulously.
Double-check that you have entered the patient data correctly.
10.1 Working with patient data and reports on EasyOne Air
10.1.1 Adding a patient to the database on EasyOne Air
>
1 Choose .
2 Choose .
The add patient dialog is displayed.
3 CAUTION! False diagnosis: The predicted values and the system
interpretation are based on the patient demographic data. Therefore,
wrong patient data can cause false results. Enter patient data
meticulously. Double-check that you have entered the patient data
correctly.
In each step, enter the requested data and choose Next >.
4 In the last step, choose Finish.
The summary screen is displayed.
Operator’s Manual V1.1 • EasyOne Air • EasyOne Connect
© ndd Medizintechnik AG • Technoparkstrasse 1, 8005 Zurich, Switzerland • www.ndd.ch 82/144
92

Working with patient data and reports
10.1.2 Editing patient data on EasyOne Air
>
1 Choose .
2 Choose .
The patient selection list is displayed.
3 Select a patient.
The summary screen is displayed.
4 Choose a list item.
5 CAUTION! False diagnosis: The predicted values and the system
interpretation are based on the patient demographic data. Therefore,
wrong patient data can cause false results. Enter patient data
meticulously. Double-check that you have entered the patient data
correctly.
Edit the entry and, if applicable, choose OK.
Note that these changes only apply to sessions going forward and not
to previous sessions.
6 Choose OK.
7 Choose the home button.
10.1.3 Deleting a patient from the database on EasyOne Air
>
1 Choose .
2 Choose .
The patient selection list is displayed.
3 Select a patient and confirm the message that is displayed.
The selected patient data is deleted.
Operator’s Manual V1.1 • EasyOne Air • EasyOne Connect
© ndd Medizintechnik AG • Technoparkstrasse 1, 8005 Zurich, Switzerland • www.ndd.ch 83/144
92

Working with patient data and reports
10.1.4 Exporting data from EasyOne Air
>
You can export data including reports to the SD memory card.
Required material
An SD card
1 Unlock and open the battery compartment by turning the lock screw
clockwise.
2 Insert the SD memory card into the SD card slot.
3 Close and lock the battery compartment by turning the lock screw
counterclockwise.
4 Choose > .
Operator’s Manual V1.1 • EasyOne Air • EasyOne Connect
© ndd Medizintechnik AG • Technoparkstrasse 1, 8005 Zurich, Switzerland • www.ndd.ch 84/144
92

Working with patient data and reports
5 Tap and hold on the patient record that you want to export.
A pop-up window is displayed.
6 In the pop-up window, choose Export.
The patient record is saved to the SD card.
7 Remove the SD card.
10.1.5 Viewing and printing reports on EasyOne Air
1 Choose .
The test selection list is displayed.
2 Select a test.
The report screen is displayed.
3 To skip through the trials, choose >> or <<.
4 To enlarge, tap on the combined volume-time curve and flow-volume curve
or on the parameter table.
5 To reduce, tap again on the combined volume-time curve and flow-volume
curve or on the parameter table.
6 If you want to print the report, choose Print.
A progress bar is displayed, which indicates the progress of the printout.
7 To view another test, do the following:
a) Choose < Back.
b) From the test selection list, select another test.
The report screen is displayed.
8 Choose the home button.
The home screen is displayed.
10.1.6 About the reports menu and the history menu
To view the reports sorted by date, choose from the home screen.
To view the reports sorted by patient, choose > .
Viewing and printing reports on EasyOne Air, 85
Operator’s Manual V1.1 • EasyOne Air • EasyOne Connect
© ndd Medizintechnik AG • Technoparkstrasse 1, 8005 Zurich, Switzerland • www.ndd.ch 85/144
92

Working with patient data and reports
10.2 Working with patient data and reports in EasyOne Connect
10.2.1 Adding patient data to the database of EasyOne Connect
1 Choose Patients.
2 Choose New.
3 CAUTION! False diagnosis: The predicted values and the system
interpretation are based on the patient demographic data. Therefore,
wrong patient data can cause false results. Enter patient data
meticulously. Double-check that you have entered the patient data
correctly.
Fill out those fields that are marked with an asterisk (*).
You cannot complete adding patient data without filling out these
fields.
4 In all other fields, enter additional patient data if necessary.
5 Choose OK.
10.2.2 Editing patient data with EasyOne Connect
1 Choose Patients.
2 Select a patient.
3 Choose Edit.
4 CAUTION! False diagnosis: The predicted values and the system
interpretation are based on the patient demographic data. Therefore,
wrong patient data can cause false results. Enter patient data
meticulously. Double-check that you have entered the patient data
correctly.
Edit the fields that you want to change.
You must fill out those fields that are marked with an asterisk (*).
5 In all other fields, enter additional patient data if necessary.
6 Choose OK.
Operator’s Manual V1.1 • EasyOne Air • EasyOne Connect
© ndd Medizintechnik AG • Technoparkstrasse 1, 8005 Zurich, Switzerland • www.ndd.ch 86/144
92

Working with patient data and reports
10.2.3 Merging two patient data records with EasyOne Connect
If, for example, two data records of the same patient were acquired with
different tests or if different spellings of a patient's name exist, you can
merge these two data records into one.
Prerequisite
The two data records must have an identical date of birth.
1 Choose Patients.
2 Select one of the two data records.
3 Drag and drop that data record onto the second data record by doing the
following:
a) Right-click the first data record and keep the mouse button pressed.
b) Move the data record across the screen onto the second data record.
c) While the first data record is above the second, release the mouse
button.
If the dates of birth of the two data records match, a confirmation
window is displayed.
If the dates of birth of the two data records do not match, a warning is
displayed. In this case, you cannot merge these two data records.
4 To finish, confirm the message.
10.2.4 Deleting patient data from the database of EasyOne Connect
1 Choose Patients.
2 Select a patient.
3 Choose Delete.
If user handling is not active, that is if you did not have to login to
EasyOne Connect, you are prompted for the default password. Proceed with
step 4.
If user handling is active, that is if you did have to login to
EasyOne Connect, you are not prompted for a password. A confirmation
window is displayed immediately. Proceed with step 5.
4 Enter the default user name / password.
The default user name / password is: admin / 8005
A confirmation window is displayed.
5 Choose Yes.
The patient and all corresponding tests are deleted from the database.
About user handling and the default password of EasyOne Connect, 105
Operator’s Manual V1.1 • EasyOne Air • EasyOne Connect
© ndd Medizintechnik AG • Technoparkstrasse 1, 8005 Zurich, Switzerland • www.ndd.ch 87/144
92

Working with patient data and reports
10.2.5 Copying patient data between EasyOne Air and EasyOne Connect
Usually, you perform spirometry with EasyOne Air stand-alone. But it can be
more convenient to enter patient data, to evaluate results or to archive patient
data and results with EasyOne Connect on your PC. For this purpose, you can
create patient records in EasyOne Connect and copy patient records onto
EasyOne Air. After you have performed spirometry, you can copy patient data
and results from EasyOne Air to EasyOne Connect.
CAUTION
DATA LOSS
With the current firmware version V1.5.x, patient data and results cannot be
merged if the patient data and results exist both on EasyOne Air and in
EasyOne Connect. If any patient data for the same patient exists on
EasyOne Air and in EasyOne Connect, the patient data and results in
EasyOne Connect can be overwritten by EasyOne Air.
Do not copy incomplete test results from EasyOne Air to EasyOne Connect,
then change patient data or add trials, and copy data from EasyOne Air to
EasyOne Connect again.
Instead, first complete tests with EasyOne Air before you copy patient data
and results to EasyOne Connect.
Make changes to existing patient data on EasyOne Air only.
Use EasyOne Connect only
to create new patient records without results yet for sending to EasyOne Air
to evaluate results,
to print reports,
to archive patient data and results,
or to send patient data and results from EasyOne Connect to your EMR system.
EASYONE AIR MAY FREEZE
If EasyOne Air is connected to your PC via USB and if there are also electromagnetic fields from other electrical devices nearby, EasyOne Air may freeze.
To restart EasyOne Air, turn EasyOne Air off and on again.
To copy patient data and results from EasyOne Air to
EasyOne Connect
1 On your PC, launch EasyOne Connect.
2 Turn on EasyOne Air.
3 Put EasyOne Air into the cradle.
Patient data and results are copied from EasyOne Air to
EasyOne Connect.
EasyOne Connect displays a message whether the copying has been
successful.
You can remove EasyOne Air from the cradle, or you can proceed with
the next procedure to create and send new patient records from
EasyOne Connect to EasyOne Air.
Operator’s Manual V1.1 • EasyOne Air • EasyOne Connect
© ndd Medizintechnik AG • Technoparkstrasse 1, 8005 Zurich, Switzerland • www.ndd.ch 88/144
92

Working with patient data and reports
To create and send a new patient record from
1 In EasyOne Connect, choose Patients.
2 Choose New.
3 CAUTION! False diagnosis: The predicted values and the system
4 In all other fields, enter additional patient data if necessary.
5 Choose OK.
6 Select the patient record that you just have created.
7 Choose > EasyOne.
EasyOne Connect to EasyOne Air
interpretation are based on the patient demographic data. Therefore,
wrong patient data can cause false results. Enter patient data
meticulously. Double-check that you have entered the patient data
correctly.
Fill out those fields that are marked with an asterisk (*).
You cannot complete adding patient data without filling out these
fields.
The selected patient record is send to EasyOne Air.
EasyOne Connect displays a message whether the sending has been
successful.
You can remove EasyOne Air from the cradle, or you can repeat steps 2
to 7 to create and send additional patient records.
Viewing and printing reports with EasyOne Connect, 89
Connectivity and data exchange, 44
10.2.6 Viewing and printing reports with EasyOne Connect
1 From the main menu, choose Patients.
2 Select a patient.
3 Choose History.
The history screen with a list of tests is displayed.
4 Select a test.
5 To view the results for the selected test, do the following:
a) Choose View.
b) If the test type is provocation, choose Menu.
c) To preview the report, choose Report.
d) To print the report, choose Print.
e) To go back to the history screen, choose Return and then History.
6 To view the results of another test, repeat steps 4 and 5.
7 To view the results of another patient, choose Patients and repeat steps 2
to 6.
Operator’s Manual V1.1 • EasyOne Air • EasyOne Connect
© ndd Medizintechnik AG • Technoparkstrasse 1, 8005 Zurich, Switzerland • www.ndd.ch 89/144
92

Working with patient data and reports
10.2.7 About the trend view with EasyOne Connect
The trend view visualizes an increase or a decline of individual parameters.
This view facilitates the comparison of different measurements over time.
From the history screen (Patients > select patient > History), choose Trend.
The trend screen displays two curves, one for the absolute values and one for
the percentage of predicted normal values.
At the bottom of the trend screen, you can select four parameters to be
displayed at the same time.
10.2.8 Assessing tests retrospectively and entering comments with
EasyOne Connect
Retrospectively, you can manually override the acceptability of trials and the
ranking of trials. This means that you can mark trials that the system judged
acceptable as unacceptable and vice versa. Also, you can change the trial
ranking (rank 1, 2, 3, and so forth).
To assess tests retrospectively
1 From any result screen in the parameter table, choose the Trial Rank field
for the particular trial.
An overlay window is displayed.
2 To mark the selected trial as acceptable or unacceptable, select or deselect
the Acceptable check-box.
If you have not activated user handling, the login window is displayed.
If you have activated user handling, the test comment window is
displayed. In this case, proceed with step 4.
3 If the login window is displayed, enter your user ID.
The selected trial is marked as either acceptable or unacceptable.
4 To change the ranking, choose Highest Ranked.
You can only set the rank to 1 (highest). To set the rank of other trials to
2, 3, and so forth, you must subsequently set the rank to 1 for all trials. The
last trial that you set to rank 1 is rank 1. The second last trial that you set to
rank 1 is rank 2, and so forth.
5 To close the overlay window, choose ×.
Operator’s Manual V1.1 • EasyOne Air • EasyOne Connect
© ndd Medizintechnik AG • Technoparkstrasse 1, 8005 Zurich, Switzerland • www.ndd.ch 90/144
92

Working with patient data and reports
To enter comments
1 In any result screen, select the comment area.
If you have not activated user handling, the login window is displayed.
If you have activated user handling, the test comment window is
displayed. In this case, proceed with step 3.
2 If the login window is displayed, enter your user ID.
The test comment window is displayed.
3 Enter your comment and choose Save.
Your comment is displayed on the result screen.
About user handling and the default password of EasyOne Connect, 105
10.2.9 About exporting comprehensive data from EasyOne Connect
Utilities > Export Data
This export is the most comprehensive export function in EasyOne Connect.
You can select which data to include in the export.
Each check box produces one file with the corresponding data.
To access data on an SQL-server based database, the SQL server must accept
the Microsoft Active Directory user account that the current Windows user is
logged in with.
10.2.10 About exporting XML from EasyOne Connect
Utilities > Export XML
The XML export enables you to process patient data with your own software
tools.
In the report configurations, you can configure which data to include in the
XML export.
To access data on an SQL-server based database, the SQL server must accept
the Microsoft Active Directory user account that the current Windows user is
logged in with.
Description of report configurations of EasyOne Connect, 115
Software Developer Guide SDK – ndd EMR plug-in
Operator’s Manual V1.1 • EasyOne Air • EasyOne Connect
© ndd Medizintechnik AG • Technoparkstrasse 1, 8005 Zurich, Switzerland • www.ndd.ch 91/144
92

Working with patient data and reports
10.2.11 About exporting from EasyOne Connect to EasyWare
Utilities > Export EasyWare
EasyWare is the PC software for EasyOne World, the predecessor model of
EasyOne Air. EasyWare uses a different database format.
This export is compatible with the database format of EasyWare.
To access data on an SQL-server based database, the SQL server must accept
the Microsoft Active Directory user account that the current Windows user is
logged in with.
EasyWare Operator’s Manual
Operator’s Manual V1.1 • EasyOne Air • EasyOne Connect
© ndd Medizintechnik AG • Technoparkstrasse 1, 8005 Zurich, Switzerland • www.ndd.ch 92/144
92

Configuration
11 Configuration
CAUTION
FALSE DIAGNOSIS
Wrong configuration settings can cause incorrect diagnostic calculations.
Be aware that wrong configuration settings can affect the predicted values,
the system interpretation, and the displayed result values.
Verify the configuration settings.
11.1 Configuration of EasyOne Air
You can configure EasyOne Air in the tools menu.
11.1.1 Configurations in the settings menu of EasyOne Air
>
11.1.1.1 Description of device settings of EasyOne Air
> >
On this screen, you can choose basic settings for EasyOne Air.
Setting Purpose Options Default setting
Speaker volume To set the speaker volume 0% – 100% 50%
Key click To enable sound for audible click
feedback
Beep during
maneuver
User Logon required To enable password protection Selected, deselected Selected
System Time To set the time Numeric entry (Not applicable)
System Date To set the date Numeric entry (Not applicable)
Date format To set the format of the date YYY-MM-DD, MM/DD/
Time format To set the format of the time 24h (00:00 – 23:59), 12h
Patient ID format To set the format of the patient ID for
Description of device settings
To enable a beeping signal during
breathing maneuvers as feedback
about air flow
compliance with national standards
Selected, deselected Selected
Selected, deselected Selected
(Determined by
YYYY, DD.MM.YYYY
(AM/PM)
Numbers only,
Alphanumeric
regional setting at
first-time setup)
(Determined by
regional setting at
first-time setup)
(Determined by
regional setting at
first-time setup)
Operator’s Manual V1.1 • EasyOne Air • EasyOne Connect
© ndd Medizintechnik AG • Technoparkstrasse 1, 8005 Zurich, Switzerland • www.ndd.ch 93/144
117

Configuration
11.1.1.2 Description of spirometry settings of EasyOne Air
> >
Predicted normal values setting
Predicted normal values are based on the latest scientific publications.
Therefore, the predicted normal values are subject to change. These changes
are delivered to you via software updates.
Updated information is published in an Application Note on the ndd website.
Application Note Reference Predicted Normal Values
Application Notes for further information, 3
List of bibliographic references, 132
Best trial/best value selection
If you choose the Best Trial option, the complete best trial is selected for
assessing the quality of the test and for assessing the interpretation. The trial
with the largest sum of FVC and FEV1 is selected, as suggested by ATS and
ERS.
If you choose the Best Value option, the best single, relevant values are
selected from different trials for assessing the quality of the test and for
assessing the interpretation. This compiled column shows, for example, the
largest FVC (or FEV6) and the largest FEV1 from all acceptable tests (unless all
tests are unacceptable). Other parameters are taken from the best trial (also
defined by the largest sum of FEV1 and FVC).
Operator’s Manual V1.1 • EasyOne Air • EasyOne Connect
© ndd Medizintechnik AG • Technoparkstrasse 1, 8005 Zurich, Switzerland • www.ndd.ch 94/144
117

Configuration
System Interpretation
Choose from the interpretation standards NLHEP, GOLD/Hardie, and NICE, or
disable automatic interpretation.
The default setting is GOLD/Hardie.
NLHEP interpretation
START
7HVWVHVVLRQJRRG"
Yes
FEV1)9&˗//1"
No
FEV1˗//1"
No
FEV1˗SUHGLFWHG"
No
FEV1˗SUHGLFWHG"
No
Yes
Yes
Yes
Yes
)9&//1"
Yes
No
Caution: interpret with care
Normal spirometry
/RZYLWDOFDSDFLW\ɠ
SRVVLEO\GXHWRUHVWULFWLRQ
RIOXQJYROXPHV
Normal spirometry
0LOGREVWUXFWLRQ
0RGHUDWHREVWUXFWLRQ
No
6HYHUHREVWUXFWLRQ
)9&//1"
Yes
,QDGGLWLRQORZYLWDO
FDSDFLW\ɠ
SRVVLEO\GXHWRUHVWULFWLRQ
RIOXQJYROXPHV
NLHEP interpretation algorithm
The diagram above shows how the interpretation for NLHEP is determined,
according to Ferguson (2000/NLHEP) [4].
Operator’s Manual V1.1 • EasyOne Air • EasyOne Connect
© ndd Medizintechnik AG • Technoparkstrasse 1, 8005 Zurich, Switzerland • www.ndd.ch 95/144
117

Configuration
START
GOLD/Hardie Interpretation 2003 & 2008
Maneuver
quality OK?
Yes
FEV1/FVC
< FEV1% limit?
Yes
FEV1˗
predicted?
No
FEV1˗
predicted?
No
FEV1˗
predicted?
No
FEV1/FVC limit age related:
\HDUV˖DJH\HDUV
No
Yes
Yes
Yes
age < 70 years: 70%
DJH!\HDUV
Mild
obstruction
Moderate
obstruction
Severe
obstruction
Obstruction
FVC < LLN and
FEV1 < LLN
Yes
No interpretation
No
Normal spirometry
Smoker?
Normal
spirometry—
at COPD risk
GOLD/Hardie 2003
No
Yes
only
Restriction
No
Very severe
obstruction
GOLD/Hardie interpretation algorithm
The diagram above shows how the interpretation for GOLD/Hardie 2003 and
GOLD/Hardie 2008 is determined, according to GOLD (2003) [11] and Hardie
(2002) [12].
The smoker status is not part of the GOLD/Hardie standard of 2008, only of
2003.
Possible restriction
END
Operator’s Manual V1.1 • EasyOne Air • EasyOne Connect
© ndd Medizintechnik AG • Technoparkstrasse 1, 8005 Zurich, Switzerland • www.ndd.ch 96/144
117

Configuration
NICE interpretation
START
Check maneuver quality
FEV1 and FVC < 80%
of predicted?
No
FEV1 < 80%
of predicted?
No
Yes
Yes
No
FEV1/FVC < 70%
FEV1 < 80%
of predicted?
FEV1 < 50%
of predicted?
FEV1 < 30%
of predicted?
Yes
Yes
Yes
Yes
No
No
No
Normal spirometry
Mild obstruction
Moderate obstruction
Severe obstruction
Restrictive disorder
Normal spirometry—
reduced FEV
1
FVC < 80%
of predicted?
Yes
No
Normal spirometry—
reduced FVC
Normal spirometry
NICE interpretation algorithm
The diagram above shows how the interpretation for NICE is determined. The
NICE interpretation is mainly used in the UK.
Operator’s Manual V1.1 • EasyOne Air • EasyOne Connect
© ndd Medizintechnik AG • Technoparkstrasse 1, 8005 Zurich, Switzerland • www.ndd.ch 97/144
117

Configuration
Lung age calculation
If the Lung Age calculation check box is selected, the lung age is displayed on
the result screen and printed on the report. The lung age is only displayed if
the patient is a smoker. You can set the smoker status on the summary screen.
When the calculated lung age is lower than the patient’s actual age, the
patient’s actual age is displayed.
In the default setting, the Lung Age calculation check box is deselected.
About the summary screen, 56
Automatic QC grading
If the Automatic QC grading check box is selected, quality messages for trial
and quality grades for tests are displayed.
In the default setting, the Automatic QC grading check box is selected.
List of quality messages and quality grades, 73
End-of-maneuver criteria selection
If you choose the FVC option, the measurement continues until the end of test
criteria are met or until you end the test manually. With this setting, all the
intermediate flow values, e.g. MEF25, FEF
If you choose the FEV6 option, the measurement stops after six seconds. With
this setting, none of the intermediate flow values, e.g. MEF25, FEF
reported.
, are reported.
25-75
25-75
, are
The FVC test determines the forced expiratory vital capacity. The forced
expiratory vital capacity is the maximum volume that the patient can exhale
during the FVC breathing maneuver and is indicated by the FVC value in the
report.
The FEV6 value indicates the forced expiratory volume that the patient has
exhaled after six seconds.
For diagnostic purposes, the FVC value is comparable with the FEV6 value. The
advantage of choosing the FEV6 option is that the FVC test only takes the
fixed duration of six seconds and is less demanding for the patient (see
Ferguson (2000/NLHEP) [4]). The disadvantage is that the intermediate flow
values, e.g. MEF25, FEF
, cannot be reported.
25-75
List of bibliographic references, 132
PEF unit
The peak expiratory flow can be specified in liters per minute (L/min) or in
liters per second (L/s).
Operator’s Manual V1.1 • EasyOne Air • EasyOne Connect
© ndd Medizintechnik AG • Technoparkstrasse 1, 8005 Zurich, Switzerland • www.ndd.ch 98/144
117

Configuration
Ethnic correction
Some studies for predicted values take into account the differences between
certain ethnic groups. However, most studies that are used for spirometry
were conducted on Caucasian subjects and are therefore most appropriate for
use with Caucasian patients.
When entering patient information, you are presented with a list of options for
four ethnic groups. In this setting, you can define the corrections for these
ethnic groups. The adjustment is made to the values for Caucasian patients.
There is an exception to this function. If specific values are available for the
chosen group of predicted values and the chosen ethnic group, they will be
used instead of the correction entered here.
The American Thoracic Society’s publication, Lung Function Testing: Selection
of Reference Values and Interpretative Strategies [8], provides guidance on
the subject of ethnic correction. This paper recommends using 88% of the
Caucasian values when testing African patients and provides general
guidance in selecting adjustments for other ethnic groups.
List of bibliographic references, 132
11.1.1.3 Description of display settings of EasyOne Air
> >
On this screen, you can choose settings that are related to the displayed
software and to the touchscreen.
Setting Purpose Options Default setting
Language To set the language English, French, German,
Spanish
Brightness To set the brightness of the touchscreen 1% – 100% 50%
Screensaver after To set the time, after which the
screensaver is enabled
Power-off after To set the time, after which EasyOne Air
is powered off to save battery
Volume/Time curve To enable the display of the volume-
time curve in addition to the flowvolume curve in the reports
Show predicted range To enable visualization of the maximum
curve and minimum curve in the
volume-time curve and flow-volume
curve in the reports
Description of display settings
5 s – 600 s 120 s
20 s – 1200 s 600 s
Selected, deselected Selected
Selected, deselected Selected
(Determined by
regional setting at
first-time setup)
Operator’s Manual V1.1 • EasyOne Air • EasyOne Connect
© ndd Medizintechnik AG • Technoparkstrasse 1, 8005 Zurich, Switzerland • www.ndd.ch 99/144
117

Configuration
11.1.1.4 Description of print settings of EasyOne Air
> >
You can determine basic settings for printouts when using EasyOne Air and
the cradle. There are more comprehensive configuration options available for
printouts when using EasyOne Connect.
Setting Purpose Options Default setting
Printer To select a physical printer or a virtual
PDF printer (saves a PDF file)
Printer page format To select the page format in imperial or
metric dimensions
Number of pages To select between a full-size or compact
report format
Data To set whether one or three trials are
included on the printout, corresponding
to the best trial/best value selection in
the spirometry settings
Curve To set which curves are included on the
printout, corresponding to the Data
setting above
Custom header To specify four lines of text on the
printout, for customizing the printout
for your institution
Description of print settings
PDF printer, External
printer
US, A4 A4
one page (compact
report), two pages (fullsize report)
Best trial (one trial), best
value (three trials)
One curve, three curves Three curves
Text entry (Not applicable)
External printer
two pages
Best value (three
trials)
Best trial/best value selection, 94
About compatible printers, 19
Setting up the physical components, 20
Description of report configurations of EasyOne Connect, 115
Operator’s Manual V1.1 • EasyOne Air • EasyOne Connect
© ndd Medizintechnik AG • Technoparkstrasse 1, 8005 Zurich, Switzerland • www.ndd.ch 100/144
117
 Loading...