

Page 1

11-Mbps USB
Wireless LAN Adapter
User’s Guide
NWH4020
National Datacomm Cor pora tio n
4th Fl., No. 24-2, Industry E. Rd. IV
Science-based Industrial Park
Hsinchu, Taiwan, R.O.C.
Version A1
January 2003
Technical Support
E-mail: techsupt@n dc.com.tw
NDC World Wide Web
http://www.ndclan.com/
Page 2

TRADEMARKS
NDC and InstantWave are trademarks of National Datacomm Corporation. All other names
mentioned in this document are t r ademarks/registered trademarks of their respective owners.
NDC provides this document “as is,” without warranty of any kind, either expressed or
implied, including, but not limited to, warranty of merchantability or fitness for a particular
purpose. NDC may make improvements and/or changes in this manual or in the product(s)
and/or the program(s) described in this manual at any time. This document might include
technical inaccuracies or t ypo graphical errors.
FCC WARNING
This equipment has been tested and found to comply with the limits for a Class B Digital
device, pursuant to part 15 of the FCC Ru les. These limits are designed to provide
reasonable protection against harmful interference in a residential installation. This
equipment generates, uses, and can radiate radio frequency energy and, if not installed and
used in accordance with the in st ructions, may cause harmful interference to radio
communications. However, there is no guarantee that interference will not occur in a
particular installation. If this equipment does cause harmful interference to radio or
television receptio n, which can be determined by turning the equipment off and on, th e user
is encouraged to try to correct t he interference by one or more of the following measures:
Reorient or relocate the receiving antenna
!"
Increase the separation bet ween t he equipment and receiver
!"
Connect the equipment into an outlet on a circuit different from that to which the
!"
receiver is connected
Consult the dealer or an experienced radio/TV technician for help
!"
You are cautioned that changes or modifications not expressly approved by the party
responsible for compliance could void your authority to operate the equipment.
This device complies with part 15 of the FCC Rules. Operation is subject to the following
two conditions:
1. This device may not cause harmful interference, and
2. This device must accept any interference received, including interference that may
cause undesired operation
FCC RF Radiation Exposure Statement
This equipment complies with FCC RF radiation exposure limits set forth for an
uncontrolled environment. This equipment should be installed and operated with a minimum
distance of 20 centimeters between the radiator and your body.
ii
InstantWave
11-Mbps USB Wireless LAN Adapter
Page 3

Packing List
The adapter package should contain the following items:
One InstantWave 11-Mbps USB wireless LAN adapter
#"
One USB cable
#"
One USB Adapter Driver disk
#"
Two InstantWave Utility disks
#"
One quick setup guide
#"
If the optional USB coupler was ordered, make sure it is in the package as well.
InstantWave
11-Mbps USB Wireless LAN Adapter
iii
Page 4

Table of Contents
INTRODUCTION..................................................................................................1
YSTEM REQUIREMENTS
S
Hardware .........................................................................................................1
Software............................................................................................................1
ERMINOLOGY USED IN THIS GUIDE
T
HE PARTS OF THE ADAPTER
T
ADAPTER INSTALLATION...............................................................................5
ONNECTING THE ADAPTER FOR THE FIRST TIME
C
NSTALLING THE DRIVER
I
Windows 98......................................................................................................6
Windows ME ....................................................................................................6
Windows 2000..................................................................................................7
Windows XP .....................................................................................................8
NSTALLING THE INSTANTWAVE UTILITY
I
NINSTALLING THE DRIVER AND UTILITY
U
THE INSTANTWAVE UTILITY.......................................................................13
SING THE INSTANTWAVE UTILITY
U
Adapter Properties.........................................................................................15
Site Survey......................................................................................................21
Radio Link Quality Indicator..........................................................................22
Station Traffic Monitor...................................................................................22
.......................................................................................1
.....................................................................2
................................................................................4
.................................................5
......................................................................................5
.............................................................8
..........................................................11
....................................................................13
DRIVER/UTILITY UPGRADE PROCEDURE ...............................................24
TROUBLESHOOTING.......................................................................................25
TECHNICAL SUPPORT....................................................................................27
NDC LIMITED WARRANTY............................................................................28
SPECIFICATIONS..............................................................................................30
APPENDIX...........................................................................................................33
iv
InstantWave
11-Mbps USB Wireless LAN Adapter
Page 5

INDEX...................................................................................................................34
InstantWave
11-Mbps USB Wireless LAN Adapter
v
Page 6

List of Figures
IGURE
F
IGURE
F
IGURE
F
IGURE
F
IGURE
F
IGURE
F
IGURE
F
IGURE
F
IGURE
F
IGURE
F
IGURE
F
IGURE
F
IGURE
F
IGURE
F
IGURE
F
IGURE
F
IGURE
F
HOC NETWORK
1. AD-
NFRASTRUCTURE NETWORK
2. I
OAMABLE MULTI
3. R
ARTS OF THE ADAPTER
4. P
ETUP PROGRAM WELCOME SCREEN
5. S
HOOSE DESTINATION LOCATION WINDOW
6. C
ELECT PROGRAM FOLDER WINDOW
7. S
TILITY INSTALLATION PROGRESS METER
8. U
ROMPT FOR DISK
9. P
OMPLETION MESSAGE
10. C
NSTANTWAVE HIGHRATE UTILITY
11. I
NSTANTWAVE UTILITY TOOLBAR
12. I
REFERENCES DIALOG BOX
13. P
ASKBAR ICO N
14. T
DAPTER PROPERTIES WINDOW
15. A
DAPTER PROPERTIES WINDOW
16. A
DAPTER PROPERTIES WINDOW
17. A
..................................................................................2
...................................................................2
INFRASTRUCTURE NETWORK
-AP
..........................................................................4
2 .............................................................................. 11
.......................................................................11
..................................................................14
....................................................................................15
...............................3
.......................................................9
............................................9
.....................................................10
.............................................10
.....................................................13
......................................................14
ONFIGURATION PANEL
— C
DVANCED INFORMATION PANEL
— A
INK INFO PANEL
— L
...............16
..........................18
.17
IGURE
F
IGURE
F
IGURE
F
IGURE
F
IGURE
F
DAPTER PROPERTIES WINDOW
18. A
DAPTER PROPERTIES WINDOW
19. A
ITE SURVEY
20. S
ADIO LINK QUALITY INDICATOR
21. R
TATION TRAFFIC MONITOR
22. S
.......................................................................................22
vi
NCRYPTION PANEL
— E
ROUBLESHOOTING PANEL
— T
......................19
.......................................................22
...............................................................23
InstantWave
11-Mbps USB Wireless LAN Adapter
..........21
Page 7

Introduction
Thank you for choosing an InstantWave 11-Mbps wireless networking product.
This guide gives complete instructions on installing and using the InstantWave
NWH4020 11-Mbps USB wireless LAN adapter, and also explains how to install
and use the InstantWave utility program included with the adapter.
The NWH4020 is part of a family of easy-to-use high-performance wireless
communication products. This family of products includes:
• InstantWave 11-Mbps Wireless Access Point (NWH650)
• InstantWave 11-Mbps Wireless Access Point (NWH660)
• InstantWave 11-Mbps Wireless Workgroup Bridge (NWH6210)
• InstantWave 11-Mbps Wireless Building-to-Building Bridge (NWH6110)
• InstantWave 11-Mbps Wireless Ethernet Clients (NWH2210, NWH2610)
• InstantWave 11-Mbps Wireless Secure Router (NWH8010)
• InstantWave 11-Mbps Wireless PC Card (NWH1010)
• InstantWave 11-Mbps Wireless PCI Card (NWH630)
System Requirements
Hardware
The host machine must be an IBM-type x86-based microcomputer with a USB
(Universal Serial Bus) interface. A 3.5-inch floppy-disk drive is required for
installation of the adapter driver and utility. Other resources must be sufficient to
run one of the environments for which the driver and utility were designed (see
next).
Software
The driver and utility included with the adapter will run in Microsoft® Windows 98,
ME, 2000, or XP.
InstantWave
11-Mbps USB Wireless LAN Adapter
1
Page 8
Terminology Used in This Guide
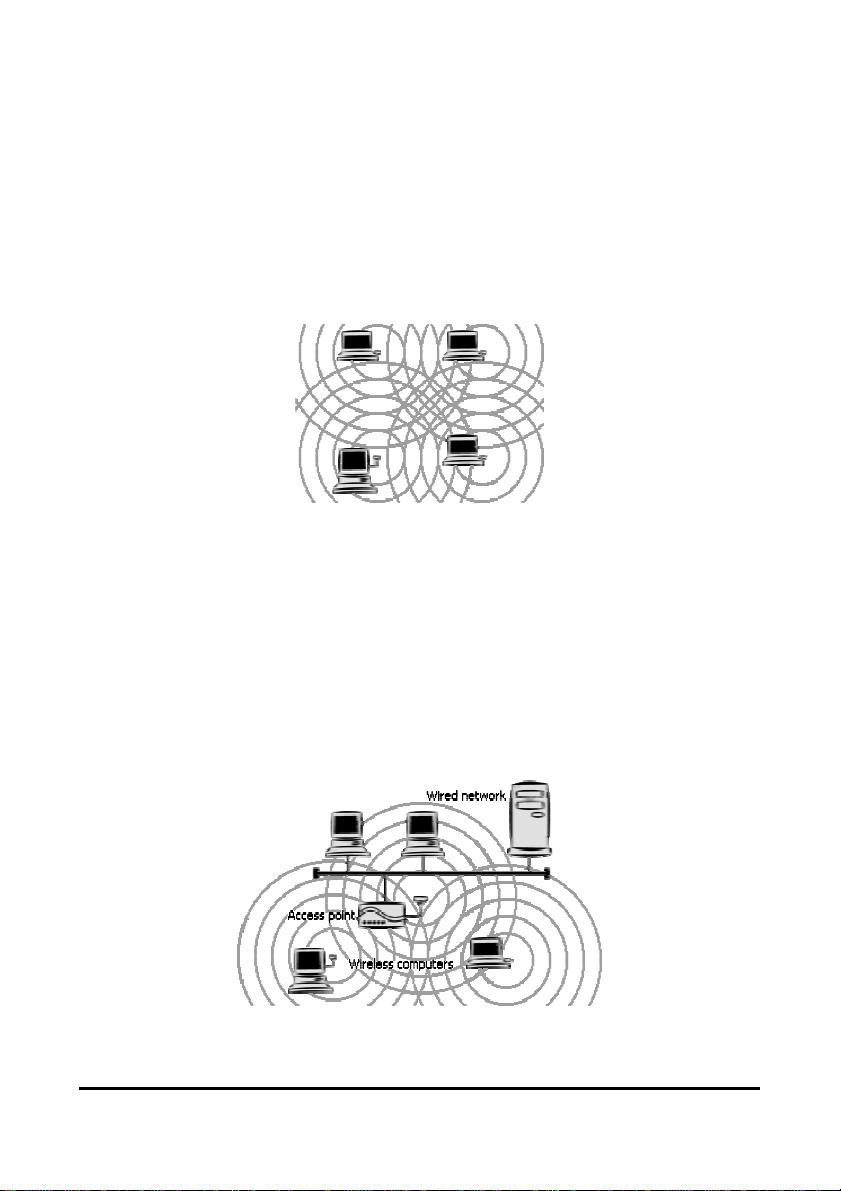
Ad-hoc Network
An ad-hoc network is a wireless local-area network (WLAN) made up of stations
communicating directly with each other through their wireless interfaces. There is
no central relay point, and normally no connection to a wired network. Ad-hoc
mode is sometimes referred to as peer-to-peer, computer-to-computer, or
Independent Basic Service Set (IBSS) mode. Figure 1 shows a typical ad-hoc
network.
Figure 1. Ad-hoc network
Infrastructure Network
An infrastructure network is a WLAN made up of wireless stations and at least one
wireless relay point, known as a base station or access point (AP). The AP usually
has a connection to a wired network, allowing wireless stations to use resources on
that network. The AP also relays all communications between wireless stations in
its coverage area; these stations never communicate directly with each other.
Infrastructure mode is sometimes referred to as managed or Basic Service Set (BSS)
mode. Figure 2 shows a typical infrastructure network..
Figure 2. Infrastructure network
2
InstantWave
11-Mbps USB Wireless LAN Adapter
Page 9
BSSID, MAC Address
A Basic Service Set (BSS) is two or more wireless devices that are in
communication with each other. Like every wired Ethernet device, every wireless
device has a fixed, unique “media access control” (MAC) address. When wireless
devices establish communication, they automatically select the MAC address of
one BSS member as an identifier for the group; this is the BSSID.
It has become customary to refer to a wireless device’s MAC address as its BSSID
even when the address is not being used to identify an active BSS.
A BSS that includes an access point is often referred to as a cell.
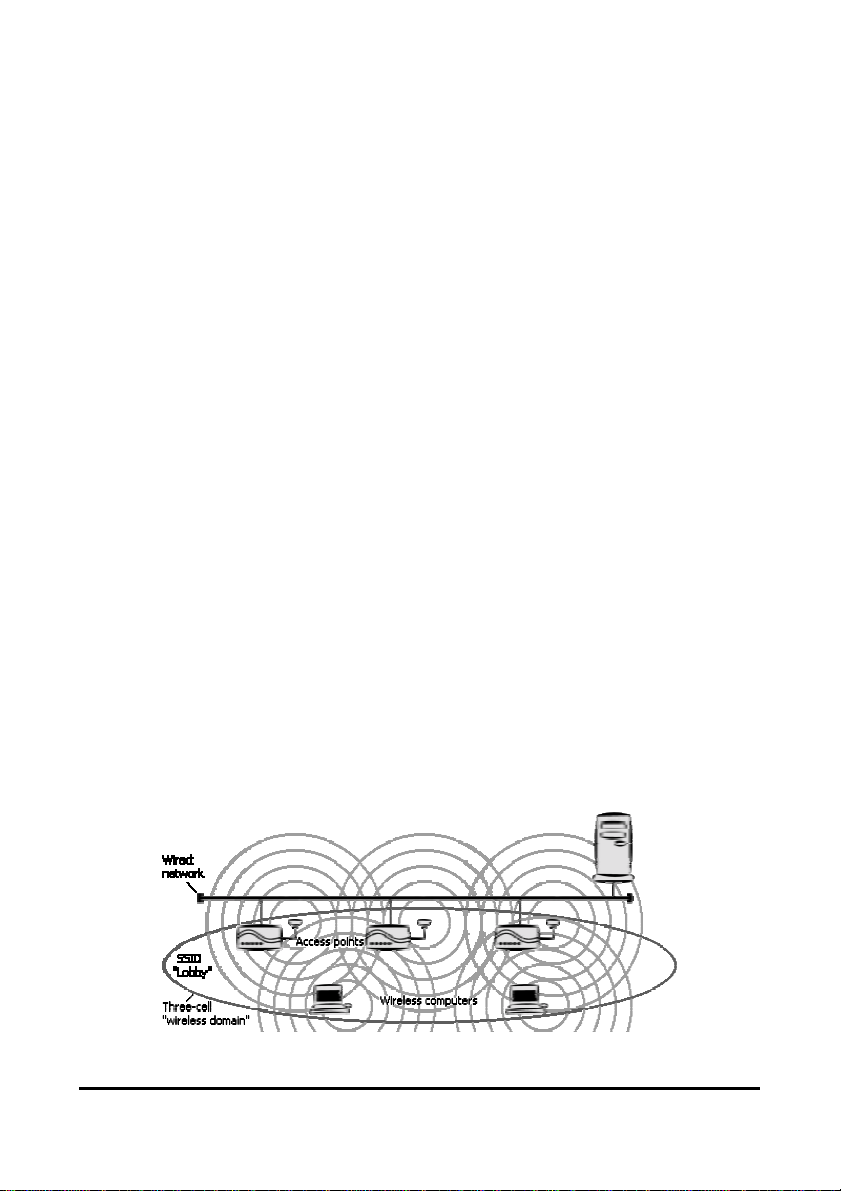
SSID, Domain Identifier
A Service Set Identifier (SSID) is a shared name, usually assigned by a network
administrator, that identifies wireless devices that are allowed to communicate with
each other. This is one way of providing basic security on a wireless network. An
SSID can be up to 32 characters long, and can include letters and numbers.
Giving multiple access points the same SSID and encryptio n settings allows
mobile stations that also share those settings to “roam” fro m one AP to another.
When at least one AP is among the devices sharing an SSID, the name may be
referred to as an Extended Service Set Identifier (ESSID).
An SSID is sometimes called a “domain name,” but it is unrelated to the domain
names used to identify machines and networks on the Internet. Other terms for
SSID are domain ID, net ID, network name, extended network ID, and wireless
network name. The set of devices that an SSID identifies is sometimes called a
communication domain or wireless domain.
Figure 3 shows a common wire less network setup. If the APs share SSID and
encryption settings, mobile devices that also share those settings can roam among
them.
Figure 3. Roamable multi-AP infrastructure network
InstantWave
11-Mbps USB Wireless LAN Adapter
3
Page 10
Roaming
When APs covering adjacent areas have the same SSID and encryption settings, a
mobile device that also shares those settings can communicate through the APs
continuously while moving from one coverage area to another. This is known as
roaming. When one AP’s signal begins to weaken, the mobile device automatically
searches for another AP that it is authorized to “associate with” (that is, connect to);
when the second AP’s signal quality is better than that of the first, the station
automatically switches over.
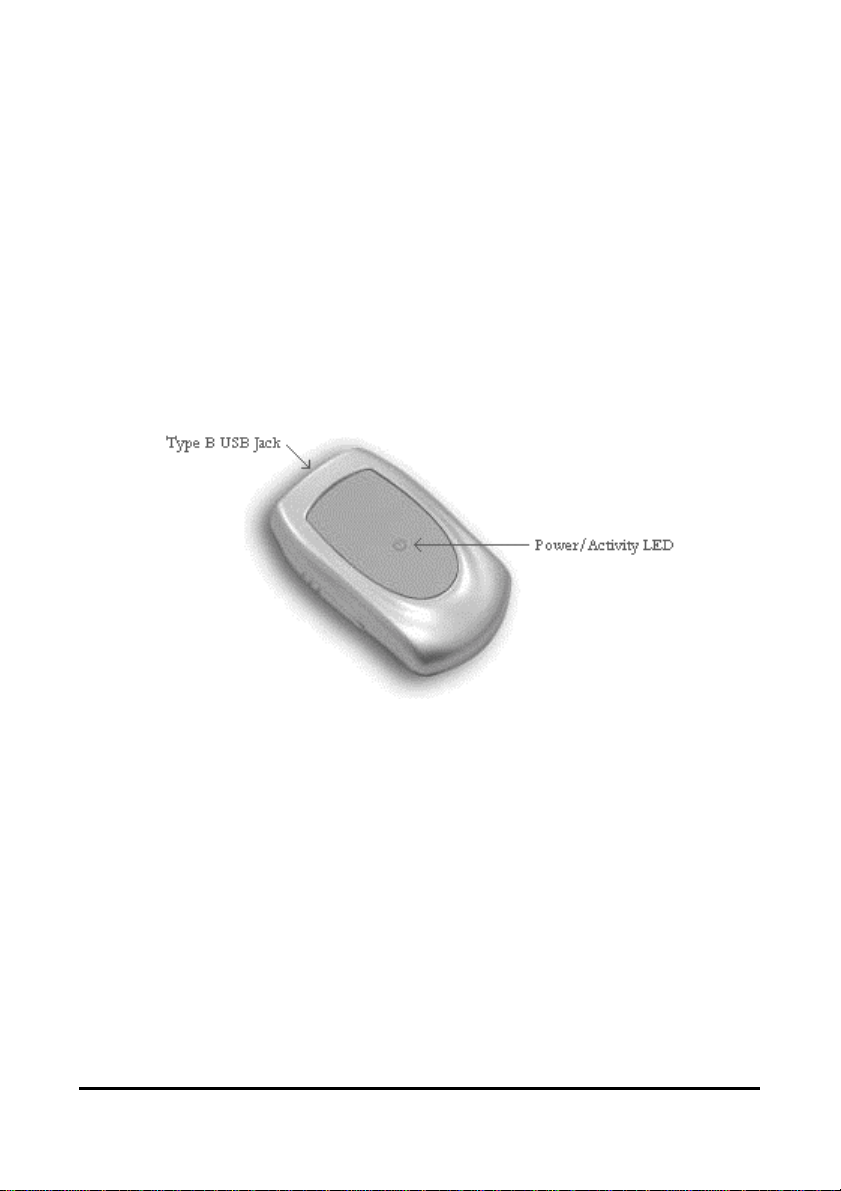
The Parts of the Ad apter
While highly sophisticated on the inside, the adapter is extremely simple on the
outside. There are only two parts to take note of: the Type B USB jack on the back,
and the power/activity LED (light-emitting diode) indicator on the top:
Figure 4. Parts of the adapter
The USB jack will accept the Type B USB plug on the supplied USB cable or the
optional USB coupler. The plugs are clearly marked as Type B.
The power/activity indicator is a red LED. It shines steadily when the adapter is
powered up but idle, and it blinks off and on when the adapter is receiving or
transmitting through its wireless interface.
4
InstantWave
11-Mbps USB Wireless LAN Adapter
Page 11

Adapter Installation
Installing the adapter consists of connecting it to the computer and installing the
driver and the utility program. Software installation will begin auto maticall y the
first time you connect the adapter to the computer. Follow these instructions
carefully to ensure successful installation.
Connecting the Adapter for the First Time
Step 1.
Step 2.
Step 3.
Step 4.
Step 5.
Step 6.
Step 7.
If the computer does not have a built-in 3.5-inch floppy-disk drive,
connect its external drive.
If the computer has not yet been set up for networking, make sure you
have the Microsoft
prompted to insert it during installation of the adapter software.
Turn the computer on and wait for the Microsoft
display to appear.
Locate a free USB jack (also known as a USB “port”) on the computer.
It may be behind a small door in the computer’s housing, and it will be
marked with a tree-like symbol. Many desktop computers have two or
more USB jacks; a laptop computer may have only one.
Plug the matching end of the supplied USB cable or the optional USB
coupler into the computer’s USB jack.
Plug the other end of the cable into the matching jack on the adapter, or
fit the adapter onto the free end of the optional USB coupler.
A driver installation program, sometimes called a “wizard,” will
automatically start up.
Insert the USB Adapter Driver disk in the floppy-disk drive.
®
Windows CD -ROM on hand. You may b e
®
Windows desktop
Installing the Driver
Each version of Microsoft® Windows has a different procedure for installing a
driver. Before carrying out the procedure for your version of Microsoft
note the following tips, which apply to all supported versions:
®
Windows,
• Make sure the driver disk is inserted at the start.
• The installation program can find the driver only if you specify the driver’s
location. Do not let the installation program carry out an “automatic” search
for a driver, and do not let it display a list of drivers.
InstantWave
11-Mbps USB Wireless LAN Adapter
5
Page 12

• When typing the location of the driver, be sure to type
and not a slash [/]. In Microsoft
®
Windows XP, be sure to type
with a backslash [\]
a:\
a:\xp_driver
with a backslash and not a slash.
• It is common for the installation program to fail to find the driver on the first
try, even though the location you type is correct. You will be prompted again
to insert the disk and type the location; simply type the same lo cation again.
Driver installation procedures for supported versions of Microsoft
®
Windows are
described in detail below.
Windows 98
In Microsoft® Windows 98, the window that appears when you first connect the
adapter is titled
Add New Hardware Wizard
. Install the driver as follows:
Step 1.
Make sure the driver disk is in drive A, and then click
Next
.
The installation program will ask if you want it to search for a driver or
display a list of drivers.
Step 2.
Click
Search for the best driver for your device (Re com m ended)
then click
Next
.
, and
Controls for specifying locations to search will appear.
Step 3.
Put a check mark on
CD-ROM drive
Specify a location
and
; type
Floppy disk drives
Microsoft Windows Update
into the location box; and then click
a:\
; remove any check marks from
; put a check mark on
Next
The installation program will indicate that it found the driver.
Step 4.
Click
Next
.
You may be instructed again to insert the disk and specify the driver’s
location. If this happens, click
OK
again.
click
OK
, type
a:\
under
Copy files from
, and
After completing the above steps, confirm all subsequent messages (that is, click
Next, Finish, OK
, or
), remove the driver disk, and allow the system to restart.
Yes
Windows ME
In Microsoft® Windows ME, the window that appears when you first connect the
adapter is titled
Step 1.
Make sure the driver disk is in drive A, click
driver (Advanced)
Add New Hardware Wizard
, and then click
. Install the driver as follows:
Specify the locat ion of the
.
Next
.
6
InstantWave
11-Mbps USB Wireless LAN Adapter
Page 13

The installation program will let you specify whether it should search
for a driver or display a list of drivers. Controls for specifying a search
location will also appear.
Step 2.
Click
Search for the best driver for your device (Re com m ended)
check mark on
then click
Next
Specify a location
.
, type
into the location box, and
a:\
, put a
You may be instructed again to insert the disk and specify the driver’s
location. If this happens, click
click
OK
again.
OK
, type
a:\
under
Copy files from
, and
The installation program will indicate that it found the driver.
Step 3.
Click
Next
.
After completing the above steps, confirm all subsequent messages (that is, click
Next, Finish, OK
, or
), remove the driver disk, and allow the system to restart.
Yes
Windows 2000
In Microsoft® Windows 2000, the window that appears when you first connect the
adapter is titled
Step 1.
Make sure the driver disk is in drive A, and then click
The installation program will let you specify whether it should search
for a driver or display a list of drivers.
Step 2.
Click
then click
The installation program will display several “optional search
locations.”
Found New Hardware Wizard
Search for a suitable driver for my device (r ecommended)
.
Next
. Install the driver as follows:
.
Next
, and
Step 3.
Step 4.
Step 5.
InstantWave
Put a check mark on
and then click
Next
.
Specify a Location
, remove a n y ot her c hec k mar ks,
Controls for specifying a location will appear.
Type
into the location box, and then click
a:\
Next
.
The installation program will find the driver and display information
about it.
Click
Next
.
A message about a “digital driver signature” not being found may
appear. Click
11-Mbps USB Wireless LAN Adapter
to continue with installation.
Yes
7
Page 14

The installation program will install the driver and indicate that
installation is complete.
Step 6.
Click
Finish
.
After completing the above steps, you may be prompted to restart your computer.
Remove the driver disk and click
to allow the system to restart.
Yes
Windows XP
In Microsoft® Windows XP, the window that appears when you first connect the
adapter is titled
Step 1.
Step 2.
Click
Next
Click
Include this locati on in the search
box, and then click
Found New Hardware Wizard
Install from a list or specific location (Advanced)
.
Search for the best driver in these locati ons
.
Next
. Install the driver as follows:
, and then click
, put a check mark on
, type
a:\xp_driver
into the location
A message about the driver not having passed “Windows Logo testing”
may appear. Click
Continue Anyway
.
After completing the above steps, confirm all subsequent messages (that is, click
Next, Finish, OK
, or
) until the installation program window closes.
Yes
Installing the InstantWave Utility
After installing the driver as described above, you must install the InstantWave
HighRate Utility to be able to join wireless networks. Do this as follows:
Step 1.
Close any applications that are running.
Be sure to exit the applications so their windows are closed and not
minimized. The operating system’s desktop display should be on the
screen.
Step 2.
Step 3.
Step 4.
Insert InstantWave Utility Disk #1 in drive A.
Open the desktop’s
In the input box labeled
Be sure to type a backslash [\] and not a slash [/] after a:.
Step 5.
Click
(or press the
OK
The setup program will load the InstallShield
“Welcome” screen will appear.
8
menu and choose
Start
, type the following:
Open
or
Enter
InstantWave
.
Run
a:\setup.exe
Return
key).
®
Wizard, and then a
11-Mbps USB Wireless LAN Adapter
Page 15

Figure 5. Setup program Welcome screen
Step 6.
Step 7.
Click
The
(or press the
Next
Choose Destination Loca tion
Enter
or
Return
key).
window will appear.
Figure 6. Choose Destination Location window
The InstantWave Utility is normally installed in the directory
C:\Program Files\Instantwave\HighRate Utility
different location, click
Browse
You will be returned to the
and follow the on-screen instructions.
Choose Destinat ion Location
. To specify a
windo w when
you are done.
Click
(or press the
Next
Enter
or
Return
key).
InstantWave
11-Mbps USB Wireless LAN Adapter
9
Page 16

The
Select Program Folder
window will appear.
Figure 7. Select Program Folder window
Step 8.
This window lets you specify where in the desktop’s
Start
menu the
InstantWave Utility will appear. Assuming you accepted the default
location in the previous window, the default action in this windo w is to
add the entry
Instantwave
create the subentry
to the Programs section of the
HighRate utility
within it, and place the utility within
Start
menu,
that.
To have the utility placed elsewhere in the
new entry na me (and subentry name, i f you wish) in the
Folders
Folders
Click
input box, or (b) select an existing entry from the
list.
(or press the
Next
Enter
or
Return
menu, either (a) type a
Start
Program
key).
Existing
Installation will begin. A progress meter will be sho wn.
Figure 8. Utility installation progress meter
Before installation is complete, you will be prompted to insert Disk 2.
10
InstantWave
11-Mbps USB Wireless LAN Adapter
Page 17

Figure 9. Prompt for Disk 2
Step 9.
Remove InstantWave Utility Disk #1, insert InstantWave Utilit y Dis k
#2, and click
Installation will proceed to completion, and the
(or press the
OK
Enter
or
Return
key).
Setup Complete
window will appear.
Figure 10. Completion message
Step 10.
Click
Finish
(or press the
Enter
or
Return
key).
Uninstalling the Driver and Utility
Windows 98 or ME:
If you are runn ing Microso ft
wish to remove the driver from your computer system, carry out the following
steps:
®
Windows 98 or ME and you
Step 1.
Step 2.
InstantWave
Disconnect the adapter.
The adapter can be connected or disconnected at any time. There is no
need to choose a “stop” command.
Open the desktop’s
and open the
11-Mbps USB Wireless LAN Adapter
Network
menu, go to
Start
icon.
Settings
, choose
Control Panel
,
11
Page 18

Step 3.
In the list of installed network components, select
Adapter
.
WLAN miniUSB
Step 4.
Click
Remove
.
You will be asked if you wish to remove the adapter or “disable” it.
Step 5.
Click
OK
.
You will be asked if you wish to restart the computer.
Step 6.
Microsoft
Click
®
Windows 2000 or XP:
and allow the system to restart.
Yes
To remove the driver from a computer running
Windows 2000 or XP, carry out the following steps:
Step 1.
Disconnect the adapter.
The adapter can be connected or disconnected at any time. There is no
need to choose a “stop” command.
Step 2.
Step 3.
Step 4.
Step 5.
Open the desktop’s
and open the
Click the
In the list titled
Click
Hardware
Uninstall
System
Network Adapters
., click OK as required to return to the
menu, go to
Start
icon.
tab, and then click
, select
Settings
Device Manager
WLAN miniUSB Adapter
window, and then close that window.
To remove the InstantWave Utility, open the desktop’s
and choose, in order,
Instantwave, HighRate utility
Alternatively, you can open the
, choose
Panel
click
Add/Remove
Add/Remove Programs
.
menu, go to
Start
, select
, and
Settings
Instantwave HighRate Utility
, choose
Control Panel
.
.
Control Panel
menu, go to
Start
Uninstall HighRate Utility
and then to
Control
Programs
, and
,
,
.
12
InstantWave
11-Mbps USB Wireless LAN Adapter
Page 19

The InstantWave Utility
The InstantWave HighRate Utility is a Microsoft® Windows-based application that
lets you configure and monitor your InstantWave wireless LAN adapter. The
program includes tools for determining the best location for the adapter, and for
diagnosing wireless network problems.
The utility lets you specify the wireless network type (infrastructure or ad-hoc),
domain name (SSID), and security (WEP) settings. The Site Survey tool lets you
view existing groups (domain name/SSID of wireless cells in a domain). It
provides the option to manually join a particular group in the network.
Tools are also provided for viewing the network in terms of wireless signal quality,
and for monitoring station data throughput.
Using the InstantWave Utility
This section explains how to use the InstantWave HighRate Utilit y.
step1.
step2.
step3.
Click the
Go to
Programs
(
Figure 11
Click
HighRate Utility
upper right corner of the screen, offering fast access to the utility’s
functions (
button on the desktop taskbar.
Start
, then to
).
Figure 11. InstantWave HighRate Utility
Figure 12
Instantwave
and the InstantWave toolbar will appear in the
).
, and then to
HighRate utility
InstantWave
11-Mbps USB Wireless LAN Adapter
13
Page 20

Figure 12. InstantWave Utility toolbar
step4.
step5.
step6.
Click the icon for the task you wish to perform. The functions provided
by the utility program are, reading from left to right:
• Adapter Properties
• Radio Link Quality Indicator
• Station Traffic Monitor
• Site Survey Tool
Right-click the InstantWave toolbar’s title bar. Four functions are
available:
#"
#"
#"
#"
Click
is used to move the toolbar to a suitable screen position.
Move
is used to close the toolbar.
Close
Preferences
About
Preferences
allows you to customize utility settings.
provides product information.
. The Preferences dialog box will appear (
Figure 13
).
Figure 13. Preferences dialog box
14
InstantWave
11-Mbps USB Wireless LAN Adapter
Page 21

#"
Launch Instantwave Utility on startup
utility at each system boot.
automatically starts the
#"
Show icon on the Taskbar
).
14
displays an icon on the taskbar (
Figure
Figure 14. Taskbar icon
The color of the icon indicates the wireless adapter’s current status:
Color Status
Red
Signal quality is poor, or the adapter
or the driver is not working properly
Yellow Signal quality is fair
Green Signal quality is good
#"
Pop-up message dialog
is used to display a warning message in
case of abnormal conditions.
#"
Play sound
is used to generate an alert sound in case of abnormal
conditions.
You can also right-click the taskbar icon to open a pop-up menu for fast access to
the utility program, utility preferences, and help.
Adapter Properties
Click the
Properties
Adapter Properties
window (
Figure 15
icon on the InstantWave toolbar to open the
).
Adapter Properties
allows the user to view the
adapter properties, and to change the configuration of the station’s wireless
interface.
InstantWave
11-Mbps USB Wireless LAN Adapter
Adapter
15
Page 22

Figure 15. Adapter Properties window — Configuration panel
Configuration
The
Configuration
panel (
Figure 15
) displays, and allows you to modify, some
important parameters of the InstantWave adapter. All parameter changes are saved
and are referred to by the InstantWave driver when the system boots.
•
Network Mode
— The IEEE 802.11 and IEEE 802.11b wireless specifications
allow for two types of network, Infrastructure and Ad hoc. Infrastructure is
used when networking with an access point (AP). The default setting is
Infrastructure.
•
Domain Name (SSID)
— Stations and APs in the same group must use the
same domain name. This name is defined in the 802.11b wireless standard as
the SSID (Service Set ID).
Having the same domain name allows all wireless nodes in the same domain
(or cell) to communicate with each other. The default setting is ANY. This lets
the utility attempt to join the nearest wireless network auto matically, as long
as the network’s SSID can be detected. All SSIDs entered will be stored and
can be accessed from the drop-down list. You can clear the list by clicking
Empty SSID
.
Note: The SSID is case-sensitive and should not contain any spaces.
•
Empty SSID
16
— Clears the SSID list
InstantWave
11-Mbps USB Wireless LAN Adapter
Page 23

•
Transmission Rate
— The transmission rate at which data packets are
transmitted by the station or the AP. You can set this to Fully Automatic, 1Mb
(that is, 1 Mbps), 2Mb, 5.5Mb, or 11Mb. Usually this should be set to Fully
Automatic. In an electromagnetically “noisy” environment, a lower rate can
provide more stable transmission quality.
•
Channel
— Ad-hoc networks only. In a multiple-cell network topology,
overlapping and/or adjacent cells using different channels can operate
simultaneously without interference if the frequency distance between the
center frequencies is at least 30 MHz. For example, channels 1, 7, and 13, are
non-overlapping channels.
In the case of an infrastructure network, changing the channel number has no
affect, as the channel is scanned for automatically. The station will look for an
AP with the same SSID, and automatically associate with it.
•
Power Saving Mode
— Power-saving mode is currently unavailable on the
NWH4020. On adapters that do have a power-saving mode, performance is
degraded when that mode is enabled.
Advanced Information
Click the
Advanced Information
adapter and the driver. This information may be useful in troubleshooting (
).
16
tab to view read-only information about the
Figure
Figure 16. Adapter Properties window — Advanced Information panel
InstantWave
11-Mbps USB Wireless LAN Adapter
17
Page 24

This panel is divided into three sections:
•
Type and Version
— This section shows the version number s of the driver a nd
the adapter’s firmware, as well as the type of chipset in the adapter.
•
Hardware Information
— Shows the “regulatory domain” the adapter was
made for (that is, the country or region it has the proper number and selection
of channels for) and the “station address,” that is, the adapter’s factory-set
MAC (Media Access Control) address. The “adapter bus type” entry is for
adapters that plug into slots on a computer’s main board; this item always
shows N/A (“not applicable”) for the NWH4020.
•
Adapter Status
— Shows the adapter’s current operational status, that is,
whether it has a wireless connection or not, or if it is searching for a
connection or in some other condition.
Link Info
Click the
Link Info
connection (
tab to view detailed information about any current wireless
Figure 17
).
Figure 17. Adapter Properties window — Link Info panel
•
— The State box shows whether or not the station is “associated” with
State
(that is, wirelessly connected to) an AP. If the station is connected, this box
also shows the AP’s BSSID (Basic Service Set ID; this is also the AP’s MAC
address).
18
InstantWave
11-Mbps USB Wireless LAN Adapter
Page 25

•
Current Channel
— The channel number shown here is the channel used for
communication between wireless stations and an AP (or, in an ad-hoc network,
between stations). In infrastructure mode, stations will scan for the channel the
AP is using and change to the same channel automatically. In ad-hoc node, the
channel number must be set manually on each station that wishes to connect.
•
Current Tx Rate
•
Signal Strength
•
Rescan
— Clicking
with the same domain name on a different channel.
— Shows the current transmission rate of the adapter.
— Displays the signal strength level.
Rescan
forces the station to rescan for an access point
Encryption
Data encryption provides more secure wireless data communications. Click the
Encryption
tab to view or change security settings (
is Disabled, and initially no key input boxes appear.
Figure 18
). The default setting
Figure 18. Adapter Properties window — Encryption panel
The
Method
control can be set to Disabled, 40-bit WEP, or 128-bit WEP. WEP
stands for Wired Equivalent Privacy, an encryption scheme that provides secure
wireless data communications. WEP uses a 40-bit or 128-bit key to scramble
wireless network data. In order to decode the data, each wireless station on the
network must use an identical 40-bit or 128-bit key.
InstantWave
11-Mbps USB Wireless LAN Adapter
19
Page 26

Disabled (default): Stations communicate with the access point without any
data encryption.
40-bit WEP: Stations communicate with the access point using 40-bit WEP
data encryption.
128-bit WEP: Stations communicate with the access point using 128-bit WEP
data encryption.
In order to decode data transmissions, all wireless stations on the network must use
the same key o r keys.
WEP Key Generation
: There ar e two ways to generate a WEP key or keys.
The first is by entering text in the
Passphrase
box and then clicking
Generate
. For
40-bit WEP, four WEP keys will be generated: Key 1, Key 2, Key 3, and Key 4.
Using the
Default Key
control, select the key currently in use on the network. If you
do not select a key, key 1 will be selected. For 128-bit WEP, a single key will be
generated.
The other WEP key generation method is to click in the key input boxes and input
values directly from t h e keyboard in hexadeci mal notation. If the ke y is not entere d
correctly, the station will not be able to join the network. If WEP is enabled on the
AP, all stations must use the same WEP key to connect to it.
Authentication
— The
Authentication
control can be set to Unspecified (this is the
default setting), Open System, or Shared Key. The setting of this control is ignored
when WEP is disabled.
When 40-bit or 128-bit WEP is enabled, the setting of this control determines
whether or not the station’s requests to join the network will be WEP encrypted.
The Unspecified setting causes the station to try joining the network with both
encrypted and unencrypted requests. In Open System authentication mode, requests
are never encrypted. Shared Key means that the station’s requests to join the
network are always encrypted.
Troubleshooting
Should a problem be encountered that cannot be resolved using the
“Troubleshooting” section of this manual, click the
).
19
Troubleshooting
tab (
Figure
20
InstantWave
11-Mbps USB Wireless LAN Adapter
Page 27

Figure 19. Adapter Properties window — Troubleshooting panel
A diagnosis program will run and display a diagnostic message. Follow the onscreen instructions to send the message, together with a description of the
symptoms, to NDC’s technical support via e-mail.
Site Survey
Site Survey scans the wireles s networking frequency ba nd and displa ys the results.
For each wireless network that the utility detects, it displays the domain name
(SSID), BSSID (MAC address), current channel, signal strength, network mode,
WEP setting, and estimated distance. It also gives you the option of selecting a
particular access point or network to associate with (join).
When Site Survey is run, “Start scanning” appears in the title bar while the search
is in progress. If any networks are found, the results appear in ten seconds. The
information is not dynamically updated. To refresh the data, click the
The Signal Str ength column shows either green (strong signal), or yellow (average
signal).
InstantWave
button.
Scan
11-Mbps USB Wireless LAN Adapter
21
Page 28

Figure 20. Site Survey
Scan
Click
to obtain and display updated survey information. You may need to
Scan
wait a short time until the scan is completed.
Join
Selecting an AP in the list will enable the
button. The
Join
command allows
Join
you to manually connect to a specific network. Note that to join an ad-hoc network
in this way, you must first choose ad-hoc mode through the Adapter Properties
window’s Configuration panel.
If joining cannot be accomplished within 20 seconds (possibly due to an AP that
has gone off the air since the data was l ast refreshed, to radio -frequency
interference, or a busy AP), the operation will fail. If this happens, you may try
joining with the same AP again, or select another AP to join.
Radio Link Quality Indicator
Clicking the InstantWave toolbar’s Radio Link Quality icon dynamically displays
the current radio signal quality (
Figure 21
Green means the signal is good, yellow indicates the signal is fair, red denotes the
signal is poor. When the signal color reaches the yellow to red border, the station
will start to roam, that is, try to associate with an AP that provides better signal
quality.
). The quality level is indicated by colors.
Figure 21. Radio Link Quality indicator
Station Traffic Monitor
This tool enables users to monitor the throughput of the wireless station (
).
22
22
InstantWave
11-Mbps USB Wireless LAN Adapter
Figure
Page 29

Figure 22. Station Traffic Monitor
This tool shows the amount of data transmitted and received by the statio n. This
information is useful when diagnos i ng networking throughput problems.
InstantWave
11-Mbps USB Wireless LAN Adapter
23
Page 30

Driver/Utility Upgrade Procedure
New drivers and utilities are released from time to time. Check
http://www.ndc.com.tw/support/driver.htm
for the latest releases.
To upgrade the InstantWave adapter driver or HighRate Utility, you need to
uninstall the current driver or utility first. See the index (last pages in this User
Guide) to find the location of detailed uninstallation instructions for your operating
system.
After removing the old InstantWave card driver or utility, follow the driver or
utility installation procedure to install the new one.
24
InstantWave
11-Mbps USB Wireless LAN Adapter
Page 31

T roubleshooting
This section provides you with some troubleshooti ng in formation in case you
encounter installation or operation problems with an InstantWave product. If your
problem still cannot be remedied after going through this section, check the FAQs
at http://www.ndc.com.tw/support/insfaq.htm
If you still have a problem, call the reseller from whom you purchased the
InstantWave product, or contact NDC technical support for assistance (see
Technical Support, page 27).
Symptom Suggested Solutions
Adapter installation
appears to have failed.
1. The adapter fails to
function.
2. The adapter’s LED does
not light up.
3. The operating system
does not detect the
adapter.
The system cannot
associate with an AP, even
though the link quality is
good and the taskbar
indicator is green.
1. Make sure the cable or coupler plugs are inserted
all the way in the USB jacks on the computer and
the adapter.
2. Connect the adapter to another USB jack on the
computer, if one is available. If the problem
persists, try connecting the adapter to another
computer to see if the problem is in the adapter or
the computer.
These problems may be caused by unsuccessful
installation. Completely uninstall the adapter and the
software, and repeat the installation procedure as
described in this manual.
Make sure the computer has the same SSID and
security settings as the access point (AP).
1. SSID:
The “Domain Name (SSID)” setting is case-sensitive
and must be the same as that of the AP. It should not
contain any spaces. See Figure 15, page 16.
2. Security:
You need to have the same security setting (Disabled,
40-bit WEP, or 128-bit WEP) and WEP key (if WEP
is enabled) as the AP. See Encryption, page 19.
InstantWave
11-Mbps USB Wireless LAN Adapter
25
Page 32

The wireless network is
often interrupted (the
taskbar icon shows red, or
the link quality indicator
shows black).
The AP cannot be detected
by the Site Survey tool.
1. Move the computer closer to the access point (AP)
to find a better signal. If the signal is still weak, try
changing the adapter’s height or orientation.
2. There may be interference, possibly caused by a
microwave oven, 2.4-GHz wireless phone, or
metal objects. Move these interference sources or
change the location of the computer or AP.
3. Change the wireless channel on the AP. See the
user’s guide fo r the AP .
4. Make sure the AP’s antenna, connectors, and
cabling are firmly connected.
The distance between the AP and the computer may
be too great.
The Secure SSID option might be enabled on the AP.
See the user’s guide for the AP.
You can join a network
using the Site Survey tool
but not if you type the
settings manually in the
Adapter Properties
window.
You encounter a “Divide
Error” when you try to run
the InstantWave Utility.
Your IBM ThinkPad X20
seems to “freeze” after yo u
install the InstantWave
Utility and restart the
system.
The system restarts if you
try to shut it down while
the InstantWave Utility is
running.
Make sure the Domain Name (SSID) setting is
correct. Note that the setting is case-sensitive and
cannot contain any spaces.
This can happen if the system was not restarted after
the utility was installed. Restart the system and the
utility will run correctly.
The IBM ThinkPad X20 and some other notebooks
need extra time to get/set the TCP/IP parameters for a
wireless (or wired) network adapter. Allow the
system three to five minutes to start up. The adapter
will then operate normally.
This is a known problem with certain older versions
of Microsoft
®
Windows. Close the utility before
shutting the system down.
26
InstantWave
11-Mbps USB Wireless LAN Adapter
Page 33

T echnical Sup port
Support from Your Network Supplier
If assistance is required, call your supplier for help. Have the following
information ready before you make the call.
1. LED status
2. A list of the product hardware (including revision levels), and a brief
description of the network structure
3. Details of recent configuration changes, if applicable
Support from NDC
If you have any problems that you cannot resolve with the information in
troubleshooting, or the FAQs at
http://www.ndc.com.tw/support/faq.htm
please note the following information and contact our technical support team:
• What you were doing when the error occurred
• What error message you saw
• Whether the problem can be reproduced
• The serial number of the product
• The firmware version
• Debugging information from the Troubles hooting func tion
NDC Technical Support is available via:
E-mail: techsupt@ndc.com.tw
For other information about NDC, please visit us at: http://www.ndclan.com/
InstantWave
11-Mbps USB Wireless LAN Adapter
27
Page 34

NDC Limited Warranty
Hardware
NDC warrants its products to be free of defects in workmanship and materials,
under normal use and service, for a period of 12 months from the date of purchase
from NDC or its Authorized Reseller, and for the period of time specified in the
documentation supplied with each product.
Should a product fail to be in good working order during the applicable warranty
period, NDC will, at its option and expense, repair or replace it, or deliver to the
purchaser an equivalent product or part at no additional charge except as set forth
below. Repair parts and replacement products are furnished on an exchange basis
and will be either reconditioned or new. All replaced products and parts will
become the property of NDC. Any replaced o r repaired product or part has a ninety
(90) day warranty or the remainder of the initial warranty period, whichever is
longer.
NDC shall not be liable under this warranty if its testing and examination disclose
that the alleged defect in the product does not exist or was caused by the
purchaser’s, or any third party’s, misuse, neglect, improper installation or testing,
unauthorized attempt to repair or modify, or any other cause beyond the range of
the intended use, or by accident, fire, lightning, or other hazard.
Software
Software and documentation materials are supplied “as is” witho ut warranty as to
their performance, merchantability, or fitness for any particular purpose. However,
the media containing the software is covered by a 90-day warranty that protects the
purchaser against failure within that period.
Limited Warranty Service Procedure
Any product (1) received in error, (2) received in a defective or non-functioning
condition, or (3) exhibiting a defect under normal working conditions, can be
returned to NDC by following these steps:
1. Prepare the following materials and information:
Dated proof of purchase
!"
Product model number and quantity
!"
Product serial number
!"
Precise reason for return
!"
Your name/address/email address/telephone/ fax
!"
28
InstantWave
11-Mbps USB Wireless LAN Adapter
Page 35

2. Inform the distributor or retailer.
3. Ship the product back to the distributor/retailer with prepaid freight. The
purchaser must pay the shipping fee from the distributor/retailer to NDC. Any
package sent C.O.D. (Cash On Delivery) will be refused.
Charges: Usually RMA (Returned Material Authorization) items will be returned
to the purchaser via airmail, prepaid by NDC. If an item is returned by another
carrier, the purchaser will pay the difference. A return freight and handling fee will
be charged to the purchaser if NDC determines that no problem existed or that the
damage was caused by the user.
Warning
NDC is not responsible for the integrity of any data on storage equipment (hard
drives, tape drives, floppy diskettes, etc.). We strongly recommend that our
customers back their data up before sending such equipment in for diagnosis or
repair.
Service after Warranty Period
After the warranty period expires, all products can be repaired for a reasonable
service charge. The shipping charges to and from the NDC facility will be borne by
the purchaser.
Return for Credit
In the case of a “DOA” (an item being “dead on arrival”) or a shipping error, a
return for credit will automatically be applied to the purchaser’s account, unless
otherwise requested.
Limitation of Liability
All expressed and implied warranties of a product’s merchantability, or of its
fitness for a particular purpose, are limited in duration to the applicable period as
set forth in this limited warranty, and no warranty will be considered valid after its
expiration date.
If this product does not function as warranted, your sole remedy shall be repair or
replacement as provided for above. In no case shall NDC be liable for any
incidental, consequential, special, or indirect damages resulting from loss of data,
loss of profits, or loss of use, even if NDC or an authorized NDC distributor/dealer
has been advised of the possibility of such damages, or for any claim by any other
party.
InstantWave
11-Mbps USB Wireless LAN Adapter
29
Page 36

Specifications
General
Regulatory Approval
Interface to Host
Standards Compliance
OS Support
USA: FCC Part 15 B and 15 C
Europe: CE ETS 300 328, ETS 300 826, and EN60950
Japan: TELEC ARIB STD-T33 and STD-T66 JATE
USB version 1.1
IEEE 802.11b, USB 1.1, and Wi-Fi compliant
Microsoft® Windows 98, ME, 2000, and XP
Software Features
Data Rates
Communication Method
Security
LED Indicators
Power
Dimensions
Environmental
Requirements
Included Accessories
Warranty
40-bit and 128-bit WEP encryption, dynamic rate shifting
(11/5.5/2/1 Mbps), Site Survey function, automatic
roaming, one-click diagnostics
11, 5.5, 2, and 1 Mbps, with auto fallback
Half duplex
40-bit and 128-bit WEP encryption
One red power/activity LED
Input voltage: 5V ±10%
Power consumption:
Transmitting: 250 mA (max.)
Receiving: 250 mA (max.)
48 × 71 × 15 mm (1.89 × 2.80 × 0.59 in.)
Operating temperature: 0° to 50° C (32° to 122° F)
Storage temperature: -20° to 65° C (-4° to 149° F)
Humidity: 5% to 90% (non-condensing)
1.2-meter USB cable (USB coupler optional)
One year, limited
30
InstantWave
11-Mbps USB Wireless LAN Adapter
Page 37

Wireless
RF Spreading Scheme
RF Frequency Range
Transmitter
Characteristics
Receiver Sensitivity
Antenna Type
IEEE 802.11b Channel
Support
Direct Sequence Spread Spectrum (DSSS)
2400 to 2483.5 MHz (North America, Europe, and Japan)
2445 to 2475 MHz (Spain)
2446.5 to 2483.5 MHz (France)
RF output power: 15 dBm (typical)
Data Modulation Methods: BPSK (1 Mbps), QPSK (2,
5.5, and 11 Mbps)
Data Modulation Speeds: 11, 5.5, 2, and 1 Mbps, with
auto fallback
-84 dBm for 11 Mbps @ BER 10
-94 dBm for 1 Mbps @ BER 10-5
Internal antenna with diversity
USA and Canada: Channels 1–11
Majority of European countries: Channels 1–13
France: Channels 10–13
Spain: Channels 10 and 11
Japan: Channels 1–14
-5
InstantWave
11-Mbps USB Wireless LAN Adapter
31
Page 38

EC DECLARATION OF CONFORMITY
For the following equipment
Product Name :
Model Number :
InstantWave 11-Mbps USB Wireless LAN Adapter
NWH4020
:
is hereby confirmed to comply with the requirements set out in the Council
Directive on the Approximation of the Laws of the Member States relating
to R&TTE Directive(99/ 5/ EC). For the evaluation regarding the
electromagnetic compatibility, the following standards were applied.
The product meets or exceeds the following EMC standards:
EN 300 328 (November 1996/A1 (July 1997))
EN 300 826 (November 1997)
En 60950:1992 + A1:1993 + A2:1993 + A3:1995 + A4:1996 + A11:1997
The manufacturer/importer is responsible for this declaration:
Company Name : NDC Europe
Company Address : 1, Earlsfort Centre
Hatch Street
Dublin 2, Ireland
Person authorized to mak e this declarat ion :
Name : Changhua Chiang
Position/Title : President and CEO
January 15, 2002
Date
32
InstantWave
Legal Signature
11-Mbps USB Wireless LAN Adapter
Page 39

Appendix
The appendix lists the channels supported by the world’s regulatory domains.
The channel numbers, channel center frequencies, and regulatory domains are
shown in the table.
Channel
Number
1 2412 O O O
2 2417 O O O
3 2422 O O O
4 2427 O O O
5 2432 O O O
6 2437 O O O
7 2442 O O O
8 2447 O O O
9 2452 O O O
10 2457 O O O O O
11 2462 O O O O O
12 2467 O O O
Center
Frequency
(MHz)
FCC/
Canada
ETSI Spain France Japan
13 2472 O O O
14 2484 O
InstantWave
11-Mbps USB Wireless LAN Adapter
33
Page 40

Index
A
Adapter Bus type.......................... 18
Adapter Properties........................ 15
Adapter Status.............................. 18
Ad-hoc Network............................. 2
Advanced Information.................. 17
Appendix...................................... 33
B
Basic Service Set............................ 3
BSSID ............................................ 3
C
Cable, USB..................................... 4
Channel ........................................ 17
Channel Frequencies.................... 33
Channel Number .......................... 19
Channel Numbers ......................... 33
Channels....................................... 18
Configuration ............................... 16
Coupler, USB................................. 4
Current Channel........................... 19
Current Tx Rate............................ 19
D
Data Transmission Rate ............... 17
Domain Identifier........................... 3
Domain Name .............................. 16
Infrastructure Network....................2
InstantWave Utility.......................13
J
Join ...............................................22
L
Launch Utility on Startup .............15
LED ................................................4
Link Info.......................................18
M
MAC Address...........................3, 18
Manually Connect to AP...............22
Media Access Control...............3, 18
Method..........................................19
Monitor......................................... 22
N
Network Mode..............................16
P
Packing List...................................iii
Parts................................................4
Play Sound....................................15
Pop-up Message Dialog................15
Power Saving Mode......................17
Power/Activity Indicator.................4
Preferences....................................14
E
Empty SSID ................................. 16
Encryption.................................... 19
H
Hardware Information.................. 18
I
Icons............................................. 13
Index............................................. 34
Indicator ......................................... 4
34
InstantWave
R
Radio Link Quality Indicator........ 22
Regulatory Domain.......................18
Regulatory Domains..................... 33
Rescan...........................................19
Roaming..........................................4
S
Scan ..............................................22
Service Set ID...............................16
Show Icon on Taskbar..................15
11-Mbps USB Wireless LAN Adapter
Page 41

Signal Strength........................19, 21
Site Survey
.................................. 21
Sound ........................................... 15
SSID....................................3, 13, 16
State.............................................. 18
Station Address ............................ 18
Station Traffic Monitor ................ 22
T
Taskbar Icon................................. 15
Technical Support ........................ 27
Toolbar....................................13, 14
Traffic Monitor............................. 22
Transmission Rate........................ 17
Troubleshooting ........................... 25
Type and Version..........................18
U
Upgrades.......................................24
USB Jack ........................................4
W
Warranty.......................................28
WEP..............................................19
WEP Key Generation ...................20
Wired Equivalent Privacy.............19
Wireless Domain Name................16
Wireless Network Type................ 13
InstantWave
11-Mbps USB Wireless LAN Adapter
35
 Loading...