

Page 1
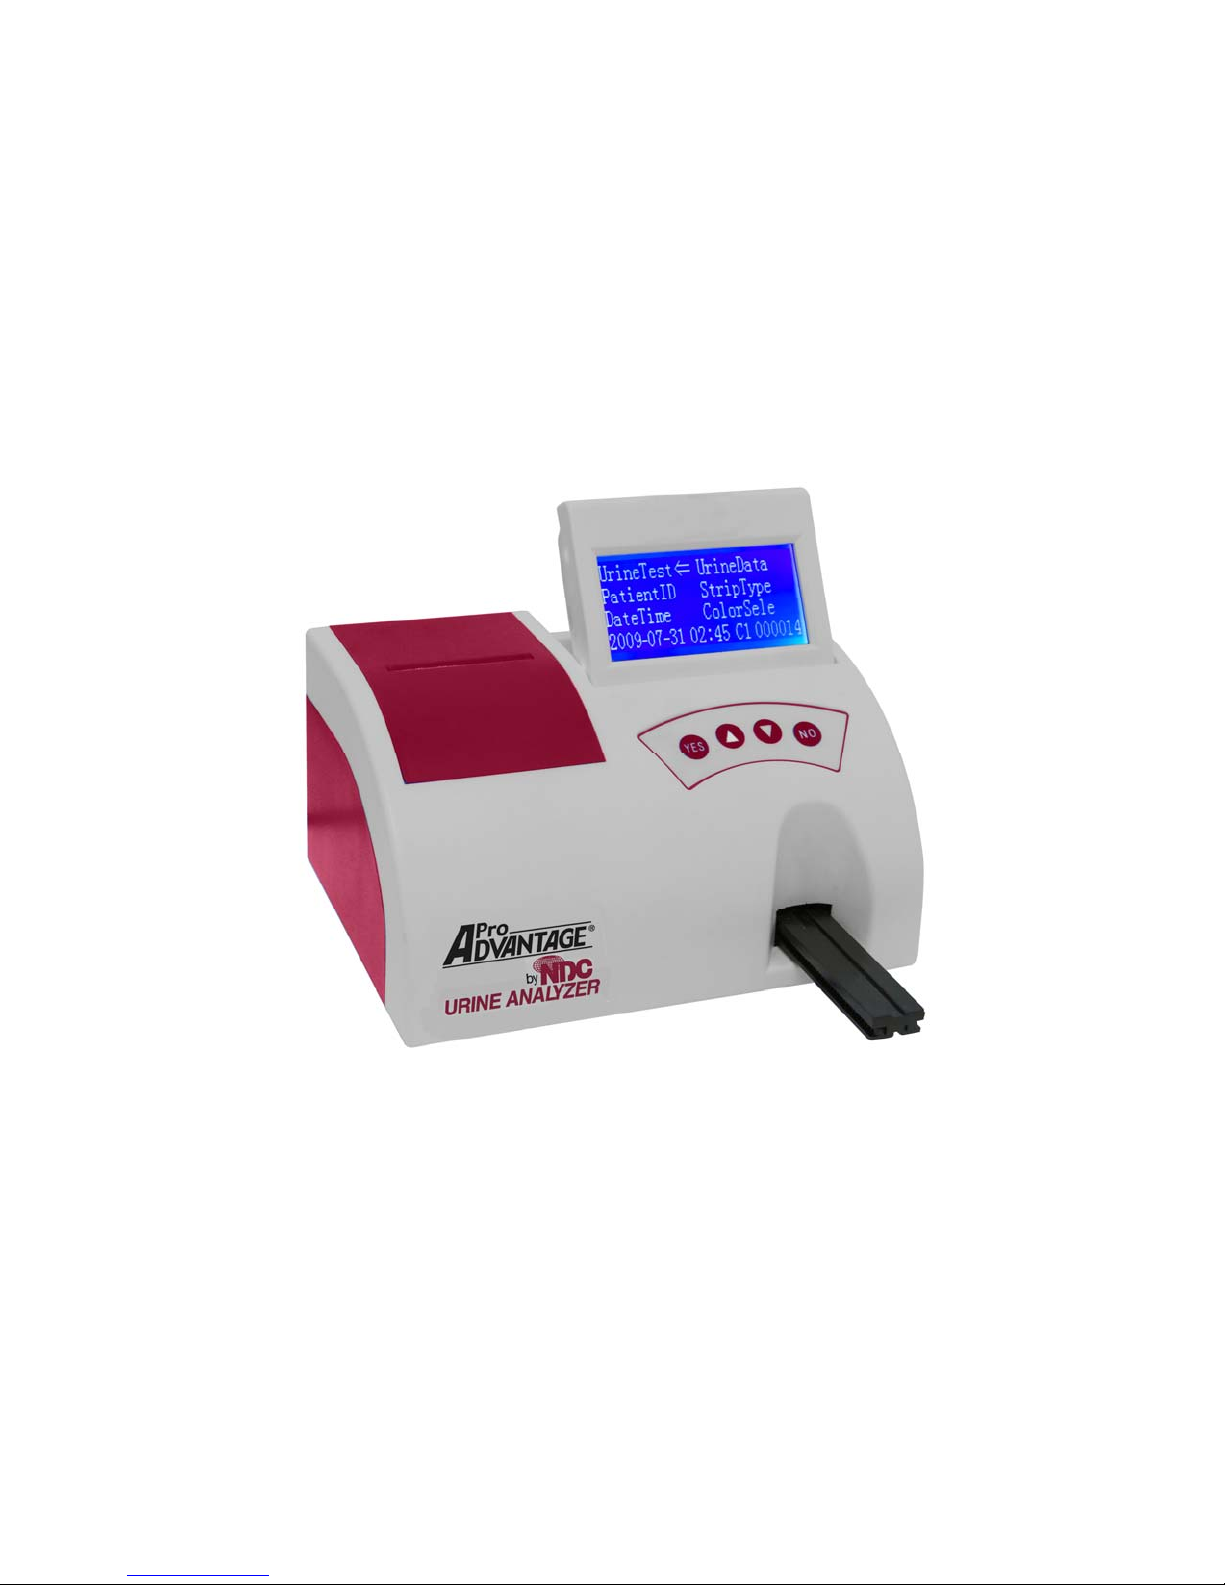
Pro Advantage®
Urine Analyzer
Operator’s Manual
© Pro Advantage by NDC. All rights reserved
PS-733 Rev 00-3/10 1/23
Page 2

The information in this manual was correct at the time of printing. However, the manufacturer continues to update and
change this manual. The manufacturer reserves the right to change the content of this manual at any time without notice.
If the manner in which this machine is used differs from the procedures specified in this manual, then the instrument and
the results may be impaired.
© Pro Advantage by NDC. All rights reserved
PS-733 Rev 00-3/10 2/23
Page 3

Table of Contents
Analyzer Overview..........................................................................................................5
What can your Urine Analyzer do?..........................................................................5
Is calibration required?..........................................................................................5
How does the analyzer work? ................................................................................5
How are results reported? .....................................................................................5
What powers the analyzer?....................................................................................5
How many patient samples does the analyzer store? ...............................................5
Instrument and Labeling Symbols....................................................................................6
1. Analyzer Installation...................................................................................................7
Contents..............................................................................................................7
Set Up .................................................................................................................7
2. Understanding the Analyzer........................................................................................8
Keyboard ............................................................................................................. 8
Menu Options.......................................................................................................8
3. Testing .....................................................................................................................9
How to run a test: ................................................................................................9
How to run continuous tests:...............................................................................10
How to enter Patient ID: .....................................................................................10
How to enter urine color: ....................................................................................10
How to enter Date and Time:...............................................................................11
How to search past patient results: ......................................................................11
How to change strip type: ...................................................................................11
4. Analyzer Set-Up.......................................................................................................12
How to change your urine analyzer settings:.........................................................12
Printer Settings:
Urine Color Settings:
Language Settings:
Baud Rate:
How to feed printer paper through the printer head:
How to change LCD screen contrast:
5. Troubleshooting.......................................................................................................14
Error Messages...................................................................................................14
Errors which Disable the Instrument
Errors which do not Disable the Instrument
Calling for Assistance
6. Quality Control for Urinalysis Strip Testing .................................................................15
7. Pro Advantage Urine Analyzer Maintenance................................................................16
Maintenance.......................................................................................................16
Routine Cleaning of Strip Bed
Disinfecting Strip Bed
8. Table of Results.......................................................................................................17
Table 1: English – Conventional Units (C1 & C2)....................................................17
How to change the printed/displayed units
Table 2: English – Standard (S.I.) Units (S1 & S2).................................................18
How to change the printed/displayed units
9. Appendicies.............................................................................................................19
Appendix 1: Specifications...................................................................................19
PS-733 Rev 00-3/10 3/23
..........................................................................................12
....................................................................................12
......................................................................................13
.................................................................................................13
......................................13
.............................................................13
.............................................................14
...................................................14
...................................................................................14
.......................................................................16
...................................................................................16
....................................................17
....................................................18
© Pro Advantage by NDC. All rights reserved
Page 4

Appendix 2: Default Settings................................................................................20
Appendix 3: Analyzer Summary & Policy...............................................................21
Intended Use of Analyzer
Optical System Explanation
Internal Checks Explanation
Human Eye vs. Instrumental Optics
.............................................................................21
..........................................................................21
.........................................................................21
..............................................................21
Appendix 4: Warranty.........................................................................................22
10. Index....................................................................................................................23
© Pro Advantage by NDC. All rights reserved
PS-733 Rev 00-3/10 4/23
Page 5

Analyzer Overview
What can your Urine Analyzer do?
Your Pro Advantage Urine Analyzer is a portable, bench top analyzer for reading the manufacturer urine reagent strips.
Training for this instrument is not required or necessary. Multiple urine strip types can be used with this analyzer.
Specifically the Pro Advantage 2 parameter (P080012), 4 parameter (P080014) and 10 parameter (P0 80010).
You have the ability to use a Patient ID and also select the color of the urine prior to testing each patient sample. This
information will be displayed along with the test results on the print out. This analyzer has a simple four (4) button
configuration that allows for quick access to choose any menu option, and also allows for quick entering and exiting out of
selected menu options
Is calibration required?
The Pro Advantage Urine Analyzer does not require daily calibration, as the instrument performs a system calibration
each time it is turned on.
How does the analyzer work?
The user has the option to input the Patient ID and also select the urine color before running the patient sample. Testing
starts when Urine Test is selected on the main menu screen. From this point you have 5 seconds to dip the urine
reagent strip, blot the edge of the strip and place it on the test strip bed. The analyzer will then count down from 60
seconds to 14 seconds before the test strip table is pulled into the instrument to read the urine reagent strip.
How are results reported?
Each result will be shown on the LCD screen and printed (if desired). The results can also be transferred to a computer
using a 9-pin serial cable and the RS-232 serial port on the back of the instrument. The analyzer retains results from 1000
patient tests. You are able to search for past patient results on the analyzer using the Urine Data menu option.
What powers the analyzer?
The analyzer has a connection in the rear of the machine which uses a power adapter that can be plugged into an
electrical outlet for use on a bench top.
How many patient samples does the analyzer store?
The analyzer will store 1000 patient results and patient ID numbers.
© Pro Advantage by NDC. All rights reserved
PS-733 Rev 00-3/10 5/23
Page 6
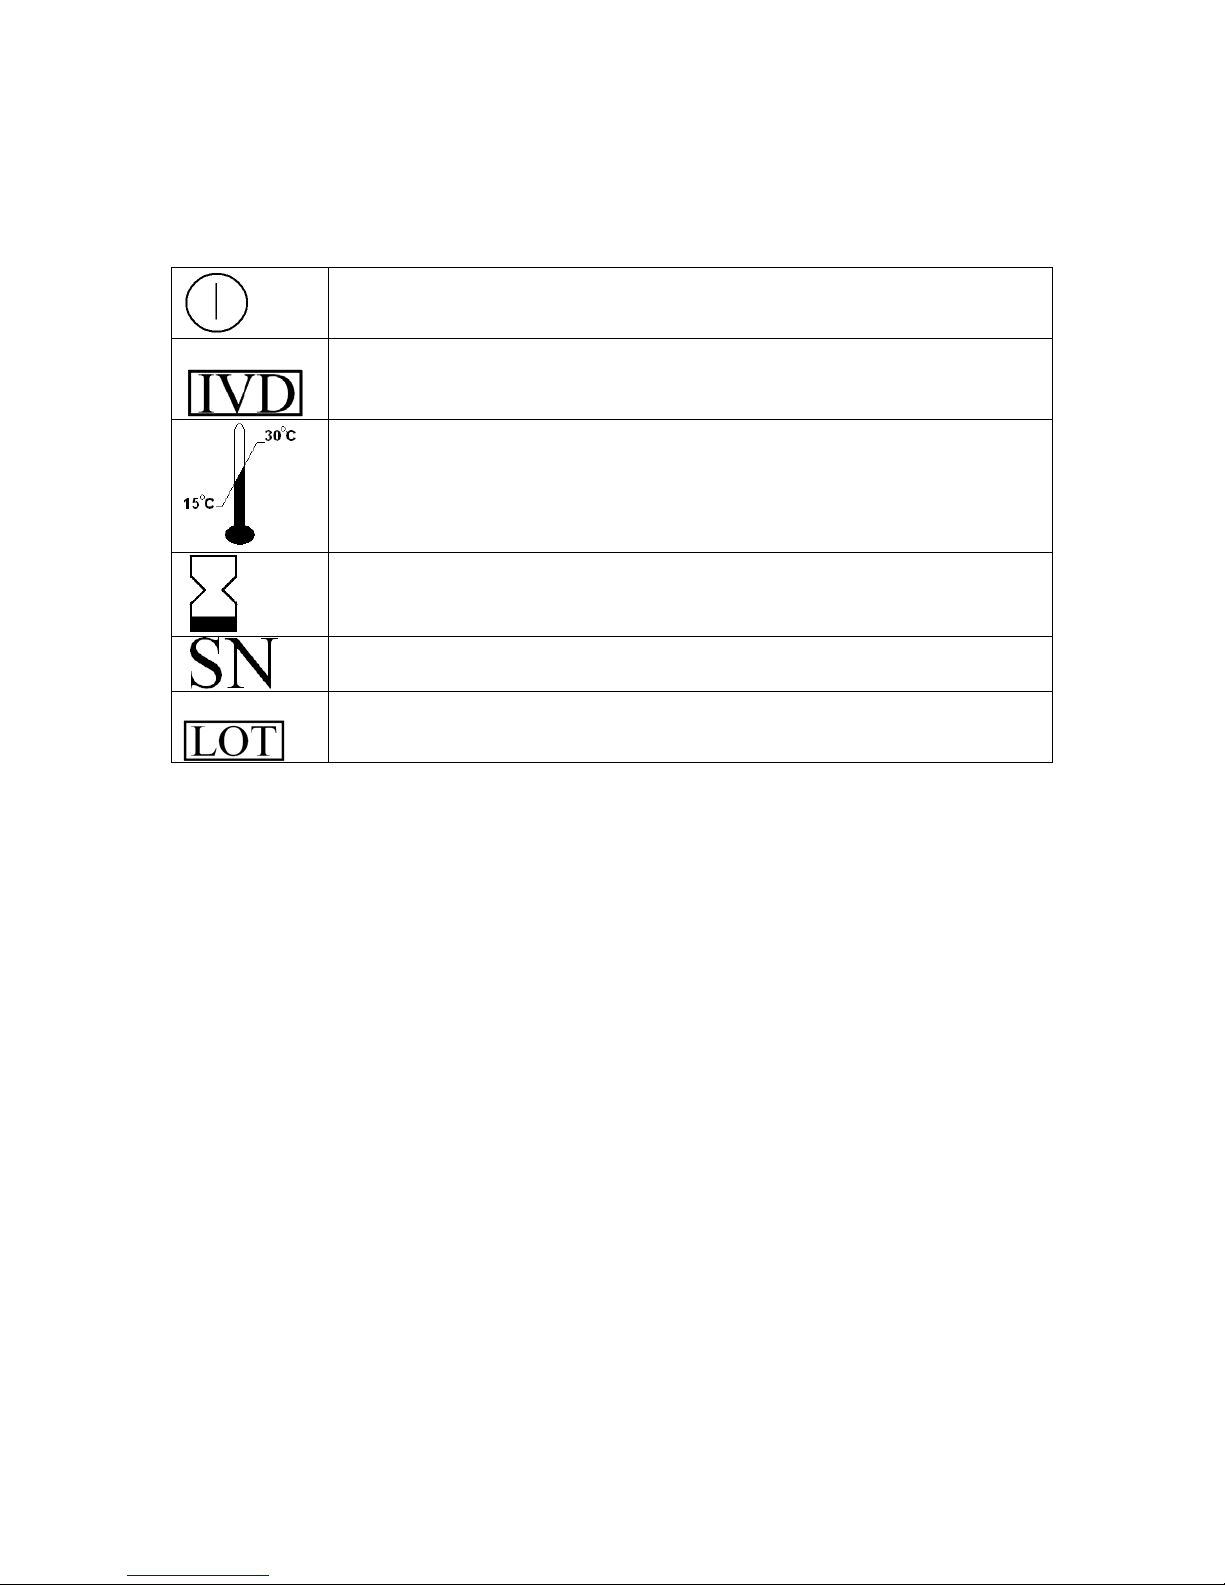
Instrument and Labeling Symbols
This section indicates the symbols that appear on the exterior packaging of the Pro Advantage Urine Analyzer, the
analyzer itself, the power adapter and the urine reagent strips.
Indicates a power on/off button
In vitro diagnostic device
Temperature Requirements for Operation (15º - 30º C)
Expiration Date: MM-YYYY
Serial Number
Lot Number
© Pro Advantage by NDC. All rights reserved
PS-733 Rev 00-3/10 6/23
Page 7
1. Analyzer Installation
Contents
1. Carefully remove the contents of the container and check for noticeable damage to the contents of the analyzer. If
there is noticeable damage, please contact the shipping company immediately after receipt.
2. Check for the following items:
a. Pro Advantage Urine Analyzer
b. Thermal Paper
c. AC Power Supply
Note: If the power supply is not the type that is needed, please contact your local technical support
provider/distributor.
d. Manual
e. How To Instructions
Set Up
Analyzer Installation
Place the Pro Advantage Urine Analyzer on a level, flat surface The best temperature for using this
where temperature and humidity conditions are consistent analyzer is -20ºC to 70ºC (-4ºF to 158ºF)
Plugging Analyzer In
Plug the proper end of the power supply into the back of the analyzer . Plug the opposite end into the wall outlet.
Connecting to a PC
The instrument can transmit results to a computer via the serial port (RS232 connection) located on the back of
the analyzer. This requires a 9-pin serial cable that can be purchased separately at an electronics store or from
your Local Technical Support Providers and Distributors
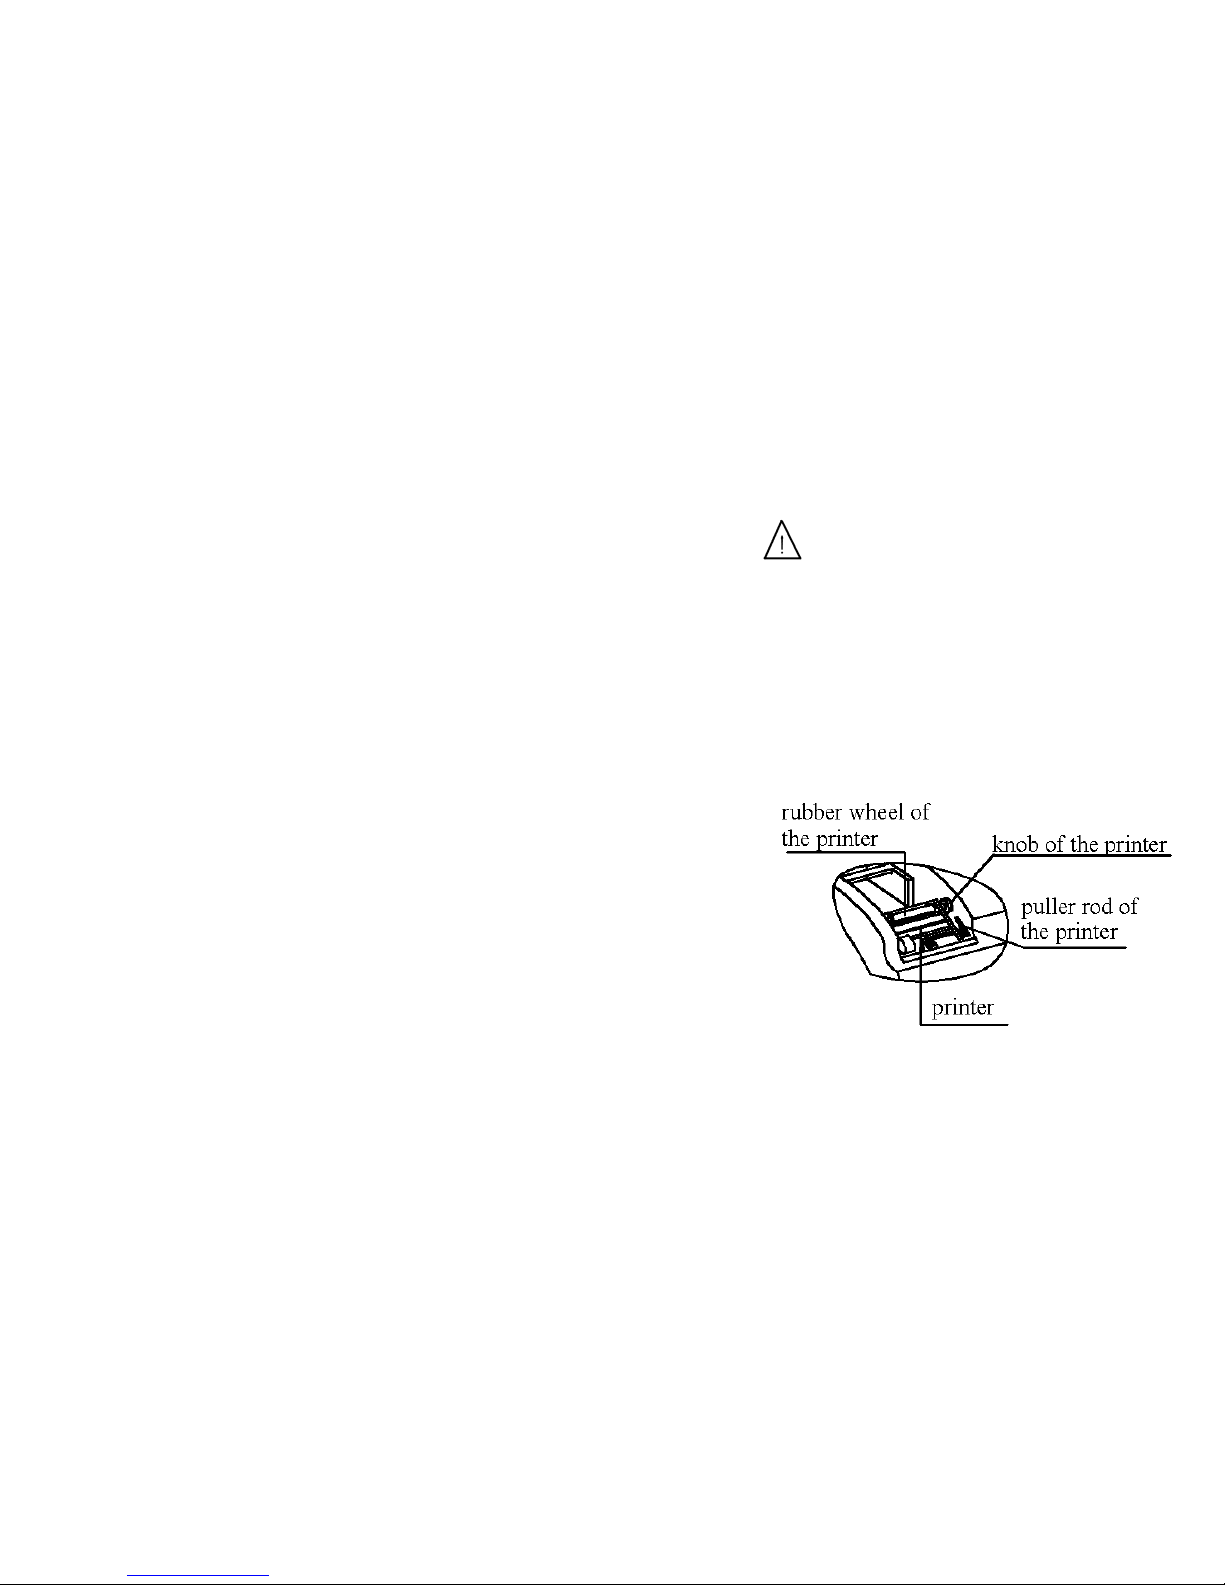
Loading the Printer Paper or Label Roll
1. Remove the printer cover by pulling up on the tab.
2. Open the thermal paper roll compartment cover by
pressing down on its tab and pulling away from the instrument.
3. Lift the pull rod arm at the bottom of the printer head,
into the upright position, in order to release the paper
4. Place the new thermal paper roll into the slot with the paper
unrolling from underneath and toward the front of the analyzer
5. Feed the paper through the printer head. Once you have approximately
3-4 inches (or 8 - 10 cm) of paper through the printer head then
push down the paper holding arm down in to the closed position.
6. Feed the end of the thermal paper roll through the printer cover.
Turning on the instrument
Locate the On/Off switch on the back of the analyzer. Flip the switch into the “On” position.
Turning off the instrument
Locate the On/Off switch on the back of the analyzer. Ensure there are no strips inside the analyzer before
switching the analyzer tothe “Off” position
© Pro Advantage by NDC. All rights reserved
PS-733 Rev 00-3/10 7/23
Page 8
2. Understanding the Analyzer
Keyboard
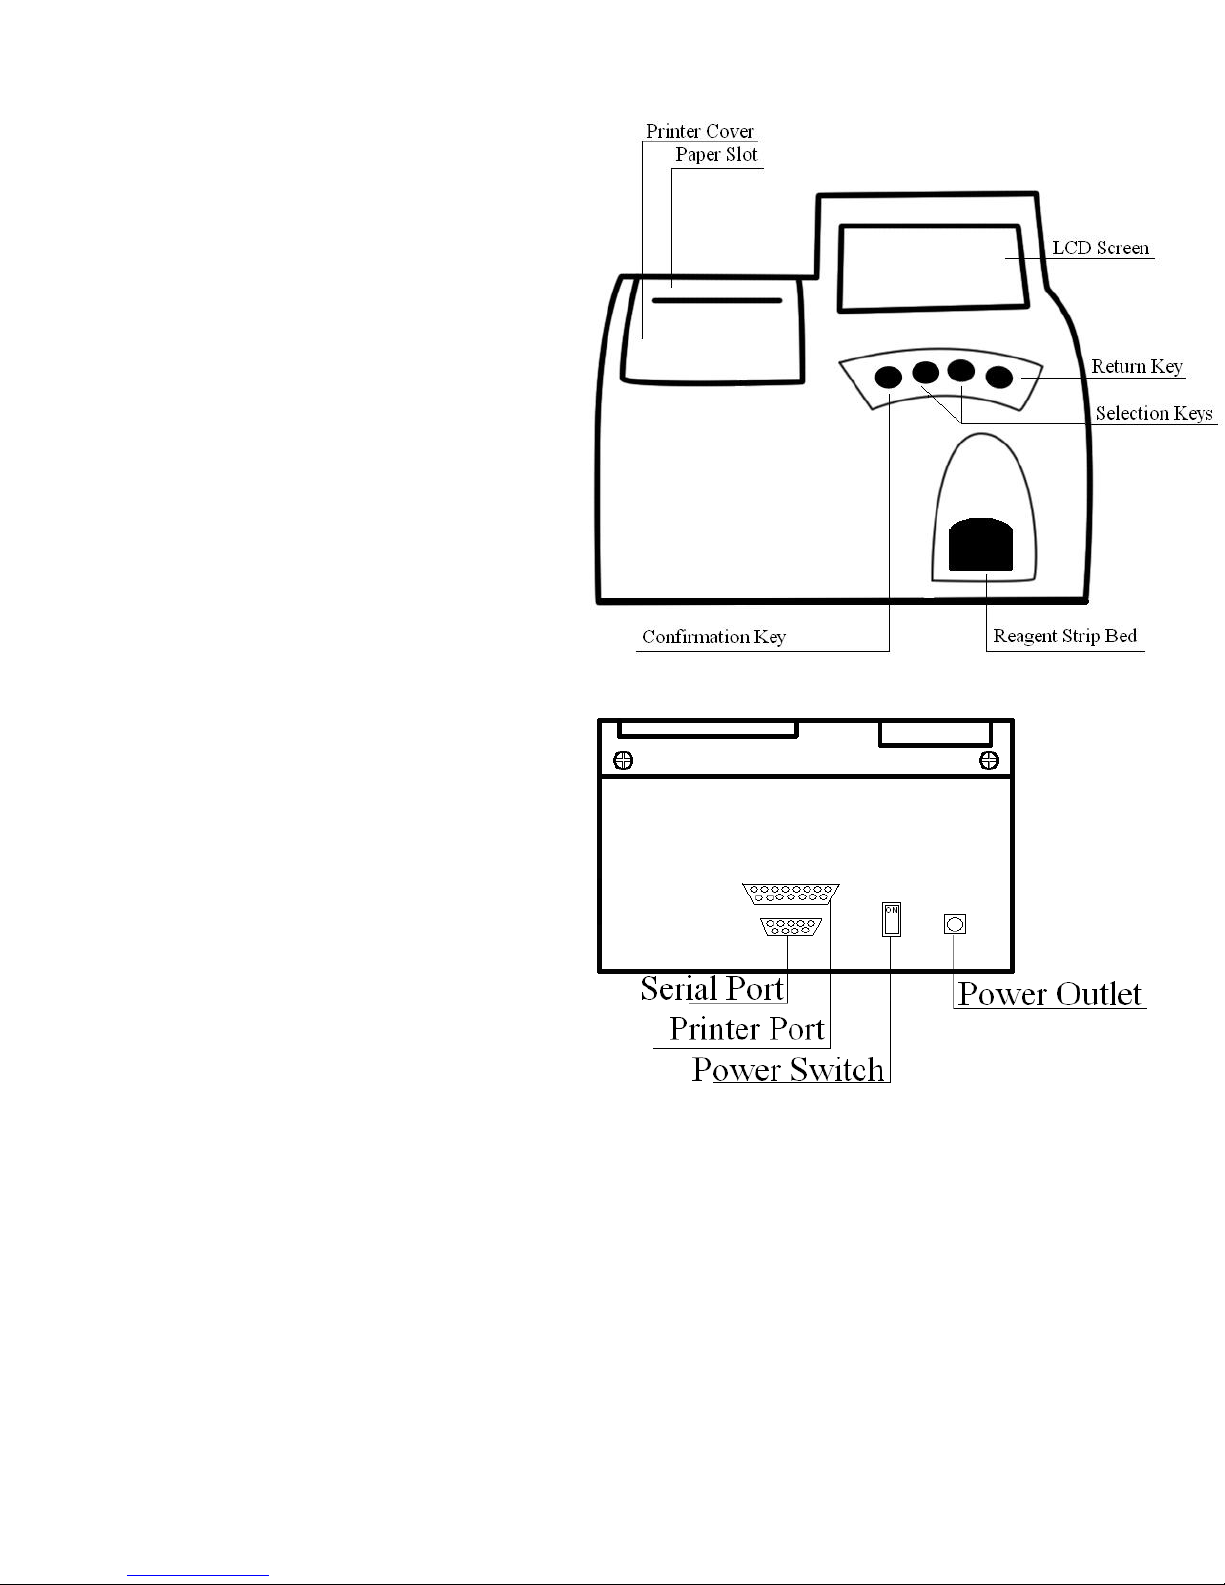
The keyboard has 4 buttons which are used to
guide you through menu options, accept or confirm
your selection, return to the previous screen, or
cancel a request.
Menu Options
Urine Test
Testing of the urine strip occurs when
selecting this menu option
Patient ID
This menu option allows for the Patient ID
to be entered prior to testing
Date & Time
This menu option allows for the Date and
Time to be changed
Urine Data
This menu option allows the user to
search for past Patient ID numbers and
their corresponding results
Strip Type
This menu option allows for the user to
change the strip type that will be used on Figure 1: Front View of Pro Advantage Urine Analyzer
the analyzer
Color Selection
This menu option allows for the user to
select the color of the patient’s urine color
prior to testing
Data Output/Serial Port
The output of data uses a serial port which
requires a 9 pin serial cable for transmission
Printer Port
The printer port can connect to a dot-matrix
format printer. The analyzer can
also be connected via the data output
connection if a laser printer is needed.
Power Switch
The power switch is used to turn on
and turn off the machine
Power Outlet
The plug from the AC Power Adapter
(included) is plugged into this port to
supply power to the analyzer Figure 2: Rear View of Pro Advantage Urine Analyzer
© Pro Advantage by NDC. All rights reserved
PS-733 Rev 00-3/10 8/23
Page 9
3. Testing
How to run a test:
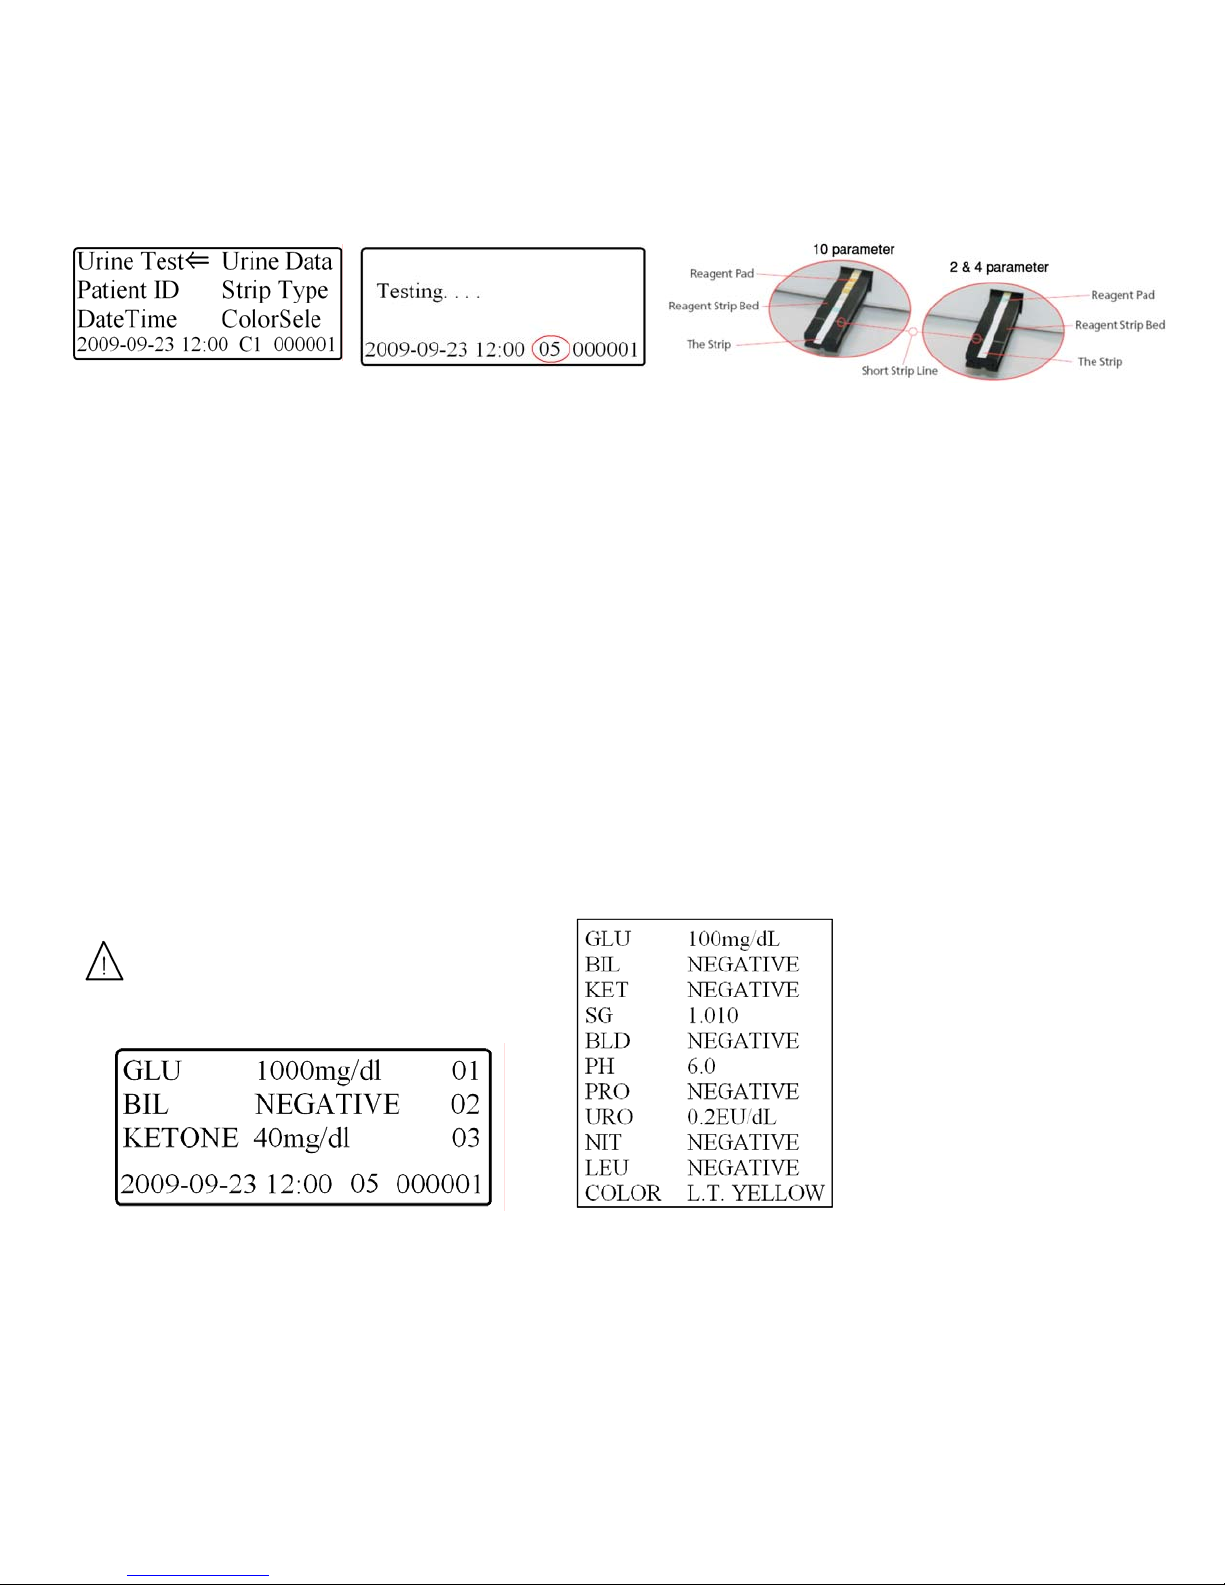
The Urine Test screen is accessed by using the arrow keys to highlight Urine Test (see Fig. 3), and then press the
“YES” key to enter the testing mode (see Fig. 4).
Figure 3: Main Menu Screen Figure 4: Testing Screen
Figure 5: Strip Alignment
After the Testing Screen is entered (Fig. 4), the analyzer will give the user 5 seconds to dip the urine reagent strip
into the urine sample, blot the strip lengthwise, and place the strip on the strip bed. The analyzer will beep once
confirming that the strip has been placed on the strip bed, and then the analyzer will count down from 60 seconds
to 0 (testing time). At 14 seconds remaining in the testing period the analyzer will move the strip bed into the
analyzer to begin reading the color of each parameter.
Once the testing time has expired the results will appear on the screen (see Fig. 6). The analyzer will also print
the results automatically if the analyzer has been set up to automatically print results. The date, time, patient ID,
and color will be printed along with the test results (see Fig. 7).
The test results displayed on the screen and the printout will include the following information:
• Patient ID or both
• Test date
• Time
• Color
• Results
From the strip bed, remove the used urinalysis strip and dispose of it according to your standard laboratory
procedures. Wipe the strip bed, if necessary. Report the results to a laboratory supervisor or physician.
The results will be displayed on the LCD
screen until another test is run, or until the
user chooses to return to the main menu.
Figure 6: Results Screen Figure. 7: Print Out
© Pro Advantage by NDC. All rights reserved
PS-733 Rev 00-3/10 9/23
Page 10
How to run continuous tests:
The Pro Advantage Urine Analyzer has an optional continuous testing mode which allo ws the user to run
consecutive tests without returning to the main menu. After the Pro Advantage Urine Analyzer has finished
displaying the results on the LCD screen, the analyzer will then accept another test strip. The analyzer will again
start its count down from 60 seconds. The user will then place another sample on the strip bed to begin testing.
The analyzer will beep once again and recognize the strip placed on the strip bed. At 14 seconds remaining in the
testing period the analyzer will move the strip bed into the analyzer, to begin reading the values of each
parameter.
If the user doesn’t have enough time to dip the strip into the next patient sample and place the strip on the strip
bed, the user can also press the “YES” key any time during the testing time to restart the testing time at 60
seconds.
How to enter Patient ID:
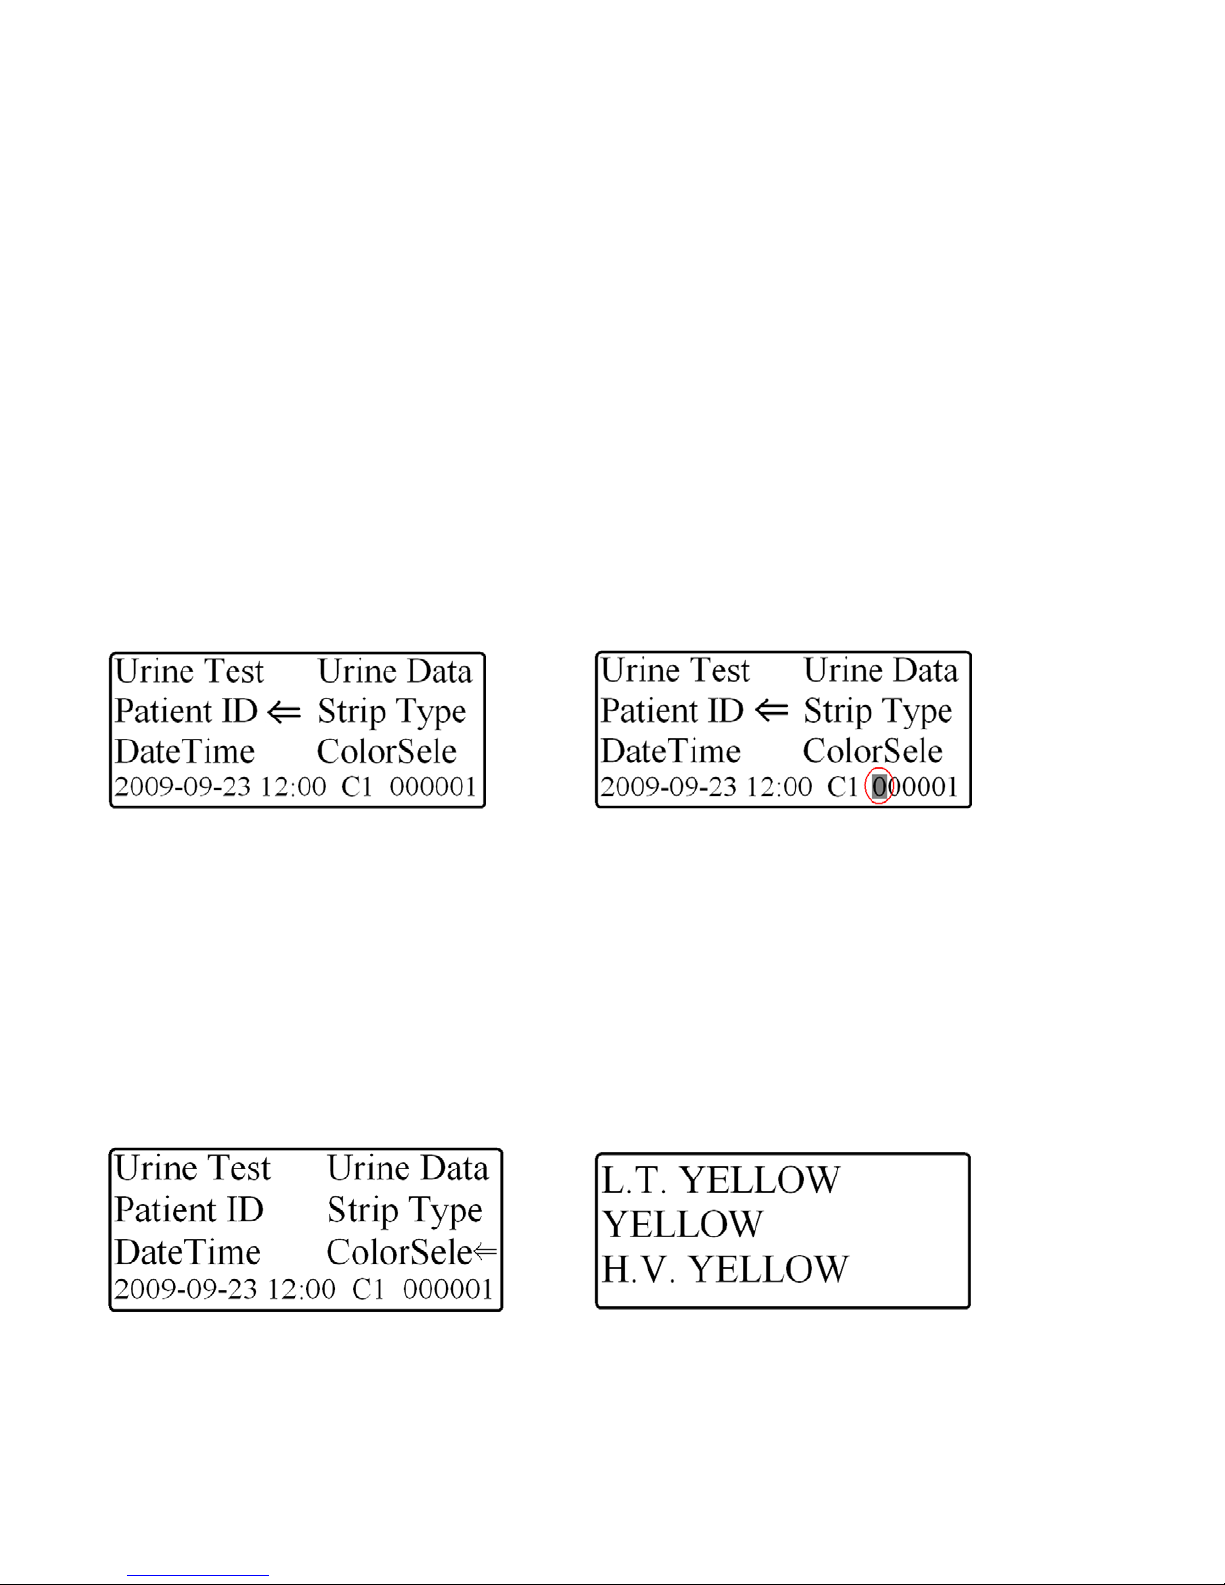
1. In order to enter the information for a new patient, use the selection keys to highlight Patient ID from the Main
Menu and press the “YES” key (see Fig. 8).
2. Once selected, the machine will highlight the first digit of the 6 digit patient ID (see Fig. 9).
3. Use the selection keys to choose a numeric digit from 0 – 9.
4. Press the “YES” key to highlight the second digit of the Patient ID
5. Continue to repeat steps 3 and 4 to finish entering the 6 digit Patient ID
Once the Patient ID is selected you may choose to enter the urine color by highlighting Color Selection (see How
to enter urine color on this page. If you choose not to select the urine color select Urine Test to test your patient
sample.
Fig. 8: Patient ID Selection Fig. 9: Entering Patient ID
How to enter urine color:
The urine sample must be visually observed and then the appropriate color selected
1. In order to enter the urine color for a new sample, use the selection keys to highlight Color Selection from the
Main Menu and press the “YES” key (see Fig.10).
2. Once selected, the machine will change to the Color Selection screen (see Fig. 11).
3. Use the selection keys to highlight a color that accurately describes the color of the patient urine sample.
4. Press the “YES” key to select the color of the patient sample and the analyzer will return to the Main Menu
If the color is “Yellow”, highlight “Yellow” with the selection keys and press the “YES” key
Once the urine color is selected you may choose to enter the Patient ID (see How to enter Patient ID on this
page) or choose to immediately run a patient sample by choosing Urine Test to test your patient sample.
Fig. 10: Color Selection Fig. 11: Color Selection Screen
© Pro Advantage by NDC. All rights reserved
PS-733 Rev 00-3/10 10/23
Page 11
How to enter Date and Time:
The date and time are displayed on the Main Menu screen and are recorded with each test result.
The format of the date and time are displayed along with specific date and time values. If the date and time values
are incorrect follow the directions below:
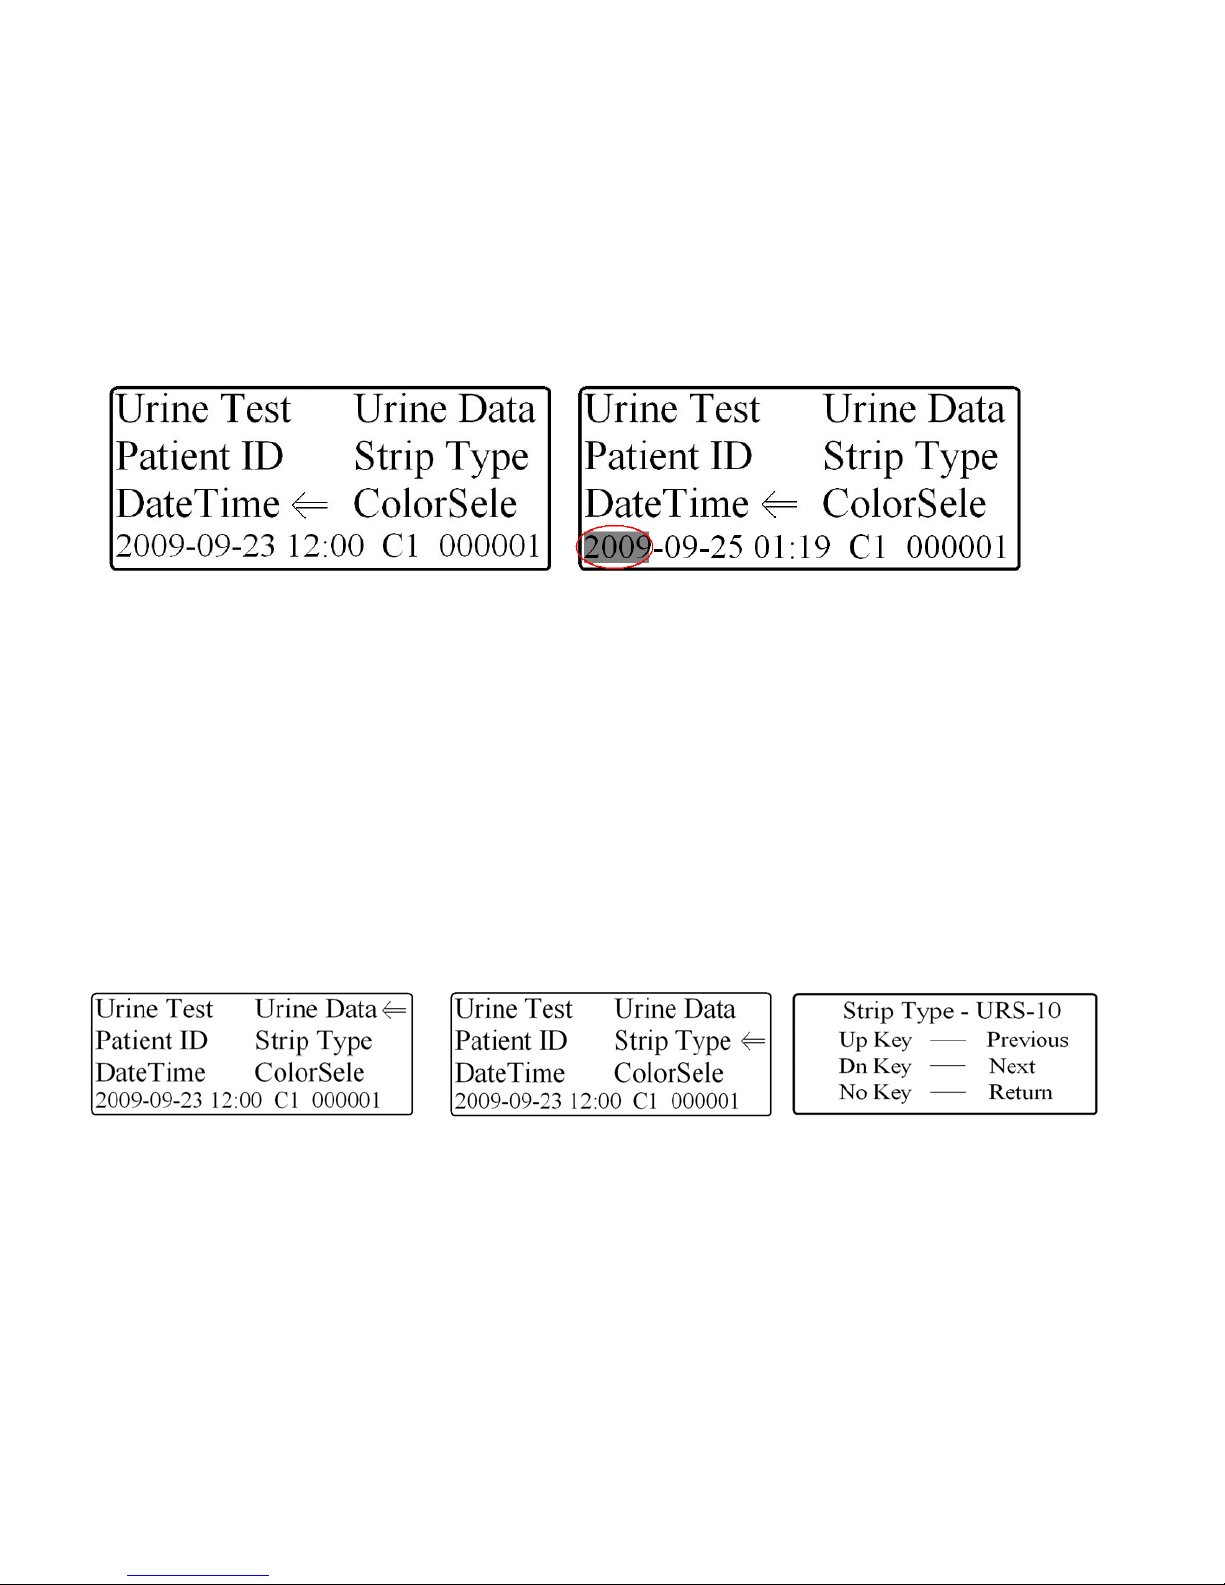
1. Highlight the DateTime option using the selection keys (see Fig. 12).
2. Press the “YES” key to change the date and time.
3. The year will become highlighted (see Fig. 13), use the selection keys to increase/decrease the year.
4. Press the “YES” key to highlight the month, use the selection keys to increase/decrease the month.
5. Press the “YES” key to highlight the day, use the selection keys to increase/decrease the day.
6. Press the “YES” key to highlight the hour, use the selection keys to increase/decrease the hour.
7. Press the “YES” key to highlight the minutes, use the selection keys to increase/decrease the minutes.
8. Press the “YES” key to return to the Main Menu.
Figure 12: Date and Time Function Figure 13: Changing the Date and Time
How to search past patient results:
The Pro Advantage Urine Analyzer stores 1000 Patient ID’s in its internal memory. The Pro Advantage Urine
Analyzer also allows the user access to these stored Patient ID’s. To access the past Patient ID results, the user
must start at the Main Menu.
1. Use the selection keys to highlight the Patient ID option (see Fig 8).
2. After highlighting the Patient ID, press the “YES” key to enter the patient ID which you need to recall (see
how to enter a Patient ID on page 10).
3. Once the Patient ID is entered, use the selection keys to highlight the Urine Data option (see Fig 14).
4. Press the “YES key to enter the Urine Data menu option.
To reprint past data press the “YES” key
To search other Patient ID’s press the “NO” key and return to the Main Menu, following steps 1-4 above.
To manually change the results showing on the LCD screen, use the selection keys to change the results th at are
displayed (see Fig. 6, Pg. 9)
Figure 14: Urine Data Option Figure 15: Strip Type Option Figure 16: Strip Type Menu
How to change strip type:
The Pro Advantage Urine Analyzer allows for the user to use multiple strip types on the analyzer. To change the
strip type on the analyzer:
1. Highlight the Strip Type function using the selection keys (see Fig. 15).
2. Press the “YES” key to enter the strip type selection menu (see Fig. 16).
3. Use the selection keys to change the Strip Type.
4. Once changed, press the “NO” key to save the selection and return to the Main Menu
© Pro Advantage by NDC. All rights reserved
PS-733 Rev 00-3/10 11/23
Page 12
4. Analyzer Set-Up
How to change your urine analyzer settings:
Your Pro Advantage Urine Analyzer allows you to change the settings to fit your laboratory or workplace
requirements
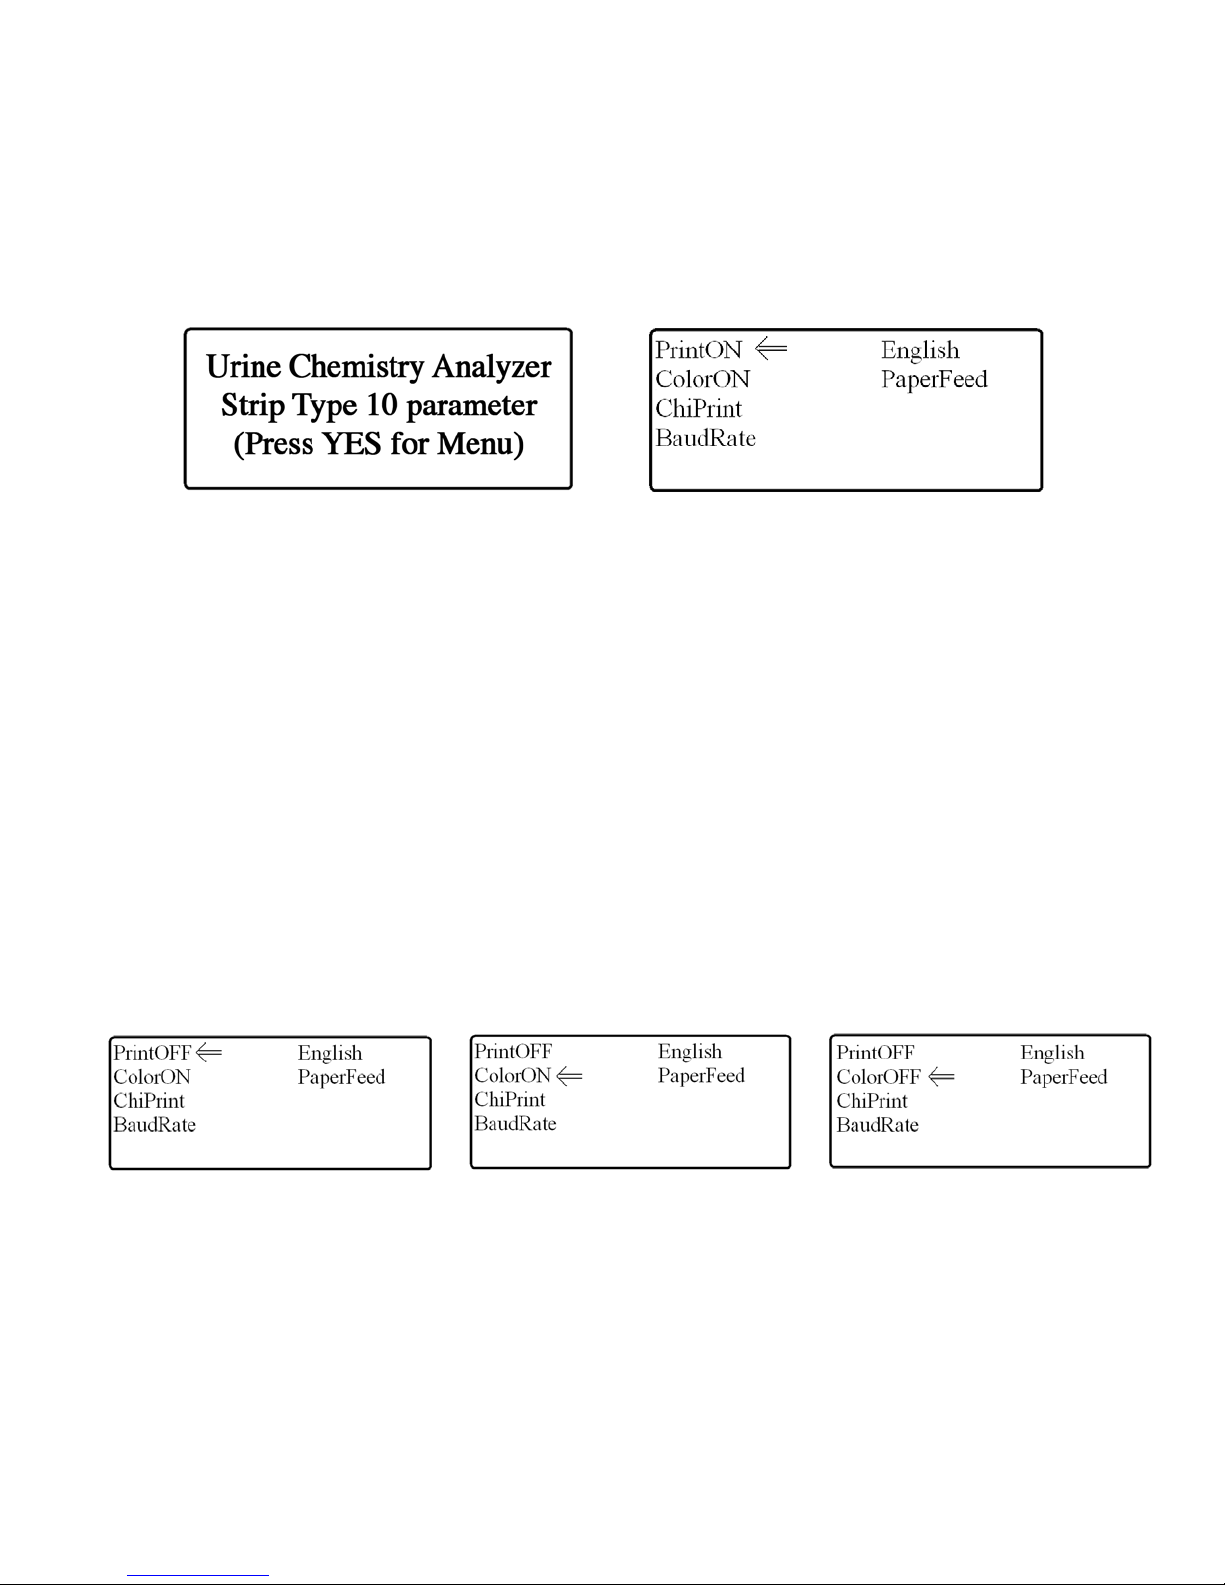
To change your setting turn on your analyzer and you will see the Welcome Screen appear (see Fig. 17). From
this screen you will be able to change the settings by
1. Press the “UP” key and the Settings Screen will appear (see Fig. 18) after your selection.
Figure 17: Welcome Screen Figure 18: Settings Screen
Printer Settings:
The print function can be turned on or off depending on your workplace requirements. To turn on or off
your printer function, enter the Settings Screen (see How to change your urine analyzer settings on
this page).
1. Use the selection keys to highlight the PrintON/PrintOFF menu option (see Fig 18).
2. Turn on/off the print function by pressing the “YES” key. The setting with change to
PrintOFF/PrintON.(see Fig. 19) depending on what function the analyzer was previously performing
PrintOFF – The analyzer will not print via the on board thermal printer
PrintON – The analyzer will print via the on board thermal printer
If you choose to connect a dot matrix style external printer and have the print function turned off, this
analyzer will print via the external printer.
Figure 19: Print Option Turned Off Figure 20: Urine Color Selected Figure 21: Urine Color Option Turned Off
Urine Color Settings:
The user may choose to not display the urine color on the analyzer print out depending on your workplace
requirements. To turn on or off your urine color function, enter the Setting Screen (see How to change
your urine analyzer settings on this page).
1. Use the selection keys to highlight the ColorON/ColorOFF menu option (see Fig 20).
2. Turn on/off the urine color function by pressing the “YES” key. The setting will change to
ColorON/ColorOFF (see Fig. 21) depending on what function the analyzer was previously performing
ColorOFF – The analyzer will not print the urine color on your patient results print out
ColorON – The analyzer will print the urine color on your patient results print out
© Pro Advantage by NDC. All rights reserved
PS-733 Rev 00-3/10 12/23
Page 13
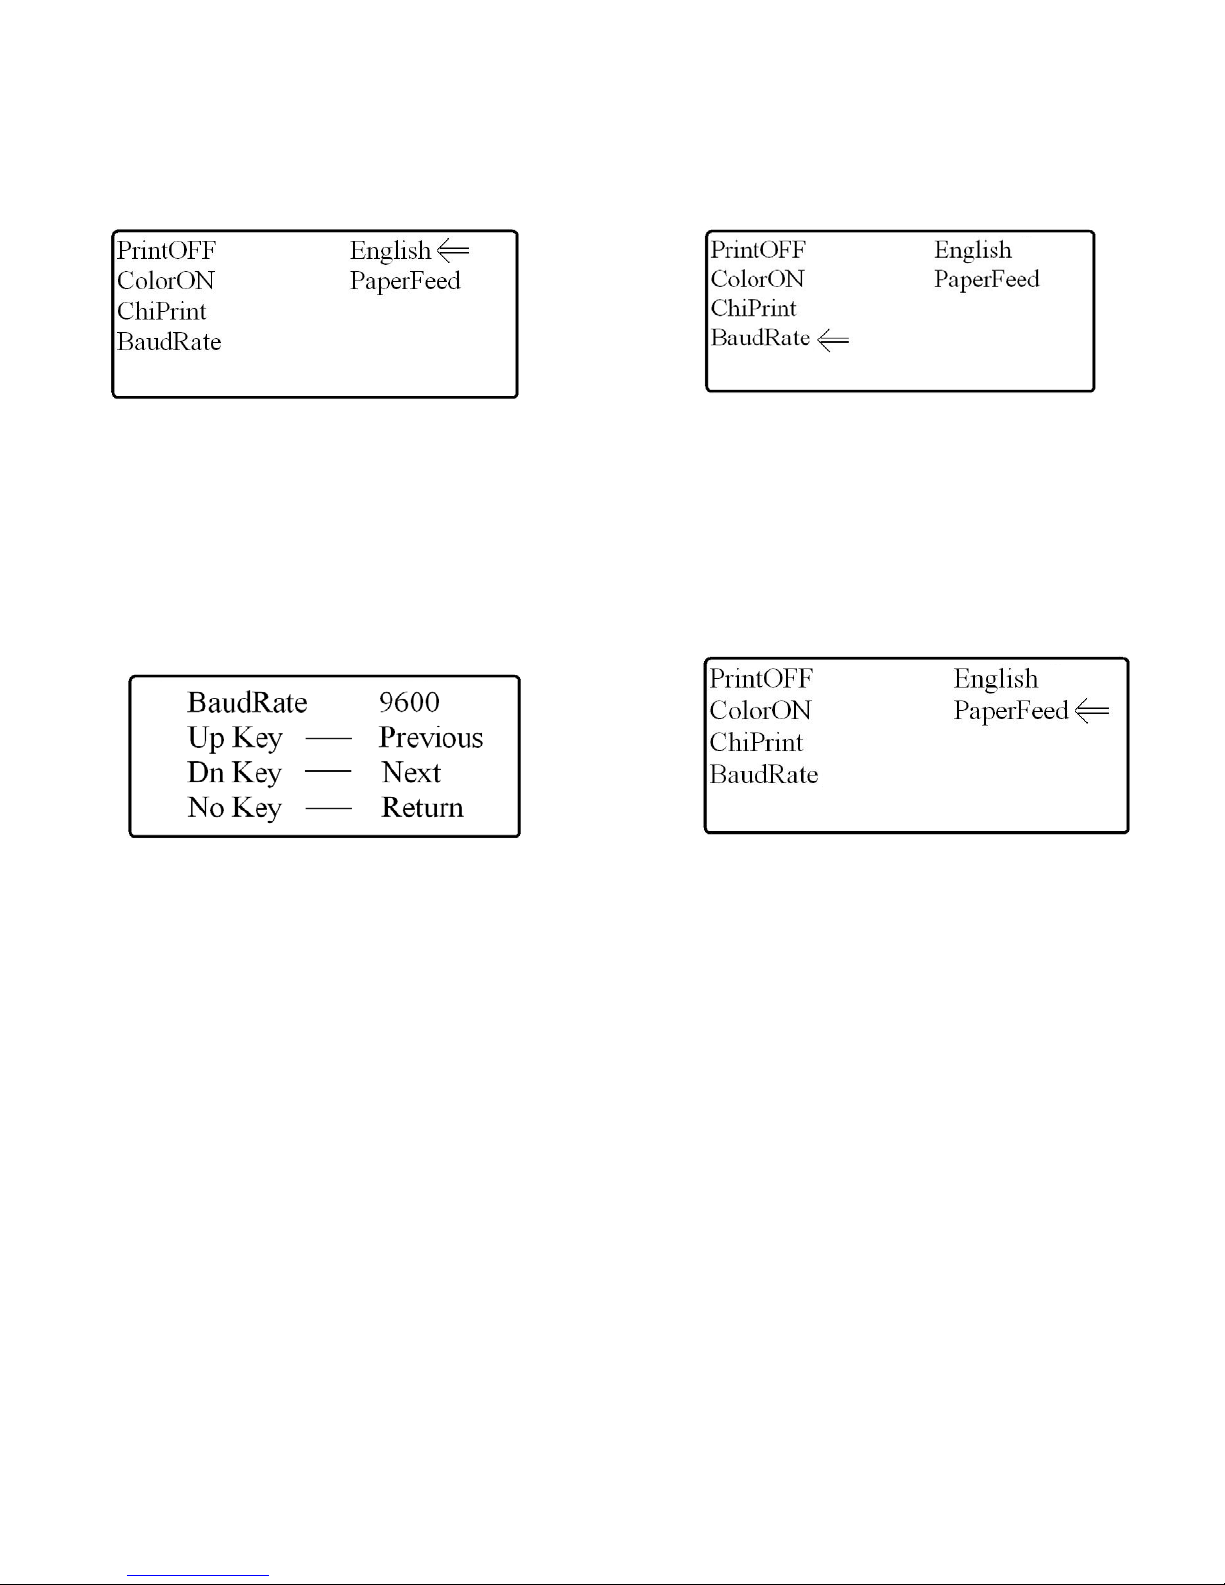
Language Settings:
The user may choose the language which is displayed on the analyzer depending on your workplace
preferences. To change the language option in the Setting Screen (see How to change your urine
analyzer settings on Page 12).
1. Use the selection keys to highlight the English menu option (see Fig. 22).
2. Press the “YES” key to change the language from English to Chinese.
Figure 22: Language Option Figure 23: Baud Rate Option
Baud Rate:
The user may choose to change the Baud Rate settings within the analyzer if the analyzer will be
connected to a computer or information software. To change the Baud Rate in the Setting Screen (see
How to change your urine analyzer settings on Page 12).
1. Use the selection keys to highlight the Baud Rate menu option (see Fig. 23).
2. Press the “YES” key to enter the Baud Rate screen
3. Use the selection keys to select the Baud Rate required (see Fig. 24)
4. Press “NO” to return to the previous screen
Figure 24: Baud Rate Settings Screen Figure 25: Paper Feed Option
How to feed printer paper through the printer head:
The Pro Advantage Urine Analyzer requires a thermal paper roll to be used to properly print the result s of
each patient sample. At times it may be difficult to feed the paper through the printer head manually, so
the analyzer has an option to feed the paper through mechanically.
The user must enter the Setting Screen (see How to change your urine analyzer settings on Page 12).
1. Highlight the PaperFeed option using the selection keys.
2. Once highlighted, press the “YES” key to feed paper through the printer (see Fig. 25).
How to change LCD screen contrast:
The Pro Advantage Urine Analyzer allows the contrast of the display to be increased or decreased to suit
the user.
1. Enter the Welcome Screen (see how to change your urine analyzer settings, Fig. 17
2. ).
3. Hold the “NO” key, and use the selection keys to adjust the contrast to be darker or lighter
4. When finished release the “NO” key
© Pro Advantage by NDC. All rights reserved
PS-733 Rev 00-3/10 13/23
Page 14
5. Troubleshooting
General Information
Your Pro Advantage Urine Analyzer will function properly if you follow the directions provided in this manual and also
maintain the instrument.
Error Messages
Error messages will be displayed on the LCD screen to alert the user that the Pro Advantage Urine Analyzer has found a
problem with the analyzer. To correct the error, see the List of Error Codes below.
Errors which Disable the Instrument
If the error is one which prevents the user from using the analyzer at all, the key pad will be disabled, and the
machine must be turned off. In the event of a disabling error, please immediately contact your local Sales
Representative, Distributor or Technical Support provider.
Errors which do not Disable the Instrument
There are specific errors which need to be corrected prior to testing another sample, but still allow for the user to
operate the analyzer.
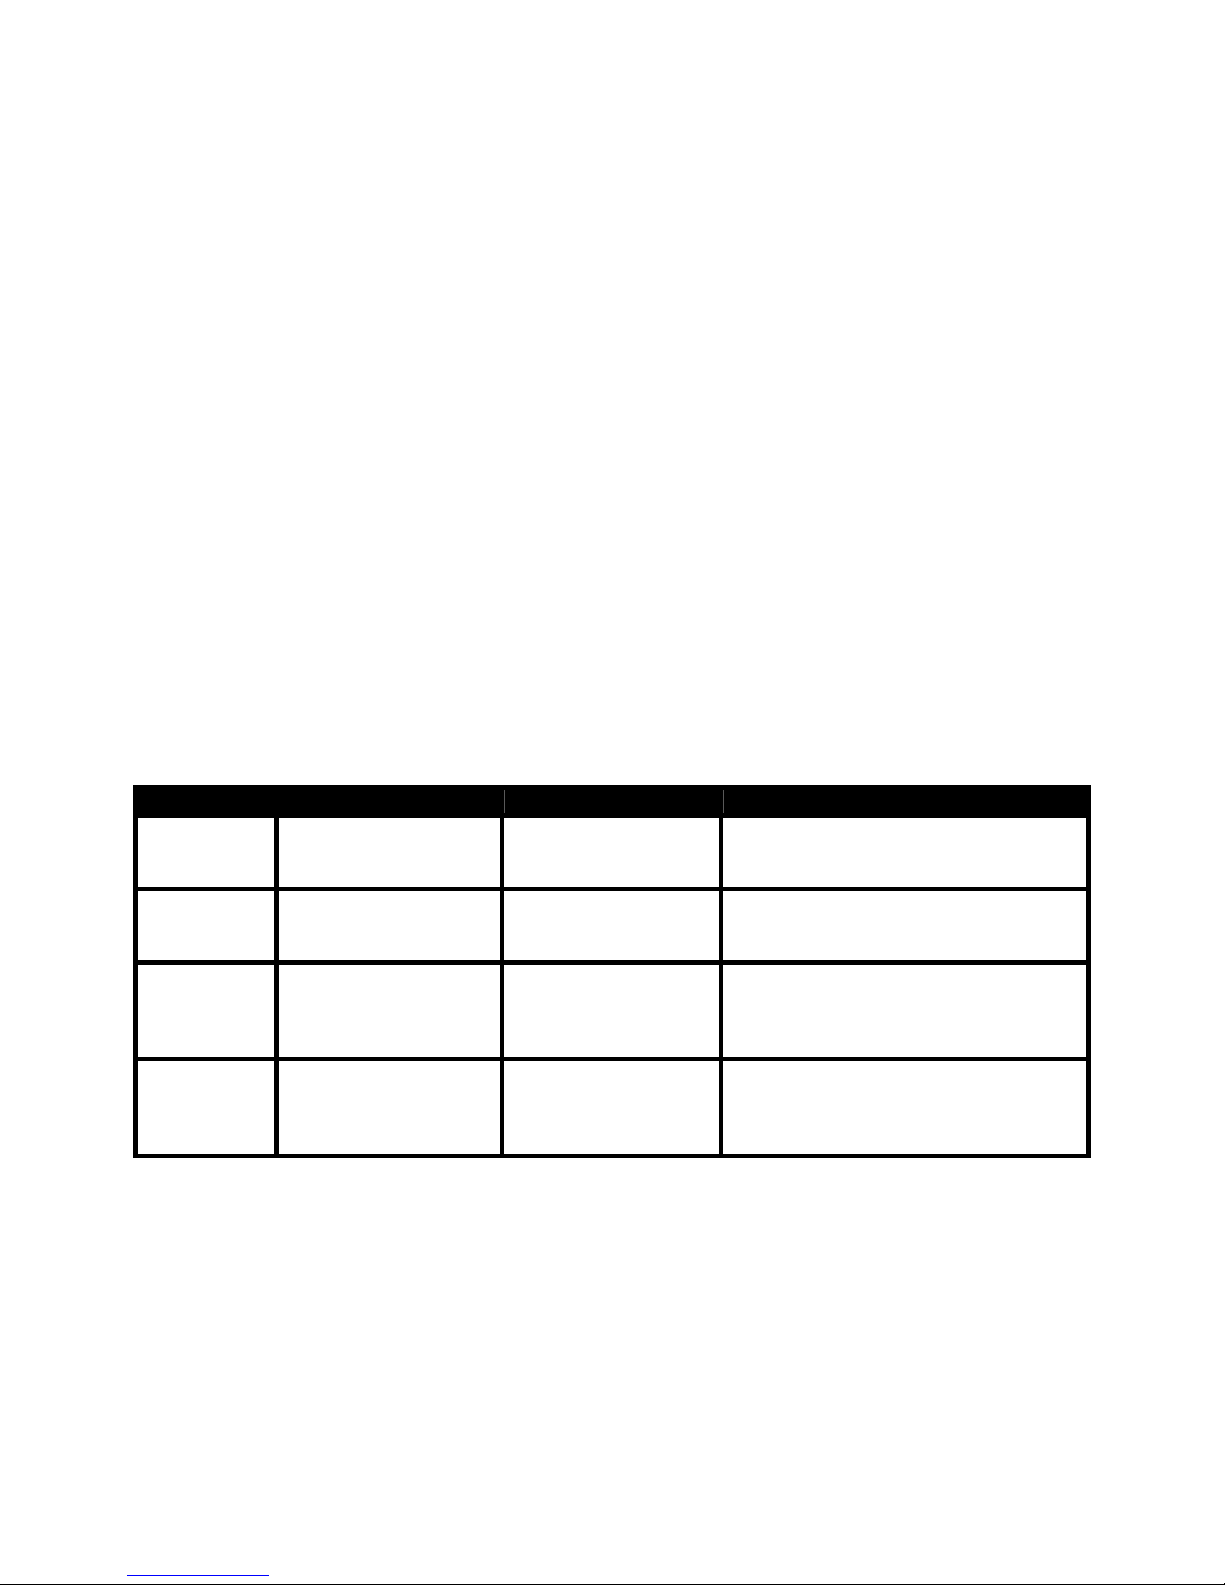
Error Code Error Status Cause of Error Solution
Trouble 1
Trouble 3
Trouble 4 No Strip on Strip Bed
Stop using the
analyzer
Re-Test the samples
again
Optical system has
failed
Improper strip
placement on strip
bed
Continuous Mode
Error, Missing
Strip/Strip
Misplacement
Please call your technical service
provider immediately
Re-test sample, and ensure the strip
touches the rear of the strip bed
Please check that the last test result
printed, and press NO when you are
finished testing.
Trouble 7
Re-Test the sample
again
• Improper strip type
• Improper strip
placement
• Check the Strip Type (see pg. 9)
• Re-test sample, and ensure the strip
touches the rear of the strip bed
Calling for Assistance
If your Pro Advantage Urine Analyzer is displaying an error, please follow the instruction shown in this manual to
resolve the error shown on the analyzer. If the error still exists after following the steps in the manual, please
contact your local technical support provider. If you are calling for assistance to a displayed error, please have
the following items ready:
1. Displayed Error Message
2. Lot number of the strips
3. Serial Number of the instrument
© Pro Advantage by NDC. All rights reserved
PS-733 Rev 00-3/10 14/23
Page 15

6. Quality Control for Urinalysis Strip Testing
The Pro Advantage Urine Analyzer is a CLIA waived analyzer when used with the manufacturer’s branded urine
reagent strips. For CLIA waived settings, we advocate for the use of positive and negative controls with each new
bottle opened.
Water should NOT be used as a negative control. Contact your manufacturer representative for any
supplementary information about quality control testing.
© Pro Advantage by NDC. All rights reserved
PS-733 Rev 00-3/10 15/23
Page 16

7. Pro Advantage Urine Analyzer Maintenance
Maintenance
Routine Cleaning of Strip Bed
1. Remove the strip bed and thoroughly clean by wetting a cotton-tipped stick with warm water and cautiously
clean strip bed.
2. Dry strip bed with a lint-free tissue or cloth
3. Return strip bed into the analyzer, firmly but slowly. The strip bed should be flush with the bottom guide plate.
Disinfecting Strip Bed
Household Bleach (5% sodium hypochlorite)
1. Household bleach can be used if diluted with water to as much as 1:20.
2. Mix 5 mL of bleach with 95 mL of water for a total of 100mL in a small container
3. Remove the strip bed from the analyzer
4. Insert strip bed into the solution making sure the strip bed is submerged
5. Submerge the strip bed for a minimum of 2 minutes and maximum of 5 minutes.
6. Do not submerge longer than 5 minutes.
7. Rinse the strip bed thoroughly with water.
8. Use a dry soft cloth and replace strip bed into analyzer (as previously described on this page in
Routine Cleaning of Strip Bed).
Isopropyl Alcohol (70% to 85%)
1. Can be used at full strength, follow steps 1 – 8 in Disinfecting Strip Bed: Household Bleach
Ensure that the Pro Advantage Urine Analyzer is kept clean and free of dust by turning the analyzer off
by pressing the on/of button at the rear of the machine. Wipe the exterior plastic casing of the analyzer,
including the LCD screen with a damp (not wet) cloth and a mild detergent (household blea ch 5% or 70%
- 80% isopropyl alcohol.
© Pro Advantage by NDC. All rights reserved
PS-733 Rev 00-3/10 16/23
Page 17
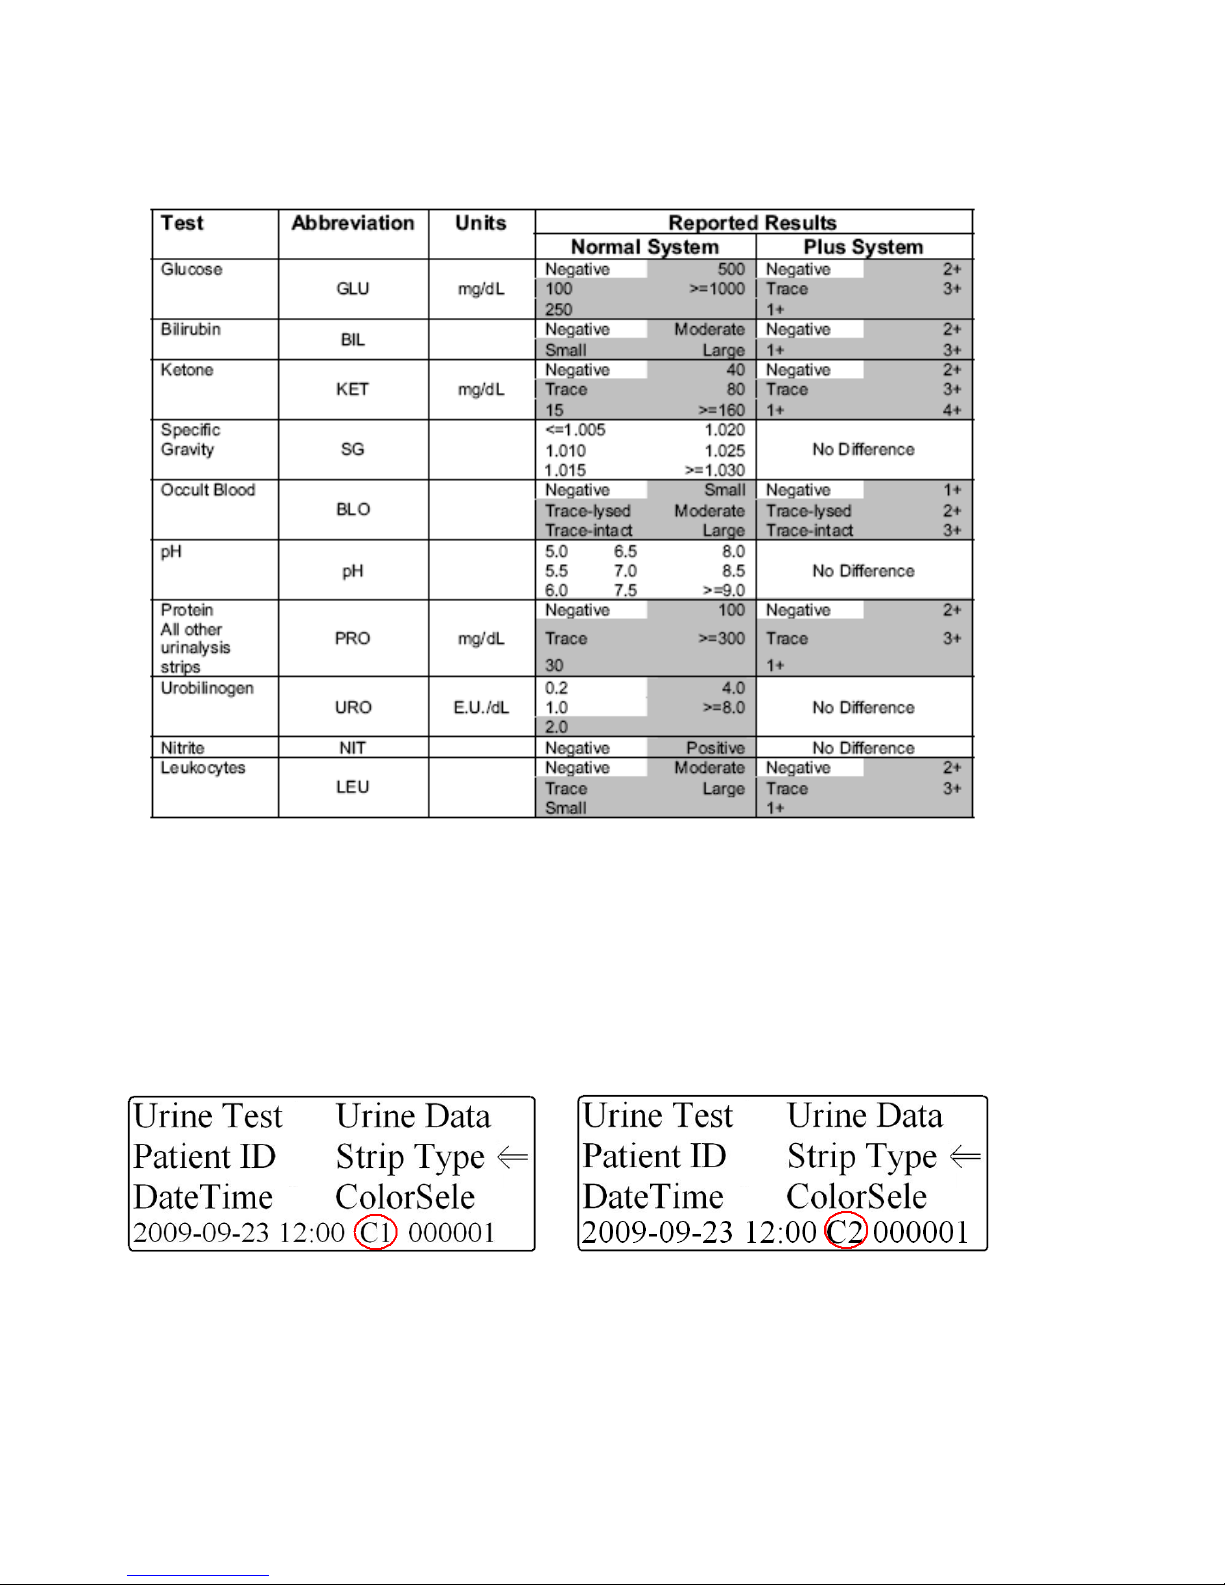
8. Table of Results
Table 1: English – Conventional Units (C1 & C2)
How to change the printed/displayed units
The Pro Advantage Urine Analyzer has the ability to change the units in which the results are displayed and
printed.
1. Start at the Main Menu screen and hold the “DOWN” selection key and press the “NO” key
2. The units will change from C1 to C2 to S1 or S2 (see Fig. 24 and 25).
C1 – English – Conventional (Normal System)
C2 – English – Conventional (Plus System)
Figure 24: Conventional Units (Standard) Figure 25: Conventional Units (Plus)
© Pro Advantage by NDC. All rights reserved
PS-733 Rev 00-3/10 17/23
Page 18
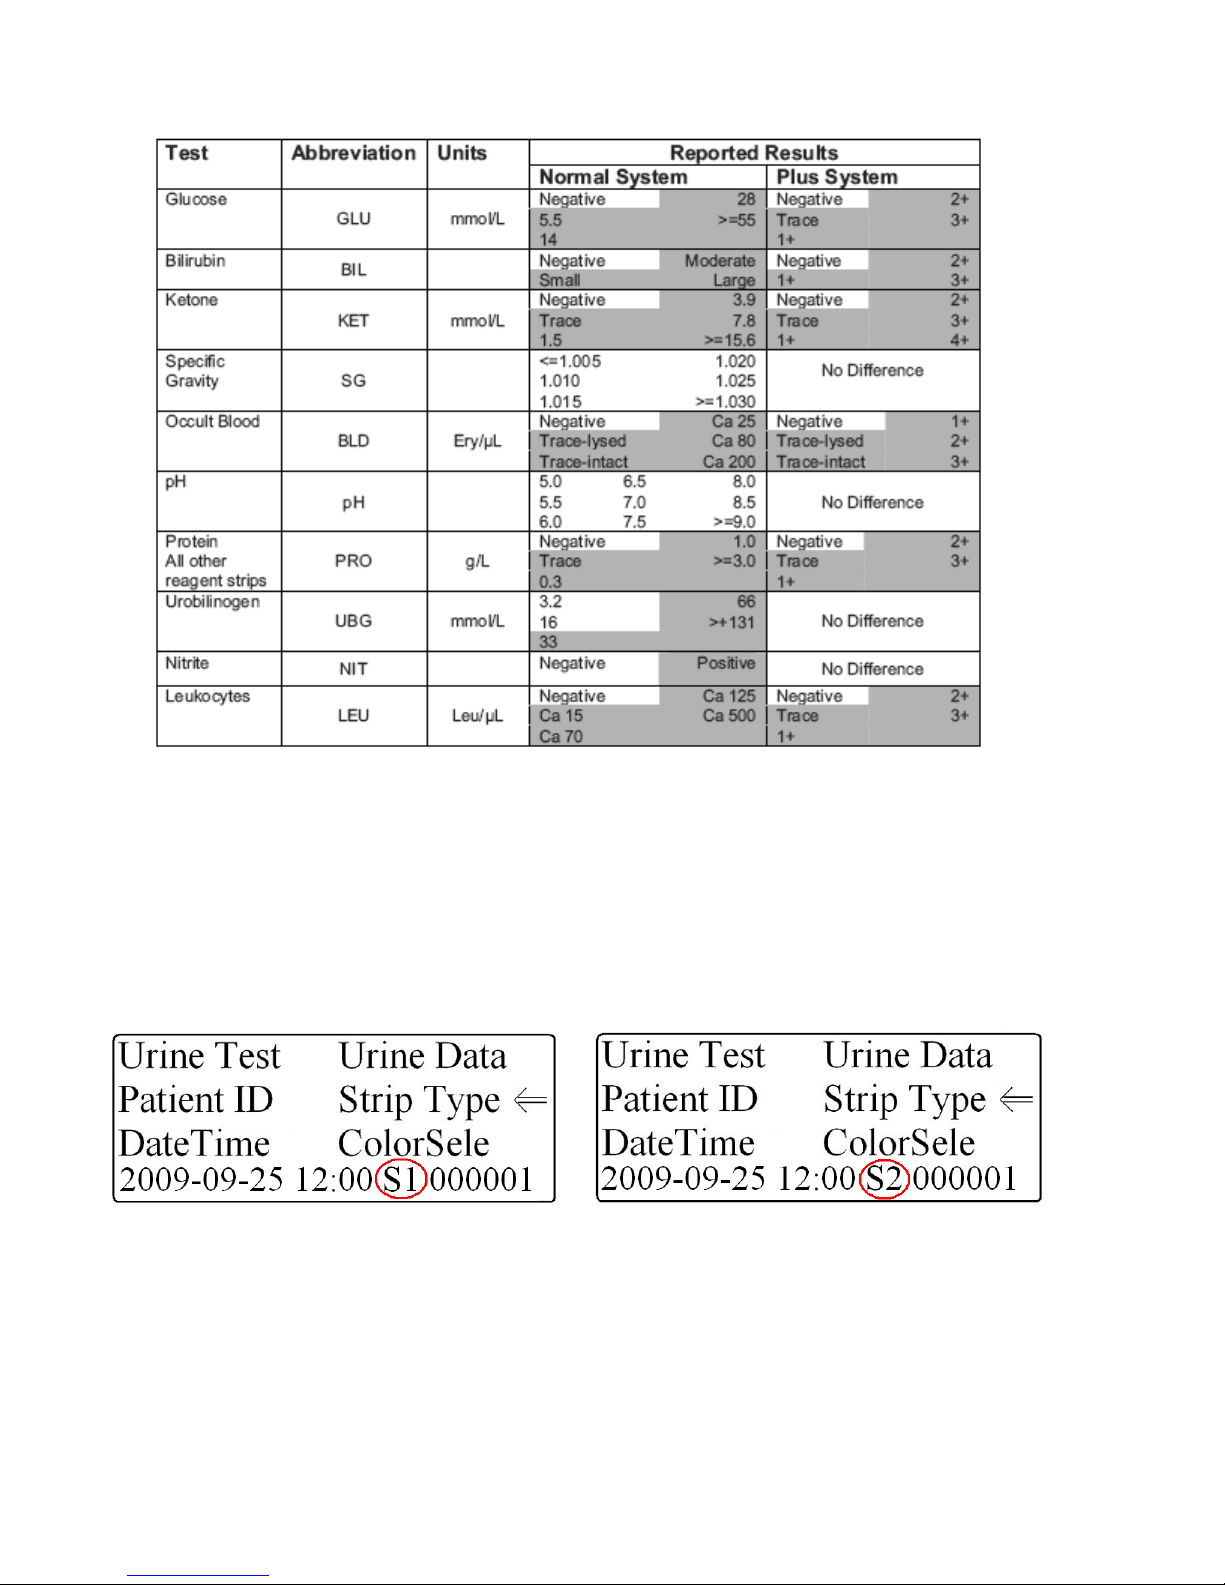
Table 2: English – Standard (S.I.) Units (S1 & S2)
How to change the printed/displayed units
The Pro Advantage Urine Analyzer has the ability to change the units in which the results are displayed and
printed.
1. Start at the Main Menu screen and hold the “DOWN” selection key and press the “NO” key
2. The units will change from C1 to C2 to S1 to S2 (see Fig. 26 and 27).
S1 – English – International (Normal System)
S2 – English – International (Plus System)
Figure 26: Conventional Units (Standard) Figure 27: Conventional Units (Plus)
© Pro Advantage by NDC. All rights reserved
PS-733 Rev 00-3/10 18/23
Page 19

9. Appendicies
Appendix 1: Specifications
Power Required
110V AC ± 20%, 45 - 65 Hz (US only)
220V AC ± 20%, 45 - 65 Hz (Europe only)
240V AC ± 20%, 45 - 65 Hz (UK only)
100V - 240V AC ± 20%, 45 - 65 Hz (with in-line lead)
Dimensions
Depth - 160 mm (6.4 inches)
Width - 215 mm (8.5 inches)
Height - 110 mm (4.25 inches)
LCD Screen Dimensions
Width – 88 mm (3.5 inches)
Height – 44 mm (1.3 inches)
Adjustable LCD Screen: up to 45 degree incline
Weight
Pro Advantage Urine Analyzer (without power supply) – 2.36 kg (5.21 lb)
Operating Temperature
18°C to 30°C (64°F to 86°F)
Operating Humidity
18% to 80% Relative Humidity
Optimal Operating Temperature
22°C to 26°C (72°F to 79°F)
Optimal Operating Humidity
35% to 55% Relative Humidity
Optimal ranges ensure that the reagent results are optimized for performance and stability. At temperatures under 22°C
(72°F), urobilinogen and leukocyte results may be decreased, and at temperatures above 26°C (79°F), increased.
Altitude: 2000 m (6562 ft)
Instrument Memory
1000 Patient test results (With Patient Identification)
© Pro Advantage by NDC. All rights reserved
PS-733 Rev 00-3/10 19/23
Page 20

Appendix 2: Default Settings
Entry of Patient ID Include Patient ID in Results
Enabled Enabled
Entry of Color Selection Include Color Selection in Results
Enabled Enabled
Date Format Language
MM-DD-YYYY English
Time Format Results Format Units Selection
12 hour Conventional
Plus System Mark Positive Results
Disabled Enabled
System Settings Connectivity Allowing Results to be Sent to Computer
Printer Automatic Enabled
Contrast Setting Baud Rate
0 (zero) 115200
Parity Stop Bits
None 1 (one)
Strip Type
10 Parameter
© Pro Advantage by NDC. All rights reserved
PS-733 Rev 00-3/10 20/23
Page 21

Appendix 3: Analyzer Summary & Policy
Intended Use of Analyzer
The Pro Advantage Urine Analyzer is for in vitro diagnostic use only:
• The analyzer reports results semi-quantitatively for leukocytes, nitrite, urobilinogen, protein, pH, specific gravity,
blood, ketone, bilirubin, and glucose in urine samples.
Optical System Explanation
The TC-101 can determine the intensity of different colors on the reagent strip test area. It does this by irradiating the test
area with light and detecting the reflectance of different wavelengths using an integrated sphere photo-detector. This
photo-detector is filtered to measured wavelengths of 550nm, 620nm, and 720nm using the integrated sphere. 720nm is
the reference wavelength and the combination of 550nm and 620nm light is used to differentiate between the different
color combinations used in the urine strips. Results are calculated by a reflection rate (R%) which is a percentage of the
total reflectance of the testing wavelength and are printed automatically. If the intensity of color on the strip is high then
the reflectance will be low conversely if the intensity of the color is low then the reflectance will be high.
Apart from there being strip blocks for each test there is also a reference block (blank) on the strip s. Its function is to
rectify any error that may be caused by the color or the urine itself. The formula for reflectance is:
R: Reflectance
Tm: The intensity of reflected radiation of the strip block to testing wavelength
Ts: The intensity of reflected radiation of the strip block to reference wavelength
Cm: The intensity of reflected radiation of the reference block to testing wavelength
Cs: The intensity of reflected radiation of the reference block to reference wavelength
Internal Checks Explanation
When the user first turns on the Pro Advantage Urine Analyzer, the analyzer performs a series of electronic che c ks. Each
time a test is read with the analyzer, the instrument ensures each test is positioned correctly on the strip bed. The
analyzer then pulls the strip bed and strip into the analyzer, taking a reference reading from the reference block on the
strip. After the initial reference block reading the analyzer begins to read all the test pads at all 4 wavelengths, The test
and reference results are then used to determine whether there is a presence and/or amount of each component in the
urine sample and the results are used to calculate the sample results.
Human Eye vs. Instrumental Optics
The human eye is inherently different in the colors that it perceives compared to those detected by an optical system. The
human eye is capable of determine differences in shade and color by the minute, whereas the optical syste m cannot.
However, optical systems can detect specific colors that are hidden or masked by other colors apparent to the human
eye.
Since there are slight difference between the human eye vs an optical system, an exact agreement between the two
options may be hard to find. Yet, agreement between the two can be found visually, if the user reports a value within one
visual color block compared to the optical system reading.
© Pro Advantage by NDC. All rights reserved
PS-733 Rev 00-3/10 21/23
Page 22

Appendix 4: Warranty
Limited Manufacturer’s Warrantee
PRO ADVANTAGE URINE ANALYZER URINE REAGENT READER
Terms and Conditions
The manufacturer warrants to the original purchaser that this instrument will be free from defects in materials and
workmanship for a period of 365 days (1 year) from the date of original purchase or installation (except as noted below).
During the stated 365-day period, The manufacturer shall replace with a reconditioned unit or, at its option, repair at no
charge a unit that is found to be defective. The manufacturer shall not be responsible for shipping charges incurred in th e
repair of such instrument.
This Warranty is subject to the following exceptions and limitations:
This warranty is limited to repair or replacement due to defects in parts or workmanship. Parts required whic h were not
defective shall be replaced at additional cost, and the manufacturer shall not be required to make any repairs or replace
any parts that are necessitated by abuse, accidents, alteration, misuse, neglect , maintenance by anyone other than the
manufacturer, or failure to operate the instrument in accordance with instructions. Further, the manufacturer assumes no
liability from malfunction or damage to the manufacturer instruments caused by the use of reagents other than reagents
manufactured or recommended by the manufacturer. The manufacturer reserves the right to make changes in design of
this instrument without obligation to incorporate such changes into previously manufactured instruments.
Disclaimer of Warranties
This warranty is expressly made in lieu of any and all other warranties express or implied (either in fact or by operation of
law) including the warranties of merchantability and fitness for use, which are expressly excluded, and is the only warranty
given by the manufacturer.
Limitations of Liability
In no event shall the manufacturer be liable for indirect, special or consequential damages, even if the manufacturer has
been advised of the possibility of such damages. For warranty service, purchaser must contact the Customer Service
Department or your local authorized distributor.
© Pro Advantage by NDC. All rights reserved
PS-733 Rev 00-3/10 22/23
Page 23

10. Index
A P
Analyzer Intended Use: Page 19 Patient ID: Page 6
Analyzer installation: Page 5 Entering a Patient ID: Page 8
Analyzer Turn On/Off: Page 5 Patient ID Search: Page 9
Patient ID Memory: Page 3
B Parity: Page 18
Baud Rate: Page 11 Power: Page 3 and 5
Powering Down: Page 6
C Powering Up Page 6
Calibration: Page 3 Printer: Page 5
Cleaning: Page 15 Printer Roll: Page 5
Color Selection: Page 6 Print Out of Results: Page 7
Contrast (LCD): Page 11
Connecting to a PC: Page 5 Q
Quality Control: Page 13
D
Date and Time: Page 6 and 10 R
Default Settings: Page 19 Results: Page 7
Display: Page 18
Dimensions: Page 17 S
Serial Port: Page 6
E Specifications: Page 17
Error Messages: Page: 12 Strip Type: Page 6 and 9
System Settings: Page 10 – 11
F Strip Bed: Page 6
G T
Testing: Page 7
H Troubleshooting: Page 12
I U
Units Page 15 – 16
J Conventions Units: Page 15
Standard (S.I.) Units: Page 16
K Urine Color: Page 10
Keyboard: Page 6
V
L
Language: Page 11 W
Loading Printer Paper: Page 5 Warranty Page 20
M X
Maintenance Page 14
Memory: Page 3 Y
N Z
O
Operating Temperature: Page 17
Operating Humidity: Page 17
Optical System: Page 19
© Pro Advantage by NDC. All rights reserved
PS-733 Rev 00-3/10 23/23
 Loading...