

Page 1
ELECTRONIC
LOGGING
DEVICE
USER MANUAL
Page 2
ELECTRONIC LOGGING DEVICE USER MANUAL ELECTRONIC LOGGING DEVICE USER MANUAL
2 | National Carrier Exchange
National Carrier Exchange | 3
ATTENTION
The NCX Electronic Logging Device is accessed using the free NCX Mobile App available for Android and
iOS Phones and Tablets. As it will store condential Driver Records, the NCX App is meant to be installed
on a single, personal phone or tablet that is owned and controlled by the Driver. It should not be installed
on a shared device.
Company-owned phones or tablets can be used so long as no other Driver uses that device.
NOTE: This Manual is required to be kept in your vehicle at all times.
What’s in the Box:
• The ELD Device
• OBD Connector
• 6 Pin Connector
• 8 Pin Volvo Connector
• 9 Pin Connector
• Antenna
• Clips & Zip Ties
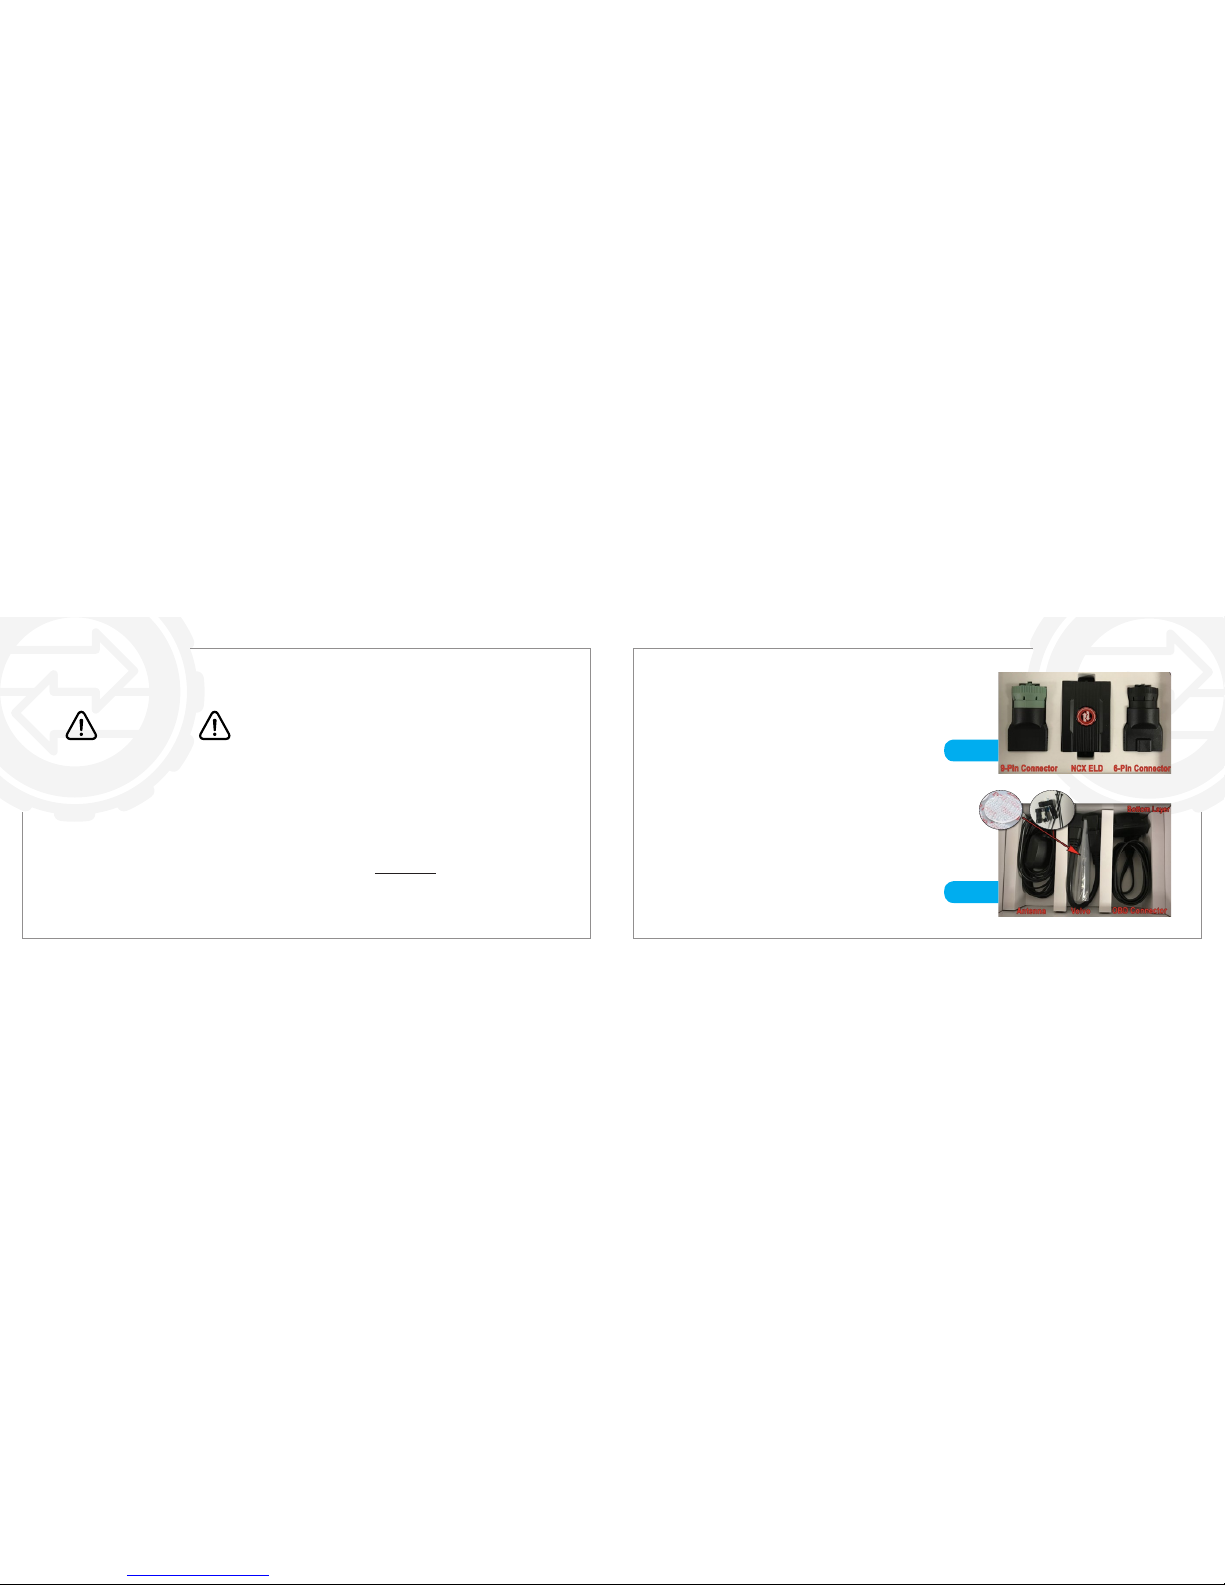
The top layer of the box contains this Manual, the NCX ELD,
a 9-Pin J1939 and 6-Pin J1708 Connector. Beneath this,
the bottom layer contains the Amplied Antenna, a
Volvo 8-Pin Connector, the ELD Connector Cable
and Mounting Supplies.
Top Layer
Bottom Layer
Velcro
Pads
Clips &
Zip Ties
Page 3
ELECTRONIC LOGGING DEVICE USER MANUAL ELECTRONIC LOGGING DEVICE USER MANUAL
4 | National Carrier Exchange
National Carrier Exchange | 5
Table of Contents:
Attention Page 2
What’s in the box 3
Exempt under the ELD Mandate 6
The NCX Fleet Management Platform 7
Installing the NCX ELD
Installing The NCX ELD in a Hino Truck 9
Installing The NCX ELD in an International Truck 10
Installing The NCX ELD in a Kenworth Truck 11
Installing The NCX ELD in a Peterbilt Truck 12
Installing The NCX ELD in a Volvo Truck 13
Installing Your NCX ELD in other vehicles 14
The NCX ELD: Connector Ports on the ELD
10 & 4 pin locking interface ports
connected to the ELD The NCX ELD 16
ELD Indicator Lights 17
The NCX ELD: SIM Card and USB Slots 18
The NCX ELD: 16 pin OBD, 6-pin, 8-pin,
& 9-pin connectors 19
The NCX ELD: Wiring Diagram 20
The NCX ELD: The Amplied GNSS Antenna 21
Installing the NCX App on your Mobile Device
Creating a New NCX Dispatcher Account 23
If invited by SMS Text Message 24
If invited by Email 25
If invited by Email Step 2 26
Creating Your Password 27
If you choose to install the NCX App
at an oth er ti me 28
Ins tal lin g th e NC X Ap p 29
Opening the NCX App 30
Conguring the NCX App
Logging into the NCX ELD App 32
The NCX ELD Dashboard 34
Pairing an ELD Device 35
Creating an ELD PIN Code 36
Changing your Status
Changing your Status 38
Selecting Type of Use 39
Saving your Status 40
Team Drives
Team Drives 42
Switching Driver 43
Active Driver 44
Inactive Driver 45
Your Logs
Viewing your Logs 47
The Help Menu 48
Certifying your Logs 49
Transferring your Logs 50
Viewing your Unidentied Logs 52
Viewing your Claimed Logs 53
Viewing your Graph 54
ELD Notications
ON DUTY for more than 14 hours 56
8 Consecutive hours of driving with out a break 57
11 hours of ON DUTY status in a 24 hour period 58
60 hours of ON DUTY status in an 7 day cycle 59
70 hours of ON DUTY status in an 8 day cycle 60
You must remain in SLEEPER BERTH
status for 10 hours 61
Appendix
Disabling the ELD PIN Code 63
Viewing your Notications 64
Viewing the NCX Privacy Policy 65
Viewing your Driver Prole 66
Viewing your Vehicle Information 67
Troubleshooting your ELD 68
Contact Us 69
FCC Certication 70
Limited Hardware Warranty
Limited Hardware Warranty 72
Page 4
ELECTRONIC LOGGING DEVICE USER MANUAL ELECTRONIC LOGGING DEVICE USER MANUAL
6 | National Carrier Exchange
National Carrier Exchange | 7
Who is Exempt from the ELD Mandate
All Trucks made before the Model Year 2000 (as per their Vehicle Registration) are EXEMPT from the
ELD Requirements.
• Drivers who use the timecard exception are not required to use ELDs or keep RODS.
• Drivers who use paper RODS for not more than 8 days out of every 30-day period are not
required to use ELDs.
• Drivers of vehicles manufactured before 2000 are not required to use ELDs
• Drivers who are required to keep RODS not more than 8 days within any 30-day period are
not required to use ELDs.
• Drivers who conduct drive-away-tow-away operations, where the vehicle being driven is the
commodity being delivered, or the vehicle being transported is a motor home or a recreation vehicle
trailer with one or more sets of wheels on the surface of the roadway are not required to use ELDs.
• Drivers of vehicles manufactured before the model year 2000. (As reected on the vehicle
registration) are not required to use ELDs.
The FMCSA may change the above Exemptions over time. Visit the following Web Page for the latest Updates:
https://www.fmcsa.dot.gov/faq/what-exceptions-are-allowed-electronic-logging-device-rule
The NCX Fleet Management Platform
The NCX Mobile App is part of a free, full-featured Fleet Management, Electronic Dispatch, Tracking and Operations
Platform. While it is not necessary to use all features of the platform to use NCX Electronic Logging Devices, it is freely
available for you to benet from. Carriers have reported a greater than 50% reduction in call volume in their rst week
of using the platform. Drivers use the NCX Mobile App, and Dispatchers or Fleet Owners use the NCX Web App to
interact with the Drivers in their Fleet. To use the NCX Platform, the Fleet Owner or Dispatcher rst creates a free Carrier
Account online at www.NationalCarrierExchange.com and watches a quick Training Video under the HELP Menu. Then,
they invite all of their Drivers to join their Fleet, using either the Drivers’ phone numbers or e-mail addresses to send
out the invitations. The Drivers (after receiving the invitations on their phones) click the link in it, create a password for
themselves and then are taken to download the free NCX Mobile App to use on their smartphones or tablets. Through
the NCX Mobile App, Dispatchers now can assign Loads to their Drivers, instantly passing all of the details right into the
Drivers’ hands. The time that is usually spent sitting on the phone relaying (and copying down) pickup numbers, drop-off
numbers, addresses, phone numbers and all of the rest is now saved, giving both Drivers and Dispatchers more time to
focus on other tasks. The NCX Mobile App is also how Drivers interact with the NCX Electronic Logging Device. The
Mobile App uses the Driver’s phone or tablet to communicate with the ELD via Bluetooth. Through the ELD functions
in the App, Drivers can log their Hours of Service, change their Duty Status, view, edit and transfer Logs to Roadside
Inspectors, as well as submit reports in compliance with the FMCSA’s Electronic Logging Device Mandate.
Page 5
ELECTRONIC LOGGING DEVICE USER MANUAL
National Carrier Exchange | 9
Installing The
NCX ELD In In
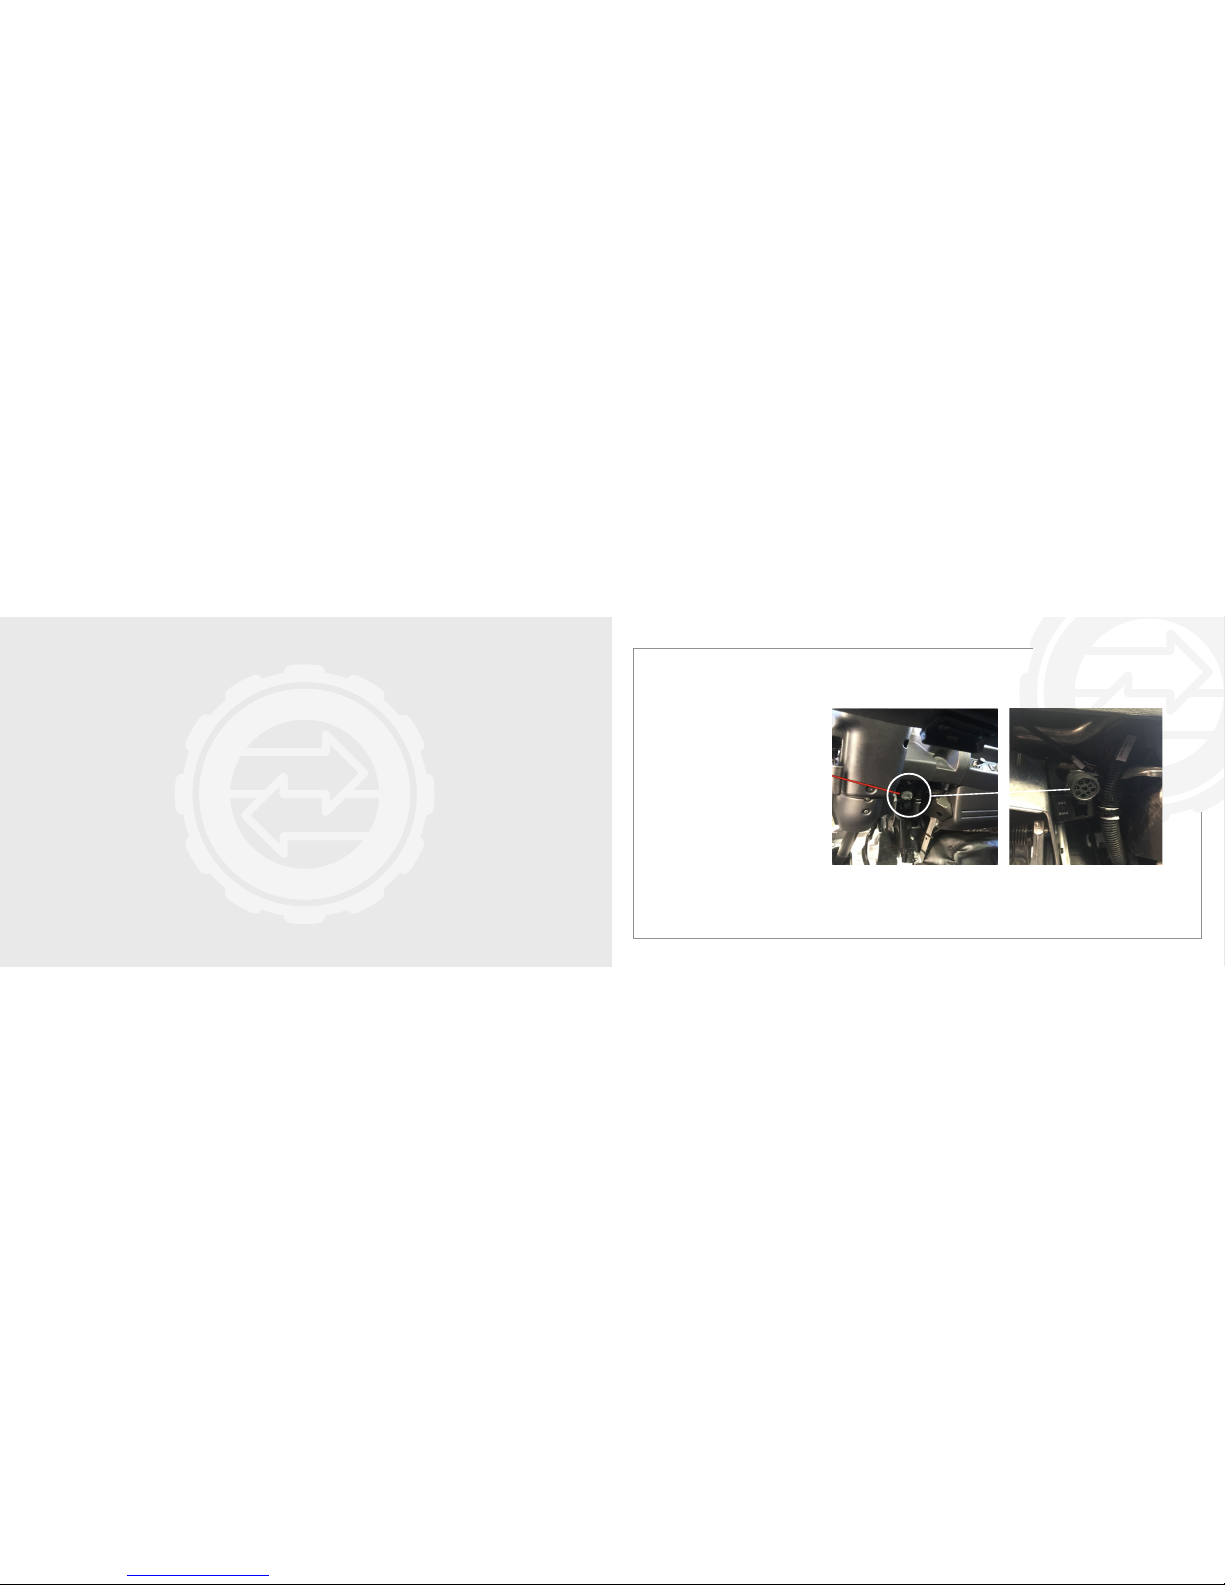
A HINO Truck
In a Hino Truck the 9-pin
port will be located under the
dashboard, on the right side
of the steering wheel. Pull the
plastic cap off and connect
the male 9-pin connector
into the female 9-pin port.
INSTALLING
THE NCX ELD
Page 6
ELECTRONIC LOGGING DEVICE USER MANUAL ELECTRONIC LOGGING DEVICE USER MANUAL
10 | National Carrier Exchange
National Carrier Exchange | 11
Installing The
NCX ELD In An
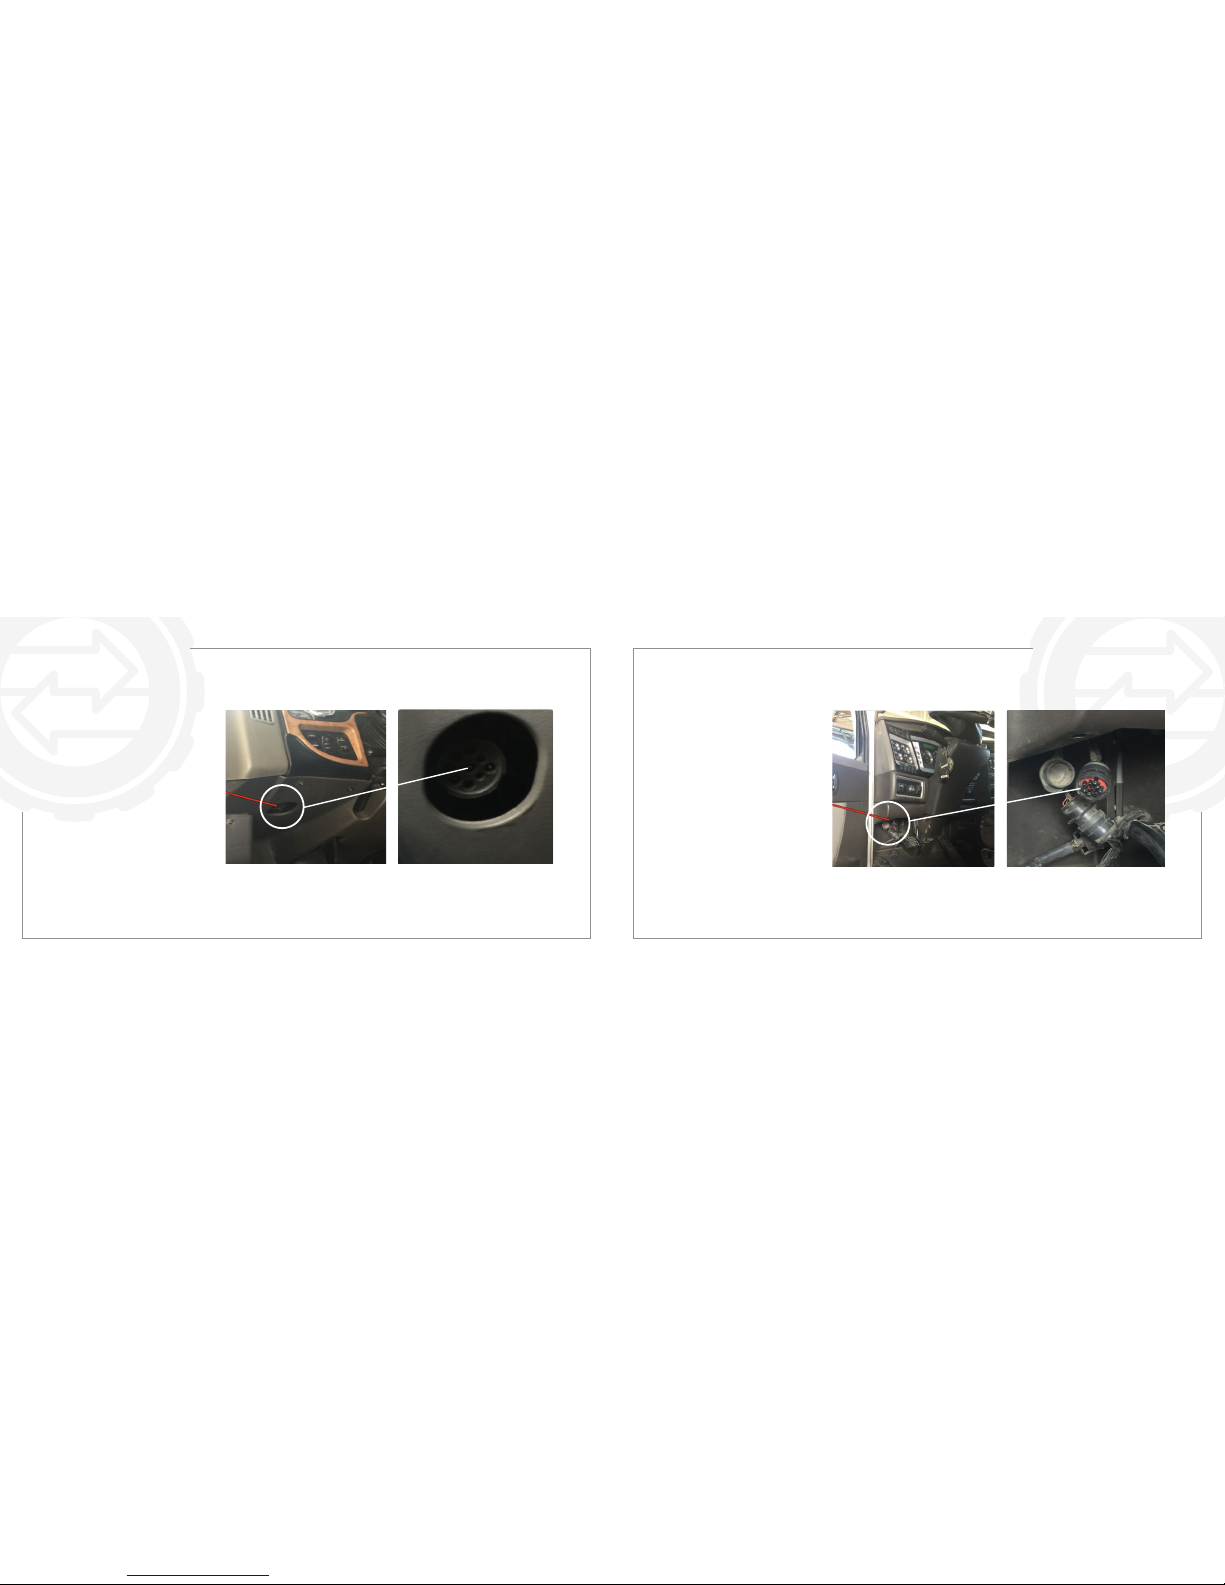
INTERNATIONAL
Truck
In an International Truck the
9-pin port will be located under
the dashboard, on the left side
of the steering wheel. Connect
the male 9-pin connector into
the female 9-pin port.
Installing The
NCX ELD In A
KENWORTH Truck
In Kenworth Trucks, the 9-pin
port will be located under the
dashboard, on the left side of
the steering wheel. On some
models (such as the one shown
above), under the plastic cap,
the 9-pin port will be MALE.
The NCX ELD comes with
several adapters, but it’s 9-pin
adapter is MALE (which is
what most Trucks need). If
Page 7
ELECTRONIC LOGGING DEVICE USER MANUAL ELECTRONIC LOGGING DEVICE USER MANUAL
12 | National Carrier Exchange
National Carrier Exchange | 13
Installing The
NCX ELD In A
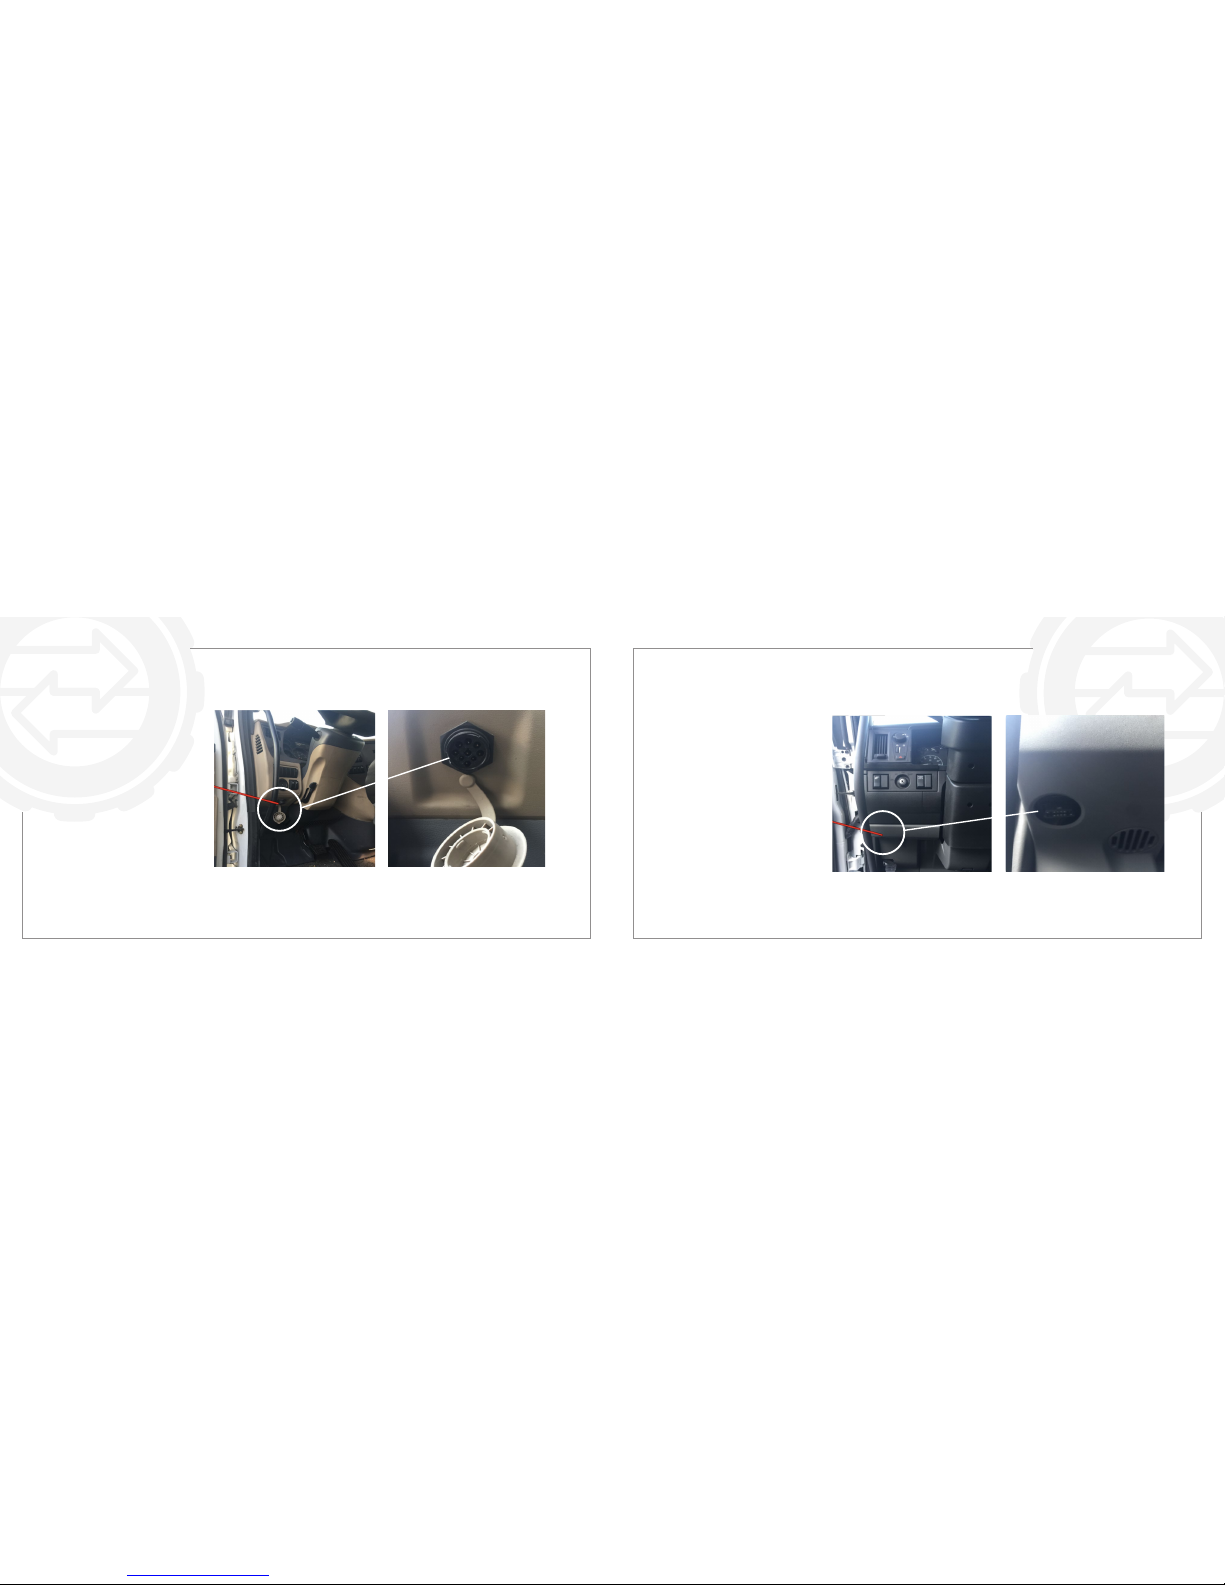
PETERBILT Truck
In a Peterbilt Truck the 9-pin
port will be located under the
dashboard, on the left side of
the steering wheel. Pull the
plastic cap off and connect
the male 9-pin connector
into the female 9-pin port.
Installing The
NCX ELD In A
VOLVO Truck
In Volvo or Mack Trucks the
8-pin port will be located under
the dashboard, on the left side
of the steering wheel. Connect
the male 8-pin connector into
the female 8-pin port. Some
newer Volvo and Mack trucks
use the OBDII Port.
Page 8
ELECTRONIC LOGGING DEVICE USER MANUAL
14 | National Carrier Exchange
Installing The NCX ELD
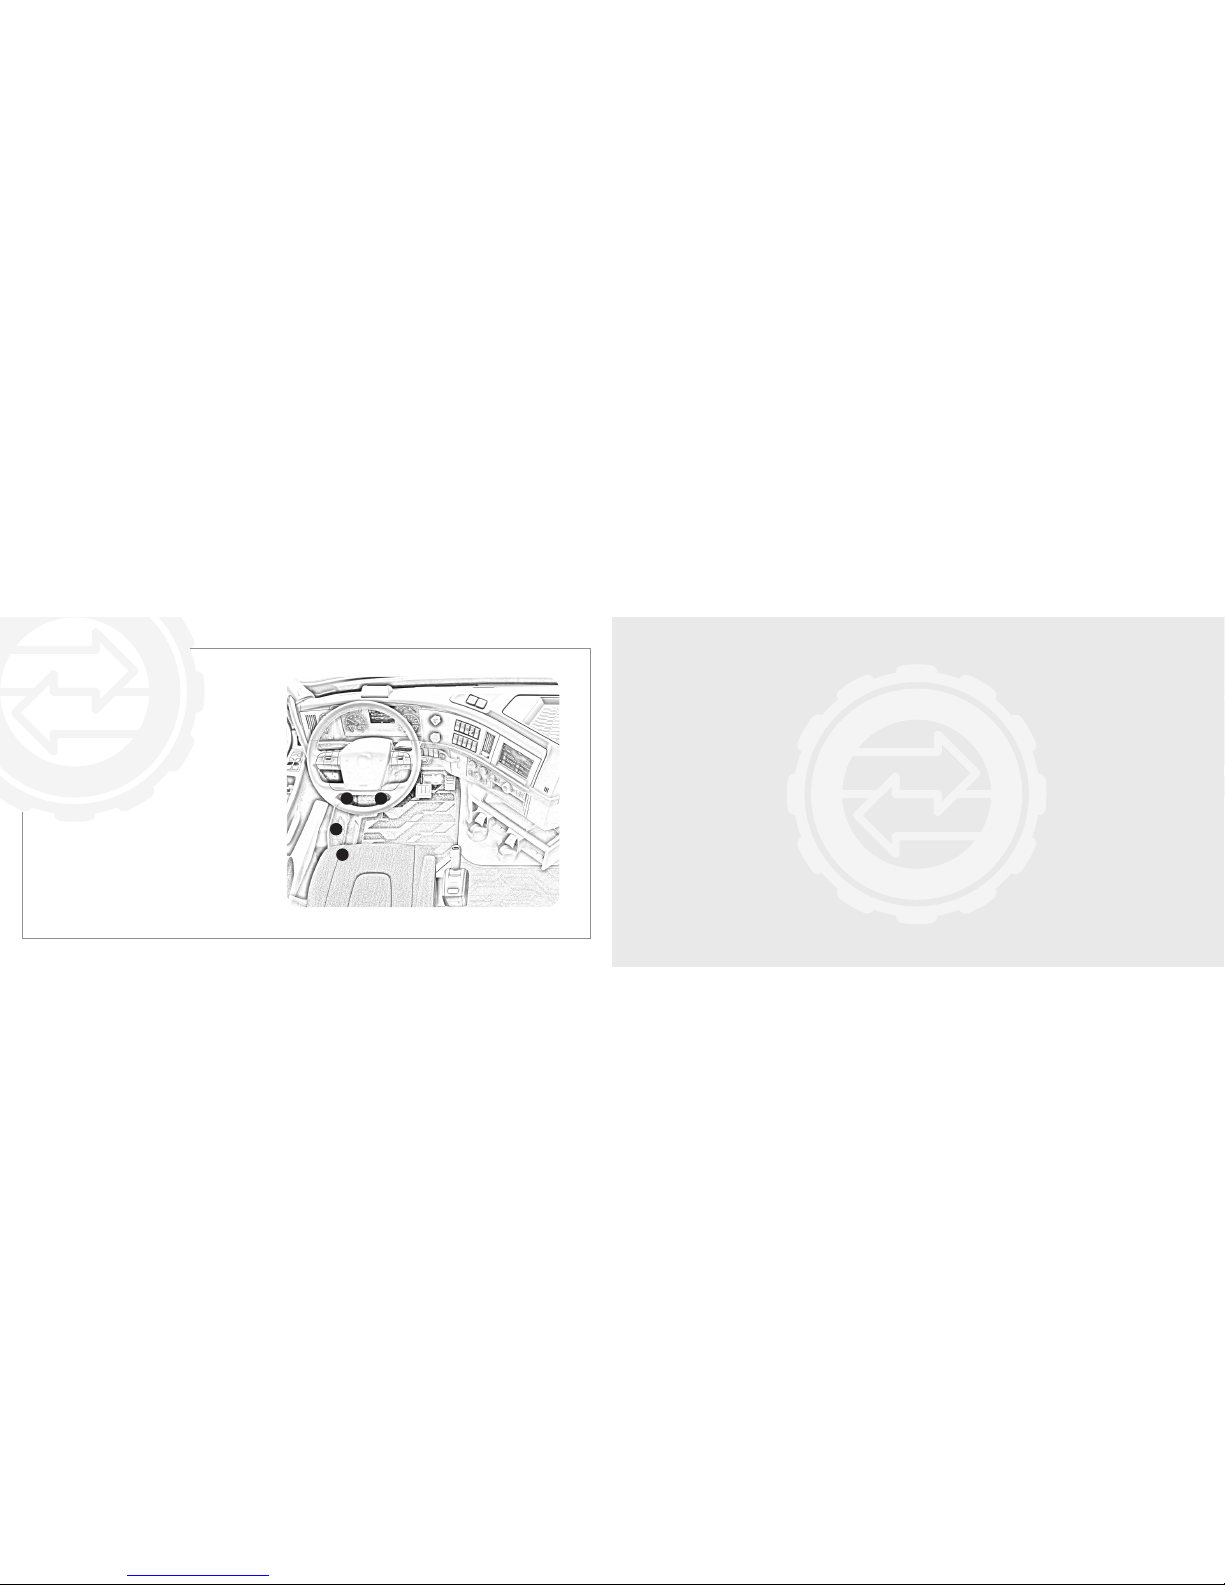
in Other Vehicles
There are a few places you can check
of the ports in your vehicle.
1. Below the driver’s seat
2. Near the drivers left kick panel
3. Underneath the left side of the dash
4. Underneath the steering wheel
Note: If your port is not in one of these areas. Please
check your Truck’s Service Manual or with a Mechanic
to nd the exact location of the Diagnostic Port in their
particular vehicle.
3 4
2
1
THE
NCX ELD
Page 9
ELECTRONIC LOGGING DEVICE USER MANUAL ELECTRONIC LOGGING DEVICE USER MANUAL
16 | National Carrier Exchange
National Carrier Exchange | 17
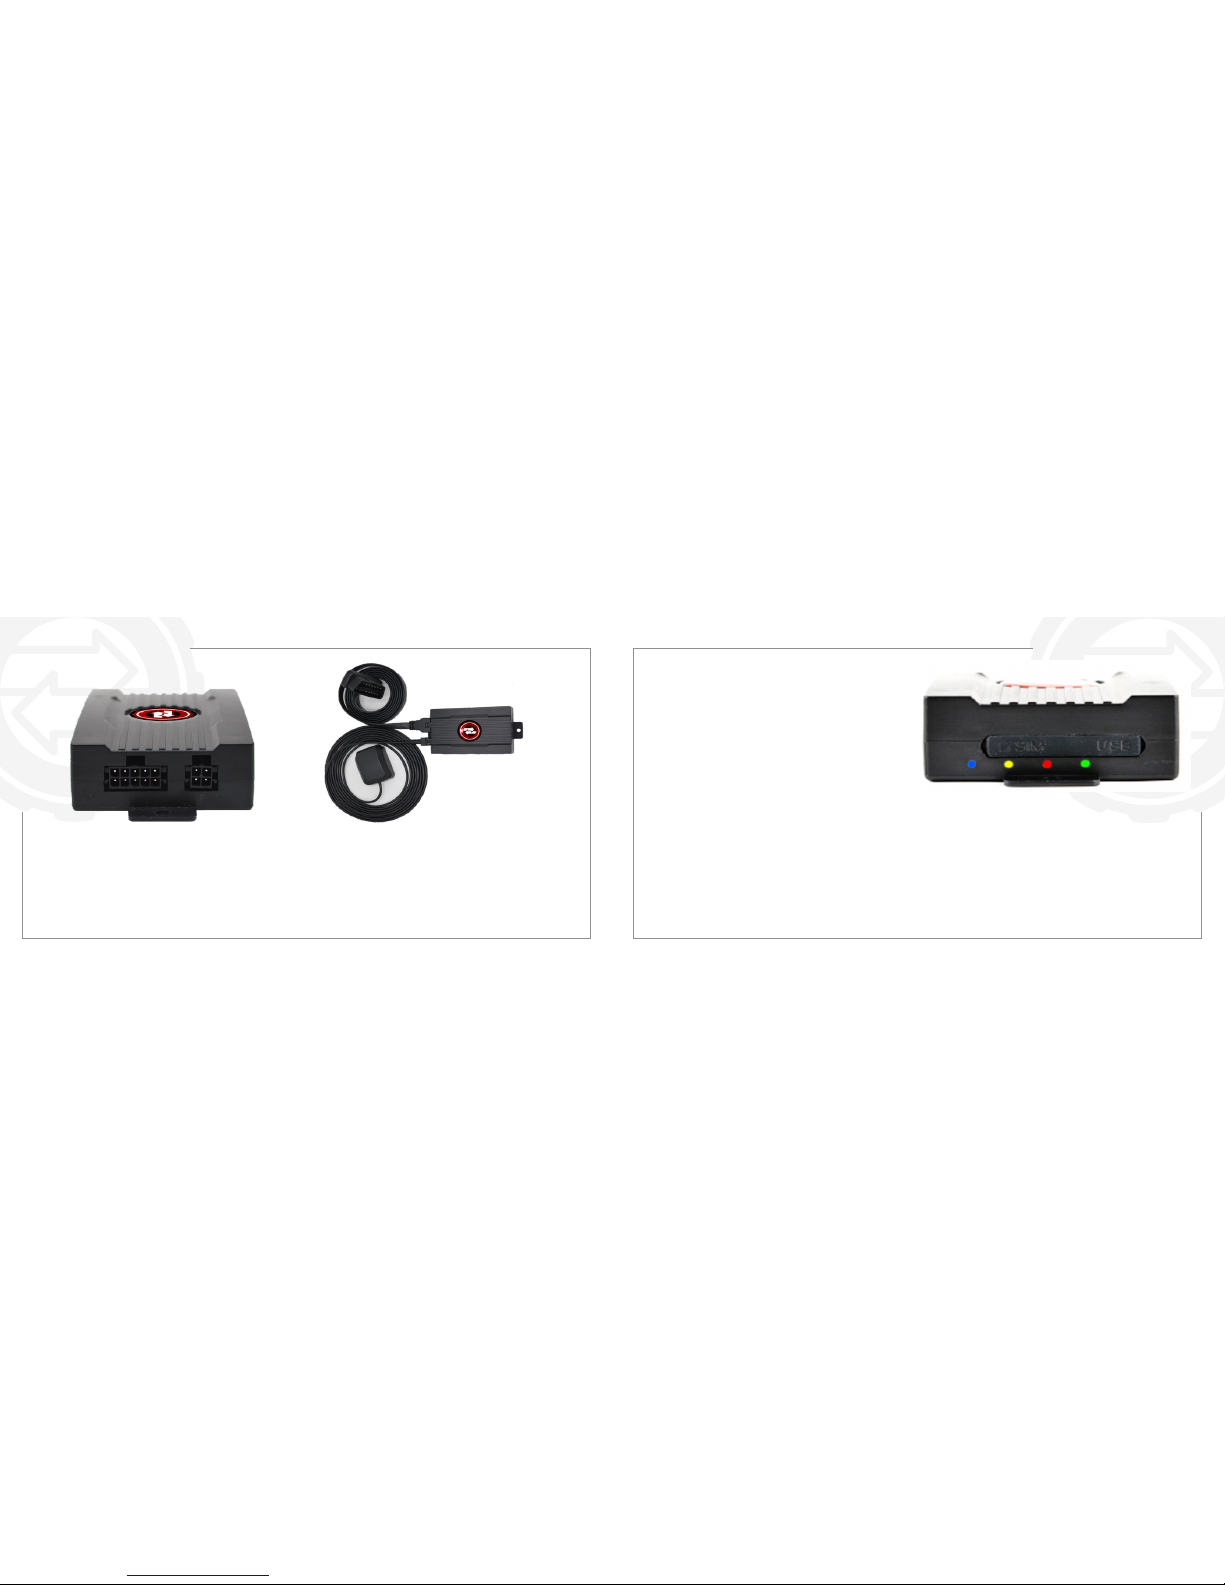
The NCX ELD connects to the Truck using a at ribbon cable.
One end of the cable goes into the 10-pin Locking Port on the
ELD, and the other connects to the Truck, usually through
one of the provided Adapters, but sometimes directly. The
4-pin Locking Port on the ELD connects to the External
GNSS Antenna.
After connecting the 10-pin locking ELD interface
connector and the 4-pin locking ELD interface
connector to the NCX ELD, the Device should look
like the picture above.
*The NCX Amplied GNSS Antenna must be placed on the dash of the vehicle closest to the windshield
10 & 4 pin locking interface ports 10 & 4 pin locking interface
ports connected to the ELD
The ELD Indicator lights
Blue Light
When your Mobile Device is connected to the NCX ELD
via Bluetooth, the Blue Light will be ON. When no
Bluetooth connection is present, the Blue Light will be OFF.
Yellow Light
When the NCX ELD is connected to a Cellular Data Network
with a SIM Card, the Yellow Light will be ON. When the NCX
ELD is searching for a Cellular Network, the Yellow Light will Flash. If no SIM Card is present, the Yellow Light will be OFF.
Red Light
When the NCX ELD has obtained a GNSS Satellite Position Lock, the Red Light will be ON. When trying to establish a Lock,
the Red Light will Flash. If no Lock can be obtained, the Red Light will be OFF.
Green Light
When the NCX ELD has established a connection to the Truck’s Engine Computer, the Green Light will be ON. While the
NCX ELD is starting up or is trying to connect, the Green Light will Flash. When no connection is present, the Green Light
will be OFF.
Page 10
ELECTRONIC LOGGING DEVICE USER MANUAL ELECTRONIC LOGGING DEVICE USER MANUAL
18 | National Carrier Exchange
National Carrier Exchange | 19
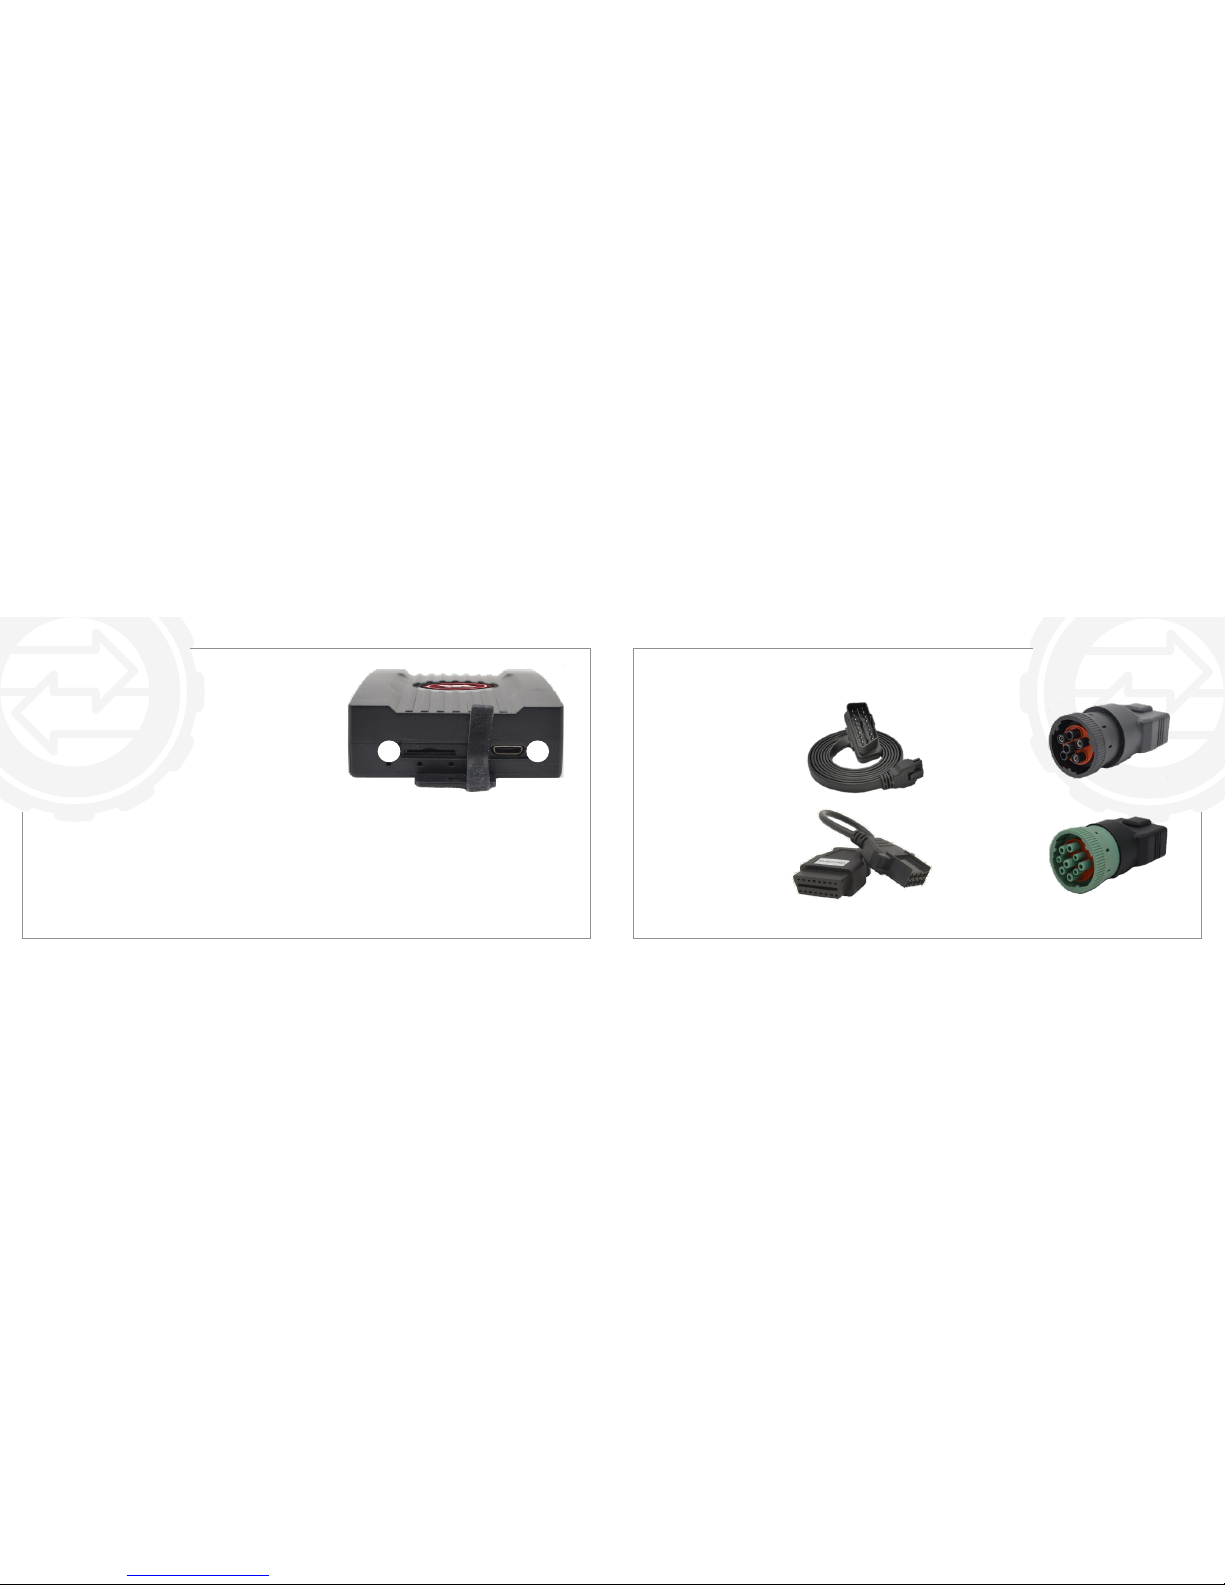
The SIM & USB Slots
A. The SIM Slot
This slot is only used if you are taking advantage of the
Telematics Functions of the NCX ELD. It can accept any
standard 3G Device Data Micro SIM Card from Cellular
Providers in North and South America, such as Verizon,
AT&T, Telus, Bell, Telcel, FLOW, Digicel, Movistar, Claro,
Vivo, Nextel, Vodafone, Avatel, Tigo, Comcel and many others.
The Cellular Data Chipset in the NCX ELD Supports both
Dual-Band UMTS/HSDPA (900/2100MHz) and Quad-Band
GSM/GPRS/EDGE(850/900/1800/1900MHz) Frequencies. Visit the HELP section of the NCX Platform
for more details on how to set up and use the Telematics functions of the NCX ELD.
B. The USB slot
The USB Port in the NCX ELD is currently only used by Technicians during troubleshooting and device
reprogramming. Future rmware updates released by NCX and downloaded to the Device will enable
additional functions with this port.
BA
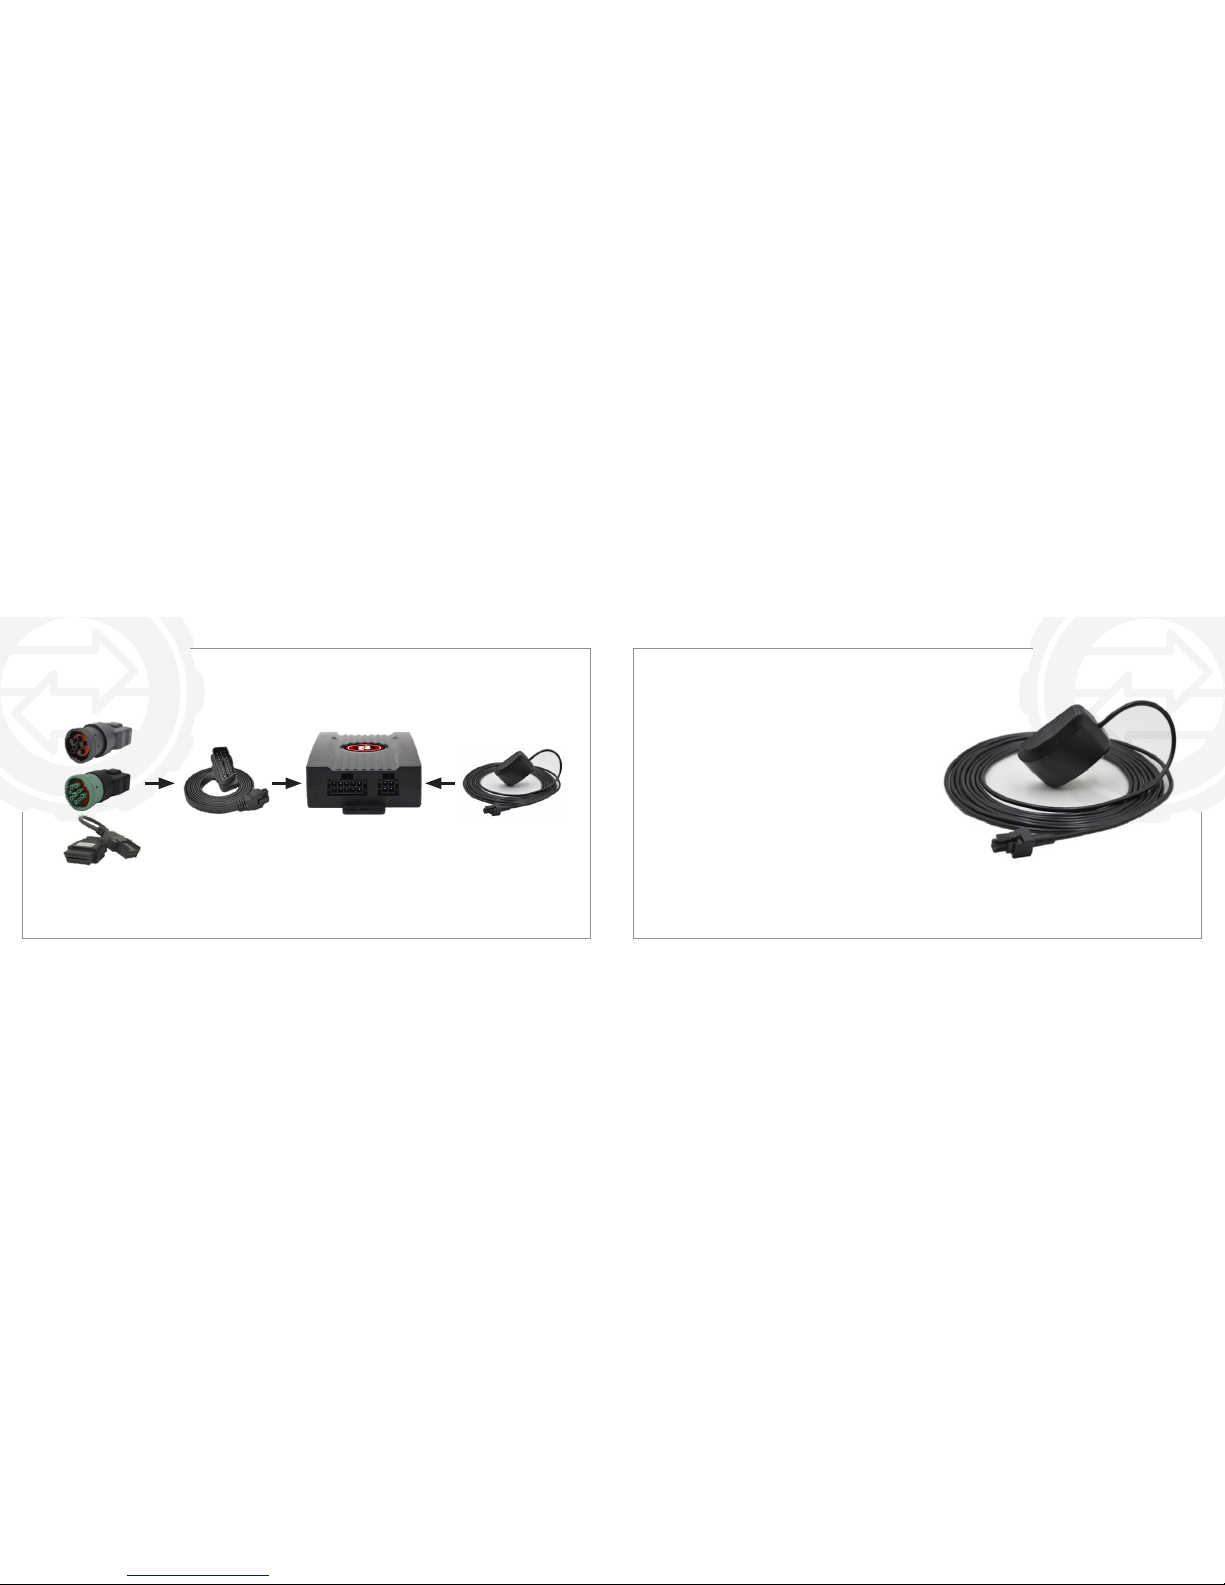
The NCX ELD: 9-pin, 8-pin, and 6-pin connectors
OBD connector
This is the 16-Pin OBD-II
Data Cable that connects
the NCX ELD to the Truck,
usually through one of the
Port Adapters to the right.
8-pin connector
This Adapter lets the
16-Pin NCX ELD Data
Cable connect to a Volvo
& Mack 8-pin Port.
6-pin connector
This Adapter lets
the 16-Pin NCX ELD
Data Cable connect
to a 6-pin J1708 Port.
9-pin connector
This Adapter lets the
16-Pin NCX ELD
Data Cable connect
to a 9-pin J1939 Port.
Page 11
ELECTRONIC LOGGING DEVICE USER MANUAL ELECTRONIC LOGGING DEVICE USER MANUAL
20 | National Carrier Exchange
National Carrier Exchange | 21
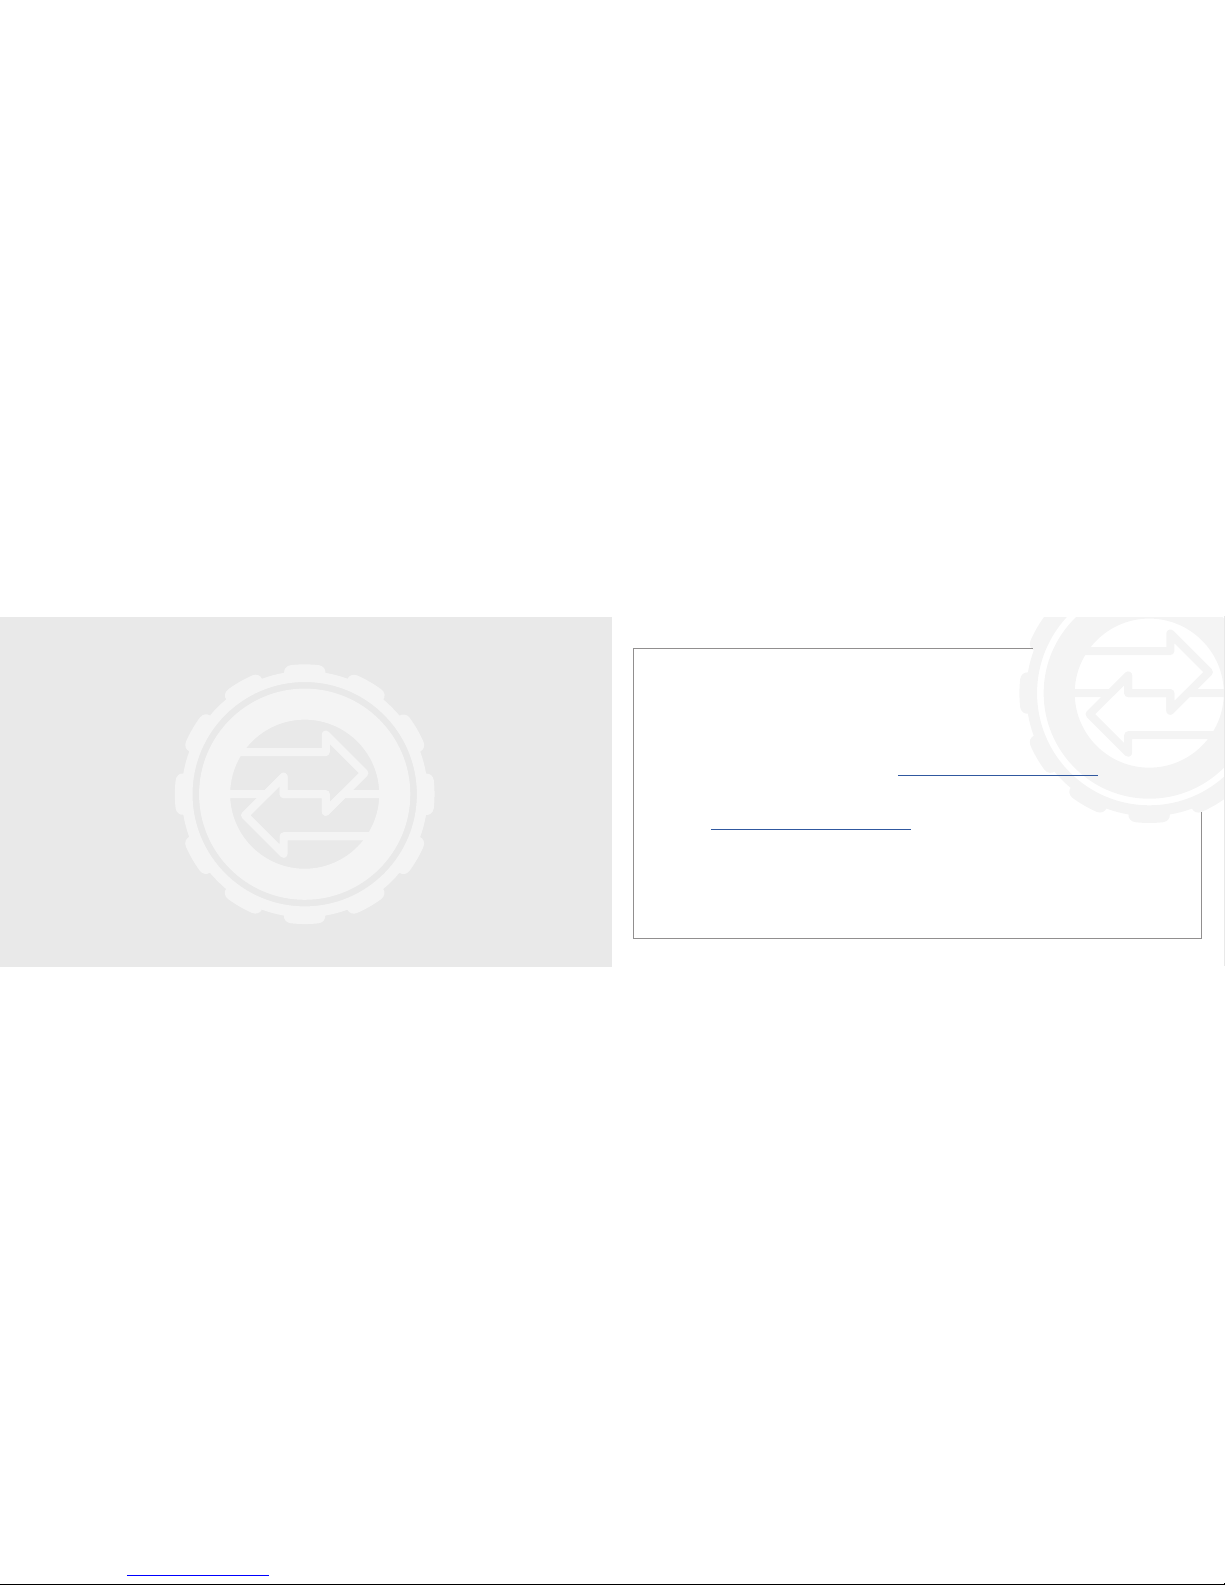
The NCX ELD: Wiring Diagram
The OBD II connector
will connect to the
NCX ELD Device.
The OBD II and GNSS
Antenna will connect to
the ELD Device.
The GNSS Antenna will
connect to the
ELD Device.
The Adapters will
connect to the OBD II
connector.
Antenna connector
The NCX Amplied GNSS Antenna enables the ELD
Device to track up to 72 Satellites at once across four
different GNSS Constellations (GPS, Galileo, GLONASS
and WAAS), providing highly reliable service even when
parts of the sky are blocked, such as by tall buildings in
cities, or while driving in canyons or hilly regions. The 4-pin
locking interface connector connects securely into the
ELD Device, and the Antenna should be positioned on the
dashboard, close to the windshield, with the round surface
facing upwards, to have the best possible “view” of the sky.
Use the provided Velcro Dots to hold the Antenna in place
on the Dashboard, and the self-adhesive Cable Clips to
neatly route the Antenna cable out of the way.
Page 12
ELECTRONIC LOGGING DEVICE USER MANUAL
National Carrier Exchange | 23
INSTALLING THE NCX
APP ON YOUR MOBILE
DEVICE - STEP 2
Creating a New NCX Dispatcher Account
• If you are a Company Driver, in order to use the NCX Mobile App and NCX ELD, you must be invited by
your Dispatcher to join their Fleet through the NCX Web Site
• If you are an Independent Owner Operator and want to use the NCX ELD, you need to rst create a
free Carrier Account on the NCX Web Site (at https://www.NationalCarrierExchange.com) and then
invite yourself (as a Driver) to join your Fleet
To create a free Carrier Account on the NCX Web Site, visit the web site on a Full-size Tablet, Laptop or
Desktop, at https://www.NationalCarrierExchange.com and tap or click on the SIGN UP button at the
top-right corner of any page. Once you have entered the needed information on the menu that follows,
your NCX Carrier Account will be instantly created. Visit the HELP Menu on the left side of the page to
view Dispatcher Tutorials and see how to invite your Drivers to join your Fleet, using either an SMS
Text Message to their Cell Phone or by E-Mail.
Page 13
ELECTRONIC LOGGING DEVICE USER MANUAL ELECTRONIC LOGGING DEVICE USER MANUAL
24 | National Carrier Exchange
National Carrier Exchange | 25
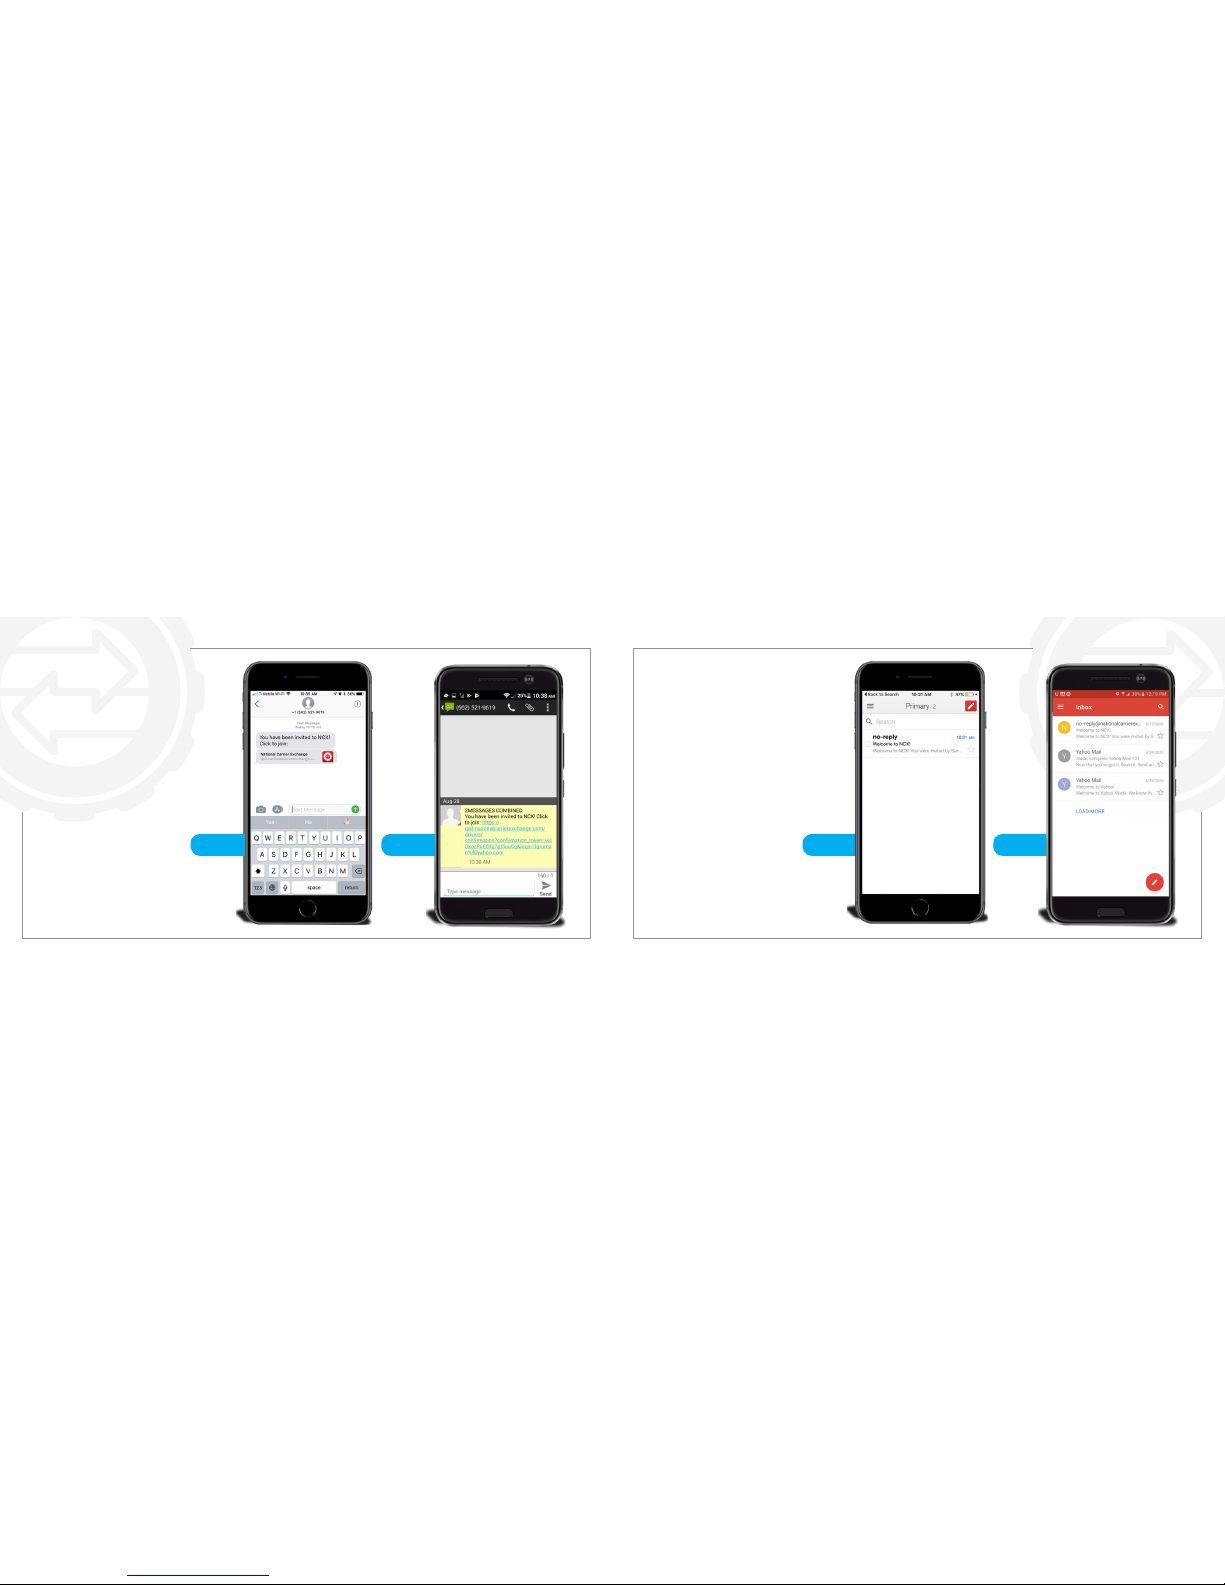
Creating a New NCX
Dispatcher Account: If
invited by SMS Text Message
iOS
For iOS tap the NATIONAL
CARRIER EXCHANGE LINK
to set your password.
Android
For Android tap the
BLUE LINK to set your
password.
iOS Android iOS Android
Creating a New NCX
Dispatcher Account:
If invited by Email
iOS & Android
Go into your email and
open the email with
the subject line
“Welcome to NCX!”
Page 14
ELECTRONIC LOGGING DEVICE USER MANUAL ELECTRONIC LOGGING DEVICE USER MANUAL
26 | National Carrier Exchange
National Carrier Exchange | 27
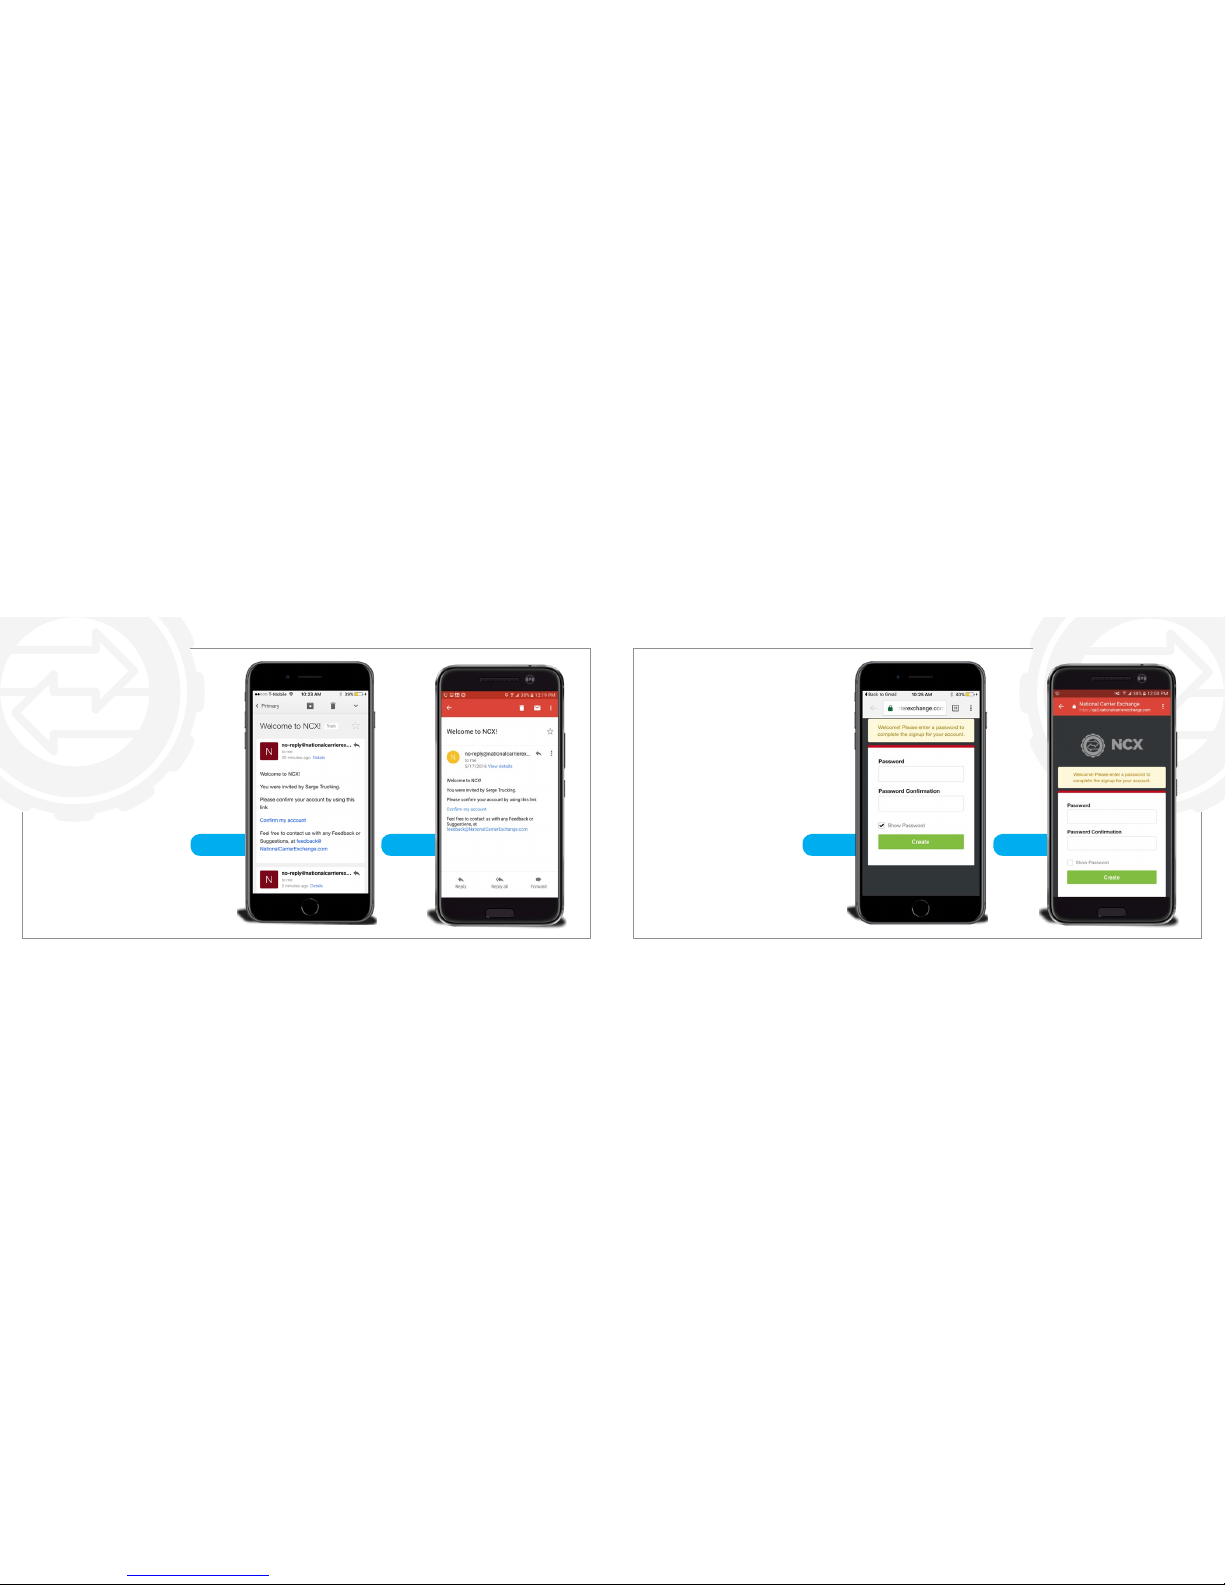
iOS Android
Creating a New NCX
Dispatcher Account:
If invited by Email -
Step 2
iOS & Android
Tap the blue CONFIRM MY
ACCOUNT link to set your
password.
iOS Android
Creating a New NCX
Dispatcher Account:
Creating your password
iOS & Android
Enter a password it must
at least 8 characters then
enter it again to conrm
the password. Tap the
green CREATE button
when you’re Done.
Page 15
ELECTRONIC LOGGING DEVICE USER MANUAL ELECTRONIC LOGGING DEVICE USER MANUAL
28 | National Carrier Exchange
National Carrier Exchange | 29
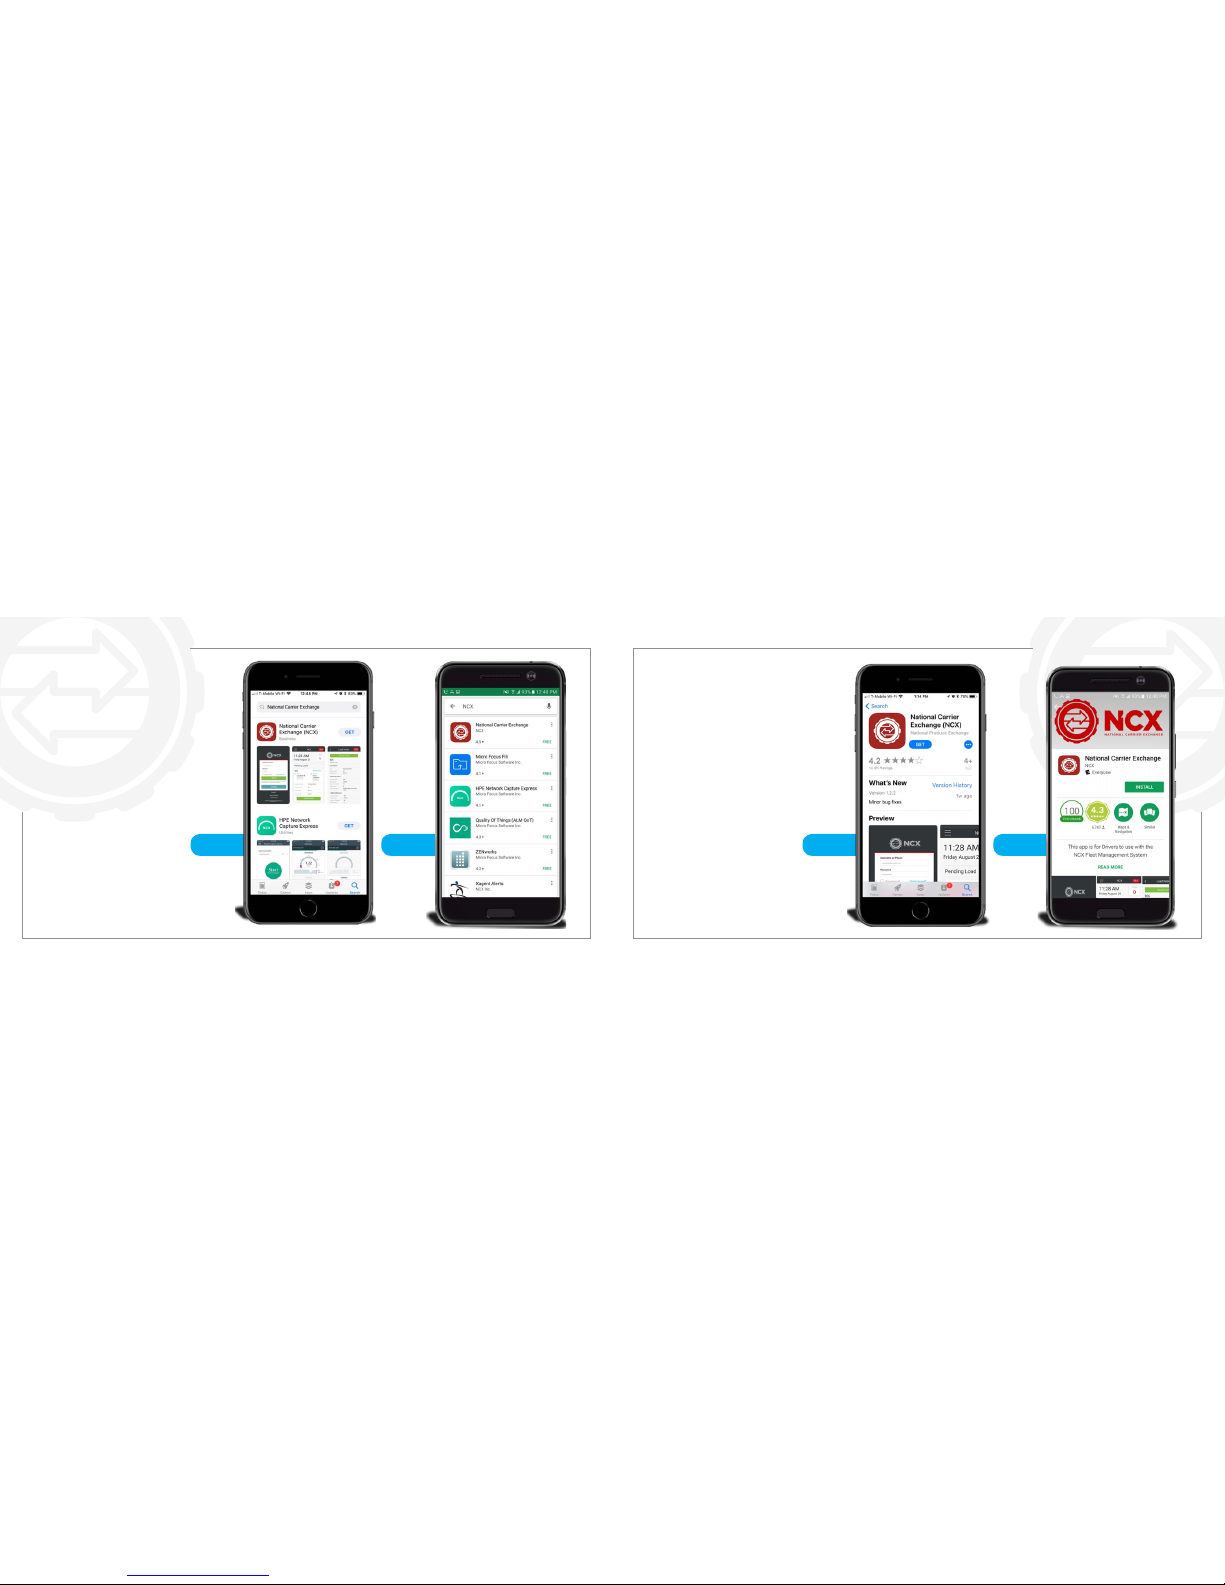
iOS Android
Installing the NCX
App: If you choose to
install the NCX App
at another time
iOS
In iOS go to the App Store
and search National Carrier
Exchange tap the red NCX
logo to open the App details.
Android
In Android go to the Google
Play Storeand search National
Carrier Exchange tap the red
NCX logo to open the App details
iOS Android
Installing the
NCX App
iOS
This is the App Store National
Carrier Exchange App details
tap GET to install the App.
Android
This is the Google Play
Store National Carrier
Exchange App details
tap the green install to
install the App.
Page 16
ELECTRONIC LOGGING DEVICE USER MANUAL
30 | National Carrier Exchange
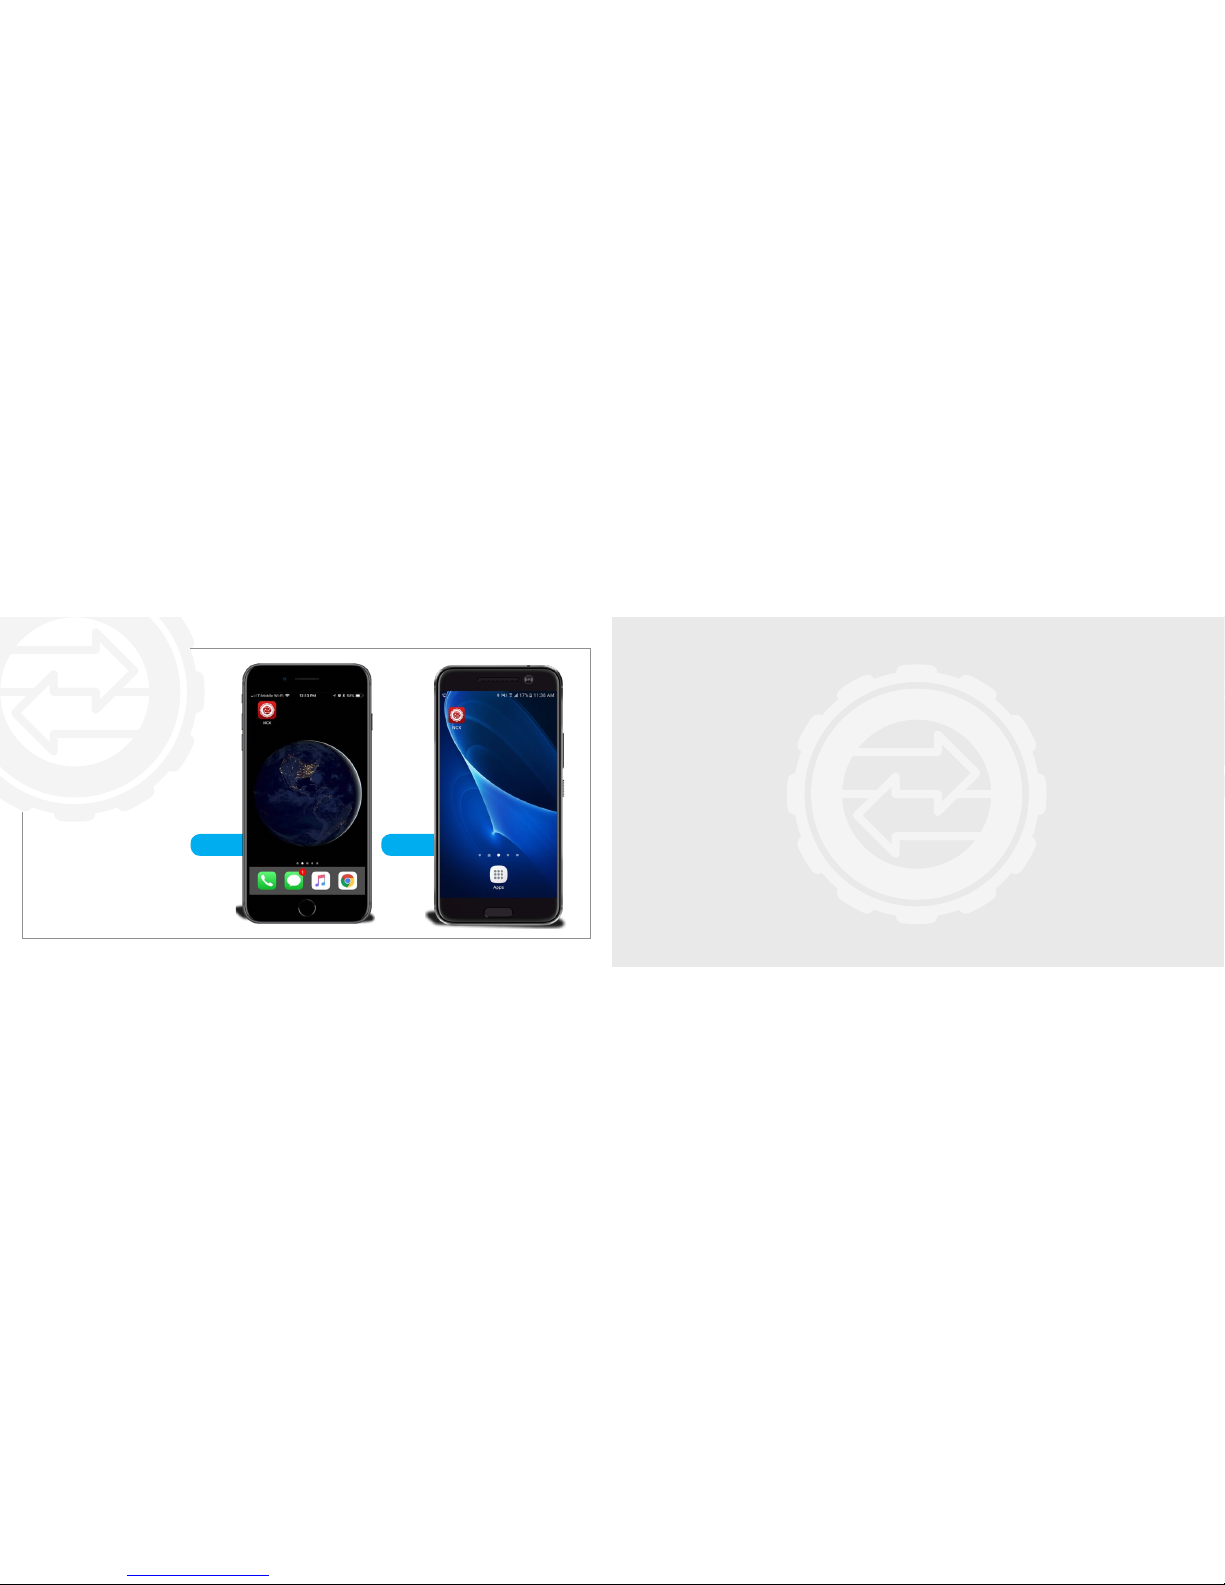
iOS Android
Opening the
NCX App
iOS
On iOS the NCX App will be
added to the home screen
tap the red NCX logo to
open the NCX App
Android
On Android go to your
apps look for and
tap the red NCX logo
to open the NCX App
CONFIGURING
THE NCX APP
Page 17
ELECTRONIC LOGGING DEVICE USER MANUAL ELECTRONIC LOGGING DEVICE USER MANUAL
32 | National Carrier Exchange
National Carrier Exchange | 33
Logging into the NCX ELD App
There are two parts to the NCX Mobile App. The rst part is the Loads Management Layer. This Layer is where drivers receive
loads from a dispatcher and report on their delivery progress. The second part is the Electronic Logging Device (ELD) Layer,
which is where drivers electronically log their hours of duty / RODS. The NCX Mobile App is built to give the ability for the driver to quickly jump from the Load Management Layer into the Electronic Loging Device (ELD) Layer and back again. When logging into the NCX Mobile App for the rst time, the user will be logged into the Loads Management Layer. They can immediately
switch between the two layers (Loads or ELD) by pushing the red “ELD” or “LOADS” button on the top right of every screen.
About the Load Management Layer
The Load Management Layer of the NCX Mobile App is used by drivers to receive load information directly from a dispatcher
(electronic dispatch), avoiding the need for Check Calls or to copy down load details. If you are working with a Dispatcher, and
receiving load details through this system, you will be able to send in Status Updates, such as “En-Route to the Pick-up Location”,
“Checked-in at the Pick-up Location”, “Picked-up Cargo”, etc. The nal step in the delivery process is when you use the built-in
Document Scanner in the NCX Mobile App to scan all of the pages of the Signed Bill of Lading.
Note: You can always nd the Load management Driver Tutorials on the login page as well as the Help page located in the Side
Menu of the NCX Mobile App.
About the Electronic Logging Device (ELD) Layer
The ELD layer of the NCX Mobile App is used to electronically log all duty hours / RODS. Drivers begin to consume their daily
allowed On-Duty Hours when they change their Mode to DRIVING (the vehicle has to be stopped to change the Mode).
Drivers set their Mode to DRIVING when the vehicle is going to be in motion. A Driver can only drive 11 hours within any
14 hour period. If the vehicle begins moving faster than 5 MPH but the Driver has not changed their Mode to ON DUTY /
DRIVING (i.e., they are in ON DUTY / NOT DRIVING Mode), the NCX Mobile App will automatically change their Mode to
DRIVING.
ON DUTY / NOT DRIVING Mode is used when the Driver is on the clock, but not driving. If the driver is in ON DUTY /
DRIVING Mode and the vehicle remains at a complete stop for 5 minutes, the App will notify the driver if they would like to
change their Mode to ON DUTY / NOT DRIVING. If they don’t respond to that notication within 1 minute and the vehicle still
remains motionless, the App will automatically change their Mode to ON DUTY / NOT DRIVING.
SLEEPER BERTH Mode for 10 hours you can be subject to a ne if the driver attempts to change his status before the 10
hours.
Page 18
ELECTRONIC LOGGING DEVICE USER MANUAL ELECTRONIC LOGGING DEVICE USER MANUAL
34 | National Carrier Exchange
National Carrier Exchange | 35
Logging into
the NCX
ELD App
The NCX
ELD Dashboard
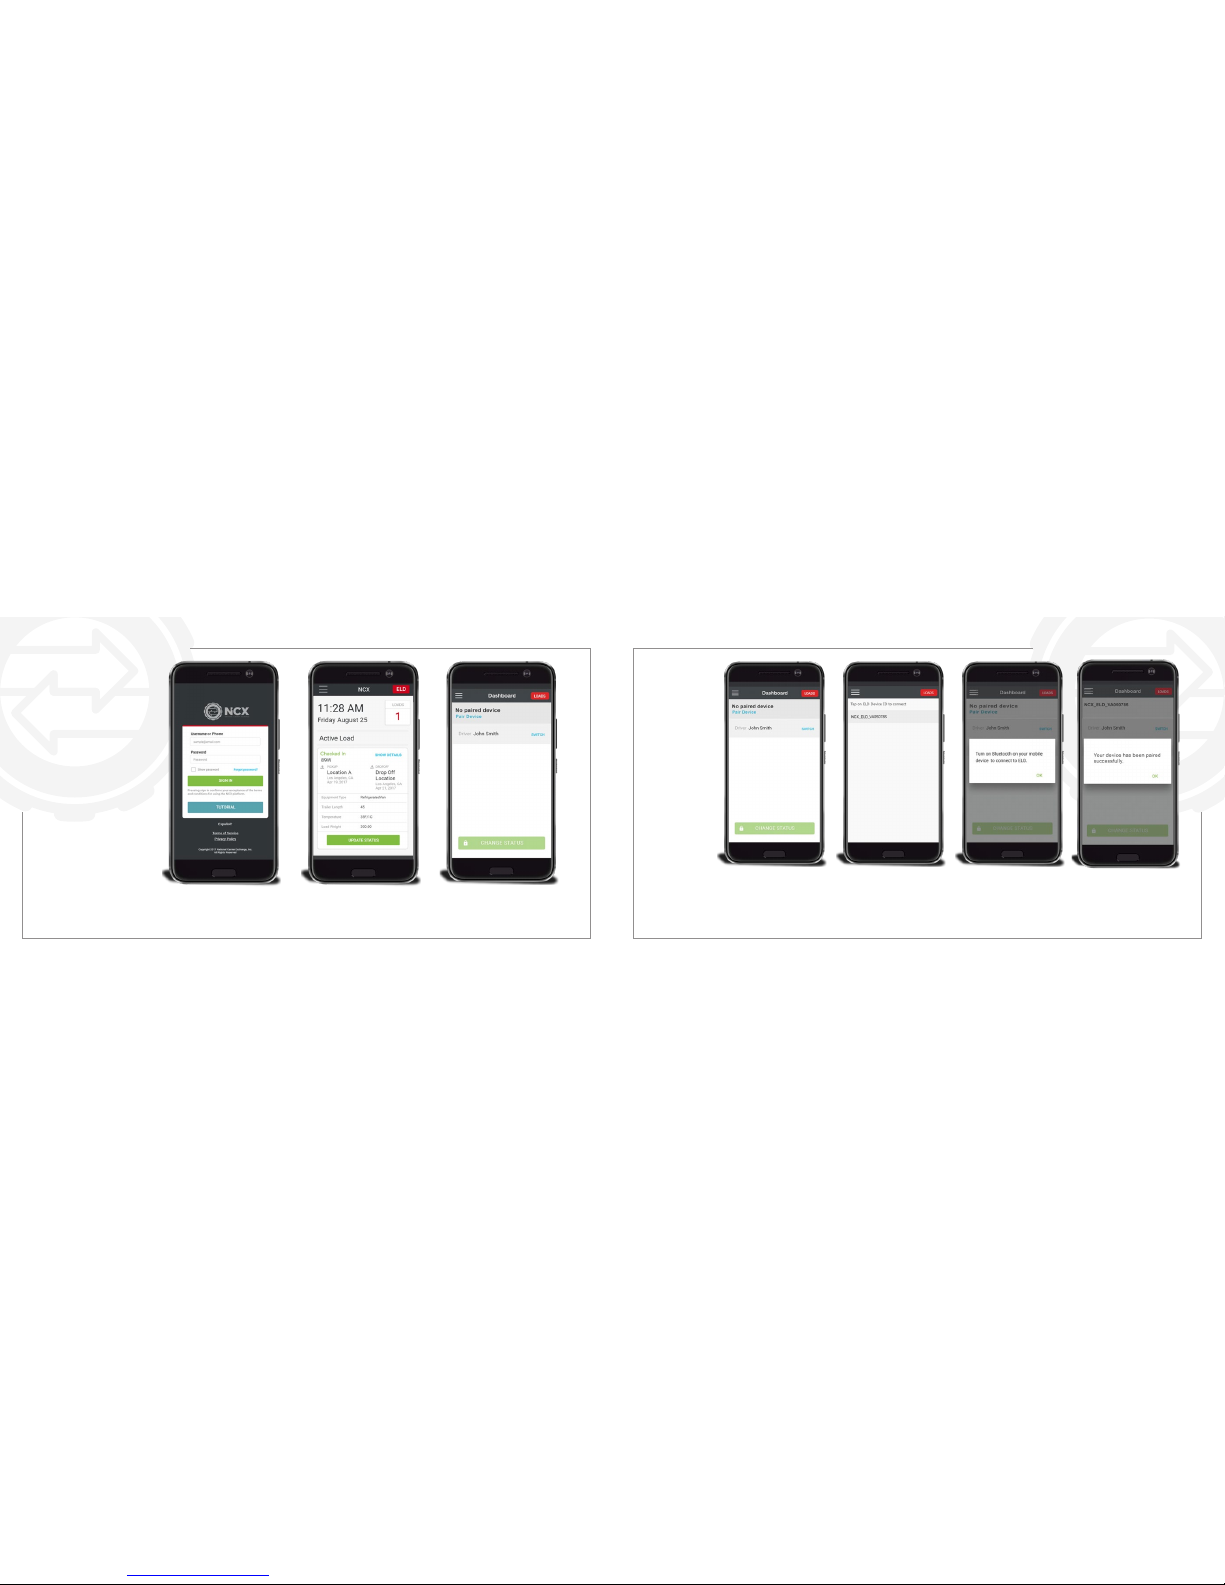
• To log in enter a valid
username and password
then tap SIGN IN to log
into the NCX mobile App.
• Tap the red ELD button
that will take you to the
ELD dashboard.
• On the dashboard you can
tap PAIR DEVICE button
to pair theELD Device.
Pairing
an ELD
Device
• On the Dashboard
you can tap PAIR
DEVICE button to
pair The ELD Device.
• Select your ELD to
begin the process of
connecting your ELD
Device.
• If no devices are found
you’ll be asked to turn
on your phones
Bluetooth tap OK
when you have.
• When paired a
message will show
that your device was
paired successfully
tap OK to close.
Page 19
ELECTRONIC LOGGING DEVICE USER MANUAL
36 | National Carrier Exchange
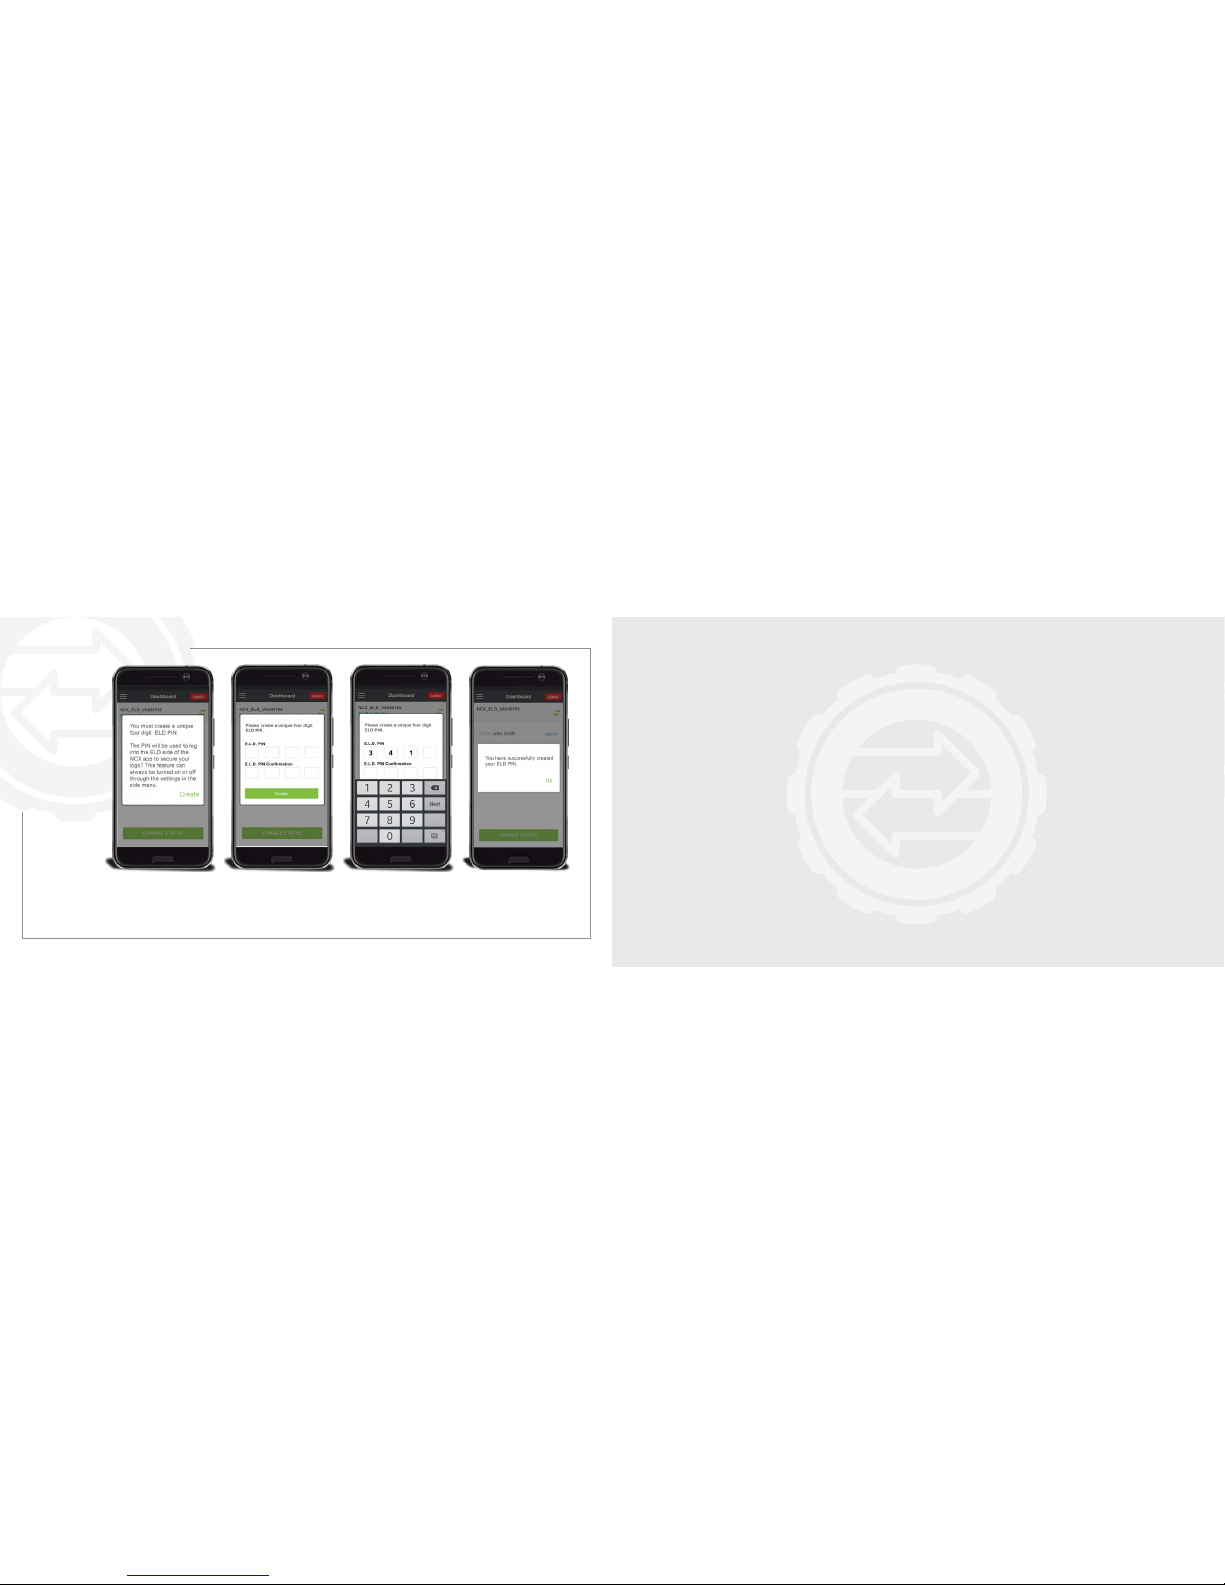
• You’ll receive a pop-up
asking you to create an
ELD PIN tap CREATE
to begin the process.
• You must create a
unique four digit ELD
PIN. This will be used to
enter the ELD portion
of the NCX app.
• Tap the rst empty
square under ELD
PIN to open a number
pad, enter a unique
four digit PIN.
• This shows your PIN has
been created successfully.
Tapping OK will nish the
ELD PIN creation & go to
the Dashboard.
Creating
an ELD
PIN
Note: NCX
advises, always
use a PIN code.
CHANGING
YOUR STATUS
Page 20
ELECTRONIC LOGGING DEVICE USER MANUAL ELECTRONIC LOGGING DEVICE USER MANUAL
38 | National Carrier Exchange
National Carrier Exchange | 39
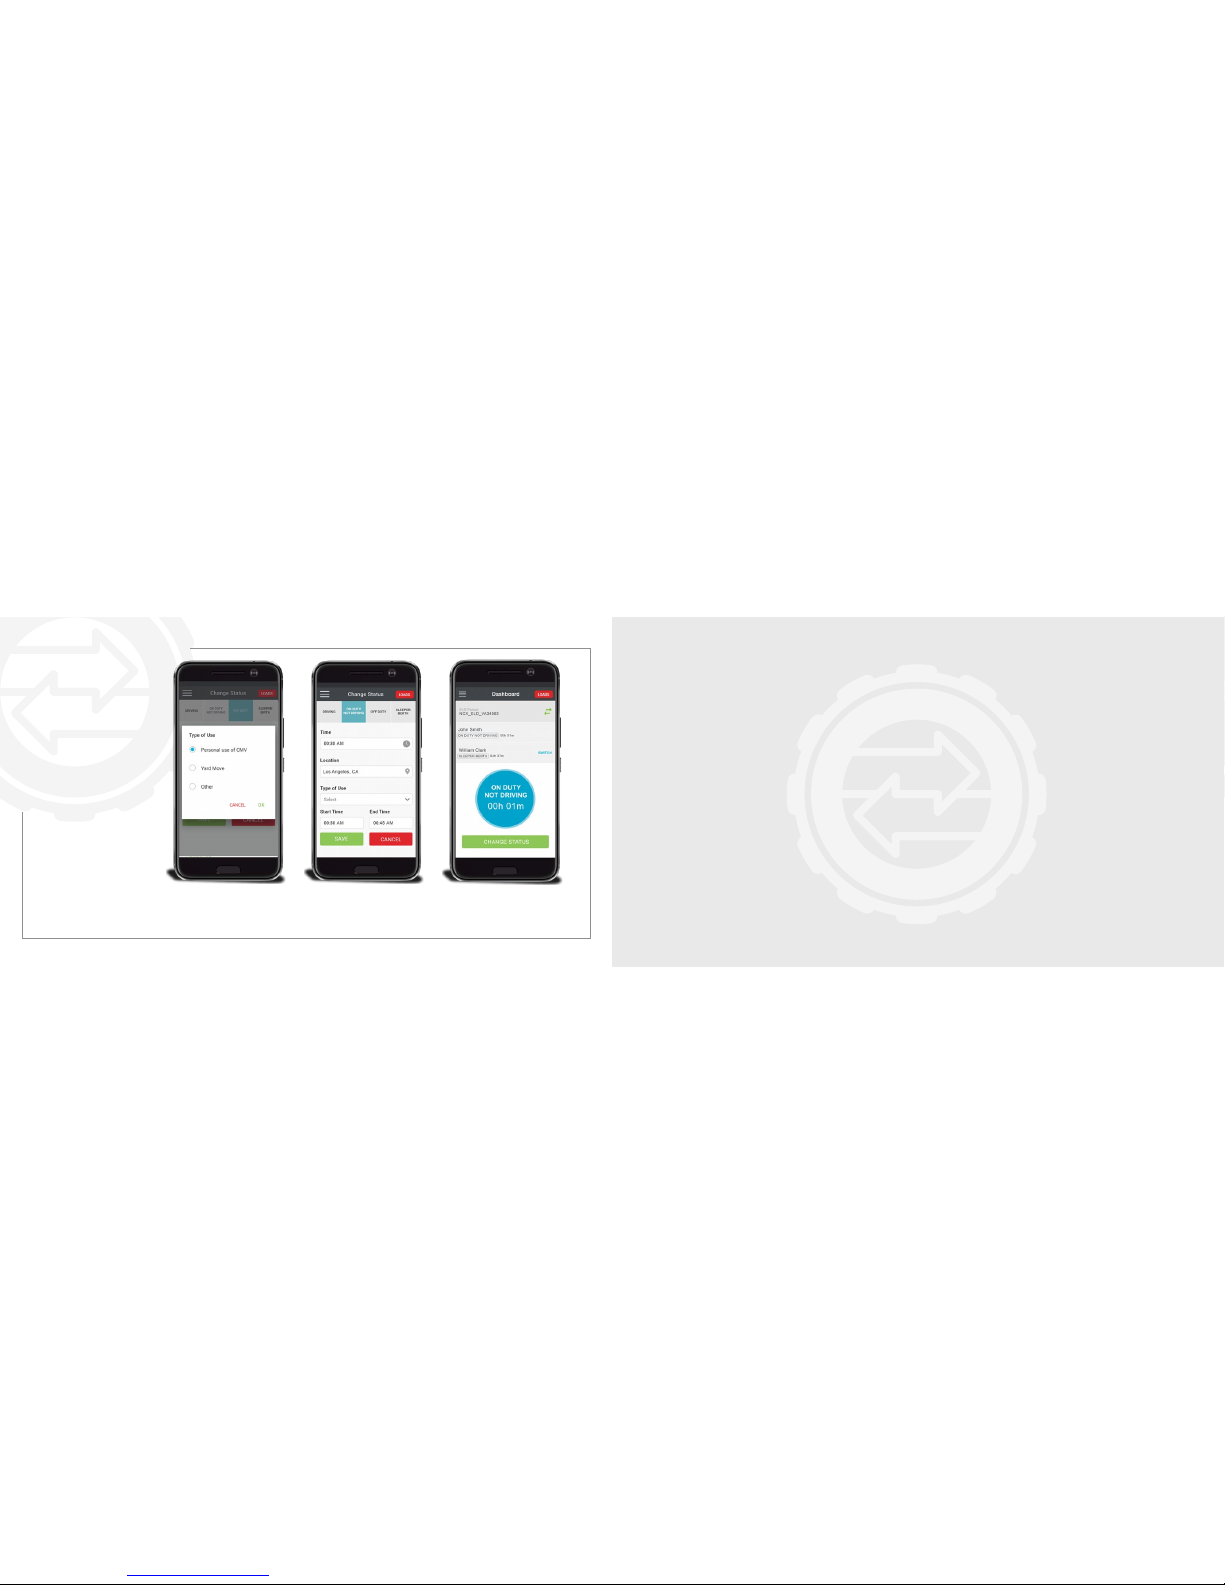
Changing
your Status
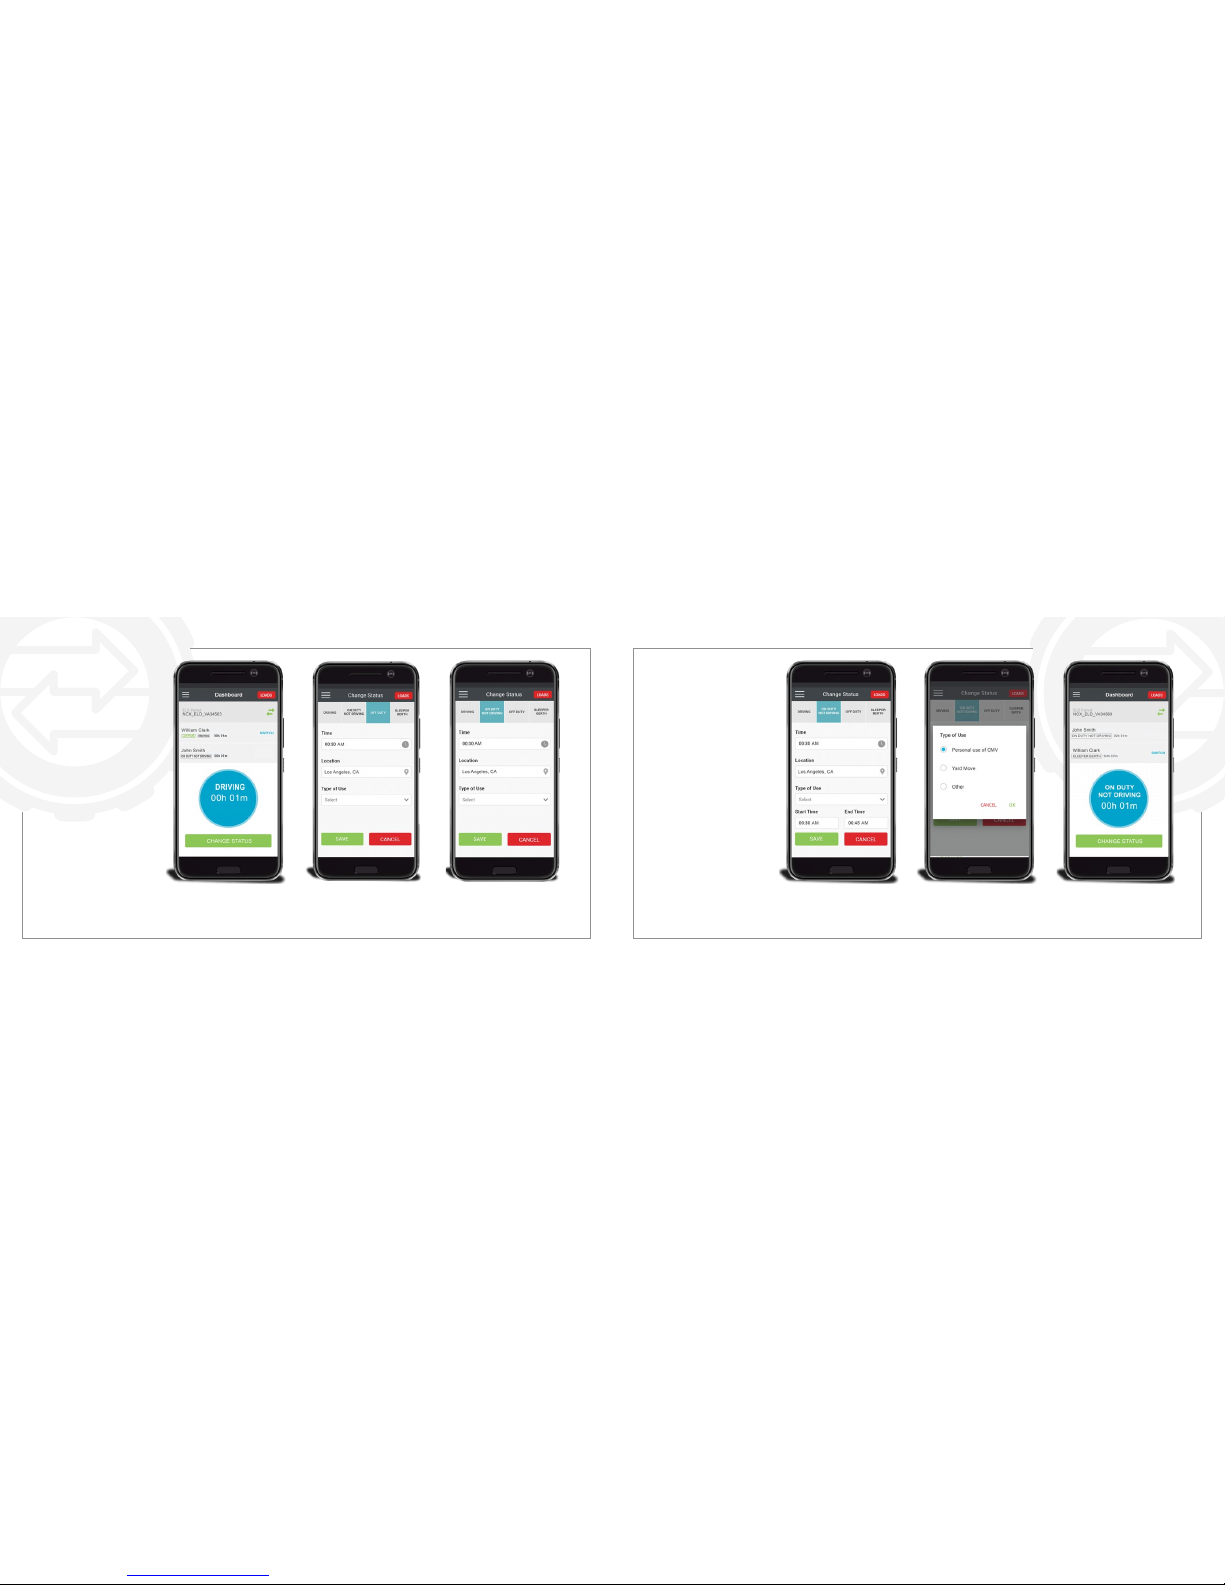
• Just tap the green
CHANGE STATUS button
to change the status.
• *NOTE* The default
setting when logging in
and changing the status
will be OFF DUTY
• Select the status that you want
to change OFF DUTY to, you
can select from DRIVING, ON
DUTY, or SLEEPER BERTH.
Changing
your Status
Selecting Type
of Use and
End Time
• The clock will show you the
time, the location bubble will
show the location, tap the
down arrow to select the
Type of Use.
• Tap the circle to select
the Type of Use. Tap OK
when you’re done.
• The Dashboard now reects
ON DUTY NOT DRIVING to
change the status again tap the
green Change Status button.
Page 21
ELECTRONIC LOGGING DEVICE USER MANUAL
40 | National Carrier Exchange
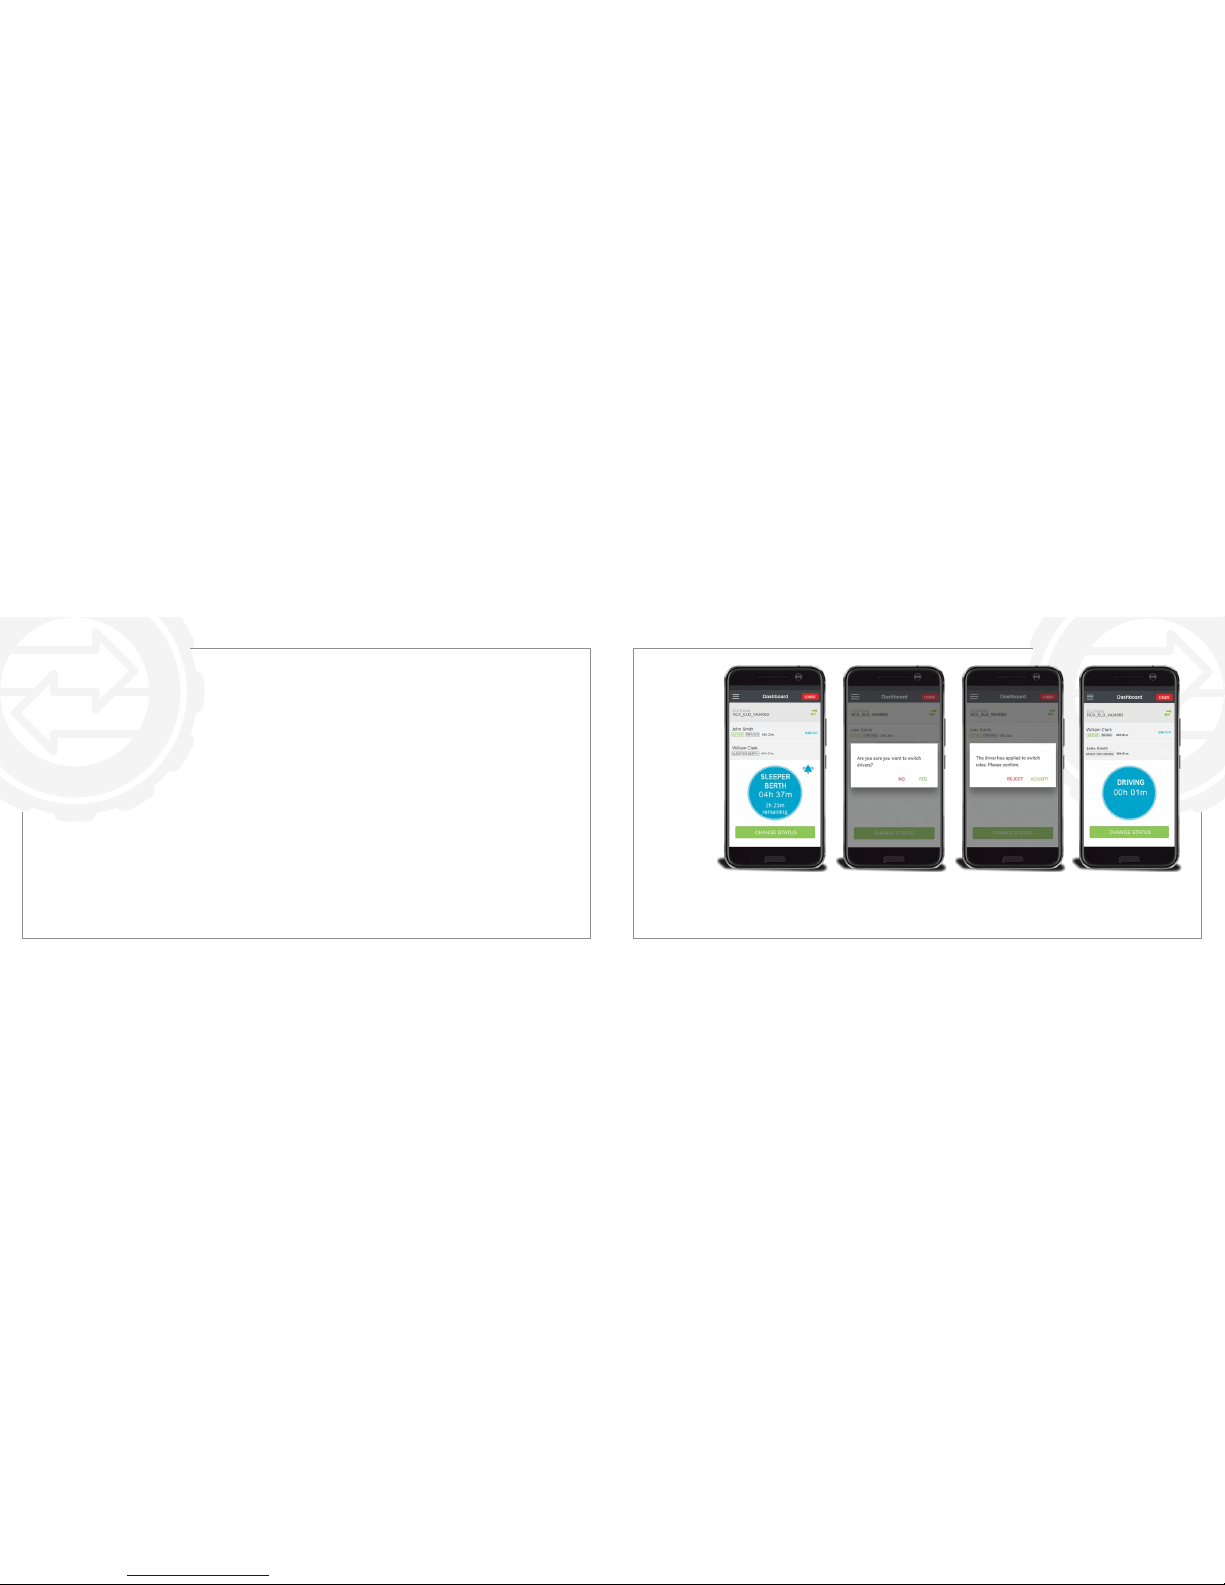
Changing
your Status
Saving your
Changed
Status
• Once you have entered the
Type of Use. You’ll be able to
Save the Status.
• Tap the green SAVE
button to save
the log.
• The Dashboard now reects
ON DUTY NOT DRIVING to
change the status again tap the
green CHANGE STATUS button.
TEAM DRIVES
Page 22
ELECTRONIC LOGGING DEVICE USER MANUAL ELECTRONIC LOGGING DEVICE USER MANUAL
42 | National Carrier Exchange
National Carrier Exchange | 43
Team Drives
As each Driver connects via Bluetooth to the ELD Device, the ELD Device registers that Driver as being present in its Logs.
As each connected Mobile Device receives the other Drivers’ details, it should add them to the roster of present Drivers.
Each Driver will see the current ON-DUTY/DRIVING Driver (which we call the ACTIVE DRIVER) listed at the top, prominently,
along with a countdown timer showing the amount of time they have remaining in their maximum allowed Hours of Service.
Only one Driver can be in On-Duty/Driving Mode at a time. All other present Drivers running the NCX Mobile App will be listed
below the Active Driver (beginning with the Driver whose App is displaying the list), along with each Driver’s current Status and
their Countdown Timer (On-Duty Time Remaining/Driving Time Remaining) or Cool-Down Timer (Remaining Hours of Rest
Required before they can Drive again) Timers.
An Audible Alarm will be in the dashboard of the App so that the Driver can activate to alert them when their Sleeper Berth
rest period has ended and they are eligible to drive again. Warnings of approaching maximum driving time limits will be issued,
at 2-Hours, 1-Hour, 30-Minutes, 15-Minutes, 5-Minutes and Overtime Violation notices.
While the ACTIVE DRIVER can always change their Status out of DRIVING Mode (such as to OFF DUTY, ON-DUTY/NOT
DRIVING, SLEEPER BERTH, etc), each other present (and connected) Driver also has the power (when the vehicle is (a)not
moving or (b) the engine is off) to request to “promote” themselves to the ACTIVE DRIVER by selecting the SWITCH command
on the Active Driver’s line on the Dashboard. When this happens, the ActiveDriver (who isin Status ON-DUTY / DRIVING) is
alerted by the NCX Mobile App that “Driver<NAME> is requesting to Switch into the DRIVING Position”. If the Active Driver
agrees, their own personal Status is demoted to ON-DUTY / NOT DRIVING, the other Driver’s Status is promoted to ONDUTY / DRIVING, each is notied with a pop-up dialog, and the driver names are reshufed in the Present Driver List (i.e.,
the Team Drivers present in the Cab)
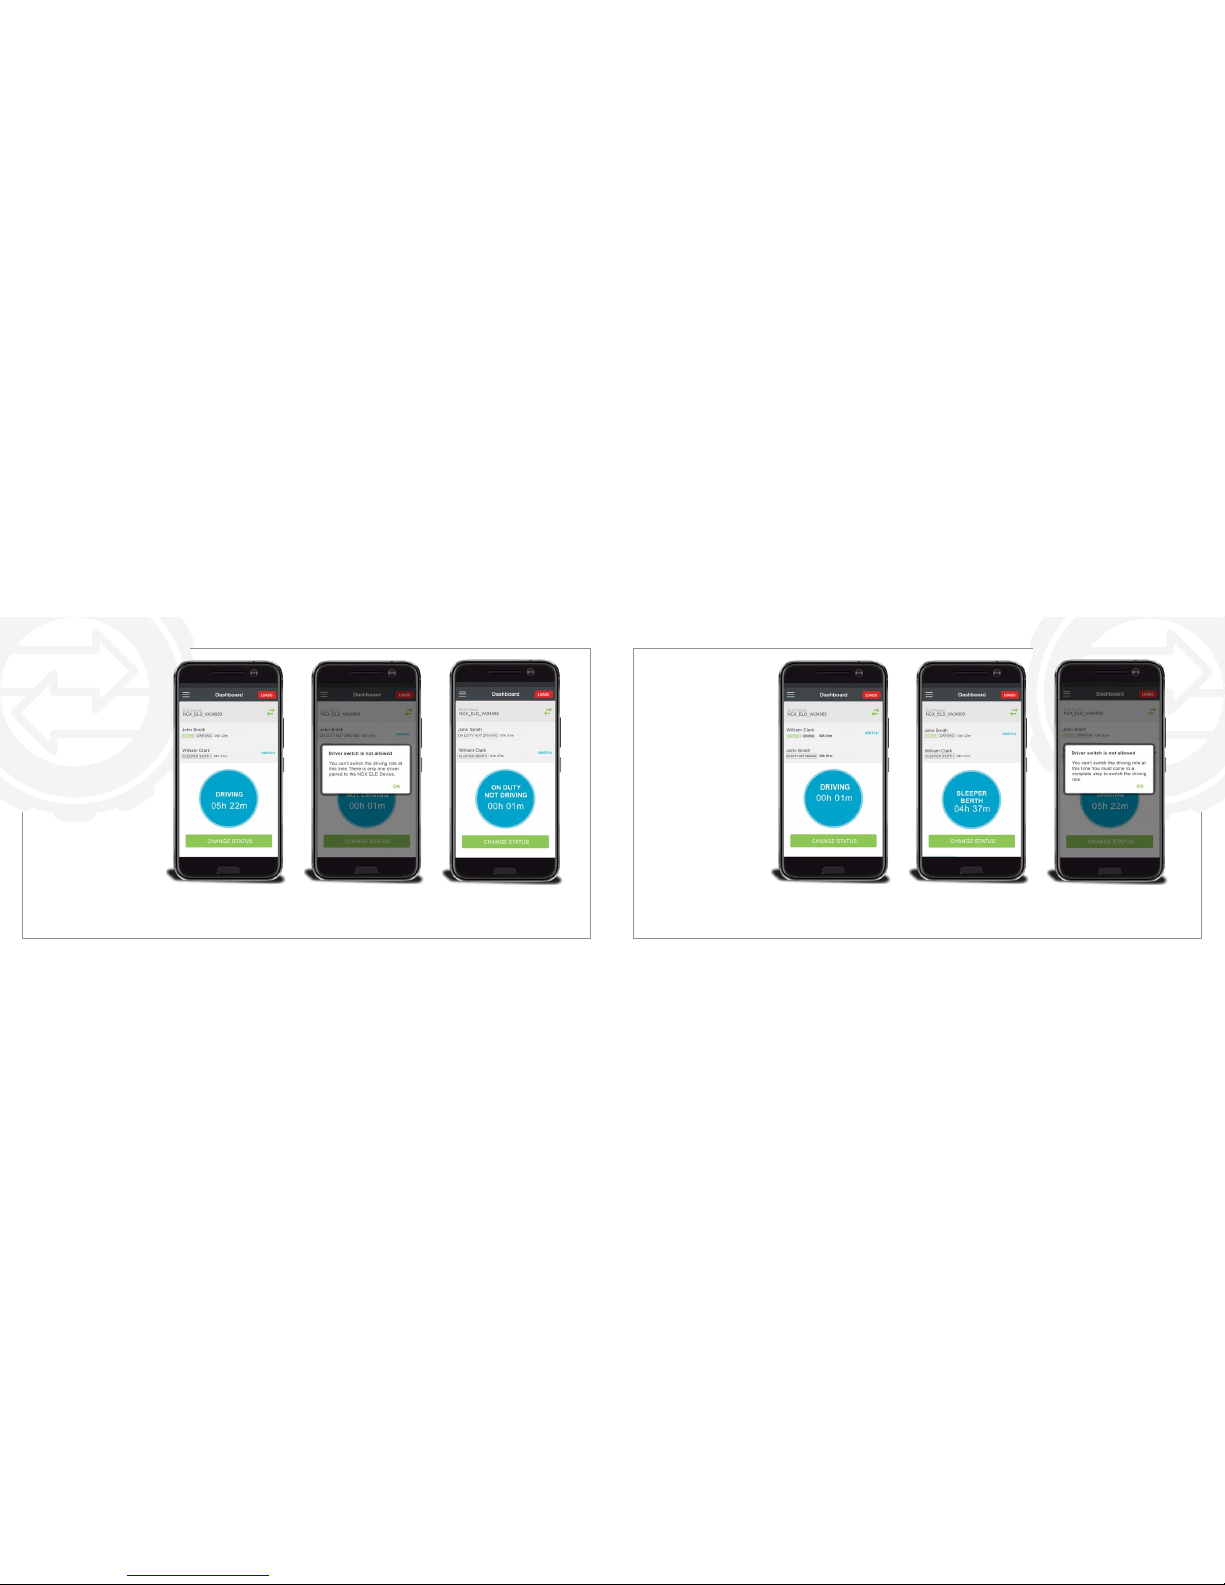
• Only the inactive
driver can tap the
SWITCH button to
switch driver.
• YES if you want to
switch driver and tap
NO if you don’t.
• On the Inactive
driver’s device a
pop-up asking to
ACCEPT or REJECT the
switch will appear.
• The ELD will only show
the Active driver when
the vehicle is in motion.
If accepted the driver
switch is made.
Team
Drives
Switching
Driver
Page 23
ELECTRONIC LOGGING DEVICE USER MANUAL ELECTRONIC LOGGING DEVICE USER MANUAL
44 | National Carrier Exchange
National Carrier Exchange | 45
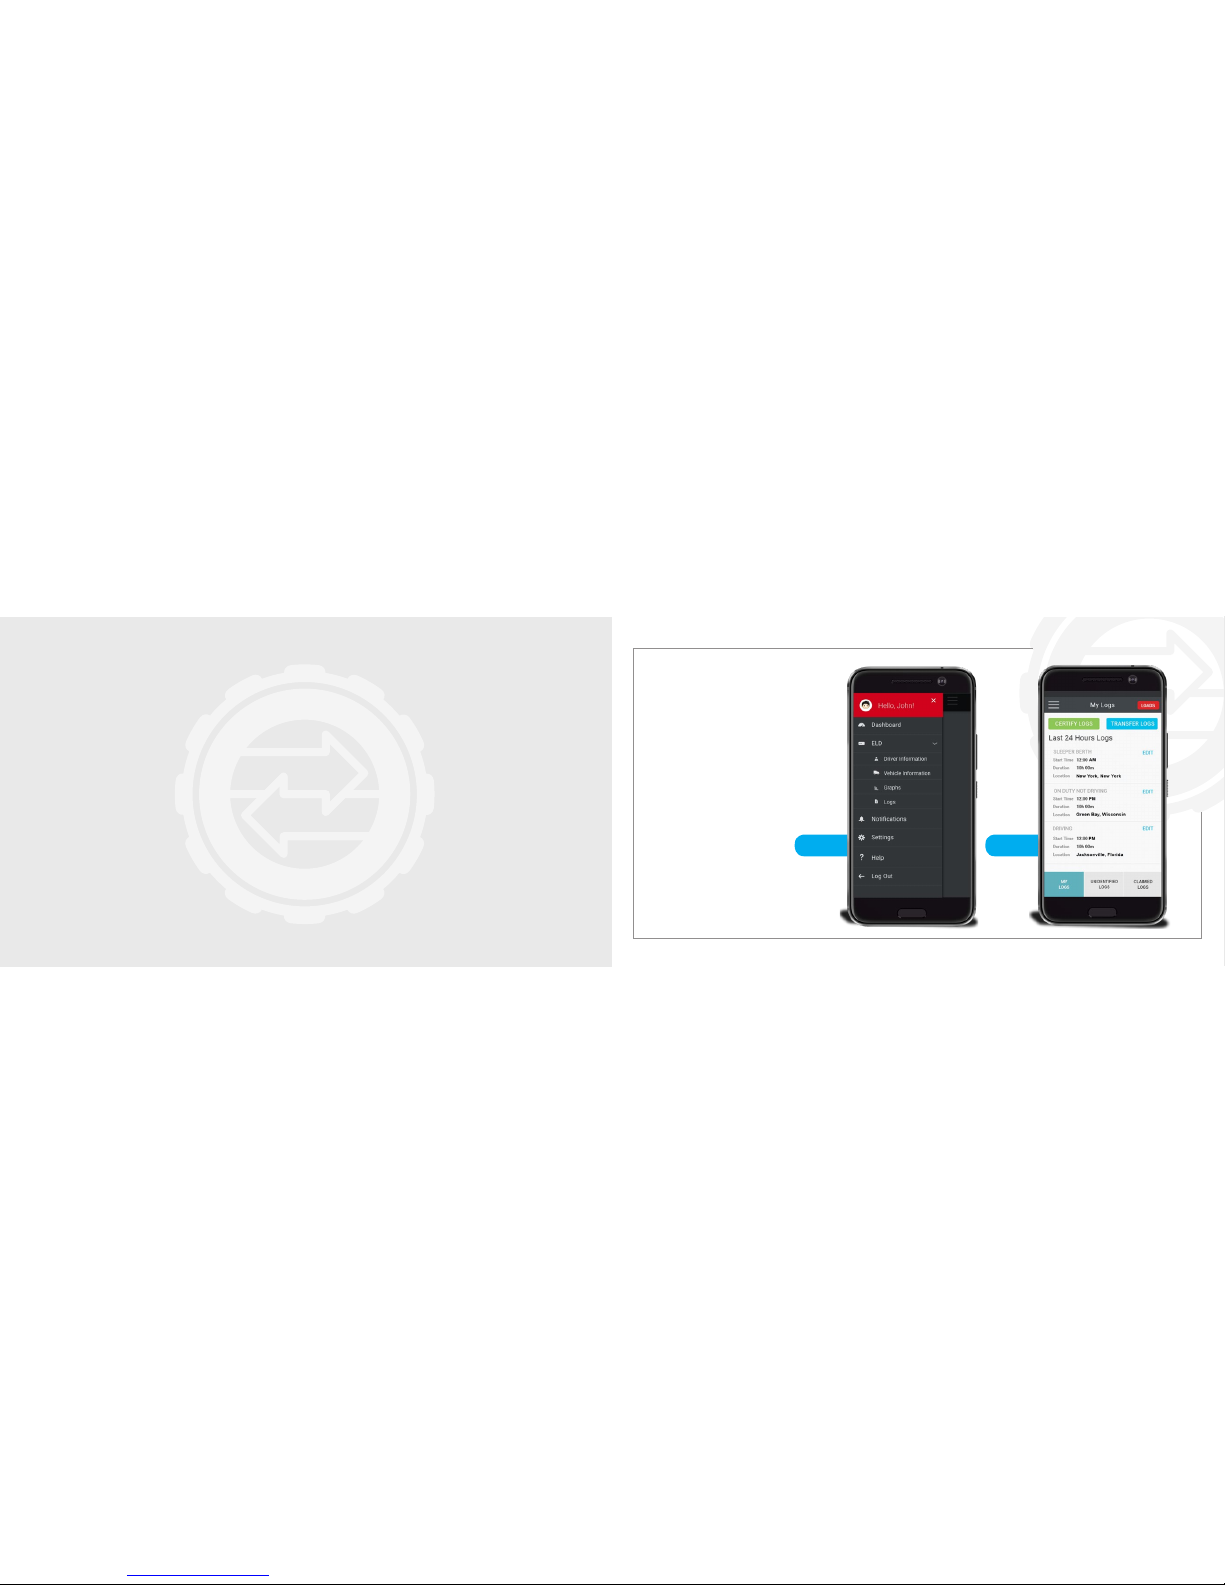
Team Drives
The Active
Driver
• The active driver is the only
driver that can initiate the
switch of a driver role.
• The active driver can only
initiate a switch when the
vehicle has been stopped for
more than 3 seconds. Tap OK
to go back to the dashboard.
• When the vehicle’s engine is
off for 3 seconds the active
driver’s status will change to
ON DUTY NOT DRIVING.
Team Drives
The Inactive
Driver
• The active driver can only
initiate a switch if there is
another driver paired with
the ELD Device.
• The inactive driver is a driver
not in the DRIVING status and
is paired. The inactive driver
can’t initiate the switch of a
driver role.
• If there is no inactive driver
paired to the NCX ELD Device
and the Active driver trys to
switch the driving role, he will
receive this pop-up.
Page 24
ELECTRONIC LOGGING DEVICE USER MANUAL
National Carrier Exchange | 47
YOUR LOGS
Step 1 Step 2
Viewing
Your Logs
Step 1
To view your logstap the
menu hamburger button
then tap the left, and
nally tap Logs
Step 2
These are your
logs for the last
24 hours.
Page 25
ELECTRONIC LOGGING DEVICE USER MANUAL ELECTRONIC LOGGING DEVICE USER MANUAL
48 | National Carrier Exchange
National Carrier Exchange | 49
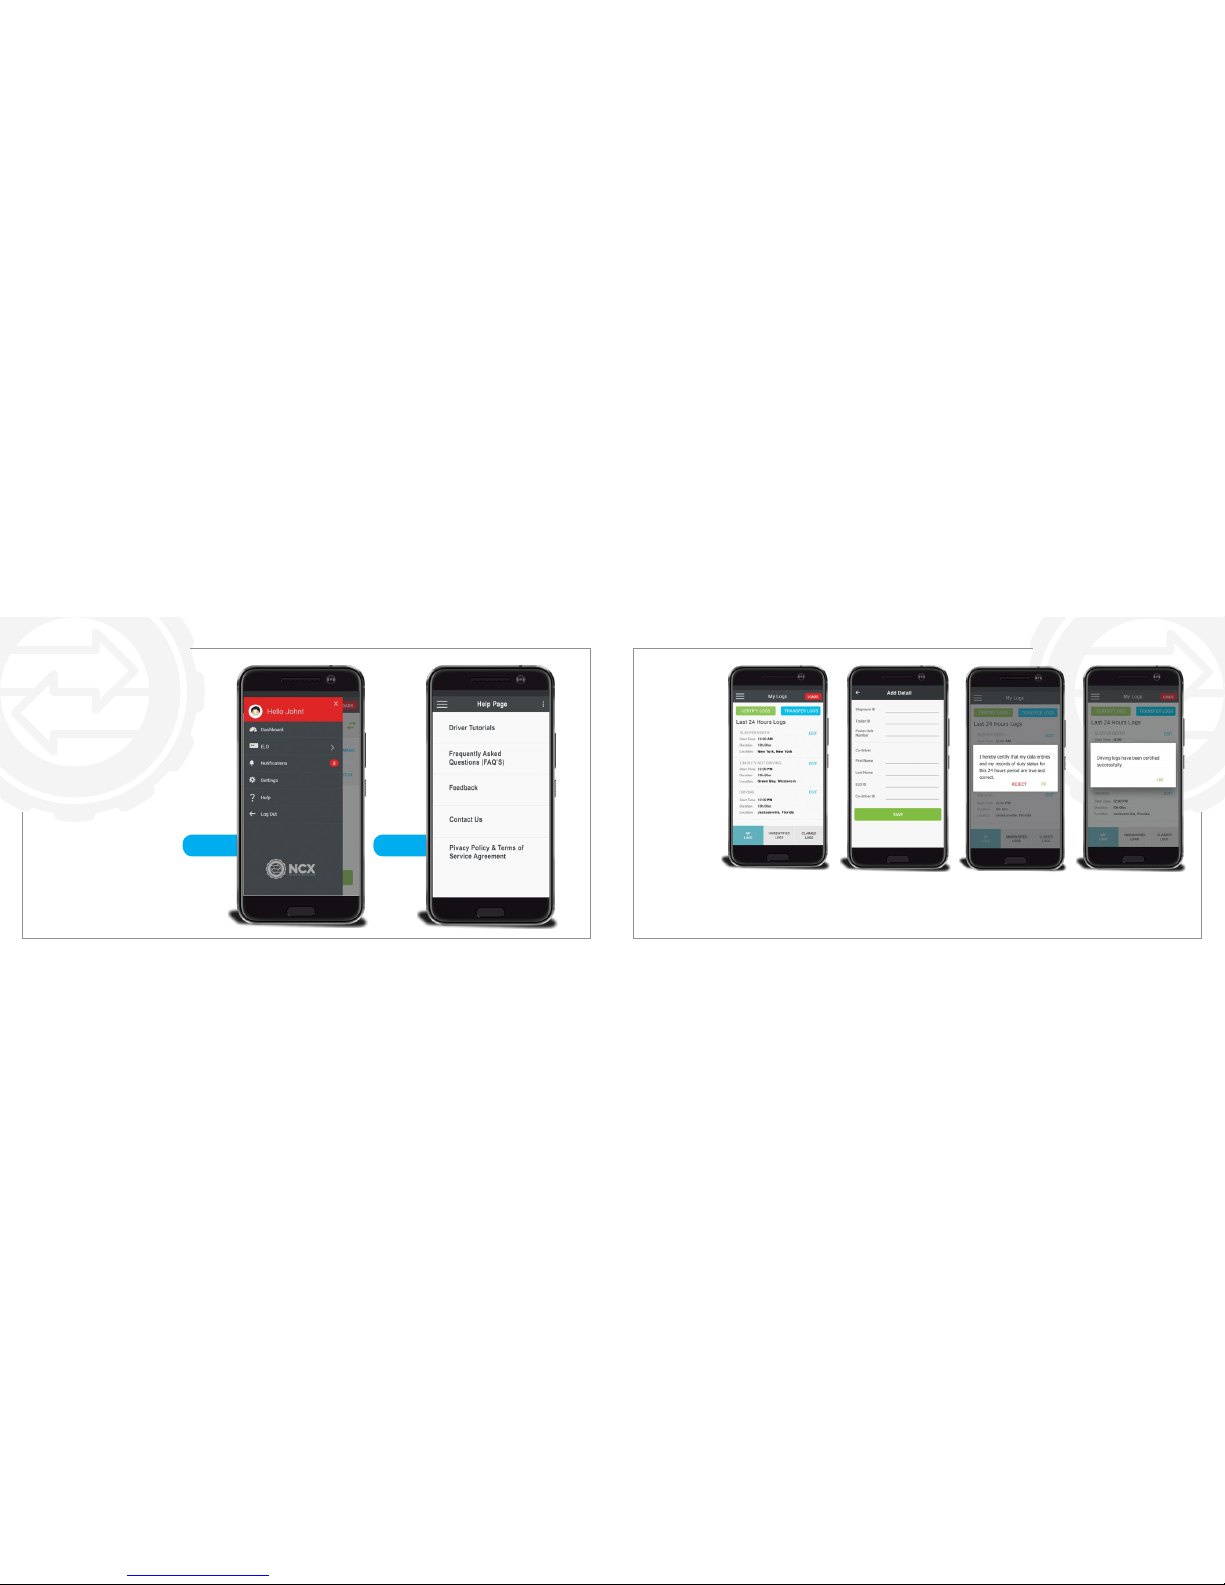
Step 1 Step 2
The
Help Page
Step 1
To view the Help page
tap the menu hamburger
button then tap the Help
button.
Step 2
If more help is
needed just contact
us by phone or email.
• To certify your logs tap
the green Certify Logs.
Tap EDIT if you need
to make any changes
to a log.
• You must enter a Power
Unit Number. All the
other elds only enter if
you have them but if you
don’t, simply type None.
• Tap the OK button to
certify your logs or the
REJECT button to not
certify them.
• You’ll see this pop-up
when you’ve successfully
certied your logs. Tap
OK to go back to the
My Logs page.
Your
Logs
Certifying
Your Logs
Page 26
ELECTRONIC LOGGING DEVICE USER MANUAL ELECTRONIC LOGGING DEVICE USER MANUAL
50 | National Carrier Exchange
National Carrier Exchange | 51
Log Inspections
Transferring your logs to a road side inspector
A roadside inspector will request your logs for the last 8 days using the Mobile NCX ELD App you have a few
ways to show the inspector your logs.
The inspector might only ask to see the logs on the device, if that’s all they ask simply go to Your Logs and show the
inspector the last 8 days of logs.
The inspector might ask for you to transfer your logs, the Mobile NCX ELD App provides two ways for you to transfer
your logs through Email which is the preferred method or through web services. You must certify your logs before
transferring your logs.
• If the inspector provides Email tap the Email section in the Transfer Logs process. The Email will be automatically entered in the email eld and your logs will be ready to be emailed. Tap the green transfer button to
complete the transfer.
• If the inspector asks to use Web Services they will provide a routing code, your logs will then be transferred to a
FMCSA server where the inspector can then review your logs of the last 8 days.
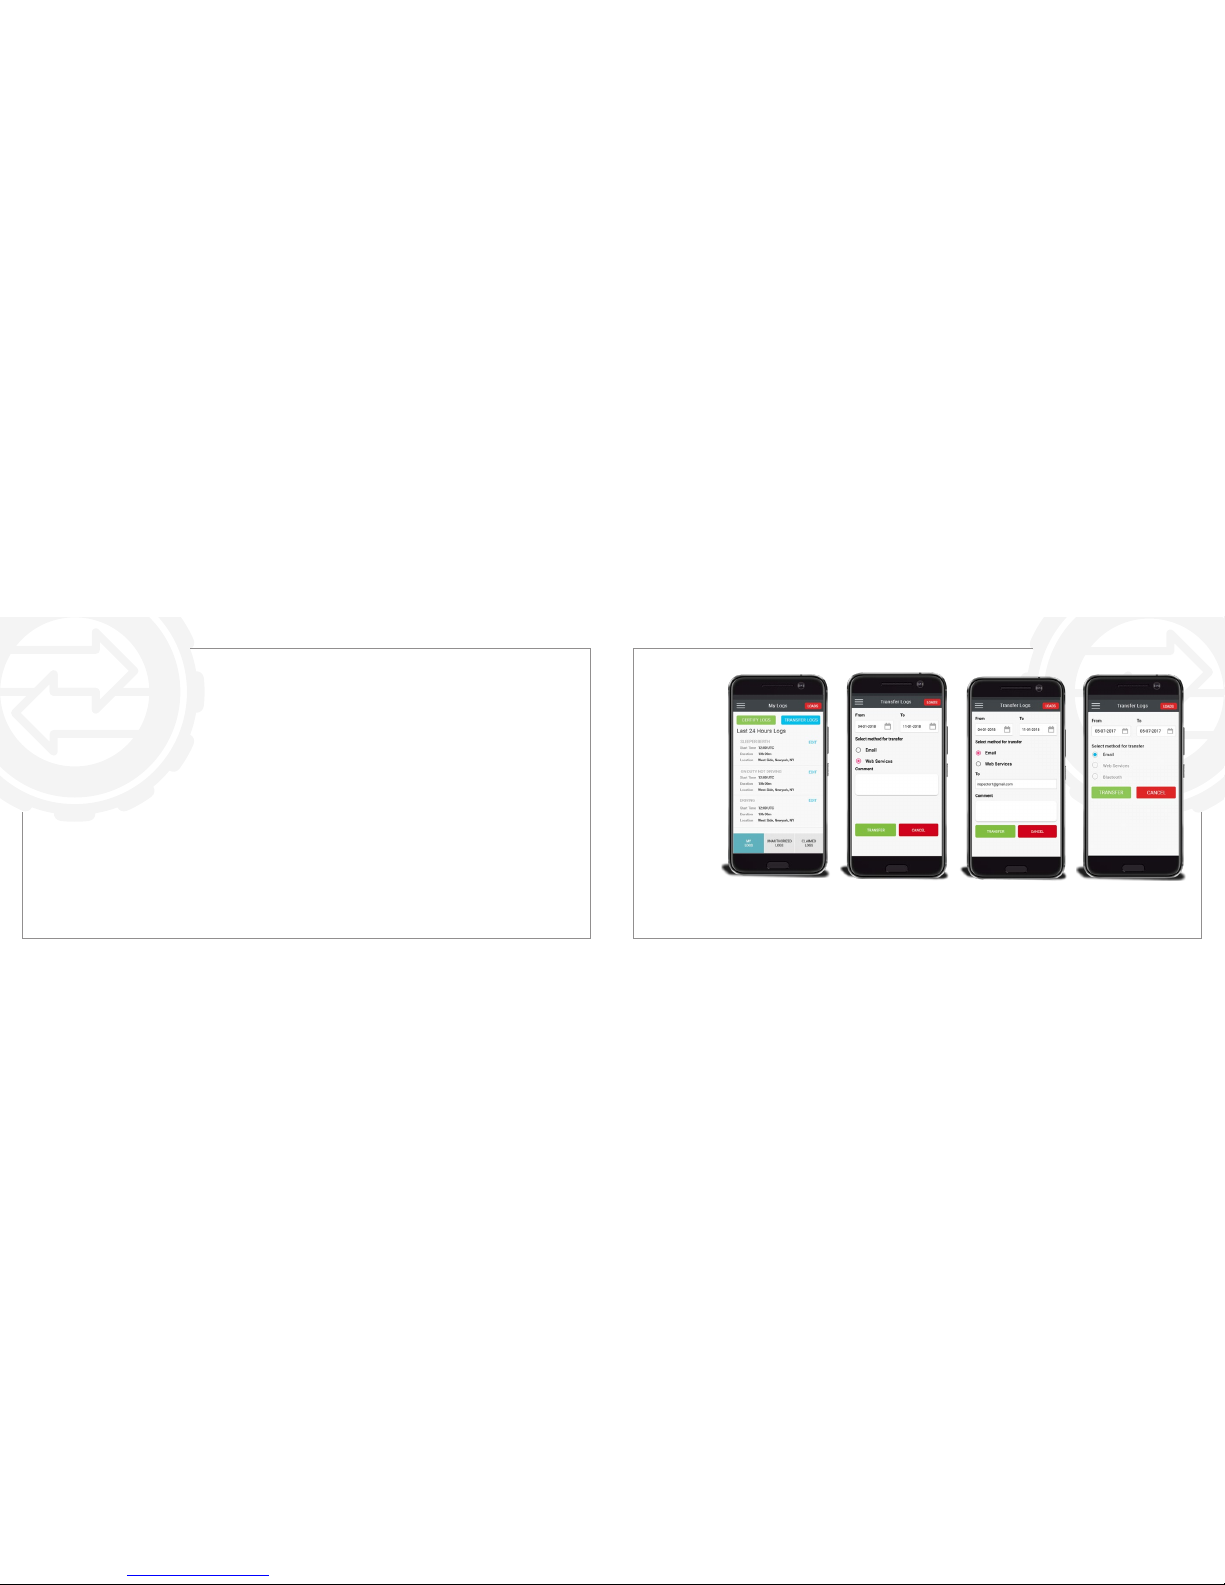
• To transfer your logs in
the MY Logs page tap
TRANSFER LOGS.
• Tap the circle to send
an email with your logs
attached. Tap the circle to
send your logs through
the web.
• If you select Email, the email
will be automatically lled
in, add any comments if any.
Tap the green TRANSFER
button to Email your logs.
• If you select Web Services
the inspector will provide
a routing code, your logs
will then be transfered
to a FMCSA server.
Your Log
Inspections
Transferring
your logs to
a road side
inspector
?
Page 27
ELECTRONIC LOGGING DEVICE USER MANUAL ELECTRONIC LOGGING DEVICE USER MANUAL
52 | National Carrier Exchange
National Carrier Exchange | 53
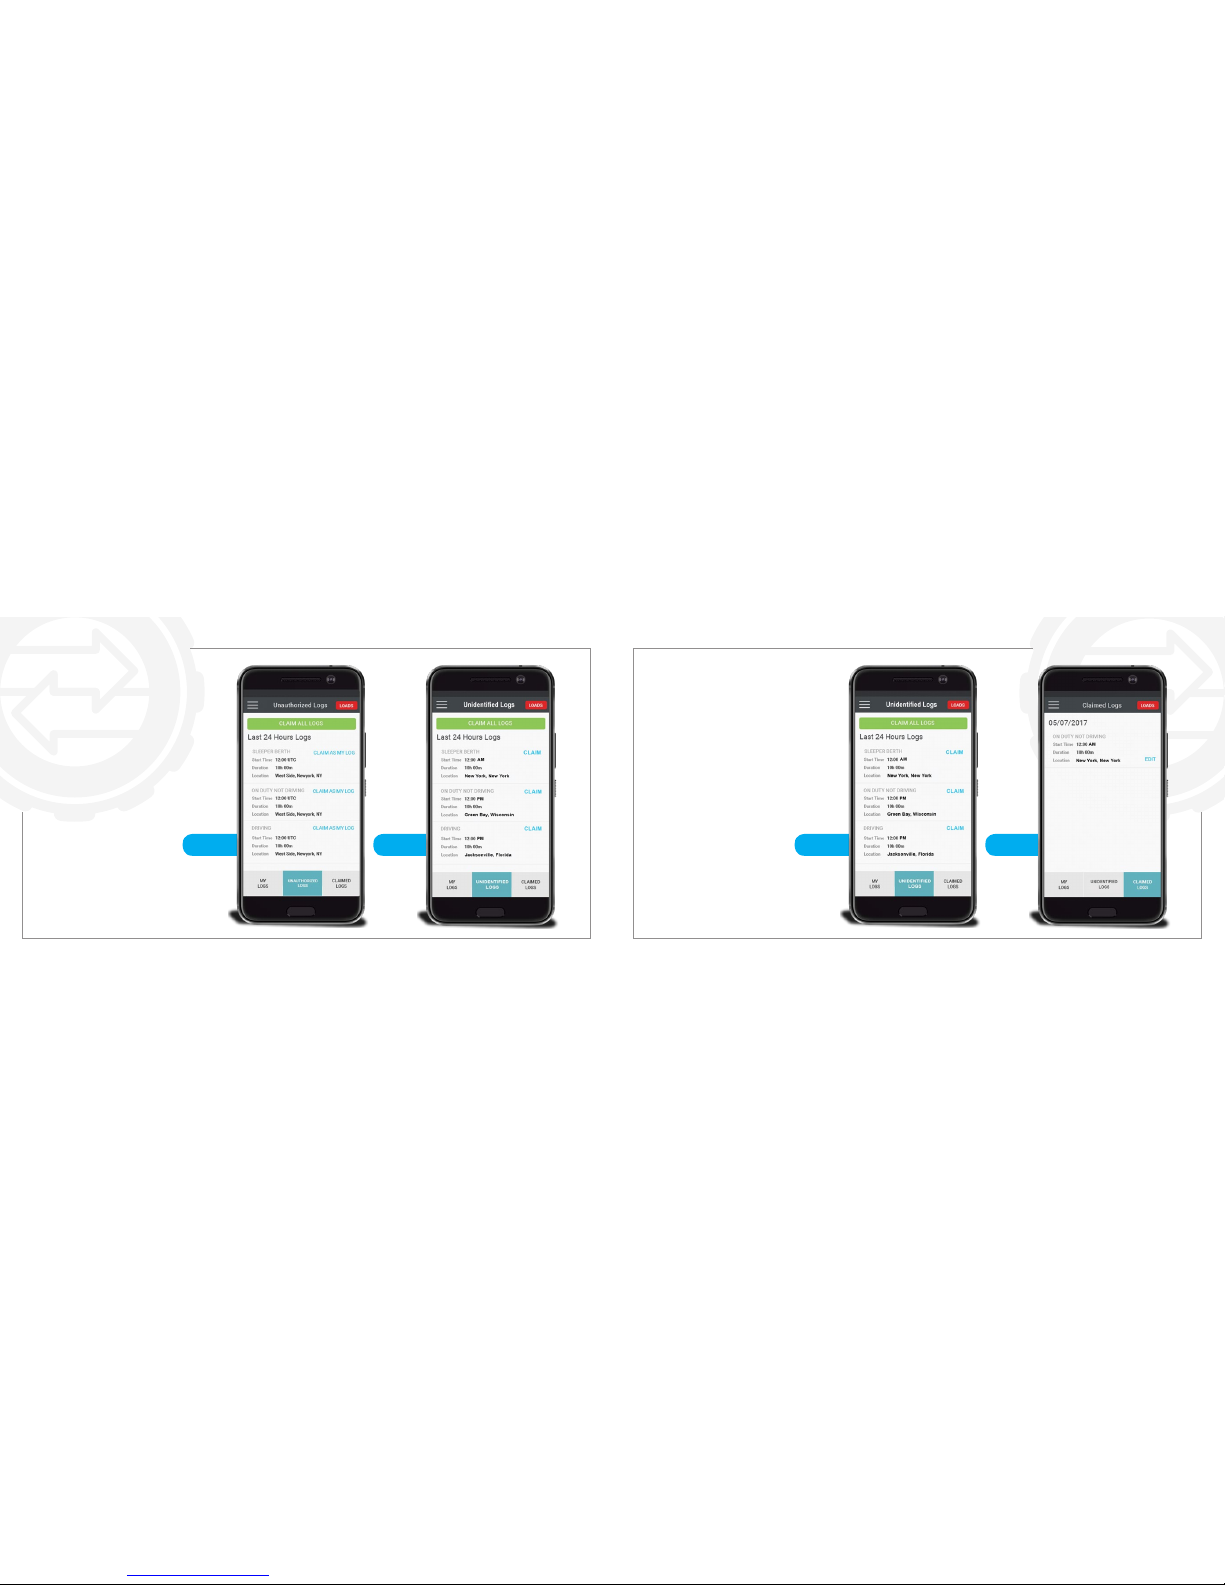
Step 1 Step 2
Your Logs
Viewing Your
Unidentied Logs
Step 1
To view your unauthorized
logs just tap the unauthorized logs button.
Step 2
You’ll be redirected to the
Unauthorized Logs page.
Tap the green Claim All Logs
to claim all the logs or tap
CLAIM to only select one
log at a time.
Step 1 Step 2
Your Logs
Viewing Your
Claimed Logs
Step 1
To view the logs
you’ve claimed tap
the CLAIMED LOGS
button.
Step 2
You’ll see any claimed
logs listed here. Tap the
EDIT button to edit the log.
Page 28
ELECTRONIC LOGGING DEVICE USER MANUAL
54 | National Carrier Exchange
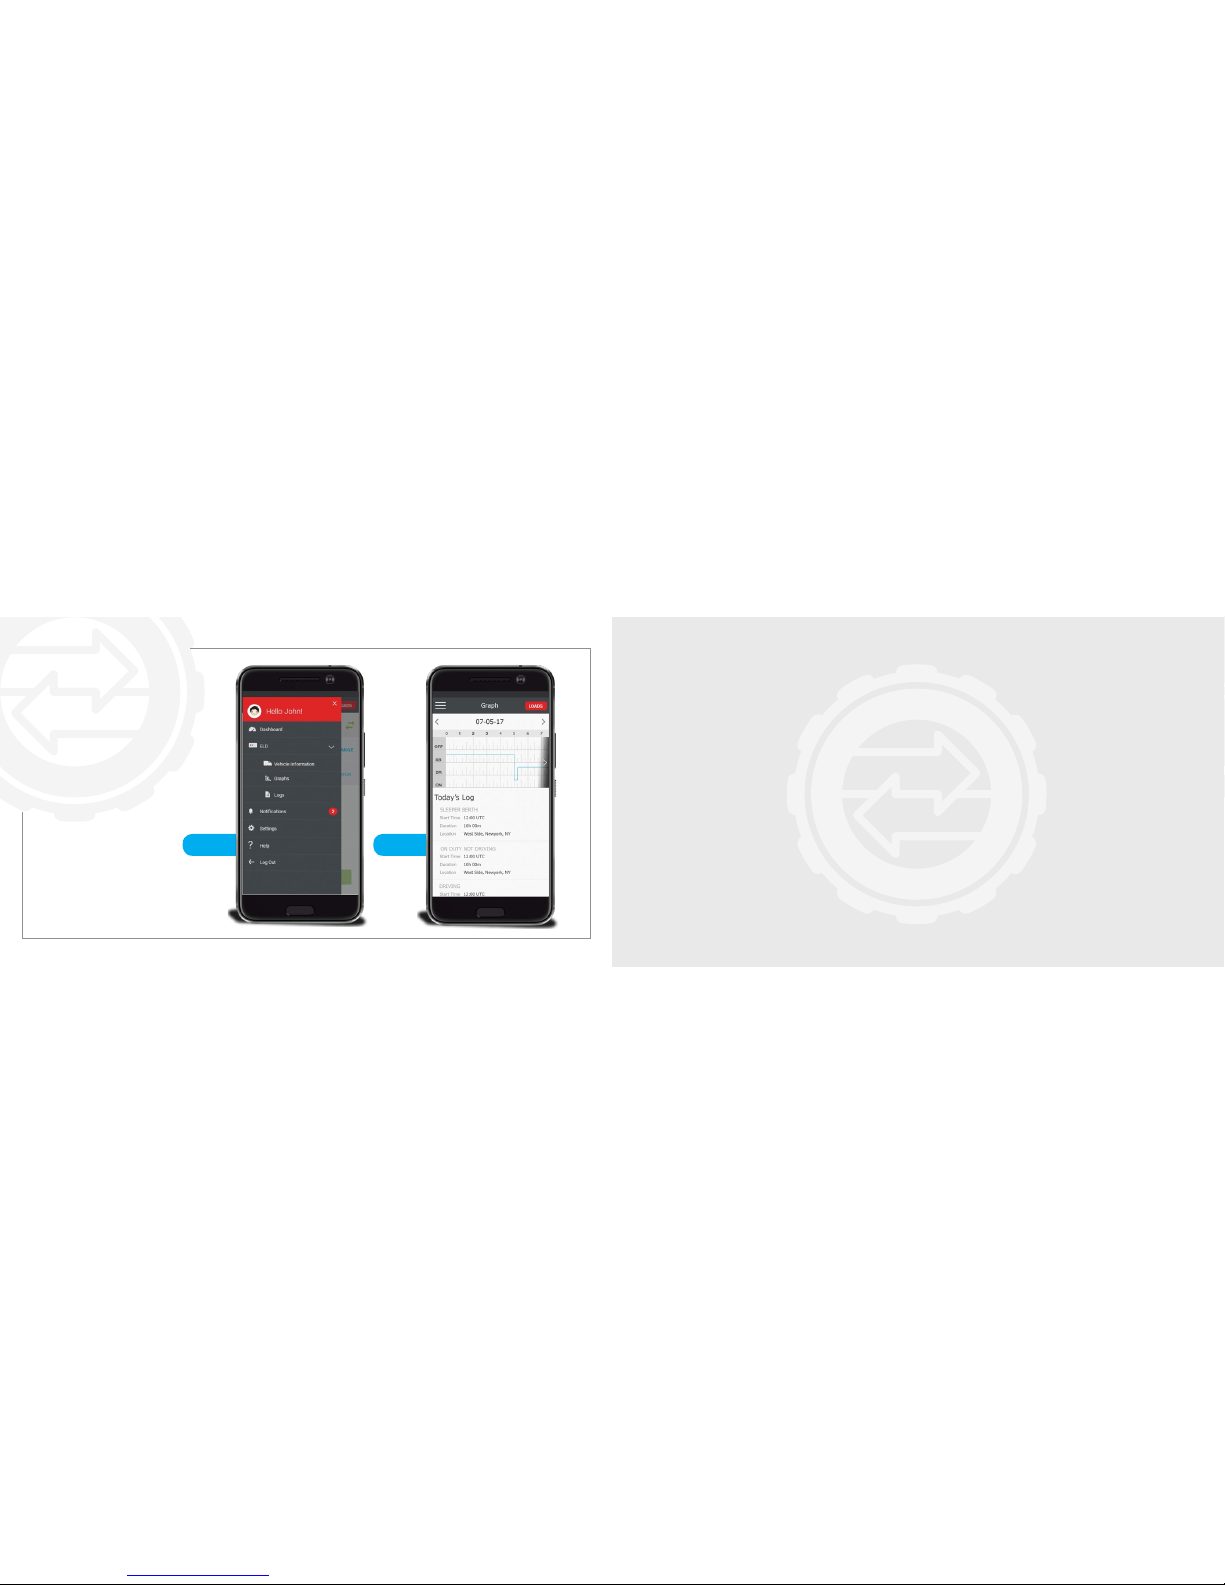
Step 1 Step 2
Viewing
Your Graph
Step 1
To view your log graph tap
the menu hamburger button
then tap the right pointing
arrow, and nally tap
Log Graph.
Step 2
Tap the right pointing
arrow to view a future
date and tap the left pointing
arrow to view a previous date.
ELD NOTIFICATIONS
Page 29
ELECTRONIC LOGGING DEVICE USER MANUAL ELECTRONIC LOGGING DEVICE USER MANUAL
56 | National Carrier Exchange
National Carrier Exchange | 57
ELD
Notications
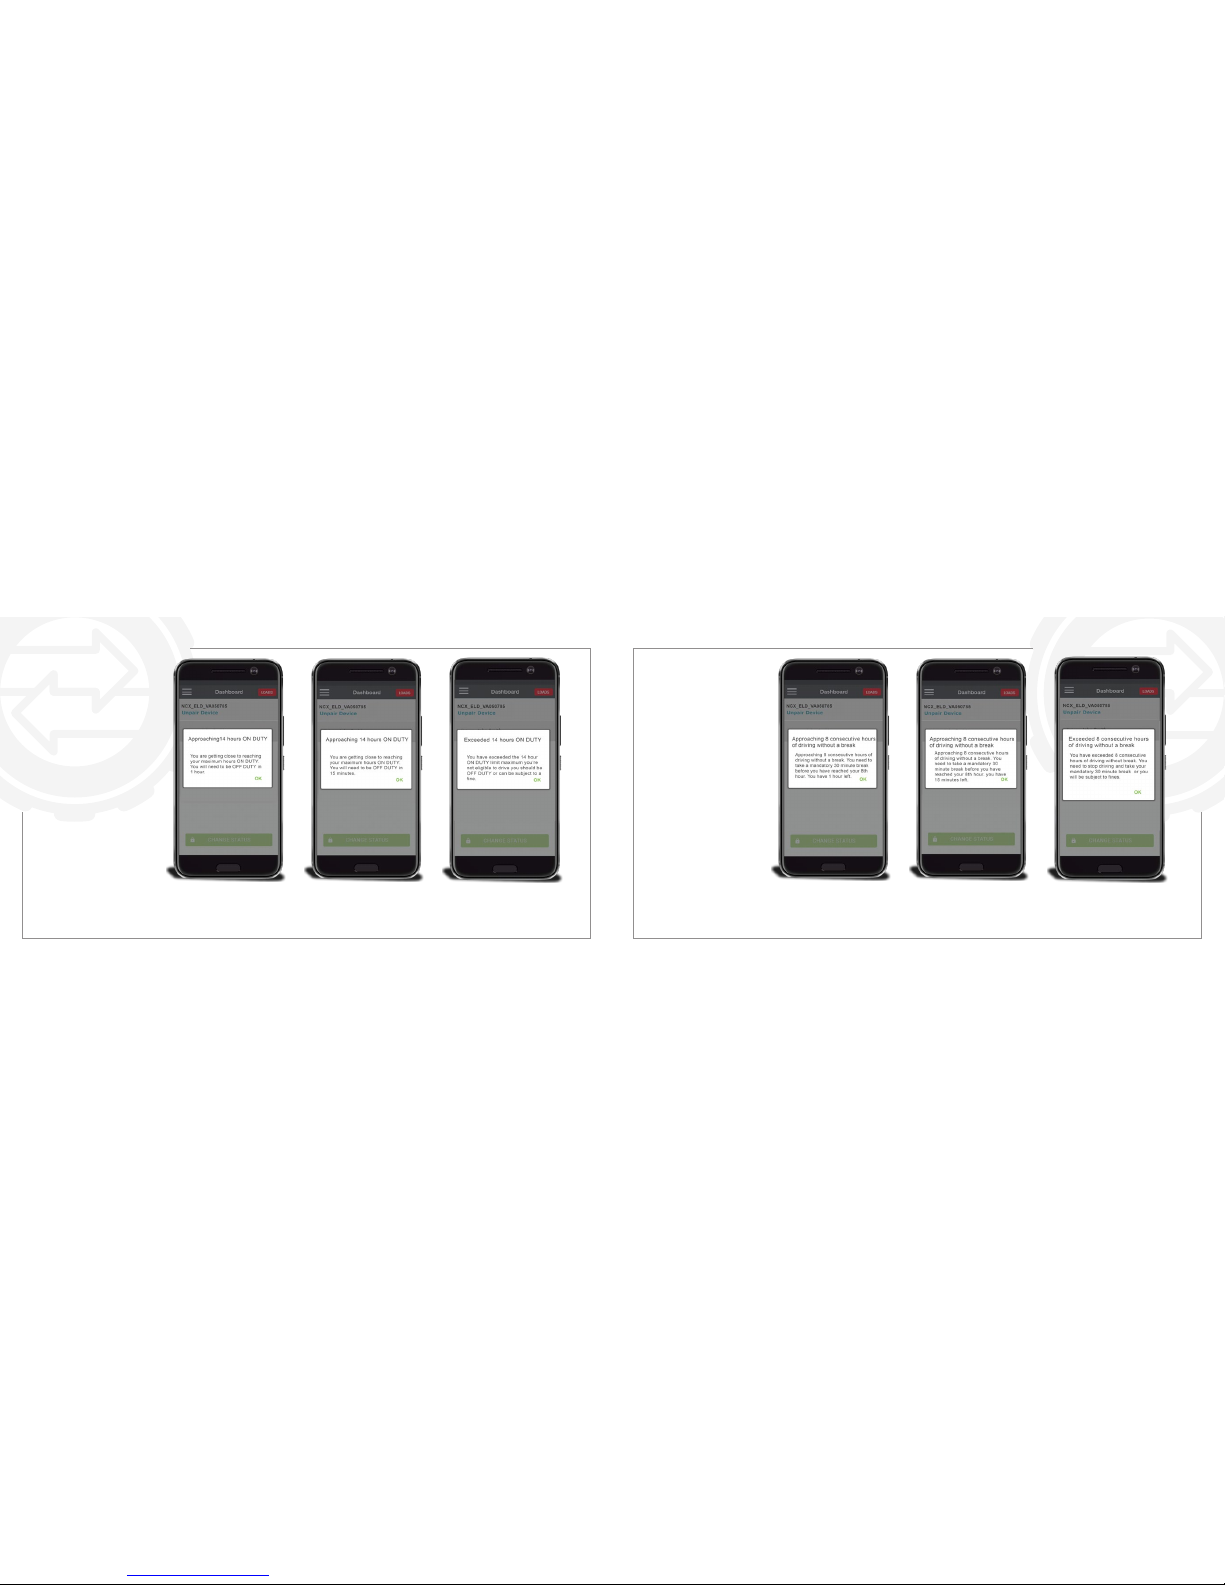
ON DUTY for
more than 14
hours
• You’ll be notied when you
are approaching your hours
ON DUTY limit maximum
tap OK to close this
notication.
• You’ll be notied when you
are approaching your hours
ON DUTY limit maximum
tap OK to close this
notication.
• You’ll be notied when you
have exceeded your hours
ON DUTY limit maximum
tap OK to close this
notication.
ELD
Notications
8 consecutive
hours of driving
with out a break
• You’ll be notied when
you are approaching your
Hours of Duty with out a
break tap OK to close this
notication.
• You’ll be notied when you
are approaching your Hours
of Duty with out a break tap
OK to close this notication.
• You’ll be notied when
you have exceeded your
hours of driving with out a
break tap OK to close this
notication.
Page 30
ELECTRONIC LOGGING DEVICE USER MANUAL ELECTRONIC LOGGING DEVICE USER MANUAL
58 | National Carrier Exchange
National Carrier Exchange | 59
ELD
Notications
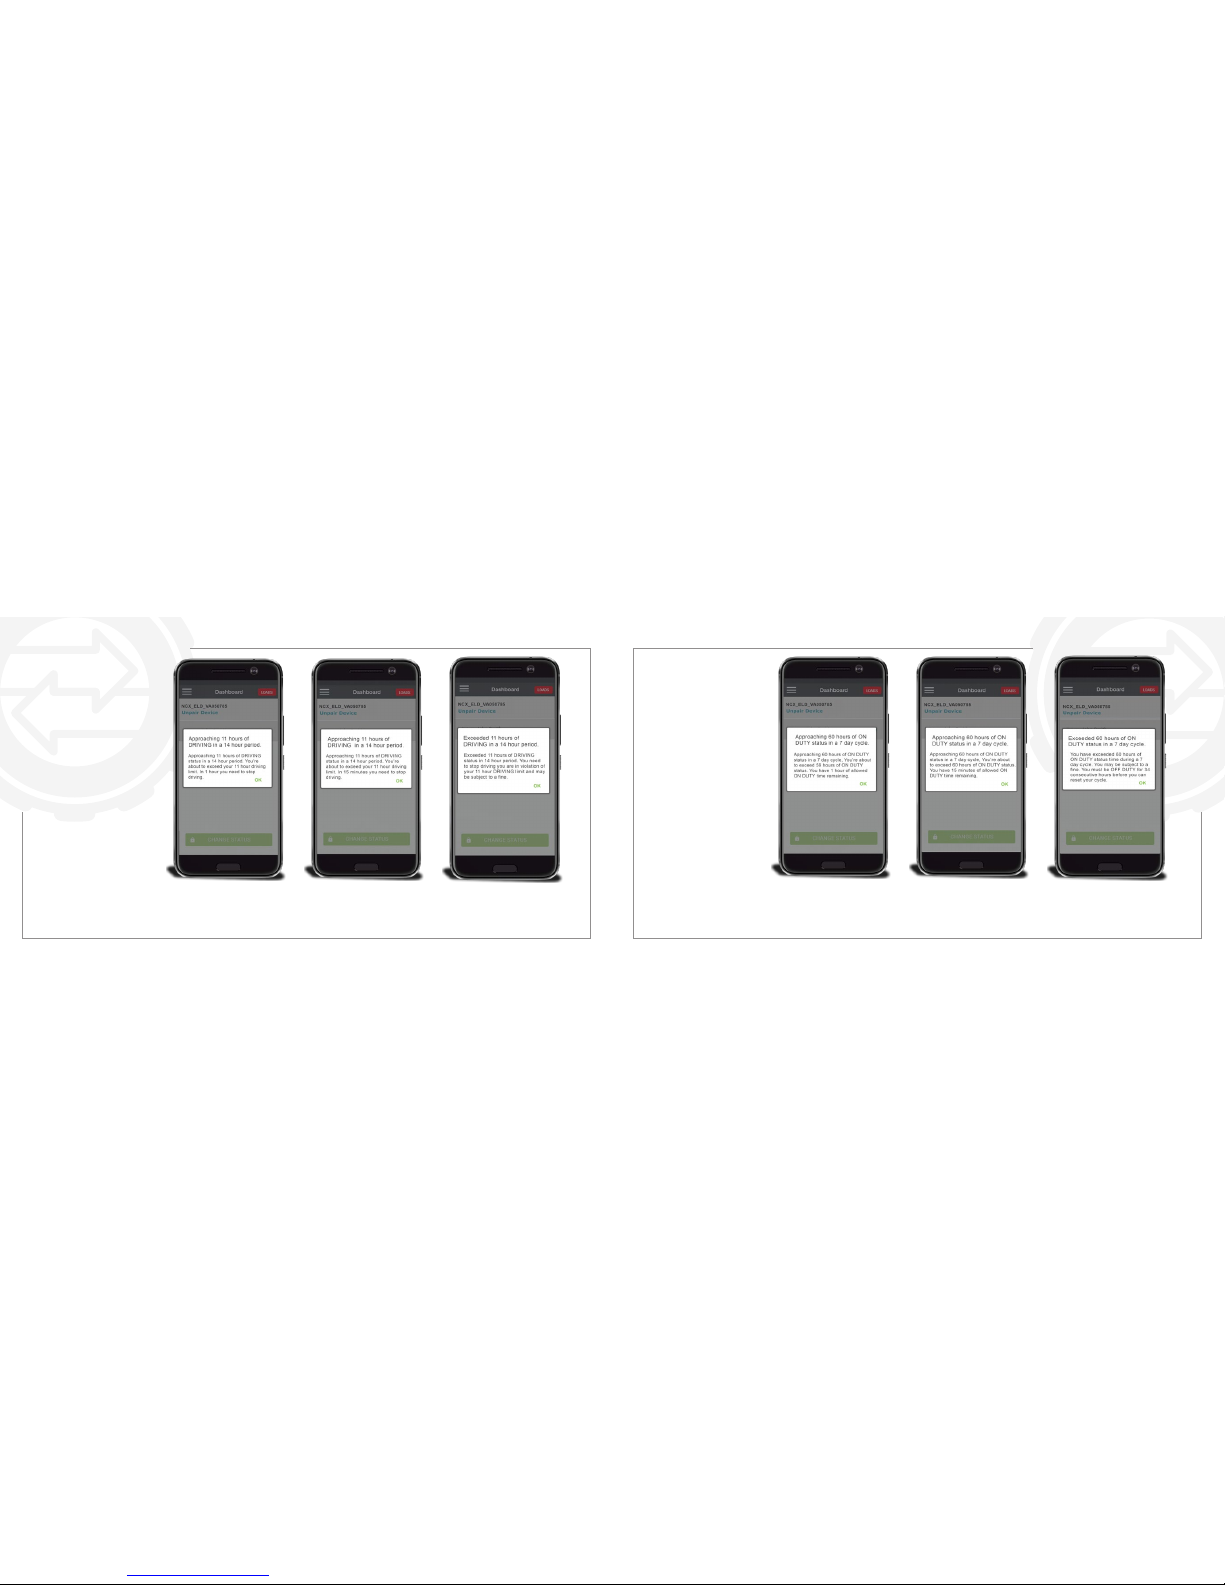
11 hours of ON
DUTY status in a
14 hour period
• You’ll be notied when you
are approaching 11 hours of
ON DUTY in a 14 hour period
with out a break tap OK to
close this notication.
• You’ll be notied when you
are approaching 11 hours of
ON DUTY in a 14 hour period with out a break tap OK
to close this notication.
• You’ll be notied when you
have exceeded 11 hours
of ON DUTY in a 14 hour
period tap OK to close this
notication.
ELD
Notications
60 hours of ON
DUTY status in a
7 day cycle
• You’ll be notied when you
are approaching 60 hours
of ON DUTY status in a 7
day cycle tap OK to close
this notication.
• You’ll be notied when you
are approaching 60 hours of
ON DUTY status in a 7 day
cycle tap OK to close this
notication.
• You’ll be notied when you
are approaching 60 hours of
ON DUTY status in a 7 day
cycle tap OK to close this
notication.
Page 31
ELECTRONIC LOGGING DEVICE USER MANUAL ELECTRONIC LOGGING DEVICE USER MANUAL
60 | National Carrier Exchange
National Carrier Exchange | 61
ELD
Notications
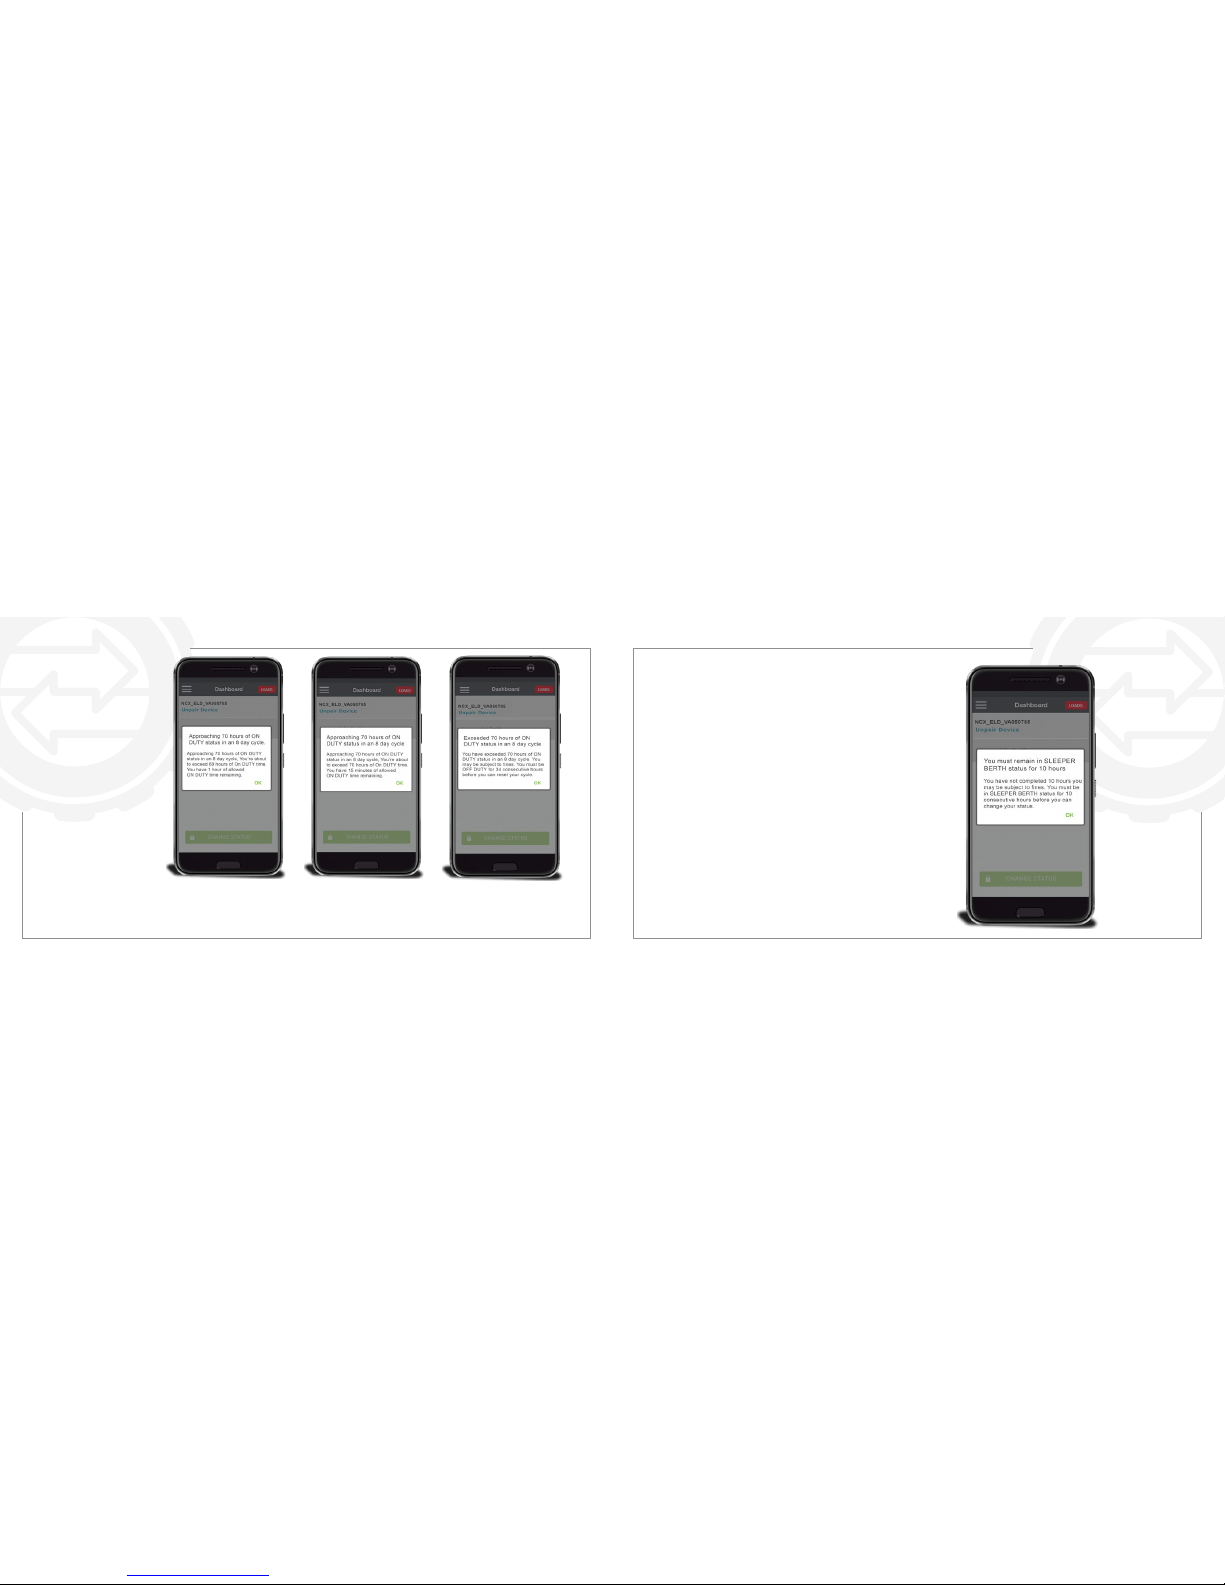
70 hours of ON
DUTY status in
an 8 day cycle
• You’ll be notied when you
are approaching approaching
70 hours of ON DUTY status
in an 8 day cycle tap OK to
close this notication.
• You’ll be notied when you
are approaching approaching 70 hours of ON DUTY
status in an 8 day cycle tap
OK to close this notication.
• You’ll be notied when you
are approaching approaching 70 hours of ON DUTY
status in an 8 day cycle tap
OK to close this notica-
ELD
Notications
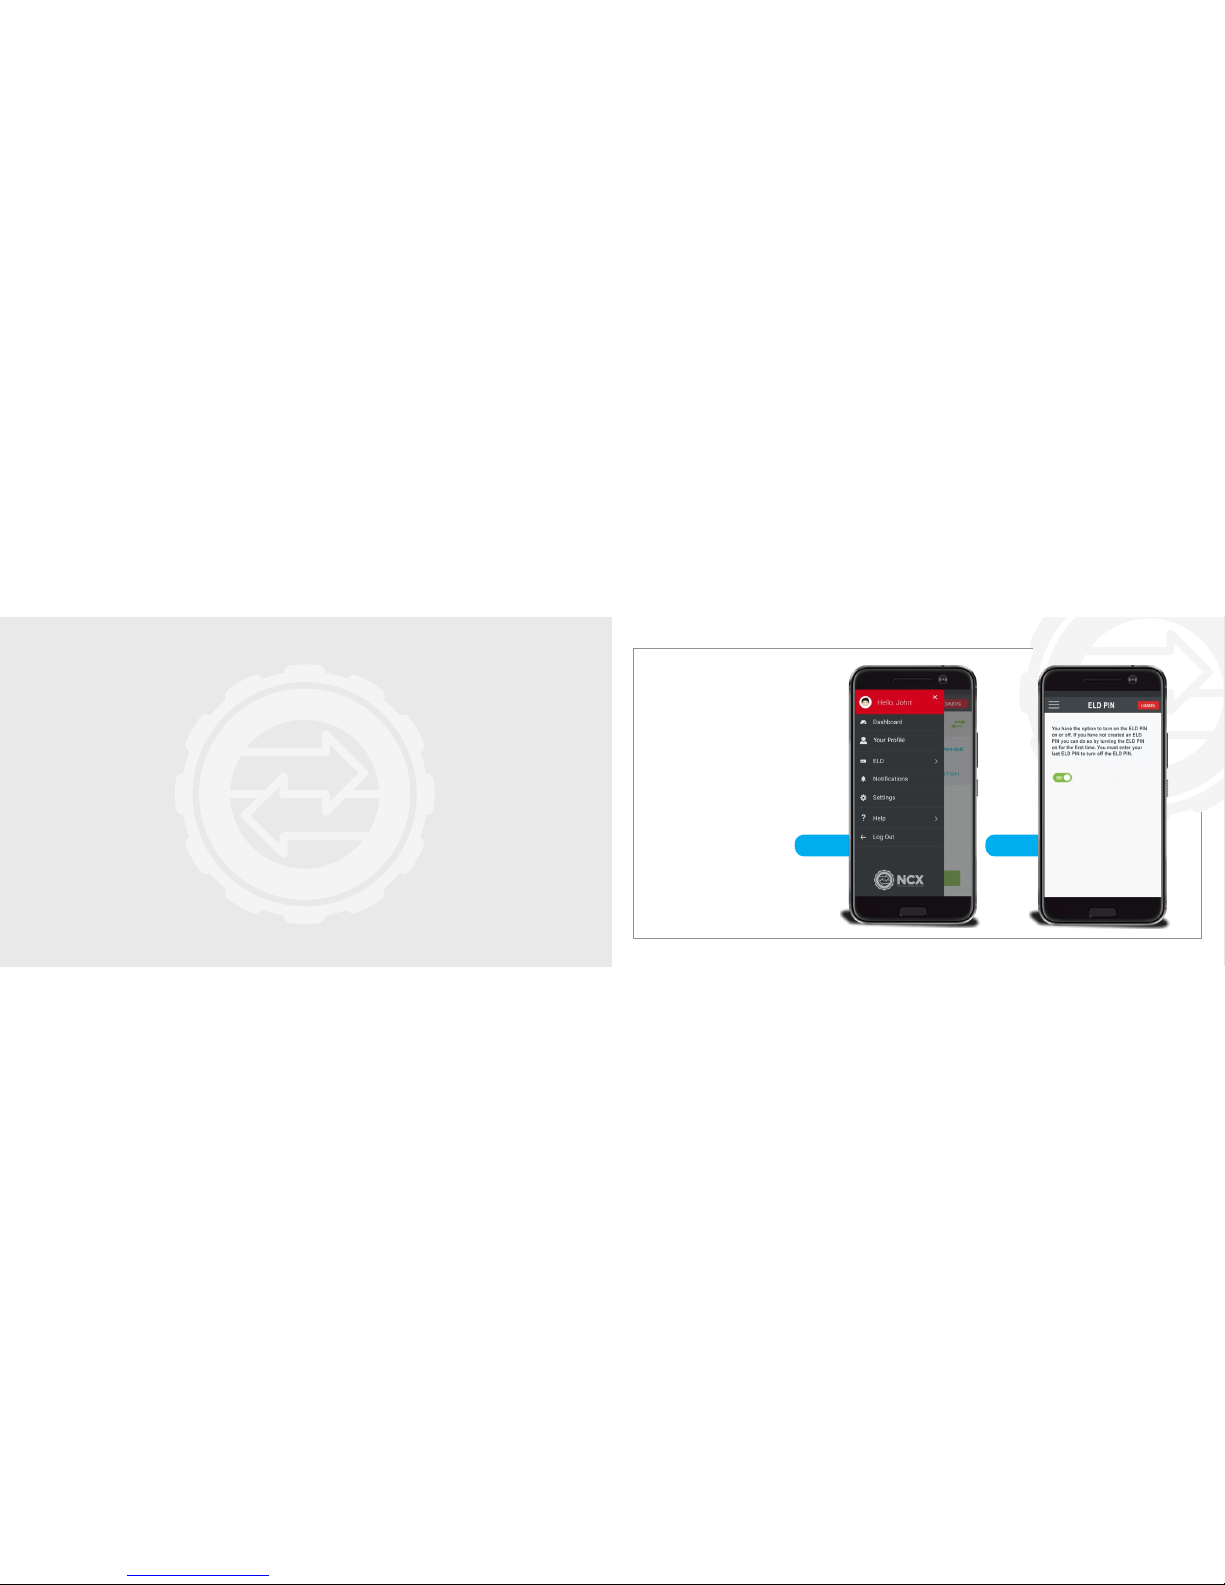
You must remain in SLEEPER BERTH
status for 10 hours You must remain in
SLEEPER BERTH status for 10 hours
Page 32
ELECTRONIC LOGGING DEVICE USER MANUAL
National Carrier Exchange | 63
Step 1 Step 2
Disabling the
ELD PIN Code
Note: Disabling the PIN Code will give anyone with
access to your Mobile Device, access to your Logs
Step 1
Tap the hamburger menu icon
then tap SETTINGS and select
ELD PIN.
Step 2
Tap the OFF switch to turn
ELD PIN on you will be
asked to create an ELD
PIN if you haven’t already
and tap the ON switch to turn
it off you must enter your last
ELD PIN.log at a time.
APPENDIX
Page 33
ELECTRONIC LOGGING DEVICE USER MANUAL ELECTRONIC LOGGING DEVICE USER MANUAL
64 | National Carrier Exchange
National Carrier Exchange | 65
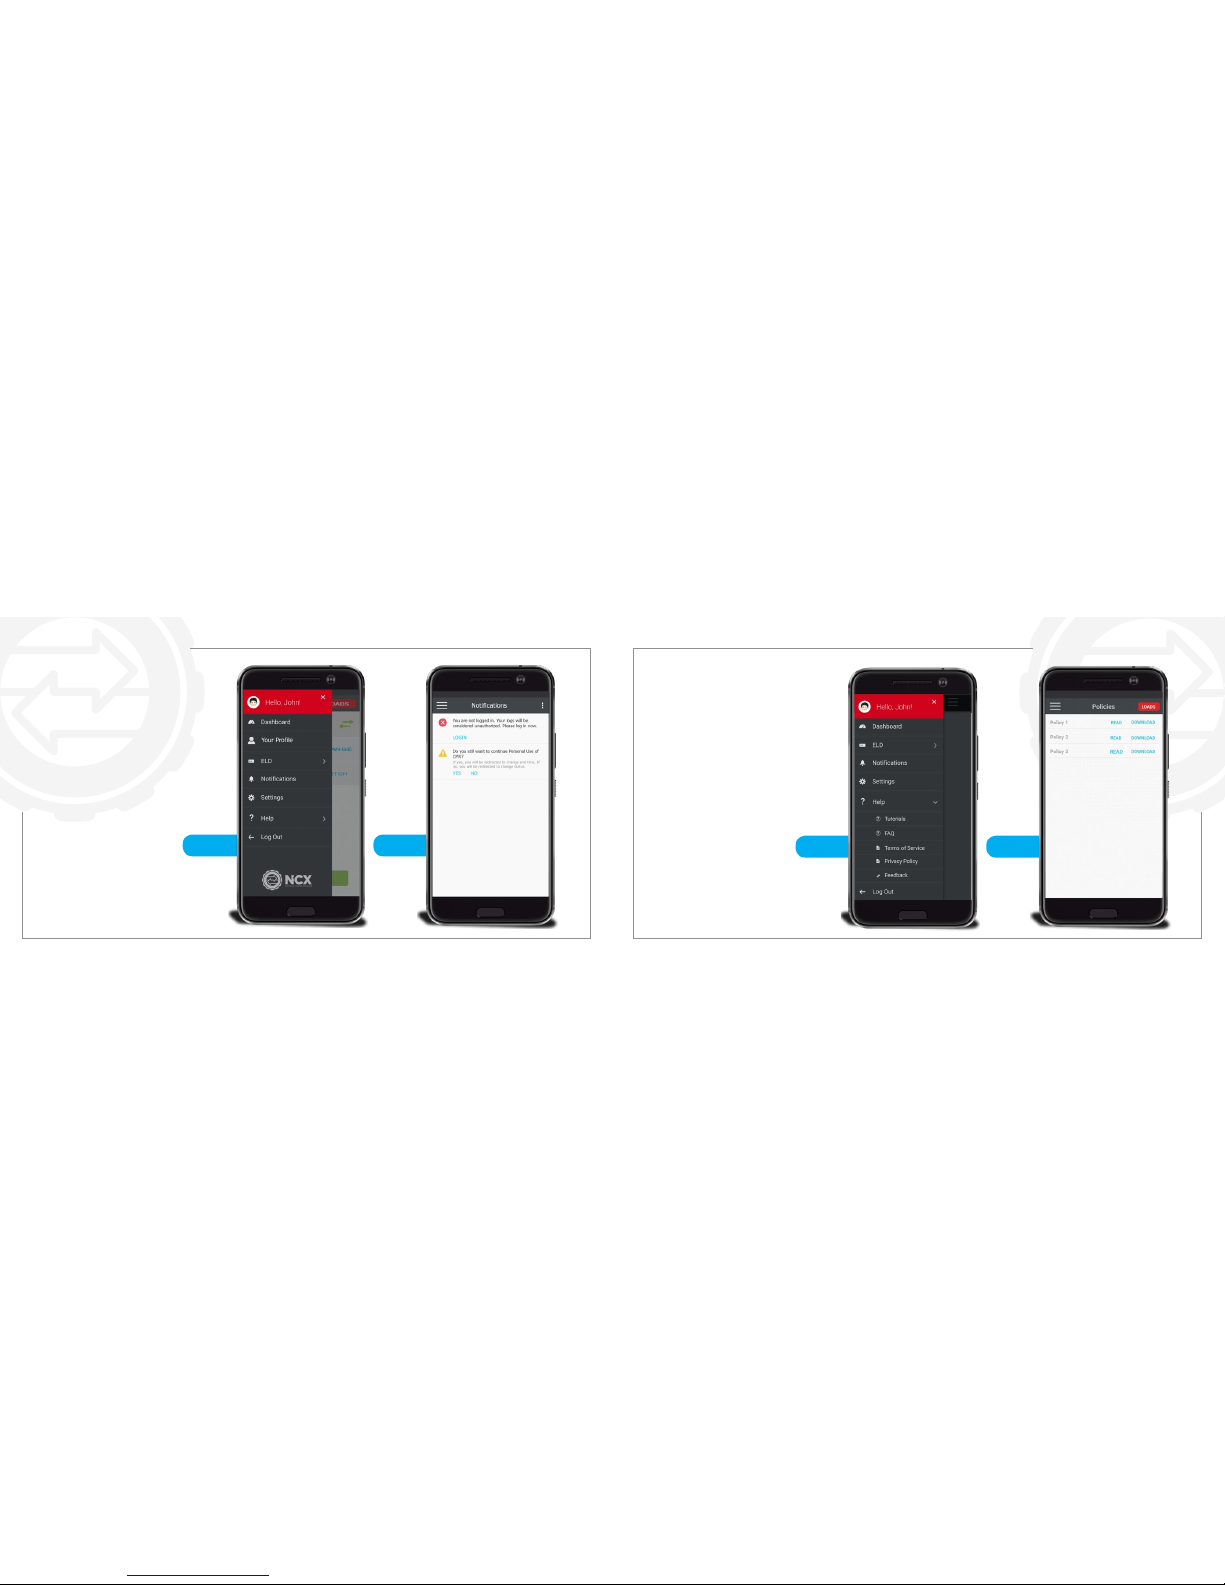
Step 1 Step 2
Viewing your
Notications
Step 1
Tap hamburger menu icon
then tap NOTIFICATIONS
to view your notications
this number is the number
of unread notications.
Step 2
This will be your
Notications page. The
BLUE TEXT are buttons
you can tap to choose the
appropriate choice.
Step 1 Step 2
Viewing the NCX
Privacy Policy
Step 1
Tap menu hamburger button
then tap the Help to view
your our Privacy Policy. Our
Privacy Policy can be found
on the Login Page as well.
Step 2
This is our Privacy Policy.
You can either tap READ
to read them or tap
DOWNLOAD to read
them later.
Page 34
ELECTRONIC LOGGING DEVICE USER MANUAL ELECTRONIC LOGGING DEVICE USER MANUAL
66 | National Carrier Exchange
National Carrier Exchange | 67
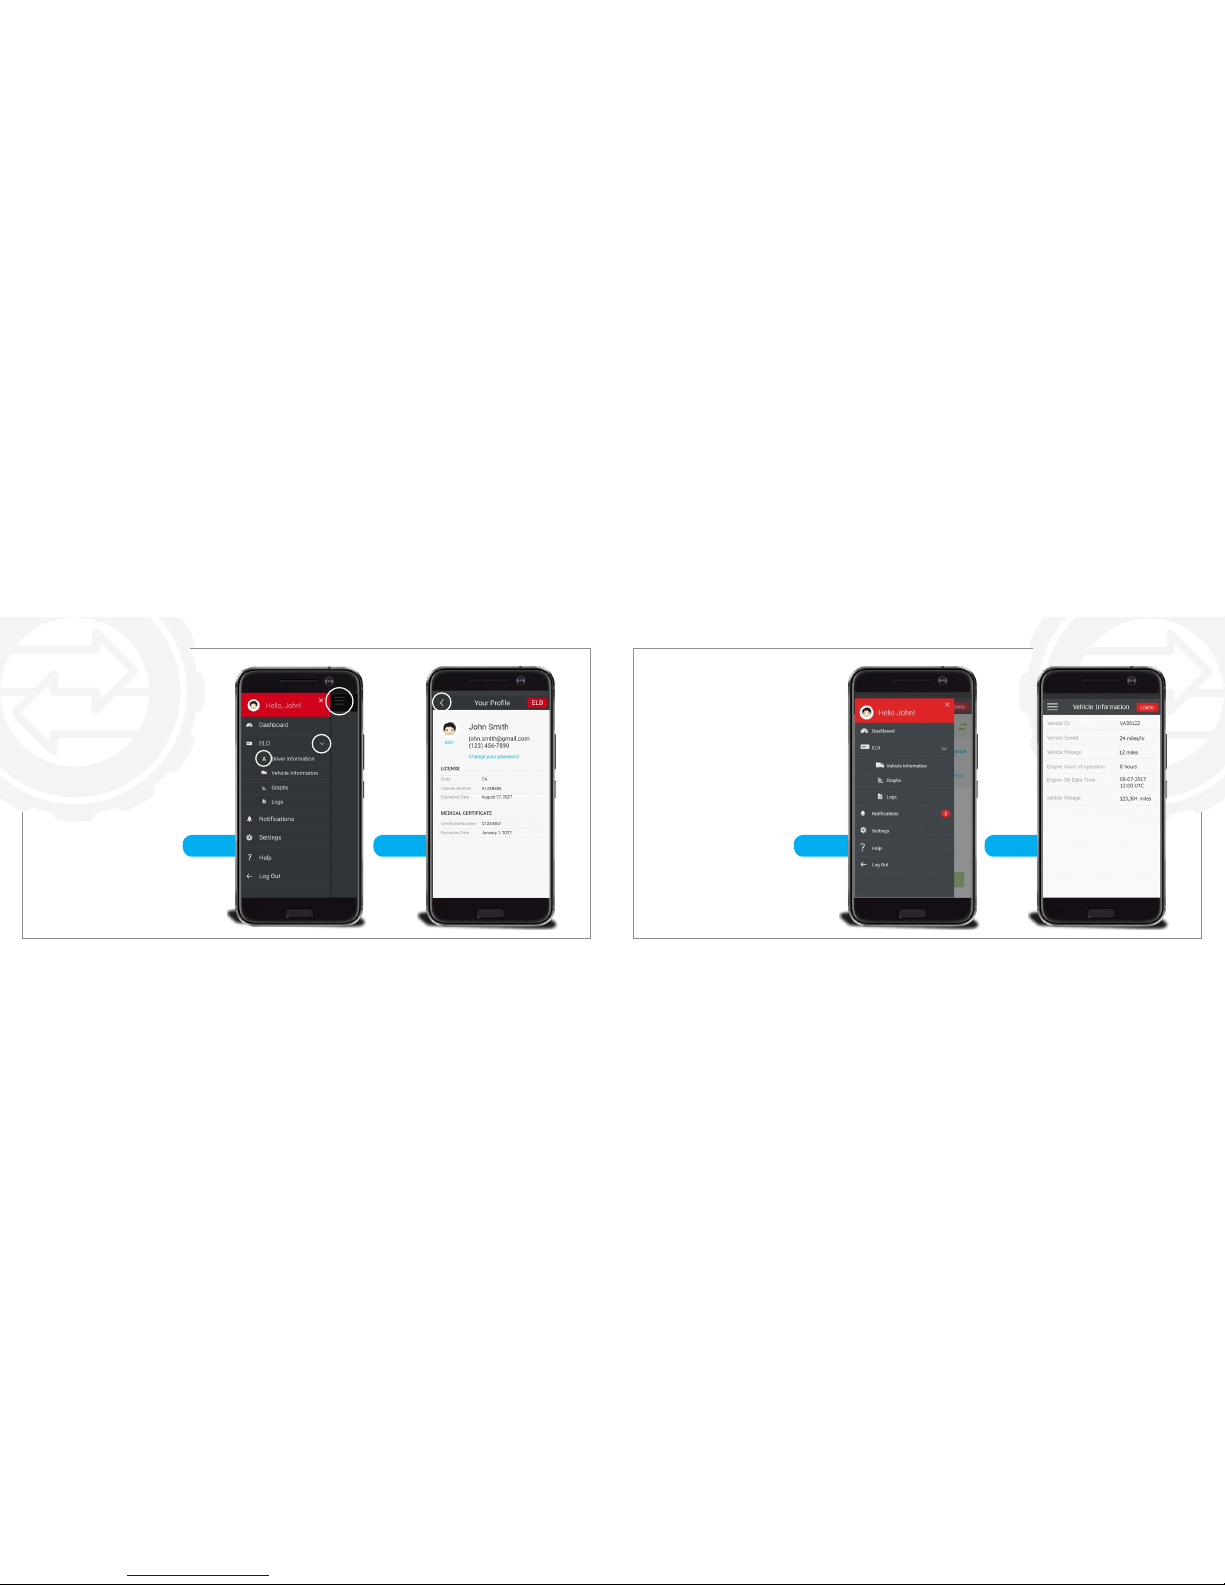
Step 1 Step 2
Viewing Your Your
Vehicle Information
Step 1
To go to your Vehicle
Information tap the menu
hamburger button then tap
the right pointing arrow,
and nally tap Vehicle
Information.
Step 2
When you’re done just
tap the menu hamburger
button to go back to the
Dashboard.
Step 1 Step 2
Viewing Your
Driver Prole
Step 1
To go to your Driver Prole
tap the menu hamburger
button then tap the right
pointing arrow, and nally
tap Driver Information.
Step 2
When you’re done
just tap left pointing
arrow to go back to
the Dashboard.
Page 35
ELECTRONIC LOGGING DEVICE USER MANUAL ELECTRONIC LOGGING DEVICE USER MANUAL
68 | National Carrier Exchange
National Carrier Exchange | 69
Troubleshooting your ELD
If you’re having issues with your ELD you can try these simple steps rst before contacting us.
If the red light is blinking then the GNSS Antenna is not receiving a signal. You must disconnect
the GNIS antenna and re- connect it and make sure it’s locked in place.
If the Green light is blinking then that means there is no signal from the vehicle to the ELD Device.
You must disconnect the OBD from the vehicle and re-connect it and make sure it’s fully connected.
If the Blue Light is off then make sure your mobile device is connected to the ELD through
Bluetooth. The Blue light will be only turned on when you’re connected to the ELD Device.
Unless you decide to use a SIM card in the ELD the yellow light will always be blinking. If you have
a SIM card and it’s blinking, remove the SIM card and reinsert it and make sure your SIM card is
connected.
Contact US
You can always contact us, we are here to answer all your questions.
By Email: [email protected]
By Phone: (213) 232-8687, Extension 1
By Mail: NCX, 650 S Grand Avenue, Suite 1188, Los Angeles, CA, 90017
Frequently Asked Questions Link:
https://www.nationalcarrierexchange.com/faq.html
Copyright © 2011-2018 National Carrier Exchange, Inc. | All Rights Reserved
Page 36
ELECTRONIC LOGGING DEVICE USER MANUAL
Page 37
ELECTRONIC LOGGING DEVICE USER MANUAL ELECTRONIC LOGGING DEVICE USER MANUAL
72 | National Carrier Exchange
National Carrier Exchange | 73
Limited Hardware Warranty
National Carrier Exchange, Inc. (NCX) provides the following limited warranty (the “Hardware Warranty”) to any purchaser
(“Customer”) of one of NCX’s Electronic Logging Devices and the software contained therein (collectively the “Hardware”).
1. Defects
1.1 NCX warrants that any Hardware purchased from NCX shall, for twelve (12) months from the date of dispatch from NCX to
Customer, be free of defects in materials and workmanship under normal use and service and shall substantially conform with
instruction manuals, user guides, and other information provided by NCX, or posted to its website, provided that such warranty
is limited by the terms of this Hardware Warranty and the NCX Terms of Service located at https://www.NationalCarrierExchange.com/terms.html (the “Terms of Service”).
2. Return, Repair and Refund
2.1. In order to make a claim for defective Hardware under this Hardware Warranty you must report any defect to NCX in
writing. Upon receipt of such report, NCX shall run a diagnostic test of the Hardware to determine if there is a defect. Upon
determining that there is a defect, NCX shall, within fteen (15) days of determination of a defect, send a replacement unit of
Hardware to Customer, at its own expense. Customer shall, at NCX’s expense, package and return the ELD to NCX. Title to the
defective Hardware shall pass to NCX upon receipt by Customer of the replacement ELD. Risk of loss shall pass to Customer
upon shipment of such replacement ELD to Customer.
2.2. If Customer has not returned any Hardware in accordance with Section 2.2 of this Hardware Warranty within thirty (30)
days of receipt of replacement Hardware, or has returned such Hardware in damaged condition, NCX shall have the right to
charge Customer $175 for each such unreturned or damaged Hardware. If you return any Hardware in a defaced manner, for
example, with writing on the Hardware or with the serial number removed or scratched off, unless otherwise approved by
NCX, we will charge you a $50 restoration fee per unit of Hardware returned in such state.
3. Limitations
3.1. This Hardware Warranty and the return and repair policy contained herein represents
Customers sole and exclusive remedy with respect to NCX Hardware.
3.2. NCX is not responsible for any data contained on any unit of Hardware or for any loss of such data.
3.3. This Hardware Warranty is null and void in the event of (a) any alteration, modication or special conguration or installation or de-installation of the Hardware without following NCX’s written instructions; (b) accidents affecting the Hardware,
misuse, tampering with, abuse, neglect or damage the Hardware; (c) use of the Services (as dened in the Terms of Service)
not in the ordinary course of your business operations; (d) connecting the Hardware to an improper voltage supply; (e) water,
weather or physical damage; or (f) use of the Hardware with accessories and/or devices which are not approved by NCX.
3.4. Warranty Disclaimer and Limitation of Liability. TO THE MAXIMUM EXTENT ALLOWABLE BY LAW AND EXCEPT AS
PROVIDED HEREIN, NCX MAKES NO WARRANTY OR REPRESENTATION, EITHER EXPRESS OR IMPLIED, REGARDING
ANY OF THE HARDWARE, WHICH IS PROVIDED TO YOU AS IS AND WITH ALL FAULTS. ALL SUCH WARRANTIES, INCLUDING, WITHOUT LIMITATION, THE IMPLIED WARRANTIES OF MERCHANTABILITY AND FITNESS FOR A PARTICULAR PURPOSE, ARE EXPRESSLY EXCLUDED. YOU BEAR THE ENTIRE RISK AS TO THE QUALITY AND PERFORMANCE
OF THE HARDWARE. NCX IS NOT RESPONSIBLE FOR ANY SPECIAL, INCIDENTAL OR CONSEQUENTIAL DAMAGES
RELATING TO THE HARDWARE.
Page 38

 Loading...