NCT Group 99M, 2000M User Manual

NCT® 99M
NCT® 2000M
Controls for Milling Machines and Machining Centers
Programmer's Manual

Manufactured by NCT Automation kft.
H1148 Budapest Fogarasi út 7
: Address: H1631 Bp. pf.: 26
F Phone: (+36 1) 467 63 00
F Fax:(+36 1) 363 6605
E-mail: nct@nct.hu
Home Page: www.nct.hu

Contents
1 Introduction ..............................................................9
1.1 The Part Program ......................................................9
Word ...............................................................9
Address Chain .........................................................9
Block ..............................................................10
Program Number and Program Name ......................................10
Beginning of Program, End of Program ......................................10
Program Format in the Memory ...........................................10
Program Format in Communications with External Devices .......................10
Main Program and Sub-program ..........................................10
DNC Channel ........................................................11
1.2 Fundamental Terms ....................................................12
2 Controlled Axes .........................................................17
2.1 Names of axes .......................................................17
2.2 Unit and Increment System of Axes ........................................17
3 Preparatory Functions (G codes) ............................................19
4 The Interpolation ........................................................22
4.1 Positioning (G00) .....................................................22
4.2 Linear Interpolation (G01) ...............................................22
4.3 Circular and Spiral Interpolation (G02, G03) .................................24
4.4 Helical Interpolation (G02, G03) ..........................................27
4.5 Equal Lead Thread Cutting (G33) .........................................29
4.6 Polar Coordinate Interpolation (G12.1, G13.1) ...............................31
4.7 Cylindrical Interpolation (G7.1) ...........................................35
5 The Coordinate Data .....................................................38
5.1 Absolute and Incremental Programming (G90, G91), Operator I ..................38
5.2 Polar Coordinates Data Command (G15, G16) ...............................38
5.3 Inch/Metric Conversion (G20, G21) .......................................40
5.4 Specification and Value Range of Coordinate Data ............................40
5.5 Rotary Axis Roll-over ..................................................41
6 The Feed ...............................................................45
6.1 Feed in rapid travers ...................................................45
6.2 Cutting Feed Rate .....................................................45
6.2.1 Feed per Minute (G94) and Feed per Revolution (G95) ....................46
6.2.2 Clamping the Cutting Feed ..........................................47
6.3 Automatic Acceleration/Deceleration .......................................48
6.4 Feed Control Functions .................................................49
6.4.1 Exact Stop (G09) .................................................49
3

6.4.2 Exact Stop Mode (G61) ........................................... 49
6.4.3 Continuous Cutting Mode (G64) ..................................... 50
6.4.4 Override and Stop Inhibit (Tapping) Mode (G63) ........................ 50
6.4.5 Automatic Corner Override (G62) .................................... 50
6.4.6 Internal Circular Cutting Override ..................................... 51
7 The Dwell (G04) ......................................................... 52
8 The Reference Point ..................................................... 53
8.1 Automatic Reference Point Return (G28) ................................... 53
8.2 Automatic return to reference points 2nd, 3rd, 4th (G30) ....................... 54
8.3 Automatic Return from the Reference Point (G29) ............................. 54
9 Coordinate Systems, Plane Selection ........................................ 56
9.1 The Machine Coordinate System ......................................... 56
9.1.1 Setting the Machine Coordinate system ................................ 57
9.1.2 Positioning in the Machine Coordinate System (G53) ...................... 57
9.2 Work Coordinate Systems .............................................. 57
9.2.1 Setting the Work Coordinate Systems ................................. 57
9.2.2 Selecting the Work Coordinate System ................................ 58
9.2.3 Programmed Setting of the Work Zero Point Offset ....................... 59
9.2.4 Creating a New Work Coordinate System (G92) ......................... 59
9.3 Local Coordinate System ............................................... 60
9.4 Plane Selection (G17, G18, G19) ......................................... 62
10 The Spindle Function .................................................... 64
10.1 Spindle Speed Command (code S) ....................................... 64
10.2 Programming of Constant Surface Speed Control ............................ 64
10.2.1Constant Surface Speed Control Command (G96, G97) ................... 65
10.2.2 Constant Surface Speed Clamp (G92) ................................ 65
10.2.3 Selecting an Axis for Constant Surface Speed Control .................... 66
10.3 Spindle Position Feedback ............................................. 66
10.4 Oriented Spindle Stop ................................................ 66
10.5 Spindle Positioning (Indexing) ........................................... 67
10.6 Spindle Speed Fluctuation Detection (G25, G26) ............................ 67
11 Tool Function .......................................................... 70
11.1 Tool Select Command (Code T) ......................................... 70
11.2 Program Format for Tool Number Programming ............................. 70
12 Miscellaneous and Auxiliary Functions ..................................... 72
12.1 Miscellaneous Functions (Codes M) ...................................... 72
12.2 Auxiliary Function (Codes A, B, C) ...................................... 73
12.3 Sequence of Execution of Various Functions ................................ 73
13 Part Program Configuration............................................... 74
4

13.1 Sequence Number (Address N) .........................................74
13.2 Conditional Block Skip ................................................74
13.3 Main Program and Sub-program .........................................74
13.3.1 Calling the Sub-program ...........................................74
13.3.2 Return from a Sub-program ........................................75
13.3.3 Jump within the Main Program ......................................77
14 The Tool Compensation ..................................................78
14.1 Referring to Tool Compensation Values (H and D) ...........................78
14.2 Modification of Tool Compensation Values from the Program (G10) ..............79
14.3 Tool Length Compensation (G43, G44, G49) ...............................80
14.4 Tool Offset (G45...G48) ...............................................81
14.5 Cutter Compensation (G38, G39, G40, G41, G42) ...........................85
14.5.1 Start up of Cutter Compensation .....................................88
14.5.2 Rules of Cutter Compensation in Offset Mode ...........................92
14.5.3 Canceling of Offset Mode ..........................................95
14.5.4 Change of Offset Direction While in the Offset Mode .....................98
14.5.5 Programming Vector Hold (G38) ...................................100
14.5.6 Programming Corner Arcs (G39) ...................................100
14.5.7 General Information on the Application of Cutter Compensation ............102
14.5.8 Interferences in Cutter Compensation ................................107
14.6 Three-dimensional Tool Offset (G41, G42) ................................112
14.6.1 Programming the Three-dimensional Tool Offset (G40, G41, G42) ..........112
14.6.2 The Three-dimensional Offset Vector ................................113
15 Special Transformations .................................................115
15.1 Coordinate System Rotation (G68, G69) ..................................115
15.2 Scaling (G50, G51) ..................................................116
15.3 Programmable Mirror Image (G50.1, G51.1) ..............................117
15.4 Rules of Programming Special Transformations .............................118
16 Automatic Geometric Calculations ........................................120
16.1 Programming Chamfer and Corner Round .................................120
16.2 Specifying Straight Line with Angle ......................................121
16.3 Intersection Calculations in the Selected Plane ..............................123
16.3.1 Linear-linear Intersection ..........................................123
16.3.2 Linear-circular Intersection ........................................125
16.3.3 Circular-linear Intersection ........................................127
16.3.4 Circular-circular Intersection .......................................129
16.3.5 Chaining of Intersection Calculations .................................131
17 Canned Cycles for Drilling ...............................................132
17.1 Detailed Description of Canned Cycles ...................................138
17.1.1 High Speed Peck Drilling Cycle (G73) ...............................138
17.1.2 Counter Tapping Cycle (G74) ......................................139
17.1.3 Fine Boring Cycle (G76) ..........................................140
5

17.1.4 Canned Cycle Cancel (G80) ...................................... 141
17.1.5 Drilling, Spot Boring Cycle (G81) ................................... 141
17.1.6 Drilling, Counter Boring Cycle (G82) ................................ 142
17.1.7 Peck Drilling Cycle (G83) ........................................ 143
17.1.8 Tapping Cycle (G84) ............................................ 144
17.1.9 Rigid (Clockwise and Counter-clockwise) Tap Cycles (G84.2, G84.3) ....... 145
17.1.10 Boring Cycle (G85) ............................................ 148
17.1.11 Boring Cycle Tool Retraction with Rapid Traverse (G86) ................ 149
17.1.12 Boring Cycle/Back Boring Cycle (G87) ............................. 150
17.1.13 Boring Cycle (Manual Operation on the Bottom Point) (G88) ............. 152
17.1.14 Boring Cycle (Dwell on the Bottom Point, Retraction with Feed) (G89) ..... 153
17.2 Notes to the use of canned cycles ....................................... 153
18 Measurement Functions ................................................ 155
18.1 Skip Function (G31) ................................................. 155
18.2 Automatic Tool Length Measurement (G37) ............................... 156
19 Safety Functions ....................................................... 158
19.1 Programmable Stroke Check (G22, G23) ................................. 158
19.2 Parametric Overtravel Positions ........................................ 159
19.3 Stroke Check Before Movement ....................................... 160
20 Custom Macro ........................................................ 161
20.1 The Simple Macro Call (G65) ......................................... 161
20.2 The Modal Macro Call ............................................... 162
20.2.1 Macro Modal Call in Every Motion Command (G66) .................... 162
20.2.2 Macro Modal Call From Each Block (G66.1) ......................... 163
20.3 Custom Macro Call Using G Code ...................................... 164
20.4 Custom Macro Call Using M Code ..................................... 165
20.5 Subprogram Call with M Code ......................................... 165
20.6 Subprogram Call with T Code ......................................... 166
20.7 Subprogram Call with S Code ......................................... 166
20.8 Subprogram Call with A, B, C Codes .................................... 166
20.9 Differences Between the Call of a Sub-Program and the Call of a Macro .......... 167
20.9.1 Multiple Calls .................................................. 167
20.10 Format of Custom Macro Body ....................................... 169
20.11 Variables of the Programming Language ................................. 169
20.11.1 Identification of a Variable ....................................... 169
20.11.2 Referring to a variable .......................................... 169
20.11.3 Vacant Variables .............................................. 170
20.11.4 Numerical Format of Variables .................................... 170
20.12 Types of Variables ................................................. 171
20.12.1 Local Variables ............................................... 171
20.12.2 Common Variables ............................................ 171
20.12.3 System Variables .............................................. 172
20.13 Instructions of the Programming Language ................................ 180
6

20.13.1 Definition, Substitution ..........................................180
20.13.2 Arithmetic Operations and Functions ................................181
20.13.3 Logical Operations .............................................184
20.13.4 Unconditional Divergence ........................................184
20.13.5 Conditional Divergence ..........................................185
20.13.6 Conditional Instruction ..........................................185
20.13.7 Iteration .....................................................185
20.13.8 Data Output Commands .........................................188
20.14 NC and Macro Instructions ...........................................191
20.15 Execution of NC and Macro Instructions in Time ...........................191
20.16 Displaying Macros and Sub-programs in Automatic Mode ....................192
20.17 Using the STOP Button While a Macro Instruction is Being Executed ............192
20.18 Pocket-milling Macro Cycle ..........................................193
Notes ..................................................................197
Index in Alphabetical Order ................................................198
July 2, 2002
7

© Copyright NCT July 2, 2002
The Publisher reserves all rights for contents
of this Manual. No reprinting, even in
extracts, is permissible unless our written
consent is obtained.
The text of this Manual has been compiled
and checked with utmost care, yet we
assume no liability for possible errors or
spurious data and for consequential losses or
demages.
8

1 Introduction
1 Introduction
1.1 The Part Program
The Part Program is a set of instructions that can be interpreted by the control system in order to
control the operation of the machine.
The Part Program consists of blocks which, in turn, comprise words.
Word: Address and Data
Each word is made up of two parts - an address and a data. The address has one or more
characters, the data is a numerical value (an integer or decimal value). Some addresses may be given
a sign or operator I.
Address Chain:
Address Meaning Value limits
O program number 0001 - 9999
/ optional block 1 - 9
N block number 1 - 99999
G preparatory function *
X, Y, Z, U, V ,W length coordinates I, -, *
A, B, C angular coordinates, length coordinates, auxiliary
functions
R circle radius, auxiliary data I, -, *
I, J, K circle center coordinates, auxiliary coordinate -, *
E auxiliary coordinate -, *
F feed rate *
S spindle speed *
M miscellaneous function 1 - 999
T tool number 1 - 9999
H, D number of length and radius compensation cell 1 - 99
L repetition number 1 - 9999
P auxiliary data, dwell time -, *
Q auxiliary data -, *
,C distance of chamfer -, *
,R radius of fillet -, *
,A angle of straight line -, *
( comment *
I, -, *
At an address marked with a * in the Value Limits column, the data may have a decimal value as
well.
At an address marked with I and -, an incremental operator or a sign can be assigned, respectively.
The positive sign + is not indicated and not stored.
9

1 Introduction
Block
A block is made up of words.
The blocks are separated by characters s (Line Feed) in the memory. The use of a block number
is not mandatory in the blocks. To distinguish the end of block from the beginning of another block
on the screen, each new block begins in a new line, with a character > placed in front of it, in the
case of a block longer than a line, the words in each new line are begun with an indent of one
character.
Program Number and Program Name
The program number and the program name are used for the identification of a program. The use of
program number is mandatory that of a program name is not.
The address of a program number is O. It must be followed by exactly four digits.
The program name is any arbitrary character sequence (string) put between opening "(" and
closing brackets ")". It may have max. 16 characters.
The program number and the program name are separated by characters s (Line Feed) from the
other program blocks in the memory.
In the course of editing, the program number and the program name will be displayed invariably in
the first line.
There may be not two programs of a given program number in the backing store.
Beginning of Program, End of Program
Each program begins and ends with characters %. In the course of part program editing the
program-terminating character is placed invariably behind the last block in order to ensure that the
terminated locks will be preserved even in the event of a power failure during editing.
Program Format in the Memory
The program stored in the memory is a set of ASCII characters.
The format of the program is
%O1234(PROGRAM NAME)s/1N12345G1X0Y...sG2Z5...s....s
...s
...s
N1G40...M2s
%
In the above sequence of characters,
s is character "Line Feed",
% is the beginning (and end) of the program.
Program Format in Communications with External Devices
The above program is applicable also in communications with an external device.
Main Program and Sub-program
The part programs may be divided into two main groups -
main programs, and
subprograms.
The procedure of machining a part is described in the main program. If, in the course of machining
repeated patterns have to be machined at different places, it is not necessary to write those
program-sections over and over again in the main program, instead, a sub-program has to be
organized, which can be called from any place (even from another sub-program). The user can
10

1 Introduction
return from the sub-program to the calling program.
DNC Channel
A program contained in an external unit (e.g., in a computer) can also be executed without storing it
in the control's memory. Now the control will read the program, instead of the memory, from the
external data medium through the RS232C interface. That link is referred to as "DNC channel". This
method is particularly useful for the execution of programs too large to be contained in the control's
memory.
The DNC channel is a protocol-controlled data transfer channel as shown below.
Controller:
Equipment:
<
BEL > DC1 NAK/ACK DC3
ACK > BLOCK
<
The above mnemonics have the following meanings (and their ASCII codes):
BEL (7): The control requests the sender to establish the communication. The control issues
L again unless ACK is returned in a definite length of time.
ACK (6): acknowledgment.
NAK (21): Spurious data transfer (e.g. hardware trouble in the line or BCC error). The
transfer of BLOCK has to be repeated.
DC1 (17): Transfer of the next BLOCK has to be started.
DC3 (19): Interruption of communication.
BLOCK:
– Basically an NC block (including the terminating character s) and the checksum
thereof (BCC) stored in 7 bits as the last byte of the block (bit 7, the
uppermost one, of BCC is invariably 0). No SPACE (32) or some other
character of lower ASCII code may be contained in the block.
– EOF (26) (End Of File), a signal is transferred by the Equipment ("sender") to
interrupt the communication.
For the DNC mode, set the second physical channel (only that one is applicable as a DNC channel)
for 8-bit even-parity mode.
A main program executed from the DNC channel may have a linear sequence only. This does not
apply to subprogram or macro (if any have been called) however, they must be contained in the
memory of control. In the event of a departure from the linear sequence in the main program
(GOTO, DO WHILE), the control will return error message 3058 NOT IN DNC. If the control
detects a BLOCK error and returns NAK, the BLOCK has to be repeated.
11
1 Introduction
1.2 Fundamental Terms
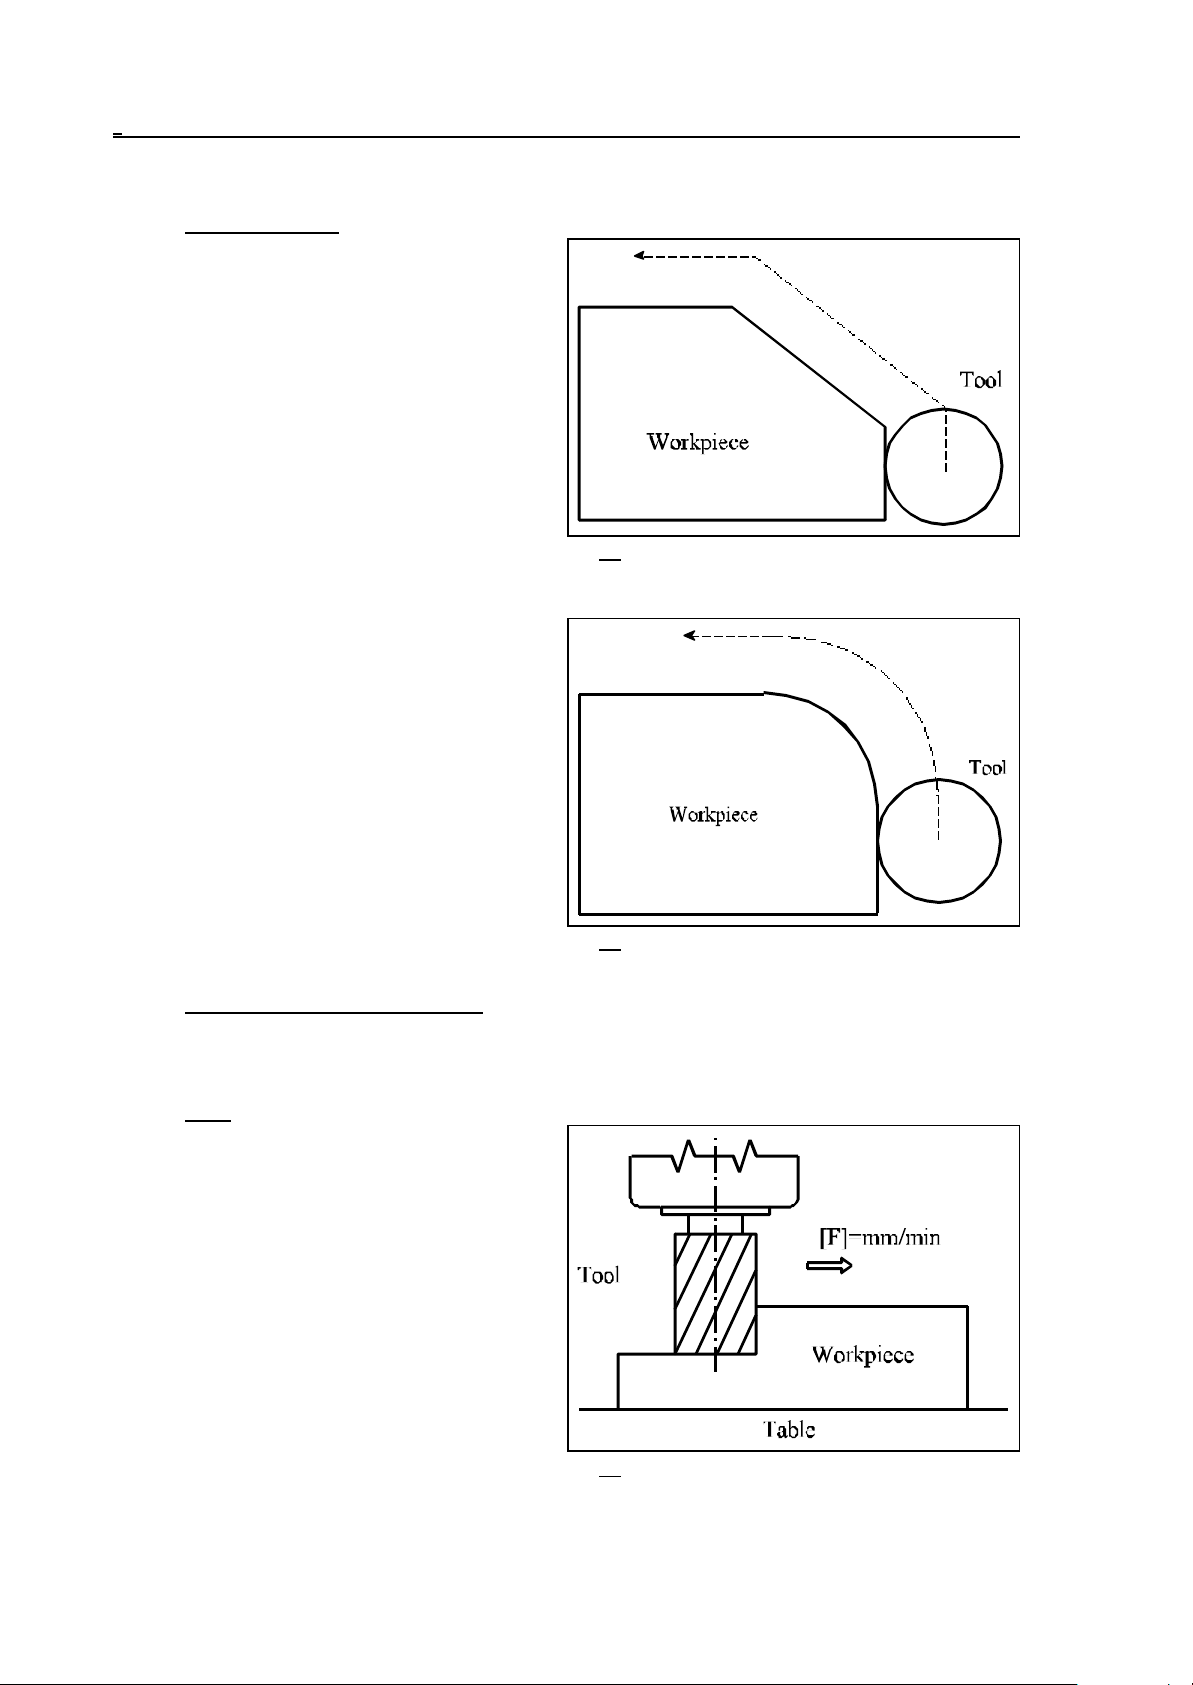
The Interpolation
The control system can move the tool along
straight lines and arcs in the course of machining. These activities will be hereafter referred
to as "interpolation".
Tool movement along a straight line:
program:
G01 Y__
X__ Y__
Tool movement along an arc:
program:
G03 X__ Y__ R__
Fig. 1.2-1
Although, in general, the table with the workpiece and not the tool moves, this description
will refer to the motion of the tool against the
workpiece.
Fig. 1.2-2
Preparatory Functions (G codes)
The type of activity to be performed by a block is described with the use of preparatory functions
(also referred to as G codes). E.g., code G01 introduces a linear interpolation.
Feed
The term "feed" refers to the speed of the tool
relative to the workpiece during the process of
cutting. The desired feed can be specified in the
program at address F and with a numerical
value. For example F150 means 150
mm/minute.
12
Fig. 1.2-3
1 Introduction
Reference Point
The reference point is a fixed point on the machine-tool. After power-on of the machine, the slides
have to be moved to the reference point. Afterwards the control system will be able to interpret data
of absolute coordinates as well.
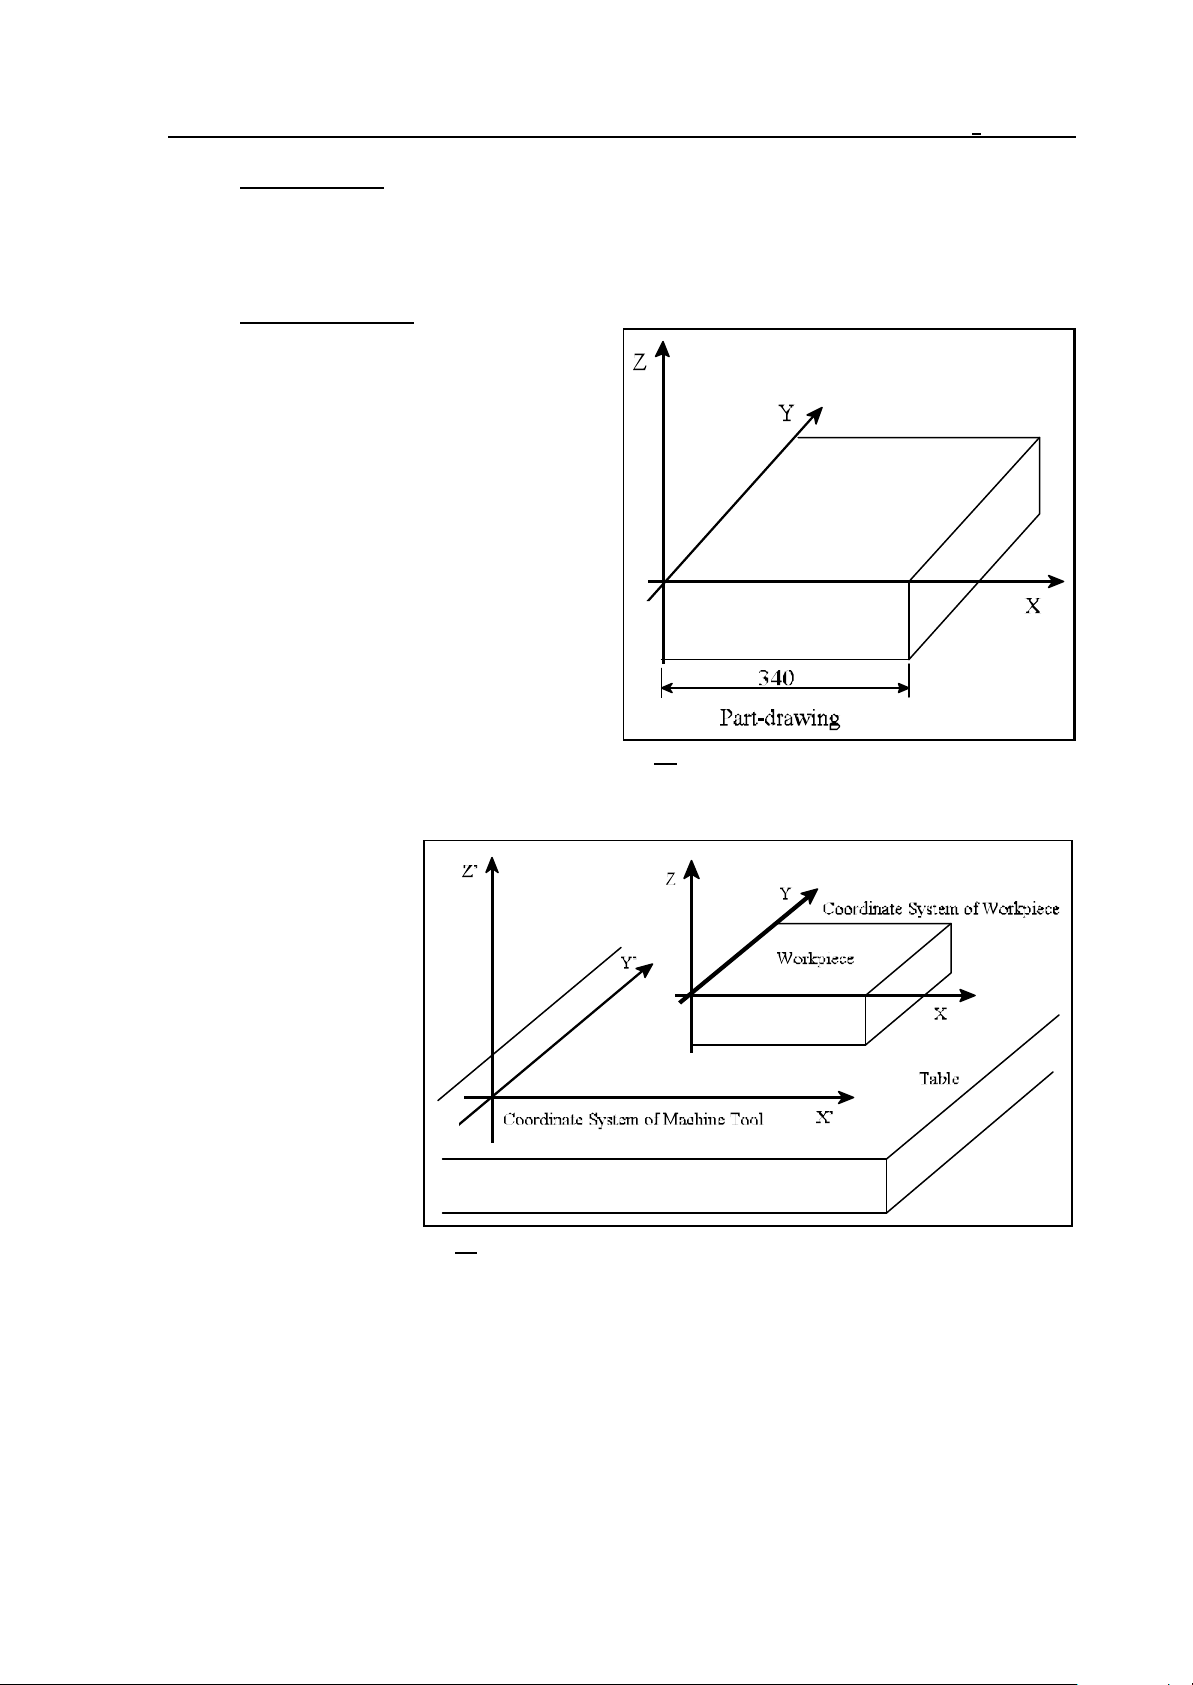
Coordinate System
The dimensions indicated in the part drawing
are measured from a given point of the part.
That point is the origin of the workpiece
coordinate system. Those dimensional data have
to be written at the coordinate address in the
part program. E.g., X340 means a point of
coordinate 340 mm in the coordinate system of
the workpiece.
Fig. 1.2-4
The coordinate system
specified in the control
system and in which the
control interprets the
positions, is different from
the coordinate system of
the workpiece. For the
control system to make a
correct workpiece, the
zero points of the two
coordinate systems have
to be set at the same
position. This can be
achieved, e.g., by moving
Fig. 1.2-5
the tool center to a point
of known position of the part and setting the coordinate system of the control to that value.
13
1 Introduction
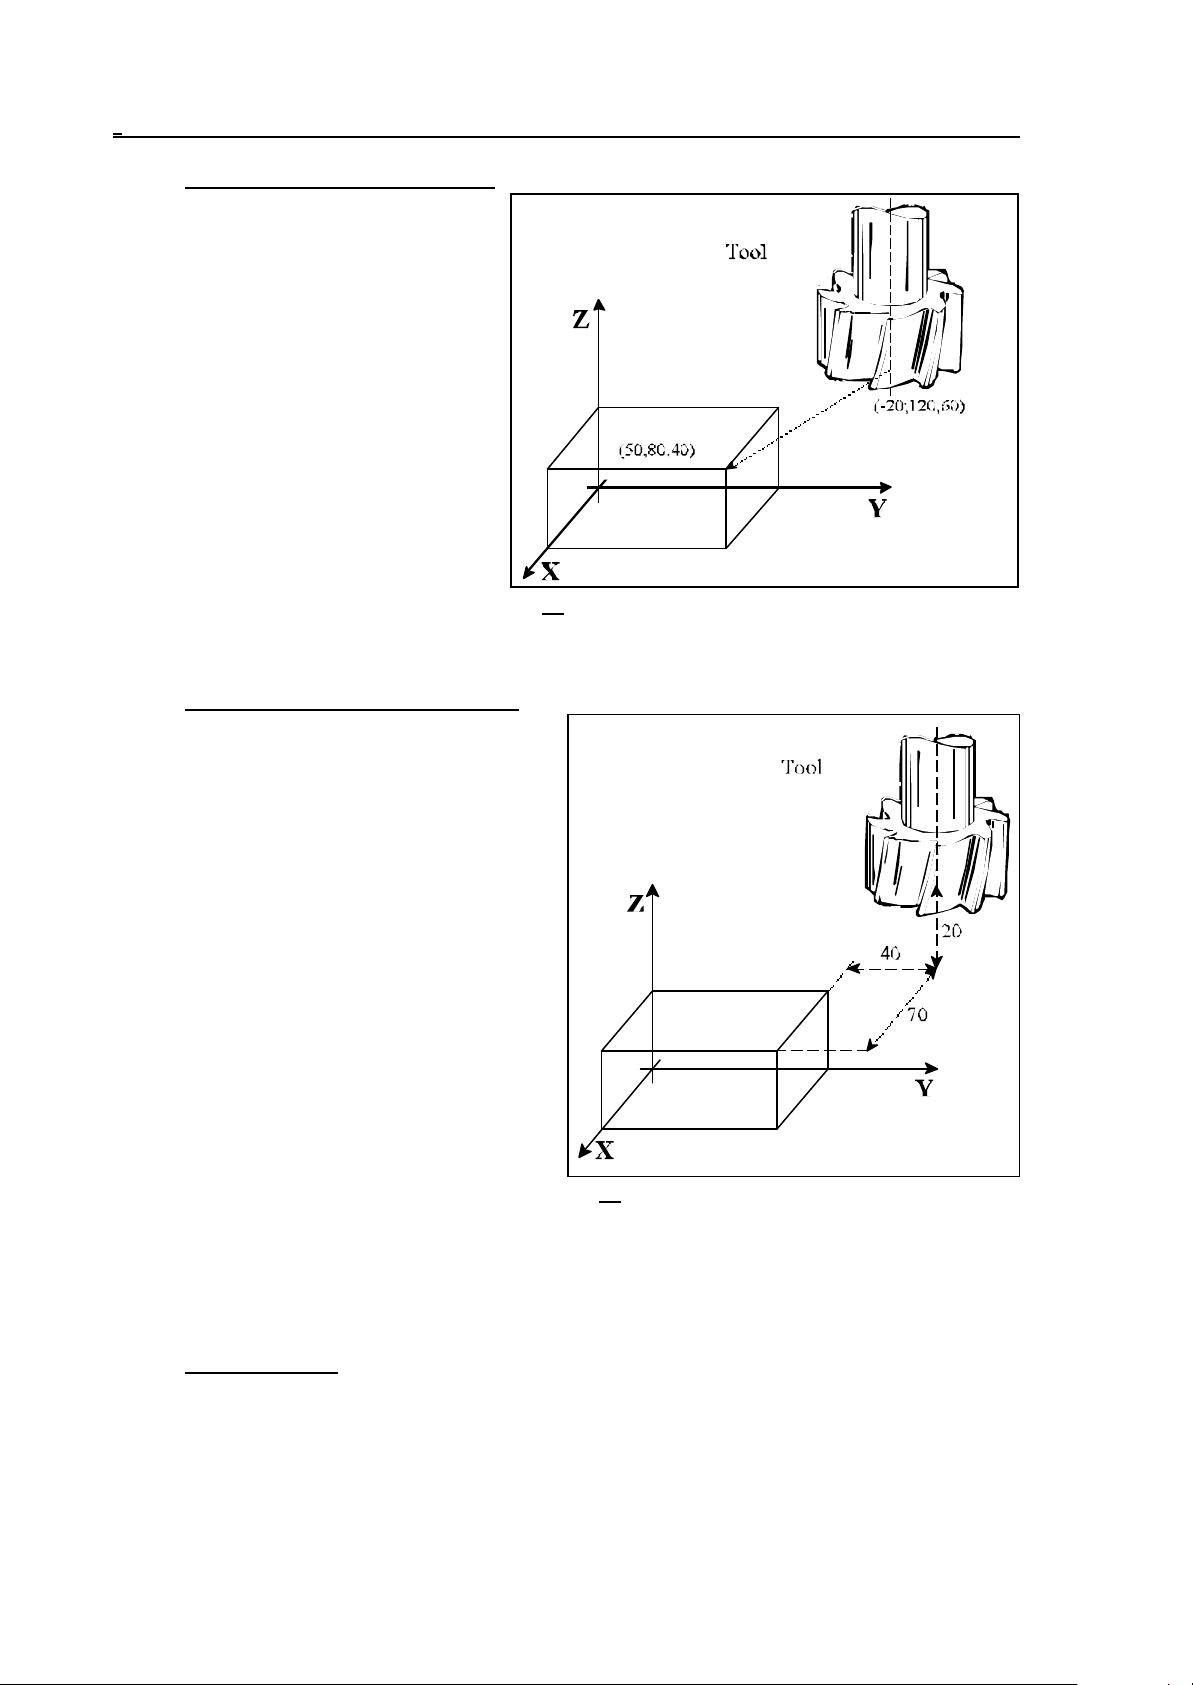
Absolute Coordinate Specification
When absolute coordinates are specified,
the tool travels a distance measured from
the origin of the coordinate system, i.e., to
a point whose position has been specified
by the coordinates.
The code of absolute data specification is
G90.
The block
G90 X50 Y80 Z40
will move the tool to a point of the above
position, irrespective of its position before
the command has been issued.
Fig. 1.2-6
Incremental Coordinate Specification
In the case of an incremental data specification,
the control system will interpret the coordinate
data in such a way that the tool will travel a
distance measured from its instantaneous
position.
The code of incremental data specification is
G91. Code G91 refers to all coordinate values.
The block
G91 X70 Y-40 Z-20
will move the tool over the above distance from
its previous position.
An incremental data may be defined to be
referred to a single coordinate as well. Standing
behind the address of the coordinate, character
I refers to the incremental specification of the
given coordinate value.
Fig. 1.2-7
In block
G90 XI-70 Y80 Z40
the data of X is interpreted as an incremental value, whereas data Y and Z are - for code G90 interpreted as absolute coordinates.
Modal Functions
Some codes are effective until another code or value is specified. These are modal codes. E.g., in
program detail
N15 G90 G1 X20 Y30 F180
N16 X30
N17 Y100
14
1 Introduction
the code of G90 (absolute data specification) and the value of F (Feed), specified in block N15, will
be modal in blocks N16 and N17. Thus it is not necessary to specify those functions in each block
followed.
One-shot (Non-modal) Functions
Some codes or values are effective only in the block in which they are specified. These are one-shot
functions.
Spindle Speed Command
The spindle speed can be specified at address S. It is also termed as "S function". Instruction S1500
tells the spindle to rotate at a speed of 1500 rpm
Tool Function
In the course of machining different tools have to be employed for the various cutting operations.
The tools are differentiated by numbers. Reference can be made to the tools with code T.
Instruction T25 in the program means that tool No. 25 has to be changed. The tool change can be
carried out manually or automatically, depending on the design of the machine.
Miscellaneous Functions
A number of switching operations have to be carried out in the course of machining. For example,
starting the spindle, turning on the coolant. Those operations can be performed with M
(miscellaneous) functions. E.g., in the series of instructions
M3 M8
M3 means “rotate the spindle clockwise”, M8 means "turn on the coolant".
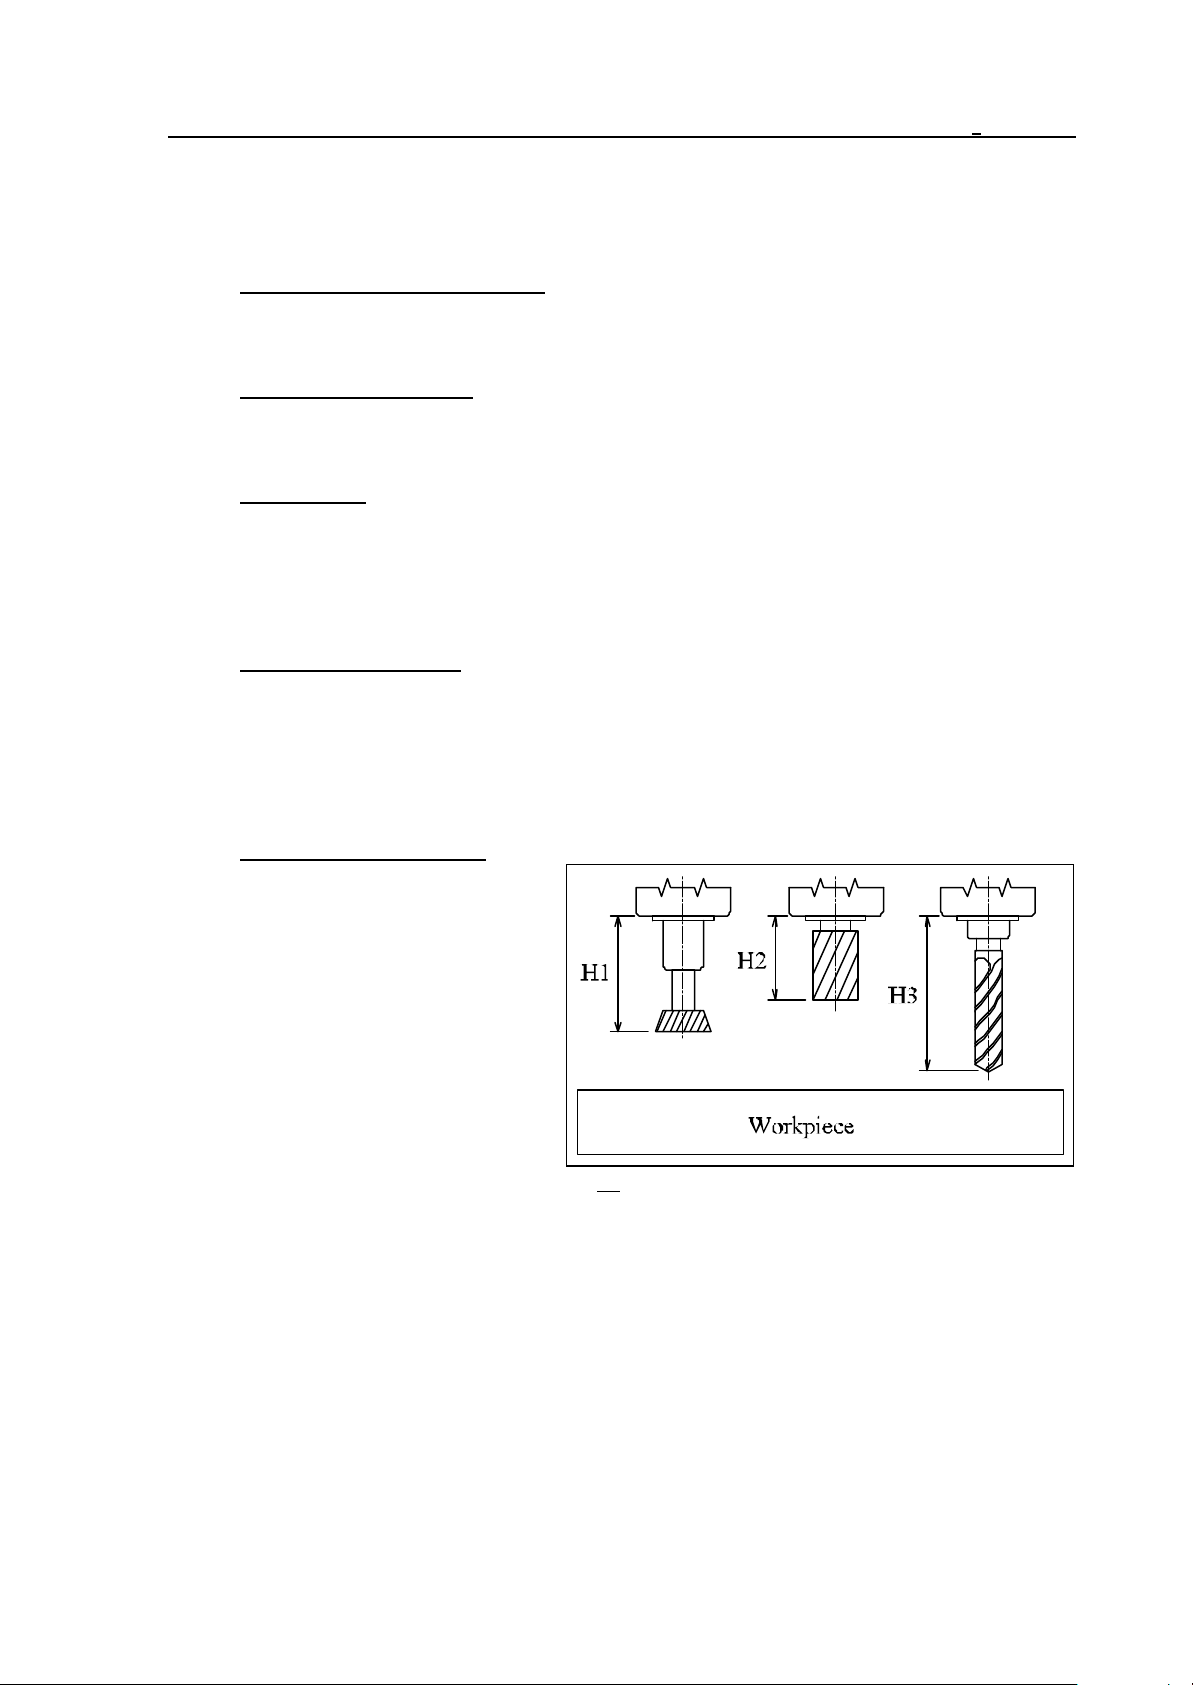
Tool Length Compensation
In the course of machining, tools of
different length are employed for the
various operations. On the other hand, a
given operation also has to be performed
with tools of different lengths in series
production (e.g., when the tool breaks).
In order to make the motions described in
the part program independent of the
length of the tool, the various tool lengths
must be set in control system. If the
program is intended to move the tip of the
Fig. 1.2-8
tool to the specified point, the value of the
particular length data has to be called. This is feasible at address H. E.g., instruction H1 refers to
length data No.1. Henceforth the control will move the tip of the tool to the specified point. That
procedure is referred to as setting “tool length compensation" mode.
15
1 Introduction
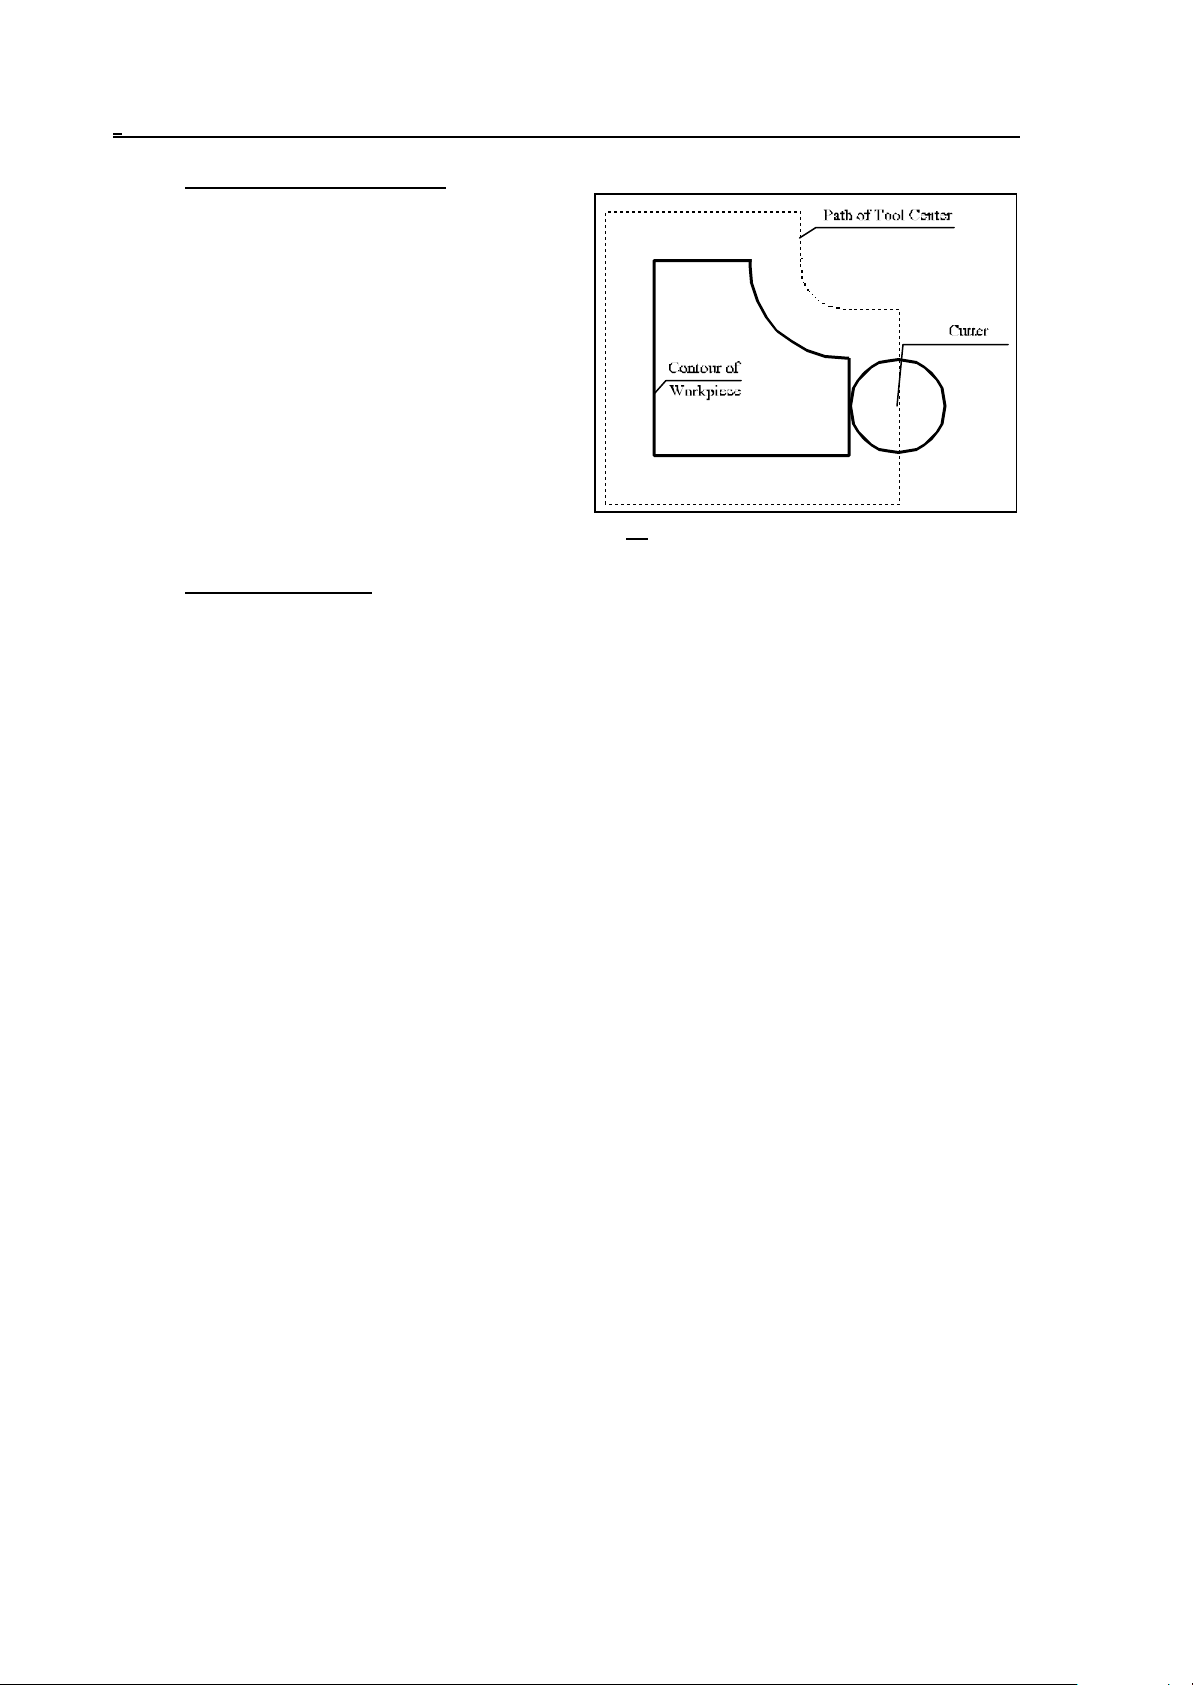
Cutter Radius Compensation
Machining a workpiece has to be done with tools
of different radii. Radius compensation has to be
introduced in order to write the actual contour data
of the part in the program, instead of the path
covered by the tool center (taking into
consideration the tool radii). The values of radius
compensations have to be set in control system.
Hereinafter reference can be made to cutter
compensations at address D in the program.
Fig. 1.2-9
Wear Compensation
The tools are exposed to wear in the course of machining. Allowance can be made for such
dimensional changes (in length and radius as well) with wear compensations. The tool wear can be
set in the control system. A geometry value, i.e., the initial length and radius of the tool, and a wear
one belong to each compensation group (referred to at address H or D). When the compensation is
set, the control will compensate the movement with the sum of the two values.
16
2 Controlled Axes
2 Controlled Axes
Number of Axes (in basic configuration) 3 axes
In expanded configuration 5 additional axes (8 axes altogether)
Number of axes to be moved simultaneously 8 axes (with linear interpolation)
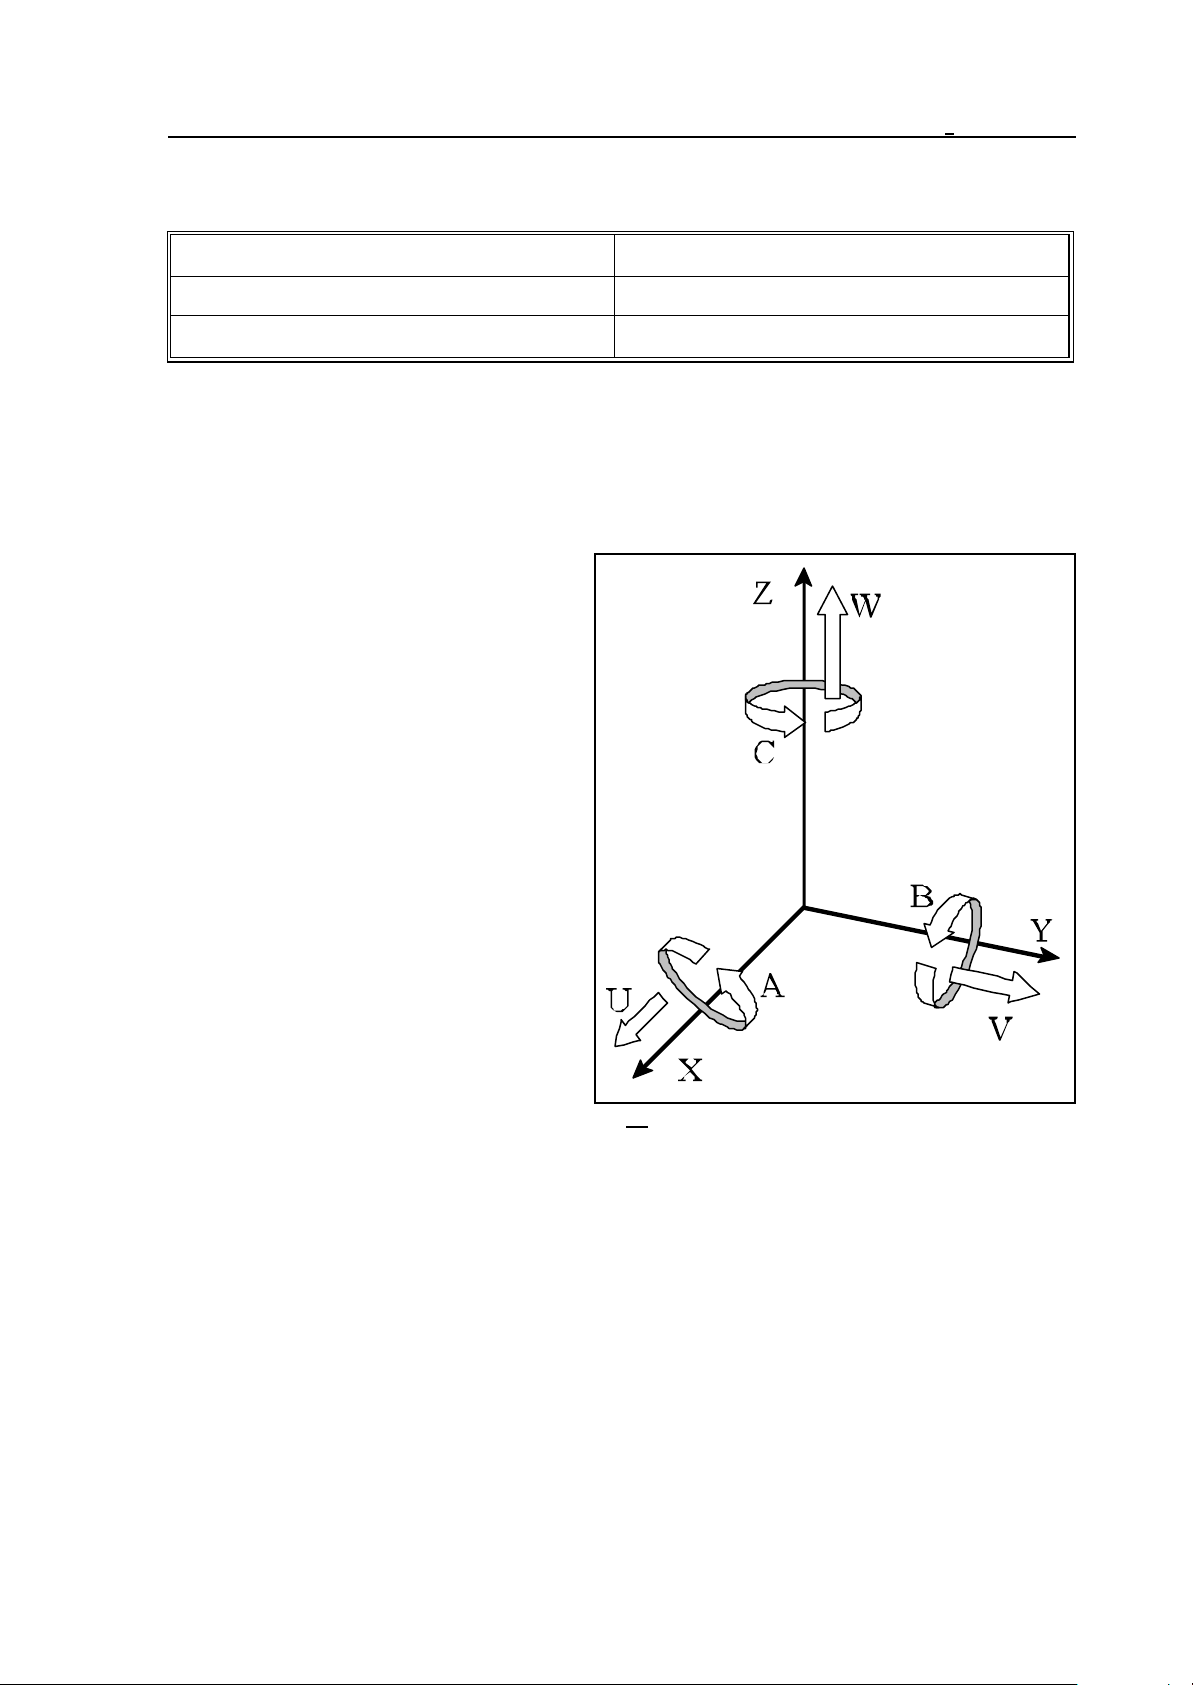
2.1 Names of axes
The names of controlled axes can be defined in the parameter memory. Each address can be
assigned to one of the physical axes.
In the basic configuration, the names of axes
in a milling control system: X, Y and Z.
The names of additional (expansion) axes
depend on their respective types.
Possible names of expansion axes
performing linear motions are: U,V and W.
When they are parallel to the main axes X,Y
and Z, their name will be U,V and W,
respectively.
Axes performing rotational motions are
termed A, B and C. The rotational axes
whose axle of rotation parallel to X, Y and
Z directions are termed A, B and C,
respectively.
Fig. 2.1-1
2.2 Unit and Increment System of Axes
The coordinate data can be specified in 8 digits. They can have signs, too. The positive sign + is
omitted.
The data of input length coordinates can be specified in mm or inches. They are the units of input
measures. The desired one can be selected from the program.
The path-measuring device provided on the machine can measure the position in mm or in inches. It
will determine the output unit of measures, which has to be specified by the control system as a
parameter. The two units of measures may not be combined on a given machine.
In the case of different input and output units of measures, the control system will automatically
perform the conversion.
17

2 Controlled Axes
The rotational axes are always provided with degrees as units of measure.
The input increment system of the control is regarded as the smallest unit to be entered. It can be
selected as parameter. There are three systems available - IS-A IS-B and IS-C. The increment
systems may not be combined for the axes on a given machine.
Having processed the input data, the control system will provide new path data for moving the axes.
Their resolution is always twice the particular input increment system. It is termed the output
increment system of the control.
Thus the input increment system of the control is determined by the resolution of the encoder.
Increment system Min. unit to be entered Max. unit to be entered
0.01 mm 999999.99 mm
IS-A
IS-B
IS-C
0.001 inch 99999.999 inch
0.01 degree 999999.99 degree
0.001 mm 99999.999 mm
0.0001 inch 9999.9999 inch
0.001 degree 99999.999 degree
0.0001 mm 9999.9999 mm
0.00001 inch 999.99999 inch
0.0001 degree 9999.9999 degree
18
3 Preparatory Functions (G codes)
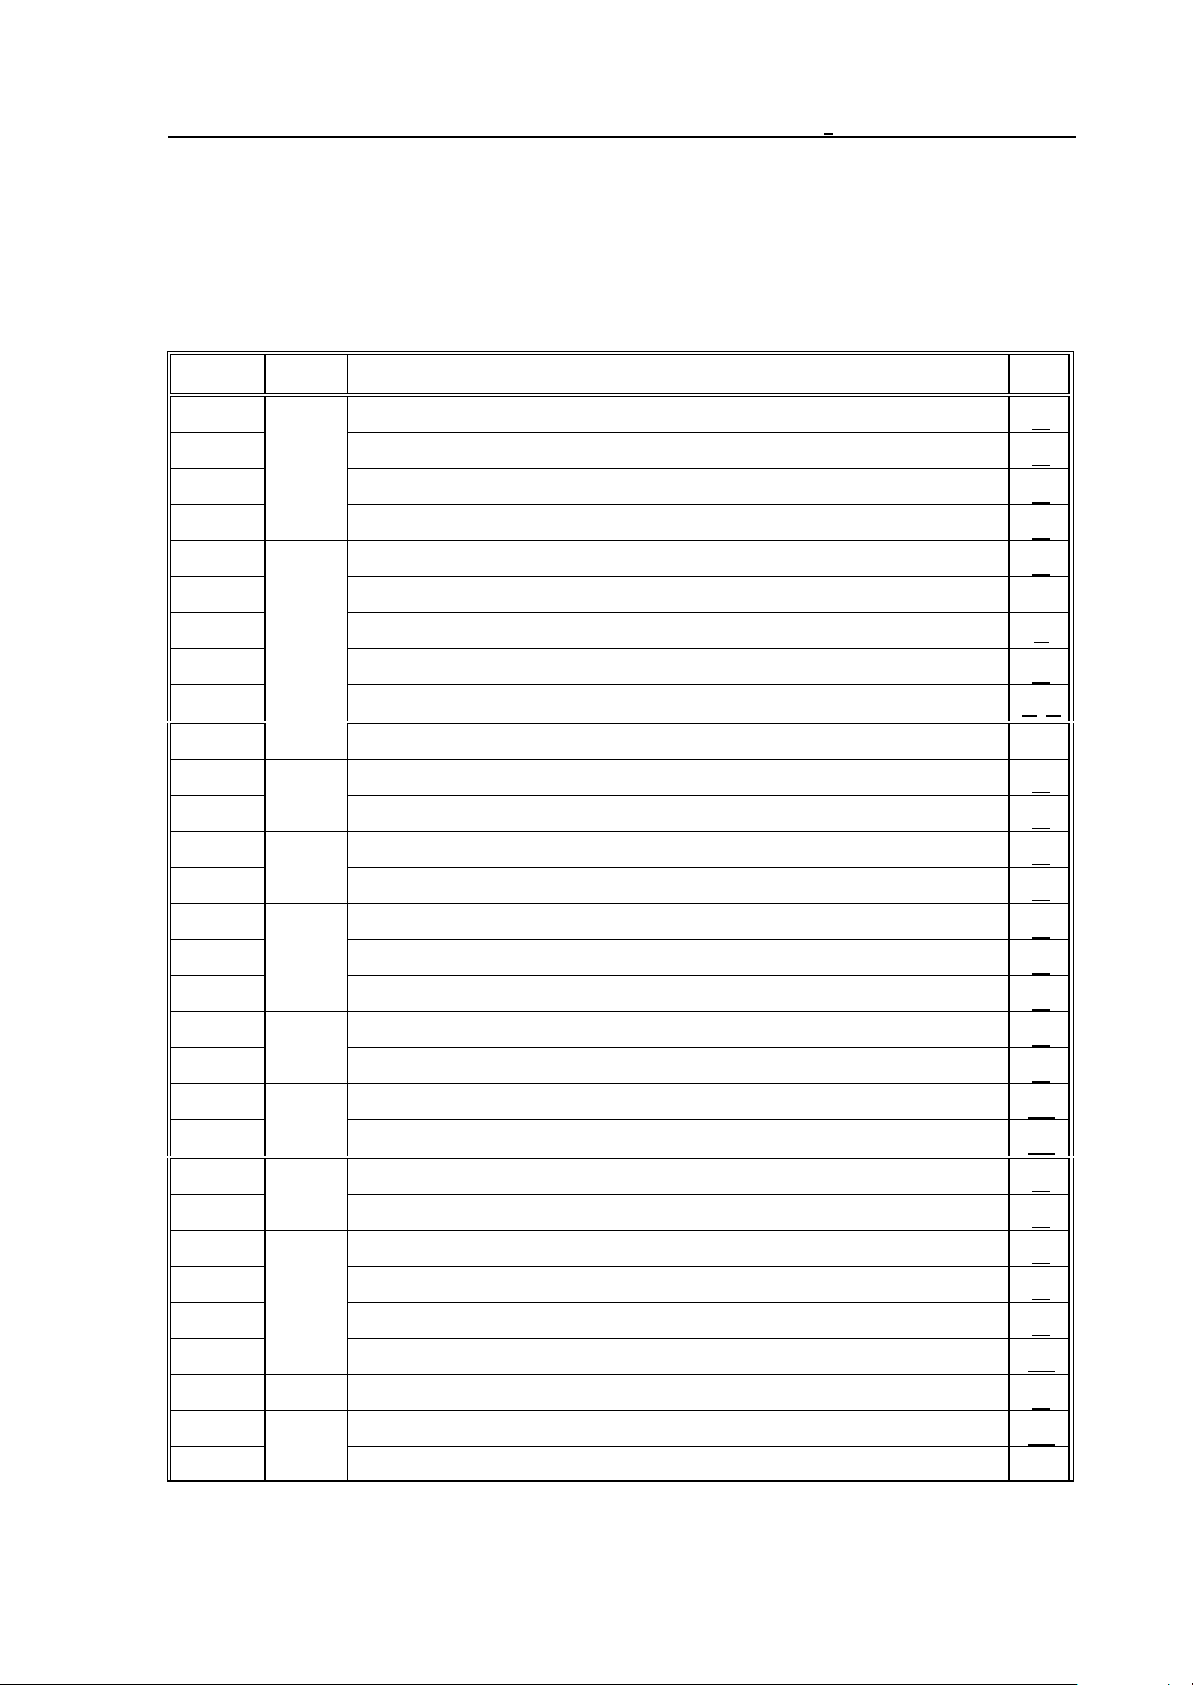
3 Preparatory Functions (G codes)
The type of command in the given block will be determined by address G and the number following
it.
The Table below contains the G codes interpreted by the control system, the groups and functions
thereof.
G code
G00
G01
Group
*
*
positioning 22
linear interpolation 22
Function
Page
01
G02 circular, helical interpolation, clockwise (CW) 24
G03 circular, helical interpolation, counter-clockwise (CCW) 24
G04
dwell 52
G05.1 multi-buffer mode on
G07.1 Cylindrical interpolation
35
00
G09 exact stop (in the given block) 49
G10 data setting (programmed)
59, 79
G11 programmed data setting cancel
G12.1
Polar coordinate interpolation on 31
26
G13.1 Polarc coordinate interpolation off 31
*
G15
polar coordinate command cancel 38
17
G16 polar coordinate command 38
*
G17
G18
*
selection of XpYp plane 62
02
selection of ZpXp plane 62
G19 selection of YpZp plane 62
G20
inch input 40
06
G21 metric input 40
*
G22
programable stroke check function on 158
04
G23 programable stroke check function off 158
*
G25
spindle speed fluctuation detection off 67
8
G26 spindle speed fluctuation detection on 67
G28
programmed reference-point return 53
G29 return from reference point 54
0
G30 return to the 1st, 2nd, 3rd and 4th reference point 54
G31 skip function 155
G33 01 thread cutting 29
G37
Automatic tool-length measurement 156
00
G38 cutter compensation vector hold 100
19

3 Preparatory Functions (G codes)
G code
Group
Function
Page
G39 cutter compensation corner arc 100
*
G40
G41 cutter radius compensation left/3 dimensional tool compensation
cutter radius/3 dimensional tool compensation cancel
07
G42 cutter radius compensation right
*
G43
G44
G45
*
tool length compensation + 80
08
tool length compensation – 80
tool offset increase 81
85
85, 88
85, 88
G46 tool offset decrease 81
00
G47 tool offset double increase 81
G48 tool offset double decrease 81
*
G49
G50
*
08 tool length compensation cancel 80
scaling cancel 116
11
G51 scaling 116
*
G50.1
programable mirror image cancel 117
18
G51.1 programable mirror image 117
G52
local coordinate system setting 60
00
G53 positioning in the machine coordinate system 57
*
G54
work coordinate system 1 selection 58
G55 work coordinate system 2 selection 58
G56 work coordinate system 3 selection 58
14
G57 work coordinate system 4 selection 58
G58 work coordinate system 5 selection 58
G59 work coordinate system 6 selection 58
G61
exact stop mode 49
G62 automatic corner override mode 50
15
G63 override inhibit 50
*
G64
continuous cutting 50
G65 simple macro call 161
G66 macro modal call (A) in every motion command 162
G66.1 macro modal (B) call from each block 163
G67 macro modal call (A/B) cancel 162
G68
G69
*
coordinate system rotation 115
16
coordinate system rotation cancel 115
G73
G74 counter tapping cycle 139
High Speed Peck Drilling Cycle 138
09
G76 fine boring cycle 140
20

3 Preparatory Functions (G codes)
G code
*
G80
G81 drilling, spot boring cycle, 141
G82 drilling, counter boring cycle 142
G83 peck drilling cycle 143
G84 tapping cycle 144
G84.2 rigid tap cycle 145
G84.3 rigid counter tap cycle 145
G85 boring cycle 148
G86 Boring Cycle Tool Retraction with Rapid Traverse 149
G87 Boring Cycle/Back Boring Cycle 150
G88 Boring Cycle (Manual Operation on the Bottom Point) 152
G89 Boring Cycle (Dwell on the Bottom Point, Retraction with Feed) 153
*
G90
*
G91
G92 00 work coordinates change/maximum spindle speed setting 59
*
G94
*
G95
Group
03
05
Function
canned cycle cancel 141
absolute command 38
incremental command 38
feed per minute 46
feed per revolution 46
Page
G96
*
G97
*
G98
G99 canned cycle R point level return 133
constant surface speed control 65
13
constant surface speed control cancel 65
canned cycle initial level return 133
10
L Notes:
– The * marked G codes in a group represent the state assumed by the control system after power-
on.
– If several codes are marked with * in a group, a parameter can be set to select the effective one
after power-on. They are : G00, G01; G17, G18; G43, G44, G49; G90, G91; G94, G95.
– At the time of power-on, the particular one of G20 and G21 will be effective, that has been set at
the time of power-off.
– Default interpretation of command G05.1 after power-on can be specified with the MULBUF
parameter.
– G codes in group 00 are not modal ones; the rest are so.
– More than one G code can be written in a block with the restriction that only one of the same
function group may used.
– Reference to an illegal G code or specification of several G codes belonging to the same group
within a particular block will produce error message 3005 ILLEGAL G CODE.
21
4 The Interpolation
4 The Interpolation
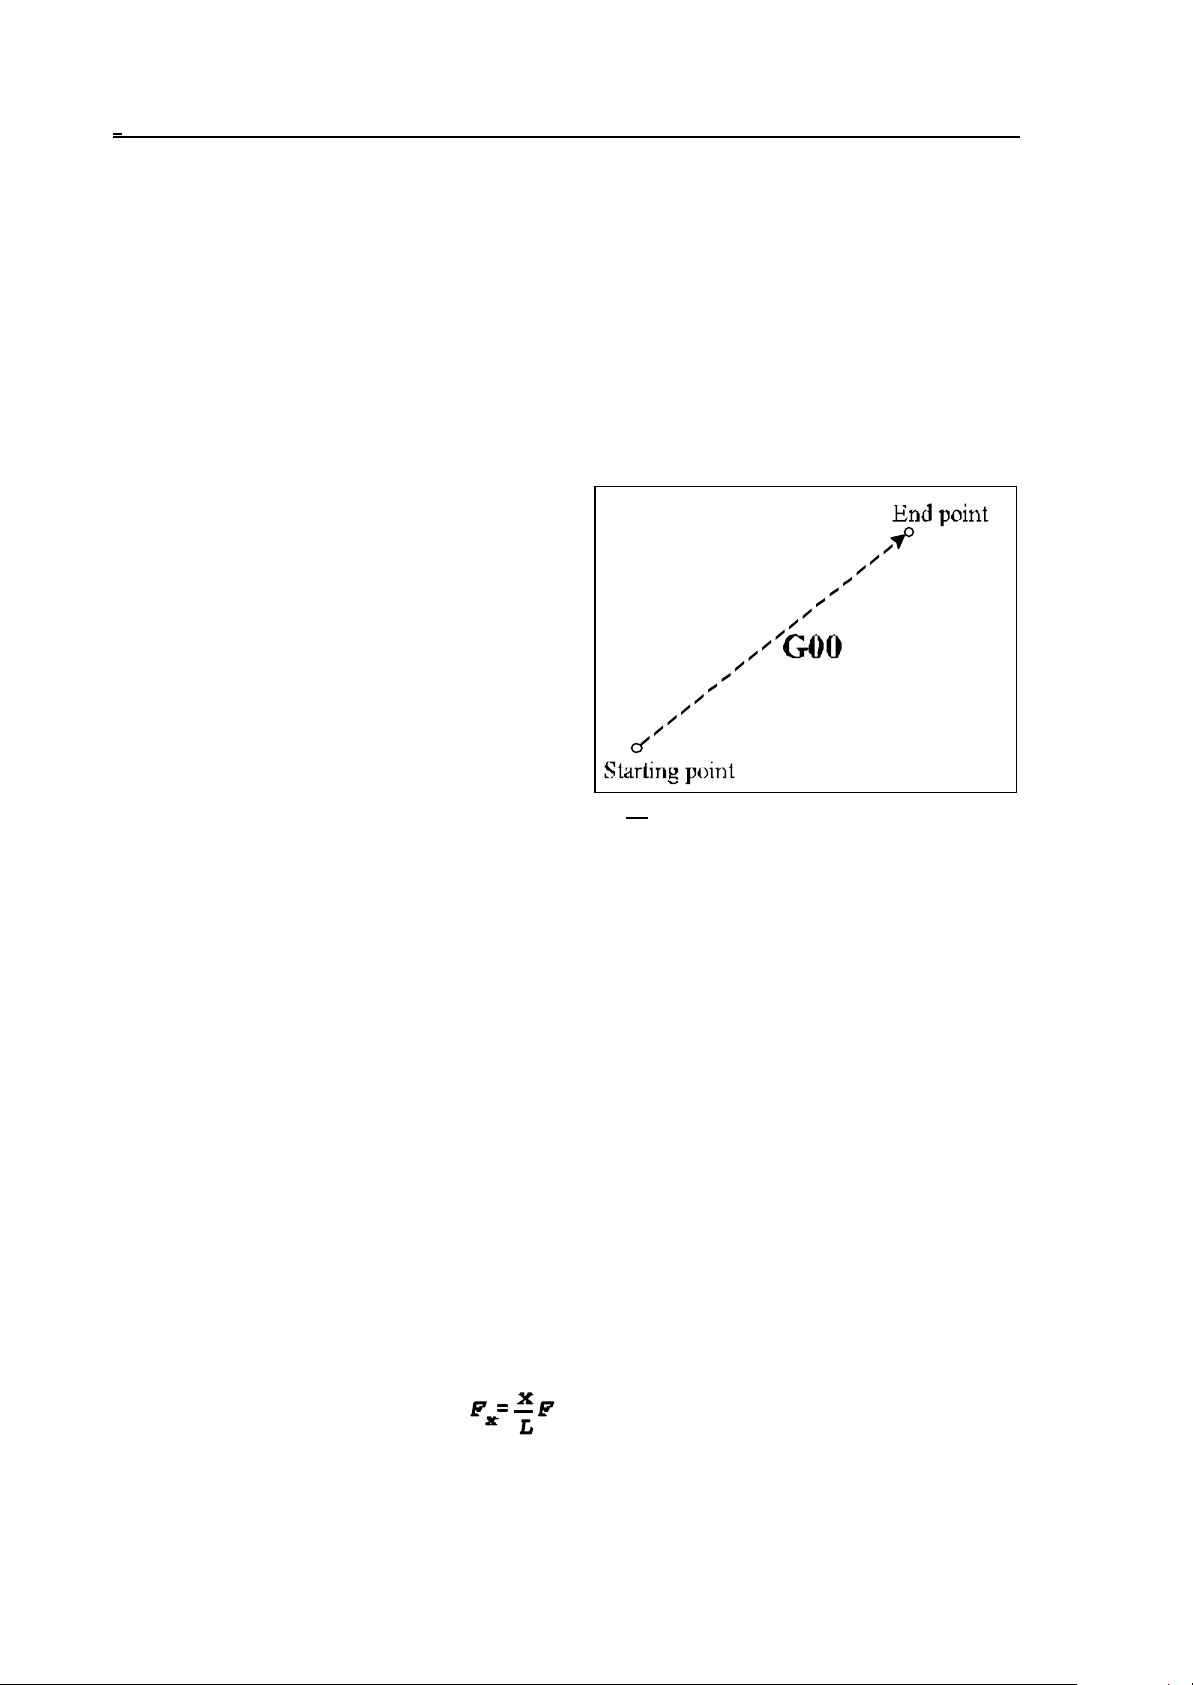
4.1 Positioning (G00)
The series of instructions
G00 v
refers to a positioning in the current coordinate system.
It moves to the coordinate v. Designation v (vector) refers here (and hereinafter) to all controlled
axes used on the machine-tool. (They may be X, Y, Z, U, V, W, A, B, C)
The positioning is accomplished along a straight line involving the simultaneous movements of all axes
specified in the block. The coordinates may be absolute or incremental data.
The speed of positioning cannot be commanded in
the program because it is accomplished with
different values for each axis, set by the builder of
machine-tool as a parameter. When several axes
are being moved at a time, the vectorial resultant of
speed is computed by the control system in such a
way that positioning is completed in a minimum
interval of time, and the speed will not exceed
anywhere the rapid traverse parameter set for each
axis.
In executing the G00 instruction, the control system
performs acceleration and declaration in starting
and ending the movements, respectively. On completion of the movement, the control will check the
"in position" signal when parameter POSCHECK in the field of parameters is 1, or will not do so
when the parameter is set to 0. It will wait for the "in position" signal for 5 seconds, unless the signal
arrives, the control will return the 1020 POSITION ERROR message. The maximum acceptable
deviation from the position can be specified in parameter INPOS.
Being a modal code, G00 remains effective until it is re-written by another interpolation command.
After power-on, G00 or G01 is effective, depending on the value set in parameter group CODES of
the parameter field.
Fig. 4.1-1
4.2 Linear Interpolation (G01)
The series of instructions
G01 v F
will select a linear interpolation mode. The data written for v may be absolute or incremental values,
interpreted in the current coordinate system. The speed of motion (the feed) can be programmed at
address F.
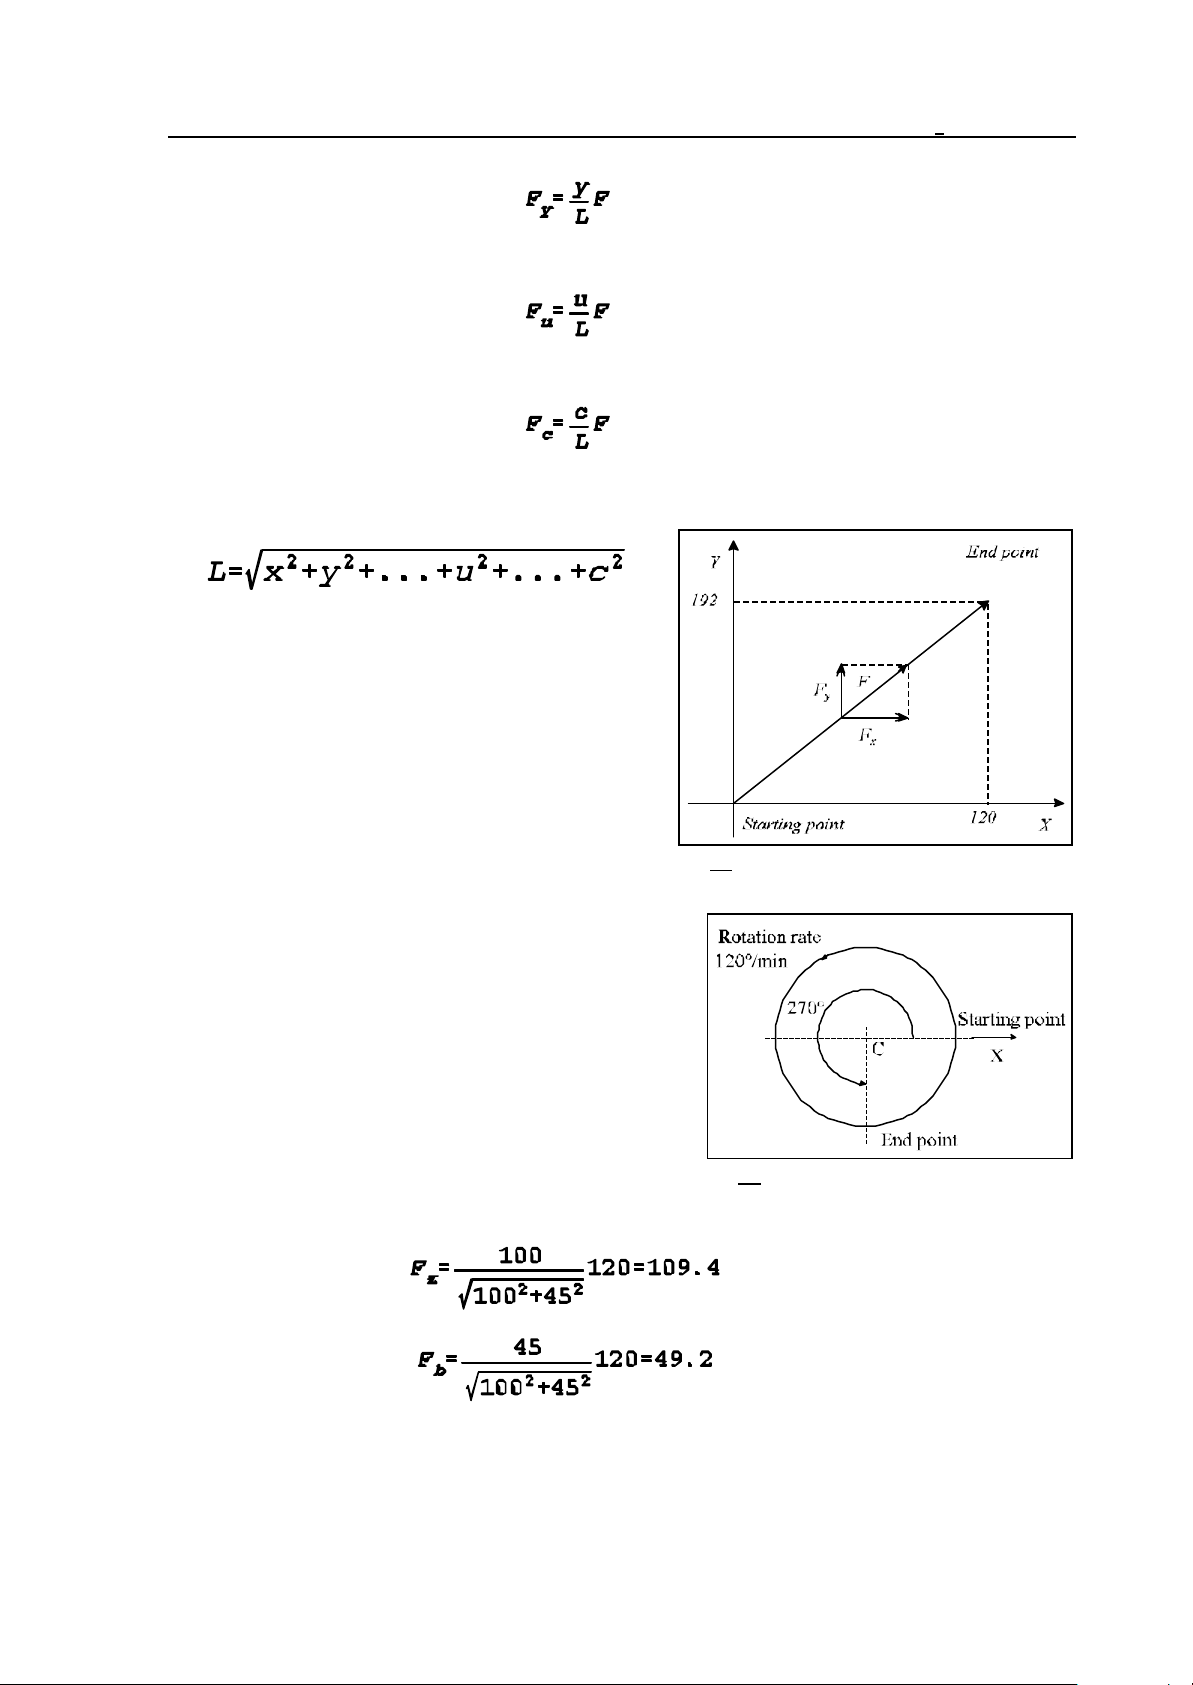
The feed programmed at address F will be accomplished invariably along the programmed path. Its
axial components:
Feed along the axis X is
22
4 The Interpolation
Feed along the axis Y is
.............................
Feed along the axis U is
.............................
Feed along the axis C is
where x, y, u, c are the displacements programmed along the respective axes, L is the vectorial
length of programmed displacement:
G01 X100 Y80 F150
Fig. 4.2-1
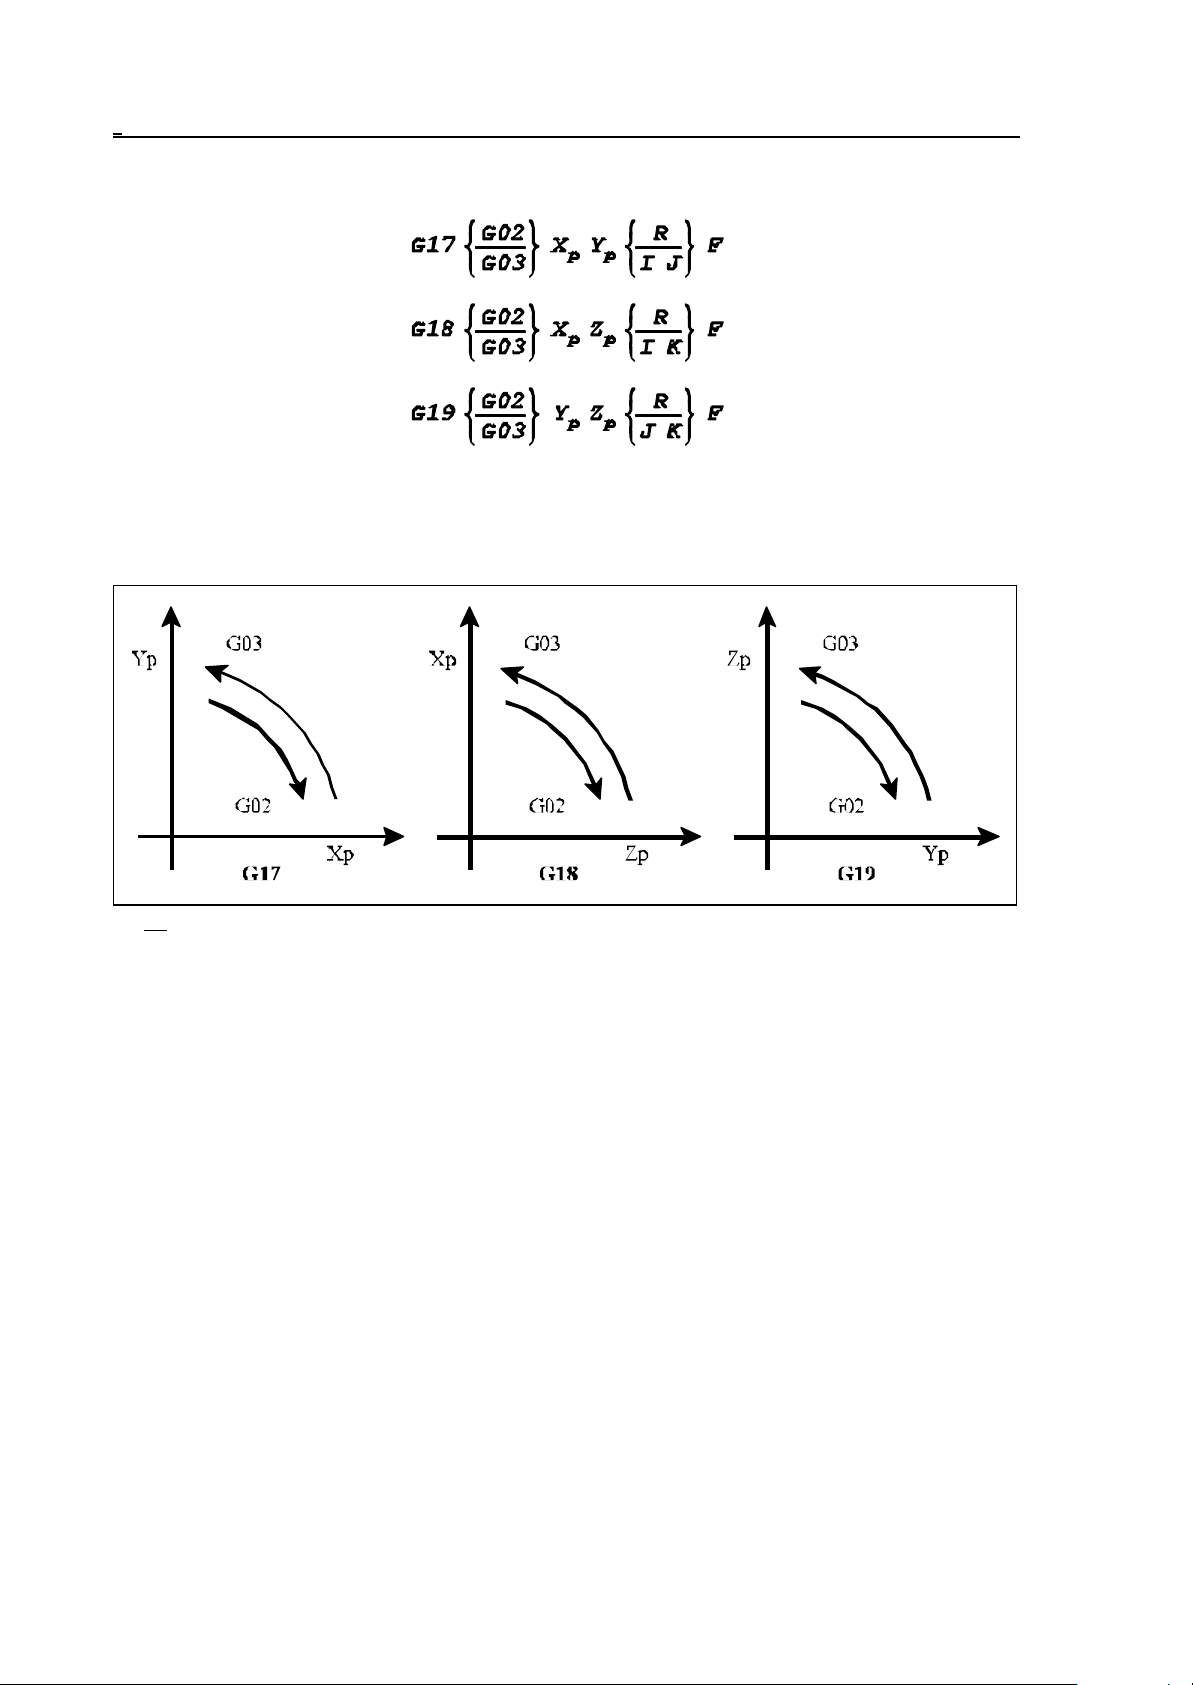
The feed along a rotational axis is interpreted in units of
degrees per minute (°/min):
G01 B270 F120
In the above block, F120 means 120deg/minute.
If the motion of a linear and a rotary axis is combined
through linear interpolation, the feed components will be
distributed according to the above formula. E.g. in block
G91 G01 Z100 B45 F120
Fig. 4.2-2
feed components in Z and B directions are:
feed along axis Z: mm/min
feed along axis B:
°/min
Being a modal code, G01 is effective until rewritten by another interpolation command. After
power-on, G00 or G01 is effective, depending on the parameter value set in group CODES of the
parameter field.
23
4 The Interpolation
4.3 Circular and Spiral Interpolation (G02, G03)
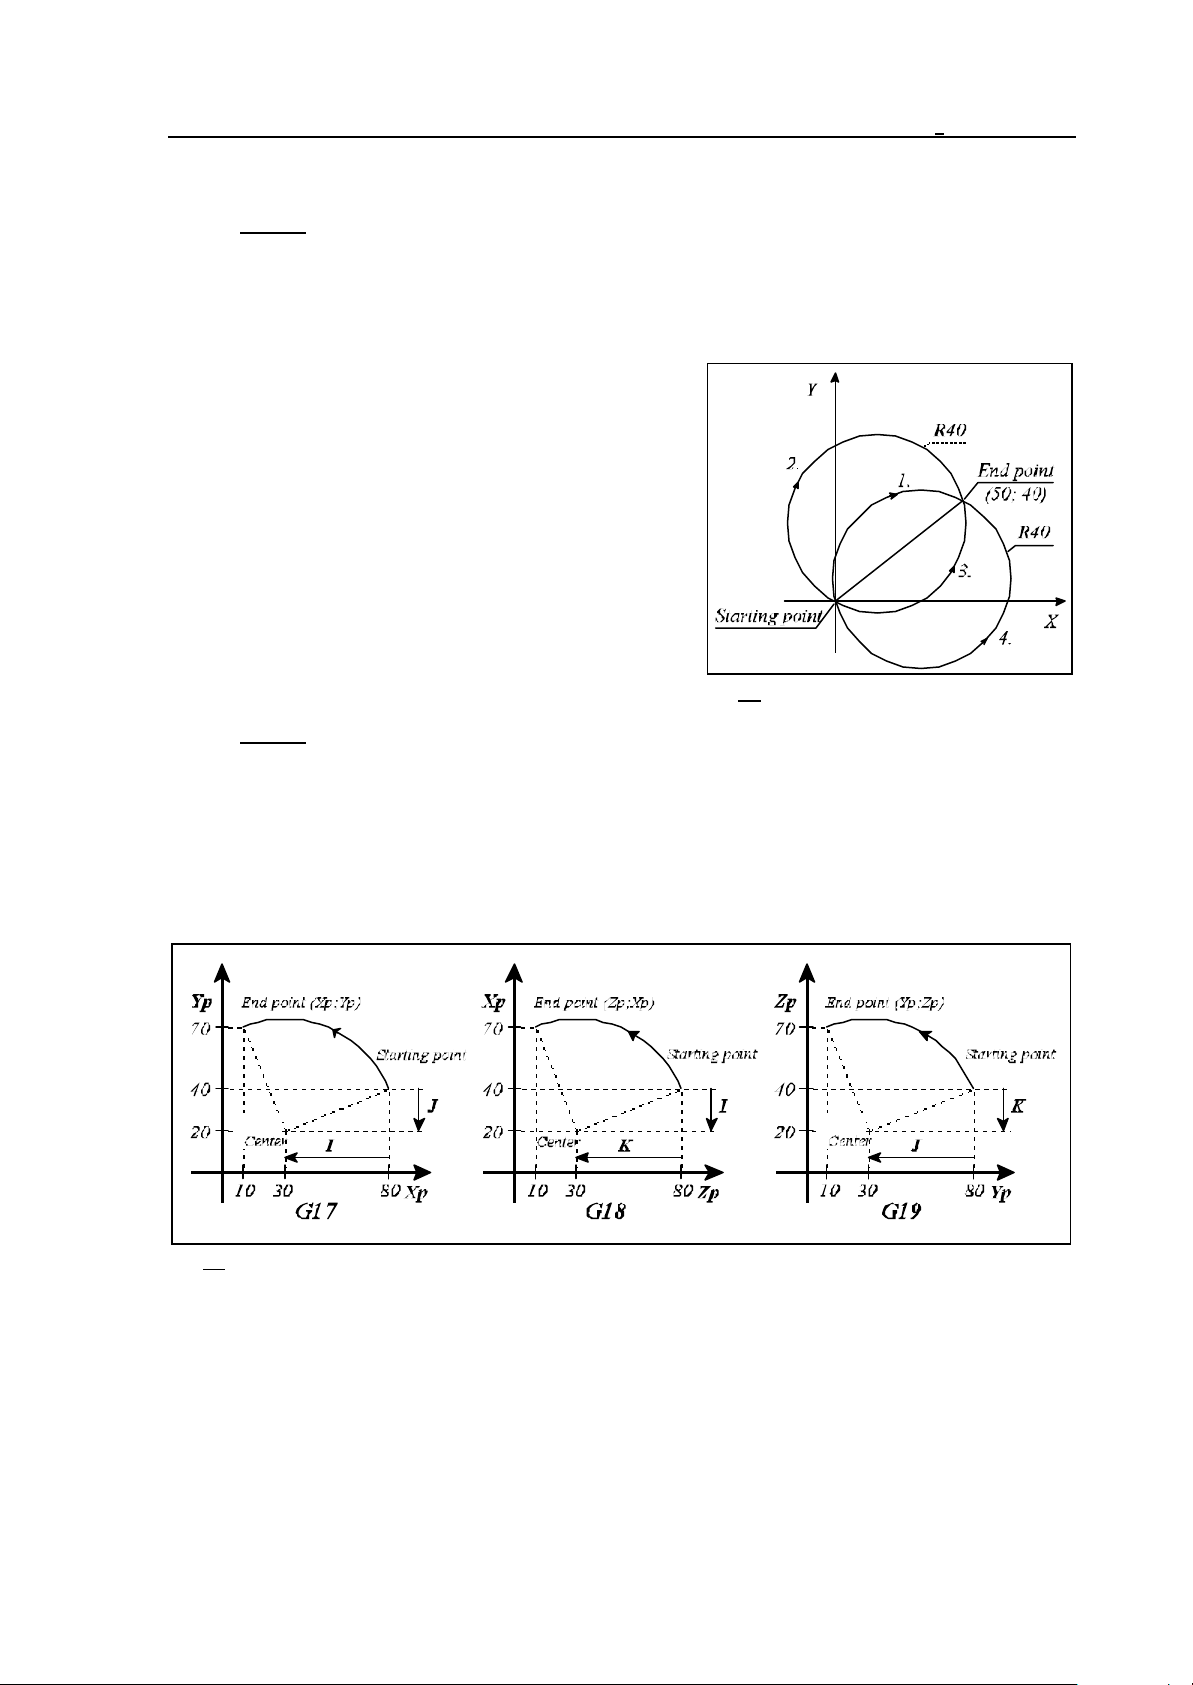
The series of instructions specify circular interpolation.
A circular interpolation is accomplished in the plane selected by commands G17, G18, G19 in
clockwise or counter-clockwise direction (with G02 or G03, respectively).
Fig. 4.3-1
Here and hereinafter, the meanings of Xp, Yp, and Zp are:
Xp: axis X or its parallel axis,
Yp: axis Y or its parallel axis,
Zp: axis Z or its parallel axis.
The values of Xp, Yp, and Zp are the end-point coordinates of the circle in the given coordinate
system, specified as absolute or incremental data.
24
4 The Interpolation
Further data of the circle may be specified in one of two different ways.
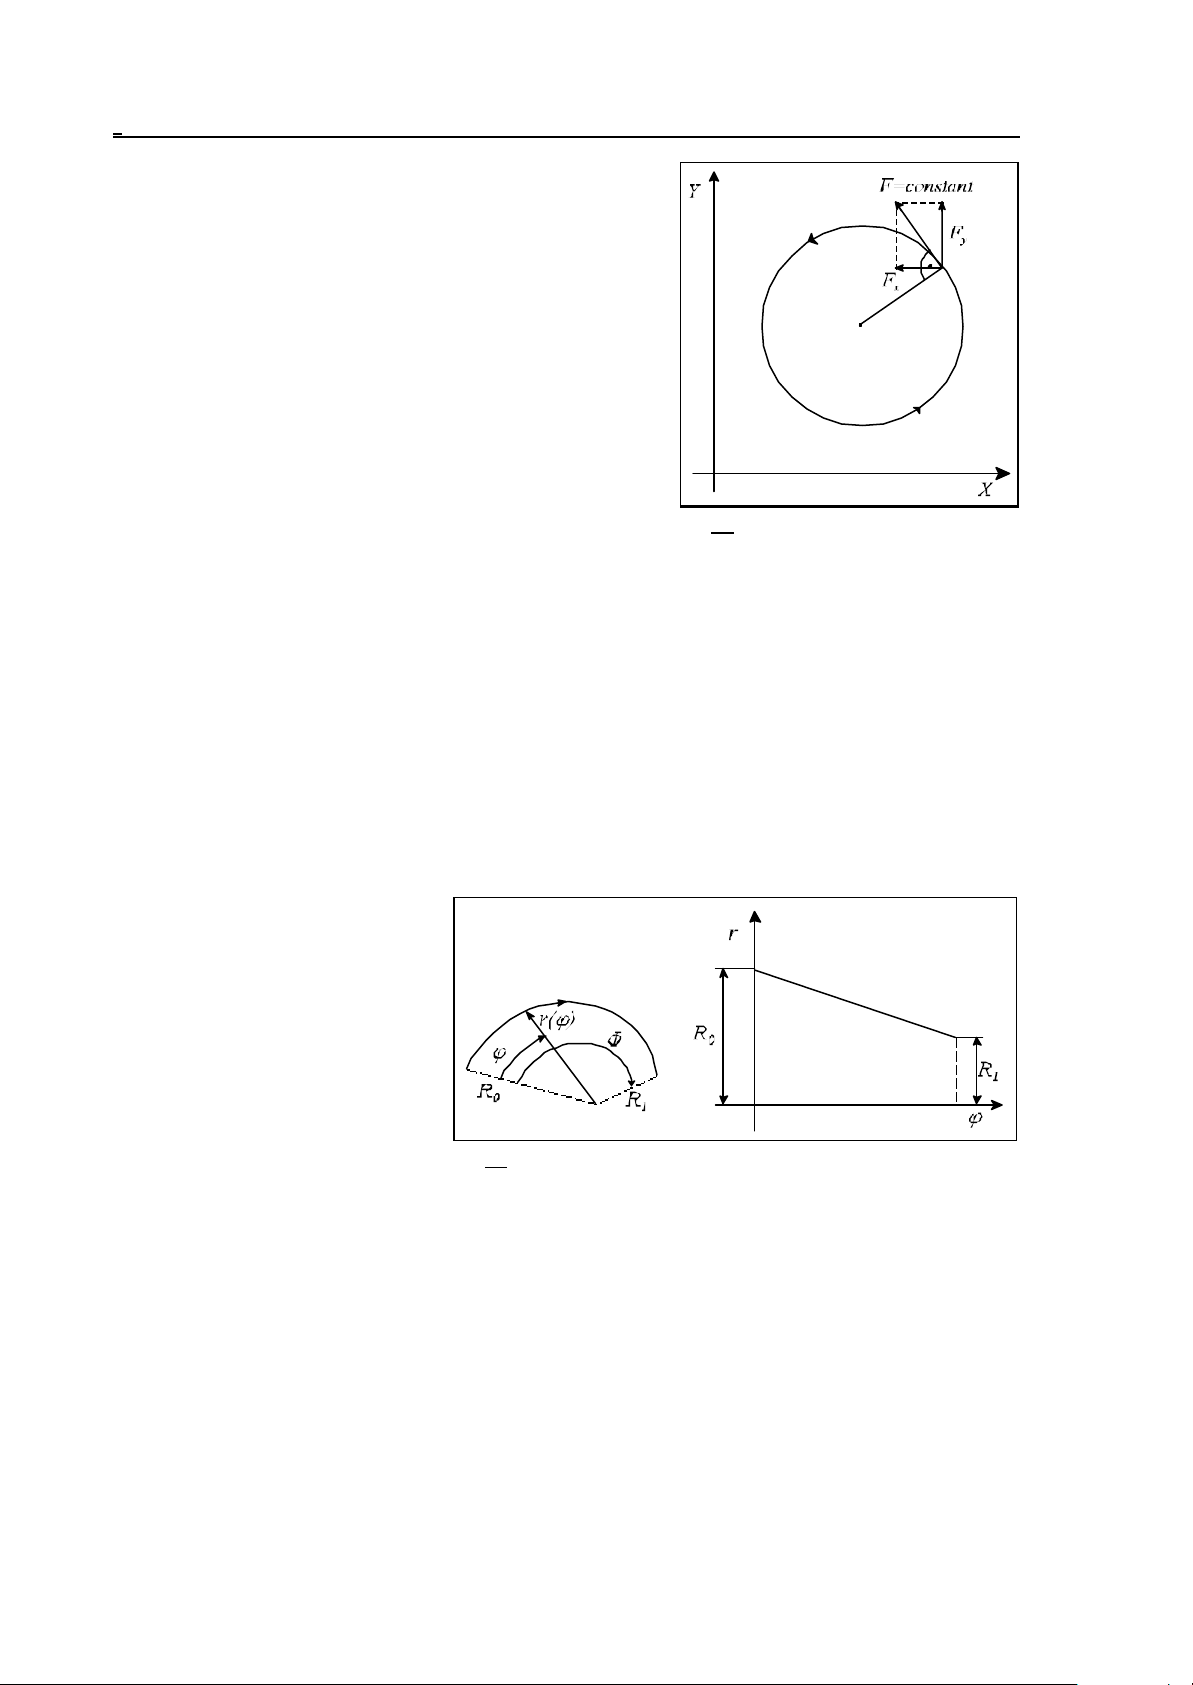
Case 1
At address R where R is the radius of the circle. Now the control will automatically calculate the
coordinates of the circle center from the start point coordinates (the point where the control is in the
instant of the circle block being entered), the end point coordinates (values defined at addresses Xp,
Yp, Zp) and from the programmed circle radius R. Since
two different circles of radius R can be drawn between
the start and the end points for a given direction of
circumventing (G02 or G03), the control will interpolate
an arc smaller or larger than 180° when the radius of the
circle is specified as a positive or a negative number,
respectively. For example:
Arc section 1: G02 X50 Y40 R40
Arc section 2: G02 X50 Y40 R-40
Arc section 3: G03 X50 Y40 R40
Arc section 4: G03 X50 Y40 R-40
Fig. 4.3-2
Case 2
The circle center is specified at address I, J, K for the Xp, Yp and Zp axes. The values specified at
addresses I, J, K are interpreted always incrementally by the control system, so that the vector
defined by the values of I, J, K points from the start point to the center of the circle. For example:
With G17: G03 X10 Y70 I-50 J-20
With G18: G03 X70 Z10 I-20 K-50
With G19: G03 Y10 Z70 J-50 K-20
Fig. 4.3-3
25
4 The Interpolation
The feed along the path can be programmed at address F,
pointing in the direction of the circle tangent, and being
constant all along the path.
L Notes:
– I0, J0, K0 may be omitted, e.g.
G03 X0 Y100 I-100
– When each of Xp, Yp and Zp is omitted, or the end point
coordinate coincides with the start point coordinate,
then:
a. If the coordinates of the circle center are
programmed at addresses, I, J, K the
control will interpolate a complete circle of
Fig. 4.3-4
360°. E.g.: G03 I-100,
b. If radius R is programmed, the control returns error 3012 ERRONEOUS CIRCLE DEF.
R.
– When the circle block
a. does not contain radius (R) or I, J, K either,
b. or reference is made to address I, J, K outside the selected plane, the control returns
3014 ERRONEOUS CIRCLE DEF. error. E.g. G03 X0 Y100, or (G18) G02 X0
Z100 J-100.
– The control returns error message 3011 RADIUS DIFFERENCE whenever the difference
between the start-point and end-point radii of the circle defined in block G02, G03 exceeds
the value defined in parameter RADDIF.
Whenever the difference of radii is
smaller than the value specified in
the above parameter, the control
will move the tool along a spiral
path in which the radius is varying
linearly with the central angle.
The angular velocity, not the one
tangential to the path will be
constant in the interpolation of a
circle arc of a varying radius.
Fig. 4.3-5
26
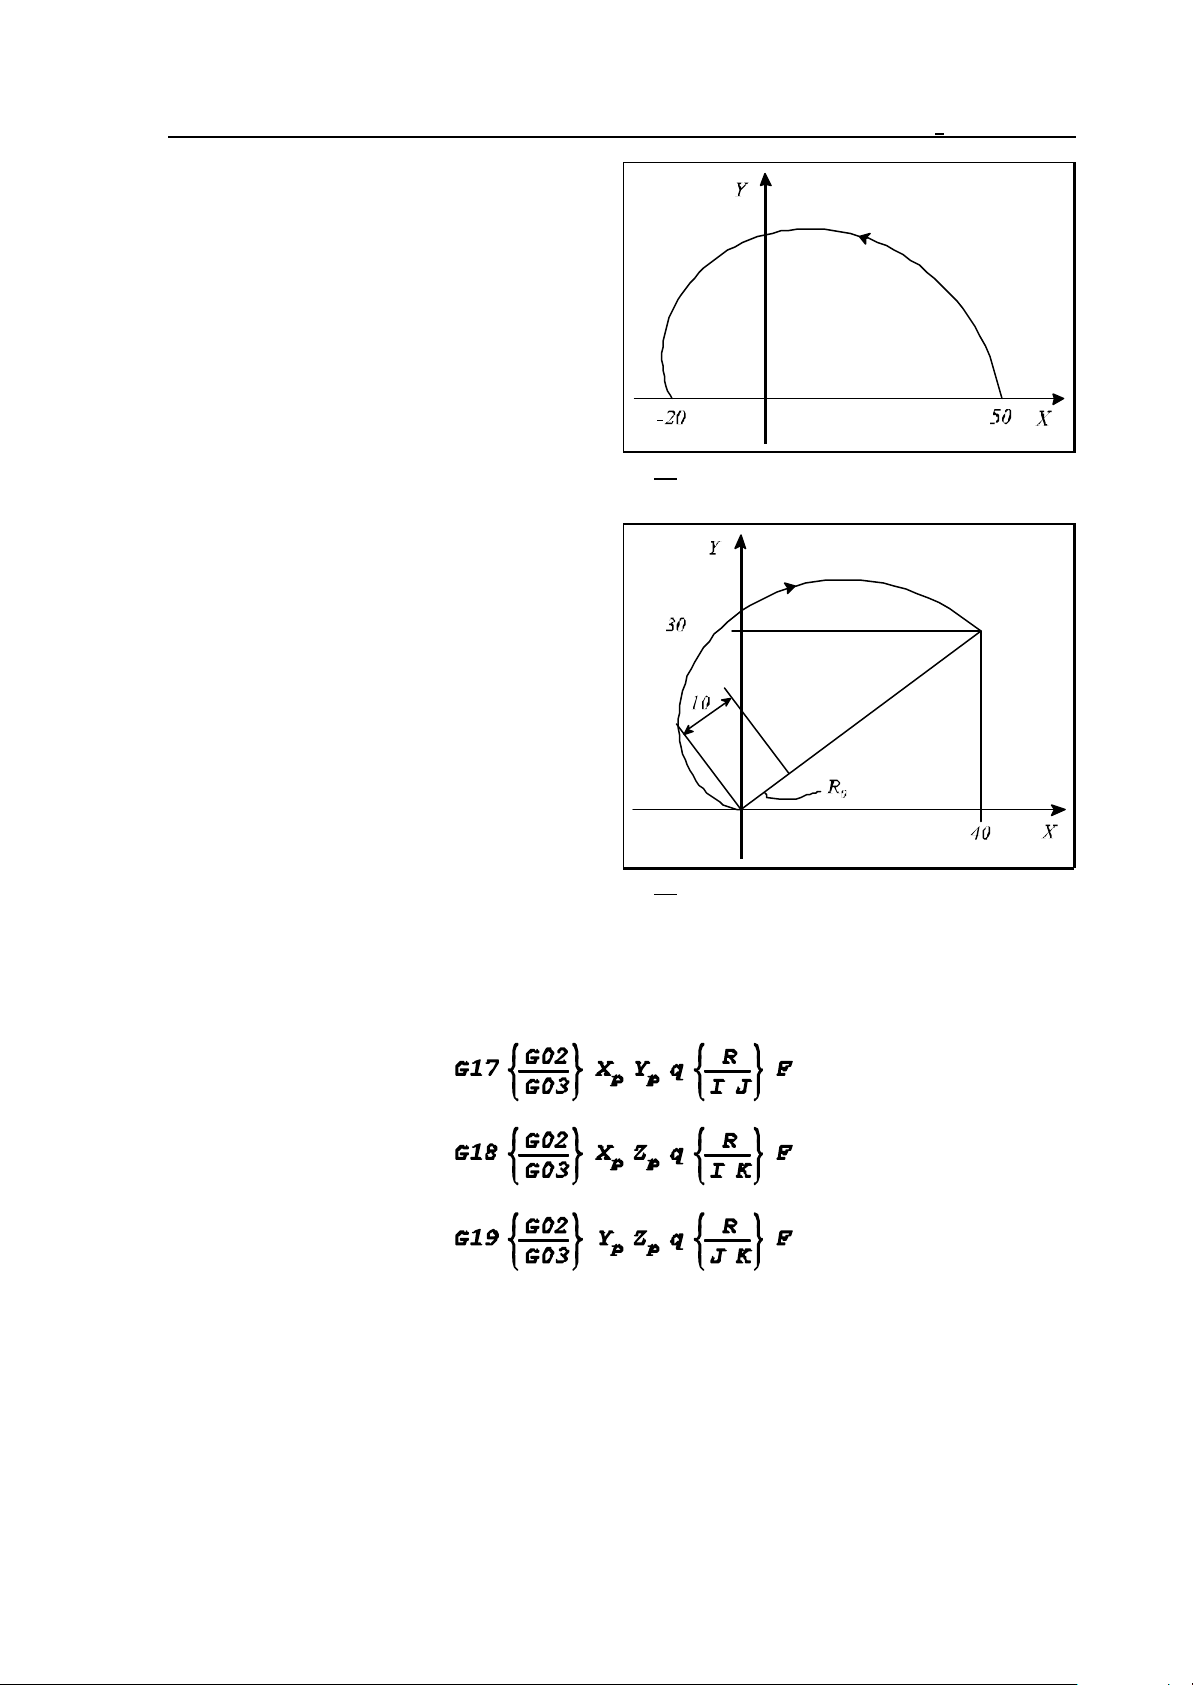
The program detail below is an example of how
a spiral interpolation (circle of varying radius)
can be specified by the use of addresses I, J, K.
G17 G90 G0 X50 Y0
G3 X-20 I-50
If the specified circle radius is smaller than half
the distance of straight line inter-connecting the
start point with the end point, the control will
regard the specified radius of the circle as the
start-point radius, and will interpolate a circle of
a varying radius (spiral), whose center point is
located on the straight line connecting the start
point with the end point, at distance R from the
start point.
G17 G0 G90 X0 Y0
G2 X40 Y30 R10
4 The Interpolation
Fig. 4.3-6
Fig. 4.3-7
4.4 Helical Interpolation (G02, G03)
The series of instructions will define a helical interpolation.
It is distinguished from circular interpolation that a third axis (q), which is not an axis composing the
circular plane. The control performs a simple movement along axis q.
27
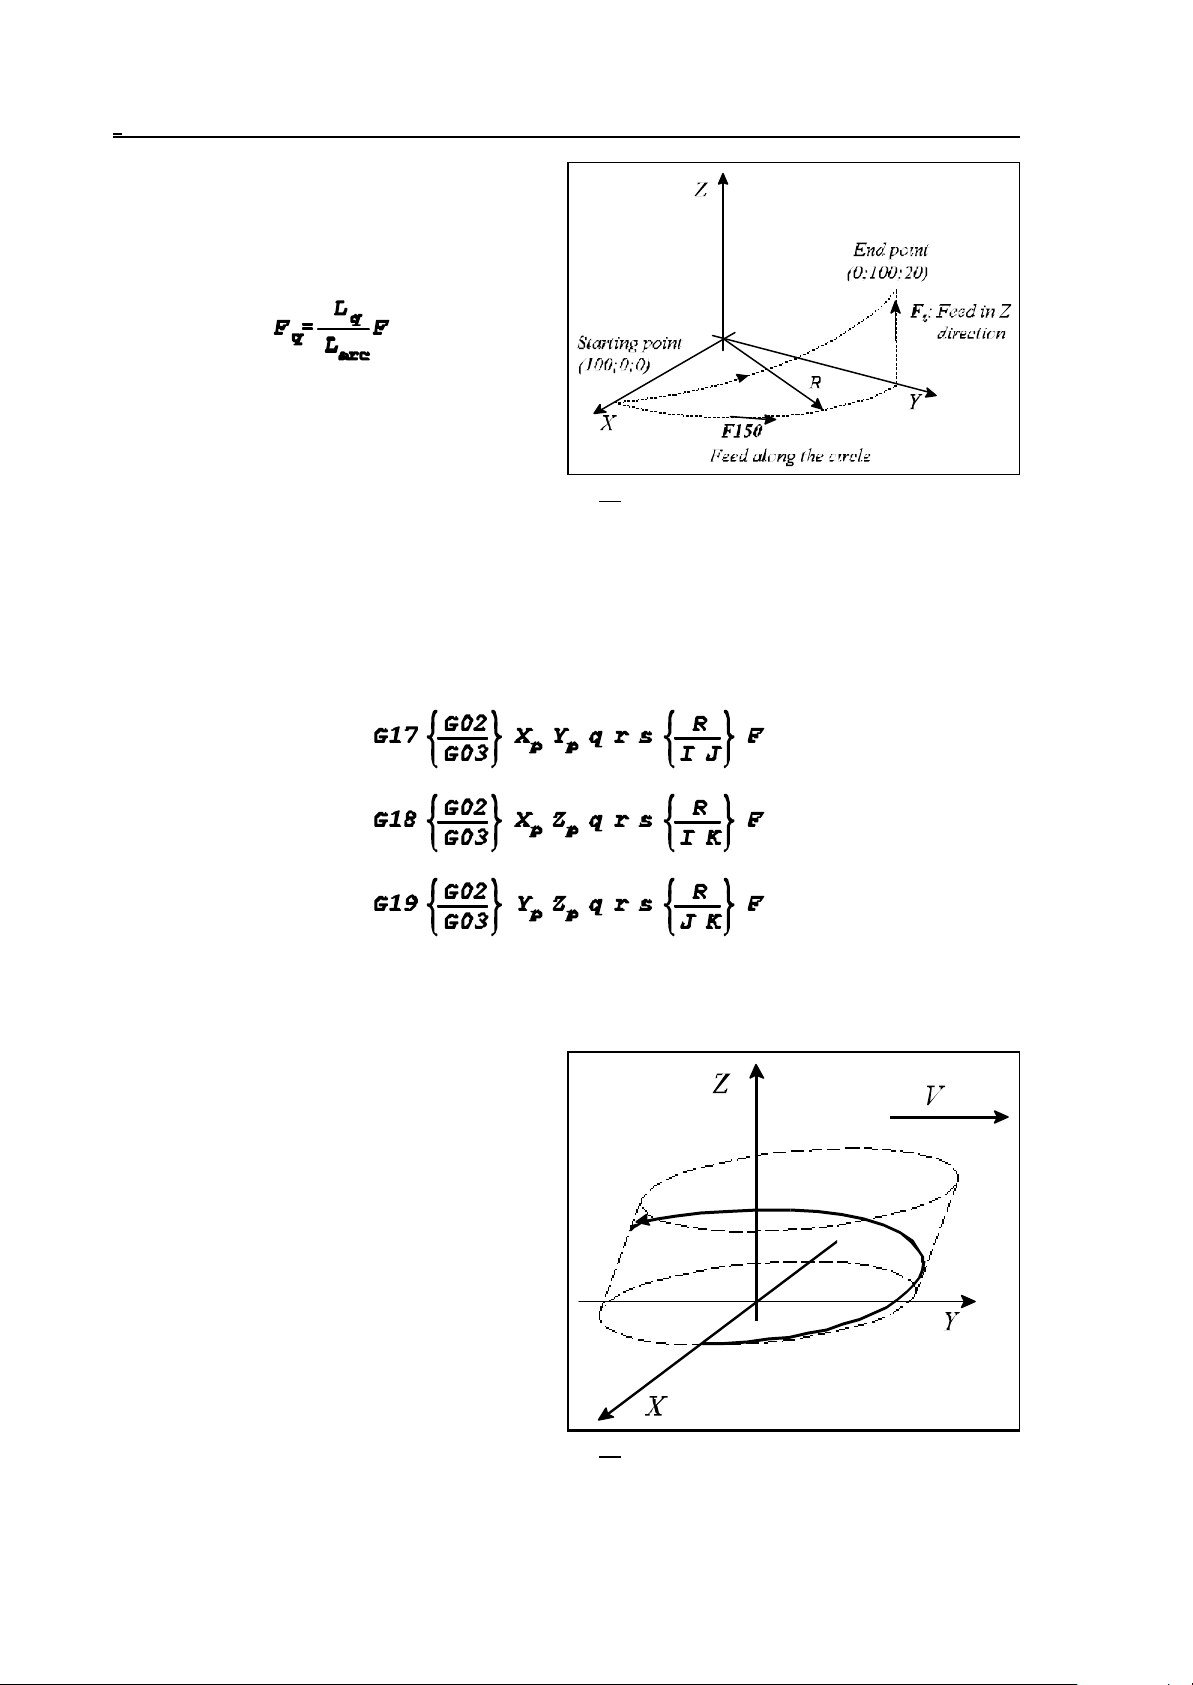
4 The Interpolation
The feed specified at address F is effective
along the circle path. Feed component Fq along
axis q is obtained from the relationship
where
Lq: displacement along axis q,
L
: length of circular arc,
arc
F: programmed feed,
Fq: feed along axis q.
For example:
G17 G03 X0 Y100 Z20 R100 F150
The series of instructions
Fig. 4.4-1
define a multi-dimensional spatial helical interpolation in which q, r, s are optional axes not involved
in the circle interpolation.
For example, series of instructions
G17 G3 X0 Y-100 Z50 V20 I-100
will move the tool along the superficies of an
oblique cylinder if V is an axis parallel to Y.
L Notes:
– Whenever parameter HELICALF in the field
of parameters is set to 1, the control will
implement the programmed feed along
the spatial path.
– In the case of the circle specified in the
selected plane having a varying radius,
the interpolation will be carried out
along the superficies of the specified
Fig. 4.4-2
cone.
28
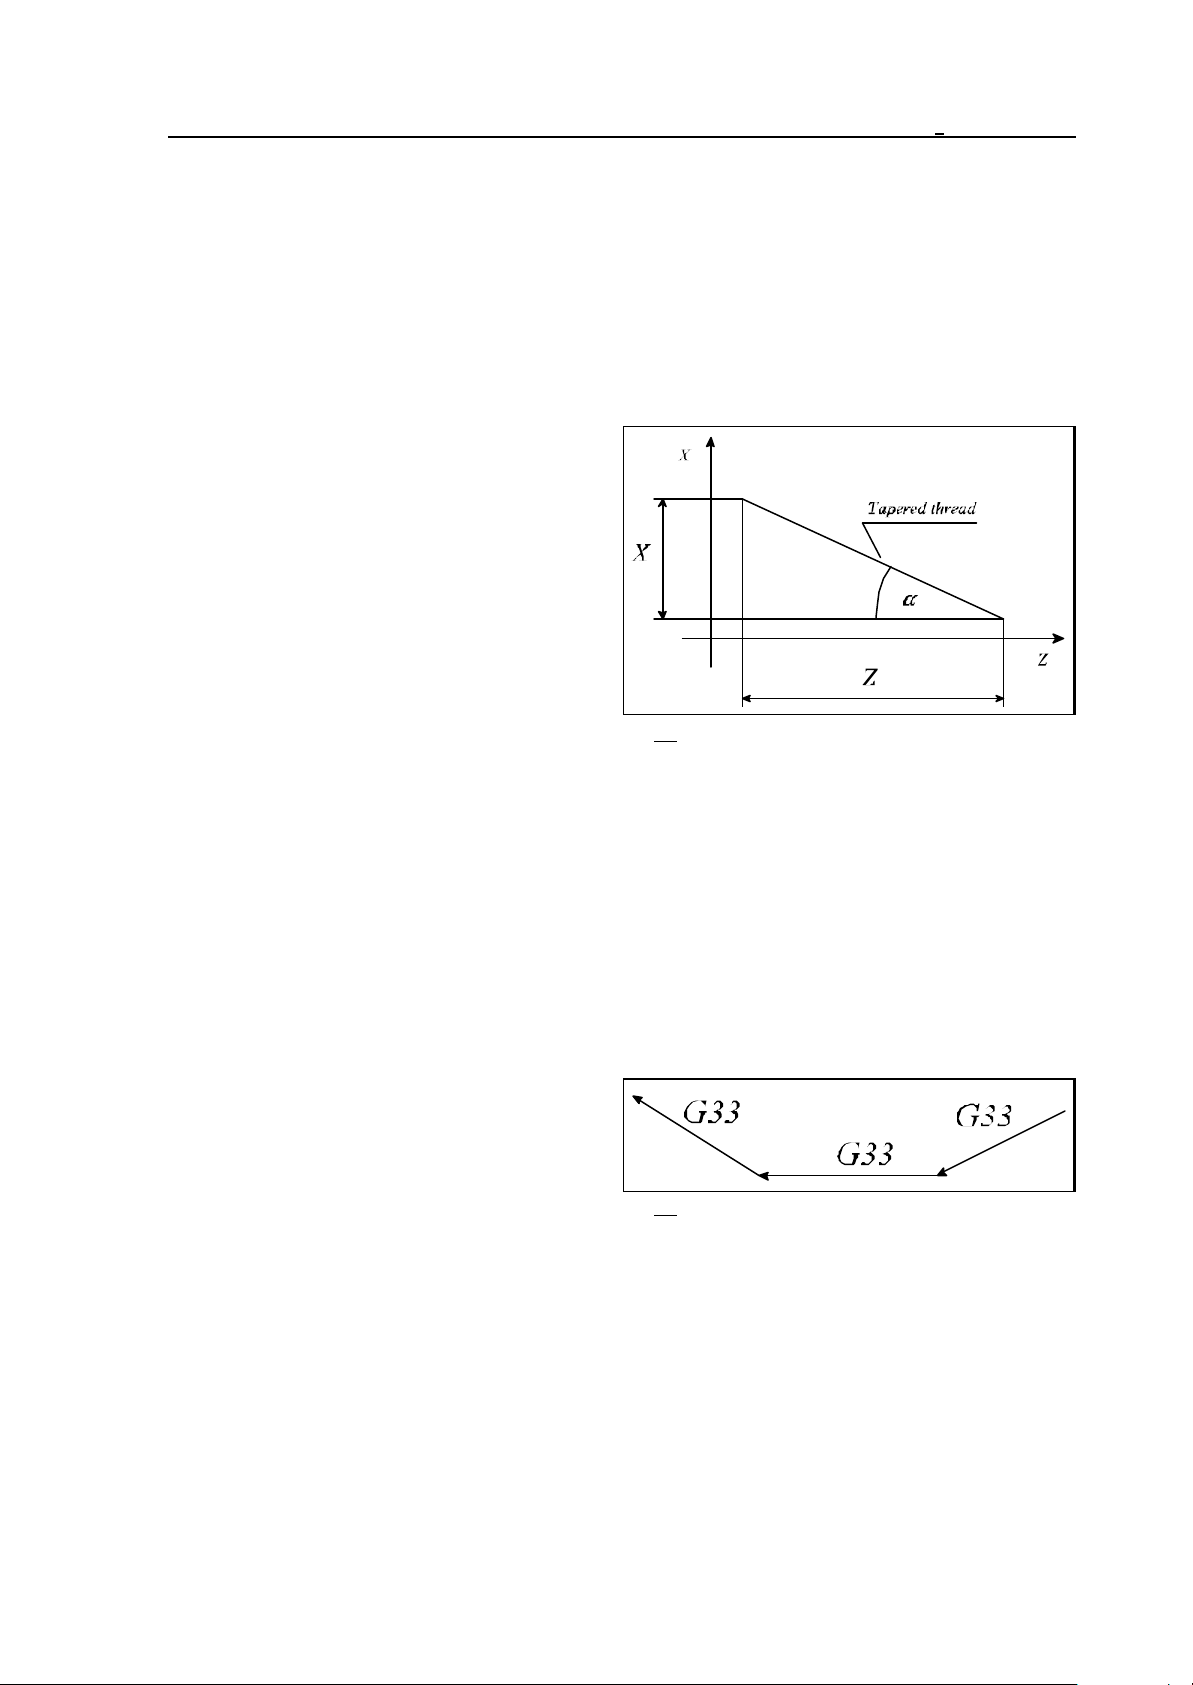
4 The Interpolation
– The specified tool-radius compensation is implemented invariably in the plane of the circle.
4.5 Equal Lead Thread Cutting (G33)
The instruction
G33 v F Q
G33 v E Q
will define a straight or taper thread cutting of equal lead.
The coordinates of maximum two axes can be
written for vector v. The control will cut a
tapered thread if two coordinated data are
assigned to vector v. The control will take the
lead into consideration along the long axis.
If "<45°, i.e. Z>X, the programmed lead will
be taken into account along axis Z,
if ">45°, i.e. X>Z, the control will take the
programmed lead along axis X.
The lead can be defined in one of two 2 ways.
– If the lead is specified at address F, the data
will be interpreted in mm/rev or
Fig. 4.5-1
inch/rev. Accordingly, F2.5 has to be
programmed if a thread of 2.5 mm lead is to be cut.
– If the pitch is specified at address E, the control will cut an inch thread. Address E is interpreted
as number of ridges per inch. If, e.g., E3 is programmed, the control will cut a thread
a"=25.4/3=8.4667mm lead.
The shift angle of the thread start is specified at address Q expressed in degrees from the zero pulse
of the spindle encoder. A multiple thread can be cut by an adequate programming of the value of Q,
i.e., the control can be programmed here for the particular angular displacements of the spindle, at
which the various threads are to be cut. If, e.g., a double thread is to be cut, the first and the second
starts will be commenced from Q0 (no special programming is needed) and from Q180,
respectively.
G33 is a modal function. If several threadcutting blocks are programmed in succession,
threads can be cut in any arbitrary surface
limited by straight lines.
Fig. 4.5-2
The control is synchronized to the zero pulse of the spindle encoder in the first block, no
synchronization will be performed in the subsequent blocks resulting in a continuous thread in each
section of lines. Hence the programmed shift angle of the thread start (Q) will also be taken into
account in the first block.
29
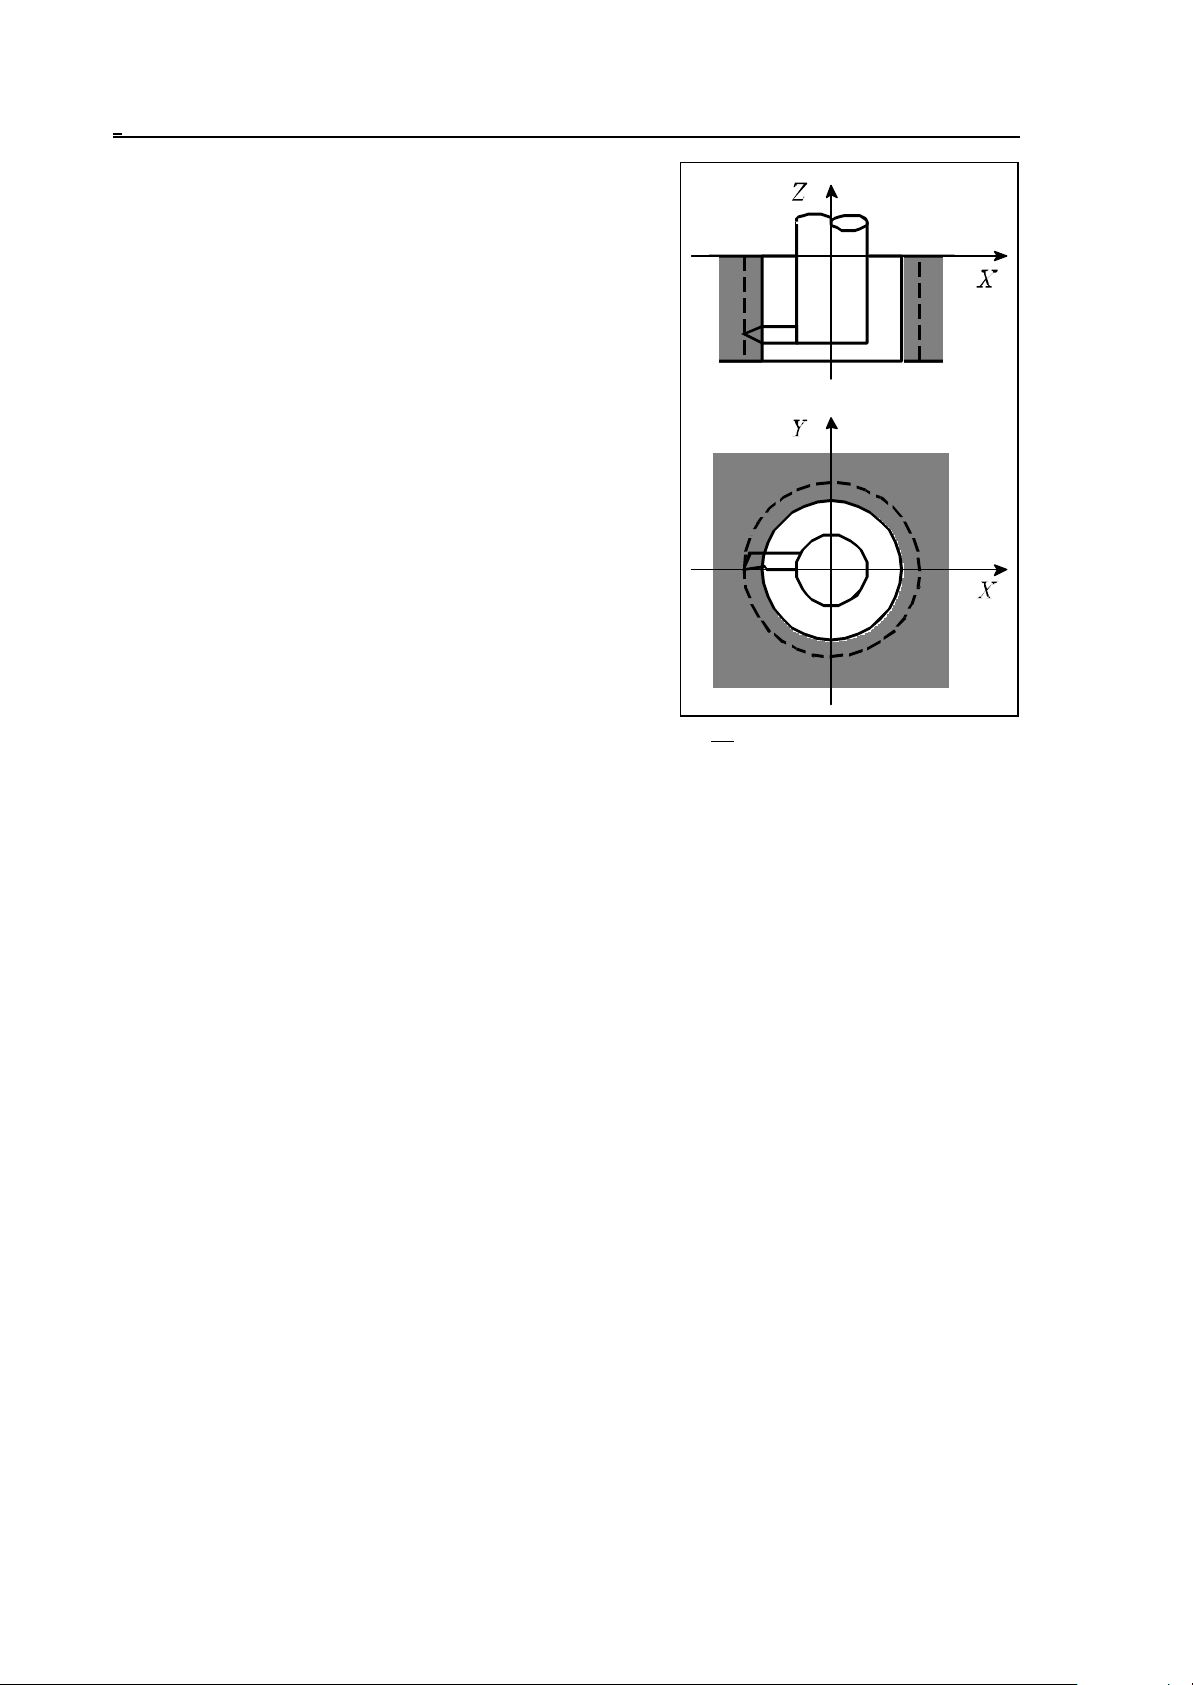
4 The Interpolation
An example of programming a thread-cutting:
N50 G90 G0 X0 Y0 S100 M4
N55 Z2
N60 G33 Z-100 F2
N65 M19
N70 G0 X5
N75 Z2 M0
N80 X0 M4
N85 G4 P2
N90 G33 Z-100 F2
...
Explanation:
N50, N55 - Moving the tool over the center of hole, starting
the spindle in counter-clockwise rotation,
N60 - First thread-cutting cycle, (lead 2mm),
N65 - Oriented spindle stop (the spindle is stopped in a
fixed position),
N70 - Tool retraction along axis X,
N75 - Tool retraction to the top of hole, programmed stop,
the operator adjust the tool to the next thread-cutting
cycle,
N80 - Return to the center of hole, re-start of spindle,
N85 - Waiting for the speed to be assumed by the spindle,
N90 - Second thread-cutting cycle.
Fig. 4.5-3
L Notes:
– The control returns error message 3020 DATA DEFINITION ERROR G33 if more than two
coordinates are specified at a time in the thread-cutting block, or if both addresses F and E
are specified simultaneously.
– Error message 3022 DIVIDE BY 0 IN G33 is produced when 0 is specified for address E in the
thread-cutting block.
– An encoder has to be mounted on the spindle for the execution of command G33.
– In the course of command G33 being executed, the control will take the feed and spindle override
values automatically to be 100%; the effect of the stop key will only prevail after the block
has been executed.
– On account of the following error of the servo system, overrun and run out allowances have to be
provided for the tool in addition to the part at the beginning and end of the thread in order to
obtain a constant lead all along the part.
– In the course of thread-cutting the feed (in mm/minute) may not exceed the value selected in the
group of parameters FEEDMAX.
– In the course of thread-cutting the speed (r.p.m) of the spindle may not exceed the maximum
speed permissible for the spindle encoder mechanically and electrically (the maximum output
frequency).
30
 Loading...