


OCTAGON SCOPE SERIES
INSTRUCTIONS
1
OCTAGON SCOPE SERIES
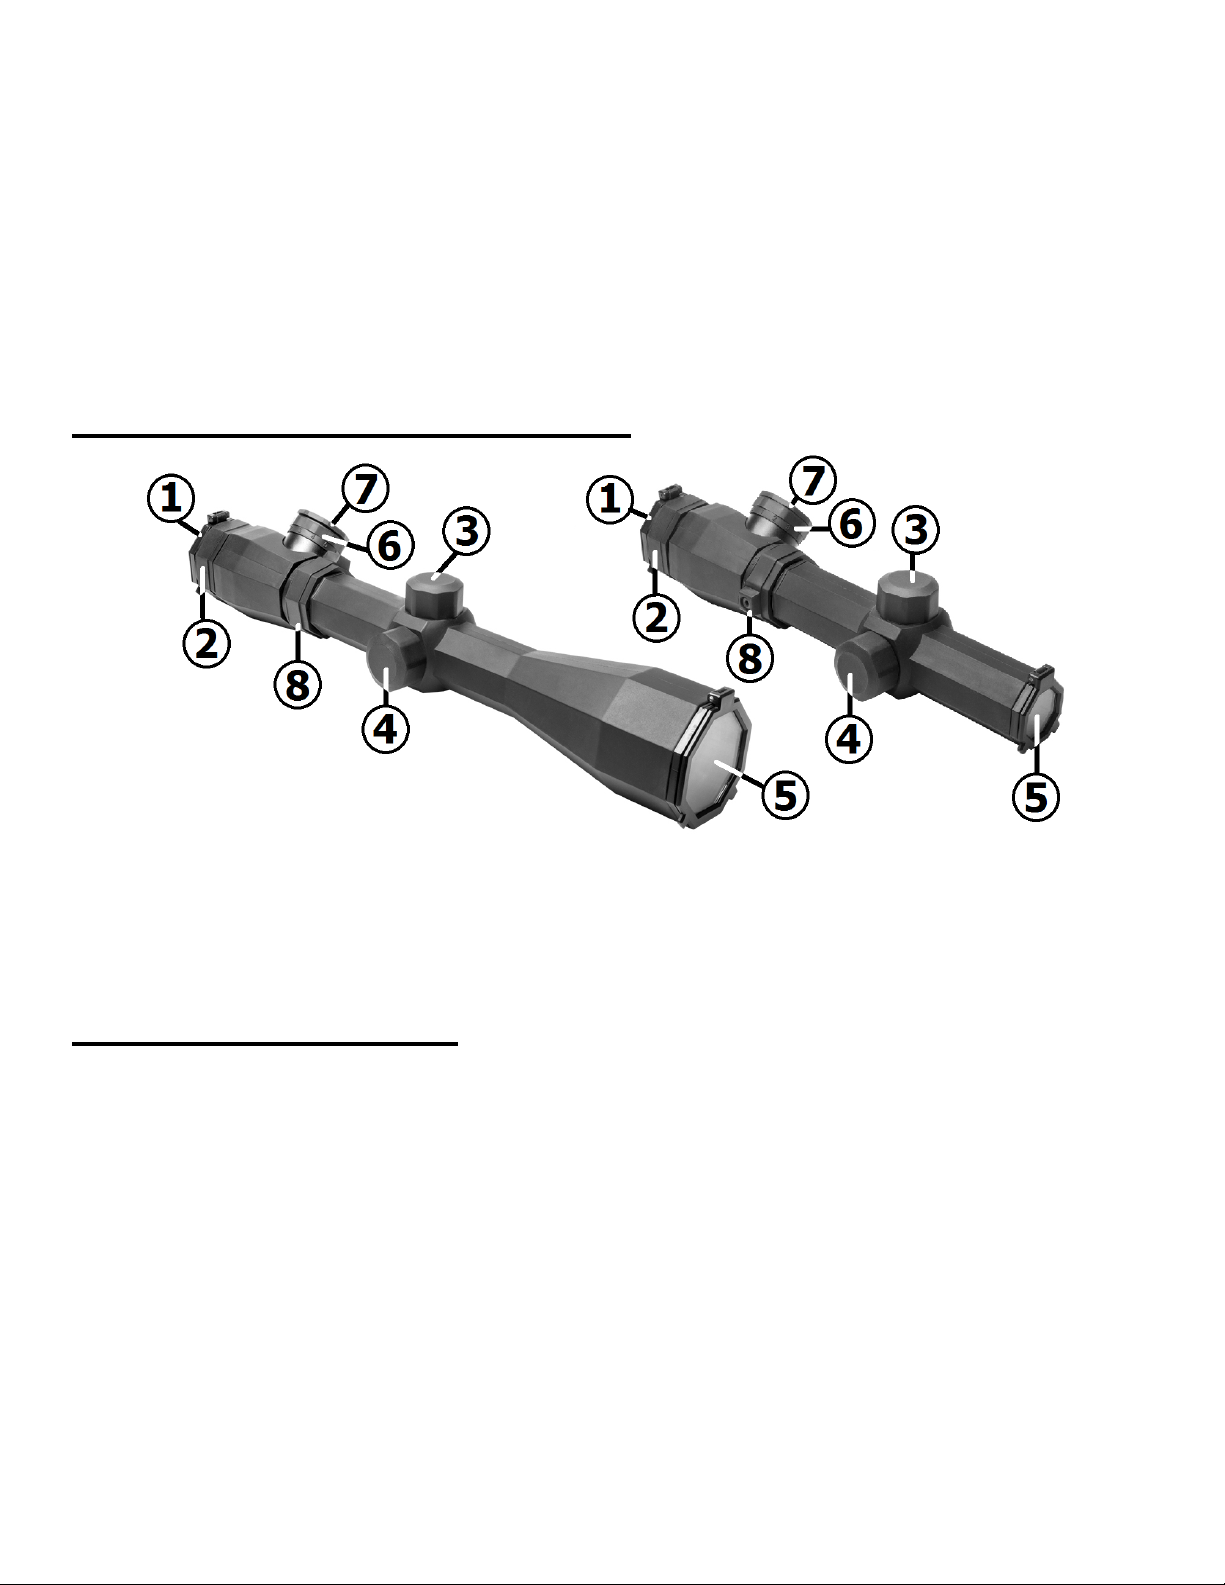
1. Ocular Lens & Flip-Up Lens Cap
2. Quick Focus Ring
3. Elevation Adjustment & Cap
4. Windage Adjustment & Cap
5. Objective Lens & Flip-Up Lens Cap
6. Rheostat Knob for Illuminated Reticle
7. Battery Cap
8. Magnification Ring
9. CR2032 Battery (inside rheostat)
Congratulations on the purchase of your NCSTAR Octagon Scope Series! The Octagon Scope
Series has several scope models to choose from: the choice of two different magnification ranges and
two reticles types, with many of the popular scope features that shooters demand.
Backed by a Lifetime Limited Warranty, your Octagon Scope will provide you with years of
reliable service. This Owner’s Manual will help you understand all of the features of your new scope.
Follow all instructions carefully before initial use, to experience the best performance.
Octagon Scope Series Features
Mounting Your Scope
CAUTION: BE SURE THAT YOUR FIREARM IS UNLOADED AND POINTED IN A SAFE
onto your optics rail on your firearm. This will allow you to space out the rings properly, for the ring
mounting bolts to match up with the cross slots of the optics rail. Once you have the scope rings
mounted onto your optics rail, you will next have to move the scope forwards or rearwards to adjust
the scope’s position to allow for Maximum Eye Relief and reticle leveling. Slide the scope as far
forward as possible in the rings. While viewing through the scope in a normal shooting position
move the scope back towards your eye until a Full Field of View is achieved while ensuring that the
scope will be a safe distance from your eye when the firearm recoils. Without disturbing the Eye
DIRECTION. PRACTICE SAFE FIREARMS HANDLING PROCEDURES AT ALL TIMES.
NOTE: IF YOU ARE UNFAMILIAR WITH THE PROCESS OF SCOPE MOUNTING IT MAY
BE NECESSARY TO EMPLOY THE SERVICE OF A QUALIFIED GUNSMITH.
It is best that you first loosen all the scope ring screws to help with mounting the Octagon scope
2
Relief setting aim the reticle at a plumb line. Align the vertical cross hair of the reticle with the plumb
line by rotating the scope within the rings. Once you are satisfied with your scopes settings and
placement, tighten the rings screws evenly and securely to approximately 10 to 15 inch lbs. of
torque (Not foot lbs.) with an inch pound torque wrench/screw driver. Be sure not to over tighten
the rings, as doing so can cause permanent damage to the scope.
Focusing Your Scope
CAUTION: VIEWING THE SUN WITH THIS SCOPE OR ANY OTHER OPTICAL
DEVICE CAN CAUSE PERMANENT INJURY TO THE EYE INCLUDING BLINDNESS
Octagon scopes have a quick focus ring feature:
Holding the scope at the proper distance from your eye, in order to achieve a Full Field of View,
the reticle should appear sharp and clear. If not, it will be necessary to adjust the focus by turning
the Quick Focus Ring.
1. Make quick glances through the eyepiece at a
featureless bright surface such as a white wall, or the
open sky.
2. Turning the Quick Focus Ring counter-clockwise will
extend the Ocular Lens outward, generally suitable for
those who are far sighted. Turning the Quick Focus Ring
clockwise will draw the Ocular Lens inward, generally
suitable for those who are near sighted.
3. Fine tune your adjustments until the reticle appears
sharp and clear. If the Ocular Lens reaches its outer
limits of adjustment, be sure not to force it as doing so
will cause damage to the eyepiece.
Windage and Elevation Adjustment Dials
Your scope is equipped with Elevation and Windage
Adjustment Dials which change your scopes point of aim
relative to the bullet point of impact on a target for a specific
range. The Elevation Adjustment Dial is located on top of the
Turret Body, and is responsible for the up and down
movement of the reticle.
side of the Turret Body, and is responsible for the left and
right movement of the of the reticle. To access the
Adjustment Dials simply twist the protective caps off counterclockwise.
The Windage Adjustment Dial is located on the right
3

On the top of each Adjustment Dial you will notice that there are arrows indicating direction of
Elevation/Windage movement per click
Magnification
100 yards
200 yards
300 yards
400 yards
500 yards
1.1X – 4X models
½ MOA
1 MOA
1½ MOA
2 MOA
2½ MOA
3X – 9X models
¼ MOA
½ MOA
¾ MOA
1 MOA
1¼ MOA
movement.
Turning the Elevation Adjustment Dial counter-clockwise will shift the bullet point of impact
up, and turning it clockwise will shift the bullet point of impact down.
Turning the Windage Adjustment Dial counter-clockwise will shift the bullet point of impact
right, and turning it clockwise will shift the bullet point of impact left.
The Elevation and Windage Adjustment Dials also feature Audible and Tactile Clicks which not
only can you see and hear the adjustments, but you can feel them as well. Each Click moves the
reticle point of aim ¼ or ½ MOA* at 100 Yards (depending on the scope model you have). The
chart below represents the amount of movement of each click at various distances.
*1 MOA = 1.047 Inches at 100 Yards
Zeroing your Scope
After you have completed the installation of your scope it will be necessary to adjust the scopes
point of aim to match the bullet’s point of impact on a target. This can be accomplished using
several methods, but we recommend the use of a Bore Sighting Device to save time and ammunition.
Using a Bore Sighting Device will ensure that your shots land “on paper”. Follow the Manufacturer’s
Instructions for the Bore Sighting Device that you choose in order to achieve the best results. You
are now ready to finalize your Zero.
CAUTION: ALWAYS BE SURE TO REMOVE THE BORE SIGHTING DEVICE BEFORE
SHOOTING LIVE AMMUNITION. FAILURE TO DO SO CAN CAUSE DAMAGE TO YOUR
firearm at the range in order to confirm an accurate Zero. Follow these steps to fine tune your scope
adjustments:
FIREARM OR INJURY TO YOURSELF AND THOSE AROUND YOU.
CAUTION: WHEN OPERATING ANY TYPE OF FIREARM ALWAYS USE PROPER EYE
AND EAR PROTECTION. BE SURE TO USE YOUR FIREARM IN AN AREA THAT IS
PERMISSIBLE UNDER LOCAL, STATE, AND FEDERAL LAW.
Bore Sighting alone is not sufficient enough to ensure an accurate Zero. You must shoot your
1. Secure your firearm using a steady platform such as a bench rest or sand bags.
2. Fire 3 to 5 carefully aimed shots at a target that is set to your desired Zeroing distance (50 or
100 yards is recommended).
3. Observe where the bullets have struck the target and make adjustments to the Elevation and
Windage settings as necessary until your point of aim matches your point of impact.
4. Continue with this process until you have achieved your desired level of accuracy.
5. Your scope is now Zeroed to your firearm at the distance that you have chosen.
4

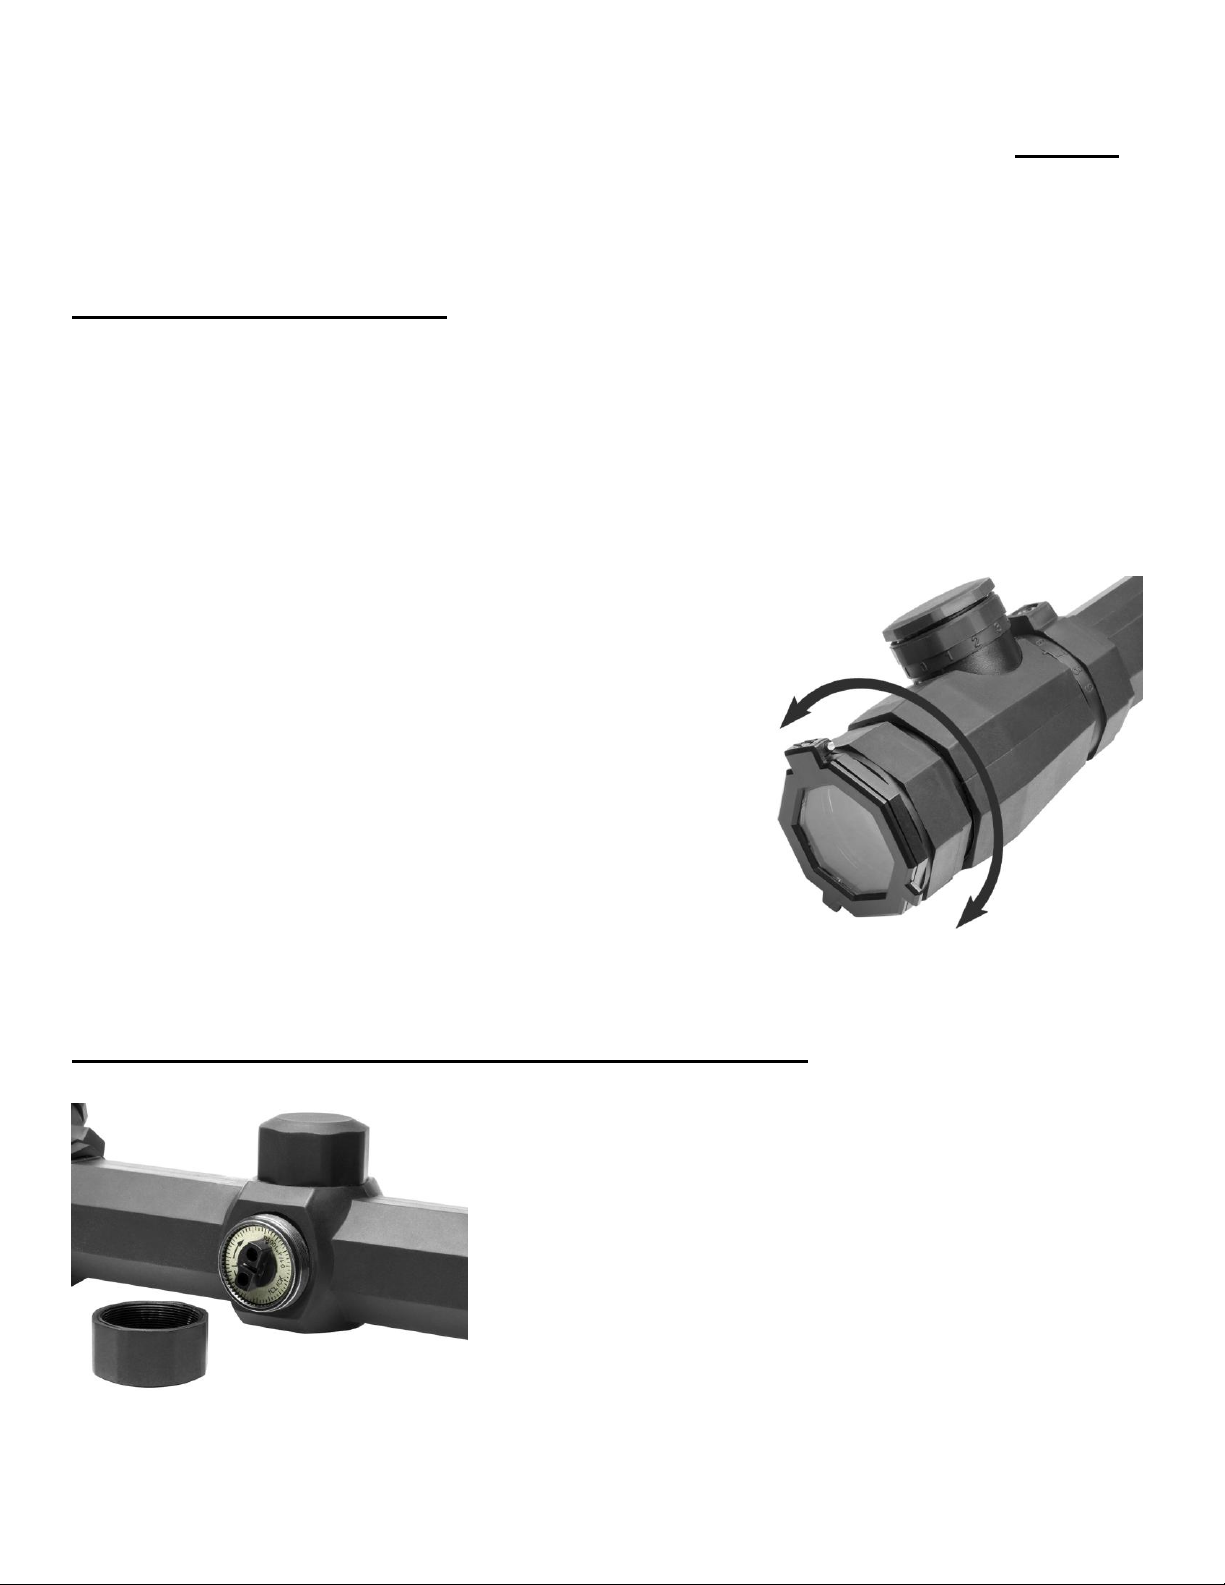
1. The Battery compartment is located within the Rheostat Knob.
2. On the top of the Rheostat Knob you will notice a thin cap. To
remove this cap grasp it firmly with one hand and twist it counterclockwise while holding the rheostat knob firmly in place with the
other hand.
3. Remove the old battery and dispose of it properly. Replace it with
a new 3 volt Lithium Battery type CR2032 only. Place the
Battery in the Battery compartment with the Positive “+” terminal
facing out. Twist the Battery cap back on to the Rheostat Knob
and hand tighten. Avoid using tools (such as pliers) to perform
this procedure as this may cause damage to the unit.
(6) Rheostat Knob for Illuminated Reticle
(7) Battery Cap
(9) CR2032 Battery
It is important to remember that many factors can affect the accuracy of your scopes zero
including ammo type, temperature, humidity, elevation, distance, angle, and other conditions.
Changing ammunition brands can affect accuracy as well.
Illuminated Reticle
There is a raised dot on the Rubber Armor as an Indicator
Mark on the Ocular Bell Housing, for the Illuminated Reticle
settings.
Depending in which direction you turn the rheostat, the
reticle can be illuminated in Red or Blue with multiple brightness
levels for each color. If you look closely at the top of the knob
you will notice a series of numbers. “0” represents the OFF
positions. If you turn the knob in either direction the reticle will
be illuminate in Red or Blue. There is 5 brightness levels, “1”
being the dimmest and “5” being the brightest for each of the colors.
Adjust the brightness level as needed in accordance with the surrounding conditions. The illumination
will increase reticle visibility especially during dusk and dawn. When the illumination is turned OFF the reticle
will appear as the normal Black Reticle. Be sure the Rheostat Knob is set to the “0” position when not in use
to preserve battery life.
Battery Installation
The Octagon Scopes have a CR2032 type battery in the rheostat.
5

Care and Maintenance
RED AND BLUE ILLUMINATED RETICLE MODELS:
MODEL
NUMBER
RETICLE
MAGNIFICATI
ON
External
TUBE
DIA.
OBJECTIVE
DIA. (mm)
FOV (FEET @
100 YARDS)
EYE RELIEF
(in)
EXIT PUPIL
(mm)
Weight
(oz.)
LENGTH
(in)
CLICK
VALUE
LENS
COATING
SOCTM11420G
Mil-Dot
1.1X - 4X
1"
20 mm
82.7’ – 22.5’
3.9" – 3.3”
18.6 – 5.1 mm
13.8
9.6”
½ MOA
Green
SOCTM3940G
Mil-Dot
3X - 9X
1"
40 mm
30.4’ – 9.9’
4.3” – 3.4”
9.3 – 3.1 mm
17.7
12.7"
¼ MOA
Green
SOCTP11420G
P4 SNIPER
1.1X - 4X
1"
20 mm
82.7’ – 22.5’
3.9" – 3.3”
18.6 – 5.1 mm
13.8
9.6”
½ MOA
Green
SOCTP3940G
P4 SNIPER
3X - 9X
1"
40 mm
30.4’ – 9.9’
4.3” – 3.4”
9.3 – 3.1 mm
17.7
12.7"
¼ MOA
Green
Your NCSTAR Octagon Scope Series Scope is shock, fog, and water proof. However, you should
never try to take it apart or clean it internally. The exposed optical lens surfaces will perform their
best if they are routinely cleaned with a lens brush or a lens cloth. For a deep cleaning, you can also
use high grade camera lens paper and camera lens cleaning solutions. Never use any other type of
materials or solvents other than those designed specifically for optical lenses to avoid damaging your
scope. Clean the outer portion of the lens cavity first with cotton swabs, clearing as much debris and
dust as possible. Then, gently clean the lenses using a circular motion starting in the center and
ending at the edges. Do not rub the lenses continually; simply wipe in short circular patterns.
Maintain the exterior surfaces of the scope by removing dirt or sand by using a soft brush or a soft,
dry cloth. It is not necessary to lubricate any part of the scope as all of the moving parts, such as the
turrets and the fast focus eyepiece, are permanently lubricated. When not in use, always store your
scope in a dry place with the lens caps on to prevent scratches to the lenses.
IF YOU ARE UNFAMILIAR WITH ANY OF THE PROCEDURES IN THIS MANUAL, ALWAYS
SEEK THE HELP OF A QUALIFIED PROFESSIONAL TO AVOID DAMAGE TO YOUR SCOPE
AND YOUR FIREARM.
Octagon Scope Series Specifications
6

OCTAGON SCOPE SERIES
FOR TECHNICAL ASSISTANCE CALL:
1-866-NcSTAR-8
(1-866-627-8278)
WWW.NCSTAR.COM
7
 Loading...