


THREE ARMORED RAIL SIGHTING SYSTEM
GREEN DOT OPTIC WITH RED LASER
INSTRUCTIONS
THREE ARMORED RAIL SIGHTING SYSTEM
This Green Dot Reflex Sight with an Integrated Red Laser is a compact Optical system, packed
with many features. You have the Green Dot as your primary targeting system and a Red Laser as a
secondary targeting device. You can use the Green Dot or Red Laser individually or you have the
option to use both the Green Dot and Laser at the same time. The Red Laser can be used for quick
point shooting at targets close to the shooter, in low light conditions. The Green Dot Sight and Red
Laser combo will mount to nearly any Weaver style or Picatinny type rails.
This Optic is backed by our NcSTAR Lifetime Limited Warranty. We trust that you will receive many
years of enjoyment and service from your Optic & laser.
CAUTION: BE SURE THAT YOUR FIREARM IS UNLOADED AND IS ALWAYS POINTED
IN A SAFE DIRECTION. ALWAYS PRACTICE SAFE AND PROPER FIREARM
HANDLING PROCEDURES AT ALL TIMES.
NOTE: IF YOU ARE UNFAMILIAR WITH THE PROCESS OF MOUNTING AN OPTIC, IT
MAY BE NECESSARY TO EMPLOY THE SERVICE OF A QUALIFIED GUNSMITH.
PLEASE FOLLOW ALL OF THE DIRECTIONS IN THIS MANUAL CAREFULLY.
FEATURES:
Unlimited eye relief.
Black anodized aluminum construction with a very tough Armored Hood around the Optic, with
Tri-Rails for attaching accessories.
Integral fully adjustable Red Laser (Elevation & Windage).
Fully Adjustable Green Dot Optic (Elevation & Windage).
Five brightness settings for the Green Dot Sight.
Ability to use Green Dot or Red Laser Individually, or Both at the same time.
Adjustable Locking Quick Release Mount will mount onto most Weaver style and Picatinny rails
Green LED (Light Emitting Diode) 100% safe for the eyes.
MOUNTING THE OPTIC:
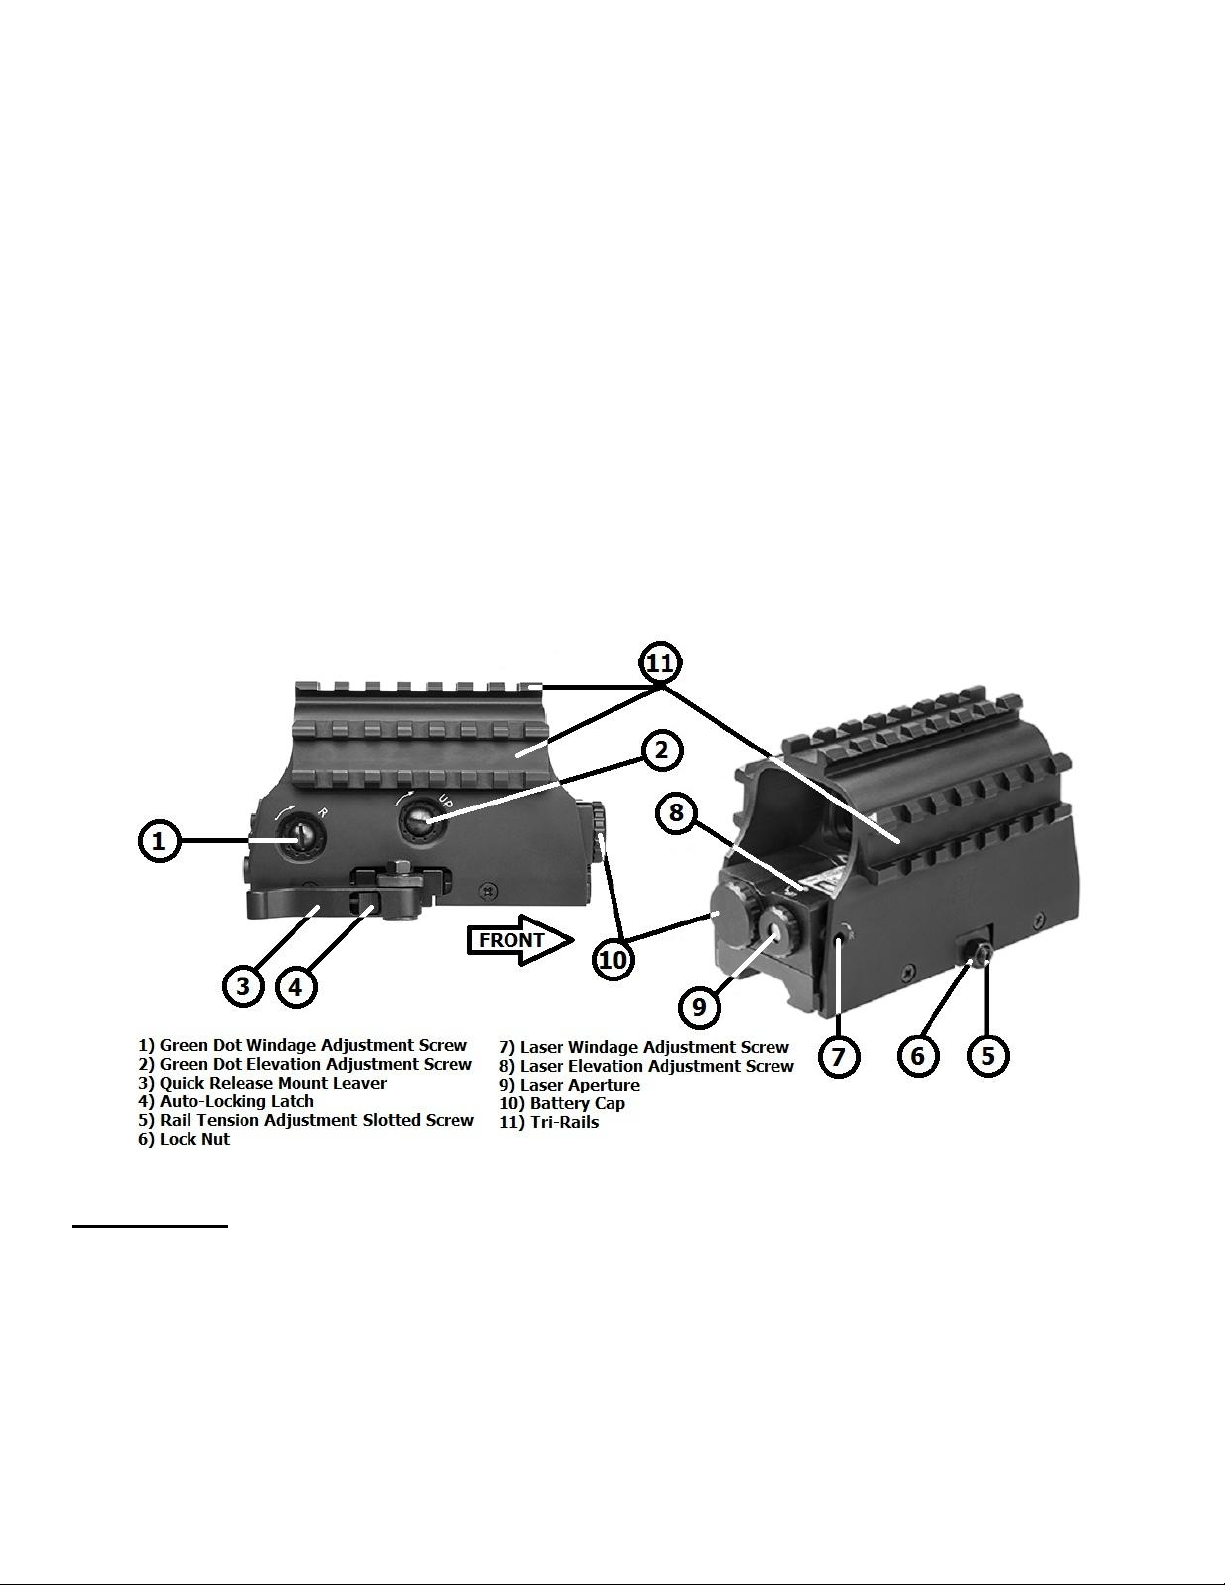
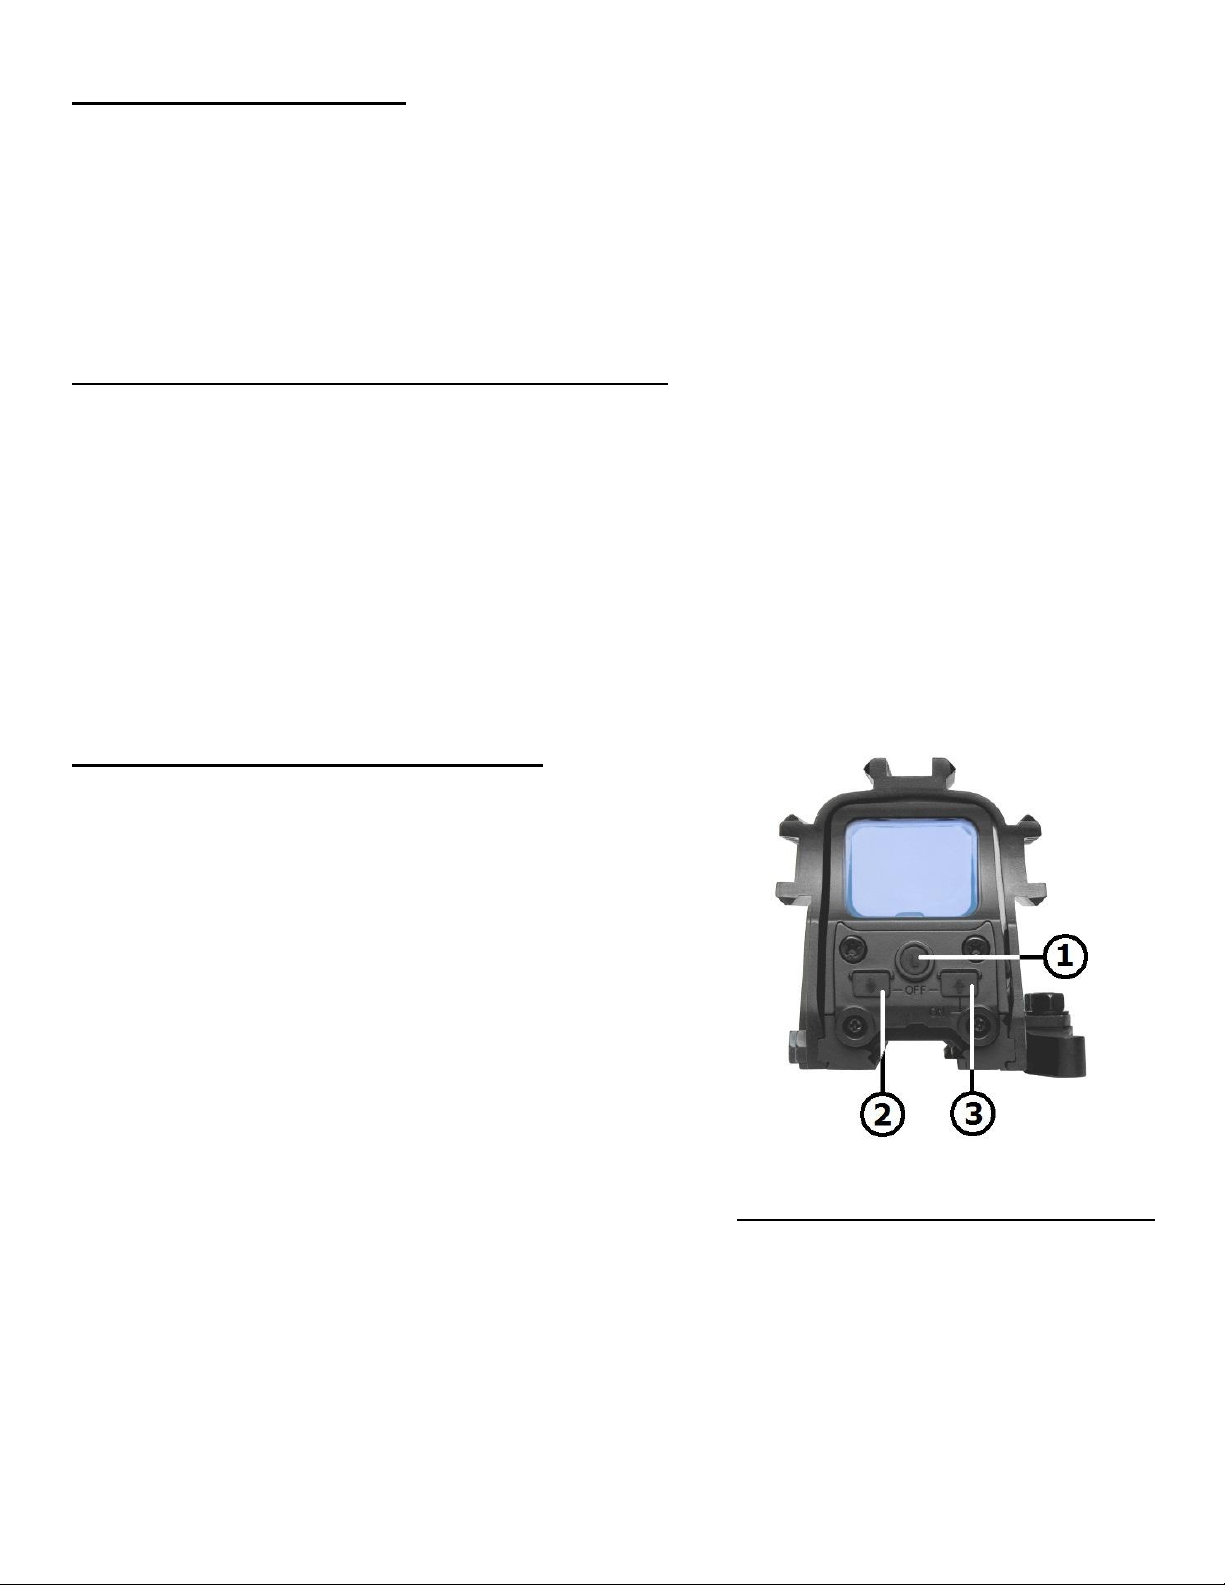
1) Laser (“L”) ON & OFF Button
2) Green Dot - Decreases Brightness Level
3) Green Dot - Increases Brightness Level
Press to Turn Green Dot ON
Press Both + to Turn Green Dot OFF
This Optic is equipped with a Quick Release Weaver style & Picatinny rail type mount with an
Auto-Locking Latch. To attach the Optic to a Weaver or Picatinny style rail, move the Auto-Locking
Latch located within the Quick Release Lever away from the pivot point (to unlock the lever) and then
swing the Quick Release Lever to the forward (Open) position. Place the Optic onto the rail, with the
Recoil Lug placed into one of the cross slots on the rail. Swing the Quick Release Lever rearward
(Closed) position to secure the Optic onto the rail.
ADJUSTING THE MOUNT’S RAIL TENSION:
On the Left side of the Quick Release Mount is a Lock Nut and Slotted Screw. The Slotted
Screw is used to adjust the rail mount tension. To adjust the rail mount tension, you must first loosen
or remove the Lock Nut Counter-Clockwise. Once the Lock Nut is loosened or removed, you can then
use small flat bladed screwdriver to turn the Slotted Screw. Turn the Slotted Screw Clockwise to
make the rail mount tension Tighter, turn the Slotted Screw Counter-Clockwise to make the rail
mount tension Looser. To test the rail mount tension, open and close the Quick Release Lever while
mounted on the rail. Make adjustments to the Slotted Screw until you get the proper rail tension.
Once you have the rail mount tension properly adjusted, turn the Lock Nut Clockwise to Lock the
Slotted Set screw in place.
GREEN DOT SIGHT OPERATIONS:
The Control Panel buttons performs a number of functions.
There is an Up and Down Arrow (Rectangular)
Buttons for controlling the Green Dot’s Brightness level and
for turning it ON/OFF. A single Round Button (with an “L”)
on the Control Panel for switching the Red Laser ON/OFF.
The Rectangular “Up Arrow” button will turn ON
the Green Dot Sight when the Optic is turned OFF.
To turn the Green Dot Sight OFF, you must depress
(at the same time) both Up and Down Arrow
buttons on the Control Panel.
When the Green Dot Sight is ON, the Down Arrow
will decrease the brightness intensity of the Green
Dot for each press of the button. The Up Arrow
will increase the brightness intensity of the Green
Dot for each press of the button. There are a total of
5 Brightness settings for the Green Dot.
The Round Button with the letter “L” (for “Laser”) on the Control Panel will cycle the Red Laser
ON or OFF. When the Red Laser is OFF, press the “L” Button to turn the Laser ON and a
second time to turn the Laser OFF.
After you are done using the Optic, make sure that BOTH the Green Dot and Red Laser is
turned OFF, in order to preserve battery life.

ZEROING YOUR GREEN DOT SIGHT:
ADJUSTING THE GREEN DOT WINDAGE AND ELEVATION:
The Green Dot Sight is equipped Windage and Elevation Dials on the right side of the Main Body.
The Elevation Dial is located on Right side of the Main Body, closest to the front of the Optic. Use a
flat blade screwdriver or small coin to make adjustments.
Turning the Green Dot Elevation Dial Clockwise will move the Green Dot Up. Moving the
Bullet impacts Down from the point of aim.
Turning the Green Dot Elevation Dial Counter-Clockwise will move the Green Dot Down.
Moving the Bullet impacts Up from the point of aim.
The Windage Dial is located on the Right side of the Main Body, closest to the rear of the Optic. Use
a flat blade screwdriver or small coin to make adjustments.
Turning the Green Dot Windage Dial Clockwise will move the Green Dot to the Right.
Moving the Bullet impacts Left from the point of aim.
Turning the Green Dot Windage Dial Counter-Clockwise will move the Green Dot to the
Left. Moving the Bullet impacts Right from the point of aim.
SIGHTING IN YOUR GREEN DOT SIGHT:
We recommend the use of a bore sighting device to save time and ammunition when zeroing your
sight. This device will help you get on paper much quicker. Follow all of the instructions set by the
manufacturer of your bore sighting device very carefully. Once you have achieved a relative zero by
way of bore sighting, it is still necessary to shoot your firearm to ensure an accurate zero.
CAUTION: ALWAYS BE SURE TO REMOVE THE BORE SIGHTING DEVICE FROM YOUR
FIREARM BEFORE SHOOTING LIVE AMMUNITION. FAILURE TO DO SO CAN RESULT
IN DAMAGE TO YOUR FIREARM, OR INJURY TO YOURSELF AND THOSE AROUND
YOU.
With some firearms it may not be possible to use a bore sighting device. In this case it will be
necessary to use a more traditional method of zeroing.
CAUTION: WHEN OPERATING ANY TYPE OF FIREARM ALWAYS USE PROPER EYE
AND EAR PROTECTION. BE SURE TO USE YOUR FIREARM IN AN AREA THAT IS
PERMISABLE UNDER LOCAL, STATE, AND FEDERAL LAW.
1. From a steady and supported shooting position (such as a shooting bench with a rifle rest or
sand bags) take careful & consistent aim and slowly fire three to five round groupings at a target.
2. Observe where the bullets have struck the target and adjust Windage and Elevation as
necessary, until your point of aim matches your point of impact.
3. Your firearm and Green Dot sight are now zeroed.

DANGER: AVOID DIRECT EYE EXPOSURE TO THE LASER BEAM. LASER RADIATION
IS EMITTED FROM THE APPERTURE.
CAUTION: AVOID SHINING THE LASER IN YOUR EYES, AND THE EYES OF OTHERS
AROUND YOU. THE LASER EMISSIONS CAN CAUSE SERIOUS INJURY TO THE EYE
INCLUDING BLINDNESS
ZEROING YOUR RED LASER SIGHT
ADJUSTING THE LASER WINDAGE AND ELEVATION:
The integral Red Laser is adjustable for both Windage and Elevation. The Laser’s Windage
Adjustment Set Screw and Laser’s Elevation Adjustment Set Screw are both found on the Optics
Front Housing. The Adjustment Set Screws can be adjusted by using the provided 2.0 mm Allen
Wrench.
To adjust the Laser Elevation Up, turn the Laser Elevation Adjustment Set Screw Counter-
Clockwise, and to adjust the Laser Elevation Down turn Laser Elevation Adjustment Set
Screw Clockwise.
To adjust the Laser Windage Right, turn the Laser Windage Adjustment Set Screw
Clockwise. To adjust the Laser Windage Left, turn the Laser Windage Adjustment Set Screw
Counter-Clockwise.
NOTE: FOR ZEROING/SIGHTING IN YOUR RED LASER, PLEASE USE THE SAME
INSTRUCTIONS ABOVE TITLED SIGHTING IN YOUR GREEN DOT SIGHT.
BATTERY INSTALLATION
Your Green Dot Optic with Integrated Red Laser comes ready to use with a
pre-installed CR123A battery. If the Laser or the Green Dot no longer
illuminates, follow these simple instructions to replace the battery.
1. The Battery Compartment & Cap is located in the Optic’s Front
Housing, next to the Laser aperture.
2. To remove this Battery Cap, grasp the knurled edge of the Battery
Cap firmly with one hand and twist it Off Counter-Clockwise.
3. Remove the old battery and dispose of it properly. Replace it with a
New 3 volt Lithium CR123A Battery. Place the new CR123A Battery
in the Battery Compartment with the Positive “+” terminal facing out
towards the Battery Cap. Twist the Battery Cap Clockwise back onto
the Battery Compartment and hand tighten. Avoid using tools (such
as pliers) to perform this procedure as this may cause damage to
the unit.
CAUTION: USE ONLY BRAND NEW 3 VOLT LITHIUM CR123A TYPE BATTERIES FOR
THIS OPTIC. USING ANY OTHER TYPE OF BATTERY MAY DAMAGE THE OPTIC.

CARE AND MAINTENANCE
Your Green Dot Optic is a factory sealed unit, please do not attempt to take it apart or clean it
internally.
The exposed Optical lens surfaces will perform their best if they are routinely cleaned with a lens
brush and the lens cloth provided with your sight. For a deep cleaning, you can also use high quality
camera lens paper and camera lens cleaning solutions. Never use any other type of materials or
solvents other than those designed specifically for Optical lenses to avoid damaging your sight.
Clean the outer edge of the lens cavity first with cotton swabs, clearing as much debris and dust as
possible. Then, gently clean the lenses using a circular motion starting in the center and ending at
the edges. Do not rub the lenses continually; simply wipe in small circular patterns.
Maintain the exterior surfaces of the scope by removing dirt or sand by using a soft brush or a clean
soft dry cloth. You can also use a silicone treated cloth to restore luster of the Optic’s body and
protect the scope against corrosion.
Be careful not to touch any of the lenses with the silicone cloth.
When not in use, always store your sight in a dry place.
IF YOU ARE NOT SURE ABOUT ANY OF THE PROCEDURES IN THIS MANUAL, ALWAYS
SEEK THE HELP OF A QUALIFIED PROFESSIONAL TO AVOID DAMAGE TO YOUR OPTIC
AND YOUR FIREARM.
LASER SPECIFICATIONS:
Red Laser Specifications:
Laser Class: Class IIIa
Maximum Output Power: <5mW
Wavelength: 635-655nm
Operating Temperature: 59 – 95 degrees Fahrenheit
Battery Type: CR123A
Operating Voltage: 4.5V DC
Operation Current: <30mA

THREE ARMORED RAIL SIGHTING SYSTEM
GREEN DOT OPTIC WITH RED LASER
FOR TECHNICAL ASSISTANCE CALL:
1-866-NcSTAR-8
(1-866-627-8278)
WWW.NCSTAR.COM
 Loading...