

Page 1

US-CA
Page 2

Page 3
EN
The Bluetooth system complies with the main safety requirements
Battery
Directive
2001/95/CE
– GPSD, 2013/56/UE BAT, 2014/30/EU
USER INSTRUCTIONS AND SAFETY
Congratulations on your purchase of an N-Com product.
N-Com B601 was made using the most advanced technology and top-quality
materials. Long-running tests and thorough system development have made it
possible to achieve the highest audio quality.
For additional information on the B601, to download the instructions in PDF format
and install the latest available Firmware version, please visit the website www.n-com.it.
Firmware version: 1.0.1
REFERENCE STANDARDS
The products of the N-Com line comply with standards as per the table below:
B601
and other applicable provisions of Directive RED 2014/53/EU,
Directive 2009/65/EC, Directive 2011/65/CE, Directive 2012/19/EU
The Declarations of Compliance can be downloaded from the website www.n-com.it (Download
section).
Model:
PMN:
B601 R
N-Com B601 R
FCC ID:
Y6MNCOM18
IC:
9455A-NCOM18
The Bluetooth® word mark and logos are registered trademarks owned by Bluetooth SIG, Inc.;
any use of such marks by N-Com is under license. Other trademarks and trade names are those
of their respective owners.
R-NZ
Fw 1.0.1-3 - 29/01/2021
Page 4

Contents
1 WARNINGS AND SAFETY ....................................................................................................................... 5
1.1 Road safety ............................................................................................................................................................................ 5
1.2 Switching on the system in safe environments......................................................................................................... 5
1.3 Interferences ......................................................................................................................................................................... 5
1.4 Appropriate use ................................................................................................................................................................... 5
1.5 Qualified personnel ............................................................................................................................................................ 6
1.6 Accessories and batteries ................................................................................................................................................. 6
1.7 Disposal .................................................................................................................................................................................. 6
2 CONTENT OF THE PACKAGING ............................................................................................................ 7
3 INSTALLATION ON THE HELMET .......................................................................................................... 8
3.1 Installing the B601 system on the helmet .................................................................................................................. 9
3.2 Adjusting the microphone ............................................................................................................................................ 13
3.3 Removing the B601 system from the helmet ......................................................................................................... 13
4 BASIC FUNCTIONS ................................................................................................................................ 14
4.1 Volume adjustment ......................................................................................................................................................... 14
4.2 Multi-language voice messages.................................................................................................................................. 14
4.3 N-Com EASYSET ............................................................................................................................................................... 14
5 CONFIGURATION MENU ..................................................................................................................... 15
6 PAIRING UP WITH MOBILE PHONES OR OTHER BLUETOOTH DEVICES ................................... 15
7 MOBILE PHONE ..................................................................................................................................... 16
7.1 Speed dial ........................................................................................................................................................................... 16
7.2 Conference call function ................................................................................................................................................ 16
8 MANAGING TWO MOBILE PHONES (OR BLUETOOTH DEVICES) ............................................... 17
9 SMART NAVI SYSTEM ........................................................................................................................... 17
10 MUSIC VIA BLUETOOTH ...................................................................................................................... 17
10.1 Sharing music via Bluetooth (A2DP Sharing) .......................................................................................................... 18
11 SATELLITE NAVIGATOR FOR MOTORCYCLES ................................................................................. 18
12 N-COM INTERCOM ............................................................................................................................... 18
12.1 N-Com “900” / “600” Series Intercom pairing up ................................................................................................. 18
12.2 N-Com “900” / “600” Series Intercom function (one-to-one connection) ................................................... 19
13 “UNIVERSAL INTERCOM” INTERCOM ............................................................................................... 19
13.1 Pairing up the Universal Intercom .............................................................................................................................. 19
13.2 Universal Intercom Function......................................................................................................................................... 19
14 BATTERY AND RECHARGE ................................................................................................................... 20
14.1 Low battery signal ............................................................................................................................................................ 20
14.2 Checking the Battery Level............................................................................................................................................ 20
14.3 Charging the system ....................................................................................................................................................... 20
15 SUMMARY TABLE OF CONTROLS ...................................................................................................... 21
16 WARRANTY ............................................................................................................................................. 22
16.1 Warranty coverage and validity ................................................................................................................................... 23
16.2 Exclusions and limitations of coverage ..................................................................................................................... 23
16.3 Procedure for submitting claims ................................................................................................................................. 23
16.4 Product identification ..................................................................................................................................................... 24
16.5 Validity of N-Com warranty .......................................................................................................................................... 25
Page 5

1 WARNINGS AND SAFETY
Read this User Manual carefully, as well as the simple rules listed below. Failure to comply with these rules may
lead to dangerous situations.
: The product cannot be used in official or non-official competitions, motordromes, circuits, racing
Caution
tracks and the like.
: Installation of the N-Com B601 system results in a weight increase of approximately 105 g, which is
Caution
added to the weight of the helmet and of the other accessories.
: The electronic components of the N-Com system mounted inside the helmet are not waterproof.
Warning
Consequently, make sure the inside of the helmet, including the comfort padding, does not get wet in order
to avoid damage to the system. If water seeps into the helmet, remove the comfort padding from the
helmet and allow to air dry.
1.1 Road safety
Always obey all Traffic Regulations in force. While riding your motorcycle, your hands should always be
engaged in actually riding the vehicle. Any operation to the N-Com system must be carried out with the
motorcycle stopped. Specifically:
• Set your cell phone on automatic answer (see the cell phone instructions to do this).
• If your cell phone is not equipped with this function, first stop your vehicle in a safe area, in compliance with
Traffic Regulations and then answer the call.
• Do not make any calls while riding. Stop your vehicle in a safe place in compliance with Traffic Regulations
and then make the call.
• Adjust the volume so that it does not cause a disturbance or distraction while riding and at the same time
allows you to distinctively hear background noises.
• Do not operate your cell phone or other devices connected to the N-Com system while riding your
motorcycle.
• In all cases, obey the Traffic Regulations and remember that riding the motorcycle has absolute priority over
any other manoeuvre.
1.2 Switching on the system in safe environments
• When using the N-Com system, comply with all limitations and instructions related to the use of cell
phones.
• Do not turn on your cell phone or the N-Com system whenever their use is forbidden or when these devices
can cause interference or dangerous situations.
• Turn off while refuelling. Do not use the N-Com system at filling stations. Do not use the device near
combustible materials or chemical products.
• Turn off when near explosive materials.
1.3 Interferences
All phones and devices with wireless signal transmission are subject to interferences that may affect the
performance of the device connected to them. These interferences are not ascribable to a defect of the N-Com
system.
1.4 Appropriate use
Use the device only in the normal position, as described in the product documentation. Do not attempt to
disassemble, tamper with, or modify any part of the N-Com system.
: Adjust the volume of the N-Com system and of the audio sources connected to it before you use the
Caution
system on the road.
: Adjusting the volume to exceedingly high levels may cause damage to your hearing.
Caution
: Incorrect installation of the system in the helmet may alter the aerodynamic and safety characteristics
Caution
of the helmet itself, thus creating dangerous conditions. Install the N-Com system according to the
instructions provided in the product documentation. In case of doubt, please contact your local N-Com
dealer.
5
Page 6
EN
Listening to other equipment should not interfere with riding your motorcycle, which must be the
Warning:
top priority at all times. Carry out all operations on the electronic equipment and on the N-Com system with
the vehicle stopped, in compliance with Traffic Regulations.
1.5 Qualified personnel
• Only qualified personnel can carry out technical assistance on this product. In case of any malfunction,
always turn to your local dealer.
• The helmet is a safety device. Tampering with it and/or with the electronic system inside the helmet can
result in dangerous situations, in addition to invalidating the product warranty.
1.6 Accessories and batteries
• Only use the type of batteries, battery chargers and accessories approved by Nolangroup for the specific
model.
• Using a battery type different from the recommended one may lead to dangerous situations and invalidate
the warranty.
• Contact your local dealer to see about the availability of approved accessories.
• When disconnecting the power supply cable of any accessory or of the battery charger, always grab and
pull the plug, not the cable.
• Do not use batteries for purposes other than the prescribed ones.
• Never use batteries or battery chargers that turn out to be damaged.
• Do not short-circuit the battery.
• Keep the battery at a temperature between 0° / +45°C (charging): -20° / +60°C (in use).
• Danger of fire or explosion: do not throw the batteries into a fire or expose them to high temperatures!
• Do not throw out batteries together with household refuse. The batteries should be disposed of in
compliance with local regulations
• Do not wear the helmet while the battery is recharging.
• The helmet should never be left within the reach of unsupervised children in order to prevent damage to
their health caused by access to the batteries.
Battery
1.7 Disposal
Refer to this user manual and to manuals related to other parts of the N-Com system in order to disassemble
the system from the helmet. Once the system has been disassembled, dispose of it according to the following
instructions:
PL743530P LiPo 3,7V – 800 mAh
• The presence of a crossed-out wheelie bin indicates that in the European Union the product
is subject to separate collection at the end of its useful life.
• Do not dispose of these products together with undifferentiated urban waste.
• The proper disposal of obsolete equipment contributes to preventing possible negative consequences on
people’s health and on the environment.
• Within the European Union, the dealer, when supplying the new equipment, ensures that the used
equipment will be collected free of charge, provided it is equivalent to a ratio of one to one.
• For more detailed information on the disposal of obsolete equipment, contact your municipality, a waste
disposal service, or the store where the product was purchased.
6
Page 7
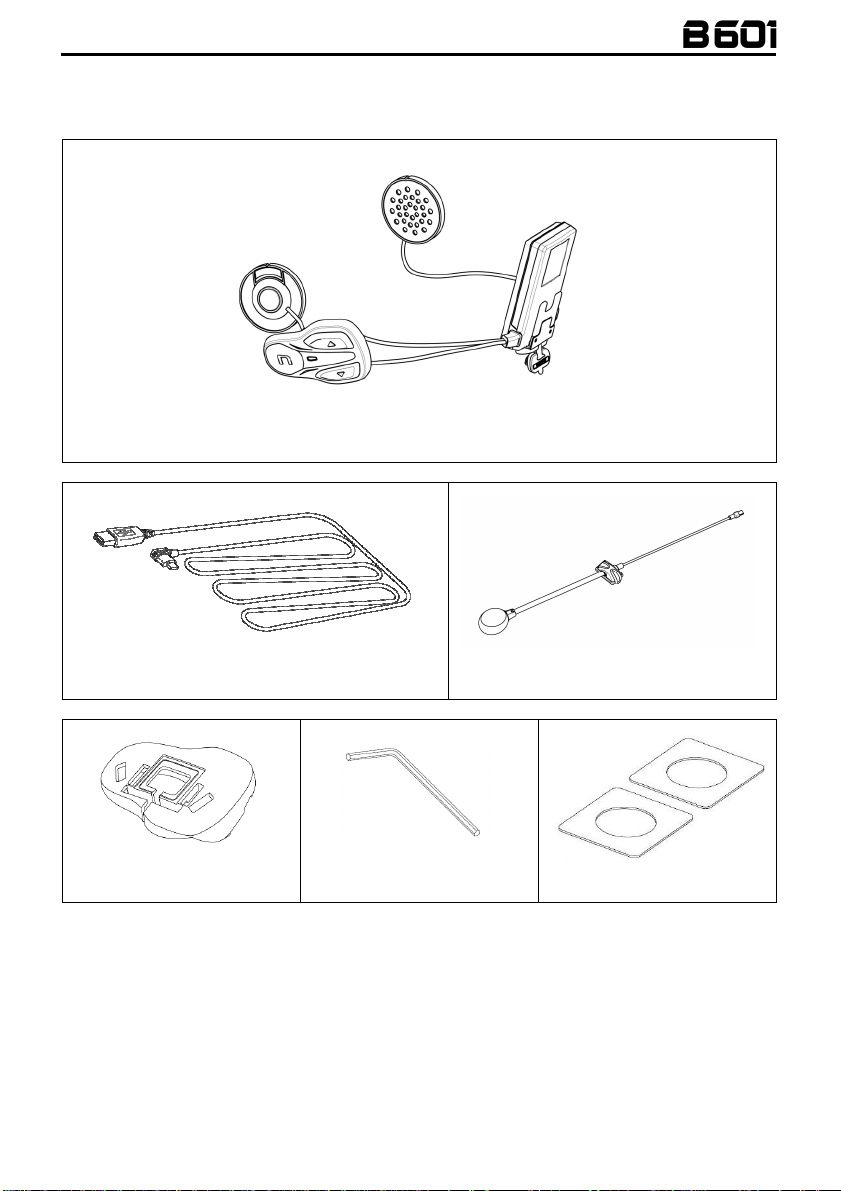
2 CONTENT OF THE PACKAGING
The N-Com B601 package contains:
Mini USB wire
Keypad adapters for N87, N100-5
N-Com B601 system
Key
Microphone with clip
Adhesive strips for loudspeakers
7
Page 8
EN
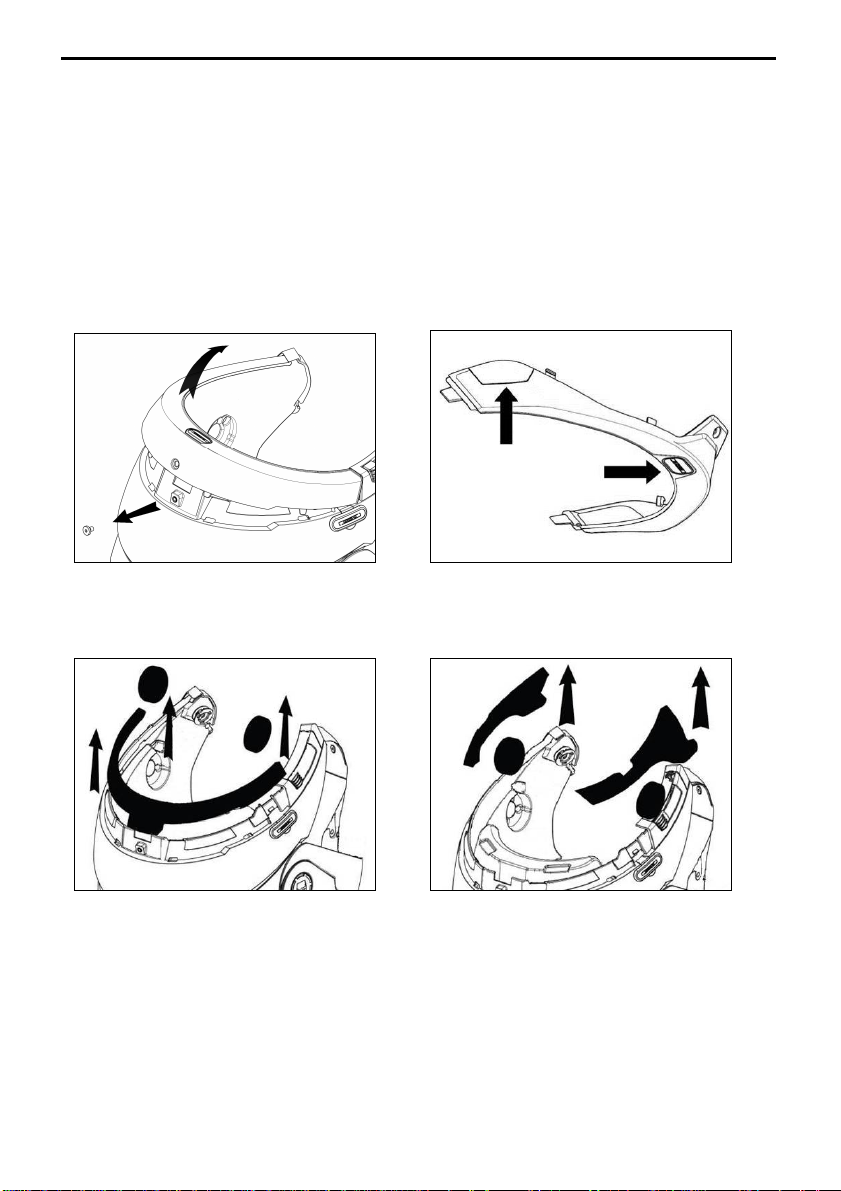
3 INSTALLATION ON THE HELMET
Important
affixed to the product (see chapter 16.3).
You can download the installation video from www.n-com.it N-Com / Download section.
• Before you install the B601 system on the helmet, make sure it turns on properly. Press the “n” key for
• Remove the cheek padding (see helmet instructions).
• Remove the helmet edge gasket using the special tool (Fig. 1).
• Completely remove the gasket as shown in Fig. 1; by doing so you also remove the padding.
• Remove the “N-Com” plugs found at the back of the shell gasket and on the left side of the helmet.
: Prior to installing the N-Com system, it is recommended to write down the identification code
about 2 seconds, until the blue LED on the key pad lights up and you hear a beep in the headset. Proceed
with the installation.
Fig. 1
• Prior to installing the N-Com system, remove any filling foam material, if present, from the helmet (refer
to the user manual for your specific helmet).
Option 1
: Keep the filling material in case you wish to use the helmet without the N-Com system in the future.
N.B.
Fig. 1 – ONLY FOR N87 – N100-5 HELMET
Option 2
8
Page 9
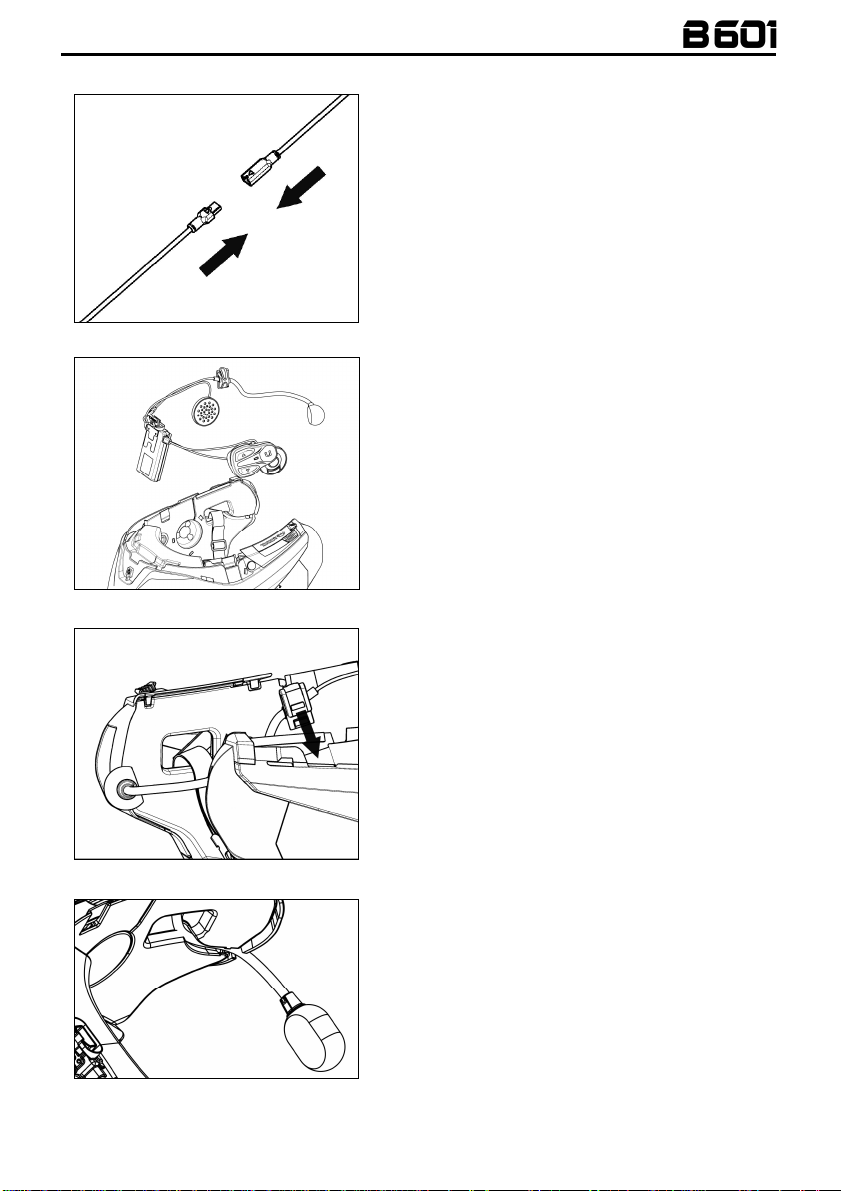
3.1 Installing the B601 system on the helmet
• Hook up the microphone connector to the other
end, following the directions of the arrows (Fig.
2).
: You can adjust the position of the microphone.
N.B.
For instructions on how to do this, please see
chapter. 3.2.
Fig. 2
Fig. 3
Fig. 4
• Place the system in the special housing in the
back of the helmet, pushing it all the way into
the groove (Fig. 3).
N.B.: For positioning of the wiring and of the
microphone in the N100-5 helmet, follow the
instructions provided in the dedicated box.
• Fix the cable inside the helmet and make sure
the right fixing clip snaps into its housing (Fig. 4).
• Position the microphone in the housing on the
right of the helmet, inserting the metal boom in
the groove found in the chin guard coupling
frame (Fig. 5).
: make sure that the side of the
Caution
microphone support with the writing “n” is facing
inward.
Fig. 5
9
Page 10
EN
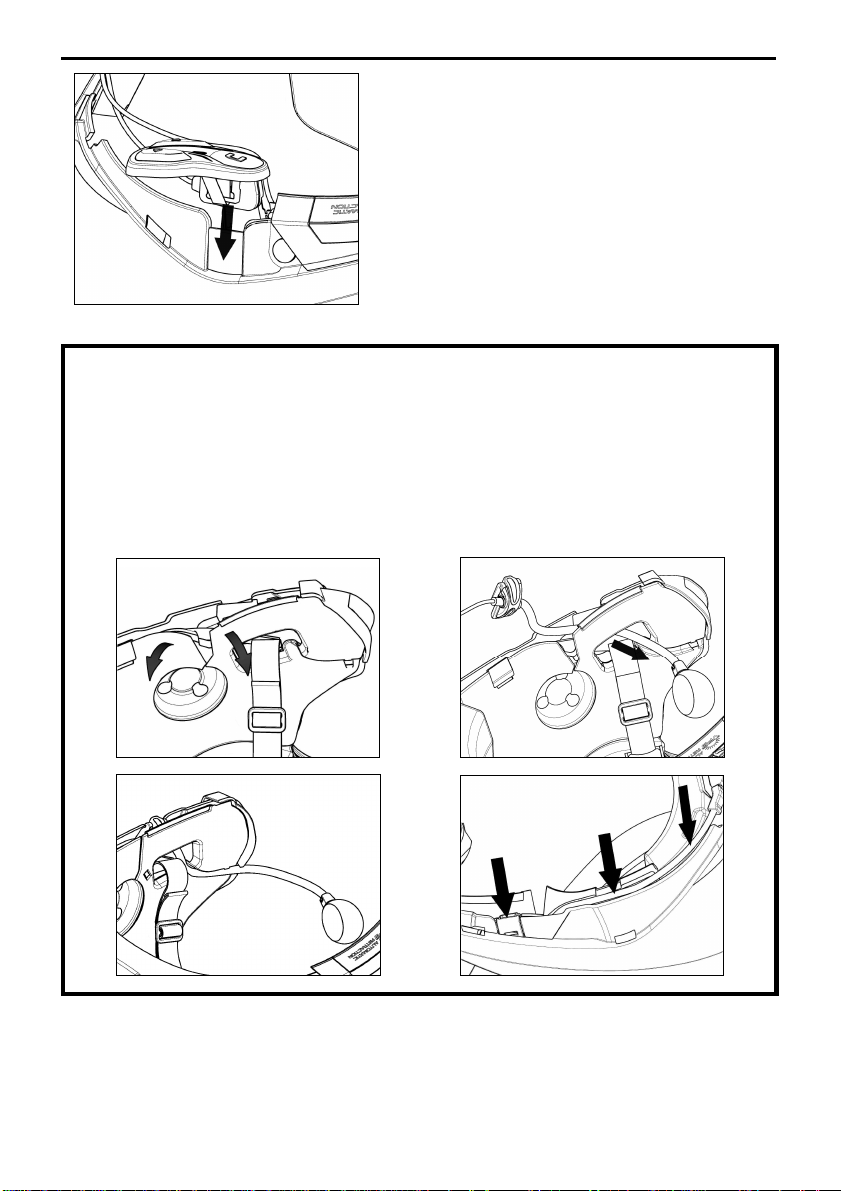
N.B.: For positioning of the keypad in helmets N87
and N100-5, follow the instructions provided in the
dedicated box.
• Fix the cable inside the helmet and make sure
the left fixing clip snaps into its housing.
• Hook up the keypad to the helmet by clicking in
the relevant hooks.
• Open the rubber cap of the B601 system.
• Reassemble the gasket and secure it with the
Fig. 6
ONLY FOR HELMET N100-5 – positioning of wiring and microphone
Positioning the right side wiring and the microphone
• Lift up the plastic lining of the cheek padding (Fig. 7).
• Insert the microphone into the eyelet (Fig. 8) and position it in the special housing, then inserting the
metal boom in the groove found in the chin guard coupling frame (Fig. 9).
: make sure that the side of the microphone support with the writing “N-Com” is facing inward.
Caution
• Fix the cable inside the helmet and make sure the right fixing clip snaps into its housing (Fig. 10).
• Reposition the plastic lining of the cheek padding, arranging it behind the two small stop hooks (Fig.
11).
specific screw.
:
10
Fig. 7
Fig. 9
Fig. 8
Fig. 10
Page 11

Fig. 11
ONLY FOR HELMET N100-5 – positioning of wiring and microphone
Positioning the left side wiring
:
• Lift up the plastic lining of the cheek padding (Fig. 12).
• Fix the cable inside the helmet and make sure the left fixing clip snaps into its housing (Fig. 13).
• Reposition the plastic lining of the cheek padding, arranging it behind the two small stop hooks (Fig.
14).
Fig. 12
Fig. 13
Fig. 14
11
Page 12
EN
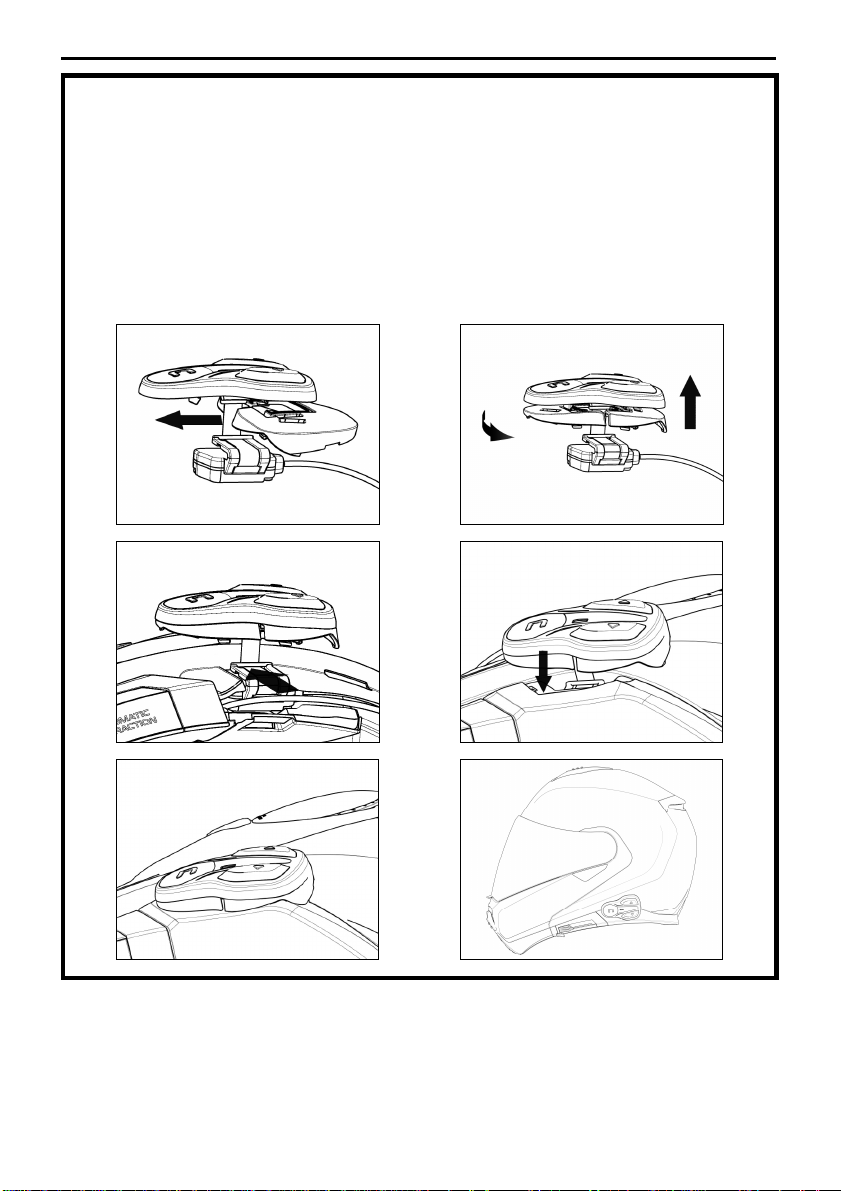
FOR N87 – N100-5 HELMENTS ONLY – positioning the keypad
Important:
accessory, which is included in the package.
Installation of the keypad on the N87, N100-5 helmets requires the use of the “KEYPAD ADAPTER”
• Insert the support specific for your helmet in the flex cable of the keypad (Fig. 15).
• Rotate the keypad support so as to position it like in Fig. 16, then hook it to the keypad.
• Fix the cable inside the helmet and make sure the left fixing clip snaps into its housing (Fig. 17).
• Open the rubber cap of the B601 system.
• Reassemble the gasket and secure it with the specific screw.
• Hook up the keypad to the helmet by clicking in the relevant hooks (Fig. 18).
• The proper positioning of the keypad is illustrated in Fig. 19 and in Fig. 20.
Fig. 15
Fig. 17
Fig. 19
• Position the left and right speakers in the respective housing obtained in the polystyrene cheek padding.
If necessary, rotate the speakers slightly in their housing. If necessary, secure them using the adhesive
strips supplied as standard equipment.
• Reassemble the padding.
Fig. 16
Fig. 18
Fig. 20
12
Page 13

3.2 Adjusting the microphone
The B601 system makes it possible to adjust the position of the microphone in order to facilitate its
positioning in the different helmet models. Proceed as follows:
• Open the clip positioned on the microphone boom, operating as indicated in Fig. 21.
• Adjust the microphone (Fig. 22).
• Close the clip (Fig. 23).
Fig. 21
Fig. 22
Fig. 23
To ensure good voice transmission quality, it is recommended to position the microphone sponge at the side
of your mouth.
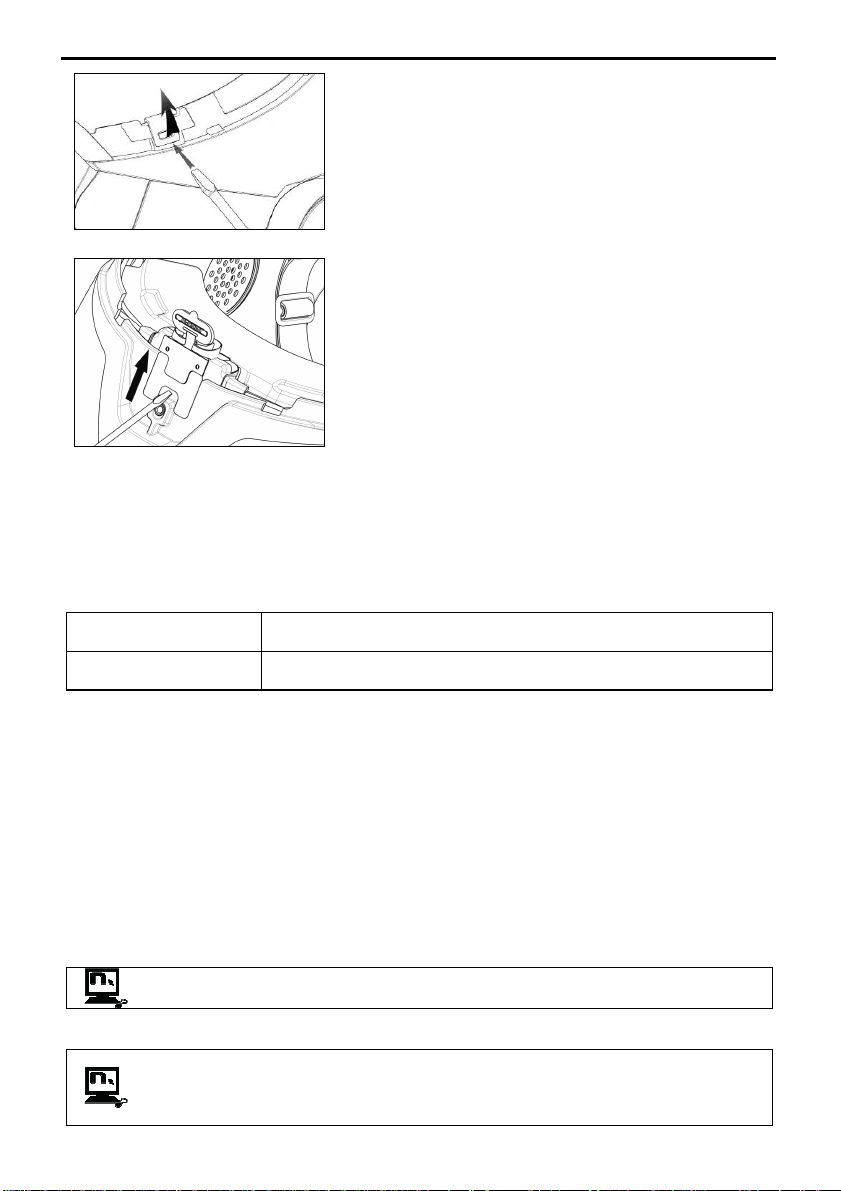
3.3 Removing the B601 system from the helmet
Proceed as follows to remove the B601 system from
the helmet:
• Remove the cheek padding and the shell gasket.
• Remove the keypad from the shell, as shown in
Fig. 24.
Fig. 24
FOR N87 / N100-5 HELMENTS ONLY – removing the keypad
• Remove the keypad from the shell, as indicated in Fig. 25.
• Rotate the keypad in a counterclockwise direction (Fig. 26).
• Remove the cheek padding and the shell gasket.
Fig. 25
Fig. 26
13
Page 14
EN
• Unhook the right and left clips from the shell,
levering upward using a flat head screw (or a
similar tool), as shown in figure 27.
Fig. 27
• Completely remove the B601 system from
helmet using a flat head screwdriver (or
similar tool) and re-install the cheek padding
and the edge gasket.
Fig. 28
4 BASIC FUNCTIONS
: Before using the N-Com device for the first time, recharge the battery completely for at least 10 hours.
Note
To obtain best performances from the battery, it is recommended to completely recharge the battery the first
few times. Afterwards, you can recharge the battery for shorter periods. Whenever possible, it is best to
recharge the battery completely.
System ON
System OFF
4.1 Volume adjustment
You can easily adjust the volume by tapping the “”or “” key. You will hear a beep when the volume reaches
the maximum or minimum level.
The volume is independent for each sound source. Once it is set for a specific source (phone call, radio, Mp3),
it will be remain in memory even after the system is switched off.
However, if you adjust the volume during stand-by mode, it will affect volume levels of every audio source.
4.2 Multi-language voice messages
The N-Com system features voice messages that provide information on the system and on the active
functions. The language set by default is English. The language of the voice messages may be changed
through the specific firmware installable with the N-Com EASYSET program. Please refer to the online HELP for
instructions on how to change the language settings.
Available languages: Italian, English, French, German, Spanish, Dutch.
The default function is enabled on the device. You can enable / disable the “VOICE
ANNOUNCEMENTS” function by using the N-Com EASYSET program.
4.3 N-Com EASYSET
“N-Com EASYSET” is the application that can be used to manage and configure the B601 system.
The programme can be downloaded from the Internet site www.n-com.it, in the “Download”
section. The functions that can also be managed from the N-Com EASYSET are listed here below
with the specific icon.
Press “n” and keep it pressed for about 2 seconds, until the LEDs turn on and
you hear the voice announcement.
Press “n” and keep it pressed for about 6 seconds, until the LEDs turn off and
you hear the voice announcement.
14
Page 15

5 CONFIGURATION MENU
All Bluetooth pair ups and other adjustments are carried out in this mode.
To put the system in “Configuration mode” (starting from a switched off system) press the “n” key and keep it
pressed for 4 seconds, until you hear the voice announcement “
Once in the “Configuration” menu, press the “” and “”keys to scroll through the various menu items. In the
items marked with an “*”, it is possible to enable / disable the function or carry out the commands by pressing
the “n” key to confirm.
The following items make up the “Configuration” menu:
A.
Mobile phone pairing
B.
Intercom pairing
C.
Universal Intercom pairing
D.
Second mobile phone pairing
E.
Speed dial*
F.
Smart Navi System
G.
Delete all pairings*
In order to delete all Bluetooth pair ups stored in the device, press the “” or “” key until you hear the
voice announcement “
Press the “n” confirmation key to delete all Bluetooth devices stored in memory.
H.
Reset
In order to restore the factory settings of the device, press the “” or “” key until you hear the voice
message “
Press the “n” confirmation key to restore all the factory settings of the device.
I.
Exiting the configuration*
To exit the “Configuration” menu, press the “” or “” key until you hear the voice announcement “
(chapter 7.1)
*
Factory Reset
the configuration
Press the “n” confirmation key to exit the “Configuration” menu.
If no key is pressed within 10 seconds, the device automatically exits the “Configuration” menu.
(chapter 6)
(chapter 12)
(chapter 13)
(chapter 9)
Delete all pairings
”.
”.
(chapter 8)
”.
Configuration Menu
”.
Exit
6 PAIRING UP WITH MOBILE PHONES OR OTHER BLUETOOTH DEVICES
• Make sure the B601 is turned off.
• Put the system in the “Configuration” mode: press the “n” key and keep it pressed for 4 seconds, until you
hear the voice announcement “
• Press the “” key to access the “Mobile phone pair up mode”.
• Turn on the search for Bluetooth devices (smartphone, GPS, MP3 reader) on the device.
• Select the N-Com device. If a password is requested, enter 0000 (four zeros).
• Connection between the two devices is established after a few seconds.
: The affiliation is stored in the helmet and in the cell phone and it is not lost when the two devices are
Note
turned off. As a result it needs to be carried out only once.
Automatic Connection
Manual Connection
Configuration Menu
Once the Bluetooth device has been paired up, connection is automatic when the
system is turned on.
In case connection is not automatically initiated after a few seconds, you can
connect from the Bluetooth device or by pressing “n” and keep it pressed for
about 2 seconds.
”.
15
Page 16
EN
7 MOBILE PHONE
To pair up a mobile phone to the B601 system, follow the procedure illustrated in Chapter 6.
Answering a phone call
Vocal answer (VOX phone)
Voice call
Hanging up/rejecting a phone call
Manual phone connection
7.1 Speed dial
Using the N-Com EASYSET program, you can store up to 3 of your favourite numbers, which
you will be able to dial from the “
Saving the Speed Dial numbers
To assign one or more speed dialling numbers:
• Put the system in the “Configuration” mode: starting from a switched off system, press the “n” key and
• Press the “” or “” key until you hear the voice command “
• Press the “n” confirmation key. You will hear the voice announcements “
• Press the “” or “” keys to select the speed dialling number to be assigned. The saved position is
• On your own mobile phone (paired up and connected to the N-Com system), call the phone number you
Using the stored numbers
To access the “Speed Dial” menu, press at the same time the “n” and “” keys (“
and “” keys to scroll through the menu items.
Then press the “n” key to confirm the selection of one of the following items:
If you wish to exit the “Speed Dial” menu, press the “” and “” keys until you hear the command
“
N.B.
7.2 Conference call function
When a call comes in on a mobile phone connected via Bluetooth to B601, the intercom is temporarily turned
off. However, if you wish to share the phone call with the other helmet, simply turn on the intercom manually
during the phone call.
keep it pressed for 4 seconds, until you hear the voice announcement “
connected”
confirmed by the voice announcement “
wish to assign to the selected speed dialling position. The call is interrupted before it goes through, and the
selected number will be saved; at this point you will hear the special voice announcement confirming the
selection (“
•
•
•
•
•
Cancelled
: If no key is pressed within 15 seconds, the system exits the “Speed Dial” menu.
.
Save Speed Dial 1
Last number redial
Speed Dial 1
Speed Dial 2
Speed Dial 3
Cancelled
”, then press “n” to confirm.
Briefly press any key when you hear the incoming call signal.
When you hear the ringtone, say any word out loud.
You can enable / disable the “VOX phone” function by using the NCom EASYSET program. The function is not active during the
intercom connection.
Press “n” and keep it pressed for about 2 seconds.
Press “n” and keep it pressed for about 2 seconds.
Press “n” and keep it pressed for about 2 seconds.
Speed Dial
” menu.
Configuration Menu
Speed dial
”.
Speed dial 1
Speed dial 1
” / “
Save Speed Dial 2
“/ “
Speed dial 2
” / “
Save Speed Dial 3
” / “
Speed dial 3
”).
”.
Speed Dial
”.
” and
“Phone
”), then use the “”
16
Page 17

Turning on the phone conference
call function
Turning off the phone conference
call function
: “Telephone Conference” function can only be used with the N-Com series “900” / “600”.
N.B.
During the phone call, briefly press “n” (channel 1).
During the phone call, press the “n” key twice (channel 2).
During the phone call, press the “n” key three times (channel 3).
During the phone call, briefly press “n”.
8 MANAGING TWO MOBILE PHONES (OR BLUETOOTH DEVICES)
The B601 system can be hooked up to two phones (or Bluetooth) devices at the same time.
The second phone (secondary device) can receive calls but not make them.
To pair up the second Bluetooth phone (secondary device):
• Make sure the B601 is turned off.
• Put the system in the “Configuration” menu: press the “n” key and keep it pressed for 4 seconds, until you
hear the voice announcement “
Configuration Menu
• Press the “” key until you reach the option “
• Turn on the search for Bluetooth devices (smartphone, GPS, MP3 reader) on the device.
• Select the N-Com system from the list. If a password is requested, enter the code 0000 (four zeros).
• After a few seconds, the connection between the two devices is activated.
Once the Bluetooth device has been paired up, connection is automatic when the system is turned on.
If you wish to connect a mobile and a satellite navigator for motorbikes, it is recommended to pair up the
mobile as the MAIN DEVICE (chapter 6) and the navigator as the SECONDARY DEVICE, following the procedure
described above.
”.
Second mobile phone pairing
”.
9 SMART NAVI SYSTEM
The “SMART NAVI SYSTEM” function allows you to listen to navigator directions coming from the smartphone
even during an intercom call.
The audio stops to allow transmission of the navigator directions from the smartphone and is automatically reestablished at the end of said instructions.
The “SMART NAVI SYSTEM” function is disabled by default on the device.
You can enable / disable the function from the Configuration Menu (Chapter 5).
: With the Smart Navi System enabled, all audio information coming from the smartphone (for example,
N.B.
notification sounds) temporarily stops the audio under way.
You can enable / disable the “SMART NAVI SYSTEM” function by using the N-Com EASYSET
program.
10 MUSIC VIA BLUETOOTH
To pair up an Mp3 device to the B601 system, follow the procedure illustrated in Chapter 6.
Play music (Play)
Pause function (Pause)
Next track (Skip)
Previous track (Rew)
Press “” and keep it pressed for about 2 seconds.
When the player is playing music, press “” for about 2 seconds.
When the player is playing music, press “” for about 4 seconds.
When the player is playing music, press “” for about 4 seconds.
17
Page 18

EN
10.1 Sharing music via Bluetooth (A2DP Sharing)
During the intercom connection, you can start playing music by briefly pressing the “” key for about 2
seconds. The music will be played in both systems.
Music sharing temporarily cuts off the intercom conversation; however, this can be automatically restored by
stopping the music (this is done by pressing the “” key for about 2 seconds).
: Music shared through the intercom can be managed by both systems, for example, both systems can
N.B.
change the track by pressing the relative command.
: the “Music Sharing” function can be used with the N-Com series “900” / “600”.
N.B.
11 SATELLITE NAVIGATOR FOR MOTORCYCLES
B601 system is compatible with the most common satellite navigators for motorcycles. For a list of compatible
models and additional details, visit the website www.n-com.it
To pair up a satellite navigator to the B601 system, follow the procedure illustrated in Chapter 8.
: Intercom connection is automatically cut off every time the navigator gives directions and restored at the
N.B.
end of the message from the navigator.
12 N-COM INTERCOM
The N-Com B601 system allows communication with other N-Com systems, up to a maximum distance of
about 250 m (in open field, with no obstacles). The range of the communication varies depending on the NCom systems used.
Important:
B601 and the “900” / “600” series N-Com systems.
To pair up to N-Com systems of a range other than the “900” / “600” series, please refer to the procedure
described in chapter 13 “Universal Intercom”.
N.B.
12.1 N-Com “900” / “600” Series Intercom pairing up
The TWIN PACK includes two N-Com systems already paired on CHANNEL 1. To connect the systems, please
refer to chapter 12.2.
• Make sure the systems are turned off.
• Put the systems in “Configuration” mode: press the “n” key and keep it pressed for 4 seconds, until you
• On both systems, press the “” key until you reach the option “
• On system A, press the key pertaining to the “pre-setting position” where you wish to save system B.
Pairing up CHANNEL 1
Pairing up CHANNEL 2
Pairing up CHANNEL 3
The Intercom connection with the selected channel is automatically activated at the end of the pair up
procedure.
The procedure described below refers exclusively to the pairing up and operation between the
: The range and quality of the communication may vary significantly depending on the presence of
obstacles, weather conditions, magnetic fields.
hear the voice announcement “
Configuration Menu
Briefly press “n”.
Press the “n” key twice.
Press the “n” key three times.
”.
Intercom pairing
”.
18
Page 19

12.2 N-Com “900” / “600” Series Intercom function (one-to-one connection)
To establish an Intercom connection with one of the systems stored in memory, simply press the command
related to the channel where the system was saved.
Connection CHANNEL 1
Call CHANNEL 2
Call CHANNEL 3
Disconnection of active intercom
In case the pre-setting position is empty, or the system being called cannot be reached within the
N.B.:
maximum range or it is already engaged in a phone call, you will hear an error voice message.
: In case the Intercom connection system falls outside the range (Intercom connection interrupted), the
N.B.
B601 system will automatically try to reconnect every 8 seconds. Double beeps will be emitted until the
Intercom connection is not restored.
If you do not want automatic reconnection, press the “n” key to stop the automatic reconnection attempts.
Briefly press “n”.
Press the “n” key twice.
Press the “n” key three times.
Briefly press “n”.
13 “UNIVERSAL INTERCOM” INTERCOM
The N-Com B601 system can be connected via Bluetooth to intercom systems of other brands or to N-Com
systems other than the “900” / “600” series 1, thanks to the UNIVERSAL INTERCOM function.
Important
following the procedure “Pairing up the Universal Intercom”.
13.1 Pairing up the Universal Intercom
The N-Com system can be paired up to the other intercom (from now on referred to as Intercom B) as if it was
a mobile phone.
• Make sure the B601 is turned off.
• Put the system in the “Configuration” mode: press the “n” key and keep it pressed for 4 seconds, until you
• Press the “” key until you reach the option “
• Put intercom B in the mobile phone pairing up mode (refer to the Intercom B manual).
• After a few seconds, Intercom B will emit the confirmation beep.
N.B.:
13.2 Universal Intercom Function
To turn on and off the audio between two helmets, proceed as follows:
From the N-Com B601 system:
Connect or disconnect Intercom B as you would for a regular N-Com intercom (chapter 12).
Intercom B may receive a dialing tone that must be answered with a phone reply command.
From intercom B
Press the “
To disconnect the intercom, press “
Note:
• During use of the UNIVERSAL INTERCOM, the B601 system keeps the connection active to the MAIN
• The intercom system connected to N-Com B601 may not allow simultaneous connection to a mobile
• Only one system paired up in Universal Intercom mode can be stored.
: N-Com systems other than the “900” / “600” series must be paired up to the N-Com B601 by
hear the voice announcement “
The system paired up using the UNIVERSAL INTERCOM is saved in the first available channel.
Voice call / Dial last number called
Configuration Menu
” command.
Hanging up/rejecting a phone call
DEVICE only (and not to the SECONDARY DEVICE).
phone.
”.
Universal intercom pairing
” command.
”.
1
Except for Bluetooth kit and Bluetooth kit2, which are not compatible
19
Page 20
EN
14 BATTERY AND RECHARGE
14.1 Low battery signal
During its operation, the system alerts the user with a voice message when the battery is low. From the first
message, the system has a 1-hour autonomy. Warning is given every 10 minute.
14.2 Checking the Battery Level
LED Indicator
When the system is powering on, their blue LED flashes rapidly indicating the battery level.
4 flashes = High, 70 ~ 100%
3 flashes = Medium, 30 ~ 70%
2 flashes = Low, 0 ~ 30%
Vocal Indicator
Starting from the system turned off, press at the same time the “n” and “” keys for about 3 seconds until you
hear three, high toned beeps. Then you will hear a voice prompt indicating the battery level. However, if you
release the keys as soon as the system turns on, you will not hear a voice prompt for the battery level
indication.
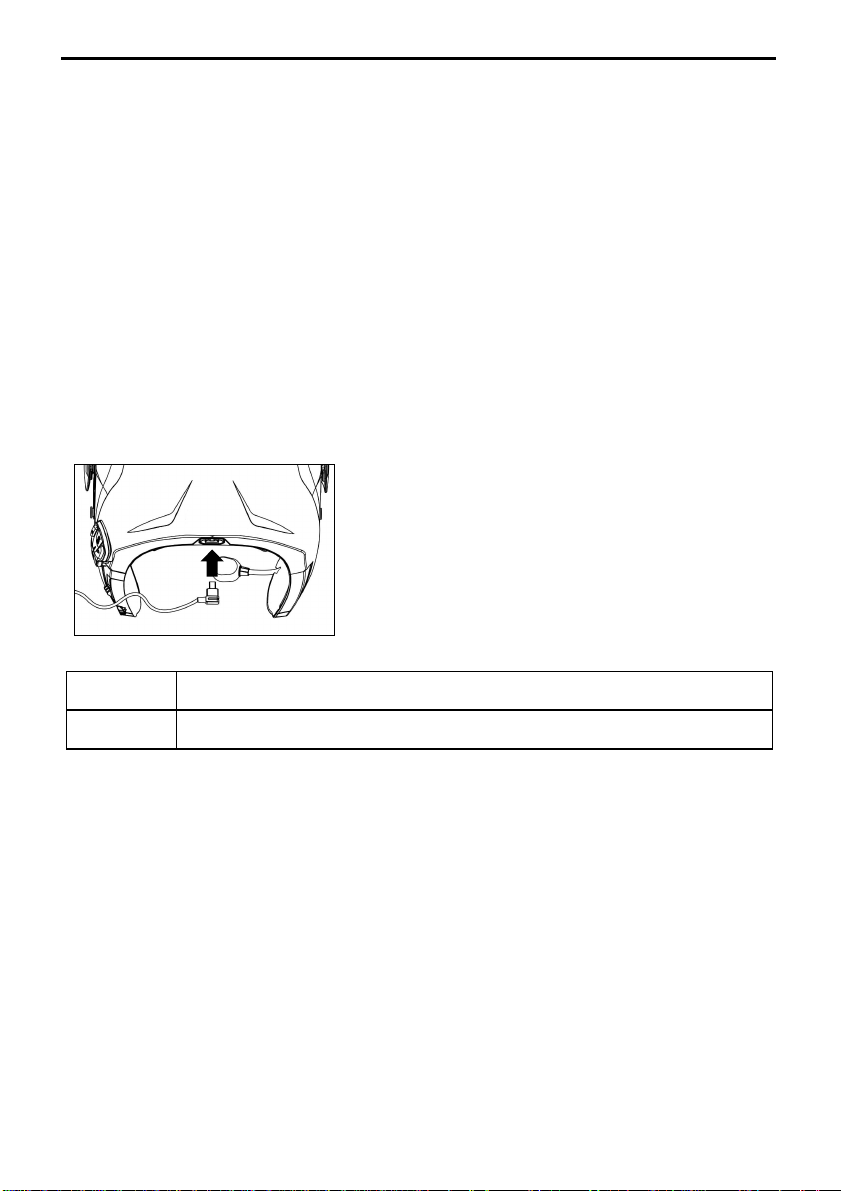
14.3 Charging the system
• To charge the system, hook it up to the battery charger or
to a USB outlet powered with the USB-mini USB cable
supplied as standard equipment. The charge will take
place as follows:
Fig. 29
B601 system
turned off
B601 system
turned on
In case you don’t plan to use the N-Com system for a long time, you need to fully recharge the device before
storing it away.
In case the device is not used for a long time, carry out a complete recharging cycle of the device at least once
every 6 months to avoid possible damage to the battery.
In case the N-Com system is left for more than 6 months without ever being recharged, the device may not
switch on; in this case, recharge the N-Com system for at least 24 hours (even if the blue signalling LED is not
flashing), then try to switch on the device again.
20
When the B601 system is connected to the battery charger, the blue LED starts to flash
quickly. When the battery is charged, the blue LED becomes steady.
When the B601 system is connected to the battery charger, the blue LED starts to flash
quickly. When the battery is charged, the blue LED goes back to its standard flashing.
Page 21
Phone Conference Activation
Phone Conference Activation
Phone Conference Activation
15 SUMMARY TABLE OF CONTROLS
Turning on
Turning off
Increase Volume
Decrease Volume
Basic Functions
Answer phone call*
Voice call
Speed Dialling Menu**
Hang up/reject a phone call
Manual Device Connection
Key
n
2 sec
6 sec
X
X
X X X
2 sec
X X
2 sec
2 sec
+
CHANNEL 1
Bluetooth Devices
CHANNEL 2
CHANNEL 3
Turning off the Conference function
Play music (Play)
Pause Function (Pause)
Next track (Forward)
Previous track (REW)
Bluetooth Music
Share A2DP music
Connection CHANNEL 1
Disconnection of active intercom
Calling CHANNEL 2
Calling CHANNEL 3
N-Com Intercom
(900 / 600 series)
*Press any key on the N-Com keypad.
**Press the keys at the same time.
X
x2
x3
X
2 sec
2 sec
4 sec
4 sec
2 sec
X
X
x2
x3
21
Page 22
EN
16 WARRANTY
Certification and Safety Approvals - FCC Compliance Statement
This device complies with Part 15 of the FCC Rules. Operation is subject to the following two conditions: (1)
this device may not cause harmful interference, and (2) this device must accept any interference received,
including interference that may cause undesired operation.
This equipment has been tested and found to comply with the limits for a Class B digital device, pursuant to
part 15 of the FCC rules. These limits are designed to provide reasonable protection against harmful
interference in a residential installation. This equipment generates, uses and can radiate radio frequency
energy and, if not installed and used in accordance with the instructions, may cause harmful interference to
radio communications. However, there is no guarantee that interference will not occur in a particular
installation.
If this equipment does cause harmful interference to radio or television reception, which can be determined by
turning the equipment on and off, the user is encouraged to try to correct the interference by one or more of
the following measures:
• Reorient or relocate the receiving antennae
• Increase the separation between the equipment and the receiver
• Connect the equipment into an outlet on a circuit different from that to which the receiver is connected
• Consult the dealer or an experienced radio/TV technician for help
FCC RF Exposure Statement
This equipment complies with FCC radiation exposure limits set forth for an uncontrolled environment. End
users must follow the specific operating instructions for satisfying RF exposure compliance. The antenna used
for this transmitter must not transmit simultaneously with any other antenna or transmitter, except in
accordance with FCC multi-transmitter product procedures.
When equipped, the distance between antenna and one’s head surface is 30.63mm. EUT is marketed without
helmet, so when the EUT is mounted with helmet, it has to be to maintain a distance of 30.63 mm from one’s
headsurface.
FCC Caution
Any changes or modifications to the equipment not expressly approved by the party responsible for
compliance could void user’s authority to operate the equipment.
Industry Canada (IC) Statement
This device complies with RSS-210 of the Industry Canada Rules. Operation is subject to the following two
conditions: 1) this device may not cause interference and 2) this device must accept any interference, including
interference that may cause undesired operation of device.
This class B digital apparatus complies with Canadian ICES-003.
IC Radiation Exposure Statement
This equipment complies with IC radiation exposure limits set forth for an uncontrolled environment. End users
must follow the specific operating instructions for satisfying RF exposure compliance.
This transmitter must not be co-located or operating in conjunction with any other antenna or transmitter.
When equipped, the distance between antenna and one’s head surface is 30.63mm. EUT is marketed without
helmet, so when the EUT is mounted with helmet, it has to be to maintain a distance of 30.63 mm from one’s
headsurface.
Model:
PMN:
Bluetooth is a registered trademark property of Bluetooth SIG, Inc.
B601 R
N-Com B601 R
FCC ID:
Y6MNCOM18
IC:
9455A-NCOM18
R-NZ
22
Page 23

FOR USA AND CANADA MARKET ONLY: WARRANTY
With this WARRANTY CERTIFICATE, Nolangroup warrants to the purchaser that the product, at the time of
purchase, is free from defects in materials and workmanship.
We kindly ask you to:
• Read the warnings for safety and proper use.
• Read the warranty terms and conditions.
•
Keep the original purchase receipt
. This receipt must be presented in case of repairs under warranty. In
these cases, the product must be sent to the dealer where the purchase was made.
16.1 Warranty coverage and validity
If any defect covered by this warranty certificate is detected within the period specified for the country of
purchase (see table at the bottom of this leaflet) from the date of purchase shown on the receipt, Nolangroup
will repair or replace the defective product through its distribution network and after having verified the
defect. Nolangroup will provide all material and labour reasonably necessary to remedy the claimed defect,
except in the cases where damage is caused by one of the items listed in the following paragraph "Exclusions
and limitations of coverage".
16.2 Exclusions and limitations of coverage
This warranty covers only defects in materials and workmanship.
Nolangroup cannot be held liable for product defects attributable in whole or in part to any other cause,
including but not limited to:
• Defects or damage resulting from use of the Product in conditions other than the usual ones.
• Damage caused by improper use and not in compliance with normal operation as indicated in the
instructions for use and maintenance of the product provided by Nolangroup.
• Neglect and normal wear and tear of internal and external parts.
• Any damage resulting from an accident.
• Any modification or tampering made to the helmet or to the N-Com system by the user or third parties.
• Use of incompatible accessories not approved by Nolangroup for the purchased N-Com device model.
• Consumable parts considered to be subject to wear and tear, such as the rechargeable battery and the
connection cables between N-Com systems and other devices.
• The proper functioning of the product/peripheral device combination when the product is used together
with accessories or equipment for which Nolangroup has not verified compatibility.
• All specific and subjective situations that may arise during actual use of the helmet, such as, for example,
problems related to comfort while riding or aerodynamic noise.
Under no circumstances shall Nolangroup be liable for any incidental or consequential damages (including,
without any limitation whatsoever, injuries to one or more persons) resulting from failure to fulfil the
obligations arising from this warranty regarding Nolangroup products.
16.3 Procedure for submitting claims
In order to submit any claim covered by this warranty, the purchaser must notify directly the dealer where the
N-Com system was purchased of the alleged defect, presenting at the same time the product which is the
object of the claim and a copy of the sales receipt.
PRIOR TO CONTACTING THE DEALER, WE RECOMMEND THAT YOU CAREFULLY READ THE INSTRUCTIONS
FOR USE ENCLOSED WITH THE PRODUCT.
THE WARRANTY IS EFFECTIVE EXCLUSIVELY FROM THE DATE OF PURCHASE UNTIL THE PERIOD INDICATED
FOR THE COUNTRY WHERE THE PRODUCT WAS PURCHASED (please see table provided at the end if this
leaflet).
Any repairs or other jobs carried out under warranty do not extend the period of the warranty itself. Hence, in
case the product or one of its components is replaced, this does not mean the start of a new warranty period,
as the purchase date of the original product will be taken into account for warranty purposes.
23
Page 24

EN
Only for repairs or replacements of electronic components, if Nolangroup repairs or replaces the product, the
product will have a warranty period equal to the remaining part of the original warranty or ninety (90) days
from the date of repair (whichever is longer).
Repair or replacement may also be carried out using regenerated components with equivalent functions.
Replaced parts or components will become the property of Nolangroup.
NOLANGROUP RESERVES THE RIGHT TO CHANGE CHARACTERISTICS, FUNCTIONALITY, COMPATIBILITY AND
SOFTWARE AT ANY TIME, WITH NO NEED FOR ADVANCE NOTICE.
This warranty does not affect the customer's legal rights under applicable national jurisdiction and the
consumer's rights vis-à-vis the dealer under the purchase/sale agreement.
16.4 Product identification
N-Com products are identified by means of a code that allows their traceability
and identification.
The identification code can be found on the adhesive label affixed to the B601
system.
24
Page 25

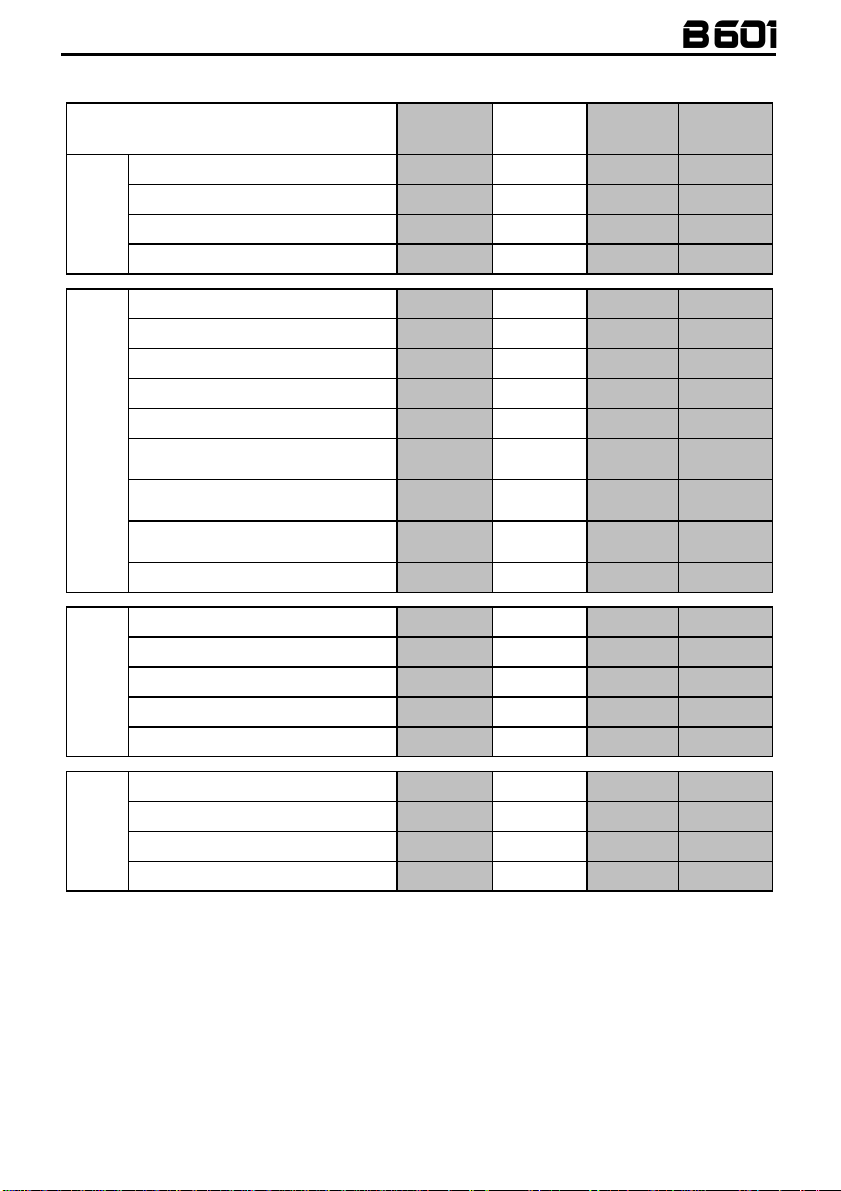
16.5 Validity of N-Com warranty
NATION
VALIDITY
2 YEARS
VALIDITY
1 YEAR
NATION
VALIDITY
2 YEARS
VALIDITY
1 YEAR
ALBANIA X LEBANON X
ALGERIA X MACEDONIA X
SAUDI ARABIA X MALAYSIA X
ARGENTINA X MALTA X
AUSTRALIA X MOROCCO X
AUSTRIA X MAURITIUS X
BAHRAIN X MEXICO X
BELGIUM BRP X MONTENEGRO X
BERMUDA X NORWAY X
BOLIVIA X NEW CALEDONIA X
BOSNIA-HERZEGOVINA X NEW ZEALAND X
BRAZIL X OMAN X
BULGARIA X NETHERLANDS X
BURKINA FASO X PAKISTAN X
CANADA X PARAGUAY X
CANADA BRP X PERU X
CHILE X FRENCH POLYNESIA X
CHINA X POLAND X
CYPRUS X PORTUGAL X
COLOMBIA X QATAR X
SOUTH KOREA X CZECH REPUBLIC X
COSTA RICA X SLOVAK REPUBLIC X
DENMARK X REUNION X
ECUADOR X ROMANIA X
EL SALVADOR X RUSSIA X
UNITED ARAB EMIRATES X SAINT-MARTIN X
PHILIPPINES X SERBIA X
FINLAND X SINGAPORE X
FRANCE X SLOVENIA X
GERMANY X SPAIN X
GHANA X UNITED STATES X
JAPAN X SOUTH AFRICA X
JORDAN X SWEDEN X
GREAT BRITAIN X SWITZERLAND X
GREECE X THAILAND X
GUADALUPE X TAIWAN X
GUATEMALA X TANZANIA X
FRENCH GUYANA X TRINIDAD & TOBAGO X
HONG KONG X TUNISIA X
INDONESIA X TURKEY X
IRAN X UKRAINE X
ICELAND X HUNGARY X
ISRAEL X VENEZUELA X
KAZAKHSTAN X ZAMBIA X
KUWAIT X
25
Page 26

ES
El sistema Bluetooth está conforme con los requisit
os esenciales de
B
aterías
Directiva
2001/95/CE
– GPSD, 2013/56/UE BAT, 2014/30/EU
SEGURIDAD E INSTRUCCIONES
Felicitaciones por haber comprado un producto N-Com.
N-Com B601 ha sido fabricado con las más modernas tecnologías y con los mejores
materiales. Las pruebas prolongadas y el desarrollo meticuloso del sistema han
permitido alcanzar la más elevada calidad de audio.
Para obtener más información sobre el B601, descargar las instrucciones en formato
PDF e instalar la última versión de firmware disponible, visite el sitio web www.ncom.it
Version Firmware: 1.0.1
REFERENCIAS NORMATIVAS
Los productos de la línea N-Com son conformes a las normativas según el esquema
que aparece a continuación:
B601
seguridad y demás disposiciones pertinentes a la Directiva RED
2014/53/EU, Directiva 2009/65/EC, Directiva 2011/65/CE, Directiva
2012/19/EU.
Las Declaraciones de Conformidad se pueden descargar del sitio internet www.n-com.it (Sección
Download).
Model:
PMN:
B601 R
N-Com B601 R
FCC ID:
Y6MNCOM18
IC:
9455A-NCOM18
La marca comercial y el logotipo Bluetooth® son propiedad de Bluetooth SIG Inc. y cualquier
uso de la misma por parte de N-Com se realiza bajo licencia. Otras marcas y nombres
comerciales pertenecen a sus respectivos propietarios.
Fw 1.0.1-3 - 29/01/2021
R-NZ
Page 27

Sumario
1 ADVERTENCIAS Y SEGURIDAD ........................................................................................................... 28
1.1 Seguridad vial .................................................................................................................................................................... 28
1.2 Encendido en ambientes seguros............................................................................................................................... 28
1.3 Interferencias ..................................................................................................................................................................... 28
1.4 Uso adecuado .................................................................................................................................................................... 28
1.5 Personal cualificado ......................................................................................................................................................... 29
1.6 Accesorios y baterías....................................................................................................................................................... 29
1.7 Eliminación ......................................................................................................................................................................... 29
2 CONTENIDO DE LA CONFECCIÓN .................................................................................................... 30
3 INSTALACIÓN EN EL CASCO ............................................................................................................... 31
3.1 Instalación del sistema B601 en el casco ................................................................................................................. 32
3.2 Ajuste del micrófono ....................................................................................................................................................... 36
3.3 Extracción del sistema B601 dal casco ...................................................................................................................... 36
4 FUNCIONES BÁSICAS ........................................................................................................................... 37
4.1 Regulación del volumen ................................................................................................................................................ 37
4.2 Anuncios Vocales en diferentes idiomas .................................................................................................................. 37
4.3 N-Com EASYSET ............................................................................................................................................................... 37
5 MENU AJUSTES ...................................................................................................................................... 38
6 ASOCIACIÓN TELÉFONO U OTROS DISPOSITIVOS BLUETOOTH ............................................... 38
7 TELÉFONO CELULAR ............................................................................................................................. 39
7.1 Marcación rápida .............................................................................................................................................................. 39
7.2 Función Conferencia Teléfono ..................................................................................................................................... 39
8 GESTIÓN DE DOS TELÉFONOS (O DISPOSITIVOS BLUETOOTH) ................................................. 40
9 SMART NAVI SYSTEM ........................................................................................................................... 40
10 MUSICA VIA BLUETOOTH .................................................................................................................... 40
10.1 Compartir música mediante Bluetooth (A2DP Sharing) ..................................................................................... 41
11 NAVEGADOR SATELITAL PARA MOTO ............................................................................................. 41
12 INTERCOMUNICADOR N-COM .......................................................................................................... 41
12.1 Asociación intercomunicador N-Com serie “900” / “600” .................................................................................. 41
12.2 Función intercomunicador N-Com serie “900” / “600” (conexión uno a uno) ............................................ 41
13 INTERCOMUNICADOR “UNIVERSAL INTERCOM” .......................................................................... 42
13.1 Asociación intercomunicador UNIVERSAL INTERCOM ....................................................................................... 42
13.2 Función intercomunicador UNIVERSAL INTERCOM ............................................................................................. 42
14 BATERIA Y RECARGA ............................................................................................................................ 43
14.1 Señal de batería cargada ............................................................................................................................................... 43
14.2 Comprobación del nivel de batería ............................................................................................................................ 43
14.3 Recargar el sistema .......................................................................................................................................................... 43
15 ESQUEMA RESUMEN DE MANDOS ................................................................................................... 44
16 GARANTÍA ............................................................................................................................................... 45
16.1 Cobertura de la garantía y validez.............................................................................................................................. 46
16.2 Exclusiones y limitaciones de cobertura ................................................................................................................... 46
16.3 Procedimiento para reenviar cualquier queja ........................................................................................................ 46
16.4 Identificación del producto. .......................................................................................................................................... 47
16.5 Validez de la garantía N-Com ...................................................................................................................................... 48
Page 28

ES
1 ADVERTENCIAS Y SEGURIDAD
Lea detenidamente el presente folleto de instrucciones. Lea las normas mencionadas a continuación. El
incumplimiento de dichas normas podría causar situaciones de peligro.
: el producto no se puede utilizar en competiciones oficiales ni extra oficiales, motódromos, circuitos,
Atención
pistas y otros casos.
: la instalación del sistema N-Com B601 comporta un incremento de peso de alrededor de 105g que
Atención
se suma al peso del casco y de los otros accesorios.
Advertencia
1.1 Seguridad vial
Respetar todas las leyes vigentes que regulan la circulación vial. Durante la conducción del vehículo, las manos
deben usarse sólo para conducir. Todas las operaciones que se deban hacer con el sistema N-Com deben ser
con el vehículo detenido.
En particular:
• Programar el teléfono para la respuesta automática (ver las instrucciones correspondientes al teléfono para
• Si el teléfono no tuviera esta función, antes de responder a una llamada, detener el vehículo en un lugar
• No realizar llamadas mientras conduce. Detener el vehículo en un sitio seguro acatando las Normas de
• Regular el volumen de manera que no cree molestias o distracciones al conducir y al mismo tempo permita
• No utilice el móvil ni otros dispositivos conectados al N-Com mientras conduce.
• En cualquier caso, el respeto de la ley y la conducción de la motocicleta tienen prioridad absoluta.
1.2 Encendido en ambientes seguros
• Para el uso del N-Com respetar todas las restricciones e indicaciones relacionadas con el uso de los
• No encender el teléfono móvil ni el sistema N-Com cuando esté prohibido su uso o cuando el aparato
• Apagarlo durante el suministro de carburante. No utilizar el sistema N-Com en las estaciones de servicio.
• Apagarlo en proximidad de materiales explosivos.
1.3 Interferencias
Todos los teléfonos y los mecanismos con transmisión de señal inalámbrica están expuestos a interferencias
que pueden influir en las ejecuciones del aparato al que están conectados. Dichas interferencias no deben ser
consideradas un defecto del sistema N-Com.
1.4 Uso adecuado
Utilizar el dispositivo sólo en la posición normal, como aparece descrito en los documentos del producto. No
desmontar, ni forzar o modificar ninguna parte del sistema N-Com.
Atención
Atención
Atención
: las partes electrónicas del sistema N-Com dentro del casco no son impermeables. Por lo tanto,
hay que evitar que se moje el interior del mismo, incluyendo el acolchado de confort, para no causar daños
al sistema. Si el agua se filtra dentro del casco, retire la tapa de confort del casco y deje que se seque al aire.
efectuar dicha operación).
apropiado respetando las Normas de Tráfico y sólo entonces responder a la llamada.
Tráfico y sólo entonces hacer la llamada.
percibir nítidamente los ruidos externos.
teléfonos móviles.
pueda causar interferencias o situaciones de peligro.
No utilizar el dispositivo cerca de combustible o de productos químicos.
: Regular el volumen del sistema N-Com y de las fuentes de audio conectadas al mismo, antes de
utilizar el sistema en la calle.
: El uso del volumen demasiado elevado podría causar daños al oído.
: Una incorrecta instalación del sistema en el casco podría modificar las características aerodinámicas
y de seguridad del casco creando situaciones de peligro. Instalar el sistema N-Com según lo descrito en los
documentos del producto. En caso de dudas, diríjase al vendedor N-Com.
28
Page 29

: Escuchar otros aparatos no debe influir en la conducción del vehículo, esto último tiene la prioridad
Atención
abosulta. Intervenir en los aparatos electrónicos y en el sistema N-Com con el vehículo detenido; respete el
Código de Circulación.
1.5 Personal cualificado
Solamente el personal cualificado puede intervenir para ofrecer asistencia técnica de este producto. En caso de
mal funcionamiento, diríjase siempre a un vendedor autorizado.
El casco es un producto de seguridad, el uso forzado del mismo y/o del sistema eletrónico en su interior, no
sólo causará la invalidez de la garantía del producto, sino también situaciones de peligro.
1.6 Accesorios y baterías
• Utilizar exclusivamente los tipos de baterías, cargadores de baterías y accesorios aprobados por
Nolangroup para el modelo del dispositivo específico.
• El uso de tipos diferentes a aquellos indicados podría resultar peligroso e incidir en la anulación de
cualquier tipo de garantía.
• Para la disponibilidad de los accesorios aprobados, dirigirse al proprio vendedor.
• Cuando se desconecte un cable de alimentación de cualquier accessorio o del cargador de baterías, tirar
del enchufe y no del cable.
• No utilizar las baterías para usos diferentes de los señalados.
• No utilizar nunca un cargador o baterías dañadas.
• No causar cortocircuito con la batería.
•
Mantener la batería a una temperatura comprendida entre entre 0° / +45°C (Durante la carga); -20° /
+60°C (Durante el uso).
• Peligro de incendio o explosión: ¡No arrojar las baterías al fuego ni exponerlas a temperaturas elevadas!
• No arrojar las baterías junto con los deshechos domésticos. Eliminar las baterías según las normativas
• No usar el casco mientras la batería se está cargando.
• No dejar nunca el casco al alcance de los niños sin la vigilancia de un adulto para evitar daños graves a su
salud causados por el eventual acceso a las baterías.
Baterías
PL743530P LiPo 3,7V – 800 mAh
1.7 Eliminación
Tenga presente este folleto de instrucciones y aquellos relacionados con otras partes del sistema N-Com para
desmontar el sistema del Casco.
Una vez desmontado el sistema, eliminarlo según las siguientes indicaciones:
• El símbolo del contenedor móvil tachado indica que en la Unión Europea el producto está
sujeto a la recogida especial de deshechos al final de su ciclo de vida.
• No elimine estos productos junto con los residuos urbanos no seleccionados.
• La correcta eliminación de los aparatos en desuso contribuye a prevenir posibles consecuencias negativas a
la salud humana y al medio ambiente.
• Dentro de la Unión Europea, el distribuidor, al suministrar el nuevo aparato, garantiza la recogida gratuita
de los aparatos usados de tipo equivalente sobre la base de uno contra uno.
• Para más información acerca de la eliminación de los aparatos en desuso, contactar el ayuntamiento, el
servicio de eliminación de residuos o la tienda donde se haya adquirido el produco.
29
Page 30

ES
2 CONTENIDO DE LA CONFECCIÓN
La confección del N-Com B601 contiene:
Cable mini USB
Adaptador teclado N87, N100-5
Sistema N-Com B601
Micrófono con clip
Llave
Adhesivos de fijación altavoces
30
Page 31

3 INSTALACIÓN EN EL CASCO
Importante
del producto aplicado al mismo (ver cap. 16.3).
Podeis descargar el video de Instalación del sito internet www.n-com.it – Sección N-Com / Download.
• Antes de instalar el sistema B601 en el casco, comprobar el correcto encendido del sistema. Pulsar y
• Extraer el relleno de confort (ver las instrucciones del casco).
• Extraer el perno de la guarnición en el borde del casco utilizando la llave correspondiente (Fig. 1).
• Extraer completamente la guarnición como aparece en la Fig. 1, quitar también el relleno de confort.
• Extraer las tapitas “N-Com” colocadas en la guarnición del borde de la calota en la zona posterior y lado
: antes de instalar el sistema N-Com, se recomienda copiar y conservar el código de identificación
mantener pulsado el botón “n” por unos 2 segundos, hasta que se encienda el LED azul en el teclado y se
escuche el tono en el auricular. Continuar con la instalación.
izquierdo.
Fig. 1
Fig. 1 –
SOLO PARA EL CASCO N87 Y N100-5
• Antes de instalar el sistema N-Com, extraer el material de relleno presente en el casco, si lo hubiera
(consulte el manual de instrucciones del propio casco).
Opción 1
Opción 2
: conservar el material de relleno del casco para un futuro uso del casco sin el sistema N-Com instalado.
Nota
31
Page 32

ES
3.1 Instalación del sistema B601 en el casco
• Acoplar el conector del micrófono con el
enchufe, siguiendo la dirección de las flechas
(Fig. 2).
: Es posible ajustar la posición del micrófono.
NOTA
Ver el cap. 3.2 para los tipos de ajustes.
Fig. 2
Fig. 3
Fig. 4
• Introducir el sistema en el alojamiento
correspondiente en la parte trasera del casco,
empujarlo hasta tocar el fondo de la ranura.
(Fig. 3).
NOTA: para colocar el cableado y el micrófono en el
casco N100-5 siga las instrucciones en el apartado
correspondiente.
• Pasar el cable dentro del casco y encajar el
cierre de fijación de la derecha en su
alojamiento (Fig. 4).
• Colocar el micrófono en su alojamiento a la
derecha del casco introduciendo el boom
metálico en la ranura de la armazón de
enganche de la carrillera (Fig. 5).
: comprobar que el lado de apoyo del
Atención
micrófono con la frase “n” quede hacia el interior del
Fig. 5
32
casco.
Page 33

NOTA: para colocar el teclado en los cascos N87 y
N100-5 siga las instrucciones en el apartado
correspondiente.
• Pasar el cable dentro del casco y encajar el
cierre de fijación de la izquierda en su
alojamiento.
• Acoplar el teclado al casco hasta accionar los
ganchos en sus respectivos alojamientos.
• Abrir el tapón de goma del sistema B601.
• Volver a montar la guarnición del borde de la
Fig. 6
calota ajustando el perno de fijación.
SOLO PARA CASCO N100-5 – colocación del cableado y del micrófono
Colocación del cableado derecho y del micrófono
:
• Extraer la protección plástica de la almohadilla (Fig. 7).
• Pasar el micrófono por la ranura (Fig. 8) y colocarlo en el respectivo alojamiento, introduciendo el boom
metálico en la ranura de la armazón de enganche de la carrillera (Fig. 9).
: comprobar que el lado de apoyo del micrófono con la frase “N-Com” quede hacia el interior
Atención
del casco.
• Pasar el cable dentro del casco y colocar el cierre de fijación de la derecha en su alojamiento (Fig. 10).
• Volver a poner la protección plástica de la almohadilla, colocándola detrás de los dos ganchos de cierre
(Fig. 11).
Fig. 7
Fig. 9
Fig. 8
Fig. 10
33
Page 34

ES
Fig. 11
SOLO PARA CASCO N100-5 – colocación del cableado y del micrófono
Colocación del cableado izquierdo
• Extraer la protección plástica de la almohadilla (Fig. 12).
• Pasar el cable dentro del casco y colocar el cierre de fijación de la izquierda en su alojamiento (Fig. 13).
• Volver a poner la protección plástica de la almohadilla, colocándola detrás de los dos ganchos de cierre
(Fig. 14).
Fig. 12
:
Fig. 13
Fig. 14
34
Page 35

SOLO PARA CASCOS N87 Y N100-5 – instalación del teclado
Importante:
TECLADO” incluido en la confección.
la instalación del teclado en los cascos N87, N100-5 necesita el accesorio “ADAPTADOR DE
• Introducir en el cable flex del teclado el soporte específico del propio casco (Fig. 15).
• Rotar el soporte teclado hasta colocarlo según la Fig. 16 y engancharlo en el teclado.
• Pasar el cable dentro del casco y encajar el cierre de fijación de la izquierda en su alojamiento (Fig. 17).
• Abrir el tapón de goma del sistema B601.
• Volver a montar la guarnición del borde de la calota ajustando el perno de fijación.
• Acoplar el teclado al casco hasta accionar los ganchos en sus respectivos alojamientos (Fig. 18).
• La instalación correcta del teclado se ilustra en la Fig. 19, 20.
Fig. 15
Fig. 17
Fig. 19
Fig. 16
Fig. 18
Fig. 20
• Colocar los auriculares Derecho e Izquierdo en los alojamientos en el interior de las almohadillas de
polistirolo. Si fuera necesario, rotar ligeramente los altavoces dentro de su sitio. Si fuera necesario, fijarlos
utilizando los adhesivos en dotación.
• Volver a introducir la almohadilla de relleno.
35
Page 36

ES
3.2 Ajuste del micrófono
El sistema B601 permite ajustar la posición del micrófono para facilitar la colocación en los diferentes modelos
de cascos. Seguir los pasos siguientes:
• Abrir el cierre colocado en la varilla del micrófono, haciendo presión como indica la Fig. 21.
• Ajustar el micrófono (Fig. 22).
• Cerrar el cierre (Fig. 23).
Fig. 21
Para garantizar la buena calidad en la transmisión de la voz, se recomienda colocar la esponja del micrófono al
lado de la boca.
3.3 Extracción del sistema B601 dal casco
Fig. 24
SOLO PARA CASCOS N87 Y N100-5 – extraer el teclado
• Extraer el teclado de la calota, abrir según aparece en la fig. 25.
• Rotare el teclado en sentido antihorario (Fig. 26).
• Extraer las almohadillas de confort y la guarnición del borde de la calota.
Fig. 22
Para quitar el sistema B601 del casco, seguir los
pasos siguientes:
• Extraer las almohadillas de confort y la
guarnición del borde de la calota.
• Sacar el teclado de la calota, según aparece en
la Fig. 24.
Fig. 23
Fig. 25
36
Fig. 26
Page 37

• Desenganchar el cierre derecho e izquierdo de
la calota, presionar hacia arriba con un
destornillador de cabeza plana (o similar) según
aparece en la figura 27.
Fig. 27
• Extraer completamente el sistema B601 del
casco con un destornillador de cabeza plana (o
similar) y volver a instalar las almohadillas y la
protección del borde.
Fig. 28
4 FUNCIONES BÁSICAS
: Antes de utilizar el dispositivo N-Com por primera vez, cargar completamente la batería al menos
Nota
durante 10 horas. Para obtener el máximo potencial de la batería, es aconsejable, en las primeras recargas,
ciclos de recarga completos. Sucesivamente, será posible recargar la batería por períodos más breves. Siempre
que sea posible, efectuar el ciclo completo de recarga.
Encendido
Apagado
4.1 Regulación del volumen
Pulsando el botón “” o el botón “” es posibile regular con facilidad el volumen. Cuando el volumen alcanza
el nivel máximo o mínimo, se escucha una señal acústica.
El volumen es independiente para cada señal sonora. Una vez seleccionado para un tipo de fuente audio
(llamada, radio, lector MP3) quedará memorizado aún después de apagado el sistema.
Sin embargo, si el volumen se regula durante el modo stand-by, se afectará el nivel de volumen de todas las
fuentes audio.
4.2 Anuncios Vocales en diferentes idiomas
El sistema N-Com está dotado de anuncios vocales que proporciona indicaciones sobre el sistema de funciones
activas. El idioma impostado por defecto es el inglés. El idioma de los anuncios vocales puede ser modificado a
través del firmware especifico instaladle con el programa N-Com EASYSET.
Hacer referencia al "HELP online” para las opciones de cambio de idioma.
Idiomas disponibles: italiano, ingles, francés, alemán, español, holandés.
La función, por defecto, está habilitada en el dispositivo. Es posible habilitar / deshabilitar la
función "ANUNCIOS VOCALES" usando el programa N-Com EASYSET.
4.3 N-Com EASYSET
“N-Com EASYSET” es un programma que permite gestionar y configurar el sistema N-Com B601.
El programa se puede descargar del sitio internet www.n-com.it en la sección “Download”.
Las funciones gestionables desde N-Com EASYSET están indicadas con el símbolo específico.
Mantener pulsado el botón “n” durante unos
enciendan los led y la señal vocal.
Mantener pulsado el botón “n” durante unos
apaguen los led y la señal vocal.
2 segundos
6 segundos
hasta que se
hasta que se
37
Page 38

ES
5 MENU AJUSTES
Para llevar el sistema a la modalidad “Ajustes” (con sistema apagado) pulsar y mantener pulsado el botón “n”
durante 4 segundos, hasta el anuncio vocal “
En el menú “Ajuste”, pulsar los botones “” y “” para navegar entre las diferentes opciones del menú. En las
opciones indicadas con “*” se puede activar/desactivar la función o seguir los comandos pulsando el botón “n”
para confirmar.
Las opciones de “Ajustes” son las siguientes:
A.
Emparejamiento teléfono
B.
Emparejamiento de intercomunicador
C.
Emparejamiento del Intercomunicador Universal
D.
Emparejamiento de segundo teléfono móvil
E.
Marcación rápida*
F.
Smart Navi System
G.
Borrar todos los emparejamientos *
Para eliminar todas las asociaciones Blueetooth presentes en la memoria del dispositivo, pulsar el botón
“” o “” hasta escuchar el mensaje vocal “
Pulsar el botón “n” para confirmar que se cancelan todos los dispositivos Bluetooth memorizados.
H.
Restaurar *
Para restablecer los ajustes de fábrica del dispositivo, pulsar el botón “” o “” hasta escuchar el
mensaje vocal “
Pulsar el botón “n” para confirmar y restablecer todos los ajustes de fábrica en el dispositivo.
I.
Salir de configuración *
Para abandonar el menú “
Restaurar
de configuración
Pulsar el botón “n” para confirmar la salida del menú “
Si pasados 10 segundos no se pulsa ningún botón, el dispositivo abandona automáticamente el menú
“
Configuración
”.
(cap. 6)
(cap. 7.1)
(cap. 9)
”.
Configuración
”.
Configuración
(cap. 12)
” pulsar el botón “” o “” hasta escuchar el mensaje vocal “
6 ASOCIACIÓN TELÉFONO U OTROS DISPOSITIVOS BLUETOOTH
• Compruebe que el B601 esté apagado.
• Llevar el sistema en menú “Ajustes”: pulsar y mantener pulsado el botón “n” durante
anuncio vocal “
• Pulsar el botón “” y entrar en modalidad “Asociación teléfono”.
• Activar en el dispositivo (smartphone, GPS, lector Mp3) la búsqueda de dispositivos Bluetooth.
• Seleccione el dispositivo N-Com. Introduzca el código 0000 (cuatro ceros) cuando se solicita la
contraseña.
• Después de algunos segundos la conexión entre los dos dispositivos se activará.
: la asociación se almacena en la memoria del casco y del teléfono y no se pierde aunque se apague. Este
Nota
procedimiento se realiza solamente una vez.
Conexión Automática
Conexión Manual
Configuración
”.
Completada la asociación del dispositivo Bluetooth, la conexión se establece
automáticamente al encender el sistema.
Si la conexión no se estableciera automáticamente, será posible conectarse
desde el dispositivo Bluetooth o sino pulsar el botón “n” durante unos 2
segundos.
”.
(cap. 13)
(cap. 8)
Borrar todos los emparejamientos
Configuración
”.
”.
4 segundos
Salir
, hasta el
38
Page 39

7 TELÉFONO CELULAR
Para asociar un teléfono celular al sistema B601 seguir el procedimiento según el Cap. 6.
Respuesta llamada
Respuesta vocal
(Teléfono VOX)
Llamada vocal
Colgar/rechazar llamada
Conexión Manual Teléfono
7.1 Marcación rápida
Utilizando el programa N-Com EASYSET es posible guardar 3 números preferidos a los que se
podrá acceder mediante el menú “
Memorizazión números de Marcación_rápida
Para asignar uno o más números de llamada rápida:
• Llevar el sistema a modalidad “Ajustes”: con el sistema apagado pulsar y mantener pulsado el botón “n”
• Pulsar el botón “” o “” hasta escuchar el mensaje vocal “
• Pulsar el botón “n” para confirmar. Se producirá el mensaje vocal “
• Pulsar los botones “” o “” para seleccionar el número de composición rápida que se desea asignar. La
• En su teléfono celular (asociado y conectado al sistema N-Com), llamar el número de teléfono que se desea
Utilizar los números memorizados
Para entrar en el menú “
rápida
Pulsar el botón “n” para confirmar la selección de una de las opciones propuestas en secuencia:
Para salir del menú “
y pulsar “n” para confirmar.
Nota
7.2 Función Conferencia Teléfono
Cuando entra una llamada al teléfono celular conectado de Bluetooth a B601, el intercomunicador se
interrumpe momentáneamente. Si se desea se puede compatir la llamada con el otro casco activando
manualmente el intercomunicador durante la llamada.
durante 4 segundos, hasta el anuncio vocal “
conectado”
posición memoria se confirmará con el mensaje vocal “
“
Marcación rápida 3
asignar en la posición de llamada rápida seleccionada. La llamada se interrumpe antes de efectuarse y el
número seleccionado será memorizado con el mensaje vocal de confirmación (“
” / “
1
.
”.
Guardar Marcación rápida 2
Marcación rápida
”) y utilizar los botones “” y “” para navegar dentro de las opciones del menú.
•
Rellamada
•
Marcación rápida 1
•
Marcación rápida 2
•
Marcación rápida 3
•
Cancelado
Marcación rápida
: Si pasados 15 segundos no se pulsa ningún botón, se abandona el menún “
Pulsar brevemente cualquier botón al escuchar el timbre.
Cuando se escuche el timbre de llamada, pronunciar cualquier palabra en
voz alta. Es posible activar / desactivar la función “Teléfono VOX”
utilizando el programa N-Com EASYSET. La función no está activa durante
la conexión con el intercomunicador.
Mantener pulsado el botón “n” durante unos 2 segundos.
Mantener pulsado el botón “n” durante unos 2 segundos.
Mantener pulsado el botón “n” durante unos 2 segundos.
Marcación rápida
Configuración
”.
”.
Marcación rápida
Marcación rápida 1
Marcación rápida 1
”.
” / “
Marcación rápida 2
” y
“Teléfono
Guardar Marcación rápida
” / “
Guardar Marcación rápida 3
”, pulsar contemporáneamente los botones “n” y “” (“
”, pulsar los botones “” y “” hasta escuchar el comando “
”).
Marcación
Cancelado
Marcación rápida
”.
” /
”
39
Page 40

ES
Activación Conferencia
Teléfono
Desconexión
Conferencia Teléfono
: la función “Conferencia Teléfono” se puede utilizar sólo con los sistemas N-Com serie “900” / “600”.
Nota
8 GESTIÓN DE DOS TELÉFONOS (O DISPOSITIVOS BLUETOOTH)
El sistema B601 permite la conexión contemporáneamente entre dos teléfonos (o dispositivos) Bluetooth. El
segundo teléfono (dispositivo secundario) podrá recibir llamadas, pero no podrá efectuarlas.
Para asociar el segundo teléfono Bluetooth (dispositivo secundario):
• Llevar el sistema al menú “Ajustes”: pulsar y mantener pulsado el botón “n” durante
anuncio vocal “
• Pulsar el botón “” hasta la modalidad “
• Activar en el dispositivo (smartphone, GPS, lector Mp3) la búsqueda de dispositivos Bluetooth.
• Seleccionar en la lista el sistema N-Com. Si se solicita un código introducir el código 0000 (cuatro ceros).
• Después de pocos segundos se activará la conexión entre los dos dispositivos.
Una vez asociado el dispositivo Bluetooth, la conexión se produce automáticamente al iniciar el sistema.
Si se desea conectar un teléfono y un navegador GPS para motos, se aconseja afiliar el teléfono como
DISPOSITIVO PRINCIPAL (capítulo 6) y el navegador como DISPOSITIVO SECUNDARIO utilizando el
procedimiento arriba descrito.
9 SMART NAVI SYSTEM
La función “SMART NAVI SYSTEM” consente la escucha de las indicaciones de navegación procedentes de tu
smartphone también durante la conversación por el intercomunicador.
El audio se interrumpe para permitir la transmisión de las indicaciones del navegador, del móvil y se restaura
automáticamente cuando acaban las mismas.
La función “SMART NAVI SYSTEM”, por defecto, aparece desactivada en el dispositivo.
Es posible activar / desactivar la función por medio del Menú Configuración (cap. 5).
: con Smart Navi System activado, todas las informaciones audio procedentes del smartphone (por ejemplo
Nota
los sonidos de notificación) interrumpen temporalmente el audio
Es posible activar / desactivar la función “SMART NAVI SYSTEM utilizando el programa N-Com
EASYSET.
10 MUSICA VIA BLUETOOTH
Para asociar un lector Mp3 al sistema B601 seguir el procedimiento según el Cap. 6.
Accionar la reproducción musical
(Play)
Función Pausa (Pause)
Pista siguiente (Skip)
Pista anterior (Rew)
Durante la llamada pulsar “n” brevemente (canal 1).
Durante la llamada, pulsar 2 veces el botón “n” (canal 2).
Durante la llamada, pulsar 2 veces el botón “n” (canal 3).
Durante la llamada pulsar “n” brevemente.
Configuración
”.
Emparejamiento de segundo teléfono móvil
Pulsar el botón “” durante 2 segundos.
Cuando el lector está conectado y en reproducción pulsar el botón
“” durante 2 segundos.
Cuando el lector está conectado y en reproducción pulsar el botón
“” durante 4 segundos.
Cuando el lector está conectado y en reproducción pulsar el botón
“” durante 4 segundos.
4 segundos
”.
, hasta el
40
Page 41

10.1 Compartir música mediante Bluetooth (A2DP Sharing)
Durante la conexión intercomunicador, es posible iniciar la reproducción musical pulsando el botón “”
durante 2 segundos. La música será transmitida en ambos sistemas.
Cuando se comparte la música se desactiva momentáneamente la conversación por intercomunicador, que se
restablecerá automáticamente al interrumpir la reproducción musical (pulsando el botón “” durante 2
segundos).
: se puede acceder a la música compartida por intercomunicador desde ambos sistemas, se podrá por
Nota
ejemplo cambiar la pista musical mediante el comando correspondiente.
: la función “Compartir la música” se puede utilizar con los sistemas N-Com serie “900” / “600”.
Nota
11 NAVEGADOR SATELITAL PARA MOTO
B601 es compatible con los navegadores satelitales para motos más difundidos – Para la lista de los modelos
compatibles y los detalles, visite la página www.n-com.it.
Para asociar un navegador satelital al sistema B601 seguir el procedimiento ilustrados en el Cap. 8.
: la conexión Intercomunicador se interrumpe automáticamente durante las indicaciones del navegador y
Nota
se restablece a final de las mismas.
12 INTERCOMUNICADOR N-COM
El sistema N-Com B601 permite la comunicación con otros sistemas N-Com, hasta una distancia máxima de
unos 250 m (en campo libre, sin obstáculos). El alcance de la comunicación puede variar según los sistemas NCom utilizados.
Importante:
B601 y sistemas N-Com serie “900” / “600”.
Para la asociación con sistemas N-Com distintos a la serie “900” / “600” seguir el procedimiento indicado en
el capitulo 13 “Intercomunicador Universal Intercom”.
Nota:
las condiciones meteorológicas, los campos magnéticos.
12.1 Asociación intercomunicador N-Com serie “900” / “600”
El paquete TWIN PACK incluye dos sistemas N-Com ya emparejados con el CANAL 1. Consulte el capítulo 12.2
para conectar los sistemas.
• Compruebe que los sistemas están apagados.
• Llevar el sistema a la modalidad “Ajustes”: pulsar y mantener pulsado el botón “n” durante 4 segundos,
• En ambos sistemas pulsar el botón “” hasta la modalidad “
• En el sistema A pulsar la función correspondiente a “posición de memoria” donde se desea memorizar el
Asociación CANAL 1
Asociación CANAL 2
Asociación CANAL 3
La conexión Intercomunicador con el canal seleccionado se activará automáticamente al final del
procedimiento de asociación.
12.2 Función intercomunicador N-Com serie “900” / “600” (conexión uno a uno)
Para restablecer la conexión Intercomunicador con uno de los sistemas presentes en memoria es suficiente
pulsar el botón correspondiente al canal donde ha sido memorizado.
el procedimiento a continuación se refiere exclusivamente a la asociación y funcionamiento entre
El alcance y la calidad de la comunicación pueden variar sensiblemente según los obstáculos presentes,
hasta el anuncio vocal “
sistema B.
Configuración
”.
Emparejamiento de intercomunicador
Pulsar “n” brevemente.
Pulsar 2 veces el botón “n”.
Pulsar 3 veces el botón “n”.
”.
41
Page 42

ES
Conexión CANAL 1
Llamada CANAL 2
Llamada CANAL 3
Desconexión intercomunicador activo
si la posición de memoria estuviera vacía, o el sistema llamado no estuviera disponible dentro del
Nota:
alcance máximo o estuviera ocupado en una llamada telefónica, se producirá un mensaje vocal de error.
: si el sistema en conexión Intercomunicador sale del radio de alcance (conexión Intercomunicador
Nota
interrumpida), el B601 buscará automáticamente una nueva conexión cada 8 segundos. Se producirán tonos
acústicos dobles hasta que la conexión se restablezca.
Si no se desea la reconexión automática, pulsar el botón “n” para detener los intentos de restablecer la
conexión.
13 INTERCOMUNICADOR “UNIVERSAL INTERCOM”
El sistema N-Com B601 se puede conectar en Bluetooth al sistema intercomunicador de otras marcas o a
sistemas N-Com distindos de la serie “900” / “600” 2, a través de la función UNIVERSAL INTERCOM.
Importante
mediante el procedimiento de “Asociación intercomunicador Universal Intercom”.
13.1 Asociación intercomunicador UNIVERSAL INTERCOM
El sistema N-Com se asocia al otro intercomunicador (a continuación denominado Intercomunicador B) como
si fuera un teléfono celular.
• Compruebe que el B601 esté apagado.
• Llevar el sistema a la modalidad “Ajustes”: pulsar y mantener pulsado el botón “n” durante 4 segundos,
• Pulsar el botón “” hasta la modalidad “
• Poner el Intercomunicador B en modalidad asociación con un teléfono celular (consultar el manual del
• Después de algunos segundos, el Intercomunicador B emitirá un tono para confirmar la conexión.
Nota:
13.2 Función intercomunicador UNIVERSAL INTERCOM
Para activar y desactivar el audio entre los dos cascos:
Desde el sistema N-Com B601:
Conectar o desconectar el Intercomunicador B como un intercomunicador normal N-Com (capítulo 12).
El Intercomunicador B podría recibir un tono de llamada al cual se responderá mediante el mando respuesta
telefónica.
Desde el intercomunicador B:
Pulsar el mando “
Para desconectar el intercomunicador pulsar el mando “
Notas:
• Durante el intercomunicador UNIVERSAL INTERCOM, el sistema B601 mantiene activa la conexión solo con
• Es posible que el sistema intercomunicador conectado al N-Com B601 no permite contemporáneamente
• Es posible mantener memorizado un único sistema asociado en modalidad Universal Intercom.
: Los sistemas N-Com de serie distinta a la serie “900” / “600” se deben asociar a N-Com B601
hasta el anuncio vocal “
propio Intercomunicador B).
el sistema asociado mediante UNIVERSAL INTERCOM se memoriza en el primer canal de memoria
disponible.
Configuración
Llamada Vocal / Repetir llamada último número
el DISPOSITIVO PRINCIPAL ( no con el DISPOSITIVO SECUNDARIO).
la conexión a un teléfono celular.
Pulsar “n” brevemente.
Pulsar 2 veces el botón “n”.
Pulsar 3 veces el botón “n”.
Pulsar “n” brevemente.
”.
Emparejamiento del Intercomunicador Universal
Colgar/rechazar llamada
”.
”.
”.
2
A excepción de Bluetooth kit y Bluetooth kit2, no compatibles
42
Page 43

al cargador de batería, el LED azul empezará a parpadear
14 BATERIA Y RECARGA
14.1 Señal de batería cargada
El sistema, durante su funcionamiento, señala con un anuncio vocal al usuario cuando la batería está casi sin
carga. A partir del primer aviso queda una autonomía de casi 1 hora. El aviso se repite cada 10 minutos.
14.2 Comprobación del nivel de batería
Indicador LED
Cuando se enciende el auricular o el Handlebar Remote, el LED parpadea rápidamente en color rojo, indicando
el nivel de carga de la batería.
4 veces = Alto, 70 a 100%
3 veces = Medio, 30 a 70%
2 veces = Bajo, 0 a 30%
Indicador de instrucciones de voz
Con el sistema apagado, mantenga pulsado el botón “n” y el botón “” simultáneamente durante
aproximadamente 3 segundos hasta que escuche tres pitidos de tono alto. A continuación, escuchará una
instrucción de voz que le indicará el nivel de batería. Sin embargo, si suelta los botones tan pronto como se
encienda el sistema, no escuchará la instrucción de voz para la indicación del nivel de batería.
14.3 Recargar el sistema
• Para recargar el sistema, conectarlo al cargador o enchufe
USB alimentado con el cable USB-mini USB en dotación.
El funcionamiento de la carga se realizará de este modo:
Fig. 29
Sistema
B601 apagado
Sistema
B601 encendido
Al conectar el sistema B601
rápidamente. Cuando la batería esté cargada, el LED azul es fijo.
Al conectar el sistema B601 al cargador de batería, el LED azul empezará a parpadear
rápidamente. Cuando la batería esté cargada, el LED azul vuelve al parpadeo estándar.
Si piensa que no va a utilizar el sistema N-Com durante un largo período de tiempo deberá cargar
completamente el dispositivo antes de dejarlo de usar.
En caso de un largo período de inoperabilidad, realice por lo menos un ciclo completo de carga del dispositivo
cada 6 meses para evitar posibles daños a la batería.
Si el sistema N-Com se deja durante más de 6 meses sin cargar, es posible que el dispositivo no se encienda: en
este caso, recargue el sistema N-Com durante al menos 24 horas (incluso si la señal de LED azul no parpadea) y
luego intente encender el dispositivo.
43
Page 44

ES
Activación Conferencia T
eléfono
Activación Conferencia Teléfono
Activación Conferencia Teléfono
Accionar la reproducción musical
900
/600)
Desconexión intercomunicador
15 ESQUEMA RESUMEN DE MANDOS
Encendido
Apagado
Subir el volumen
Básicas
Funciones
Bajar el volumen
Respuesta llamada*
Llamada vocal
Menú llamada Rápida**
Colgar/rechazar llamada
Conexión Manual Dispositivo
Botón
n
2 sec
6 sec
X
X
X X X
2 sec
X X
2 sec
2 sec
+
CANAL 1
Bluetooth
Dispositivos
CANAL 2
CANAL 3
Desactivación Conferencia
(Play)
Función Pausa (Pause)
Pista siguiente (Forward)
Musica
Bluetooth
Pista anterior (REW)
Compartir música A2DP
Conexión CANAL 1
activo
Llamada CANAL 2
N-Com (serie
Llamada CANAL 3
Intercomunicador
*Pulsar cualquier botón del teclado N-Com.
**Pulsar contemporáneamente los botones.
X
x2
x3
X
2 sec
2 sec
4 sec
4 sec
2 sec
X
X
x2
x3
44
Page 45

16 GARANTÍA
Certificado y Aprobación de Seguridad. Declaración Normativas FCC
Este dispositivo cumple con el apartado 15 de las normas FCC. El funcionamiento está sujeto a las dos
condiciones siguientes: (1) Este dispositivo no debe ocasionar interferencias dañinas, y (2) este dispositivo
debe poder soportar cualquier interferencia recibida, incluidas las posibles interferencias que provoquen mal
funcionamiento.
Este producto ha sido probado y se ha determinado que cumple con los límites establecidos en el apartado 15
de las normas FCC para un dispositivo digital de clase B. Estos límites se han diseñado para brindar un grado
de protección razonable contra las interferencias dañinas en una instalación de carácter residencial. Este
equipo genera, utiliza y puede irradiar energía de radiofrecuencia y, de no ser instalado y utilizado según las
instrucciones, podría provocar interferencias dañinas a comunicaciones de radio. No obstante, no existe
ninguna garantía de que no se producirá interferencia en una instalación específica.
Si este equipo causa interferencias dañinas a la recepión de radio o televisión, que se pueden detectar
apagando y encendiendo los equipos, el usuario puede intentar solucionar dichas interferencias con una o
algunas de las siguientes medidas:
• Volver a orientar o colocar la antena de recepción
• Aumentar la distancia entre el equipo y el receptor
• Conectar el equipo a una toma de corriente que no sea la del receptor
• Contactar al distribuidor o a un técnico radio /TV experto para asistencia técnica
FCC RF Declaración de Exposición
Este equipo cumple con los límites FCC de exposición a la radiación establecidos para un entorno no
controlado. Los usuarios finales deberán respetar las instrucciones específicas de funcionamiento para
satisfacer las normativas de conformidad a la exposición RF.
La antena utilizada para este transmisor no debe transmitir simultáneamente con ninguna otra antena o
transmisor, excepto según los procedimientos FCC para los productos multi transmisores.
Cuando está equipado, la distancia entre la antena y cabeza deberá ser de 30,63 mm. EUT se comercializa sin
casco, por lo tanto cuando el EUT se instala con casco, se deberá respetar la distancia de 30,63 mm desde la
cabeza del usuario.
Precaución FCC
Cualquier cambio o modificación del equipo que no haya sido expresamente aprobado por la parte
responsable del cumplimiento de las normativas podría anular la autorización para operar el mismo.
Declaración de la Industria de Canadá (IC)
Este dispositivo cumple con las Normativas RSS-210 de la Industria de Canadá. La operación está sujeta a las
dos siguientes condiciones: 1) este dispositivo no debe causar interferencia y 2) este dispositivo tiene que
aceptar cualquier interferencia, incluso la interferencia que pueda provocar un malfuncionamiento del
dispositivo. Este aparato digital de clase B cumple con la normativa canadiense ICES-003.
Declaración de Exposición a la Radiación (IC)
Este dispositivo cumple con los límites de exposición a la radiación IC establecidos para un entorno no
controlado. Los usuarios finales deberán respetar las instrucciones de funcionamiento específicas para
satisfacer las normativas de conformidad RF.
Este transmisor no deberá colocarse ni deberá funcionar simultáneamente con cualquier otra antena o
transmisor.
Cuando está equipado, la distancia entre la antena y la cabeza es de 30,63 mm. EUT se comercializa sin casco,
por lo tanto cuando el EUT se instala con casco, se deberá respetar la distancia de 30,63 mm desde la cabeza
del usuario.
Model:
PMN:
Bluetooth es una marca registrada de propiedad de Bluetooth SIG, Inc.
B601 R
N-Com B601 R
FCC ID:
Y6MNCOM18
IC:
9455A-NCOM18
R-NZ
45
Page 46

ES
SÓLO PARA EL MERCADO USA Y CANADÁ: GARANTÍA LIMITADA
Con este CERTIFICADO DE GARANTÍA, Nolangroup garantiza al comprador que el producto, al momento de la
compra, está libre de defectos en materiales y mano de obra.
Lo invitamos a:
• Leer las advertencias de seguridad y uso correcto.
• Revisar los términos y condiciones de la garantía.
•
Guardar el recibo de compra original
estos casos, el producto debe enviarse al distribuidor donde se realizó la compra.
16.1 Cobertura de la garantía y validez
Si se detecta algún defecto cubierto por este certificado de garantía dentro del período previsto para el país
de compra (consulte la tabla al final de este folleto) desde la fecha de compra que se muestra en el recibo,
Nolangroup procederá, a través de su red de distribución y después de la verificación del defecto, a reparar o
reemplazar el producto defectuoso. Nolangroup suministrará todo el material y el trabajo razonablemente
necesario para remediar el defecto reportado, excepto en el caso de que el daño fuese causado por uno de los
elementos enumerados en el siguiente párrafo "Exclusiones y limitaciones de la cobertura".
16.2 Exclusiones y limitaciones de cobertura
Esta garantía solo cubre los defectos en materiales y mano de obra.
Nolangroup no se hace responsable de los defectos del producto atribuibles total o parcialmente a cualquier
otra causa, que incluye, entre otras:
• Defectos o daños resultantes del uso del Producto en condiciones diferentes a las habituales.
• Daños causados por el uso incorrecto y no de acuerdo con el funcionamiento normal como se indica en
las instrucciones de uso y mantenimiento del producto, suministradas por Nolangroup.
• Descuido y desgaste normal de las partes internas y externas.
• Cualquier daño resultante de un accidente.
• Cualquier modificación o manipulación hecha al casco o al sistema N-Com por el usuario o por terceros.
• Uso de accesorios incompatibles no aprobados por Nolangroup para el modelo de dispositivo N-Com
adquirido.
• Las piezas de consumo consideradas sujetas a desgaste, como por ejemplo la batería recargable y los
cables de conexión entre los sistemas N-Com y otros dispositivos.
• El correcto funcionamiento de la combinación producto / dispositivo periférico, cuando el producto se usa
junto con accesorios o equipos para los cuales Nolangroup no ha verificado la compatibilidad.
• Todas las situaciones específicas y subjetivas particulares que pueden surgir en el uso dinámico del casco,
como por ejemplo, problemas de comodidad al conducir o chirridos y silbidos aerodinámicos.
En cualquier caso, Nolangroup no se hace responsable de los daños accidentales o consecuentes (incluidos,
entre otros, lesiones a la persona o personas) como resultado del incumplimiento de las obligaciones
derivadas de esta garantía con respecto a los productos Nolangroup.
16.3 Procedimiento para reenviar cualquier queja
Para reenviar cualquier reclamo cubierto por esta garantía, el comprador debe notificar directamente al
distribuidor donde se compró el sistema N-Com el supuesto defecto encontrado, presentando
simultáneamente el producto objeto de la queja y una copia del recibo.
ANTES DE CONTACTAR AL DISTRIBUIDOR, LE RECOMENDAMOS LEER LAS INSTRUCCIONES DE USO
ADJUNTAS AL PRODUCTO ATENTAMENTE.
LA VALIDEZ DE LA GARANTÍA ES EFECTIVA EXCLUSIVAMENTE DESDE LA FECHA DE COMPRA HASTA EL
PERÍODO PREVISTO PARA EL PAÍS DE COMPRA (consulte la tabla al final de este folleto).
El servicio de garantía no extiende el período de la garantía misma. Por lo tanto, en caso de reemplazo del
producto o de uno de sus componentes, no comienza un nuevo período de garantía ni en el producto, ni en el
componente individual suministrado como reemplazo, sin embargo se debe tener en cuenta la fecha de
compra del producto original.
. Es necesario mostrarlo en caso de reparaciones en garantía. En
46
Page 47

Solo para reparaciones o reemplazos de componentes electrónicos, si Nolangroup repara o reemplaza el
producto, dicho producto tendrá un período de garantía igual a la parte residual de la garantía original o
noventa (90) días a partir de la fecha de reparación (el período más largo).
La reparación o el reemplazo también se pueden realizar a través de componentes regenerados con una
funcionalidad equivalente. Las partes o los componentes reemplazados pasarán a ser propiedad de
Nolangroup.
NOLANGROUP SE RESERVA EN CUALQUIER MOMENTO MODIFICAR SIN AVISO CARACTERÍSTICAS,
FUNCIONALIDADES, COMPATIBILIDADES, SOFTWARE.
Esta garantía no afecta los derechos legales del cliente bajo la jurisdicción nacional vigente y los derechos del
consumidor hacia el distribuidor consagrados en el contrato de compra / venta.
16.4 Identificación del producto.
Los productos N-Com se identifican mediante un código que permite la
trazabilidad e identificación del producto.
El código de identificación se muestra en la etiqueta adhesiva aplicada en el
sistema B601.
47
Page 48

ES
16.5 Validez de la garantía N-Com
PAÍS
ALBANIA X LÍBANO X
ARGELIA X MACEDONIA X
ARABIA SAUDITA X MALASIA X
ARGENTINA X MALTA X
AUSTRALIA X MARRUECOS X
AUSTRIA X MAURICIO X
BAHREIN X MÉXICO X
BÉLGICA BRP X MONTENEGRO X
ISLAS BERMUDAS X NORUEGA X
BOLIVIA X NUEVA CALEDONIA X
BOSNIA HERZEGOVINA X NUEVA ZELANDA X
BRASIL X OMÁN X
BULGARIA X PAÍSES BAJOS X
BURKINA FASO X PAKISTÁN X
CANADÁ X PARAGUAY X
CANADÁ BRP X PERÚ X
CHILE X POLINESIA FRANCESA X
CHINA X POLONIA X
CHIPRE X PORTUGAL X
COLOMBIA X KATAR X
COREA DEL SUR X REPUBLICA CHECA X
COSTA RICA X REPUB. ESLOVACA X
DINAMARCA X REUNIÓN X
ECUADOR X RUMANIA X
EL SALVADOR X RUSIA X
EMIRATOS ÁRABES
UNIDOS
FILIPINAS X SERBIA X
FINLANDIA X SINGAPUR X
FRANCIA X ESLOVENIA X
ALEMANIA X ESPAÑA X
GHANA X ESTADOS UNIDOS X
JAPÓN X SUDÁFRICA X
JORDÁN X SUECIA X
GRAN BRETAÑA X SUIZA X
GRECIA X TAILANDIA X
GUADALUPE X TAIWÁN X
GUATEMALA X TANZANIA X
GUYANA FRANCESA X TRINIDAD Y TOBAGO X
HONG KONG X TÚNEZ X
INDONESIA X TURQUÍA X
IRÁN X UCRANIA X
ISLANDIA X HUNGRÍA X
ISRAEL X VENEZUELA X
KAZAJSTÁN X ZAMBIA X
KUWAIT X
VALIDEZ'
2 AÑOS
VALIDEZ'
1 AÑO
X
SAN MARTÍN
PAÍS
VALIDEZ'
2 AÑOS
X
VALIDEZ'
1 AÑO
48
Page 49

FR
Le système Bluetooth est conforme aux normes essentielles de
Batterie
Directive 2001/95/CE
– GPSD, 2013/56/UE BAT, 2014/30/EU
SÉCURITÉ ET MODE D'EMPLOI
Félicitations ! Vous venez d'acheter un produit Nolangroup N-Com.
Le N-Com B601 a été réalisé en faisant recours aux toutes dernières technologies et
en utilisant les meilleurs matériaux. Les nombreux tests effectués et la mise au point
du système dans les moindres détails ont permis d'obtenir une qualité audio sans
égal.
Pour plus d’informations concernant le B601, pour télécharger le mode d’emploi au
format PDF et installer la dernière version du micrologiciel disponible, visitez le site
www.n-com.it
Version micrologiciel : 1.0.1
NORMES DE RÉFÉRENCE
Les produits de la ligne N-Com sont conformes aux normes comme cela est indiqué
ci-après :
B601
sécurité et aux autres dispositions de la Directive RED 2014/53/EU,
Directive 2009/65/EC, Directive 2011/65/CE, Directive 2012/19/EU
pertinentes en la matière.
Les déclarations de Conformité peuvent être téléchargées sur le site www.n-com.it, rubrique
Téléchargement.
Model:
PMN:
B601 R
N-Com B601 R
FCC ID:
Y6MNCOM18
IC:
9455A-NCOM18
La marque et les logos Bluetooth® sont des marques déposées appartenant à Bluetooth SIG,
Inc. et toute utilisation de ces marques par N-Com est sous licence. Les autres marques et noms
commerciaux sont ceux de leurs propriétaires respectifs.
R-NZ
Fw 1.0.1-3 - 29/01/2021
Page 50

Sommaire
1 AVERTISSEMENTS ET CONSIGNES DE SÉCURITÉ ........................................................................... 51
1.1 Sécurité routière ............................................................................................................................................................... 51
1.2 Mise en marche dans les lieux sûrs ............................................................................................................................ 51
1.3 Parasitage ........................................................................................................................................................................... 51
1.4 Usage approprié ............................................................................................................................................................... 51
1.5 Personnel qualifié ............................................................................................................................................................. 52
1.6 Accessoires et batteries .................................................................................................................................................. 52
1.7 Pour se débarrasser du produit ................................................................................................................................... 52
2 CONTENU DE L'EMBALLAGE ............................................................................................................... 53
3 INSTALLATION DANS LE CASQUE ..................................................................................................... 54
3.1 Installation du système B601 dans le casque ......................................................................................................... 55
3.2 Réglage du microphone ................................................................................................................................................ 59
3.3 Retrait du système B601 du casque ........................................................................................................................... 59
4 FONCTIONS DE BASE ........................................................................................................................... 60
4.1 Réglage du volume .......................................................................................................................................................... 60
4.2 Annonces vocales multilingue ..................................................................................................................................... 60
4.3 N-Com EASYSET ............................................................................................................................................................... 61
5 MENU CONFIGURATION ..................................................................................................................... 61
6 APPAIRAGE DE TÉLÉPHONE OU D’AUTRES DISPOSITIFS BLUETOOTH ..................................... 61
7 TÉLÉPHONE PORTABLE ........................................................................................................................ 62
7.1 Appel rapide....................................................................................................................................................................... 62
7.2 Fonction Conférence Téléphonique ........................................................................................................................... 63
8 GESTION DE DEUX TELEPHONES (OU DISPOSITIFS BLUETOOTH) ............................................. 63
9 SMART NAVI SYSTEM ........................................................................................................................... 63
10 MUSIQUE VIA BLUETOOTH ................................................................................................................. 64
10.1 Partager de la musique via Bluetooth (A2DP Sharing) ........................................................................................ 64
11 NAVIGATEUR PAR SATELLITE POUR MOTOS .................................................................................. 64
12 INTERPHONE N-COM .......................................................................................................................... 65
12.1 Appairage interphone N-Com série « 900 » / « 600 »......................................................................................... 65
12.2 Fonction interphone N-Com série « 900 » / « 600 » (connexion un à un) ................................................... 65
13 INTERPHONE « UNIVERSAL INTERCOM » ....................................................................................... 66
13.1 Appairage UNIVERSAL INTERCOM ............................................................................................................................ 66
13.2 Fonction UNIVERSAL INTERCOM ............................................................................................................................... 66
14 BATTERIE ET RECHARGE ...................................................................................................................... 67
14.1 Signal de batterie déchargée ....................................................................................................................................... 67
14.2 Vérification du niveau de charge de la batterie ..................................................................................................... 67
14.3 Recharge du système ...................................................................................................................................................... 67
15 SCHEMA RECAPITULATIF COMMANDES ......................................................................................... 68
16 GARANTIE ............................................................................................................................................... 69
Page 51

1 AVERTISSEMENTS ET CONSIGNES DE SÉCURITÉ
Lire attentivement ce livret d'instructions. Lire les recommandations de base reportées ci-après. Le non-respect
de ces celles-ci peut produire des situations de danger.
: Ce produit ne peut être utilisé dans les compétitions officielles et non officielles, les motodromes,
Attention
les circuits, les pistes et autres endroits semblables.
: L’installation du système d'interphone N-Com B601 produit une augmentation de poids d'environ
Attention
105g à ajouter au poids du casque et aux autres accessoires.
: Les composants électroniques du système N-Com présents à l'intérieur du casque ne sont pas
Notice
imperméables. Éviter par conséquent que l'intérieur du casque ne se mouille de même que le rembourrage
de confort afin d'éviter d'endommager le système. Si de l'eau pénètre à l'intérieur du casque, enlever le
système N-Com et l'habillage de confort du casque et le faire sécher à l'air libre.
1.1 Sécurité routière
Respecter toutes les lois en vigueur en matière de circulation routière. Pendant la conduite, vos mains doivent
s'occuper du pilotage de votre véhicule. Les opérations à effectuer sur le système N-Com doivent être
accomplies lorsque votre véhicule est à l'arrêt.
En particulier :
• Régler votre téléphone sur le mode de réponse automatique (voir les instructions concernant votre
téléphone pour effectuer ce réglage).
• Si votre téléphone ne prévoit pas cette fonction, avant de répondre à un appel entrant, veuillez tout d'abord
arrêter votre véhicule en un lieu sûr en respectant le Code de la Route.
• Ne pas passer d'appels en conduisant. Arrêtez d'abord votre véhicule en un lieu sûr en respectant le Code
de la Route avant de passer un appel.
• Régler le volume de façon à ce que celui-ci ne gêne ou ne distrait pas la conduite et ne vous empêche pas
d'entendre distinctement les bruits extérieurs.
• Ne pas utiliser le téléphone portable ou d'autres dispositifs reliés à N-Com pendant la conduite.
• Dans tous les cas, le respect du Code de la Route et les manœuvres nécessaires pour conduire votre
motocyclette ont toujours la priorité absolue.
1.2 Mise en marche dans les lieux sûrs
• Pour utiliser N-Com, veuillez vous conformer à toutes les restrictions et à toutes les indications concernant
l'utilisation des téléphones portables.
• Ne pas allumer votre téléphone portable ou le système N-Com lorsque leur utilisation est interdite ou
lorsque le dispositif peut provoquer des interférences ou constituer un danger.
• Éteindre le dispositif lorsque vous vous ravitaillez en carburant. Ne pas utiliser le système N-Com dans les
stations service. Ne pas utiliser le dispositif à proximité de combustibles ou de produits chimiques.
• Éteindre le dispositif à proximité de matériaux explosifs.
1.3 Parasitage
Tous les téléphones et dispositifs émettant des signaux sans fil peuvent ressentir des parasitages qui influeront
sur les performances de l'appareil relié à ceux-ci. Ces parasitages ne sauraient être assimilés à un défaut du
système N-Com.
1.4 Usage approprié
Utiliser le dispositif uniquement dans sa position normale (voir à ce propos la documentation jointe au
produit). Ne pas démonter, altérer ou modifier une quelconque partie du système N-Com.
: Régler le volume du système N-Com et des sources audio qui y sont reliées avant d'utiliser le
Attention
système sur la route.
: L'utilisation d'un volume trop élevé peut être nuisible au canal auditif.
Attention
: Une mauvaise installation du système à l'intérieur du casque pourrait modifier les caractéristiques
Attention
aérodynamiques et de sécurité du casque et créer ainsi des conditions de danger. Installer le système N-
51
Page 52

FR
Com conformément à ce qui est décrit dans la documentation du produit. En cas de doute, contactez votre
revendeur N-Com.
: L’écoute d'autres appareils ne doit pas avoir de répercussions sur la conduite du véhicule qui reste
Attention
absolument prioritaire. Effectuez toutes les manœuvres sur les appareils électroniques et sur le système NCom lorsque le véhicule est à l'arrêt, en respectant les règles du Code de la Route.
1.5 Personnel qualifié
Seul un personnel qualifié est autorisé à effectuer des interventions d'assistance technique sur ce produit. En
cas de dysfonctionnement, adressez-vous toujours à un revendeur agréé. Le casque est un produit de sécurité :
l'altération du casque et/ou du système électronique qu'il renferme annule non seulement la garantie du
produit mais est également dangereuse.
1.6 Accessoires et batteries
• Utiliser uniquement les types de batterie, le chargeur de batterie et les accessoires spécifiquement agréés
par Nolangroup pour votre modèle de dispositif.
• L'utilisation de types différents de ceux indiqués pourrait être dangereux et annuler toutes les garanties
applicables. Pour connaître la disponibilité des accessoires agréés, adressez-vous à votre revendeur.
• Pour débrancher le cordon d'alimentation de n'importe quel accessoire ou du chargeur de batterie, saisir et
tirer la fiche et non pas le cordon.
• Ne pas utiliser les batteries à des fins autres que celles prescrites.
• Ne jamais se servir d'un chargeur de batterie ou de batteries endommagés.
• Ne pas mettre la batterie en court-circuit.
• Conserver la batterie à une température comprise entre 0° / +45°C (En charge); -20° / +60°C (En cours
d'utilisation).
• Risque d'incendie ou d’explosion : ne pas jeter les batteries dans le feu et ne pas les exposer à des
températures élevées !
• Ne pas jeter les batteries avec les ordures ménagères. Éliminer les batteries conformément aux normes
locales en vigueur.
• Ne pas mettre le casque au cours du chargement de la batterie.
• Ne jamais laisser le casque à portée de main des enfants laissés sans surveillance, afin d’éviter que l’accès
éventuel aux batteries d’alimentation puisse nuire gravement à leur santé.
Batterie
1.7 Pour se débarrasser du produit
Consulter ce livret ainsi que les livrets des autres éléments du système N-Com pour enlever le système du
casque. Après avoir enlevé le système, jetez-le en respectant les indications suivantes :
• La présence du symbole d'une poubelle barrée indique que le produit fait l'objet, au sein de
l'Union Européenne, d'un tri sélectif en fin de vie.
• Ne pas jeter ces produits dans les déchets urbains non-différenciés.
• Se débarrasser correctement des appareils obsolètes contribue à la prévention des risques possibles sur la
santé humaine et l'environnement.
• Au sein de l'Union européenne, le revendeur, lorsqu'il fournit le nouvel équipement, veille à ce que
l'équipement usagé soit collecté gratuitement tant qu'il est équivalent à un équipement neuf.
• Pour plus d'informations sur le recyclage des appareillages obsolètes, contactez votre Mairie, le centre de
traitement des déchets ou bien le revendeur où vous avez acheté le produit.
PL743530P LiPo 3,7V – 800 mAh
52
Page 53

2 CONTENU DE L'EMBALLAGE
L'emballage N-Com B601 comprend :
Cordon mini-USB
Adaptateurs clavier N100-5/87
Système N-Com B601
Microphone avec clip
Clé
Adhésifs de fixation haut-parleur
53
Page 54

FR
3 INSTALLATION DANS LE CASQUE
Important
appliqué sur celui-ci (voir par. 16.3).
Vous pouvez consulter de la vidéo d’installation sur le site Internet www.n-com.it – Section N-Com / Download.
• Avant d'installer le système B601 dans le casque, vérifiez que le système se mette en marche
• Enlevez les joues de confort (voir la notice du casque).
• Enlevez la vis de la garniture du bord du casque à l'aide de la clé prévue à cet effet (Fig. 1).
• Enlevez complètement la garniture du bord comme cela est indiqué à la Fig. 1, en retirant ainsi également
• Enlevez les caches « N-Com » présents sur la garniture du bord de la calotte dans la partie arrière et sur le
: avant d'installer le système N-Com, il est recommandé d'écrire le code d'identification du produit
correctement. Appuyez sur la touche « n » pendant environ 2 secondes jusqu’à l’allumage de la LED bleue
sur le pavé et qu'une tonalité soit émise dans le casque. Procédez à l'installation.
le mousse de confort.
côté gauche du casque.
Fig. 1
• Avant d’installer le système N-Com, retirer toutes les mousses du casque, s’il y a lieu (se référer au manuel
de l’utilisateur de votre casque).
Option 1
Remarque
54
: conserver les caches de remplissage du casque en cas d’utilisation de ce dernier sans le système N-
Com.
Fig. 1 –
POUR CASQUE N87 ET N100-5 SEULEMENT
Option 2
Page 55

3.1 Installation du système B601 dans le casque
• Raccorder le connecteur du microphone à la
contrepartie en respectant la direction des
flèches (Fig. 2).
Remarque :
il est possible de régler la position du
microphone. Pour les modes de réglage, voir le
paragraphe 3.2.
Fig. 2
Fig. 3
Fig. 4
• Insérez le système dans le logement prévu à cet
effet à l'arrière du casque et poussez-le jusqu'au
fond de la rainure (Fig. 3).
Remarque : pour le positionnement des câblages et
du microphone dans le casque N100-5, suivez les
instructions dans le boîtier dédié.
• Rangez le câble à l'intérieur du casque et faites
déclencher le clip de fixation droit dans le siège
correspondant (Fig. 4).
Fig. 5
• Positionnez le microphone dans le logement ad
hoc sur le côté droit du casque, en insérant le col
de cygne métallique dans la rainure présente sur
la structure de fixation de la mentonnière (Fig. 5).
: vérifiez que le côté du support du
Attention
microphone avec l'indication « n » est orienté
vers l'intérieur du casque.
55
Page 56

FR
Remarque : pour le positionnement du pavé dans les
casques N100-5/87, suivez les instructions dans le
boîtier dédié.
• Placez le câble à l'intérieur du casque et faites
déclencher le clip de fixation gauche dans son
siège.
• Accrochez le pavé au casque jusqu'à
l'encliquetage des crochets ad hoc.
• Ouvrez la calotte en caoutchouc du système
B601.
Fig. 6
POUR LE CASQUE N100-5 UNIQUEMENT – positionnement des câblages et du microphone
Positionnement du câblage droit et du microphone
• Soulevez le revêtement en plastique de la joue (Fig. 7).
• Insérez le micro à l’intérieur de l'œillet (Fig. 8) et positionnez-le dans le logement prévu à cet effet, en
insérant le col de cygne métallique dans la rainure présente sur la structure de fixation de la
mentonnière (Fig. 9).
: vérifiez que le côté du support du microphone avec l'indication « N-Com » est orienté vers
Attention
l'intérieur du casque.
• Rangez le câble à l'intérieur du casque et positionnez le clip de fixation droit dans le siège
correspondant (Fig. 10).
• Repositionnez le revêtement en plastique de la joue, en le plaçant derrière les deux crochets de retenue
(Fig. 11).
• Remontez la garniture du bord et fixez-la à l'aide
de la vis ad hoc.
:
56
Fig. 7
Fig. 9
Fig. 8
Fig. 10
Page 57

Fig. 11
POUR LE CASQUE N100-5 UNIQUEMENT – positionnement des câblages et du microphone
Positionnement du câblage gauche
:
• Soulevez le revêtement en plastique de la joue (Fig. 12).
• Placez le câble à l'intérieur du casque et positionnez le clip de fixation gauche dans son siège (Fig. 13).
• Repositionnez le revêtement en plastique de la joue, en le plaçant derrière les deux crochets de retenue
(Fig. 14).
Fig. 12
Fig. 13
Fig. 14
57
Page 58

FR
POUR CASQUE N100-5/87 SEULEMENT – positionnement du pavé
Important
dans l’emballage.
: pour installer le pavé sur les casques N100-5/87, utiliser l’accessoire « ADAPTATEUR PAVÉ » présent
• Insérez le support spécifique du casque sur le câble flexible du pavé (Fig. 15).
• Faites pivoter le support du pavé pour qu'il soit positionné comme le montre la Fig. 16 et fixez-le au
pavé.
• Placez le câble à l'intérieur du casque et faites déclencher le clip de fixation gauche dans son siège (Fig.
17).
• Ouvrez la calotte en caoutchouc du système B601.
• Remontez la garniture du bord et fixez-la à l'aide de la vis ad hoc.
• Accrochez le pavé au casque jusqu'à l'encliquetage des crochets ad hoc (Fig. 18).
• Le positionnement correct du pavé est illustré aux Fig. 19, 20.
Fig. 15
Fig. 17
Fig. 19
• Positionnez les haut-parleurs droit et gauche dans les sièges prévus à cet effet dans les joues en
polystyrène. Si cela est nécessaire, tourner légèrement les haut-parleurs dans leur logement. Si
nécessaire, les fixer à l'aide des autocollants fournis.
• Remettre le mousse de confort en place.
Fig. 16
Fig. 18
Fig. 20
58
Page 59

3.2 Réglage du microphone
Le système B601 permet d'ajuster la position du microphone afin de faciliter son positionnement dans les
différents modèles de casque.
Procéder comme suit :
• Ouvrir le clip situé sur la tige du microphone, en faisant levier comme cela est indiqué à la Fig. 21.
• Régler le microphone (Fig. 22).
• Fermer le clip (Fig. 23).
Fig. 21
Fig. 22
Fig. 23
Pour garantir une bonne qualité de transmission vocale, il est recommandé de placer la mousse du
microphone du côté de la bouche.
3.3 Retrait du système B601 du casque
Pour enlever le système B601 du casque, procédez de
la façon suivante :
• Enlevez les joues de confort et la garniture du
bord de la calotte ;
• Enlevez le pavé de la calotte en faisant levier vers
le haut, comme cela est indiqué à la Fig. 24.
Fig. 24
POUR CASQUE N87 ET N100-5 SEULEMENT – Retrait du pavé
• Enlever le pavé de la calotte en faisant levier comme cela est indiqué (Fig. 25).
• Tourner le pavé dans le sens inverse des aiguilles d’une montre (Fig. 26).
• Enlevez les joues de confort et la garniture du bord de la calotte.
Fig. 25
Fig. 26
59
Page 60

FR
• Libérez les clips droit et gauche de la calotte en
faisant levier vers le haut avec un tournevis plat
(ou autre objet similaire), comme cela est
indiqué à la Fig. 27.
Fig. 27
Fig. 28
• Enlevez complètement le système B601 du
casque à l'aide d'un tournevis plat (ou similaire)
puis réinstallez les joues et la garniture du bord.
4 FONCTIONS DE BASE
Remarque
pendant au moins 10 heures. Pour que la batterie procure des performances optimales, il est recommandé
d'effectuer des cycles de recharge complets lors des premières recharges. Par la suite, il est possible de
recharger la batterie pour des durées plus courtes. D'une façon générale, il est toujours préférable d'effectuer
un cycle de recharge complet.
Marche
Arrêt
4.1 Réglage du volume
Vous pouvez facilement régler le volume en appuyant sur le bouton « » ou « ». Un bip retentit dès que le
volume atteint son niveau maximal ou minimal.
Le volume est réglable pour chaque source sonore. Une fois défini pour une certaine source (appel
téléphonique, radio, lecteur Mp3) il restera mémorisé même après l’arrêt du système.
Toutefois, si vous réglez le volume alors que le casque audio est en mode veille, le volume de toutes les
sources audio est modifié.
4.2 Annonces vocales multilingue
Le système N-Com est équipé d'annonces vocales fournissant des informations sur le système et les fonctions
actives. La langue par défaut est l'anglais. La langue des annonces vocales peut être modifiée à l'aide du
micrologiciel spécifique installable avec le programme N-Com EASYSET. Consulter l'AIDE en ligne pour
connaître les modes de changement de langue.
Langues disponibles : italien, anglais, français, allemand, espagnol, néerlandais.
: Avant d'utiliser pour la première fois le dispositif N-Com, chargez complètement la batterie
Appuyez sur la touche « n » pendant 2 secondes environ jusqu'à ce que les
LEDs s'allument et que l’annonce vocale soit émise.
Appuyez sur la touche « n » pendant 6 secondes environ jusqu'à ce que les
LEDs s'éteignent et que l’annonce vocale soit émise.
La fonction, par défaut, est activée sur le dispositif. Il est possible d’activer/désactiver la fonction
« ANNONCES VOCALES » à l’aide du programme N-Com EASYSET.
60
Page 61

4.3 N-Com EASYSET
N-Com EASYSET est le programme qui permet de gérer et configurer le système B601.
Ce programme peut être téléchargé dans la section « Download » du site Internet www.n-com.it.
Les fonctions qui peuvent également être gérées par le N-Com EASYSET sont indiquées par
l'icône correspondante.
5 MENU CONFIGURATION
Ce mode permet de réaliser tous les appairages Bluetooth et les autres réglages.
Pour placer le système en mode « Configuration » (avec système éteint), appuyez sur la touche « n » (retour)
pendant 4 secondes jusqu'à ce que vous entendiez le message vocal «
Configuration
Dans le menu « Configuration », appuyez sur les touches « » et « » pour naviguer à travers les différentes
options du menu. Pour les options marquées d’un « * », il est possible d’activer/désactiver la fonctionnalité ou
d’exécuter les commandes en appuyant sur la touche « n » de validation.
Les options du menu « Configuration » sont les suivantes :
A.
Couplage téléphone
B.
Couplage interphone
C.
Couplage intercom universel
D.
Couplage d'un second téléphone mobile
E.
Appel rapide *
F.
Smart Navi System
G.
Annulation couplages *
(par. 6)
(par. 7.1)
(par. 9)
(par. 12)
(par. 13)
(par. 8)
Pour éliminer tous les appairages Bluetooth présents dans la mémoire du dispositif, appuyez sur la touche
« » ou « » jusqu'à ce que vous entendiez le message vocal «
Annulation couplages
Appuyez sur la touche « n » de validation pour supprimer tous les dispositifs Bluetooth présents dans la
mémoire.
H.
Réinitialisation
*
Pour restaurer les valeurs d’usine du dispositif, appuyez sur la touche « » ou « » jusqu'à ce que vous
entendiez le message vocal «
Réinitialisation
».
Appuyez sur la touche « n » de validation pour restaurer toutes les valeurs d’usine du dispositif.
I.
Sortir du menu configuration *
Pour quitter le menu « Configuration », appuyez sur la touche « » ou « » jusqu'à ce que vous
entendiez le message vocal «
Sortir du menu configuration
».
Appuyez sur la touche « n » de validation pour quitter le menu « Configuration ».
Si aucune touche n’est appuyée d’ici 10 secondes, le dispositif quitte automatiquement le menu
« Configuration ».
».
».
6 APPAIRAGE DE TÉLÉPHONE OU D’AUTRES DISPOSITIFS BLUETOOTH
• Vérifiez que le B601 est éteint.
• Placez le système en mode « Configuration » : tenez appuyée la touche « n » pendant
ce que vous entendiez le message vocal «
Configuration
».
4 secondes,
• Appuyez sur le bouton « » et entrez dans le mode « Appairage téléphone ».
• Activez sur le dispositif (smartphone, GPS, lecteur Mp3) la recherche des dispositifs Bluetooth.
• Sélectionnez le dispositif N-Com. Si un mot de passe est demandé, saisissez le code 0000 (quatre fois
zéro).
• La connexion entre les deux dispositifs est activée quelques secondes plus tard.
Remarque :
Connexion Automatique
l'appairage est enregistré par le casque et le téléphone et n'est pas perdu lorsque ces derniers sont
éteints. Cette procédure doit donc être effectuée une seule fois.
Après avoir effectué la procédure de couplage du dispositif Bluetooth, la
connexion se fait de façon automatique à la mise en marche du système.
Si la connexion n'est pas automatiquement établie d'ici quelques secondes, il
Connexion manuelle
est possible de se connecter via le dispositif Bluetooth ou en appuyant sur la
touche « n » pendant environ 2 secondes.
jusqu'à
61
Page 62

FR
7 TÉLÉPHONE PORTABLE
Pour appairer un téléphone portable au système B601, veuillez suivre la procédure décrite au par. 6.
Réponse appel
Réponse vocale (VOX téléphone)
Appel vocal
Raccrochage/refus appel
Connexion manuelle téléphone
7.1 Appel rapide
Utilisez le programme N-Com EASYJET pour enregistrer 3 numéros favoris qui pourront être
appelés avec le menu «
Enregistrement des numéros à Appel rapide
Pour enregistrer un ou plusieurs numéros à numérotation abrégée :
• Placez le système en mode « Configuration » : avec le système éteint, tenez appuyée la touche « n »
• Appuyez sur la touche « » ou « » jusqu’à ce que vous entendiez le message vocal «
• Appuyez sur la touche de validation « n ». Le message vocal «
• Appuyez sur la touche « » ou « » pour sélectionner le numéro rapide à assigner. L’emplacement
• Depuis votre téléphone portable (appairé et connecté au système N-Com), appelez le numéro de
Utilisation des numéros en mémoire
Pour accéder au menu « Numérotation abrégée », appuyez simultanément sur les touches « n » et « »
(«
Appuyez ensuite sur la touche « n » pour valider la sélection de l’une des options proposées en séquence :
Si vous souhaitez quitter le menu « Appel rapide », appuyez sur les touches « » et « » jusqu'à ce que la
commande «
Remarque
pendant 4 secondes, jusqu'à ce que vous entendiez le message vocal «
est émis.
mémoire est confirmé par le message vocal «
téléphone que vous souhaitez affecter à la position d’appel rapide de votre choix. L’appel est interrompu
avant d’être émis et le numéro sélectionné sera enregistré, avec le message vocal de confirmation
correspondant («
»).
3
Appel rapide
•
Dernier numéro
•
Appel rapide 1
•
Appel rapide 2
•
Appel rapide 3
•
Annulée
: Si vous n'appuyez sur aucune touche d’ici 15 secondes, vous quitterez le menu « Appel rapide ».
Enregistrer Appel rapide 1
») puis servez-vous des touches « » et « » pour naviguer dans les options du menu.
» soit émise, puis appuyez sur « n » pour valider.
Annulée
Appuyez brièvement sur une touche quelconque lorsque le téléphone
sonne.
Lorsque vous entendez la sonnerie, prononcez n'importe quel mot à
haute voix. Vous pouvez activer/désactiver la fonction «VOX téléphone »
en utilisant le programme N-Com EASYSET. La fonction n'est pas active
pendant la connexion interphonique.
Appuyez sur la touche « n » pendant environ 2 secondes.
Appuyez sur la touche « n » pendant environ 2 secondes.
Appuyez sur la touche « n » pendant environ 2 secondes.
Appel Rapide
».
Configuration
».
Appel rapide
» et
«
Téléphone connecté
» / «
Appel rapide 3
» / «
Enregistrer Appel rapide
».
Appel rapide 1
» / «
Enregistrer Appel rapide 2
» / «
Appel rapide 1
Appel rapide 2
».
»
62
Page 63

7.2 Fonction Conférence Téléphonique
À réception d'un appel entrant sur le téléphone portable connecté en Bluetooth au B601, l'interphone est
momentanément mis en veilleuse. Si cela est souhaité, il est cependant possible de partager l'appel avec
l'autre casque en activant manuellement l'interphone pendant l'appel.
Activation Conférence
Téléphonique
Désactivation Conférence
Téléphonique
Remarque
: la fonction « Conférence téléphonique » ne peut être utilisée qu’avec les systèmes N-Com de la
série « 900 » / « 600 ».
Pendant l'appel, appuyez sur « n » brièvement (canal 1).
Pendant l’appel, appuyez 2 fois sur la touche « n » (canal 2).
Pendant l’appel, appuyez 3 fois sur la touche « n » (canal 3).
Pendant l'appel, appuyez sur « n » brièvement.
8 GESTION DE DEUX TELEPHONES (OU DISPOSITIFS BLUETOOTH)
Le système B601 peut se connecter simultanément à deux téléphones (ou dispositifs) Bluetooth. Le deuxième
téléphone (dispositif secondaire) pourra recevoir des appels mais pas en passer.
Pour appairer le deuxième téléphone Bluetooth (dispositif secondaire) :
• Vérifiez que le B601 est éteint.
• Placez le système en mode « Configuration » : tenez appuyée la touche « n » pendant
ce que vous entendiez le message vocal «
• Appuyez sur la touche « » jusqu’à ce que s’affiche le mode «
• Activez sur le dispositif (smartphone, GPS, lecteur Mp3) la recherche des dispositifs Bluetooth.
• Sélectionnez le système N-Com dans la liste. Si un mot de passe est demandé, saisissez le code 0000
• La connexion entre les deux dispositifs est activée quelques secondes plus tard.
Après avoir effectué la procédure de couplage du dispositif Bluetooth, la connexion se fait de façon
automatique à la mise en marche du système.
Si vous souhaitez connecter un téléphone et un navigateur satellite pour motos, nous vous recommandons
d’appairer le téléphone en tant qu'APPAREIL PRINCIPAL (chapitre 6) et le navigateur en tant qu'APPAREIL
SECONDAIRE en suivant la procédure décrite ci-dessus.
».
mobile
(quatre fois zéro).
Configuration
».
Couplage d'un second téléphone
4 secondes,
jusqu'à
9 SMART NAVI SYSTEM
La fonction « SMART NAVI SYSTEM » vous permet d’écouter les indications de navigation provenant de votre
Smartphone même durant un appel intercom.
L’émission audio s’arrête pour permettre la transmission des indications de navigation du Smartphone et est
automatiquement rétablie à la fin des instructions vocales.
La fonction « SMART NAVI SYSTEM » est désactivée par défaut sur l’appareil.
Vous pouvez activer/désactiver cette fonction depuis le Menu Configuration (Chapitre 5).
: Avec le « SMART NAVI SYSTEM » activé, toute information audio provenant du Smartphone (par exemple,
N.B.
les sons de notification) arrête temporairement la lecture audio en cours.
Vous pouvez activer/désactiver la fonction « SMART NAVI SYSTEM » en utilisant le programme
N-Com EASYSET.
63
Page 64

FR
10 MUSIQUE VIA BLUETOOTH
Pour appairer un lecteur Mp3 au système B601, veuillez suivre la procédure décrite au par. 6.
Marche lecture musicale (Play)
Fonction Pause
Piste suivante (Skip)
Piste précédente (Rew)
10.1 Partager de la musique via Bluetooth (A2DP Sharing)
Durant la connexion interphonique, il est possible de démarrer la lecture musicale en appuyant sur la touche
« » pendant 2 secondes. La musique sera transmise dans les deux systèmes.
Le partage de la musique désactive temporairement la conversation interphonique, qui sera par contre
automatiquement rétablie en interrompant la lecture de la musique (en appuyant sur la touche « » pendant
2 secondes).
Remarque
Remarque
: La musique partagée en mode interphone peut être gérée par les deux systèmes, qui pourront, par
exemple, changer la piste musicale en appuyant sur la commande correspondante.
: la fonction « Partage de musique » ne peut être utilisée qu’avec les systèmes N-Com de la série
« 900 » / « 600 ».
11 NAVIGATEUR PAR SATELLITE POUR MOTOS
Le B601 est compatible avec la plupart des systèmes de navigation par satellite prévus pour les motos. Pour
obtenir la liste des modèles compatibles et plus de détails, visitez le site www.n-com.it
Pour appairer un système de navigation par satellite au système B601, veuillez suivre la procédure que celle
décrite au par. 8.
Remarque
: la connexion interphone est automatiquement interrompue à chaque indication du navigateur et
restaurée à la fin de chacune d’elles.
Appuyez sur la touche « » pendant 2 secondes.
Lorsque le lecteur est connecté et en lecture, appuyez sur la touche
« » pendant 2 secondes.
Lorsque le lecteur est connecté et en lecture, appuyez sur la touche
« » pendant 4 secondes.
Lorsque le lecteur est connecté et en lecture, appuyez sur la touche
« » pendant 4 secondes.
64
Page 65

12 INTERPHONE N-COM
Le système N-Com B601 assure la communication avec d’autres systèmes N-Com jusqu'à une distance
maximale d'environ 250 m (en champ libre, sans obstacles). La portée de la communication varie en fonction
des systèmes N-Com utilisés.
Important :
système B601 et les systèmes N-Com de la série « 900 » / « 600 ».
Pour l'appairage avec les systèmes N-Com d’une gamme autre que la série « 900 » / « 600 », veuillez-vous
référer à la procédure décrite au paragraphe 13 « Interphone Universal Intercom ».
Remarque :
d'obstacles, des conditions météorologiques et des champs magnétiques.
12.1 Appairage interphone N-Com série « 900 » / « 600 »
L’emballage TWIN PACK comprend deux systèmes N-Com déjà appairés sur le CANAL 1. Se reporter au
paragraphe 12.2 pour le raccordement des systèmes.
• Assurez-vous que les systèmes sont éteints.
• Placez les systèmes en mode « Configuration » : tenez appuyée la touche « n » pendant
• Sur les deux systèmes, appuyez sur la touche « » jusqu’à ce que le mode «
• Sur le système A, appuyez sur la commande correspondant à la « position de mémoire » où vous
Appairage CANAL 1
Appairage CANAL 2
Appairage CANAL 3
La connexion Interphone avec le canal sélectionné est automatiquement activée à la fin de la procédure
d’appairage.
12.2 Fonction interphone N-Com série « 900 » / « 600 » (connexion un à un)
Pour établir la connexion Interphone avec l’un des systèmes présents en mémoire, appuyez sur la commande
correspondant au canal où il a été enregistré.
Connexion CANAL 1
Appel CANAL 2
Appel CANAL 3
Déconnexion interphone actif
Remarque
a déjà un appel téléphonique en cours, vous entendrez un message vocal d’erreur.
Remarque
interrompue), le système B601 essaiera automatiquement de se reconnecter toutes les 8 secondes. Des tons
acoustiques doubles seront émis jusqu'à ce que la connexion Interphone soit rétablie.
Si vous ne souhaitez pas vous reconnecter automatiquement, appuyez sur «
de reconnexion automatique.
La procédure décrite ci-après concerne uniquement l’appairage et le fonctionnement entre le
la portée et la qualité de la communication peuvent varier sensiblement en fonction de la présence
jusqu'à ce que vous entendiez le message vocal «
Configuration
».
Couplage Interphone
apparaisse.
souhaitez enregistrer le système B.
Appuyez
brièvement
sur la touche « n ».
Appuyez 2 fois sur la touche « n ».
Appuyez 3 fois sur la touche « n ».
Appuyez
brièvement
sur la touche « n ».
Appuyez 2 fois sur la touche « n ».
Appuyez 3 fois sur la touche « n ».
Appuyez
brièvement
sur la touche « n ».
: si l’emplacement mémoire est vide, ou bien si le système appelé est hors de la portée maximale ou
: si le système de connexion Interphone sort du champ de portée (connexion Interphone
» pour arrêter les tentatives
n
4 secondes,
»
65
Page 66

FR
13 INTERPHONE « UNIVERSAL INTERCOM »
Le système N-Com B601 peut être connecté à des systèmes interphoniques via Bluetooth d’autres marques ou
à des systèmes N-Com autres que la série « 900 » / « 600 » 3 grâce à la fonction UNIVERSAL INTERCOM.
Important
au N-Com en utilisant la procédure d’ « Appairage interphone Universal Intercom ».
13.1 Appairage UNIVERSAL INTERCOM
Le système N-Com est appairé à l'autre interphone (appelé ci-après Interphone B) comme s'il s'agissait d'un
téléphone portable.
• Vérifiez que le B601 est éteint.
• Placez le système en mode « Configuration » : tenez appuyée la touche « n » pendant
• Appuyez sur la touche « » jusqu’à ce que s’affiche le mode «
• Placez l'interphone B en mode appairage de téléphone portable (voir la notice de l'interphone B).
• Après quelques secondes, l'interphone B émet une tonalité de confirmation.
Remarque
13.2 Fonction UNIVERSAL INTERCOM
Pour activer et désactiver l’audio entre les deux casques :
Depuis le système N-Com B601 :
Branchez ou débranchez l'interphone B comme un interphone N-Com normal (voir par. 12).
L'interphone B pourrait recevoir une tonalité d'appel à laquelle il faut répondre avec la commande de réponse
téléphonique.
Depuis l'interphone B :
Appuyez sur la commande «
Pour déconnecter l'interphone, appuyez sur la commande «
Remarque :
• Pendant la communication interphonique INTERCOM UNIVERSEL, le système B601 maintient la connexion
• Il est possible que le système d'interphonie connecté au N-Com B601 ne permette pas la connexion
• Vous pouvez garder en mémoire un seul système appairé en mode Universel Intercom.
: les systèmes N-Com appartenant à une gamme autre que la série « 900 » / « 600 » sont appairés
ce que vous entendiez le message vocal «
Configuration
».
4 secondes,
Couplage intercom universel
: le système appairé via UNIVERSAL INTERCOM est enregistré dans le premier espace de mémoire
(canal) disponible.
Appel vocal / Rappeler dernier numéro
active au DISPOSITIF PRINCIPAL seulement (et non au DISPOSITIF SECONDAIRE).
simultanée à un téléphone portable.
».
Raccrochage/refus appel
».
jusqu'à
».
3
Sauf pour le Bluetooth kit et le Bluetooth kit2, qui sont incompatible
66
Page 67

14 BATTERIE ET RECHARGE
14.1 Signal de batterie déchargée
Pendant son fonctionnement, le système informe l'utilisateur par une annonce vocale lorsque la charge de la
batterie est faible. Après la première annonce, il vous reste une autonomie d'environ 1 heure. L'annonce est
répétée toutes les 10 minutes.
14.2 Vérification du niveau de charge de la batterie
Voyant LED
Lors de la mise sous tension du casque audio, leur voyant LED clignote rapidement en bleu indiquant le niveau
de charge de la batterie.
4 clignotements = Fort, 70 ~ 100%
3 clignotements = Moyen, 30 ~ 70%
2 clignotements = Faible, 0 ~ 30%
Instructions vocales
Lorsque le système est éteint, appuyez simultanément sur la touche « n » et « » pendant 4 secondes jusqu’à
ce que vous entendiez un triple bip à volume élevé. Vous entendrez ensuite l'instruction vocale indiquant le
niveau de charge de la batterie. Cependant, si vous relâchez les boutons immédiatement après la mise en
marche du système, vous n’entendrez pas l’instruction vocale sur le niveau de charge de la batterie.
14.3 Recharge du système
• Pour recharger le système, veuillez le connecter au
chargeur de batterie ou à un port USB alimenté avec le
câble USB ou mini USB fourni. Le fonctionnement de la
charge se fera comme suit :
Fig. 29
Système
B601 éteint
Système
B601 allumé
Connectez le système B601 au chargeur de batterie, la LED bleue commence à clignoter
rapidement. Lorsque la batterie est chargée, la LED bleue reste allumée fixe.
Connectez le système B601 au chargeur de batterie, la LED bleue commence à clignoter
rapidement. Lorsque la batterie est chargée, la LED bleue recommence à clignoter
normalement.
Dans le cas où vous n’allez pas utiliser votre système N-Com pendant un long moment, vous devez recharger
complètement l’appareil avant de le ranger.
Dans le cas où l’appareil n’est pas utilisé pendant un long moment, effectuez un cycle de recharge complet de
l’appareil au moins une fois tous les 6 mois afin d’éviter un potentiel dommage de la batterie.
Dans le cas où le système est laissé plus de 6 mois sans avoir été rechargé, l’appareil peut ne pas s’allumer ;
dans ce cas, rechargez le système N-Com pendant au moins 24 heures (même si la LED bleue ne clignote plus),
puis essayez d'allumer l’appareil à nouveau.
67
Page 68

FR
Activation conférence téléphonique
Activation conférence téléphoniqu
e
Activation conférence téléphonique
«
900
/ 600
»)
15 SCHEMA RECAPITULATIF COMMANDES
Touche
Marche
Arrêt
Augmentation volume
Diminution volume
Fonctions Base
Réponse appel*
Appel vocal
Menu Numérotation abrégée**
Raccrochage/refus appel
Connexion manuelle dispositif
CANAL 1
Dispositifs Bluetooth
CANAL 2
CANAL 3
Désactivation conférence
Marche lecture musicale (
Fonction Pause (
Piste suivante (
Piste précédente (Rew)
Partage de musique A2DP
Musique Bluetooth
Connexion CANAL 1
Déconnexion interphone actif
Connexion CANAL 2
Com (série
Connexion CANAL 3
Interphone N-
* Appuyez sur n’importe quelle touche du pavé N-Com.
** Appuyez simultanément sur les touches.
Pause
Forward
Play
)
)
)
2 sec
6 sec
2 sec
2 sec
2 sec
2 sec
n
X
X
X X X
X X
X
x2
x3
X
2 sec
2 sec
4 sec
4 sec
X
X
x2
x3
+
68
Page 69

16 GARANTIE
Certification et homologation de sécurité - Déclaration de conformité FCC
Cet appareil est en conformité avec la partie 15 des règles de la FCC. Son fonctionnement est soumis aux deux
conditions suivantes : (1) Cet appareil ne doit pas créer d’interférences préjudiciables, et (2) cet appareil doit accepter
toutes les interférences reçues, y compris celles qui pourraient entraver son bon fonctionnement.
Cet équipement a été testé et jugé conforme aux limites pour un appareil numérique de classe B, conformément à la
partie 15 des règles de la FCC. Ces limites sont conçues pour fournir une protection raisonnable contre les interférences
nuisibles dans une installation résidentielle. Cet équipement génère et utilise de l’énergie radio fréquence et, s’il n’est
pas installé et utilisé conformément aux instructions, il peut occasionner des interférences nuisibles au niveau des
communications radios. Cependant, il n’existe aucune garantie que ces interférences ne se produiront pas dans une
installation particulière.
Si cet équipement génère des interférences nuisibles à la réception de la radio ou de la télévision (ce qu’il est possible
de déterminer en mettant l’équipement hors tension, puis sous tension), l’utilisateur est invité à suivre une ou plusieurs
des mesures suivantes pour corriger le problème des interférences en prenant l’une des mesures suivantes :
• Modifier l’emplacement ou l’orientation de l’antenne de réception.
• É loigner l’appareil du récepteur.
• Brancher l’appareil sur une prise située sur un circuit différent de celui du récepteur.
• Consulter le revendeur ou un technicien expérimenté pour obtenir de l’aide.
Énoncé FCC sur l’exposition aux radiations RF
Cet équipement est conforme aux réglementations FCC d’exposition aux radiations définies pour un environnement non
contrôlé. Les utilisateurs doivent respecter les instructions d’exploitation spécifiques pour répondre aux exigences de
conformité sur l’exposition aux RF. L’antenne utilisée pour cet appareil ne doit pas fonctionner en même temps qu’une
autre antenne ou émetteur, sauf s’il y a conformité avec les procédures FCC des produits multi-émetteurs.
Précautions FCC
Tout changement ou modification non expressément approuvé par la partie chargée de la mise en conformité peut
annuler le droit de l’utilisateur à utiliser l’équipement.
Avis d'Industrie Canada
Cet appareil est conforme à norme CNR-210 des règlements d'Industrie Canada. Son fonctionnement est sujet aux deux
conditions suivantes: 1) Cet appareil ne doit pas provoquer d'interférences et 2) Cet appareil doit accepter toute les
interférences y compris celles pouvant entraîner son dys-fonctionnement.
Cet appareil numérique de classe B est conforme à la norme NMB-003 du Canada.
Avis d'Industrie Canada sur I'exposition aux rayonnemensnts
Cet équipement est conforme aux limites d'exposition aux radiations dans un environnement non contrôlé. Les
utilisateurs doivent suivre les instructions de fonctionnement spécifiques pour le respect d'exposition aux RF. Cet
émetteur ne doit pas être co-localisés ou fonctionnant en conjonction avec une autre antenne ou transmetteur.
Lorsqu'il est équipé, la distance entre l'antenne et la surface de la tête est de 30,63 mm. L'EUT est commercialisé sans
casque, donc lorsque l'EUT est monté avec un casque, il doit être maintenu à une distance de 30,63 mm de sa surface de
tête.
Model:
PMN:
Bluetooth est une marque déposée de Bluetooth SIG, Inc.
POUR LE MARCHE US ET CANADIEN UNIQUEMENT: GARANTIE LIMITEE
Par le présent CERTIFICAT DE GARANTIE, Nolangroup assure à l'acheteur que le produit ne présente, au moment de
l'achat, aucun défaut quant aux matériaux utilisés ou à la fabrication. Nous vous invitons à :
•
•
•
16.1 Couverture de la garantie et validité
Si un quelconque défaut couvert par le présent certificat de garantie est découvert dans la période de garantie prévue
dans le Pays d’achat (voir le tableau indiqué au fond de cet opuscule) à compter de la date d'achat reportée sur le
ticket d'achat, Nolangroup s'engagera, par le biais de son réseau de distribution et après avoir constaté la nature du
B601 R
N-Com B601 R
FCC ID:
Y6MNCOM18
IC:
9455A-NCOM18
Lire les notices de sécurité et les conseils d'utilisation.
Lire la teneur et les conditions de la garantie.
Conserver le ticket d'achat original.
Celui-ci devra être présenté pour toute réparation sous garantie. Dans ces cas-
ci, le produit devra être amené au revendeur chez qui l'achat a été effectué.
R-NZ
69
Page 70

FR
défaut, à réparer ou à remplacer le produit défectueux. Nolangroup fournira tout le matériel et le travail
raisonnablement requis pour réparer le défaut signalé, sauf si le dommage est dû à l'une des raisons indiquées au
paragraphe suivant « Exclusions et limites de la couverture ».
16.2 Exclusions et limites de la couverture
Cette garantie couvre uniquement les défauts des matériaux et de fabrication.
Nolangroup ne saurait être tenu pour responsable des défauts du produit imputables, en tout ou en partie, à l'une des
causes indiquée dans la liste – non exhaustive – ci-après :
•
Défauts ou dommages suite à l'utilisation du Produit dans des conditions autres que les conditions habituellement
prévues.
•
Dommages dus à un usage incorrect et non conforme au fonctionnement normal conformément à ce qui est
indiqué dans les instructions d'utilisation et d'entretien du produit fournies par Nolangroup.
•
Manque d'entretien et usure normale des parties internes et externes.
•
Dommages dus à un accident.
•
Toute modification ou altération apportée au casque ou au système N-Com par l'utilisateur ou des tiers.
•
Utilisation d'accessoires incompatibles non approuvés par Nolangroup pour le modèle de dispositif N-Com
acheté.
•
Consommables sujets à l'usure ou au vieillissement tels que par exemple la batterie rechargeable et les câbles de
raccordement entre les différents systèmes N-Com et d'autres dispositifs.
•
Le bon fonctionnement de la combinaison produit/périphérique, lorsque le produit est utilisé avec des accessoires
ou des équipements dont Nolangroup n'a pas vérifié la compatibilité.
•
Toutes les situations particulières spécifiques et subjectives qui pourraient se présenter dans l'utilisation
dynamique du casque, comme par exemple les problèmes de confort durant le pilotage ou les bruissements et
sifflements aérodynamiques.
Nolangroup ne pourra en aucun cas être tenu pour responsable des dommages accidentels ou conséquentiels (y
compris, sans limitation aucune, les lésions corporelles provoquées aux personnes) dues au non-respect des
obligations dérivant de cette garantie concernant les produits Nolangroup.
16.3 Procédure pour l'envoi des réclamations éventuelles
Pour toute réclamation couverte par la présente garantie, l'acheteur devra communiquer directement au revendeur où
il a acheté le système N-Com le défaut présumé constaté, en présentant en même temps le produit faisant l'objet de la
réclamation, outre la copie du ticket de caisse.
AVANT DE VOUS ADRESSER À VOTRE REVENDEUR, NOUS VOUS RECOMMANDONS DE LIRE ATTENTIVEMENT LE
MODE D’EMPLOI FOURNI AVEC LE PRODUIT.
LA VALIDITÉ DE LA GARANTIE EST EFFECTIVE EXCLUSIVEMENT À PARTIR DE LA DATE D'ACHAT JUSQU'À LA DATE
D’EXPIRATION PRÉVUE POUR LE PAYS ACHETÉ (voir le tableau à la fin de cet opuscule).
Toute prestation effectuée en garantie ne prolonge pas la durée de la garantie. Par conséquent, en cas de
remplacement du produit ou d'un de ses composants, ledit produit ou composant fourni en remplacement ne
déclenchera pas une nouvelle période de garantie et il faudra au contraire tenir compte de la date d'achat du produit
d'origine.
Uniquement pour les réparations et les remplacements des composants électroniques, lorsque Nolangroup procèdera
à la réparation ou au remplacement du produit, ledit produit bénéficiera d'une période de garantie égale à la partie
résiduelle de la garantie d'origine ou d'une période de 90 (quatre-vingt-dix) jours à compter de la date de réparation
(la période à considérer sera celle qui est la plus longue).
La réparation ou le remplacement pourront également être effectués à l'aide de composants régénérés présentant des
fonctionnalités équivalentes. Les parties ou les composants remplacés deviendront la propriété de Nolangroup.
NOLANGROUP SE RÉSERVE À TOUT MOMENT DE MODIFIER SANS PRÉAVIS AUCUN LES CARACTÉRISTIQUES, LES
FONCTIONNALITÉS, LA COMPATIBILITÉ ET LES LOGICIELS DE SES PRODUITS.
La présente garantie n'influe pas sur les droits légaux du client sous la juridiction nationale en vigueur et sur les droits
du consommateur vis-à-vis du revendeur sanctionnés par le contrat d'achat/vente.
16.4 Identification du produit
Les produits N-Com sont identifiés par un code qui permet la traçabilité et
l’identification du produit.
Le code d'identification se trouve sur l'étiquette adhésive fixée sur le système B601.
70
Page 71

16.5 Validité de la garantie N-Com
PAYS
VALIDITÉ
2 ANS
VALIDITÉ
1 AN
PAYS
VALIDITÉ
2 ANS
VALIDITÉ
1 AN
ALBANIE X LIBAN X
ALGÉRIE X MACÉDOINE X
ARABIE SAOUDITE X MALAISIE X
ARGENTINE X MALTE X
AUSTRALIE X MAROC X
AUTRICHE X MAURICE X
BAHREÏN X MEXIQUE X
Belgique BRP X MONTÉNÉGRO X
BERMUDES X NORVÈGE X
BOLIVIE X NOUVELLE CALÉDONIE X
BOSNIE-HERZÉGOVINE X NOUVELLE-ZÉLANDE X
BRÉSIL X OMAN X
BULGARIE X PAYS-BAS X
BURKINA FASO X PAKISTAN X
CANADA X PARAGUAY X
CANADA BRP X PÉROU X
CHILI X POLYNÉSIE FRANÇAISE X
CHINE X POLOGNE X
CHYPRE X PORTUGAL X
COLOMBIE X QATAR X
CORÉE DU SUD X RÉPUBLIQUE TCHÈQUE X
COSTA RICA X RÉPUB. SLOVAQUIE X
DANEMARK X RÉUNION X
ÉQUATEUR X ROUMANIE X
EL SALVADOR X RUSSIE X
ÉMIRATS ARABES UNIS X SAINT-MARTIN X
PHILIPPINES X SERBIE X
FINLANDE X SINGAPOUR X
FRANCE X SLOVÉNIE X
ALLEMAGNE X ESPAGNE X
GHANA X ÉTATS-UNIS X
JAPON X AFRIQUE DU SUD X
JORDANIE X SUÈDE X
GRANDE-BRETAGNE X SUISSE X
GRÈCE X THAÏLANDE X
GUADELOUPE X TAÏWAN X
GUATEMALA X TANZANIE X
GUYANE FRANÇAISE X TRINITÉ-ET-TOBAGO X
HONG KONG X TUNISIE X
INDONÉSIE X TURQUIE X
IRAN X UKRAINE X
ISLANDE X HONGRIE X
ISRAËL X VENEZUELA X
KAZAKHSTAN X ZAMBIE X
KOWEÏT X
71
Page 72

www.n-com.IT
 Loading...