


User Manual of NC-AC44APP/NC-AC21AP
Version V1.0

1
www.nc-link.cn
Thank you for purchasing NC-Link Access Point. This manual will instruct you
how to configure and the AP, enable you to use it in a perfect status.
Please check the Package before use it.
Package Contents
Item
Description
Unit
QTY 1 Access Point
PCS 1 2
PoE Injector (NC-AC21AP)
PCS 1 3
Mounting Accessory
Set 1 4
Quick Installation Guide
PC
1
1. Manual Instruction
This manual is subject to tell users how to use this Wireless Access Point
properly. Contents include description of this platform’s properties, and how to
configure this platform. Pre-reading this manual before operation is highly
recommended.
1.1 Target Reader
This manual is for those familiar with basic networking knowledge and
terminology
2. Product Introduction
NC-AC44APP/NC-AC21AP are highly performance Wi-Fi Access Point, complied
with IEEE 802.11ac/n/g/b/a.
NC-AC44APP is 1200Mbps, 867Mbps @5.8GHz, 300Mbps @2.4GHz
NC-AC21AP is 750Mbps, 433Mbps @5.8GHz, 300Mbps @2.4GHz
2.1 Product Layout
2.1.1 Interface
DC Jack: It is used for 12V direct current power supply.
WAN/PoE: The WAN/PoE port is used to connect to the power and
Internet.
LAN: Then LAN port is used for bridging.
Reset: Press the Reset button about 15 seconds, then release to reset.
The default IP address is 192.168.188.253
2
www.nc-link.cn
Default password is admin
RJ45 Connector
NC-AC44APP with 2 x 10/100M/1000Mbps auto-negotiation RJ45
Ethernet Port
NC-AC21AP with 2 x 10/100Mbps auto-negotiation RJ45 Ethernet Port
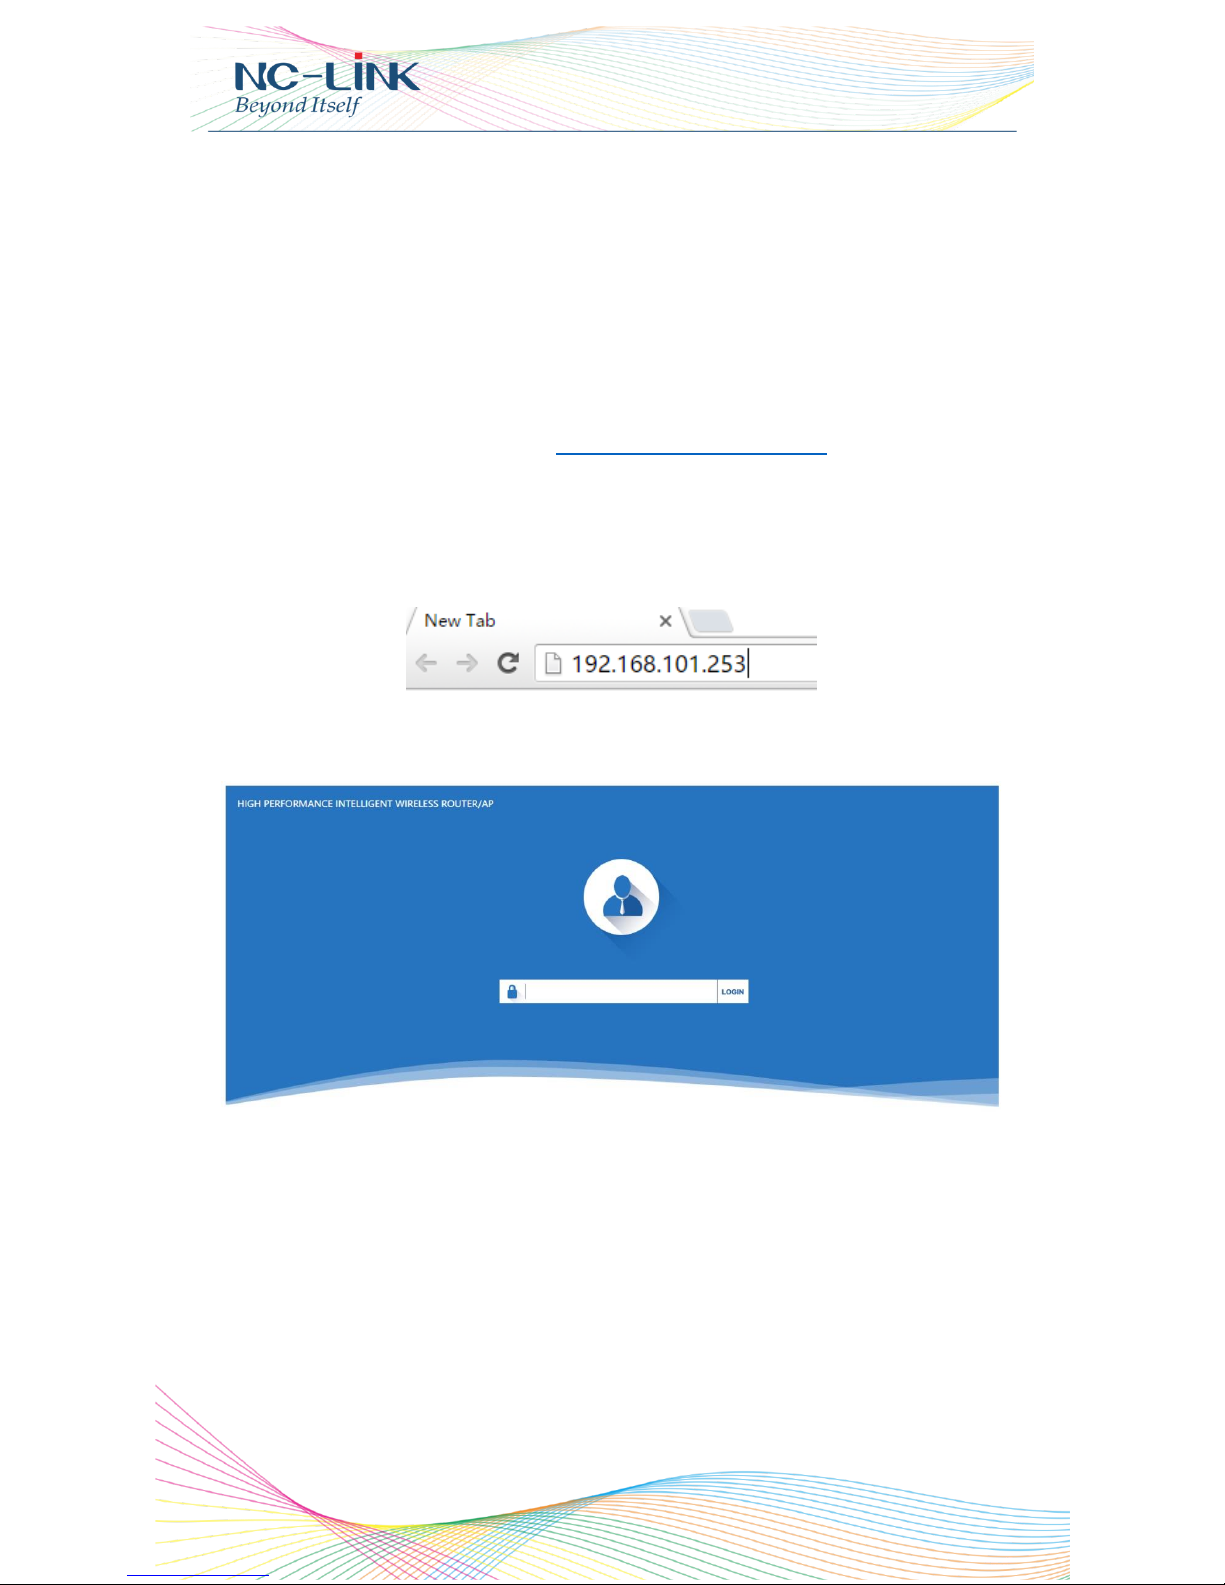
3. Login
Connect your PC to the NC-AC44APP LAN Port, then login Web Management
Page with default IP Address: http://192.168.188.253
Default password: admin. Below base on Chrome browser.
Login Steps:
Open Chrome browser, input http://192.168.188.253 in the address bar to login
Access Point
Login screen require password, the default is admin, input it and click “LOGIN”
After login, you can see below Web page.

3
www.nc-link.cn
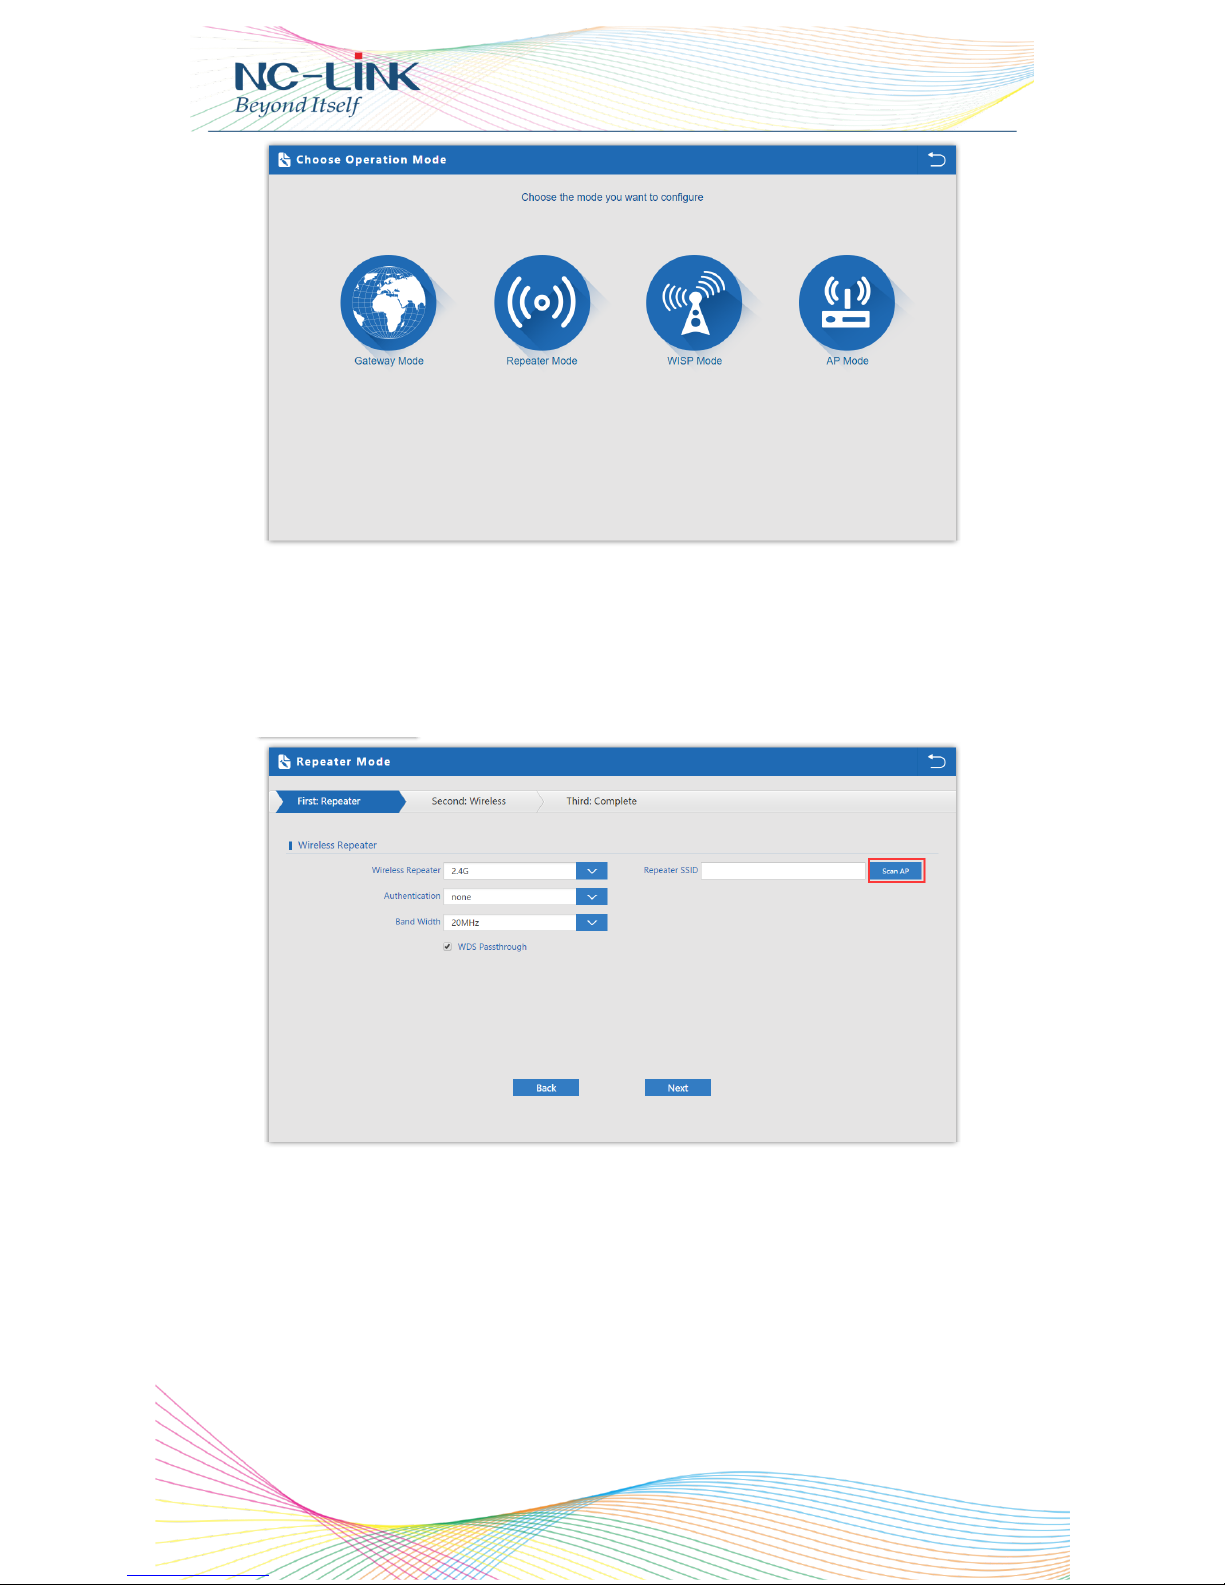
Click “Wizard” to start operating mode configuration.
4
www.nc-link.cn
4. Repeater Mode Configuration
a) Select the AP radio frequency and “Scan AP”

5
www.nc-link.cn
b) Select the AP signal you want to repeat
c) Input the Password and click “Next”

6
www.nc-link.cn
d) Configure wireless parameter then click “Next”
e) Configuration complete, device will reboot in 2 minutes

7
www.nc-link.cn
5. AP Mode Configuration
a) Configure the wireless parameter as you want then click “Next”
b) If Internet to LAN Port is DHCP, just click “Next”

8
www.nc-link.cn
c) If Internet to LAN Port need static IP, input as it required then “Next”
d) Configuration complete, device will reboot in 2 minutes

9
www.nc-link.cn
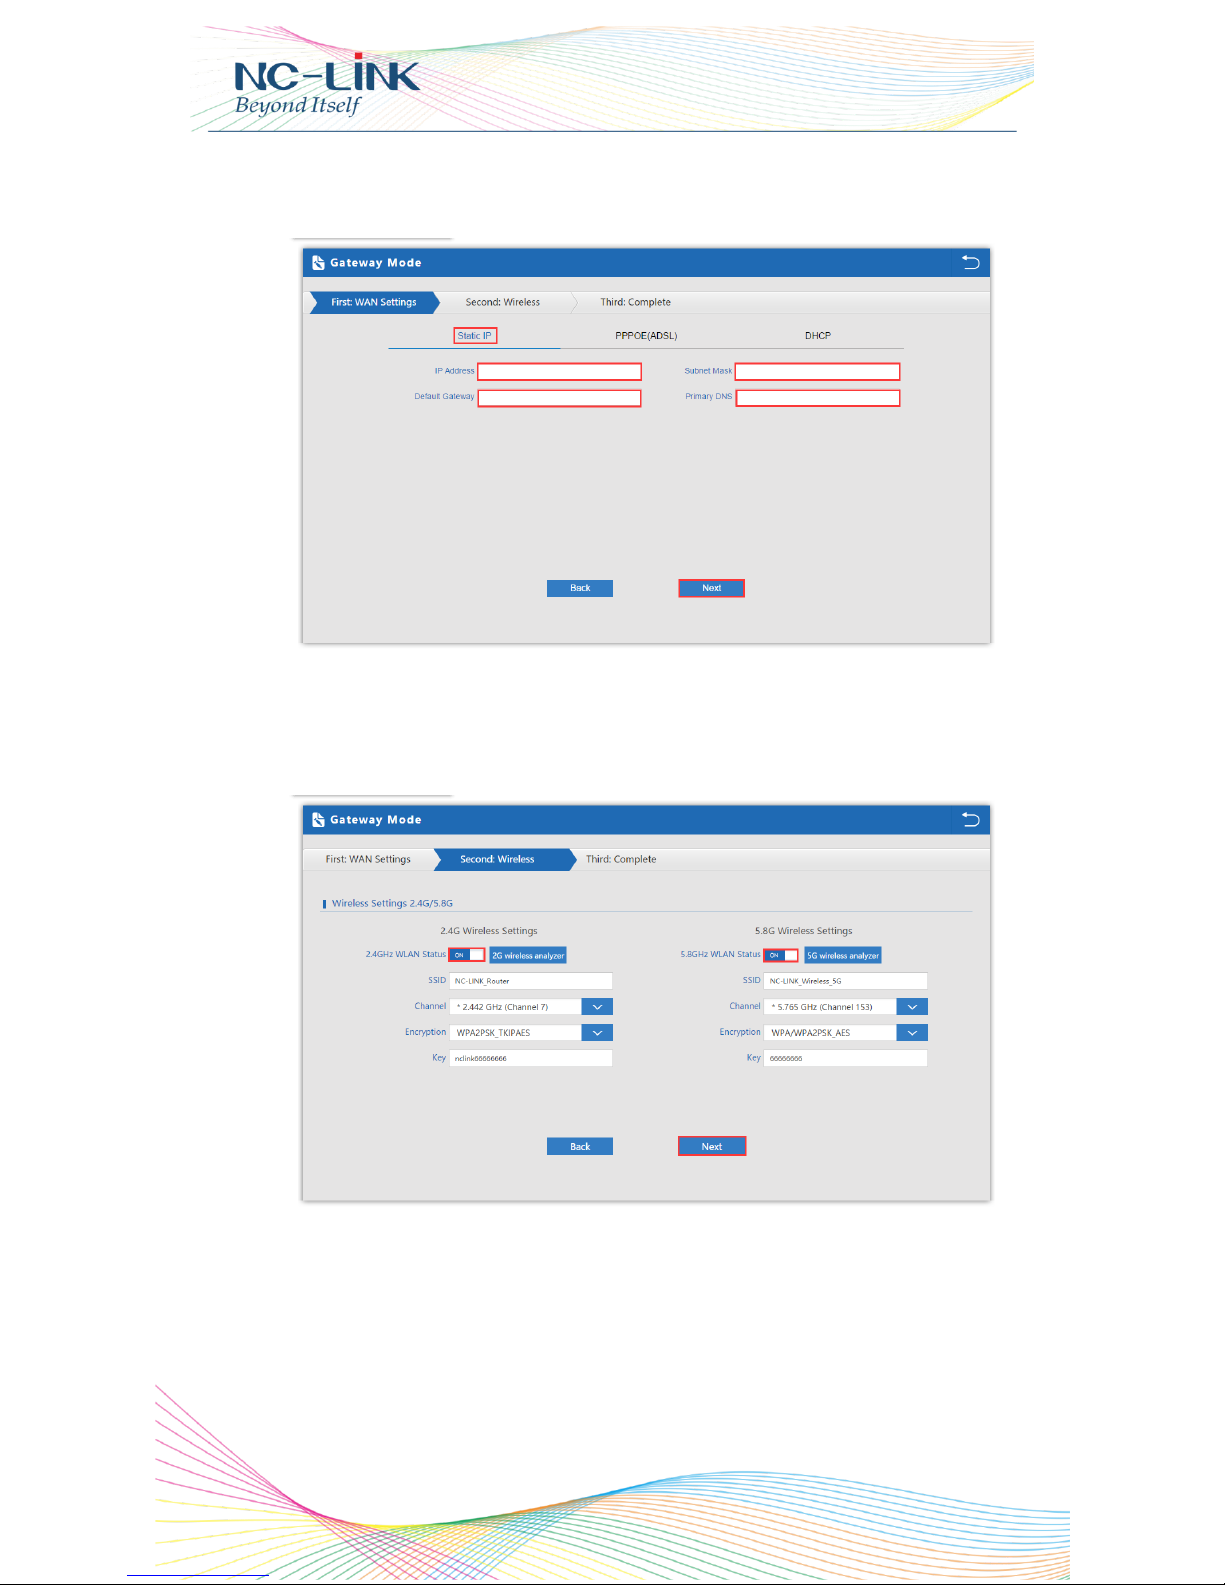
6. Gateway Mode Configuration
a) WAN is DHCP access type, just click “Next”
b) WAN is PPPoE access type, input the Username and Password then click
“Next”
10
www.nc-link.cn
c) WAN is Static IP access type, input all the information require then click
“Next”
d) Configure the wireless parameter as you want then click “Next”
11
www.nc-link.cn
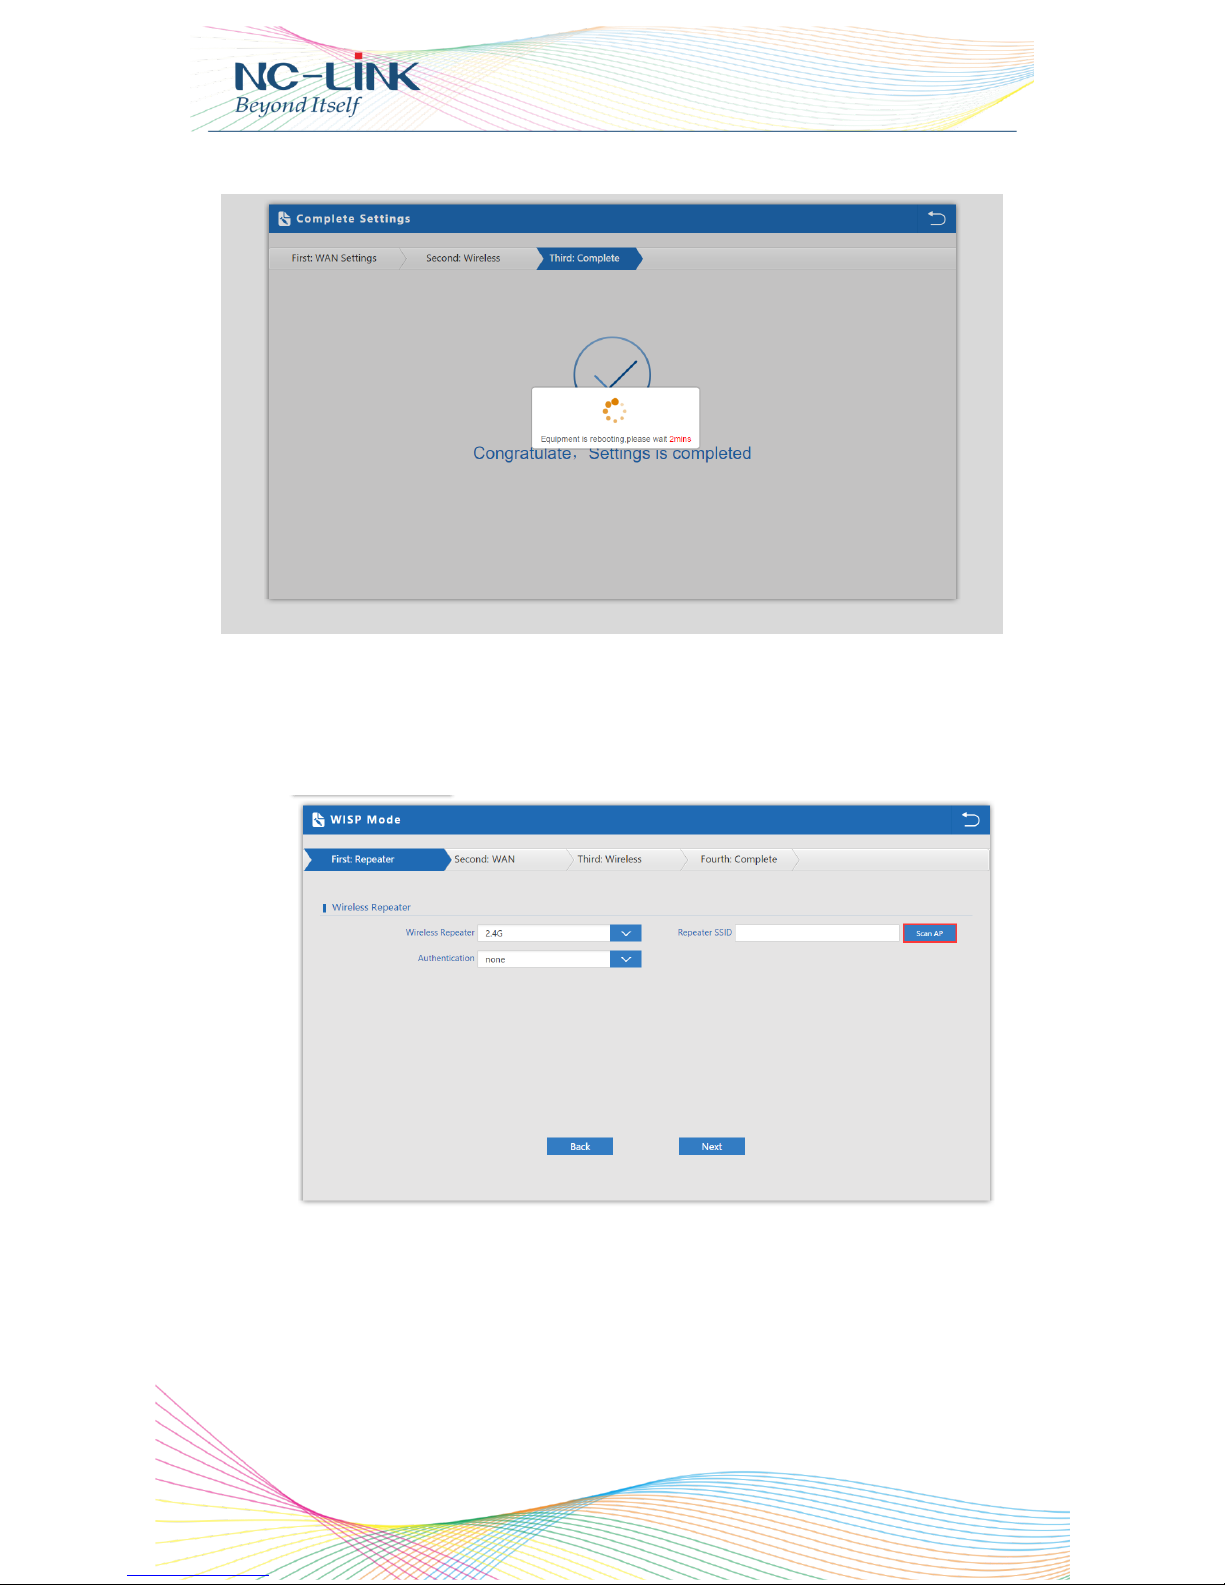
e) Configuration complete, device will reboot in 2 minutes
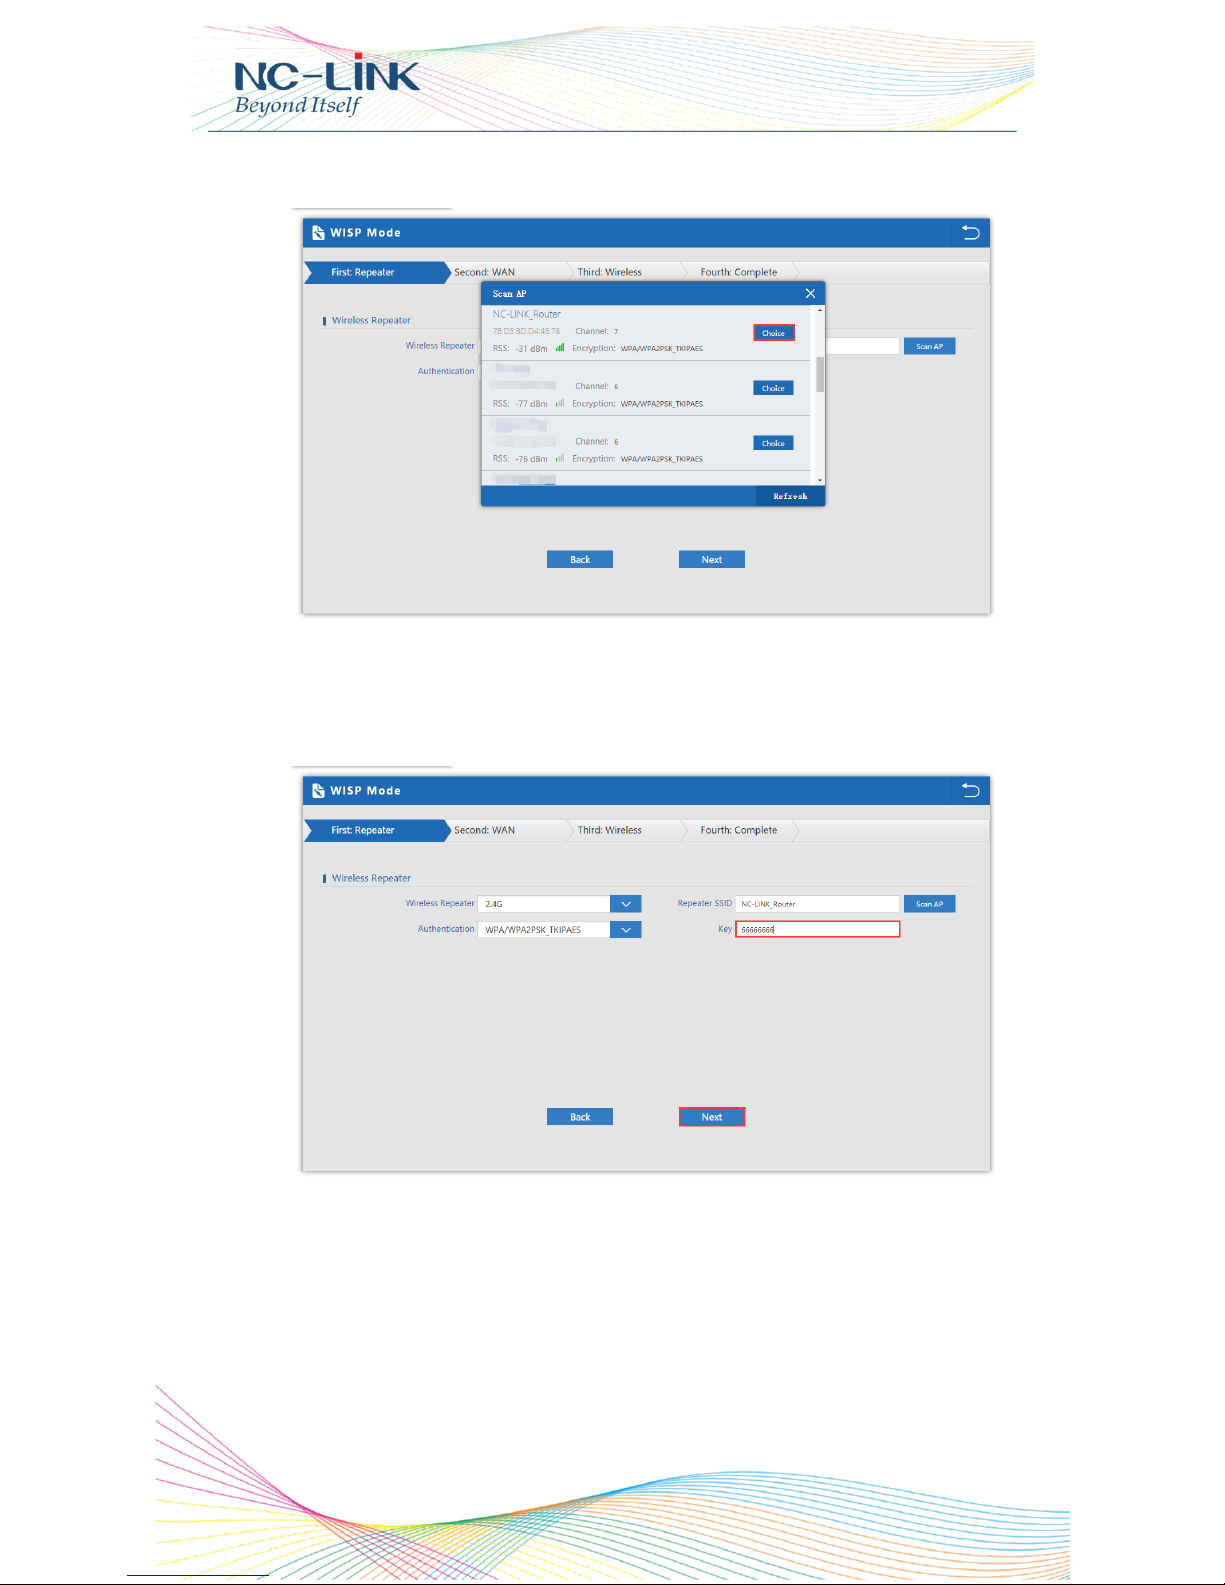
7. WISP Mode Configuration
a) Select the AP frequency then “Scan”
12
www.nc-link.cn
b) Select the AP signal you want to repeat
c) Input the Password and click “Next”
13
www.nc-link.cn
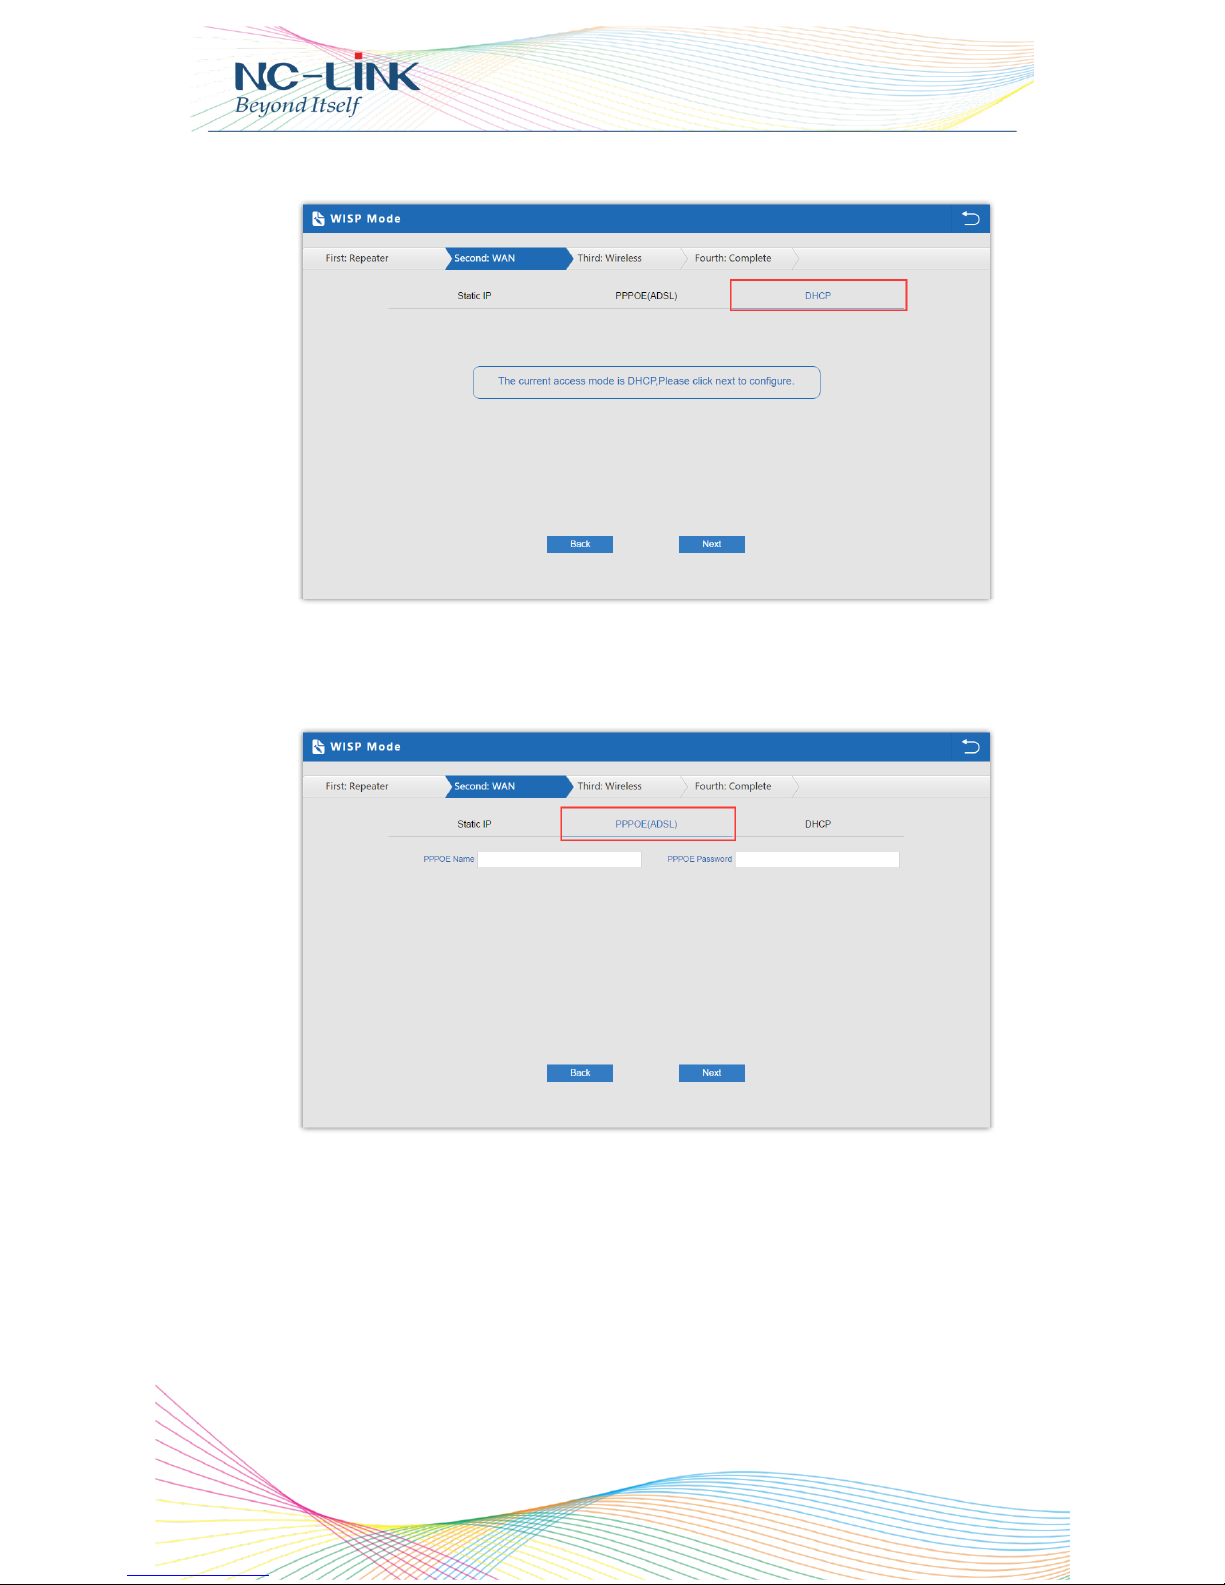
d) WAN is DHCP access type, just click “Next”
e) WAN is PPPoE access type, input the Username and Password then click
“Next”

14
www.nc-link.cn
f) WAN is Static IP access type, input all the information require then click
“Next”
g) Configure the wireless parameter as you want then click “Next”
15
www.nc-link.cn
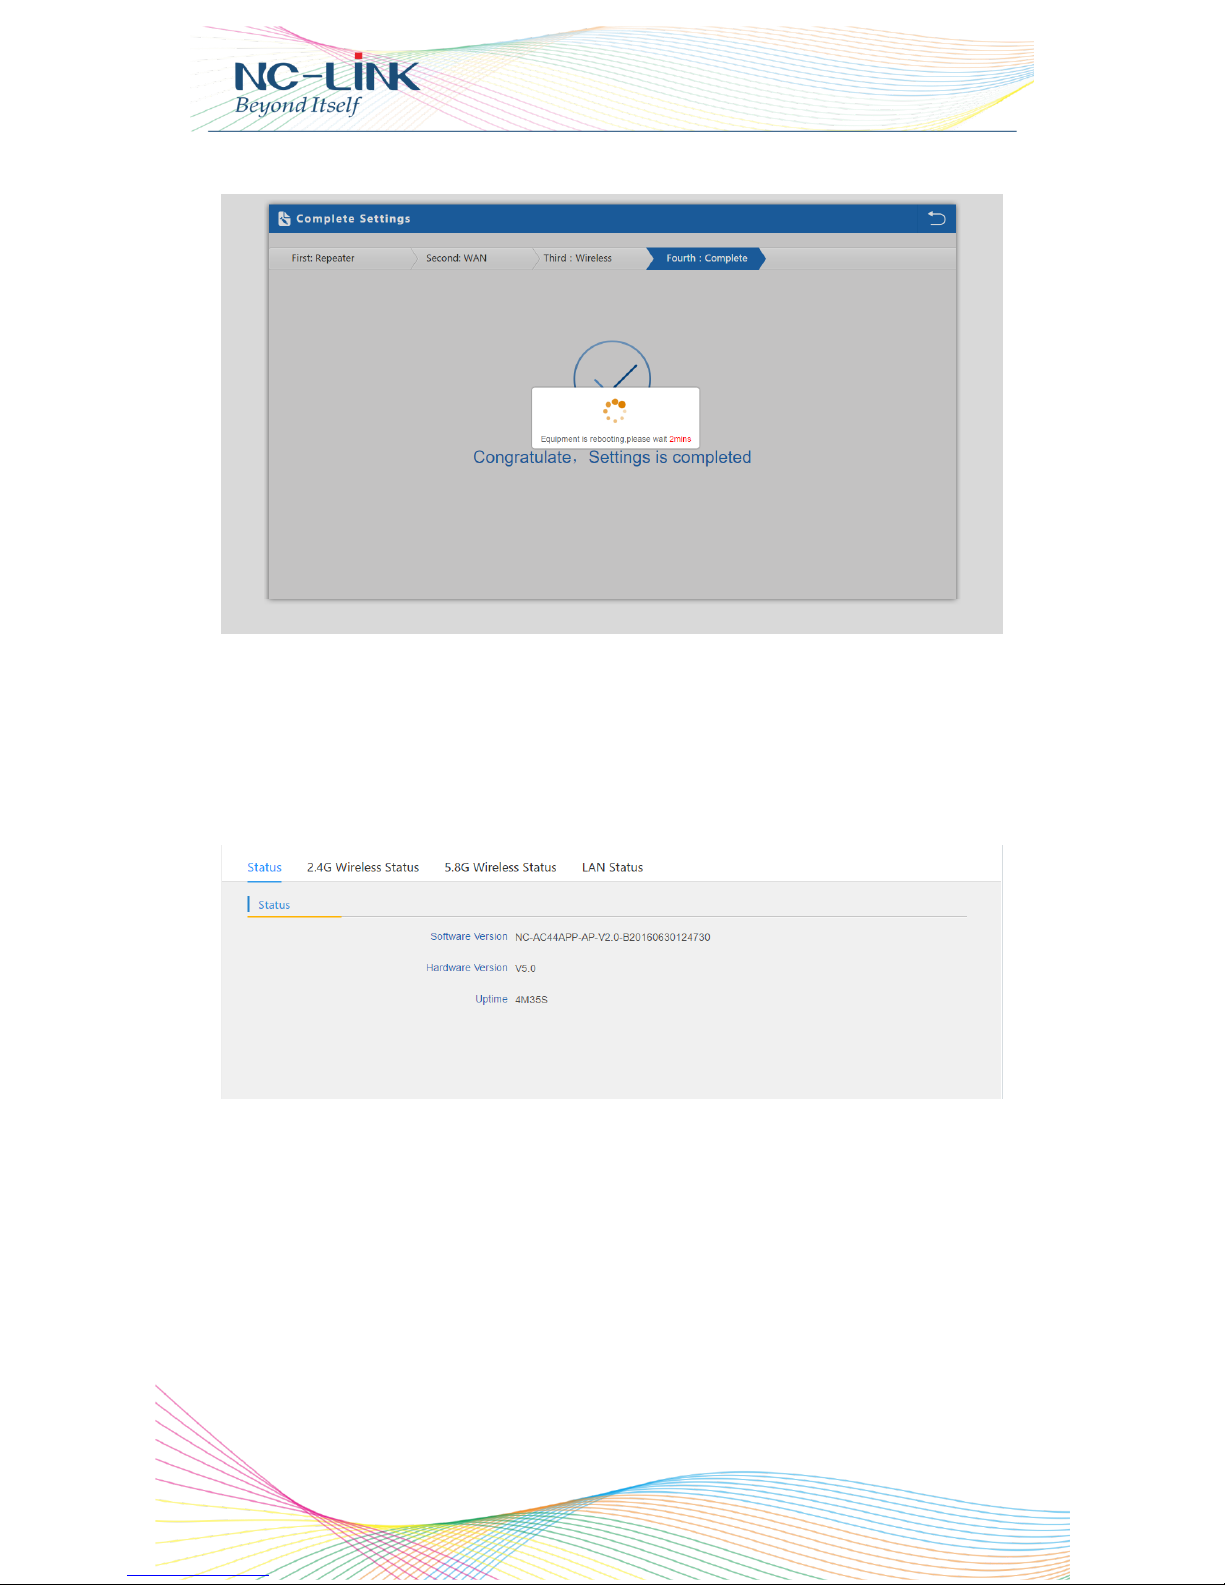
h) Configuration complete, device will reboot in 2 minutes
8. Advanced
8.1 Device Status
8.1.1 Status
8.1.2 2.4G Wireless Status

16
www.nc-link.cn
8.1.3 5.8G Wireless status
8.1.4 LAN Status
8.2 2.4G Wireless
17
www.nc-link.cn
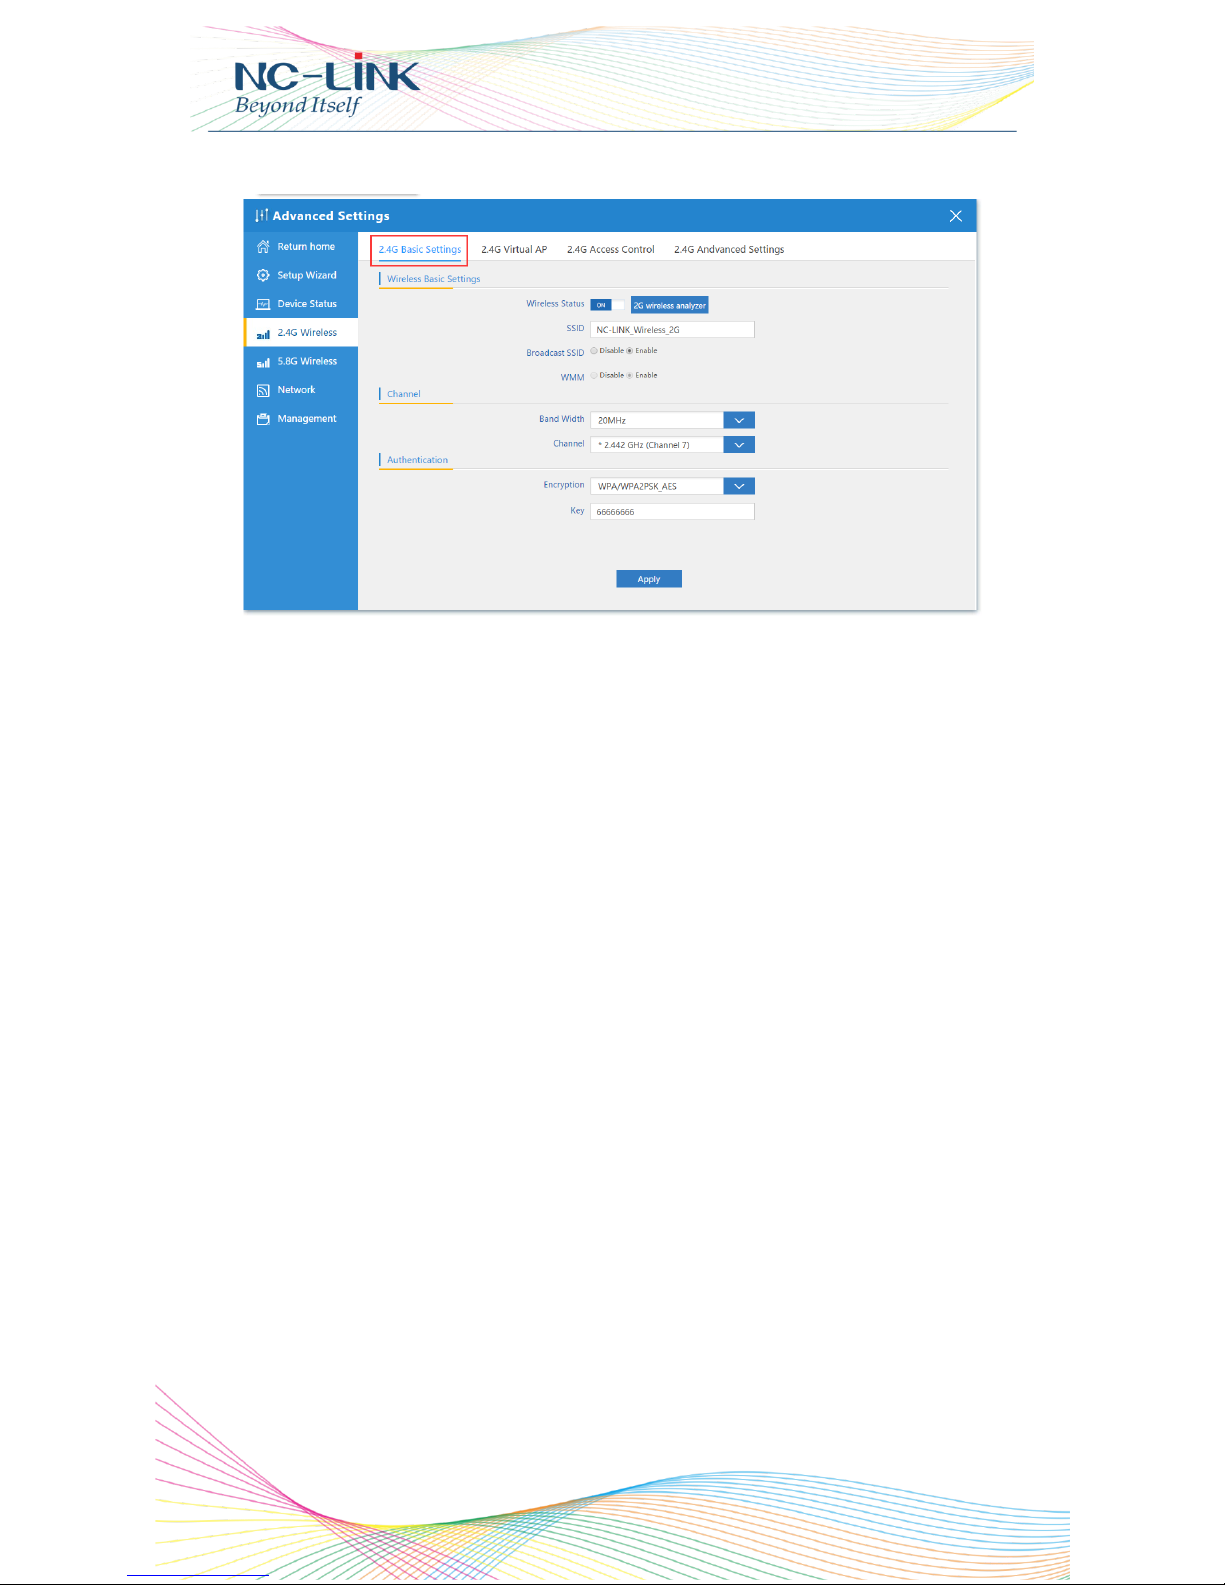
8.2.1 2.4G Basic Setting
Wireless Status: ON/OFF the 2.4GHz wireless
2G Wireless Analyzer: Analyze the 2.4G wireless signal around
help to choose a better channel to avoid interference
SSID: Set the SSID
Broadcast SSID: Enable or Disable broadcast SSID
WMM: Enable or Disable WMM function
Band Width: Set the Band Width of wireless signal
Channel: Set the Channel of the wireless signal
Encryption: Choose the encryption type or open
8.2.2 2.4G Virtual AP

18
www.nc-link.cn
Wireless Status: ON/OFF the Virtual AP
SSID: Set the SSID
Broadcast SSID: Enable or Disable broadcast SSID
WMM: Enable or Disable WMM function
Encryption: Choose the encryption type or open
8.2.3 2.4G Access Control
Allow or deny the Access Control based on MAC address
8.2.4 2.4G Advanced Setting

19
www.nc-link.cn
Regional: set it of your country or region
MODE: you can choose 802.11N/G, 802.11B/G
RF Output Power: 100%, 75%, 50%, 25%, 12.5%
MAX user: limit the number of connect client
Coverage threshold: limit the number of connect client
Other advanced Setting: Professional installation or maintenance
person can set it accordingly. General, keep it default. Click Apply
after setting
8.3 5.8G Wireless
8.3.1 5.8G Basic Setting
Wireless Status: ON/OFF the 5.8GHz wireless

20
www.nc-link.cn
5G Wireless Analyzer: Analyze the 25.8G wireless signal around
help to choose a better channel to avoid interference
SSID: Set the SSID
Broadcast SSID: Enable or Disable broadcast SSID
WMM: Enable or Disable WMM function
Band Width: Set the Band Width of wireless signal
Channel: Set the Channel of the wireless signal
Encryption: Choose the encryption type or open
8.3.2 5.8G Virtual AP
Wireless Status: ON/OFF the Virtual AP
SSID: Set the SSID
Broadcast SSID: Enable or Disable broadcast SSID
WMM: Enable or Disable WMM function
Encryption: Choose the encryption type or open
8.3.3 5.8G Access Control

21
www.nc-link.cn
Allow or deny the Access Control based on MAC address
8.3.4 5.8G Advanced Setting
Regional: set it of your country or region
MODE: you can choose 802.11A, 802.11AN, 802.11AN/AC
RF Output Power: 100%, 75%, 50%, 25%, 12.5%
MAX user: limit the number of connect client
Coverage threshold: limit the number of connect client
Other advanced Setting: Professional installation or maintenance
person can set it accordingly. General, keep it default. Click Apply
after setting

22
www.nc-link.cn
8.4 Network
8.4.1 LAN Settings
Setting the Access Type of Internet
8.4.2 VLAN
Setting the VLAN base on SSID
8.5 Management
8.5.1 System Time

23
www.nc-link.cn
System Time: Set CPE’s time
8.5.2 Logs
Logs: the system logs can be enable or disable, user can view the system log

24
www.nc-link.cn
8.5.3 Upgrade Firmware
Upgrade Firmware: Upgrade new firmware to access stable function for CPE
8.5.4 System
System: from here you can reload the backup file to restore the system, or
restore to factory default, reboot the CPE through firmware

25
www.nc-link.cn
8.5.5 User
User: Set the CPE’s User Name and Password
9. Trouble Shooting
Q: Client can not find the SSID
A: To check wireless setting about the broadcast SSID whether enable
Q: Client can not connect to the SSID
A: Firstly, check client quantity whether reach the limit; secondly, check
client’s RSSI whether lower than the threshold limit; thirdly, check the client
whether in the deny list of setting
Q: Client can connect to SSID but can not surf the Internet
A: This mainly due to the DNS issue, check the gateway router for the DNS
setting
Q: Client network speed is slow
A: Check the link rate of your connection. If it is low, change other place to
get better signal. If it is high, need to check whether has QoS in the gateway
router then do some adjustments
 Loading...