

Page 1
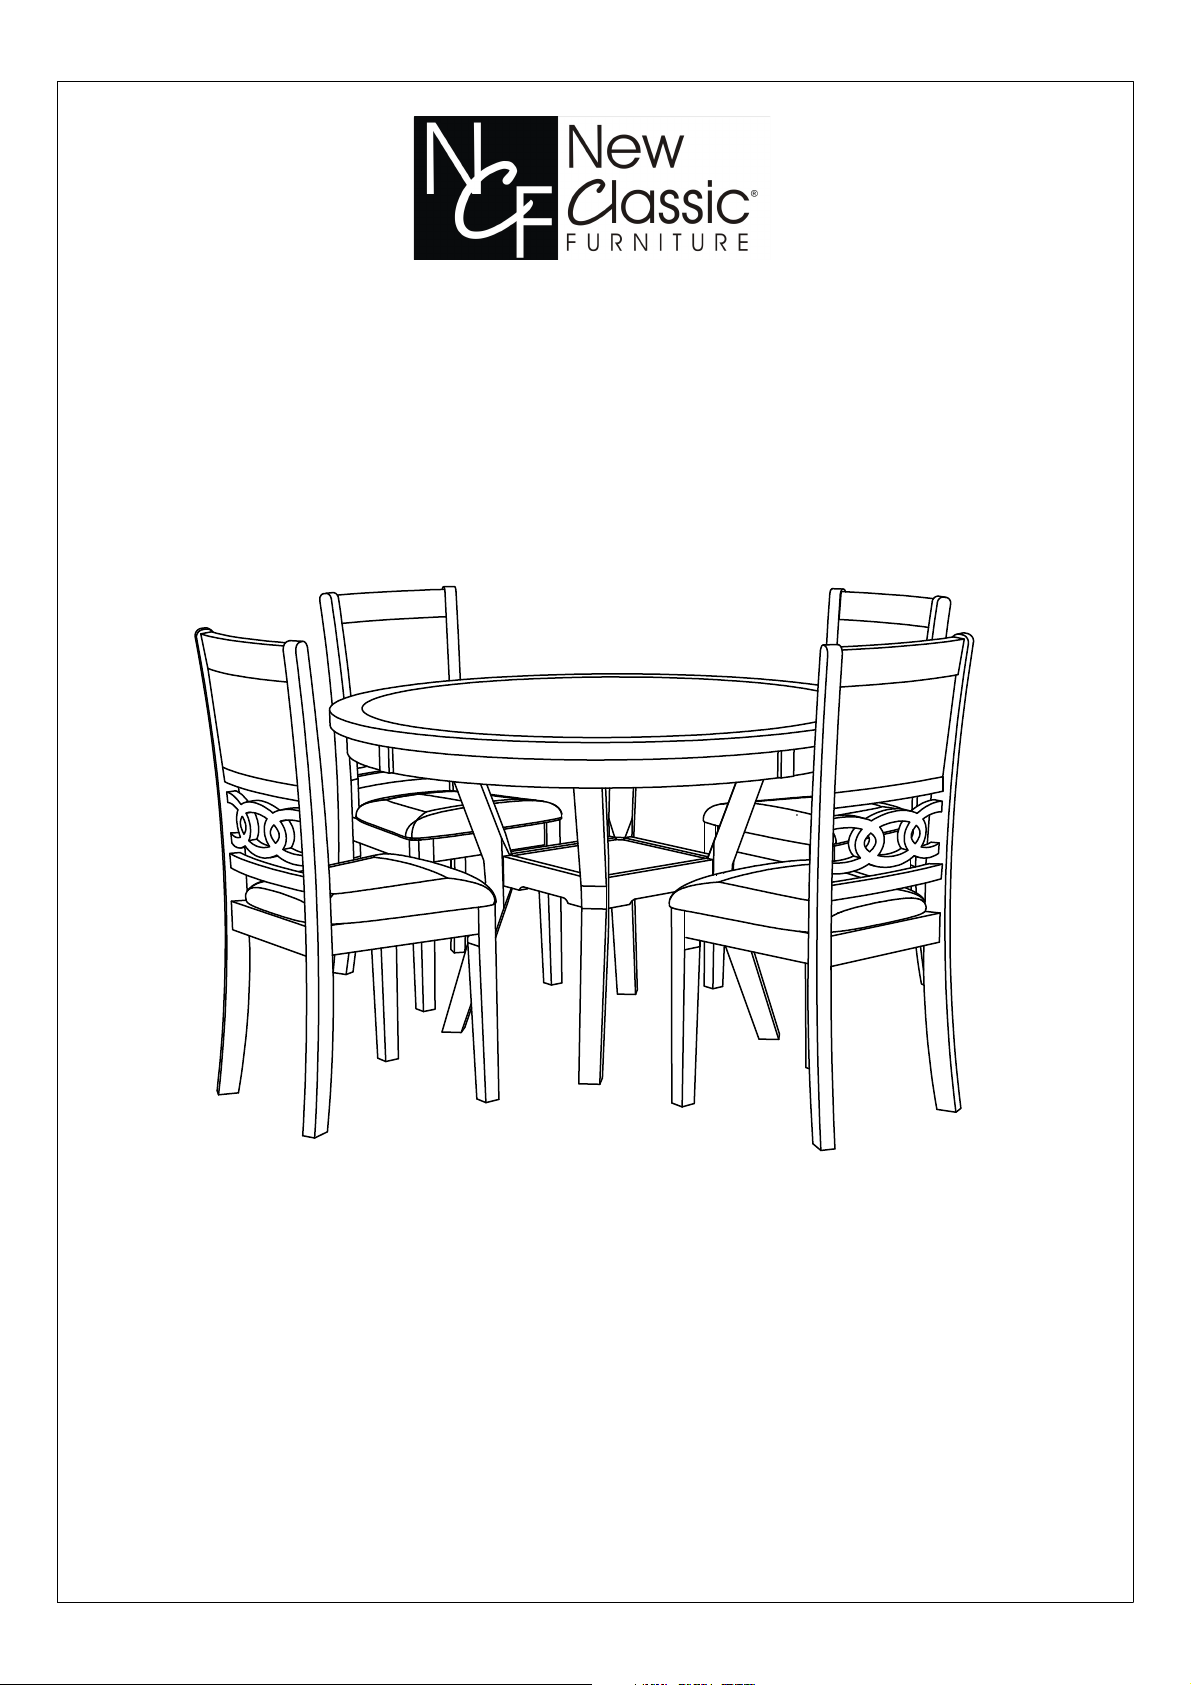
ASSEMBLY INSTRUCTIONS
ITEM NO. D1701-50S
GIA ROUND DINING TABLE
GIA DINING CHAIR (SET INCLUDES 4 CHAIRS)
This page lists all the contents included in the Box. Please take time to identify the
hardware as well as the individual components to this product. As you unpack and
prepare for assembly, place the contents on a carpeted or padded area to protect
them from damage.
C l e a n i n g & C a r e
Treat the surface with care, clean it with a dry or damp soft cloth.
Do not use abrasive cleaners. Hardware may be loosen over time.
Periodically c
A Phillips screwdriver is necessary for assembly.
heck that all connections are tight.
1
Page 2

GENERAL INFORMATION, TIPS & TRICKS
1. Please read the assembly instructions prior to assembling this product.
2. To avoid damages, assemble this prod
3. Make sure all bolts and nuts are tightly fastened before the product is used.
4. Not for commercia
5. Care: Wipe with a damp cloth. Use furniture polish or lemon oil on the
wood as needed. Avoid prolonged exposure to moisture.
Please make sure you have all parts before beginning assembly. Please wait
until all steps are completed before tightening bolts. We recommend two
people to assemble.
l use.
A Phillips screwdriver is necessary for assembly.
uct on a non-abrasive surface such as a carpet.
Do not put hot pots or objects which are more than
80 degrees Fahrenheit directly on the table.
2
Page 3
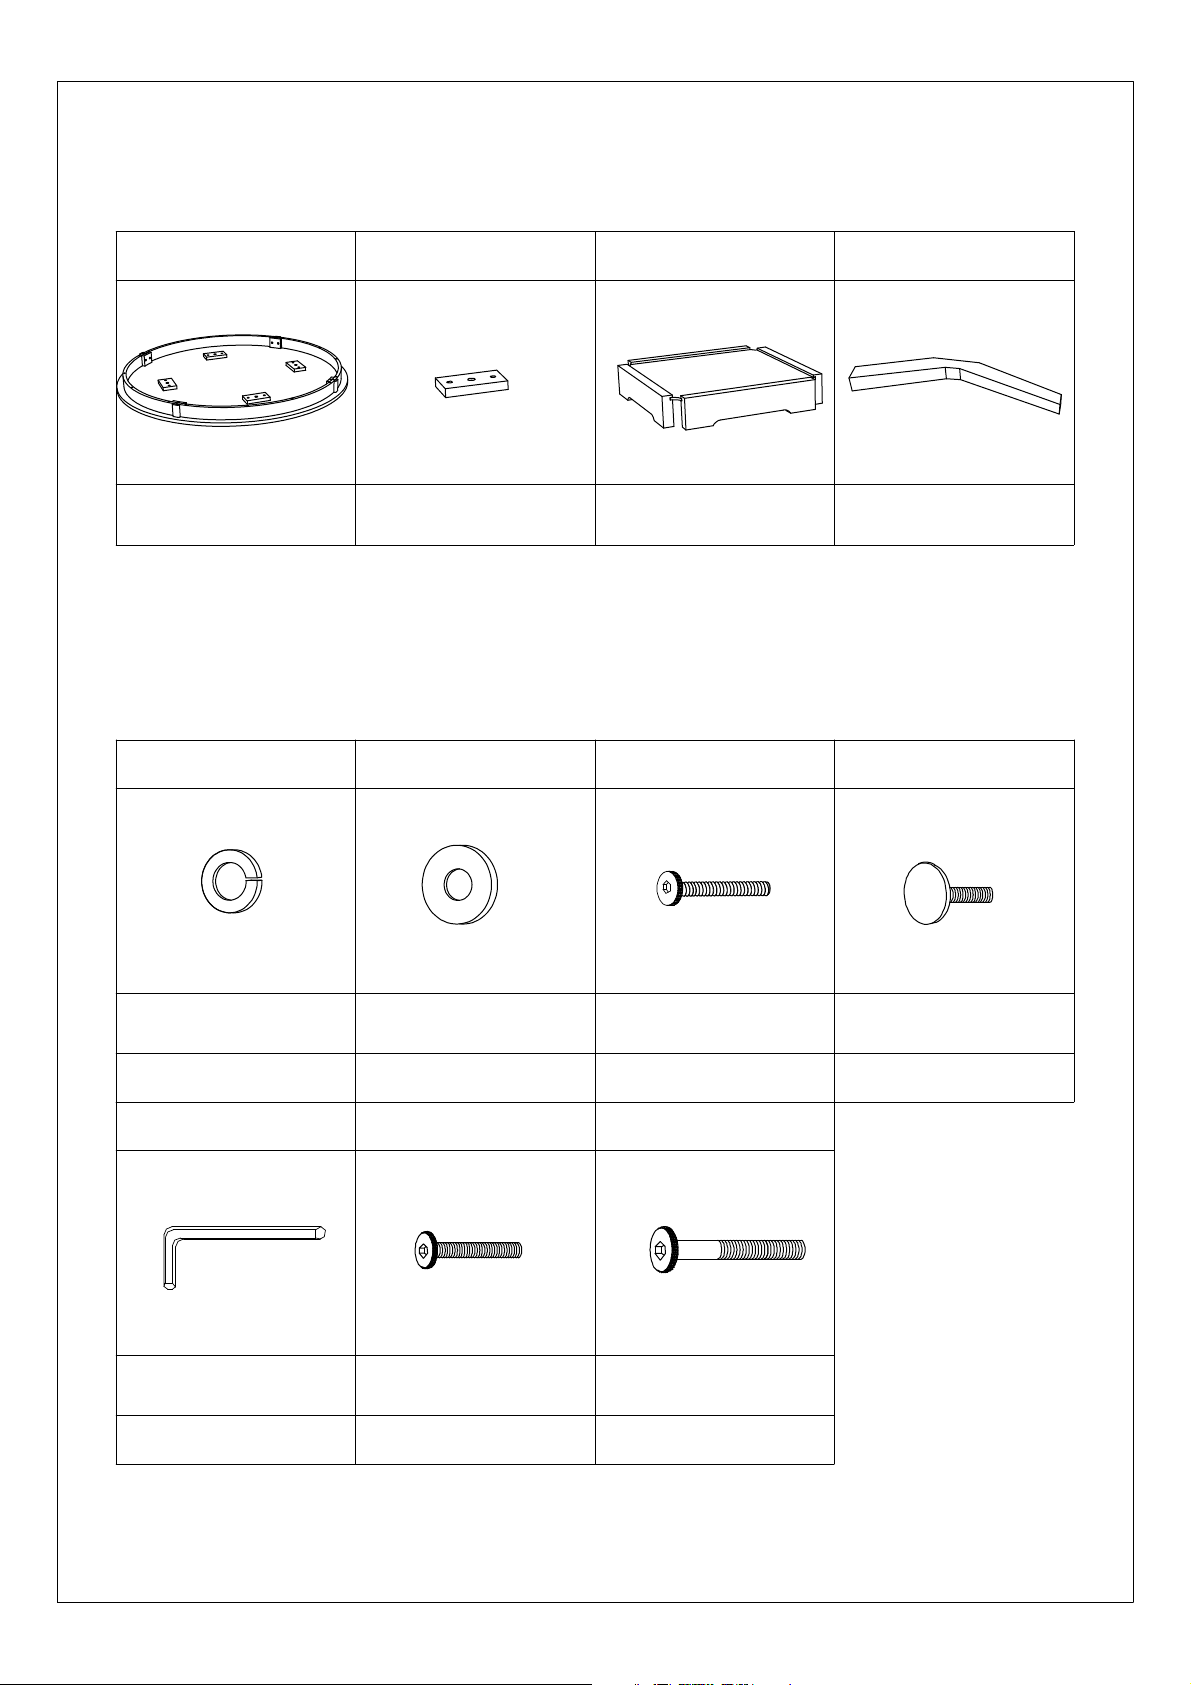
TABLE PART LIST
A. Table Top
QTY: 1 PC
B. Connector Panels
QTY: 4 PCS QTY: 4 PCS
C. Middle Shelf D. Table Legs
QTY: 1 PC
TABLE HARDWARE LIST
2. SPRING WASHERS1.5.
3. FLAT WASHERS
LONG BOLTS
LEVELERS
4.
SIZE:
QTY:
ALLEN KEY
SIZE: 1/4” DIA
QTY: 1 PC QTY: 8 PCS
SIZE: 5/16" DIA5/16" DIA
QTY: 16 PCS16 PCS
SIZE: 1/4” x 1”
SIZE: 5/16” x 1 1/4”
QTY: 4 PCS
7. SHORT BOLTS6. SHORT BOLTS
SIZE: 5/16” x 2 1/2”
QTY: 8 PCS
3
SIZE: 5/16" DIA
QTY: 4 PCS
Page 4
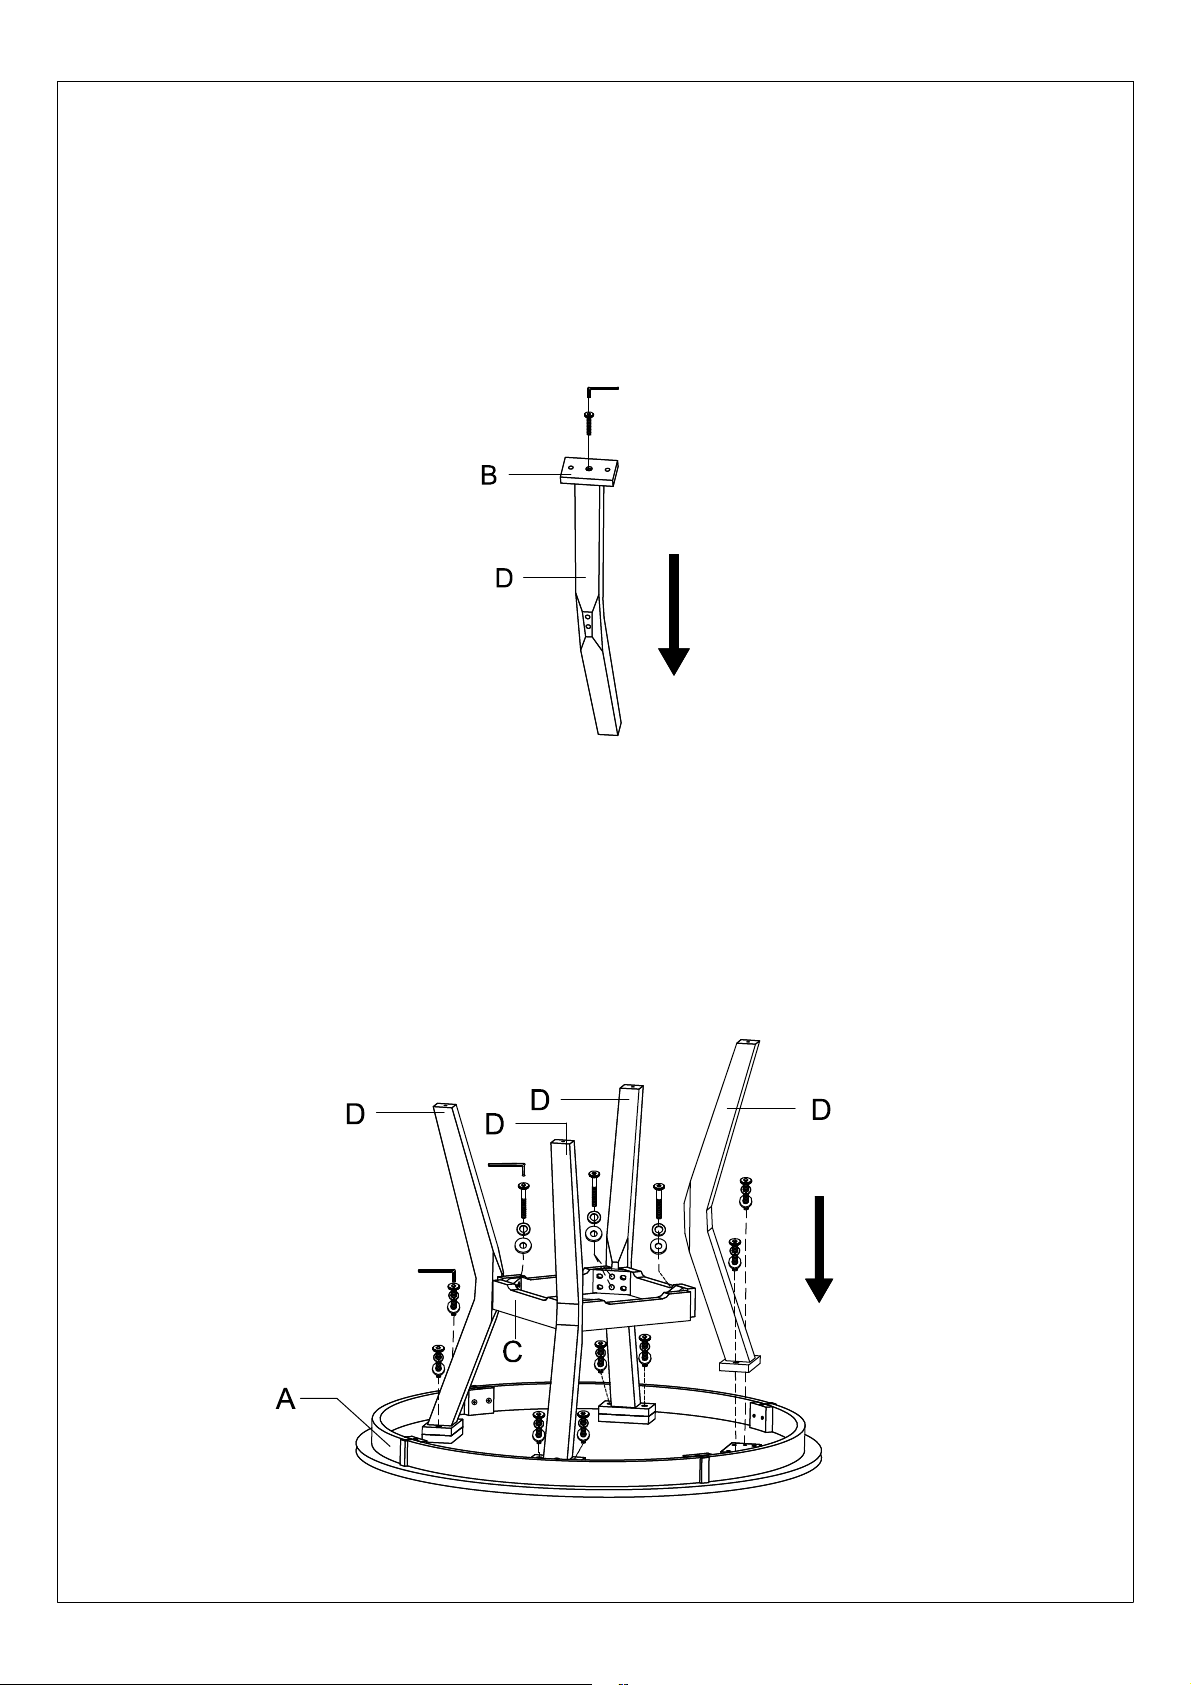
TABLE ASSEMBLY INSTRUCTIONS
3
5
STEP 1
Attach the Connector Panels (B) to the Table Legs (D) by using Long Bolts (3).
Tighten by using Allen Key (5).
STEP 2
Attach the Table Legs (D) to the Table Top (A) by using Short Bolts (6) with
Allen Key
(5). Do not tighten all bolts at this step.
Attach Middle Shelf (C) to the Table Legs (D) by using Short Bolts (7), Spring
Washers (1), and Flat Washers (2) with Allen Key (5). Do not tighten all bolts
at this step.
5
5
6
6
7
7
7
1
2
1
2
6
6
6
6
6
6
4
Page 5
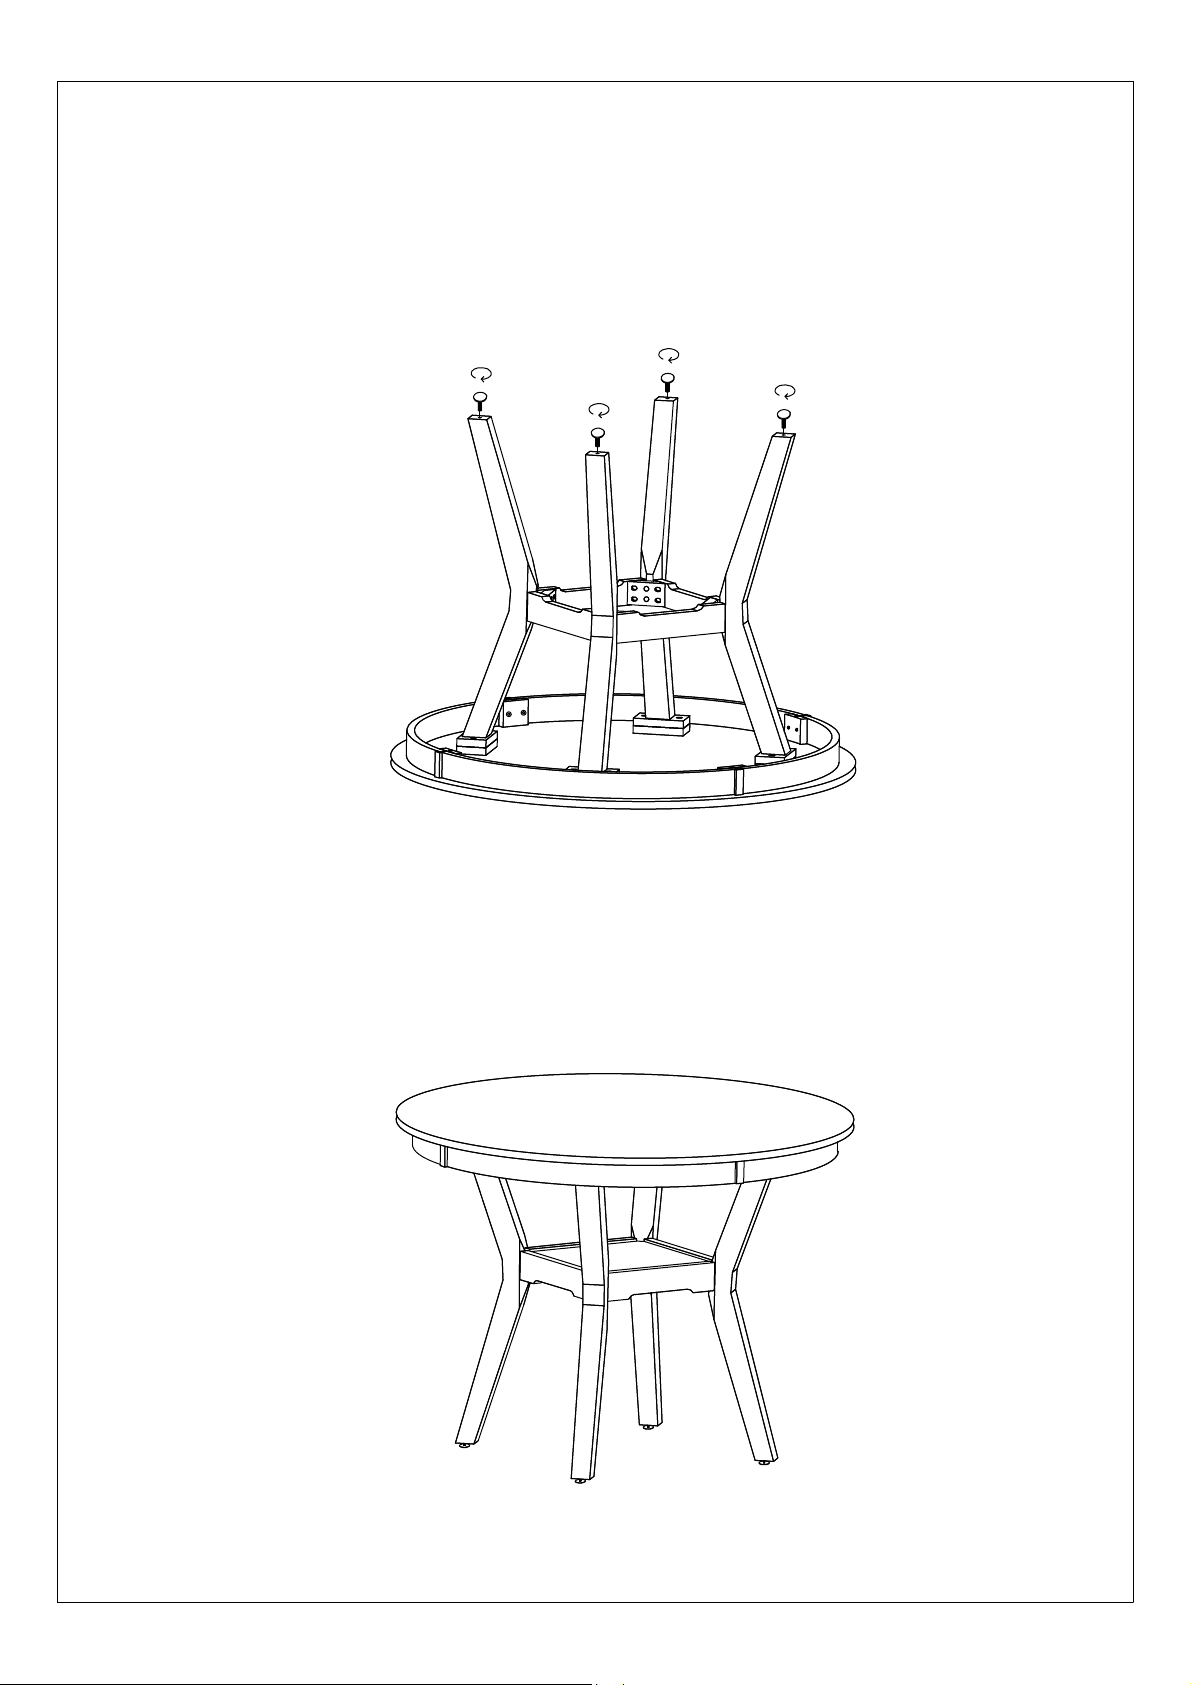
TABLE ASSEMBLY INSTRUCTIONS
4
4
44
4
STEP 3
Attach the Levelers (4) to the base of the Table Legs (D) in clockwise
direction.
STEP 4
T
urn the table to the upright position carefully.
Make sure the table is level, and then securely tighten all bolts at this
stage. Assembly is now completed.
5
Page 6
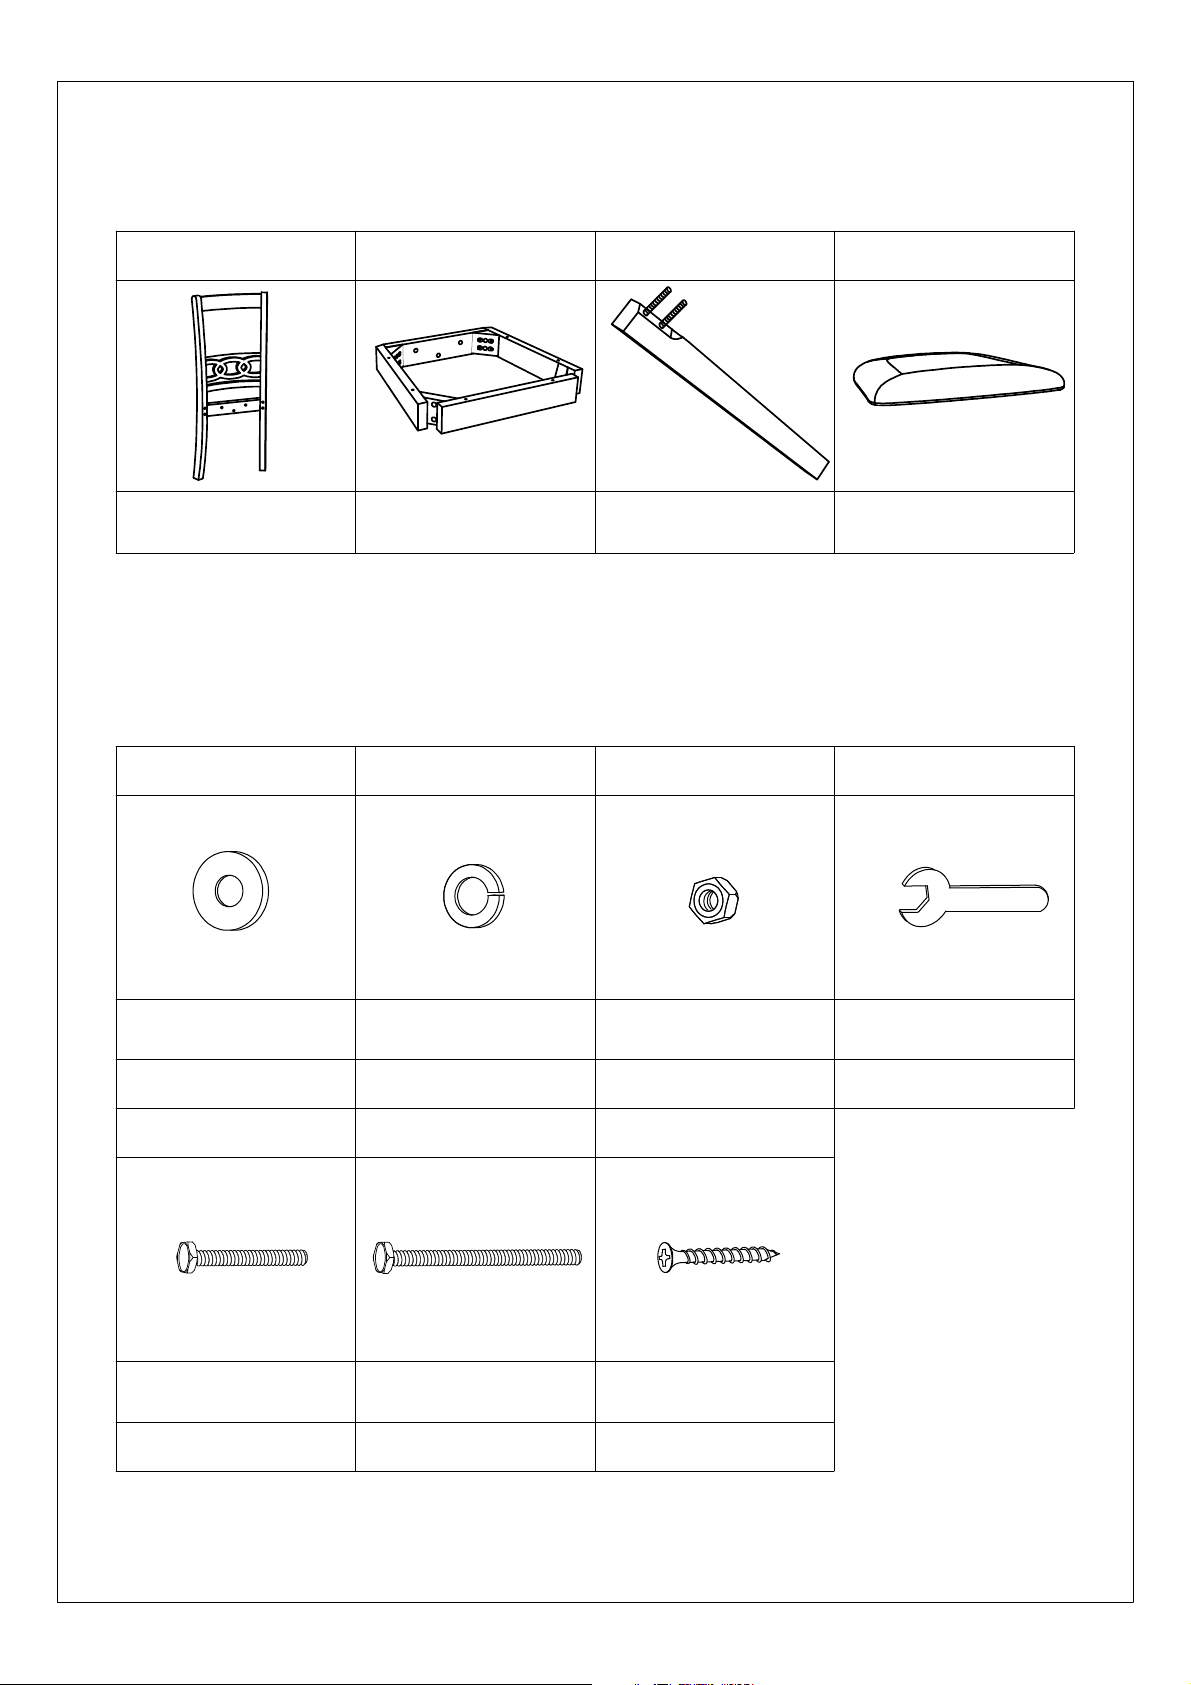
CHAIR PART LIST
A. Back Legs
1. FLAT WASHERS
B. Seat Frames C. Front Legs
QTY: 4 PCSQTY: 4 PCS
QTY: 8 PCS
CHAIR HARDWARE LIST
2. SPRING WASHERS
D. Cushion Seats
QTY: 4 PCS
4. ALLEN WRENCH3. NUTS
SIZE: 5/16" DIA
QTY: 44 PCS QTY: 44 PCS QTY: 16 PCS
5. SHORT BOLTS 6. LONG BOLTS 7. WOOD SCREWS
SIZE: 1/4" x 1 3/4"
SIZE: 5/16" DIA
SIZE: 1/4" x 3"
QTY: 16 PCSQTY: 12 PCS
SIZE: 5/16" DIA
SIZE: 5/32" x 1 1/2"
QTY: 24 PCS
6
SIZE: 5/16" DIA
QTY: 1 PC
Page 7
CHAIR ASSEMBLY INSTRUCTIONS
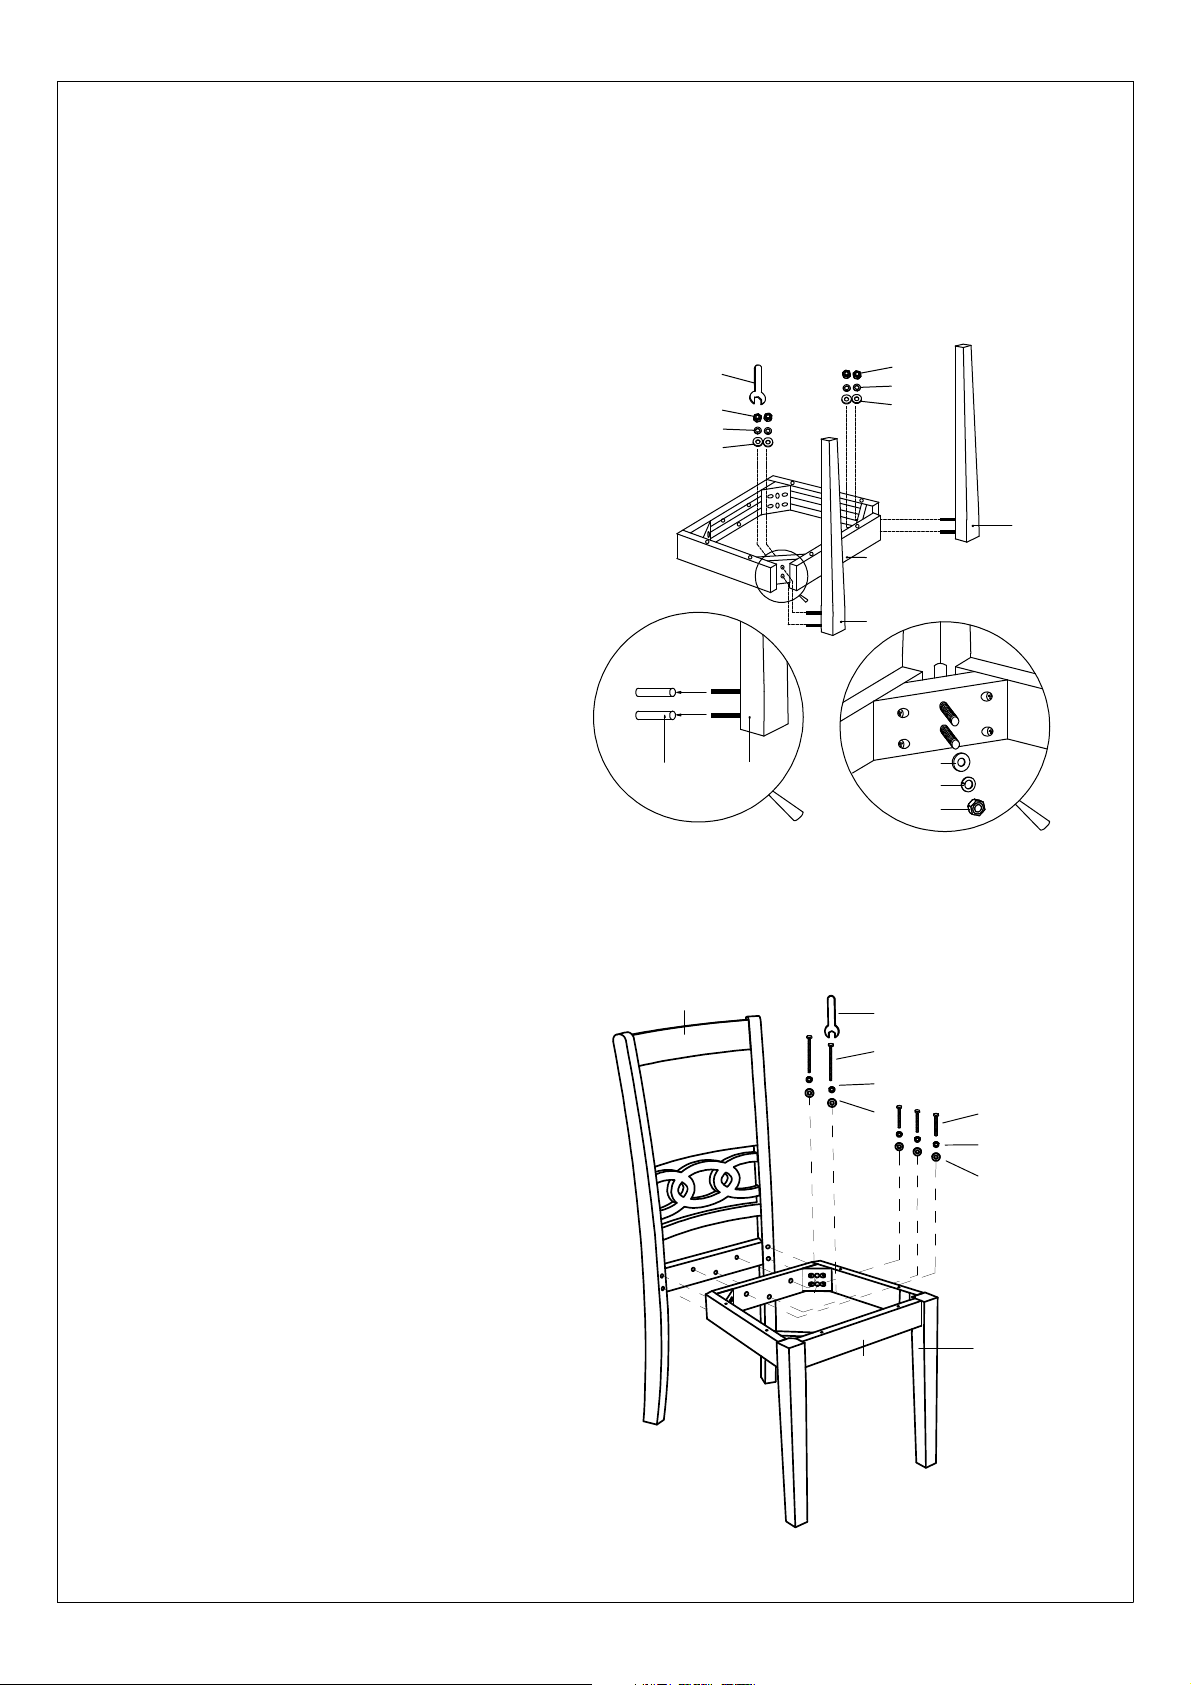
STEP 1
Attach the Front Legs (C) to the Seat Frame (B) by using Nuts (3), Spring
Washers (2), and Flat Washers (1).
3
2
1
Note: The Seat Frame (B) has
two screw holes on each
4
3
2
1
side, which are used for
attaching the seat. These
holes are wider on the
B
bottom and narrower on
the top. Ensure the wider
holes face towards
you.
C
PLASTIC PLUG.
C
STEP 2
Attach the Seat Frame (B) to the Back Leg (A) by using Short Bolts (5),
1
2
3
C
Long Bolts (6), Spring Washers (2), and Flat Washers (1).
Do not fully tig
hten.
A
Turn the chair upright.
Make sure the assembled
unit is level and
square. Tightly fasten all
Nuts (3) and Bolts (5&6)
with the Allen Wrench (4).
4
6
2
1
B
5
2
1
C
7
Page 8
CHAIR ASSEMBLY INSTRUCTIONS
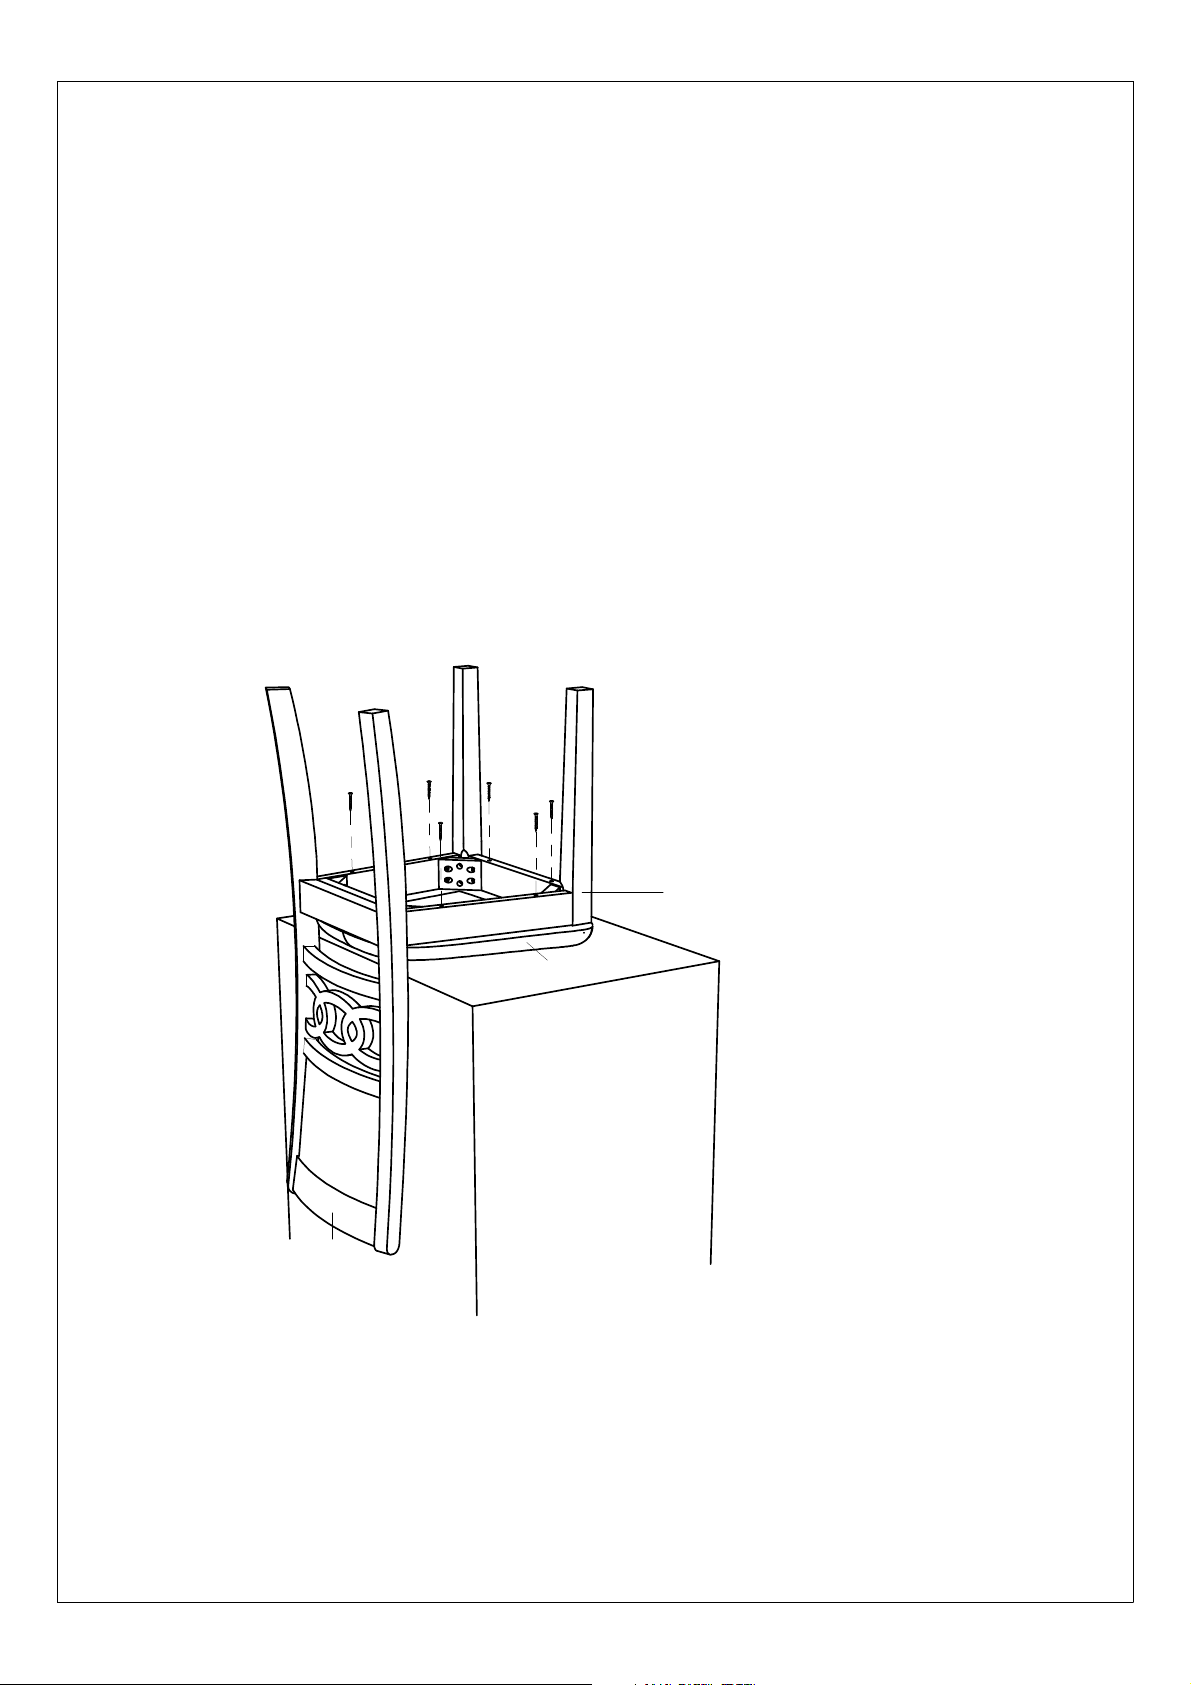
STEP 3
Place the Cushion Seat (D) upside down on a non-abrasive table
surface. The rear (tapered end) of the Cushion Seat (D) shoule be
near the table edge.
Hint: Protect the non-abrasive table surface and the Cushion Seat (D) by laying a towel
in-between the chair seat and table.
Place the assembled chair frame on the Cushion Seat (D).
Attach with Wood Screws (7). Tighten the screws.
7
7
A
7
7
7
7
C
D
8
Page 9
STEP 4
CHAIR ASSEMBLY INSTRUCTIONS
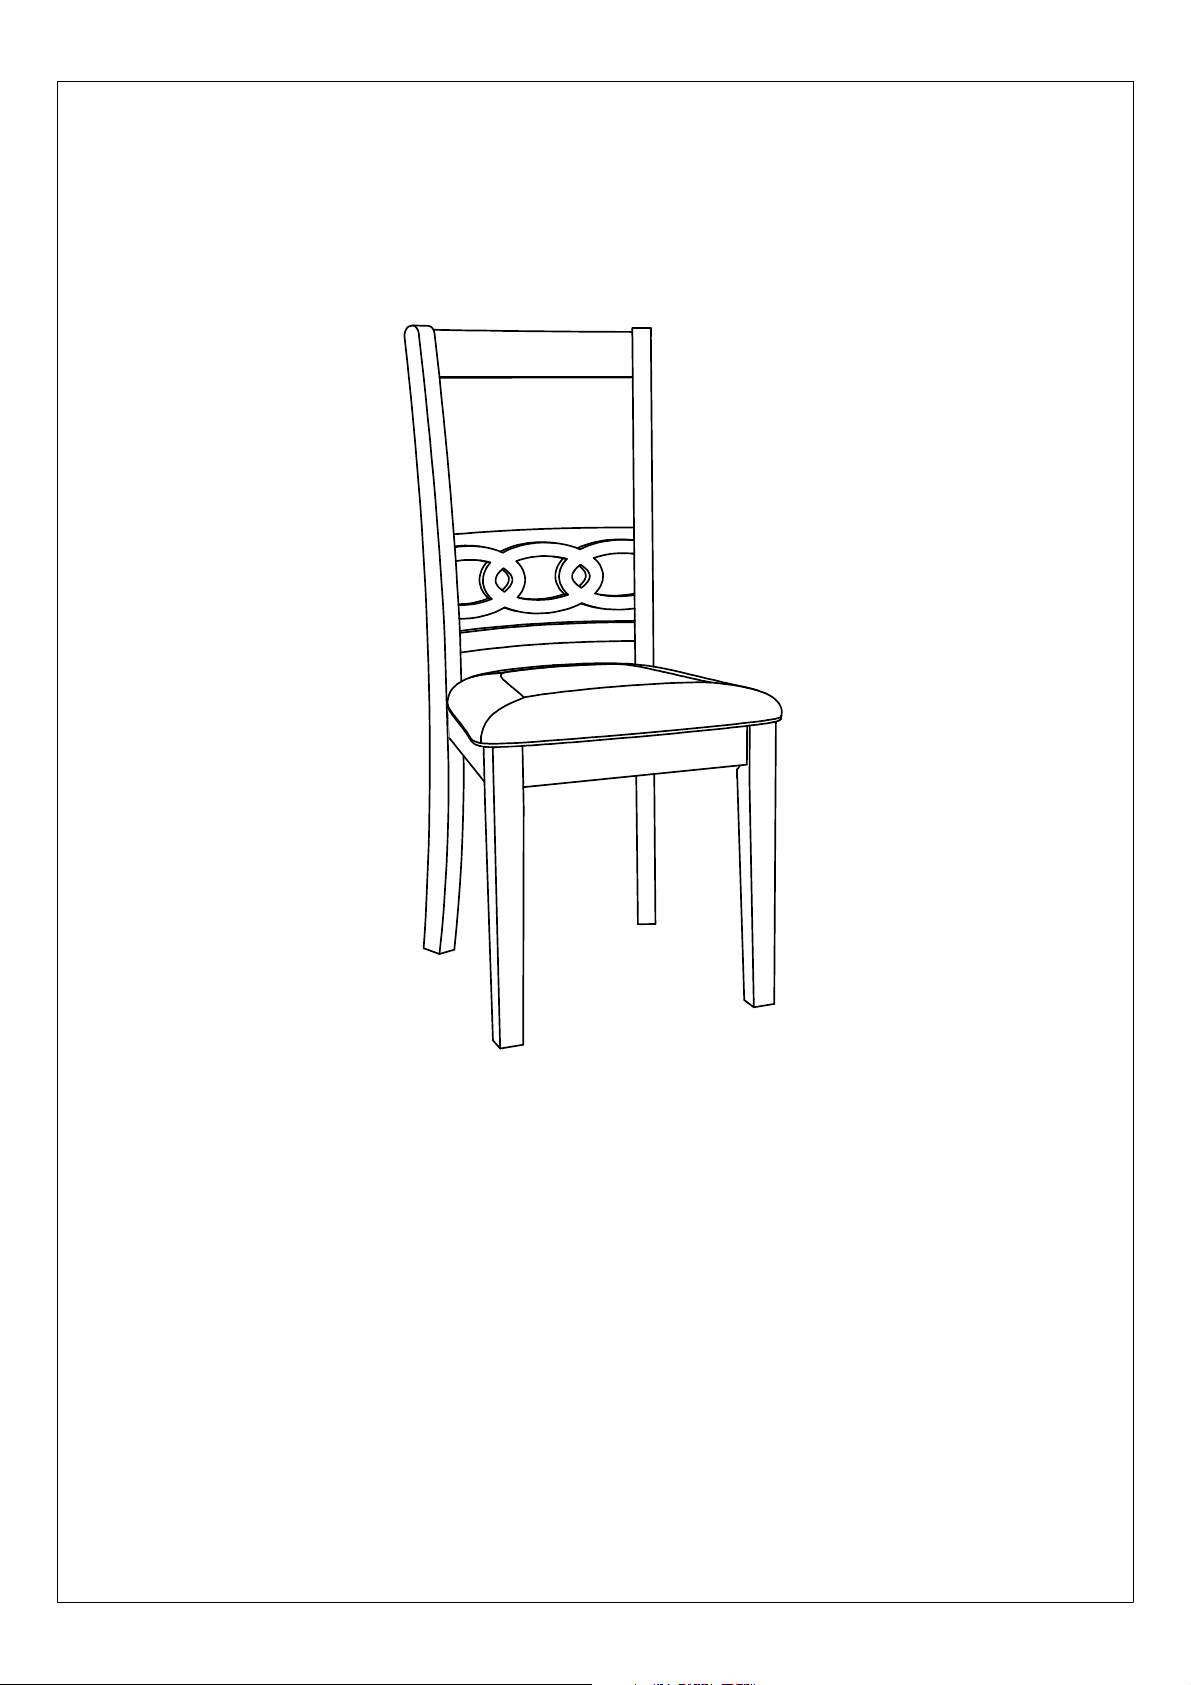
The Dining Chair is now ready for use.
Repeat Steps 1 to 3 to assemble the other chairs.
Printed in Vietnam
9
 Loading...