

Page 1

Floppy Disk Drive
Installation Guide
Version 1.1
NC200, NC400 and
NC900
Page 2

ii
Copyright
Copyright © 1999, 2000 by Network Computing Devices, Inc. (NCD). The information contained in
this document is subject to change without notice. Network Computing Devices, Inc. shall not be liable
for errors contained herein or for incidental or consequential damages in connection with the
furnishing, performance, or use of this material. This document contains information which is
protected by copyright. All rights are reserved. No part of this document may be photocopied,
reproduced, or translated to another language without the prior written consent of Network Computing
Devices, Inc.
Copyright © 1990, 1992, 1993, 1994, 1995, 1996 Tektronix, Inc. Wilsonville, Oregon.
Printed in the United States of America or the United Kingdom. All rights reserved. This document
may not be copied in whole or in part, or otherwise reproduced except as specifically permitted under
U.S. copyright law, without the prior written consent of Network Computing Devices, Inc., 350 North
Bernardo Avenue, Mountain View, CA 94043 USA.
Portions of the network computer source code are copyrighted © 1989 by Sun Microsystems, Inc. Sun
design patents pending in the U.S. and foreign countries. OPEN LOOK is a trademark of AT&T. Used
by written permission of the owners.
Portions of this NCBridge software copyright © 1984-95 Adobe Systems Incorporated. All rights
reserved.
Some fonts are copyrighted © 1986, 1985 by Bigelow & Holmes. Lucida is a registered trademark of
Bigelow & Holmes.
Trademarks
Network Computing Devices is a registered trademark of Network Computing Devices, Inc. WinDD
and NCBridge are trademarks of Network Computing Devices, Inc.
Ethernet is a trademark of Xerox Corporation; UNIX is a registered trademark of AT&T; DEC,
DECnet, DECwindows, ULTRIX, SCAMP, VMS, and VT are trademarks of Digital Equipment
Corporation; SPARCstation is a registered trademark of SPARC International, licensed exclusively to
Sun Microsystems, Inc.; Sun Microsystems, SunOS, NFS, Sun, Sun-3, Sun-4, and OpenWindows are
trademarks of Sun Microsystems, Inc.; OSF, OSF/Motif, and Motif are trademarks of Open Software
Foundation, Inc.; X and X Window System are trademarks of the Massachusetts Institute of
Technology. Hewlett-Packard, HP, and vue are trademarks of the Hewlett-Packard company. IBM and
SMIT are trademarks of International Business Machines. Silicon Graphics and IRIS are registered
trademarks and IRIX is a trademark of Silicon Graphics, Inc. OpenConnect is a registered trademark of
OpenConnect Systems, Inc. Other trade names used in this document are trademarks or registered
trademarks of the manufacturers or vendors of the associated products.
Microsoft, Windows NT and Windows95 are registered trademarks of Microsoft Corporation.
Adobe, Acrobat, Display PostScript, and ShowPS are trademarks of Adobe Systems Incorporated
which may be registered in certain jurisdictions.
Use of a term in this book should not be regarded as affecting the validity of any trademark or service
mark.
Page 3

Floppy Disk Drive Installation
iii
Certifications
UL 1950, CAN/CSA C22.2 No. 950, IEC 950, FCC Class A, EN55022 (class A), EN50082-1,
EN60950, C-Tick, VCCI, MPR II (monitors only), CE, Energy Star Compliant (both monitor and logic
unit).
Disclaimers
THE SOFTWARE PRODUCTS ARE PROVIDED “AS IS” WITHOUT WARRANTY OF ANY
KIND. TO THE MAXIMUM EXTENT PERMITTED BY APPLICABLE LAW, NCD FURTHER
DISCLAIMS ALL WARRANTIES, INCLUDING WITHOUT LIMITATION, ANY IMPLIED
WARRANTIES OF MERCHANTABILITY, FITNESS FOR A PARTICULAR PURPOSE AND
NONINFRINGEMENT. THE ENTIRE RISK ARISING OUT OF THE USE OR PERFORMANCE
OF THE SOFTWARE PRODUCTS AND DOCUMENTATION REMAINS WITH THE END USER.
TO THE MAXIMUM EXTENT PERMITTED BY APPLICABLE LAW, IN NO EVENT SHALL
NCD OR ITS SUPPLIERS BE LIABLE FOR ANY CONSEQUENTIAL, INCIDENTAL, DIRECT,
INDIRECT, SPECIAL, PUNITIVE, OR OTHER DAMAGES WHATSOEVER (INCLUDING,
WITHOUT LIMITATION, DAMAGES FOR LOSS OF BUSINESS PROFITS, BUSINESS
INTERRUPTION, LOSS OF BUSINESS INFORMATION, OR OTHER PECUNIARY LOSS)
ARISING OUT OF THE USE OF OR INABILITY TO USE THE SOFTWARE PRODUCTS OR
DOCUMENTATION, EVEN IF NCD HAS BEEN ADVISED OF THE POSSIBILITY OF SUCH
DAMAGES. BECAUSE SOME STATES/JURISDICTIONS DO NOT ALLOW THE EXCLUSION
OR LIMITATION OF LIABILITY FOR CONSEQUENTIAL OR INCIDENTAL DAMAGES, THE
ABOVE LIMITATION MAY NOT APPLY TO YOU.
Revisions
Revision history of this document:
Contact Information
Network Computing Devices, Inc.
301 Ravendale Drive
Mountain View, CA 94043 USA
1-800-800-9599 (USA and Canada)
1-503-641-2200
http://www.ncd.com
Part Number Revision Date Description
9300948 July, 2000 NC200, NC400, and NC900 Network
Computer Floppy Disk Drive Installation
Guide, Rev. A.
Page 4

iv
Safety Summary
Terms In This Document
CAUTION statements identify conditions of practices that can result in damage to
the equipment or other property.
Page 5

Floppy Disk Drive Installation
1
Floppy Disk Drive Installation
Introduction
These instructions describe how to connect your new floppy disk drive to your
Network Computer (NC). Connection is made to the parallel port on the NC.
When you are using the WinDD ICA client, this drive provides you with PC file
storage and retrieval capability at your NC.
With NCBridge 3.2 (or higher), there is a new local floppy manager client that
allows the user to transfer files between a UNIX host and the local floppy disk.
Operation of this client is described later in this document.
Before you begin installation, check the contents of the kit to be sure that you
have everything and check to be sure you have a Parallel Port installed in your
NC. Then turn to the installation procedures that begin on page 2.
Kit Contents
The Floppy Drive kit includes the following:
• One Floppy Drive
• One AC Power Adapter
• One AC Power Cord
• One Interconnect cable
• These installation instructions
Page 6

Floppy Disk Drive Installation
2
Floppy Disk Drive Installation
System Requirements
To connect the floppy drive to your NC, you must have a Parallel Port installed.
If you do not have a Parallel Port installed, contact your NCD distributor or
sales representative. In addition, your NC must be operating with NCBridge
Software Version 3.2 or later.
Connecting the Drive
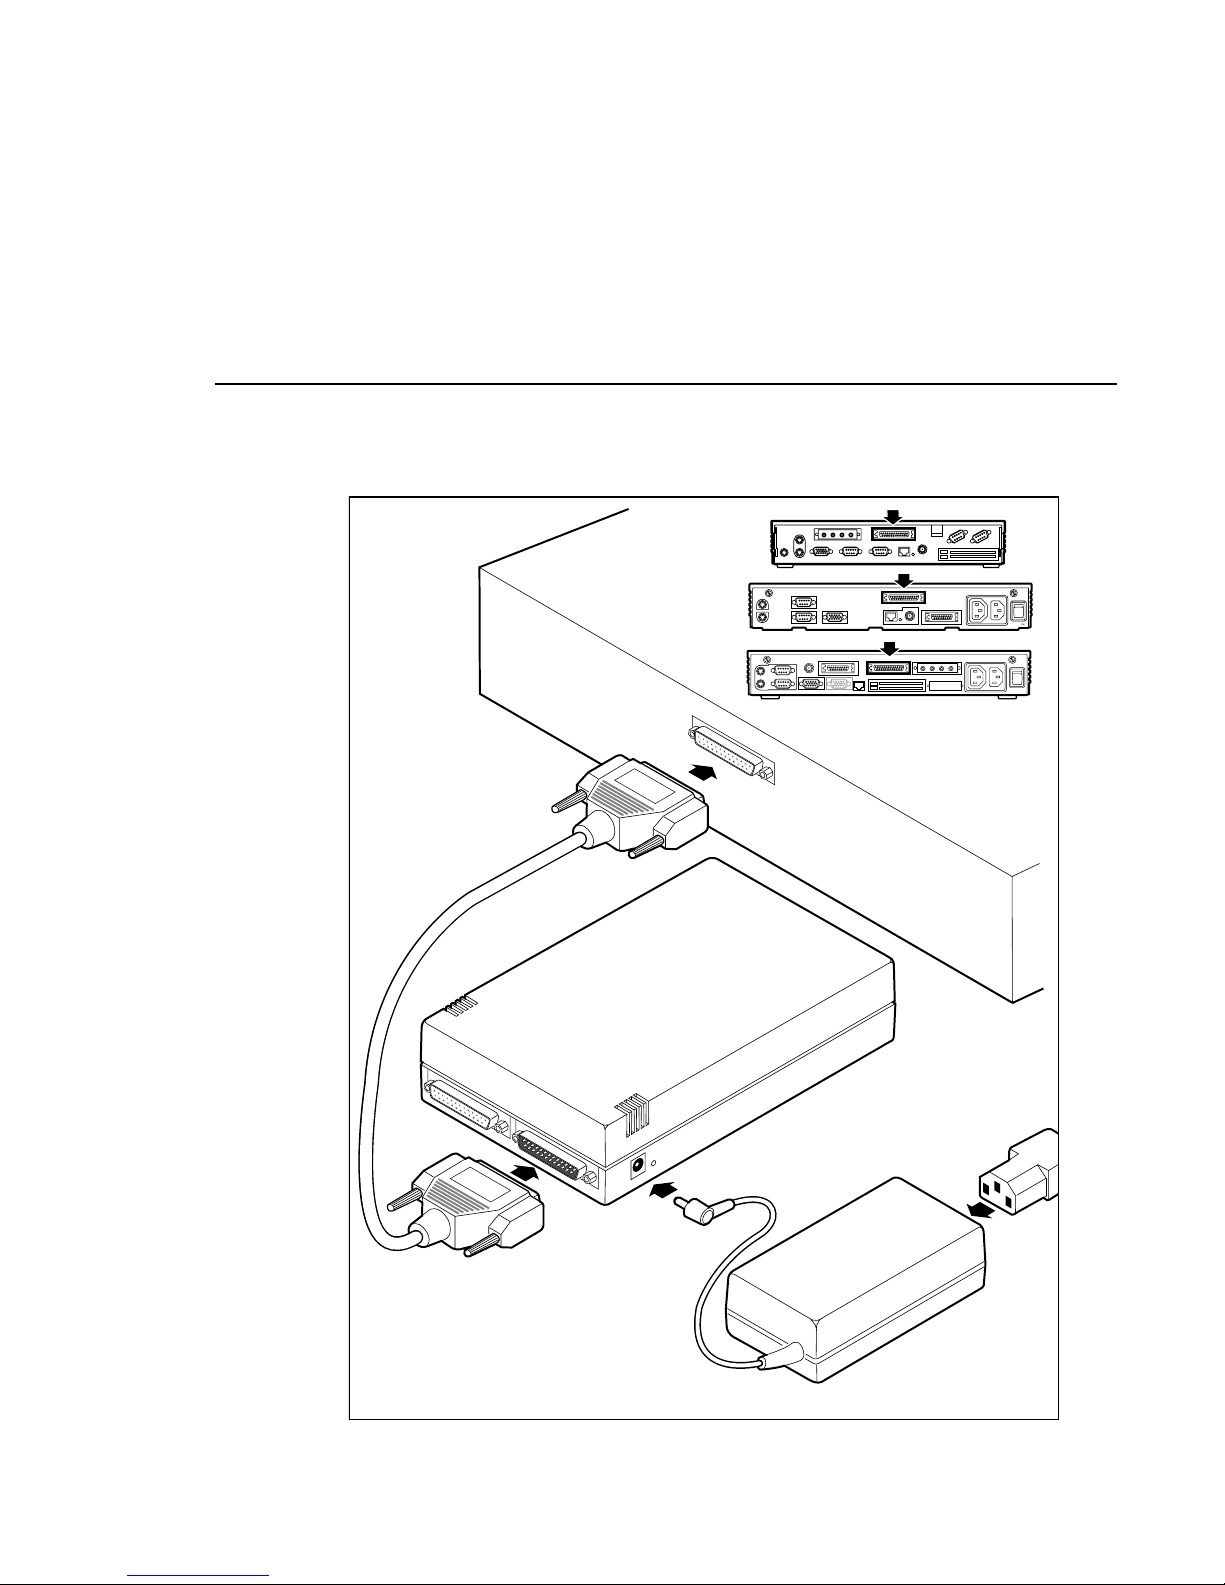
1. Connect the drive to the NC’s parallel port. Refer to the drawing in Figure 1.
Look at the plugs on the interconnect cable. The plug that has pins connects
to the NC; the plug that has holes connects to the floppy drive.
2. Connect the power supply to the floppy drive as shown.
Now you are ready to make the connection to the network described on page 4.
Page 7
Connecting the Drive
Floppy Disk Drive Installation
3
Figure 1. Connecting the Floppy Drive to the NC
9296-1
I
O
Page 8
Floppy Disk Drive Installation
4
Floppy Disk Drive Installation
Connecting the Drive to the Network with
Windows NT Terminal Server
This section describes how to connect the floppy drive to the network via an
ICA connection using a Windows NT 4.0 Terminal Server Edition host.
Before you can use the floppy drive you must connect the drive to the network,
which means that you give the drive a designator and a path on the network.
You only need to make this connection one time. The network connection will
remain in effect each time you log on until you specifically disconnect the drive
from the network.
Remember that you have exclusive access to the floppy drive connected to your
NC. Other users cannot read from or write to the floppy drive connected to your
NC, and you cannot read from or write to floppy drives connected to other NCs.
The following is a description for mapping the local floppy disk to a Windows
NT Terminal Server using MetaFrame software.
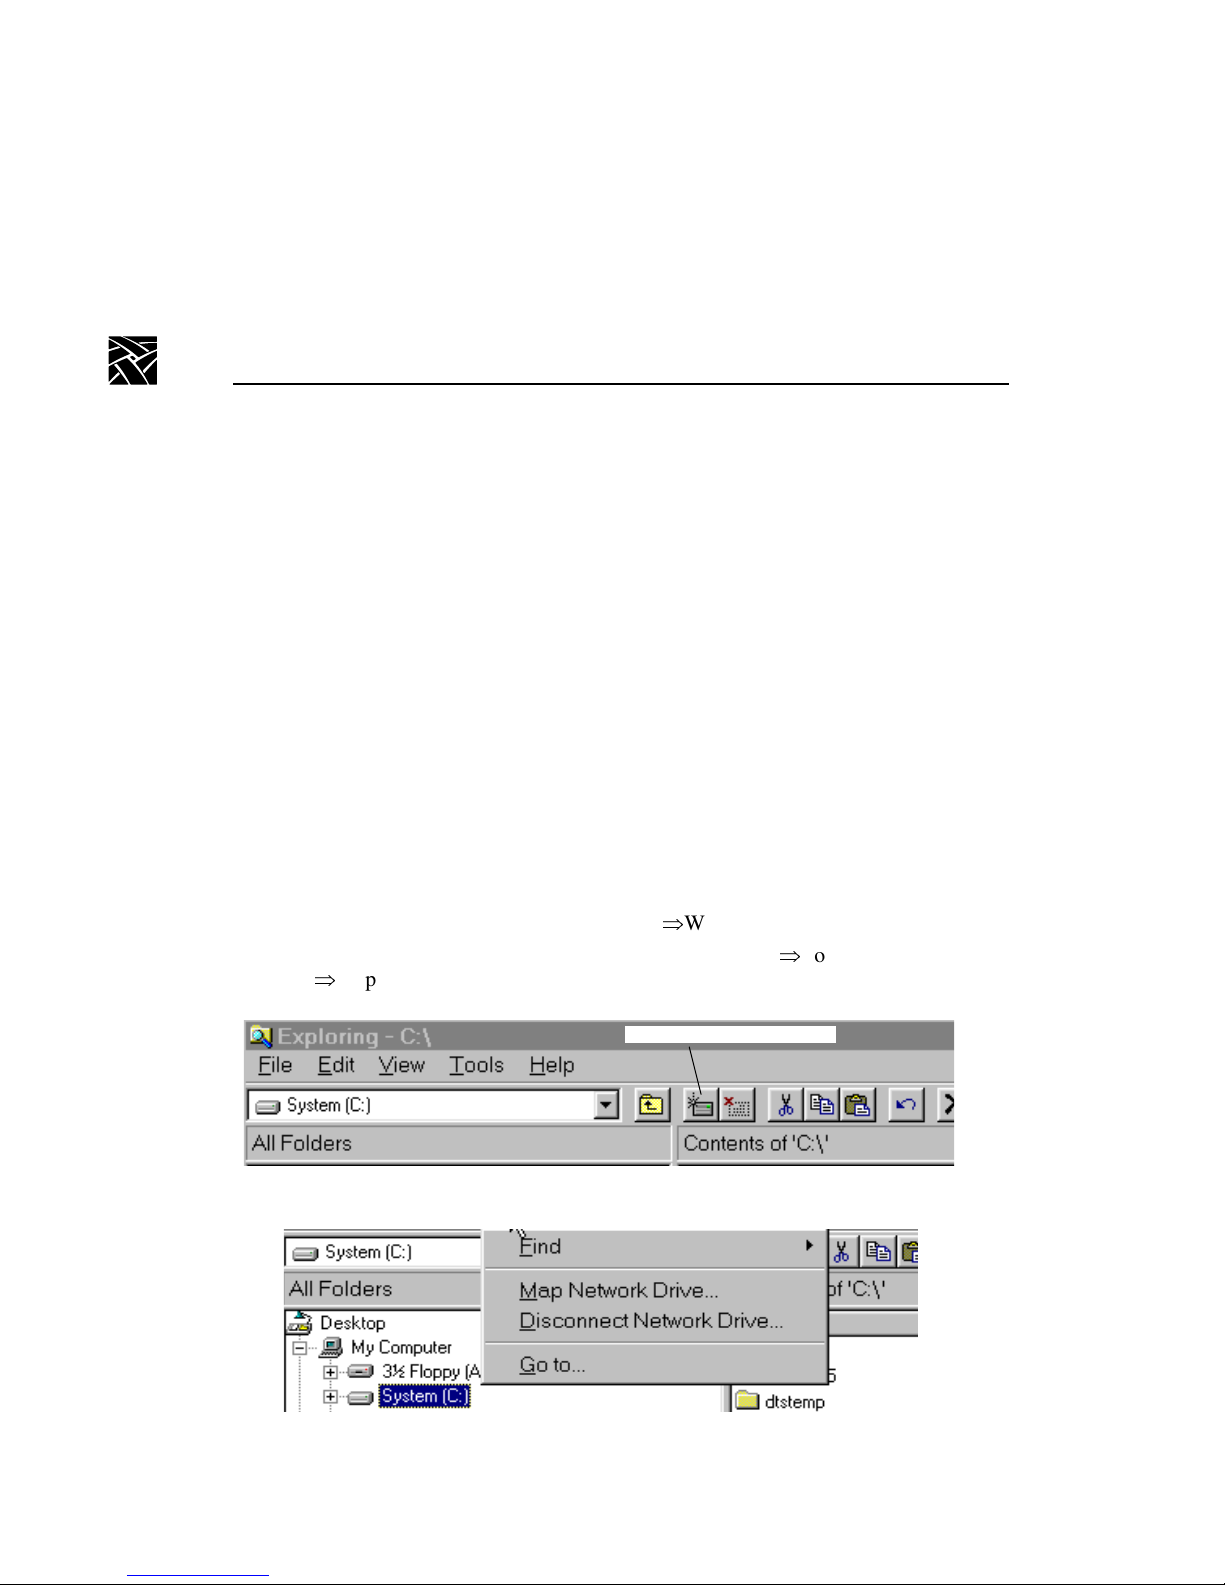
1. Click on the Start button and select ProgramsWindows Explorer.
2. Use either the Map Network Drive icon (Figure 2) if ViewToolbar is on or
ToolsMap Network Drive Menu (Figure 3) if the icons are not used.
Figure 2. Map Network Drive Icon
Figure 3. Network Drive Menu
Map Network Drive Icon
Page 9
Connecting the Drive to the Network with Windows NT Terminal Server
Floppy Disk Drive Installation
5
3. To disconnect a network drive, click on the
Disconnect
network drive icon
or select
Tools
Disconnect Network Drive . . . In the dialog box that
appears, select the drive to be disconnected and click
OK
.
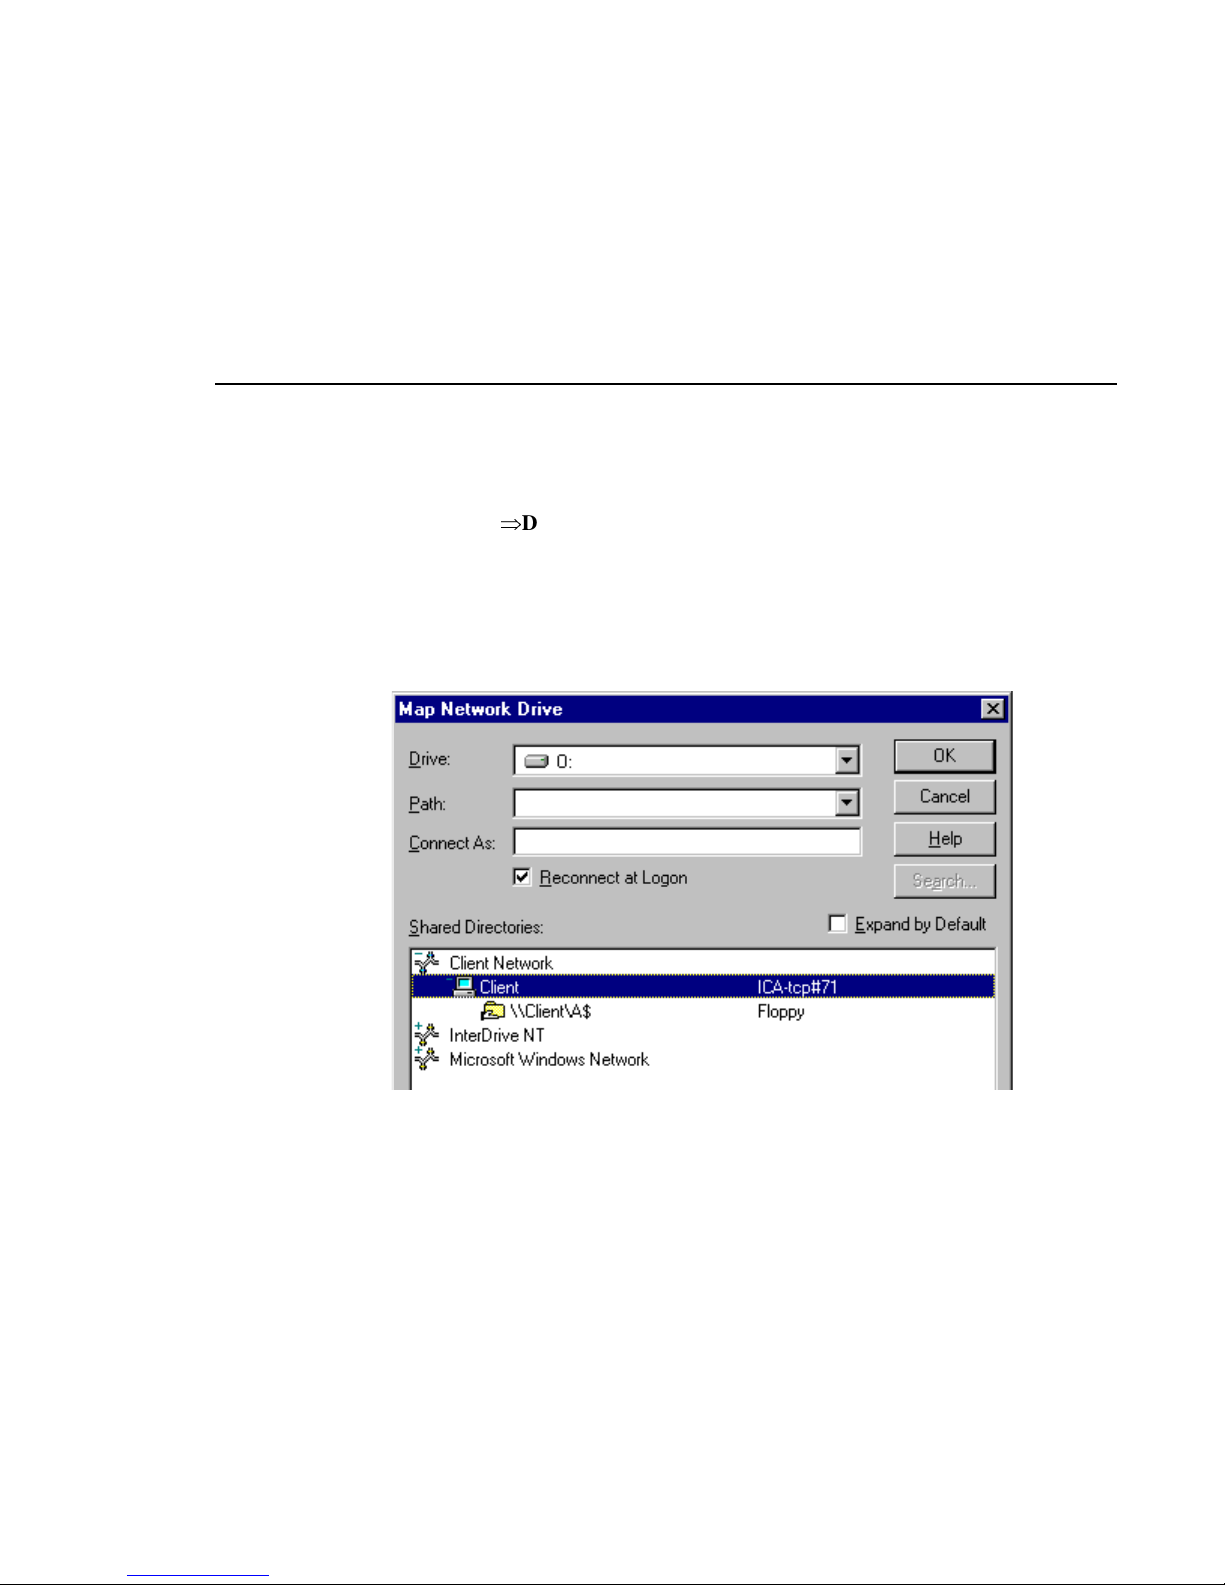
4. Select a drive designation in the Drive field (see Figure 4). The letter that
appears in the block is the next available unused drive designation. You can
use this letter or select a different one by pulling down on the button in the
block or at the end of the block.
Figure 4. Connect Network Drive Dialog Box
5. Enter \\Client\A$ in the Path field. To do this: select the A drive in the Shared
Directories (double-click on
Client Network
, then on
Client
, then click on A:),
or pull down on the button at the end of the Path field and select \\Client\A$ .
6. Click on the
OK
button to make the connection.
The drive, which appears as a drive icon in the
Windows Explorer
window, is
ready for use. You can use the
Windows Explorer
to move files to or from the
floppy drive just as you would any other drive.
Page 10

Floppy Disk Drive Installation
6
Floppy Disk Drive Installation
Formatting a Disk
The current version of Windows NT Server 4.0 is not designed to format
network-connected floppy disks. This means that you cannot format a disk
locally in the disk drive connected to your NC using the disk formatting
operations (Copy Disk, Label Disk, and Format Disk) in the
File
menu of the
Windows Program Manager. Local disk-formatting capability is, however, a
feature of the WinDD ICA client.
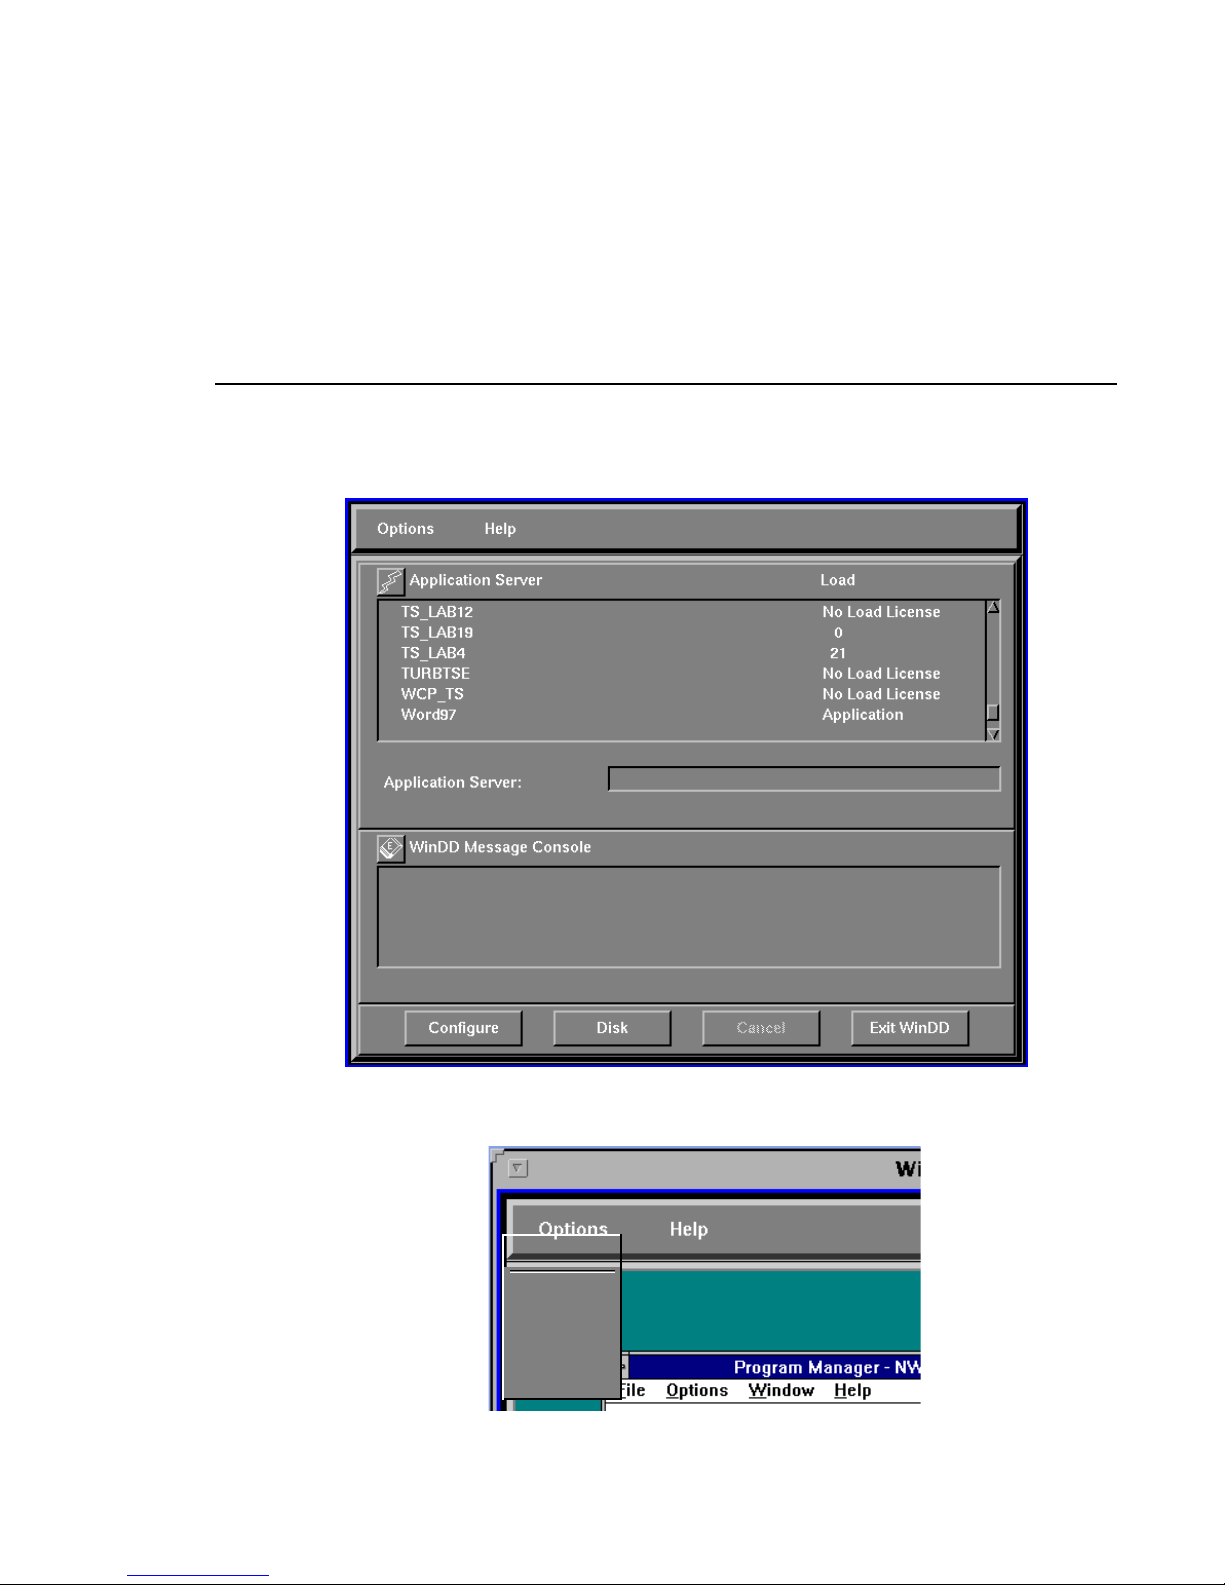
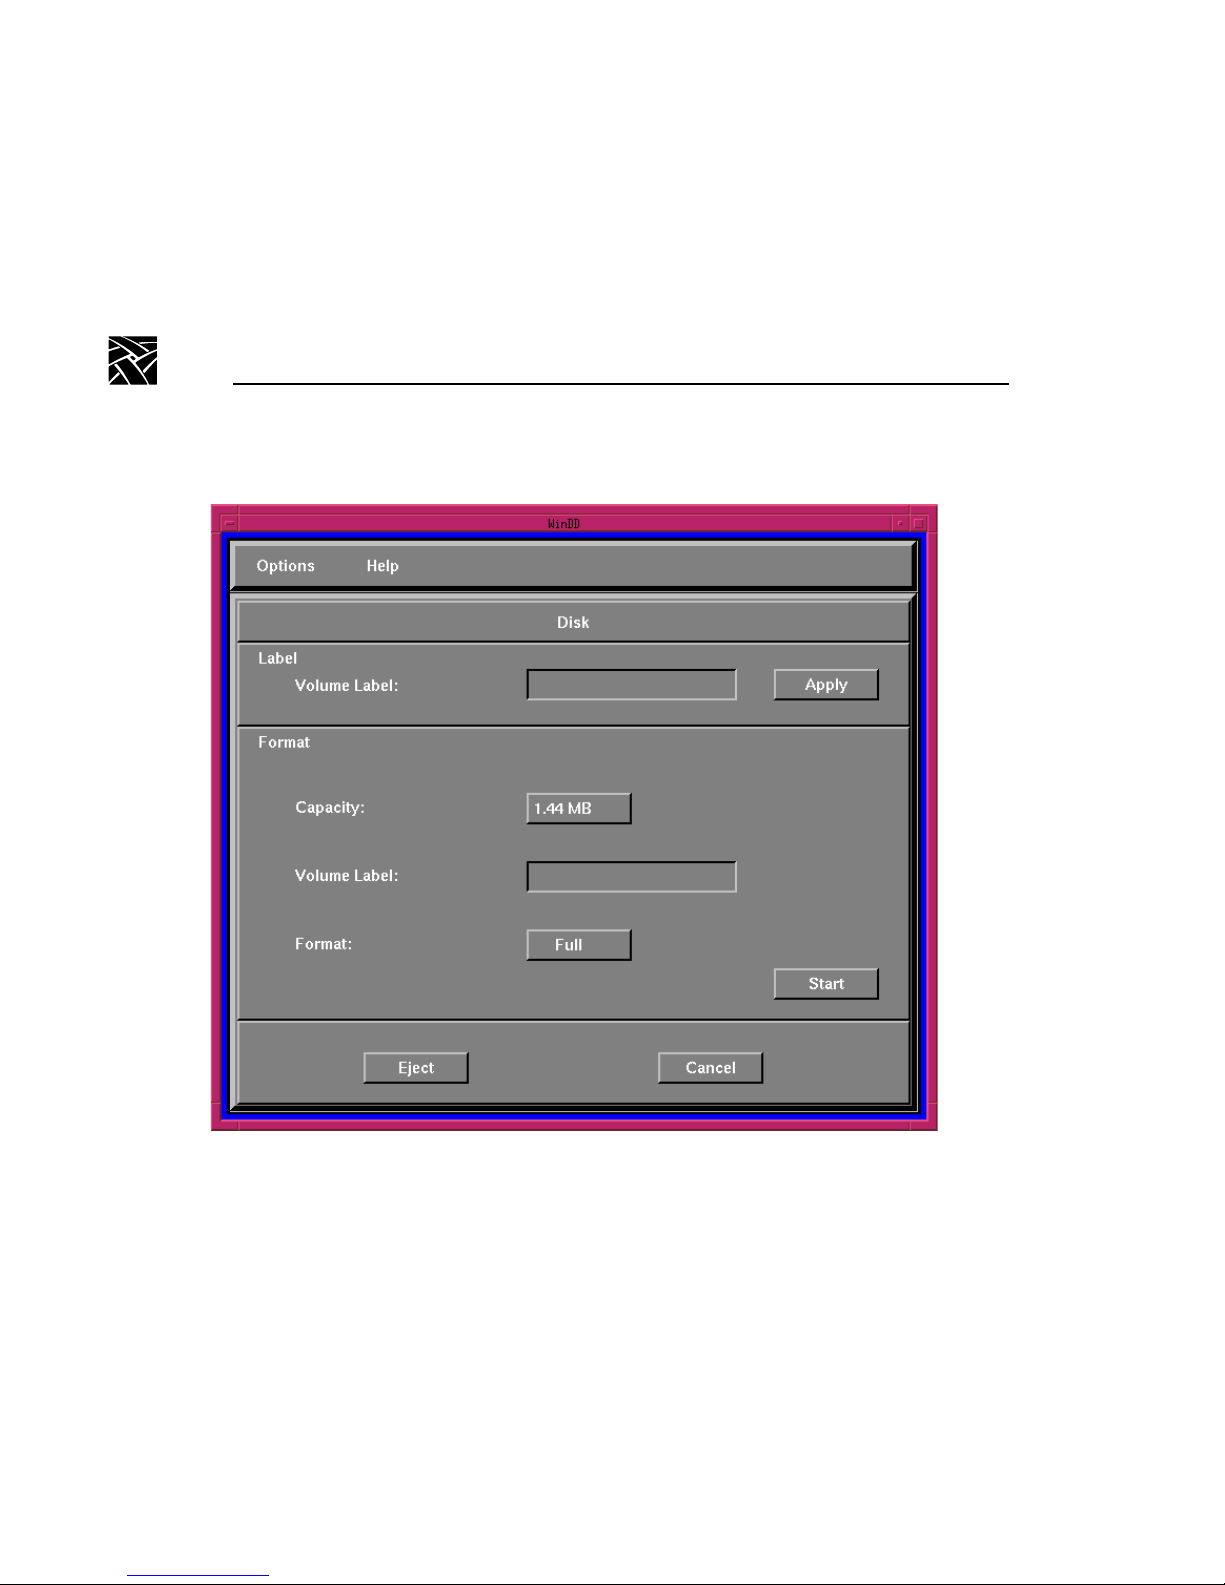
To format a disk, click the Disk button at the bottom of the WinDD login
window (Figure 5) or select Disk from the
Options
menu in the WinDD menu
bar (Figure 6). In either case the Disk Formatting Menu appears (Figure 7). Fill
in the volume label block and set the Capacity and Quick Format parameters as
appropriate, then press the Start button.
>>> CAUTION: The Copy Disk, Label Disk, and Format Disk selections in the
Disk menu of the Windows File Manager are for use with the application
server’s A: drive. They have no effect on a disk in your local floppy drive and
may destroy data on any disk in the servers A: drive.
Page 11
Formatting a Disk
Floppy Disk Drive Installation
7
Figure 5. WinDD ICA Client Log On Window
Figure 6. WinDD ICA Client Options Menu
Log On
Configure
Disk
Exit
Page 12
Floppy Disk Drive Installation
8
Floppy Disk Drive Installation
Figure 7. Disk Formatting Menu
Page 13

Local Floppy Manager (LFM) Client for UNIX Hosts
Floppy Disk Drive Installation
9
Local Floppy Manager (LFM) Client for UNIX
Hosts
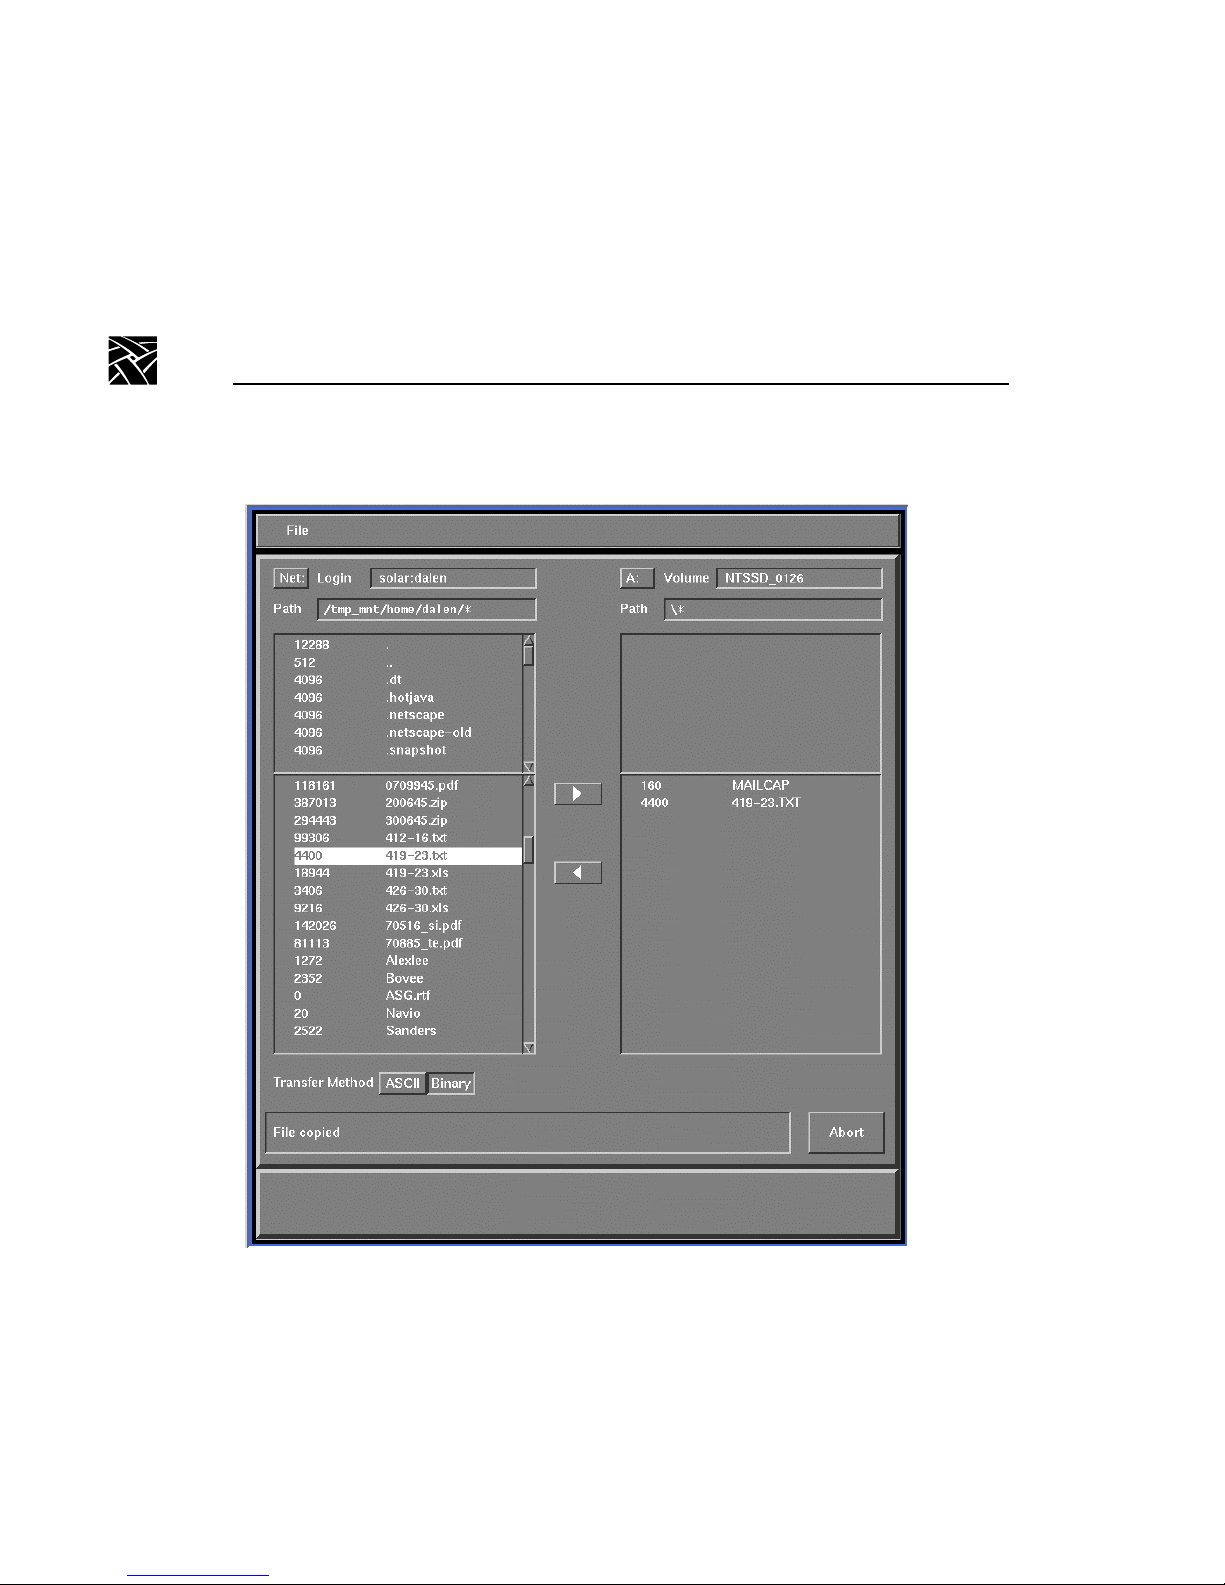
The LFM client provides a Graphical User Interface (GUI) for copying files
between the local floppy drive attached to the NC via the parallel interface and
a UNIX host server. The GUI features a point and click operation. The LFM
client is available with NCBridge version 3.2 or higher.
The LFM client is compatible with both the current NC product and earlier NCs
and X terminals. The compatible platforms are XP117C, XP119C, XP119M,
XP200, XP350, XP400, NC200, NC400 and NC900 series products.
To start the LFM on an NC, ensure that the floppy drive is connected to the
parallel port of the NC and powered up. Then, for the NC900, type this
command at the command-line prompt:
xpsh -display <
ipaddr
>:0 lfm.900
Example:
xpsh -display 134.6.5.12:0 lfm.900
To start the LFM client on a NC200/400 unit, type the following:
xpsh -display <
ipaddr
>:0 lfm.500
Example:
xpsh -display 134.6.7.14:0 lfm.500
Once the client is properly executed, the console of the NC should indicate that
the files “lfm.xxx” and “fdDrv.xxx” have been loaded, where “xxx” is one of
the extensions listed below:
The client screen should appear, as shown in Figure 8.
Model Extension
XP (*.350)
NC200/NC400 (*.500)
NC900 (*.900)
Page 14
Floppy Disk Drive Installation
10
Floppy Disk Drive Installation
Figure 8. Local Floppy Manager Client
Page 15

Troubleshooting
Floppy Disk Drive Installation
11
Troubleshooting
Use this troubleshooting guide if you encounter problems installing or using the
floppy disk drive.
If . . . Then . . .
You cannot read files on a disk in
the drive.
Check that the interconnect cable is installed
correctly and completely attached to the
floppy drive and the X terminal.
The WinDD ICA client window
“hangs” when you attempt to
connect network drive.
This typically happens when the local print
spooler or net to port access is enabled. You
(or your system administrator) can disable
them by doing the following:
1. Reset the X server from the Setup window.
2. Modify the
xp.cnf
file to disable the net to
port access or the local print spooler. Then
restart the NC.
The floppy drive will not format a
disk.
Be sure that you use only the “Format”
button at the bottom of the WinDD ICA
client log on window or select “Format”
from the Options menu in the WinDD menu
bar when attempting to format a disk.
Do not use the Copy Disk, Label Disk, or
Format Disk selections in the Disk menu of
the Windows File Manager. These are for use
with the application server’s A: drive; they
have no effect on a disk in your floppy and
may destroy data on any disk in the servers
A: drive.
Page 16

Floppy Disk Drive Installation
12
Floppy Disk Drive Installation
Page 17

Page 18

Network Computing Devices, Inc.
301 Ravendale Drive
Mountain View, CA 94043-5207
9300948 Rev. A
 Loading...