

Page 1
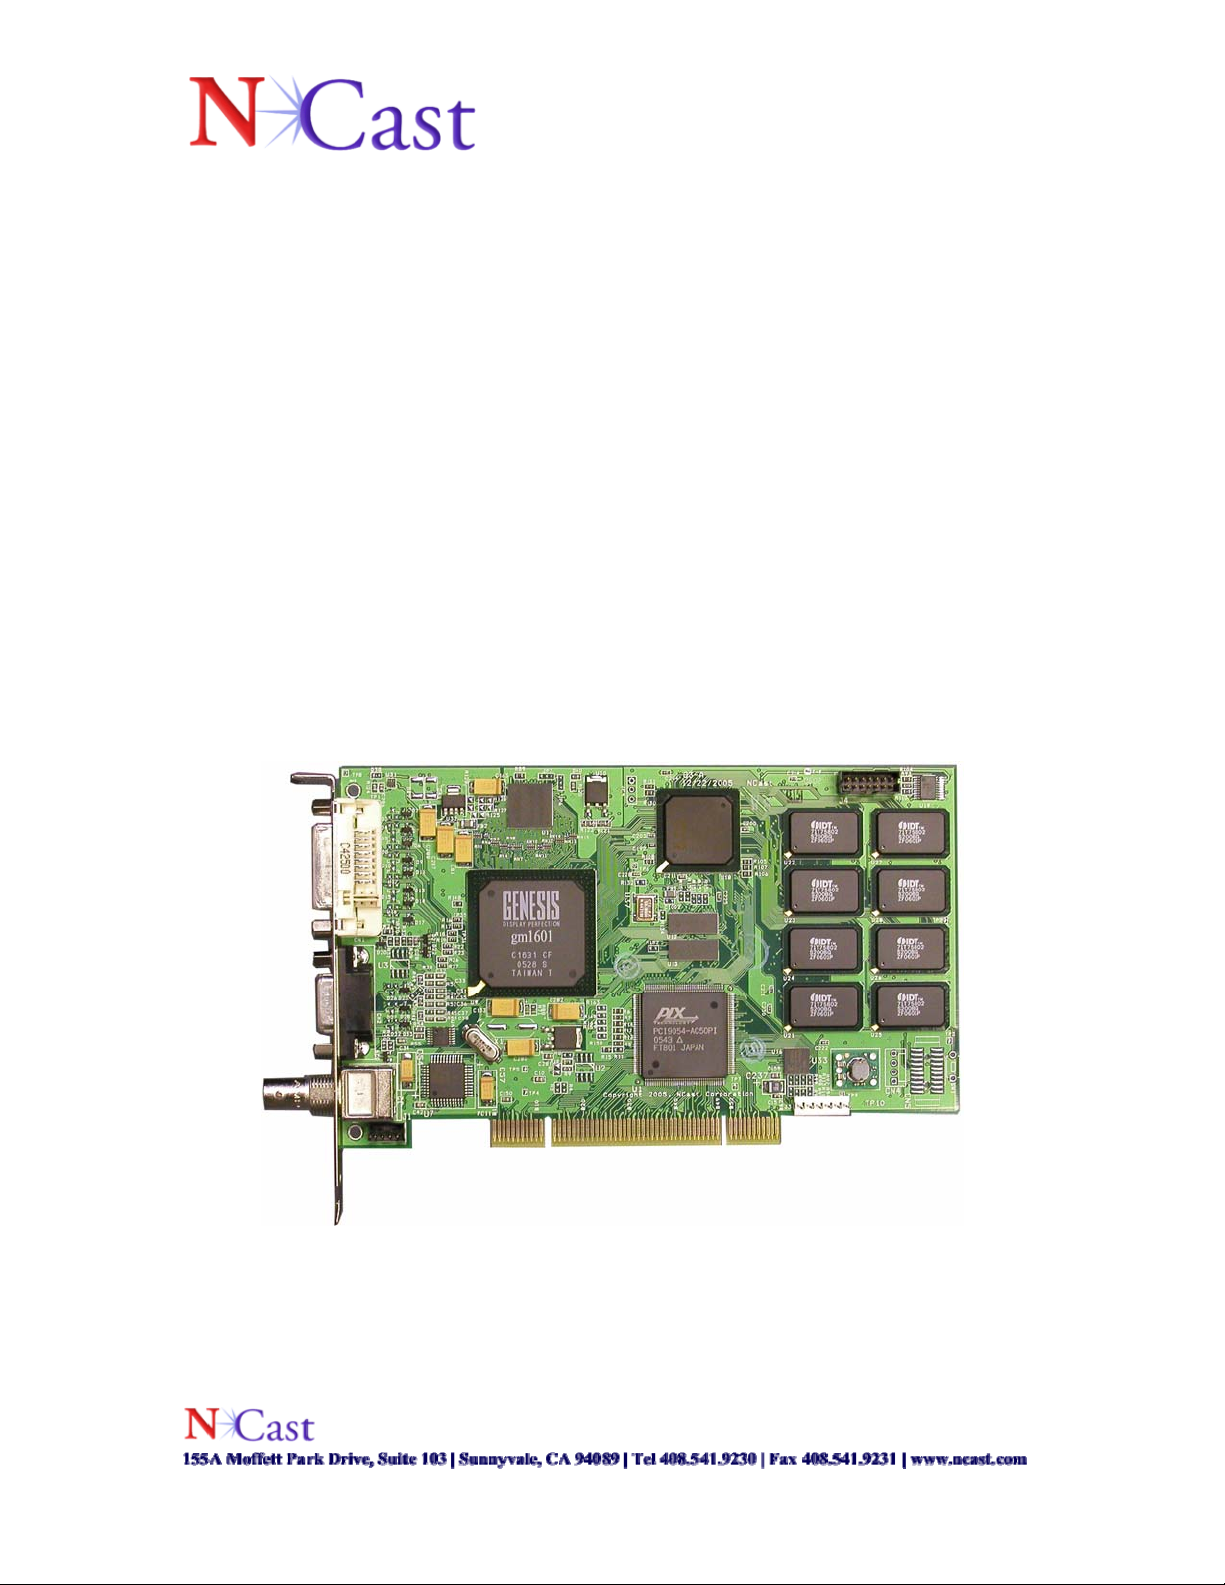
Digitizer 3.0 Capture Card
User Manual
Page 1 of 15
Page 2

1. INTRODUCTION............................................................................................................................... 3
2. HARDWARE OVERVIEW............................................................................................................... 3
RESOLUTIONS............................................................................................................................................. 3
FRAME-RATE .............................................................................................................................................. 3
VIDEO CAPTURE......................................................................................................................................... 4
3. SPECIFICATION............................................................................................................................... 4
4. SOFTWARE OVERVIEW................................................................................................................ 4
WINDOWS DRIVER ..................................................................................................................................... 4
FUNCTIONALITY ......................................................................................................................................... 5
DIGITIZER 3 APPLICATIONS ........................................................................................................................ 6
5. INSTALLATION................................................................................................................................6
6. QUICK START................................................................................................................................... 7
WINDOWS MEDIA ENCODER ...................................................................................................................... 7
Properties.............................................................................................................................................. 8
Sources.................................................................................................................................................. 8
Adjustments......................................................................................................................................... 10
Custom................................................................................................................................................ 11
Preview ............................................................................................................................................... 12
Video Size............................................................................................................................................ 13
7. TECHNICAL SUPPORT................................................................................................................. 14
APPENDIX A ............................................................................................................................................. 15
Page 2 of 15
Page 3

1. Introduction
The NCast Digitizer Capture Card 3.0 functions as an RGB, DVI, and video capture
device. The DCC-3 card also provides customizable Picture-in-Picture (PiP) capabilities
for video within graphics display. The DCC-3 card supports up to UXGA resolution and
delivers SXGA at 30 fps. The DCC-3 card is primarily designed for applications
requiring high resolution and high frame rates. Example applications include webcasting
over IP, local capture, remote viewing, and replacing dedicated monitors.
The DCC-3 is a PCI plug-in card, and is compatible with Windows XP/2000 and Linux
operating systems. Drivers for both operating systems are available at
www.ncast.com/downloads. The card is designed to work with software such as
Windows Media Encoder for real time streaming, presentation authoring, and archiving
of high resolution/frame rate graphics and video.
2. Hardware Overview
The DCC-3 card is designed to capture high resolution and frame-rate graphics. The card
accepts inputs from DVI and HD15 RGB inputs, and also S-Video and BNC Composite.
The RGB data is transferred using the PCI bus master DMA.
Resolutions
The DCC-3 card supports resolutions up to UXGA (1600x1200) from the RGB and DVI
sources. Scaling options also are available. For instance, a smaller resolution such as
1024x768 can be sent at either the original resolution, or scaled to a different resolution.
For instance, the DCC-3 can accept a 1280x720 input and scale it up to a 1600x1200
resolution. Ultimately based upon user settings, the resolution from the input signal will
be scaled up/down to the selected resolution. For a list of support resolutions by the
DCC-3 card, please reference Appendix A.
Frame-rate
The DCC-3 card is designed to capture a maximum of 30 fps. of 1280x1024 and 18 fps.
of 1600x1200. However, the highest possible frame-rate is dependant upon the signal
frequency, PCI bridge and CPU of the host computer. For instance, the user can expect a
higher frame rate by using an Intel P4 @ 2.0 GHz then a P4 @ 1.06 GHz.
Page 3 of 15
Page 4
Video Capture
The DCC-3 provides full frame-rate signals from S-Video, Composite and DVI inputs, at
both PAL and NTSC resolutions. Odd and even frames are combined during capture, and
de-interlacing is implemented in the driver code.
3. Specification
Physical Half-Size PCI Card
One female DVI-analog connector
One female High Density 15 pin VGA connector
One Composite BNC video connector
Optional S-Video connector (different bracket)
Pixel Rate 165 MHz
Graphics Sampling 24 bits per pixel/8-8-8 format
Input Resolutions Supported 640x350 up to 1920x1200
Output Resolutions
(supported by hardware)
Frame Rate Up to 30 fps. SXGA, 18 fps. UXGA
Operating Systems Windows 2000/XP, Linux
Horizontal Frequency 105 kHz
Storage Memory 2x1 mega pixels in double buffered acquisition mode
Temperature 0 to 35 deg. C.
Humidity 5% to 90% non-condensing
Application Software Windows Media Encoder, Real Producer, Windows
640x350 up to 1600x1200
Movie Maker, Windows Messenger, and MSN
Messenger. Installer, Windows Driver, API, software
development kit, and sample applications.
4. Software Overview
Windows Driver
The DCC-3 can be installed by downloading the Digitizer Capture Card v 3.0 Drivers
from the NCast website at http://www.ncast.com/downloads.html. Once the driver has
been downloaded, double click on the .zip icon and follow the installation instructions as
outlined later in this section.
The Windows Driver offers the most important functionality to the user applications.
The driver enables the card to be compatible with the Windows 2000 Kernel Streaming
Page 4 of 15
Page 5

Model, and therefore the DCC-3 should be usable with most Windows video capture
programs.
The DCC-3 and driver have been tested with the following Windows programs:
• Windows Media Encoder 9 Series
• Real Producer
• Windows Movie Maker
• Windows Messenger
• VLC
• MSN Messenger
Functionality
As the DCC-3 captures graphics and video requires constant output resolution, some of
the operations like de-interlacing and scaling must be turned on or off before capture
begins. As the DCC-3 can switch between interlaced and non-interlaced modes and also
modes with different resolutions, the following functionality was placed within the
driver:
• The DCC-3 tries to capture 30 fps., but most programs (like Windows Media
Encoder) are able to drop frames if the user wishes to capture less than 30 fps.
• If there is no signal detected, the DCC-3 will output 30 fps. of black screen.
• The DCC-3 is able to switch selected PiP and main inputs on the fly. While
changing input signals or detecting a new resolution, a black screen will be
generated.
• To change the selected inputs, get information about the current resolutions,
adjust the PiP size and format, and update the firmware the user can reference the
DCC-3’s property page in Windows, or use the application properties such as in
Windows Media Encoder.
Page 5 of 15
Page 6

Digitizer 3 Applications
An optional application is available for download at
http://www.ncast.com/downloads.html. The Play Cap Moniker application, the
application currently available, demonstrates to users how to access DCC-3 Inputs using
Direct Show and the provided DLL library. Through these interfaces, users can test
controls for:
• Selecting current inputs on both main and PiP windows
• Switch between PiP and Full Screen modes
• Change size of PiP and Main windows
• Adjust position of PiP and Main windows
The description of access to the API is outlined in “ncastwd1.idl” file, which compiles
with Microsoft IDL compiler (MIDL). The file used to access this functionality is
“ncastwd1_i.c”.
5. Installation
The DCC-3 packaging should contain the following items:
• The Digitizer Capture Card 3.0
• Installation and Application Instruction Sheet
• RGB HD15 Cable
• BNC to Composite video adaptor
• S-Video bracket
The DCC-3 Card is packed in anti-static material, and should be kept in this material until
the user is ready to install it.
Follow the instructions below for installing the DCC-3 Card under the Windows OS:
• Download the Digitizer Capture Card v 3.0 driver for Windows at the URL:
www.ncast.com/downloads.html on the host computer.
• Unpack the .zip file on the computer into the desired Folder name.
• Shutdown the computer.
• Verify that all power is off to the PC and disconnect all cables.
• Remove the PC cover.
• Find an empty PCI slot and remove the backing slot.
• Remove the DCC-3 Card from the anti-static bag, and insert it securely within the
empty PCI slot.
• Fasten the DCC-3 Card securely with a screw, and replace the PC cover.
• The DCC-3 Card can be connected to your input device through the DVI, HD15,
S-Video, or Composite Connectors.
Page 6 of 15
Page 7

• Attach the applicable cable(s) (DVI, HD15, S-Video, Composite) to the
appropriate connector on the input device, and attach the other end to your DCC-3
card.
• After power up, wait for the “Found New Hardware” wizard to install the DCC-3
card.
• If no “Found New Hardware” wizard appears or it had been canceled earlier, go
to Start / Control Panel / Add new hardware and the “Found New Hardware”
wizard will appear.
• Proceed with the “Found New Hardware” wizard. If the “Found new Hardware”
wizard asks you to connect to Windows Update to download new software, select:
“No, not at this time.” Following this, instruct the wizard to “Install from a list or
specific location (Advanced).” Point at the target folder, specifically in the driver
binaries directory. Proceed with the installation until completion.
6. Quick Start
Windows Media Encoder
• Connect appropriate inputs. For this Quick start scenario, we will assume
a combination of a RGB for the main input, and a DVD player as the PiP input.
• Launch Windows Media Encoder Professional. If the user does not have
it installed, Windows Media Encoder can be downloaded from the Microsoft Web
site.
• Click on “Custom Session” to start a session.
• Select the “NCast Digitizer III x.x.x.x.” device from the “Video” source
drop down.
• Please reference the following pages for an overview on the various tabs
of the DCC-3 configuration.
Page 7 of 15
Page 8
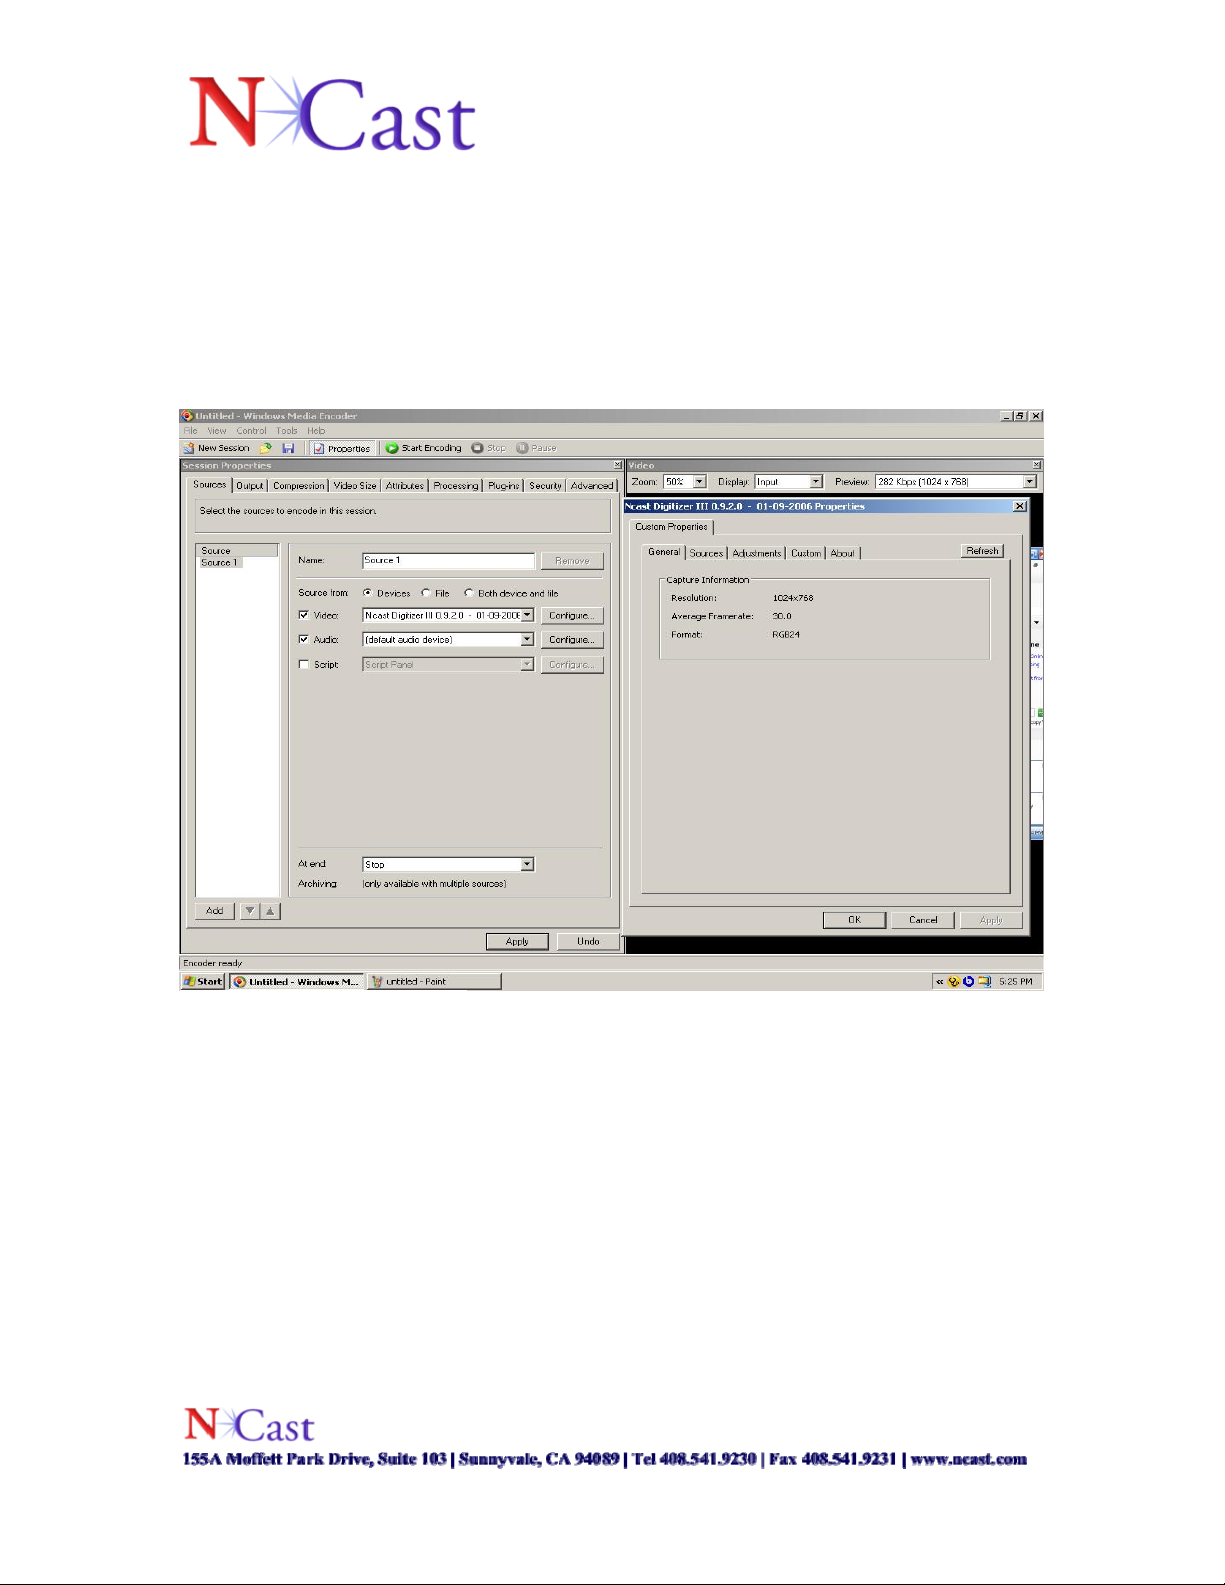
Properties
• To view the configuration and properties page, click on the “Configure” button.
The display should be similar to the screenshot below, with updated information
for the current driver release and source input. The “General” property page is
currently reporting the resolution of the Main input at 1024x768, the current
frame-rate, and format of RGB24.
Screenshot 1- General
Sources
• From the sources page, the user can select inputs for both Main and PiP, toggle
PiP on/off, view information about the current signals, and set positions for both
Main and PiP.
i. Main
1. Source - The user can select between XGA (RGB), DVI,
Composite and S-Video (if enabled).
2. Position- This option determines the position of the Main
Input. Available selections are presets such as: Full Screen,
Top-Left, Top-Right, etc. Also, customizable presets are
available and referred to as Custom 1, Custom 2. The
Page 8 of 15
Page 9

custom presets can be determined by the user, and more on
this option is available later in the custom section of this
Quick Start.
ii. PiP Source- The user has the same available options as the Main
source. The user can combine XGA with DVI, S-Video and
Composite, but S-Video cannot be combined with Composite and
vice versa. All other input combinations are available.
iii. Position- The user has the same options available for PiP
positioning as with the Main input.
Screenshot 2- Sources
Page 9 of 15
Page 10
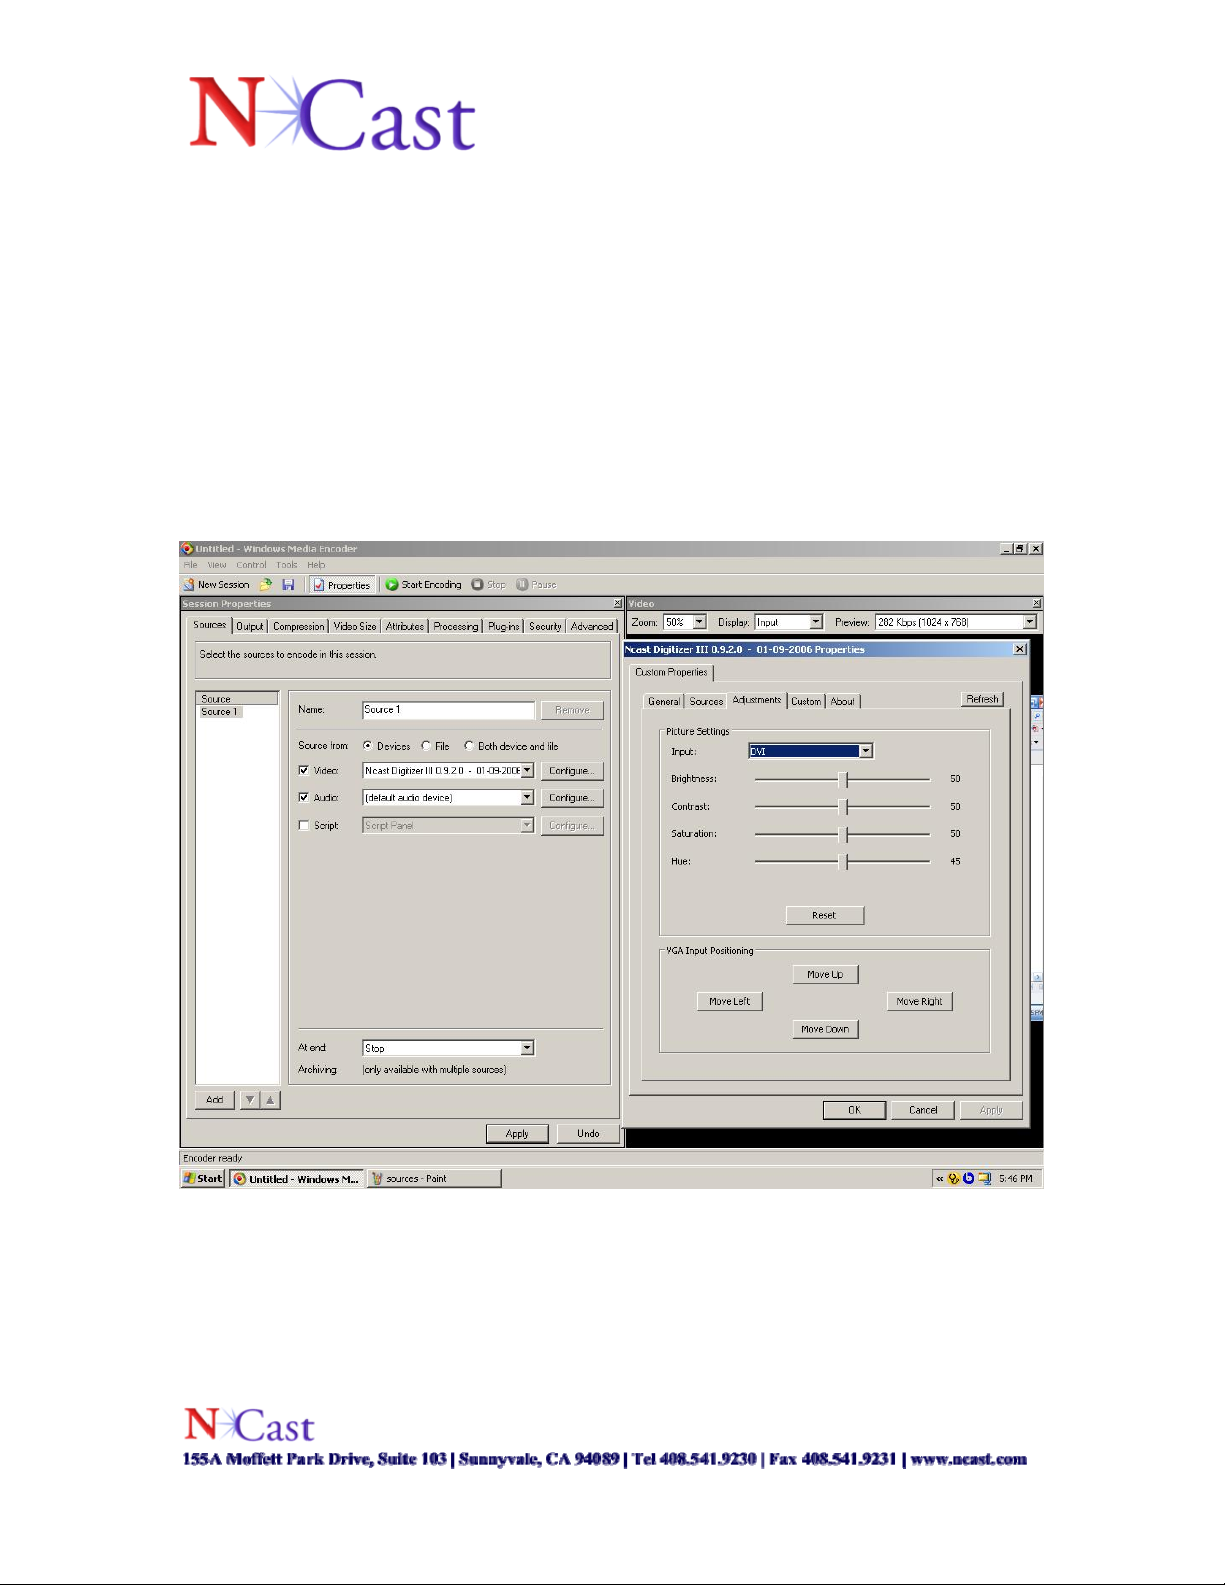
Adjustments
• The adjustments tab allows for a user to alter the picture settings for a desired
input and also adjust the RGB/DVI input position.
i. Picture Settings- The user is allowed to select DVI, XGA,
Composite and S-Video as the desired input. From this menu
using sliders, the user is able to determine the desired level of
brightness, contrast, saturation and hue. Each value will be saved
according to the corresponding input selected.
ii. VGA Input Positioning- A minority of input signals may require
additional positioning to center the image. From this control panel,
the user can adjust vertical and horizontal position pixel by pixel,
in an x,y format.
Screenshot 3- Adjustments
Page 10 of 15
Page 11
m
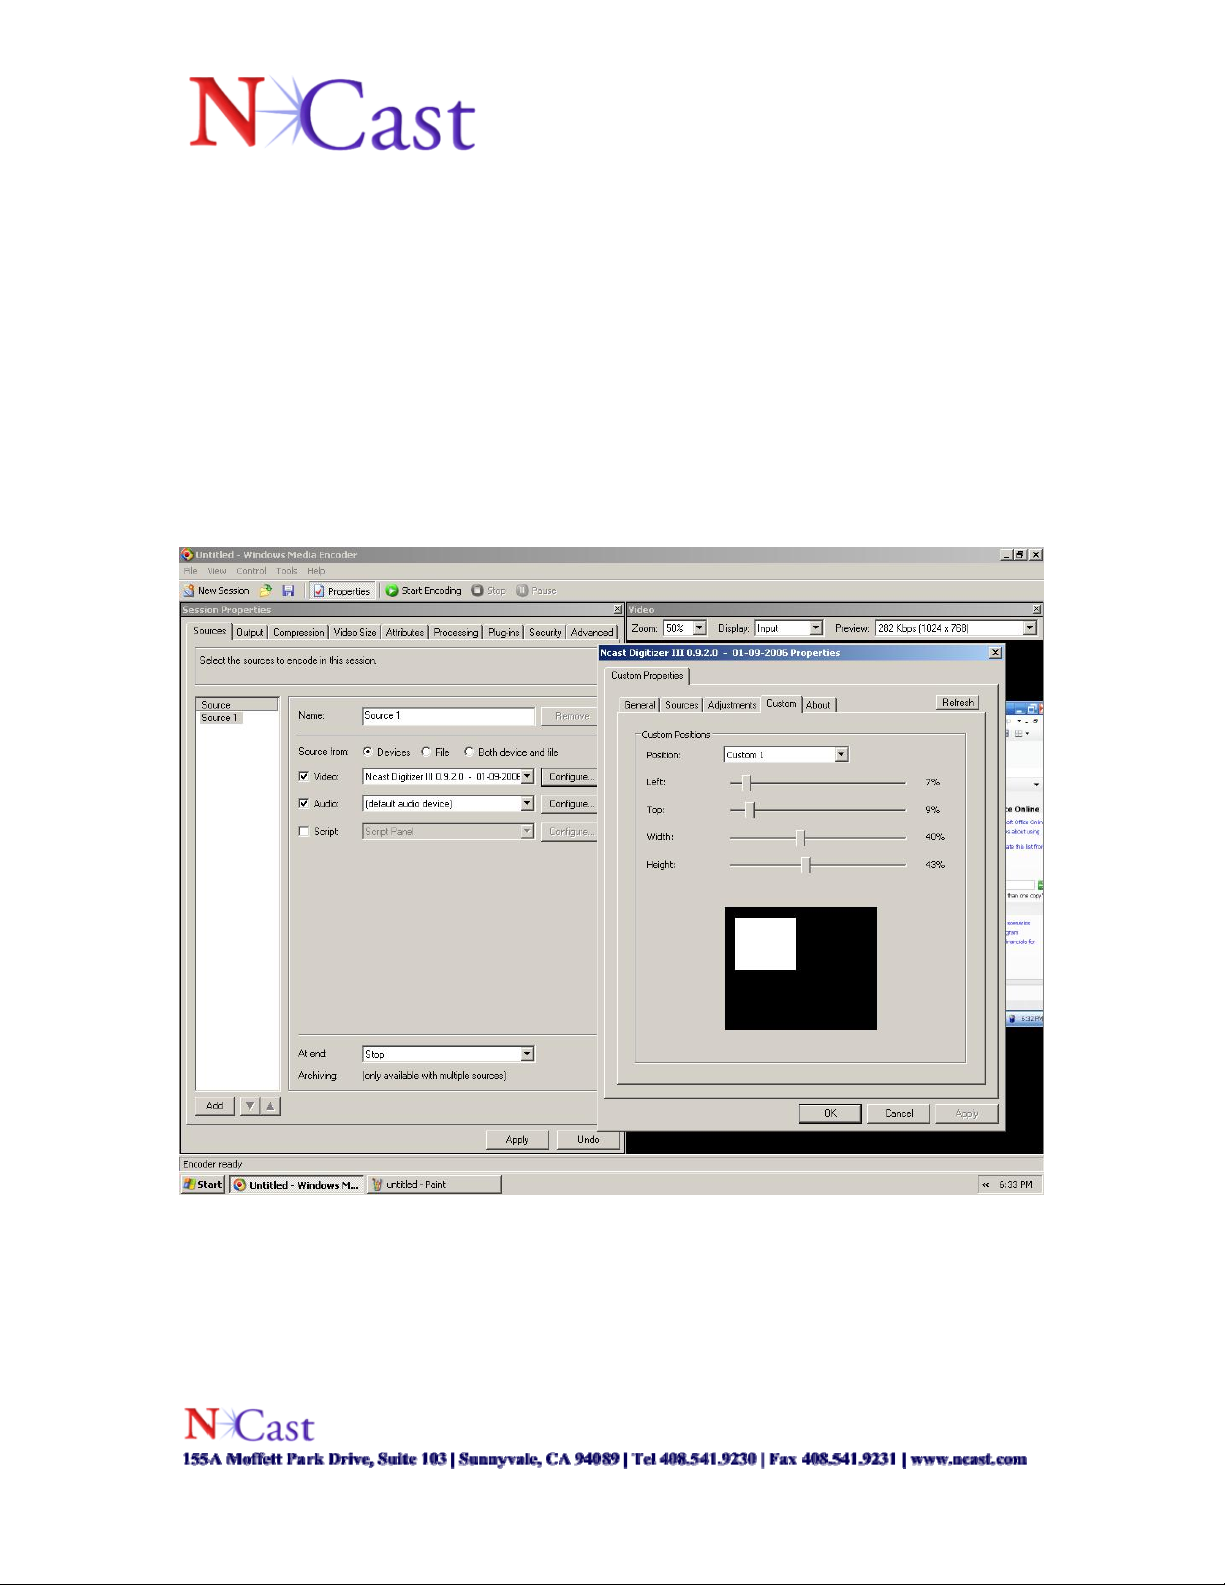
Custom
• This feature allows the user to create up to 10 custom positions for both Main and
PiP sources.
i. Position- User can select one of 10 custom positions. When a
custom position preset is selected, such as “Custom 1”, the user
can establish position and size controls and save them. In the
screenshot below, the PiP input is represented by the white screen,
and the black screen represents the Main input. The “Left” slider
allows the user to position the PiP along the x axis. The “Top”
slider allows the user to position the PiP along the y axis. The
“Width” slider adjusts the width of the PiP window, and the
“Height” slider adjusts the length of the PiP window.
Screenshot 4- Custo
Page 11 of 15
Page 12
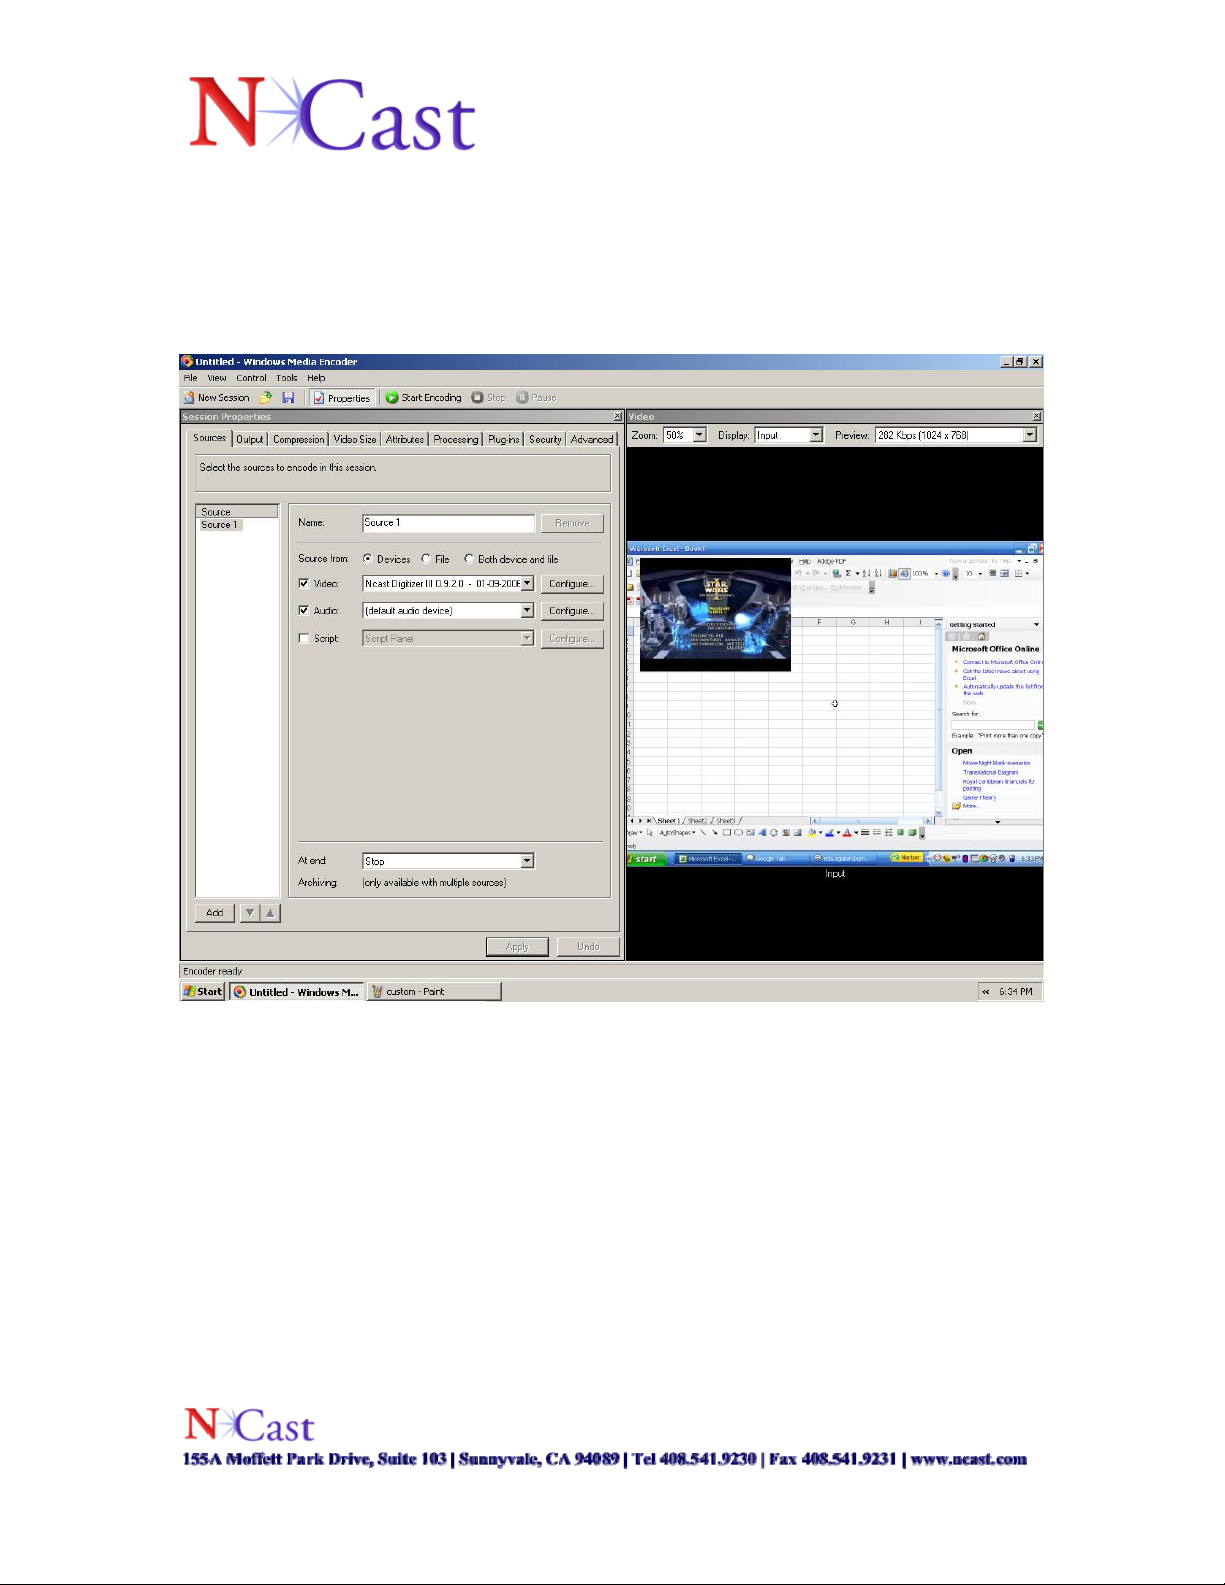
Preview
• Once the proper configuration options are established, click on the Apply button
to see a Preview of the captured inputs. The screenshot below is an example of a
RGB input coming from a laptop combined with a DVD player.
Screenshot 5- Preview
Page 12 of 15
Page 13
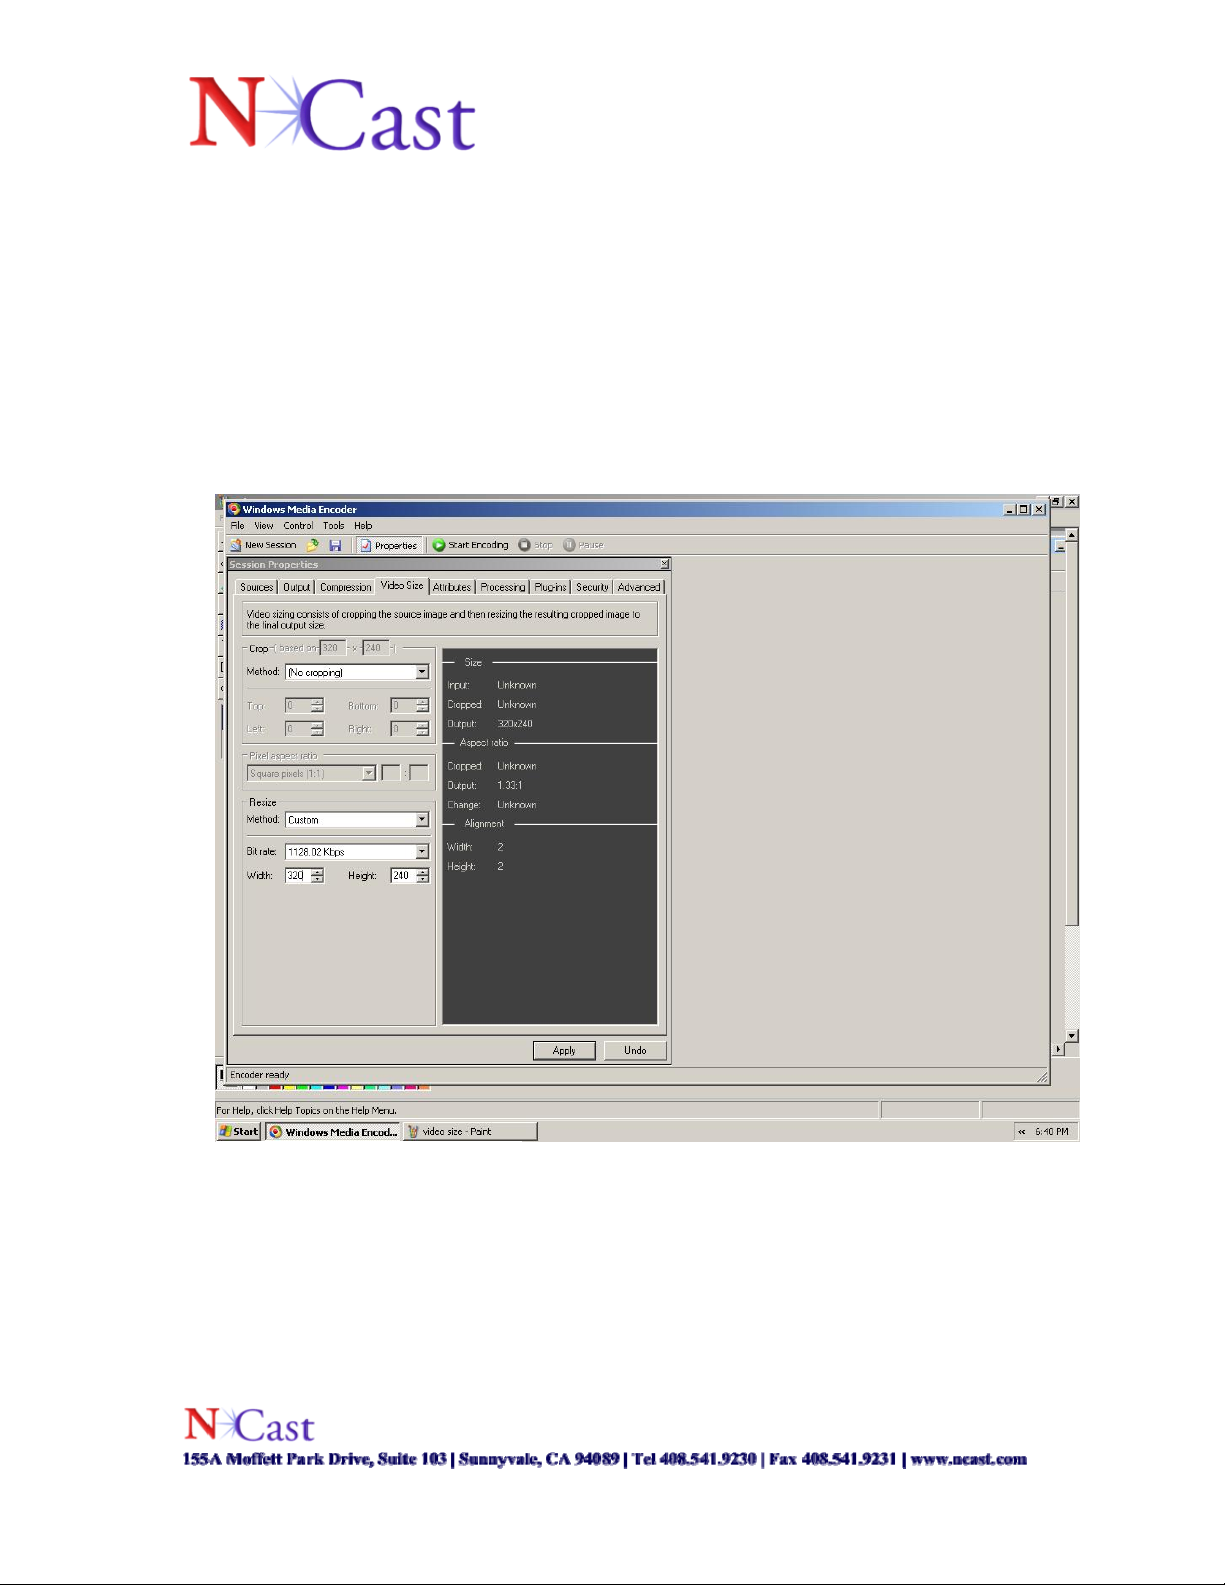
Video Size
• If the user wishes to use a larger capture size than XGA, then they will need to
adjust the properties settings within Windows Media Encoder. Click on the
“Video Size” tab in the “Session Properties” page in Windows Media Encoder.
You should see a similar screenshot as is displayed below.
• The “Width” and “Height” screen allow the user to input the desired size, for
instance UXGA would appear as Width: 1600 and Height: 1200.
Screenshot 6- Video Size
• Following this step, the user can click on the “Start Encoding” button to begin
a session.
Page 13 of 15
Page 14

7. Technical Support
Customers can access support documentation at www.ncast.com. Also, users can send an
e-mail to support@ncast.com with as much information on your reference system as
possible. Also feel free to contact us appropriately below:
NCast Corporation
155 Moffett Park Drive
Suite A-103
Sunnyvale, CA 94089
Tel: 800-765-7718
Fax: 408-541-9231
E-mail: support@ncast.com
Web: www.ncast.com
Page 14 of 15
Page 15
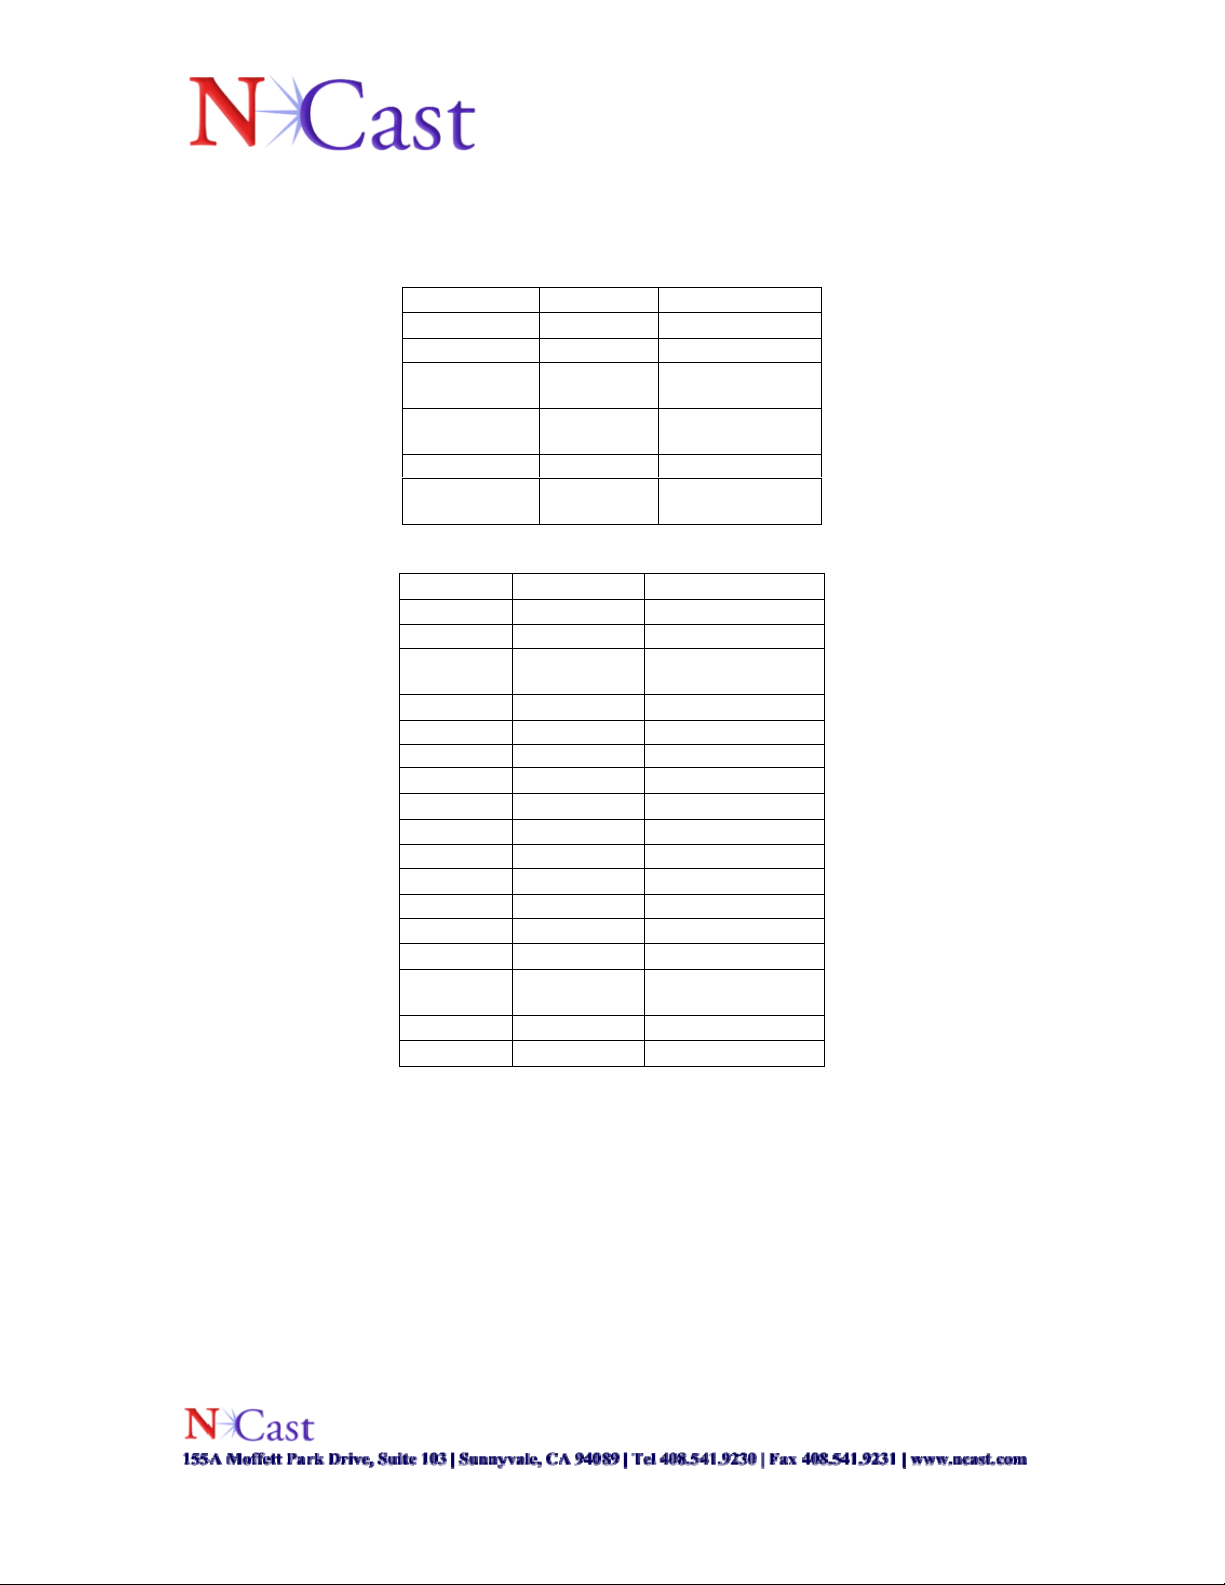
Appendix A
Supported Standard Video Input Modes
Video Resolution Frequency
NTSC- 480i 720x480 60Hz
PAL- 576i 720x576 50Hz
Progressive-
480p
Progressive-
576p
HDTV- 720p 1280x720 50, 60Hz
HDTV- 1080i,
1080p
Supported Standard Graphics Input Modes
Resolution Resolution Frequency
VGA 640x350 70, 85Hz
VGA 640x400 56, 70, 85Hz
VGA 640x480 60, 66, 67, 72, 75,
VGA 640x480 60, 72, 70, 75, 85Hz
SVGA 720x350 70Hz
SVGA 720x400 70, 85Hz
SVGA 800x600 56, 60, 72, 75, 85Hz
SVGA 832x624 75Hz
XGA 1024x768 60, 70, 75, 85Hz
XGA 1152x864 70, 75Hz
XGA 1152x870 75Hz
XGA 1152x900 66, 76Hz
SXGA 1280x960 60, 85Hz
SXGA 1280x1024 60, 67, 70, 72, 75,
UXGA 1600x1200 60, 75Hz
WUXGA 1920x1200 60Hz
720x480 60Hz
720x576 50Hz
1920x1080,
1920x1080
50, 60Hz
85Hz
76, 85Hz
Page 15 of 15
 Loading...