

Page 1

Vers. 1.1
APPCON 3000
Montageanleitung
Installationsvideos unter www.APPCON3000.de
Der APPCON 3000 wurde von Dipl. Ing. Thomas Treyer und Zweiradmechaniker Meister Udo Ochendalski entworfen und gebaut.
Das einzigartige Ergebnis setzt den Standard in der noch neuen
Kategorie der Dynamo Lader am Fahrrad. Als kleines Unternehmen
sind wir auf Ihre Hilfe angewiesen. Wenn Sie der Schuh drückt, zögern Sie bitte nicht uns anzurufen (02234 94 94 000) oder senden
Sie uns eine E-Mail an [email protected]. Wir reagieren umgehend.
Ihre Zufriedenheit ist uns persönlich sehr wichtig. Für uns sind ne-
gative und unqualizierte online Rezensionen verständlicherweise
unnütz. Weder retten sie die Welt damit, noch verbessern sie das
Produkt! Wenn unerwartet Aufgabenstellungen entstehen, die Sie
unzufrieden machen, melden Sie sich bei mir persönlich, bevor Sie
graue Haare bekommen! Ich kläre das umgehend! Versprochen!
Udo@ NC-17.de.
Wichtiger Hinweis
Bitte nutzen Sie den APPCON 3000 immer zusammen mit der Karbon-Schutzröhre, einzige Ausnahme ist die Montage im Steuerrohr
(optional). Die Wandstärke des Aluminiumgehäuses ist sehr dünn,
um eine A-Headset Montage zu ermöglichen. Ein Transport bzw.
Nutzung ohne Protektion Case kann und wird wahrscheinlich nach
einiger Zeit zu kleineren Beulen am APPCON Gehäuse führen.
1
Page 2

Dies ist dann kein Garantiefall. Bitte nutzen Sie die mitgelieferte
Karbon-Schutzröhre.
Wichtiger Hinweis
Nutzen Sie bitte immer die Originalkabel Ihres USB Verbrauchers.
Minderwertige Kabel können zu Verminderung der Ladeleistung
führen oder sogar Fehlfunktionen hervorrufen. Dieses gilt besonders für Nachbauten von Kabel der Firma Apple, aber auch bei
USB-C gibt es schwarze Schafe unter den Ladekabeln.
Wichtiger Hinweis
Grundsätzlich ist der APPCON gut gegen Wassereindringen geschützt IP 68. Es hat sich herausgestellt, dass bei einer Weltumrundung unglaubliche und unvorstellbare Wetter- und Wegbedingungen herrschen. Es ist daher ratsam bei extremen Bedingungen
den APPCON geschützt mitzuführen, z.B. in der A-Headset Monta-
ge oder in einer Tasche. Wenn Sie ihn während der Fahrt genauso
sorgsam behandeln wir Ihr Handy passt das.
Um Eindringen von Wasser zu vermeiden darf der APPCON 3000
keinesfalls mit einem scharfen Wasserstrahl (Schlauch, Hochdruckreiniger) abgespritzt oder untergetaucht werden.
Allgemeines APPCON 3000
Der APPCON 3000 ist genial und simpel zugleich. Er ist dazu bestimmt, Strom aus einem beliebigen Nabendynamo zu gewinnen,
um diesen im APPCON 3000 umzuwandeln, zu speichern und kon-
tinuierlich beliebige USB-Geräte zu versorgen. Grundsätzlich gilt
das Szenario: Sie fahren mit einem vollen Handy los und kommen
mit einem vollen Handy an. Selbstverständlich hängt alles vom geernteten Strom ab, also der Geschwindigkeit und Fahrdauer. Aber
keine Sorge: In den Mikroprozessor im APPCON 3000 sind unsere
2
Page 3

Erfahrungen mit dem Vorgängermodell vollumfänglich eingeossen, sodass man sich viele Gedanke zu diesem Thema machen
kann, aber mit Sicherheit nicht muss.
Zum Verständnis grundsätzlich gilt:
Entwicklungsziel war, auch große Smartphones während der
Radtour mit Strom zu versorgen. Es kann aber nur so viel Strom
entnommen werden, wie Sie erwirtschaften und sich demzufolge
Strom im APPCON 3000 Puffer-Akku bendet. Beim Anschließen
eines sehr großen Verbrauchers, z.B. ein großes Tablet wie das
iPad von Apple, wird der APPCON 3000 seine gesamte Kapazität
innerhalb kürzester Zeit mit bis zu 2 Ampere abgeben. Tablets wie
das iPad haben intern einen viel größeren Akku als der APPCON
3000, typischerweise hat der Akku in einem Tablet ca. 10.000 mAh
Kapazität. Kunden berichten, dass sie ein leeres iPad um 30% aufladen konnten, was deshalb ein sehr guter Wert ist. Beachten Sie
deshalb bitte bei der Bewertung des Ladezustands die Verhältnismäßigkeit.
Ach ja, um eine Frage gleich zu beantworten: Sie können den großen Akku eines Pedelecs nicht mit Nabendynamo und APPCON
3000 laden ;-)
Die Installation ist denkbar einfach.
Mit dem mitgelieferten Dynamokabel verbinden Sie den Naben-
dynamo mit dem 6-poligen Rundstecker des APPCON 3000. Ihr
Handy oder Ihr Navi schließen Sie mit dessen USB-Ladekabel an
die USB-Buchse des APPCON 3000 an. Fertig!
Bei Bedarf können Sie aus dem Appstore unsere App AppConGT
laden, mit der Sie im Zusammenspiel mit dem APPCON 3000 einen vollwertigen Fahrradcomputer erhalten.
Sie müssen sich vorher nur noch Gedanken machen, wie Sie den
APPCON 3000 in Ihr persönliches „Setup“ Ihres Fahrrad integrieren und es kann losgehen…
3
Page 4
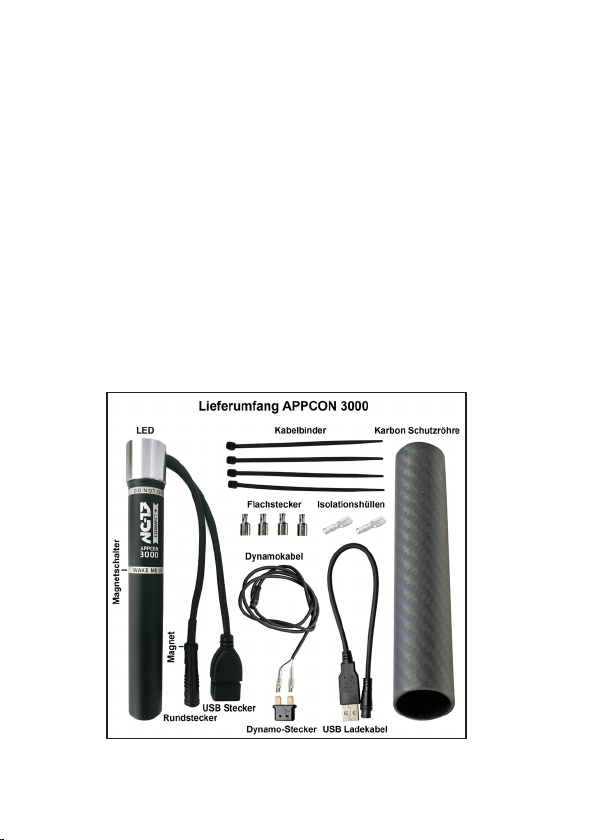
Lieferumfang
1x Anleitung
1x APPCON 3000
1x APPCON 3000 Karbon-Schutzröhre
1x Dynamokabel zum APPCON 3000
1x Y Steckverbinder
1x Dynamo-Stecker
1x USB-Ladekabel für APPCON 3000 (Anschluss an USB-Ladegerät)
4x Kabelbinder
4x Flachstecker
2x Isolationstülle
Empfohlenes Werkzeug: (falls nötig)
Flachzange zur Montage der Flachstecker
Seitenschneider oder scharfe Schere zum Abschneiden/Abisolieren der Kabel und Kabelbinder.
Eine Video-Anleitung zur Montage nden Sie auf www.Appcon3000.de
oder YouTube
4
Page 5

Hauchen Sie ihrem APPCON 3000 Leben ein:
Der APPCON 3000 verfügt über zwei Schlafmodi. (Zeltmodus und
Tiefschlaf-Modus). Nach dem Kauf ist der APPCON 3000 im Tiefschlaf Modus. Im Tiefschlaf ist die Selbstentladung des APPCON
3000 extrem gering. Sie haben zwei Möglichkeiten, den APPCON
3000 zu wecken:
Die naheliegendste Möglichkeit ist es, den APPCON 3000 mit dem
Dynamo Ihres Rades zu verbinden. Wenige Radumdrehungen reichen nun und die LED des APPCON 3000 begrüßt Sie mit einem
bunten Farbenspiel.
Wenn Sie gerade kein Fahrrad zur Hand haben, können Sie den
APPCON 3000 auch mit dem mitgelieferten USB-Ladekabel an
ein USB-Ladegerät oder an einen USB-Port eines Computers anschließen. Auch hier reichen wenige Sekunden und der APPCON
3000 ist wach.
Nach einiger Zeit der Nichtbenutzung geht der APPCON 3000 in
den einfachen Schlafmodus, den sogenannten Zelt-Modus. Die
LED ist aus. In diesem Zelt-Modus lässt sich der APPCON 3000
ohne externe Hilfsmittel aufwecken, was ideal ist, wenn Sie den
APPCON 3000 vom Fahrrad mitnehmen und abends im Zelt ein
USB-Gerät laden wollen (daher der Name Zelt-Modus).
Nach weiteren 2 Wochen der Nichtbenutzung geht der APPCON
3000 automatisch in den Tiefschlaf. Damit übersteht der APPCON
3000 problemlos auch eine längere Winterpause.
Das Aufwachen aus dem Zelt-Modus ist weiter unten in der Anleitung beschrieben.
INFORMATION: Das Öffnen des APPCON 3000 ist aus Sicherheitsgründen in keinem Fall gestattet. Beim unautorisierten Öffnen
des APPCON 3000 verlieren Sie jeglichen Garantieanspruch und
es geschieht selbstverständlich auf eigenes Risiko. Wir können
5
Page 6

keinen Service für geöffnete Geräte anbieten. Für diesen Fall ist
extra von uns eine Sicherung eingebaut, die zweifelsfrei die unautorisierte Öffnung nachweist.
Persönliches Setup
Wir haben uns hunderte Trekking-Räder angesehen und keines
glich dem anderen. Die Individualität in der persönlichen Nutzung
ist einzigartig. Wir lieben das Radfahren! Wir Radler sind Individua-
listen, es wird keine Standardlösung geben können. Deshalb empfehlen wir folgende Montagevarianten mit der Gewissheit, dass es
viele Lösungen geben wird.
NC-17 Tasche (optional Artikel Nr. 4079)
NC-17 A-Headset (optional Artikel Nr. 4083)
NC-17 Flaschenhalter (optional Artikel Nr. 4028)
Wie auch immer Sie Ihr Setup gestalten möchten: Bitte beachten
Sie, dass die USB-Buchse frei nach unten hängen muss, damit
kein Regen hineinlaufen und sich ansammeln kann. Ebenso ist die
ungeschützte Montage im Spritzbereich des Vorderrades zu ver-
meiden, Goldkontakte lieben keinen Schlamm!
Beispiel Setup mit einer Tasche
Überlegen Sie, wie Sie den APPCON 3000 an Ihrem Fahrrad mitführen wollen. Überlegen Sie, wo Sie die beiden Kabel vom APPCON 3000 verbinden möchten. Z.B. außerhalb einer Tasche oder
innerhalb einer Tasche. Überlegen Sie, ob Sie die Tasche immer
am Rad lassen (Festmontage) oder ob Sie die Tasche immer mitnehmen wollen.
Bei einer Festmontage der Tasche ist es sinnvoll, die Kabel in der
Tasche zu verbinden. Wollen Sie die Tasche mitnehmen, geht es
schneller die Steckverbinder außerhalb der Tasche zu verbinden.
Grundsätzlich ist es natürlich ratsam, alle Steckverbindungen in
der Tasche vorzunehmen, um vor Regen geschützt zu sein.
6
Page 7
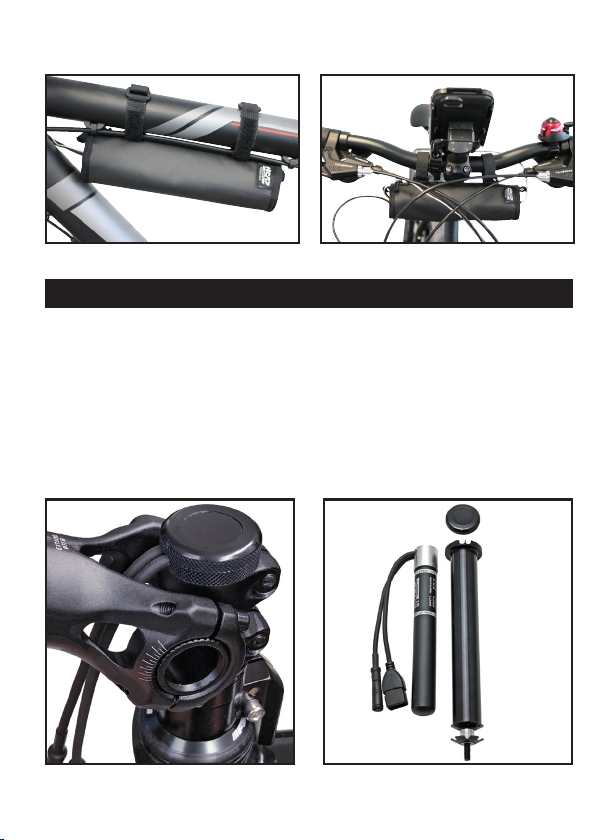
Wir empfehlen Ihnen erst die Kabelführung zu organisieren und erst
dann die Kabelbinder zur Fixierung der Dynamoleitung zu montieren.
Beispiel: Oberrohrmontage (optional) Lenkermontage Tasche (optional)
Beispiel Setup A-Headset Montage
Bei der A-Headset Montage (optional) wird anhand eines Adapters
der APPCON 3000 in das Steuerrohr Ihrer Fahrradgabel gescho-
ben und xiert. Diese etwas aufwendige Montage kann nur vom
Fachhändler durchgeführt werden.
Eine separate Montageanleitung liegt dem Adapter bei. Hinweis:
Die A-Headset Montage ist nicht für alle Gabeln geeignet. Nähere
Angaben hält Ihr Fachhändel für Sie bereit.
Beispiel: A-Headset Montage (optional)
7
Page 8
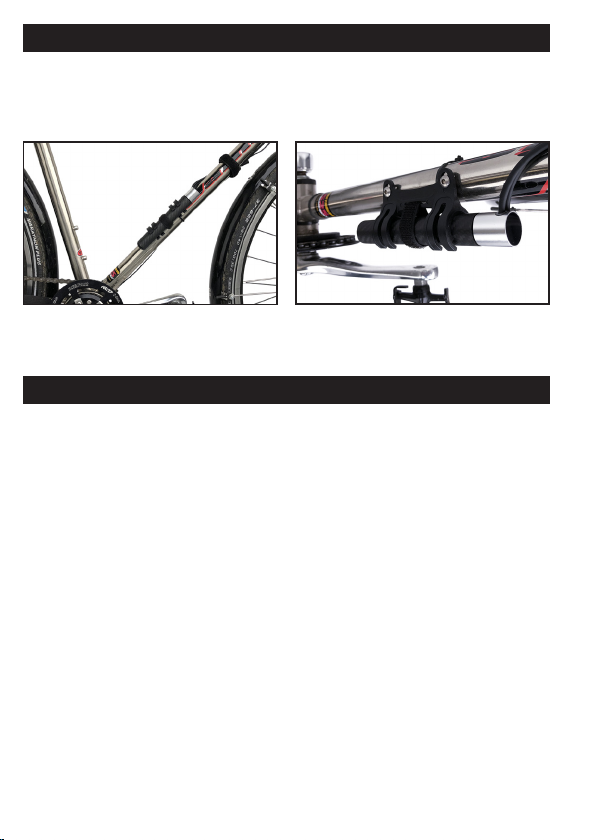
Beispiel Flaschenhalter-Montage optional
Bei der Flaschenhalter-Montage wird der APPCON 3000 seitlich
unterhalb der Wasserasche anhand eines Aluminium Adapters
montiert (optional).
Diese Montageart wird nur empfohlen, wenn Hinter- und Vorderrad
mit Schutzblechen versehen sind.
Installation Dynamo Kabel
1. Sie nutzen den Dynamo nicht, um Ihre Lichtanlage zu speisen
2. Sie nutzen einen Shimano Dynamo und speisen damit Ihr Licht
3. Sie nutzen einen SON Dynamo und speisen damit Ihr Licht
1. Sie nutzen den Dynamo nicht, um Ihre Lichtanlage zu speisen
Das ist einfach. Im Falle von Shimano stecken Sie einfach den
vorkonfektionierten Dynamo Stecker auf den Dynamo Nabenanschluss. Sehen Sie sich den Stecker an, er kann nur von einer
Seite aufgeschoben werden. Im Falle einer SON Nabe müssen
Sie die beiden Flachstecker von dem vorkonfektionierten Dynamo
Stecker abgezogen werden um sodann auf den SON wieder aufgesteckt zu werden. Falls die Flachstecker locker sitzen, kann es
sein, das Sie mit einer Zange die Flachstecker etwas zusammen-
drücken müssen, um eine stramme Verbindung zum SON Dynamo
herzustellen. Beim SON Dynamo ist die Polung nicht relevant. Also
einfach anstecken.
8
Page 9
2. Sie nutzen einen Shimano Dynamo und speisen damit Ihr Licht
Aus historischen Gründen verbindet Shimano einen der beiden
Pole mit der Metallachse des Vorderrades. Da auch der Frontscheinwerfer einen der beiden Pole mit dem Fahrradrahmen verbindet, entsteht hier die Möglichkeit, das Lichtkabel so zu stecken,
dass beide Pole irgendwie mit dem Metall des Fahrradrahmens
verbunden sind und kein Licht mehr leuchtet. Die schlechte Nachricht zuerst: Man kann die beiden Adern des Lichtkabels falsch mit
dem Dynamo verbinden. Die gute Nachricht: Es gibt nur zwei Möglichkeiten und es kann nichts kaputt gehen.
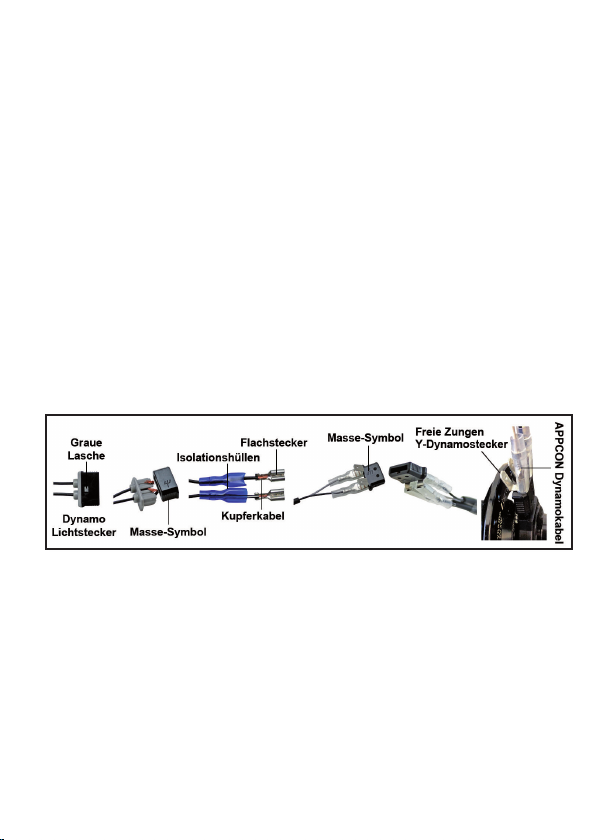
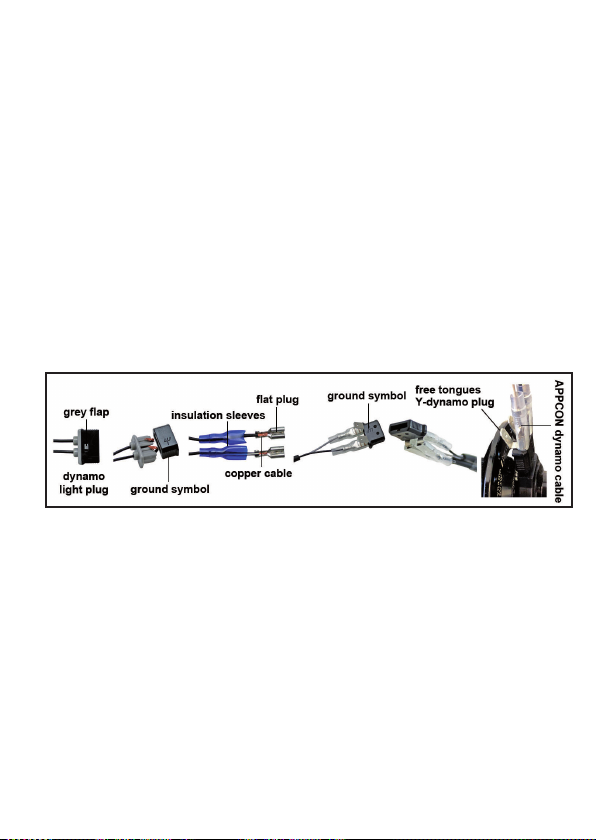
Schauen Sie sich deshalb das vorhandene Lichtkabel am Nabendynamo genau an. Einer der beiden Anschlüsse am Dynamo-Stecker ist mit einem Masse-Symbol gekennzeichnet. Üblicherweise
hat eine der beiden Adern des Lichtkabels einen weißen Strich,
damit man die Adern unterscheiden kann.
Warnhinweis: Die Flachstecker und Y-Stecker sind bestimmungs-
gemäß aus dünnem Blech hergestellt. Ein mehrmaliges hin- und
herbiegen wird unweigerlich zum Bruch des Bauteils führen.
Bevor Sie den Dynamo-Lichtstecker am Dynamo abziehen, stellen
Sie fest, welche Ader am Massezeichen konfektioniert ist. Machen
Sie sich bitte eine Notiz. Lösen Sie nun den alten grau-schwarzen
Dynamostecker vom Dynamo. Trennen Sie nun den grauen vom
schwarzen Teil des alten Dynamosteckers, indem Sie mit einem
kleinen Schraubendreher die graue Lasche etwas hineindrücken.
9
Page 10

Die beiden Adern des Lichtkabels lassen sich nun leicht aus dem
alten Dynamostecker herausnehmen.
Schieben Sie nun die im Lieferumfang enthaltenen Isolationshüllen
jeweils auf eine Ader auf. Kürzen Sie nun mit einer Zange/Messer die Kupferkabel, sodass sie in die im Lieferumfang beiliegenden Flachstecker eingelegt werden können, ohne dass sie in den
Klemmbereich reinragen. Drücken Sie nun den Flachstecker mit
der Kabelisolierung zusammen und schieben Sie die zuvor aufgeschobenen Isolierhülle über den Flachstecker.
Soweit so gut. Schieben Sie nun die beiden Stecker auf die freien
Zungen des Y-Dynamosteckers auf. Achten Sie bitte darauf, dass
die Masse-Ader an der gleichen Stelle montiert ist wie sie zuvor
montiert war (Ihre Notiz). Stecken Sie jetzt den Stecker, der nun mit
2 Kabeln bzw. 4 Adern versehen ist, auf die Dynamo-Nabe auf. Je
nach Bauraum am Nabendynamo kann es hilfreich sein den Y-Stecker umzudrehen, sodass er auf die Gabelseite zeigt. Hierzu kann
nicht der Adapter gedreht werden, sondern die Flachstecker selbst.
Hinweis: Wenn Sie während der Montage die Flachstecker unseres
Kabels vom Shimano-Adapter abziehen, müssen Sie später beim
Aufstecken der Flachstecker beachten, dass unsere weiße Ader
mit dem Massesymbol auf dem Shimano Adapter verbunden wird.
3. Sie nutzen einen SON Dynamo und speisen damit Ihr Licht
Im Auslieferungszustand des Kabels ist der Shimano Adapter
aufgesteckt (Schwarzer Kunststoffkörper mit grauem Einsatz).
Der Shimano Adapter wird bei einem SON Dynamo nicht benötigt. Lösen Sie deshalb die vorkonfektionierten Flachstecker des
APPCON 3000 Dynamo Kabels von dem Shimano Adapter. Sitzen
diese zu schwer, müssen Sie eine Zange zu Hilfe nehmen. In Ihrer
Hand liegen nun der Y-Stecker und der Dynamo Stecker. Ziehen
10
Page 11

Sie die beiden Lichtkabel vom SON Dynamo ab und stecken Sie
die APPCON 3000 Y-Stecker an diese Stelle am Dynamo auf.
Die nun vom SON Dynamo abgezogenen Kabel werden dann auf
den Y-Stecker wieder aufgeschoben. Es kann sein, dass die Flachstecker vom Licht zu leicht oder zu schwer auf den Y-Stecker aufgeschoben werden können. In diesem Fall müssen Sie den Flachstecker mit der Zange leicht weiten oder zusammendrücken.
Anschluss an den APPCON 3000
Die Verkabelung an der Dynamoseite sollte jetzt abgeschlossen
sein. Bevor Sie nun die mitgelieferten Kabelbinder zur Befestigung
der Dynamoleitung nutzen, überlegen Sie sich genau, wo und wie
sie die Steckverbindung zum APPCON 3000 arrangieren wollen.
Gegebenenfalls müssten Sie sich weitere Kabelbinder besorgen.
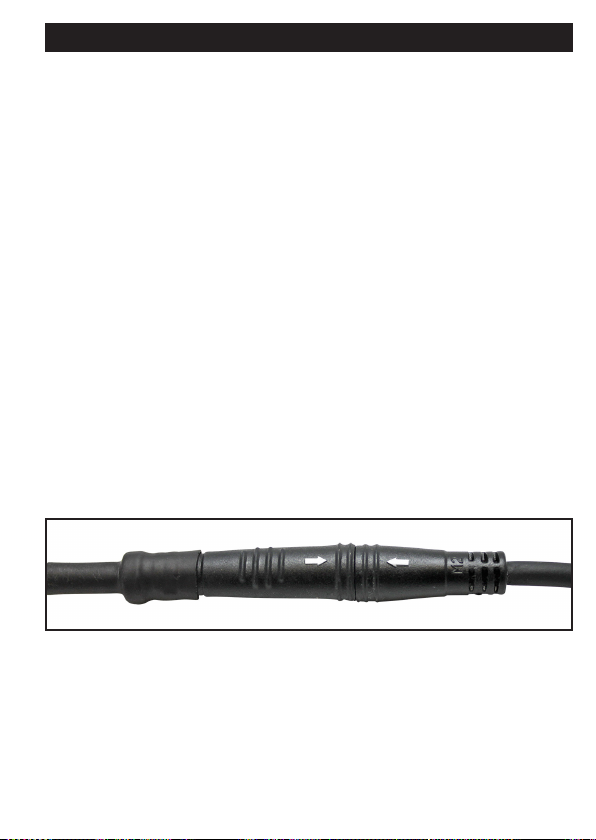
Stecken Sie den Rundstecker des Kabels in das Gegenstück des
APPCON 3000. Bitte achten Sie beim Einstecken unbedingt auf
die zu sehenden Positionspfeile, die beim Zusammenschieben
zueinander zeigen müssen. Da es sich um einen wasserfesten
Stecker handelt, wird die eigentliche Steckverbindung einen spürbaren Kraftaufwand erfordern. Deshalb ist es umso wichtiger, dass
die Pfeile zueinander zeigen, um Schäden an den Pins des Steckers auszuschließen.
Warnhinweis: Stehen die beiden Pfeile beim Zusammenschieben
nicht übereinander, werden Sie den Stecker zerstören, was zum
unmittelbaren Ausfall der Ladeverbindung führt. Des Weiteren wird
es darauf hinauslaufen, dass der APPCON 3000 nicht mehr einsatzbereit ist und Sie ihn zu einer kostspieligen Reparatur einsenden müssen. Achten Sie deshalb besonders beim Zusammenstecken auf die richtige Positionierung der Stecker, sodass die Pfeile
zueinander zeigen. Danke!
11
Page 12
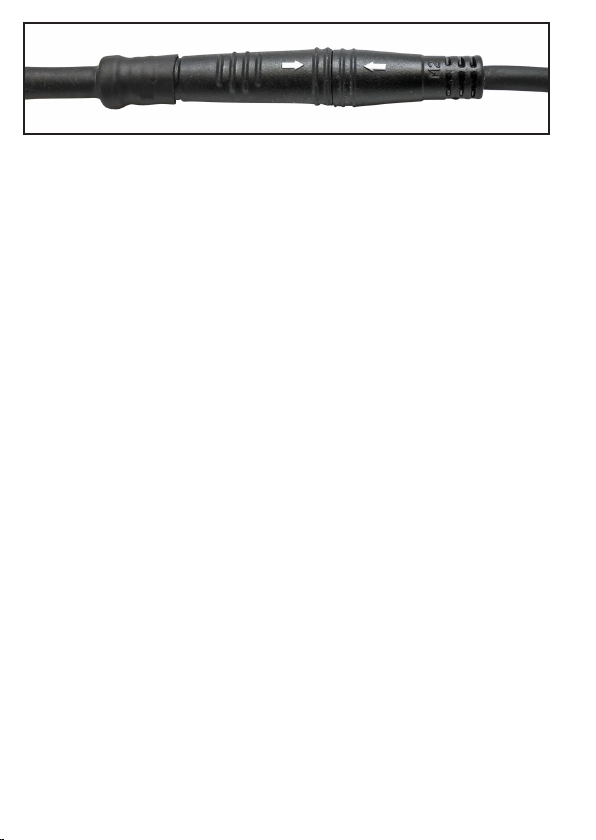
Tipp: Sollten Steckverbindungen sehr schwergängig sein, können
Sie den Rundstecker etwas von außen fetten (z.B. Kugellagerfett).
Licht abschaltbar
Hinweis: Für die Verwendung des APPCON 3000 ist ein Fahrlicht
mit An- und Ausschalter oder eine Sensor-Automatik Voraussetzung für eine einwandfreie Funktion. Während eingeschaltetem
Licht lädt der APPCON 3000 nur ungenügend mit ca. 1 Watt.
Übrigens wie alle anderen auch.
Lichtkabel Test
Testen Sie jetzt, ob das Licht funktioniert. Wenn es überhaupt nicht
oder nur schwach leuchtet, kann es daran liegen, dass der Masse-
Anschluss des alten Lichtkabels vertauscht ist. Vertauschen Sie in
diesem Fall die beiden Anschlüsse des alten Lichtkabels. Wie auch
immer können Sie dabei nichts kaputt machen. Keine Sorge. Fahren Sie nun ein kurzes Stück mit dem Fahrrad (5 Meter reichen).
Die LED des APPCON 3000 sollte nun blau blinken.
Damit haben Sie die Montage erfolgreich abgeschlossen!
Wenn es irgendwo hapert und Sie graue Haare bekommen (oder
vorher), rufen Sie wenn möglich schon vorher bei unserer Hotline
an: +49 (0) 2234-9494000 ersatzweise +49 (0) 2234 20 38 911
oder [email protected]. Danke
12
Page 13

Wichtiger Hinweis
Um Eindringen von Wasser zu vermeiden darf der APPCON 3000
keinesfalls mit einem scharfen Wasserstrahl (Schlauch, Hochdruckreiniger) abgespritzt oder untergetaucht werden. Nutzen sie
immer die mitgelieferte Carbon Schutzhülle für den APPCON 3000.
Lichtanlage
Der APPCON 3000 „erntet“ die Energie des Nabendynamos und
lädt damit seinen internen Akku. Der APPCON 3000 bezieht aber
nur dann Energie vom Nabendynamo, wenn die Fahrradbeleuchtung ausgeschaltet ist.
Sie schalten das Energiemanagment des APPCON 3000 also ein,
indem Sie die Fahrradbeleuchtung ausschalten. Nachts ist es deshalb für den APPCON 3000 nicht möglich oder sinnvoll, Energie
zu ernten.
Wir empfehlen, den Fahrrad-Scheinwerfer auf Automatik-Mode zu
stellen, so dass er tagsüber automatisch abgeschaltet ist. Wenn Ihr
Scheinwerfer über ein Tagfahrlicht verfügt, sollten Sie es abschalten. Bei eingeschaltetem Tagfahrlicht erntet der APPCON 3000
nur sehr wenig Energie! Schalten Sie nachts und in der Dämmerung das Licht Ihres Fahrrads nicht aus, um dem APPCON 3000
mehr Energie des Dynamos zur Verfügung zu stellen. Die Sicherheit im Straßenverkehr hat Vorrang! Fahren Sie in der Dämmerung
und nachts immer mit Licht! Beachten Sie bitte die vor Ort herrschenden gesetzlichen Bestimmungen und achten Sie auf ihre
Sicherheit.
Hinweis: Auch wenn der APPCON 3000 nur sehr wenig Energie
ernten kann, weil die Fahrradbeleuchtung eingeschaltet ist, kann
er dennoch jederzeit die Bluetooth-Schnittstelle bedienen und eine
Tacho-App auf Ihrem Smartphone mit Daten über Strecke und Geschwindigkeit ausführen. Darüber hinaus kann der APPCON 3000,
13
Page 14

falls sein interner Akku ausreichend geladen ist, ein USB-Gerät
über seine USB-Buchse laden.
Hinweis: APPCON 3000 ist ein sehr efzienter und leistungsstar-
ker Lader, der seine internen Parameter im Interesse einer maximalen Lebensdauer kontinuierlich überwacht. Dazu gehört auch
die Temperatur. Bei einer Überhitzung schaltet der APPCON 3000
den Dynamo-Eingang für die Zeit der Überhitzung ab, die LED
leuchtet weiß/rot. Bei ganz extremen Temperaturen wird auch der
USB-Ausgang abgeschaltet. Nach der Abkühlung geht es weiter
wie gewohnt. Kaputt gehen kann dabei nichts.
Laden des Smartphones
1. Um die APPCON 3000 Funktion zu nutzen, benötigen Sie keine
App. Wir empfehlen jedoch den Einsatz unserer App, Sie erhalten somit einen vollwertigen Fahrradcomputer und sehen den
Ladezustand des Akkus.
2. Schließen Sie das Original USB-Ladekabel Ihres Smartphones
an die USB-Buchse des APPCON an. Hinweis: Sie können na-
hezu alle USB-Geräte laden.
3. Fahren Sie eine kurze Strecke, falls nötig, (5 Meter reichen), um
den APPCON 3000 aufzuwecken. Die LED im dunklen Glasdeckel blinkt.
4. Eine grün oder blau blinkende LED bedeutet, dass der interne
Akku des APPCON 3000 ausreichend geladen ist, um sofort mit
dem Ladevorgang beginnen zu können.
5. Eine rot blinkende LED bedeutet, dass der interne Akku des APPCON 3000 leer ist. Sie können nun den APPCON 3000 mit
dem mitgelieferten USB-Ladekabel an einem USB-Ladegerät
auaden oder durch Fahren mit Ihrem Fahhrad.
6. Schnelladetechnik Handys: Der APPCON muss erst auf 17%
am Bike geladen werden bevor sich der USB Ausgang öffnet
14
Page 15

(LED rot). Dieser Wert ist der Schnellladetechnik der modernen
Handys geschuldet (ist kompliziert). Es gibt für Sie nichts zu beachten, es wird alles automatisch geregelt. Wollen Sie dennoch
an die Restkapazität des APPCONS rankommen müssten Sie
den APPCON in der APP neu booten. (Mehr Infos darüber im
Blog unter www.appcon3000.de).
7. Im Lieferumfang bendet sich auch ein USB Ladekabel, das
mit Ihren USB-Netzteilen kompatibel ist. Sie können damit den
APPCON 3000 zuhause laden. Beschreibung folgt unter weiter
unten.
8. Der Ladevorgang des Smartphones wird auch dann fortgesetzt,
wenn Ihr Fahrrad steht oder die Fahrradbeleuchtung eingeschaltet wird. Die dafür notwendige Energie bezieht der APPCON 3000 aus seinem internen Akku.
9. Wenn das Fahrrad ca. 2 Minuten steht, schaltet sich der
APPCON 3000 ab. Seine USB-Buchse wird dann stromlos
wenn kein Abnehmer z.B. ein Handy angeschlossen ist. Ist ein
Handy angeschlossen wird weiter geladen.
Zelt-Modus
Der Akku des APPCON kann auch als normale Powerbank genutzt
werden. Das Auaden an der Steckdose erfolgt über ein normales
USB-Netzteil z.B. das Ladegerät Ihres Smartphones. Das dazu nötige Ladekabel ist im Lieferumfang enthalten. Voraussetzung zur
Nutzung des Zelt-Modus ist das der APPCON nicht im Tiefschlaf ist.
Hinweis Tiefschlafmodus: Der APPCON geht nach 2 Wochen der
Nichtnutzung in einen Tiefschlafmodus und schaltet ab. Keine LED
blinkt mehr. Es wird kein Status über Bluetooth gemeldet. Montiert
am Rad wacht der APPCON 3000 wieder auf, sobald das Laufrad
sich bewegt. Ebenso wacht er automatisch auf, wenn Sie über das
mitgelieferte USB-Ladekabel ein USB-Netzteil anschließen.
15
Page 16
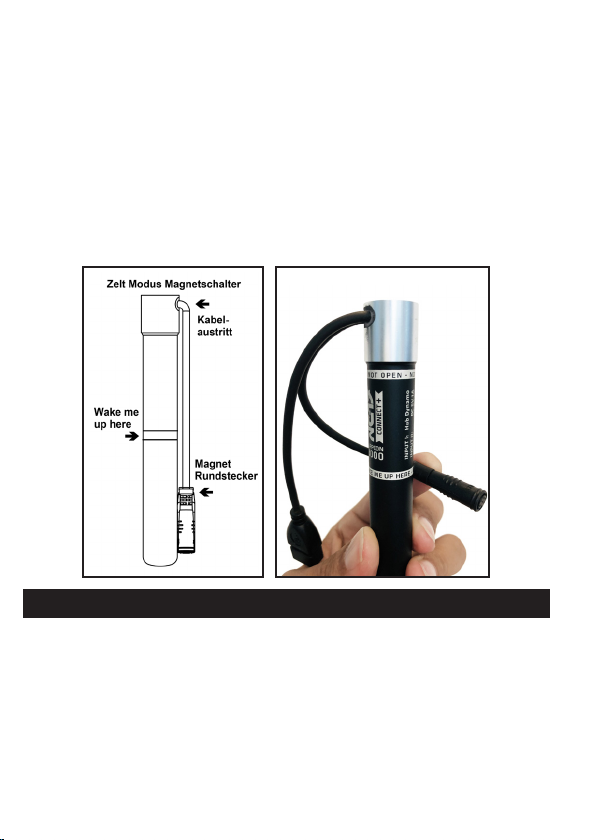
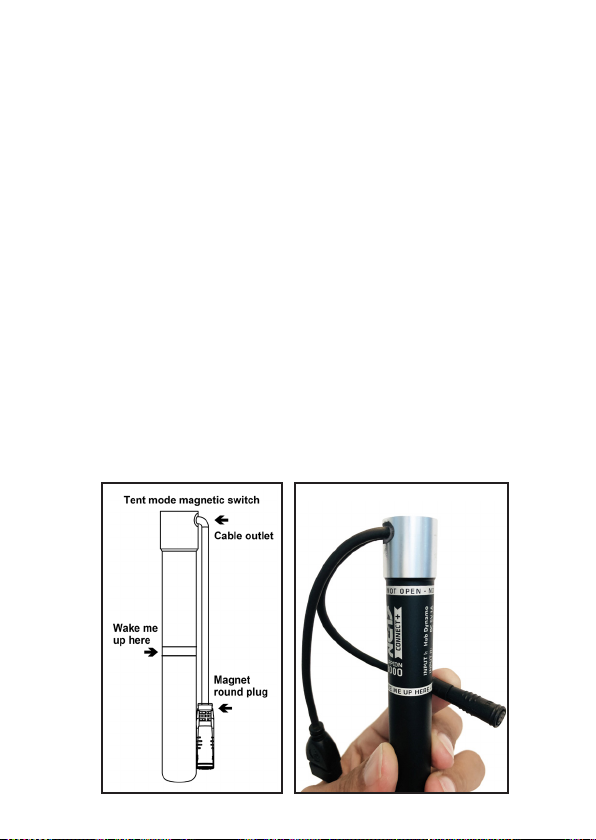
Zum Aufwecken z.B. im Zelt (vorausgesetzt der APPCON ist nicht
im Tiefschlaf) müssen Sie den eingebauten Magneten des Rundsteckers auf die Gravierung (wake me up here) bewegen. Hier-
durch wird ein Magnetschalter betätigt. Die genaue Position ist
gegenüber dem Kabelaustritt aus dem Gehäuse. Das zu wissen
ist hilfreich, da Sie durch die Carbon Schutzhülle die Gravierung
nicht sehen können. Das hört sich jetzt komplizierter an wie es ist.
Einfach mit dem eingebauten Magneten des Rundsteckers über
die Aufweckposition am Gehäuse streichen. Der Erfolg des Auswa-
chens wird durch das Blinken der LED angezeigt.
LED Status Anzeige APPCON 3000
Die LED ist entweder aus oder sie blinkt in verschiedenen Farben,
um den Status anzuzeigen (rot, grün oder blau).
Erste Inbetriebnahme:
Im Auslieferungszustand bendet sich Ihr APPCON 3000 im Tiefschlaf, die LED ist aus. Um ihn zu wecken, reicht es, den APPCON
an einen Nabendynamo oder ein USB-Ladegerät anzuschließen.
16
Page 17

Nach wenigen Sekunden begrüßt Sie die LED des APPCON in allen Farben. APPCON 3000 ist nun gebootet und einsatzbereit.
LED blinkt blau:
APPCON 3000 ist eingeschaltet und kann ein angeschlossenes
USB-Gerät laden. Bluetooth ist kopplungsbereit. Alles ist perfekt
und arbeitet so wie es soll.
LED konstant blau:
APPCON 3000 ist eingeschaltet und kann ein angeschlossenes
USB-Gerät laden. Er ist mit Ihrem Handy gekoppelt, Tachofunktionen sind aktiv.
LED blinkt langsam grün für 60 sec.:
APPCON 3000 hat die Bluetooth-Verbindung abgeschaltet und
hält den USB Ausgang für 1 Minute offen. Bei Nichtnutzung des
USB Ausgangs geht der APPCON in den Zelt-Modus, die LED geht
aus. Mit dem Magnet können Sie jederzeit den USB Port wieder
öffnen. Ist der USB Ausgang in Benutzung blinkt die grüne LED.
LED blinkt rot:
APPCON 3000 ist eingeschaltet. Sein Akku ist leer. Bluetooth ist
kopplungsbereit, er kann aber kein angeschlossenes USB-Gerät
laden.
LED konstant rot:
APPCON 3000 ist eingeschaltet. Sein Akku ist leer. Er ist über
Bluetooth mit Ihrem Handy gekoppelt, Tachofunktionen sind aktiv,
er kann erst ab 17% Ladung ein angeschlossenes USB-Gerät laden.
Aufwecken / Einschalten:
Wenn die LED aus ist, können Sie kein USB-Gerät laden. Sie können aber den APPCON 3000 einfach aufwecken, indem Sie den
Magnet um die Gehäusemitte herum führen (Aufwecken aus dem
Zeltmodus). Nach dem Aufwecken blinkt die LED blau Bluetooth
17
Page 18

bereit 1 Min und dann grün 1 Min dann geht die LED aus. Ist ein
USB Verbraucher angerschlossen wir dieser solange geladen bis
der APPCON leer ist. Ist kein USB Verbraucher angeschlossen
schaltet der APPCON den USB Port nach 2 min ab.
Aufwecken aus dem Tiefschlaf:
Wenn Sie den APPCON 3000 mehr als 2 Wochen nicht benutzen,
geht das Gerät in einen Tiefschlaf, in dem die Selbstentladung des
Akkus sehr gering ist. Nun kann ein Magnet den APPCON 3000
nicht mehr einschalten. Wie bei der ersten Inbetriebnahme können
Sie den APPCON einfach wieder einschalten, indem Sie ihn an
den Nabendynamo oder ein USB-Ladegerät anschließen.
APPCON App
Grundsätzlich ist der APPCON ein Lader zur Stromversorgung am
Fahrrad. Als kleiner Betrieb sind wir sehr stolz auf das Ergebnis.
Die App ist eine Ergänzung zum APPCON 3000 und braucht noch
die eine oder andere Verbesserung. Seien Sie also bitte nicht so
streng mit uns, wir arbeiten daran und sind für Verbesserungsvorschläge offen.
Hinweis: Der APPCON kann jederzeit ohne App betrieben werden. Unsere App greift auf keine ihrer persönlichen Daten zu bzw.
falls doch (Apple Health) werden sie nur auf Ihrem Handy gespeichert. Es gibt keinerlei Gedanken oder Bestrebungen von uns, Ihre
Daten zu ermitteln, geschweige denn sie weiterzugeben.
Es wird eine Servicefunktion geben bei der der APPCON-Status
zur Fehleranalyse durch den Anwender ausgelesen werden kann.
Diese generierte Datei kann NC-17 per E-Mail zur Analyse gesendet werden. Alle Daten werden im Klartext in der E-Mail stehen. Es
werden keine weiteren Daten übermittelt.
Bitte beachten Sie unsere Datenschutzverordnung auf unserer
Webseite www.NC-17.de
18
Page 19

Die kostenlose App „AppConGT“ können Sie aus dem App Store
für iOS oder dem Play Store für Android herunterladen. Diese App
verwandelt Ihr iPhone oder Android-Telefon in einen komfortablen Fahrrad-Computer und führt z.B. ein Tagebuch über alle Ihre
Fahrrad-Touren.
Bluetooth-Kopplung
Hinweis: Nicht alle Handys unterstützen das benötigte Bluetooth
4.0 Protokoll. Es kann sein, dass möglicherweise in sehr wenigen
Fällen bei älteren Telefonen ein Update nötig wird.
TIPP: Haben Sie Probleme beim Laden Ihres Handys mit dem AP-
PCON 3000 oder bei der Herstellung der Bluetooth Verbindung,
dann leihen Sie sich von Bekannten ein Apple oder Samsung Ge-
rät neuerer Generation. Wenn dann alles funktioniert, haben Sie
weitestgehend alle Fehler der Verkabelung oder des APPCON
ausgeschlossen.
Wenn Sie eine App auf Ihrem Smartphone nutzen wollen, müssen
Sie den APPCON 3000 mit der App koppeln, damit Daten vom APPCON 3000 an das Smartphone übertragen werden können. Diese Kopplung müssen Sie nur einmal durchführen, und zwar direkt
in der App und nicht im Betriebssystem. Sowohl das Smartphone
als auch der APPCON 3000 speichern die Kopplung und erkennen
sich bei der nächsten Radtour automatisch wieder, ohne dass Sie
noch einmal manuell die Kopplung durchführen müssen.
1. Laden Sie unsere kostenlose APPCON App AppConGT oder
eine andere App, die das Bluetooth-4.0 Protokoll unterstützt aus
dem Apple App Store oder Google Play Store.
2. Beachten Sie bitte, dass der APPCON 3000 direkt in der App
angemeldet wird und nicht im Betriebssystem.
3. Fahren Sie eine kurze Strecke ( 5 Meter reichen), um den AP-
PCON 3000 einzuschalten oder nutzen Sie den Zeltmodus
19
Page 20

Schalter. Die LED unter der verdunkelten Scheibe blinkt. Die
Kopplungsbereitschaft wird durch ein blaues oder rotes Blinken
signalisiert.
4. Die Bluetooth-Schnittstelle des APPCON ist nun aktiv. Sie haben ab jetzt 60 Sekunden Zeit, die App mit dem APPCON in den
Einstellungen der App zu koppeln. Folgen Sie dazu den Anweisungen der App (App-Einstellungen).
5. In den Einstellungen können Sie u.a. für Ihr Rad Reifengröße
und die Polzahl Ihres Dynamos eingeben. Fertig.
6. Beachten Sie bitte, dass der APPCON 3000 nur eine Verbindung simultan unterstützt. Sie können nicht gleichzeitig einen
APPCON 3000 an zwei Telefonen betreiben. Geht technisch leider nicht.
7. Die App hingegen unterstützt mehrere Verbindungen simultan.
Es ist möglich, zusätzlich zum APPCON 3000 noch weitere
Bluetooth-Sensoren zu koppeln, z. B. die Cadence- oder PulsSensoren von NC-17.
Wichtiger Hinweis: Firmware Update
Ihr APPCON 3000 verfügt über die Möglichkeit, immer auf dem
aktuellsten Stand zu sein.
Möglich wird das durch sogenannte Firmware-Updates, die wir mit
der App ausliefern. Wenn ein Update vorliegt, wird Sie die App informieren. Planen Sie ca. 10 min Zeit ein. Ein Fortschrittsbalken
wird angezeigt.
Laden des APPCON durch ein Netzteil
(Netzteil nicht im Lieferumfang)
Verwenden Sie nur handelsübliche USB-Netzteile mit 5 Volt, andernfalls kann der APPCON beschädigt werden. Hinweis: Sehr oft
eignet sich auch das Original Ladegerät Ihres mobilen Gerätes.
Im APPCON Lieferumfang bendet sich das Ladekabel mit USB
20
Page 21

Anschluss zum Netzteil und einem 6-poligen Rundstecker, der in
den APPCON gesteckt wird.
Ihr APPCON wird nun geladen und die LED leuchtet oder blinkt
blau, solange der Auadevorgang dauert. Sowie der APPCON
3000 geladen ist, wechselt die LED zu grün. Sind Sie neugierig?
Sie können während des Ladevorgangs unsere App auf Ihrem
Smartphone nutzen und sich den Ladezustand des Akkus in Prozent anzeigen lassen. Nachdem Sie den APPCON vom Netzstecker getrennt haben, geht er automatisch in den Zelt-Schlafmodus.
Hinweis: Wenn der APPCON 3000 über USB geladen wird, ist sein
USB-Ausgang abgeschaltet. Sie können also nicht gleichzeitig
ein anderes USB-Gerät laden, während der APPCON 3000 selbst
über USB geladen wird.
Für weitere Infos folgen Sie unserem Blog: www.APPCON3000.de
Bestimmungsgemäße Verwendung
Die APPCON 3000 Lade-Elektronik erntet aus seinem handelsüblichen Fahrrad-Nabendynamo den Wechselstrom, um ihn in Gleichstrom umzuwandeln. Der Anschluss an anderen Spannungsquellen, z. B. einen Netztransformator oder eine KFZ-Lichtmaschine
gilt als nicht bestimmungsgemäß und kann zu Beschädigungen
oder Verletzungen führen.
Die im APPCON 3000 integrierte Powerbank ist ausschließlich zur
Stromversorgung von Geräten mit einer USB Betriebsspannung
von 5 V bis max. 2 Ampere Gleichstrom (Mobiltelefone, Navigationsgeräte, Tablets etc.) bestimmt. Eine andere oder darüber hinausgehende Benutzung gilt als nicht bestimmungsgemäß und
kann zu Beschädigungen und Verletzungen führen.
Ansprüche jeglicher Art wegen Schäden aus nicht bestimmungsgemäßer Verwendung sind ausgeschlossen.
21
Page 22

Wartung und Reinigung
Verwenden Sie auf keinen Fall aggressive und scheuernde Reinigungsmittel, Reinigungsalkohol oder andere chemische Lösungen,
da dadurch das Gehäuse angegriffen oder gar die Funktion beeinträchtigt werden kann. Das Produkt ist für Sie wartungsfrei, zerlegen
Sie es niemals. Der Akku ist fest eingebaut und darf nur von NC-17
gewechselt werden. Trennen Sie das Produkt vor jeder Reinigung
von der Stromverbindung (USB Port) und angeschlossenen Geräten. Zur Reinigung genügt ein trockenes, weiches und sauberes
Tuch. Drücken Sie nicht zu stark auf das Gehäuse. ACHTUNG: Es
hat nur eine sehr geringe Wandstärke, dies kann zu Beschädigun-
gen oder Kratzspuren führen. Das Protektion Case (Carbon Hülle)
schützt den APPCON 3000 vor Beschädigungen. Halten Sie die
Hülle und den APPCON 3000 immer sauber um beim Zusammenschieben keine Kratzer auf dem APPCON 30000 zu bekommen.
Sicherheitshinweise
In bestimmten extremen Lade- /Endlade-Szenarios kann der APPCON 3000 heiß werden. Alle Schutzmaßnahmen wurden getroffen
- wie Überladeschutz, Überentladungsschutz, Kurzschlussschutz,
Überhitzungsschutz.
Temperaturgrenzen APPCON 3000:
guter Temperaturbereich: -19°C bis 55°C,
schlechter Temperaturbereich: kleiner -20° oder größer 60°.
Beim Auaden des APPCON 3000 (z.B. Laden durch Dynamo) gelten folgende Temperaturgrenzen:
guter Temperaturbereich: 0°C bis 50,5°C
schlechter Temperaturbereich: kleiner -5°C oder größer 51°C
Wird der schlechte Temperaturbereich erreicht, schaltet der APPCON 3000 einzelne Funktionen ab. Die rote/weiße LED leuchtet so
lange, bis eine Abkühlung in den guten Temperaturbereich erfolgt ist.
22
Page 23

Warnung
Schützen Sie den APPCON 3000 vor offenem Feuer! Es besteht
Explosionsgefahr. Beim Öffnen oder Beschädigungen des APPCON 3000 kann es zu einem Elektrolytaustritt kommen, der ätzend
für Haut und Augen ist. Schützen Sie den APPCON 3000 immer
mit dem mitgelieferten Karbon-Schutzrohr, in diesem ist er sicher
vor Stößen und Beschädigungen.
Elektrostatische Entladung:
Dieses Gerät ist sensibel gegenüber elektrostatischer Entladung. Schützen Sie das Gerät vor jeder möglichen elektrostatischen Entladung.
Gewährleistung
Die NC-17 Europe GmbH übernimmt keinerlei Haftung oder Ge-
währleistung für Schäden, die aus unsachgemäßer Installation
und / oder unsachgemäßem Gebrauch des APPCONs oder einer
Nichtbeachtung der Bedienungsanleitung resultieren.
Garantiebedingungen
Die Garantieleistung gilt nur für Material- und Produktionsfehler.
NC-17 Europe GmbH haftet nicht für den Verlust von möglichen
Daten auf eingesandten Geräten. Die unentgeltliche Garantieleistung bezieht sich auf die Reparatur oder den Austausch mangelhafter Teile. Bitte haben Sie Verständnis, dass wir keine Garantie-
leistungen erbringen können bei z.B.:
- missbräuchlicher oder unsachgemäßer Behandlung, Installation
oder Anwendung
- Beschädigungen, Kratzer oder Abnutzung
- Veränderungen, Eingriffen oder Reparaturen durch Dritte
- Schäden durch höhere Gewalt oder Transport
Wie auch immer sind wir ein deutscher Handwerksbetrieb und
stellen unsere Kunden, wenn irgendwie möglich, immer zufrieden.
Bitte rufen Sie uns an, wenn der Schuh drückt, wir klären das umgehend. Am besten bevor Sie graue Haare bekommen.
23
Page 24

Entsorgung
Informationspicht gemäß Batteriegesetz (BattG)
Der APPCON 3000 ist mit dem Symbol der Mülltonne gekennzeichnetes
Gerät und unterliegt der europäischen Richtlinie 2002/96/EC. Alle Alt-Akkus
und Alt-Batterien müssen getrennt vom Hausmüll über die dafür vorgese-
henen staatlichen Stellen entsorgt werden. Als Verbraucher sind Sie gesetzlich zur Entsorgung über lokal verfügbare Rückgabe- und Sammelsys-
teme oder über
NC-17 Europe GmbH
Zur Mühle 2-4, 50226 Frechen,
[email protected], Tel. +49 2234 94 94 000
CE Konformitätserklärung
Dieses Produkt erfüllt die grundlegenden Anforderungen aus dem
Gesetz über Funkanlagen und Telekommunikationsendeinrichtungen
(FTEG) und der Richtlinie 1999/5/EG
(Artikel 3 der R&TTE).
MSDS: ATSU180413211
UN38.3: ATSU180413211
Apple Inc , YouTube, Google, Bluetooth® sind eingetragene Wortmarke
und oder Bildmarke des jeweiligen Herstellers. Alle anderen Namen von
Produkten und Dienstleistungen sind Marken der jeweiligen Firmen.
Gut zu wissen:
Die Bestimmungen zur Mitnahme von Gepäck im Flugzeug ändern sich
laufend. Der folgende Tipp ist deshalb nur eine Momentaufnahme: Der
APPCON 3000 darf im Flugzeug nur im Handgepäck mitgenommen werden, keinesfalls im Koffer. Es gelten die Bestimmungen zum Mitführen einer
Powerbank.
NC-17 Europe GmbH / Zur Mühle 2 - 4 / 50226 Frechen, Germany
Tel: +49 (0)2234.9494 000 / Fax: +49 (0)2234.9494 010
www.NC-17.de / email: [email protected]
24
Page 25

Vers. 1.1
APPCON 3000
assembly instruction
Please also watch installation videos www.APPCON3000.de
The APPCON 3000 was designed and built by Dipl. Ing. Thomas
Treyer and master bicycle mechanic Udo Ochendalski. This unique
product sets the standard in the still new category of dynamo chargers on bicycles. As a small company we are dependent on your
help. If the shoe pinches you, please do not hesitate to call us
(02234 94 94 000) or send us an e-mail to [email protected]. We
will respond immediately. Your satisfaction is very important to us
personally. For us, negative and unqualied online reviews are understandably useless. Neither do they save the world with it, nor do
they improve the product! If unexpected tasks arise that make you
dissatised, please contact me personally before you get grey hair!
I will clarify this immediately! Promised! Udo@ NC-17.de.
Important note
Please always use the APPCON 3000 together with the carbon
protection tube, The wall thickness of the aluminium housing is
very thin to allow A-Headset mounting. A transport or use without
protection Case can and will probably lead to small dents on the
APPCON case after some time. This is not a warranty case. Please
use the supplied carbon protection tube.
25
Page 26

Important note
Please always use the original cables of your USB device. Poor
quality cables can reduce the charging performance or even cause
malfunctions. This applies especially to replicas of Apple cables,
but USB-C also has black sheep among the charging cables.
Important note
Basically the APPCON is well protected against water penetration IP 68. It has been found that during a circumnavigation of the
world unbelievable and unimaginable weather and road conditions
prevail. It is advisable to carry the APPCON protected in extreme
conditions, e.g. in the A-Headset assembly or in a bag. If you treat
him as carefully while driving as your mobile phone then all is well.
In order to prevent the ingress of water, the APPCON 3000 must
never be sprayed or submerged with a sharp jet of water (hose,
high-pressure cleaner).
General APPCON 3000
The APPCON 3000 is ingenious and simple at the same time. It is
designed to generate direct current from any hub dynamo in order
to convert and store it in the APPCON 3000 and to continuously
power any USB device. Basically, the scenario applies: You drive
off with a full mobile phone and arrive with a full mobile phone. Of
course, everything depends on the electricity harvested, i.e. the
speed and driving time. But don‘t worry: The microprocessor in the
APPCON 3000 fully incorporates our experience with the previous
model, so that you can think a lot about this topic, but you certainly
don‘t have to.
26
Page 27

To the understanding basically applies:
The development goal was to also supply large smartphones with
power during the cycle tour. However, you can only draw as much
power as you generate and therefore there is power in the APPCON 3000 buffer battery. When connecting a very large device,
e.g. a large tablet like Apple‘s iPad, the APPCON 3000 will deliver its entire capacity within a very short time with up to 2 amps.
Tablets like the iPad have a much larger internal battery than the
APPCON 3000, typically the battery in a tablet has about 10,000
mAh capacity. Customers report that they were able to charge an
empty iPad by 30%, which is a very good value. Therefore, please
consider proportionality when evaluating the charge level.
Oh yes, to answer a question right away: You can‘t charge the big
battery of a pedelec with hub dynamo and APPCON 3000 ;-)
The installation is very simple.
Connect the hub dynamo to the 6-pin round plug of the APPCON
3000 with the supplied dynamo cable. Connect your mobile phone
or navigation device to the USB socket of the APPCON 3000 with
its USB charging cable. Done!
If required, you can download our AppConGT app from the Apps-
tore, with which you can get a fully-edged bicycle computer in
combination with the APPCON 3000 and call up information on
charging status.
You only have to think about how to integrate the APPCON 3000
into your personal „setup“ of your bike and you‘re ready to go...
Scope of delivery
1x instruction
1x APPCON 3000
27
Page 28
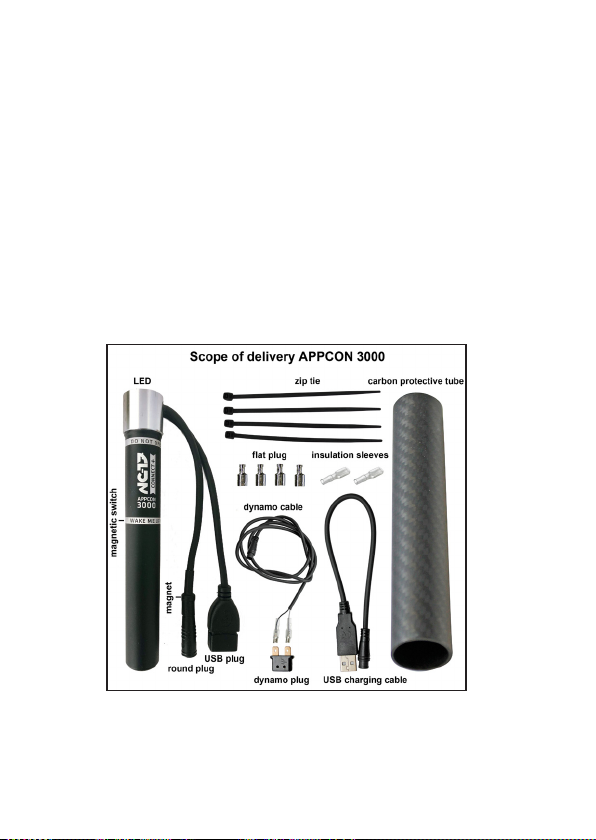
1x APPCON 3000 carbon protection tube
1x dynamo cable to APPCON 3000
1x Y Connector
1x dynamo plug
1x USB charging cable for APPCON 3000 (connection to USB
charger)
4x cable ties
4x at plug
2x insulation grommet
Recommended tool: (if necessary)
Flat nose pliers for mounting the at plugs
Side cutters or sharp scissors for cutting/stripping cables and cable
ties.
You can nd video instructions for installation on www.Appcon3000.
de or YouTube.
28
Page 29

Breathe life into your APPCON 3000:
The APPCON 3000 has two sleep modes. (tent mode and deep
sleep mode). After purchase the APPCON 3000 is in deep sleep
mode. In deep sleep the self-discharge of the APPCON 3000 is
extremely low. There are two ways to wake up the APPCON 3000:
The most obvious option is to connect the APPCON 3000 to the
dynamo of your bike. A few turns of the wheel are enough and the
LED of the APPCON 3000 welcomes you with a colourful play of
colours.
If you don‘t have a bicycle at hand, you can also connect the APPCON 3000 to a USB charger or to a USB port of a computer using
the supplied USB charging cable. A few seconds are enough and
the APPCON 3000 is awake.
After some time of non-use the APPCON 3000 goes into the simple
sleep mode, the so-called tent mode. The LED is off. In this tent
mode, the APPCON 3000 can be woken up without external aids,
which is ideal if you want to take the APPCON 3000 off your bike
and load a USB device in your tent in the evening (hence the name
tent mode).
After another 2 weeks of non-use, the APPCON 3000 automatically
goes into a deep sleep. Thus the APPCON 3000 survives a longer
winter break without any problems.
Waking up from the tent mode is described below in the instructions.
INFORMATION: For safety reasons, opening the APPCON 3000 is
not permitted under any circumstances. Unauthorised opening of
the APPCON 3000 will void all warranty claims and is, of course, at
your own risk. We cannot offer any service for opened devices. In
this case, we have specially installed a safety device that unequivocally detects the unauthorized opening.
29
Page 30

Personal Setup
We looked at hundreds of trekking bikes and none were like the
other. The individuality in the personal use is unique. We love cycling! We cyclists are individualists, there will be no standard solution. That is why we recommend the following assembly variants
with the certainty that there will be many solutions.
NC-17 bag (optional article no. 4079)
NC-17 A-Headset (optional article no. 4083)
NC-17 bottle holder (optional article no. 4028) not suitable if you
plan to cross deep brooks and rivers IP68!
Whatever you want to design your setup: Please note that the USB
socket must hang freely downwards to prevent rain from entering
and accumulating. Also avoid unprotected mounting in the splash
area of the front wheel, gold contacts do not like mud!
Example setup in a bag
Example setup in a bag Think about how you want to carry the APPCON 3000 on your bike. Think about where you want to connect
the two cables from the APPCON 3000. For example, outside a
bag or inside a bag. Think about whether you always leave the bag
on the wheel (xed installation) or whether you always want to take
the bag with you.
For a xed mounting of the bag, it makes sense to connect the
cables in the bag. Do you want to take the bag, it is faster to connect the connectors outside the bag. In principle, it is of course
advisable to make all the connections in the bag to be protected
from rain. We recommend that you rst organize the cable routing
and only then install the cable ties to x the dynamo cable.
30
Page 31
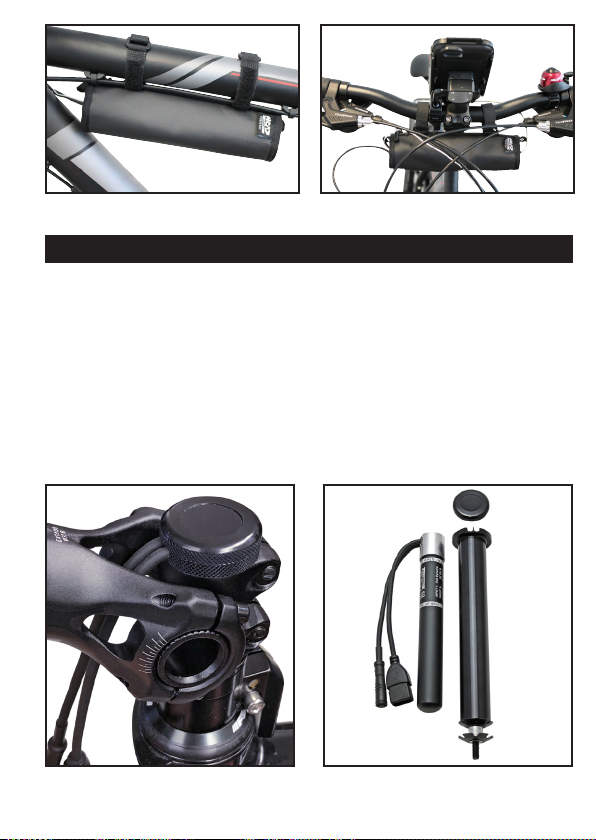
Top tube mounting (optional) Handlebar mounting bag (optional)
Example Setup A-Headset Mounting
With the A-Headset assembly (optional), the APPCON 3000 is slipped into the head tube of your bicycle fork using an adapter and
xed. This somewhat complex assembly can only be carried out by
a specialist dealer.
Separate assembly instructions are included with the adapter.
Note: The A-Headset assembly is not suitable for all forks. The
North American importer Peter White Cycles or your dealer can
provide you with more detailed information.
Example: A-Headset assembly (optional)
31
Page 32
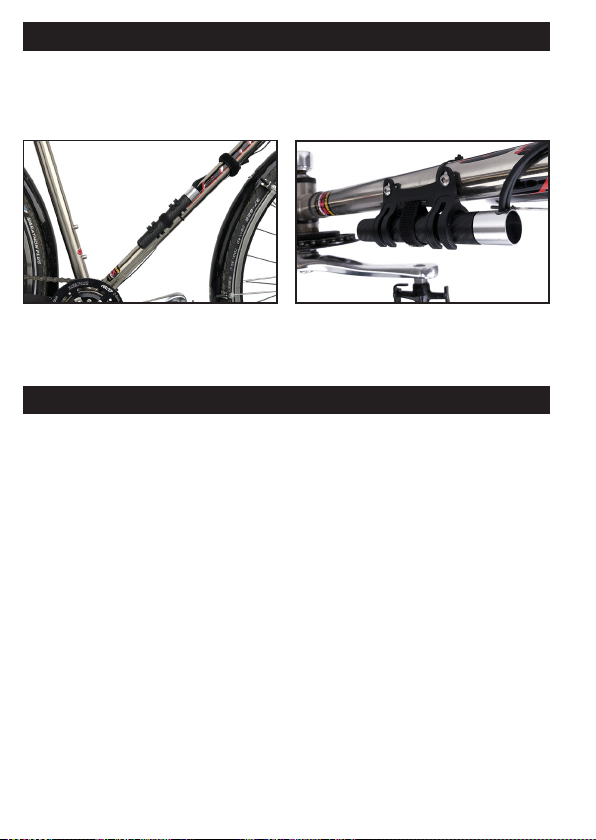
Example bottle holder assembly optional
When mounting the bottle holder, the APPCON 3000 is mounted
laterally below the water bottle using an aluminium adapter (optional).
This type of mounting is only recommended if the rear and front
wheels are tted with mudguards.
Dynamo cable installation
1. you do not use the dynamo to power your lighting system
2. you use a Shimano Dynamo and feed your light with it
3. you use a SON dynamo and feed your light with it
1. you do not use the dynamo to power your lighting system
That‘s easy. In the case of Shimano, simply plug the pre-assembled
Dynamo plug into the Dynamo hub connector. Look at the plug, it
can only be pushed on from one side. In case of a SON hub you
have to remove the two at plugs from the prefabricated Dynamo
plug and then put them back on the SON. If the at plugs are loose,
you may have to squeeze the at plugs with pliers to make a tight
connection to the SON Dynamo. The polarity is not relevant for the
SON Dynamo. So just plug it in.
32
Page 33
2. You use a Shimano Dynamo and feed your light
For historical reasons, Shimano combines one of the two poles
with the metal axle of the front wheel. Since the front headlight also
connects one of the two poles to the bicycle frame, this creates the
possibility of putting the light cable in such a way that both poles
are somehow connected to the metal of the bicycle frame and no
light shines anymore. The bad news rst: You can connect the two
wires of the light cable wrong with the Dynamo. The good news:
There are only two options and nothing can break.
Therefore, look carefully at the existing light cable on the hub dynamo. One of the two connections on the dynamo plug is marked
with a mass symbol. Usually, one of the two wires of the light cable
has a white line, so you can distinguish the wires.
Warning: The tabs and Y-plugs are made of thin sheet as intended. A repeated back and forth will inevitably lead to breakage of
the component.
Before disconnecting the dynamo light plug from the dynamo,
determine which wire is connected to the ground symbol. Please
make a note of this. Now disconnect the old grey-black dynamo
plug from the dynamo. Now separate the grey from the black part
of the old dynamo plug by pressing in the grey tab a little with a
small screwdriver. The two wires of the light cable can now be easily removed from the old dynamo plug.
33
Page 34

Now push the insulation sleeves included in the scope of delivery
onto each wire. Now shorten the copper cables with pliers/knives
so that they can be inserted into the at plugs supplied without
protruding into the clamping area. Now press the at plug with the
cable insulation together and push the previously pushed on insu-
lation sleeve over the at plug.
So far so good. Now push the two connectors onto the free tongues
of the Y-dynamo connector. Please make sure that the ground wire
is mounted in the same place as it was before (your note). Now
plug the plug, which is now equipped with 2 cables or 4 cores, onto
the dynamo hub. Depending on the space available on the hub
dynamo, it may be helpful to turn the Y-connector over so that it
points to the fork side. For this you cannot turn the adapter, but the
at plugs themselves.
Note: If you disconnect the at plugs of our cable from the Shimano
adapter during assembly, you will have to make sure that our white
wire is connected to the ground symbol on the Shimano adapter
when connecting the at plugs later.
3. you use a SON dynamo and feed your light with it.
The Shimano adapter is plugged in when the cable is delivered
(black plastic body with grey insert). The Shimano adapter is not
required for a SON Dynamo. Therefore disconnect the pre-as-
sembled at plugs of the APPCON 3000 Dynamo cable from the
Shimano adapter. If they are too heavy, you will have to use pliers.
The Y-plug and the Dynamo plug are now in your hand. Disconnect
the two light cables from the SON Dynamo and connect the APPCON 3000 Y-connectors to this place on the dynamo.
The cables removed from the SON Dynamo are then pushed back
onto the Y-connector. It is possible that the at plugs can be pushed
too easily or too heavily onto the Y-plug by the light. In this case
you have to widen or compress the at plug slightly with the pliers.
34
Page 35
Connection to the APPCON 3000
The wiring on the dynamo side should now be completed. Before
you use the supplied cable ties to x the dynamo cable, consider
exactly where and how you want to arrange the plug connection
to the APPCON 3000. If necessary, you may need to purchase
additional cable ties.
Insert the round plug of the cable into the counterpart of the APPCON 3000. Please pay attention to the position arrows which can be
seen when pushing the cables together. Since this is a waterproof
plug, the actual plug connection will require a noticeable amount of
force. Therefore it is all the more important that the arrows point to
each other to prevent damage to the pins of the connector.
Warning: If the two arrows are not on top of each other when
pushing the plug together, they will destroy the plug, resulting in
the immediate failure of the charging connection. Furthermore, the
APPCON 3000 will no longer be ready for use and you will have to
send it in for a costly repair. Therefore, pay particular attention to
the correct positioning of the plugs when plugging them together,
so that the arrows point to each other. Thank you!
Tip: If plug connections are very stiff, you can grease the round
plug a little from the outside (e.g. ball bearing grease).
Light can be switched off
Note: To use the APPCON 3000, a driving light with on/off switch or
an automatic sensor is required for proper function. When the light
35
Page 36

is switched on, the APPCON 3000 charges only insufciently with
approx. 1 Watt. By the way, like all the others.
Light cable test
Test the light now to see if it works. If it doesn‘t light up at all or only
weakly, it may be because the ground connection of the old light
cable is reversed. In this case, swap the two connections of the old
light cable. However, you cannot break anything. Don‘t worry. Now
ride the bike for a short distance (5 meters are enough). The LED
of the APPCON 3000 should now ash blue.
You have now successfully completed the installation!
If there is a problem somewhere and you get grey hair, call our hotline in advance if possible: +49 (0) 2234-9494000 or +49 (0) 2234
20 38 911 or [email protected]. Thank you
Important note
To prevent the ingress of water, the APPCON 3000 must never
be sprayed or submerged with a sharp jet of water (hose, highpressure cleaner). Always use the supplied carbon protective cover
for the APPCON 3000.
lighting system
The APPCON 3000 „harvests“ the energy of the hub dynamo and
thus charges its internal battery. However, the APPCON 3000 only
draws energy from the hub dynamo when the bicycle lighting is
switched off.
You switch on the energy management of the APPCON 3000 by
switching off the bicycle lighting. At night it is therefore not possible
or useful for the APPCON 3000 to harvest energy.
36
Page 37

We recommend setting the bicycle headlight to automatic mode
so that it is automatically switched off during the day. If your headlight has a daytime running light, you should switch it off. When the
daytime running light is switched on, the APPCON 3000 harvests
very little energy! Do not switch off the light of your bicycle at night
or in the twilight in order to provide the APPCON 3000 with more
energy from the dynamo. Safety on the road has priority! Always
drive with the lights on at dusk and at night! Please observe the
local legal regulations and their safety.
Note: Even if the APPCON 3000 can only harvest very little energy because the bicycle lighting is switched on, it can still operate
the Bluetooth interface at any time and execute a tacho app on
your smartphone with data on distance and speed. In addition, the
APPCON 3000 can charge a USB device via its USB socket if its
internal battery is sufciently charged.
Note: The APPCON 3000 is a very efcient and powerful charger
that continuously monitors its internal parameters for maximum
battery life. This also includes the temperature. In case of overheating, the APPCON 3000 switches off the dynamo input for the time
of overheating, the LED lights up white/red. At extreme temperatures, the USB output is also switched off. After cooling down, the
process continues as usual. Nothing can break.
Charging the Smartphone
1. To use the APPCON 3000 function, you do not need an App.
However, we recommend the use of our app, so you get a fully-
edged bike computer and see the charge status of the battery.
2. Connect the original USB charging cable of your smartphone to
the USB socket of the APPCON. Note: You can charge almost
all USB devices.
37
Page 38

3. Drive a short distance if necessary (1 meter is enough) to wake
the APPCON. The LED in the dark glass lid ashes.
4. A green or blue ashing LED means that the internal battery of the
APPCON is sufciently charged to start charging immediately.
5. A red ashing LED means that the internal battery of the APP-
CON 3000 is empty. You can now charge the APPCON 3000
with the supplied USB charging cable on a USB charger or by
riding your bicycle.
6. quick charging technology mobile phones: The APPCON must
rst be charged to 17% on the bike before the USB output opens
(red LED). This value is due to the fast charging technology of
modern mobile phones (is complicated). There is nothing for
them to pay attention to, everything is automatically controlled.
If you still want to get the remaining capacity of the APPCONS
you have to reboot the APPCON in the APP. (More info in the
blog).
7. a USB charging cable is also included, which is compatible with
your USB power supplies. You can use it to charge the APPCON
3000 at home. Description follows below.
8. The charging process of the smartphone continues even if your
bicycle is stationary or the bicycle lighting is switched on. The
APPCON 3000 draws its power from its internal battery.
9. When the bicycle is stationary for approx. 2 minutes, the APPCON 3000 switches itself off. Its USB socket is then de-energised if no customer, e.g. a mobile phone, is connected. If a
mobile phone is connected, we continue to charge.
tent mode
The battery of the APPCON can also be used as a normal power
bank. Charging at the power outlet is done via a normal USB power
38
Page 39
supply, e.g. the charger of your smartphone. The necessary charging cable is included. Prerequisite for using the tent mode is that
the APPCON is not in deep sleep.
Note deep sleep mode: The APPCON goes into a deep sleep mode
after 2 weeks of non-use and switches off. No more LED ashes.
No status is reported via Bluetooth. Mounted on the wheel, the APPCON 3000 wakes up again as soon as the wheel moves. It also
wakes up automatically if you connect a USB power supply unit via
the USB charging cable supplied.
To wake up e.g. in a tent (assuming the APPCON is not in deep
sleep) you have to move the built-in magnet of the round plug to
the engraving (wake me up here). This activates a magnetic switch.
The exact position is opposite the cable exit from the housing. It is
helpful to know this as you cannot see the engraving through the
carbon protective cover. This sounds more complicated now. Simply swipe the built-in magnet of the round plug over the wake-up
position on the case. The success of the wake-up is indicated by
the ashing of the LED.
39
Page 40

LED status display APPCON 3000
The LED is either off or ashing in different colors to indicate the
status (red, green or blue).
Initial start-up:
When delivered, your APPCON 3000 is in deep sleep, the LED is
off. To wake it up, simply connect the APPCON to a hub dynamo
or a USB charger. After a few seconds the LED of the APPCON
welcomes you in all colours. APPCON 3000 is now booted and
ready for use.
LED ashes blue:
APPCON 3000 is switched on and can charge a connected USB
device. Bluetooth is ready for pairing. Everything is perfect and
works as it should.
LED constant blue:
APPCON 3000 is switched on and can charge a connected USB
device. It is paired with your mobile phone, tachometer functions
are active.
LED ashes green slowly for 60 seconds:
APPCON 3000 has switched off the Bluetooth connection and
keeps the USB output open for 1 minute. If the USB output is not
used, the APPCON goes into tent mode. With the magnet you can
open the USB port again at any time. Is the USB Port open the
green LED is ashing.
LED ashes red:
APPCON 3000 is switched on. Its battery is empty. Bluetooth is
ready for pairing, but it cannot charge a connected USB device.
LED constantly red:
APPCON 3000 is switched on. Its battery is empty. It is paired with
your mobile phone via Bluetooth, tachometer functions are active,
it can only charge a connected USB device from a charge of 17%.
40
Page 41

Wake up / switch on:
If the LED is off, you cannot charge a USB device. However, you
can simply wake up the APPCON 3000 by moving the magnet
around the centre of the housing (waking it up from tent mode).
After waking the LED blue Bluetooth ready ashes 1 min and then
green 1 min then the LED goes off. If a USB consumer is connected, it will be charged until the APPCON is empty. If no USB
consumer is connected, the APPCON switches off the USB port
after 2 min.
Wake up from deep sleep:
If you do not use the APPCON 3000 for more than 2 weeks, the device goes into a deep sleep in which the self-discharge of the battery is very low. Now a magnet can no longer switch on the APPCON
3000. As with the initial start-up, you can simply switch the APPCON
on again by connecting it to the hub dynamo or a USB charger.
APPCON APP
Basically the APPCON is a charger for the power supply of a bicycle. As a small company we are very proud of the result. The App is
an addition to the APPCON 3000 and needs some improvements.
So please don‘t be so strict with us, we work on it and are open for
improvement suggestions.
Note: The APPCON can be used without App at any time. Our
app does not access any of your personal data or, if it does (Apple
Health), it is only stored on your mobile phone. There is no thought
or effort on our part to collect your information, let alone share it
with others.
There will be a service function where the APPCON status can be
read for error analysis by the user. This generated le can be sent
to NC-17 by e-mail for analysis. All data will be in plain text in the
e-mail. No further data will be transmitted.
41
Page 42

Please note our privacy policy on our website www.NC-17.de
You can download the free app „AppConGT“ from the App Store
for iOS or the Play Store for Android. This app turns your iPhone or
Android phone into a comfortable bike computer and keeps a diary
of all your bike tours.
Bluetooth pairing
Note: Not all mobile phones support the required Bluetooth 4.0
protocol. It is possible that in very few cases an update may be
necessary for older phones.
TIP: If you have problems charging your mobile phone with the
APPCON 3000 or establishing a Bluetooth connection, borrow a
new generation Apple or Samsung device from a friend. If then
everything works, you have excluded as far as possible all errors of
the wiring or the APPCON.
If you want to use an app on your smartphone, you have to connect
the APPCON 3000 with the app so that data can be transferred
from the APPCON 3000 to the smartphone. You only have to do
this once, directly in the app and not in the operating system. Both
the smartphone and the APPCON 3000 save the pairing and recognize each other automatically during the next bike tour, without
you having to perform the pairing again manually.
1. Download our free APPCON App AppConGT or another app that
supports the Bluetooth 4.0 protocol from the Apple App Store or
Google Play Store.
2. Please note that the APPCON 3000 is registered directly in the
app and not in the operating system.
3. Drive a short distance (5 meters are enough) to turn on the APPCON 3000 or use the tent mode switch. The LED under the dar-
kened window ashes. The readiness for coupling is indicated
by a blue or red ashing.
42
Page 43

4. The Bluetooth interface of the APPCON is now active. You now
have 60 seconds to pair the app with the APPCON in the settings of the app. Follow the instructions of the app (App settings).
5. In the settings you can enter the tire size for your wheel and the
number of poles of your dynamo. Done.
6. Please note that the APPCON 3000 only supports one connec-
tion simultaneously. You cannot operate an APPCON 3000 on
two telephones at the same time. Unfortunately this is not technically possible.
7. The app, on the other hand, supports several simultaneous
connections. In addition to the APPCON 3000, it is possible to
connect further Bluetooth sensors, e.g. the Cadence or pulse
sensors of NC-17.
Important Note: Firmware Update
Your APPCON 3000 has the possibility to be always up to date.
This is made possible by so-called rmware updates, which we
install through the APPCONGT. If an update is available, the app
will inform you. Schedule approx. 10 min time. A progress bar will
be displayed. More help in the blog: www.APPCON3000.de
Charging the APPCON with a power supply unit
(power supply not included)
Only use commercially available USB power supplies with 5 volts,
otherwise the APPCON may be damaged. Note: Very often the original charger of your mobile device is also suitable. The APPCON
scope of delivery includes the charging cable with USB connection
to the power supply unit and a 6-pin round plug, which is plugged
into the APPCON.
Your APPCON is now charging and the LED lights up or ashes
blue as long as the charging process lasts. As soon as the APP-
43
Page 44

CON 3000 is charged, the LED changes to green. Are you curious?
You can use our app on your smartphone during the charging process and have the charge status of the battery displayed in percent. After you have disconnected the APPCON from the mains
plug, it automatically goes into the tent sleep mode.
Note: If the APPCON 3000 is charged via USB, its USB output is
switched off. So you cannot load another USB device at the same
time as the APPCON 3000 itself is being loaded via USB.
For more information follow our blog: www.APPCON3000.de
Intended Use
The APPCON 3000 charging electronics harvests the alternating
current from its standard bicycle hub dynamo in order to convert
it into direct current. The connection to other voltage sources, e.g.
a mains transformer or a motor vehicle alternator, is considered
improper and can lead to damage or injury.
The Powerbank integrated in the APPCON 3000 is exclusively intended for the power supply of devices with a USB operating voltage of 5 V to max. 2 Ampere direct current (mobile phones, navigation devices, tablets etc.). Any other use or use beyond this is
considered improper and can lead to damage and injury.
Claims of any kind for damage resulting from improper use are
excluded.
Maintenance and cleaning
Never use aggressive and abrasive cleaning agents, cleaning alcohol or other chemical solutions, as these can attack the housing or
even impair its function. The product is maintenance-free for you,
never disassemble it. The battery is permanently installed and may
only be replaced by NC-17. Disconnect the product from the power
44
Page 45

supply (USB port) and connected devices before cleaning. A dry,
soft and clean cloth is sufcient for cleaning. Do not press too hard
on the housing. ATTENTION: It has a very thin wall, this can lead to
damage or scratch marks. The protection case (carbon cover) protects the APPCON 3000 from damage. Always keep the case and
the APPCON 3000 clean to avoid scratches on the APPCON 30000.
Safety Instructions
In certain extreme loading/unloading scenarios, the APPCON 3000
can become hot. All protective measures have been taken - such
as overcharge protection, overdischarge protection, short-circuit
protection, overheating protection.
Temperature limits APPCON 3000:
Good temperature range: -19°C to 55°C,
poor temperature range: less than -20° or greater than 60°.
The following temperature limits apply when charging the APPCON
3000 (e.g. charging by dynamo):
good temperature range: 0°C to 50.5°C
Poor temperature range: less than -5°C or greater than 51°C
If the poor temperature range is reached, the APPCON 3000
switches off individual functions. The red/white LED lights up
until the unit has cooled down to the good temperature range.
Warning
Protect the APPCON 3000 from open re! There is a risk of explosion. When the APPCON 3000 is opened or damaged, electrolyte
may leak which is corrosive to the skin and eyes. Always protect
the APPCON 3000 with the supplied carbon protective tube, in
which it is safe from shocks and damage.
Electrostatic discharge:
This device is sensitive to electrostatic discharge. Protect the device from any possible electrostatic discharge.
45
Page 46

Warranty
NC-17 Europe GmbH assumes no liability or warranty for damages
resulting from improper installation and / or improper use of the
APPCON or non-observance of the operating instructions.
warranty terms
The guarantee applies only to material and production defects. NC17 Europe GmbH is not liable for the loss of possible data on sent
devices. The free warranty refers to the repair or replacement of
defective parts. Please understand that we cannot provide warranty services for e.g:
- misuse or improper handling, installation or application
- Damage, scratches or abrasion
- Modications, interventions or repairs by third parties
- Damage due to force majeure or transport
However, we are a German craft business and always satisfy our
customers if possible. Please give us a call if the shoe pinches, we
will clarify that immediately. Best before you get grey hair.
Disposal
Obligation to inform according to battery law (BattG)
The APPCON 3000 is marked with the symbol of the garbage
can and is subject to the European Directive 2002/96/EC. All old
batteries and accumulators must be disposed of separately from
household waste by the appropriate government authorities. As a
consumer, you are legally required to dispose of your batteries via
locally available return and collection systems or via
NC-17 Europe GmbH
Zur Mühle 2-4, 50226 Frechen,
[email protected], Phone +49 2234 94 94 000
46
Page 47

CE Declaration of Conformity
This product complies with the essential requirements of the
Act on Radio Installations and
telecommunications terminal equipment
(FTEG) and Directive 1999/5/EC
(Article 3 of the R&TTE).
MSDS: ATSU180413211
UN38.3: ATSU180413211
FCC Compliance Statement
This device complies with part 15 of the FCC Rules. Operation is
subject to the following two conditions: (1) This device may not
cause harmful interference, and (2) This device must accept any
interference received, including interference that may cause undesired operation.
FCC WARNING
This equipment has been tested and found to comply with the limits
for a Class B digital device, pursuant to Part 15 of the FCC Rules.
These limits are designed to provide reasonable protection against
harmful interference in a residential installation.
This equipment generates, uses and can radiate radio frequency
energy and, if not installed and used in accordance with the instructions, may cause harmful inerference to radio communications.
However, there is no guarantee that interference will not occur in a
particular installation. If this equipment does cause harmful interference to radio or television reception, which can be determined by
turning the equipment off and on, the user is encouraged to try to
correct the interference by one or more of the following measures:
- Reorient or relocate the receiving antenna.
- Increase the separation between the equipment and the receiver.
47
Page 48

- Connect the equipment into an outlet different from that to which
the receiver is connected.
- Consult the dealer or an experienced radio/TV technician for help.
Caution:
To comply with the limits for an FCC Class B computing device,
always use the shielded signal cord supplied with this unit.
The Federal Communications Commission warns that changes or
modi cations of the unit not expressly approved by the party res-
ponsible for compliance could void the user’s authority to operate
the equipment.
M/N: CC2564MODA
FCC ID: Z64-2564N
IC: 451I-2564N
Apple Inc , YouTube, Google, Bluetooth® are registered trademarks
and/or trademarks of their respective owners. All other product and
service names are trademarks of their respective companies.
Good to know:
The regulations governing the carriage of baggage on an aircraft are
constantly changing. The following tip is therefore only a snapshot:
The APPCON 3000 may only be carried in hand luggage, not in a
suitcase. The regulations for carrying a Powerbank apply.
NC-17 Europe GmbH / Zur Mühle 2 - 4 / D-50226 Frechen, Germany
Phone: +49 (0)2234.9494 000 / Fax: +49 (0)2234.9494 010
48
www.NC-17.de / email: [email protected]
 Loading...