

Page 1
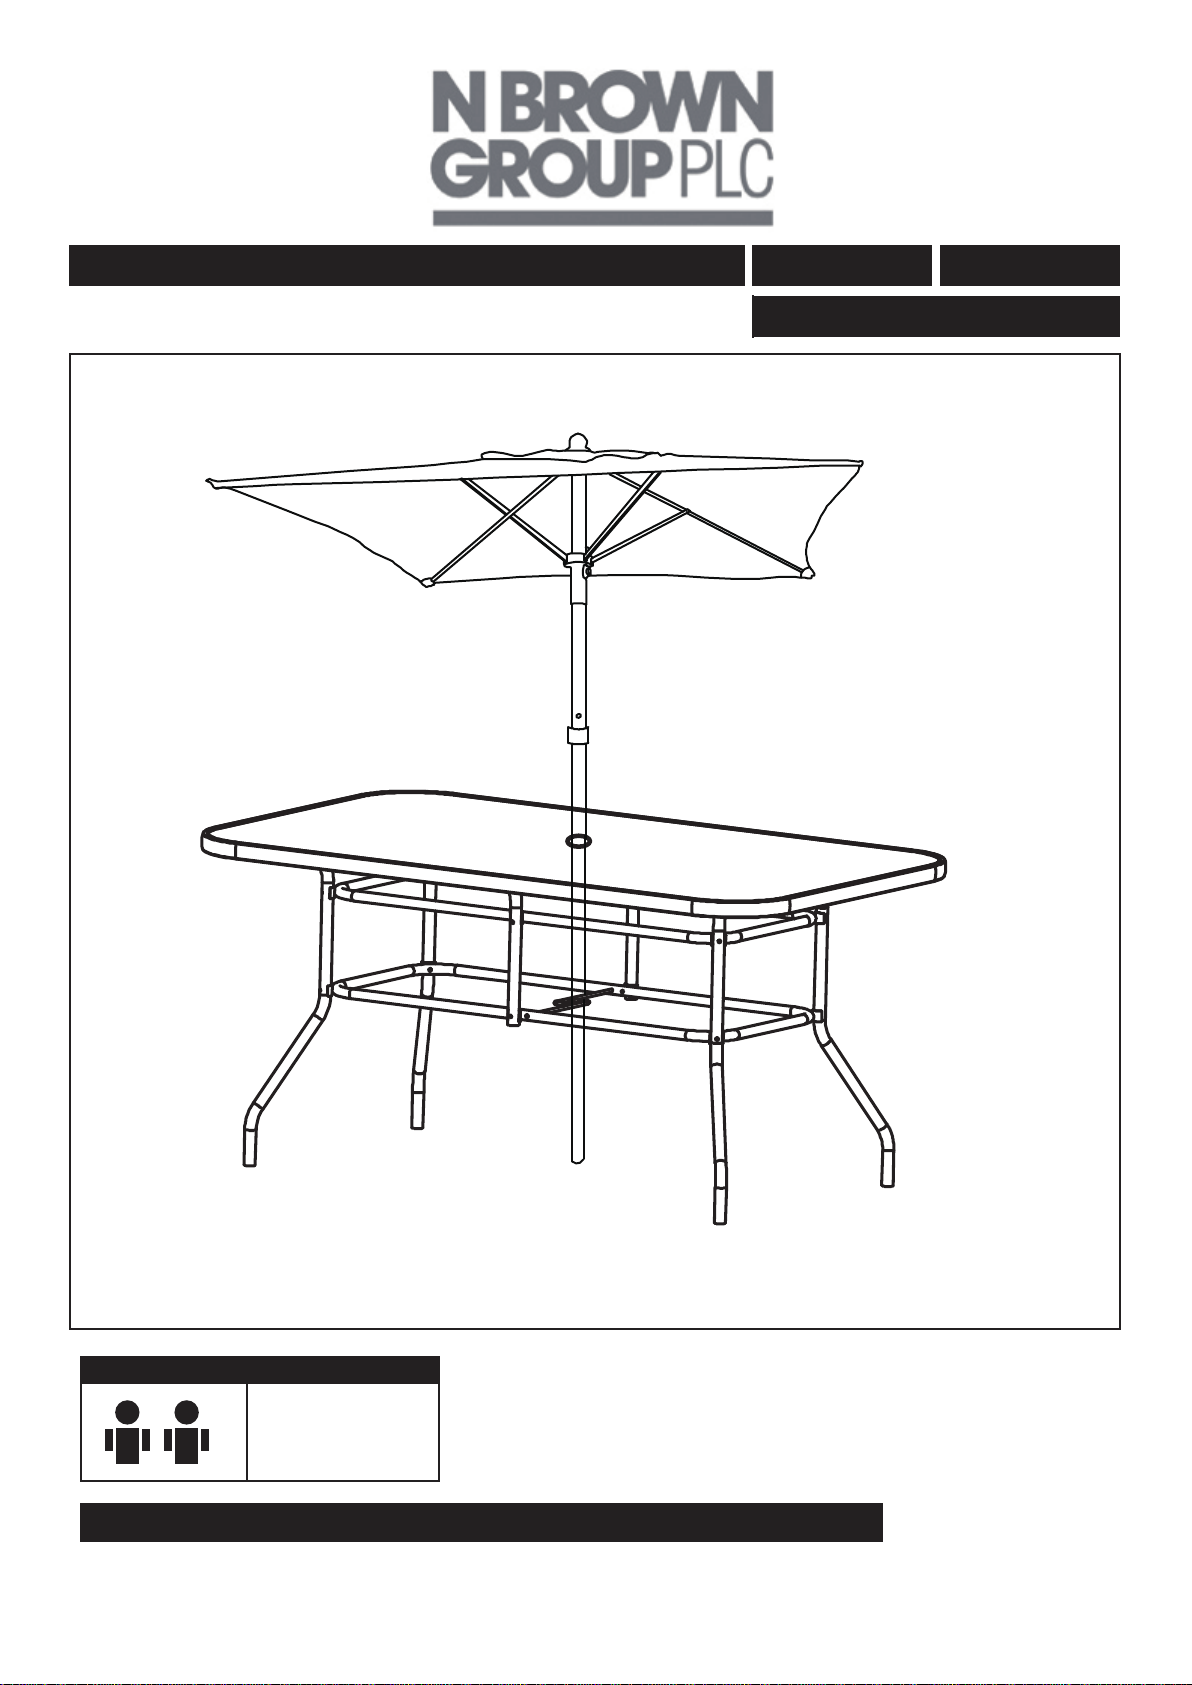
Assembly Instructions - Please keep for future reference
Cat No.
WT401
Malaga 6 Seater Dining Set
No. People Assembly Time
30 - 40
Minutes
Important - Please read these instructions fully before starting assembly
If you need help or have damaged or missing parts, call the JDW customer helpline: 0871 231 2000
Page 2
Safety and Care Advice
Important - Please read these instructions fully before starting assembly
• Check you have all the
components and tools
listed on the next pages.
•
plastic bags and seperate
them into their groups.
• Keep children and animals
away from the work area,
small parts could choke if
swallowed.
Care and Maintenance
• Please clean using cloth
with glass cleaner, do not
use bleach or abrasive
cleaners.
• Make sure you have
enough space to lay out
the parts before starting.
• Do not stand or put weight
on the product, this could
cause damage.
• Assemble the item as close
same room) as possible.
• Assemble on a soft, level
surface to avoid damaging
• From time to time check
that there are no loose
screws on this unit.
• We do not recommend the
use of power
drills/drivers
for inserting
screws as this
could damage
the unit. Only use hand
screwdrivers.
• This product should not be
discarded with household
waste. Take to your local
authority waste disposal
centre.
Warning
Important - In order to help prevent overturning, this product must be used with the wall anti-tip
strap/device provided.
• To help prevent product toppling over please follow the below steps:
• Use the anti-tip strap/device provided.
• Do not allow children to climp or hang on the furniture.
• Do not place heavy items on top of the furniture, unless the furniture has been designated for
this purpose.
Please note that only the anti-tip strap/devices and screw are provided, you will need to provide
wall plugs and screws applicable for your wall type.
If you need help or have damaged or missing parts, call the JDW
customer helpline: 0871 231 2000
If you are unhappy with the product and wish to return it,
please follow the retailer’s returns procedure.
Page 3
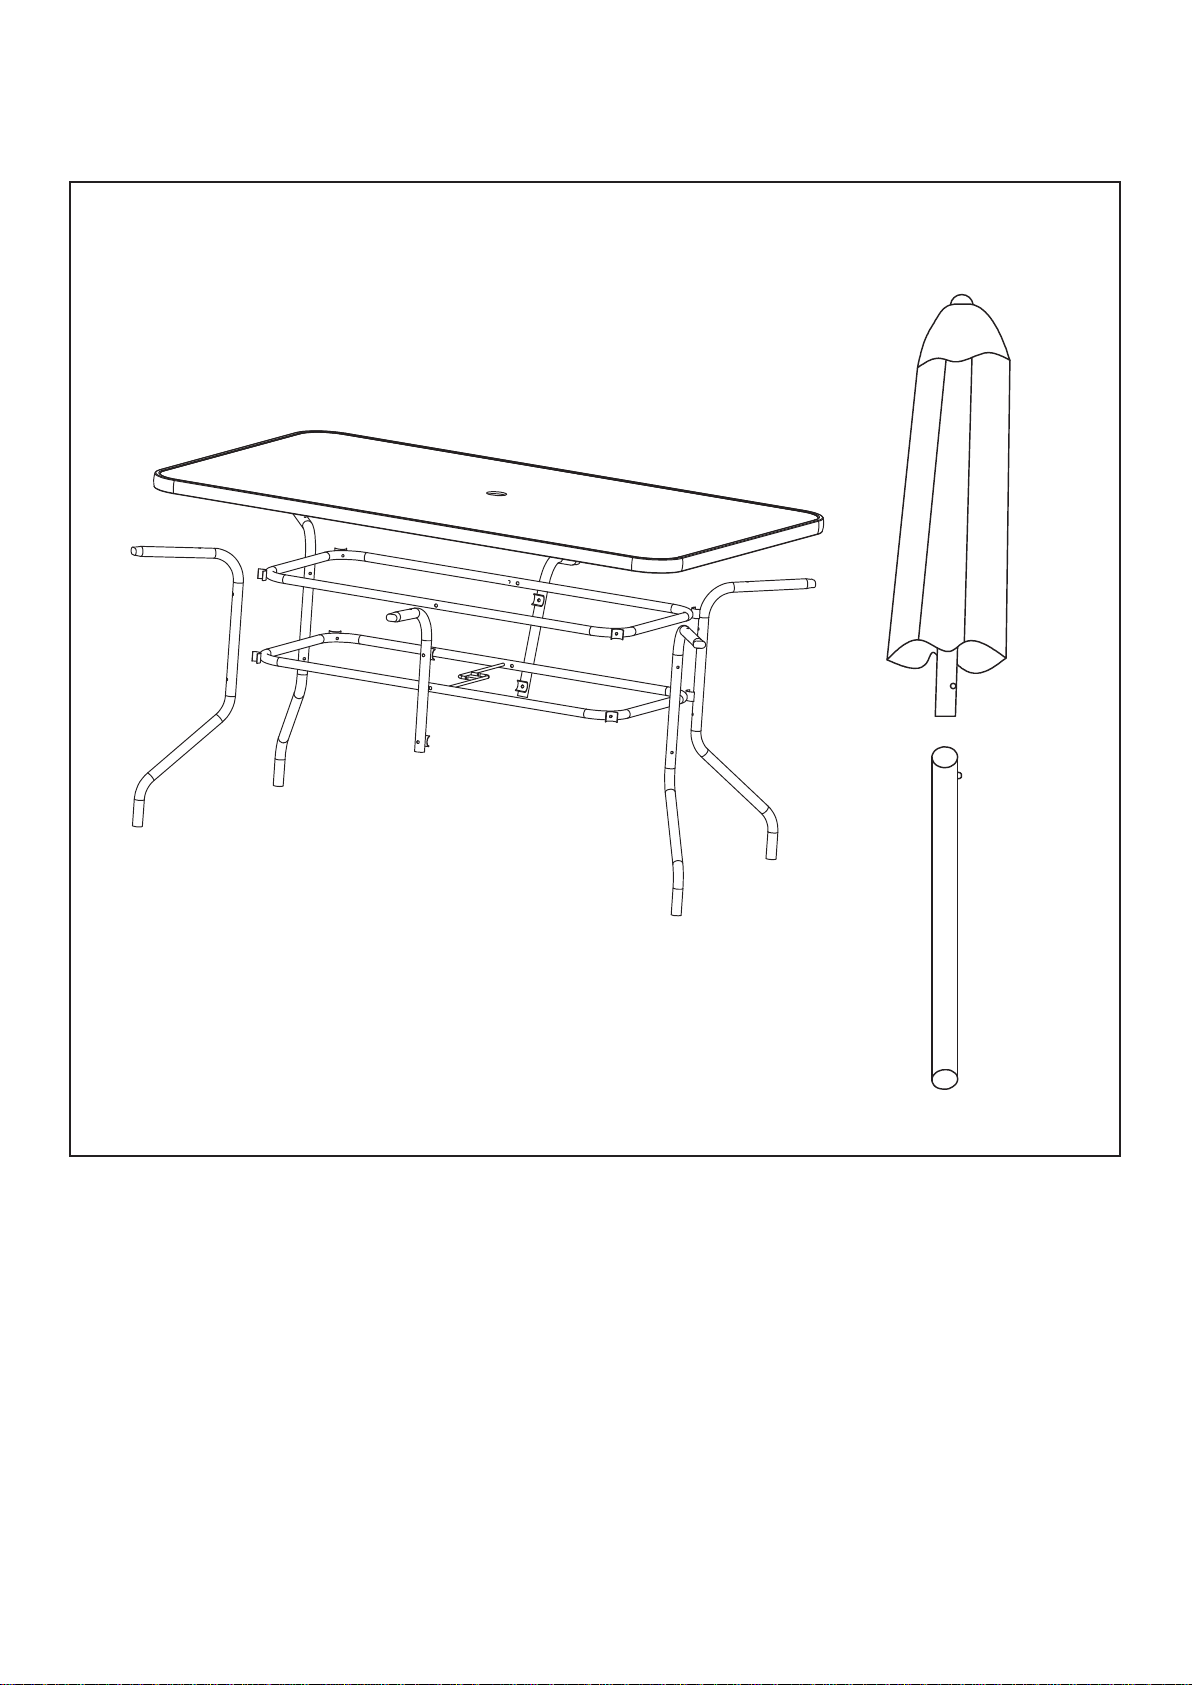
Exploded View
A
K
D
C
E
E
D
E
E
N
M
Page 4
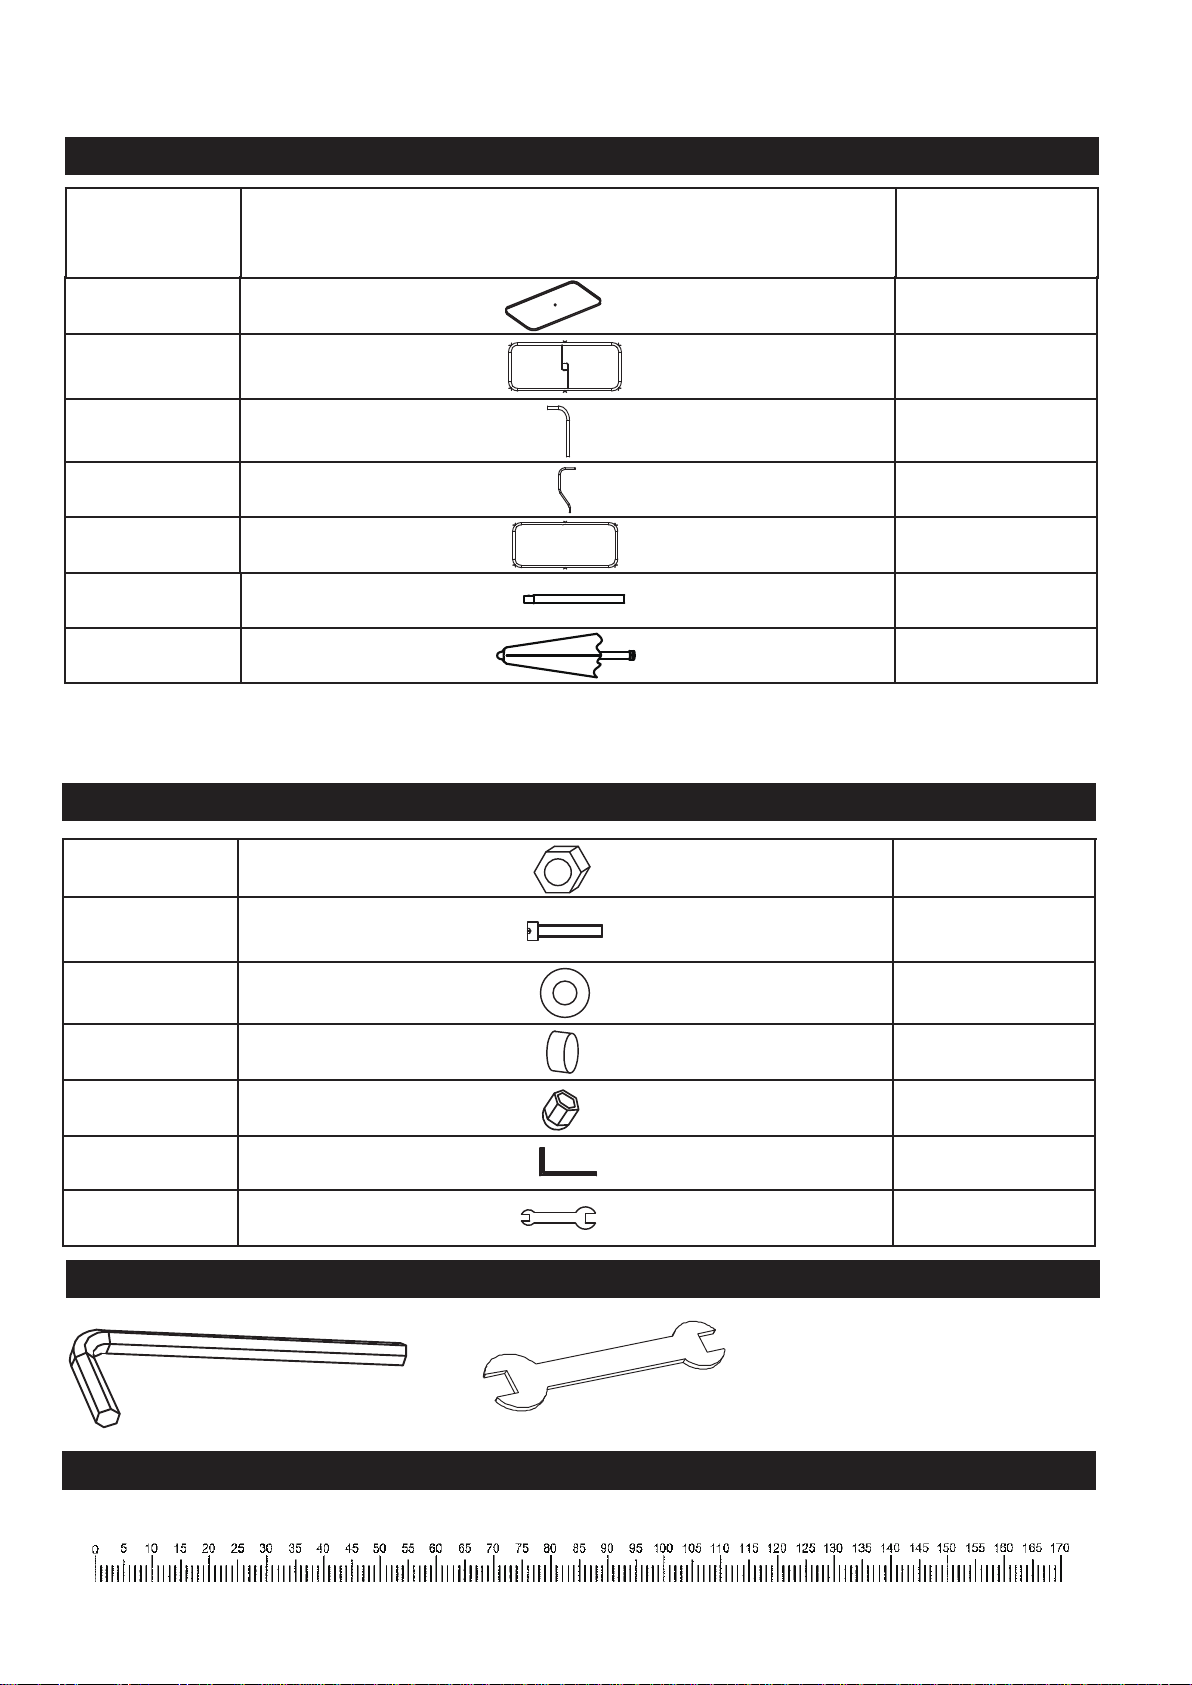
Components - Panels
Please check that you have all the components listed below before constructing your item.
Part No Description Qty
A 1
C 1
D 2
E 4
K 1
M 1
N 1
Components - Fixings
Please check that you have all the components listed below before constructing your item.
G 12
H 12
I 12
J 12
L 12
B 1
F 1
Tools Required
Allan Key
Ruler - Use this to measure your screws (mm)
Wrench
Page 5
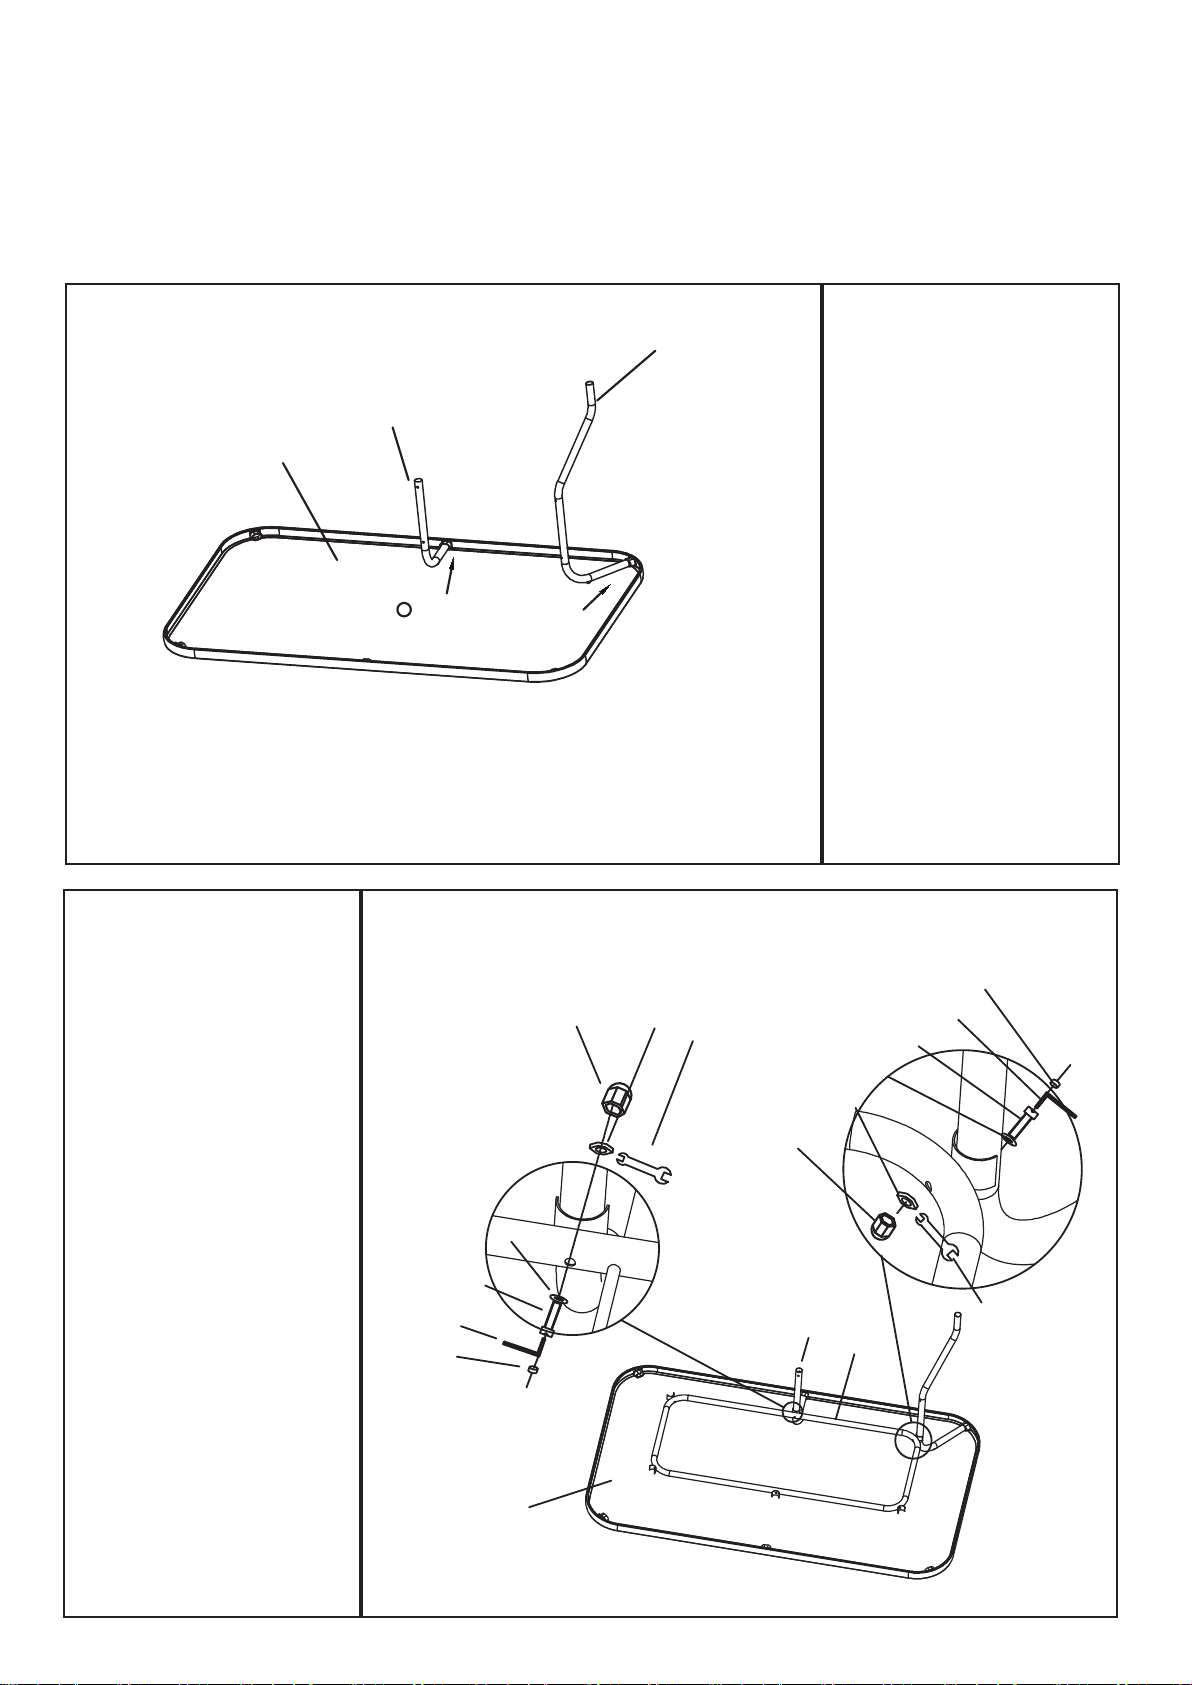
Assembly Instructions
Note: All Bolt Head Caps and Nut Caps should not be attached before finally
tightening all Bolts with the Allen Key.
Only tighten all bolts when you are satisfied with the alignment of all components.
Step 1
E
• Put the the table
A
Step 2
• Fasten connecting
tube (Part K) with
leg tube (Part E)
D
L
G
F
top (Part A) on the
ground, connect
the table leg
(Part E) and the
supporting tube
(Part D) with the
table top (Part A).
J
B
H
and supporting
tube (Part D) by
bolts (Part H),
washer (Part I)
and nut (Part G).
J
B
H
I
A
L
D
G
K
I
F
Page 6
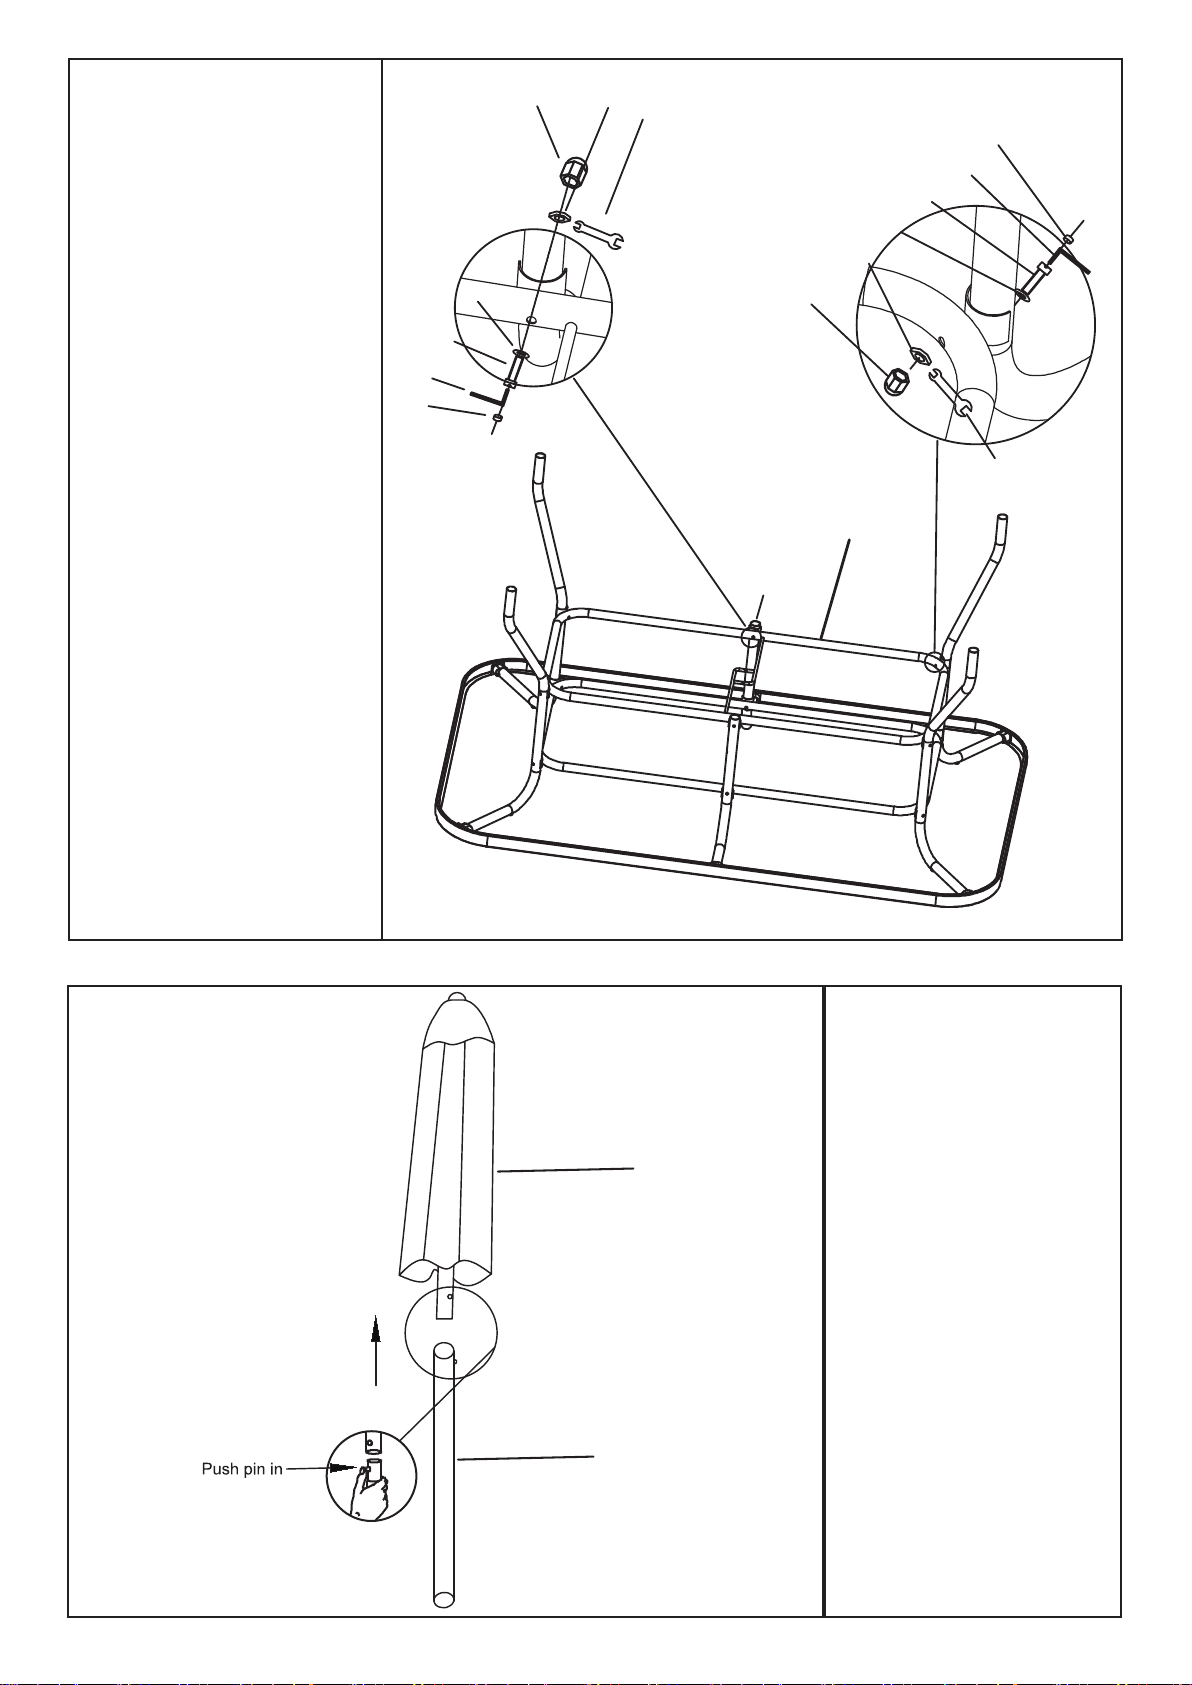
Step 3
• Fasten table leg
(Part E) and
supporting tube
(Part D) with
connecting tube
(Part C) by bolts
(Part H), washer
(Part I) and nut
(Part G).
•
Please ensure the
screws are tightend
J
B
H
I
L
G
F
J
B
H
I
G
L
F
C
completely, then
put the plastic cap
(Part J) on bolt
(Part H). Put plastic
cap (Part L)
on nut(Part G).
D
Step 4
• Connect the
umbrella lower
M
N
pole (Part M) with
the upper pole
(Part N).
Page 7
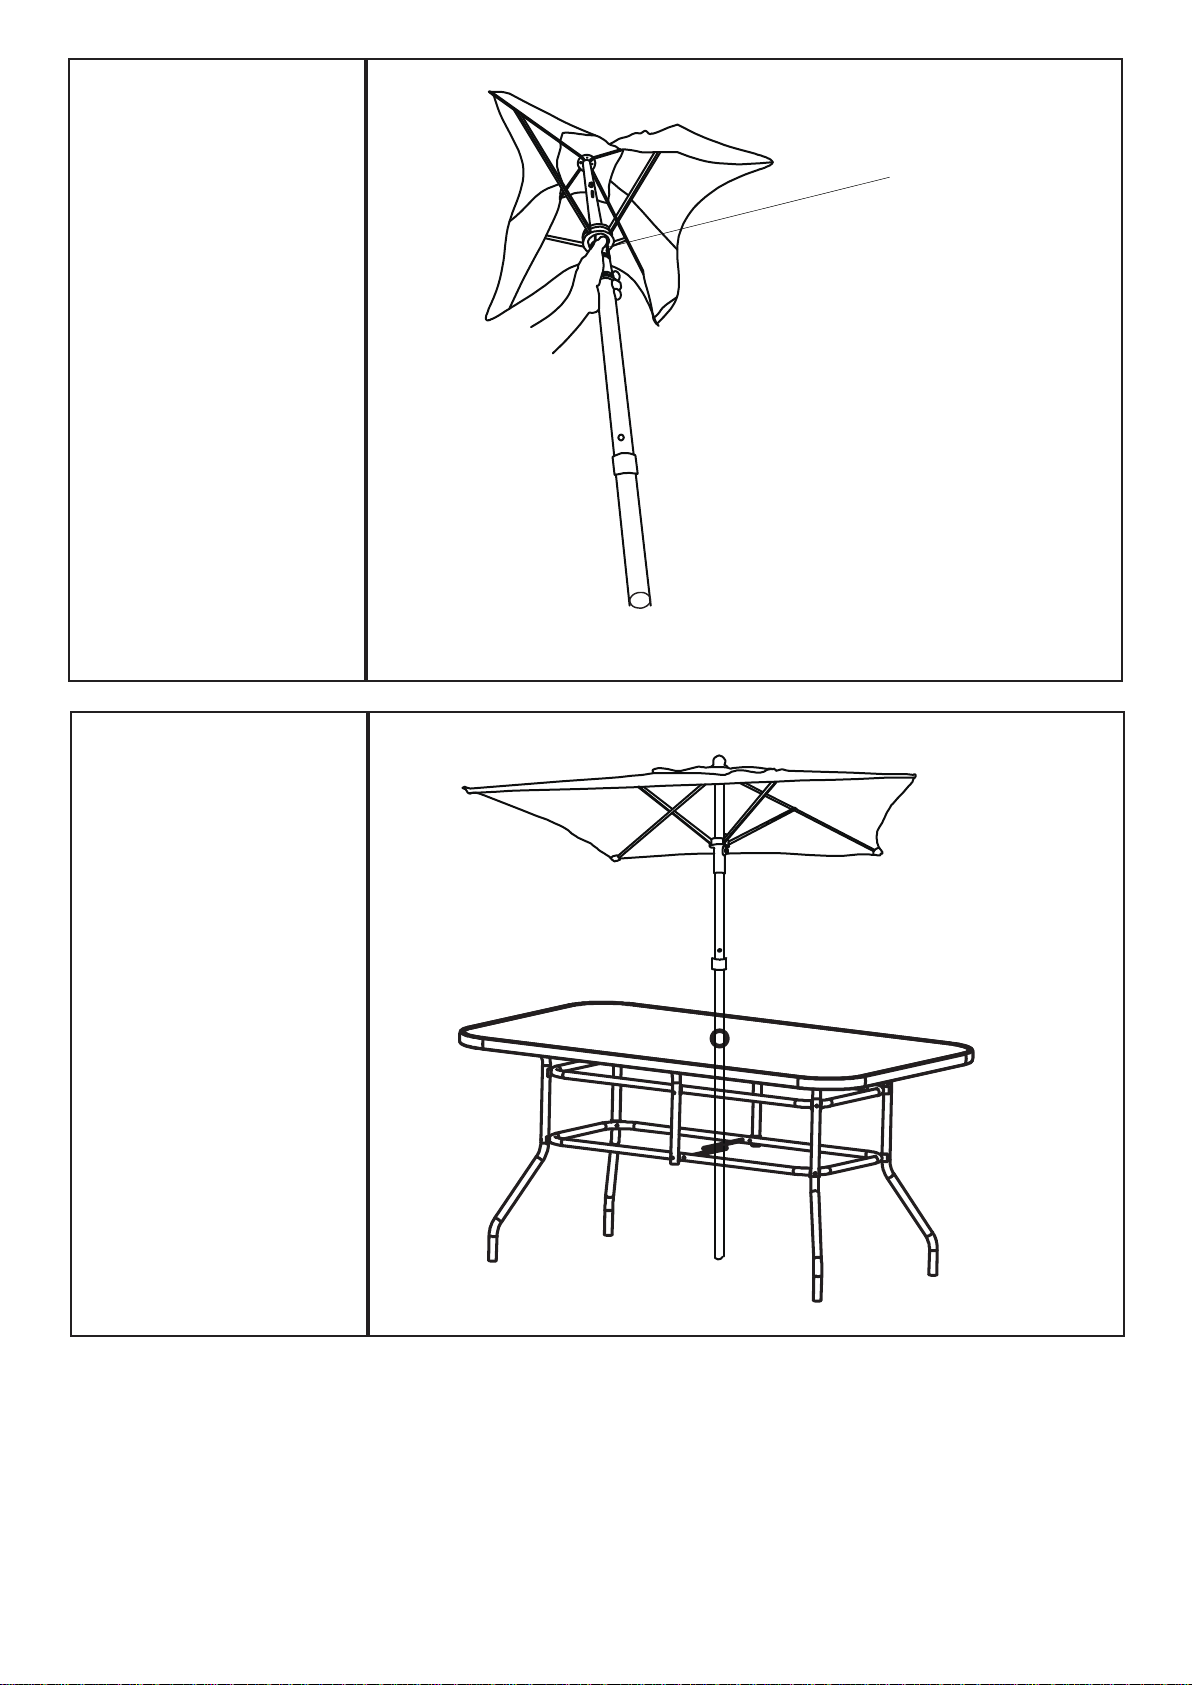
Step 5
• Push up to open
the umberlla.
Push up
Step 6
• Put the umbrella
into the table
umbrella hole.
CARE AND CLEANING:
1. TO CLEAN,WIPE WITH DAMP CLOTH.DO NOT USE BLEACH,ACID SOLVENTS OR ABRASIVE CLEANERS
OR FRAME PARTS.
2. DURING VARYING WEATHER CONDITIONS AND WINTER PERIOD,WE STRONGLY RECOMMEND THAT
IT CAN BE.STORED IN A DRY AREA
WITH A SUITABLE COVER BEFORE STORAGE,PLS INSURE IT IS CLEAN AND DRY.
3
.
PERIODICALLY CHECK AND ENSURE THAT ALL THE SCREWS ARE COMPLETELY TIGHTEN.
4
A MATCHING FURNITURE COVER IS STRONGLY RECOMMENDED TO EXTEND THE USAGE LIFE-SPAN.
.
Page 8

Manchester
M60 6ES
 Loading...