

Page 1
EX
902
2
User Manual www.newbalance-watch.com
NM-705.1
Page 2
Design of the Watch
1
Thank you for purchasing this watch. Please read this manual thoroughly before using
the watch!
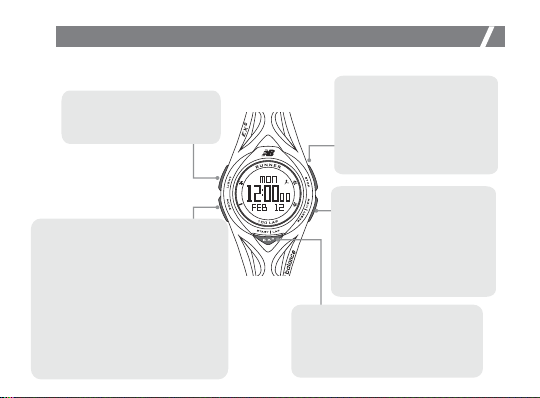
[EL] EL Button
• To turn on the EL back
light for about 3 seconds.
[M] Mode Button
• To select among function modes:
Home Time, Workout, Daily
alarm, Countdown timer and
Dual time.
• Hold down to select/exit setting
display in the following modes:
Home Time, Workout, Daily
alarm, Countdown timer and
Dual time.
• To select among different setting
items in setting mode.
[S] Stop
• To activate the ‘stop’
function in Exercise, Count
Down Timer Mode. Press to
activate the ‘stop’ function.
• To increase the setting
value during setting display
[R/V] Reset / View Button
• To select different
sub-functional displays in
the Workout Mode.
• To reset counting in the
Workout Mode.
• To decrease the setting
value during setting display.
[S/L] Start / Lap Button
• To activate the ‘start’ function in
the Workout and Timer Modes.
• To take Lap records when the
chronograph is running.
Page 3
Specifications
2
Time Mode
• Time System: am, pm, hour, minute,
second
• Time Format: 12-hour or 24-hour format
• Calendar Range: 2000~2099
Alarm Mode
• Daily alarm and hourly chime
• Alarm Sound: 30 seconds
Workout Mode
• Heart rate measuring range: 30 to 240
bpm.
• Hear Rate Alert Zone:
3 Pre-defined and 1 user defined.
• Auto-calibration or manual input of
stride length.
• Above / below heart rate zone alert
• Workout Timer: Max 23H59M59S
• Distance: 99.99 km / 63.13 mile
• Step: Max 99,999
• Calorie: Max 9,999 kcal
Recall Mode
• Store up to 10 segments and up to
100 lap records
• Each Segment summary contains:
time stamp, total lap no., Workout
time, average pace, calorie
consumption, distance, average
speed, max HR, average HR, step and
above/on/below zone timer
• Each Lap Record contains: split time,
lap time, distance, average pace,
average HR and average speed within
the lap
• Odometer function
Timer Mode
• Resolution: 1 second
• Measuring range: 23H59M59S
Others
• Back Light Type: Electro-Luminescent
(EL) back light
• 10 LCD level contrasts adjustable
• Metric / Imperial unit selectable
• 5 ATM water resistance
Page 4
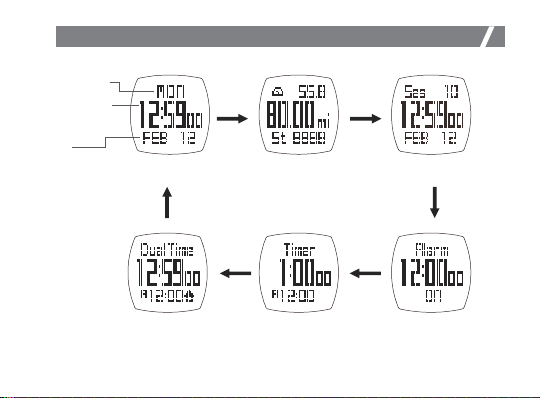
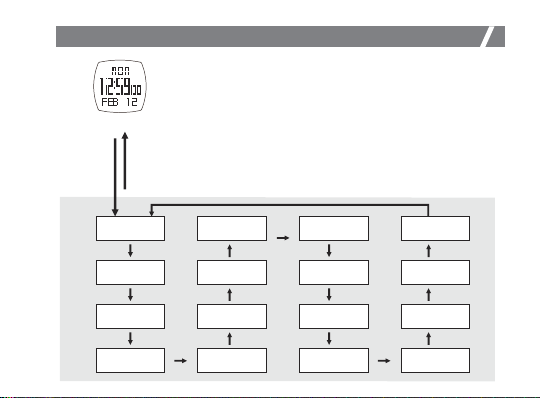
Major Function Modes
3
Day of week
Current Time
(hour, minute,
second)
Date
(month, day)
Home Time Mode Workout Mode Recall Mode
[M] [M]
[M]
[M]
[M]
Dual Time Mode Countdown Timer Mode Daily Alarm Mode
[M]
Page 5
Time Set Mode
4
Home Time Mode
hold [M]
How to Select a Time Set
• To select Time Setting Mode, hold down [M] for about 2
seconds in Home Time Mode.
• Press [M] to move the selection among these 16
settings refer to the adjacent diagram.
• Press [S] or [R/V] to adjust the value.
• Hold down [M] to exit the Time Setting Mode.
• Chime-when this function is on, audible sound will be
heard at zero minute hourly.
• Beep-when this function is on, audible sound will be
hold [M]
Second
[M]
Minute
[M]
Hour
[M]
Year
heard as key is pressed.
Chime
[M]
Time Format
[M]
Day
[M] [M]
[M]
Month
[M]
Beep
[M]
Gender
[M]
Birth
[M]
Unit
[M]
Contrast
[M]
BMI
[M]
Weight
[M]
Height
Page 6
Workout Mode - Precaution/Tips for Heart Rate Measurement
5
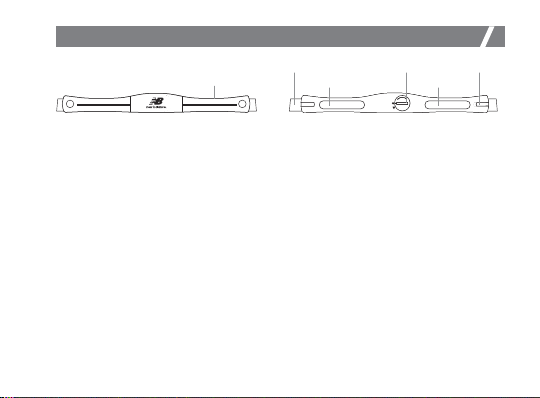
Soft Belt
Front View Back View
Heart Rate Features
• This Watch supports 5.3kHz chest strap (not included in this packaging), thus, with
chest strap, this Watch can provide a continuous supply of heart rate data like current
heart rate, average heart rate and maximum heart rate to user for guiding them to
achieve their fitness goal.
Precautions / Tips
• There is two contacts located on the back of the Chest Strap. These two contacts
must be firmly contacted with the user’s skin during measurement.
• DO NOT take heart rate measurement when diving or under water.
• Clean the contacts occasionally by applying a few drops of water, and wipe it dry with
a paper towel to remove any residual grease.
• DO NOT use hand cream; it will insulate the signal between the skin and the contacts.
• Clean your skin with soap and water for better signal transmission.
• For those with extremely dry skin, apply some conductive gel or water may help.
• Adjust the Chest Strap with the supplied elastic band until it is hold on your chest
firmly to avoid loosen it when doing exercise.
• Avoid doing any awkward motion during measurment, otherwise error may be
resulted.
Battery DoorElastic band
contact contact
release slot
Page 7
Workout Mode - Wearing the chest strap
5.1
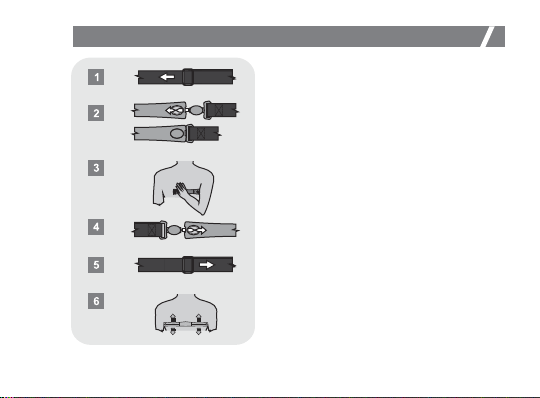
How to Wear the Chest Strap
• Refer to the below steps to wear the
chest strap on one’s chest:
1) Extend the elastic band for allowing a
loose fitting the chest strap on your
chest.
2) Connect one connector with the chest
strap. Ensure that the connector is
completely lodged into the chest strap.
3) Fit the chest strap on your chest with
one hand.
4) Connect the opposite connector to the
chest strap with the another hand.
5) Fasten the elastic band until it is fitted
on your chest comfortably.
6) Adjust the chest strap until the two
contacts are firmly contacted with
your skin.
IMPORTANT: DO NOT wearing the chest
strap over your cloth, otherwise the chest
strap CANNOT get the heart rate signal.
NOTE: In dry seasons, wetting the contacts
with some water can make the signal
transmission better.
Page 8
Workout Mode - Healthier Lifestyle and Pedometer
5.2
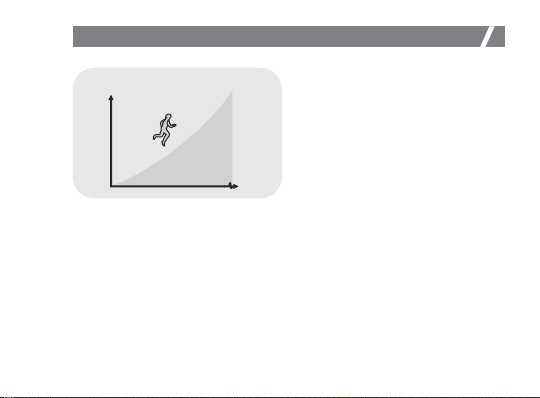
Tips to achieve a Healthier Lifestyle
Step/Distance
• The below are the general guide for
• Ta ke enough sleep,
• Make social connection,
• Do more exercise,
• Take a daily walk, and
• Eat balanced diet.
How to Increase Walking Steps
Time
• It is suggested that walking could
• Walk to your office by getting off
• Establish a walking habit every
• Walking with some soft music or
• Set up a goal (How many km
achieving a healthier lifestyle:
make contribution to health. Some
tips which would increase your
walking steps:
the bus earlier or park your car
farther away from your office.
da y.
friends.
within a week) for your walking.
Page 9
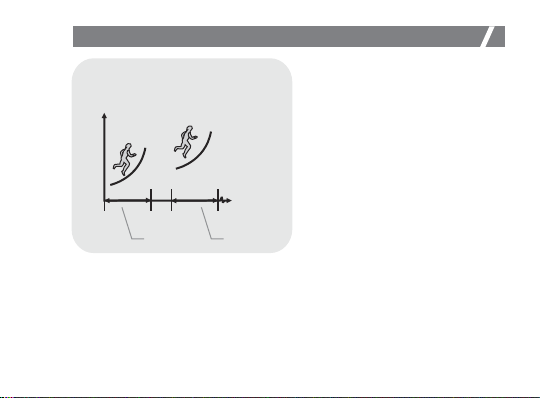
Workout Mode - What is a Pedometer
5.3
Step/
Distance/
Calorie expenditure
speed A
start startstop stop
speed B
walk/run 1 walk/run 1
Time
Pedometer Features
• This Watch provides some
advanced pedometer features for
guiding user to achieve his/her
fitness goals.
• The information includes distance,
speed, exercise time and calorie
expenditure for walk or run. The
data can be read instantly or
saved into a record for recall later.
Page 10
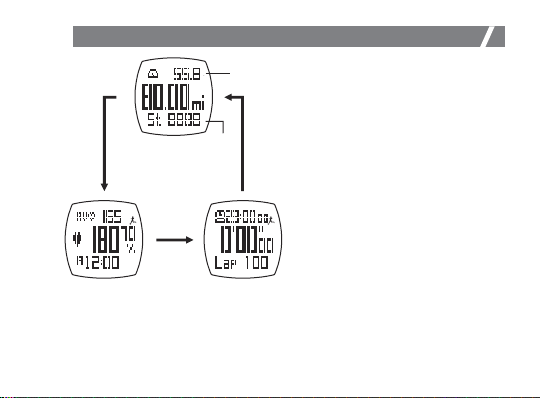
Workout Mode
5.4
Press
[R/V]
HRM View Worktime View
Distance View
Press
[R/V]
3rd line
1st line
Press
[R/V]
Workout Mode
Under workout mode, users can
select those sub-functions by
pressing [R/V] button:
• Distance view
• HRM view
• Worktime view
The 1st and 3rd line display can be
customised by user, refer to chapter
5.7.1 for the selection.
Page 11
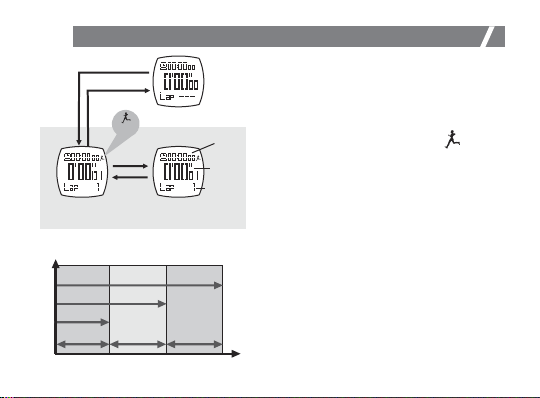
Workout Mode - Operation
5.5
Press
Press
[S/L]
[S]
Run Lap Time
Start
Workout
Split Time 1
Workout
ON
Press
[S/L]
10
Seconds
Split Time 2
Stop
Display
Split Time 3
[S/L] [S/L] [S/L] [S]
Workout
Lap 3Lap 2Lap 1
How to Turn ON/OFF the Exercise Function
• Five seconds after Workout Mode is
selected, the Heart Rate function will be
turned ON automatically but workout
function hasn’t been turned ON yet.
• Press [S/L] to turn on the workout.
Lap
• When workout function is turned ON,
Time
Split
Time
Lap No.
Stop
workout data will be updated yet.
• The Heart Rate measurement will be
STOPPED automatically if NO ‘heart rate’ is
detected for 5 minutes.
• Press [S/L] can make a lap record.
• As workout is finished, press [S] to turn off
the workout. Hold [R/V] to reset the current
workout and saved into recall mode.
NOTE:
1) The Chest strap/Watch MUST be worn on
the user’s chest/wrist properly before heart
rate/pedometer measurement.
2) User can use the Watch without the chest
strap, then NO heart rate data will be
recorded for that exercise session.
3) When segment or lap memory is not
Time
available. The oldest segment will be
deleted automatically to spare memory.
Page 12
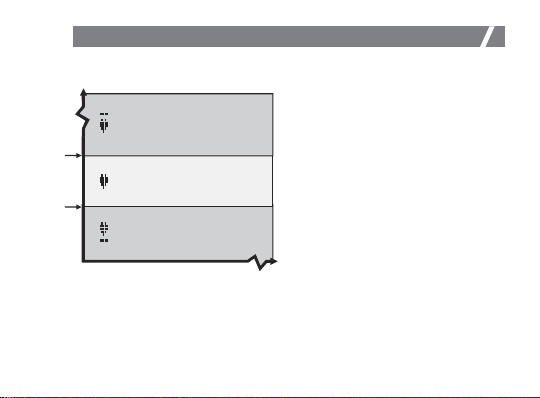
Workout Mode - Heart Rate Alert
5.6
Heart rate
(beats per minute)
Above HR Zone
Above
Zone
Below
Zone
The Objective Heart Beat Range
WARNING: Consult a doctor or trainer
for setting the zone prior to undergo an
serious Cardo-fitness training.
“ Bi - Bi ”
The Objective Heart Beat Range
(the ideal range for
training or health reason)
Below HR Zone
(the ideal range for training
or health reason)
“ Bi ”
• The Heart Rate Alert feature is a
supplementary feature of the Heart
Rate Measurement function. This
feature can be function by setting a
objective heart rate range, and hence,
the Watch will alert the user when
he/she gets a heart rate measurement
which is out of the objective heart rate
range.
• In order to hear the audible alert of
above and below zone alert, zone alert
shall be turned on. (refer to 5.8.1)
How to Acquire the Objective Heart Rate
Range
• The objective heart rate range is the
region that binding by the upper and
lower heart rate limits. These limits
must be set according to application
and on one’s own health condition.
• These limits can be obtained by the
following:
1) Get these two limits by consulting a
doctor or trainer.
2) Get these two limits by %EMHR
Page 13
5.7.1
Hold
[M]
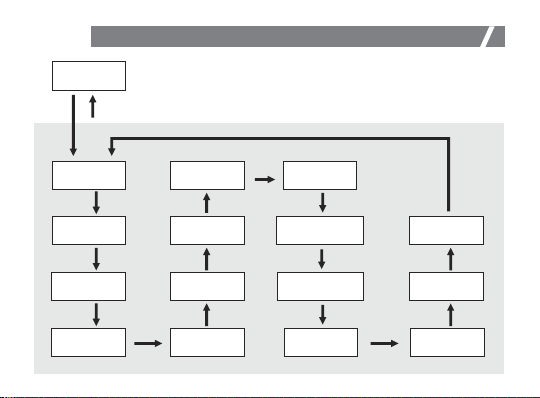
Workout Mode - Setting Sequence
Exercise
Mode
Hold
[M]
HR Zone
Select
[M]
Above Zone
ON/OFF
[M]
Below Zone
ON/OFF
[M]
My Zone
Lower Limit
[M]
HR View
[M]
Distance View
3rd Line
[M]
Distance View
1st Line
[M]
[M] [M]
My Zone
Upper Limit
HR View
3rd Line
[M]
Work Time View
1st Line
[M]
Work Time View
3rd Line
[M]
Calibrate
Walk Distance
[M]
Run stride
[M]
Calibrate
Run Distance
[M]
Walk stride
Page 14
5.7.1
Lap No.
Work Time
Lap Time
Speed
Speed - Average
Pace
Pace - Average
Distance
Step
HR
HR - Average
HK Zone - Above
HR Zone - In
HR Zone - Below
Calorie
Time
Workout Mode - Setting Sequence
To Set the Workout Mode
• Press and hold the [M] button
under workout mode to select
the ‘Setting’ display.
The Setting Sequence
• If one of the settings is flashing,
press the [S] or [R/V] button to
change the value(hold the
button to change the value at a
faster pace).
• To calibrate ‘Walk’ and ‘Run’
stride, see next chapter for
details.
• Above HR Zone and Below HR
Zone can refer to 5.6 for more
details.
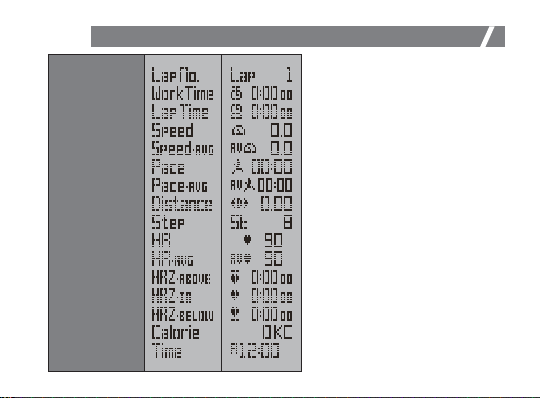
• In figure show the selection of
1st and 3rd line display.
Page 15
5.7.2
Workout Mode - Setting Mode - Walk and Run stride
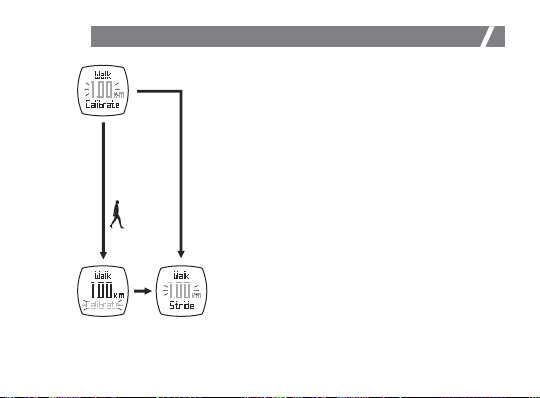
Walk and Run Stride
• To get the accurate walk and run speed and
distance calculation, user need to enter their
personal walk and run stride.
• User can enter their personal walk and run stride
by selecting auto or manual calculation.
To auto set the Walk and Run Stride
• Select ‘Calibrate walk or run distance’ setting
under workout setting mode.
• Input the known distance by pressing [S] or
[R/V].
• Press [S/L] to start calibrating.
• User start to walk or run for the specific distance.
• When reaches, press [S] to finish calibration
• The watch will automatic calculate the walk/run
stride.
To manual set the Walk and Run Stride
• Select ‘Calibrate walk or run stride’ setting under
workout setting mode.
• Press [M] to enter ‘Walk’ or ‘Run Stride’ display
• When the digit is flashing, press [S] or [R/V] to
enter the value of the stride.
Calibrate
Walk
Set the
walkstride
calibrate
distance
[S/L]
[S]
Walk
Stride
[M]
Page 16
Workout Mode - Potential Causes for NO Heart Rate Reading
5.8
or Long Response Time
1) Cause: Dry Skin.
Solution: Apply conductive gel or saliva thoroughly to chest area. Even water will help if
conductive gel is not available.
2) Cause: Chest strap is not placed firmly over the chest.
Solution: Make sure the chest strap is placed firmly over the chest by tightening elastic
band.
3) Cause: Muscle tremors caused by holding the Chest strap too hard on your chest.
Solution: The contacts must make firm contact (NOT too hard) with the user’s skin
during measurement. This will ensure good and consistent readings even while walking
or jogging with arms swing naturally.
4) Cause: Dead skin on chest.
Solution: Usually rubbing your skin with a towel will help.
5) Cause: A thin layer of body grease insulate the ECG signal which prevents the Chest
Strap or Watch from picking up one’s ECG.
Solution: Wipe chest and the back of Chest Strap with a tissue or soft towel.
6) Cause: Hairy skin.
Solution: Apply conductive gel to chest area or wrist.
7) Cause: Irregular heartbeats.
Solution: N/A It is difficult to consistently pick up a reading for those with irregular heart
beats. Inconsistent response times are expected for those with arrhythmia.
8) Cause: Battery Low.
Solution: It might be due to the battery level of the Chest Strap / watch is low. Replace
the battery and try again.
9) Cause: Interference of other RF devices (Chest-Strap Measurement)
Solution: Depart from the place where RF source potentially exist.
Page 17
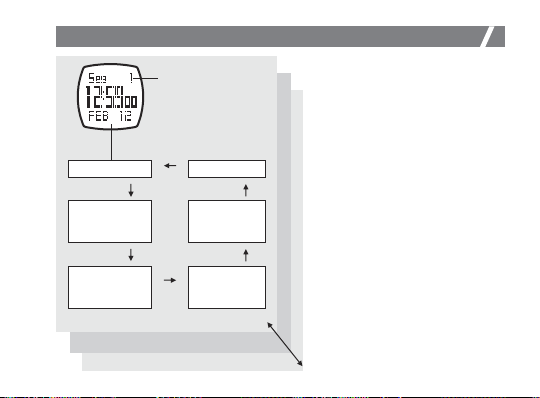
Recall Mode - Summary Display
6
Segment no.
Time Stamp Odometer
[R/V]
Total Lap No./
Work Time/
Average Pace
[R/V]
Calorie/
Distance/
Average Speed
[R/V]
[R/V]
[R/V]
Above/In
/Below
Zone Time
[R/V]
Max HR/
Average HR/
Step
Segment 1
Segment 2
Segment 3
Recall Mode
• User can review the Segment
Session in details here.
• It can store up to 10 Segment
Sessions with 100 Lap Records.
• Each segment contains
Summary and Lap Record
display.
Summary Display
• User can review the summary
information for Segment session.
• Press [S] to select the Workout
session.
• Press [R/V] to review the
summary information as
adjacent diagram.
• Press [S/L] to enter Lap Record
display.
[S]
Page 18
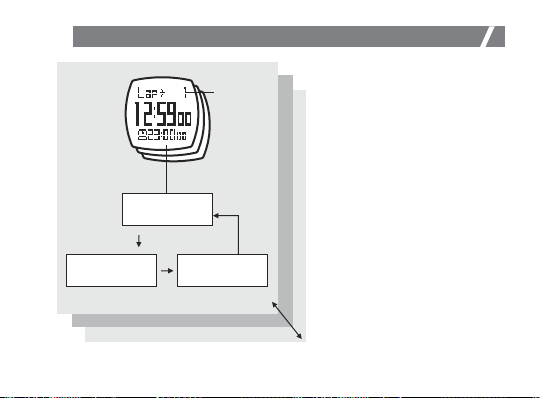
Recall Mode - Lap Record Display
6.1
Split time/
Lap Time
[R/V] [R/V]
Distance/
Average pace
[R/V]
Average HR/
Average speed
Lap no.
Lap 1
Lap 2
Lap Record Display
• User can review the information
for each lap
• Press [S] to select the lap record
• Press [R/V] to review the lap
information as adjacent diagram
• Press [S/L] to return to
Summary Display
[S]
Lap 3
Page 19
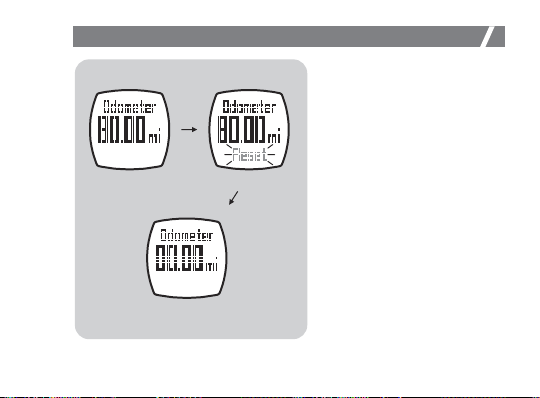
Recall Mode - Clear Odometer
6.2
Odometer
View
Clear memory
Hold
1 Second
[R/V]
Reset
Hold
5 Seconds
[R/V]
• Odometer is used to count the
travelled distance until next
reset.
• Select the Odometer Session
by pressing [R/V].
• Hold [R/V], display will show
“Reset” and keep holding
[R/V] button for more 5
seconds.
• Odometer Session will be
cleared to zero.
Page 20
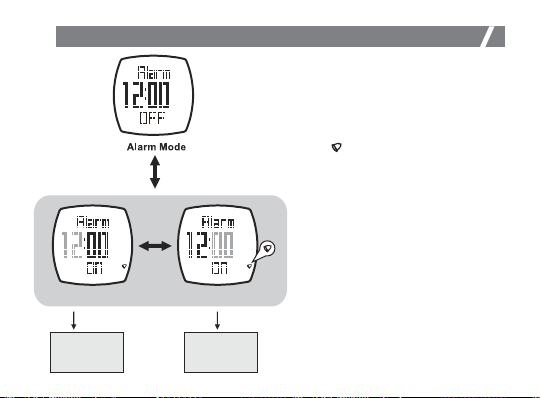
Alarm Mode
7
Hold
[M]
[M]
Hours Setting Minutes Setting
[S] or [R/V]
Increase /
Decrease the
value
[S] or [R/V]
Alarm
On/Off
[S] or [R/V]
scroll
the setting
faster
Daily Alarm Display
• In the Daily Alarm Display, Alarm
Time (hours, minutes) appears on
the 2 row of the display.
Daily Alarm ON and OFF
• When the Daily Alarm Indicator
‘ ’ appears (which means the
daily alarm is ON), the watch
starts beeping at the alarm time.
Daily Alarm Sound
• The alarm beeps for 30 seconds
when the daily alarm function is
turned ON.
• You can stop the beeping by
pressing any button.
Note:
Alarm will be turned on automatically
if any changes has been made to the
Hold
setting
Page 21
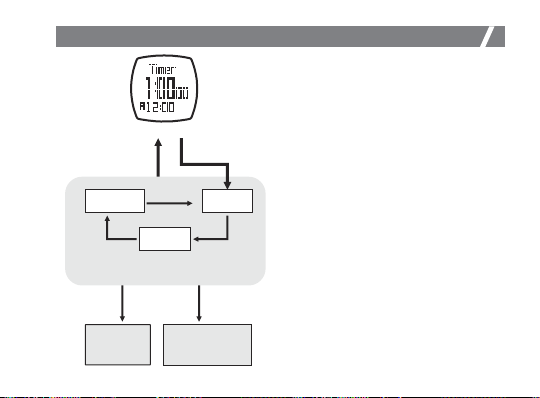
Timer Mode - Setting Count-down Target
8
Timer Mode
Hold [M]
Second
[M] [M]
Count-down Target
Setting Sequence
[S] or [R/V]
Change
the setting
value
Hold [M]
[M]
Minute
Change the
setting value at
a faster speed
Hour
Hold
[S] or [R/V]
How to Set Count-down Target
• In the Timer Mode, hold [M] to enter the
Count-down Target setting display:
• Press [M] to select ‘hour’, ‘minute’, or
‘second’ setting (flashing).
• Press [S] or [R/V] to change the
setting value (Hold [S] or [R/V] to
change the setting value at a faster
speed).
• When the setting is completed, hold
[M] to exit the setting display and
return to the Timer Mode.
• When no key is pressed for more than
1 minute, the watch will return to the
Timer Mode automatically.
Page 22
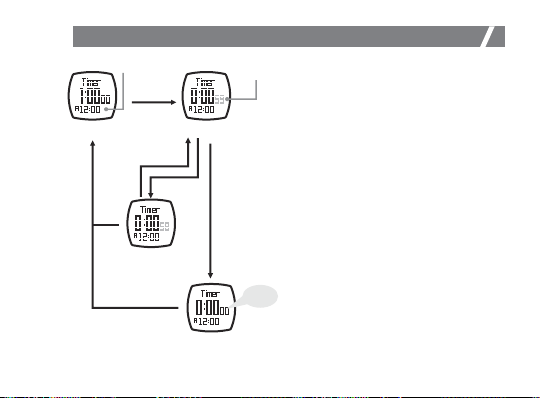
Timer Mode - Using the Count down Timer
8.1
Initial Display
Current Time
[S/L]
Hold
[R/V]
Stop-Counting
Display
Auto Reset
[S/L]
[S]
Count-down
Counting Display
Counting
down
Count down
to zero
target
Beep!
How to use Count down timer
• Press [S/L] to start counting when
the timer is stopped. Press [S] again
to stop counting when the timer is
running.
• The timer beeps once per minute at
the last 10 minutes.
• It beeps once per 10 seconds at the
last minute.
• It beeps every second when
counting down to the last 5 seconds.
• When the timer reaches to zero, it
beeps for 30 seconds. After that it
will reset to initial count-down target
automatically.
• Press any key to turn off the beep
sound.
• When the timer is stopped hold,
[R/V] for 2 seconds to reset the
timer to the initial count-down
target.
Page 23
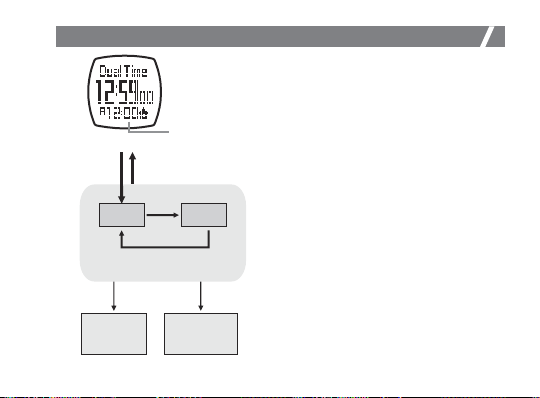
Dual Time Mode
9
Dual Time Mode
the setting
Current Time
Hold [M]Hold [M]
[M]
Hour Minute
[M]
Dual time Setting Sequence
hold
[S] or [R/V]
scroll
faster
[S] or [R/V]
Increase /
Decrease
setting by 1
To Set the Dual time Mode
• To set Dual time mode, press and hold
the [M] button under Dual Time Mode
(the ‘Hour’ digits will start flashing)
The Setting Sequence
• When the ‘Hour ’ digits start to flash,
press the [M] button to move the flash
following the sequence of the adjacent
diagram.
• When one of the settings (hour, minute)
is flashing, press the [S] or [R/V]
button to scroll through the setting
(hold down the button to scroll the
setting at a faster pace).
• Press and hold the [M] button to exit
the setting sequence.
Page 24
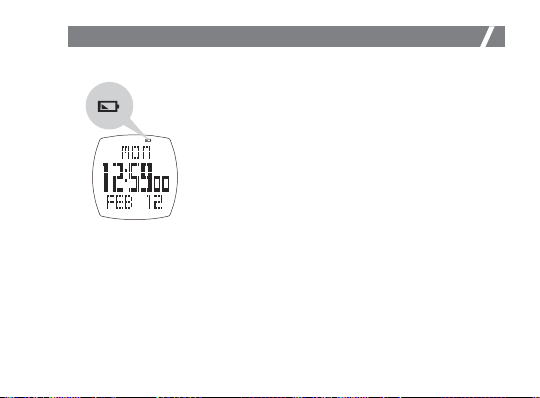
Battery - Battery Low Indication and Battery Replacement
10
Battery Low Detection
• When the battery-low indicator appears on the
Battery-Low
Indicator
display, it means that the capacity of the battery
is low.
• However, if the appearance of battery-low
indicator is caused by using the Watch under
very cold condition, the indicator will be
disappeared when normal temperature returns.
NOTE: It is recommended to complete the battery
replacement by a certified service agency, because
this Watch contains precise electronic sensors and
components.
IMPORTANT: If the battery has been replaced, all
memory will be cleared.
Page 25
Care and Maintenance
11
• This watch contains electronic components. Never attempt to open the case or
remove the back cover.
• Avoid exposing the watch to extreme temperature, chemicals which will
damage the watch.
• Keep the watch away from the conditions of strong electric field and static
electricity.
• Avoid rough usage or severe impact. The watch is designed to withstand impact
under normal use. It is advisable to subject it to severe impact or rough usage.
• Clean your watch occasionally with a soft moistened cloth only. Avoid using
chemicals, especially soap as the waterproof gasket will corrode.
• Store the watch in a dry place when it is not in use.
Page 26
Precautions for Straps
12
• Exposure to water often makes a strap fragile and it may soon tear.
• Don’t apply perfume or moisturizers around your wrist as the chemicals can
erode the metal, leather and plastic of watch straps.
• The strap’s condition will depend on the owner’s wearing habits as well as the
climate of the place where the person lives. An original replacement on straps
is possible to be re-ordered through an authorized service center.
• PU straps are usually very hardwearing, please wash them with mild soapy
water only.
• There may be discoloration for light color and transparent straps after normal
wear for some time.
• In case if there is any severe or persistent skin reaction, such as severe redness,
itching, rash or hives, you should stop wearing this watch, and consult your
doctor.
Page 27
Precautions for Water Resistance
13
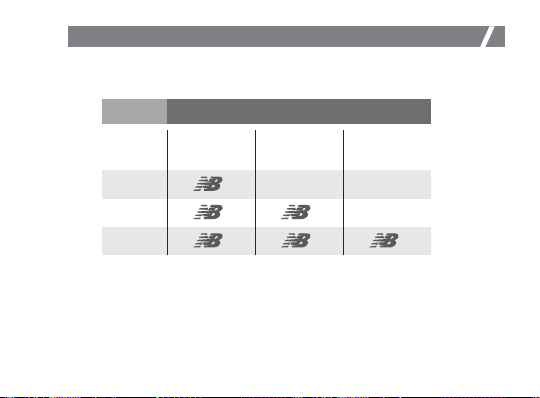
All New Balance watches are designed to withstand use as indicated on the below
chart.
Indication
Level of
resistance
3 ATM
(30 meters)
5 ATM
(50 meters)
10 ATM
(100 meters)
• Water damage may occur if the push buttons are pressed under water.
• Should water or condensation appear in the watch, please check the watch
immediately as corrosion of electronic parts can occur inside the case.
Light spray
perspiration,
light rain, etc
Water-related use
Bathing,
etc
Swimming,
etc
Page 28
Precautions for Battery
14
Battery Life
The battery in your New Balance watch is estimated to last for 2 years.
Battery Replacement
If the watch is out of battery, you are recommended to go to the authorized New
Balance service center for correct battery replacement in order to retain a valid
warranty and avoid any damage on the water resistance function.
WARNING!
Always keep watch batteries away from children. If swallowed, contact a doctor
immediately. Batteries contain chemical substances. They should be disposed of
properly according to local regulations.
Page 29
Authorized Licensee of New Balance Athletic Shoe, Inc.
New Balance and Flying NB are registered trademarks of
New Balance Athletic Shoe, Inc.
 Loading...