

GRACIAS,
Por la compra de este MI NICOMPONE NTE DE AUDIO. Este produc to esta diseñ ado
singularmente co n un reproduc tor de CD/VCD c on memori a programab le y repetici ón
de pista. También of rece una gran c aracter ística de son ido en RADIO AM/ FM
estereofónico y RE PRODUCTOR DE CASSE TTE estereo q ue le permite h acer
grabaciones dire ctas del radi o o del reprodu ctor de dis co. Tiene dos bo cinas dinám icas
de alto rango.
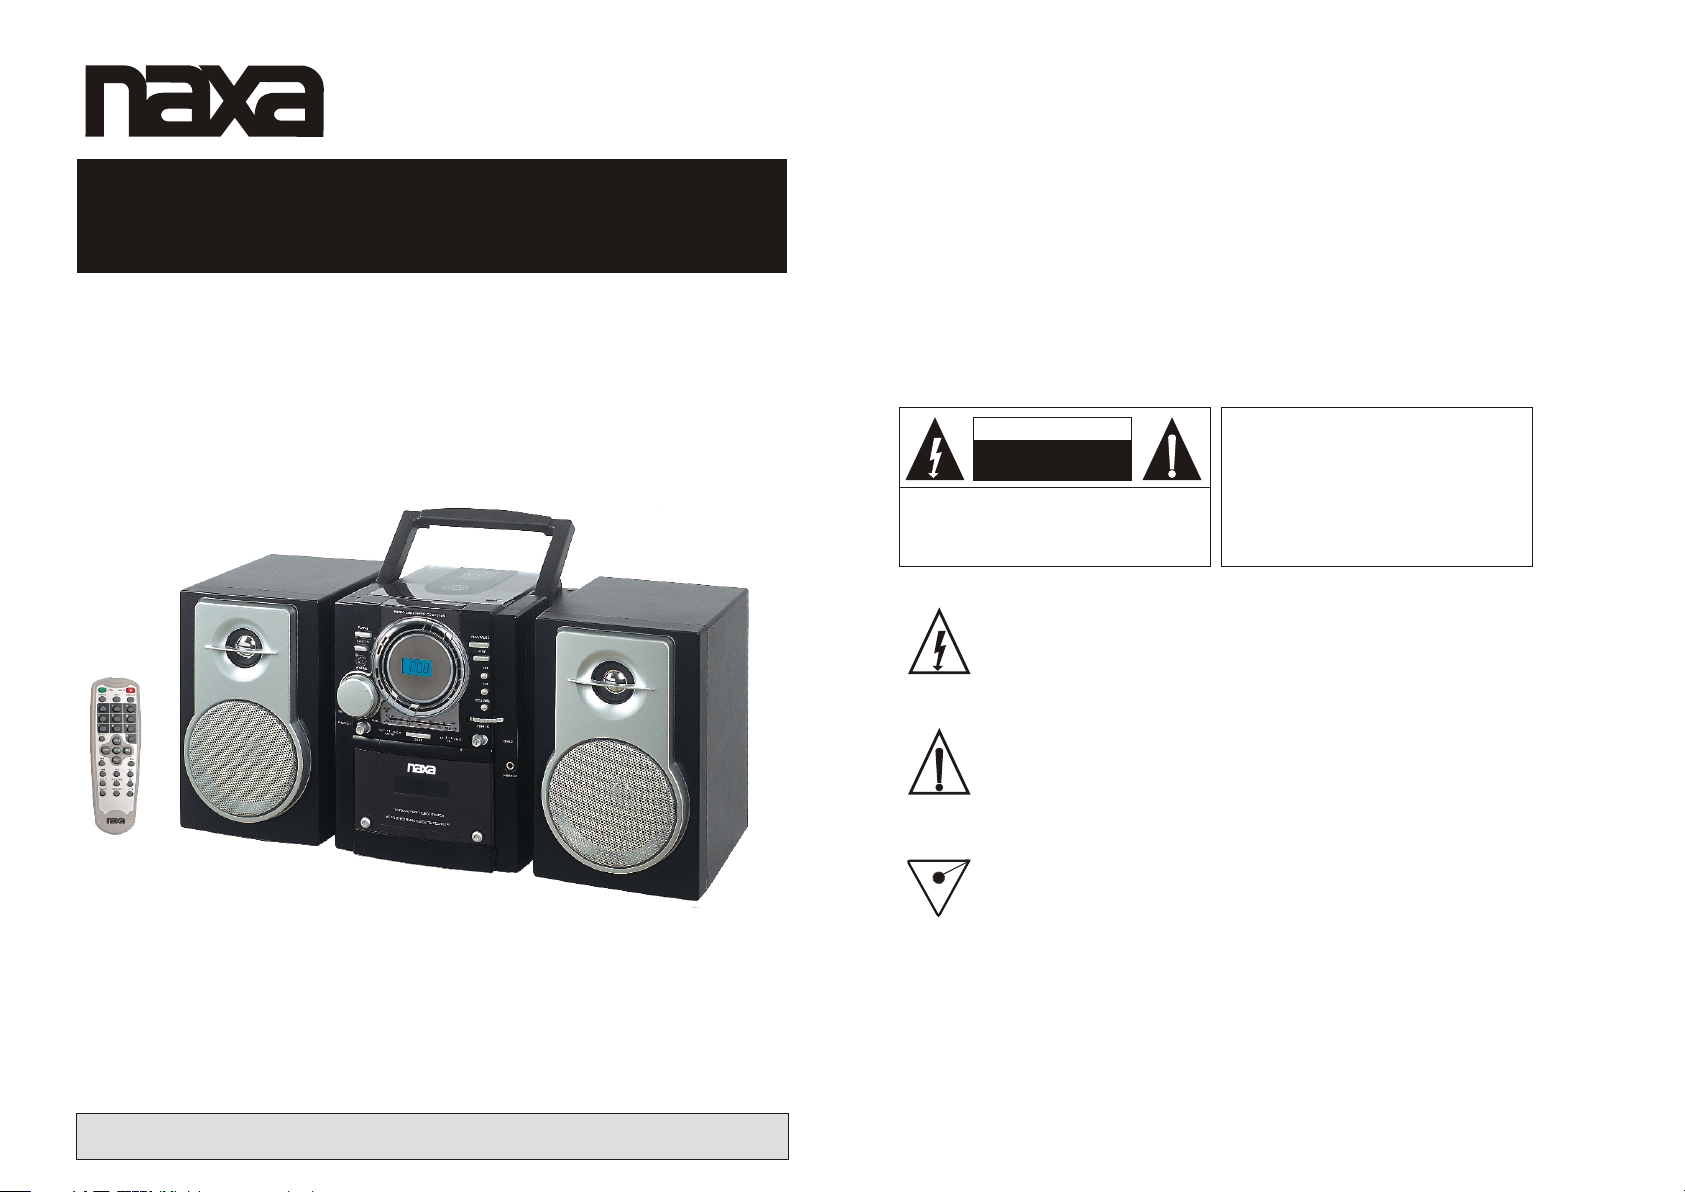
MINICOMPONENTE
RADIO AM/FM, REPRODUCTOR DE CASSETTE,
REPRODUCTOR DE CD/VCD
NX- 425
Estamos seguros qu e este produc to le proporcionara mu chos años de gr an desempeñ o
con un mínimo de cuida do y mantenim iento. Favor de revisa r el contenid o de este manua l
completa y cuidado samente ant es de operar es ta unidad , aseguránd ose de entend er
todas las funcione s y operacion es para logra r el máximo b eneficio de t odas las
característica s de este produ cto.
El numero de serie de la u nidad esta co locado sobr e la etique ta localiza da en la parte
trasera del gabine te. Recomen damos que ano te este num ero de serie pa ra en caso de
que este dato sea nece sario en fech as futuras.
PRECAUCION
NO ABRI R RIESG O DE CHOQ UE
ELEC TRICO
NO EXP ONER A LA LUVI A O HUMEDA D
PRE CAUCI ÓN: PARA RE DUC IR EL RI ESGO DE
CHO QUE ELÉ CTRIC O NO RETI RAR LA CUB IERTA
(O TAPA) , D ENTRO D E ESTE APAR ATO NO HAY
PARTES QUE EL USU ARI O PUE DA DAR LE SE RVICIO,
ACU DIR A UN CENT RO DE SER VIC IO AUTORIZADO O
CON P ERSON AL CALIFICADO
VOLTAJE PE LIGROSO
El símbolo d e un rayo con ca beza de flec ha dent ro de u n trian gul o equil áte ro, adv ierte
de la presen cia de VOLTAJE PELIGRO SO NO AISLADO d entro d el pr oduct o, qu e puede
ser de magni tud sufici ente para co nstit uir u n riesg o de ch oque el éct rico pa ra las perso nas.
ATEN CION
El símbolo d e admiraci ón dentro de u n trian gul o equil áte ro, adv ierte al usu ario sobre l a
presenci a de importa ntes instr uccio nes d e opera ció n y mante nimiento ( servicio ) en el
manual que v iene con el ap arato.
SEG URIDA D LÁSER .-ESTA UNI DAD EMP LEA UN RAYO
LÁS ER. SOL O UN CENT RO DE SER VICIO AU TORIZA DO
O PER SONAL CA LIFIC ADO DEB EN INTE NTAR REPA RAR
ESTA UN IDAD PARA EV ITAR POS IBLES D AÑOS A
LOS O JOS.
PRE CAUCI ÓN.-EL US O DE CONT ROLES , AJU STES O
PRO CEDIM IENTO S DIFER ENTES A LOS E SPECI FICAD OS
EN ES TE MANU AL DE OPER ACIÓN P UEDEN R ESULTAR
EN EX POSIC IÓN A RADIA CIÓN PE LIGRO SA
,
FAVOR DE LEER ESTE MANUAL COMPLETAMENTE ANTES DE
OPERAR ESTE PRODUCTO.
CONSERVAR ESTE MANUAL PARA FUTURAS REFERENCIAS.
MANUAL DE OPERACIÓN
1 ~ 1 5
PEL IGRO
Radiació n láser invi sible y peli grosa c uan do abre y l os se guros s on liberad os. Evitar l a
exposici ón directa a l rayo láser.
ADVERTENCIA DE G OTEO: “El ap arato no deb e de ser ex pue sto a got eo o sa lpica dur a de líqu idos, no deb en
col ocars e obj etos ll eno s con líq uidos, com o vasos sobr e el apar ato .”
ADVERTENCIA DE V ENTILACI ÓN: “La vent ilaci ón no rmal de l apa rato no d ebe impedi rse de ningu na mane ra. ”
ADVERTENCIA : “Para redu cir el riesg o de fueg o o cho que elé ctr ico no ex poner este a parato a la ll uvia o humed ad.”
-1-
PREPARACIÓN PARA USARLO
DESEMPACAR E INSTALAR
Sacar cuidadosam ente la unida d de la caja y reti rar todo el m aterial de em balaje de la mi sma unidad.
Retirar las etique tas descrip tivas que pue den encon trarse fren te o encima del g abinete de la unidad.
No retirar las etiqu etas locali zadas en la par te traser a o en los botone s del gabinet e de la unidad.
El cordón de aliment ación de Vca re movible est a empaque tado en un cart ón separado d e la unidad.
Asegurase que el cor dón de alimen tación de Vca n o es desech ado acciden talmente co n el cartón o
material de embala je.
Presionar el botón d e abrir la puer ta del CD para ab rir el comp artimient o del disco com pacto. Hay
una tarjeta blanca e n el comparti miento del di sco compa cto que esta di señada para p revenir el
movimiento del cap tador óptic o del CD durant e el embarq ue y desplaza miento del pr oducto. Retirar
esta tarjeta antes d e usar el repro ductor de discos compa ctos.
FUENTES DE PODER
Este MINICOMPONE NTE DE AUDIO est a diseñado para operar a l a alimentac ión de la línea
casera (según el Paí s). Intenta r operar este aparato co n alguna otra f uente de pode r puede
causar daños al mism o.
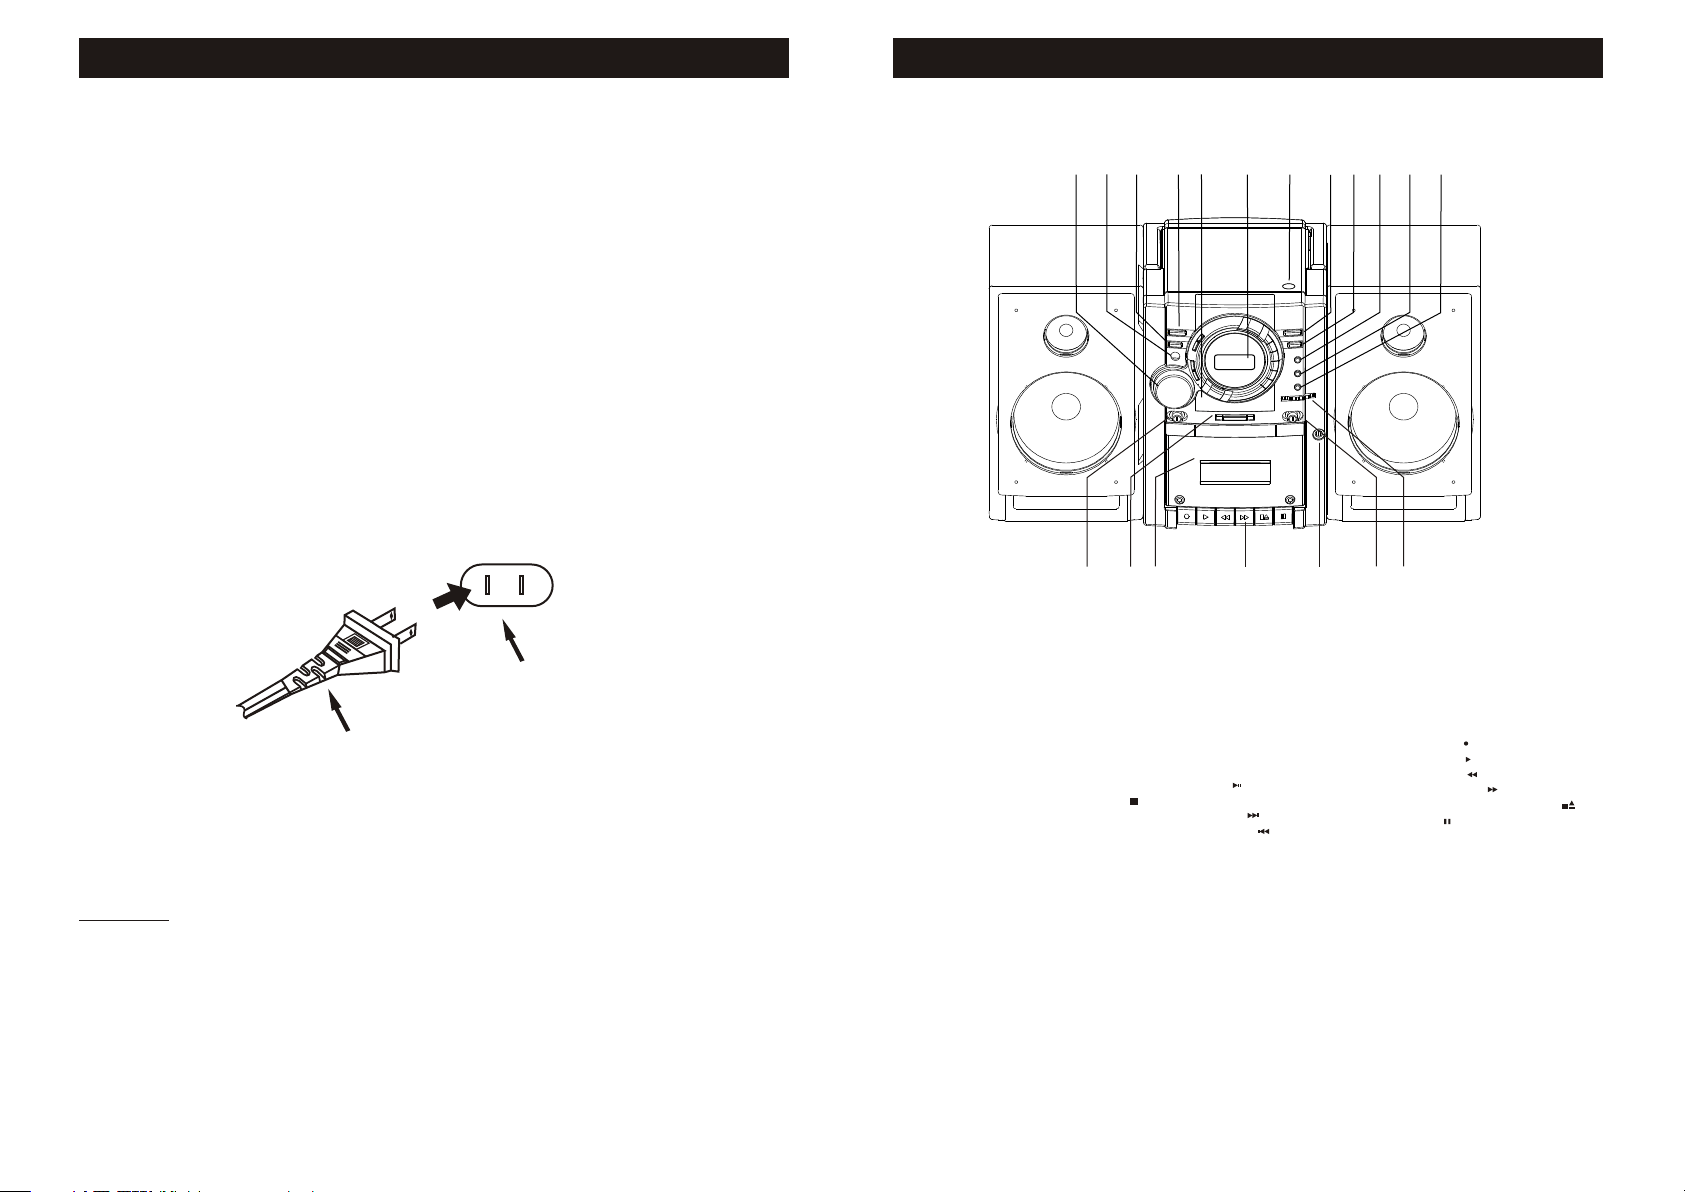
LOCALIZACIÓN DE CONTROLES E INDICADORES
6
5
3
4
16
2
17
8
7
18
9
10
1
19
11
15
14
12
13
Salida Vca
(TOMACORRIFNTE)
Clavija Vca
OPERACIÓN Vca
Desenvolver el cor dón de alimen tación de Vca y e xtender lo completa mente a lo larg o, insertar la
clavija en el tomaco rriente de pa red de la casa y el o tro extre mo insertar lo en la entrad a de Vca de
la unidad. en caso de qu e su unidad cue nte con selec tor de volt aje, coloca r este en la posi ción
adecuada de acuerd o al voltaje de l tomacorri ente.
-2-
1.Botón para abrir pu erta del CD
2.Selector de Funci ón “CD,VCD/ TAPE”O FF”/RADIO ”
3.Botón de volumen
4.Ventana del sensor r emoto
5.Botón de reproduc ción aleato ria CD “RANDO M”
6.Botón de repetir r eproducci ón CD “REPEAT”
7.Indicador de Pant alla de CD
8.Pantalla de crist al liquido
9.Botón de reproduc ir/pausa CD “ PLAY/PAUSE” ( )
10.Botón de detener C D “STOP” ( )
11.B otón de salta r/avanzar C D “SKIP/F ORWARD” ( )
12.Botón de saltar /retroced er CD “SKIP/REVERSE” ( )
13.Botón de sumari o “RESUME”.
14.Botón de sinton ía
-3-
15.Selector de ban da “AM/FM/F M STEREO”
16.Botón de bajos “D BSS”
17.Puerta del cass ette
18.Botones del cas sette (Deba jo de la
cubierta de contro l)
Grabar “RECORD” ( )
Reproducir “PLAY” ( )
Rebobinado “RW D” ( )
Ava nce rápido “F FWD” ( )
Detener/Expuls ar “STOP/ EJECT” ( )
Pausa “PAUSE” ( )
19.Conector de aur iculares es téreo
CONTROL REMOTO
20
21
CONTROLES DE OPERA CIÓN Y FUNCIONES
CONECTAR A LA TV COMO SIG UE
CABLES DE AUD IO/VI DEO
VIDEO
AUDIO IZQ (L )
AUDIO DER (R )
PBC MUTE
OSD
PROG
22
23
2
1
5
4
25
8
7
SEL ECT
26
27
28
29
VOL+
STOP
VOL -
30
A-B
31
GOTO
RESUME
32
SLO W RETURN
33
34
20.Botón de PBC
21.Botón de silenci o “MUTE”
22.Botón de program a
23.Botón de OSD
24.Botón de repetir “ REPEAT”
25.Botones numéri cos
26.Botón de selecci onar “SELEC T”
27.Botón incremen tar volumen “ VOL +”
28.Botón de detener “ STOP”
29.Botón de SURROUN D
30.Botón de anterio r
31.Botón de saltar/ retrocede r
REPEA T
24
3
6
9
0
42
41
40
39
R/L
P/N
38
37
36
35
32.Botón de ir “GO TO”
33.Botón de lento “SL OW”
34.Botón de regreso “ RETURN”
35.Botón de sistema “ PAL/NTSC”
36.Botón de sumario “ RESUME”
37.Botón de izquier da/derech a/estereo “ R/L”
38.Botón de repetir “ A-B”
39.Botón de saltar/ avanzar
40.Botón de siguien te
41.Botón bajar volu men “VOL “
42.Botón de reprodu cir/pausa .
BLANCO
AMARILLO
TV
ENTRADA DE VI DEO
ENTRADA DE
AUDIO
IZQUIERD O
ROJO
ENTRADA DE AUD IO
DERECHO
NOTA:
Este MINICOMPONE NTE debe de con ectarse a un multisist ema PAL TV o TV para que sop orte
la señal con formato PAL/NTSC.
Asegurar que el MINI COMPONENT E y cualquier otro equip o a ser conecta do están en el mo do de
espera (STAND BY) o a pagado, des conecta r el cordón de al imentació n de Vca del tomacorrien te
de pared antes de inic iar a conecta r.
No bloquear las aber turas de vent ilación del a parato. C olocarlo de m anera que el ai re circule
libremente.
Leer las instrucci ones antes de c onectar otro equipo.
Asegura que se obser va y respeta la c odificaci ón de color es al conecta r los cables de a udio y video.
Durante la reprodu cción el volu men de la TV puede ser mas b ajo que el nive l durante las t ransmis iones
de TV, si este es el caso ajus tar el volume n al nivel dese ado.
CONECTOR AURICULA RES ESTEREO FONICOS
Conectar la clavij a de los auricu lares ester eofónic os de ∅ 3,5 mm
en el conector “PHON ES” para escu char en privado. Cuand o los
auriculares son co nectados, l as bocinas so n automát icamente
desconectadas. An tes de coloca r los auricul ares en la ca beza,
reducir el volumen a u n nivel bajo, e ntonces col ocarse lo s
auriculares e incr ementar gra dualmente h asta un niv el agradabl e.
Conectar los cable s de las bocina s a los conecto res
de salida de audio der echo e izquie rdo “ L y R”
localizados en la pa rte trasera d el gabinete d e la unidad
-4-
-5-
INSTRUCCIONES DE OPERACION
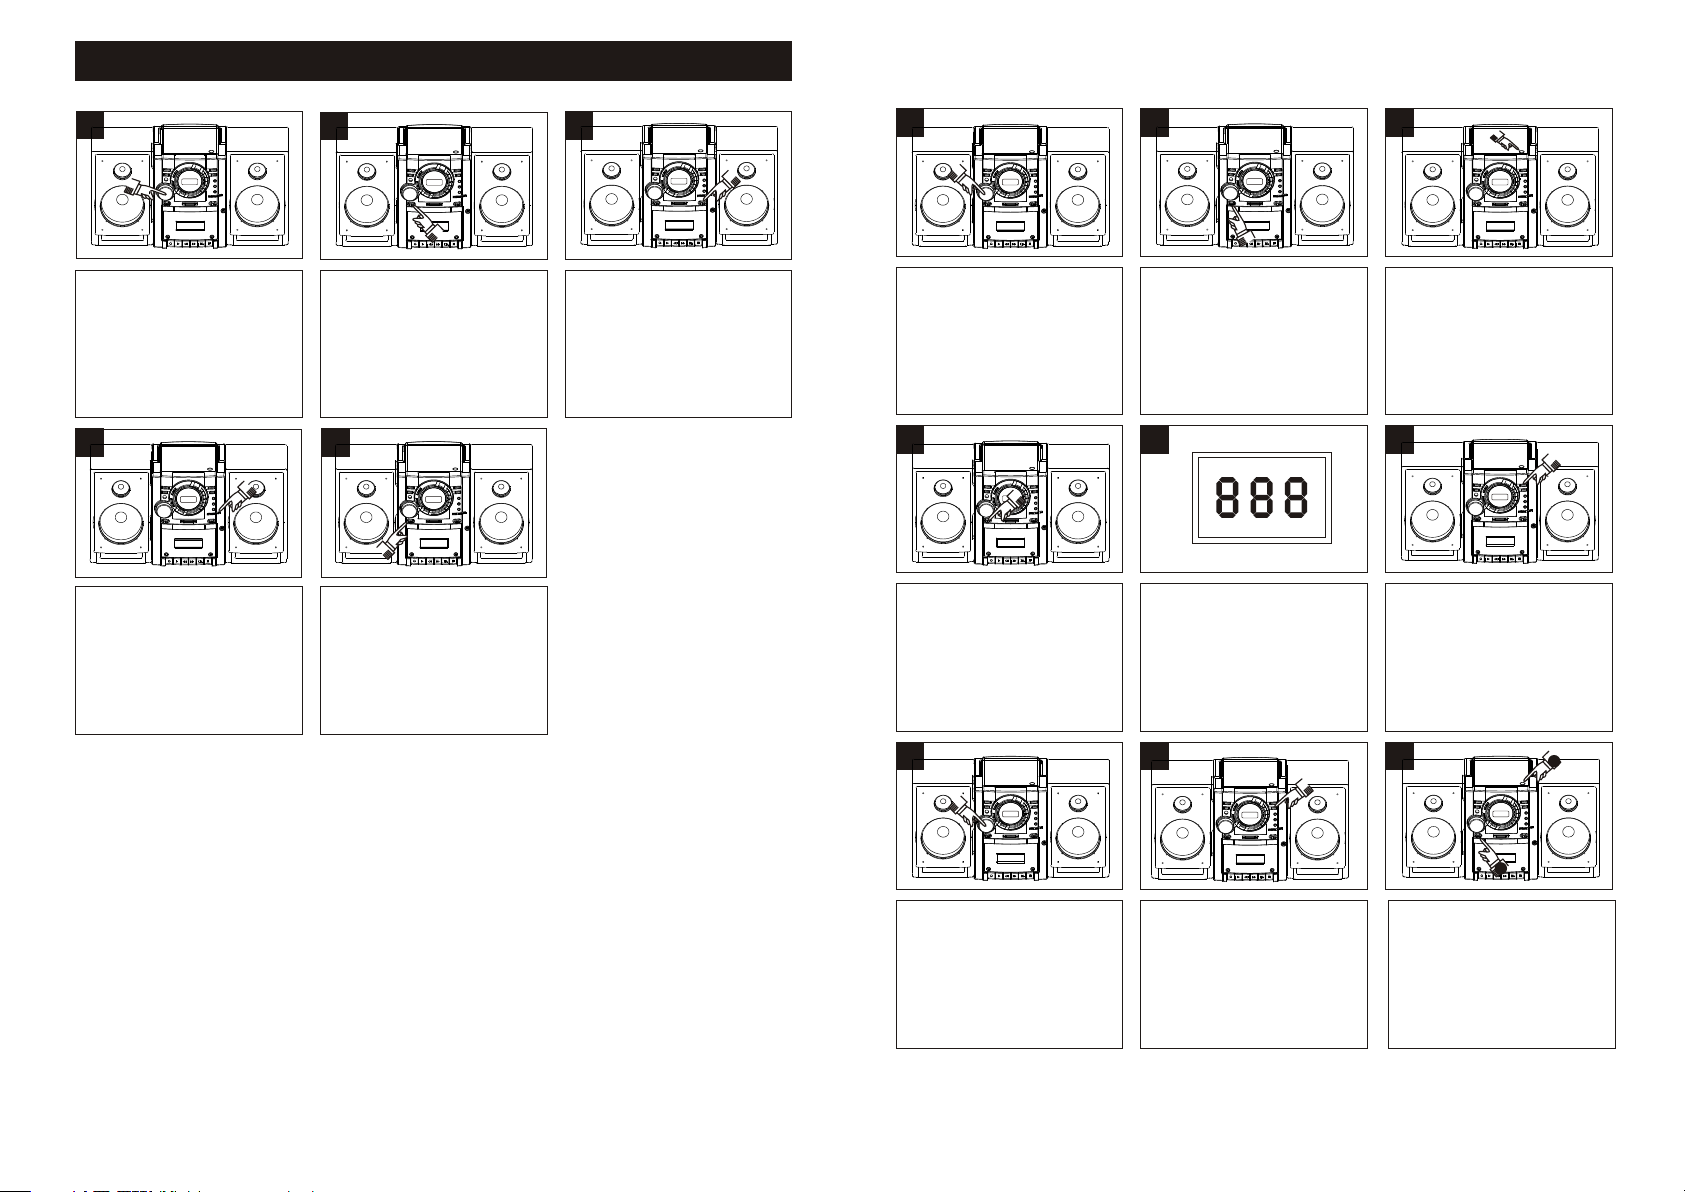
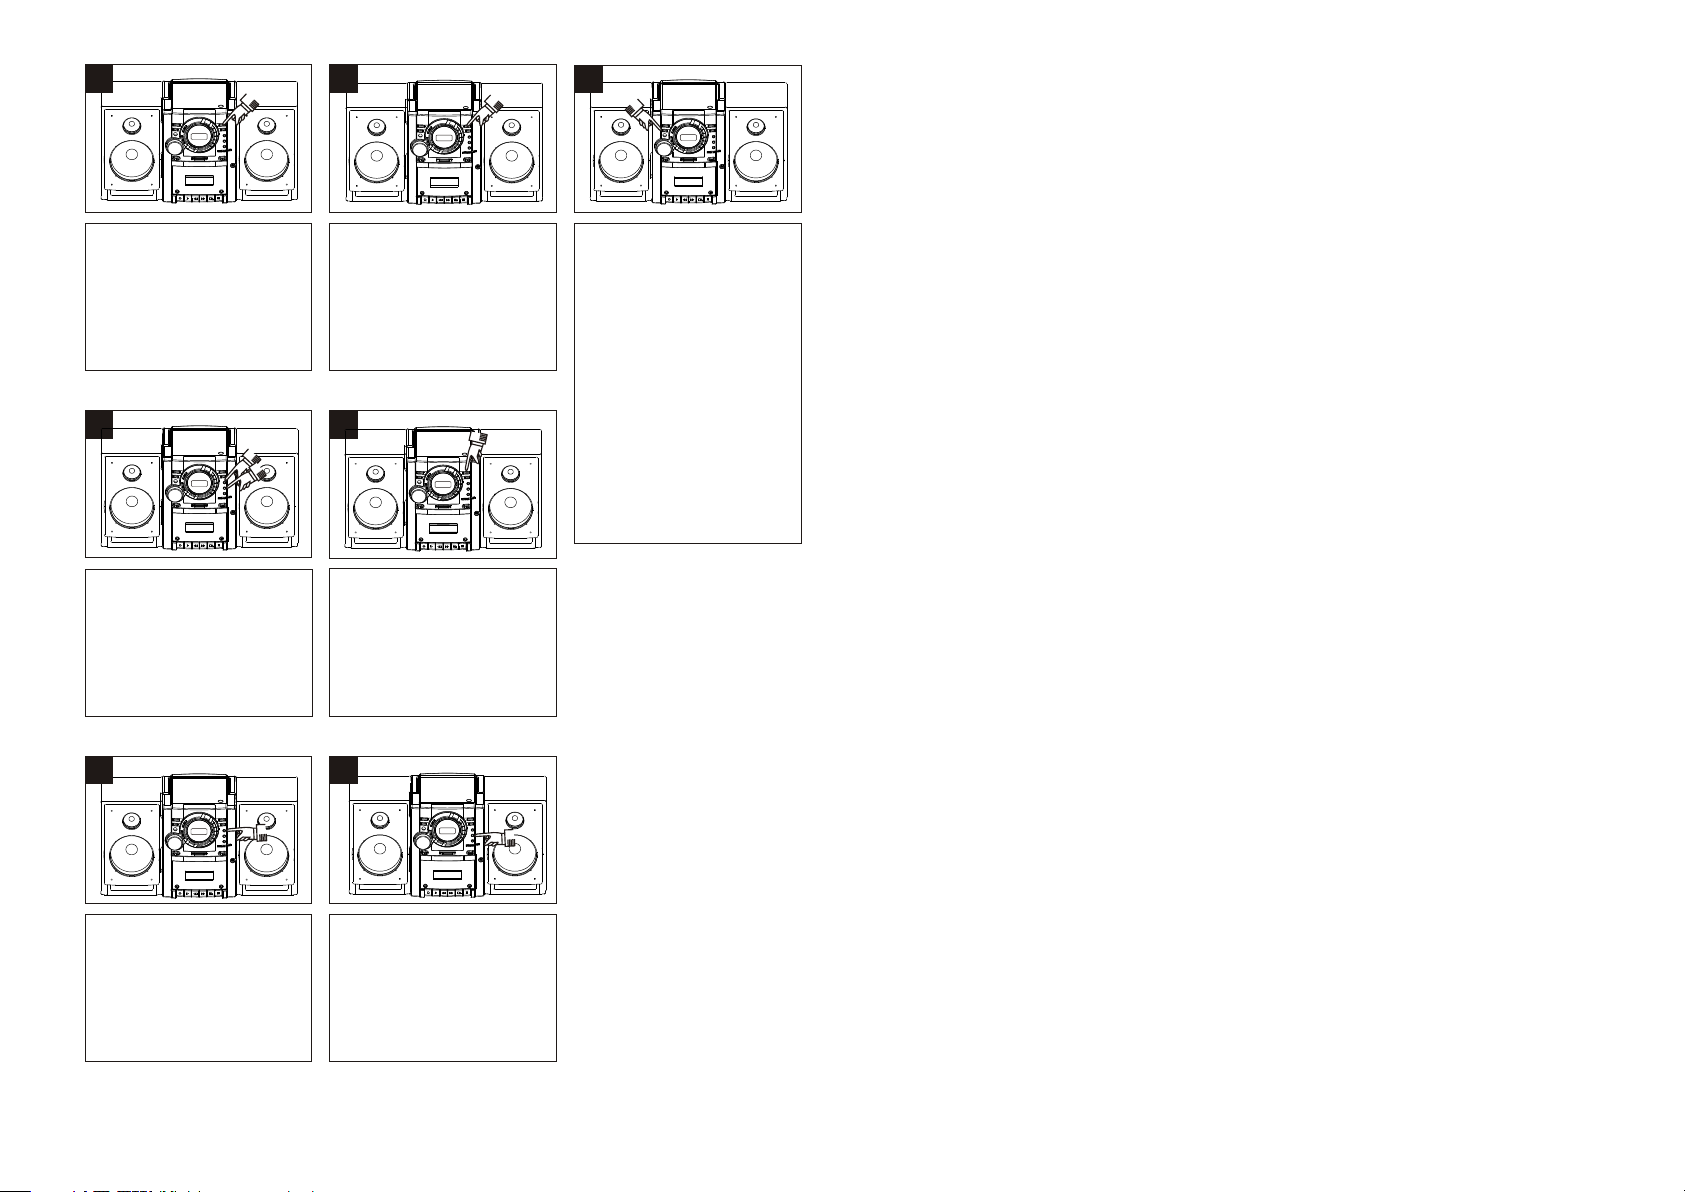
ESCUCHANDO EL RADIO
1
REPRODUCCIÓN DE DISCOS CD/VCD
REPRODUCCIÓN NORMAL
2
3
1
2
3
Colocar el control d e volumen
en un nivel bajo.
4
Girar el control de si ntonía para
encontrar la estac ión deseada .
NOTA: Si el selecto r de banda
es colocado en FM ESTE REO y
se ha sintonizado un a estación
el indicador de FM est ereo se
encenderá.
Colocar el selecto r de función
en la posición de RADI O.
5
Al finalizar de escu char el radio ,
colocar el selecto r de función en
la posición de apaga do “TAPE”
para apagar el apara to.
Colocar el selecto r de banda en
la banda deseada, AM, F M o FM
STEREO.
NOTA: Si seleccio na FM o FM
STEREO, asegurar se de
levantar la antena d e varilla
para FM y extenderla
completamente en t oda su
longitud.
SECRETOS PARA UNA BUENA RECEPCION
FM / FM EST EREO: Asegu rar que la ante na telescópica de vari lla para FM es le vantada y extendida
completamente. P uede ser nece sario varia r la direcc ión de la anten a para encont rar la señal mas
fuerte para cada est ación de FM. Si s e escucha débil o distan te la señal de la s estacione s de
FM ESTEREO y la recepc ión es insati sfactoria, colocar e l selector de b anda en la posi ción de FM
(monoaural), est o generalme nte proporc iona una me jor recepci ón aunque el so nido no se escuchara
en modo estereo.
AM: La antena de barra d e ferrita est a incorporada en la part e interna del a parato. Pue de ser
necesario girar el a parato lige ramente par a que la ante na interna es te en la direcc ión del transmisor
de AM. Hay que probar par a encontrar l a posición qu e provee la m ejor recepc ión para cada e stación
de AM.
Colocar el control d e volumen
en un nivel bajo
Colocar un disco CD/ VCD en el
centro con la cara rot ulada o
impresa hacia arri ba. Cerrar la
tapa del compartim iento del CD.
7
Ajustar el nivel de vo lumen.
Colocar el selecto r de función
en la posición de CD/V CD
5
El reproductor de CD /VCD
leerá la tabla de cont enido del
disco y el numero tota l de
pistas del disco apa rece en
la pantalla.
8
Para detener la repr oducción
antes de que el disco te rmine,
presionar el botón d etener CD.
El disco se detiene y la p antalla
muestra el numero to tal de
pistas del disco.
Presionar el botón a brir puerta
del CD, para abrir el
compartimiento d el CD.
NOTA: Si es la primer a vez que
abre, retirar la tar jeta de
seguridad del comp artimient o
del CD y desecharla.
64
Presionar Reprod ucción/Pa usa
del CD, para iniciar l a
reproducción des de la pista 1.
La pista deseada pue de esco
gerse y reproducir se desde
el control remoto.
9
Después de que la ult ima pis ta
se reproduce, el di sco se de tiene
automáticamen te y la pan talla
despliega el nume ro tota l de
pistas del disco. S i ha term inado
de escuchar presi onar el b otón
de abrir puerta del C D, reti rar el
disco y cerrar la pue rta. Co locar
el selector de func ión en
apagado “TAPE”
1
2
-6- -7-
CONTROL DE PAUSA CD/VCD
OPERACIÓN CON CONTROL REMOTO CD/VCD
1 2
Durante la reprodu cción de
CD/VCD, si desea pau sar el
disco momentánea mente,
presionar Reprod ucir/Paus a
nuevamente, la rep roducción s e
detiene pero el disc o continua
girando y el numero de l a pista
destella en la panta lla.
Presionar el botón d e
Reproducir/pau sa nuevamen te
para volver al modo de
reproducción nor mal del disco .
INICIAR LA REPRODUCCIÓN DE UNA PISTA ESPECIFICA
1
Después de inserta r el disco y
que el numero de pista s aparece
en la pantalla, pres ionar
saltar/avanzar o
saltar/retroce der para
seleccionar una pi sta especif ica
a reproducir.
2
Cuando la pista dese ada
aparece en la pantal la,
presionar Reprod ucir/Paus a.
La reproducción in iciara en la
pista selecciona da.
SALTAR ADELANTE/ATRÁS EN LAS PISTAS DEL CD
1
Durante la reprodu cción
presionar saltar /avanzar un a
vez, para avanzar al i nicio de la
siguiente pista, p resionar
repetidamente pa ra avanzar un
numero mayor de pist as.
2
Durante la reprodu cción
presionar saltar /retroced er una
vez, para regresar a l inicio de la
pista, presionar r epetidame nte
para regresar un num ero mayor
de pistas.
3
Reproduciendo la s pistas en
orden aleatorio (a zar), presi onar
el botón de aleatori o “RANDOM”.
-La pantalla de la TV d espliega
las pistas al azar ini ciando la
reproducción aut omáticame nte.
-Las pistas se reprod ucen en
orden aleatorio.
-Para finalizar est a función
presionar el botón d etener CD.
NOTA: Si presiona e l botón
repetir “REPEAT” y seleccion a
repetir todas las pi stas del disc o
en la unidad princip al o con el
control remoto cua ndo esta en
modo de reproducci ón aleatori o,
una nueva selecció n arranca
cuando la selecció n aleatoria
actual termine.
1.BOTÓN PBC
Este botón solo tien e función en el m odo de ver menú e n la pantal la. Esto se obs erva
aproximadament e 10 segundos .
2.BOTÓN IZQUIERDO /DERECHO “L /R”
La primera vez, el son ido en el canal i zquierdo se rá la salid a de ambos cana les.
La segunda vez, el son ido en el canal d erecho será l a salida de a mbos canale s.
Presionar el botón l a primera vez p ara unir auto máticam ente el lado iz quierdo.
Presionar el botón p or segunda ve z para unir aut omática mente el lado d erecho.
Presionar el botón p or tercera ve z para tener la salida de so nido estere o.
El modo de sonido este reo existe mi entras el pod er se encue ntre encend ido.
NOTA: Este puede us arse para rem over el son ido o cambiar i diomas dobl es con la función en
le modo VCD, esto no se us a en CD.
3.BOTÓN DE SILENCIO “ MUTE”
Presionar una vez, e l sonido se apa gara de las boc inas, pre sionar dos ve ces para que el s onido vuelva.
4.BOTÓN DE SELECCIÓ N “SELECT”
Seleccionar los di scos presio nando el botó n SELECT, des pués ingres e el numero. La a uto
reproducción CD/ VCD/MP3.
5.REPRODUCCIÓN PR OGRAMADA
En el modo detenido pr esionar el bo tón de progra ma por prim era vez para en trar al modo de
programación, es to permite pr ogramar las p istas a ser r eproducid as, con los bot ones numé ricos
(Hasta 99 pistas pue den program arse).
OPERACIÓN: Presi onar los boto nes numéricos, despu és el botón de pr ograma, las p istas
presionadas será n programad as, entonce s presion ar Reproduc ir/Pausa, p ara reproducir las
pistas programad as.
6.BOTÓN DE SIGUIENT E “NEXT” Y ANTERIOR “ BACK”
Presionar estos bo tones para se leccionar l a pista sig uiente o ante rior en el modo d e
reproducción CD/ VCD/MP3.
7.BOTONES DE SALTAR AVANZAR Y RETROCEDE R
Presionar el botón d e avance rápi do o retroces o en el contr ol remoto dur ante la repro ducción
CD/VCD/MP3, la vel ocidad de ava nce o retroceso es relat ivamente le nto la primer a vez cuand o
presiona nuevame nte, la veloc idad se vuelv e mas rápid a. Hay cuatro n iveles de vel ocidad
disponibles: x1, x 2, x3 y x4. Para vo lver al modo de reproduc ción normal , presionar
Reproducción/P ausa en la unid ad principa l o en el contr ol remoto.
NOTA: Algunos disc os en MP3 tiene n tal funci ón.
8.REPRODUCCIÓN LE NTA “SLOW”
Presionar el botón d e reproducc ión lenta “SL OW” duran te la reprodu cción de VCD.
Reproducirá el dis co a velocida d normal la pri mera vez, c ada vez que se pr esiona el bot ón la
velocidad de repro ducción cam bia a velocid ad 1/2, 1/4 , 1/8 y 1/16. Pre sionar Repr oducir/Pausa para vo lver
al modo de reproducc ión normal (N o hay salida de a udio durante el modo de re producció n lenta).
El botón de reproduc ción lenta “S LOW” no es apli cable en CD .
9.BOTÓN DE REPRODUC IR/PAUSA “PLAY/PAUSE”
Este botón tiene la mi sma función q ue el botón de Re produci r/Pausa en el p anel de la unid ad principal.
10.BOTÓN DE DETENER “ STOP”
Presionar el botón d etener, todo s los program as se detie nen, se despl iega en la pant alla de la TV la
foto del logotipo y la p antalla des pliega el num ero total d e pistas.
11.SU MARIO “RESU ME”
Arranca nuevamen te en algunas p osiciones c uando el mo do de reprodu cción de VCD es ta en la
posición de deteni do.
Presionar el botón d etener “STOP” una ve z y entonces pr esionar el bo tón de sumario “RESUME ”.
Si el disco se cambia to das las memor ias del disco s e borran.
12.BOTÓN DE REGRESO “ RETURN”
En el modo de reproduc ción de VCD reg resa a el indic ador del me nú principa l si este botón
es presionado.
-8-
-9-

1.BOTÓN DE SISTEMA PAL/NTSC
Este botón solo se usa e n el modo de repr oducción de V CD. Presi onar solo una v ez para
seleccionar el tip o de señal NTSC , dos veces par a selecci onar el tipo de s eñal PAL, consigue
el mejor efecto de señ al de Audio/Video “A/V”.
2.BOTONES NUMER ICOS (0-9)
Cualquier pista se p uede selecc ionar y repro ducir, pre sionando lo s botones del 0 -9.
3.BOTONES PARA AUM ENTAR Y DISMINUIR VOLUME N
Presionar los boto nes de aument ar y disminui r volumen p ara increme ntar y bajar el v olumen
respectivament e.
4.BOTÓN DE IR “GO TO”
Presionar este bot ón durante el m odo de reprod ucción de V CD, aparece “ TIME _____: _____” en
la pantalla de la TV. Pres ionar direc tamente los d ígitos pa ra los minuto s y segundos, l a imagen se
mostrara en tal tiem po y la reprodu cción segui rá.
5.BOTÓN DE OSD
Presionar el botón d e OSD, el estad o de trabajo ac tual apar ece en la panta lla de la TV.
1.SINGLE: Un solo dis co.
2.ELAPSED:Ti empo tran scurrido (m inutos:se gundos)
3.Sistema selecci onado para la TV:PAL o NTSC.
4.Estado de reprodu cción selec cionado:Un o, Todo o Apag ado.
5.Estado del segund o canal selec cionado:MO NO L, MONO R o ES TEREO.
6.BOTÓN DE SURROUND
Presionar este bot ón en el modo de re producció n de VCD para c onseguir di ferentes ef ectos
de imagen y sonido:
1) 1o Prensa: Efecto d el CONCIERTO.
2) 2ò Prens a: E fecto d e TR EATER.
3) 3ó Prensa : Ef ecto de S TA NDIUM.
4) 4ô Prens a: E fecto d e la I GLESIA.
5) 5ö Prens a: E fecto R ED ONDO 3D.
6) 6õ Prens a :E fecto V IV O.
7) 7o Prens a: E fecto E ST ÁNDAR.
REPRODUCIENDO CASSETTES
1
Colocar el control d e volumen
en un nivel bajo.
Open su rface s ide
4
Empti est ree l.
Insertar un casset te pregraba do
en el compartimien to del
cassette con la part e abierta
hacia arriba y la bobi na llena
del lado derecho, ce rrar la
puerta del cassett e.
2
Colocar el selecto r de funcione s
en la posición de TAPE.
5
Presionar el botón d e
reproducción par a que empiece
a reproducirse el ca ssette.
Ajustar el nivel del v olumen.
3
Abrir la cubierta de l os controle s
del cassette para ve r los
botones del casset te, presion ar
el botón Detener/E xpulsar par a
abrir la puerta del ca ssette.
6
Para avanzar o rebob inar la
cinta rápidament e, presiona r
los botones de avanz ar o
regresar. Cuando ll egue al
punto deseado, pre sionar el
botón de reproducc ión para
volver a la reproduc ción normal .
7.BOTÓN DE REPETIR “R EPEAT”
Presionar este bot ón durante la r eproducci ón, se repi te la pista act ual en reprod ucción;
si se presiona una seg unda vez toda s las pistas de l disco se re piten; la ter cera vez es par a
cancelar la funció n de repetir. Es te botón tien e la misma fu nción que el bo tón repetir d e la
unidad principal .
8.BOTÓN DE A-B
Repite secciones e ntre dos punt os específicos (Repe tir A-B)
La primera vez que se pr esiona el bot ón A-B durante l a reprodu cción es para d efinir el pun to A.
La segunda vez que se pr esiona el bot ón A-B durante l a reprodu cción es para d efinir el pun to
B y se repite la reprodu cción entre e stos dos puntos.
La tercera vez que se pr esiona el bot ón A-B es para vol ver al modo d e reproducc ión normal.
9.RANGO DEL CON TROL REMOTO
Usar el control remo to dentro de un á ngulo de 30º a la i zquierd a y derecha hor izontalme nte y sobre
una distancia de 3 met ros.
-10-
7
Para pausar la repro ducción
momentáneament e, presiona r
el botón de Pausa; la ci nta se
detiene momentán eamente
pero el motor contin ua girando.
Presionar Pausa nu evamente
para volver a la repro ducción
normal.
8
Para detener la repr oducción
antes de que la cinta te rmine,
presionar Detene r/Expulsa r.
El botón de reproduc ción se
libera y el motor de la ci nta se
apaga.
-11-
9
Cuando la cinta lleg a a su fin,
el mecanismo de auto
detención se activ a, el botón
de reproducción es l iberado y
el motor de la cinta se ap aga.
Presionar Detene r/Expulsa r
para abrir la puerta d el cassette
y retirar así el casse tte.

GRABANDO UN CASSETTE
El sistema de grabac ión de cinta en e ste product o, le permi te hacer grab aciones dir ectas del radio o
del reproductor de d iscos a un cass ette con la cin ta en blanc o desde el comp artimient o del cassette.
Un circuito automá tico de contr ol de nivel de vo lumen de gr abación (AL C), control a automáticamente
el nivel del volumen d e las grabaci ones para evi tar disto rsiones. Se p uede variar e l nivel de volumen
al realizar una grab ación de un cas sette, esto n o tendrá ni ngún efecto s obre el mater ial que se esta
grabando en la cinta .
Para grabar en un cass ette, proce der como sigu e:
1
Open su rface s ide
Empti est ree l
Abrir la puerta del ca ssette e
insertar un casset te con cinta
de buena calidad en la r anura
del cassette con la pa rte abierta
hacia arriba y la bobi na llena del
lado derecho. Cerr ar la puerta
del cassette.
2
Seleccionar la fun ción que
desea grabar, Radio o C D,
operar dicha funci ón conforme
a sus propias instru cciones.
3
Para iniciar la grab ación,
presionar el botón d e grabar al
mismo tiempo el botó n de
reproducción baj a. La cinta
empieza a moverse y to do el
material de la fuent e
seleccionada se gr abara en
la cinta.
CUIDADO Y MANTENIMIENTO
MEDIDAS DE SEGURID AD CONTRA
BORRADO ACCI DENTAL
Al realizar una nuev a grabación , cualquier m aterial
del programa previ amente grab ado es
automáticament e borrado y sol o permanece l a
nueva grabación. P ara resguar dar las graba ciones
del borrado accide ntal, el cass ette y el mecan ismo
reproductor de cas sette están e quipados co n
dispositivos esp eciales.
En la parte inferior d el cassette e xisten unas
lengüetas de segur idad en cada la do. Para
evitar el borrado ac cidental, r omper y retirar
estas lengüetas co n un desarmad or. Si solo
desea proteger un la do de la cinta, r omper y
retirar la lengüet a correspon diente, con e l
lado que se desea prot eger dirigi do hacia
usted romper la leng üeta del lado i zquierdo.
Para grabar sobre un c assette en el q ue las
lengüetas han sido r etiradas, c olocar en el
área de las lengüeta s un pedazo de ci nta
adhesiva.
NOTA: Cuando las le ngüetas han s ido
retiradas, el botó n de grabació n “RECORD”
no se puede presiona r.
LENGU ETA LAD O 2
LENGU ETA
CUBRI R CON
CINTA ADHESIVA
LENGU ETA LAD O 1
ROMPE R Y RETIRAR
LA LENGU ETA
4
Para evitar grabar m aterial no
deseado, como come rciales de
radio, presionar P ausa para
pausar temporalm ente la
grabación. Liber ar el botón de
pausa para volver a gr abar de
nuevo.
5
Al finalizar de grab ar, presiona r
Detener/Expuls ar para deten er
la cinta.
6
3
4
Si desea escuchar la g rabación
inmediatamente , presionar e l
botón Regresar has ta que la
cinta se regrese com pletament e,
entonces presion ar
Detener/Expuls ar. Colocar el
selector de funció n en TAPE y
presionar el botón d e
reproducción.
2
SISTEMA DINAMICO DE BAJOS (DBBS)
Este circuito espe cial provee r espuesta a los bajos, es pecialmen te a niveles de v olumen bajos donde
el sonido bajo tiend e a desaparec er. Colocar el b otón DBBS e n la posición d e encendido “ ON”
(presionado) “ ” par a aumentar la r espuesta del sonido ba jo, colocar e l botón en la pos ición de
apagado “OFF” (lib erado) “ ”par a una respuesta normal a l os sonidos ba jos.
NOTA: Si tiene el cir cuito de DBBS e ncendid o a volumen alt o y escucha que l a música contiene muy
fuertes los sonido s bajos, pude e xperiment ar algo de di storsión. S i esto ocurre r educir el volumen o
pagar el circuito de D BBS.
-12- -13-
RECOMENDACIÓN DE LA CINTA DEL CASSETTE
La longitud de las cin tas normale s debe ser de 15 (C -30), 30 (C -60) y 45 (C-90 ) minutos de ti empo de
grabación en cada la do. Las cinta s con longitu d mas grand e como las de 60 (C -120) minut os de tiempo
de grabación de cada l ado, no son rec omendable s. Usar sol o cintas de alt a calidad. Si s e generan
problemas con el cas sette, veri ficar la unidad primer o con otro cass ette, para de termina r si el problem a
es el cassette o la unid ad.
Si existe cinta floj a en el cassett e, esta debe de ajustars e antes de inse rtar el casse tte. Intr oducir una
pluma o lapiz en uno de lo s carretes y gi rar hacia el ex terior de l cassette ha sta que la cint a se ajuste.

CUIDADO Y MANTENIMIENTO
GUIA RAPIDA DE SOLUCIÓN DE PROBLEMAS
CUIDADO DE LOS DISCO S COMPACTOS
Tratar los dis cos con cui dado. Tomar l os discos sol o
por los bordes. No per mitir que los d edos entren en
contacto con la cara d e grabación d el disco.
No colocar cinta adh esiva, etiq uetas, etc. Para marca r el disco.
Limpiar el disco per iódicamen te con una tela s uave y seca ,
libre de hilachas y pe lusa. No usar d etergente s o limpiad ores
abrasivos para lim piar el disco . Si es necesario, usar un e quipo de limp ieza de disco s compactos.
Si un disco salta o se que da en una secci ón del mismo, e sta proba blemente su cio o dañado (r ayado).
Al limpiar el disco, h acerlo con mo vimientos r ectos del c entro hacia e l exterior de l os bordes del disco.
No limpiar con movim ientos circ ulares.
Esta unidad esta dis eñada para re producir so lo discos c ompactos qu e tienen
el logotipo de ident ificación c omo se muestr a aquí.
Otros discos puede n no cumplir co n las normas de l os discos c ompactos y pu eden
no reproducirse ap ropiadame nte.
Los discos deben de al macenarse e n sus estuche s después d e cada uso para e vitar daños .
No exponer los disco s a los rayos dir ectos del sol , alta hume dad, altas te mperatura s, polvo, e tc.
La exposición prol ongada a temp eraturas al tas puede n ondular el di sco.
No pegar o escribir al go sobre cual quiera de los l ados del disco. Los inst rumentos de e scritura o
la tinta pueden daña r la superfic ie.
LIMPIANDO LA UNIDAD
Para prevenir ries go de fuego o cho que eléctri co, desco nectar el cor dón de alimen tación del
tomacorriente de p ared al limpi ar la unidad.
El acabado de la unida d puede limpi arse con una te la suave del polvo como co n otros mobil iarios,
tener cuidados al li mpiar las par tes de plástico.
Un jabón suave y una tel a humedecid a pueden usar se para limpiar la parte f rontal.
Limpiar periódic amente las ca bezas de la cin ta del cass ette (R/P HEAD, ERASE HEAD), el
cabestrante (CAP STAN) y el rodillo de pre sión (PINCH R OLLER) para o btener un buen sonido de
reproducción. Li mpiar despu és de mas o menos 1 00 horas de u so o si el sonido s e escucha
deteriorado. Usa r un cotonete d e algodón (Co tton Swab ) humedecid o con solucio nes de limpieza
o con alcohol, enton ces secar con o tro cotonete.
Si la unidad present a algún probl ema, ver la sig uiente gu ía antes de lle var a reparac ión.
PROBLEMA
RADIO
Ruido o sonido
distorsionado al
escuchar transmi siones
de radio.
El indicador de FM
ESTEREO no
enciende
Ningún sonido en
AM o FM
POSIBLE CAUSA
La estación no fue sin tonizada
adecuadamente en AM o F M.
La antena telescóp ica de FM no esta
orientada adecua damente.
La unidad no esta orie ntada
adecuadamente pa ra AM
Pobre señal de FM ST se recibe o el
selector de banda no e sta en FM ST
La estación no trans mite en señal
estereo.
El selector de funci ón esta en TAPE
Volumen al mínimo
SOLUCION
Sintonizar adecu adamente la s
estaciones.
Reorientar la ante na telescóp ica de FM.
Girar la unidad hast a obtener la me jor
recepción
Resintonizar la es tación, int entar otra
estación o cambie el s elector de
banda a FM ST.
Cambiar de estació n.
Colocar el selecto r de función
en RADIO
Incrementar el vol umen
REPRODUCTOR DE CASSETTE
Colocar el selecto r de función en TAPE
Incrementar el vol umen
Limpiar las cabeza s
Cambiar el cassett e
Reemplazar las bat erías
Ningún sonido
Sonido distorsio nado
Vari ación en la
velocidad
El selector de funci ón no esta
en TAPE
Volumen al mínimo
Cabezas sucias
Cassette con cinta v ieja o dañada
Baterías bajas
GRABADOR DE CASSETTE
NO graba
Sonido distorsio nado
en la reproducción
Las lengüetas de pro tección est án
removidas
Cassette defectu oso o
cabezas sucias
Cubrir las abertur as con cinta ad hesiva
Reemplazar el cass ette o limpia r
las cabezas.
REPRODUCTOR DE DISCO COMPACTO
Pinch R oller
NOTA: No usar objet os de metal sob re o cerca de l as cabezas de g rabación.
R/P
Head
Capst an
Erase
Head
Cotto n Swab
14- -15-
El reproductor de
CD/VCD no reproduc e
CD/VCD salta al
estar reproducie ndo
GENERAL
No hay sonido
El selector de funci ón no esta en CD
No hay CD instalado o es ta instalad o
al revés
El disco esta sucio o ra yado
Los auriculares es tán conecta dos
en el conector para au riculares
Colocar el selecto r de función en C D
Instalar un CD o volte ar el CD
instalado.
Limpiar el disco o usa r otro disco
Desconectar los au riculares d el
conector para auri culares

Thank you
For purchasing this Portable CD/MP3 audio system. This uniquely designed product has a built-in
CD/MP3 player with programmable memory and repeat playback. It also features a great sounding
AM/FM stereo radio and a stereo cassette player/recorder that will allow you to make direct recordings
from either the radio or the CD player. It has two full-range dynamic speakers.
We are sure that this portable CD/MP3 audio system will provide you with many years of exceptional
performance with a minimum of care and maintenance. Please review the contents of this instruction
manual completely and carefully before operating your unit, to make sure that you understand all
functions and operations and get the maximum benefit out of all the great features included in this
product.
Operat o r s manual
MICRO VCD/CD/RADIO/CASSETTE RECORDER SYSTEM
NX - 4 2 5
The serial number of your unit can be found on a label on the bottom of the cabinet. We suggest that
you record the serial number in the provided below in case this information is ever needed at a future
date.
Serial Number
CAUTION
RISK OF ELECTRIC SHOCK
DO NOT OPEN
CAUTION : TO REDUCE THE RISK OF ELECTRIC
SHOCK, DO NOT REMOVE COVER (OR BACK). NO
USER - SERVICEABLE PARTS INSIDE. REFER
SERVICING TO QUALIFIED SERVICE PERSONNEL.
DANGEROUS VOLTAGE
The li ghtning flash with arrowhead symbol, within an equilateral tri angle is intended to alert the user
to the presence of uninsulated dangerous volt age within the product s enclo sure that may be of
sufficie nt magnitude to constitu te a risk of electric shock to persons.
ATTENTION
The exclamation point within an equilateral Triangle is intended to alert the user to the Presence of
important operating and maintenance (servicing) instructions in the literature accompanying the
appliance.
LASER SAFETY: This unit employs a laser. Only
qualified service personnel should attempt to
service this device due to possible eye injury.
C AU T IO N : U SE O F C O N T R O L S ,
ADJUST M E NT S OR PERF O R MAN C E ,
PROCEDURE HEREIN MAY RESULT IN
HAZ ARDOUS RADIATION EXPOSU RE.
,
Operator s manual
1~ 1 5
Danger:
Invisible and hazardous laser radiation when Open and interlock failed or defeated. Avoid direct
exposure to beam.
Dripping warning:
Ventilation warning
The product shall not be exposed to dripping or splashing and that no
objects filled with liquids, such as vases, shall be placed on the product.
The normal ventilation of the product shall not be impeded for intended
use.
-1-

PREPARATION FOR USE
Unpacking and Setup
* Carefully remove the unit from the display carton and remove all packing materials from the unit itself.
* Remove any descriptive labels that may be found on either the front or top cabinet of the unit. Do not
remove any labels located on either the back or bottom cabinet of the unit.
* The detachable AC power cord is packed in the carton separately from the unit. Make sure that the
AC power cord is not accidentally discarded with the carton or packing material.
* Press the CD door OPEN Button to open the CD compartment door. There is a white card in the CD
compartment which is intended to prevent the CD pickup from moving during shipment of the product,
Remove this card from the CD compartment before use.
Power Sources
This portable audio system is designed to operate in 110/220V AC 50/60Hz house current. Attempting to
operate this unit from any other power source may cause damage to unit, which is not covered by your
warranty.
LOCATION OF CONTROLS AND INDICATORS
6
5
3
4
16
2
17
8
7
18
9
10
1
19
11
15
14
12
13
AC Outlet
AC Plug
AC Operation
Unwind the AC cord and extend it to its full length, insert the small end of the AC cord into the AC socket
on the back cabinet of the unit. Insert the other end of the AC cord into any convenient 110/220V AC
50/60 Hz household outlet.
-2-
1.CD Door Open Button
2.FUCTION Switch (VCD/CD/TAPE/OFF/RADIO)
3.VOLUME Button
4.REMOTE SENSOR window
5.RANDOM Button
6.REPEAT Button
7.LCD Display
8.FM STEREO LED Indicator
9.PLAY/PAUSE Button
10.STOP Button
11.CD Skip/Forward ( ) Button
12.CD Skip/Reverse ( ) Button
13.RESUME Button
14.TUNING Button
15.BAND Switch (AM/FM/FM STEREO)
16.DBBS Button
17.Cassette Door
18.Cassette Control Buttons:
RECORD Button ( )
PLAY Button ( )
REWIND Button ( )
FAST FORWARD Button ( )
STOP/EJECT Button ( )
PAUSE Button ( )
19.PHONES
-3-

REMOTE CONTROL
CONTROL OPERATIONS AND FUNCTIONS
CONNECTING TO A TV SET AS FOLLOWING:
22
23
25
26
27
28
29
30
31
32
33
34
20
PBC MUTE
PROG
2
1
5
4
8
7
SELECT
STOP
GOTO
RESUME
SLOW RETURN
OSD
VOL+
VOL-
A-B
21
REPEAT
3
6
9
0
R/L
P/N
24
42
41
40
39
38
37
36
35
Video
Audio (L)
Audio (R)
White
White
Yellow
TV set
Video input jack
Audio input jack (L)
Video/Audio cable
Red
Audio input jack (R)
Yellow
White
Red
NOTE:
* This player must be connected to a multi-system PAL TV, or TV for supporting PAL/NTSC
signal format.
* Ensure that this player and other equipment to be connected are set to the standby mode or off
and disconnect the AC power cords before commencing connection.
* Do not block ventilation holes of the equipment and arrange them, so that air can circular freely,
* Read through the instructions before connecting other equipment.
* Ensure that you observe the color coding when connecting audio and video cables.
* During playing the TV volume may be at a lower level than during TV broadcasts, etc. If this is the
case, adjust the volume to the desired level.
20. PBC BUTTON
21. MUTE BUTTON
22. PROGRAM BUTTON
23. OSD BUTTON
24. REPEAT 1/ALL BUTTON
25. NUMERIC BUTTON
26. SELECT BUTTON
27. VOLUME UP BUTTON
28. STOP BUTTON
29. SURROUND BUTTON
30. BACK ( ) BUTTON
31. SKIP-FR ( ) BUTTON
32.GOTO BUTTON
33.SLOW BUTTON
34.RETURN BUTTON
35.P/N BUTTON
36.RESUME BUTTON
37.LEFT/RIGHT/STEREO BUTTON
38.REPEAT A-B BUTTON
39.SKIP-FF ( ) BUTTON
40.NEXT ( )BUTTON
41.VOLUME DOWN BUTTON
42.PLAY/PAUSE ( ) BUTTON
-4-
STEREO HEADPHONE JACK
Connect the stereo headphones to the 3.5mm PHONES
jack located at the left top panel for private listening. When
the headphones are connected, the sound from the
speakers will automatically cut off. Before putting the
headphones on your head, reduce the volume to a
low level. Then put the headphones on and gradually
increase the volume to a comfortable listening level.
Connect the loud speaker cables to input
jacks R&L on main unit rear cabinet.
-5-

LISTENING TO THE RADIO
1
OPERATING INSTRUCTIONS
2
3
PLAYING VCD/MP3/CD DISCS
NORMAL PLAYBACK
1
2
3
Set the VOLUME Control to a low
setting.
4
Rotate the TUNING Control to
find the desired station.
NOTE: if the BAND Switch is set
to the FM STEREO position and
you have tuned to an FM stereo
station, the FM STEREO Led
Indicator will light.
Hints for Better reception
FM/FM Stereo - Make sure that the telescopic FM Rod Antenna is raised and extended to its full length. You may
have to vary the direction of the antenna to find the strongest signal for each FM station. If you are listening
to weak or distant FM Stereo station, the reception is unsatisfactory.
AM - The AM ferrite bar antenna is located inside the cabinet. It may be necessary to turn the unit slightly
so that the internal antenna is point in the direction of the AM transmitter. You may have to experiment
to find the position that provides the strongest reception for each of your favorite AM stations.
Slide the FUNCTION Switch to
the RADIO position.
5
When you have finished listening,
slide the FUNCTION switch to
the TAPE (off) position to shut
the power off.
Slide the BAND Switch to a
desired setting - AM, FM, or FM
STEREO
NOTE: If you select either the
FM or FM Stereo bands, be sure
to raise the FM rod antenna and
extend it to its full length.
Set the VOLUME Control to a low
setting.
Place a VCD/CD on the center
spindle, with the printed label side
facing up. Close the CD
compartment door.
7
Adjust the VOLUME Playback
will continue until all the tracks
on the disc have been played.
Slide the FUNCTION Switch to
the VCD/CD position.
5
The VCD/CD player will read
the table of contents on the disc
and the total number of tracks
on the disc will appear on the
VCD/CD Track Display.
8
To stop playback before the disc
ends, press the CD STOP ( )
Button. The disc will stop and
the display will show the total
number of tracks on the disc.
Press the CD Door OPEN Button
to open the CD compartment door.
NOTE: If you have not already
done so, remove the CD transit
lock card from the CD compartment
now and discard it.
64
Begin automatically playback on
track 01. The desired track
can be played by remote control.
9
After the last track has been played,
the disc stops automatically and the
display shows the total number of
tracks on the disc. If you are finished
listening, press the CD Door Open
1
Button to open the CD Door.
Remove you disc and slide the
FUNCTION Switch to the
TAPE(OFF) position.
1
2
2
-6-
-7-

VCD/MP3/CD PAUSE CONTROL
VCD/CD REMOTE CONTROL OPERATION
1 2
During VCD/MP 3/CD playback, if
you wish to Pause the disc
momentarily, press the VCD/MP3/
CD PLAY/PAUSE Button again.
Playback stops but the disc
continues to spin and the track
number flashes in the VCD/MP 3/
CD Display.
TO BEGIN PLAYBACK FROM A SPECIFIC TRACK
1
After you insert the disc into the
VCD/MP 3/CD player and the total
number of tracks appear on the
display, you may press either
the Skip/Forward ( ) or
Skip/Reverse ( ) Button to
select a specific track for playback.
Press CD PLAY/PAUSE
button again ,CD/CD-R/RW
resume normal playback.
2
When your desired track number
appears in the display, press the
CD PLAY/PAUSE Button.
Playback will begin from the track
you selected.
3
Playing tracks in RANDOM,
select this function when the
device is stopped by pressing
RANDOM on unit.
- TV display SHUFFLE ON play
back starts auto automatically.
- The tracks on the CD are play
back in RANDOM order.
- To end this function press
STOP Button.
NOTE: If you press REPEAT all on
the main unit or remote control
while you are in RANDOM mode,
a new selection starts when the
current random selection is over.
1.PBC BUTTON (20)
The button only has the function in the mode of screen menu showing. It shows about 10 seconds.
2. R/L BUTTON (37)
- The first time, the sound on channel left will be output from both channels.
- The second time, the sound on channel right will be output from both channels.
- Press the button the first time to join to left automatically.
- Press the button the second time to join to right automatically.
- Press the button the third time to output the stereo sound.
The stereo sound mode has already existed while the power is on.
NOTE: It may be used to remove the sound or change double languages with the function in the mode
of VCD. It s no use on CD.
3. MUTE BUTTON (21)
Press MUTE button one times, the sound will stopped in speakers, and press two times return to sound.
4. SELECT BUTTON (26)
Select discs press SELECT button(26) after enter the number. The VCD/MP 3/CD auto playback.
5. PROGRAM BUTTON (22)
In stopping mode, press the button the first time to enter the mode of programming, it may
program the tracks to be played with the numeric button.
OPERATION: Press the numeric button after program button the tracks pressed will be
programmed, then press the PLAY/PAUSE (22) to play the registered tracks .
6. NEXT (40) / BACK (30) BUTTON
- Press NEXT or BACK button to select the tracks forward or reverse in the playing mode of VCD/MP 3 or CD.
7. SKIP-FF (39)/FR (31) BUTTON
- Press SKIP-FF/FR button on the remote control during VCD/MP 3/CD playback, The speed of fast forward
(or reverse) is relatively slow at first when press again, the speed becomes faster. There are 4 levels of
speed available: x1,x2,x3,x4. To return to normal play, press PLAY button on main unit or remote control.
NOTE: some Mp3 disc have on such function.
FOR WARD/REVERSE SKIP TRACK
1
During playback, press the
Skip/Forward ( ) Button
once to advance the player to the
beginning of the next track, press
the Skip/Forward ( ) Button
repeatedly to advance the player
to higher number tracks .
( / )
2
During playback, press the
Skip/Reverse ( ) Button
once to move the player to the
beginning of the previous track,
press the Skip/Reverse ( )
Button repeatedly to move the
player back to lower - number
tracks .
-8-
8. SLOW - MOTION PLAY (33)
- Press SLOW button (33) during VCD playing.
- Play the disc at normal speed first. Each time the button is pressed, the play speed becomes 1/2,1/4,1/8,1/16.
Press play button return to normal play (there is no sound during SLOW - MOTION PLAY).
- Pressing SLOW button (33) is no use in CD playing.
9. PLAY/PAUSE BUTTON(42)
- This button has the same function as the PLAY/PAUSE key on the panel of the main unit.
10. STOP BUTTON (28)
- Press STOP button, all program is stopped. The TV screen display the logo picture, and the LCD
show the total number of tracks.
11. RESUME (36)
Start again at the some position when stopped during playback mode for VCD.
- Press stop button once and then press RESUME button.
- If disc changed ,all memory of RESUME will be erased.
12. RETURN BUTTON (34)
- The mode of VCD playing will return to main menu indicating mode if this button is pressed.
-9-

13. P/N BUTTON(35)
This button only use in VCD playing mode. Press it once to select NTSC type, twice to select PAL
type of video signal, you will get the best A/V appreciating affect.
PLAYING CASSETTE TAPES
14. 0-9 NUMERIC BUTTON(25)
-Any one track may selected and played by pressing the 0-9 numeric buttons.
15.VOLUNE DOWN BUTTON(41)&VOLUME UP BUTTON(27)
Press the VOLUME DOWN button(41) to get the lower volume, and press the VOLUME UP button (27)
to get the higher volume.
16. GOTO BUTTON(32)
Press GOTO button during VCD playing, it appear TIME : on the TV screen. You
may press directly the digit key for minutes and seconds, the picture will be found to this time and play
go on.
17. OSD BUTTON (23)
Press OSD button, TV screen appear the current working status.
1. SINGLE-single disc
2. ELAPSED-time(minutes:seconds) is elapsed
3. Selected system of TV-PAL or NTSC
4. Selected repeat status-one, all or off
5. Selected second channel status-MONOL, MONO R or STEREO
18. SURROUND BUTTON(29)
Pressing the button on VCD playing different times gives you different picture and sound effect:
1)1st Press: CONCERT effect.
2)2nd Press: TREATER effect.
3)3rd Press: STADIUM effect.
4)4th Press: CHURCH effect.
5)5th Press: 3D ROUND effect.
6)6th Press: LIVE effect.
7)7th Press: STANDARD effect.
19. REPEAT BUTTON(24)
Press REPEAT button (24) the first time during play, it will repeat play the present track; the
second time is to repeat play all tracks; the third time is for cancelling its repeat. It has the same
function as the REPEAT on the panel of the main unit.
20. A-B (38)
Repeating sections between two specific points (A-B repeat)
-The first time of A-B button (38) during play is for defining the star (A)
-The second time of pressing A-B Button (38) is for defining the end (B) and repeat play of selection
between points A&B
- The third time of pressing A-B button (38) is returning to normal play.
1
Set the VOLUME Control to a low
setting.
Open surface side
4
Emptiest reel.
Insert a pre-recorded cassette
into the slots in the Cassette Door
with the open end facing up and
the full reel in the right side.
Close the cassette door.
7
2
Slide the FUNCTION Switch to
the TAPE position.
5
Press the cassette Play ( )
Button to begin playback.
Adjust the VOLUME .
8
3
Open the Cassette Control Cover
to expose the cassette controls
and press the STOP/EJECT
( ) Button to open the
Cassette Door.
6
To advance or rewind the tape
rapidly, press either the cassette
Fast Forward ( ) or
Rewind ( ) button. When
you reach the desired point, press
the cassette play ( ) Button
to resume normal playback.
9
REMOTE CONTROL RANGE
Use the remote control within an angle of 30 at the left and right horizontally and over distances
up to about 3 meters starting ahead.
-10-
To pause playback momentarily,
press the cassette Pause ( )
Button. The tape movement
stops but the tape motor is sitll
running. Press the cassette Pause
( )Button again to release
Pause and resume normal
playback.
To stop playback before the tape
ends, press the Stop/Eject
( ) Button. The Play Button is
release and the tape motor
shuts off.
-11-
When the tape reaches the end,
the auto-stop mechanism
activates, the tape PLAY Button
is release and the tape motor
shuts off. Press the Stop/Eject
( ) Button to open the
Cassette Door and remove the
tape.

MAKING A TAPE RECORDING
CARE AND MAINTENANCE
The tape recorder in this system allows you to make direct recordings from the radio or CD player to a
blank cassette in the tape compartment. An automatic recording volume level control (ALC) circuit will
automatically control the volume level of your recordings to prevent distortion. You may change the settings
of the volume during a tape recording, as these controls have no effect on the material being recorded onto
the tape.
To make a tape recording, proceed as follows:
1
Open surface side
Emptiest reel
Open the cassette Door and
insert a good quality blank
cassette tape into the slots on
the door, with the open end facing
up and the full reel on the righthand side. Close the Cassette
Door.
4
2
Select the function you wish to
record, either radio or CD, and
operate that function according
to its own instructions.
5
3
When you are ready to begin
recording, press the cassette
Record ( )Button. The cassette
Play ( ) Button will also engage.
The tapes will begin moving and
all of the material from your
selected source will be recorded
on the tape.
6
3
4
SAFEGUARD AGAINST ACCIDENTAL ERASURE
When a new recording is made, any material
previously recorded is automatically
erased and only the new recording remains. To
safeguard valuable recordings from being erased
accidentally, the cassette and the deck are
equipped with a special device,
On the back of the cassette, there is an erase
prevention tab on each side. To prevent
accidental erasing, break out these tabs with
a screwdriver. If only one side of the tape is to
be protected, break out the tab on the left side
with the side facing you.
To record on a tape in which the tab has been
broken, place a piece of adhesive tape over that
area.
NOTE: When a tab is broken out, the record
button cannot be depressed.
Cover with tape
CASSETTE TAPE RECOMMENDATIONS
Standard tape lengths have 15 (C-30), 30 (C-60) and 45 (C-90) minutes of recording time on each side.
Longer length tapes of 60 (C-120) minutes of recording time in each side are not recommended. Use
2
only high quality tapes. If a problem develops, check the unit first with another cassette to determine if
the problem is with the cassette, and not with the unit.
Tab for side 2
Tab
Tab for side 1
Break out the tab
To avoid recording unwanted
material, such as radio
commercials, use the Pause
( ) Button to stop the recording
temporarily. Release the Pause
( ) Button to begin recording
again.
When you are finished recording
press the Stop/Eject ( )
Button to stop the tapes.
If you wish to listen to your
recording immediately, press the
cassette Rewind ( )Button until
1
the tape rewinds to the beginning,
then press the Stop/Eject ( )
2
Button . Set the Function
Switch to the TAPE position and
3
press the cassette Play ( )
4
Button to begin playback.
Dynamic Bass Boost System (DBBS)
This special circuit provides bass response, especially at lower volume levels
where the bass has a tendency to disappear. Set the DBBS button to On
to increase the bass. Set the DBBS button to Off for normal bass response.
Note: If you have the DBBS circuit On at high volume and you are listening to
,
,
,
,
,
,
music that contains very strong bass, you may experience some distortion. If
this occurs, reduce the volume or switch the DBBS button Off.
-12- -13-
If there is any stack in the tape, it should be removed before inserting the cassette compartment. Place
a pencil in one of the hubs and rotate toward the outside of the cassette until all stack is taken up.
2

CARE AND MAINTENANCE
TROUBLESHOOTING GUIDE
Caring for Compact Discs
* Treat the disc carefully. Handle the disc only by its edges.
Never allow your fingers to touch the shiny, unprinted side
of the disc.
* Do not attach adhesive tape, stickers, etc. To the disc label.
* Clean the disc periodically with a soft, lint-free, dry cloth.
Never use detergents or abrasive cleaners to clean the disc.
If necessary, use a CD cleaning kit.
* If a disc skips or gets stuck on a section of the disc, it is probably dirty or damaged(scratched).
When cleaning the disc, wipe in straight lines from the center of the disc to the outer edge of the disc.
Never wipe in circular motions.
* This unit is designed to play only compact discs bearing the identification logo as showed here.
Other discs may not conform to the CD standard and may not play properly.
* Compact Disc should be stored in their cases after use to avoid damage.
* Do not expose compact disc to direct sunlight, high humidity, high temperatures, or dust, etc. Prolonged
exposure or extreme temperatures can warp the disc.
* Do not stick or write anything on either side of the disc. Sharp writing instruments, or the ink may
damage the surface,
Cleaning the unit
* To prevent fire or shock hazard, disconnect your unit from the AC power source when cleaning.
* The finish on your unit may be cleaned with a dust cloth and cared for as other furniture. Use cotton cloth
when cleaning and wipe the plastic parts.
* Mild soap and a damp cloth may be used on the front panel.
* Periodic cleaning of the tape heads, capstan and pinch roller is necessary to maintain good sound reproduction.
Clean them after every 100 hours of use or less if playback has deteriorated. Use a cotton
swab moistened with head cleaning solution or isopropyl alcohol, then wipe dry with another swab.
Pinch Roller
NOTE: Never use metal objects on or near the tape heads. Do not allow any cleaning material to fall into
the tape assembly.
R/P
Head
Capstan
Erase
Head
Cotton Swab
Should this unit exhibit a problem, check the following before seeking service.
Symptom
Radio
Noise or sound
distorted on radio
broadcasts.
FM STEREO Indicator
dose not light
AM or FM, no sound.
Cassette player
No sound.
Sound distorted.
Speed varied.
Cassette Recorder
Will not record.
Distorted sound on
playback.
Compact Disc Player
VCD/CD Player
will not play.
VCD/CD skip
while playing.
General
No sound.
Possible Cause
Station not tuned properly for AM or FM.
FM: Telescopic antenna is not properly
adjusted.
AM: Unit is not positioned correctly.
Poor FM signal being received or BAND
switch is not set to FM STEREO
Station is not broadcasting in the stereo.
FUNCTION switch is not set to the
RADIO position.
Volume at minimum.
FUNCTION switch is not set to the TAPE
position.
Volume at minimum.
Dirty head.
Tape old or worn.
Batteries are low.
Erase prevention tab removed.
Defective tape or dirty tape head.
FUNCTION switch is not set to the CD
position.
CD is not installed or installed upsidedown.
Disc is dirty or scratched.
Headphones connected into the
Headphones jack.
Solution
Retune the AM or FM broadcast station.
Reorient FM telescopic antenna.
Rotate unit until best reception is
obtained.
Retune station, try another station or set
BAND switch to FM STEREO.
Change stations.
Slide the FUNCTION switch to the RADIO
position.
Increase Volume.
Slide the FUNCTION switch to the TAPE
position.
Increase Volume.
Clean the head.
Replace the Tape.
Replace the batteries.
Cover hole with adhesive tape.
Replace tape or clean tape head.
Slide the FUNCTION switch to the CD
position.
Insert CD with label side up.
Wipe disc with cloth or use another disc.
Remove the Headphones from the
Headphones jack.
14- -15-
 Loading...