

Page 1
Personal CD Player
MODEL NX-319
INSTRUCTION MANUAL
Operating Instructions
BEFORE OPERATING THIS PRODUCT, READ, UNDERSTAND,
AND FOLLOW THESE INSTRUCTIONS.
Be sure to save this booklet for future reference.
Page 2

IMPORTANT SAFEGUARDS
z Do not take the unit apart. The laser beam used in the unit can cause vision damage.
z Do not insert metal or other objects inside the unit. This unit is equipped with a safety device which
automatically turns the laser beam off when the disc compartment is opened. If foreign objects get
inside the unit, however , this safety device can get deactivated.
z Dropping the unit or subjecting it to strong shocks could result in product damage.
z Do not expose the unit to dripping or splashing water. Do not place objects filled with liquids, such as
vases, on the unit.
z Do not apply oil, petroleum products, or solvents to any part of this set.
z Do not restrict normal ventilation of the product or overheat, otherwise product damage can occur.
z Use the unit within a temperature range of 41ºF/50C to 95ºF/35ºC. Do not place the unit in the
following locations:
----Locations where the temperature is high. The unit’s case may warp or the unit may otherwise be
damaged if it is placed in direct sunlight, near heaters( where the temperature is 140ºF/60ºC or greater) or in
cars with windows closed( In the summer, in-car temperatures may reach 200ºF or more)
----Humid or dusty locations.
----Locations exposed to heavy vibrations.
----Unstable or tilted surfaces.
CONDENSATION
If cold water is poured into a glass, water droplets will emerge on the outside of the glass. This is called
condensation. Condensation may also occur on internal operating parts of the laser pickup.
Condensation occurs:
When the unit is brought from the outdoors into a warm room, or if it is in a cold room which is heated
quickly.
In the summer, if the unit is moved suddenly from an air-conditioned room or car to a hot or humid location.
The unit may not be operated properly if condensation develops. Should condensation occur, wait for one or
two hours( to allow the internal parts to adjust to the surrounding temperature) before using the unit.
Page 3
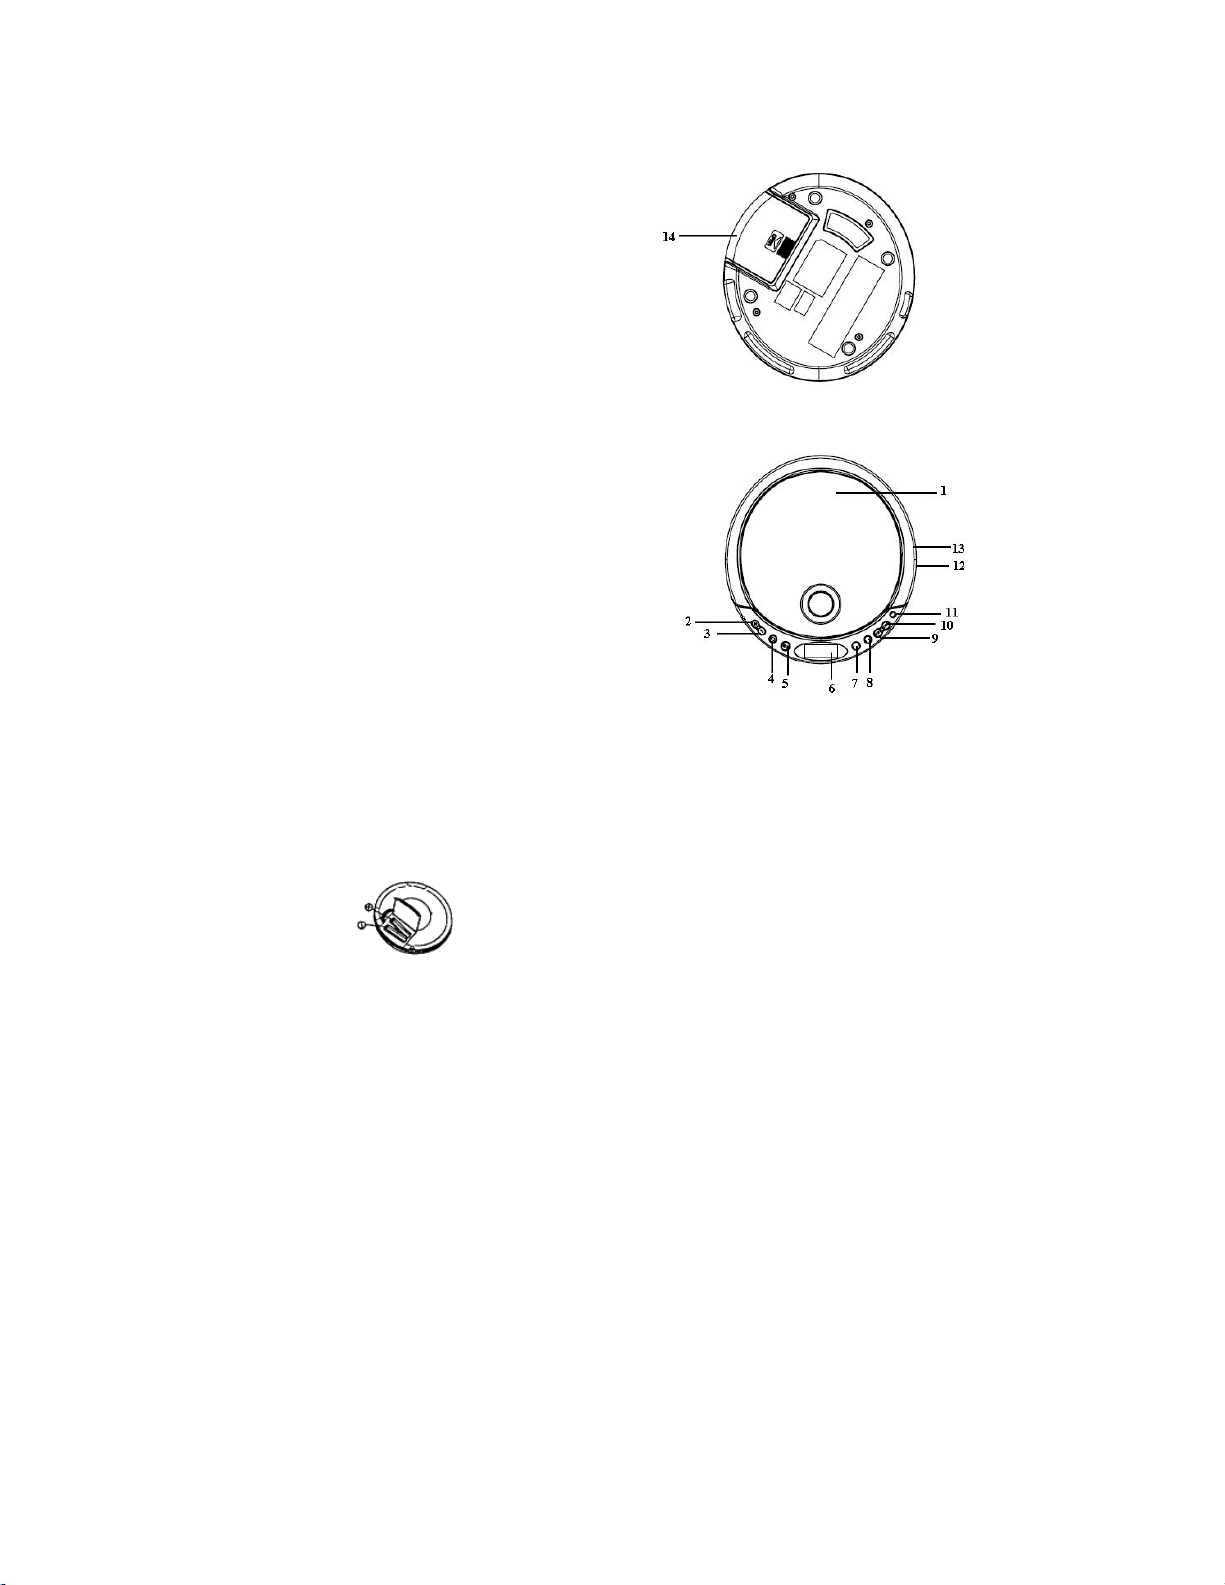
LOCATION OF CONTROLS
1. CD DOOR
2. CD REWIND BUTTON (│◄◄ SKIP)
3. CD FAST FORWARD BUTTON (►►│ SKIP)
4. MODE BUTTON (REPEAR/ INTRO/ SHUFF)
5. CD PROGRAM BUTTON
6. LCD DISPLAY
7. CD PLAY/ PAUSE BUTTON
8. CD STOP BUTTON
9. VOLUME DECREASE BUTTON (VOLUME -)
10. VOLUME INCREASE BUTTON (VOLUME +)
11. CD DOOR OPEN BUTTON
12. EARPHONE JACK
13. DC 4.5V INPUT JACK
14. BATTERY COMPARTMENT
ALKALINE BATTERY INSTA LLATION
Slide the OPEN switch to open the CD door, insert two AA batteries (not included) into the battery
compartment. Be sure to observe the proper polarity (the “+” and ”-” signs) as indicated on the battery
compartment.
Note: When replacing alkaline batteries, use two new batteries of the same type. Do not mix a used battery
with a new one or mix different types of batteries.
When inserting the batteries, incorrectly inserting even one with improper polarity will cause leakage.
Never charge, heat, disassemble, or throw batteries into a fire.
Old or discharged batteries must be recycled or disposed of properly in compliance with all applicable laws.
For detailed information, contact your local solid waste authority.
Page 4

VOLUME CONTROL
To increase the volume by pressing the volume knob “VOLUME +”
To decrease the volume by pressing the volume knob “VOLUME –“
PLA Y A DISC
Sure to reduce the volume before plugging in or unplugging the headphones.
1. plug the cord from a pair of headphone/earphone into the PHONES jack.
2. Press the OPEN button to the CD door.
3. Hold the disc with the label side up and press it into spindle until it spindle until it “clicks” into place.
4. Close the disc compartment, press PLAY/PAUSE button, the disc will begin spin, the display will
indicate"--"and then the total number of track and total playing time on the disc, play will begin
immediately from track number 1.
5. Adjust the volume as desired.
6. To stop play temporarily, press the PLAY/PAUSE button.
z The elapsed playing time flashes in the display.
z Press the PLAY/PAUSE button again to resume.
7. To stop play, press the STOP/OFF button. Total tracks and total playing time appears in the display and
the power turns off automatically after thirty seconds.
TRACK SEARCH
Press the►►│ SKIP and │◄◄ SKIP button during play to skip to the desired track.
1. Press the ►►│SKIP button to skip to the next track on the disc.
2. Press the │◄◄ SKIP button to skip to the beginning of the track currently playing.
3. Press the │◄◄ SKIP button twice or more to skip to previous tracks.
FORWARD/REVERSE SEARCH
Press and hold the ►►│ SKIP or │◄◄ SKIP button during play to scan the disc at high speed. When the
desired section of the disc is found, release the button. Normal play will resume.
►►│ SKIP……………………..FORWARD
│◄◄ SKIP…………………….REVERSE
AUTO POWER ON FUNCTION
The power tunes on automatically when the PLAY/PAUSE button is pressed.
AUTO POWER OFF FUNCTION
Page 5

The power will turn off automatically when all tracks on a disc have been played or when the STOP/OFF
button is pressed after 30 seconds.
PROGRAMMED PLAY
The tracks on the disc can be programmed for play in any order. (Up to 20 tracks cab be programmed).
1. Press the PROG button once during play, "PROG" flashes in the display.
2. Press the │◄◄ SKIP or ►►│ SKIP button to select the first to be programmed.
3. Press the PROGRAM button. The fires track number is now programmed.
4. Repeat steps 2 and 3 program additional tracks.
5. After the programming is finished, press the PLAY/PAUSE button.
z "PROGRAM" flashing stops in the display and programmed play begins.
z The player stops automatically after programmed tracks have been played. The programmed
tracks are stored in memory unit the disc compartment is opened. To play the same program again,
press the PLAY/PAUSE button.
z Press the "STOP" twice to cancel all programmed tracks.
MODE Button – There are 3 kinds of functions :
A. Repeat Play
During PLAY mode
z Press the MODE button once to play single track repeatedly.
z “REPEAT 1” will appear on the display.
During PLAY mode
z Press the MODE button twice to play the entire disc repeatedly.
z “REPEAT ALL” will appear in the display.
NOTE – To cancel REPEAT simply press the MODE button until the repeat indicator disappears.
B. Intro Scan
In STOP mode
z Press the MODE button three times.
z “INTRO” will appear in the display.
z Press the PLAY button to play the first 10 seconds of each track on the disc.
NOTE – To cancel INTRO SCAN simply press the MODE button until the INTRO sign disappears.
C. Random Play
In STOP mode
z Press the MODE button four times.
z “SHUFF” will appear in the display.
z Press the PLAY button, all the tracks on a disc will be played in a random sequence.
NOTE – To cancel RANDOM PLAY simply press the MODE button until the SHUF indicator disappears.
Page 6

CLEANING THE P ICKUP LENS
Dust on the pickup lens can lead to erratic operation and interruption of the sound during play.
To clean the pickup lens, open the disc compartment. Blow the dust off the lens using a camera lens blower
(available at most camera stores). Do not touch the surface of the lens.
CLEANING THE CABINET
Use only a soft and water-dampened cloth to clean the unit’s exterior. Never use benzyl, benzene or other
strong chemical cleaners, since these could damage the finish. It is important that no liquid reaches the
inside of the unit.
NOTE: Do not touch the surface of the pickup lens. Do not allow any liquids on the inside of the product.
-----To clean the pickup lens, open the CD Door and blow the dust off the pickup lens using a camera lens
blower(available at most camera stores).
-----To clean the CD player cabinet, use a soft and damp cloth to wipe off the exterior surface.
-----Never use benzene or other strong chemical cleaners as these can damage the product’s finish.
HANDLING DISCS
This product is designed to play CDs bearing the DISC Identification logo. CDs not carrying this logo may
not conform to the CD standard and may not play properly.
Dirty, scratched, or warped discs may cause skipping or noise.
---------Handle the CD only by the edges.
---------To keep the CD clean , do not touch the surface of the disc.
---------Return CDs to their original cases after use to avoid serious scratches that could cause the laser
pickup to skip.
--------Do not expose CDs to direct sunlight, high humidity or high temperatures for extended periods of
time as prolonged exposure to high temperatures can warp CDs.
---------Do not apply paper or write anything on either side of a CD. Sharp writing instruments or the inks in
some felt-tip pens may damage the surface of a CD
Page 7

TO Clean CDs
----------Fingerprints should be wiped from the surface of the CD with a soft cloth. Unlike conventional
records, CDs have no grooves to collect dust and microscopic debris, so gently wiping the CDs with a cloth
removes most of the particles.
-----------Wipe in a straight motion from the inside to the outside of the CD.
------------Never use chemicals (i.e. record cleaning sprays, anti-static sprays, benzene or thinner) to clean
CDs as damage to the plastic of the CD may occur.
To clean the CD player:
Dust on the pickup lens can lead to erratic operation and interruption of the sound during play.
:
TROUBLE SHOOTING GUIDE
SYMPTOM CAUSE SOLUTION
CD will not play Disc is inserted incorrectly Reinsert CD with the label side
facing up.
No sound from
headphone
Defective or wrong type
compact disc
CD Door is not closed Close the lid securely(press
Moisture has formed on the
inside of the CD player
Headphone plug not is
inserted properly
Headphone plugged into
the line out jack
The volume control set to
minimum
Weak batteries Replace with fresh batteries or
Try another audio compact
disc(DVD or data disc will not
work)
down on door)
Take out the CD and leave the
CD Door open for about an hour
to dry the moisture condensation
Reinsert the headphone plug
into the headphone jack
Plug headphone into the
Headphones Jack(not the Line
Out jack)
Increase the volume
use the AC Power Adaptor
Page 8

Defective CD Try another CD
Sound is skipping The CD or pickup lens is
dirty
Too much movement of the
CD player
Anti-skip button is turned
off
Sound is distorted Music is too loud Decrease the volume
Weak batteries Replace with fresh batteries .
Clean or replace the CD or clean
the pickup lens using a camera
brush/blower
Reduce the movement of the CD
player.
Turn on the anti-skip button
 Loading...