

Page 1
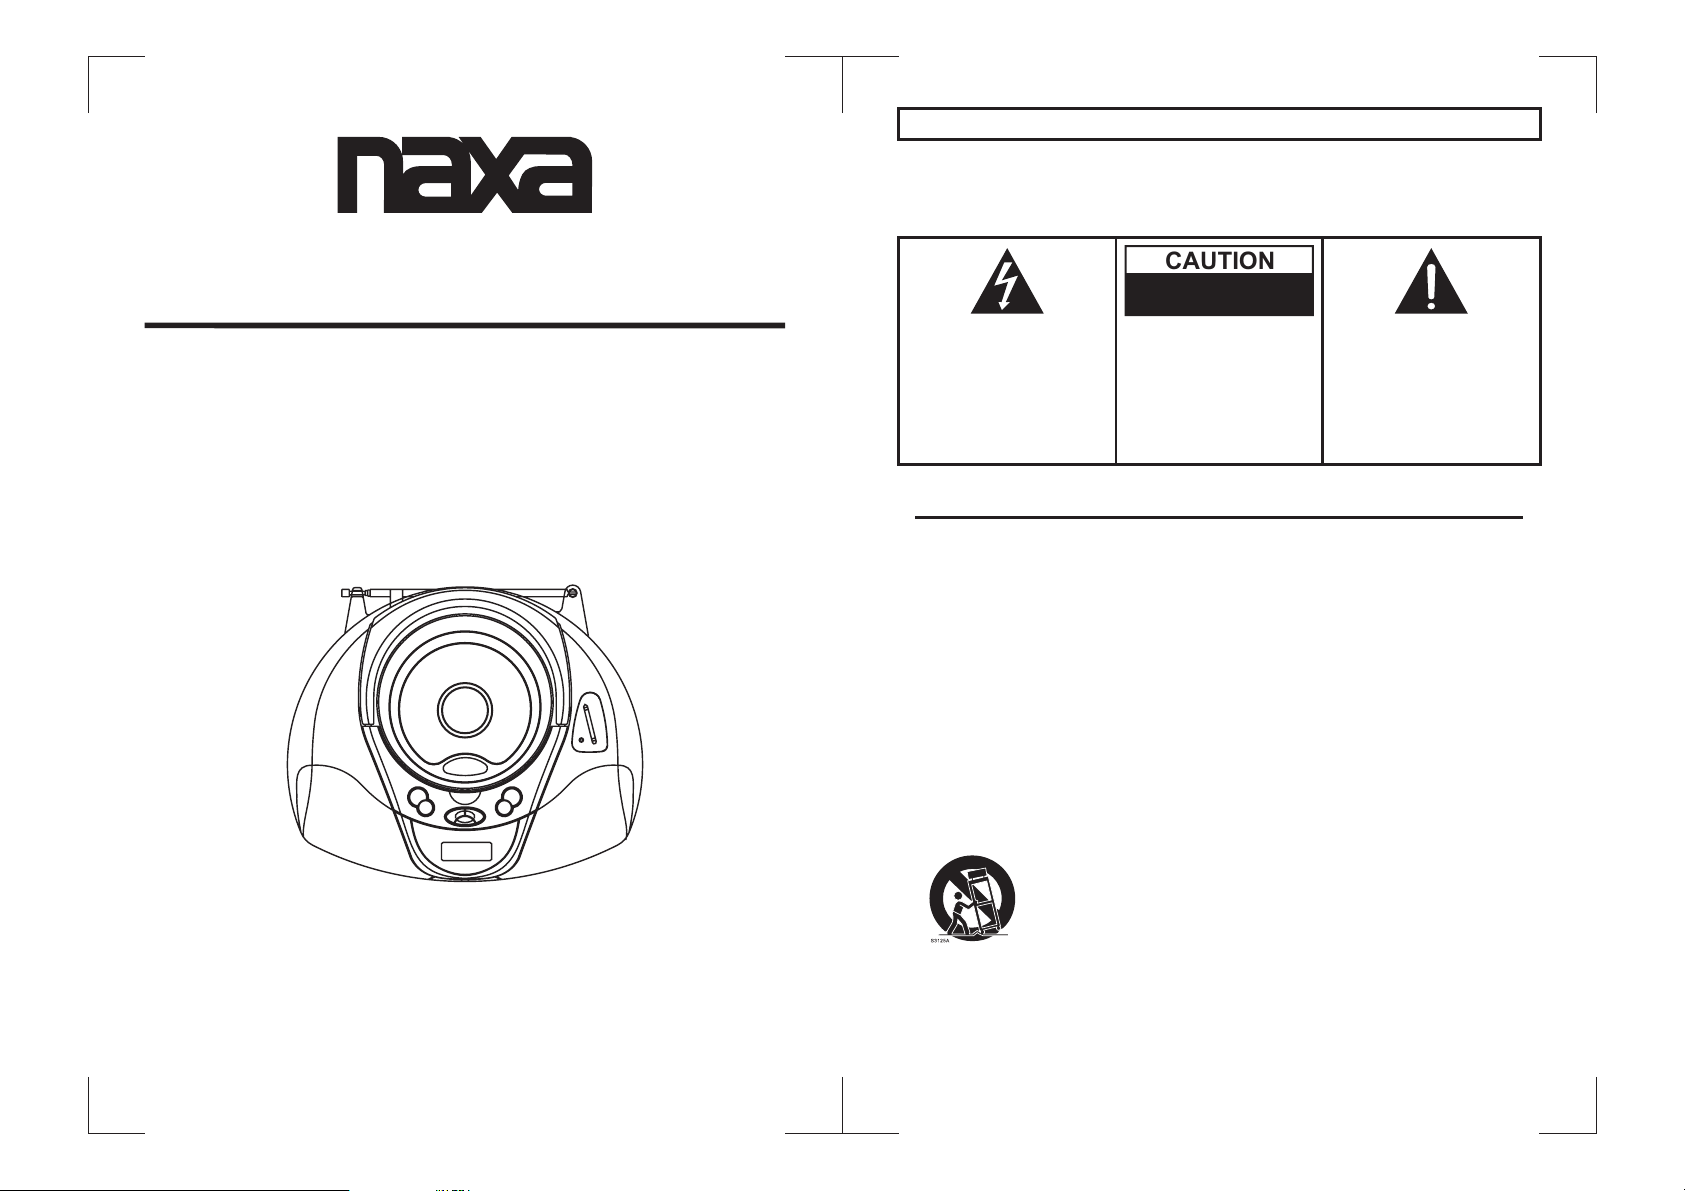
OPERATING MANUAL
PORTABLE MP3/CD PLAYER
WITH AM/FM STEREO
WARNING
- TO PREVENT FIRE OR SHOCK HAZARD, DO NOT USE THIS PLUG WITH AN
EXTENSION CORD, RECEPTACLE OR OTHER OUTLET UNLESS THE BLADES CAN
BE FULLY INSERTED TO PREVENT BLADE EXPOSURE.
- TO PREVENT FIRE OR SHOCK HAZARD, DO NOT EXPOSE THIS APPLIANCE TO
RAIN OR MOISTURE.
CAUTION
RISK OF ELECTRIC SHOCK
DO NOT OPEN
The lightning flash with arrowhead
symbol, within an equilateral
triangle, is intendedto alert theuser
to the presence of uninsulated
"dangerous voltage" within the
product's enclosure that may be of
sufficient magnitude to constitute
a risk of electric shock to persons.
WARNING: TO REDUCE THE
RISK OF ELECTRIC SHOCK,
DO NOTREMOVE COVER (OR
BACK). NO USERSERVICEABLE PARTS INSIDE.
REFER SERVICING TO
QUALIFIED SERVICE
PERSONNEL.
The exclamation point within an
equilateral triangle is intended to
alert the user to the presence of
important operating and
maintenance (servicing)
instructions in the literature
accompanying the appliance.
NX-243
Please read and follow these instructions before using your unit.
IMPORTANT SAFETY INSTRUCTIONS
1) Read these instructions.
2) Keep these instructions.
3) Heed all warnings.
4) Follow all instructions.
5) Do not use this apparatus near water.
6) Clean only with dry cloth.
7) Do not block any ventilation openings. Install in accordance with the manufacturer's
instructions.
8) Do not install near any heat sources such as radiators, heat registers, stoves, or other
apparatus (including amplifiers) that produce heat.
9) Do not defeat the safety purpose of the polarized or grounding-type plug. A polarized plug
has two blades with one wider than the other. A grounding type plug has two blades and a
third grounding prong. The wide blade or the third prong are provided for your safety. If the
provided plug does not fit into your outlet, consult an electrician for replacement of the
obsolete outlet.
10) Protect the power cord from being walked on or pinch particularly at plugs, convenience
receptacles, and the point where they exit from the apparatus.
11) Only use attachments/accessories specified by the manufacturer.
12) Use only with the cart, stand, tripod, bracket, or table specified by the manufacturer, or sold
with the apparatus. When a cart is used, use caution when moving the cart/apparatus
combination to avoid injury from tip-over.
13) Unplug this apparatus during lightening storms or when unused for long periods of time.
14) Refer all servicing to qualified service personnel. Servicing is required when the apparatus
has been damaged in any way, such as power-supply cord or plug is damaged, liquid has
been spilled or objects have fallen into the apparatus, the apparatus has been exposed to
rain or moisture, does not operate normally, or has been dropped.
15) This appliance shall not be exposed to dripping or splashing water and that no object filled
with liquid such as vases shall be placed on the apparatus.
16) CAUTION: Visible and Invisible Laser Radiation when open and interlock defeated.
DO NOT STARE INTO BEAM.
Page 2
Dripping Warning:
The product shall not be exposed to dripping or splashing
and no items filled with liquid like a filled glass or vase or cup, shall be placed on
the product.
Ventilation Warning:
The ventilation openings of the product shall not be
intentionally covered.
The mains plug is used as disconnect device, the disconnect device shall
remain readily operable.
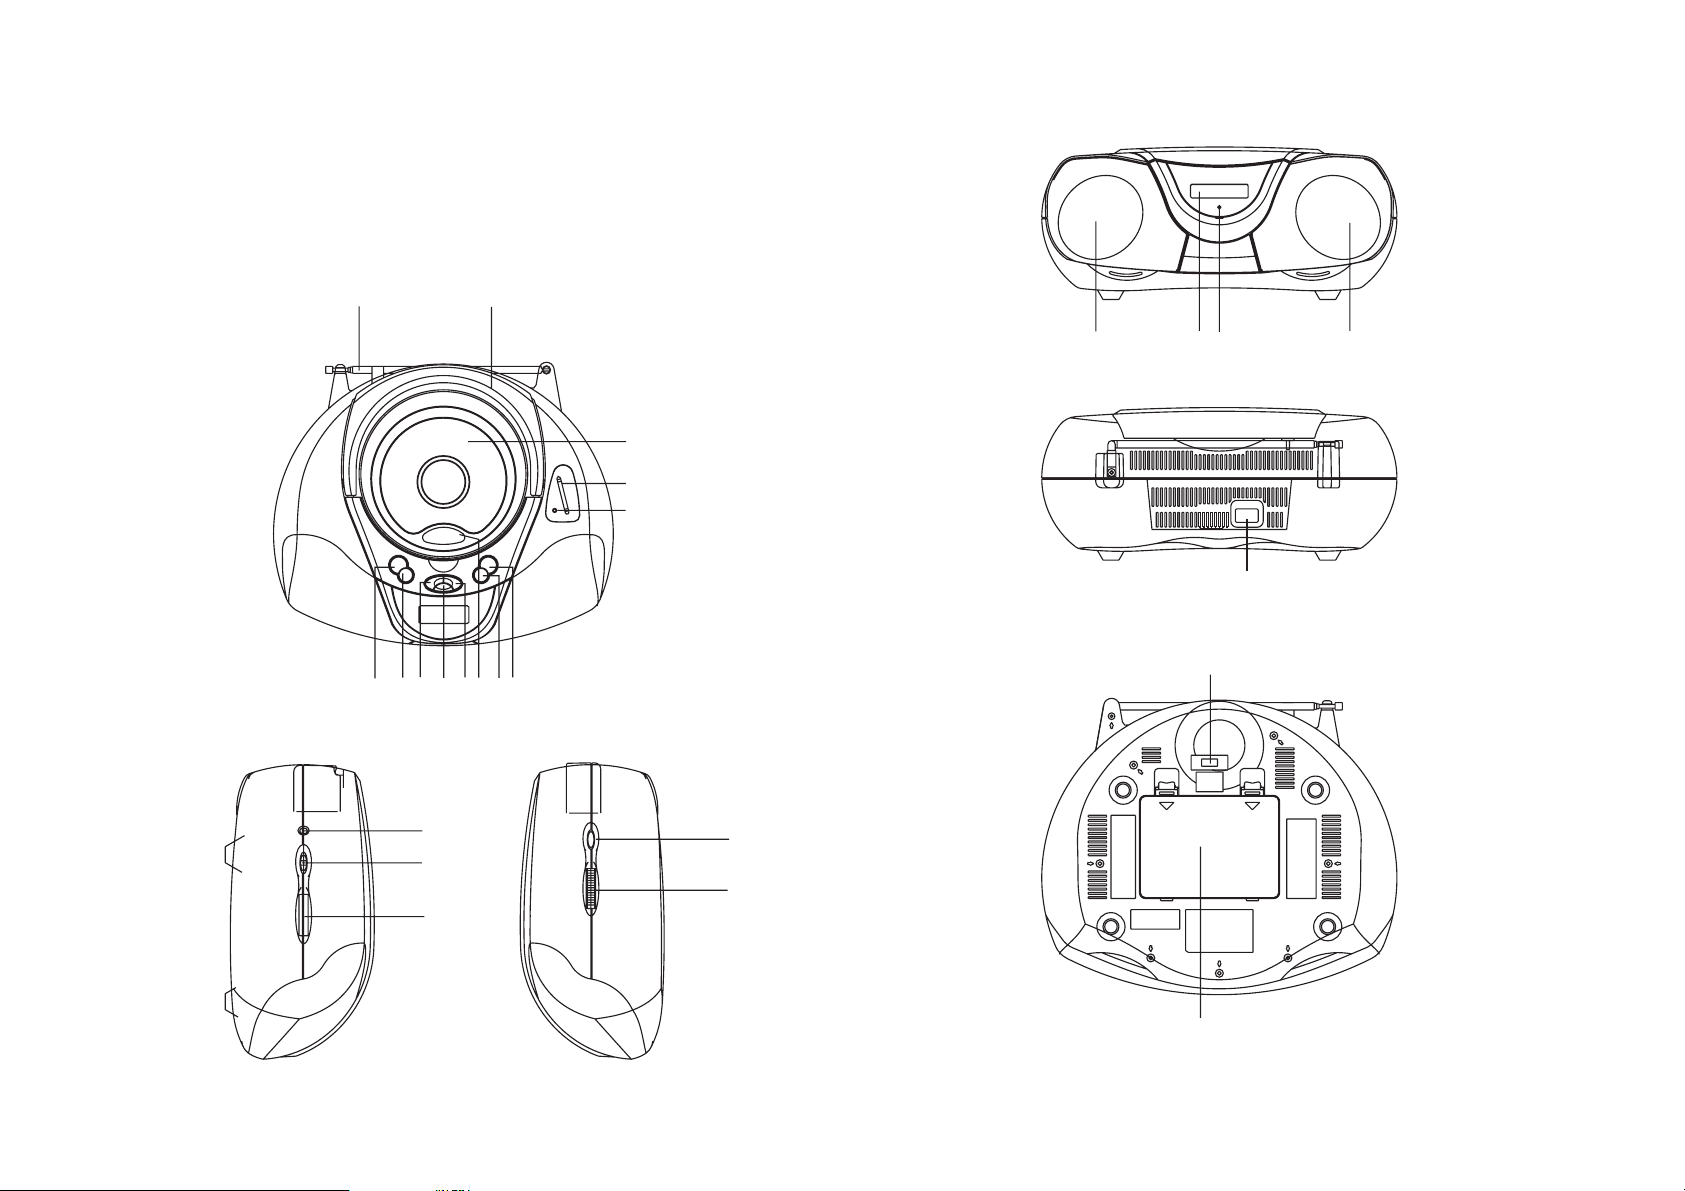
12
18
12
11
10
5
619
4
13
14
15
8
9
3
7
16
17
20
21
22
23
18
24
1
2
Page 3
LOCATION OF CONTROLS
1. HANDLE
2. FM TELESCOPIC ANTENNA
3. CD DOOR OPEN AREA
4. MODE BUTTON
5. EQ/PROGRAM BUTTON
6. STOP BUTTON
7. PLAY/PAUSE BUTTON
8. BACKWARD SKIP/SEARCH
BUTTON ( )
9. FORWARD SKIP/SEARCH
BUTTON ( )
10.FM STEREO INDICATOR
11.DIAL SCALE
12.CD DOOR
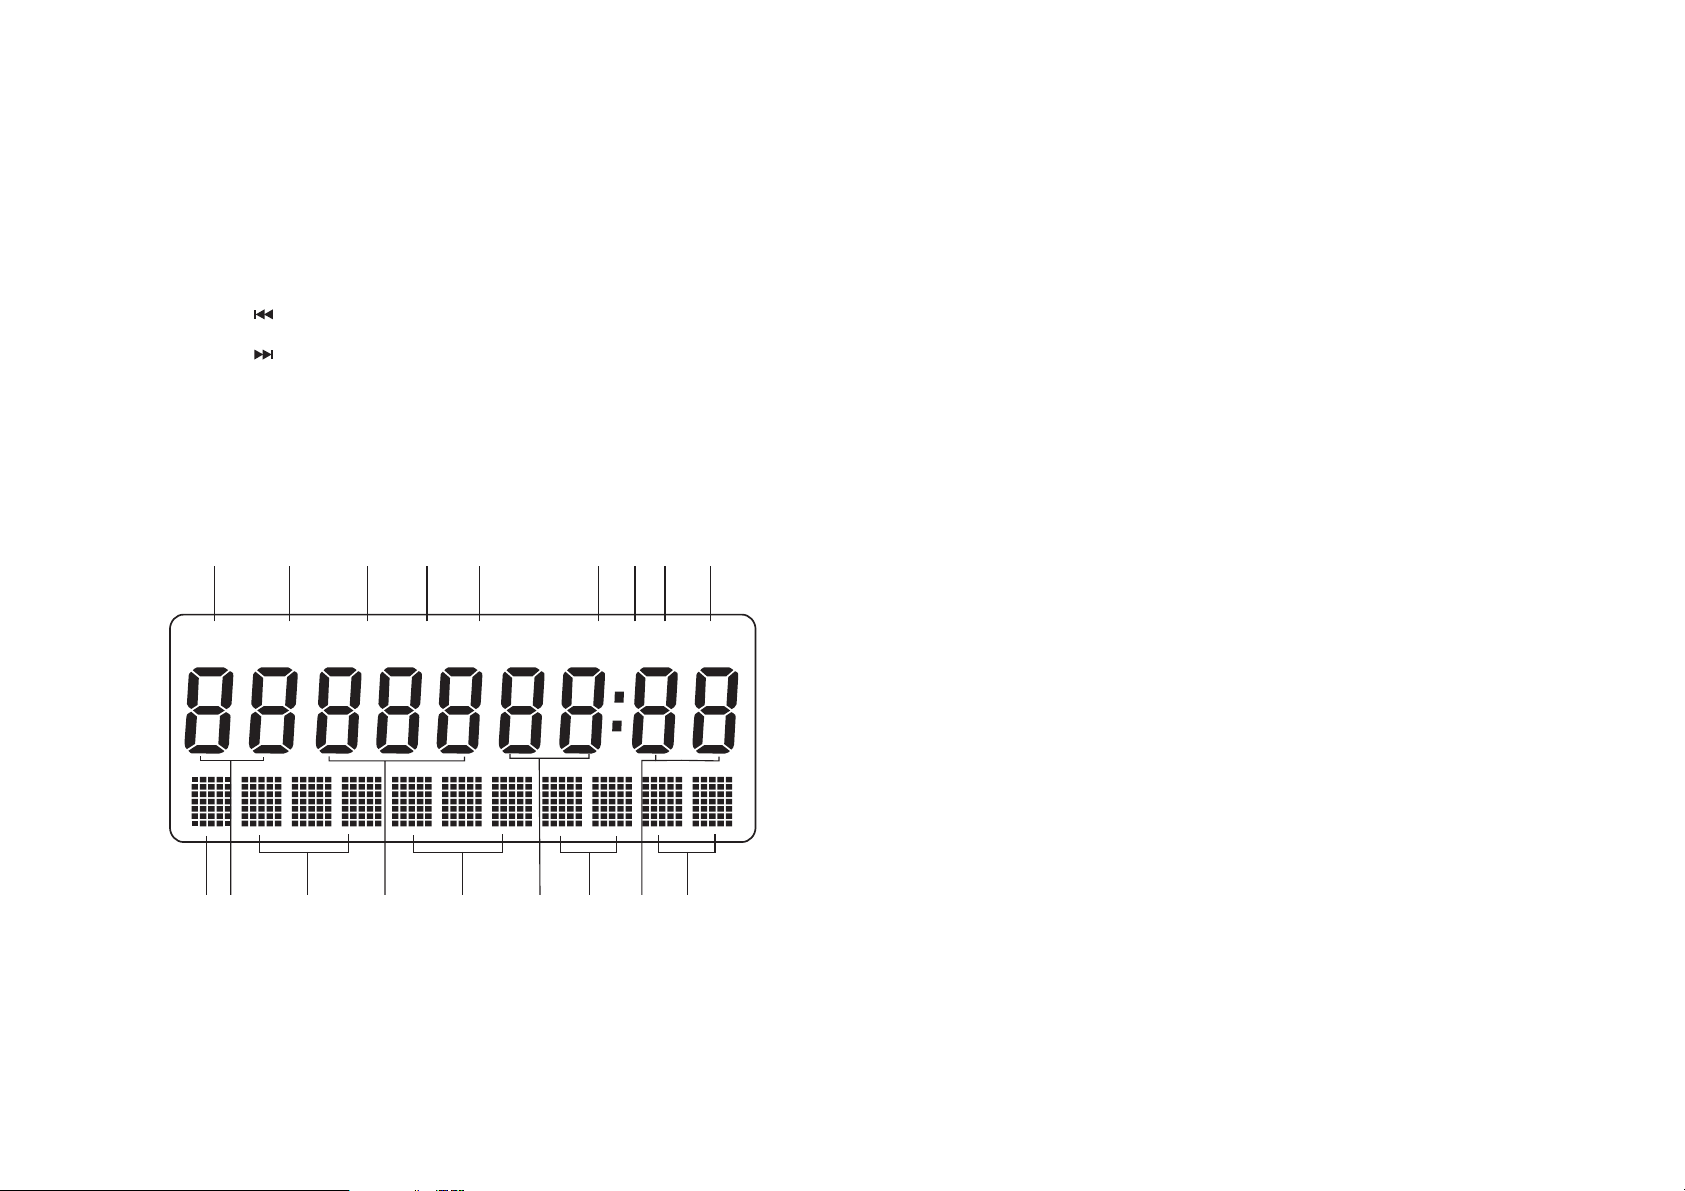
Get familiarized with the displayed contents in the LCD
12
PROG SHUFF INTRO
3
4
MP3
13. PHONES JACK
14. FUNCTION SWITCH
15. VOLUME CONTROL
16. BAND SWITCH
17. TUNING CONTROL
18. SPEAKERS
19. 10+/ALBUM BUTTON
20. LCD DISPLAY
21. POWER INDICATOR
22. AC SOCKET
23. AC VOLTAGE SELECTOR (FOR
DUAL VOLTAGE VERSION)
(OPTIONAL)
24. BATTERY COMPARTMENT
5
CD ALL
REPT 1
67
DIR
89
1. "PROG" shows during programmed playing.
2. "SHUFF" shows during random playing.
3. "INTRO" shows during intro scan playing.
4. "MP3" shows when the disc being played is a MP3 disc.
5. "CD" shows when the disc being played is a CD.
6. "REPT" shows during repeat playing.
7. "REPT 1" shows during single track repeat playing.
8. "REPT DIR" shows during single album tracks repeat playing (only for MP3
disc).
9. "REPT ALL" shows during the whole disc repeat playing.
10. This is the current album number during MP3 playing.
11. This is the number of the track being played.
12. This is the elapsing minute of the track being played.
13. This is the elapsing second of the track being played.
14. This is the status column. During MP3 playing, it also shows the playing
information of the current track.
POWER SUPPLY
BATTERY OPERATION
q
1. Remove the battery compartment cover gently.
2. Install 6 x 'C' size batteries (UM-2 or equivalent) taking care that the
correct polarities are observed.
3. Replace the battery compartment cover.
NOTE:
=
The AC line cord must be removed for battery operation.
=
To avoid damage which may result from leaking batteries, remove the
batteries when t hey become weak or when the unit is not to be used for
long period of time.
AC OPERATION
q
Insert one end of the AC power cord to the socket located at the rear of the
player, and the other end to the wall outlet.
10
14 14 14 14
11
3
12
13
14
NOTE:
NOTE:
! IMPORTANT
Disposal of used batteries
To be friendly to the environment we live in, dispose of the used batteries
according to related local regulations on disposal of used non-recharge able or
rechargeable batteries. Throwing away used batteries at random is prohibited
by statute and you are violating the local law against protecting the environment
by such acts.
Please be sure the AC Voltage Selector is switched to your local
voltage (for dual voltage version) (optional).
If the AC plug of this unit does not fit in your AC outlet, a plug adaptor
should be used. Consult your local dealer on the type of plug adaptor
required.
4
Page 4

If you are not sure what to do with the used batteries, you may contact your
local authorities for detailed instructions as to the steps you should take to
dispose of batteries.
It is obliging to relieve the burden on the environment and to recycle used
things. You are supposed to dispose of used batteries in the designated
dustbins or collection stations for recycling items.
For the benefit of this generation and future generations, and as a reciprocation
to what we are given by the environment, let 's take actions this moment to
protect the vulnerable environment we are living in and dependent upon!
STEREO HEADPHONES JACK
A stereo headphones jack has been provided on the side of the unit so that you can
enjoy music without disturbing others. To use this jack, plug in the
headphones/earphones (3.5mm in diameter, not included) and adjust the VOLUME
to a comfortable level.
NOTE:
When external headphones/earphones are connected, the sound to the
unit's main speakers will be made mute.
PLAY THE RADIO
1. Slide theFUNCTION switch tothe RADIOposition,
.
up
the POWER Indicator willlight
2. Select the desired band with the BAND switch.
3. Tune to the desired station by rotating the TUNING control. (Move the control
back and forth until you get the strongest clearest sound).
4. The built-in AM (MW) antenna and external FM TELESCOPIC ANTENNA are
directional.
When receiving an FM broadcast, fully extend the TELESCOPIC
=
ANTENNA and position for the best reception.
For AM (MW) broadcasts, rotate the whole set until the best reception is
=
heard.
5. Adjust the volume level to a comfortable listening level.
6. To turn offthe radio, slide the FUNCTION switch to the OFF position.
NOTES:
If a particular FM (STEREO) station is weak, or you hear too much
=
background noise, try moving the BAND switch to the FM (MONO)
position. This can often result in a much clearer reception.
When the BAND switch is set to FM stereo position and a Stereo radio is
=
broadcasting, the FM STEREO indicator near the Dial Scale will light up.
HANDLE AND MAINTAIN A COMPACT DISC
Follow the instructions below to handle and maintain your disc in order that long
time and trouble free performance can possibly be obtained:
Ensure not to caress the rain bow side of the disc;
=
handle the disc by the edge.
=
Long time exposure to sunshine, high temperatures and
humidity will damage the disc. Keep the storage area
clean.
=
Avoid sticking labels on both sides of a disc. Writing with
HANDLE DISC ONLYAS SHOWN
pointed articles on the disc should be strictly avoided.
=
Clean the disc wiping the centre and then working out to
the edge with a dry & soft cloth or a disc brush. Avoid
CLEAN FROM CENTER TO EDGE
any cleansing lotion or chemical eradicator.
=
Store them in their cases when they are not to be used.
DO NOT STORE NEAR HEAT
LOAD A DISC
1. Slide the FUNCTION switch to the CD/MP3 position.
2. Open the CD door.
3. Insert a disc with the label side facing upward (if the disc is upside down, the
display will show "NO DISC").
4. Close the CD door by hand.
NOTE:
Never touch the laser lens inside the CD compartment. If it ever gets
dirty,clean it with a cleaning disc.
REMOVE A DISC
1. Make sure the CDMP3 disc is not playing. If it is, press the CD STOP button.
2. Open the CD door.
3. Gently remove the disc.
4. Close the CD door by hand.
5. Replace the disc in its protective storage box.
PLAY A CD
1. Make sure the power is connected, slide the FUNCTION switch to V
CD(MP3) position, POWER indicator will light.
2. Load a disc into the CD compartment. Close the CD door, the disc will
begin to spin.
3. Adjust the VOLUME to the desired volume level.
4. To stop playing temporarily, press the CD PLAY/PAUSE button.
The current playing track would flash on the display.
Resume normal play by pressing PLAY/PAUSE button again.
5. To stop playing, press the STOP button. The total tracks' number and
Whole playing time will be shown on the display.
6. To turn off the player, slide the FUNCTION switch to OFF position.
5
6
Page 5

ANTI-SHOCK PROTECTION
A special circuitry inside the player guarantees that there will be no sound
skipping when the player is subject to shock and shaking in music playback. The
laser scans the CD/MP3 disc and saves data for up to 60/120 seconds ahead
of where the playback is on the disc. In case of shocks or shaking or vibrations,
the player reads from the memory until the laser can read CD again. But if there
is too much vicious vibration or shaking exerted on the player, the player may
malfunction and sound skipping is caused.
When this happens, place the player on a level table where no vibration will be
brought. Normal sound will resume immediately.
EQ SELECTION
Press Program/EQ button continuously during disc playback mode to select EQ
sound effects among DBB, POP, CLASSICAL, JAZZ, ROCK, and NORMAL.
SKIP TRACKS AND SEARCH FOR A SPECIFIC POINT TO PLAY
1. Press once the SKIP/SEARCH up button in music play to skip to the next
Track. To skip to a specific track ahead, press this button several times.
2. Press once the SKIP/SEARCH down button in music play to skip to the
beginning of the current track. To skip to a specific track at back, press this
button several times.
3. Press 10+ button once in play to skip to the track 10 tracks ahead, twice to
skip to the track 20 tracks ahead. You can reach the last track of the disc
using this button. Press this button again at the last track of disc to go to the
first track for playback.
4. Hold the SKIP/SEARCH up button in music play to search at quick rate for a
specific point to play.
5. Hold the SKIP/SEARCH down button in music play to search at quick rate for
a specific point to play.
PROGRAMMED PLAY
Programmed play is that tracks on the disc can be edited for playback in a
preferred order with the use of PROGRAM button.
In CD stop mode, press PROGRAM button once, "PROG" shows in the LCD
with a flickering "000" and the program sequence indication "P-01", select the
first track to be programmed using SKIP/SEARCH buttons or +10 button, and
press PROGRAM button again to store and advance to the next programming
step. The program sequence indication changes to "P-02" waiting for your next
input.
Repeat the steps above to program more tracks. A maximum of 20 tracks can
be programmed in memory in a preferred order.
Press PLAY/PAUSE button to begin programmed play in the preferred order
after you are done with programming. The player stops automatically after all
programmed tracks are played.
You may press STOP button to terminate programmed playback. In program
stop mode, press STOP button again to clear the programming; press
PLAY/PAUSE button to begin the programmed playback with the programming
order identical with the previous one done.
You may press STOP or PLAY/PAUSE button during programming to exit.
REPEAT A SINGLE TRACK
To repeat a preferred track in playback, press MODE button once, "REPT ONE"
shows in the LCD . Then select the preferred track using SKIP/SERCH buttons
or +10 button. The player will repeat the chosen track until you press STOP
button.
REPEAT ALL TRACKS
To repeat all tracks, press MODE button twice in play mode, "REPT ALL" shows
in the LCD. The player will repeat all tracks until you press STOP button.
INTRODUCTION PLAY
Introduction play is that the first ten seconds of each track are played in a
sequential order. Press MODE button three times to enter this mode during
play, "INTRO" shows in the LCD. Press SKIP forward button to begin
Introduction play from the Next track immediately after the current track, or the
SKIP backward to begin Introduction play from the current track. Press
Play/Pause button to begin Introduction play from Track NO.1. Press
Play/Pause button again in Intro playback to exit Introduction play mode and
normal music play resumes.
RANDOM PLAY
Random play is that tracks on the disc are played by the player at random.
Press MODE button four times to enter this mode during play, "SHUFF" shows
in the LCD. Press Play/Pause or SKIP buttons to begin Random playback.
Tracks on the disc will be selected at random for playback and the player stops
automatically after all tracks are played. Press MODE button once more to exit
random and return to normal playback from the track it's reached.
7
8
Page 6

MP3-CD PLAYBACK
This player is capable of MP3-CDs. It takes a longer time for this player to read
an MP3-CD than it does CD-DA. Wait patiently while it is reading.
After an MP3-CD is successfully read, the icon of "MP3" shows in the LCD
together with the total number of albums and tracks. And less than a second
later, playback begins from the first track of the first album.
LOCATE A TRACK OR ALBUM AND SEARCH FOR A SPECIFIC POINT TO
PLAY
1. Press once the SKIP/SEARCH up button in music play to skip to the next
track. To skip to a specific track ahead, press this button several times.
2. Press once the SKIP/SEARCH down button in music play to skip to the
beginning of the current track. To skip to a specific track at back, press this
button several times.
3. Press 10+ button once in play to skip to the track 10 tracks ahead, twice to
skip to the track 20 tracks ahead. You can reach the last track of the current
album using this button. Press this button again at the last track of album to
go to the first track of this album for playback.
4. Hold the SKIP/SEARCH up button in music play to search at quick rate for a
specific point to play.
5. Hold the SKIP/SEARCH down button in music play to search at quick rate for
a specific point to play.
6. Hold ALBUM button, the album number will flash; press the Skip/Search
button to select the desired album then Play/Pause button to begin playing
the first track of the selected album; press the SKIP/SEARCH button to select
the exact track you are going to listen to.
REPEAT A SINGLE TRACK
To repeat a preferred track in playback, press MODE button once, "REPT 1"
shows in the LCD . Then select the preferred track using SKIP/SERCH buttons
or +10 button. The player will repeat the chosen track until you press STOP
button.
REPEAT AN ALBUM
To repeat a preferred album in playback, press MODE button twice, "REPT DIR"
shows in the LCD. Then select the preferred album using the Album and Skip
buttons together. The player will repeat the chosen album until you press STOP
button.
INTRODUCTION PLAY
Introduction play is that the first ten seconds of each track are played in a
sequential order. Press MODE button four times to enter this mode during play,
"INTRO" shows in the LCD. Press SKIP forward button to begin Introductionplay
from the Next track immediately after the current track, or the SKIP backward to
begin Introduction play from the current track. Press Play/Pause button to begin
Introduction play from Track NO.1. Press Play/Pause button again in Intro
playback to exit Introduction play mode and normal music play resumes.
RANDOM PLAY
Random play is that tracks on the disc are played by the player at random.
Press MODE button five times to enter this mode during play, "SHUFF" shows in
the LCD. Press Play/Pause or SKIP buttons to begin Random playback. Tracks
on the disc will be selected at random for playback and the player stops
automatically after all tracks are played. Press MODE button once more to exit
random and return to normal playback from the track it's reached.
PROGRAMMED PLAY
Programmed play is that tracks on the disc can be edited for playback in a
preferred order with the use of PROGRAM button.
In MP3 stop mode, press PROGRAM button once, "PROG" shows in the LCD
with a flickering album "00" and the program sequence indication "P-01"; select
the album number to be programmed using SKIP/SEARCH buttons or +10
button, and press PROGRAM button again to store; the track number "000"
flickers waiting for your selection. Choose the desired track with SKIP/SEARCH
buttons or +10 button. Press PROGRAM button again to confirm the first
programming and advance to the next programming step. The program
sequence indication changes to "P-02" waiting for your next input.
Repeat the steps above to program more tracks. A maximum of 20 tracks can
be programmed in memory in a preferred order.
Press PLAY/PAUSE button to begin programmed play in the preferred order
after you are done with programming. The player stops automatically after all
programmed tracks are played.
You may press STOP button to terminate programmed playback. In program
stop mode, press STOP button again to clear the programming; press
PLAY/PAUSE button to begin the programmed playback with the programming
order identical with the previous one done.
You may press STOP or PLAY/PAUSE button during programming to exit.
REPEAT ALL TRACKS
To repeat all tracks, press MODE button three in play mode, "REPT ALL" shows
in the LCD. The player will repeat all tracks until you press STOP button.
9
10
Page 7

MANUAL DE OPERACIÓN
REPRODUCTOR DE MP3/CD
CON AM/FM ESTEREO
ADVERTENCIA DE GOTEO:
El aparato no debe de ser expuesto a goteo o salpicadura de líquidos, no deben colocarse
objetos llenos con líquidos, como vasos sobre el aparato.
ADVERTENCIA DE VENTILACIÓN:
La ventilación normal del aparato no debe impedirse de ninguna manera.
El enchufe principal se utiliza como dispositivo de desconexión, el dispositivo de
desconexión debe ser accesible fácilmente.
12
12
11
10
MODELO: NX-243
Favor de leer y seguir las instrucciones de este manual antes de
operar la unidad.
Conservar el manual para futuras referencias.
5
619
4
13
14
15
8
9
3
7
16
17
1
Page 8

18
20
21
18
LOCALIZACIÓN DE LOS CONTROLES
1. ASA / AGARRADERA
2. ANTENA TELESCÓPICA DE FM
3. ÁREA PARA ABRIR LA PUERTA DEL CD
4. BOTÓN DE MODO
5. BOTÓN DE PROGRAMA/ECUALIZADOR
6. BOTÓN DE DETENER
7. BOTÓN DE REPRODUCIR/PAUSAR
8. BOTÓN DE SALTAR/BUSCAR HACIA
ATRÁS " "
9. BOTÓN DE SALTAR/BUSCAR HACIA
DELANTE " "
10. INDICADOR DE FM ESTÉREO
11. INDICADOR DE SINTONÍA
12. PUERTA DEL CD
Descripción de los indicadores en la pantalla de cristal líquido LCD
13. CONECTOR PARA AUDÍFONOS
14. SELECTOR DE FUNCIÓN
15. CONTROL DE VOLUMEN
16. SELECTOR DE BANDA
17. CONTROL DE SINTONÍA
18. BOCINAS
19. BOTÓN DE 10+/ALBUM
20. PANTALLA LCD
21. INDICADOR DE PODER
22. CONECTOR DE ENTRADA DE Vca
23. SELECTOR DE VOLTAJE Vca
(PARA VERSIÓN DE VOLTAJE
DUAL) (OPCIONAL)
24. COMPARTIMIENTO DE LAS
BATERÍAS
24
23
22
12
PROG SHUFF INTRO
10
14 14 14 14
3
MP3
11
5
4
CD ALL
12
32
67
REPT 1
89
DIR
13
14
Page 9

1. "PROG": Se despliega durante la reproducción del programa.
2. "SHUFF": Se despliega durante la reproducción al azar.
3. "INTRO": Se despliega durante la introducción de las pistas.
4. "MP3": Se despliega cuando se reproduce un disco con formato MP3.
5. "CD": Se despliega cuando se reproduce un disco con formato CD.
6. "REPT": Se despliega durante la repetición de la reproducción.
7. "REPT 1": Se despliega durante la repetición de una pista.
8. "REPT DIR": Se despliega durante la repetición de una carpeta
(solo para discos con formato MP3).
9. "REPT ALL": Se despliega durante la repetición de todo el disco.
10. Este es el numero de la carpeta actual durante la reproducción MP3.
11. Este es el numero de la pista actual en reproducción.
12. Estos son los minutos transcurridos de la pista en reproducción.
13. Estos son los segundos transcurridos de la pista en reproducción.
14. Esta es la columna de estado. Durante la reproducción de un disco MP3,
este despliega la información de la pista actual en reproducción.
Si usted no está seguro qué hacer con las baterías usadas, puede avisar a las
autoridades locales para las instrucciones detalladas acerca de los pasos usted
debe tomar para la disposición adecuada de las baterías.
Está obligando conservar el medio ambiente y reciclar de manera adecuada las
cosas. Se debe disponer las baterías usadas en los lugares específicos o en los
centros de reciclaje respectivos.
Para el beneficio de esta generación y generaciones del futuro, y como una
reciprocidad a lo que nosotros hacemos por el medio ambiente, tome las acciones
en este momento ¡proteja el medio ambiente vulnerable en el que nosotros estamos
viviendo y dependiendo!
CONECTOR PARA AURICULARES ESTEREOFÓNICOS
Un conector para auriculares estéreo se provee en un costado de la unidad de
manera que pueda escuchar el aparato sin molestar a otras personas. Para usar
este conector, conectar uno auriculares/audífonos (de 3,5 mm de diámetro, no
incluidos) estéreo y ajustar el control del volumen a un nivel adecuado.
FUENTES DE PODER
OPERACIÓN CON BATERÍAS
1. Retirar la tapa del compartimiento de las baterías.
2. Instalar 6 baterías de 1,5 Vcc tamaño "C" (UM2 o equivalentes), verificando la
correcta polaridad como se observa en el interior del compartimiento.
3. Colocar la tapa del compartimiento nuevamente.
Notas:
* Para operar la unidad con las baterías, debe de retirar el cordón de alimentación.
* Para evitar daños debido a la fuga de líquido ácido de las baterías, retirar las
baterías cuando están agotadas o cuando la unidad no sera usada por un periodo
largo de tiempo.
OPERACIÓN CON Vca
Insertar el extremo del cordón de alimentación al conector de entrada de Vca
localizado en la parte trasera de la unidad y conectar la clavija al tomacorriente.
Notas:
* Asegurarse que el selector de voltaje este ajustado al voltaje de su localidad (solo
para unidades con selector de voltaje).
* Si la clavija del cordón de alimentación no entra en tomacorriente de pared. Debe
usarse un adaptador para clavija. Consultar con su distribuidor local sobre el tipo de
adaptador para clavija necesario.
¡IMPORTANTE!
Disposición de las baterías usadas
Para ayudar al ambiente en que vivimos, disponga de las baterías usadas según
las regulaciones locales relacionadas en la disposición de las baterías recargables
o no recargables. Se prohibe tirar las baterías al medio ambiente y esto viola las
leyes locales de protección al medio ambiente.
Nota:
Cuando los auriculares/audífonos son conectados, las bocinas internas son
desconectadas automáticamente.
OPERACIÓN DEL RADIO
1. Colocar el selector de función en la posición de "RADIO", el indicador de poder se
enciende.
2. Seleccionar la banda deseada a través del selector de banda.
3. Sintonizar la estación requerida a través del control de sintonía. Suavemente girar
el control de sintonía hacia delante y hacia atrás hasta conseguir el sonido fuerte y
claro.
5. La antena interna de AM y la antena de telescópica de FM son direccionales.
* Cuando sintoniza una estación de FM, extender la ANTENA TELESCÓPICA DE
FM completamente. y girarla hasta obtener la mejor recepción.
* Cuando sintoniza estaciones de AM, la mejor recepción puede lograrse girando la
unidad.
6. Ajustar el control de volumen al nivel deseado
7. Para apagar el radio, colocar el selector de función en la posición de "TAPE"
(PODER APAGADO "OFF")
Notas:
* Si la estación de FM ESTÉREO es débil o se escucha demasiado ruido o silbido,
colocar el selector de banda en la posición de FM (MONO). Esto a menudo resulta
en una recepción mas clara.
* Cuando el selector de banda es colocado en la posición de FM Estéreo y se
sintoniza una estación estereofónica, el indicador de FM estéreo localizado cerca del
indicador de sintonía se enciende.
54
Page 10

MANEJO Y MANTENIMIENTO DE LOS DISCOS COMPACTOS
Seguir la instrucciones para el manejo y mantenimiento de los discos
compactos para tener una mayor duración y mejor desempeño.
* Asegurarse de no tocar las su per fic ies del disco, sujetarlo del
extremo.
* La exposición a los rayos directos del sol, altas temperaturas y
h u me da d pu e d e d añ a r l o s di sc o s. M a nt en e r e l á r ea d e
almacenamiento limpio.
SUJETAR EL DISCO COMO SE
OBSERVA
* Evitar pegar etiquetas o cintas adheribles en el disco. Esta prohibido
escribir con artículos puntiagudos sobre el disco.
* Limpiar los discos con una tela suave, limpia, seca y libre de pelusa.
Limpiar con movimientos rectos del centro hacia el borde, nunca con
LIMPIAR CON MOVIMIENTOS RECTOS
DEL CENTRO HACIA EL BORDE
movimientos circulares. Evitar usar productos químicos ya que estos
pueden dañar el disco.
* Almacenar los discos en su estuche cuando no estén en uso.
NO COLOCAR CERCA DE FUENTES
DE CALOR
INSERTANDO UN DISCO
1. Colocar el selector de función en la posición de "CD/MP3".
2. Abrir la puerta del compartimiento del CD.
3. Insertar un disco con el lado de la etiqueta dirigido hacia arriba (si el disco es colocado al
reves, la pantalla despliega "NO DISC").
4. Cerrar la puerta del compartimiento del CD.
Nota: Nunca tocar el lente del rayo láser. Si el lente esta sucio, limpiarlo con un disco de
limpieza.
RETIRANDO EL DISCO
1. Asegurarse que el disco no esta en el modo de reproducción. Si esto es así, presionar el
botón de detener "STOP" CD.
2. Abrir la puerta del compartimiento del CD.
3. Suavemente retirar el disco.
4. Cerrar la puerta del compartimiento del CD.
5. Colocar el disco dentro de su estuche para protegerlo.
PROTECCIÓN ANTIVIBRACIÓN
Un circuito especial en el interior del reproductor garantiza que el sonido no salta cuando
el reproductor es sujeto a golpes, sacudidas o vibraciones durante la reproducción de la
música. El láser examina el disco CD/MP3 y almacena los datos de 60/120 segundos en
la memoria. En caso de existir golpeteo, sacudidas o vibraciones, el reproductor lee la
información de la memoria hasta que el láser se establece y puede leer la información del
disco nuevamente. Pero si el golpeteo, sacudidas o vibración son por demasiado tiempo,
el reproductor puede no operar adecuadamente y pueden ocurrir saltos del sonido.
SELECCIÓN DEL MODO DE ECUALIZACIÓN
Pr e siona r "PROG/ EQ" con tinuam e nte du r ante l a reprod ucción de un di s co par a
seleccionar el modo de ecualización: DBB, Pop, Clásica, Jazz, Rock y Normal.
SALTAR LAS PISTAS O BUSCAR UN PUNTO ESPECIFICO DE REPRODUCCIÓN
1. Presionar ":" durante la reproducción para saltar a la pista siguiente. Para saltar varias
pistas hacia delante, presionar varias veces ":".
2. Presionar "9 " durante la reproducción para sa lta r al inicio de la pista actual en
reproducción. Para saltar varias pistas hacia atrás, presionar varias veces "9".
3. Presionar "10+" una vez durante la reproducción para saltar a la pista 10 o mayor,
presionar "10+" dos veces para saltar a la pista 20 o mayor. Puede alcanzar la ultima pista
del disco, presionando este botón. Estando en la ultima pista del disco, presionar "10+"
para ir a la primera pista del disco.
4. Presionar y sostener ":" para buscar un punto especifico hacia adelante de la pista.
Una vez alcanzado el punto deseado, liberar el botón.
5. Presionar y sostener "9" para buscar un punto especifico hacia atrás de la pista. Una
vez alcanzado el punto deseado, liberar el botón.
REPRODUCCIÓN DEL DISCO
1. Asegurarse que el poder esta conectado, colocar el selector de función en la posición de
"CD/MP3", el indicador de poder se enciende.
2. Insertar un disco como se indico anteriormente y cerrar la puerta del disco, entonces el
disco empezara a girar.
3. Ajustar el volumen al nivel deseado.
4. Para pausar la reproducción, presionar "PLAY/PAUSE" durante la reproducción.
* La pista actual en reproducción destellara en la pantalla.
* Para volver a la reproducción normal, presionar "PLAY/PAUSE" nuevamente.
5. Para detener la reproducción, presionar "STOP". El numero total de pistas y el tiempo
total de reproducción se despliegan en la pantalla.
6. Para apagar el reproductor, colocar el selector de función en la posición de apagado
"OFF".
76
Page 11

PROGRAMACIÓN DE LA REPRODUCCIÓN
La reproducción de las pistas del disco puede ser programada en el orden deseado
usando el botón de programa "PROGRAM".
Estando en el modo detenido, presionar "PROGRAM" una vez, "PROG" se despliega en
la pantalla LCD y destellando "000" y el indicador de secuencia del programa "P-01".
Seleccionar la primera pista a ser programa presionando "9 ó : " o "10+" y presionar
"P ROGR AM" nu evam ente p ara a lmace nar l a pista sel eccionada y ava nzar p ara
programar la pista siguiente. El indicador de secuencia del programa cambia de "P-01" a
"P-02", esperando se ingrese la segunda pista a programar.
Repetir los pasos explicados anteriormente para programar las demás pistas deseadas.
Hasta un máximo de 20 pistas pueden ser programadas en la memoria en el orden
deseado.
Una vez terminada la programación, presionar "PLAY/PAUSE" para reproducir las pistas
en el orden programado. El reproductor se detiene automáticamente después de que
todas las pistas programadas se reproducen.
Para detener la reproducción del programa, presionar "STOP". En el modo de programa
detenido, presionar "STOP" nuevamente para limpiar el programa de la memoria.
Presionar "STOP" o "PLAY/PAUSE" durante la programación para salir.
REPETIR UNA PISTA
Para repetir la reproducción de una pista, presionar "MODE" una vez y la pantalla
despliega "REPT ONE". Entonces seleccionar la pista presionando "9 ó :" o "10+". La
pista seleccionada se reproduce continuamente hasta que presiona "STOP".
REPETIR TODAS LAS PISTAS DEL DISCO
Para repetir todas las pistas del disco, presionar "MODE" dos veces en el modo de
re produ cción y la pa ntall a des plieg a "REP T ALL" . Toda s las p istas del d isco s e
reproducen continuamente hasta que presiona "STOP".
INTRODUCCIÓN DE LA REPRODUCCIÓN
La introducción de la reproducción, reproduce los primeros 10 segundos de cada pista
del disco en orden secuencial. Presionar "MODE" tres veces para entrar a este modo
durante la reproducción y la pantalla despliega "INTRO". Presionar ":" para iniciar la
introducci ón d e la pista siguiente a la pis ta a ctual, o presionar "9 " para iniciar la
introducción de la pista actual. Presionar "PLAY/PAUSE" para iniciar la introducción
desde la prime r a p i s t a . P r e s i o n a r " P L A Y / P A U S E " n u e v a m e nte en el modo de
introducción para salir de este y volver al modo de reproducción normal.
REPRODUCCIÓN ALEATORIA (AL AZAR)
Las pistas pueden ser reproducidas en orden al azar determinado por el reproductor.
Pr esio nar " MODE " cua tro v eces para entr ar a e ste m odo y la pa ntal la de spli ega
"SHUFF". Presionar "PLAY/PAUSE" o "9 ó :" para iniciar la reproducción al azar. La
reproducción de las pistas del disco se reproducen de manera al azar seleccionadas por
el reproductor. El reproductor se detiene automáticamente cuando todas las pistas del
disco se r e p r o d u cen. Pres i o n a r " MODE" una v e z m á s p ara salir d e l m o d o de
reproducción al azar y volver al modo de reproducción normal a partir de la pista actual.
REPRODUCCIÓN DE DISCOS MP3
Este reproductor tiene la capacidad de reproducir disco MP3. Este toma un poco más de
tiempo para leer un disco con formato MP3 que un disco de audio normal.
Después de que el disco MP3 es leído, el indicador de "MP3" se despliega en la pantalla
junto con el numero total de ca rpe tas y pi sta s. Pocos segundos después, inicia la
reproducción a partir de la primera pista de la primer carpeta.
LOCALIZAR UNA PISTA O CARPETA Y BUSCAR UN PUNTO ESPECIFICO
1. Presionar ":" durante la reproducción para saltar a la pista siguiente. Para saltar varias
pistas hacia delante, presionar varias veces ":".
2. Presi onar "9 " dur ante la reproducció n para saltar al inic io de la pista act ual en
reproducción. Para saltar varias pistas hacia atrás, presionar varias veces "9".
3. Presionar "10+" una vez durante la reproducción para saltar a la pista 10 o mayor,
presionar "10+" dos veces para saltar a la pista 20 o mayor. Puede alcanzar la ultima pista
del disco, presionando este botón. Estando en la ultima pista del disco, presionar "10+"
para ir a la primera pista del disco.
4. Presionar y sostener ": " para buscar un punto especifico hacia adelante de la pista.
Una vez alcanzado el punto deseado, liberar el botón.
5. Presionar y sostener "9" para buscar un punto especifico hacia atrás de la pista. Una
vez alcanzado el punto deseado, liberar el botón.
6. Presionar y sostener "ALBUM", el numero de la car pet a de ste lla en l a pa nta lla ,
presionar "9 ó : " p a r a s e l e c c i o n a r l a c a r p e t a d e s e a d a y e n t o n c e s p r e s i o n a r
"PLAY/ P A U S E " para in i c i a r la repro d u c c ión de la p r i m e ra pista d e l a c arpeta
seleccionada. Presionar "9 ó :" para saltar a otras pistas.
REPETIR UNA PISTA
Para repetir la reproducción de un a pista, pres ionar "MODE" una vez y la pa ntalla
despliega "REPT ONE". Entonces seleccionar la pista presionando "9 ó :" o "10+". La
pista seleccionada se reproduce continuamente hasta que presiona "STOP".
REPETIR UNA CARPETA
Para repetir la reproducción de una carpeta, presionar "MODE" dos veces y la pantalla
despliega "REPT DIR". Entonces seleccionar la carpeta preferida usando los botones de
"ALBUM" y "9 ó :" juntos. La carpeta seleccionada se reproduce continuamente hasta
que presiona "STOP".
REPETIR TODAS LAS PISTAS DEL DISCO
Para repetir todas las pistas del disco, presionar "MODE" dos veces en el modo de
re p roducc i ón y la p antall a despli e ga "RE P T ALL". T odas la s pista s del dis c o se
reproducen continuamente hasta que presiona "STOP".
98
Page 12

INTRODUCCIÓN DE LA REPRODUCCIÓN
La introducción de la reproducción, reproduce los primeros 10 segundos de cada pista
del disco en orden secuencial. Presionar "MODE" tres veces para entrar a este modo
durante la reproducción y la pantalla despliega "INTRO". Presionar ": " para iniciar la
introducción de la pis ta s igu ien te a la pista actual, o presionar "9 " para iniciar la
introducción de la pista actual. Presionar "PLAY/PAUSE" para iniciar la introducción
desde la primera pista. Presionar "PLAY / P A U S E " n u e v a m e n t e e n e l m o d o d e
introducción para salir de este y volver al modo de reproducción normal.
REPRODUCCIÓN ALEATORIA (AL AZAR)
Las pistas pueden ser reproducidas en orden al azar determinado por el reproductor.
Pr esio nar " MODE " cua tro veces para e ntra r a es te mo do y l a pantalla desp lieg a
"SHUFF". Presionar "PLAY/PAUSE" o "9 ó :" para iniciar la reproducción al azar. La
reproducción de las pistas del disco se reproducen de manera al azar seleccionadas por
el reproductor. El reproductor se detiene automáticamente cuando todas las pistas del
disco se r e p r o ducen. Pr e s i o n a r "MODE" u n a v e z más para s a l i r d el modo d e
reproducción al azar y volver al modo de reproducción normal a partir de la pista actual.
PROGRAMACIÓN DE LA REPRODUCCIÓN
La reproducción de las pistas del disco puede ser programada en el orden deseado
usando el botón de programa "PROGRAM".
Estando en el modo de MP3 detenido, presionar "PROGRAM" una vez, "PROG" se
despliega en la pantalla LCD y destella el numero de carpeta "00" y el indicador de
secuenc ia del programa "P-0 1"; seleccionar el numero de la carpe ta a programar
presionando "9 ó :" o "10+". El numero de pista "000" empieza a destella esperando la
selección. Seleccionar la primera pista a ser programa presionando "9 ó : " o "10+" y
presionar "PROGRAM" nuevamente para almacenar la pista seleccionada y avanzar para
programar la pista siguiente. El indicador de secuencia del programa cambia de "P-01" a
"P-02", esperando se ingrese la segunda pista a programar.
Repetir los pasos explicados anteriormente para programar las demás pistas deseadas.
Hasta un máximo de 20 pistas pueden ser programadas en la memoria en el orden
deseado.
Una vez terminada la programación, presionar "PLAY/PAUSE" para reproducir las pistas
en el orden programado. El reproductor se detiene automáticamente después de que
todas las pistas programadas se reproducen.
Para detener la reproducción del programa, presionar "STOP". En el modo de programa
detenido, presionar "STOP" nuevamente para limpiar el programa de la memoria.
Presionar "STOP" o "PLAY/PAUSE" durante la programación para salir.
10
 Loading...