

Page 1
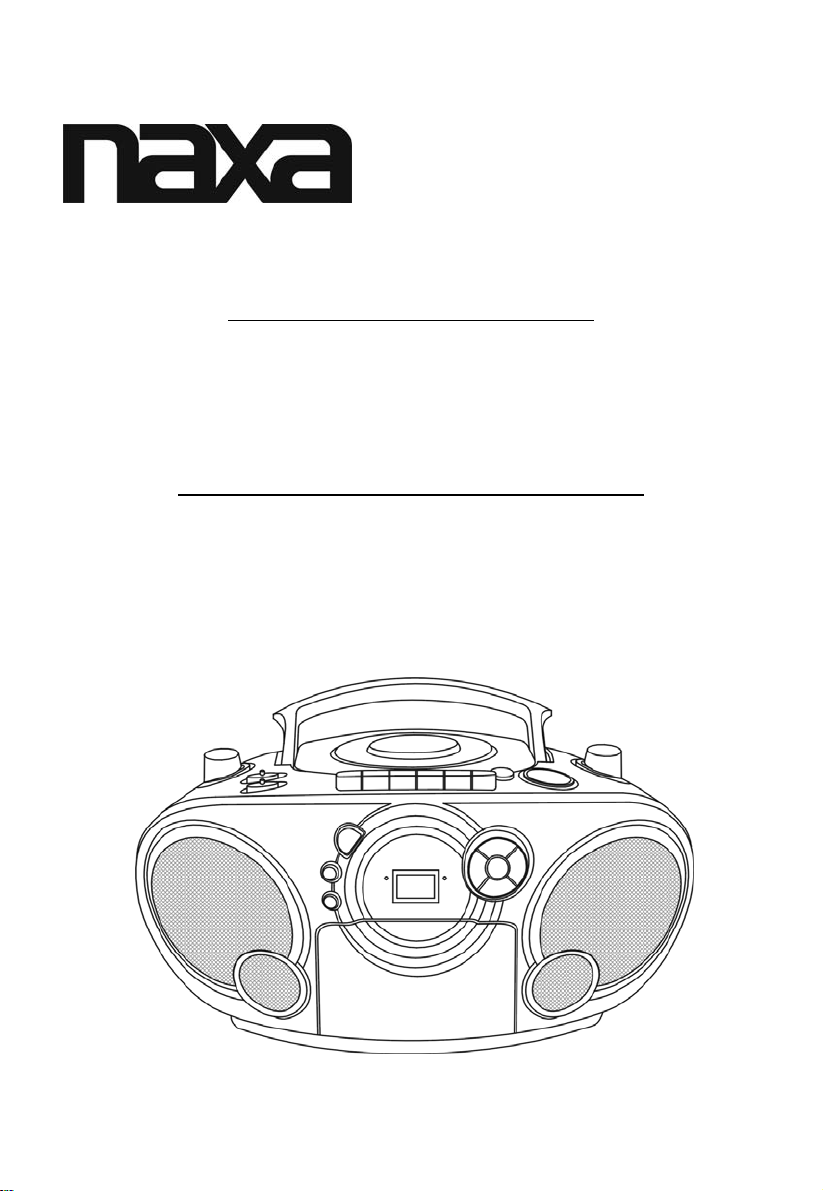
NX-207
INSTRUCTION MANUAL
PORTABLE CD PLAYER WITH STEREO RADIO
CASSETTE RECORDER
MANUAL DE INSTRUCCIONES
ESTERÉO CD PLAYER PORTÁTIL CON GRABADORA
DE CINTA Y RADIO
Page 2
1
Page 3
* ENGLISH *
IMPORTANT NOTES
INTRODUCTION
z Thank you for buying our product.
z Please read through these operating instructions, so you will know how to operate your equipment
properly. After you finished reading the instructions manual, put it away in a safe place for future
reference.
WARNING
To prevent fire or shock hazard, do not expose this appliance to rain or moisture. To avoid electrical shock, do not open
the cabinet; refer servicing to qualified personnel only.
CAUTION
Use of controls or adjustment or performance of procedures other than those specified herein may result in hazardous
radiation exposure.
DANGER
Invisible laser radiation when open and interlock failed or defeated. Avoid direct exposure to beam.
NOTE: The manufacturer is not responsible for any radio or TV interference caused by unauthorized
z Avoid installing the unit in locations described below:
z Operate turning controls and switches as instructed in manual.
z Before turning on the power for the first time, make sure that the power cord is properly installed.
z Store your tapes or CD in a cool area to avoid damage from heat.
CAUTION: TO REDUCE THE RISK OF ELECTRIC SHOCK, DO DOT REMOVE COVER (OR BACK).
WARNING: Remove batteries if exhausted or if they will not be used again for a long period.
The incorrect use of batteries can cause electrolyte leakage and will corrode the compartment or
Do not mix battery types, e.g. alkaline with zinc carbonate.
When inserting new batteries, replace all batteries at the same time.
modifications could void the user’s authority to operate the equipment.
1. Places exposed to direct sunlight or close to heat radiating appliance such as electric heaters, on
top of other stereo equipment that radiate too much heat.
2. Places locking ventilation or dusty places.
3. Places subject to constant vibration.
4. Humid or moist places.
NO USER SERVICEABLE PARTS INSIDE, REFER SERVICING TO QUALIFIED
SERVICE PERSONNEL.
cause the batteries to burst, therefore:
This Compact Disc player is classified as a Class 1 LASER PRODUCT.
THE CLASS 1 LASER PRODUCT label is located on the rear exterior.
2
Page 4

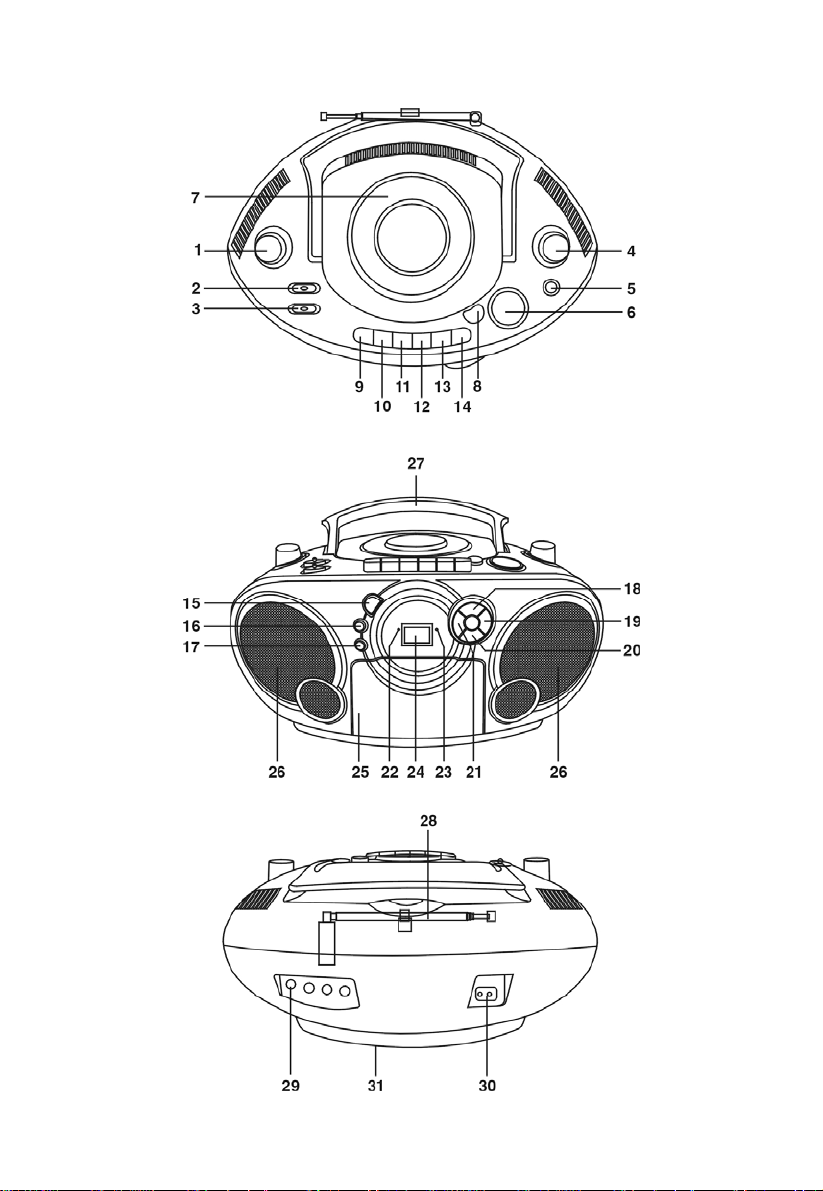
FEATURES AND CONTROLS
1. VOLUME KNOB
2. FUNCTION SWITCH
3. BAND SELECTOR
4. TUNING KNOB
5. BUILT-IN CONDENSER MICROPHONE
6. DIAL SCALE
7. CD COMPARTMENT
8. CD DOOR OPEN AREA
9. CASSETTE PAUSE BUTTON
10. CASSETTE STOP/EJECT BUTTON
11. CASSETTE FAST FORWARD BUTTON
12. CASSETTE REWIND BUTTON
13. CASSETTE PLAY BUTTON
14. CASSETTE RECORD BUTTON
15. CD PROGRAM BUTTON
16. CD REPEAT BUTTON
17. CD RANDOM BUTTON
18. CD PLAY/PAUSE BUTTON
19. CD SKIP/SEARCH FAST FORWARD
BUTTON
20. CD STOP BUTTON
21. CD SKIP/SEARCH BACKWARD BUTTON
22. POWER INDICATOR
23. FM STEREO INDICATOR
24. CD DISPLAY
25. CASSETTE DOOR
26. SPEAKERS
27. HANDLE
28. TELESCOPIC ANTENNA
29. AUX-IN JACK
30. AC SOCKE
31. BATTERY DOOR
POWER SUPPLY
1. BATTERY OPERATION
– REMOVE THE BATTERY COMPARTMENT DOOR.
– INSERT 8 PIECES UM-1 (D SIZE) BATTERIES INTO THE BATTERY COMPARTMENT WITH
BATTERY POLARITY POSITIONED AS INDICATED.
NOTE: WE RECOMMEND THE USE OF ALKALINE BATTERIES.
– CLOSE THE BATTERY COMPARTMENT DOOR.
2. AC OPERNATION
- THE AC POWER CORD IS LOCATED INSIDE THE BATTERY COMPARTMENT.
- PLUG THE AC LINE CORD INTO ANY NORMAL HOUSEHOLD AS MAINS OUTLET IN CORRECT
VOLTAGE AND THE MAINS SOCKET.
- THE BATTERIES WILL BE AUTOMATICALLY DISCONNECTED.
RADIO OPERATION
1. Connect the unit to the power source.
2. Slide the FUNCTION SWITCH to "RADIO" position.
3. Select desired wave band with the BAND SWITCH.
4. Tune to desired station by rotating the TUNING CONTROL.
5. Gently rotate this control back & forth until you get the strongest, clearest sound.
6. The built-in MW (AM) antenna and the FM antenna rod are directional. When receiving FM broadcast,
extend the FM TELESCOPIC ANTENNA in full length. The strongest reception can be achieved by
rotating the set for MW (AM) or Telescopic Antenna for FM.
NOTE: If you are receiving FM stereo broadcast, the FM STEREO INDICATOR will illuminate.
7. Adjust the VOLUME CONTROL to your listening preference.
8. To turn off the radio, slide the FUNCTION SWITCH to "TAPE" position.
3
Page 5

CASSETTE OPERATION
PLAYBACK OF CASSETTE
Be sure to tighten any slack tape in the cassette before use, using either a pencil or a ballpoint pen,
simply insert the pen or pencil into the center of spool and rotate to remove slacks. Depress the
STOP/EJECT button to open the cassette door.
Insert the cassette into the compartment with the open end facing upwards and the full reel on the left
hand side, push the cassette well down and close the door, be sure not to touch the tape surface, Set
the Function switch to “TAPE” position and press the cassette play button. To stop playback, press the
STOP/EJECT button once. To release the cassette, press the STOP/EJECT button again.
AUTO STOP
When the tape reaches the end during playback or recording, the built-in auto stop system will release
the depressed play, record keys. The auto stop system operates while recording from the built-in radio
or CD player, only the cassette function is brought automatically to stop mode and the radio or CD
player will continue to play.
TAPE RECORDING
A. Install a cassette tape.
B. Set FUNCTION SWITCH to “RADIO” position. After selecting the desired band and tune the TUNING
KNOB to desired broadcast station. Then push down RECORD BUTTON and PLAY BUTTON
simultaneously.
C. After recording the desired broadcast, depress the STOP/EJECT BUTTON lightly, and then set
FUNCTION SWITCH to “TAPE” position in order to listen to the recorded broadcast.
D. If you desire to play recorded broadcast, please follow the instructions explained in playback section.
ERASURE: When you record over previously recorded tape, the original recording is automatically
erased and replaced by these newly recording materials.
RECORDING FROM CD
1. Insert a blank cassette tape into the tape compartment.
2. Slide the FUNCTION switch to CD/AUX position.
3. Load a CD and select the desired track you want to record.
4. Press CD PLAY/PAUSE button to start playback. Press RECORD key to begin recording. RECORD
key and PLAY key go down simultaneously.
5. Press PAUSE key to interrupt or edit recording. Press it again to resume recording.
6. Press STOP/EJ. Key to end recording.
7. To hear what you recorded, follow instructions in PLAYING A CASSETTE TAPE.
Recording From built-in MIC
1. Set the Function Switch to "TAPE" normal position.
2. Insert a blank cassette tape into the tape deck.
3. Press the RECORD key and the PLAY key simultaneously. You can start the recording through the
built-in MIC.
4. To stop the recording manually, press the Stop/Eject Button.
TYPES OF CASSETTE
Use only good quality cassettes (IEC TYPE 1) for making recordings. May be used to replay other types
of cassette but is unable to make proper recording on these more specialized tapes.
The use of C120 cassettes is NOT recommended in this machine.
PROTECTING RECORDING
Normally, anything recorded on the tape is automatically erased when new recording is made. It is
possible to protect your recording from accidental erasure by removing the tabs found on the rear of the
cassette.
4
Page 6

When the cassette is held with the recorded side upper-most and exposed tape facing the front, the
protective tab will be found on the left rear of the cassette.
All pre-recorded cassette are protected in this way to prevent accidental erasure of the commercial
recording. “Protected” cassette will prevent the record button from being operated. If at any time you
attempt to record and find that this button will not depress, never force the mechanism or it may be
damaged. Check that a cassette has been loaded and that tab has not been removed. Recording on a
cassette from which the tabs have been removed can be done by covering the tab openings with a
piece of adhesive tape.
CARE OF CASSETTE MECHANISM
Gently clean the tape head and pinch wheel/capstan assemblies after every 10 hours of using the unit.
A range of cassette care products are available.
The erase head and record/play head and the surface of the pinch roller are delicate and must not be
touched with metal objects such as screwdrivers. You may find it easier to clean the assembly by
pressing the PLAY button to bright head and pinch roller into view. Be sure to press the STOP button
after cleaning the mechanism.
Damage to the pinch wheel can occur if the unit is left in PLAY mode with the power switch off. Under no
circumstances should you attempt to lubricate any part of the machine.
LISTENING TO COMPACT DISC (CD)
Set FUNCTION SWITCH to "CD/AUX" position. Open the CD door to put in a compact disc. Close it and
start reading. The LCD display always shows the tracks of a disc which are still to be played. Total
number of tracks of the disc are shown in stop mode.
Playing The Entire Disc
1. Press PLAY/PAUSE button to start playback. The playback starts from track 1, PLAY appears in the
display.
2. To interrupt playback, press PLAY/PAUSE button. PLAY flashes on and off in the display.
3. To resume playback, press PLAY/PAUSE button again, PLAY become steady on the display.
4. To stop playback, press STOP button, the total number of tracks appears in the display.
Selecting A Different Track During Play
1. Press CD SKIP/SEARCH FORWARD/BACKWARD button on the unit continuously until the desired
track number appears in the display.
2. Playback starts from the desired track. (Press CD PLAY/PAUSE button to start playback in stop
mode)
Starting Again With The Track That Is Currently Playing
1. Press CD SKIP/SEARCH BACKWARD button once.
2. The playback will start again from the beginning of the track.
Stopping Play
1. Press CD STOP button if you wish to stop play. The total track number which can be played will now
appear in the display.
2. Open the CD door on the unit to remove the CD.
5
Page 7

REPEAT PLAY
When playing, press REPEAT button once. "RPT" will be shown flashing on the display for playing the
same track only. If repeat all tracks, press the REPEAT button again, "RPT" will be shown on the display.
To cancel repeat play, press the REPEAT button until the "RPT" letter disappears.
PROGRAM PLAY
1. Press CD PROGRAM button to make program memory in stop mode.
2. "PRG" and the track number 01 will show flashing on the display.
3. Press CD SKIP/SEARCH FORWARD/BACKWARD button to select a track number. The track
number will show and the "PRG" will show flashing on the display.
4. Press the" PROG" button to store the track number. The "PRG" will show and the track number 02 will
show flashing on the display.
5. Repeat step (3) to (4) to program other desired tracks.
6. Press CD PROGRAM button once more and all the programmed track numbers will be shown one by
one.
7. Press CD PLAY/PAUSE button, playback will start from the first programmed track.
8. You can press CD SKIP/SEARCH FORWARD/BACKWARD button to select the track number in
memory.
9. In stop mode, press STOP button to cancel the program play.
To Erase the Memory (Program)
To clear the program, you may have two ways:
1. Press STOP button when the disc stopped, or
2. Open the CD compartment lid, program will be erased.
RANDOM PLAY
After pressing “PLAY” button, press “RANDOM” button to start playing the music randomly. To abandon
this function, press “STOP” button.
AUX-IN OPERATION
This unit has provided special AUX-IN jack, through this jack other audio sources can be connected to
this unit and be amplified.
1. Set the FUNCTION switch to CD/AUX position.
2. Connect the audio cable into the AUX-IN jack and the other end connect to the AUDIO OUT jack of
the external audio source. The unit will change to AUX-IN mode automatically.
3. Adjust the volume of the main unit to your desired level.
4. Press PLAY of the external audio source(eg.MP3 player)to start playback.
6
Page 8

COMPACT DISC MAINTENANCE
1. Always use a compact disc bearing the mark as shown.
2. Notes on handing discs
z Removing the disc from its storage case and loading it.
z Do not touch the reflective recorded surface.
z Do not stick paper or write anything on the surface.
z Do not bend the disc.
3. Storage
z Store the disc in its case.
z DO not expose discs to direct sunlight or high temperatures, high humidity or dusty places.
4. Cleaning a disc
z Should the disc become soiled, wipe off dust, dirt and fingerprints with a sort cloth.
z The disc should be cleaned from the center to the edge.
z Never use benzene, thinners, record cleaner fluid or anti-static spray.
z Be sure to close the CD door, so the lens is not contaminated by dust.
z Do not touch the lens.
7
FROM THE CENTRE TO THE EDGE
Page 9

SPECIFICATIONS
GENERAL
Power Requirement AC 120V ~ 60Hz
Power consumption AC 13 Watts
Weight Approx. 2.5kg
Dimensions Approx. 372mm (W) x 172mm (H) x 243mm (D)
Operation temperature +5° C - + 35 °C
REVEIVER SECTION
Receiving Bands AM / FM
Tuning Range AM 540 - 1600 KHz
COMPACT DISC SECTION
Optical Pickup 3-Beam Laser
Frequency Response 100Hz – 16 KHz
CASSETTE SECTION
Recording System 2 Tracks 2 channel (Stereo)
Biasing System DC bias
Frequency Response 125 – 6.3 KHz
Wow and Flutter 0.35 % WRMS (JIS)
AUDIO SECTION
Power output Maximum 1.8 - 2 Watts x 2
ACCESSORIES
Instruction Booklet 1
AC Cord 1
Caution
z To avoid electric shock, this unit must not be exposed to dripping water splash.
Ventilation warning - The normal ventilation of the product shall not be impeded for intended use.
DC 12V UM-1 x 8 PCS
FM 88 - 108 MHz
8
Page 10

* SPANISH *
NOTAS IMPORTANTES
INTRODUCCION
z Gracias por comprar este producto.
z Por favor lea detenidamente estas instrucciones de operación, así usted sabrá como operar
adecuadamente su equipo. Después de terminar de leer este manual de instrucciones, guarde este
en un lugar seguro para futuras referencias.
ADVERTENCIA
Para prevenir el peligro de fuego o de choque, no exponga esta aparato a la lluvia o a la humedad. Para
evitar el choque eléctrico, no abra el gabinete; refiera el mantenimiento al personal cualificado
solamente.
PRECAUCION
El uso de otros procedimientos para los controles o ajustes o acciones que no se especifican aquí
puede dar como resultado una exposición peligrosa de radiación.
PELIGRO
Una invisible exposición del láser se proyecta cuando se abre o el seguro falla o esta defectuoso. Evite
exponerse directamente al lente de emisión.
NOTA: El fabricante no se responsabiliza por ninguna interferencia de radio o TV causadas por una
modificación no autorizadas pueden anular la autoridad del usuario para operar el equipo.
z Evite instalar la unidad en lugares que se describen abajo:
1. Lugares que están expuestos a la luz directa del sol o cerca de aparatos térmicos que irradian
calor como calefactores eléctricos, en la parte superior de otros equipos estereofónicos que
irradian demasiado calor.
2. Lugares con ventilación cerrada o lugares sucios.
3. Lugares sujetos a una constante vibración.
4. Lugares húmedos o mojados.
z Opere los controles e interruptores como se instruyen en el manual.
z Antes de encender la potencia por primera vez, revise que el cordón de potencia esta
apropiadamente instalado.
z Guarde sus cintas o CD en un área fría para evitar danos por el calor.
PRECAUCION: PARA REDUCIR EL RIESGO DE UNA DESCARGA ELECTRICA, NO RETIRE LA
COBERTURA ( O LA PARTE DE TRASERA) NO EXISTEN EN EL INTERIOR PARTES QUE USTED
PUEDA REPARAR, BUSQUE SERVICIO DE PERSONAL CALIFICADO.
ADVERTENCIA: Remueva las baterías si gastadas o si el aparato no va a ser usado de nuevo por un
largo período de tiempo.
- El uso incorrecto de las baterías puede causar que se enmojezca y corrosión del compartimiento o
causar que las baterías exploten. Por lo tanto:
- No mezcle tipos de baterícas, por ejemplo alcalinas con carbonatadas con Zinc.
- Cuando introduzca nuevas baterías, reemplacelas todas al mismo tiempo.
9
Este reproductor de Discos compactos esta clasificado como
PRODUCTO LASER CLASE 1 La etiqueta.
PRODUCTO LASER CLASE 1 esta localizado en la parte de atrás
exterior.
Page 11

LOCALIZACION DE LOS CONTROLES
1. PERILLA DE VOLUMEN
2. PERILLA DE FUNCION (RADIO/CD/TAPE)
3. BOTÓN DE SELECCION DE BANDA
4. PERILLA DE SITONIZACION
5. MICRÓFONO ELECTROSTÁTICO
INCOPRORADO
6. CUADRANTE GRADUADO
7. PUERTA DEL CD
8. ÁREA DE ABERTURA DE LA PUERTA DEL CD
9. BOTÓN DE PAUSA DE CASSETE (PAUSE)
10. BOTÓN DE PARADA/EXPULSION DE
CASSETE (STOP/EJECT)
11. BOTÓN DE AVANCE RAPIDO CASSETE
(F.FWD)
12. REBOBINADO DE CASSETE (REW)
13. BOTÓN DE REPRODUCCIÓN DE CASSETE
(PLAY)
14. BOTÓN DE GRABACIÓN DE CASSETE (REC)
15. PROGRAMACIÓN DE CD
16. BOTÓN DE REPEAT CD
17. BOTÓN DE BÚSQUEDA ALEATORIA DE CD
18. BOTÓN DE REPRODUCCION/PAUSA DEL CD
19. SELECTOR HACIA ADELANTE DE PISTA DE
CD
20. BOTÓN DE PARADA DEL CD
21. SELECTOR HACIA ATRÁS DE PISTA DE CD
22. INDICADOR DE PODER
23. INDICADOR DE FM ESTÉREO
24. PANTALLA CD
25. PUERTA DE CASSETE
26. ALTAVOZ
27. ASA
28. ANTENA TELESCOPICA
29. TOMA AUX IN
30. SUMINISTRO DE ENERGIA VOLTAJE AC
31. PUERTA DE PILAS
FUENTE DE PODER
1. OPERACION DE BATERIAS
- REMUEVA EL COMPARTIMIENTO DE BATERIAS.
- INSERTE 8 BATERIAS TAMAÑO “ UM-1 ” ( D) EN EL COMPARTIMIENTO PARA ESTAS CON
LA POLARIDAD ASI COMO INDICADA. NOTA: NOSOTROS RECOMENDAMOS EL USAR
BATERIAS ALKALINAS.
- CIERRE LA PUERTA DEL COMPARTIMIENTO DE BATERIAS.
2. OPERACION ca
- EL CORDON DE PODER ca ESTA LOCALIZADO DENTRO DEL COMPARTIMIENTO DE
BATERIAS.
- CONECTE EL CORDON DE LA LINEA ca EN EL ENCHUFE PRINCIPAL ca EN EL VOLTAJE
CORRECTO Y LOS ENCHUFES PRINCIPALES.
- LAS BATERÍAS SE DESCONECTARÁN AUTOMÁTICAMENTE.
FUNCIONAMIENTO DE LA RADIO
1. Conectar el aparato a una fuente de alimentación energética.
2. Lievar el SELECTOR DE FUNCIONES a la posición “RADIO”.
3. Seleccionar la frecuencia deseada con el SELECTOR DE FRECUENCIAS.
4. Sintonizar la emisora deseada girando el BOTÓN SINTONIZADOR.
5. Girar este botón con suavidad hacia adelante y hacia atrás hasta que se escuche un sonido fuerte y
claro.
6. La antenna incorporada de MW (AM) o LW y la antenna de FM son direccionales. Al recibir una
emission en FM extender la ANTENA TELESCÓPICA completamente. La major recepción se obtiene
girando el aparato para MW(AM) o LW o girando la antenna telescópica para FM.
OBSERVACIÓN: Si se está recibiendo una emission em FM estéreo, el INDICADOR de FM
ESTÉREO se iluminará.
7. Ajustar el CONTROL DE VOLUMEN como se desee.
8. Para desconectar la radio deslizar el SELECTOR DE FUNCIONES hacia la posición “TAPE”.
10
Page 12

OPERACION DEL CASETE
REPRODUCCION DE CASETE
Asegurese de socar las cintas sueltas en el casete antes de usar. Puede utilizar un lápiz para hacerlo o
un lapicero introduciendolo en el orificio y dandole vuelta para remover lo flojo. Presione el boton de
PARAR/EXPULSAR para abrir la puerta del casete.
Introduzca el casete en el compartimiento con la cinta que tiene la abertura hacia abajo y con toda la
cinta depositada en el lado izquierdo, presione el casete y cierre la puerta. Asegurese de no tocar la
superficie del casete. Coloque el interruptor de función en la posición de “TAPE: CINTA” y presione el
boton de reproducción de casete. Para parar la reproducción presione una vez mas el boton
STOP/EJECT: PARAR/EXPULSION. Para sacar el casete presione el boton STOP/EJECT:
PARAR/EXPULSION nuevamente.
AUTO PARADA
Cuando la cinta alcanza el final durante la reproducción o grabación, el sistema de auto parado
automático soltará el boton presionado de reproducción, teclas de grabación. El sistema de parado
automático opera mientras grabando de la radio incorporada o del reproductor de CD, solamente la
función del casete es traida automaticamente para parar el modo y la radio o el reproductor de de CD
continuará reproducción.
GRABACIÓN DE CINTA
A. Instale una cinta de casete.
B. Seleccione el INTERRUPTOR DE FUNCION a la posición de “RADIO.” Después de seleccionar la
banda deseada, y de colocar el INTERRUPTOR SINTONIZADOR a la estación deseada. Luego
presione el BOTON DE GRABACION y el BOTON DE REPRODUCCION simultaneamente.
C. Después de grabar la estación deseada, presione el BOTON DE PARAR/EXPULSAR suavemente, y
luego coloque el INTERRUPTOR DE FUNCION a la posición de “TAPE: CINTA” para escuchar lo
grabado.
D. Si usted desea reproducir lo grabado, por favor siga las instrucciones explicadas en la sección de
reproducción.
BORRAR: Cuando usted graba sobre una cinta pregrabada, la grabación original es automaticamente
borrada y reemplazada por el nuevo material de grabación.
COMO GRABAR DESDE UN CD
1. Coloque una cinta en blanco en el equipo.
2. Mueva el SELECTOR DE FUNCION a la posición CD/AUX
3. Coloque un CD y seleccione la canción que desea grabar.
4. Presione el botón RECORD y el botón PLAY se accionará automáticamente, el CD también
empezará la reproducción automáticamente.
5. Presione el botón PAUSE para interrumpir o editar la grabación. Púlselo otra vez para continuar la
reproducción.
6. Presione el botón STOP/EJ. para finalizar la grabación.
7. Para escuchar lo que está grabando, siga las instrucciones de COMO REPRODUCIR UNA CINTA.
Grabación del MIC incrustado
1. Fije el interruptor de función a la posición normal de "CINTA".
2. nserte una cinta blanca de cassette en la cubierta de cinta.
3. Presione la llave GRABAR y la llave REPRODUCIR simultáneamente. Usted puede comenzar la
grabación con el MIC incrustado.
4. Para parar la grabación manualmente, presione el botón de Parar/Expulsar.
TIPOS DE CASETE
Solo use casetes de buena calidad (IEC Tipo 1) para hacer grabaciones. Este puede ser usado para
reproducir otros tipos de casate pero no es posible hacer grabaciones propias en estas cintas
especiales.
El uso de casetes C120 no es recomendado en esta máquina.
11
Page 13

PROTEGIENDO LA GRABACION
Normalmente, cualquier cosa grabada en el casete es automaticamente borrada cuando la nueva
grabación es hecha. Es posible el proteger su grabación a que se borre accidentalmente al remover la
pestaña encontrada en la parte de atras del casete.
LENGUETA DE BORRADO
Cuando el casete esta sostenido con el lado grabador arriba y la cinta expuesta mostrandose al frente,
la pestaña protectora ser encontrada a la izquierda del casete.
Todos los casetes pregrabados estan protegidos de esta manera para prevenir que se borre
accidentalmente de la grabación comercial. El casete “Protejido” prevenirá que el boton de grabación
sea operado. Si en algún momento usted intenta grabar y se encuentra con que el boton no se oprime,
nunca fuerce el mecanismo o puede ser dañado. Chequee que un casete haya sido puesto y que la
pestaña haya sido removida. Grabación de un casete del cual las pestañas hayan sido removidas
puede ser llevada a cabo al cubrir las aberturas de las pestañas con una pieza de cinta adhesiva.
CUIDADO DEL MECANISMO DEL CASETE
Suavemente limpie las cabezas de la cinta y los rieles/cabrestante después de 10 horas de operar su
unidad. Un rango de productos para cuidado del casete estan disponibles.
CABEZA DE GRABACION/REPRODUCCION
CABEZA DE BORRADO
CABRESTANTE
RODILLO DE PELLIZCO
La cabeza para borrar y la grabar/reproducir y la superficie del riel son delicadas y no deben de tocar
con objetos metálicos como desatornilladores. Usted puede encontrar mas fácil el limpiar el ensamblaje
al presionar el boton de PLAY: REPRODUCCION para traer la cabeza y los rieles a la vista. Asegurese
de presionar el boton de PARAR después de limpiar el mecanismo.
Daños a los rieles pueden ocurrir si la unidad es dejada en el modo de PLAY: REPRODUCCION con el
interruptor de poder apagado. Bajo ninguna circunstancia usted debe de tratar de lubricar alguna parte
de su aparato.
ESCUCHANDO UN DISCO COMPACTO (CD)
Colocar el SELECTOR DE FUNCIONES en la posicion “CD/AUX”. Introducir un CD en el aparato y
comenzar a escucharlo. El indicador LCD muestra las pista que quedan por escuchar. El total de pistas
del CD se puede ver en el modo stop.
Reproduciendo el Disco Entero
1. La reproduccion (playback) empezara al presionar el boton CD PLAY/PAUSE, aparece el indicator.
La reproduccion empieza con la primera pista. El display muestra el numero de pista corriente y su
tiepo transcurrido.
2. Para interruptir la reproducción, presione el boton de REPRODUCIR CD/PAUSA.
3. Para continuar con la reproducción, presione el boton de REPRODUCIR CD/PAUSA una vez.
4. Para parar la reproducción, presione el boton de PARAR CD.
Seleccionando una Pista Diferente Durante Reproducción
1. Presione el boton SALTAR CD HACIA ADELANTE/RETROCEDER en la unidad constantemente
hasta que el número de la pista deseada aparezca en el visualizador.
2. La reproducción de la pista deseada iniciará. (Apriete el botón de PLAY/PAUSA de CD para empezar
la repetición en modo de stop.)
12
Page 14

Repite otra vez cuando la pista de música se está poniendo.
1. Apriete el botón de SALTO/PISTA ATRÁS DE CD una vez.
2. La repetición va a iniciar desde el comienzo de la pista.
Parando la Reproducción
1. Presione el BOTON DE PARAR si usted desea parar la reproducción. El número total de pistas que
pueden ser tocadas aparecer· en el visualizador.
2. Abra la puerta del CD en la unidad para remover el CD.
REPETIR LA LECTURA
Cuando está leyendo, oprima una vez el botón de repetir. “PRT” se muestra destellando en la
demostración, lo cual quiere decir que solo repite la misma pista. Si quiere que repita todas las pistas,
vuelva a oprimir el botón y “RPT” se muestra en la demostración. Si quiere cancelar la repetición,
oprima el botón de REPETIR hasta que “RPT” desaparezca.
LECTUFRA PROGRAMADA
1. Oprima el botón de PROGRAMAR para hacer memoria programada en el modo de parada.
2. (En el visor parpadeará el mensaje “PRG”)
3. Presione el botón CD SKIP FORWARD/BACKWARD para seleccionar un número de pista. El
número de pista aparecerá en el visor.
4. Presione el botón “PROG” para que todos los número de pista
5. “Pr” parpadea nuevamente. Repita los pasos (3) o (4) para programar otras pistas deseadas.
6. Presione una vez más el botón “PROG” para que todos los números de pista programados
aparezcan uno por uno.
7. La reproducción comenzará desde la primera pista programada en cuanto se presione el botón CD
PLAY/PAUSE.
8. Presione el botón CD SKIP FORWARD/BACKWARD para seleccionar un número de pista
almacenado en la memoria.
9. Desde el modo de detención, presione el botón STOP para cancelar la reproducción del programa.
Para borrar la memoria (programa)
Para borrar el programa, tiene dos formas de hacerlo:
1. Pulse el botón STOP cuando el disco esté parado, o
2. Abra la compuerta del CD, se borrará el programa.
COMO TOCAR CANCIONES DE MODO ALEATORIO
Depués de pulsar el boton “PLAY”, pulsar el botón “RANDOM” para empezar a escuchar canciones de
modo aleatorio. Para salir de esta function, pulsar el botón “STOP”.
OERACÓN DEL CONECTOR AUX-IN
Esta unidad tiene incorporado un conector AUX-IN, a travé del cual otras fuentes de audio pueden ser
conectadas para ser amplificadas.
1. Ajuste el selector de función en posición CD/AUX.
2. Conecte el cable de audio en el conector AUX-IN y el otro extreme en la salida de audio de su
dispositivo externo, la unidad cambiará al modo de conector AUX-IN automáticamente.
3. Ajuste el volumen de la unidad principal al volumen deseado.
4. Presione PLAY en el dispositivo externo,(Ej, Reproductor MP3) para iniciar la reproducción.
13
Page 15

MANTENIMIENTO DE DISCO COMPACTO
1. Siempre use un disco compacto con la marca establecida.
2. Notas de como manejar discos:
z Remueva el disco de su compartimiento y coloquelo.
z No toque la superficie donde se ha grabado.
z No pegue papel o escriba en la superficie.
z No doble el disco.
3. Guardar
z Guarde el disco en su caja.
z No exponga su disco a la luz solar directa o a altas temperaturas, alta humedad o lugares
polvosos.
4. Limpiando un Disco
z El disco debe ser limpiado de polvo, tierra, o huellas con un paño suave.
z El disco debe ser limpiado del centro a la orilla.
z Nunca use Benzeno, zinner, fluidos limpiadores de discos, o aerosales anti estaticos.
z Asegurese de cerrar la puerta del CD, para que el lente no se contamine con polvo.
z No toque el lente.
DESDE EL CENTRO A LOS BORDES
CORRECTO
INCORRECTO
14
Page 16

ESPECIFICACIONES
GENERALES
Energia requerida ca 120V ~ 60Hz
DC 12V 8 Baterias tamaño UM-1
Potencia AC 13W
Peso Aproximadamente 2.5 Kg
Dimensiones Aprox.372mm(W) x 172mm(H) x 243mm (D)
Temperatura para Operacion +5℃ – + 35℃
SECCION RECIBIDORA
Bandas recibidoras AM/FM
Rango de Sintonia AM 540 – 1600 KHz
FM 88 – 108 MHz
SECCION DEL CD
Lector óptico 3 rayos laser
Respuesta de Frecuencia 100Hz – 16KHz
SECCION DE LA CASETERA
Sistema de grabación 2 Pistas 2 Canales (Esteréo)
Sistema Biasing Borrador Magnetico
Respuesta de Frecuencia 125 – 6.3 KHz
Wow & flutter 0.35% WRMS (JIS)
SECCION DE AUDIO
Salida de Energia(Aparato principal) Maximo 1.8 - 2 Watts x 2
ACCESORIOS
Manual de Instrucciones 1
Cordán AC 1
PRECAUCION
z Para evitar cortocircuitos y descargas electricas, esta unidad no debe ser expuesta al agua, lluvia o
sitios altamente humedos.
15
 Loading...