

Page 1
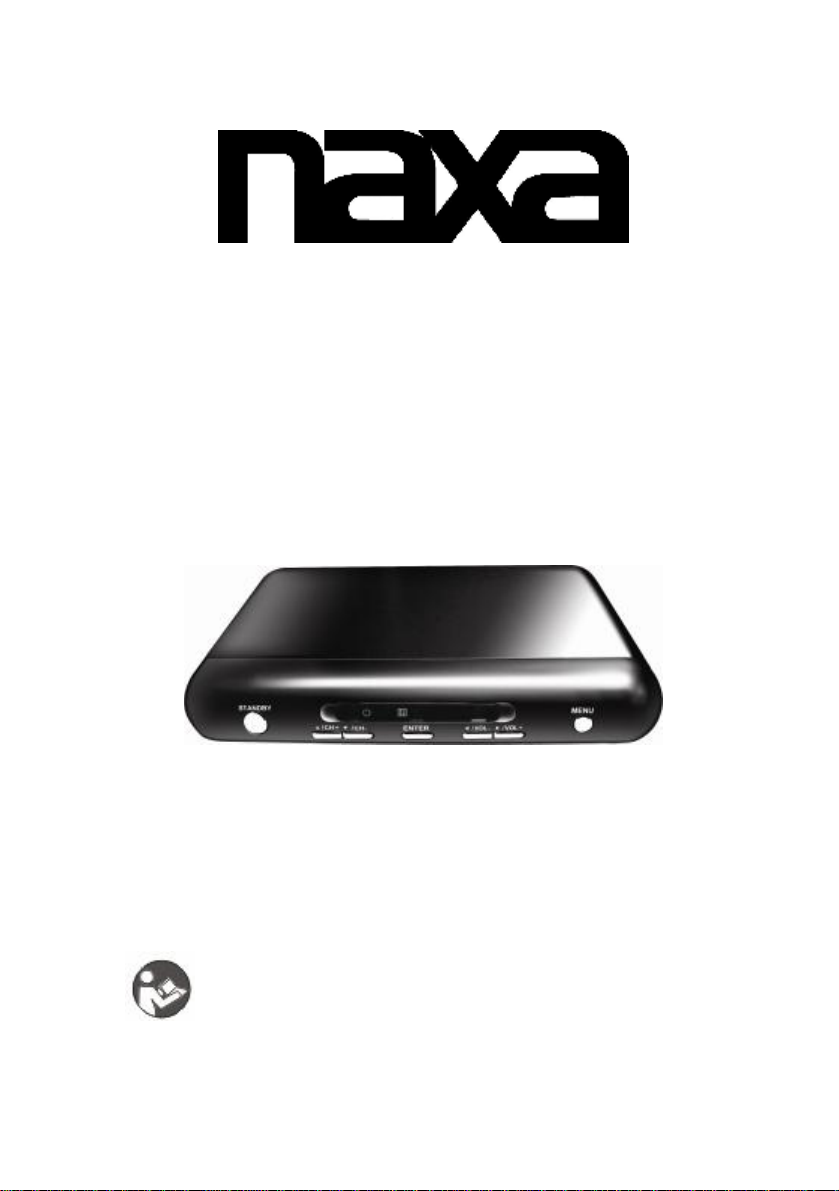
Digital Television Converter Box
MODEL NO.: NT-50
Instruction Manual
BEFORE USING THIS PRODUCT, READ, UNDERSTAND,
AND FOLLOW THESE INSTRUCTIONS.
Save this booklet for future reference.
Page 2
IMPORTANT INSTRUCTIONS
SAFETY INSTRUCTIONS
R I
CAUTION: TO REDUCE THE RISK OF ELECTRIC SHOCK.
DO NOT REMOVE COVER (OR BACK).
NO USER SERVICEABLE PARTS INSIDE.
USE THE RECOMMENDEDACCESSORIES ONLY.
REFER SERVICING TOQUALIFIED SERVICE PERSONNEL.
The graphic symbols on the back cover of the set mean the following:
The lighting flash with arrowhead symbol within an equilateral triangle is
intended to alert the user to the presence of uninsulated dangerous voltage.
Within the product's enclosure, there may be full of sufficient magnitude to
constitute a risk of electric shock to persons.
The exclamation point within an equilateral triangle is intended to alert the
user to the presence of important operating and maintenance (servicing)
instructions in the literature accompanying the appliance.
WARNING:
-TO AVOID THE RISK OF FIRE OR ELECTRIC SHOCK, DO NOT
EXPOSE THIS PLAYER RAIN OR MOISTURE. AND DO NOT CLOSE
TO FIRE, HEAT SOURCES.
-KEEP GOOD VENTILATION OF THE PRODUCT AND AC ADAPTER.
-DISCONNECT FROM POWER SOURCE DURING LIGHTNING
STORM, OUT FOR LONG TIME OR DOING KINDS OF
CONNECTIONS.
-HAVE THE PRODUCT UNPLUGGED FROM THE POWER SOURCE
BEFORE CLEANINGRE, LOCATING OR SERVICING.
1
Page 3

PRECAUTIONS
- TO PROLONGUSE TIME, PLEASE MAKE SURE THE INTERVAL OF
SWITCHING ON AND OFF IS NOT LESS THAN 5 SECONDS.
- PROTECT THE POWER CORD FROM BEING WALKED ON OR
PINCHED, PARTICULARLY AT PLUGS, CONVENIENCE RECEPTACLES,
AND THE POINT WHERE THEY EXIT THE PRODUCT.
USE OF POWER
- DO NOT CONNECT TO POWER OVER PRESCRIPTIVE VOLTAGE,
USE THE CORRECT VOLTAGE AND CURRENT MARKED ON THE
PRODUCT ELECTRICAL RATINGS LABEL. ELECTRIC POWER
OVERLOAD WILL CAUSE FIRE OR ELECTRIC SHOCK.
- DO NOT PULL CABLES, SHOULD HOLD PLUG WHEN USING.
POWER SOCKET.
- UNPLUG AC CABLE FROM POWER SOCKET IF NOT USE THE
UNIT FOR LONG TIME.
BATTERY USAGE AND HANDLING
- KEEP BATTERY AWAY FROM CHILDREN AND PETS.
- REMOVE THE BATTERY FROM THE REMOTE CONTROL WHEN
THE PRODUCT WILL NOT BE USED FOR AN EXTENDED PERIOD.
- NEVER THROW BATTERY INTO A FIRE. DO NOT EXPOSE
BATTERY TO FIRE OR OTHER HEAT SOURCES.
FEATURES
COMBINED VIDEO OUTPUT ( VIDEO )
STEREO AUDIO OUTPUT ( AUDIO-R / AUDIO-L OUTPUT )
EPG GUIDE TO DISPLAY INFORMATION ABOUT PROGRAM
MULTI-OSD LANGUAGES FUNCTION
AUTO TV SCANNING FUNCTION
SUPPORT FULL FUNCTION REMOTE CONTROL
SUPPORT STANDBY FUNCTION FOR LOW CONSUMPTION
2
Page 4
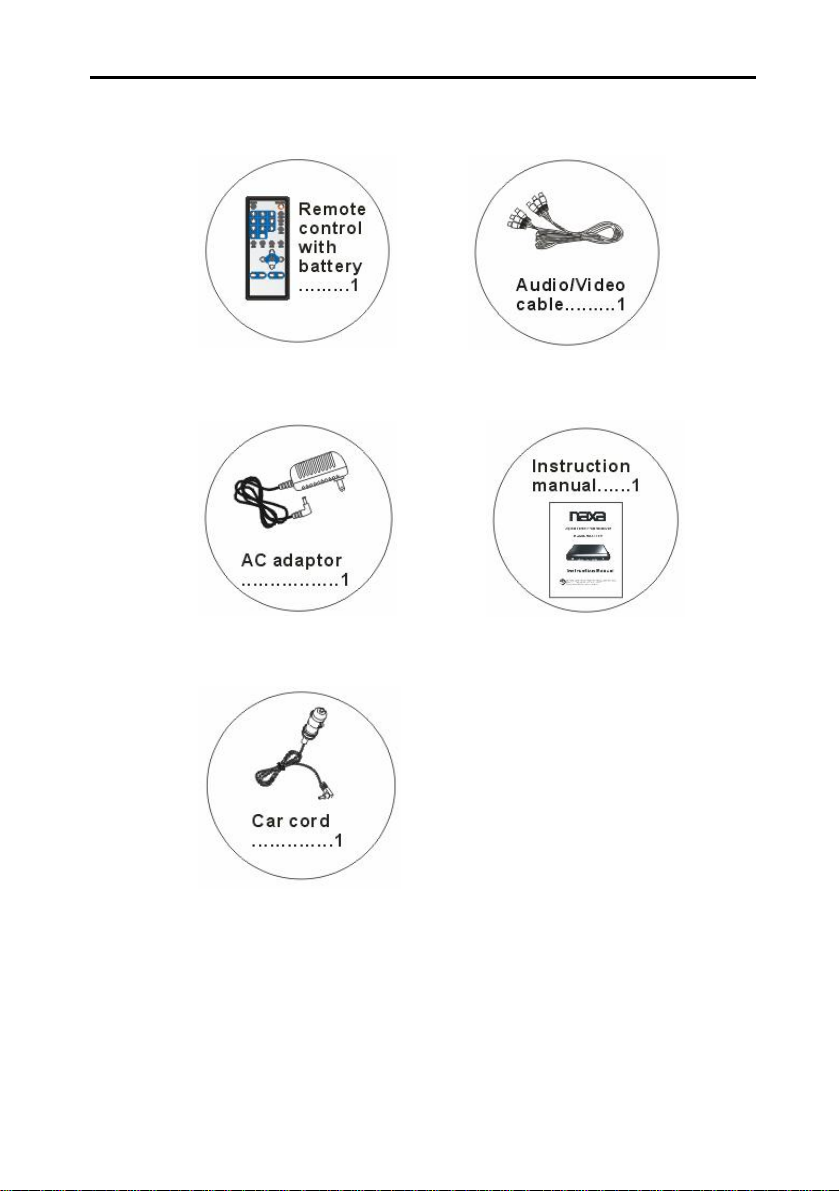
ACCESSORIES
3
Page 5

7
15
15
16
TABLE OF CONTENTS
GETTING STARTED:
IMPORTANT INSTRUCTION..........................................................
FEATURES......................................................................................
ACCESSORIES...............................................................................
GENERAL PARTS AND CONTROLS.............................................
MAIN UNIT........................................ .............................................
REMOTE CONTROL.......................................................................
BASIC CONNECTION.....................................................................
REMOTE CONTROL PREPARATION............................................
OPERATIONS:
BASIC OPERATIONS. ........................................ .......................... 9-10
MAIN MENU.................................................................................... 10-15
FOR REFERENCE:
SPECIFICATIONS...........................................................................
MAINTENANCE..............................................................................
GENERAL TROUBLESHOOTING..................................................
1-2
5-6
2
3
5
6
8
4
Page 6
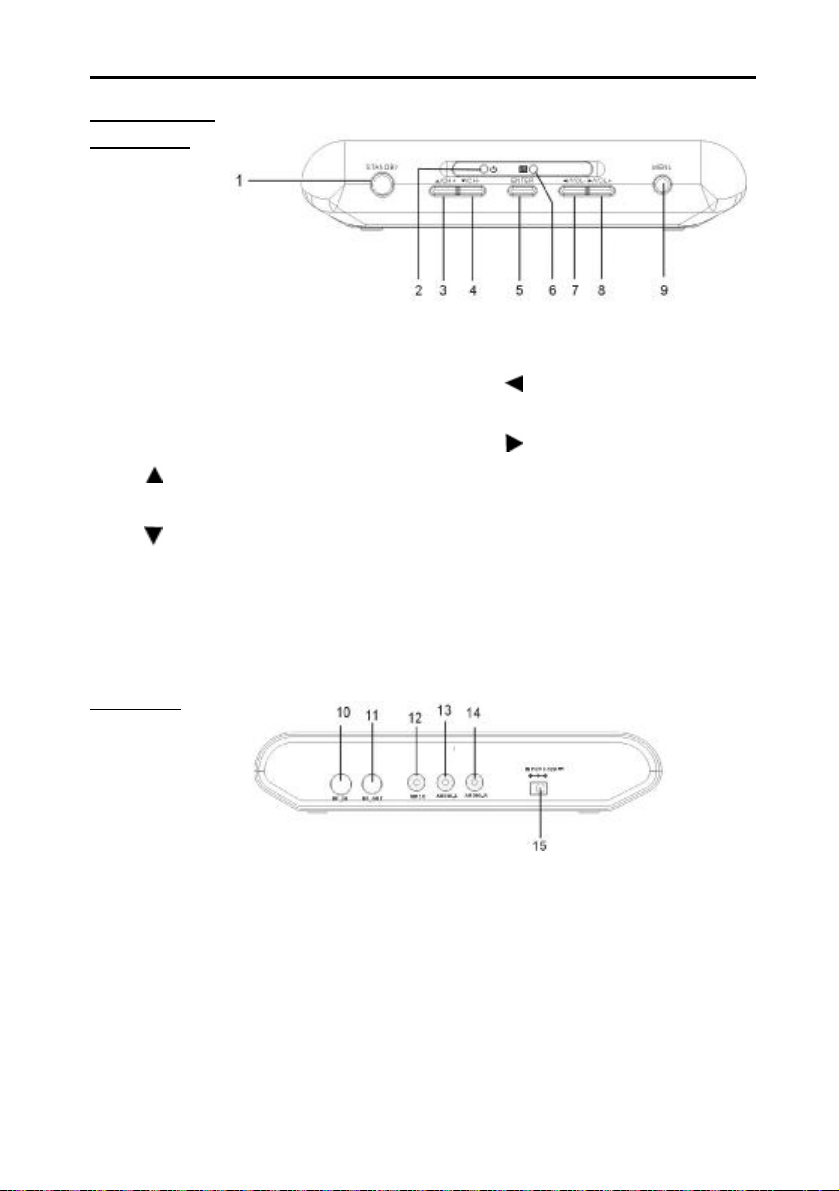
GENERAL PARTS AND CONTROLS
MAIN UNIT
FRONT VIEW
1. STANDBY button - To set the unit in
standby mode.
2. Standby indicator - To set the unit in
standby mode; press it again to switch it on.
3. CH+/ button - To select next
channel or move up.
4. CH-/ button - To select previous
channel or move down.
5. ENTER button - To confirm an
operation.
BACK VIEW
10. RF-IN: connect to the antenna.
11. RF-OUT: connect to the unit.
12. VIDEO: connect to the VIDEO in TV or monitor.
13. AUDIO-L: connect to the AUDIO-L in TV or monitor.
14. AUDIO-R: connect to the AUDIO-R in TV or monitor.
15. DC IN JACK: power input jack.
6. Remote control sensor
7. VOL-/ button - To decrease the
volume level or move left.
8. VOL+/ button - To increase the
volume level or move right.
9. MENU button - To enter menu setting
page.
5
Page 7

Remote control
1. MUTE button: To mute the sound.
2. NUMERRIC buttons: To input the
numeric information, such as channel
number and so on.
3. -/-- button: Two digital program button.
4. CC button: To set the caption mode.
5. EPG button: Display the program information
of current day or latter days.
6. VOL+ button: To increase volume level.
7. VOL- button: To decrease volume level.
8. STANDBY button: To set the TV in standby
mode; press it again to switch it on.
9. AUDIO button: To set the audio mode.
10. LIST button: To display all channels stored.
11. MENU button: To display the main menu.
Press it can also return to previous menu in
menu setup page.
12. INFO: To display current program
information, such as channel number,
soundtrack mode, subtitle language and so
on.
13. EXIT: To exit the menu page.
14. Navigation buttons: To move up, down,
left or right. ( when you input two numbers to
select channels, there will be three underlines
before the finger when one number was
input, and then you should press the right
button to put the underlines behind, then press
the other number. )
15. ENTER: To confirm a selection
or an operation.
16. CH-: To select previous
program.
17. CH+: To select next program.
6
Page 8

BASIC CONNECTION
l Ensure all the cables are disconnected from the main unit before connecting to AC
power source by AC power adaptor.
l Read through the instructions before connecting other equipment.
1.CONNECTING TO AC POWER SOURCE
2.CONNECT EXTERNAL ANTENNA TO UNIT
Install external antenna into antenna jack for best picture.
7
Page 9

REMOTE CONTROL PREPARATION
BATTERY INSTALLATION
Install the battery as the follow picture. Be sure negative and positive terminals are
positioned as indicated in the battery compartment. (Fig1 )
SERVICE LIFE OF BATTERY
-The battery normally last for about one year although this depends on how often, and
for how often the remote control is used.
-If the remote control fails to work even when it is operated near the player, replace the
battery.
- Use one size CR2025 battery.
Note:
l Do not use rechargeable (Ni-Cd) battery.
l Do not attempt to recharge, short-circuit, disassemble, heat or throw
the batteries into the fire.
l Do not drop, step on or otherwise impact the remote control. This may
damage the parts or lead to malfunction.
l If the remote control is not going to be used for a long time, remove
the battery.
REMOTE CONTROL OPERATION
1. Remove the protective plastic tab before
operating the remote control.
2. Point the remote control from no more than
about 6 m from the remote control sensor and
within about 60º of the front of the player (Fig 2).
NOTE:
-The operating distance may vary according to
the brightness of the room.
-Do not point bright lights at remote control
sensor.
-Do not place objects between the remote control and the remote control sensor.
-Do not use this remote control while simultaneously operating the remote control of any other
equipment.
8
Page 10

BASIC OPERATIONS
MAKE SURE ALL THE EQUIPMENTS AND AC ADAPTOR ARE CONNECTED PROPERLY
AND THE UNIT IS SET IN CORRECT MODE BEFORE KINDS OF OPERATIONS.
TURN ON THE UNIT
Press STANDBY button of the unit to turn on the unit (The power indicator will display green
color). Press it again to standby the unit (The power indicator will display red color) .
AUTO SEARCHING
Before normal watching you must search effective channels first.
-Press MENU button on remote control, the screen will display:
-Select AUTO SEARCH item, press right button to enter this item.
-Set the SOURCE TYPE what you want. Select START SEARCH item then press right to start
to search channels automatically. Wait for several minutes until searching finished, then the
first searched channel will play.
NOTE: You must do auto search again after different system selection according to your area.
SELECT WANTED PROGRAM
1. Press CH + button to enter next channel.
2. Press CH - button to enter previous channel.
3. Press numeric buttons on the remote control directly to select program what you want.
Example: Track 9, press "9" three seconds later, it will automatically switch to track 9,
or press ENTER button to confirm directly.
Track 12, press "1 " and "2", three seconds later, it will automatically switch to track12,
or press ENTER button to confirm directly.
NOTE: If one frequency dot has more than one channel, for example, you want select
<CH 14 NO.2>, press 1 and 4, then press right navigation button and input 2. Press ENTER
button to confirm. Once the input is done, it will start broadcasting the selected channel
immediately.
VOLUME CONTROL
1. Press the VOL+ or VOL- to adjust the level of currently volume.
2. The level of VOLUME can be adjust from 0-40.
MUTE CONTROL
Press the MUTE button to mute the sound, press it again to switch ON the sound.
NOTE: When the unit is in Mute mode, pressing VOL+ button will switch ON the sound and
turn it up, pressing VOL- button will switch ON the sound and turn it down.
9
Page 11

cc
It is used to set the caption mode.
-Keep pressing CC button to select different mode as desired.
-Option: On/Off
INFO (INFORMATION)
It is used to display current program information.
-Press INFO button, the screen will display as below:
EPG (Electronic program guide)
When viewing a digital channel, press the EPG button to access
the program guide supplied by the signal provider (not available
in all areas).
Press the LEFT/RIGHT button to access previous/next page in
program scheduler.
MAIN MENU
Common procedure for initial settings
1. Press MENU button.
2. Use the UP or DOWN button to select preferred page, then press RIGHT button to enter.
Each page for setting the value will display. Then move the up or down button to select item
and use left or right button to set.
3. Press MENU button again to return to previous menu setting page.
Press MENU button to enter TV MAIN MENU page as follows:
10
Page 12

1. AUTO SEARCH
1.1 SOURCE TYPE - It is used to set the source type.
-Press up or down button to select it and then press left or right button to set.
-Options: Antenna/Cable.
1.2 START SEARCH - Before normal watching you must search effective channel first.
-Press up or down button to select it and press RIGHT button to get in scanning setup page.
-Press RIGHT navigation button to cancel the auto scan.
1.3 SNR - This option is not user adjustable.
2. CH SETUP
2.1 CHANNEL
-Press up or down button to select it and then press left or right button to change the channel
number.
2.2 SKIP
-Press up or down button to select skip item, then press left or right button to select on or off.
ON: If SKIP is ON, channel number what you select will be skipped when selecting channel
using the CH- or CH+ button.
OFF: If SKIP OFF, all the channel numbers (the channels are stored in the unit) can be
accessed using CH- or CH+ button.
Skip/unskip a channel:
1. Press up/down button to select CHANNEL item, then press left/right button to select the
channel backward/forward you want to skip.
2. Press up/down button to select the SKIP item in channel setup menu and press left/right
button to skip current channel or not.
2.3 FAVORITE LIST
-Press up or down button to select this item, then press right button to get in the favorite list
page.
-You can set maximum five favorite channels. Press up or down button to select item then
press left/right button to set the channel is your favorite channel or not.
11
Page 13

3. CC SETUP
3.1 CC DISPLAY
-Press up or down button to select it and press left or right button to set the cc display ON or
OFF.
3.2 608CC TYPE
-Press up or down button to select this item, and press left or right button to change the cc
type .
-Option:C1/C2/C3/C4/T1/T2/T3/T4
3.3 708 CC TYPE
-Press up or down button to select this item, and press left or right button to change the cc
type.
-Option:Service1/Service2/Service3/Service4/Service5/Service6
3.4 CC MODE
-Press up or down button to select this item, and press left or right button to change the cc
mode.
-Option: Broadcast/Customer
-If you select CUSTOMER, There will appear CC CUSTOMER item, select this item and
press right button to enter, you can set what you want to, such as font, color, etc.
CC size - Press left/right button to switch the option list between small, large or standard.
CC font - To choose the CC font between Font 0 to 7.
CC opacity - To change the CC opacity, it consists of solid mode, flashing mode, trnsl mode,
trnsp mode.
CC color - To switch the CC color between blue, yellow, magenta, cyan, black, white, red,
green.
Edge color - To change the edge color of the screen to gray, red, green, blue, yellow, navy,
dark gray or black.
Edge type - To change the edge type between raised, depressed, outline, L. Shadow, R.
Shadow or None.
BK color - Select the BK color between red, green, blue, yellow, navy, dark gray, black, gray.
BK opacity - To select the opacity between solid and trnsl.
4. EAS SETUP
-This system can display EAS (Emergency Alert System) message broadcast pursuant to
47CFR11.117 of the FCC Rules.
-Press up or down button to select this item, and press right button to enter.
-Option: always, skip low priority and skip low/medium priority
-Press up or down button to select what you desire and press OK/ENTER button to confirm,
then there will be a √ icon in the frame. Press OK/ENTER button again, the icon will
disappear.
12
Page 14

5. PROGRAM CONTROL
-Press up or down button to select this item.
-Press ENTER button to enter the PROGRAM CONTROL menu, then the screen will display
the following picture.
- There need input password "0000" in order for the child not to change any settings.
- If password is invalid, input numbers are cleared and you could input password again; when
password is valid, enter the menu automatically.
- Then press up/down button to choose the item you want to set. And press left/right button to
switch items on or off.
RRT Setting
- Press RESET is for resetting RRT information
Movie Ratings
- After enter the PROGRAM CONTROL, press UP/DOWN key to enter the Movie Ratings
sub-menu and select the rating you want by pressing UP/DOWN button.
- Press LEFT/RIGHT button to switch the check box between view and block and the default
mode is View.
Note: Blocking a rating affects all the higher ratings, so that blocking R in the example above
automatically blocks NC-17 and X, whatever previous state of these ratings was. If a password
is defined while a TV program warning is received for the current channel, sound is muted and
the following menu is displayed on the centre of screen; what's more, the rating information
should be consistent with current active program rating.
USA TV Ratings:
-Enter USA TV Content Ratings sub-menu and then press UP/DOWN button to select previous
item or next item.
Note: Blocking a rating affects all the higher ratings, so that blocking PG in the example above
automatically blocks 14+ and MA, whatever previous state of these ratings was. If a password
is defined while a TV program warning is received for the current channel, sound is muted and
the following menu is displayed on the centre of screen, what is more, the rating information
should be consistent with current active program rating.
Canada English:
- Press left/right button to switch the check box between view and block.
- Press up/down button to select previous item or next item.
Note: Blocking a rating affects all the higher ratings, so that blocking PG in the example above
automatically blocks 14+ and 18+, whatever previous state of these ratings was. If a password
is defined while a TV program warning is received for the current channel, sound is muted and
the following menu is displayed on the centre of screen, what is more, the rating information
should be consistent with current active program rating.
Block Enable Unrated
- Press the LEFT/RIGHT button to switch between OFF and ON. If you want to set the
following items, you must switch these two buttons on.
13
Page 15

Canada French:
G-18ans+:
- Press left/right button to switch the check box between view and block.
- Press up/down button: select previous item or next item.
Note: Blocking a rating affects all the higher ratings, so that blocking 13 ans+ in the example
above automatically blocks 16 ans+ and 18 ans+, whatever previous state of these ratings
was. If a password is defined while a TV program warning is received for the current channel,
sound is muted and the following menu is displayed on the centre of screen, what is more,
the rating information should be consistent with current active program rating.
Set password:
- At first, you should input your new password.
- And then input the password again in order to check your new password.
Notes: Return to upper menu when user press EXIT or MENU key.
6. SYSTEM SETUP
6.1 FACTORY RESET
-It is used to reset to factory settings.
-Press up/down button to select this item, then press right button to enter.
6.2 TIME SETUP
6.2.1 Clock
-The Clock displays the current time from programs.(this option is not user adjustable)
6.2.2 Time Zone
-To set the time zone: Eastern, Samoa, Hawaii, Alaska, Pacific, Mountain, Central, Atlantic
and Newfoundland.
6.2.3 Daylight Saving
-It is used to set daylight saving time.
-Press up/down button to select it, then press left/right to set it ON/OFF.
6.3 OSD LANGUAGE
-Press up/down button to select this item, then press left/right button to change the OSD
language.
-Option: English or other languages. It depends on the software.
6.4 AUDIO LANGUAGE
-It is used to set the audio language.
-Press up/down button to select it, then press left/right button to select the language as
desired.
6.5 SCREEN
-It is used to select screen display mode.
-Press up/down button to select this item, and press left/right button to change the mode.
-Option:4:3/16:9
6.6 FORMAT
-It is used to select the format mode.
-Option: Normal
14
Page 16

Specification
s
1. Input Resistance : 75Ω
2. Power Consumption: ≤9.6W
3. Standby Power Consumption: ≤0.5W
4. Power Source: AC adaptor or car adaptor(normal: DC 12V 0.8A)
5. Measurement: 205(L)X130(W)X40(D)mm
6. Weight: Approx.500g
7. Connection terminals:
1. Antenna Jack
2. AV Jack
3. External Power Source Input Jack
Specifications are subject to change without notice.
MAINTENANCE
Be sure to press STANDBY to set the player to the standby mode and disconnect
the AC adaptor before maintaining the player.
Wipe the player with a dry, soft cloth.
If the surfaces are extremely dirty ,wipe clean with a cloth which has been
dipped in a weak soap-and-water solution and wrung out thoroughly, and then
wipe again with a dry cloth.
Never use alcohol, benzine, thinner, cleaning fluid or other chemicals. And do
not use compressed air to remove dust
15
Page 17

GENERAL TROUBLESHOOTING
Check the following points before assuming malfunctions of the TV set:
Phenomenon Reasons
No picture & sound Improper connection of AC adaptor.
No picture
No sound
Poor reception TV antenna is not properly adjusted or TV channel is not right.
Dark or blurred
picture
Unclear or unstable
picture
Picture moves up &
down, blurs or folds
over
Interfered snow
picture
No color Color or color system is not set properly.
TV reception channel is not right and try to reset the unit. Or relocate the
TV antenna to the place where reception is better.
Volume is too low; Mute function is switched on. Or the signal is too
weak.
The bright & contrast is too low.
TV antenna is not properly adjusted or in too weak signal reception
area.
TV antenna is not rightly adjusted. The signal reception is too weak or
caused by signal reflection from the buildings nearby or mountains.
The signal is interfered by cars engine, railway, high tension wires, neon
signs or radio frequency.
16
 Loading...