

Page 1
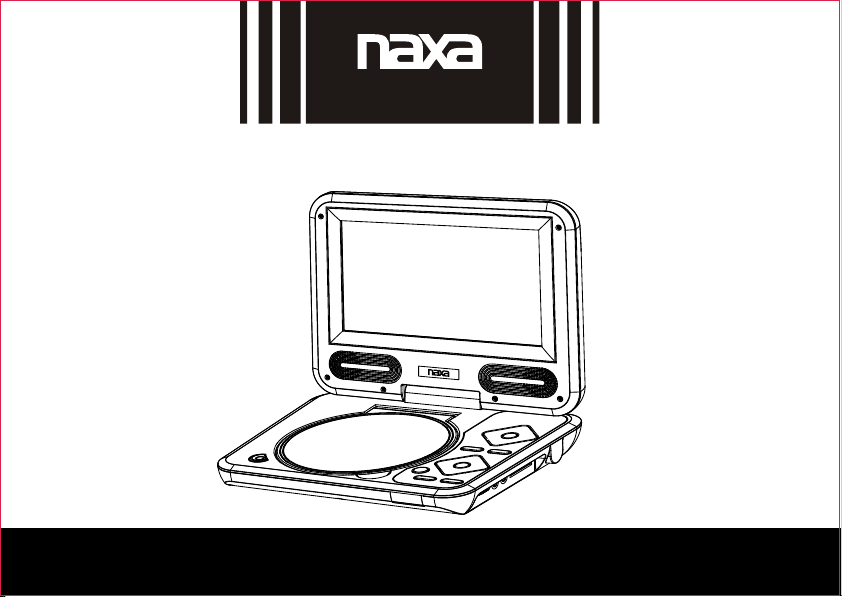
NPD-702
INSTRUCTION MANUAL
7” PORTABLE DVD PLAYER WITH USB/SD/MMC INPUTS
Page 2
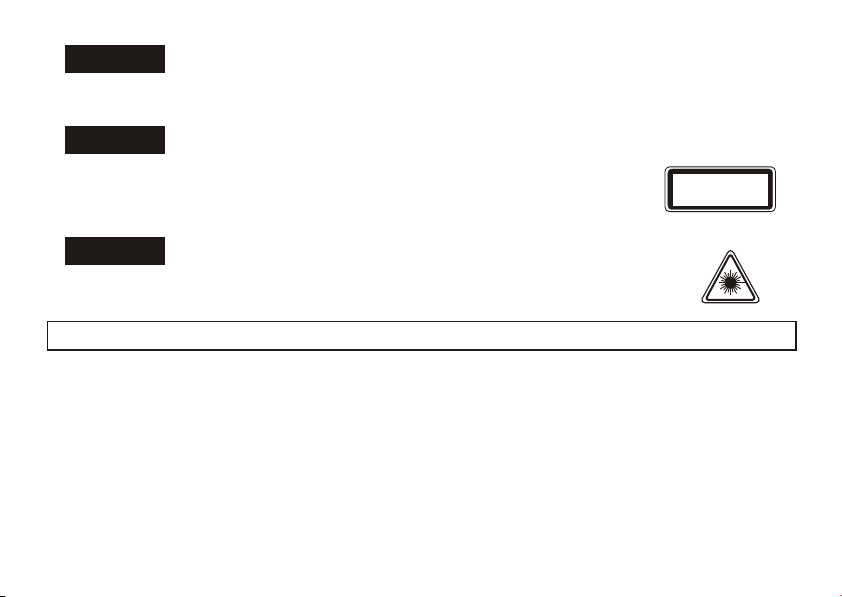
WARNING
TO REDUCE THE RISK OF FIRE OR ELECTRIC SHOCK, DO NOT EXPOSE
THIS APPLIANCE TO RAIN OR MOISTURE.
CAUTION
Use of controls or adjustments or performance of procedures
other thanthose specified herein may result in hazardous
radiation exposure.
This Compact Disc player is classified as CLASS 1 LASER product.
CLASS 1 LASER PRODUCT
KLASSE 1 LASER PRODUKT
LUOKAN 1 LASER LAITE
KLASS 1 LASER APPARAT
CAUTION!
Invisible laser radiation when open and interlocks defeated. Avoid
exposure to beam.
FOR SAFE AND EFFICIENT OPERATION
- Do not damage the mains lead.
When not in use, disconnect the mains lead from the outlet. Grasp the plug, not the mains lead,
when disconnecting the unit.
- If water should enter the unit, electrical shock or a malfunction may result. Use in an area where
there is low humidity and little dust.
- Do not disassemble or alter the unit in any way.
- Do not use the unit in areas where extremes in temperature occur (below 5 C o r e xceeding
。
35 C), or where it may be exposed to direct sunlight.
- Because of the CD player's extremely low noise and wide dynamic range, there is a tendency
to turn the volume on the amplifier higher than necessary. Doing so may produce an
GB -1
。
Page 3
excessively high output from the amplifier which can cause damage to your speakers. Please
be careful in this regard.
- Sudden changes in the surrounding temperature can cause dew to form on the optical
pickup lens inside the unit. Under this condition the unit may be unable to operate properly.
If this should occur, remove the disc and allow the player to adjust to the surrounding
temperature.
- This unit must be operated in a horizontal position.
- Please use the original DVD or VCD or CD or MP3 software, and any copy discs are not
recommendable for use.
- The ventilation should not be impeded by covering the ventilation openings with items,
such as newspapers, table-cloths, curtains, etc;
- No naked flame sources, such as lighted candles, should be placed on the apparatus;
- It shall not be exposed to dripping or splashing and that no objects filled with liquids,
such as vases, shall be placed on the apparatus;
- Do not place the product in closed bookcases or racks without proper ventilation.
- Where the mains plug or an appliance coupler is used as the disconnect device,
the disconnect device shall remain readily operable.
- Batteries (battery pack or batteries installed) shall not be exposed to excessive heat such
as sunshine, fire or the like.
- Excessive sound pressure from earphones and headphones can cause hearing loss.
GB -2
Page 4

POWER SUPPLY
There are two ways to supply power : AC p ow er s up pl y an d Li th iu m ba tt er y po we r su pp ly.
AC power operation
Connect one end of the mains lead to the DC ~I N so ck et a nd t he o th er e nd t o an A C ou tl et ,
and set the POWER ON/POWER OFF sel ec t sw it ch t o PO WE R ON .
Lithium battery power supply
When the lithium battery be full charg ed , pu sh t he P OW ER O N/ PO WE R OF F se le ct s wi tc h to
POWER ON, the unit will start work .
Once you connect the unit to the AC outlet, the li th iu m ba tt er y wi ll b e ch ar ge d. T he i nd ic at or
light has been flashing duri ng c ha rg e pe ri od .
GB -3
Page 5
1
24
25
2
3
4
5
19
20
21
22
23
6
7
8
9
10
11
12
13
14 15 16
GB -4
18
17
Page 6

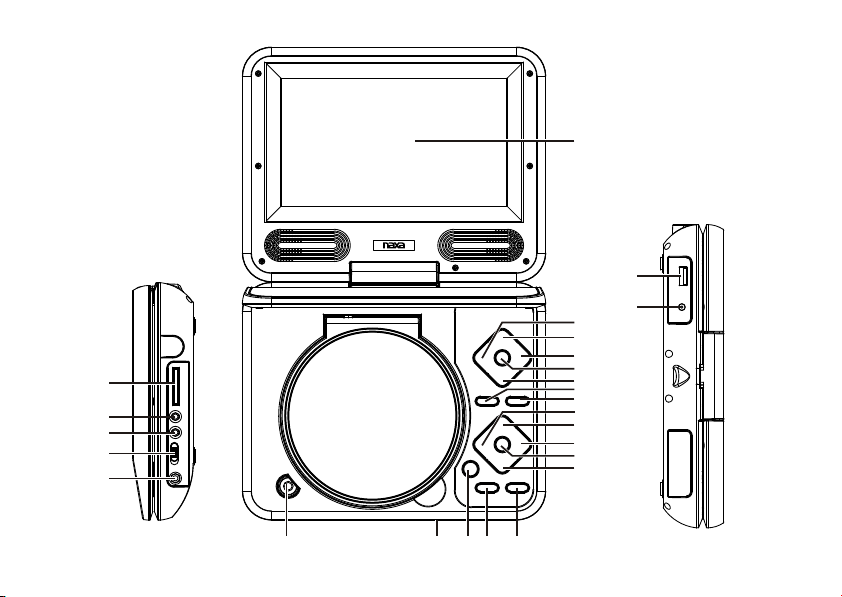
THE FUNCTION PARTS OF THE UNIT
1. TFT s cr ee n
2. Left button
In the menu interface , press the key to mov e
left the option, then press"OK " ke y to e nt er t he
current location.
3. Upward/ Previous song butto n:
In the menu interface , press the key to mov e
up the option, then press"OK" ke y to e nt er t he
current location.
In the CD/VCD/DVD play interface, press the
key to enter previous song
4. Right button
In the menu interface, press the key to mo ve
left the option, then press"OK " ke y to e nt er t he
current location.
5. OK button
6. Downward/ Next button
In the menu interface , press the key to mov e
down the option, then press"OK " ke y to e nt er
the current location.
In the CD/VCD/DVD play interface, press the
key to enter next song.
7. Setup button: Enter DVD setup menu.
8. Menu button:
In CD/VCD play mode ,open or close PBC .
In DVD play mode, enter song play menu.
9. Vo lu me - bu tt on
10. USB/SD card button
11. Vol um e+ b ut to n
12. Repeat button
13. Audio button
14. CD/VCD/DVD Compartment Lid
open button
15. indicator light:
In work state, indicator light d is pl ay g re en ,
in standby state, indicato r li gh t di sp la y re d.
16. Mode button:
Enter display setup menu to set Br ig ht ne ss ,
Contrast, Colar, FLI P, MODE, R es et .
17. Stop button
18. Pause/play button
19. SD/MMC card socket
20. AV OUT socket
21. COAXIAL socket
22. POWER ON/POWER OFF select sw it ch
23. Phone socket
24. USB socket
25. DC~IN socket
GB -5
Page 7
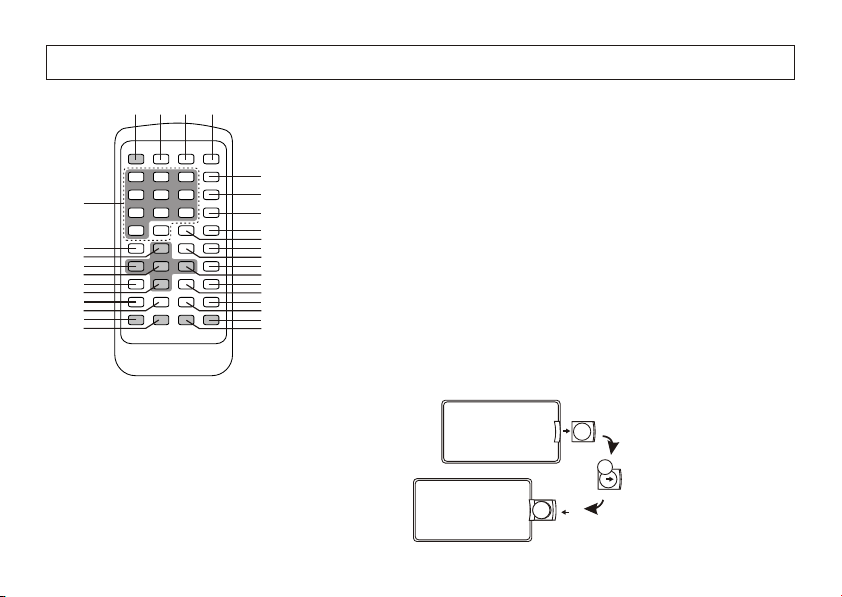
REMOTE CONTROL
4
231
1. STAN DBY button
2. USB/CARD button
3. DISPLAY button
4. MUTE button
6
5
11
13
15
17
19
21
23
25
27
29
7
8
9
10
12
14
16
18
20
22
24
26
28
30
5. Number button
6. REPEAT b ut to n
7. A-B button
8. GOTO button
9. STOP button
10. TITLE button
11.SETUP button
12. VOL+ button
13. Upward button
14. ZOOM button
15. LEFT b ut to n
CAUTION
1.W hen usi ng the re mot e contr oller , mak e sure th e
rem ote con troll er di rectl y to the re mot e sink of t he
uni t ,and av oid ope rat ing in th e 45°c an d 5m ra nge
hav ing no an y bar.
2.W hen the r emote c ont rolle r doesn 't us e ,chan ge
the b atter y as righ t pic ture.
3.I f the bat tery is n't u sed for a l ong tim e ,ta ke out it .
16. VOL- button
17. OK button
18. RIGHT button
19. AUDIO button
20. PLAY/PAUS E bu tt on
21. Downward button
22. SUBTITLE button
23. Fast Recede button
24. Next song button
25. Fast forward button
26. Previous song Button
27. LCD- MO DE b ut to n
28. MENU/PBC b ut to n
29. N/P button
30. PROG button
+
GB -6
Page 8

INSTRUCTION TO KEYSTROKES OF REMOTE CONTROLLER
1. Standby button: switch on/off t he u ni t.
2. USB/CARD button: when insetr US B or
CARD, p re ss t hi s bu tt on t o pl ay song in the
USB or CARD.
3. Display button: display the i nf or ma ti on o f
current song.
4. Mute: mute control
5. Repeat button:
Each press the REPEAT b ut to n wi ll
change the repeat mode. During MP4 /V CD /
CD playback, there are three modes : Re pe at
single ,Repeat all and off. During DVD
playback, there are four modes : Re pe at
chapter, Rep ea t Titl e, R ep ea t al l an d of f.
Note: During VCD playback, the PCB m od e
must be set to off.
6. A-B button:
Repeat play between A-B point fo r al l di sc s.
1) Press "A-B" button once at the poin t wh er e
repeat play is started. (“Rep A- ” ap pe ar s on
the TF T sc re en .)
2) Press "A-B" button again at the p oi nt w he re
repeat play is stopped. ("Re p A- B" a pp ea rs o n
the TF T sc re en )
3) To cancel, press "A-B" button again.
7. GOTO button:
Press this button enter into searc h in te rf ac e,
such as:
Search
Title 16
Chapter 1
Time 00:00:03
Press upward/downward bu tt on t o mo ve
high light bar to select item you desi re d, t he n
press left or right button to set th e va lu e, o r
press number buttons to set the valu e.
8. Title button: press this button to display
disc's played title.
9. Stop button: stop play.
10. Setup button: enter into the DVD setup
interface.
11. Upward/Downward button : pr es s th e ke y
to move up/down the option, then pre ss " OK "
button to enter the current location .
12. Left/Right button: press the k ey t o mo ve
left/right the option, then pr es s "O K" b ut to n
to enter the current location.
GB -7
Page 9
13. OK button: press to enter an item in the
menu or to confirm and execute a selecti on .
14. Zoom button: repeat this butto n in t ur n to
Q1,Q2,Q3, Q4, off.
15. Vol -/ +: t ur n do wn /u p th e vo lu me .
16. Audio button: enter into Audio s et up
menu, repeat press this button to se le ct l ef t,
right and stereo audio.
17. Subtitle button: The button's fu nc ti on i s
switch subject title in DVD disc play mode.
( One DVD disc has over 32 kind of language ).
18. Play/Pause button: Switch between Play
and Pause.
19. Fast backward search button
20. Fast forward search button
21. Pre-view SKIP button
22. Next-view SKIP button
23. LCD- MO DE b ut to n: E nt er d isplay setup
menu to set Brightness,Cintras t, Co lo r,Flip,
Mode,Reset.
24. N/P button: switch between PAL mode
and NTSC mode.
25. PROG button: press PROG button , en te r
desired track in sequence by set ti ng t he
program play.
Press this button enter into progr am p la y
interface, such as:
When playing DVD:
Program
......
1 ......
...... ......
2
...... ......
3
Play
Clear program
When playing VCD:
Program
1 ......
2
......
3
......
Play
Clear program
Press upward/downward/le ft /r ig ht b ut to n to
move high light to design poin t, t he n pr es s
number button to set title and chapt er w hi ch
you desired. Move the high light t o “p la y”
after finishing the setup of the p ro gr am p la y,
then press OK button, the unit will pl ay t he
DVD DISC in sequence according to the
program sequence you just do. If y ou w an t to
cancel the program play, move the high light
to “Clear program”, then press O K bu tt on .
Tip: When play DVD disc, you must input
title and chapter, and w he n pl ay V CD, you
just only input chaper.
26. Menu:
In CD/VCD play mode ,open or close PBC .
In DVD play mode, enter song play menu.
GB -8
Page 10
GENERAL OPERATION
1. Connect one end of the mains lead to the
DC ~IN socket and the other end to an AC
outlet, the indicator light wi ll d is pl ay r ed .
2. Press the CD/VCD/DVD Compartment Lid
open button to open the Compartment Li d,
put the DISC in.
3. Set the POWER ON/POWER OFF select
switch to POWER ON, the indicato r li gh t wi ll
DVD PLAYING OPERATION
display green, and the unit will a ut om at ic al ly
play the DISC.
4. Press the Play/Pause button to pause the
play, press twice to resume play.
5. Press Stop button to stop the play.
6. Press power button to switch of f th e un it ,
the indicator light will dis pl ay r ed .
1. Open the unit, after inserting th e di sc ,
close the cover , then the unit will pla y
automatically.
(Press some invalid button, th e sc re en w il l
show "not allowed at the moment". )
2. Title/Chapter Search
(1) Some discs will have many titl e, e ac h ti tl e
will have many chapters. Press Title button
on the remote controller in playin g, t he s cr ee n
will show title.
(2) Press upward/downwar d/ le ft /r ig ht b ut to n
to select expected title, then pre ss “ OK ”
button to play.
(3) Select play ing tra cks chapter with nu mber
key "0-9" and "10+" (the entering number mu st
less than the total chap ter number), then
press "ENT ER" to play.
3. Pr eviou s and next
Dur ing playing, press " " " " button of the
remote con troller, each time pr ess the button,
jump a chapter to playin g.
Pre ss " ", playing from the next cha pter;
pre ss " ", playing from the previous chapter.
4. Fast forward and fa st backward
(1) Press the " " button or " " button to
act ivate fast forward or fas t bac kward function.
GB -9
Page 11

(2)Each time you touch the " ", the fast
forward speed goes from forward X2,
forward X4,fo rward X8, for ward X16 to normal
playback.
(3)Each time you touch the " ", the fast
backward spee d goe s from backward X2,
backward X4, backw ard X8,backward X16
to normal playback .
5. Pausing disc play
(1)Press the " " button to make the disc
pause.
(2)Press the " " button again to start
playing again .
6. Stopping playba ck
(1)Press the " " button once, stop playing,
press the button again to stop al l play backs
without last memor y.
(2)Press the " " button to resume from
whe re it is stopped or start play.
7. Change the subtitle
This function only available when there are
two or more subtitle languages recorde d in
the disc.
Press "SUBTITLE" button on the remote
con troller while playing to chang e bet ween
ava ilable sub title languages. Repeatly press
the button, the subtitl e language chan ge
amo ng English , Spa nish, French, Chinese,
subtitle on, subti tle off.
Some discs record most 32 languages.
Ple ase see most subtitle marks on the di sc,
the number show how many languages had
rec orded.
8. Switching the Audio Languages
This function only available when there are
two or more audio la nguages recorded in the
disc.
Press "AUDIO" button on th e remote
con troller, each time press it , you can switch
between available languages.
Some of disc can record 8 audios. Detailed
con dition, pl ease see language ma rk on the
disc. The number had showed the recorded
lan guage.
The function may not wo rk with some disc or
during some course s. It may require some
time to switch between audio language.
9. Repeat function
Press the “REPEAT” button on the remote
con troller to repe at playing.
Press the first ti me, showing current repeat
mod e, select repea t mode accordin g to
pressing times, re peat mode is circle as below:
rep eat All repeat chapter repeat title .
GB -1 0
Page 12

10.Repeat segment
Press "A-B" button on the remote contr ol le r
to select expected playing seg me nt ,
the default is off.
Press once, the repeat begin fro m A
Press twice, the repeat end from B
Press third, close the repeat fu nc ti on .
SETUP THE DVD MENU FUNCTION
Press “SETUP ” bu tt on o n th e re mo te
controller or the unit, the screen wil l sh ow
setup menu. Press direction key (u pw ar d/
downward/lef/right butto n) t o mo ve t he h ig h
light and set the items, press OK bu tt on t o
confirm. Press the “SETUP” b utton for the
second time, the unit will exit setu p in te rf ac e.
1. Language setting
(1) Language
English
French
Spanish
Deutsch
Italian
Portuguese
Swedish
中文
11.Screen display playing st at us
When playing and then press "DISPL AY"
button on the remote controller, the s cr een
will display the playing sta tu s: t it le p la yi ng
time, title remainder time, chap te r pl ay in g
time, chapter remainder time.
(2) Subtitle
English
French
Spanish
German
Italian
Portuguese
Swedish
Chinese
Auto
Off
(3)DIVX subtitle
ASCII
Unicode
Turk is h
Central European
Cyrillic
Chinese
GB -1 1
Page 13

(4) Audio
English
French
Spanish
German
Italian
Portuguese
Swedish
Chinese
(5) DVD menu
English
French
Spanish
German
Italian
Portuguese
Swedish
Chinese
2. Video setting
(1) Aspect Ratio
4:3 LB
4:3 PS
16:9
(2) TV System
NTSC
PAL
Auto
3. Audio setting
(1) Digital Output
Off
PCM
All
(2) Night Mode
Off
On
(3) Down sampling
Off
On
(4) Smart Sound
Off
classical
Rock
Jazz
Pop
4. Misc Setting
(1) Use Default Setting
Move the high light to the “Use Defaul t
Settings”, then press OK butto n, i t wi ll s ho w
“Do you want to use default setting? ” yo u
can select yes or no.
(2) Screen saver
Off
On
(3) Enable
Off
On
GB -1 2
Page 14

VCD PLAYING OPERATION
After selecting the disc, the pl ay in g mo de
auto form. The function whether or not w or k
according to some the story of the dis c. I f th e
VCD disc with PB C fu nc ti on , it w il l st ar t
playing after the menu screen disp la yi ng .
1. Title/Chapter playing (The disc must have
PB C fu nc ti on a nd t he P BC is on)
When playing, press " Menu " button , th e
screen will show title. Press nu mb er k ey " 0- 9"
and "10+" to select expected chapter ( th e
entering number must less than the tot al
chapter number).
2. Previous and next
During playing, press " " " " button o f th e
remote controller, eac h ti me p re ss t he button,
jump a chapter to playing.
Press " ", playing from the next chapt er ;
press " ", playing from the previo us c ha pt er.
3. Fast forward and fast backward
(1)Press the " " button or " " button to
activate fast forward or fas t ba ck wa rd f un ct io n.
(2)Each time you touch the " ", the fast
forward speed goes from forw ar d X2 ,
forward X4, forward X8, for wa rd X 16 t o no rm al
playback.
(3)Each time you touch the " ", the fast
backward speed goes from bac kw ar d X2 ,
backward X4, backward X8,b ac kw ar d X1 6 to
normal playback.
4. Pa using disc play
(1)Press the " " button to make the disc
pause.
(2)Press the " " button again to start
playing again.
5. Stopping playback
(1)Press the " " button once, stop pla yi ng ,
press the button again to stop al l pl ay b ac ks
without last memory.
(2)Press the " " button to resume from
where it is stopped or start pla y.
6. Repeat function
Press the “REPEAT ” bu tt on o n th e remote
controller to repeat playing .
Press the first time, showing cu rr en t re pe at
mode, select repeat mode accordi ng t o
pressing times, repeat mod e is c ir cl e as
below: repeat single repeat al l re pe at o ff.
7. Repeat segment
Press "A-B" button on the remote contr ol le r
to select expected playing seg me nt ,
GB -1 3
Page 15

the default is off.
Press once, the repeat begin fro m A
Press twice, the repeat end from B
Press third, close the repeat fu nc ti on .
8. Screen display playing stat us
When playing and then press "DIS PL AY"
button on the remote controller, the s cr een
JPEG PLAYING OPERATION
will display the playing sta tu s: Track, chapter
playing time, chapter remain de r ti me .
9. Change the audio output
Press the “AUDIO” button when playing,
each time you press, the sound modes w il l
change in sequence. Switch among : Le ft ,
Right, Mix, Stereo.
JPEG disc is formed by many list s, e ac h li st
has many JPEG pictures.
After selecting disc and pla y it , th e un it w il l
auto play JPEC disc.
Press "Upward " or "Downward" or “ Le ft ” or
MP3/MP4 PLAYING OPERATION
1. MP3 is formed by many lists (fold er s ), e ac h
list has many MP3 tracks.
After selecting disc and pla y it , th e un it w il l
auto play MP3 mode.
Press " upward" or "downward " bu tt on t o
select page.
Press "upward", "downward" , " le ft " a nd "
right " button to select track.
Press " OK" to playing selected tr ac k.
Press "left" button to return fold er.
“Right” button on the remote contr ol le r to
select different picture.
Press " OK " button to play selected pic tu re .
Press "left" button to return menu.
2. Fast forward and fast backward
(1)Press the " " button or " " button to
activate fast forward or fas t ba ck wa rd f un ct io n.
(2)Each time you touch the " ", the fast
forward speed goes from forw ar d X2 ,
forward X4,forward X8, for w ar d X1 6 to
normal playback.
(3)Each time you touch the " ", the fast
backward speed goes from bac kw ar d X2 ,
GB -1 4
Page 16

backward X4, backward X8,b ac kw ar d X1 6 to
normal playback.
3. Pa using disc play
(1)Press the " " button to make the disc
pause.
(2)Press the " " button again to start
playing again.
4. Stopping playback
(1)Press the " " button once, stop pla yi ng ,
press the button again to stop al l pl ay b ac ks
without last memory.
(2)Press the " " button to resume from
where it is stopped or start pla y.
5. Repeat function
When playing, press “repeat” t o se le ct
repeat function. Press once to sel ec t a tr ac k
CD PLAYING OPERATION
repeat; Press twice to select fold er o r di r
repeat; Press third to select repe at a ll d is c;
Press four close.
Repeat mode: repeat " OFF " repeat " ONE "
repeat " DIR " repeat " ALL ".
6. Repeat segment
Press "A-B" button on the remote contr ol le r
to select expected playing seg me nt , th e
default is off.
Press once, the repeat begin fro m A
Press twice, the repeat end from B
Press third, close the repeat fu nc ti on .
7. Screen display playing stat us
When playing or stop, press " di sp la y "
button on the remote controller to sho w
current track playing time or rema in de r ti me .
After selecting the disc and pla y it , th e un it
will auto play CD (If press the butt on o n th e
unit or the remote controller withou t fu nc ti on ,
the screen will show "not allowed at t he
moment".
1. Select number to play at first hand .
Press number button " 0~9 " and " 10+ " on
the remote controller to select song
according to track number (if th e tr ac k
number over the disc range, the inpu t is
invalid ).
Eg: If you select twelfth track, p re ss " 1 0+ "
first and then press " 2 " to select it.
2. Previous and next
During playing, press " " " " button o f th e
remote controller, eac h ti me p re ss t he button,
GB -1 5
Page 17

jump a chapter to playing.
Press " ", playing from the next chapt er ;
press " ", playing from the previo us c ha pt er.
3. Fast forward and fast backward
(1)Press the " " button or " " button to
activate fast forward or fas t ba ck wa rd f un ct io n.
(2)Each time you touch the " ", the fast
forward speed goes from forw ar d X2 ,
forward X4, forward X8, for wa rd X 16 t o
normal playback.
(3)Each time you touch the " ", the fast
backward speed goes from bac kw ar d X2 ,
backward X4, backward X8,b ac kw ar d X1 6 to
normal playback.
4. Pa using disc play
(1)Press the " " button to make the disc
pause.
(2)Press the " " button again to start
playing again.
5. Stopping playback
(1)Press the " " button once, stop pla yi ng ,
press the button again to stop al l pl ay b ac ks
without last memory.
(2)Press the " " button to resume from
where it is stopped or start pla y.
6. Repeat playing
When playing, press “REPEAT” button to
select repeat playing functi on .
Press once, repeat playing the c ur re nt t ra ck .
Press twice, repeat playing th e cu rr en t di sc .
Press third times, close repea t pl ay in g
function.
Repeat mode: repeat " OFF " repeat " ONE "
repeat " ALL ".
7. Repeat segment
Press "A-B" button on the remote contr ol le r
to select expected playing seg me nt , th e
default is off.
Press once, the repeat begin fro m A
Press twice, the repeat end from B
Press third, close the repeat fu nc ti on .
8. Screen display playing
When playing, press "displ ay " t o sh ow
round current track playing ti me , cu rr en t
track remainder time, all disc p la yi ng t im e
and all disc remainder time.
GB -1 6
Page 18

USB/SD CARD PALY
Insert the USB or SD card to the USB socke t or S D/ MM C so ck et , pr es s “U SB /C AR D” b ut to n on t he
remote controller, the u ni t wi ll r ea d the information on the USB or SD card. The next steps as
operation DVD
SPECIFICATIONS
Compatibility:
DISC DVD/VCD/MP3
Mode: PAL/NTSC
Screen size: 7 inch
Power: 0.8Wx2
DC power supply: 12V, 1.5A
Work temperature: 5 35
Lithium Battery: 7.4V/1750mA h
Dimensions : 210x 164 x 41 mm
(W) x (H) x (D)
weight (approx) : 822.5g (excl ud in g ba tt er ie s)
。
C~ C
。
Accessory: instruction boo k,
remote controller, AV cord, powe r ad ap to r,
power supply by car plug, assu ra nc e ca rd .
Specifications subject to change without notice.
GB -1 7
Page 19

NPD-702
NPD-702
REPRODUCTOR DE DISCO VERSATIL DIGITAL (DVD)
CON PANTALLA INTEGRADA
Manual de Operación
FAVOR D E LEE R ESTE MA NUAL COMPL ETAMENT E ANTE S DE OPER AR Y/O CO NEC TAR ESTE P ROD UCT O.
CON SERVAR EL MANUAL PAR A FUTURAS REF ERE NCI AS.
Page 20

ADVERTEN CIA
PARA RE DUCIR EL RIESGO D E FUE GO O CHOQ UE ELEC TRI CO, NO EX PONER ESTE P RODUC TO A LA LLUV IA,
HUMEDAD, G OTEO O SA LPÌ CADUR A DE AGUA.
PRECAUCI ON
El uso de cont roles , aju stes o pr ocedi mie ntos di feren tes a l os espe cific ado s en este
man ual pue de resu lta r en expo sició n a rad iació n láser p eli grosa .
Est e repro ducto r de di sco com pacto e sta c lasif icado c omo u n produ cto LAS ER
CLASS 1 LASER PRODUCT
KLASSE 1 LASER PRODUKT
LUOKAN 1 LASER LAITE
KLASS 1 LASER APPARAT
CLASE 1.
PRECAUCI ON
Radiació n láser i nvisible e xiste c uan do abre e l compa rti mient o del dis co y li bera lo s segur os.
Evi tar la ex posic ión a l a radia ción lá ser.
PARA SEGURIDAD Y UNA OPERACIÓN EFICIENTE
No dañar el co rdón de a limentac ión de lo s adaptado res. Cu and o no use el r eprod uct or, desc onect ar el c ordón d e
ali menta ción de l tom acorr iente . Par a desco necta rlo , sujet arlo de l a cla vija y re tirar lo; n unca ja larlo d el co rdón mi smo.
Si se d erram a agua o al gún otro liq uido en e l interior d e la unid ad, esto pue de resu lta r en ries go de fue go, c hoque
elé ctric o o mal fun cio namie nto. Us ar es te prod ucto en u n lug ar con hu medad b aja y p oco pol vo.
No desensa mblar o a lte rar est e produ cto d e ningu na mane ra.
No usar este p roduc to en á reas do nde pue den o curri r tempe rat uras ex trema s (me nores a 5 º C o mayor es a 35 º C) o
don de este e xpues to ba jo los ra yos dir ect os del so l.
Debido a que e l ruido d el reprodu ctor es b ajo y el rango d inámi co es a ncho, e xiste u na te ndenc ia de aum ent ar el
vol umen am plifi can do tant o como es n ece sario . Hacer e sto p uede pr oduci r una s alida e xcesi vam ente al ta del
amp lific ador lo q ue pu ede cau sar dañ os a la s bocin as. Fav or de t ener cu idado c on es te punt o.
ES -1
Page 21

Cambios re penti nos en la temp eratu ra am bient e puede n cau sar got as de roc ío en e l inter ior del l ent e láser, b ajo est a
con dició n la unid ad pu ede no op erar ad ecu adame nte. Si e sto o curre , remov er el d isco y de jar que e l rep roduc tor se
aju ste a la te mpera tur a ambie nte.
Est e produ cto deb e ope rarse e n posic ión h orizo ntal.
Favor de usa r progr ama s origi nales d e DVD , VCD, CD o M P3, no se r eco miend a el uso de d isc os copi ados.
No debe impe dirse l a adecuada v entil ación del pr oduct o cub riend o las ran ura s de vent ilaci ón co n artíc ulos co mo so n
per iódic os, man tel es, cor tinas , etc .
No se deben co locar e nci ma de est e produ cto f uente s gener ado ras de fl amas co mo so n velas , velad ora s.
Est e produ cto no de be se r expue sto al go teo o s alpic adura d e agu a, a la llu via o hum eda d. No se de ben col oca r objet os
lle nos con l íquid os co mo vaso s encim a de es te prod ucto.
No colocar e ste pro duc to en lib reros c err ados o ár eas sin a dec uada ve ntila ció n.
Cuando la cl avija d e los adapta dores o u n aparato ac oplad or so n usado s como un d isp ositi vo de des con exión , el
dis posit ivo de de sco nexió n perma nec e realm ente op era ble.
El paquete d e bater ías o b aterí as inst ala das no de ben ser e xpu estas a l calor e xce sivo co mo bajo s los r ayos di recto s del
sol , fuego o c alor.
El uso de los au dífon os a vo lumen d e audio a lto p uede ca usar da ños a l siste ma audi tiv o.
Para preve nir rie sgo s de fueg o o choqu e elé ctric o, no exp one r este pr oducto al go teo o sal picadura d e agua, l a
llu via o hum edad. N o col ocar ob jetos llen os con lí quidos com o vasos e nci ma de est e produ cto .
ESTA PROD UCTO NO DEBE SER AJUSTAD O O REPARA DO POR CULAQUIER PERSO NA EX CEPTO P OR EL
CENTR O DE SERVICIO AU TORIZ ADO O POR PER SONAL CALIFICADO
ES -2
Page 22

FUENTES DE ALIMENTACION
Este produ cto tie nes d os tipo s de fuen te de a limen tació n:
Fuente de al iment aci ón a trav és del ad apt ador ca /cc o ada pta dor par a autom óvi l cc/cc
Fuente de al iment aci ón a trav és de la ba ter ía reca rgabl e de li tio.
Ope ració n con los a dap tador es:
Conectar l a salid a del adapta dor al co nec tor de en trada d e Vcc d el apar ato y con ect ar el otr os extr emo a l tomac orrie nte
(adaptad or ca/c c) o al e ncend edor de c iga rros de l autom óvi l (adap tador c c/c c), ent onces a jus tar el se lecto r de
Enc endid o/Apa gad o al modo d e ENCEN DID O
Ope ració n con la ba ter ía reca rgabl e:
Cuando la ba tería r eca rgabl e esta ca rga da comp letam ent e, colo car el se lec tor de En cendi do/ Apaga do al mod o de
ENC ENDID O y la unid ad em pezar a a opera r con l a bater ía si los a dap tador es está n des conec tados .
Para carga r la bate ría , conec tar la sa lid a del ada ptado r ca/ cc al con ector d e ent rada de V cc del ap ara to y cone ctar el o tro
extremo al t omaco rri ente, e ntonc es aj ustar e l selec tor d e Encen der/C arg ar al mod o de CARG AR y la b aterí a de liti o
empezara a c argar se, e l indic ador de c arg a se enci ende en c olo r verde y p erman ece d estel lando d ura nte el pr oceso d e
carga.
ES -3
Page 23

DESCRIPCION DE PARTES
1
24
25
2
3
4
5
19
20
21
22
23
14 15 161718
ES -4
6
7
8
9
10
11
12
13
Page 24

DESCRIPCION DE PARTES
1. Pa ntall a
2. Bo tón de iz quier da
En la i nterf ase del m enú, pr esion ar este b otón pa ra
des plaza rse a la op ción iz quier da, ent onces p resio nar
“OK ” para en trar a la o pción a ctual .
3. Bo tón de Arr iba / Ante rior
En la i nterf ase del m enú, pr esion ar este b otón pa ra
des plaza rse a la op ción ar riba, e ntonc es pres ionar “ OK”
par a entra r a la opci ón actu al.
En la i nterf ase de re produ cción d e un CD/V CD/DV D
pre siona r este bo tón par a salta r a la pist a, capi tulo o ti tulo
ant erior.
4. Bo tón de de recha
En la i nterf ase del m enú, pr esion ar este b otón pa ra
des plaza rse a la op ción de recha , enton ces pre siona r “OK”
par a entra r a la opci ón actu al.
5. Bo tón de ac eptar “ OK”
6. Bo tón de Aba jo / Sigu iente
En la i nterf ase del m enú, pr esion ar este b otón pa ra
des plaza rse a la op ción ab ajo, en tonce s presi onar “O K”
par a entra r a la opci ón actu al.
En la i nterf ase de re produ cción d e un CD/V CD/DV D
pre siona r este bo tón par a salta r a la pist a, capi tulo o ti tulo
sig uient e.
7. Bo tón de aj ustes
Pre siona r este bo tón par a entra r al menú d e ajust es del DV D
8. Bo tón de me nú
En el m odo de re produ cción d e un CD/V CD, pre siona r
par a activ ar o desa ctiva r el cont rol de re produ cción “ PBC”
En el m odo de re produ cción d e un DVD, p resio nar par a
ent rar al me nú de rep roduc ción de l as canc iones .
9. Bo tón par a dismi nuir vo lumen
10. B otón pa ra sele ccion ar tarj eta de me moria S D o
mem oria US B.
11. Bo tón p ara inc remen tar vol umen.
12. B otón de r epeti ción.
13. B otón de a udio.
14. B otón pa ra abri r la tapa d el comp artim iento d el disc o.
15. L uz indi cador a
En el m odo de op eraci ón, la lu z indic adora s e ilumi na en
col or verd e.
En mo do de esp era, la l uz indi cador a se ilum ina en co lor
roj o.
16. B otón de m odo
Des plieg a el menú d e ajust es para a justa r el Bril lo,
Con trast e, Colo r, Rotar, M odo, Re stabl ecer.
17. B otón de d etene r.
18. B otón de R eprod ucir / Pa usar
19. R anura p ara tar jeta de m emori a MMC/S D
20. C onect or de sal ida de Aud io/Vi deo ( A/V)
21. C onect or de sal ida Coa xial
22. S elect or de Enc endid o/Apa gado
23. C onect or para a udífo nos
24. C onect or para m emori a USB
25. C onect or de ent rada de V cc
ES -5
Page 25

CONTROL REMOTO
4
231
5
11
13
15
17
19
21
23
25
27
29
PRECAUCI ON
1. Al us ar el con trol re mot o, aseg urase q ue el c ontro l remot o
se di rige di recta men te al sen sor rem oto d e la unid ad con
un án gulo de 4 5 º a los lad os y un a dista ncia de 5 m etr os.
2. Si e l contr ol remo to no o pera ad ecuad ame nte ree mplaz ar
la ba tería c omo se in dic a en las fi guras a l a der echa.
3. Cu ando el c ontro l rem oto no va s er usad o por u n perio do
lar go de tie mpo, fa vor d e retir ar la bat erí a para ev itar
dañ os debi do a la fug a de ac ido de la b aterí a.
1. Bo tón de es pera
2. Bo tón de ta rjeta S D / Mem oria US B
3. Bo tón de de splie gue
4. Bo tón de si lenci o
6
5. Bo tones n uméri cos
7
6. Bo tón de re petir
8
7. Bo tón de re petir s ecc ión A-B
9
10
8. Bo tón de ir
12
14
16
9. Bo tón de de tener
18
20
10 .Bo tón de ti tulo
22
24
11. Bo tón de ajust es
26
28
12. Botón de i ncrem ent ar volu men
30
13. Botón de a rriba
14. Botón de a cerca mie nto
15. Botón de i zquie rda
ES -6
16. Botón de d ismin uir v olume n
17. Botón de a cepta r
18. Botón de d erech a
19. Botón de a udio
20. Botón de R eprod uci r/Pau sar
21. Botón de a bajo
22. Botón de s ubtit ulo
23. Botón de r egres o ráp ido
24. Botón de s iguie nte
25. Botón de a vance r ápi do
26. Botón de a nteri or
27. Botón de M odo-L CD
28. Botón de M enú / PBC
29. Botón de N TSC / PAL
30. Botón de p rogra ma
+
Page 26

FUNCIÓN DE LOS BOTONES DEL CONTROL REMOTO
1. Bo tón de es pera: P res ionar p ara enc end er o pasa r al
mod o de espe ra la uni dad .
2 .Bot ón de SD/ USB: AL ins ertar u na memo ria U SB o
tar jeta de m emori a SD/ MMC, pr esion ar es te botó n para
rep roduc ir las pi sta s en la USB o t arjet a.
3. Bo tón de de splie gue : Presi onar pa ra de spleg ar la
inf ormac ión de la c anc ión act ual.
4. Bo tón de si lenci o: Pr esion ar para d esa ctiva r la sali da
de au dio.
5. Bo tones n uméri cos 0 - 9
6. Bo tón de re petir : Cad a vez que p resio na es te botó n se
cam bia el mo do de rep eti ción. D urant e la re produ cción
de MP 4/VCD /CD exi ste n tres mo dos: Re pet ir una,
Rep etir to do y Desa cti var. Dur ante la r epr oducc ión de
un di sco DVD e xiste n cua tro mod os: Rep eti r capit ulo,
Rep etir Tit ulo, Re pet ir todo y d esact iva r. Nota: D urant e
la re produ cción d e VCD , el modo d e PBC deb e est ar
des activ ado.
7. Bo tón de re petir A- B: Pr esion ar para r epe tir una
sec ción A-B d e una pis ta. 1 ) Presi onar “A -B” p ara
def inir el p unto in ici al “A” (“ Rep A” se de spl iega en l a
pan talla ). 2) Pre sio nar “A- B” nuev ame nte par a defin ir el
pun to fina l “B” (“R ep A-B ” se desp liega e n la pa ntall a) y
la se cción d efini da en tre los p untos A- B se re pite
con tinua mente . 3) Pr esion ar “A-B ” nue vamen te para
can celar l a funci ón.
8. Bo tón de ir : Presi ona r para en trar a la i nte rfase d e
bús queda c omo sig ue:
Sea rch
Tit le 16
Cha pter 1
Tim e 00:00 :03
Pre siona r “ o ” para se lec ciona r la opci ón
des eada, e ntonc es pr esion ar “ o ” para a jus tar el
val or o pres ionar l os bo tones n uméri cos p ara aju star
los v alore s direc tam ente.
9. Bo tón de de tener : Pre siona r para de ten er la
rep roduc ción.
10. Botón de t itulo : Pre siona r para de spl egar el t itulo d el
dis co en rep roduc ció n.
11. Bo tón de ajust es: Pre sionar par a entra r a la interfa se
de aj ustes d el DVD.
12. Botón de Vo l+: Pre sio nar par a incre men tar el
vol umen.
13. Botón de a rriba : Pre siona r para mo ver a rriba l a
opc ión, en tonce s pre siona r “OK” pa ra en trar en l a
opc ión act ual.
14. Botón de a cerca mie nto: Pr esion ar pa ra acer car la
ima gen en Q1 , Q2, Q3, Q 4 y des activ ado.
15. Botón de i zquie rda : Presi onar pa ra mo ver a la
izq uierd a la opci ón, e ntonc es pres ion ar “OK” p ara
ent rar en la o pción a ctu al.
16. Botón de Vo l-: Pre sio nar par a dismi nui r el volu men.
17.Botón de a cepta r: Pr esion ar para e ntr ar a una op ción
o par a confi rmar y ej ecu tar una s elecc ión .
ES -7
Page 27

FUNCIÓN DE LOS BOTONES DEL CONTROL REMOTO
18. Botón de d erech a: Pr esion ar para m ove r a la dere cha
la op ción, e ntonc es pr esion ar “OK” p ara e ntrar e n la
opc ión act ual.
19. Botón de a udio: P res ionar p ara ent rar a l menú de
aju stes de a udio, p res ionar r epeti dam ente es te botó n
par a selec ciona r can al izqu ierdo , der echo o es tereo .
20. Botón de r eprod uci r/pau sar: Pr esi onar pa ra inic iar l a
rep roduc ción, p res ionar n uevam ent e para pa usar la
rep roduc ción. P res ionar p or terc era v ez para v olver a l a
rep roduc ción.
21. Botón de a bajo: P res ionar p ara mov er ab ajo la op ción,
ent onces p resio nar “ OK” par a entra r en la o pción a ctual .
22. Botón de s ubtit ulo : La func ión de es te bo tón est a sujet o
al ti tulo en e l modo de r epr oducc ión del d isc o DVD (Un
dis co DVD pu ede ten er ha sta 32 ti pos de id iom as).
23. Botón de r egres o ráp ido ( ): Pr esion ar pa ra regr esar
ráp idame nte dur ant e la repr oducc ión .
24. Botón de s iguie nte ( ) : Presi onar pa ra sa ltar a la p ista,
cap itulo o t itulo s igu iente .
25. Botón de a vance r ápi do ( ): Pre siona r par a avanz ar
ráp idame nte dur ant e la repr oducc ión .
26. Botón de a nteri or ( ): P resio nar par a sal tar a la pi sta,
cap itulo o t itulo a nte rior.
27. Botón de m odo-L CD: P resio nar par a ent rar al me nú de
des plieg ue para a jus tar el Br illo, C ont raste , Color,
Rot ar, Modo y R estab lec er.
28. Botón de M enú/P BC: E n el modo d e repro duc ción de
un CD /VCD, p resio nar p ara act ivar o de sac tivar “ PBC”.
En el m odo de re produ cci ón de un DV D, pres ion ar para
ent rar al me nú de rep rod ucció n de las ca nci ones.
29. Botón de N TSC/PAL: Pr esionar pa ra sele ccionar el
mod o entre N TSC o PAL.
30. Botón de p rogra ma: P resio nar par a ent rar a la
int erfas e para pr ogr amar la r eprod ucc ión de la s pista s
en el o rden de seado .
Pre siona r este bo tón p ara ent rar a la in ter fase de
pro grama ción de l a rep roduc ción, c omo e s:
Dur ante la r eprod ucc ión de un d isco DV D:
Pro gr am
......
1 ......
...... ......
2
...... ......
3
Durante la r eprod ucc ión de un d isco VC D:
1 ......
2
......
3
......
Presiona r “ ” para se lec ciona r el punt o
deseado, e ntonc es pr esion ar los bo ton es numé ricos
para ajust ar el tit ulo , o capit ulo des ead o. Desp ués de
ter minar l a progr ama ción de l a repro duc ción,
seleccio nar “Pl ay” y p resio nar “OK ” par a inici ar la
reproduc ción de l pro grama . Para ca nce lar el
pro grama , selec cio nar “Cl ear pro gra ma” y pre siona r
“OK ”.
Al reprodu cir dis cos D VD debe i ngres ar el t itulo y
cap itulo ; al repr odu cir dis cos VCD s olo d ebe ing resar
el ca pitul o
Play
Clear program
Pro gr am
Play
Clear program
ES -8
Page 28

OPERACIÓN GENERAL
1. Co necta r la fuen te de a limen tació n de ac uerdo a l o
exp licad o anter ior mente y e l indic ado r se enci ende en
col or rojo ( modo de e spe ra).
2. Pr esion ar el bot ón pa ra abri r la tapa d el co mpart imien to
del d isco y co locar u n dis co dent ro del co mpa rtimi ento.
3. Co locar e l selec tor d e Encen dido/ Apa gado en e l modo
de EN CENDI DO y el ind ica dor cam bia a col or ve rde e
ini cia la re produ cci ón auto mátic ame nte del d isco.
REPRODUCCION DE UN DISCO DVD
1. Abrir la tap a del com par timie nto del d isc o y coloc ar un
dis co, cer rar la ta pa e in icia au tomát ica mente l a
rep roduc ción de l dis co.
(Al p resio nar alg uno s boton es esto s no so n valid os y la
pan talla d espli ega “ no perm itido p or el m oment o”)
2. Bú squed a de capi tul o/tit ulo
a) Alg unos di scos pu ede n tener v arios t ítu los, ca da
tit ulo tie ne vari os ca pítul os. Pre sio nar “Titulo” en e l
con trol re moto du ran te la rep roduc ció n, la pan talla
des plieg a el titu lo.
b) Pr esion ar “ ” p ara sel eccionar e l titul o
des eado, e ntonc es pr esion ar “OK” p ara i nicia r la
rep roduc ción.
c) Se lecci onar el c api tulo co n los bot one s numér icos
“0- 9” y “10+ ” (el num ero i ngres ado deb e ser m enor
al nu mero to tal de ca pít ulos) , enton ces p resio nar
“EN TER” pa ra inic iar l a repro ducci ón.
4. Pr esion ar “Rep rod ucir/ Pausa r” pa ra paus ar la
rep roduc ción de l dis co. Pre siona r el bo tón
nue vamen te para v olv er a la rep roduc ció n del pun to
don de se pau so.
5. Pr esion ar “Det ene r”: Par a deten er la r eprod ucció n del
dis co.
6. Pr esion ar el bot ón de p oder pa ra apag ar la u nidad y
el in dicad or camb ia a co lor roj o.
3. An terio r / Sigui ent e
Dur ante la r eprod ucc ión, pr esion ar “ o ” en el
con trol re moto, c ada v ez que pr esion a un bo tón sal ta
hac ia atrá s o hacia d ela nte un ca pitul o res pecti vamen te.
Pre siona r “ ” para salta r al capi tul o anter ior,
Pre siona r “ ” para sal tar al ca pitulo sig uient e.
4. Av ance / Regre so rápi do
a) Pr esion ar “ o ” para ac tiv ar la fun ción de
reg reso o av ance rá pid o.
b) Ca da vez qu e presi ona “ ”, la ve locid ad de
reg reso rá pido va ria d e X2, X6, X 8, X16 y
rep roduc ción no rma l.
c) Ca da vez qu e presi ona “ ” , la velo cidad d e
ava nce ráp ido var ia de X 2, X6, X8 , X16 y
rep roduc ción no rma l.
ES -9
Page 29

REPRODUCCION DE UN DISCO DVD
5. Pa usar la r eprod ucc ión del d isco
a) En e l modo de r eprod ucc ión, pr esion ar “ ”
par a pausa rla.
b) Pr esion ar “ ” nuevame nte par a volver a la
rep roduc ción de sde e l punto d onde se p aus o.
6. De tener l a repro duc ción
a) En e l modo de r eprod ucc ión, pr esion ar “ ” una
vez p ara det ener la r epr oducc ión, pr esi onar “ ”
par a volve r a la repr odu cción d esde el p unt o
don de se det uvo. Pr esi onar “ ” dos v eces pa ra
det ener la r eprod ucc ión tot almen te y bo rrar la
mem oria de l ultim o pun to, pre siona r “ ” par a
vol ver a la re produ cci ón desd e el punt o ini cial.
7. Ca mbian do el sub tit ulo
Est a funci ón solo e sta d ispon ible cu and o exist en dos o
mas i dioma s de subt itu lo grab ados en e l dis co.
Pre siona r “Subt itu lo” en el c ontro l rem oto dur ante la
rep roduc ción pa ra se lecci onar un o de lo s idiom as de
sub titul o dispo nib le. Al pre siona r rep etida mente e l
bot ón, el id ioma de l sub titul o cambi a ent re Ingl es,
Esp añol, F rance s, Ch ino, Su btitu lo ac tivad o, Subt itu lo
des activ ado.
Algu nos dis cos tie nen g rabad os la may orí a de 32
idi omas.
Fav or de ver l a mayor ía de l as marc as de los
sub títul os en el di sco , el núme ro indi ca cu antos
idi omas es tán gra bad os.
8. Ca mbian do el idi oma d e audio
Est a funci ón solo e sta d ispon ible cu and o exist en dos o
más i dioma s de audi o gra bados e n el disc o.
Pre siona r “Audi o” en e l contr ol remo to du rante l a
rep roduc ción pa ra se lecci onar un o de lo s idiom as de
aud io disp onibl e.
Algu nos dis cos tie nen g rabad os 8 idio mas d e audio .
Fav or de ver l a mayor ía de l as marc as de los
sub títul os en el di sco , el núme ro indi ca cu antos i dioma s
est án grab ados.
La fu nción n o puede o per ar con al gunos d isc os o
dur ante al gunos p roc esos. E sto pue de re queri r más
tie mpo par a selec cio nar ent re los id iom as de aud io.
9. Fu nción d e repet ir
Pre siona r “Repe tir “ en el con trol re mot o para
sel eccio nar el mo do de r epeti ción.
Pre siona r la prim era v ez para d esple gar e l modo de
rep etici ón actu al, s elecc ionar e l mod o de repe tició n de
al pr esion ar el bot ón re petid ament e de ac uerdo a l a
sig uient e secue nci a: Repe tir tod o Rep etir ca pitul o
Rep etir ti tulo.
ES -1 0
Page 30

REPRODUCCION DE UN DISCO DVD
10. Repeti r una sec ció n A-B
Pre siona r “A-B” e n el co ntrol r emoto p ara s elecc ionar
una s ecció n desea da de ntro de u na capi tul o, titu lo o
pis ta.
Pre siona r una vez p ara d efini r el punt o ini cial “A ”.
Pre siona r nueva men te para d efini r el pu nto fin al “B”.
Pre siona r por ter cer a vez par a cance lar l a funci ón.
FUNCIÓN DEL MENÚ DE AJUSTES DEL DV
Pre siona r “Ajus tes ” en el con trol re mot o o la unid ad, la
pantalla d espli ega la inter fase de l menú de ajus tes.
Pre siona r “ ” para de spl azars e y selec cio nar la
opción des eada y pr esionar “O K” para c onf irmar lo. Pre sio nar
“Aj ustes ” por seg und a vez par a salir d e la in terfa se del me nú
de ajustes .
1. Ajuste s del idioma
a) Idioma
Ing les
Fra nces
Esp añol
Alemán
Ita liano
Portugué s
Sueco
Chino
11. De spliegue d el esta do de reprod ucció n en pantall a
Dur ante la r eprod ucc ión pre siona r “De splie gue” en e l
con trol re moto, e nto nces la p antal la de splie ga el
est ado de re produ cci ón: Tiem po de rep rod ucció n del
tit ulo, ti empo re sta nte del t itulo , tie mpo de
rep roduc ción de l cap itulo , tiemp o res tante d el capi tul o
b) Subt itulo
Ing les
Frances
Esp añol
Alemán
Ita liano
Portugué s
Sueco
Chino
Automáti co
Desactiv ado
c) Subt itulo D IVX
ASC II
Unicode
Turco
Europa cen tral
Chino
ES -1 1
Page 31

FUNCIÓN DEL MENÚ DE AJUSTES DEL DV
d) Audio
Ing les
Fra nces
Esp añol
Alemán
Ita liano
Portugué s
Sueco
Chino
e) Menú d el DVD
Ing les
Fra nces
Esp añol
Alemán
Ita liano
Portugué s
Sueco
Chino
2. Ajus tes de vi deo
a) R ango de pant alla
4:3 L B
4:3 P S
16:9
b) Sistema de TV
NTS C
PAL
Automáti co
3. Aju stes de a udio
a) Sali da digi tal
Desactiv ado
PCM
Todo
b) Mod o de noch e
Desactiv ado
Act ivado
c) Mues treo
Desactiv ado
Act ivado
d) Ecua lizad or
Desactiv ado
Clásico
Rock
Jazz
Popular
4. Mezc la de ajuste s
a) Ajustes pr edete rmi nado
Seleccio nar “Us ar aj ustes p redet erm inado ”,
entonces p resio nar “ OK”, la u nidad d esp liega l a
pre gunta “ ¿Esta s egu ro de res table cer l os
ajustes? ”, ento nce s selec ciona r “Si ” o “No”.
b) Pro tecto r de pantall a
Desactiv ado
Act ivado
c) Habil ita r
Desactiv ado
Act ivado
ES -1 2
Page 32

REPRODUCCION DE UN DISCO VCD
Después de s elecc ionar el dis co, el mo do de r eprod ucció n
automáti co. La fu nci ón pued e o no trab aja r de acue rdo al
pro grama e n el disc o. Si e l disco V CD esta c on la f unció n de
PBC a ctiva da, est e ini cia la re produ cci ón desp ués de
desplega r el menú d e rep roduc ción.
1. Re produ cción d el Tit ulo/C apitu lo (e l disco d ebe con tar
con l a funci ón de PBC y e sta d ebe ser a ctiva da) .
Dur ante la r eprod ucc ión, pr esion ar “M enú” y la p antal la
des plieg a el titu lo. P resio nar “0- 9” y “1 0+” par a
sel eccio nar el ca pit ulo des eado (e l num ero ing resad o
deb e ser men or al num ero t otal de c apítu los ).
2. Ant erior / S iguie nte
Dur ante la r eprod ucc ión, pr esion ar “
con trol re moto, c ada v ez que pr esion a un bo tón sal ta
hac ia atrá s o hacia d ela nte un ca pitul o
res pecti vamen te.
Pre siona r “ ” para sal tar a l capit ulo anteri or,
Pre siona r “ ” para sal tar al ca pitulo sig uient e
3. Ava nce / Regres o rápid o
a. Pr esion ar “ o ” para a ctiva r la fu nción d e
reg reso o av ance rá pid o.
b. Ca da vez qu e presi ona “ ” , la ve locid ad de
reg reso rá pido va ria d e X2, X6, X 8, X16 y
rep roduc ción no rma l.
C. ad a vez que p resio na “ ”, l a veloc idad de
ava nce ráp ido var ia de X 2, X6, X8 , X16 y
rep roduc ción no rma l.
o ” en el
4. Pa usar la r eprod ucc ión del d isco
a. En e l modo de r eprod ucc ión, pr esion ar “ ”
par a pausa rla.
b. Pr esion ar “ ” nue vamen te pa ra volv er a la
rep roduc ción de sde e l punto d onde se p aus o.
5. De tener l a repro duc ción
En el m odo de re produ cci ón, pre siona r “ ” una vez
par a deten er la rep rod ucció n, pres ion ar “ ” p ara
vol ver a la re produ cci ón desd e el punt o don de se
det uvo. Pr esion ar “ ” dos veces p ara det ener la
rep roduc ción to tal mente y b orrar l a mem oria de l ultim o
pun to, pre siona r “ ” par a volve r a la re produ cción
des de el pun to inic ial .
6. Fu nción d e repet ir
Pre siona r “Repe tir “ en el con trol re mot o para
sel eccio nar el mo do de r epeti ción.
Pre siona r la prim era v ez para d esple gar e l modo de
rep etici ón actu al, s elecc ionar e l mod o de repe tició n de
al pr esion ar el bot ón re petid ament e de ac uerdo a l a
sig uient e secue nci a: Repe tir tod o Rep etir ca pitul o
Rep etir ti tulo.
7. Re petir u na secc ión A- B
Pre siona r “A-B” e n el co ntrol r emoto p ara s elecc ionar
una s ecció n desea da de ntro de u na capi tul o, titu lo o
pis ta.
Pre siona r una vez p ara d efini r el punt o ini cial “A ”.
Pre siona r nueva men te para d efini r el pu nto fin al “B”.
Pre siona r por ter cer a vez par a cance lar l a funci ón.
ES -1 3
Page 33

REPRODUCCION DE UN DISCO VCD
8. De splie gue del e stado de rep roduc ció n en pant alla
Dur ante la r eprod ucc ión pre siona r “De splie gue” en e l
con trol re moto, e nto nces la p antal la de splie ga el est ado
de re produ cción : Tiem po de rep roduc ció n del tit ulo,
tie mpo res tante d el ti tulo, t iempo d e rep roduc ción de l
cap itulo , tiemp o res tante d el capi tul o.
REPRODUCCION DE UN DISCO JPEG
Los discos c on arch ivo s con for mato JP EG es ta form ado
por carpet as, cad a car peta co ntien en va rios ar chivo s de
imágenes J PEG.
Después de c oloca r un di sco y cer rar la ta pa de l
comparti mient o, la u nidad r eprod uce a utomá ticam ent e los
archivos d e imáge nes JPEG.
REPRODUCCION DE UN DISCO MP3/MP4
1. Un d isco co n archi vos d e forma to MP3 o MP 4 est a
for mado po r carpe tas , cada ca rpeta c ont ienen v arios
arc hivos e n forma to MP 3 o MP4.
Des pués de c oloca r un di sco y cer rar la ta pa de l
com parti mient o, la u nidad r eprod uce a utomá ticam ent e
los a rchiv os de imá gen es MP3 o MP 4.
Pre siona r “ , ” en el c ontro l remoto par a selec cionar la
car peta de seada y p res ionar “ OK” par a ent rar en la
car peta.
Pre siona r “ , , , ” en el co ntr ol remo to para
sel eccio nar el ar chi vo dese ado y pre sio nar “OK ” para
ini ciar la r eprod ucc ión del a rchiv o sel eccio nado.
9. Ca mbian do la sal ida d e audio
Pre siona r “Audi o” en e l contr ol remo to du rante l a
rep roduc ción re pet idame nte par a sel eccio nar una d e
las s alida d e audio d e Izq uierd o, Dere cho , Mezcl a y
Est ereo.
Presiona r “ , , , ” en el c ont rol rem oto para
seleccio nar un ar chi vo dife rente .
Presiona r “OK” pa ra re produ cir el ar chi vo sele ccion ado .
Presiona r “ ” pa ra re gresa r al menú .
Pre siona r “ ” para re gre sar a la ca rpeta .
2. Ava nce / Regres o rápid o
a. Pr esion ar “ o ” para act iva r la func ión de
reg reso o av ance rá pid o.
b. Ca da vez qu e presi ona “ ”, la ve locid ad de
reg reso rá pido va ria d e X2, X6, X 8, X16 y
rep roduc ción no rma l.
C. ad a vez que p resio na “ ”, la veloc idad de
ava nce ráp ido var ia de X 2, X6, X8 , X16 y
rep roduc ción no rma l.
ES -1 4
Page 34

REPRODUCCION DE UN DISCO MP3/MP4
3. Pa usar la r eprod ucc ión del d isco
a. En e l modo de r eprod ucc ión, pr esion ar “ ” par a
pau sarla .
b. Pr esion ar “ ” n uevam ente para vo lver a la
rep roduc ción de sde e l punto d onde se p aus o.
4. De tener l a repro duc ción
En el m odo de re produ cci ón, pre siona r “ ” un a vez
par a deten er la rep rod ucció n, pres ion ar “ ” pa ra
vol ver a la re produ cci ón desd e el punt o don de se
det uvo. Pr esion ar “ ” dos vece s par a deten er la
rep roduc ción to tal mente y b orrar l a mem oria de l ultim o
pun to, pre siona r “ ” para volve r a la repr oducción
des de el pun to inic ial .
5. Fu nción d e repet ir
Dur ante la r eprod ucc ión, pr esion ar “R epeti r“ en el
con trol re moto pa ra se lecci onar el m odo d e repet ición .
Pre siona r una vez p ara s elecc ionar r epe tir una p ista.
Pre siona r dos vec es pa ra repe tir dir ect orio o ca rpeta .
REPRODUCCION DE UN DISCO CD
Después de c oloca r un di sco y cer rar la ta pa de l
comparti mient o, la u nidad r eprod uce a utomá ticam ent e el
disco (si pr esion a un bo tón en el c ontro l rem oto o la un idad
sin n ingun a funci ón, l a panta lla des pli ega “No p ermit ido a l
momento” )
1.Se lecci onar el n úme ro de pis ta
Presiona r “0-9” y “ 10+ ” en el con trol re mot o para
sel eccio nar la pi sta d e acuer do al núm ero
Pre siona r tres ve ces p ara rep etir to das l as pist as.
Pre siona r cuatr o vec es para c ancel ar la f unció n.
Mod o de repe tició n: De sacti var Repe tir una
Rep etir di recto rio /carp eta Rep etir to do
6. Re petir u na secc ión A- B
Pre siona r “A-B” e n el co ntrol r emoto p ara s elecc ionar
una s ecció n desea da de ntro de u na capi tul o, titu lo o
pis ta.
Pre siona r una vez p ara d efini r el punt o ini cial “A ”.
Pre siona r nueva men te para d efini r el pu nto fin al “B”.
Pre siona r por ter cer a vez par a cance lar l a funci ón.
7. Desplieg ue del es tad o de repr oducc ión e n panta lla
Dur ante el m odo de re pro ducci ón o dete nid o presi onar
“De splie gue” en e l con trol re moto, e nto nces la p antal la
des plieg a el esta do de r eprod ucció n: Tie mpo de
rep roduc ción de l a pis ta o tiem po rest ant e de la pis ta.
(Si el númer o ingre sado es mayo r al núme ro to tal de pi stas
en el disco, e l númer o es in valid ado).
Ejemplo:
Para selec ciona r la pi sta 5, pr esion ar “5 ”;
Para selec ciona r la pi sta 22, p resio nar “ 10+” do s veces y
entonces p resio nar “ 2”
ES -1 5
Page 35

REPRODUCCION DE UN DISCO CD
2. Ant erior / S iguie nte
Dur ante la r eprod ucc ión, pr esion ar “ o ” en el
con trol re moto, c ada v ez que pr esion a un bo tón sal ta
hac ia atrá s o hacia d ela nte una p ista re spe ctiva mente .
Pre siona r “ ” para s altar a l a pista ante rior,
Pre siona r “ ” par a salta r a la pi sta sig uient e.
3. Ava nce / Regres o rápid o
a. Pr esion ar “ o ” para a ctiva r la fu nción d e
reg reso o av ance rá pid o.
b. Ca da vez qu e presi ona “ ”, la v eloci dad de re gre so
ráp ido var ia de X2, X 6, X8 , X16 y rep roduc ció n norma l.
c. Ca da vez qu e presi ona “ ”, la velo cidad d e ava nce
ráp ido var ia de X2, X 6, X8 , X16 y rep roduc ció n norma l.
4. Pa usar la r eprod ucc ión del d isco
a. En e l modo de r eprod ucc ión, pr esion ar “ ” par a
pau sarla .
b. Pr esion ar “ ” nue vamen te pa ra volv er a la
rep roduc ción de sde e l punto d onde se p aus o.
5. De tener l a repro duc ción
En el m odo de re produ cci ón, pre siona r “ ” una vez
par a deten er la rep rod ucció n, pres ion ar “ ” pa ra
vol ver a la re produ cci ón desd e el punt o don de se
det uvo. Pr esion ar “ ” dos vece s para deten er la
rep roduc ción to tal mente y b orrar l a mem oria de l ultim o
pun to, pre siona r “ ” para v olver a l a rep roduc ción
des de el pun to inic ial .
6 Fun ción de r epeti r
Dur ante la r eprod ucc ión, pr esion ar “R epeti r“ en el
con trol re moto pa ra se lecci onar el m odo d e repet ición .
Pre siona r una vez p ara s elecc ionar r epe tir la pi sta act ual .
Pre siona r dos vec es pa ra repe tir tod as la s pista s del dis co.
Pre siona r tres ve ces p ara can celar l a fun ción de
rep etici ón.
Mod os de rep etici ón: D esact ivar Re pet ir una
Rep etir to do.
7. Re petir u na secc ión A- B
Pre siona r “A-B” e n el co ntrol r emoto p ara s elecc ionar
una s ecció n desea da de ntro de u na capi tul o, titu lo o pist a.
Pre siona r una vez p ara d efini r el punt o ini cial “A ”.
Pre siona r nueva men te para d efini r el pu nto fin al “B”.
Pre siona r por ter cer a vez par a cance lar l a funci ón.
8 Des plieg ue del es tad o de repr oducc ión e n panta lla
Dur ante el m odo de re pro ducci ón pres ion ar
“De splie gue” en e l con trol re moto, e nto nces la p antal la
des plieg a el tiem po de r eprod ucció n de la p ista ac tual,
el ti empo re stant e de la p ista, e l tiemp o de
rep roduc ción de Toto el di sco y el tiemp o resta nte del
dis co.
ES -1 6
Page 36

REPRODUCCION DE UN TARJETA DE MEMORIA SD/MMC O MEMORIA USB
Ins ertar l a tarje ta de m emori a SD/MM C a la ra nura pa ra tarj eta d e la unid ad o la mem ori a USB al pu erto US B de la u nidad ,
presiona r el botó n de US B/TARJETA en la u nid ad o cont rol rem oto p ara sel eccio nar l a Tarje ta o memo ria USB , ent onces l a
unidad lee rá la inf orm ación d e la tarj eta o m emori a USB. Lo s pas os de ope ració n son s imila res a la op era ción de u n disco DVD.
ESPECIFICACIONES
For matos compat ibles :
Discos DVD / V CD / MP3
Modo: PAL / NTSC / AU TOM ATIC O
Tamaño de la pan talla : 17,78 cm (7” )
Fue nte de aliment ación d e Vcc: 12 Vcc 1, 5 A
Fue nte de aliment ación d e batería re carga ble:
7,4 V cc 1750 mAh
Pot encia d e salid a: 2 x 0,8 W
Temperatur a de oper ación : 5 35 ºC
Dimensio nes: 21 0 x 164 x 41 mm apro ximad ament e
Pes o: 822, 5 g (sin ba ter ías) ap roxim adamente
LAS ESPECI FICACI ONES Y EL DI SEÑO DE ESTE PRODUCTO ESTÁN SUJETOS A CMABIOS SI N PREVI O AVISO PARA MEJORAS DE LOS MI SMOS.
Accesori os:
Manual de op eraci ón
Control re moto
Cable de Audi o/Video
Adaptado r ca/cc
Adaptado r para au tomóvil cc /cc
Gar antia
ES -1 7
 Loading...