

Page 1
Page 2
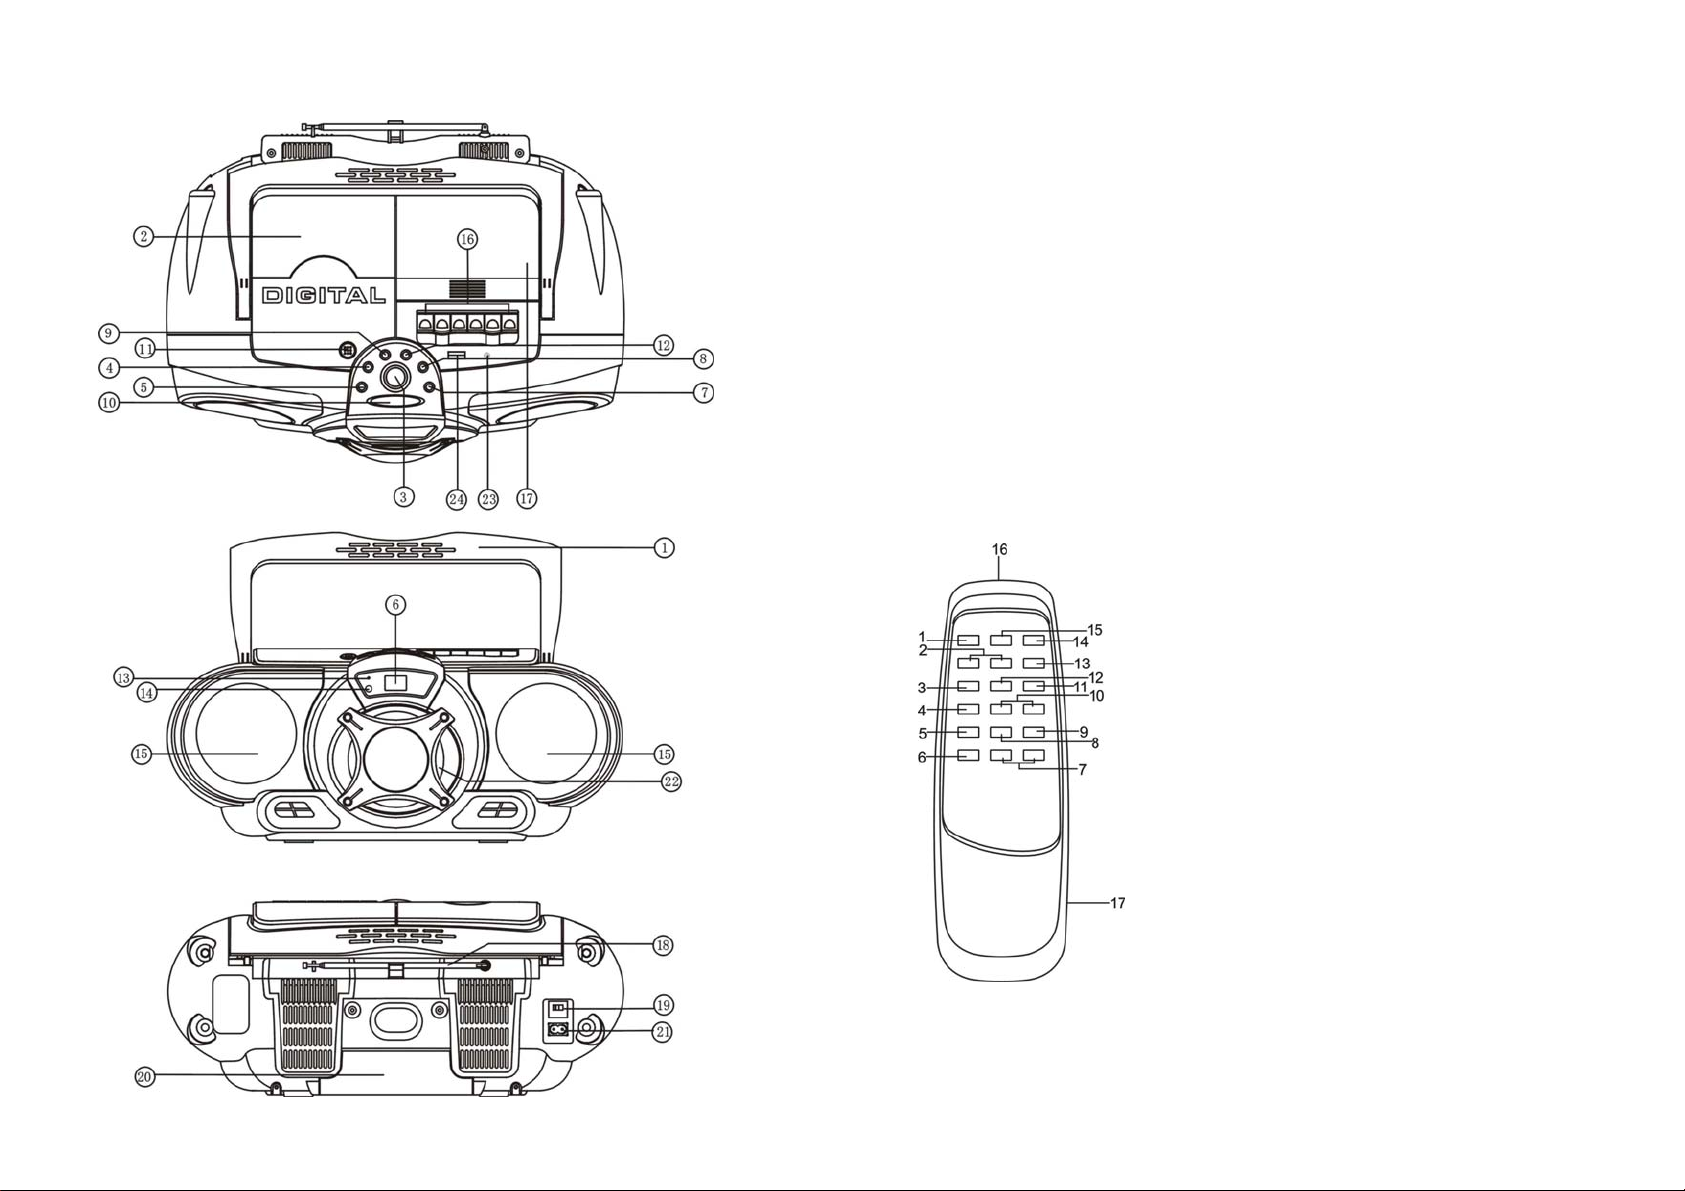
LOCA TION AND CONTROLS
FEA TURES AND CONTROLS
1. FOLDING HANDLE
2. CD COMPARTMENT
3. STANDBY/FUNCTION BUTTON
4. BACK/TUN.- BUTTON
5. CD STOP BUTTON
6. LCD DISPLAY
7. CD PLAY/PAUSE BUTTON
8. NEXT/TUN.+ BUTTON
9. VOL.- BUTTON
10. BASS BUTTON
11. CD DOOR PUSH OPEN/CLOSE
12. VOL.+ BUTTON
13. STANDBY INDICATOR
14. REMOTE SENSOR
LOADING THE BATTERIES INTO THE REMOTE HANDSET
Open the battery compartment cover.
Insert 2PCS “AAA” batteries (not included) as indicated inside the battery compartment.
Close the cover.
KEY FUNCTIONS:
1. MUTE KEY
2. M+ / M- KEY
3. MO/ST. KEY
4. FOLD.+/+10 KEY
5. FOLD.-/-10 KEY
6. BASS KEY
7. VOL.-/VOL.+ KEY
8. STOP KEY
9. CD PLAY/PAUSE KEY
10. TUN./SKIP SEARCH FORWARD/BACKWARD KEY
11. P-MODE KEY
12. PROG. KEY
13. MOMORY KEY
14. STANDBY KEY
15. FUNCTION KEY
16. REMOTE SENSOR
17. BATTERY DOOR
15. SPEAKERS(L&R)
16. CASSETTE FUNCTION KEYS
(RECORD-PLAY-REWIND -FAST
FORWARD -STOP/EJECT -PAUSE)
17. CASSETTE COMPARTMENT
18. FM TELESCOPIC ANTENNA
19. AC VOL TAGE SELECTOR
(optional for dual voltage)
20. BATTERY DOOR
21. AC SOCKET
22. POWER DRIVE WOOFER
23. AUX IN JACK
24. USB PORT
2
3
Page 3

REMOTE CONTROL OPERATION
To operate the unit with the remote control, point the remote
handset at the remote sensor on the front panel and press the
appropriate button on the remote handset.
The remote works best within a range of 6 ~ 7 meters from the
front panel and on an angle of 30 degrees. Bright sunlight or
room light condition s can interfere with the remo te control. If
the remote operation is unsatisfactory or stops working entirely,
first try replacing the remote batteries, then try reducing the
room lighting conditions.
POWER SOURCE
This unit is designed to be operated on AC/DC.
AC OPERATION
Plug the smaller end of AC power cord into AC jack on unit and the other bigger end into household AC
wall outlet. The batteries will be automatically disconnected. For dual voltage ver sion, make sure that
the AC VOLTAGE SELECT O R is swit ched to your local voltage.
DC OPERATION
Open the BATTERY COMPARTMENT DOOR. Install 8 pcs UM-1/D size batteries (not inclu ded) into
compartment. Please follow correct polarities as indicated.
CAUTION
Remove batteries if they are exhausted or long time use.
Batteries contain chemical substances, so they should be disposed of properly.
BASIC FUNCTION
Turning on the unit
Press and hold the STANDBY/FUNCTION button on unit or press the STANDBY key on remote
control, then press the STANDBY/FUNCTION button on unit or FUNCTION key on remote control to
choose FM or AM or AUX or TAP or CD or USB mode.
Volume adjusting
Press the electronic VOLUME UP/DOWN button on unit or on remote control to increase or decrease
volume.
Press MUTE button on remote control to turn off the sound. Press again to turn on.
BASS BOOST SYSTEM
The BASS button controls the bass of the unit. Bass sound is the lower frequency ranges of sound. The
button can be pushed to OFF or ON mode, When the BASS is on, the unit boosts (increases) the sound
output of the bass frequencies.
AUX IN OPERATION
This unit has provided special AUX-IN jack, through this jack other audio source s can be connected to
this unit and be amplified.
1. Press the STANDBY/FUNCTION button on unit or FUNCTION key on remote control to AUX
mode.
2. Connect the audio cable into the AUX-IN jack and the other end connec t t o t he AU DIO OUT jack o f
the external audio source. The unit will change to AUX mode automatically.
3. Adjust the volume of the ma in unit to your de sired level. Press PLAY of the external audio source
(eg. MP3 player) to start playback.
USING THE RADIO
TUNING RADIO STATIONS
1. Press the STANDYB/FUNCTION button on unit or F UNCTIO N key on re mote co ntrol t o select F M
or AM mode.
2. T une to desired station by pressing the “NEXT/TUN.+“ or “BACK/TUN.-“ button on unit or pressing
the TUN./SKIP SEARCH FORWARD/ BACKWARD key on remote control, “ST EREO” will show
on the display if receive stereo stations.
3. Press the VOLUME UP/ DOWN button on unit or remote control to desired volume level.
4. Extend FM TELESCOPIC ANTENNA to its full length if you are listening to FM broadcasting.
Gently move the unit back and forth to get the best reception when you are listening to AM program,
or place the unit in an open location.
Note: The r adio func tion is initially set at ST mode, if the broadcasting program is too noisy when you
are listening to FM stereo station, press MO/ST. button on remote to switch to MONO FM. When you
are receiving FM stereo program, the display will show “ STEREO ”
5. To turn off the radio, press the STANDBY/FUNCTION button on unit or FUNTION key on remote
control to choose the other functions or press STANDBY button to turn off the unit.
RADIO STATION MEMORY OPERATION
You may pre-store 30 (AM and FM) radio stations in memory for your preference controlled, so as you
can listen to your desired station directly and quickly, no need to tuning and search for again.
1. Press the STANDBY/FUNCTION button on unit or the FUNCTION key on remote control to select
band (AM or FM), Tune into a station.
2. Press MEMORY button on remote, “P01” will flash on the display. Then press the
“NEXT/TUN.+“ or “BACK/TUN.-“ button on unit or press the TUN./SKIP SEARCH
FORWARD/BACKWARD key on remote control to select the first desired station.
3. Press the M+ or M- key on remote to choose the desired sequence you want to store, then press
MEMORY key on remote control again to enter.
4. Search another station, repeat steps (2) & (3) until all desired stations stored. Up to 30 station s c an be
programmed (10 for AM and 20 for FM).
5. Press the M+ or M- key on remote to listen to the stored station directly.
USING THE CASSETTE
UNDERST ANDING THE BUTTONS
RECORD - Press to record from the radio or CD/MP3/USB/AUX player.
PLAY - Press to play cassettes.
REWIND - From stop mode, press to rewind the tape toward the beginning.
F.FWD - From stop mode, press to advance the tape toward the end.
STOP/EJ. - Press to stop current tape activity or to open the cassette compartment door when no buttons
are active.
PAUSE - Press to interrupt tape play or record mode. Press the second time to resume tape play or tape
record mode.
PLA YING A CASSETTE TAPE
1. Press the STANDBY/FUNCTION button on unit or the FUNCTION key on remote to TAP mode.
2. Press STOP/EJ. key to open the cassette compartment door.
3. Insert cassette tape into the compartment with the open edge facing up and the full reel
on the right.
4. Close the door securely.
5. Press REWIND or F.FWD to move tape to the desired starting point.
6. Press PLAY key to begin playing the tape.
7. Adjust the volume to your desired listening level.
4
5
Page 4

AUTOMATIC STOP FEATU RE
When the cassette deck is operating in play or record mode and the end of the tape is reached, the unit
automatically shuts itself off and returns all buttons to the off position.
TYPES OF CASSETTE
Use only good quality cassettes (IEC TYPE 1) for making recordings. May be used to replay other types
of cassette but is unable to make proper recording on these more specialized tapes.
The use of C120 cassettes is NOT recommended in this machine.
PROTECTING RECORDING
Normally, anything recorded on the tape is automatically erased when new recording is made. It is
possible to protect your recording from accidental erasure by removing the tabs found on the rear of the
cassette.
When the cassette is held with the recorded side upper-most and exposed tape facing the front, the
protective tab will be found on the left rear of the cassette.
All pre-recorded cassette are protected in this way to prevent accidental erasure of the commercial
recording. “Protected” cassette will prevent the record button from being operated. If at any time you
attempt to record a nd find that this butto n will not depress, never force the mechanism or it may be
damaged. Check that a cassette has been loaded and that tab has no t been removed. Recording on a
cassette from wh ich the t abs have be en remove d can be done by c overing th e tab open ings wit h a piece
of adhesive tape.
CARE OF CASSETTE MECHANISM
Gently clean the tape head and pinch wheel/capstan assemblies after every 10 hours of using the unit.
A range of cassette care products are available.
The erase head and record/play head and the surface of the pinch roller are delicate and must no t be
touched with metal objects such as screwdrivers. You may find it easier to clean the assembly by
pressing the PLAY button to bright head and pinch roller into view. Be sure to press the STOP button
after cleaning the mechanism.
Damage to the pi nch wheel c an occ ur if the unit is le ft in P LAY mode with the power switch off. Unde r
no circumstances should you attempt to lubricate any part of the machine.
RECORDING FROM THE RADIO
1. Load a blank tape into the tape compartment and close the door.
2. Press the STANDBY/FUNCTION button on unit or the FUNCTION key on re mote to AM or FM
mode. Tune to required station by rotating the TUNING KNOB.
3. Press RECORD key to begin recording. The RECORD key and PLAY key go down simultaneously.
4. Press STOP/EJ. key to end recording.
5. To hear what you recorded, follow instructions in PLAYING A CASSETTE TAPE.
NOTE: PAUSE FOR A MOMENT - Using the PAUSE key on the cassette deck instead of the
STOP/EJ. key to momentarily interrupt recording gives you a much clear recording.
RADIO RECORDING TIPS
To temporarily pause the recording, press PAUSE key on the cassette deck. Press PAUSE key again to
resume recording.
CD/MP3/USB RECORDING
A. Install a blank tape into cassette compartment.
B. Press the STANDBY/FUNCTION button on unit or the FUNCTION key on remote to CD or USB
mode. Load a disc into the disc compartment or insert a USB bar into the USB slot, start playback by
pressing the CD PLAY/PAUSE button.
C. Press the RECORD BUTTON and PLAY BUTTON simultaneously to start recording. Press the
STOP/EJ BUTTON lightly to end r ecording, or the unit will st op recording au tomatically while the
tape reaches its end.
D. To listen to the recor ding, press FUNCTION button to select “TAP” playing mode, then start tape
playback.
USING THE CD/MP3
Discs for Playback
This system can playback all digital audio CD, MP3 finalized digital audio CD-Recordable (CD-R) discs,
finalized digital audio CD-Rewritable (CD-RW) discs and CD-DA format digital audio
CD/CD-R/CD-RW discs.
LOADING A DISC
1. Press the STANDBY/FUNCTION button on unit or the FUNCTION key on remote to CD mode.
2. Open the CD door. “ OP ” will be shown on the display.
3. Place an audio CD/MP3 into the tray with the label side facing up.
4. Close the CD door. The total number of tracks and the disc type will appear on the display after
several seconds.
5. To remove the CD, press CD door PUSH OPEN/CLOSE to open CD compartment lid, grasp the CD
by its edges, and carefully take it out.
Note:
To ensure good system performance, wait until the disc tray completely reads the disc before
proceeding.
If no disc loaded into the compartment, or the di sc is place upside down or unreadable, the display
will show no.
PLA YI NG A DISC
1. The playback starts from track 1 automatically when reading the disc.
To pause playback, press PLAY/PAUSE button on unit or on remote. The current playing time will
flash on the display.
To resume playback, press PLAY/PAUSE button on unit or on remote again.
2. To stop playback, press STOP button on unit or on remote, the total number of tracks.
SELECTING A DESIRED TRACK/PASS AGE
To select a desired track
Press the NEXT/TUN.+ or BACK/TUN.- button on unit or the TUN./SKIP SEARCH
FORWARD/BACWARD on remote respectively in stop mode or during playing until the desired track
appears on the display. Press the PLAY/PAUSE button on unit or on remote to start play.
To search for a particular passage during playback (track scanning at high speed)
Press and hold the NEXT/TUN.+ or BACK/TUN.- button on unit or the TUN./SKIP SEARCH
FORWARD/BACWARD on remote to scan the curre nt playing track at h igh speed until desired point
(passage) appears, then release the button for normal playback mode. Playback w ill start a gain fro m this
point.
6
7
Page 5

To select a song which track number exceeds 10(for MP3 disc only)
To select a song/track which number exceeds 10, press the FOLD.+/+10 or FOLD.-/-10 key on the remote
control each time to skip forward or backward 10 tracks, then press the NEXT/TUN.+ or BACK/TUN.button on unit or the TUN./SKIP SEARCH FORWARD/BACWARD on remote to select desired track.
For example: to select the 17
the NEXT/TUN.+ button on unit or the TUN./SKIP SEARCH FORWARD key on remote six times
immediately.
To select a desired folder(for MP3 disc that contains more than one folder)
To select a desired folder during playback, press and hold the FOLD.+/+10 or FOLD.-/-10 key on
remote control to next/previous folder.
th
track from the 1st track, press FOLD.+/+10 key on remote, and then press
PROGRAM TRACKS
Programming tracks of disc are possible when playback is stopped. Up to CD 20 tracks /MP3 99 tracks
can be stored in the memory in any order.
1. In stop mode, pre ss the PROG. Key on remote, the“ P ”will flash and the P01 indicator will be
on.
2. Press the NEXT/TUN.+ button on unit or the TUN./SKIP SEARCH FORWARD on remote to select
the first desired track to be programmed.
3. Press the PROG. Key on remote to enter. The display changes to show P02.
4. Repeat steps 2 & 3 to store other desired tracks until all tracks are programmed.
5. Press the PLAY/PAUSE button to start playback from the first programmed track.
6. Press the STOP button to stop program playback.
To Erase the Memory (Program)
To clear the p rogram, you have two options:
1. Press the STOP button twice to erase the memory, or
2. Open the CD compartment lid, program will be erased.
REPEAT
You can play one track or all tracks on the disc repeatedly.
To Repeat a Single Track
1. Press the P-MODE key on remote control once in play, " " shows flashing on the display.
The current track will be played over and over again till you press the STOP button.
2. To cancel repeat play, press P-MODE key on remote till the " " disappears from display.
To repeat all the Tracks
1. Press P-MODE key on remote control till the " " shows steady on the display, all tracks on the
disc will be played over and over again till you press the STOP button.
2. To cancel repeat play, press the P-MODE key on remote till the " " disappears from the display.
To repeat current Directory (for MP3 only)
1. Press P-MODE key on remote control till “ FOLDER” shows steady on the display, the current
directory will be played repeatedly until the STOP button is pressed.
2. To cancel repeat play, press the P-MODE key on remote till the " FOLDER" disappears from
the display.
RANDOM PLAY
Press the P-MODE key on remote in play mode till the “RAND” shows steady on the display, the
random play will start from next track automatically or press CD skip forward button, until all tracks are
played over and then stop. Press the P-MODE key on remote once to cancel.
LISTENING TO USB PLAYBACK
1. Press the STANDBY/FUNCTION button on unit or the FUNCTION key on remote to USB mode.
2. Connect the USB to the USB INPUT. The LCD will show the total nu mber of tracks stored in the
USB. The playback stars from track 1 automatically after reading the USB.
3. Press the STOP button on unit or on remote
number of USB and STOP.
4. Proceed repeat play (repeat 1- repeat folder - repeat all)/program play/skip up and back operation as
the same described in above “CD/MP3 OPERATION”.
CAUTION:
Do not use any USB extension cable for connecting the USB bar which may cause harmful
interference
on remote to stop playing. The display will show total
SPECIFICATIONS
GENERAL
Power Requirement AC 110/220V ~ 60/50Hz
DC 12V UM-1 x 8 PCS
Remote Handset DC 3V 2 x UM-4 size batteries
Power consumption 35 Watts
Dimensions 460mm (L) x 200mm (H) x 342mm (W)
Operation temperature +5° C - + 35 °C
RECEIVER SECTION
Receiving Bands AM / FM ST.
Tuning Range AM 520 - 1710 KHz
FM 87.5 - 108 MHz
COMPACT DISC SECTION
Optical Pickup 3-Beam Laser
Frequency Response 100Hz – 16 KHz
CASSETTE SECTION
Recording System 2 Tracks 2 channel (Stereo)
Biasing System DC bias
Frequency Response 125 – 6.3 KHz
Wow and Flutter 0.35 % WRMS (JIS)
AUDIO SECTION
Power output Max. 5 Watts x 2
Woofer Power output Max. 10 Watts
ACCESSORIES
Instruction Booklet 1
Remote Sensor 1
AC Cord 1
Caution
To avoid electric shock, this unit must not be exposed to dripping water splash.
Ventilation warning - The normal ventilation of the product shall not be impeded for intended use.
8
9
 Loading...