

Page 1
Page 2
2
3
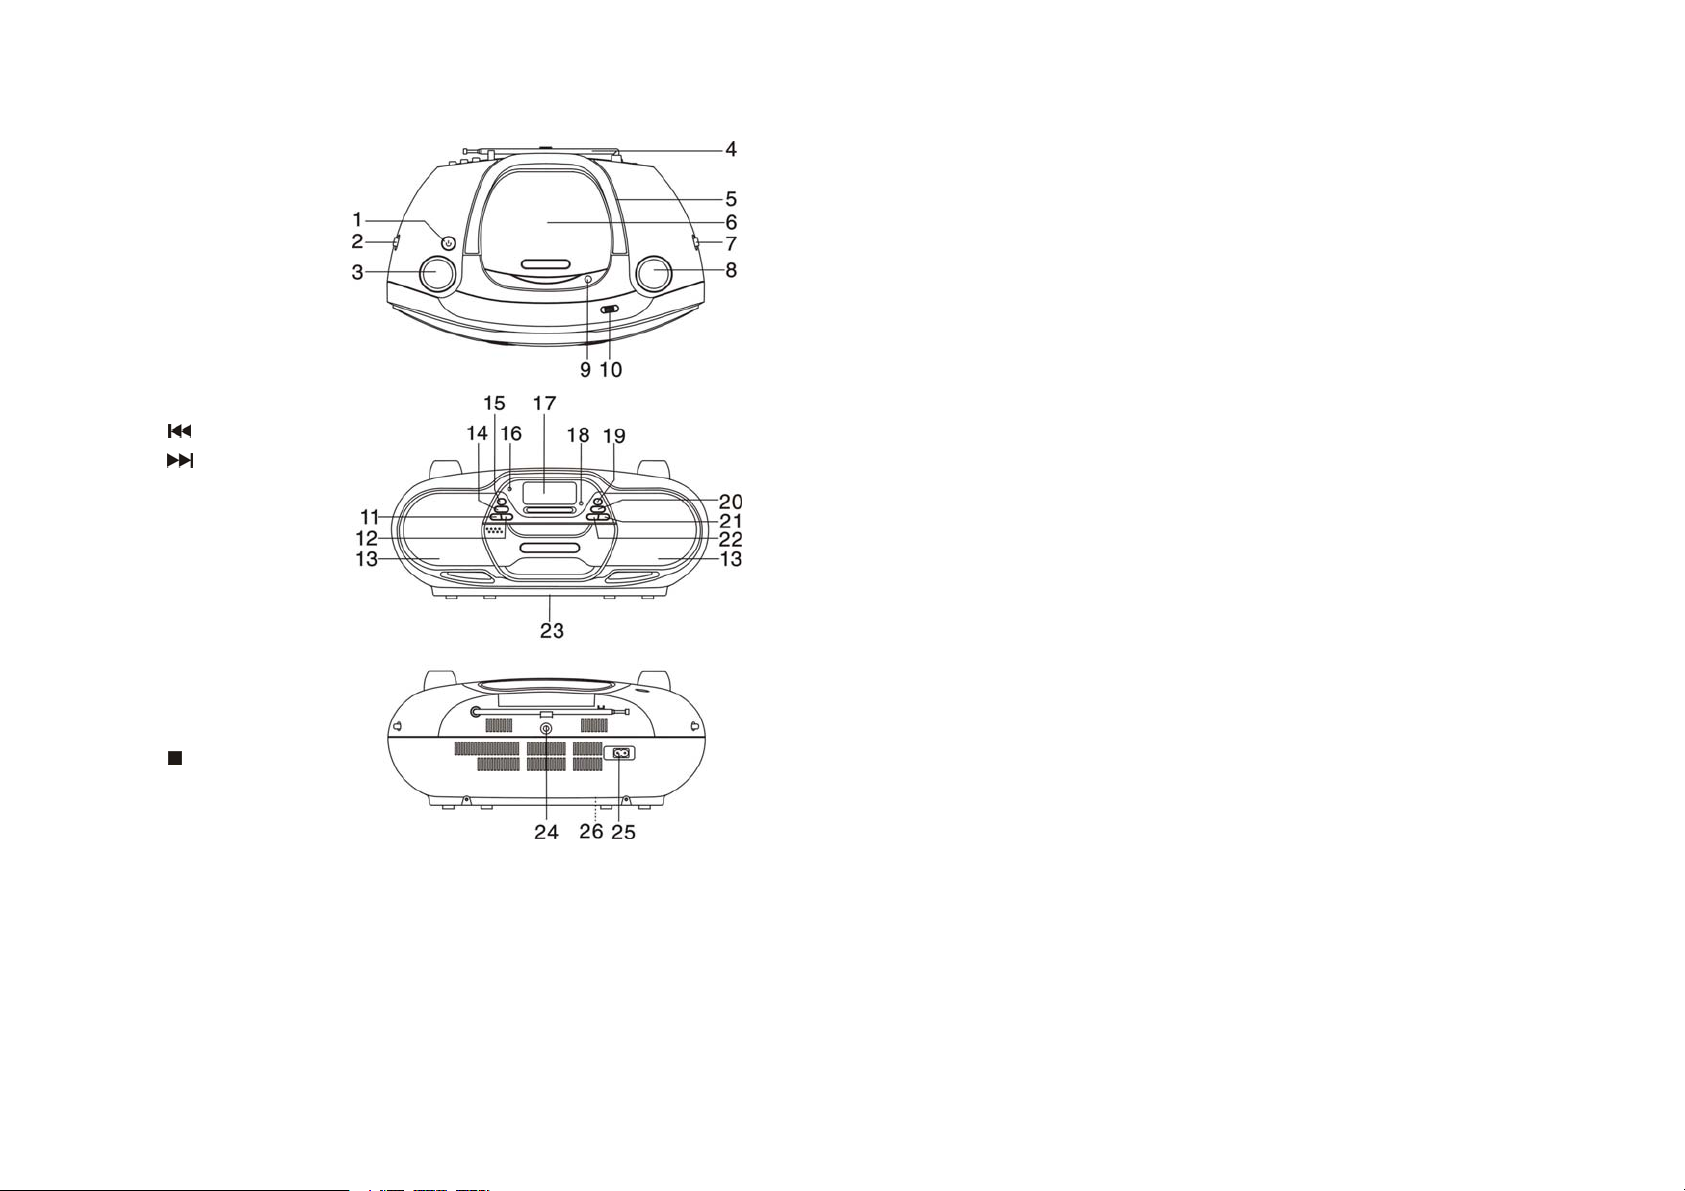
NAME OF CONTROLS
1. POWER ON/OFF BUTTON
2. FUNCTION SWITCH
3. VOLUME KNOB
4. FM TELESCOPIC ANTENNA
5. HANDLE
6. CD COMPARTMENT
7. BAND SELECTOR
8. TUNING KNOB
9. CD DOOR OPEN/CLOSE
10. USB PORT
11. CD BACK
12. CD NEXT
13. SPEAKERS
14. PROG./P-MODE BUTTON
15. X-BASS BUTTON
16. POWER INDICATOR
17. LCD DISPLAY
18. FM STEREO INDICATOR
19. FOLD+/+10 BUTTON
20. FOLD-/-10 BUTTON
21. CD PLAY/PAUSE/USB BUTTON
22. CD STOP
23. BATTERY DOOR
24. AUX IN JACK
25. AC SOCKET
26. AC VOLTAGE SELECTOR
(optional for dual voltage)
POWER SOURCE
This unit is designed to be operated on AC/DC.
AC OPERATION
Plug the smaller end of AC power cord into AC jack on unit and the other bigger end into AC
wall outlet. The batteries will be automatically disconnected.
sure that the AC VOLTAGE SELECTOR is switched to your local voltage.
BUTTON
BUTTON
BUTTON
For dual voltage version, make
DC OPERATION
Open the BATTERY COMPARTMENT DOOR. Install 8 pcs 1.5V UM-1/D size batteries (not
included) into compartment. Please follow correct polarities as indicated.
CAUTION: Remove batteries if they are flat or not being used for a long period of time.
Batteries contain chemical substances, so they should be disposed of properly.
BASIC FUNCTION
SWITCHING ON THE UNIT
Press the POWER ON/OFF button , the POWER indicator will illuminate.
TO ADJUST VOLUME
Rotate the VOLUME CONTROL right or left to increase or decrease volume.
BASS BOOST SYSTEM
For more extra bass, press the BASS BOOST button. Press again to turn off bass.
USING THE RADIO
1. Move the FUNCTION switch to RADIO position .
2. Slide the BAND switch to select the desired wave band: AM/FM/FM ST..
3. Tune to required station by rotating the TUNING KNOB.
4. Rotate the VOLUME CONTROL to comfortable volume level.
5. Extend the TELESCOPIC ANTENNA to its full length if you are listening to FM broadcasting.
Gently rock the unit back and forth to get the best reception when you are listening to AM
program, or place the unit in an open place.
Note: If the broadcasting program is too noisy when you are listening to FM stereo station,
please slide the BAND switch to FM, The FM STEREO indicator will be off .
6. Turn off the radio by switching the FUNCTION switch to " CD/MP3/USB/AUX " position or
press the POWER ON/OFF button.
USING THE CD/MP3
Discs for Playback
This system can playback all digital audio CD, MP3 finalized digital audio CD-Recordable (CDR) discs, finalized digital audio CD-Rewritable (CD-RW) discs and CD-DA format digital audio
CD/CD-R/CD-RW discs.
LOADING A DISC
1. Set the FUNCTION switch to CD/MP3/USB/AUX position.
2. Open the CD door.
3. Place an audio CD into the tray with the label side facing up.
4. Close the CD door.
The total number of tracks will appear on the display after several seconds.
5. To remove the CD, press to open CD compartment lid, grasp the CD by its edges, and
carefully take it out.
Page 3

4
5
Note:
To ensure good system performance, wait until the disc tray completely reads the disc
before proceeding.
If no disc is loaded into the compartment, or the disc is placed upside down, the display will
show NOd.
PLAYING A DISC
1. Press the PLAY/PAUSE/USB button to start playback.
The playback starts from track 1, the “ ” indicator is shown on the display.
To interrupt playback, press the PLAY/PAUSE/USB button. The “ ” indicator will flash on
the display.
To resume playback, press the PLAY/PAUSE/USB button again.
2. To stop playback, press the STOP
display.
button, the total number of tracks appears on the
SELECTING A DESIRED TRACK/PASSAGE
To select a desired track
Press the CD NEXT or BACK button repeatedly in the stop mode or during play until the
desired track appears on the display.
Press the PLAY/PAUSE/USB
button to start play.
To search for a particular passage during playback
(track scanning at high speed)
Press and hold the CD NEXT or BACK button to scan the current playing track at high speed
until desired point passage, and then release the button. Playback will start again from this
point.
To select a song which track number exceeds 10 (for MP3 disc only)
To select a song/track which number exceeds 10, Press the FOLD+/+10 button each time to
skip forward/backward 10 tracks, then press the NEXT or BACK button to select desired track.
For example: to select the 17
times immediately.
th
track, press FOLD+/+10 button, and then the NEXT button six
To Select A Desired Folder (for MP3 disc only)
Note:(if the MP3 disc contains more than one folder)
Press and hold the FOLD+/+10 or FOLD-/-10 button more than 1 second to skip next/previous
folder. Until the desired folder number appears on the LCD display, then release the button,
PROGRAM TRACKS
Programming tracks of disc are possible when playback is stopped. Up to CD 20 tracks /MP3
99 tracks can be stored in the memory in any order.
1. In the stop mode, press the PROG./P-MODE button, the PROGRAM will flash and the
P01 will be show on the display.
2. Press the CD NEXT or BACK button to select the first desired track to be programmed.
3. Press the PROG./P-MODE button to enter. The display changes to show
4. With MP3 disc,keep pressed FOLD-/-10 or FOLD+/+10 button to select the desired album.
5. Repeat steps 2 & 3 to store other desired tracks for CD until all tracks are programmed.
Repeat steps 2,3 & 4 for MP3.
6. Press the PLAY/PAUSE/USB button to start playback from the first programmed track.
7. Press the STOP button to stop program playback.
P02.
To Erase the Memory (Program)
To clear the program, you have two options:
1. Press the STOP button when the disc is stopped, or
2. Open the CD compartment lid, program will be erased.
REPEAT PLAY
To Repeat a Single Track
1. Press the PROG./P-MODE button once in the play mode, “REPEAT” will flash on the display.
The current track will be played repeatedly until the STOP button is pressed
2. Press the PROG./P-MODE button until the “REPEAT” disappear.
To repeat all the Tracks
1. Press PROG./P-MODE button twice in the play mode, “REPEAT” shows steady on the
display, all tracks on the disc will be played repeatedly until the STOP button is pressed.
2. To cancel repeat play, press the PROG./P-MODE button till the “REPEAT” disappear.
To repeat current Directory (for MP3 only)
1. Press PROG./P-MODE button third in play mode, “REPEAT FOLDER ” shows steady on
the display, The current directory will be played repeatedly until the STOP button is
pressed.
2. Press the PROG./P-MODE button till the “REPEAT FOLDER ” disappear.
RANDOM PLAY
Press the PROG./P-MODE button in the play mode till the “RANDOM ” shows steady on the
display, the random play will start from next track automatically(or press CD skip forward
button), until all tracks are played over and then stop. Press the PROG./P-MODE button once
to cancel.
(
INTROSCAN PLAY
Press the PROG./P-MODE button in the play mode till the “INTRO ” shows steady on the
display, the unit will start to play the first 10 seconds of music of each track , until all tracks are
played over and then stop. Press the PROG./P-MODE button once to cancel.
for CD disc only)
LISTENING TO USB
USB PLAYBACK
The USB input jack is compatible with a data flash memory key, it is not guarantee the
compatibility with MP3 players with proprietary software.
1. Press and hold the PLAY/PAUSE/USB button to select USB playing mode while the
FUNCTION switch on main unit is set to CD/MP3/USB position.
2. Connect the USB to the USB INPUT. The CD will display total number of tracks stored
inside the USB.
3. Press the PLAY/PAUSE/USB
once again to temporarily stop.
4. Press the STOP button to stop playing. The display will show total number of tracks.
5. The function are the same as per MP3 playback.
6. To exit USB operation, press and hold PLAY/PAUSE/USB button to return the CD mode.
button to start playing. Press the PLAY/PAUSE/USB button
Page 4

6
AUX-IN OPERATION
This unit has provided special AUX-IN jack, through this jack other audio sources can be
connected to this unit and be amplified.
1. Set the FUNCTION switch to CD/MP3/USB/AUX position.
2. Connect the audio cable into the AUX-IN jack and the other end connect to the AUDIO OUT
jack of the external audio source. The unit will change to AUX mode automatically.
3. Adjust the volume of the main unit to your desired level.Press PLAY of the external audio
source (eg. MP3 player) to start playback.
SPECIFICATIONS
GENERAL
Power Requirement AC 110/220V ~ 60/50Hz
DC 12V 8 x 1.5V UM-1 / D size
Power Consumption AC 18 Watts
Weight Approx. 2.2 kg
Dimensions Approx.385mm (W) x 240 mm (D) x 155mm (H)
Operation Temperature +5°C - +35° C
CD SECTION
Channels: 2 channels
Optical pick-up: 3 beams laser
Frequency Response: 100Hz - 16KHz
RADIO SECTION
Receiving Band: AM/FM
Tuning Range: AM: 530 - 1710 KHz
FM: 88 - 108 MHz
Antenna: FM rod antenna, AM built-in ferrite bar
AUDIO SECTION
Power Output 1.8 Watts x 2
ACCESSORIES
Instruction Booklet 1
AC Cord 1
ESD Remark:
In case of malfunction due to electrostatic discharge, just reset the product (reconnect of power
source may be required) to resume normal operation.
 Loading...