

Page 1
7" Core™ Tablet with Android™ OS 8.1
& GMS Certication
NID-7020
Instruction Manual
Please read carefully before use and keep for future reference.
Page 2

Thank You
In the Box
We know you have many choices when it comes to
technology; thank you for choosing us here at Naxa
Electronics. Established in 2001 in Los Angeles, California, we are dedicated to delivering products that entertain and delight.
We trust that you will be happy with your purchase.
Please read this manual carefully and save it for refer
ence. You may also find the latest FAQ, documentation,
and other product material at our website. Come visit
us on the web at www.naxa.com and see all that we
have to offer!
-
Please take a moment to make sure that you have everything in the list below. Although we make every effort to ensure that each Naxa device is securely packed
and sealed, we know a lot can happen in between us and
you. If anything is missing, check back with your local
retailer to get immediate assistance. If they cannot help
you, please contact our Naxa Support team at www.
naxa.com/naxa_support.
• NID-7020 tablet
• Power Adapter
• USB cable
• User’s manual
• Warranty Card
• Black case & Keyboard(see the image below)
Page 2 Naxa Electronics
Page 3

Before You Start
Please take note of the following before you start.
1) Do not drop the unit. Avoid forceful shaking of the
display to prevent damage or unusual operation.
2) Do not touch the unit with metal or sharp
objects to avoid short circuit or damage.
3) Schedule regular backup of your data to prevent
the loss of important data. Always backup your
data before upgrading the firmware.
4) Do not disassemble. Do not wipe the surface of the
unit with alcohol, thinner or benzene.
5) Do not disconnect the tablet while it is formatting
or uploading/downloading. Doing so may corrupt
your data.
6) Do not allow water or foreign objects to enter the
tablet.
7) Do not use the tablet in places that are extremely
hot, cold, dusty, or humid.
8)
Please charge your tablet when the Low Battery
icon is displayed, system turns off automatically,
or keys are not responsive.
www.naxa.com Page 3
9) It is normal for the tablet to become slightly warm
during the charging process.
10) The USB port is for transferring data only. The port
is not used to charge any devices.
11)
Specifications are subject to change without
prior notice.
Page 4
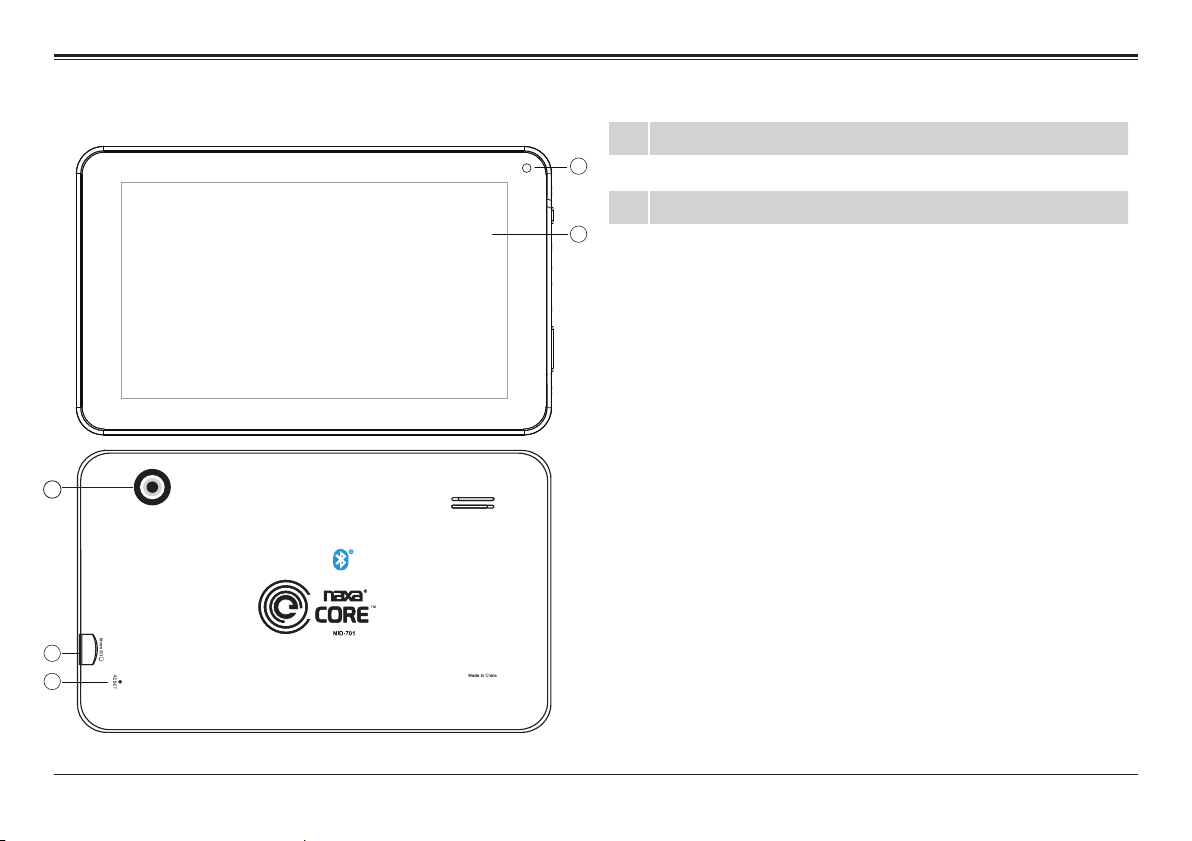
At a Glance
1
0
8
9
1 Front camera
1
2 LCD touchscreen
3 Power button
2
4 Headphone jack
9
FCC ID: 2ACJAPLT76XXG
Page 4 Naxa Electronics
Page 5
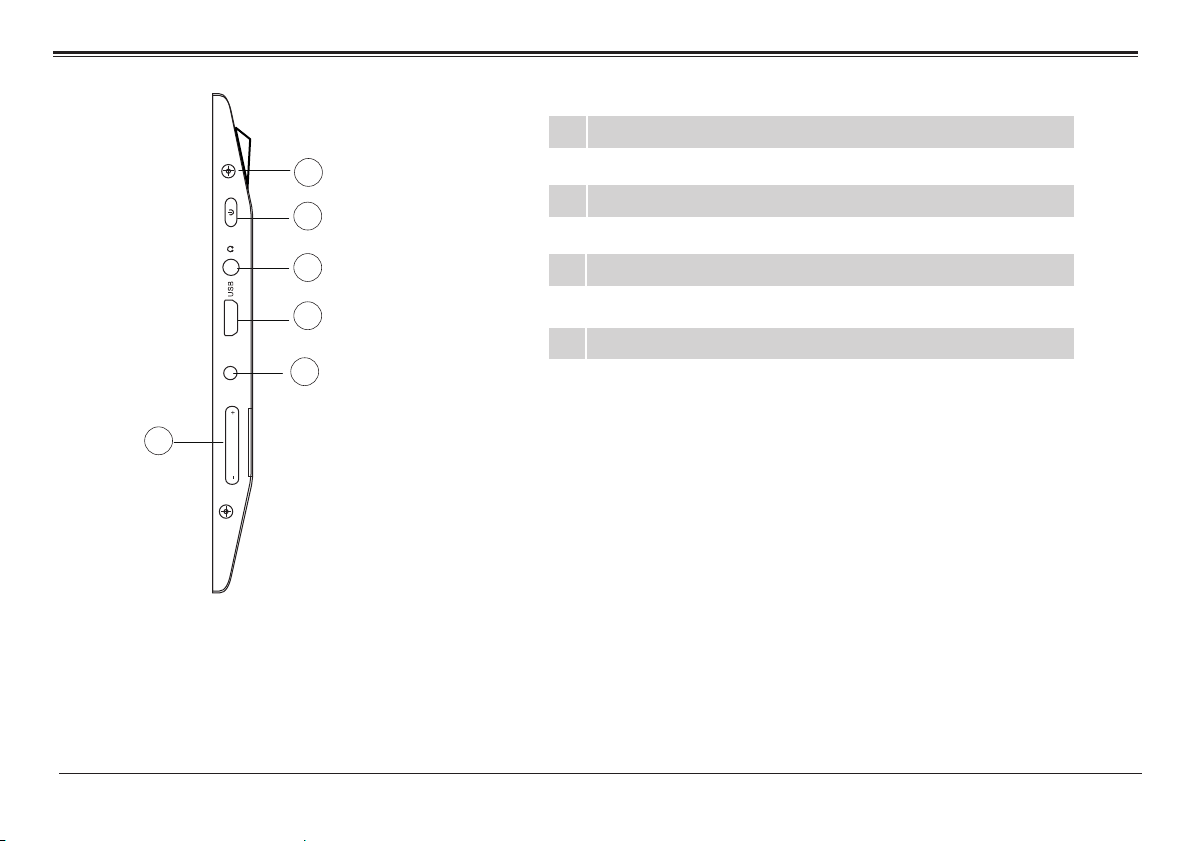
7
3
5
Micro USB port
Volume + / -
6
Microphone
7
Memory card slot (microSD/microSDHC)
8
DC 5V
4
5
1
1
9 Reset
Rear Camera
10
DC jack
11
6
www.naxa.com Page 5
Page 6

Basic Operation
Charging your device
To ensure the longevity of your battery, please charge
your tablet for 10 hours upon initial charge. Afterwards,
charge the device accordingly as needed. Connect the
DC adapter that is supplied with your device and plug
it into an AC outlet that supports 100-240V ~50/60 Hz
1. When device is not in use, press the power button
once to go into sleep mode.
2. Shut down applications when not in use.
3. Turn off WLAN when not in use.
4. Disable application sync.
5. Set a shorter time for display backlight.
6. Reduce brightness on the display.
Powering On
Press and hold the Power Button for 2-3 seconds
to turn on the unit.
Sleep Mode
After the device is on, press the power button once
and it will go into sleep mode. The screen is now on
standby and under low battery consumption. To wake
up the device, simply press the power button again.
Saving Battery Life
Please review the following several key points on
extending the battery life of your tablet.
Page 6 Naxa Electronics
Power Off
To power off the device, press and hold the power
button for 2-3 seconds until the screen displays
“Power Off”, then select “OK” to power off the unit
completely.
Page 7
Reset / Force Shutdown
If the device is locking up, use a small pin to press
Reset as it will force shut down and restart the device.
You can also perform a hard reset by press and holding
the Power and ESC buttons at the same time for 3-5
seconds. Then press ESC buton to select “wipe data/
factory reset.” Now press the Power button to confirm
your selection. Then press ESC button again to select
“Yes--delete all user data,” and press the power button
to confirm your selection. Finally the screen will display
“reboot system now” press the power button to confirm.
Your device will reboot and start up normally.
RESET
Touch Panel
Click – Use finger or capacity panel pen to touch once,
to select or activate function, select menu, or
turn on applications.
Tap and hold – Tap and hold for 2 seconds, a pop up
menu with options will display.
www.naxa.com Page 7
Page 8

Slide – Slide up, down, left or right for fast scrolling,
browsing page and display screen.
Drag – drag an icon to relocate the position.
Double Click – Double click to enlarge or shrink the
display size of the picture or while browsing a website.
Shut – Use two fingers at same time on touch panel,
to enlarge or to shrink the display scale.
Page 8 Naxa Electronics
Page 9

Home Screen
①
②
③
④
⑤
⑧
⑥
⑦
① Google search
② Tap to turn on voice search, it will search
according to voice input ( Make sure WI-FI is on)
③ List of current running applications
④ Back to Home screen
www.naxa.com Page 9
⑤ Back to previous screen
⑥ Display of icons and device status, tap to
turn on notification screen
⑦ Screenshot
⑧ Enter applications page
Page 10

Changing the Wallpaper
Adding Widgets to the
1. Press the home screen for about 2 seconds, it will
pop-up the wallpaper selection.
2. Select from the preloaded wallpapers or picture
as wallpaper.
3. Click “set wallpaper” to confirm.
Adding a Shortcut on Home
Screen
1. On the application page, tag the icon of application
2. Tap and hold an app icon then drag it to a home
screen to create a shortcut that is easily accessible.
To place an app icon shortcut on another
home screen, drag it to the edge of the
screen and wait for a new home screen to
appear. (If the current home screen is empW\
the tablet will not create a new home
screen).
Home Screen
Some apps have Widgets that can be placed on a Home
screen. Widgets are like windows into your apps; they
allow you to use some features of the app quickly from
the Home screen.
To add a widget:
1) Tap & hold on an empty part of a Home screen,
then tap WIDGETS.
2) Swipe left/right to browse the available widgets.
Tap and hold a widget to pick it up, then drag it to
an empty space on a Home screen.
If you have dragged the widget to a Home
screen that doesn’t have room for it, the
widget will not be added.
Some widgets will prompt you to make
additional choices before it is added to the
Home screen.
Page 10 Naxa Electronics
Page 11

Using Folders on the Home
Notification Screen
Screen
You can combine several app icons in a folder. Tap and
hold an icon to pick it up, then drop it onto another
icon. A folder will be created that contains both icons.
On any Home screen, you can:
1) Open a folder. Tap it—the folder opens.
2) Rename a folder. Tap the folder label under the icon.
3) Reposition an app or folder icon on the screen. Tap &
hold the icon, then drag the icon to where you want it.
Place related app icons in the same folder
(e.g., video apps, game apps, communication
apps, etc.)
Rotate Screen Setting
1) Go to Menu Setting page.
2) Tap “Accessibility” and locate “Auto-Rotate Screen”.
3) Tap “AUTO ROTATE” icon to open/close auto rotation
function.
The Notification Bar is found at the top of the screen
and displays quick status information (e.g., the time
and battery life).
Icon Icon Description
WiFi signal Wifi connection, icon is full under strong signal
Battery Status of battery or if device is being charged
Screen shot Press it to take screen shot
Applications
Internet Browsing
The Browser app lets you browse and
view websites.
1) Go to Application page and select the CHROME icon.
2) Tap the address bar and enter in a URL.
Browser Settings
When browsing a webpage, tap the upper right “ ”,
then you can adjust the settings, add bookmark,
view history, etc.
www.naxa.com Page 11
Page 12

Add/Delete Webpage
1) Tap “ ” at the upper right corner, then press “New
Tab” to add a webpage.
2) Tap “X” to delete the webpage.
E-Mail
E-Mail Account Setup
1. Enter Application page and select “G-Mail.”
2. Enter Email address and Password.
3. Select
Manual Setting (Company Email Account)
4. Follow and input your credentials.
Next Step (Personal Email Account) or
Sending a Message (Gmail)
1. Enter Application page and select “G-Mail”.
2. Click to compose an email.
3. Type in Receipient’s email address. (use ; when
entering more than 1 address)
4. Input a Subject
5. In the Body, compose your message.
6. Tap the if you are wanting to inclue an attachment.
7. Tap to send out email message.
Check Incoming Messages
In your email account, you can check downloaded
messages by going online to check new messages.
Sound Recorder
1. Click Sound Recorder in the Application page.
2. Tap to start recording.
3. Tap to stop and save the recroding.
4. Recording can be found in the following location:
Android/data/com.android.soundrecorder/files/
Download
Page 12 Naxa Electronics
Page 13

Google Play Music
Click “Play Music” in application page.
With your Music Library displayed, select a track to
begin playback.
Video Player
The built-in front camera can take pictures and video.
Tap in the application page, then slide right on the
screen and it will display the camera and video
shooting mode.
Take a Photo
1. Tap the Camera icon ( ).
2. To capture a photo, tap .
www.naxa.com Page 13
Page 14

Shoot a Video
1. Tap select video.
2. Tap to record a video.
3. Tap to stop recording.
4. You can find the video file in the video player.
Camera Settings
In camera and video mode, tap & to access
the setup menu.
You can manage files under the options list.
Managing Application Files
Installation of Applications
In the Android system, all application files are in APK
format. APK files can be installed through a memory
card, internal memory or downloaded from third party
providers.
File Explorer
Go to the application page and select “Explorer”.
View a File
In Explorer, user can view and manage files in an
memory card, Internal Storage and USB storage.
APK Installation from a device:
Download an APK file and save it to a memory card or
USB flash drive. Click the APK file under “APKinstall” in
the application page to complete the installation.
Once the application has successfully installed, the
app icon will be displayed on the application page.
Connect USB port with OTG cable
File Operation
1. Go to the application page and tap “Explorer”.
2. Select a file or file path.
3. Tap on the file or folder and hold for 2 seconds so
so that the options will appear.
4. Select “Multi,” select file or folder, then select
Editor, perform function in option list.
Page 14 Naxa Electronics
Uninstall an APK file
1. Go to the application page and select “APKInstaller”.
2. Select “Manage”.
3. Tap APK file to uninstall.
Page 15

Close Running Applications
1. Go to the settings menu page.
2. Select “Apps”.
3. Choose which app you would like to close.
Connecting to a PC
You can connect your tablet with a PC by using a USB
cable.
1. Connect the PC and the tablet.
2. On your tablet, select “File Transfer Mode” as you
can now transfer files from each device to one
another.
Connecting a USB device
•
USB Keyboards and mice are supported by this
device.
View media files on USB storage with pre-loaded
•
photo, music, and video applications.
www.naxa.com Page 15
Page 16

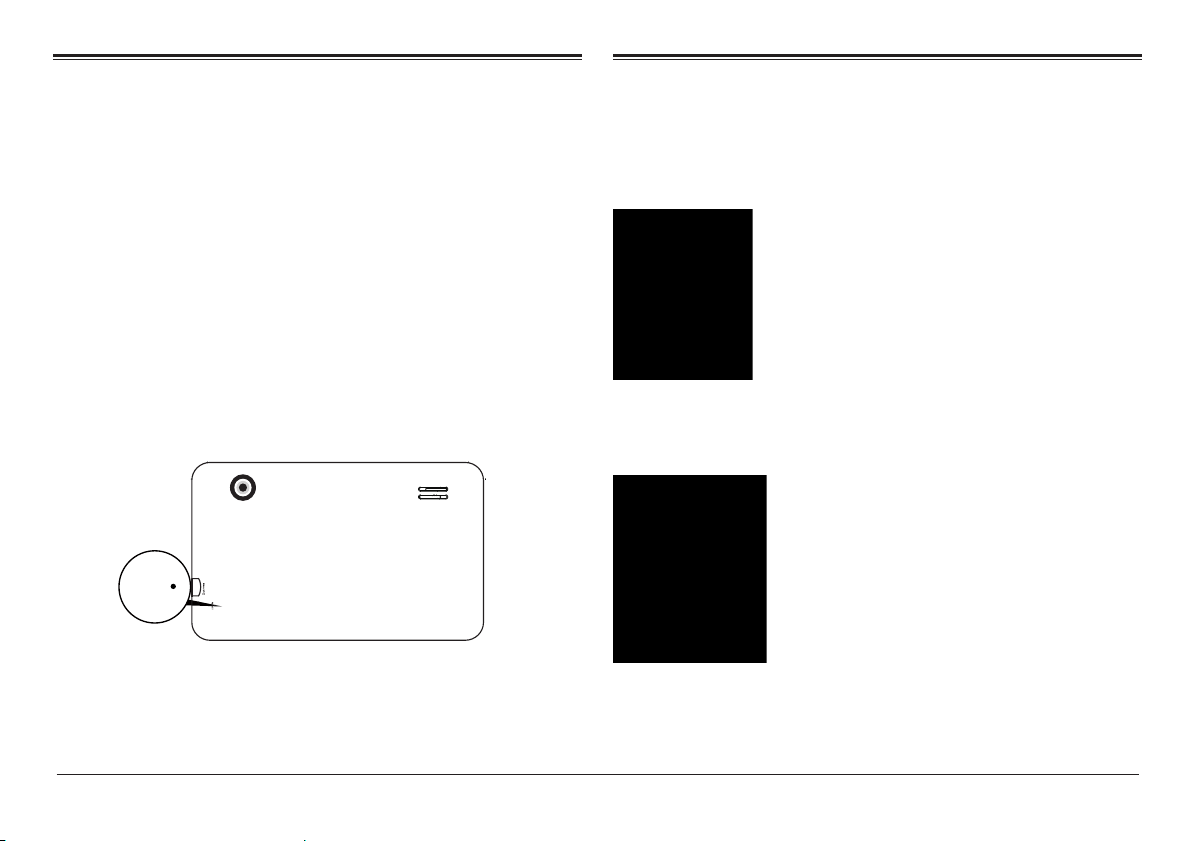
Inserting a MåĵŅųƼ ard
You may install a memory card to expand your
device’s storage space.
1. This device supports a memory card with up to
32GB capacity.
2. Insert a memory card into the card slot.
Make sure that the PHPRU\ card is inserted
all the way into the slot.
Before removing the card, make sure your
device is not accessing data on the card.
Wi-Fi Setup
To use Wi-Fi, you connect to a wireless access point, or
“hotspot.” Some hotspots are open and you can simply
connect to them. Others implement security features
that require other steps to set up, such as digital cer-
users can connect.
Connecting to a Wi-Fi
Network
your device, Wi-Fi is turned on automatically.
1. Swipe down from the top of your screen to reveal
Your tablet works best when it is connected to the
internet. Your tablet can connect wirelessly to the
internet using Wi-Fi networks.
Wi-Fi is a wireless networking technology that can
provide internet access at distances of up to 100
meters depending on the router and surroundings.
Page 16 Naxa Electronics
tap the Settings icon
2. Under Connections, tap Wi-Fi.
3. Slide the Wi-Fi switch to the On position.The device
scans for available Wi-Fi networks and displays the
indicated with a Lock icon.
.
Page 17

4. Tap a network name to see more details or to con
nect to it. If the network is secured, you will be
prompted to enter a password or other credentials.
(If you don’t know the password, you will need to
ask the owner of the network to provide it.) If the
viously, it will connect to it automatically.
5. To forget a network or to modify its settings, tap &
hold the network name.
• You may want the tablet to forget a network if
you don’t want to connect automatically or if
you no longer use the network.
• Modify a network’s settings to change the
(i.e., Proxy and static IP settings). Networks are
ers and to use automatic IP addressing. Proxy
settings need to be added for each individual
Wi-Fi network.
Language & Input
1. Language: Users can choose OSD Languages.
2. Keyboard & Input Metods: Select language method.
3. In this state, Users can switch the input method.
www.naxa.com Page 17
Page 18

Date & Time
When connected to the internet, turn on “Automatic
date & time,” so the device can obtain real date & time.
Users are soley responsible for the apps they
download. Be sure that the apps are from an
entrusted source prior to downloading as
Naxa Electronics, Inc. is not liable for any shape
or form should the tablet become damaged for
something that was downloaded.
Troubleshooting
1. Can not Power on
Connect the power cable to charge the device, check
back in a few minutes and try again.
If it still can not power on, contact Naxa Tech Support.
2. Noise coming from unit.
Check to see if audio file is not corrupt.
Audio files that are corrupt will cause an alarming
Developer Options
Enter Setting Menu, then select “About Tablet,” then
tap “Build number” about 8 times until the Developer
Options menu appears on the screen.
Page 18 Naxa Electronics
or jumping sound.
3. Can not download or copy.
Check to see if the tablet is connected online and
receiving a strong internet connection.
Check to see if there is enough storage.
Check the USB cable
4. Unable to connect via USB
Make sure that the USB device is securely connected.
Check to make sure the cable is not damaged.
Page 19

Warnings and Precautions
triangle is intended to alert the user to the presence of uninsulated “dangerous voltage” within the product’s enclosure that
shock
The exclamation point within an equilateral triangle is intended
to alert the user to the presence of important operation and servicing instructions in the literature accompanying the appliance.
CAUTION
• Do not block the ventilation openings or holes.
•
paratus.
• When discarding batteries, follow all local rules and laws governing
the disposal of batteries. Consider the environmental impact of your
actions!
-
•
or moisture.
Important Safety Information
1. Read Instructions: All the safety and operating instructions should be
read before the product is operated.
2. Retain Instructions: The safety and operating instructions should be
retained for future reference.
3. Heed Warnings: All warnings on the product and in the operating instructions should be adhered to.
4. Follow Instructions: All operating and usage instructions should be
followed.
5. Cleaning: Unplug this product from the wall outlet before cleaning.
Do not use liquid cleaners or aerosol cleaners. Use a damp cloth for
cleaning.
6. Attachments: Use only attachments recommended by the manufacturer. Use of other attachments may be hazardous.
7. Water and Moisture: Do not use this product near water (e.g., near a
bathtub, washbowl, kitchen sink, laundry tub, in wet basements, or
near a swimming pool and the like).
8. Accessories: Do not place this
stand, tripod, bracket, or table. Use only with carts,
stands, tripods, brackets, or tables recommended
by the manufacturer or sold with the product. Any
mounting of the product should follow the manufacturer’s instructions and should use a mounting accessory recommended by the manufacturer.
product on an unstable cart,
www.naxa.com Page 19
Page 20

A product and cart combination should be moved with care. Quick
stops, excessive force, and uneven surfaces may cause the product
and cart combination to overturn.
9. Ventilation: Slots and openings in the cabinet are provided for ventilation to ensure reliable operation of the product and to protect it
from overheating. These openings should never be blocked by placing
the product on a bed, sofa, rug, or other similar surface. This product
should not be placed in a built-in installation such as a bookcase or
rack unless proper ventilation is provided or the manufacturer instructions have been adhered to.
10. Power Sources: This product should be operated only from the type of
power source indicated on the rating label. If you are not sure of the
type of power supply to your home, consult your product dealer or
local power company. For products intended to operate from battery
power or other sources, refer to the operating instructions.
11. Grounding or Polarization: This product may be equipped with a polarized alternating-current line plug that has one blade wider than
This is a safety feature. If you are unable to insert the plug fully into
the outlet, try reversing the direction of the plug. If the plug should
not defeat the safety purpose of the polarized plug.
12. Power-Cord Protection: Power supply cords should be routed so that
they are not likely to be walked on or pinched by items placed upon
or against them, paying particular attention to cords at plugs, convenience receptacles, and at the point which they exit from the product.
13. Protective Attachment Plug: The product may be equipped with an attachment plug with overload protection. This is a safety feature. See
the operating instructions for replacement or directions to reset the
protective device. If replacement of the plug is required, be sure the
service technician has used a replacement plug that has the same ove
14. Lightning: For added protection for this product, unplug it from the
wall outlet during a lightning storm or when it is left unattended and
unused for long periods of time. This will prevent damage to the product due to lightning or power-line surges.
15. Overloading: Do not overload wall outlets, extension cords, or inte-
tric shock.
16. Object and Liquid Entry: Never push objects of any kind into this product through openings as they may touch dangerous voltage points or
liquid of any kind on the product.
17. Servicing: Do not attempt to service this product yourself as opening or removing covers may expose you to dangerous voltage or other
18. Damage Requiring Service: Unplug this product from the wall outlet
ing conditions: a) when the power-supply or plug is damaged; b) if
liquid has been spilled or if objects have fallen into the product; c) if
the product has been exposed to rain or water; d) if the product does
not operate normally by following the operating instructions. Adjust
only those controls that are covered by the operating instructions as
improper adjustment of other controls may result in damage and will
product to its normal operation; e) if the product has been dropped or
damaged in any way; f) when the product exhibits a distinct change in
performance—this indicates a need for service.
19. Replacement Parts: When replacement parts are required, be sure
by the manufacturer or have the same characteristics as the original
r-
-
-
Page 20 Naxa Electronics
Page 21

other hazards.
20. Safety Check: Upon completion of any service or repairs to this
product,ask the service technician to perform safety checks to ensure
that the product is in proper operating condition.
21. Wall or Ceiling Mounting: The product should be mounted to a wall or
ceiling only as recommended by the manufacturer.
22. Heat: The product should be situated away from heat sources such as
radiators,heat registers, stoves, or other products (including ampli-
FCC NOTICE
This device complies with Part 15 of the FCC Rules. Operation is subject
to the following two conditions: (1) this device may not cause harmful
interference, and (2) this device must accept any interference received,
including interference that may cause undesired operation.
Note: This equipment has been tested and found to comply with the limits for a Class B digital device, pursuant to Part 15 of the FCC Rules. These
limits are designed to provide reasonable protection against harmful interference in a residential installation. This equipment generates, uses
and can radiate radio frequency energy and, if not installed and used in
accordance with the instructions, may cause harmful interference to radio communications. However, there is no guarantee that interference
will not occur in a
harmful interference to radio or television reception, which can be determined by turning the equipment off and on, the user is encouraged to
try to correct the interference by one or more of the following measures:
• Reorient or relocate the receiving antenna.
• Increase the separation between the equipment and receiver.
• Connect the equipment into an outlet on a circuit different from that
particular installation. If this equipment does cause
to which the receiver is connected.
• Consult the dealer or an experienced radio/TV technician for help.
CAUTION ON MODIFICATIONS
this device may void the authority granted by the FCC to operate the
equipment.
WARNING:
This product contains lead, a chemical known to the State of California to
cause cancer and birth defects or other reproductive harm. Wash hands
after handling.
Trademarks & Regulatory Statements
@2019 NAXA® ELECTRONICS CORPORATION. ALL RIGHTS RESERVED.
Naxa® is a registered trademark of Naxa Electronics, Inc. All other
trademarks and logos are property of their respective owners unless
indicated otherwise. No portion of this packaging may be photographed,
copied, or redistributed without prior notive of Naxa Electronics, Inc.
Specifications are subject to change without notice.
Android™ and all Google Brand Features are trademarks of Google LLC, Inc.
www.naxa.com Page 21
Page 22

Display Panel 7” TFT LCD
Display Resolution 1024 x 600
Touch layer Capacitive touch screen
OS Android 8.1
CPU Cortex A9 1.2GHz (Quad Core)
RAM 1 GB
Video MPEG4-sp, ASP, DivX, WMV, RMVB,
H.264/1080P
Power adapter AC 100~240V, 50/60 Hz; DC 5V out
Battery Rechargeable lithium-polymer bat-
tery (2400 mAh)
Note: Product are improved continuously. We reserve the right to modify
Memory 16 GB
External Memory Memory Card (up to 32GB)
Wireless Connectivity Wi-Fi 802.11 b/g/n
In case of malfunction due to electrostatic discharge, just reset the product to resume normal operation (reconnecting the power source may be
required).
Bluetooth® 2.1
A/V connectivity Headphone out (3.5 mm)
Built-in microphone
Built-in stereo speakers (1 W)
Camera Rear: 0.3 MP (2.0 MP with
interpolation)
Front: 0.3 MP
Audio MP3, WMA, FLAC, APE, OGG
Page 22 Naxa Electronics
Page 23

Support
If you have problems with your device, please consult the instructions in this manual. Please also visit us on the
web at www.naxa.com to get up to the minute news, alerts, and documentation for your device. For additional
assistance, please contact Naxa Technical Support.
NAXA Technical Support
2320 East 49th St.
Vernon, CA 90058
866-411-6292
http://www.naxa.com/naxa_support/
www.naxa.com Page 23
 Loading...